4WD REVERY
48″ HIGH LIFE JACK
OPERATIONAL ADVICE
PLU: 299575
WARNING:
TO PREVENT SERIOUS INJURY, PLEASE READ AND UNDERSTAND ALL WARNINGS AND INSTRUCTIONS BEFORE USE.
SAVE THIS MANUAL
Keep this manual in a safe place for future reference. This manual contains useful information relating to the safe use and operation of a High Lift Jack.
WORKING LOAD LIMIT: 1500KG
INTRODUCTION:
Ridge Ryder High Lift jack is one of the most practical recovery accessories you can have. It can be used in a number of situations where it s necessary to lift, winch, clamp, pull, and push. In an emergency situation, it can also be used as a hand winch by attaching a cable at each end. High Lift jacks are great when it comes to lifting the vehicle clear from an obstacle for example a mound of dirt or rock that has come into contact with the underside of your vehicle and struck it. The jack can lift the vehicle enabling you to fill the holes or position articles such as rocks, wood or sand racks to assist in creating traction for the wheels. The Ridge Ryder jack stands at a total height of 48” 22cm), as a minimum lowered height of 110mm (11cm) maximum lifting height of 1020mm (102cm), and can lift up to a maximum working d Limit of 1500kg. The Ridge Ryder High Lift Jack has complied with the mandatory standards of AS/NZS2693:2007
(CPN1/2010)
SAFETY WARNINGS AND
OPERATING PRECAUTIONS
When using this High Lift Jack, safety precautions should always be followed to reduce the risk of personal injury and damage to the Jack.
- LEARN TO USE YOUR HIGH LIFT JACK:
Take some time and practice using your high lift jack so you will be familiar with ALL OPERATIONS. To ensure proper operation, carefully inspect for any damaged parts before operating the jack. Do NOT get under a raised vehicle; do NOT use this jack for vehicle maintenance or wheel removal. No person should place any portion of their body under a vehicle that is supported by a jack. - JACK PREPARATION:
You must lubricate the jack before use with either a penetrating oil or silicone spray. Apply a light coat on the length of the lifting bar. Coat ll the moving components in the lifting mechanism. Do NOT use grease or motor oil as they are not appropriate for lubricating the jack. Do NOT lubricate the handle or base plate. - KEEP AREA CLEAR:
Do NOT allow people to remain in the area during lifting operations. Spectators should not be allowed around the load to be lifted by the ack or under the load supported by the jack. - INSPECT HIGH LIFT JACK AND EQUIPMENT FREQUENTLY:
The High Lift Jack should be inspected carefully for damages before each use. Visually inspect the jack before each use, make sure all moving parts such as the climbing pins are not worn or damaged. Check the lifting bar (climbing rail) and Handle and ensure there is not racks or bends or other sign of damage. Check each hole on the lifting bar that they are free from blocking or signs of damage. Do NOT use the jack unless it has been properly lubricated and is in good clean working condition, substances such as dust, sand, water, and mud can affect the performance and functionality of the jack. - WORKING AREA CONDITIONS:
Keep the working area well lit. - USE LEATHER GLOVES:
When handling and using a high lift jack always use hand protection to reduce the possibility of injury. - STABILISE THE LOAD:
Secure the vehicle by putting the transmission into the park (automatic) or low range (manual) and applying the hand brake. Use an accessory such as wheel chocks at the opposite end being lifted. Do NOT use the jack to support the load, use accessories such as vehicle support stand that are rated greater than the load being lifted to support the load. - DO NOT OVERLOAD:
NEVER exceed the rated working load limit of the jack. Do not use inappropriate attachments in an attempt to exceed its rated working load limit. Do NOT use any attachments to extend the length of the handle this will void the manufacturer’s warranty. - STAY ALERT:
Watch what you are doing. Use your common sense. Do not use this High Lift Jack when you are tired, stressed or WHEN UNDER THE INFLUENCE OF DRUGS, ALCOHOL, OR MEDICATION. - WARNING LABELS & IDENTIFICATION PLATE
Do not discard or remove any warning labels or identification plates on this High Lift Jack. These contain important safety
information. - 4WD DRIVER TRAINING COURSE:
Persons intending to use the High Lift Jack should consider completing a nationally recognized four-wheel drive training course or contact a four-wheel-drive club for comprehensive advice on the proper selection and use of the Jack.
OPERATING INSTRUCTIONS
When using this High Lift Jack, safety precautions should always be followed to reduce the
risk of personal injury and damage to Jack.
Every situation is different; the information provided is to be used as a guide only. This guide does not cover each individual situation you must use your common sense and good judgment. ALWAYS consider the safety of yourself and others.
WARNING
NOT FOR VEHICLE MAINTENANCE OR WHEEL REMOVAL. NO PERSON SHOULD PLACE ANY PORTION OF THEIR BODY UNDER A VEHICLE THAT IS SUPPORTED BY A JACK.
THIS JACK MUST HAVE A MINIMUM LOAD OF 50KG ON IT TO LOWER STEP-BY-STEP, OTHERWISE, THE LIFTING MECHANISM WILL SLIDE DOWN TO THE BASE PLATE DROPPING THE VEHICLE.
DO NOT USE THE JACK TO SUPPORT OR STABILISE A LOAD.
Using the jack incorrectly to support or stabilize a load may result in serious injury and death.
Secure the vehicle by putting the transmission into the park (automatic) or low range (manual) and applying the handbrake. Use an accessory such as wheel chocks at the opposite end being lifted. Do NOT use the jack to support the load, use accessories such as vehicle support stand that are rated greater than the load being lifted to support the load. NEVER place any part of your body under a raised load that has ot been correctly supported.
Ensure the lifting jaw of the jack is completely under the load to be lifted to prevent the possibility of the load falling off. The high lift jack must be placed on a flat reinforced solid steel surface of the vehicle that is rated for lifting. Do NOT lift a load using curved surfaces.
IMPORTANT During lifting and lowering, the weight of the load pushes up against the jack’s handle. If your hands slip off the handle, rf the handle is horizontal when you move the control lever, it may move up very quickly. ALWAYS keep your head away from and out of the jack handle path of movement. ALWAYS place the handle in the upright position against the lifting bar before moving the control lever o lower the load. ALWAYS keep a fi rm grip on the jack handle so your hands do not slip. Unexpected movement of the jack handle may result in the user being struck causing serious injury or death.
Raising a vehicle too high or attempting to lift more than one corner may result is the vehicle tipping over or move unexpectedly and esult in serious injury or death and damage to your vehicle. EVER push the lifted load off the jack.
Keep, the jack is clean, oiled, and rust-free. Substances such as dust, sand, water, and mud can affect the performance and functionality of the jack.
USING THE HIGH LIFT JACK TO LIFT
PLAN YOUR LIFT:
Check your surroundings; ensure all spectators are well clear of the area and out of the vehicle. Select and prepare all accessories deeded or the safe lifting of the load. Check the condition of the jack and accessories before commencing. Do NOT use the jack or any accessories that show any signs of damage.
SAFETY:
Wear appropriate clothing and safety gear, such as leather gloves, long sleeve shirts, and pants, closed shoes. If you are going to be performing a recovery in the sun wear a hat and sunscreen to protect yourself from the sun’s UV rays.
WORKING AREA CONDITIONS:
Keep the working area well lit. Keep children away from Ensure no persons remain inside the vehicle whilst the jack working area, never let children operate the jack. is in operation.
STABILISE THE LOAD:
Secure the vehicle by putting the transmission into the park(automatic) or low range (manual) and applying the hand brake. Use an accessory such as wheel chocks at the opposite the end being lifted.
SELECT THE LIFTING LOCATION:
The lifting jaw of the jack must be able to completely fit under the load to be lifted to prevent the possibility of the load falling off. The high lift jack must fit on a flat reinforced solid steel surface of the vehicle that is rated for lifting. Do NOT lift a load using curved surfaces.
SURFACE CONDITION:
Make sure the jack is securely positioned on safe ground. The ground should be hard, level and dry. On surfaces that are soft you will need o use a High Lift Jack base for added security, the base will prevent your jack from sinking into soft ground. The lifting bar should be pointing straight up.
POSITION THE JACK:
Make sure the control lever is in the up position. Unlock the handle from the upright position. Hold the handle firmly and pull the lifting mechanism up and position it completely and securely under the load to be lifted. The jacks ratcheting lifting mechanism allows the lifting jaw to raise without pumping the handle.
START LIFTING:
Holding the handle firmly with both hands pump the handle in an up and down motion. The high lift jack has a ratchet-style handle which n the lift mode will claw the lifting mechanism up the teeth on the lifting bar with every downward movement of the handle. It has a long handle allowing you plenty of leverage for lifting the vehicle. Do NOT use any attachments to extend the length of the handle. Keep watching the jack and load being lifted stop lifting if either the jack or load begins to move. Once at desired height is reached place a 13mm bolt (not included) through the hole in the lifting bar immediately below the lifting mechanism.
STABILISE THE LOAD:
Do NOT use the jack to support the load, use accessories such as vehicle support stand that are rated greater than the load being lifted to support the load. Lower the jack onto the support stands and remove the High Lift Jack.
LOWERING THE LOAD:
IMPORTANT The High Lift Jack MUST have a minimum load of 50kg on it to lower step by step otherwise the lifting mechanism will slide down to the base dropping your vehicle. Before you move the control lever to the down position place the handle upright against the lifting bar. When lowering the weight of the load pushes up against the jack handle. If the jack handle is in the horizontal position when the control lever is moved to the lowering position it may fly up and cause serious injury. With the handle locked in the upright position ve the controls the lever to the down position. Holding the handle firmly with both hands pump the handle in an up and down motion. The high lift jack has a ratchet-style handle which in the lowering mode will claw the lifting mechanism down the teeth on the lifting bar with every upward movement of the handle.
USING THE HIGH LIFT JACK TO WINCH
We do not recommend the use of this jack as a winch for your vehicle. It should only be used as an aid for winching obstacles from the path of your vehicle.
Do NOT overload the top clamp of the high lift jack as it may cause the clamp to bend or break resulting in serious injury or death.
Use only correctly rated shackles, chains, cables, or extension straps that have a greater working load limit or breaking strength than the CK. apply air breaks such as a recovery blanket or dampener to the chains, cables, or straps.
PLAN YOUR RECOVERY:
Check your surroundings; ensure all spectators are well clear of the area. Select and prepare all the accessories needed. Check the condition f the jack and accessories before commencing. Do NOT use the jack or any accessories if they show any signs of damage.
KEEP WINCHING AREA CLEAR:
Do NOT allow people to remain in the area during winching operations, it is recommended 1.5 times the length of the longest Chain, able r straps should remain clear. Do not step over a taut recovery line or allow anyone else to do so. Due to the possibility of it breaking, irect all people to stand clear of any possible pathways. A snapped line could cause serious injury or death. Keep proper footing and balance at all times. Do not reach over or across the jack and pull cable while in operation.
SAFETY:
Wear appropriate clothing and safety gear, such as leather gloves, long sleeve shirts, and pants, closed shoes. If you are going to be reforming a recovery in the sun wear a hat and sunscreen to protect yourself from the sun’s UV rays.
WORKING AREA CONDITIONS:
Keep the working area well lit. Keep children away from working areas, never let children operate the jack. Ensure no persons
remain inside the vehicle.
SETTING THE CLAMP:
Loosen the top clamp nut and bolt and rotate the clamp so that it is in line with the lifting bar.
CONNECTING THE JACK TO AN ANCHOR POINT:
Select the most appropriate anchor point. Anchor points must be strong enough to withstand the forces applied. Once you have selected the anchor point using correctly rated recovery equipment to attach the chain, strap, or cable recovery line. Securely attach the another end of the recovery line to the jack’s lifting jaw. Apply an air break such as a recovery blanket or damper mid-way down the line.
CONNECTING TO LOAD:
Connect the chain, strap, or cable to the top clamp of the jack, if the recovery line does not connect to the clamp safely use a hackle. Attach the recovery line to the load. Apply an air break such as a recovery blanket or dampener midway down the line.
BEGIN THE WINCHING OPERATION:
Secure the load behind the direction of the pull. Make sure the control lever is in the upright position. Unlock the handle from the upright position. Holding the handle firmly pump the handle. Each pump will slide the jacks lifting mechanism along the lifting bar creating a puling effect. Keep watching the jack, recovery lines and load being pulled.
FINISHED WINCHING OPERATION:
Secure the load. Before you move the control lever to the down position lock the handle into a position parallel to the lifting bar. th the handle locked in the upright position move the control lever to the down position. Holding the handle firmly pump the handle each pump will shift the jacks lifting mechanism along the lifting bar releasing the tension. Once the tension is below 50kg the lifting mechanism will release.
IMPORTANT The High Lift Jack MUST have a minimum load of 50kg on it to lower step by step otherwise the lifting mechanism will slide down to the base dropping your load.
USING THE HIGH LIFT JACK TO CLAMP
Do NOT overload the top clamp of the high lift jack, the clamp is designed for low-pressure clamping or holding of an item. Do NOT attempt to use the clamp to crush an item as it may cause the clamp to bend or break resulting in serious injury or death.
Do NOT use the clamp if it shows any signs of damage.
SETTING THE CLAMP:
Loosen the top clamp nut and bolt and rotate the clamp so that it is 90 to the lifting bar with the flat section facing down on the same side as the lifting jaw. The Clamp can be repositioned anywhere along the lifting bar.
START CLAMPING:
Make sure the control lever is in the up position. Unlock the handle from the upright position. Holding the handle firmly and I’ll the lifting mechanism up and position it completely and securely under the item to be clamped. Holding the handle firmly ump the handle in an up and down motion until the lifting jaw has contacted the item and applied enough pressure to clamp it.
RELEASE CLAMPED ITEM:
Before you move the control lever to the down position place the handle upright against the lifting bar. With the handle locked in the upright position move the control lever to the down position. Holding the handle firmly with both hands pumps the handle n an up and down motion. The high lift jack has a ratchet-style handle which in the lowering mode will claw the lifting mechanism down the holes on the lifting bar with every upward movement of the handle.
WARNING: Because there is only a small amount of pressure applied on the lifting mechanism during the clamping function after the first or second pump the mechanism will release to the base.
IMPORTANT The High Lift Jack MUST have a minimum load of 50kg on it to lower step by step otherwise the lifting mechanism will slide down to the base.
MAINTENANCE INSTRUCTIONS
IMPORTANT:
NEVER PERFORM ANY MAINTENANCE WHILE THE JACK IS IN OPERATION UNDER LOAD.
The High Lift Jack is not self-lubricating. Constant care and maintenance is required to get the best performance and maximum life span from this jack.
Keeping the jack clean, oiled, and rust-free is extremely important. Substances such as dust, sand, water, and mud can affect the performance and functionality of the jack.
CLEANING:
Clean the large build-ups of Dirt, Mud, and dust from the jack using a brush, water pressure cleaner or Air compressor. Use a cleaning solvent or degreaser to give the jack a good all-over clean. Once the cleaning solvent has been washed off allow the jack to dry completely.
LUBRICATING:
Once the jack has been cleaned and allowed to dry you must now lubricate it with a Penetrating oil or silicone spray. Grease and motor oil are not appropriate for lubricating the jack. Apply a light coat on the length of the lifting bar. Coat all the moving components in the lifting mechanism.
IMPORTANT: Do NOT get any lubricant on the jack handle or base plate, this will make the unit slippery when in operation and could be dangerous for the operator resulting in serious injury or death.
STORING THE JACK:
Store the jack with the handle in the upright locked position. Make sure the control lever is in the up position. Store in a dry location preferably in a storage bag.
TROUBLESHOOTING:
Lifting mechanism Jams or does not move freely:
- Climbing pins in the jacks lifting mechanism have been design to walk up the lifting bar, if you find the pins are not moving reely or the lifting mechanism seems to jam clean and lubricate the pins. Follow the lubrication maintenance instructions to clean and lubricate the walking pins. Test the jack WITHOUT any load by raising the lifting mechanism, if the jack continues to jam or the pins do not operate smoothly please contact the place in which the jack was purchased.
Lifting pins will not locate:
- Make sure the lifting bar is clean and well lubricated.
- Make sure the lifting mechanism is clean and well lubricated
- Check the condition of each climbing hole in the lifting bar, if there is any signs of damage please contact the place of purchase.
- The Climbing pins may be bent check to see if the pins are bent. If you find the pins are bent please contact the place of purchase.
- Check the lifting mechanism condition if there is any sign of damage or bending please contact the place of purchase.
- Check the springs on the climbing pins if there is any sign of damage please contact the place of purchase.
Control lever will not engage or disengage:
- Make sure the control lever and reversing switch mechanism is clean and well lubricated if there is any sign of damage please contact the place of purchase.
- Check the reversing switch where it contacts the cross pins to make sure it is clean and well-lubricated, if there is any sign of damage or bending please contact the place of purchase.
- Check the cross pins make sure they are clean and well lubricated, if there is any sign of damage please contact the place of purchase.
The lifting mechanism will not work
- Check the Handle shear pins and bolts are located and not bent or damaged, if there is any sign of damage please contact the place of purchase.
The jack wobbles excessively:
- Check the bolt and nut on the base plate are located and done uptight and there is no sign of damage.
- Check the base plate is in perfect condition and has no bends or cracks, if there is any sign of damage please contact the place of purchase.
NEVER carry out any repairs to the jack by yourself, please return to the place of purchase.
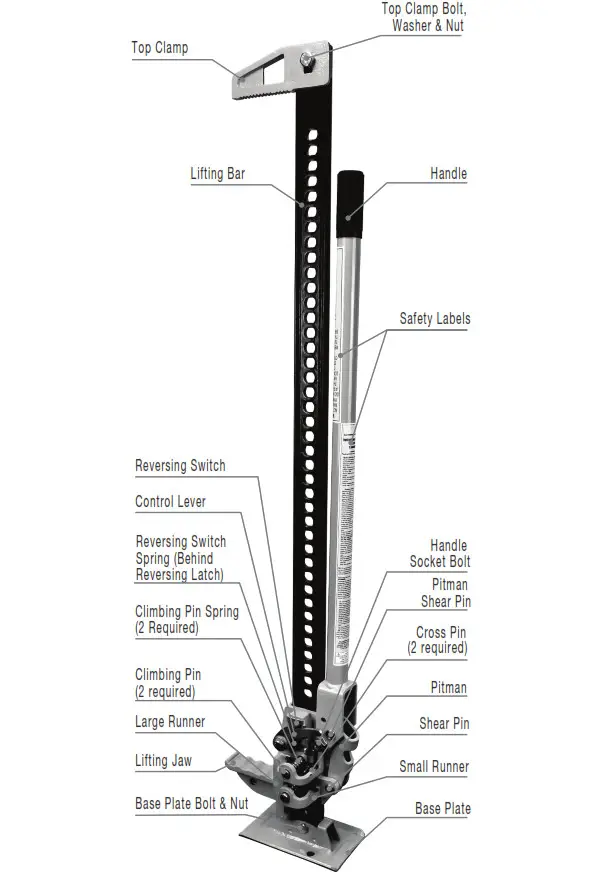
JACK COMPONENTS IDENTIFICATIONS and BREAKDOWN