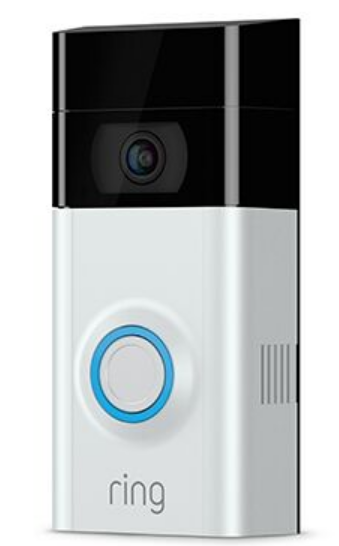
Video Doorbell 3
1. Charge the provided battery.
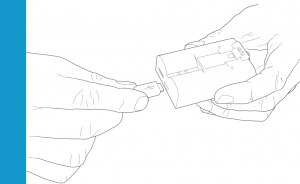
First, fully charge the battery by plugging it into a power source using the provided orange cable.
The small light on top will glow green once fully charged.
 = Charging
  = Charged
 3
3
2. Set up your Video Doorbell in the Ring app.
After charging, insert the battery in the bottom of your Video Doorbell until it clicks into place.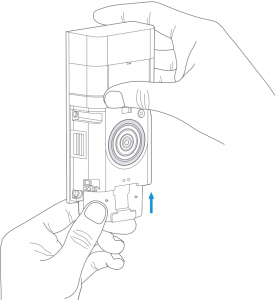 4
4
The Ring app walks you through setting up and managing your Video Doorbell.
Search for “Ring” in one of the app stores below, or visit:
In the Ring app, select Set Up a Device.
When prompted, select Doorbells, and follow the in-app instructions.
Grab your Wi-Fi password
It’s required for the in-app setup. Write it down below so it’s handy when you need it:

7
3. Install your Video Doorbell.
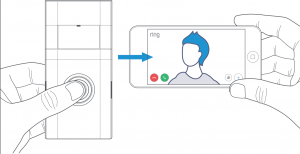
After setup, push the button on the front of your Video Doorbell to see video from the camera in the Ring app.
Smile, you’re on camera!
8
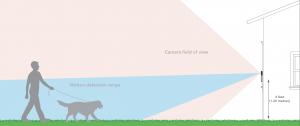
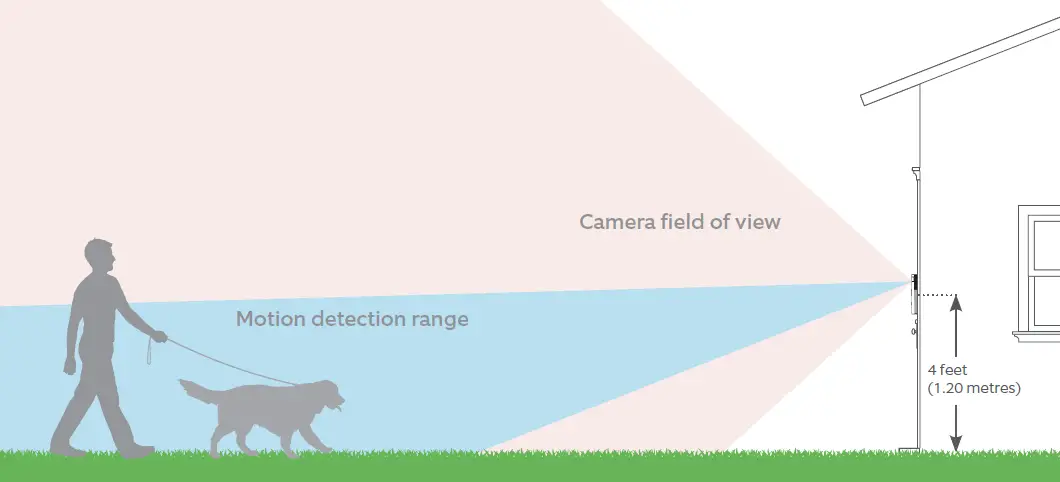
Install Video Doorbell approximately four feet (1.20 metres) above the ground for optimal performance.
If you’re connecting to existing doorbell wiring that’s higher than four feet, thus limiting where you can install your new Doorbell, use the provided wedge mount to angle your Doorbell down.
Steps for wiring to an existing doorbell
If replacing an existing doorbell, shut off power at the breaker. Then remove it from the wall and disconnect the wires.
Your Video Doorbell is compatible with doorbell systems supplying 8-24 volts AC at 50 or 60Hz, 40VA max.
 Do not wire your Video Doorbell to a DC-powered intercom system or other DC power source.
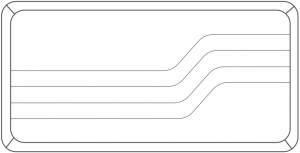
If desired, the chime can ring when the button on your Ring Doorbell is pressed.
Just follow the in-app instructions during setup.
If you see the “No In-Home Chime” button during setup, be sure to press it.
To change your wiring settings after setup, go to Device Settings > Chime Connection.
Also, consider purchasing a Ring Chime or Chime Pro, which allow you to hear Ring alerts from anywhere in your home.
Insert the mini-level into your Video Doorbell to make sure it’s even when you install it.
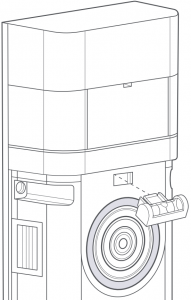
12
Steps for wiring to an existing doorbell
If installing on stucco, brick, or concrete, mark 4 drill holes. Use the provided masonry drill bit to drill holes in your wall, then insert the included anchors.

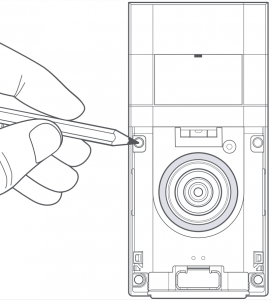
If you’re installing on wood, skip this step and toss the anchors in that drawer of stuff you never use.
Connect the wires coming out of your wall to the screws on the back of your Video Doorbell.
Either wire can connect to either screw. The order doesn’t matter.
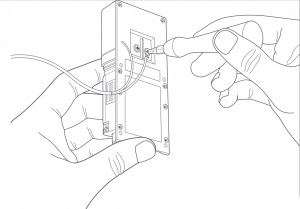
Steps for wiring to an existing doorbell
If you have trouble connecting the wires coming out of your wall to the back of your Video Doorbell, use the provided wire extensions and wire nuts.
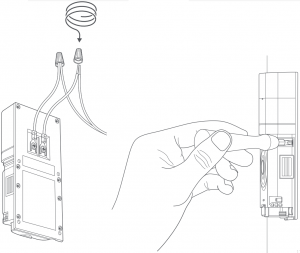
Feed all the wires (and the wire nuts, if you used them) into your wall and secure your Video Doorbell on the wall using four screws.
Place one of the provided faceplates on your Video Doorbell by slotting it in at the top and clicking it into place.
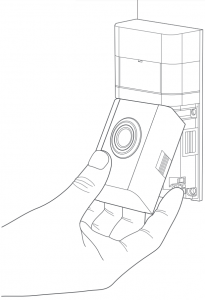
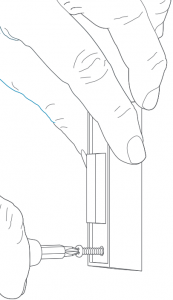
Lastly, insert one of the provided security screws into the bottom, and tighten with the star-shaped end of the screwdriver bit.That’s it! Your Video Doorbell is now ready to use.
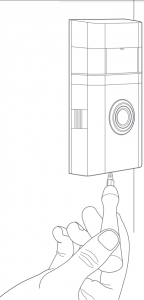
For additional help, visit:
Or give us a call…
For a list of all our customer support numbers, visit:
To review your warranty coverage, please visit .
© 2020 Ring LLC or its affiliates.
Ring and all related logos are trademarks of Ring LLC or its affiliates.
]]>
Ring Video Doorbell
Powering Your Ring
Charge your Ring Doorbell before installation using the supplied orange cable.
While charging, the circular light on the front of your Ring will let you know the percentage it’s charged. 
If you have an existing doorbell Ring can run off its existing power supply for a continuous charge (see step 6). NOTE: Ring is not compatible with most intercom systems.
If you don’t have an existing doorbell Ring can run off its built-in battery and last 6-12 months between charges. If you receive frequent motion events, you may need to charge your Ring more frequently.
Getting Ready for Setup
Say “Hello” to the back of your Ring Doorbell
Setup Button – You’ll be instructed to push the orange setup button during the in-app setup (see step 3).
While in setup mode, the light on the front of your Ring Doorbell will spin.
Charging Port – Plug the orange cable into the charging port to charge your Ring Doorbell. 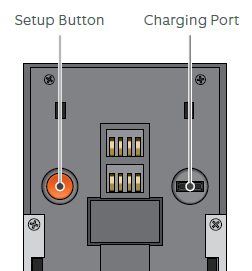
Step 1
Download the Ring app
The Ring app will walk you through the entire installation process, but if you prefer to reference a hard copy, use this manual.
Visit: ring.com/app
Visit the online setup guide for extra help
We also have an online guide with videos and tutorials to help you set up and use your Ring Video Doorbell.
Visit: ring.com/setup
Step 2
Perform the in-app setup
The Ring app will walk you through this process. Download the Ring app by visiting ring.com/app
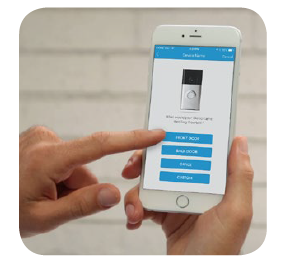
Tap the plus sign in the Ring app to set up a new device, and select Video Doorbell when prompted.
Perform in-app setup near your router. You’ll need your network name and Wi-Fi password..
Step 3
Push the front button to test the video
While inside near your router, push the button on the front of your doorbell to see live video in the Ring app. Then, perform this same test while outside. 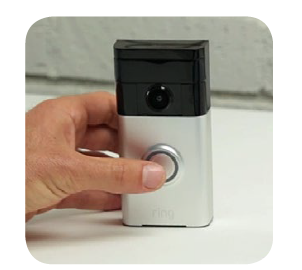
If video quality is not as good outdoors as it was indoors, you may need to move your router closer to your door or invest in a Wi-Fi extender.
Learn more at: ring.com/extender
Step 4
Remove your existing doorbell (optional)
If you’re replacing a wired doorbell, first turn off the power at the breaker. Then, remove your doorbell from the wall, and disconnect the wires. 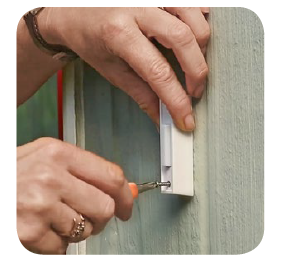
If your existing doorbell has a diode, you’ll need to use the diode included with your Ring Doorbell for installation.
Step 5
Install the mounting bracket
Take everything that came in the box (along with a power drill if you’re installing on stucco, brick or concrete), to the spot where you’re installing your Ring Doorbell.
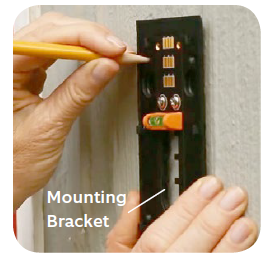
Snap the provided level onto the mounting bracket, and align the bracket accordingly.
Then, remove the orange tape, and use the mounting bracket as a template to mark four corner holes for your screws.
Installing the mounting bracket (continued)
On stucco, brick or concrete, install the anchors using the provided drill bit and a power drill before installing the mounting bracket.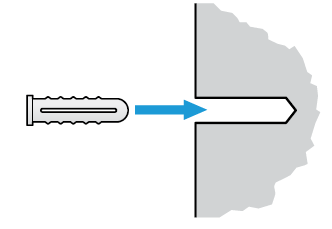
On wood or siding, you can skip this part and screw the bracket directly onto your wall.
If you have one, it may help to use a smaller drill bit to drill pilot holes first.
Installing the mounting bracket (continued)
Drive the screws into the anchors or directly into the wall until they’re flush with the mounting bracket and the bracket is flat against the wall. 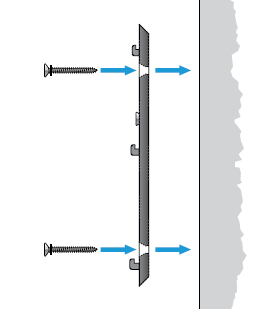
If the wall isn’t flat, make sure you don’t screw the bracket in so tightly that it bends.
Step 6
Connect the wires (optional)
Connect the wires coming out of your wall to the screws on the bracket. Note that it doesn’t matter which wire connects to which screw. 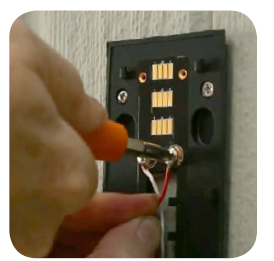
The wiring must be connected to a transformer with a voltage of 8VAC – 24VAC and an internal doorbell or resistor.
DC transformers and (therefore) most intercoms are not supported.
How and when to use the diode
If your doorbell is digital (i.e. plays a melody), attach the included diode to the two screws on your bracket.
If it’s mechanical (i.e. goes “ding-dong”), DO NOT use the diode.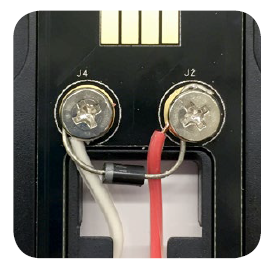
If you have a digital doorbell, connecting the diode the wrong way won’t do any harm. If your doorbell doesn’t ring, just reverse the diode.
Learn more at ring.com/diode
Step 7
Attach Ring Doorbell to the bracket
Line up the holes in your Ring Doorbell with the slots on the bracket. Push firmly towards the wall and then down until you feel a click.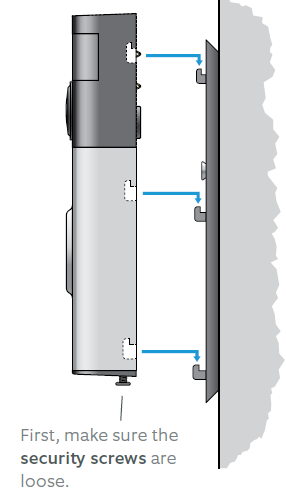
Step 8
Secure your Ring Doorbell
Use the star-shaped end of your Ring screwdriver to tighten the security screws on the bottom of your Ring Doorbell.
Then, restore power at the breaker.
Ring Light Patterns
The front light on your Ring Doorbell uses a number of patterns to communicate messages.
Here are some common ones: 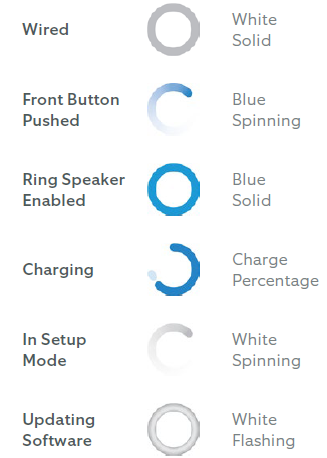
Answering Your Door
When someone is at your door, you can perform the following actions: 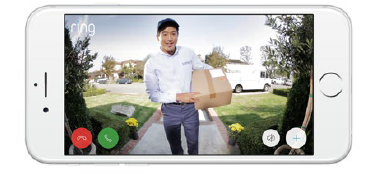
- Disable/enable your microphone
- Mute/unmute your speaker
- Zoom in/out
- Access the Ring Plus menu
Turning alerts on or off:
You can toggle alerts for Rings or Motions on or off in the Ring app. 
Need Help?
For additional help, visit: ring.com/help
For immediate assistance, we’re available 7 days a week at: 01727 263045
For a list of all our customer support numbers, visit: ring.com/callus
FCC Rules
This device complies with Part 15 of the FCC Rules. Operation is subject to the following two conditions:
- this device may not cause harmful interference, and
- this device must accept any interference received, including interference that may cause undesired operation.
For best results, use type Li-Ion batteries. Install only new batteries of the same type in your product. Failure to insert batteries in the correct polarity, as indicated in the battery compartment, may shorten the life of the batteries or cause batteries to leak. Do not mix old and new batteries. Do not mix Alkaline, Standard (Carbon-Zinc) or Rechargeable (Nickel Cadmium) or (Nickel Metal Hydride) batteries. Do not dispose of batteries in fire. Batteries should be recycled or disposed of as per state and local guidelines.
Warning: Changes or modifications to this unit not expressly approved by the party responsible for compliance could void the user’s authority to operate the equipment.
NOTE: This equipment has been tested and found to comply with the limits for a Class B digital device, pursuant to Part 15 of the FCC Rules. These limits are designed to provide reasonable protection against harmful interference in a residential installation. This equipment generates, uses and can radiate radio frequency energy and, if not installed and used in accordance with the instructions, may cause harmful interference to radio communications.
However, there is no guarantee that interference will not occur in a particular installation. If this equipment does cause harmful interference to radio or television reception, which can be determined by turning the equipment off and on, the user is encouraged to try to correct the interference by one or more of the following measures:
- Reorient or relocate the receiving antenna.
- Increase the separation between the equipment and receiver.
- Connect the equipment into an outlet on a circuit different from that to which the receiver is connected.
- Consult the dealer or an experienced radio/TV technician for help.
Hereby, Bot Home Automation, declares that this consumer electronic is in compliance with the essential requirements and other relevant provisions of Directive 1999/5/EC. The declaration of conformity may be consulted at www.ring.com/DoC.pdf.
Protect the device from direct sunlight. Install the device at dry locations and protect it against rain and humidity. The device may not get contact to salt water or other conductive liquids. The device must be charged only within a building in a dry state.
]]>
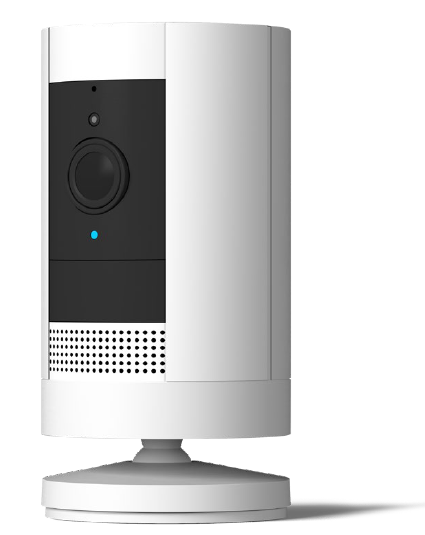
ring Stick Up Cam Battery
Set up your Stick Up Cam.
Download the Ring app.
The Ring app walks you through setting up and managing your Stick Up Cam.
Search for “Ring” in one of the app stores below, or visit: ring.com/app
Grab your Wi-Fi password.
You’ll need it to set up your Stick Up Cam.
Write it down below so it’s handy when you need it:
Charge the provided battery.
First, fully charge the battery by plugging it into a USB power source using the provided orange cable.
The battery is fully charged when just one LED is lit.
Remove the battery cover.
Twist the battery cover counterclockwise to unlock, then remove it from your Stick Up Cam.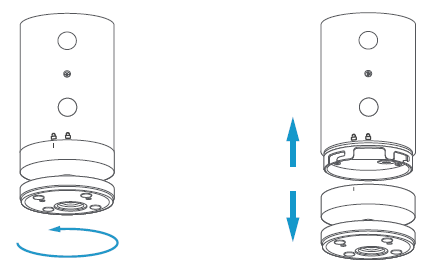
Insert the battery.
Insert the charged battery into the bottom of your Stick
Up Cam until it clicks into place.
Now place the battery cover back onto your Stick Up Cam.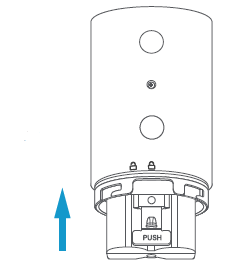
Set up your Stick Up Cam in the Ring app.
In the Ring app, select Set Up a Device.
When prompted, select Security Cams and follow the in-app instructions.
Try it out!
After setup, tap the Live View button in the Ring app to see live video from your Stick Up Cam.
Blue light flashing?
If the light on the front of your Stick Up Cam is flashing after setup, it’s updating its software.
Do not remove the battery from your Stick Up Cam while the light is flashing!
Install your Stick Up Cam.
Choose a location.
Stick Up Cam is happy just about anywhere, indoors or out. It comes ready to sit on a flat surface like a table or shelf, but can also be mounted to a wall.
Choose a spot where it can provide the view you want. 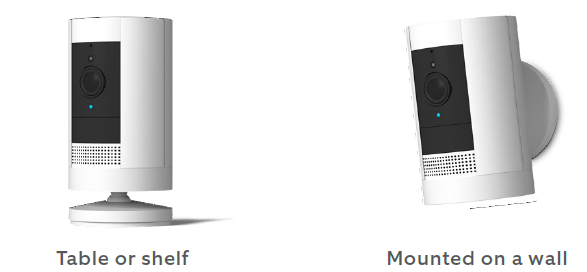
Wanna mount to a ceiling?
Mount to a ceiling with the Ring Stick Up Cam Mount (sold separately).
How to use Stick Up Cam on a table or shelf:
Insert the charged battery, then place it at your chosen location. Your Stick Up Cam is now ready to protect you.
Once you’re done, check out the live video in the Ring app to make sure you have the view you want.
If you’d like a downward camera angle…
Swivel the base around so that the long side faces the front, then tilt your Stick Up Cam so it points downward. 
Install the security screws (optional).
Your Stick Up Cam comes with two optional security screw locations.
One secures the battery compartment, and the other secures the mounting bracket to the base. To use them, open the battery compartment and/or remove the mounting bracket, then pop out the rubber plug(s). 
- Swivel the base so the long side faces the front.
- Insert and drive the security screw into the base screw location with a standard Phillips-head screwdriver (not included).
- Turn your Stick Up Cam over to access the battery compartment screw hole, and drive the second security screw.

How to install Stick Up Cam on a wall:
Remove the base.
Unscrew it using a standard Phillips-head screwdriver (not included).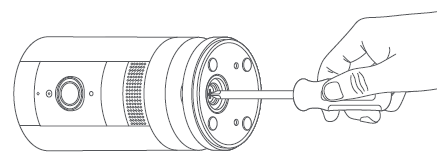
Re-attach the base.
Screw it into the back of your Stick Up Cam with the “UP” arrow on the bracket pointing upward. 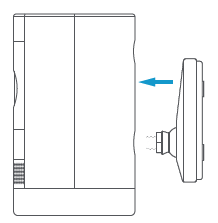
Remove the mounting bracket.
Slide it down to remove it from the base.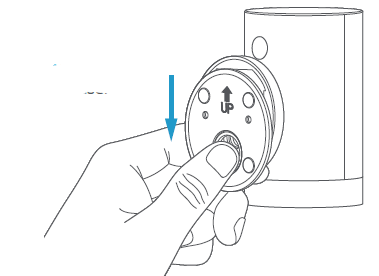
Drive the screws.
Hold the bracket against your wall, making sure the “UP” arrow is pointing upward, and mount it with the included screws.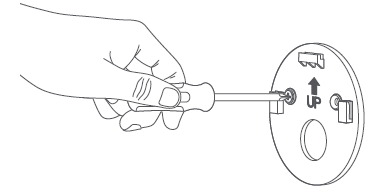
Mount your Cam.
Guide the grooves in the base onto the hooks on the bracket. Slide Stick Up Cam down to secure it to the wall. 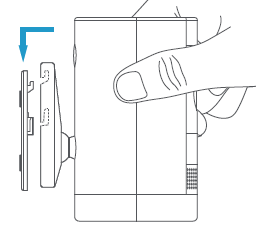
Check it out!
Now rotate it to your desired angle, and check out the live video in the Ring app to make sure you have the view you want.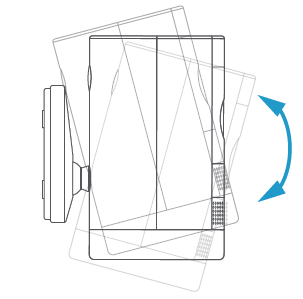
Install the security screws (optional).
Your Stick Up Cam comes with two optional security screw locations.
One secures the mounting bracket to the base, and the other secures the battery compartment.
To access them after you’ve mounted your Stick Up Cam, rotate it to either side.
To install the base screw…
First, slide your Stick Up Cam off of the mounting bracket. Pop the rubber plug out of the base, then place Stick Up Cam back on the bracket. Secure with one of the provided screws.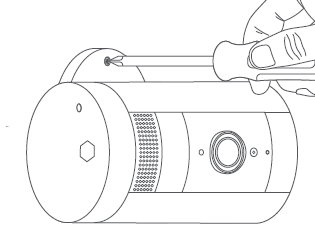
To install the battery compartment screw…
Remove the battery compartment, pop out the rubber plug, then replace the battery compartment on your Stick Up Cam.
Secure with one of the provided screws.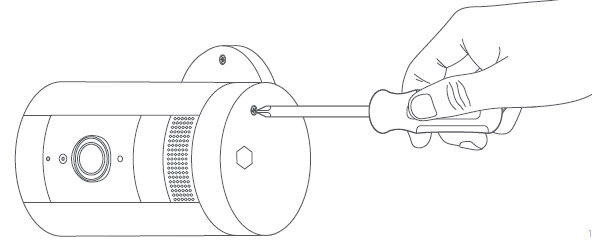
Help
For additional help, visit: ring.com/help Or give us a call…
- US 1 800 656 1918
- Canada 1 855 300 7289
- Worldwide +1 310 929 7085
For a list of all our customer support numbers, visit: ring.com/callus
To review your warranty coverage, please visit www.ring.com/warranty. © 2019 Ring LLC or its affiliates.
Ring and all related logos are trademarks of Ring LLC or its affiliates.
]]>
Keypad 2nd Generation
Z-Wave™ Technical Manual
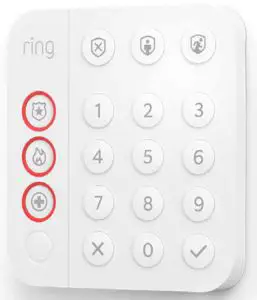
Ring Keypad
Introduction
Ring Alarm Keypad is a wireless accessory for the Ring Alarm system which provides users the ability to arm and disarm their system, view system status, and manage alarm conditions. After installing the Keypad and setting up the Keypad in the Ring app, perform arming and disarming actions as well as receive system indications for different status updates and events. The Ring Alarm Base Station is required to enable Keypad features and functions within the Ring app.
Notes:
- This product can be operated in any Z-Wave™ network with other Z-Wave certified devices from other manufacturers. All mains operated nodes within the network will act as repeaters regardless of vendor to increase reliability of the network.
- SmartStart enabled products can be added into a Z-Wave network by scanning the ZWave QR Code present on the product with a controller providing SmartStart inclusion. No further action is required and the SmartStart product will be added automatically within 10 minutes of being switched on in the network vicinity.
Installation & Set-Up
Ring Alarm Keypad – Basic Setup & Installation
In-app Setup
- Ensure your Ring Alarm system is disarmed.
- In the Ring app, tap Set Up a Device and find the Keypad in the Security Devices menu.
- Follow the in-app instructions to complete setup. Plug in the Keypad to trigger setup mode.
Installation
- Choose a location for installing the Keypad.
- Use the provided bracket and place the Keypad on a flat surface. For wall mounting, use the screws and anchors to secure the bracket to the wall and slide the Keypad into place.
- Using the provided double-sided tape, peel the backing and attach the Motion Detector to the mounting location.
Note
This product can be operated in any Z-Wave network with other Z-Wave certified devices from other manufacturers. All mains operated nodes within the network will act as repeaters regardless of vendor to increase reliability of the network.
This is a SmartStart enabled product which can be added into a Z-Wave network by scanning the Z-Wave QR Code present on the product with a controller providing SmartStart inclusion. No further action is required and the SmartStart product will be added automatically within 10 minutes of being switched on in the network vicinity. This product can also be operated in any Z-Wave network with other Z-Wave certified devices from other manufacturers.
Z-Wave Instructions
Z-Wave Device Type: Entry Control Keypad
Role Type: Listening Sleeping Slave
GENERIC_TYPE_ENTRY_CONTROL (0x40)
SPECIFIC_TYPE_SECURE_KEYPAD (0x0B)
Ring Alarm Keypad – Inclusion
Adding Ring Alarm Keypad to a Z-Wave Network
Ring Alarm Keypad can be added via SmartStart or Classic inclusion mode.
Note
When prompted for the QR Code or PIN, you may find them on the device, on the box, or on a card inside the box. Keep the device nearby. You’ll be prompted plug the device in to power on the device and enter setup mode.
SmartStart Inclusion Steps:
- Initiate the add flow for Security Devices in the Ring mobile application – Follow the guided add flow instructions provided in the Ring mobile application.
- When prompted by the mobile application, scan the QR code found on the package of the Keypad. The QR code can also be found on the device itself.
- Using the power adapter and cable provided, plug the Keypad into a standard outlet and the device will go into SmartStart inclusion mode. While in this mode, Keypad can be added to a Z-Wave controller that supports SmartStart. When in SmartStart inclusion mode, SmartStart can be restarted by tapping the button on the front of the device.
Classic Inclusion Steps:
Classic Inclusion should be used if the controller does not support SmartStart.
- Initiate add flow for Security Devices in the Ring mobile application – Follow the guided add flow instructions provided in the Ring mobile application.
- Select add manually and enter the 5-digit DSK PIN found on the package of the Ring Alarm Keypad or the 5-digit DSK PIN found under the QR code on the device. After powering on the device, press and hold the #1 button for ~3 seconds. Release the button and the device will enter Classic inclusion mode which implements both classic inclusion with a Node Information Frame, and Network Wide Inclusion. During Classic Inclusion mode, the green Connection LED will blink three times followed by a brief pause, repeatedly. When Classic inclusion times-out, the device will blink alternating red and green a few times.
| LED Behabior for Inclusion | Blink Pattern |
| SmartStart Started | Green LED three times, repeated after a brief pause |
| Classic Inclusion Started | Green LED three times, repeated after a brief pause |
| Classic Inclusion Timed-Out | Alternate red and green a few times |
| Inclusion Successful (Authenticated S2) | Green LED on solid |
| Inclusion Not Successful (Self-Destruct) | Red LED on solid |
Ring Alarm Keypad – Exclusion
Removing Ring Alarm Keypad from a Z-Wave Network
Exclusion Instructions:
- Initiate remove “Ring Alarm Keypad” flow in the Ring Alarm mobile application – Select the settings icon from device details page and choose “Remove Device” to remove the device. This will place the controller into Remove or “Z-Wave Exclusion” mode.
- Locate the pinhole reset button on the back of the device.
- With the controller in Remove (Z-Wave Exclusion) mode, use a paper clip or similar object and tap the pinhole button. The device’s Connection LED turns on solid red to indicate the device was removed from the network.
Ring Alarm Keypad – Factory Reset
Factory Default Instructions
- To restore Ring Alarm Keypad to factory default settings, locate the pinhole reset button on the device. This is found on the back of the device after removing the back bracket.
- Using a paperclip or similar object, insert it into the pinhole, press and hold the button down for 10 seconds.
- The device’s Connection icon LED will rapidly blink green continuously for 10 seconds. After about 10 seconds, when the green blinking stops, release the button. The red LED will turn on solid to indicate the device was removed from the network.
Note
Use this procedure only in the event that the network primary controller is missing or otherwise inoperable.
Wake-Up Notification
Not applicable. Ring Alarm Keypad (LSS) is a Frequently Listening Receiver Slave (FLiRS) device and does not support Wake Up Command Class.
Z-Wave Command Classes
| Command Class | Version | Required Security Class |
| Association | 2 | Highest granted |
| Association Group Information | 3 | Highest granted |
| Device Reset Locally | 1 | Highest granted |
| Firmware Update Meta Data | 5 | Highest granted |
| Indicator | 3 | Highest granted |
| Manufacturer Specific | 2 | Highest granted |
| Multi-Channel Association | 3 | Highest granted |
| Powerlevel | 1 | Highest granted |
| Security 2 | 1 | none |
| Security 0 | 1 | none |
| Supervision | 1 | none |
| Transport Service | 2 | none |
| Version | 3 | Highest granted |
| Z-Wave Plus Info | 2 | none |
| Notification | 8 | Highest granted |
| Configuration | 4 | Highest granted |
| Battery | 2 | Highest granted |
| Entry Control | 1 | Highest granted |
Association Command Class
| Group Identifier | Max Nodes | Description |
| 1 (Lifeline) | 0x05 | 1. Notification Report a. See notification CC section for notifications that are sent 2. Entry Control Notification 3. Battery Report 4. Device Reset Locally Notification |
Configuration Command Class
The Keypad has the following supported configuration parameters.
| Parameter Number |
Description | Number of Bytes |
Default | Min | Max | Format |
| 1 | Heartbeats: This parameter is the number minutes between heartbeats. Heartbeats are automatic battery reports on a timer after the last event. | 1 | 70 (0x46) | 1 (0x01) | 70 (0x46) | 1 |
| 2 | Number of application level retries attempted for messages either not ACKed or messages encapsulated via supervision get that did not receive a report. | 1 | 1 (0x01) | 0 (0x00) | 5 (0x05) | 2 |
| 3 | Application Level Retry Base Wait Time Period: The number base seconds used in the calculation for sleeping between retry messages. | 1 | 5 (0x05) | 1 (0x01) | 60 (0x3C) | 3 |
| 4 | Announcement Audio Volume (for audio files – should this be lumped into one of the other volume settings?) | 1 | 7 | 0 | 210 | 4 |
| 5 | Key Tone Volume | 1 | 6 | 0 | 10 | 5 |
| 6 | Siren Volume | 1 | 10 | 0 | 10 | 6 |
| 7 | Long press emergency duration (seconds) This parameter allows a user to configure the duration in seconds for the hold time required to capture a long press . This includes Emergency Buttons + Mode Buttons (Police, Fire, Medical, Disarmed, Home, Away) | 1 | 3 | 2 | 5 | 7 |
| 8 | Long press number pad duration (seconds) This parameter allows a user to configure the duration in seconds for the hold time required to capture a long press . This includes Number Pad + Check & X (0-9, Check, X) | 1 | 3 | 2 | 5 | 8 |
| 9 | Proximity Display Timeout : Timeout in seconds when proximity is detected and no input is received | 1 | 5 | 0 | 30 | 9 |
| 10 | Button Press Display Timeout : Timeout in seconds when any button is pressed, but a sequence is not completed and buttons are no longer being pressed | 1 | 5 | 0 | 30 | 10 |
| 11 | Status Change Display Timeout: Timeout in seconds when indicator command is received from the hub to change status | 1 | 5 | 0 | 30 | 11 |
| 12 | Security Mode Brightness: Adjusts the brightness of the security mode buttons | 1 | 100 | 0 | 100 | 12 |
| 13 | Key Backlight Brightness: Adjusts the brightness of the keypad backlight. Used for Key Backlight LEDs only Available settings: 0-100% | 1 | 100 | 0 | 100 | 13 |
| 14 | Ambient Light Sensor Level: Light threshold where keypad will stop backlighting if higher than | 1 | 5 | 0 | 100 | 14 |
| 15 | Proximity On/OFF: Turn On and Off the Proximity Detection. |
1 | 1 | 0 | 1 | 15 |
| 16 | Ramp Time Config: Ramp time in milliseconds to turn the LEDs on/off. Applies to all LEDs on the keypad | 1 | 50 | 0 | 255 | 16 |
| 17 | Low Battery Threshold – The percentage level at which the display would turn on the yellow battery indicator (whenever the display is on). | 1 | 15 | 0 | 100 | 17 |
| 18 | Languages Set: bit number in the languages supported bitmask to set | 1 | 3 0 (US English) | 0 | 31 | 18 |
| 19 | Warn Battery Threshold – The percentage level at which the display would turn on the red battery indicator (whenever the display is on). | 1 | 5 | 0 | 100 | 19 |
| 20 | The number of milliseconds waiting for a Supervisory Report response to a Supervisory Get encapsulated command from the device before attempting a retry. | 2 | 1500 (0x5DC) | 500 (0x1F4) | 5000 (0x1388) |
20 |
| 21 | System Security Mode Display: (Always, Sometimes, Never). • 601 = Always On • 1 – 600 = periodic interval • 0 = Always |
2 | 0 | 0 | 601 | 21 |
| 22 | Languages Supported (Get): returns bitmask of languages supported. Bits set to 1 indicate that the language is supported | 4 | N/A | N/A | N/A | 22 |
Notification Command Class, V8
| Sensor Condition | Command Class and Value | Association Group |
| AC mains power reconnected | Notification Report Type: 0x08 Power Management State: 0x03 AC mains reconnected |
1 (Lifeline) |
| AC mains power disconnected | Notification Report Type: 0x08 Power Management State: 0x02 AC mains disconnected |
1 (Lifeline) |
| Watchdog Notification | Notification Report Type: System 0x09 State Value: 0x04 System Software Failure State Parameter Value = Ox55 |
1 (Lifeline) |
| Software Fault (Ring) | Notification Report Type: System 0x09 State Value: 0x04 System Software Failure State Parameter Value = OxAA (Ring Value for Soft Fault) |
1 (Lifeline) |
| Software Fault (SDK) | Notification Report Type: System 0x09 State Value: 0x04 System Software Failure State Parameter Value = OxA9 (SDK Value for Soft Fault) |
1 (Lifeline) |
| Software Reset (Not triggered by failure) | Notification Report Type: System 0x09 State Value: 0x04 System Software Failure State Parameter Value = OxAC |
1 (Lifeline) |
| Power On Reset | Notification Report Type: Ox08 Power Management Event Parameter: Ox01 Power has been applied |
1 (Lifeline) |
| Brownout | Notification Report Type: 0x08 Power Management Event: 0x05 Voltage Drop/Drift |
1 (Lifeline) |
| Pin Reset (soft reset) | Notification Report Type: System 0x09 State Value: 0x04 System Software Failure State Parameter Value = OxAB |
1 (Lifeline) |
| Dropped Frame | Yes, via Notification Set of Notification Type 0x07, and status of 0x00: This type of notification turned off 0xFF: This type of notification turned on |
1 (Lifeline) |
Supplier’s Declaration of Conformity – Compliance Information Statement
Unique Identifier: Ring Contact Sensor
Responsible Party and Party issuing Supplier’s Declaration of Conformity
Ring LLC dba Ring
1523 26th Street
Santa Monica, CA 90404 U.S.A.
www.ring.com / [email protected]
FCC Compliance Statement (for products subject to Part 15)
This device complies with Part 15 of the FCC Rules. Operation is subject to the following two conditions: (1) This device may not cause harmful interference, and (2) this device must accept any interference received, including interference that may cause undesired operation.
NOTE: This equipment has been tested and found to comply with the limits for a Class B digital device, pursuant to Part 15 of the FCC Rules. These limits are designed to provide reasonable protection against harmful interference in a residential installation. This equipment generates, uses, and can radiate radio frequency energy and, if not installed and used in accordance with the instructions, may cause harmful interference to radio communications.
However, there is no guarantee that interference will not occur in a particular installation. If this equipment does cause harmful interference to radio or television reception, which can be determined by turning the equipment off and on, the user is encouraged to try to correct the interference by one or more of the following measures:
- Reorient or relocate the receiving antenna.
- Increase the separation between the equipment and receiver.
- Connect the equipment into an outlet on a circuit different from that to which the receiver is connected.
- Consult the dealer or an experienced radio/TV technician for help.
Innovation, Science and Economic Development Canada (ISED) Compliance
This device contains licence-exempt transmitter(s)/ receiver(s) that comply with Innovation, Science and Economic Development Canada’s licence-exempt RSS(s). Operation is subject to the following two conditions:
- This device may not cause interference.
- This device must accept any interference, including interference that may cause undesired operation of the device.
CAN ICES-3 (B)/NMB-3(B)
In accordance with FCC requirements of human exposure to radio frequency fields, the radiating element shall be installed such that a minimum separation distance of 20 cm is maintained from the general population.
WARNING: Changes or modifications to this unit not expressly approved by the party responsible for compliance could void the user’s authority to operate the equipment.
CAUTION: To reduce the risk of electrical shock, DO NOT open the unit. There are no user serviceable parts inside the unit. Refer to customer support for any repairs.
CAUTION: Danger of explosion if battery is incorrectly replaced. Replace only with the same or equivalent type recommended by the manufacturer. Dispose of the used batteries according to the manufacturer’s instructions.
To review your warranty coverage, please visit www.ring.com/warranty.
© 2020 Ring LLC or its affiliates.
Ring, Always Home, and all related logos are trademarks of Ring LLC or its affiliates.
ring Floodlight Cam Wired Pro
User Guide
 WARNING: Risk of electrical shock
Disconnect power at the fuse or circuit breaker before installing.
Verify that the supply voltage is correct. Connect fixture to a 100 VAC~240 VAC 50/60 Hz power source.
Properly ground fixture.
Always follow code standards when installing wired connections.
CAUTION: Risk of fire. Do not install near combustible or flammable surfaces.
NOTICE: Do not connect this light fixture to a dimmer switch or timer.
Your Floodlight Cam must be installed on a 4” round UL listed weatherproof electrical box.
This manual is for informational purposes only.
Working with electricity can be dangerous unless proper safety precautions are taken. If you are not comfortable or are inexperienced with the processes and tools described in this manual, we recommend that you hire a licensed electrician.
Quick Start
- Open the Ring app and select Set Up a Device.
Then follow the in-app instructions. - Scan this code
This identifies your Ring device to make setup fast and easy

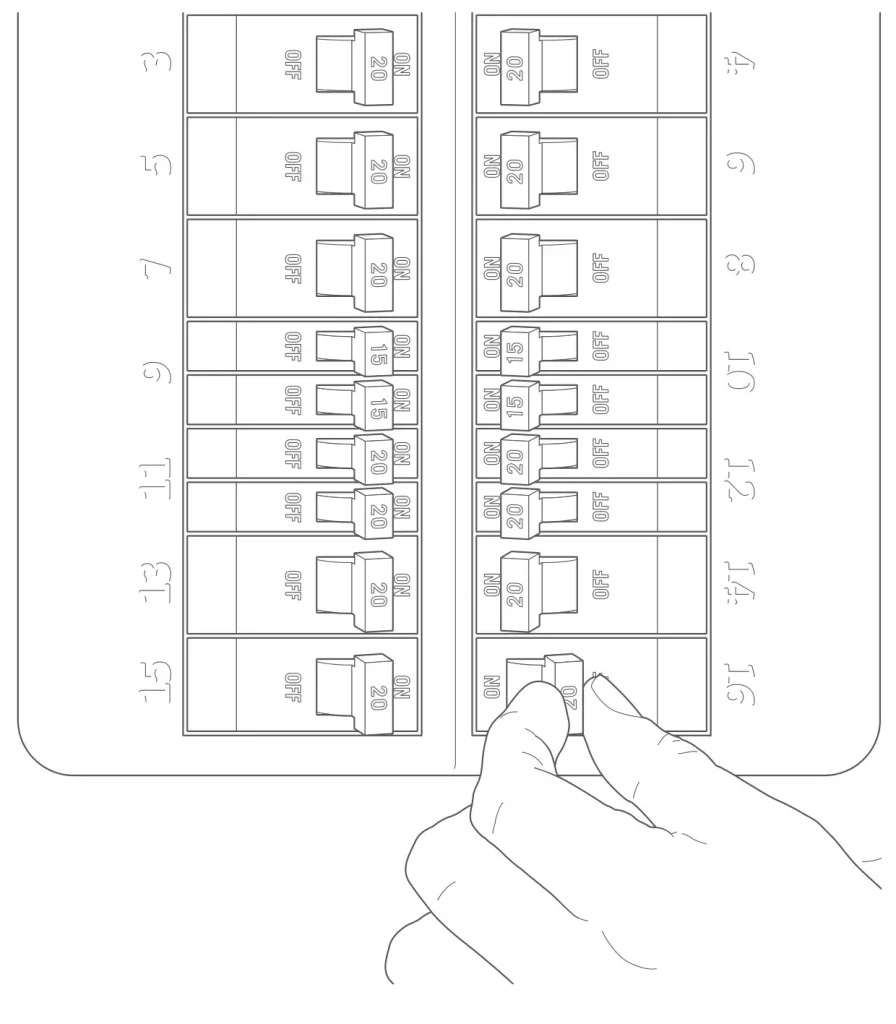
Shut off power at the breaker!
You’ll be working with electrical wires during the install process. If you don’t know where your breaker is or how to turn off power to your floodlight circuit, we recommend you hire a licensed electrician.
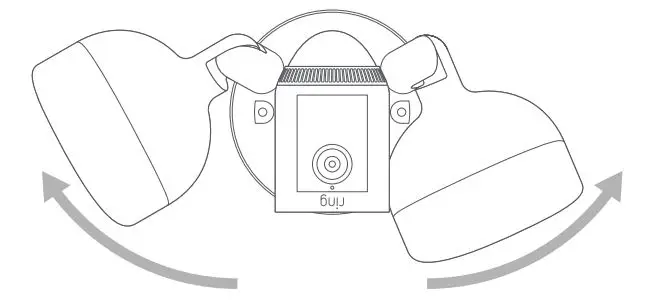
Prep your Floodlight Cam for installation
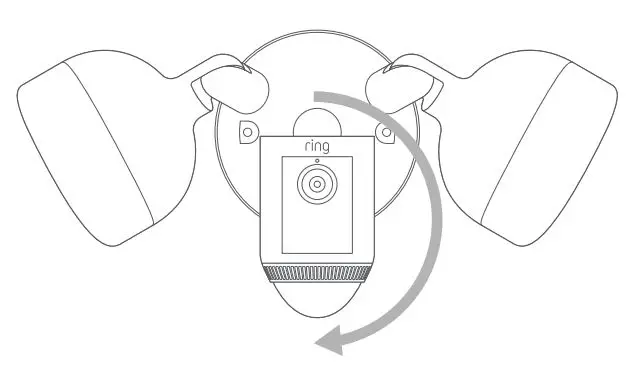
First, rotate the lights out of the way, like this…
If you’re mounting on an eave or overhang, your camera is already in position.
If you’re mounting to a wall, rotate the camera into position like this…
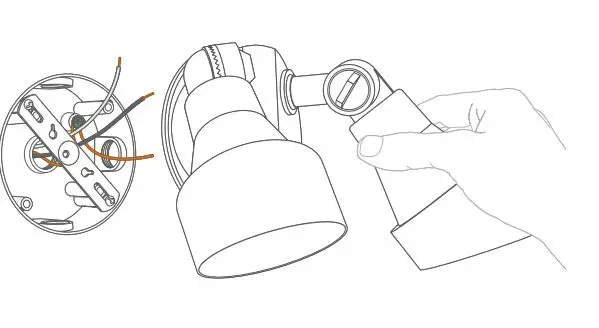
Remove your existing floodlight.
With power off at the breaker, remove your existing floodlight from the junction box it’s attached to and disconnect the wires.
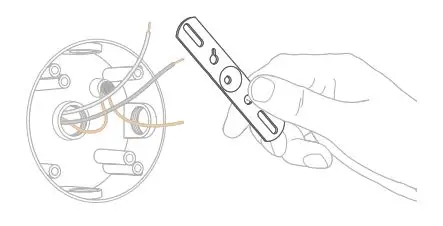
If there is a metal bracket attached to your junction box, remove that as well.
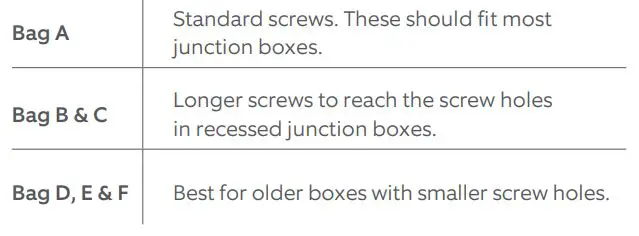
Choose your screws.
Select a set of screws from the bags marked “A” through “F” that fit your junction box to secure the metal mounting bracket. One size does not fit all here, so we sent several. Save a screw from either Bag B or C. You will use it on the next page.
Attach the metal mounting bracket.
With the screws you selected in the previous step, secure the metal mounting bracket to your junction box using either pair of screw holes. Be sure to align the bracket so that the “FRONT” text faces outwards.
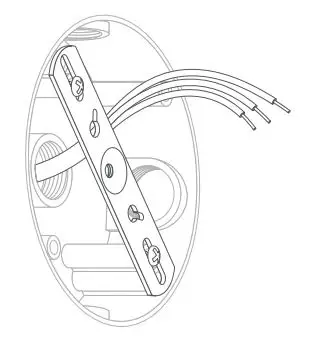
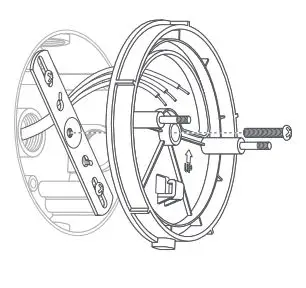
Install the plastic mounting plate.
Pull gently from the opening of the plastic plate to free it from the fixture, then feed your power wires though the opening.
With your power wires fed through the mounting plate, center it over the metal mounting bracket. If you’re installing on a wall, the “UP” arrow should point up.
If you’re installing under an eave, it should point towards the wall.
Then, insert one of the screws from Bag B or C into the center hole, and tighten to secure.
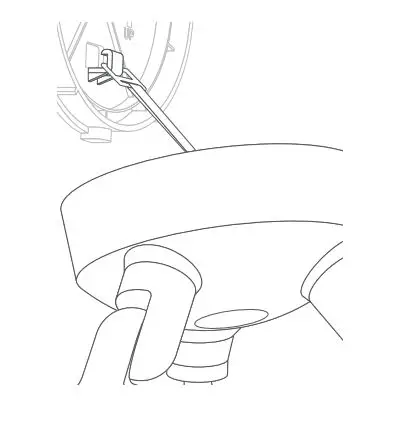
Hang it up.
Locate the nylon strap on the back of your Floodlight Cam light fixture, and loop the buckle at the end over the hook on the mounting plate. Make sure the buckle and hook are secure before releasing the light fixture.
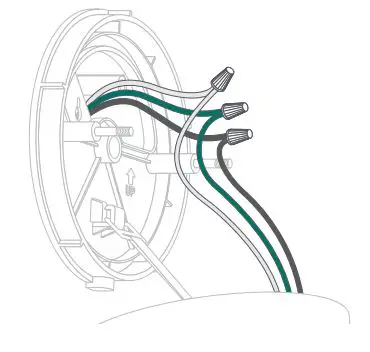
Connect the wires
The green wire on your Floodlight Cam is the ground wire. With power still off at the breaker, use a wire nut from the bag marked “G” to connect the green (or ground) wire from your Floodlight Cam to the green wire coming from your junction box.
The white wire on your Floodlight Cam is a neutral wire. Use another wire nut from the bag marked “G” to connect the white wire from your Floodlight Cam to the white (or neutral) wire coming from your junction box.
The black wire on your Floodlight Cam is a hot wire. Use another wire nut from the bag marked “G” to connect the black wire from your Floodlight Cam to the black (or hot) wire from your junction box.
Give all 3 wire connections and wire nuts a gentle tug to make sure they are secure.
![]() WARNING: If you can’t easily identify the wires coming out of your junction box, or have difficulty with or are uncomfortable connecting them, consult with a licensed electrician.
WARNING: If you can’t easily identify the wires coming out of your junction box, or have difficulty with or are uncomfortable connecting them, consult with a licensed electrician.
Mount the light fixture.
Tuck the power wires into the junction box, then align the two holes on the light fixture with the threaded posts on the plastic mounting plate. Slide the light fixture onto the posts and push it firmly into place.
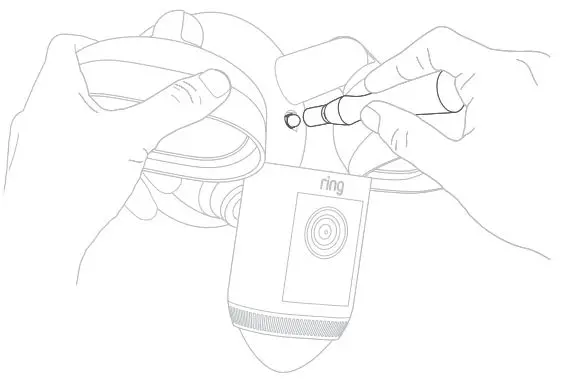
Secure your fixture using two of the hex cap nuts from Bag G over the ends of the threaded posts. Remove the reversible bit from the included screwdriver and use the handle to tighten the hex cap nuts.
Restore power at the breaker
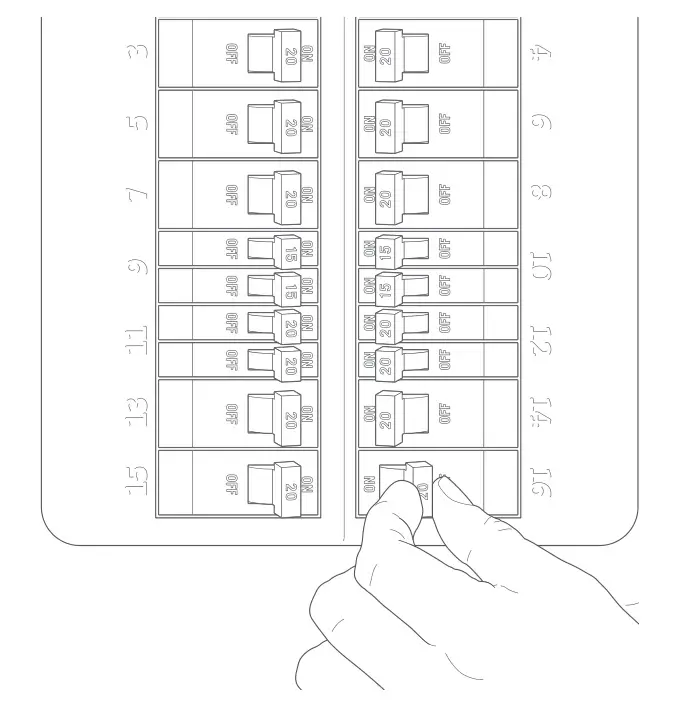
Now that your Floodlight Cam is installed, you can turn power back on at the breaker. The lamps on your Floodlight Cam will flash once it’s powered on.
Complete setup in the Ring App.
Once your Floodlight Cam powers on, follow the instructions to continue with setup in the app.
Review, share and download.
Your new device comes with a free 30-day trial of our Ring Protect video recording service.
To continue your subscription and save your videos, please visit ring.com/protect-plans
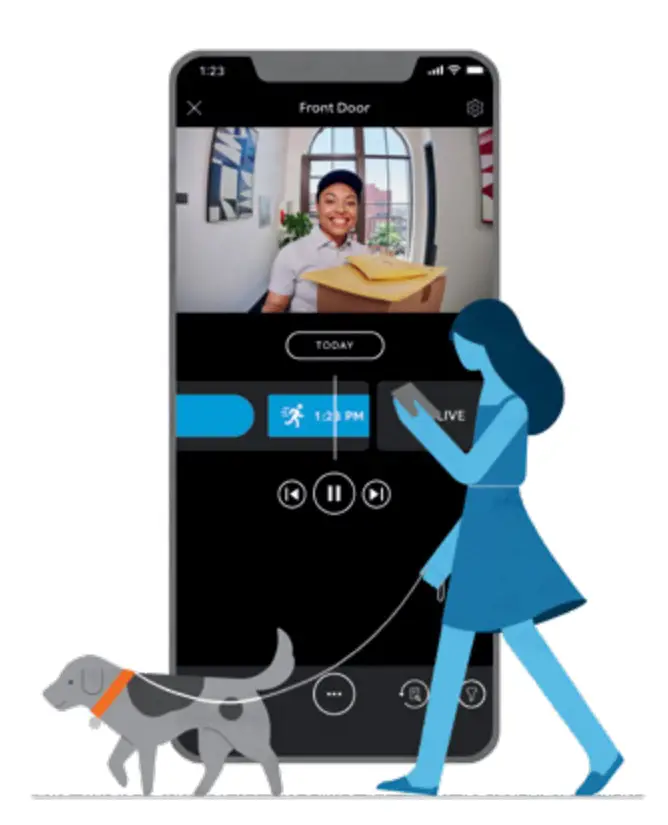
What is Ring Protect?
Ring Protect is a subscription service that stores videos from your Ring devices.
Why do I want it?
Ring lets you interact with visitors and monitor your property in real time, while Ring Protect allows you review and share those videos anytime.
How much does it cost?
Ring Protect starts at $3 USD/month or $30 USD/year per Ring doorbell or camera.*
How do I sign up?
Simply log into your Ring account at ring.com/protect-plans, and follow the on-screen instructions.
*$5 CAD per month or $50 CAD per year
![]()
For additional help, visit ring.com/help
Or give us a call
US 1 800 656 1918
Canada 1 855 300 7289
Worldwide +1 310 929 7085
For a list of all our customer support numbers, visit ring.com/callus
For information on our warranty, theft protection, and Ring Protect Plans, visit ring.com/legal
© 2021 Ring LLC or its affiliates.
Ring and all related marks are trademarks of Ring LLC or its affiliates.
]]>
Ring Alarm Range Extender – 2nd Generation User Manual
Introduction
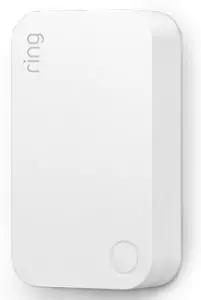
Ring Alarm Range Extender is a wireless repeater for the Ring Alarm system which helps to improve the range and reliability of the Ring Alarm network by listening for and repeating network communication between the Ring Alarm Base Station and other Ring Alarm end devices. After installing the Range Extender and setting up the Range Extender in the Ring app, the devices added to Ring Alarm’s network can utilize the Range Extender’s routing and repeating to communicate effectively with the Base Station. The Ring Alarm Base Station is required to enable Range Extender features and functions within the Ring app.
Notes:
- This product can be operated in any Z-WaveTM network with other Z-Wave certified devices from other manufacturers. All mains operated nodes within the network will act as repeaters regardless of vendor to increase reliability of the network.
- SmartStart enabled products can be added into a Z-Wave network by scanning the Z-Wave QR Code present on the product with a controller providing SmartStart inclusion. No further action is required and the SmartStart product will be added automatically within 10 minutes of being switched on in the network vicinity.
Installation & Set Up
Ring Alarm Range Extender Basic Setup & Installation
In-app Setup
- Ensure your Ring Alarm system is disarmed.
- In the Ring app, tap Set Up a Device and find the Range Extender in the Security Devices menu.
- Follow the in-app instructions to complete setup. Plug in the Range Extender to trigger setup mode.
- Tap the button on the front to retry setup mode.
In-app Setup
- Make sure your Ring Alarm is disarmed.
- In the Ring app, tap set up a Device and find the Range Extender in the Security Devices menu.
- Follow the in-app instructions to complete setup.
Installation:
- Make Sure the Range Extender is plugged into an outlet at all times.
- Choose an outlet between your base station and some of the devices farthest from your base station.
Your can move the range extender to another outlet as needed to expand the range of your Z-wave network. - The Range Extender plugs into a standard outlet.
- Choose a location for installing your Range Extender. For best coverage, install the Range Extender in an outlet between the Base Station and end devices which may require the use of the Range Extender to improve their ability to communicate with the Base Station.
For additional help visit: ring.com/help
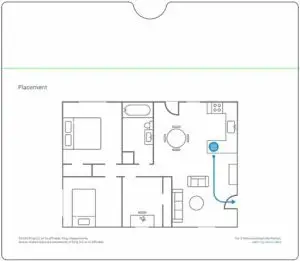
Placement:
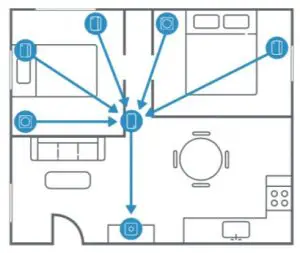
Choose an outlet between your base station and some of the devices farthest from your base station.
Note: You can move the Range Extender to another outlet as needed to expand the range of your Z-wave network.
For Z-wave technical information visit: ring.com/z-wave
Note:
- This product can be operated in any Z-Wave network with other Z-Wave certified devices from other manufacturers. All mains operated nodes within the network will act as repeaters regardless of vendor to increase reliability of the network.
- This is a SmartStart enabled product which can be added into a Z-Wave network by scanning the Z-Wave QR Code present on the product with a controller providing SmartStart inclusion. No further action is required and the SmartStart product will be added automatically within 10 minutes of being switched on in the network vicinity. This product can also be operated in any Z-Wave network with other Z-Wave certified devices from other manufacturers.
Z-Wave Instructions
Z-Wave Device Type: Repeater
Role Type: Always On Slave (AOS)
- GENERIC_TYPE_REPEATER_SLAVE (0x0F) ·
- SPECIFIC_TYPE_REPEATER_SLAVE (0x01)
Ring Alarm Range Extender Inclusion
Adding Ring Alarm Range Extender to a Z-Wave Network
Ring Alarm Range Extender can be added via SmartStart or Classic inclusion mode.
Note: When prompted for the QR Code or PIN, you may find them on the device, on the box, or on a card inside the box. Keep the device nearby. You’ll be prompted to plug in the Range Extender to power on the device and enter setup mode.
SmartStart Inclusion Steps:
- Initiate the add flow for Security Devices in the Ring mobile application Follow the guided add flow instructions provided in the Ring mobile application.
- When prompted by the mobile application, scan the QR code found on the package of the Range Extender. The QR code can also be found on the device itself.
- Plug the device into a standard outlet and the device will go into SmartStart inclusion mode. While in this mode, Range Extender can be added to a Z-Wave controller that supports SmartStart. When in SmartStart inclusion mode, SmartStart can be restarted by tapping the button on the front of the device.
Classic Inclusion Steps:
- Initiate add flow for Security Devices in the Ring mobile application Follow the guided add flow instructions provided in the Ring mobile application.
- Select Add Manually and enter the 5-digit DSK PIN found on the package of the Ring Alarm Range Extender or the 5-digit DSK PIN found under the QR code on the device.
- After powering on the device, press and hold the button on the front of the device for ~3 seconds. Release the button and the device will enter Classic inclusion mode which implements both classic inclusion with a Node Information Frame, and Network Wide Inclusion. During Classic Inclusion mode, the green LED will blink three times followed by a brief pause, repeatedly. When Classic inclusion times-out, the device will blink alternating red and green a few times.
Note: Classic Inclusion should be used if the controller does not support SmartStart.
| Led behavior for Inclusion | Blink Pattern |
| SmartStart Started | Green LED three times, repeated after a brief pause |
| Classic Inclusion Started | Green LED three times, repeated after a brief pause |
| Classic Inclusion Timed-Out | Alternate red and green a few times |
| Inclusion Successful (Authenticated S2) | Green LED on solid |
| Inclusion Not Successful (Self-Destruct) | Red LED on solid |
Removing Ring Alarm Range Extender from a Z-Wave Network
Exclusion Instructions:
- Initiate remove “Ring Alarm Range Extender” flow in the Ring Alarm mobile application Select the settings icon from device details page and choose Remove Device to remove the device. This will place the controller into Remove or “Z-Wave Exclusion” mode.
- Locate the pinhole reset button on the back of the device.
- With the controller in Remove (Z-Wave Exclusion) mode, use a paper clip or similar object and tap the pinhole button. The device’s red LED turns on solid to indicate the device was removed from the network.
Factory Default Instructions
- To restore Ring Alarm Range Extender to factory default settings, locate the pinhole reset button on the device. This is found on the back of the device after unplugging the device from the outlet.
- Using a paperclip or similar object, insert it into the pinhole, press and hold the button down for 10 seconds.
- The device will rapidly blink green continuously for 10 seconds. After about 10 seconds, when the green blinking stops, release the button. The red LED will turn on solid to indicate the device was removed from the network.
Note: Use this procedure only in the event that the network primary controller is missing or otherwise inoperable.
Wake-Up Notification
Not applicable. Ring Alarm Range Extender is an Always On Slave (AOS) and does not support Wake Up Command Class.
Z-Wave Command Classes
| Command Class | Version |
| Association | 2 |
| Association Group Information | 3 |
| Device Reset Locally | 1 |
| Firmware Update Meta Data | 5 |
| Indicator | 3 |
| Manufacturer Specific | 2 |
| Multi-Channel Association | 3 |
| Powerlevel | 1 |
| Security 2 | 1 |
| Supervision | 1 |
| Transport Service | 2 |
| Version | 3 |
| Z-Wave PlusTM Info | 2 |
| Notification | 8 |
| Configuration | 4 |
| Battery | 2 |
Association Command Class
| Group Identifier | Max Nodes | Description |
| 1 (Lifeline) | 0x05 | 1. Notification Report a. See notification CC section for notifications that are sent
2. Battery Report 3. Device Reset Locally Notification |
Configuration Command Class
The device has the following supported configuration parameters.
| Parameter Numb | Description | Number of Bytes | Default | Min | Max | Format |
| 1 | Heartbeats: This parameter is the number minutes between heartbeats. Heartbeats are automatic battery reports on a timer after the last event. |
1 | 70 (0x46) | 1 (0x01) | 70 (0x46) | 0x01 Unsigned |
| 2 | Number of application level retries attempted for messages either not ACKed or messages encapsulated via supervision get that did not receive a report. | 1 | 1 (0x01) | 0 (0x00) | 5 (0x05) | 0x01 Unsigned |
| 3 | Application Level Retry Base Wait Time Period:
The number base seconds used in the calculation for sleeping between retry messages |
1 | 5 (0x05) | 1 (0x01) | 60 (0x3C) | 0x01 Unsigned |
| 4 | This parameter allows a user, via software, to configure the various LED indications on the device. | 1 | 1 (0x01) | 0 (0x00) | (0x01) | enum |
| 5 | The number of milliseconds waiting for a Supervisory Report response to a Supervisory Get encapsulated command from the device before attempting a retry. | 2 | 1500 (0x5DC) | 500 (0x1F4) | 5000 (0x1388) | 0x01 Unsigned |
Notification Command Class, V8
| Device Condition | Command Class and Value | Association Group |
| AC mains power reconnected | Notification Report Type: 0x08 Power Management State: 0x03 AC mains reconnected | 1 (Lifeline) |
| AC mains power disconnected | Notification Report
Type: 0x08 Power Management State: 0x02 AC mains disconnected |
1 (Lifeline) |
| Comm Test Button Pressed | Notification Report
Type: System 0x09 Event: Heartbeat 0x05 |
1 (Lifeline) |
| Watchdog Notification | Notification Report
Type: System 0x09 State Value: 0x04 System Software Failure State Parameter Value = 0x55 |
|
| Software Fault (Ring) | Notification Report
Type: System 0x09 State Value: 0x04 System Software Failure State Parameter Value = 0xAA (Ring Value for Soft Fault) |
1 (Lifeline) |
| Software Fault (SDK) | Notification Report
Type: System 0x09 State Value: 0x04 System Software Failure State Parameter Value = 0xA9 (SDK Value for Soft Fault) |
1 (Lifeline) |
| Software Reset (Not triggered by failure) | Notification Report
Type: System 0x09 State Value: 0x04 System Software Failure State Parameter Value = 0xAC |
1 (Lifeline) |
| Power On Reset | Notification Report
Type: 0x08 Power Management Event Parameter: 0x01 Power has been applied |
1 (Lifeline) |
| Brownout | Notification Report
Type: 0x08 Power Management Event: 0x05 Voltage Drop/Drift |
1 (Lifeline) |
| Pin Reset (soft reset) | Notification Report
Type: System 0x09 State Value: 0x04 System Software Failure State Parameter Value = 0xAB |
1 (Lifeline) |
| Dropped Frame | Notification Report Type: System 0x09 State Value: 0x04 System Software Failure State Parameter Value = 0xAD | 1 (Lifeline) |
Supplier’s Declaration of Conformity Compliance Information Statement
Unique Identifier: Ring Alarm Range Extender
Responsible Party and Party issuing Supplier’s Declaration of Conformity
Ring LLC dba Ring 1523 26th Street
Santa Monica, CA 90404 U.S.A. www.ring.com / [email protected]
FCC Compliance Statement (for products subject to Part 15)
This device complies with Part 15 of the FCC Rules. Operation is subject to the following two conditions: (1) This device may not cause harmful interference, and (2) this device must accept any interference received, including interference that may cause undesired operation.
NOTE: This equipment has been tested and found to comply with the limits for a Class B digital device, pursuant to Part 15 of the FCC Rules. These limits are designed to provide reasonable protection against harmful interference in a residential installation. This equipment generates, uses, and can radiate radio frequency energy and, if not installed and used in accordance with the instructions, may cause harmful interference to radio communications.
However, there is no guarantee that interference will not occur in a particular installation. If this equipment does cause harmful interference to radio or television reception, which can be determined by turning the equipment off and on, the user is encouraged to try to correct the interference by one or more of the following measures:
- Reorient or relocate the receiving antenna.
- Increase the separation between the equipment and receiver.
- Connect the equipment into an outlet on a circuit different from that to which the receiver is connected.
- Consult the dealer or an experienced radio/TV technician for help.
Innovation, Science and Economic Development Canada (ISED) Compliance This device contains licence-exempt transmitter(s)/ receiver(s) that comply with Innovation, Science and Economic Development Canada’s licence-exempt RSS(s). Operation is subject to the following two conditions:
- This device may not cause interference.
- This device must accept any interference, including interference that may cause undesired operation of the device.
CAN ICES-3 (B)/NMB-3(B) In accordance with FCC requirements of human exposure to radio frequency fields, the radiating element shall be installed such that a minimum separation distance of 20 cm is maintained from the general population.
WARNING: Changes or modifications to this unit not expressly approved by the party responsible for compliance could void the user’s authority to operate the equipment.
CAUTION: To reduce the risk of electrical shock, DO NOT open the unit. There are no user serviceable parts inside the unit. Refer to customer support for any repairs.
CAUTION: Danger of explosion if battery is incorrectly replaced. Replace only with the same or equivalent type recommended by the manufacturer. Dispose of the used batteries according to the manufacturer’s instructions.
]]>
ring 5D22E9 Video Doorbell 4
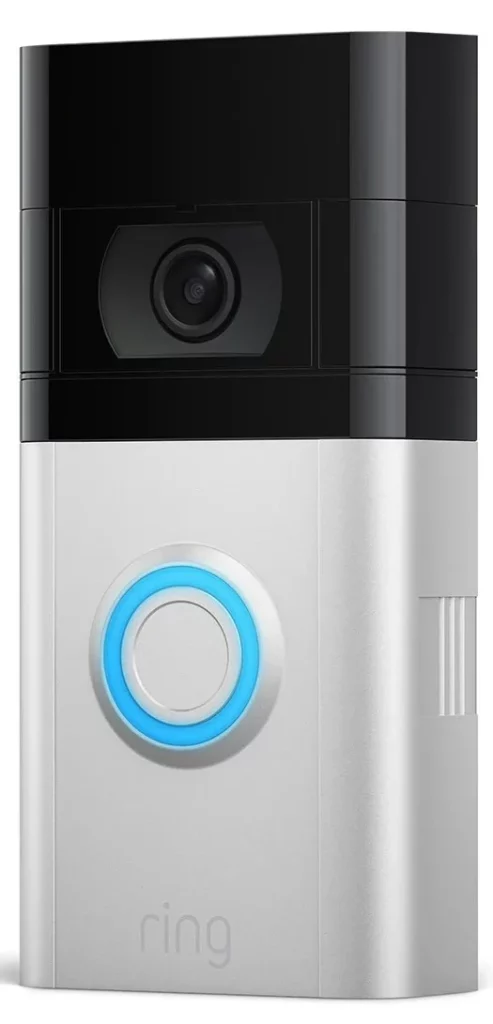
Included installation hardware.
Bag Hardware
- (5) Short Mounting Screws
To mount Ring Doorbell directly to a wall
(5) Wall Anchors
To install on concrete, stucco, or brick - (2) Security Screws
To secure Ring Doorbell after installation
Corner Mount Hardwar - (5) Short Bracket Screws
To mount Ring Doorbell to the corner mount
(3) Medium Bracket Screws
To mount one angle bracket to a wall
(3) Long Bracket Screws
To mount two angle brackets to a wall
(3) Wall Anchors
To install on concrete, stucco, or brick
Charge the battery
First, fully charge the battery by plugging it into a power source using the provided orange cable.
The small light on top will glow green once fully charged.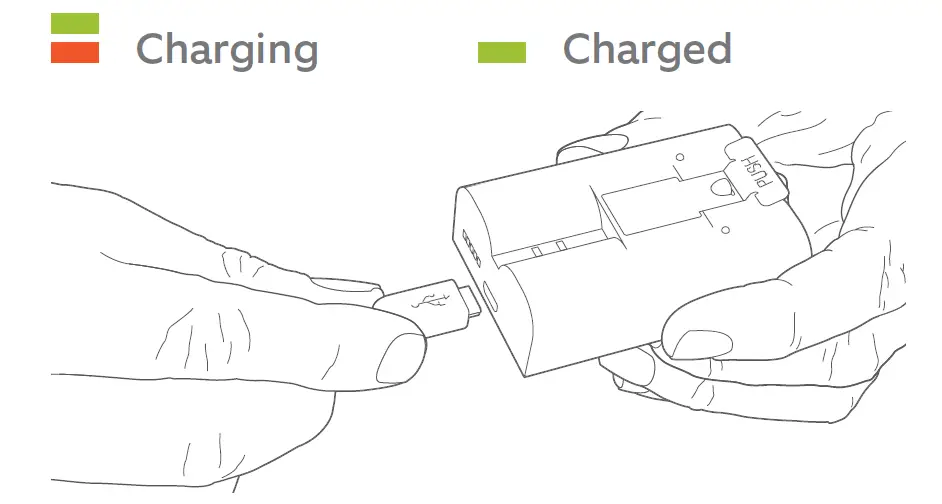
Insert the battery.
After charging, insert the battery in the bottom of your Ring Doorbell until it clicks into place.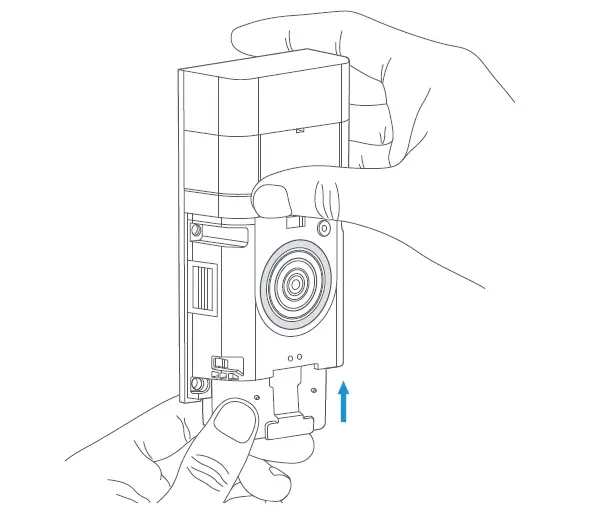
Download the Ring app.
The Ring app walks you through setting up and managing your Ring Doorbell.
Search for “Ring” in one of the app stores below, or visit ring.com/app
Do you have an in-home chime?
The chime can ring when the button on your Ring Doorbell is pressed. Just follow the in-app instructions during setup.
Don’t have an in-home chime?
If you see the “No In-Home Chime” button during setup, be sure to press it.
NO IN-HOME CHIME
Consider purchasing a Ring Chime or Ring Chime Pro, which allows you to hear alerts from anywhere in your home. Learn more at ring.com
To change your wiring settings after setup, go to Device Settings > Chime Connection.
Set up your Ring Doorbell near your wifi router.
In the Ring app, select Set Up a Device and follow the in-app instructions.
When prompted, select Doorbells,
and follow the in-app instructions.
Try it out.
After setup, push the button on the front of your Ring Doorbell to see video from the camera in the Ring app.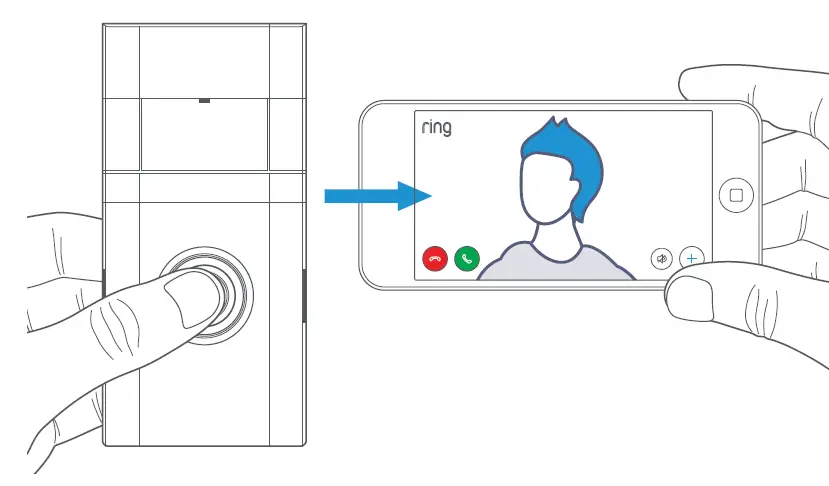 CAUTION
If you have problems with video quality after installation, you may need to move your router closer to your door, or add a Ring Chime Pro. Learn more at: ring.com/chime-pro
Install your Ring Doorbell.
Install your Ring Doorbell approximately four feet (1.20 metres) above the ground for optimal performance.
If you’re connecting to existing doorbell wiring that’s higher than four feet and want to angle your Ring Doorbell down for a better view, you can purchase a Wedge Kit online at ring.com/accessories.
Install the anchors.
If installing on stucco, brick, or concrete, mark 4 drill holes using the Ring Doorbell as a template. Then, use a 1/4” masonry drill bit to drill holes in your wall, and insert four of the included wall anchors.
(If you’re installing on wood, skip this step.)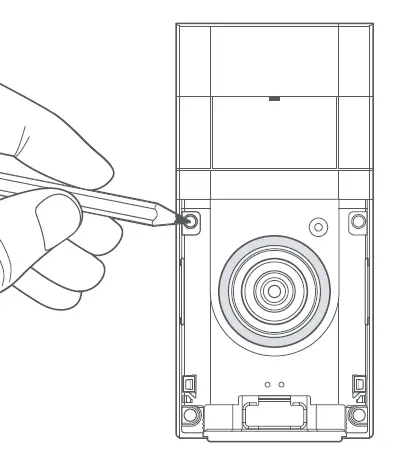 Secure your Ring Doorbell.
Use four of the provided Short Mounting Screws to secure your Ring Doorbell directly to the wall.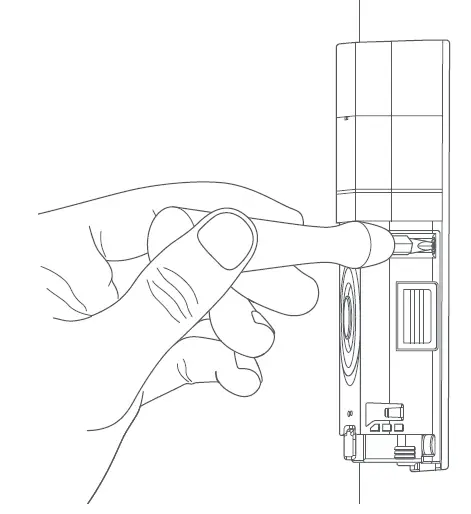 Install the faceplate.
Place the faceplate on your Ring Doorbell by slotting it in at the top and clicking it into place.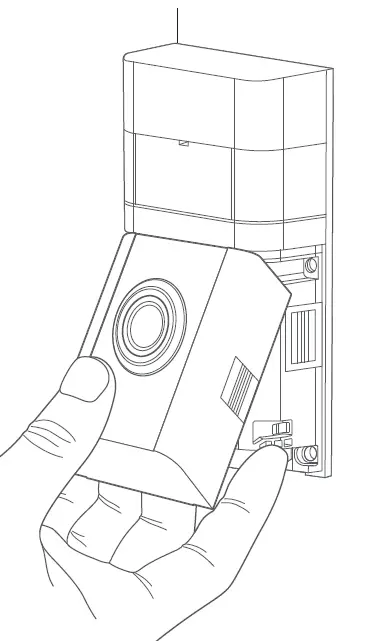 Secure the faceplate.
Lastly, use the included screwdriver to insert and tighten one of the Security Screws. Your Ring Doorbell is now ready to use.
If replacing an existing doorbell or using the included Corner Mount, continue to page 12.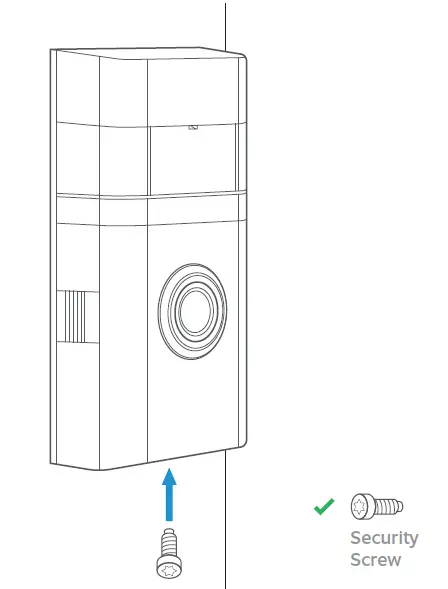 CAUTION!
If you use the wrong screws to secure the Ring Doorbell, you could damage the battery during installation, create a fire hazard, and be seriously injured.
Optional: Remove your existing doorbell
If replacing an existing doorbell, shut off power at the breaker. Then remove the doorbell button from the wall and disconnect the wires. If you’re not sure which breaker controls your doorbell, turn off the master breaker for your home, or contact an electrician.
Your Ring Doorbell is compatible with doorbell systems supplying 8–24 volts AC at 50 or 60Hz, 40VA max.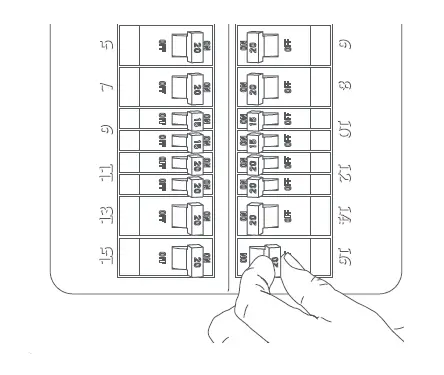 CAUTION!
You’ll be working with electrical wires during the install process. If you are uncomfortable or inexperienced with doing so, consult with a licensed electrician. Do not wire your Ring Doorbell to a DC-powered intercom system or other DC power source.
Optional: Install the Corner Mount
The Corner Mount can angle your Ring Doorbell to improve motion detection
and provide a better view
Install the anchors.
If installing on stucco, brick, or concrete, mark 2 drill holes using the Corner Mount as a template. Then, use a 1/4” masonry drill bit to drill holes in your wall, and insert the included anchors.
(If you’re installing on wood, skip this step.)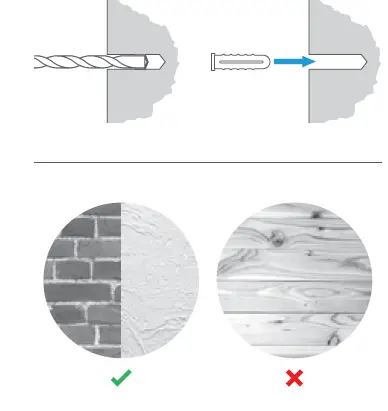 Install the Corner Mount
Use the Medium Bracket Screws to secure the Corner Mount to your wall. Use the Short Bracket Screws to secure your Ring Doorbell to the mount. If connecting to existing doorbell wiring, feed the wires through the back of the Corner Mount before securing the Corner Mount to the wall.
The Corner Mount can be painted
to match your home.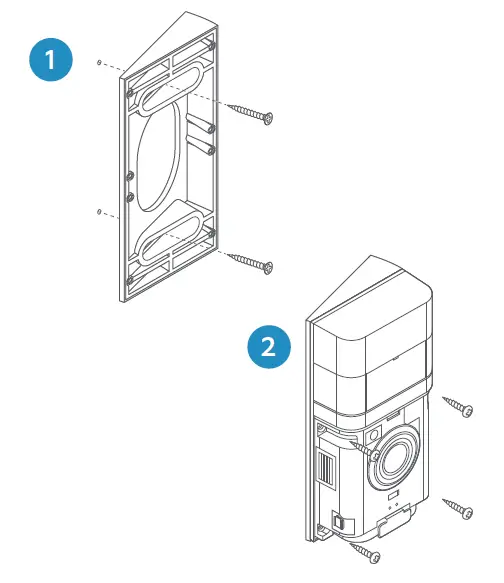 Optional: Connect to existing doorbell wires
Connect the wires coming out of your wall to the screws on the back of your Ring Doorbell.
It doesn’t matter which wire goes to each screw, as long as both are connected.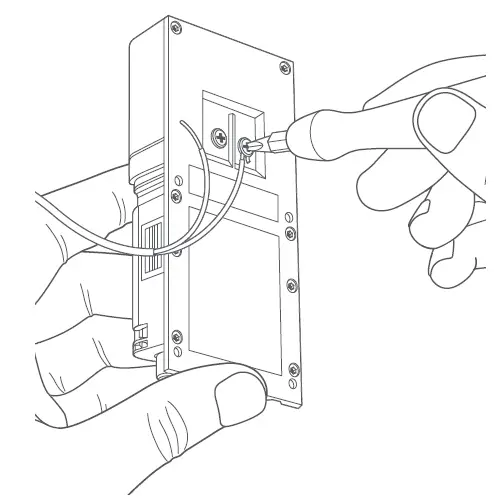 If you have trouble connecting the wires coming out of your wall to the back of your Ring Doorbell, use the provided wire extensions and wire nuts.
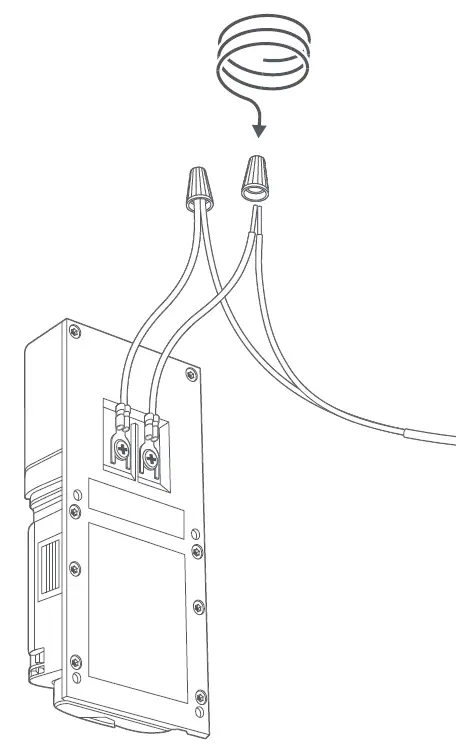 Feed all the wires (and the wire nuts, if you used them) into your wall and secure your Ring Doorbell to the wall using four of the provided Short Mounting Screws.
 Install the faceplate.
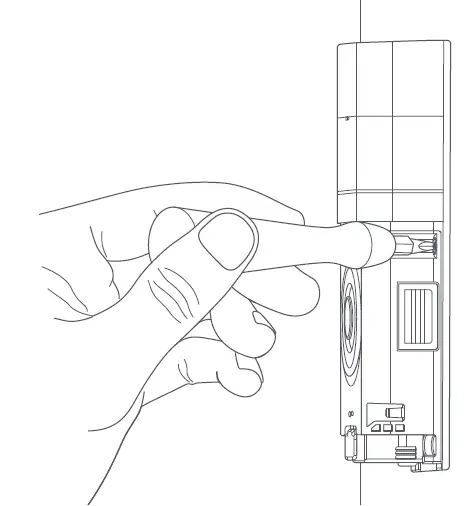
Place the faceplate on your Ring Doorbell by slotting it in at the top and clicking it into place.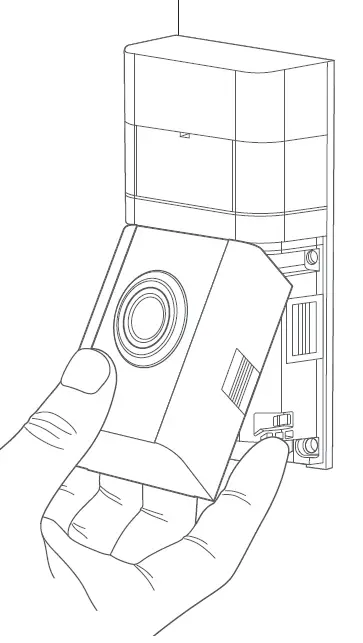 Secure the faceplate.
Lastly, use the included screwdriver to insert and tighten one of the Security Screws.
Your Ring Doorbell is now ready to use.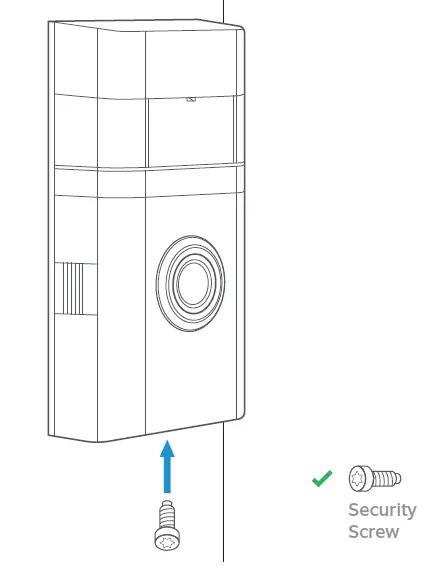 CAUTION!
If you use the wrong screws to secure the Ring Doorbell, you could damage the battery during installation, create a fire hazard, and be seriously injured.
Review, share and download.
Your new device comes with a free 30-day trial of Ring Protect video recording service.
To continue your subscription and save your videos, please visit ring.com/protect-plans
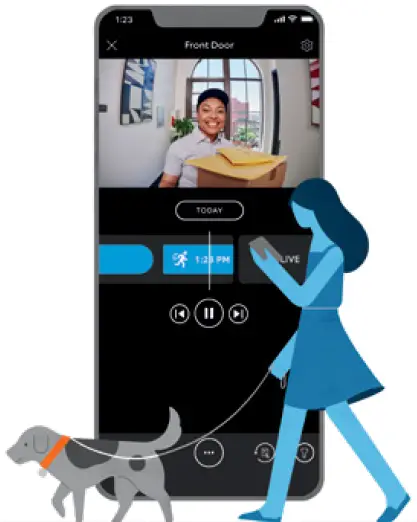
What is Ring Protect?
Ring Protect is a subscription service that stores videos from your Ring devices.
Why do I want it?
Ring lets you interact with visitors and monitor your property in real time, while Ring Protect allows you review and share those videos anytime.
How much does it cost?
Ring Protect Basic covers one Ring device for $3 USD/month or $30 USD/year.*
Ring Protect Plus covers all Ring devices
at one property, and costs $10 USD/month or $100 USD/year.**
How do I sign up?
Simply log into your Ring account at ring.com/protect-plans, and follow the on-screen instructions.
For additional help, visit ring.com/help
Or give us a call
US 1 800 656 1918
Canada 1 855 300 7289
Worldwide +1 310 929 7085
For a list of all our customer support numbers, visit ring.com/callus
For information on our warranty, theft protection, and Ring Protect Plans, see ring.com/legal
© 2020 Ring LLC or its affiliates.
Ring and all related marks are trademarks
of Ring LLC or its affiliates.
IMPORTANT PRODUCT INFORMATION
SAFETY INFORMATION: FAILURE TO FOLLOW THESE SAFETY INSTRUCTIONS COULD RESULT IN FIRE, ELECTRIC SHOCK, OR OTHER INJURY OR DAMAGE.
WARNING: Electrical shock hazard. Disconnect power to installation area at your circuit breaker or fuse box before beginning installation. Always use caution when handling electrical wiring. Installation by a qualified electrician may be required in your area. Refer to your local laws and building codes before performing electrical work; permits and/or professional installation may be required by law.
WATCH FOR SMALL PARTS. The device and accessories may present a choking hazard to small children and pets. Keep them out of reach of small children and pets.
Your device can withstand outdoor use and has been tested to with-stand water projected through a 6.3mm nozzle at a volume of 12.5 liters per minute and a pressure of 30 kPa at a distance of 3 meters for at least 3 minutes. However, your device is not intended for underwater use. To protect against electric shock, do not intentionally submerge or immerse your device, battery, or adapter (not included) in water or expose your device or adapter to other liquids. Do not spill any food or beverages on your device, battery, or adapter. Do not attempt to clean or polish your device, battery, or adapter with or expose your device, battery, or adapter to oil, lotion, or other abrasive substances. Do not expose your device, battery, or adapter to salt water or other conductive liquids. Do not expose your device, battery, or adapter to pressurized water, high velocity water, or extremely humid conditions (such as a steam room). If your device, battery, or adapter gets wet, carefully unplug all cables without getting your hands wet and wait for it to dry completely before plugging it in again. Do not attempt to dry your device, battery, or adapter with an external heat source, such as a microwave oven or a hair dryer. To avoid risk of electric shock, do not touch your device, battery, or adapter or any wires connected to your device during a lightning storm while your device, battery, or adapter is plugged in. If your device, battery, or adapter appears to be damaged, discontinue use immediately.
Your device does not contain any serviceable or replaceable parts. Do not open the housing or disassemble the device. Protect your device from direct sunlight. Install the device at dry locations and protect it against rain and humidity. Handle your device and its accessories with care. Your device or its accessories may have pointed edges which can lead to scratches, cuts, or other physical injury.
Use only accessories supplied with your device, or specifically marketed for use with your device, to power your device. Use of third-party acces-sories may impact your device’s performance. In limited circumstances, use of third-party accessories may void your device’s limited warranty. In addition, use of incompatible third party accessories may cause damage to your device or the third-party accessory. Read all safety instructions for any accessories before using with your device.
BATTERY SAFETY
Keep the battery and its power adapter in a well-ventilated area and away from heat sources, especially when in use or charging. Do not charge your battery near water or in extremely humid conditions. Do not open, disassemble, bend, deform, puncture or shred the battery. Do not modify, attempt to insert foreign objects into the battery or immerse or expose to water or other liquids. Do not expose the battery to fire, explosion or other hazard. Promptly dispose of used batteries in accordance with applicable laws and regulations. If dropped and you suspect damage, take steps to prevent any ingestion or direct contact of fluids and any other materials from the battery with skin or clothes.
Only use approved Li-Ion batteries designed and manufactured to work with your Ring device. The use of other batteries could cause injury to yourself, others and/ or damage your Ring device. Do not attempt to open or interfere with the battery pack, doing so could cause injury to yourself, others and/or your Ring device. Do not dispose of your batteries in fire and do not expose your batteries to extreme heat. Only charge your batteries inside a building, in a dry state and using the supplied charging cable. The chemicals used within your Li-Ion battery are hazardous and harmful to the environment when not properly disposed of. Always dispose of used batteries in accordance with your local applicable laws and regulations. Do not dispose of used batteries in your household waste. For more information where to recycle and dispose of used batteries contact the retailer you purchased the product from or your local authorities.
If a battery leaks, remove all batteries and recycle or dispose of them in accordance with battery manufacturer’s recommendations. If fluid from the battery comes into contact with skin or clothes, flush with water immediately.
Protect the device from direct sunlight. Install the device at dry loca-tions and protect it against rain and humidity. The device may not get contact to salt water
SAFELY CONNECTING YOUR RING DOORBELL 4 TO YOUR HOME’S ELECTRICAL WIRING
If you install the Ring Doorbell 4 where a doorbell is already in use and you connect the Ring Doorbell 4 to your home’s doorbell electrical wiring, you must turn off the existing doorbell’s power source at your home’s circuit breaker or fuse and test that the power is off BEFORE removing the existing doorbell, installing the Ring Doorbell 4, or touch-ing electrical wires. Failure to turn off circuit breaker or fuse so could result in FIRE, ELECTRIC SHOCK, or OTHER INJURY or DAMAGE.
More than one disconnect switch may be required to turn off the equip-ment before servicing.
To test whether you have successfully de-energized your existing door-bell’s power source, press your doorbell several times to confirm that the power is off.
If the electrical wiring in your home does not resemble any of the diagrams or instructions provided with Ring Doorbell 4, if you encoun-ter damaged or unsafe wiring, or if you are unsure or uncomfortable in performing this installation or handling electrical wiring, please consult a qualified electrician in your area.
Only use accessories that are recommended by the manufacturer. Use of third-party accessories may lead to damage to your Ring Doorbell 4 or the accessory and may cause fire, electric shock, or injury.
Product Specifications
- Device Name: Video Doorbell 4
- Model Number: 5D22E9
- Electrical Rating: Can connect to a doorbell system supplying 8-24VAC, 50/60Hz, 40VA (max) for continuous charging and internal doorbell control Temperature Rating: -5°F to 120°F (-20.5°C to 48.5°C)
RECYCLING YOUR DEVICE PROPERLY
In some areas, the disposal of certain electronic devices is regulated. Make sure you dispose of, or recycle, your device in accordance with your local laws and regulations. For information about recycling your device, go to amazon.com/devicesupport.
Terms of Service and Warranty
Use of the product is subject to your registration with Ring and your agreement with the Terms of Service found at ring.com/terms
To review your warranty coverage, please refer to the enclosure inside this box or visit ring.com/warranty
FCC
This device complies with Part 15 of the FCC Rules. Operation is subject to the following two conditions: (1) this device may not cause harmful interference, and (2) this device must accept any interference received, including interference that may cause undesired operation.
NOTE: This equipment has been tested and found to comply with the limits for a Class B digital device, pursuant to Part 15 of the FCC Rules. These limits are designed to provide reasonable protection against harmful interference in a residential installation. This equipment generates, uses and can radiate radio frequency energy and, if not installed and used in accordance with the instructions, may cause harmful interference to radio communications.
However, there is no guarantee that interference will not occur in a particular installation. If this equipment does cause harmful interfer-ence to radio or television reception, which can be determined by turning the equipment off and on, the user is encouraged to try to correct the interference by one or more of the following measures:
- Reorient or relocate the receiving antenna.
- Increase the separation between the equipment and receiver.
- Connect the equipment into an outlet on a circuit different from that to which the receiver is connected.
- Consult the dealer or an experienced radio/TV technician for help.
Pursuant to Section 15.21 of the FCC rules, changes or modifications to a Product by the user that are not expressly approved by the party responsible for compliance could void the user’s authority to operate the equipment.
The device meets the FCC Radio Frequency Emission Guidelines. Infor-mation on the product is on file with the FCC and can be found by inputting such Product’s FCC ID (which can be found on the device) into the FCC ID Search form available at fcc.gov/oet/ea/fccid.
The party responsible for FCC compliance is:
Ring LLC, 1523 26th St, Santa Monica, CA USA, 90404
FCC Radiation Exposure Statement
This device complies with FCC radiation exposure limits set forth for an uncontrolled environment and it also complies with Part 15 of the FCC RF Rules. This equipment must be installed and operated in accordance with provided instructions and the antenna(s) used for this transmitter must be installed to provide a separation distance of at least 20 cm from all persons and must not be co-located or operating in conjunction with any other antenna or transmitter. End-users and installers must be provided with antenna installation instructions and consider removing the no-collocation statement.
THEFT PROTECTION
If your Ring camera or doorbell product is stolen at any time after your purchase, Ring will replace the stolen device at no charge to you. This theft protection is not transferable and applies only to the original consumer purchaser. Coverage of this theft protection is limited to one (1) replacement only for each Ring camera or door-bell product that you have purchased. Theft protection does not apply to any products purchased from third party sellers on eBay and other online marketplaces. Any claim based on theft of your Ring camera or doorbell product must be submitted within fifteen (15) days of the theft and include the original sales receipt, and a copy of a police report evidencing that you reported the theft to the police. Failure to report the theft to police voids this theft protection.
For Consumers in Australia
Our goods come with guarantees that cannot be excluded under the Australian Consumer Law. You are enti-tled to a replacement or refund for a major failure and compensation for any other reasonably foreseeable loss or damage. You are also entitled to have the goods repaired or replaced if the goods fail to be of acceptable quality and the failure does not amount to a major failure. Goods presented for repair may be replaced by refurbished goods of the same
type rather than being repaired. Refurbished parts may be used to repair the goods.
LIMITED WARRANTY
This is a “Limited Warranty” which gives you specific legal rights. You may also have other rights, which vary from jurisdiction to jurisdiction. Some jurisdictions, such as Australia, do not allow the exclusion or limitation of incidental or consequential damages, so the limitation or exclusion under this Limited Warranty may not apply to you. Please keep your dated sales receipt; it is required for all warranty requests. Except as otherwise provided by the Australian Consumer Law, any dispute or controversy regarding this Limited Warranty arising from your use of your Ring products will be resolved by final and bind-ing bilateral arbitration in accordance with the “Dispute Resolution” section of the Terms of Service, found ring.com/terms.
- WHAT THE WARRANTY COVERS
For a period of one (1) year from the date of purchase of your Ring product, or one (1) year from the date of receipt of your replacement Ring product (see Section II below for details), Ring LLC (“Ring”) will, at its sole option, repair or replace any Ring products that malfunction due to defective parts or workmanship at no charge to you. This warranty is not transferable and applies only to the original consumer purchaser. Ring may, in its sole discretion, make any repair or replacement with new or refurbished product or components. If the product or component requiring repair or replacement is no longer available, Ring may, in its sole discretion, replace such product with a similar product of similar function. - WHAT THE WARRANTY DOES NOT COVER
Repair service, damage due to misuse, abuse, negligence or casualty (e.g., fire), acts of God (including but not limited to lightning, flood, tornado, earthquake, or hurricane), and consumable parts (including batteries) are not covered by this warranty. Damage from unauthorized service or modification of the product or of any furnished component will void this warranty in its entirety. This warranty does not include reimbursement for inconvenience, installation, loss of use, or unauthorized service. In addition, this warranty does not cover any losses, injuries to persons, loss of property or general damages. This warranty, our theft protection, and community support services do not apply to any products purchased from third party sellers on eBay and other online marketplaces. We strongly suggest that you do not buy Ring products from any unauthorized sellers, as such products may be used, defective, counterfeit or may not be designed for use in your country. This warranty covers only Ring products and is not extended to other equipment, components, or devices that a customer uses in conjunction with our products. Except in relation to any guarantees you may be entitled to under the Australian Consumer Law, Ring’s maximum liability under this warranty is limited to the original purchase price of the Ring product in question.
THIS WARRANTY IS EXPRESSLY IN LIEU OF ALL OTHER WARRANTIES, (EXCEPT THOSE GUARANTEES YOU MAY BE ENTITLED TO UNDER THE AUSTRALIAN CONSUMER LAW), EXPRESSED OR IMPLIED, INCLUDING ANY WARRANTY, REPRESENTATION OR CONDITION OF MERCHANTABILITY OR THAT THE PRODUCTS ARE FIT FOR ANY PARTICULAR PURPOSE OR USE, AND SPECIFICALLY IN LIEU OF ALL SPECIAL, INDIRECT, INCIDENTAL OR CONSEQUENTIAL DAMAGES. IF RING LLC CANNOT LAWFULLY DISCLAIM STATUTORY OR IMPLIED WARRANTIES, THEN TO THE EXTENT PERMITTED BY LAW AND EXCEPT IN RELATION TO ANY GUARANTEES YOU MAY BE ENTITLED TO UNDER THE AUSTRA-LIAN CONSUMER LAW, ALL SUCH WARRANTIES SHALL BE LIMITED IN DURATION TO THE DURATION OF THIS EXPRESS LIMITED WARRANTY AND TO REPAIR OR REPLACEMENT SERVICE. SOME JURISDICTIONS DO NOT ALLOW LIMITATIONS ON HOW LONG A STATUTORY OR IMPLIED WARRANTY LASTS, SO THE ABOVE LIMITATIONS MAY NOT APPLY TO YOU. EXCEPT AS OTHERWISE PROVIDED BY THE AUSTRALIAN CONSUMER LAW, REPAIR OR REPLACEMENT SHALL BE THE SOLE REMEDY OF THE CUSTOMER AND THERE SHALL BE NO LIABILITY ON THE PART OF RING LLC FOR ANY SPECIAL, INDI-RECT, INCIDENTAL OR CONSEQUENTIAL DAMAGES, INCLUDING BUT NOT LIMITED TO ANY LOSS OF BUSINESS OR PROFITS, WHETHER OR NOT FORESEEABLE. SOME JURISDICTIONS, SUCH AS THOSE IN WHICH THE AUSTRALIAN CONSUMER LAW APPLIES, DO NOT ALLOW THE EXCLUSION OR LIMITATION OF INCIDENTAL OR CONSEQUENTIAL DAMAGES, SO THE ABOVE LIMITATION AND EXCLUSIONS MAY NOT APPLY TO YOU.
This limited warranty gives you specific rights. You may have addi-tional rights under applicable law, and this limited warranty does not affect such rights.
THEFT PROTECTION
If your Ring camera or doorbell product is stolen at any time after your purchase, Ring will replace the stolen device at no charge to you. This theft protection is not transferable and applies only to the original consumer purchaser. Coverage of this theft protection is limited to one (1) replacement only for each Ring camera or doorbell product that you have purchased. Theft protection does not apply to any products purchased from third party sellers on eBay and other online market-places. Any claim based on theft of your Ring camera or doorbell prod-uct must be submitted within fifteen (15) days of the theft and include the original sales receipt, and a copy of a police report evidencing that you reported the theft to the police. Failure to report the theft to police voids this theft protection.
HOW TO OBTAIN SERVICE / REPLACEMENT
To obtain the benefit of the above limited warranty or theft protection, please contact Ring community support at:
- [email protected]
- +61 2 8294 9169
- 1300 205 983 (Toll Free)
For warranty requests where the Australian Consumer Law does not apply: Please be prepared to describe the product that needs service, the nature of the problem and to provide proof of purchase. You will also be required to return your existing device in accordance with directions that will be provided by Ring. Ring has no warranty obli-gations with respect any products that are excluded from warranty pursuant to Paragraph 2 above, as reasonably determined by Ring, and the owner of such device shall bear all shipping costs for the return of such product to owner. Any claim under this Limited Warranty must be submitted to Ring before the end of the warranty period described above. Please allow up to fourteen (14) business days for your warranty request to be processed. For replacement requests: Please be prepared to describe the product that needs to be replaced and a copy of the police report. Please allow up to fourteen (14) business days for your replacement to be processed.
]]>ring 5B28S5 Contact Sensor
Placement

Slim Magnet

First, complete the in-app setup.
- Make sure your Ring Alarm is disarmed.
- In the Ring app, tap Set Up a Device and find the Contact Sensor in the Security menu.
- Follow the in-app instructions to complete setup.
Then, install the device in your home.
- Choose the door or window where you’d like to install your Sensor and magnet.
- If the magnet is too large, open the back and remove the magnet piece from the magnet case and mount it directly.
- Line up the Sensor and magnet, with no more than 2.5cm (1”) between them.
- Leave at least 1.3cm (1/2”) space around the Sensor so you can open the battery compartment.
- Clean the area, then peel the backing from the mounting tape and press the Sensor and magnet into place.
- To install using screws you will need: Screws: 4x 3x21mm. Anchors: 4x 5mm.
If you’re using the Contact Sensor on a door you use often, choose Main Door as the placement option. Main doors have Entry and Exit Delays to prevent you from accidentally triggering the alarm.
How to change the battery.
Slide the sensor backward and off the mounting bracket. Replace the battery with fresh CR2032 cell batteries. Ensure that the battery is inserted correctly. When inserting batteries, make sure the (+) is facing up.
WARNING: Inserting the battery with the wrong polarity may damage the device.
SAFETY AND COMPLIANCE INFORMATION
Use Responsibly. Read all instructions and safety information before use.
SAFETY INFORMATION
WARNING! Failure to read and follow these safety instructions before the operation could result in fire, electric shock, or other injury or damage.
WARNING! Your device should only be used in accordance with the specific instructions for use and the intended purpose of the device. Using your device in any way other than its intended purpose could cause injury to yourself, others and/or damage to the device or property.
CAUTION! The device is not waterproof and as such should not be submerged in water, doing so could cause injury to yourself, and others and/or damage to the device.
WATCH FOR SMALL PARTS! Your device and accessories may present a choking hazard to small children. Keep them out of reach of small children.
Ring Contact Sensor is for indoor use only.
BATTERY SAFETY
This product contains lithium coin batteries. This device requires batteries for use. Only use new CR2032 3V batteries. Never mix old and new batteries. Keep all of the batteries out of the reach of children. Do not open, disassemble, puncture, cut, bend, shred or heat the batteries and do not allow metal objects to touch the battery terminals on the device as they can become hot and cause burns. Remove all batteries if they are worn out or before storing your Device for an extended period of time.
Dispose of all batteries in accordance with applicable laws and regulations and do not dispose of batteries by throwing them into a fire. If any batteries begin to leak, take steps to prevent the fluid from coming into direct contact with skin or clothes as the fluid could be corrosive and may be toxic. Remove the batteries and clean the battery compartment in accordance with the battery manufacturer’s recommendations.
CAUTION! The danger of explosion if the battery is incorrectly replaced. Replace only with the same or equivalent type recommended by the manufacturer. Dispose of the used batteries according to the manufacturer’s instructions.
CHEMICAL BURN HAZARD! This product contains lithium coin batteries. Do not ingest batteries. If the coin cell battery is swallowed, it can cause severe internal burns in just 2 hours and lead to death. Keep all of the batteries out of the reach of children. If you think batteries might have been swallowed or placed inside any part of the body, seek immediate medical attention.
PRODUCT SPECIFICATIONS
- Model Number: 5B28S5
- Electrical Rating: 2x CR2032 3V
- Temperature Rating: 0°C – 49°C
DECLARATION OF CONFORMITY
Hereby, Ring LLC, declares that the radio equipment type Ring Contact Sensor (5B28S5) is in compliance with Directive 2014/53/EU and relevant UK statutory requirements. The full text of the Declarations of Conformity are available at the following internet address: ring.com/doc.pdf.
RADIOFREQUENCY COMPLIANCE
In order to protect human health, this device meets the thresholds for exposure of the general public to electromagnetic fields according to Council Recommendation 1999/519/EC. This device should be installed and operated with at least 20 cm between the radiator and your body.
- Wireless Features: Z-Wave
- Maximum Equivalent Isotropically Radiated
- Power: 868.40 – 869.85 MHz 4.38 dBm EIRP
RECYCLING YOUR DEVICE PROPERLY
In some areas, the disposal of certain electronic devices is regulated. Make sure you dispose of, or recycle, your device in accordance with your local laws and regulations.
MANUALS
Find online manuals at: ring.com/alarm-manual
WARRANTY
Find warranty information at: ring.com/warranty
Z-WAVE
For Z-Wave technical information, visit: ring.com/z-wave
- UK +44 1727 26 3045
- EU +800 8700 9781
- Saudi Arabia +80081 47867
- UAE +80001 84084
- South Africa +0800993700
- Worldwide +1 310 929 7085
Ring
Singel 542 1017 AZ Amsterdam The Netherlands 1 Principal Place, Worship Street London, EC2A 2FA United Kingdom 2021 Ring LLC or its affiliates. Ring and all related marks are trademarks of Ring LLC or its affiliates.

Included installation hardware
- (1) Ring Access Controller Pro 2
- (1) 8-pin, 3.5 mm Pitch Terminal Block Connector
- (1) Puck Antenna · (4) Cable Labels
- (2) Adhesive Strips
- (1) USB Adapter
You’ll also need…
- Wires (18-22 AWG)/Cables for Connector Terminals
- Precision Flathead Screwdriver
- Wire Strippers
- Optional: RJ45 Ethernet Cable ( 3 meters)
- Optional: PVC Junction Box (if installed outside of the call box or existing junction box)
Download the Ring app
The Ring app walks you through setting up and managing your Ring Access Controller Pro 2.
Search for “Ring” in one of the app stores below, or visit ring.com/app


In the Ring app, select Set Up a Device and follow the in-app instructions.
Connect the wires to the terminal block
Using a precision flathead screwdriver, loosen the terminal block connector screws. Strip about 0.25″ of the insulation to expose the wire (18-22 AWG), then place the wire in the desired opening.
Tighten the screw to hold the wire in place. Give it a gentle tug to make sure it’s secure. Repeat for the rest of your wires.
Note: the positive and negative terminals are interchangeable.
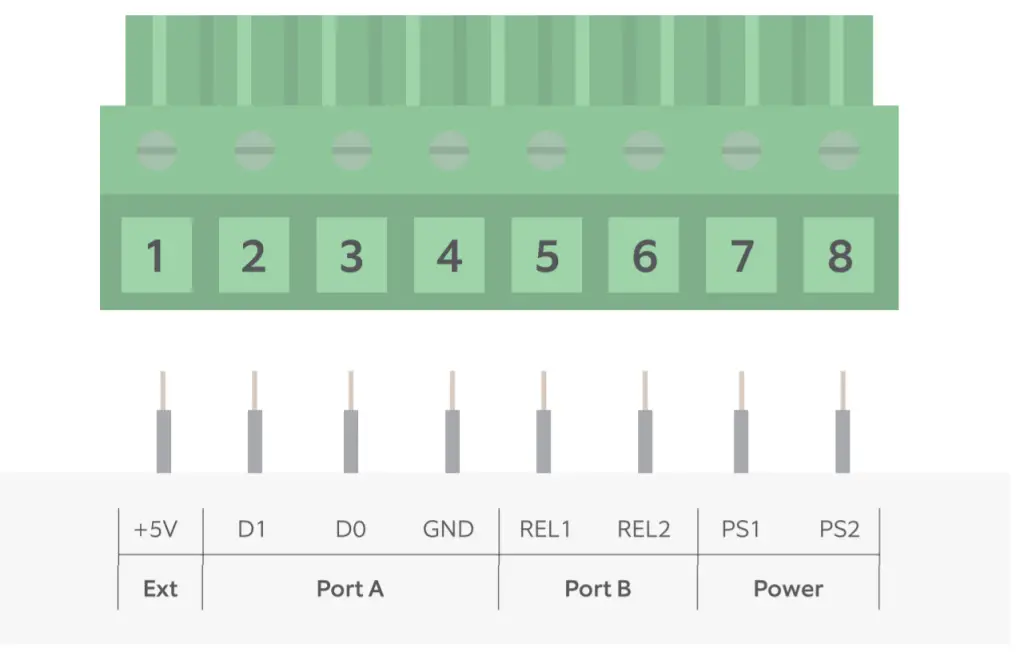
Once you’re done, connect the wires to your desired access control terminals. Use the included cable labels to properly identify the wires.
Remove the knockout
If you’re using an Ethernet cable, you can skip ahead to “Place your Access Controller.”
On your call box or junction box, identify a knockout that is at least 1/2″ away from the wall, making sure the antenna wire can reach your Access Controller install location.
Once you’ve found a good spot, remove the knockout.
Install the puck antenna
Unscrew the nut and remove the washer from the puck antenna. Insert the cable through the knockout hole, ensuring the puck antenna is outside the call box or junction box.
Place the washer on the antenna mounting post and screw the nut to fix the puck antenna in place. Make sure it’s secure, but do not overtighten.
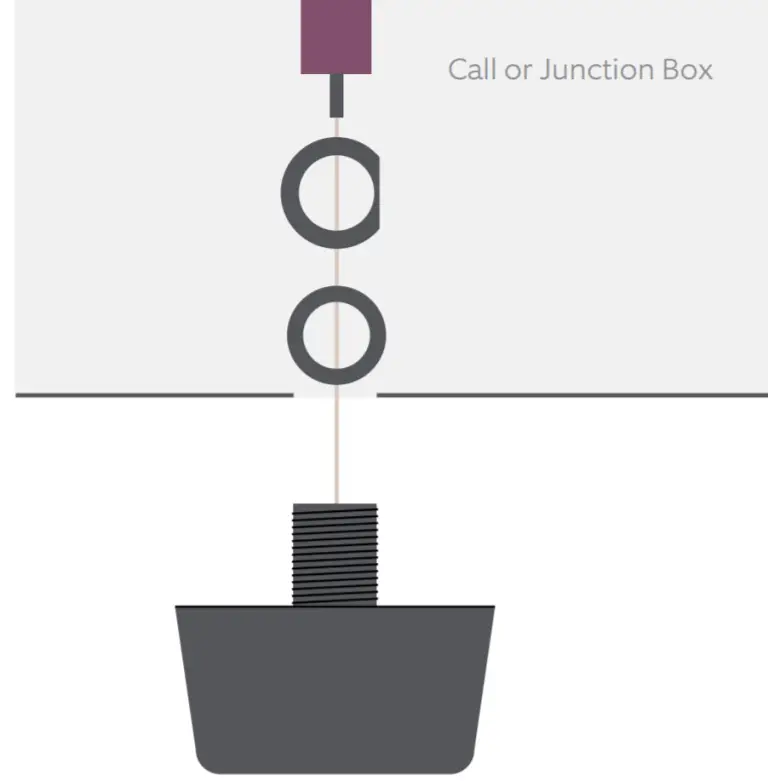
Place your Access Controller
Remove the liner from one side of the adhesive strips and place the strips in the recesses on the back of your access controller. Clean the surface where the access controller will be placed. Peel the liner off of the other side and place the Access Controller against the clean and dry mounting surface for 30 seconds.
If you’re mounting outside your call box, drill a hole for the antenna and terminal block wires. Pass the wires and terminal block through the hole.
Connect the terminal block to your Access Controller
Plug the terminal block connector into the mating connector on your Access Controller.

Connect the antenna or Ethernet cable
Attach the puck antenna connector to the antenna port on your Access Controller until it locks into place.
If you have an Ethernet connection in your call box or junction box, plug the cable into the Ethernet port on your Access Controller instead.
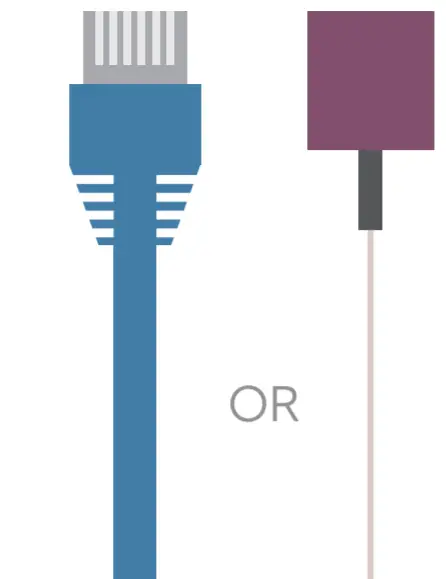
Power it up
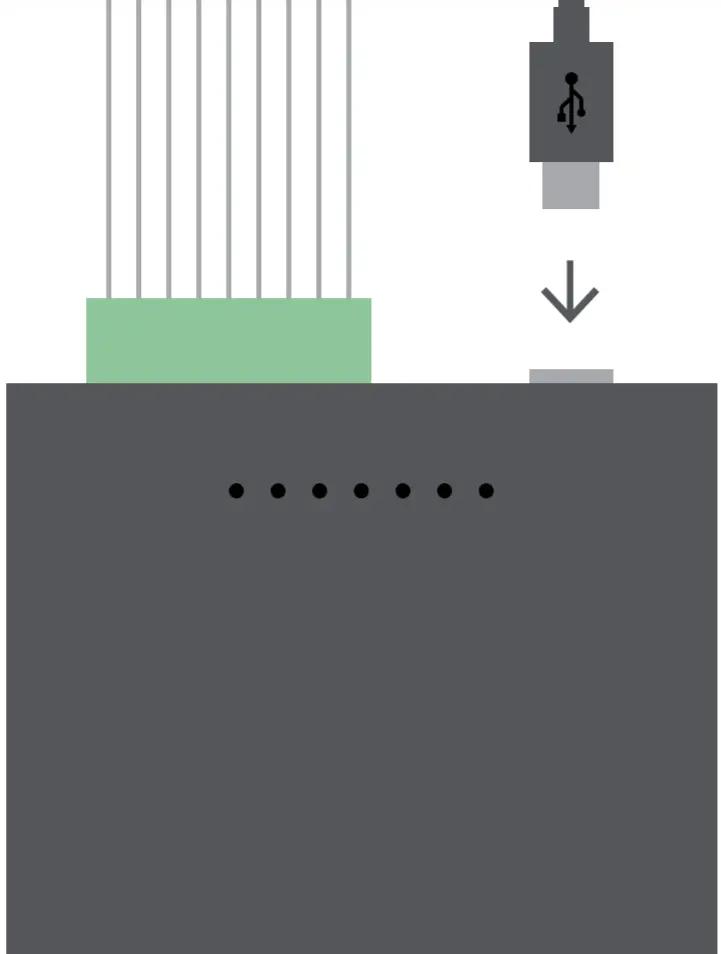
If you mounted your device outside the call box, plug it into an outlet using the included micro USB cable and DC power brick.
If you mounted your device inside the call box, connect the power wires from your box to terminals 7 and 8 on the terminal block (it doesn’t matter which wire connects to which terminal).
LED and Connector Terminal Indicators
PWR: Solid light indicates the device is powered
CELL:
- Red indicates no cellular coverage
- Yellow indicates low cellular coverage
- Green indicates good cellular coverage
- White indicates the device is using Ethernet
- Blue indicates attempting to get cellular strength
CON: Flashing light indicates device has Internet connectivity
RUN: Flashing light indicates device is running as programmed
REC: Solid light indicates device is in record mode and scanning for access credential (only occurs while provisioning a fob credential)
DR1 and DR2: Solid light for 2 seconds indicates respective door is opening at that time
IMPORTANT PRODUCT INFORMATION
This device should only be installed by a professional installer or licensed electrician.
⚠ SAFETY INFORMATION: FAILURE TO FOLLOW THESE SAFETY INSTRUCTIONS COULD RESULT IN FIRE, ELECTRIC SHOCK, OR OTHER INJURY OR DAMAGE.
Users are required to use a power supply that complies with PS2 or L.P.S. certification and approval. Use only accessories supplied with your device, or specifically marketed for use with your device, to power your device. Use of third-party accessories may impact your device’s performance. In limited circumstances, use of third-party accessories may void your device’s limited warranty. In addition, use of incompatible third party accessories may cause damage to your device or the third-party accessory. Read all safety instructions for any accessories before using with your device.
Protect the device from direct sunlight. Install the device at dry locations and protect it against rain and humidity. The device may not get contact to salt water or other conductive liquids. The device must be charged only within a building in a dry state.
⚠ SAFETY INFORMATION: FAILURE TO FOLLOW THESE SAFETY INSTRUCTIONS COULD RESULT IN INJURY.
Small parts contained in the Access Controller Pro 2 may present a choking hazard to small children. Keep small parts away from children. Your Ring Access Controller Pro 2 should only be used in accordance with the instructions and intended purpose. Using this accessory in any way other than its intended purpose could cause injury to yourself, others or damage to the device. Your Ring Ring Access Controller Pro 2 is not waterproof and as such should not be submerged in water, doing so could cause injury to yourself, others or damage to the device.
DANGER — TO REDUCE THE RISK OF FIRE OR ELECTRIC SHOCK, FOLLOW THESE INSTRUCTIONS CAREFULLY.
- Do not force the adapter into a power outlet.
- Do not expose your device or adapter to liquids. If your device or adapter gets wet, carefully unplug all cables without getting your hands wet and wait for the device and adapter to dry completely before plugging them in again. Do not attempt to dry your device or adapter with an external heat source, such as a microwave oven or a hair dryer. If the device or adapter appear damaged, discontinue use immediately. Use only accessories supplied with the device to power your device. To avoid risk of electric shock, do not touch your device or any wires connected to your device during a lightning storm.
- If the adapter or cable appears damaged, discontinue use immediately.
Install your power adapter into an easily accessible socket-outlet located near the equipment that will be plugged into or powered by the adapter.
Product Specifications
- Model No.: ecBAC-1
- Temperature Rating: -20°C to 65°C
- Power Input: 100240V ~0.3A 50/60Hz
- Power Output: 5.2V, 1.8A (9 watts)
RECYCLING YOUR DEVICE PROPERLY
In some areas, the disposal of certain electronic devices is regulated. Make sure you dispose of, or recycle, your device in accordance with your local laws and regulations. For information about recycling your device, go to amazon.com/devicesupport.
TERMS OF SERVICE AND WARRANTY
By purchasing or using the product, you agree to the Terms of Service found at ring.com/terms.
For information on our warranty, visit ring.com/legal.
This device complies with Part 15 of the FCC Rules. Operation is subject to the following two conditions: (1) this device may not cause harmful interference, and (2) this device must accept any interference received, including interference that may cause undesired operation.
NOTE: This equipment has been tested and found to comply with the limits for a Class B digital device, pursuant to Part 15 of the FCC Rules. These limits are designed to provide reasonable protection against harmful interference in a residential installation. This equipment generates, uses and can radiate radio frequency energy and, if not installed and used in accordance with the instructions, may cause harmful interference to radio communications.
However, there is no guarantee that interference will not occur in a particular installation. If this equipment does cause harmful interference to radio or television reception, which can be determined by turning the equipment off and on, the user is encouraged to try to correct the interference by one or more of the following measures:
- Reorient or relocate the receiving antenna.
- Increase the separation between the equipment and receiver.
- Connect the equipment into an outlet on a circuit different from that to which the receiver is connected.
- Consult the dealer or an experienced radio/TV technician for help.
Pursuant to Section 15.21 of the FCC rules, changes or modifications to a Product by the user that are not expressly approved by the party responsible for compliance could void the user’s authority to operate the equipment.
The device meets the FCC Radio Frequency Emission Guidelines. Information on the product is on file with the FCC and can be found by inputting such Product’s FCC ID (which can be found on the device) into the FCC ID Search form available at fcc.gov/oet/ea/fccid.
The party responsible for FCC compliance is: Ring LLC, 1523 26th St, Santa Monica, CA USA, 90404
FCC Radiation Exposure Statement
This device complies with FCC radiation exposure limits set forth for an uncontrolled environment and it also complies with Part 15 of the FCC RF Rules. This equipment must be installed and operated in accordance with provided instructions and the antenna(s) used for this transmitter must be installed to provide a separation distance of at least 20 cm from all persons and must not be co-located or operating in conjunction with any other antenna or transmitter. End-users and installers must be provided with antenna installation instructions and consider removing the no-collocation statement.
Additional info
Manufactured by: Ring LLC
Website: Ring.com
Contact Name: RACP Tech Support
Contact Number: 1-888-255-1041
Email: [email protected]
For information on our warranty, visit ring.com/legal
© 2021 Ring LLC or its affiliates. Ring and all related marks are trademarks of Ring LLC or its affiliates.


Home Security Begins at the Front Door
Your new Ring Video Doorbell is the start of a Ring of Security around your entire property.
Now, you’ll always be connected to your home, so you can watch over your property and answer the door from anywhere.
See who’s at your door, prevent crime and protect your home – all from your phone, tablet, or PC.
Charge the provided battery.
Charge the provided battery
First, fully charge the battery by plugging it into a power source using the provided orange cable.
The small light on top will glow green once fully charged.
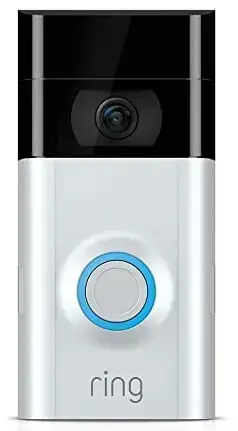
If you can’t wait to play with your Ring Doorbell, go ahead and set it up. But, we recommend fully charging it before installation.
Insert the battery
After charging, insert the battery into the bottom of your Ring Doorbell until it clicks into place.
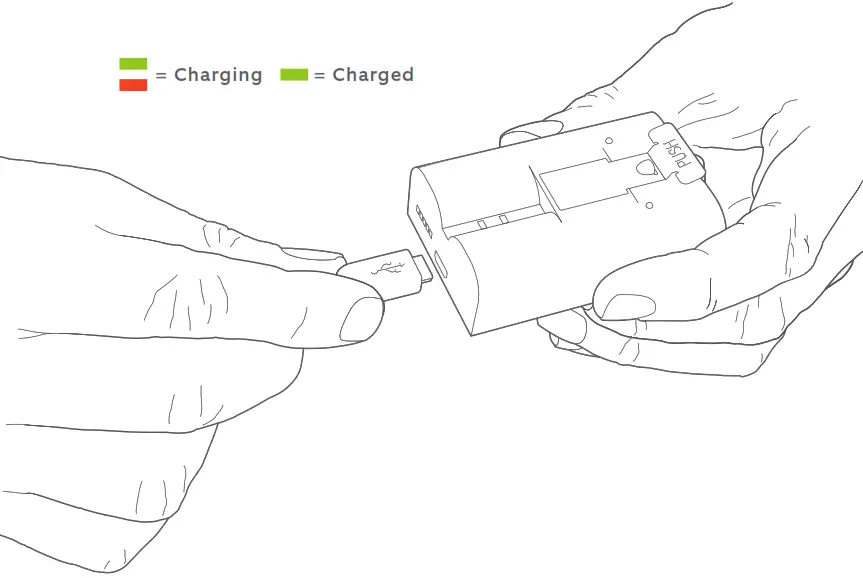
Set up your Ring Video Doorbell 2 in the Ring app.
Download the Ring app
The Ring app will walk you through setting up and managing your Ring Doorbell.
Search for “Ring” in one of the app stores below, or visit: ring.com/app.
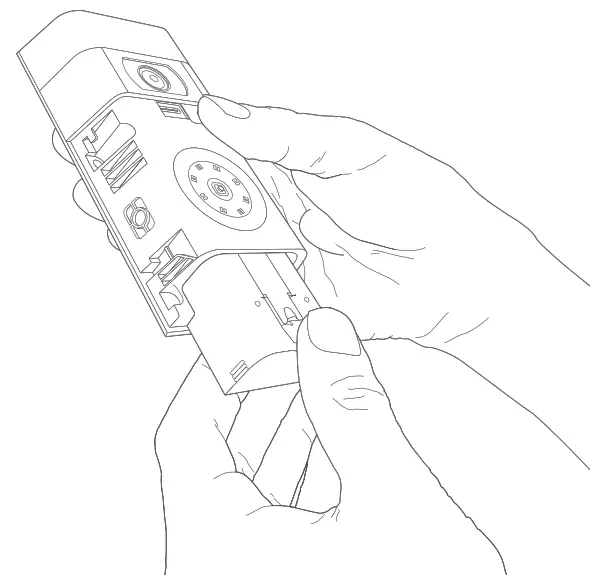

Set up your Ring Video Doorbell near your router
In the Ring app, select Set Up a Device.
When prompted, select Ring Video Doorbell 2 and follow the in-app instructions.
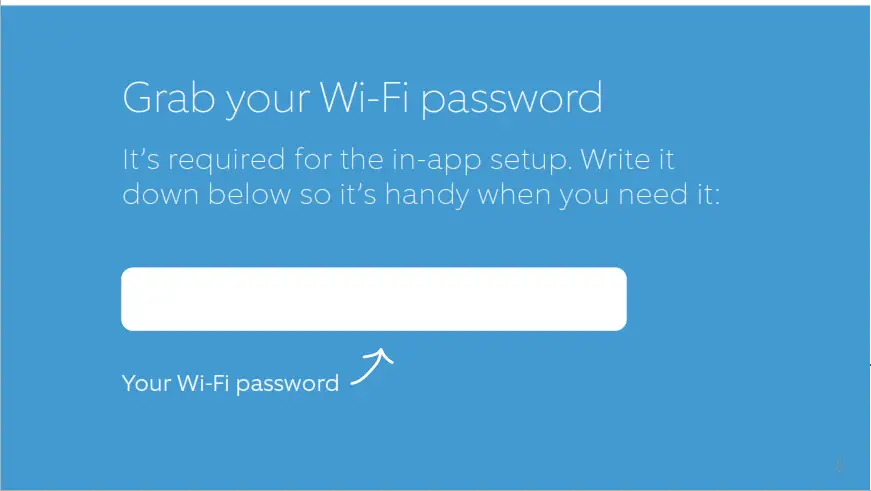
Try it out!
After setup, push the button on the front of your Ring Doorbell to see video from the camera in the Ring app.
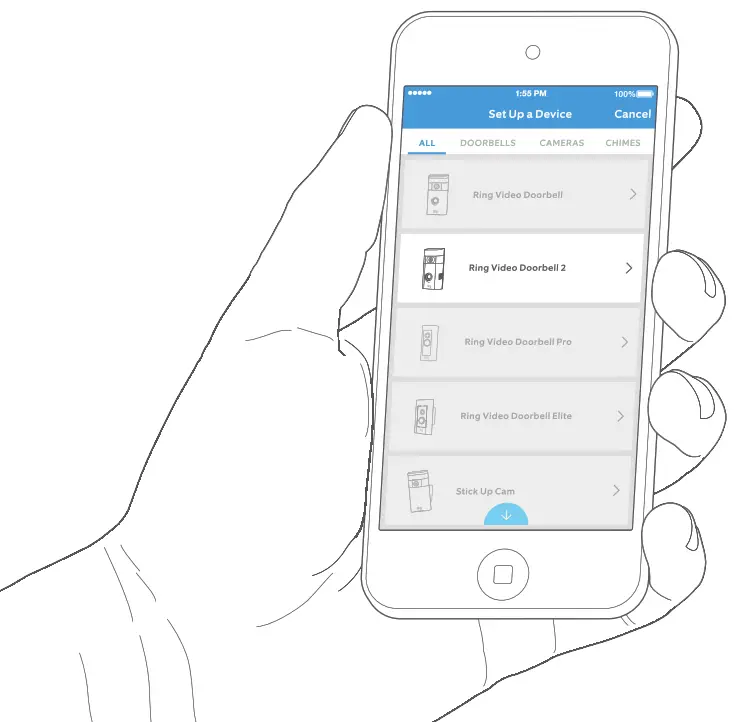
Next, test the video quality where you will install your Ring Doorbell.
Everything look good? Continue to the next section.
Something not right? Jump ahead to the troubleshooting section.
Install your Ring Video Doorbell 2 on the wall.
Select an install height
Install your Ring Doorbell four feet off the ground for optimal performance.
If you’re connecting to an existing doorbell wiring that’s higher than four feet, thus limiting where you can install Ring Doorbell, use the provided wedge mount to angle your Ring the Doorbell down.
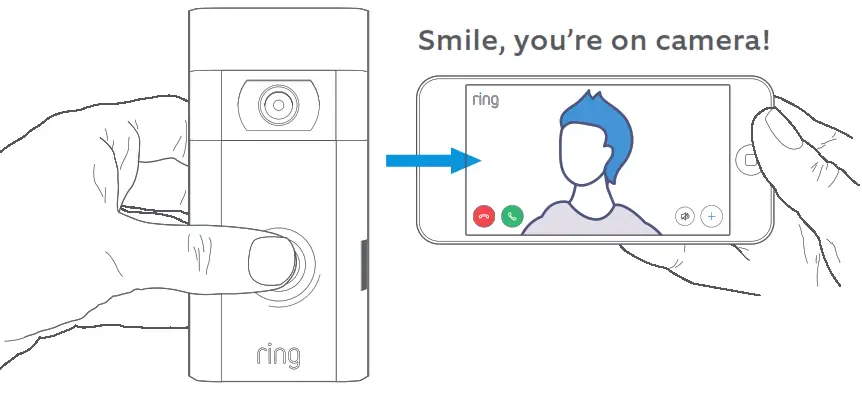
Remove your existing doorbell (optional)
If replacing an existing doorbell, shut off power at the breaker. Then remove it from the wall and disconnect the wires.
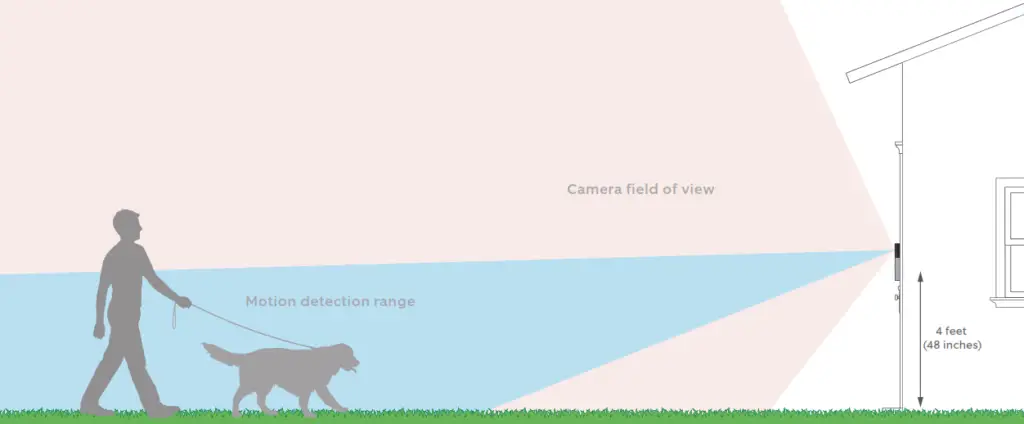
 If wiring your Ring Doorbell to an existing doorbell, a transformer with a voltage of 8–24VAC is required. If wiring directly to a transformer, a resistor must be used.
DC transformers and most intercoms are not supported.
Install the diode (optional)
If you’re wiring your Ring Doorbell to a digital doorbell – you’ll know it’s digital if it plays a synthesized melody – then install the included diode.
If your existing doorbell is mechanical, DO NOT use the diode, as it can damage your existing doorbell.
Not sure? Visit ring.com/diode

 The lighter band on your diode should be on the same side as the wire that runs to the “Front” terminal on your bell.
If you don’t know which side this is, don’t worry, since wiring the diode the wrong way can’t do any harm.
If your bell doesn’t ring when pushing the button on your Ring Doorbell, just reverse the wires on the back of your Ring Doorbell and try again.
Insert the mini-level
Insert the mini-level into your Ring Doorbell to make sure it’s even when you install it.
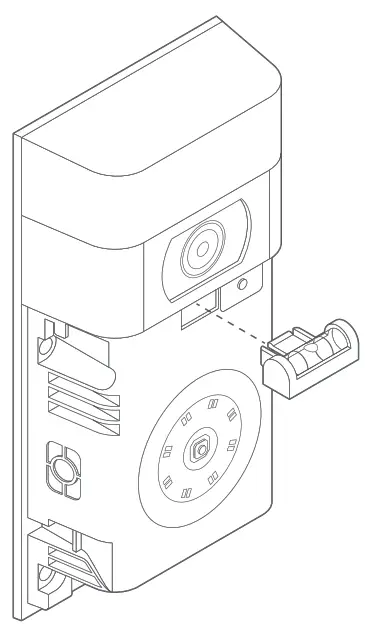
Install anchors (optional)
If installing on stucco, brick, or concrete, mark 4 drill holes. Use the provided bit to drill holes in your wall and insert the anchors.
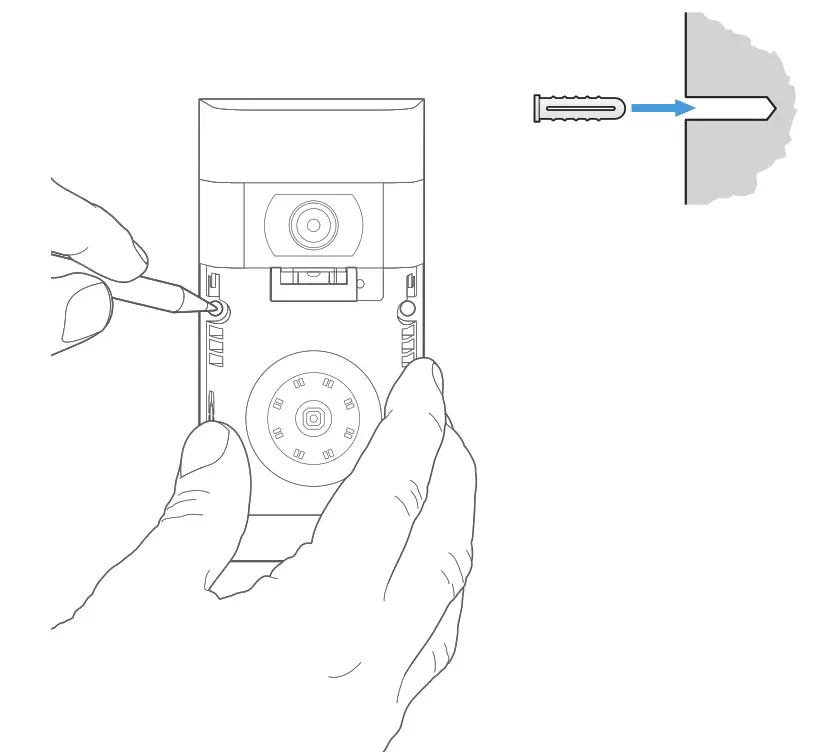
If you’re installing on wood, skip this step and toss the anchors in that drawer of stuff you ever use.
Connect the Wires (optional)
Connect the wires coming out of your wall to the screws on the back of your Ring Doorbell.
Either wire can connect to either screw. The order doesn’t matter.
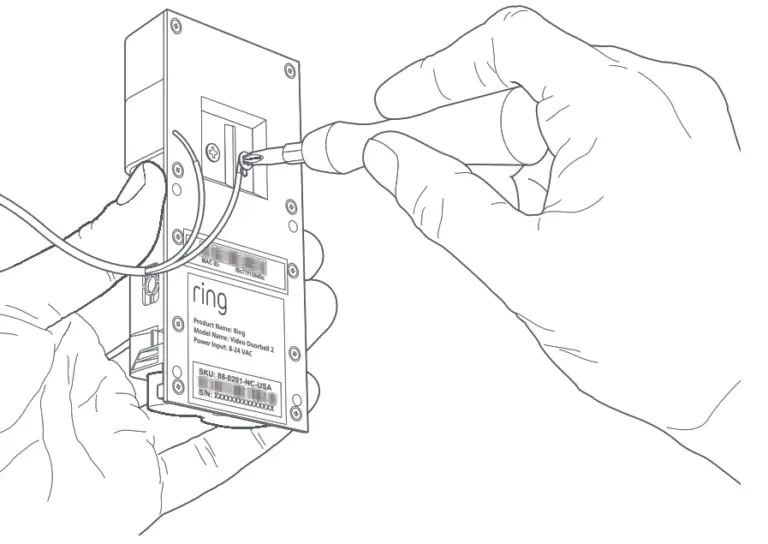
Attach the wire extensions (optional)
If you have trouble connecting the wires coming out of your wall to the back of your Ring Doorbell, use the provided wire extensions and wire nuts.
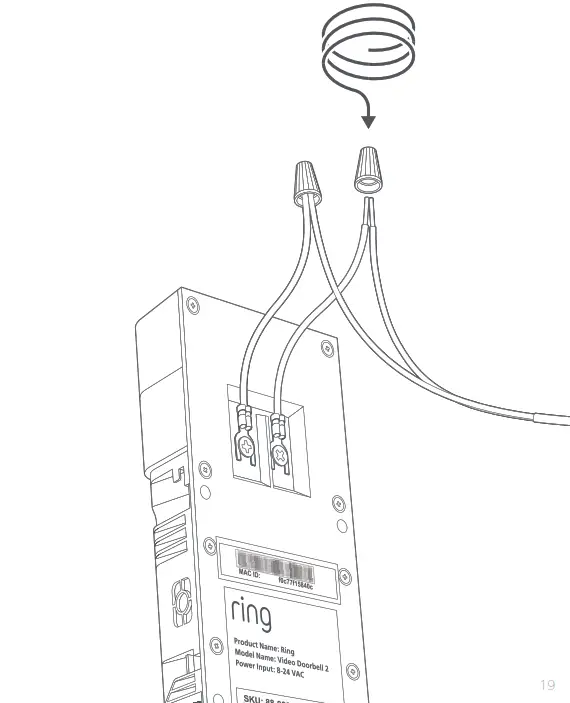
Screw it in
Feed all the wires (and the wire nuts, if you used them) into your wall and secure your Ring Doorbell on the wall using four screws.
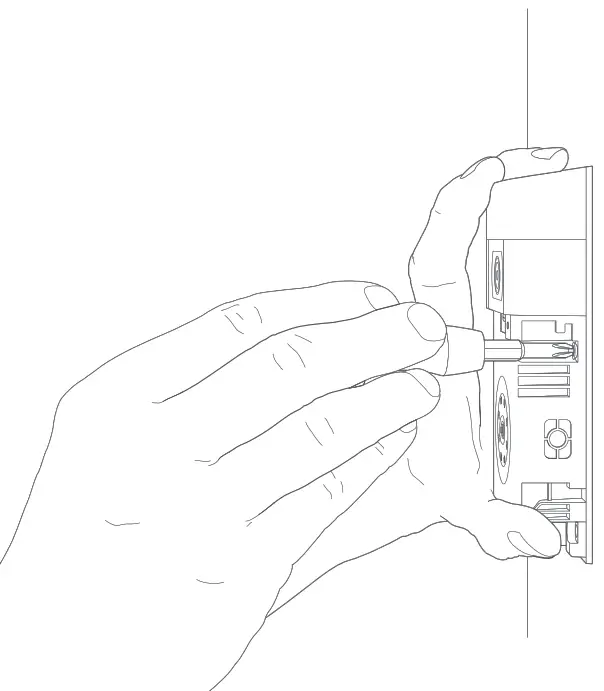
Install the faceplate
Place one of the provided faceplates on your Ring Doorbell by slotting it in at the top and clicking it into place.
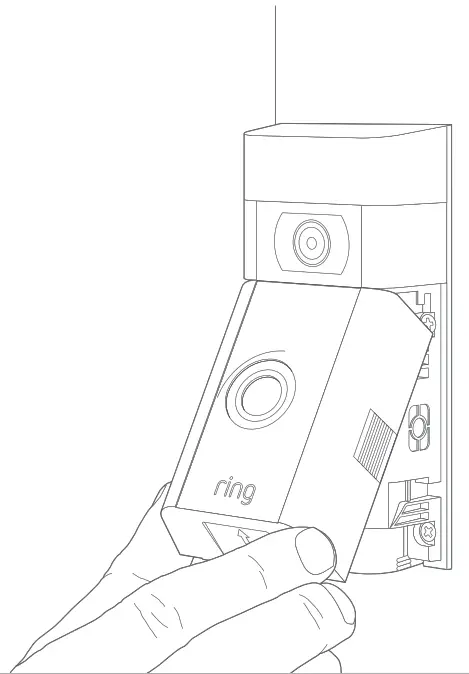
Secure with a security screw
Lastly, use one of the provided security screws and the star-shaped end of the screwdriver bit to secure the faceplate.
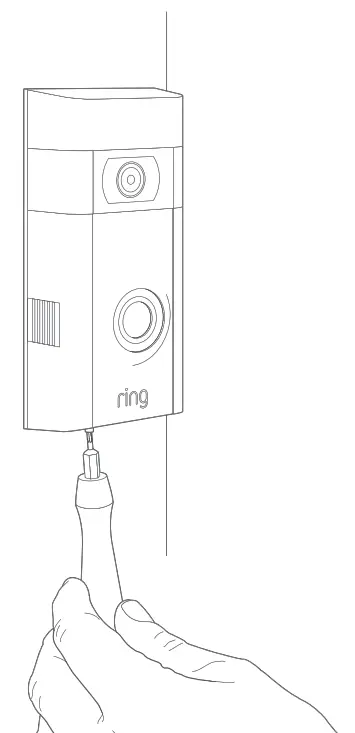
Check out all the exciting features.
After setting up your Ring Doorbell in the app, select it
This will bring you to the Device Dashboard, where you can change settings and access various features.
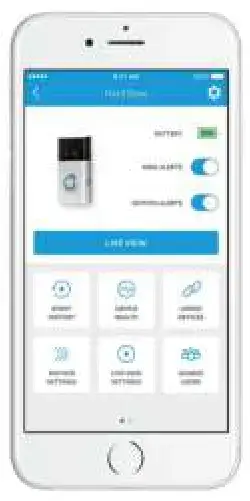
Ring Alerts are notifications you receive when someone presses the button on the front of your Ring Doorbell.
Motion Alerts are notifications you receive when movement is detected within your Motion Zones.
Switch these alerts on or off on this screen.

Shared Users
Select Shared Users to let family or friends answer live events and view recordings (if the recording is enabled).

Motion Settings
Select Motion Settings to enable and customize your motion detection settings.

Device Health
Visit Device Health to diagnose any problems you run into with your Ring Doorbell.

Event History
View a log of all the events captured by your Ring Doorbell in Event History.
Answering your door

When someone is at your door, you can access these features:
![]() Two-way Talk – Speak to visitors and hear what they have to say.
Two-way Talk – Speak to visitors and hear what they have to say.
![]() Microphone – Mute or unmute your mic.
Microphone – Mute or unmute your mic.
![]() Speaker – Mute or unmute audio in the app.
Speaker – Mute or unmute audio in the app.
![]() Ring Neighborhoods – Share suspicious events with your neighbors.
Ring Neighborhoods – Share suspicious events with your neighbors.
Ring Video Recording

This optional feature saves recordings of every event your Ring Doorbell captures.
You can access these events on any device running the Ring app or by logging into your account at: ring.com/activity
Learn more at: ring.com/video-recording

Your new Ring Doorbell includes a free trial of Ring
Recording for you to enjoy. Watch your email inbox for important announcements about this service.
Having trouble?
Here are some answers…
I’m having trouble completing the in-app setup
When the in-app setup fails, look at the front of your Ring Doorbell. The light indicates the issue.
 Top Flashing White means your WiFi password was entered incorrectly.
Select your Wi-Fi network in your phone settings, select the option to forget it, then reconnect to it again to confirm that you’re using the correct password during setup.
 Right Flashing White means your Ring Doorbell may be too far from your router to get a decent signal. Repeat set up in the same room as your router. If this works, then you may need to get a Chime Pro to boost the Wi-Fi signal to your Ring Doorbell.
Learn more at: ring.com/chime-pro.
 Left Flashing White indicates a possible issue with your internet connection.
Unplug your modem or router for 40 seconds, plug it back in and then repeat the setup process.
 Spinning White indicates that your Ring Doorbell is in setup mode. You’ll need to follow the instructions in the Ring app. When prompted, connect to the Wi-Fi
the network being broadcast by your Ring Doorbell.
 Nothing In this case, repeat setup and note the resulting pattern. If the front light never does anything, then you likely need to charge the battery.
Why can’t I find the temporary Ring network on my phone?
Sometimes your phone fails to pick up the temporary
Ring network. If this happens, go to your phone settings, turn off your Wi-Fi connection, wait 30 seconds and turn it back on. If the Ring network still fails to appear, ensure that the battery in your Ring Doorbell is fully charged.
If none of the above helped…
Perform a hard reset on your Ring Doorbell by holding down the setup button for 15 seconds, waiting 30 seconds, and repeating the setup process.
Turn off cellular data and Bluetooth on your mobile device and try again.
Try performing set up on a different mobile device.
Why isn’t my internal doorbell ringing properly when someone presses the button on my Ring?
Make sure the circular light on the front of your Ring is glowing white to confirm that it’s wired correctly.
If your internal doorbell is digital (which means it produces a synthesized melody), make sure you installed the provided diode.
If you have installed the diode, it may be installed backward. Simply reverse the wiring on the back of your Ring Doorbell and press the front button again.
If your internal doorbell is mechanical (which means it has a physical bell and makes a classic “ding dong” sound), then make sure you didn’t install the diode.
Visit ring.com/diode for installation assistance.
Why can’t visitors hear me on my
Ring when I talk through the app?
If you’re on an iPhone or iPad, check the microphone permission on your device. Select Settings, find Ring, and select it. Lastly, make sure the switch next to
Microphone is toggled on.
If you’re on an Android device, go to Settings > Application/Apps > Application Manager > Ring > Permissions. Ensure everything here is on.
If you don’t see the Microphone option, then uninstall and reinstall the Ring app. When prompted to allow microphone access, choose “Allow.”
I’m not receiving motion alerts
First, make sure you’ve configured Motion Detection, and that Motion Alerts are turned on (see pg. 24).
To further troubleshoot issues with not receiving notifications, select Device Health in the Ring app and then select Troubleshoot Notifications.
Why is my video and/or audio quality poor?
First, determine the cause. Remove your Ring Doorbell and bring it inside near your router. Press the front button on your Ring Doorbell and look at the video in the Ring app.
If you get good video quality near the router, you need to extend your Wi-Fi signal.
We recommend Chime Pro to boost the signal to your Ring Doorbell. Learn more at: ring.com/chime-pro.
If video quality is still poor near your router, test your internet speed by selecting Device Health in the Ring app, then Test Your Wi-Fi.
The instructions in the app will help you diagnose and solve any issues related to poor video quality.
© 2017 Bot Home Automation, Inc.
RING, ALWAYS HOME, and CHIME are trademarks of Bot Home Automation, Inc.


