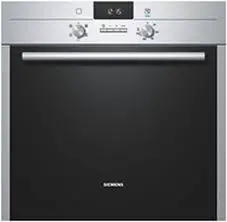
9001643607 (010414) SN25EI38CM

Before using for the first time, read the operating instructions.
Setting up Home Connect
Tip: Connect your appliance to a mobile device. You can conveniently change all settings via the Home Connect app.
- Install the Home Connect app on your mobile device and follow the instructions.
- Scan the QR code using the Home Connect app.


Overview of water hardness settings
You can find an overview of the water hardness values that can be selected here.
A table of country-specific units can be found in the instruction manual.
| Hardness range | mmol/l | Setting value |
| Soft | 0 – 1.1 | H:00 |
| Soft | 1.2 – 1.4 | H:01 |
| Medium | 1.5 – 1.8 | H:02 |
| Medium | 1.9 – 2.1 | H:03 |
| Medium | 2.2 – 2.9 | H:04 |
| Hard | 3.0 – 3.7 | H:05 |
| Hard | 3.8 – 5.4 | H:06 |
| Hard | 5.5 – 8.9 | H:07 |
Setting the water softening system
- Press
 .
. - To open the basic settings, press Setup 3 sec. for 3 seconds.
• The display shows H:xx.
• The display shows .
. - Press – or + repeatedly until the right water hardness has been set.
- To save the settings, press Setup 3 sec. for 3 seconds.
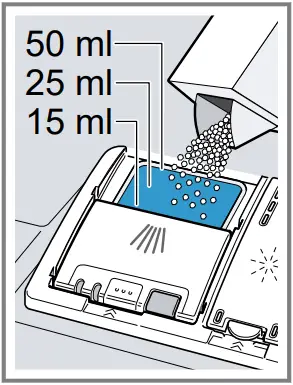
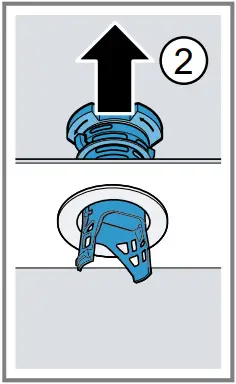
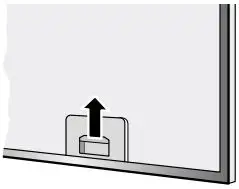
1 Adding special salt ![]()
To avoid damage to the appliance, only add special salt to the dispenser for special salt just before the programme starts.
1. Unscrew the lid of the dispenser for special salt and remove.
2. On initial start-up: Fill the dispenser right up with water.
3. Add the special salt to the dispenser. The water in the dispenser is displaced and forced out. Never add detergent.
4. Place the lid back on the dispenser and turn to close.
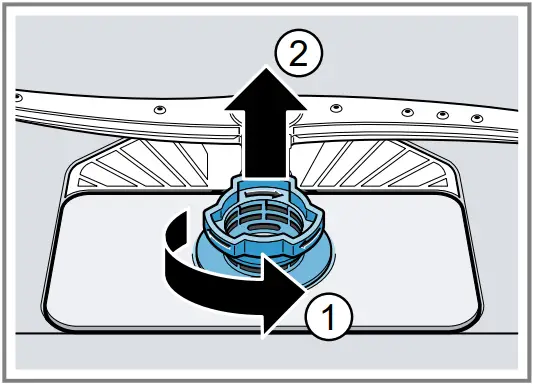
2 Adding rinse aid ![]()
1. Press the catch on the lid of the dispenser for rinse aid (1) and lift (2).

2. Add rinse aid up to the max mark.
3. Close the lid of the dispenser for rinse aid.
• The lid clicks into position.
3 Adding detergent ![]()
1. Add the detergent to the dry detergent dispenser.
2. Close the lid of the detergent dispenser.
• The lid clicks into position.

Programmes
The programme data has been measured in the laboratory according to European standard EN 60436. The consumption figures depend on the programme and additional function selected.
The running time will change if the rinse aid system is switched off or rinse aid needs to be added.
| Programme | 1) Duration [h:min] 2) Energy [kWh] 3) Water [l] |
Intensive 70° |
1) 2:10 – 2:15 2) 1,300 – 1,350 3) 9,0 – 12,0 |
| Auto 45-65° |
1) 1:45 – 2:45 2) 0,750 – 1,250 3) 5,0 – 14,0 |
Eco 50° |
1) 4:35 2) 0,691 3) 7,4 |
| Silence 50 1 |
1) 4:05 2) 0,950 3) 6,7 |
Glass 40° |
1) 1:40 – 1:45 2) 0,700 – 0,750 3) 10,0 – 13,5 |
Speed 65° |
1) 1:00 2) 1,200 3) 10,0 |
Speed 45° |
1) 0:35 2 2) 0,700 3) 10,0 |
Machine Care |
1) 2:15 2) 1,350 3) 13,0 |
Favourite |
1) 0:15 – 0:15 2) 0,050 – 0,050 3) 4,0 – 4,0 |
| 1 Suitable programme for running at night: it takes longer, but is extremely quiet. 2 half standard load |
|
How to use your appliance
- Load the tableware.
Only clean tableware that is suitable for dishwashers. Remove large remnants of food from the tableware. Check that the spray arms can rotate freely. - Add detergent.
- Switch on the appliance .
- Select the programme.
- Start the programme.
- Remove the tableware at the end of the programme.
- To cancel the programme, press Reset 4 sec. for approx. 4 seconds.
The programme is cancelled and ends after approx. 1 minute.
Cleaning filters
1. After each wash check the filters for residue.
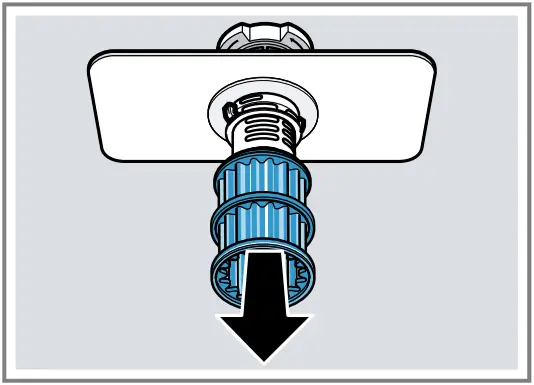
2. Turn the coarse filter anticlock-wise (1) and remove the filter system (2).
3. Pull down the micro filter to remove.
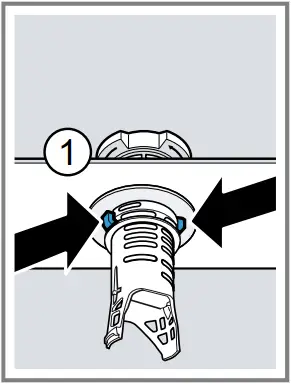
4. Press the locking catches (1) together and lift the coarse filter out (2).
5. Clean the filter elements under running water.
6. Re-assemble the filter system.
7. Insert the filter system into the appliance and turn the coarse filter clockwise. Make sure that the arrow markings match up.
Cleaning spray arms
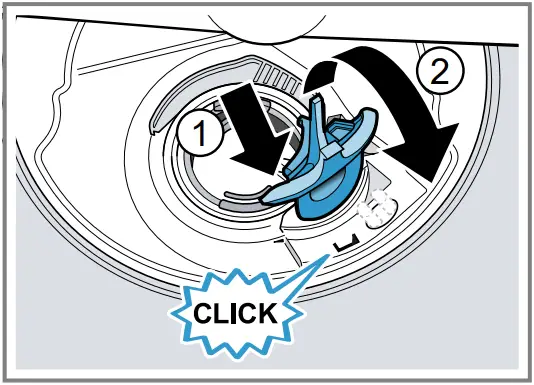
1. Unscrew the upper spray arm (1) and pull down to remove (2).
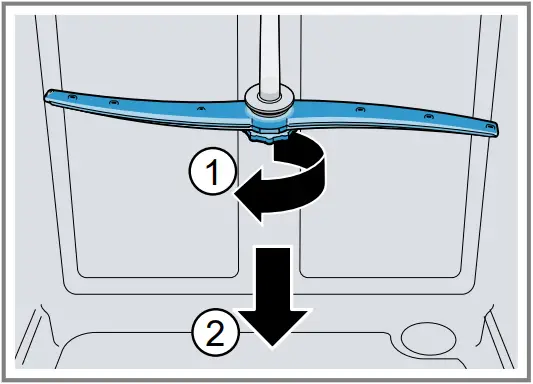
2. Pull up the lower spray arm to remove.
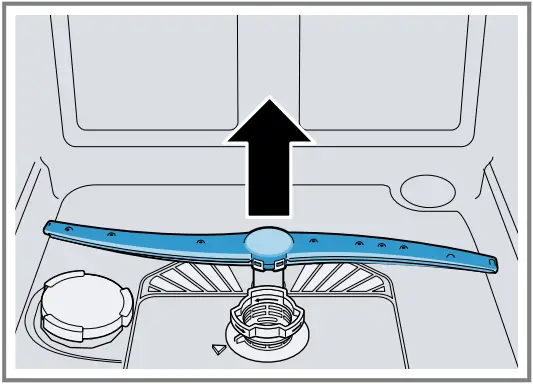
3. Check the outlet nozzles on the spray arms for blockages under running water and remove any foreign bodies.
4. Insert the lower spray arm.
• The spray arm clicks into position.
5. Insert the upper spray arm and screw it firmly in place.
Clean wastewater pump
1. Disconnect the appliance from the power supply.
2. Remove the filter system.
3. Scoop out any water.
4. Prise off the pump cover using a spoon and grip it by the crosspiece.
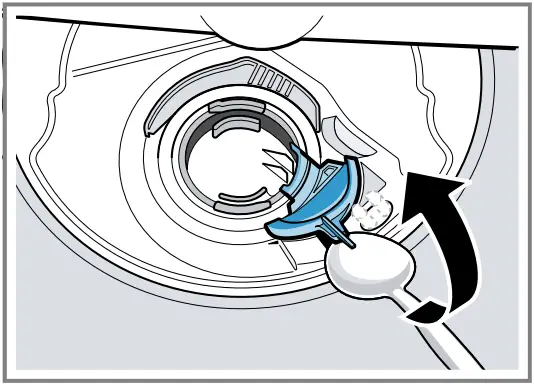
5. Lift the pump cover inwards at an angle and remove.
6. Remove any remnants of food and foreign bodies in the area of the impeller.
7. Insert the pump cover (1) and press down (2).
• The pump cover clicks into position.
8. Install the filter system.
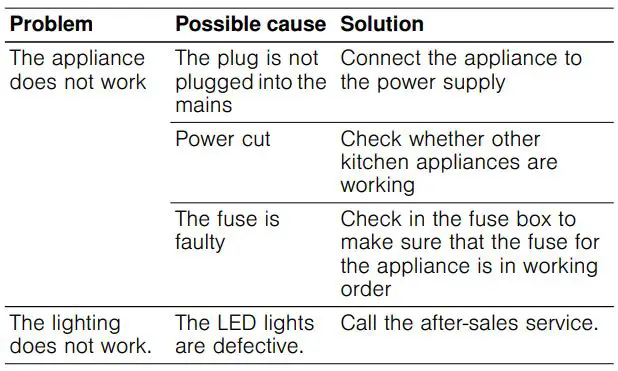
Troubleshooting
| Fault | Cause and troubleshooting |
| E:32-00 will light up alternately or indicator for water supply lights up. | Supply hose is kinked. |
| Water tap is turned off. |
|
| Water tap is jammed or furred up. The flow rate must be at least 10 l/min when the water supply is open. |
|
| The filters in the water connection of the supply or AquaStop hose are blocked. 1. Switch off the appliance. 2. Pull out the mains plug. 3. Turn off the water tap. 4. Unscrew the water connection. 5. Remove the filter from the supply hose 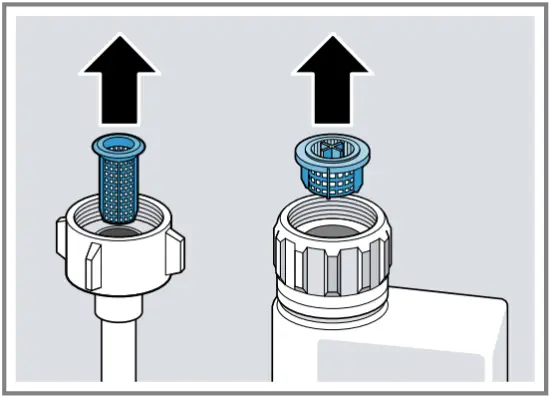
6. Clean the filter. |
|
| E:92-40 will light up alternately. | Filters are soiled or blocked. |
| E:61-02 will light up alternately. | Wastewater pump is blocked. |
| Cover of the wastewater pump is loose |
|
| Remnants of food on tableware. | Tableware is placed too close together or basket is overfilled. 1. Arrange tableware with sufficient space in between. The spray jets must reach the surfaces of the tableware. 2. Avoid points of contact. |
| Spray arm rotation is blocked. |
|
| Spray arm nozzles are blocked. |
|
| Filters are soiled. |
|
| Filters are inserted incorrectly and/or not engaged. 1. Insert the filters properly. 2. Engage the filters. |
|
| Washing programme selected too weak. |
|
| Removable streaks are present on glasses, glassware with a metallic appearance and cutlery. | Amount of rinse aid to be dispensed is set too high. |
| No rinse aid has been added. |
|
| Rust spots on cutlery. | Cutlery is not sufficiently rust-resistant. Knife blades are often more severely affected. |
| Cutlery may also rust if washed together with rusting items. |
|
| Detergent residue is present in the detergent dispenser or the tablet collecting tray. | Spray arms were blocked by tableware so detergent was not rinsed out. |
![]()
User Manual
| the Gebrauchsanleitung | it manual utente |
| fr Manuel d’utilisation | NL User manual |

http://siemens-home.bsh-group.com/welcome
Register your product on My Siemens and discover exclusive services and offers.
siemens-home.bsh-group.com/welcome The future moving in.
Observe the following safety instructions.
1.1 General instructions
Read this manual carefully.
Keep the operating instructions and product information for future reference or for subsequent owners.
Do not connect the device in case of transport damage.
1.2 Destination of the device
Only use the device:
for cooling and freezing food and for preparing ice cubes.
for domestic use and in enclosed spaces within the domestic environment.
to an altitude of 2000 m above sea level.
1.3 Restriction of users
This appliance can be used by children aged 8 years and above and persons with reduced physical, sensory or mental capabilities or lack of experience and/or knowledge if they have been given supervision or instruction concerning the use of the appliance in a Safeway and understand the resulting hazards. understood. Children must not play with the appliance. Cleaning and user maintenance shall not be made by children unless they are supervised.
Children from 3 years old and under 8 years old are allowed to fill and empty the fridge/freezer.
1.4 Safer transport
![]() WARNING ‒ Risk of injury!
WARNING ‒ Risk of injury!
The heavyweight of the device can cause injuries when lifted.
- Do not lift the device alone.
Secure installation
![]() WARNING — Risk of electric shock! Improper installations are dangerous.
WARNING — Risk of electric shock! Improper installations are dangerous.
- Only connect and use the device in accordance with the information on the type plate.
- Only connect the device to a mains supply with an alternating current via a properly installed earthing socket.
- The protective earth system of the electrical house installation must be installed in accordance with the electrical engineering regulations.
- Never power the device via an external switching device, e.g. a time switch or remote control.
- When the device is installed, the mains plug of the mains connection cable must be freely accessible, or if free access is not possible, an all-pole disconnecting device must be installed in the permanently installed electrical system in accordance with the installation instructions.
- When setting up the device, make sure that the power cord is not pinched or damaged.
Damaged power cord insulation is dangerous. - Never bring the connecting cable into contact with heat sources.
![]() WARNING — Risk of explosion!
WARNING — Risk of explosion!
If the ventilation openings of the device are closed, a flammable gas-air mixture can form in the event of a cold circuit leak.
- Do not block ventilation openings in the housing of the device or in the installation housing.
![]() WARNING — Risk of fire!
WARNING — Risk of fire!
Using an extended power cord and unauthorized adapters is dangerous.
- Do not use extension cords or multiple sockets.
- If the power cord is too short, contact customer service.
- Only use adapters approved by the manufacturer.
Portable mobile multiple power outlets or portable power supplies can overheat and cause a fire.
- Do not place portable mobile multiple power outlets or portable power supplies on the back of the devices.
Safe use
![]() WARNING — Risk of electric shock!
WARNING — Risk of electric shock!
Penetrating moisture can cause an electric shock.
- Only use the device in closed rooms.
- Never expose the device to excessive heat and humidity.
- Do not use a steam cleaner or high-pressure cleaner to clean the appliance.
![]() WARNING — Risk of suffocation!
WARNING — Risk of suffocation!
Children can pull packing material over their heads and become entangled and suffocate.
- Keep packaging material away from children.
- Do not let children play with packaging material.
Children can inhale or swallow small parts and choke. - Keep small parts away from children.
- Do not allow children to play with small parts.
![]() WARNING — Risk of explosion!
WARNING — Risk of explosion!
Damage to the refrigerant circuit can cause flammable refrigerants to leak and explode.
- Do not use mechanical devices or means other than those recommended by the manufacturer to accelerate defrosting.
- Loosen frozen food with a blunt object, eg with the handle of a wooden spoon.
Products with flammable propellants and explosive substances can explode, eg aerosol cans. - Do not store products with flammable propellants and explosive substances in the device.
![]() WARNING – Risk of fire!
WARNING – Risk of fire!
Electrical appliances inside the appliance can lead to a fire, e.g. heating appliances or electric ice-cream makers.
- Do not use electrical appliances inside the appliance.
![]() WARNING – Risk of injury!
WARNING – Risk of injury!
Bottles or cans of carbonated drinks may burst.
- Do not keep bottles or cans of carbonated drinks in the freezer compartment.
Injury to the eyes from leaking flammable refrigerant and harmful gases. - Do not damage the pipes of the refrigerant circuit and the
The device can tilt. - Do not stand or lean on the plinth, drawers, or doors.
![]() WARNING – Risk of burns!
WARNING – Risk of burns!
Parts on the back of the appliance become hot during use.
- Never touch the hot parts.
![]() WARNING – Risk of cold burns!
WARNING – Risk of cold burns!
Contact with frozen foods and cold surfaces can cause cold burns.
- Never put frozen food in your mouth after it has been taken out of the freezer compartment.
- Avoid prolonged skin contact with frozen foods, ice, and freezer compartment surfaces.
![]() CAUTION – Risk of health hazard!
CAUTION – Risk of health hazard!
Observe the following instructions to avoid contamination of foodstuffs.
- Opening the door for an extended period of time can lead to a significant increase in temperature in the compartments of the
- Clean surfaces that come into contact with food and accessible drainage systems regularly.
- Store raw meat and fish in suitable containers in the refrigerator in such a way that it does not come into contact with or drip onto other foodstuffs.
- If the refrigerator/freezer is left empty for a long time, switch off the appliance, defrost, clean and leave the door open to prevent mold from forming.
Parts of the device made of metal or with a metallic appearance may contain aluminum. When acidic foods come into contact with aluminum, aluminum ions can transfer to the foods. - Do not consume contaminated food.
Damaged device
![]() WARNING — Risk of electric shock!
WARNING — Risk of electric shock!
A damaged appliance or damaged power cord is dangerous.
- Never use a damaged device.
- Never pull on the power cord to disconnect the device from the power supply. Always pull the plug on the power cord.
- If the appliance or the mains cable is damaged, immediately unplug the mains cable from the socket or switch off the fuse in the fuse box.
- Contact customer service. -Page 111
Improper repairs are dangerous. - Only qualified personnel may carry out repairs on the device.
- Only original spare parts may be used to repair the device.
- If the power cord of this appliance is damaged, it must be replaced by the manufacturer, its service agent, or a similarly qualified person in order to avoid a hazard.
![]() WARNING ‒ Risk of fire!
WARNING ‒ Risk of fire!
If the pipes are damaged, flammable refrigerant and harmful gases can escape and ignite.

- Keep fire and ignition sources away from the device.
- Ventilate the room.
- Turn off the device. →Page 99
- Pull the mains plug out of the socket or switch off the fuse in the fuse box.
- Contact the service department. →Page 111
Preventing material damage
PAY ATTENTION!
Using the plinth, drawers, or appliance doors as a seat or step can damage the appliance.
- Not on the plinth, drawers, or doors standing or leaning.
Contamination with oil or grease can make plastic parts and door seals porous. - Keep plastic parts and doors sealing oil and grease-free.
Parts of the device made of metal or with a metallic appearance may contain aluminum. Aluminum reacts on contact with acidic foods. - No foodstuffs unpackaged in-store the device.
Environmental protection and savings
3.1 Disposing of the packaging
The packaging materials are environmentally friendly and can be reused.
- The individual components are on the kind of separate disposal.
3.2 Saving energy
If you follow these directions, your device will use less power.
Choice of installation location s Does not expose the device to di- direct sunlight.
Preventing material damage NL
Place the appliance as far as possible body from radiators, stove, and other heat sources:
– Keep a distance of 30 mm from electric or gas stoves.
– Keep a distance of 300 mm from oil and coal stoves.
Keep a small distance to the sidewall on.
Never open the external ventilation opening cover or close.
Save energy when using.
Remark: The arrangement of the equipment parts has no influence on the energy consumption of the appliance.
Open the device only briefly and close it carefully.
Never enter the ventilation openings Benin, or cover or close the ventilation grilles on the outside.
Transport refrigerated foodstuffs parts in a cool bag and put them in the appliance quickly.
Warm food and drinks first to cool, then place in the appliance.
To avoid the cold of the deep- to use frozen products, put them in the refrigerator compartment for thawing.
Always leave some space between the legs equipment and the back wall.
4 Set up and connect
4.1 Scope of delivery
After unpacking, check all parts for transport damage and the completeness of the delivery.
In case of complaints, please contact your dealer or our service → Page 111 contact on.
The delivery consists of:
NL Set up and connect
Freestanding device
Equipment and accessories
Assembly instructions
Instructions
Customer service overview
Warranty Supplement2
Energy label
Information about energy consumption and sounds
4.2 Criteria for the installation location
WARNING
Risk of explosion!
If the appliance is located in a room that is too small, a flammable gas-air mixture can form in the event of a leak in the cooling circuit.
- Only set the device to a space, which has a volume of at least 1 m3 per 8 g of refrigerant.
The amount of refrigerant is stated on the rating plate. →fig. 1 / 5
The weight of the device can be up to 120 depending on the model.
The surface must be stable enough to support the weight of the appliance.
Permissible room temperature
The permitted room temperature depends on the climate class of the device.
The climate class can be found on the type plate. →fig. 1 / 5
Climate- Permitted space class temperature SN 10 °C…32 °C
Depending on the device version
Not in all countries
| Climate class | Permitted space temperature |
| N | 16 °C…32 °C |
| ST | 16 °C…38 °C |
| T | 16 °C…43 °C |
The device is fully functional within the permitted indoor temperature.
If you use a device of the climate class SN at lower room temperatures, damage to the device up to a room temperature of 5 °C can be excluded.
4.3 Mounting the device
- The device is in accordance with the install the installation manual.
4.4 Preparing the device for the first use
- Remove the information material.
- Remove the protective film and transport safeguards, eg adhesive strips and cardboard.
- Cleaning the device for the first time. →Page 105
Connecting the appliance electrically
- Insert the mains plug of the appliance’s connecting cable into a socket in the vicinity of the appliance.
The connection data of the device can be found on the type plate. → fig. 1 / 5
2. Check the mains plug for tightness.
The device is now ready for use.
Getting to know your appliance nen
Device
Here you will find an overview of the components of your device. → Fig. 1
| a | Cooling compartment → Page 102 |
| b | Freezer compartment → Page 103 |
| 1 | Relief |
| 2 | Bottle rack → Page 97 |
| 3 | Storage drawer → Page 98 |
| 4 | Fruit and vegetable drawer → Page 98 |
| 5 | Rating plate → Page 112 |
| 6 | freezer drawer → Page 106 |
| 7 | Leveling foot |
| 8 | Control panel → Page 97 |
| 9 | Door rack for large bottles → Page 98 |
Remark: Differences between your device and the images may be based on equipment and size.
5.2 Control panel
You can set all functions of your device and obtain information about the operating status via the control panel. → Fig. 2
Getting to know your device NL
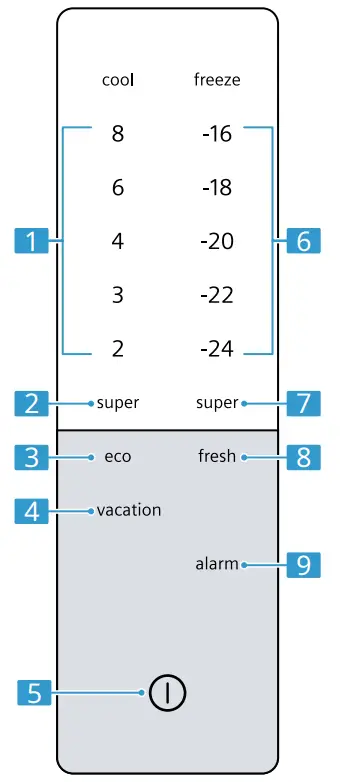
| 1 | Shows the set temperature of the refrigerator compartment in °C. |
| 2 | super (refrigerator compartment) switches Supercooling in or out. |
| 3 | Turn power saving mode on or off. |
| 4 | switches the holiday mode on or off. |
| 5 | turns on the device or from. |
| 6 | Shows the set temperature of the freezer compartment in °C. |
| 7 | (freezer compartment) switches Super Freeze on or off. |
| 8 | switches the Fresh mode in or out. |
| 9 | switches the warning wings signal off. |
Equipment
The equipment of your appliance depends on the model.
6.1 Shelf
To vary the shelves as desired, you can remove the shelf and put it back in a different position. → “Remove platform”, page 106
6.2 Bottle rack
Store bottles safely on the bottle rack.
To vary the bottle rack as desired, you can remove the bottle rack and put it back in a different location. → “Remove platform”, page 106
NL The Ministry in essence
6.3 Storage drawer
Lower temperatures prevail in the storage drawer than in the refrigerator compartment. Temperatures below 0 °C may occur temporarily.
To achieve temperatures close to 0°C in the storage drawers set the refrigerator compartment temperature to 2°C.
Use the lower temperatures in the drawer to store food that spoils quickly, e.g. fish, meat, and sausage.
6.4 Fruit and vegetable drawer
Store fresh fruit and vegetables packed in the fruit and vegetable drawer. Store sliced fruits and vegetables covered or in an airtight container. Depending on the type of food and the amount, condensation may form in the fruit and vegetable drawer.
Remove the condensation water with a dry cloth. To ensure that the quality and aroma are preserved, you should store cold-sensitive fruit and vegetables outside the appliance at temperatures of approx. 8 °C to 12 °C, e.g. pineapple, bananas, citrus fruits, gherkins, zucchini, peppers, tomatoes, and potatoes.
6.5 Door racks
To vary the door rack as required, you can remove the door rack and place it in a different position.
→ “Remove Door Rack”, Page 106
Accessories
Use only original accessories. These are adapted to the device. The accessories of the device depending on the model.
egg tray Store eggs safely on the egg tray.
ice cube tray
Use the ice cube tray to make ice cubes.
Making ice cubes Use only drinking water to make ice cubes.
- Fill the ice cube tray ¾ full with drinking water and place it in the freezer compartment. Only loosen frozen ice cube trays with a blunt object, e.g. the handle of a spoon.
- To loosen the ice cube tray, twist the ice cube tray slightly or hold it briefly under running water.
The Ministry in essencetie
7.1 Switch on device
- Connect the appliance electrically.
→ Page 96
Remark: If the device was previously turned off via the control panel, 3 seconds keep pressed.
The appliance starts to cool.
A warning beep will sound signal and the temperature display flashes because the freezer compartment is still too warm. - Switch off the warning signal with.
a goes out as soon as the set temperature is reached. - Set the desired temperature.
→ Page 99
Notes on use
When you have set up the device switched on, it takes up to a few hours before the set temperature is reached.
Do not put food in the appliance until the set temperature has been reached.
The front sides of the housing are temporarily heated. This prevents condensation from forming in the area of the door seal.
When you close the door, pressure arises. The door will then be more difficult to open. Wait a moment until the negative pressure is compensated.
Switching off the machine
- Hold for 3 seconds.
Set temperature
Set fridge compartment temperature
- Press the desired temperature now.
The recommended temperature in the refrigerator compartment is 4 °C.
Set freezer temperature - Press the desired temperature.
The recommended temperature in the freezer compartment is −18 °C.
8 Additional Features
8.1 Supercooling
With Supercooling, the refrigerator compartment cools as cold as possible.
Switch on Super Cool before loading large quantities of food.
Remark: If Super Cool is on, there may be more noise.
Enable super cooling
- Press (refrigerator compartment).
a (refrigerator compartment) lights up.
Remark: After approx. 6 hours, the device switches to normal operation.
Switch off super cooling - (refrigerator compartment) press.
Automatic Super Freeze
With automatic Super Freezing, the freezer compartment cools significantly at a lower temperature than in normal operation. As a result, the food freezes faster to the core.
The automatic Super Freeze switches on when you place fresh food in the bottom freezer drawer starting from the right.
Automatic Super Freeze is activated at the factory. You can deactivate the automatic Super Freeze. When the automatic Super Freeze is on, (freezer compartment) lights up and there may be more noises.
The appliance switches to normal operation after the automatic Super Freeze has expired.
Activate Auto Super Freeze
- (freezer compartment) press and hold for 5 seconds. If there are 2 acoustic signals are heard, the automatic Super Freeze is activated.
Deactivate Automatic Super Freeze - (freezer compartment) press and hold for 5 seconds. If there are 3 acoustic signals are heard, the automatic Super Freeze is deactivated.
Auto Cancel Super Freeze - Press (freezer).
Manual Super Freeze
With Super Freezing, the freezer compartment cools as cold as possible.
Switch on Super Freeze 4 to 6 hours before loading a quantity of food from 2 kg into the freezer compartment.
To take advantage of the freezing power, use Super Freeze.
→ “Freezing power conditions gen”, Page 103
Remark: If Super Freeze is on, there may be more noise.
Manual Super Freeze switch
- Press a (freezer) lights up. (freezer).
Remark: After approx. 54 hours, the device switches to normal operation.
Manual Super Freeze
Switch off - Press (freezer).
Vacation mode
If you are away for a longer period of time, you can switch the device into energy-saving holiday mode.
CAREFULLY
Risk of health hazard!
While the holiday mode is switched on, the refrigerator compartment heats up. The increased temperature allows bacteria to multiply and spoil the food.
- When holiday mode is switched on so do not store food in the refrigerator compartment.
The device sets the temperatures automatically.
| refrigerator compartment | 14 °C |
| bottle compartment | the temperature on- altered |
| Freezer | the temperature on- altered |
Enable holiday mode
- impressions. burns.
Switch off holiday mode - impressions.
Energy Saving Mode
Energy-saving mode switches the device to energy-saving mode.
The device automatically changes the temperatures.
| refrigerator compartment | 8 °C |
| bottle compartment | the temperature on- altered |
| Freezer | −16 °C |
Energy Saving Mode switch
- impressions. is lit.
Energy Saving Mode
Switch off - impressions.
Fresh mode
To keep the food fresh for longer, you can switch on the fresh cooling mode of the appliance.
The device automatically changes the temperatures.
| refrigerator compartment | 2°C |
| bottle compartment | the temperature on- altered |
| Freezer | the temperature on- altered |
Enable fresh mode
- impressions. is lit.
Disable fresh mode - impressions.
Sabbath Mode
So that you can also use the device on Sabbaths, Sabbath mode disables all functions that are not absolutely necessary.
The following functions are disabled during Sabbath mode:
Supercooling
Automatic Super Freeze and manual Super Freeze
Alarm
Indoor lighting
Acoustic signals
Messages on the control panel Neel
Remark: During Sabbath mode, the control panel backlight turns off. burns with reduced brightness.
Enable Sabbath Mode pressed for 15 seconds
- until an acoustic signal sounds. burns.
Remark: After approx. 80 hours, the device switches to normal operation.
Disable Sabbath Mode - pressed for 15 seconds until an acoustic signal sounds.
Alarm
Door alarm
If the door of the appliance is left open for a long time, the door alarm is activated.
A warning signal sounds, flashes, and the temperature display of the corresponding compartment flashes.
Disable door alarm
- Close or open the appliance door alarm to press.
a The warning signal is off switched.
Temperature alarm
When it is too hot in the freezer compartment, the temperature alarm is activated.
A warning signal sounds, the set temperature (freezer compartment), and flash alarm
![]() CAREFULLY Risk of health hazard!
CAREFULLY Risk of health hazard!
When defrosting, bacteria can multiply and the frozen food can go bad.
- Half or completely defrosted frozen were not refreezing.
- Do not cook or roast the food until freeze again.
- The maximum retention time no longer take full
The temperature alarm may activate in the following cases:
The appliance is in user names.
Do not put food in the appliance until the set temperature has been reached.
Large amounts are packed food. Switch on Super Freeze before placing large quantities of food in the appliance.
The freezer compartment door is too long opened.
Check whether the frozen product is partially or completely thawed.
Disable temperature alarm
- a The warning signal is off switched.
atelngerar compartment
In the refrigerator compartment, you can store meat, sausage, fish, dairy products, eggs, ready meals, and bread and pastries.
The temperature is adjustable from 2 °C to 8 °C.
The cold storage also allows you to store slightly perishable foodstuffs in the short or medium term. The lower the temperature selected, the longer the food will remain fresh.
Tips for storing food in
Ira rungaretoe ceenpaqmant
Only fresh and undamaged clearing out resources.
Store the food in the airtightly packed or covered.
Leave warm food and drinks cool down first.
Keep the manufacturer’s instructions the best before date or use date.
Cold zones in the refrigerator compartment
The air circulation in the refrigerator compartment creates different cold zones.
Coldest zone
The coldest zone is between the arrow stamped on the side and the shelf underneath.
Tip: Store quickly perishable food in the coldest zone, e.g. fish, sausage and meat.
Warmest zone
The warmest zone is at the very top of the door.
Tip: Store less sensitive foods in the warmest zone, eg hard cheese and butter. As a result, the aroma of the cheese develops better and the butter remains spreadable.
freezer compartment
You can store frozen food, freeze food and make ice cubes in the freezer compartment.
The temperature is adjustable from -16 °C to -24 °C.
Long-term storage of foodstuffs should be at a temperature of -18 °C or lower.
Freezing allows you to store perishable foods for a long time. The low temperatures slow down or stop spoiling.
Freezing capacity
The freezing capacity indicates which amount of food can be frozen to the core in how many hours.
Information about the freezing capacity can be found on the type plate. -fig
Conditions for freezing capacity
I.Approx. 24 hours before loading fresh food, switch on Super Freeze.
— ‘Manual Super Freeze switch”, page 100 2. Place the food in the bottom freezer drawer, starting from the right.
Fully use freezer
compartment volume Find out how to put the maximum amount of frozen food in the freezer compartment.
- Remove all equipment.
— Page 106 - Store the food directly on the shelves and the bottom of the freezer compartment.
Tips for storing food in the Ice: er compartment
Store the food in the air tightly packed.
Bring food to be frozen not in contact with frozen food.
The foodstuffs are side by side placed in the compartments or freezer drawers.
For larger quantities of fresh to freeze food quickly and carefully, place it in the lower freezer drawers.
For good air circulation in pushing the appliance into the freezer drawer as far as it will go.
11.4 Tips for freezing fresh foodlen
Only fresh and impeccable freezing foodstuffs.
Foods per portion frozen zen.
Prepared foods are better suitable than raw edible foods.
Wash vegetables before freezing reduce and blanch.
Wash fruit before freezing, destone and peel if necessary, add sugar or ascorbic acid solution if necessary.
Food suitable for freezing
Foods such as baked goods, fish and seafood, meat, game and poultry, eggs without shells, cheese, butter, quark, ready meals, and leftovers.
Food unsuitable for freezing
Foods are eg lettuce, radishes, eggs with shell, grapes, red apples and pears, yogurt, sour cream, Fraiche, and mayonnaise.
Pack frozen foods
Suitable packaging material and the right type of packaging largely preserve product quality and avoid freezer burn.
- Place the food in the packaging.
- Push the air out.
- Seal the package airtight to prevent the food from losing its flavor or drying out.
- Provide the packaging with the contents of the freezing date.
Shelf life of the frozen food at
The freezer calendar printed on it indicates the maximum storage time in months at a constant temperature of -18°C.
11.6 Defrosting methods for frozen food
![]() CAREFULLY Risk of health hazard!
CAREFULLY Risk of health hazard!
When defrosting, bacteria can multiply and the frozen food can go bad.
- Half or completely defrosted frozen were not refreezing.
- Do not cook or roast the food until freeze again.
- The maximum retention time no longer takes full advantage.
Animal foods in the defrost refrigerator compartment. e.g. fish me* Cheese and cottage cheese.
Bread at room temperature thaw.
Foodstuffs for direct con-preparation in the microwave, in the oven, or on the stove.
| Product | Storage time |
| fish, sausage, ready-made dishes, bread, and banquet | Up to 6 months Pine tree |
| Poultry, meat | Up to 8 Mon- Pine tree |
| Vegetable fruit | Up to 12 Mon- Pine tree |
Defrosting in the freezer compartment
Thanks to the fully automatic “NoFrost” system, the freezer compartment remains frost-free. Thawing is not necessary.
.1 Cleaning and maintenance love
Carefully clean and maintain your device to ensure that it continues to function properly for a long time.
The cleaning of inaccessible places must be carried out by the after-sales service. There may be costs associated with cleaning by the service department.
Preparing the device for cleaning
- Turn off the device.
Page 99 - Unplug the appliance from the
Pull the mains plug out of the socket or switch off the fuse in the fuse box. - Remove all food and store in a cool
If available, place cooling elements on the food. - Remove all equipment and accessories from the device.
Page 106 - Remove the shelf above the fruit and vegetable drawer.
Page 106
Cleaning the appliance
WARNING
Risk of electric shock!
Penetrating moisture can cause a shock.
- No steam cleaner or high pressure use cleaner to clean the appliance.
The liquid in the lighting, in the controls, or in the internal ventilation openings can be dangerous.
- The washing-up water must not be placed in the light, into the controls, or into the internal ventilation openings.
PAY AM N1101/4
Unsuitable cleaning agents can damage the surfaces of the device.
- No harsh scouring or dishwashing use sponges.
- No sharp or abrasive cleaning using chemicals.
- No strong alcoholic cleaning agents use chemicals. When you clean equipment and accessories in the dishwasher, they can become deformed or discolored.
- Never use equipment and accessories clean the rest in the dishwasher.
- Prepare device for cleaning. — Page 105
- Clean the appliance, the equipment, the accessories, and the door seals with a dishcloth, lukewarm water, and a little pH-neutral washing-up
- Dry thoroughly with a soft, dry
- Position the equipment and install the equipment parts.
- Connect the appliance electrically.
- Put the food in the appliance.
Removing parts
If you want to thoroughly clean the equipment, remove it from the device.
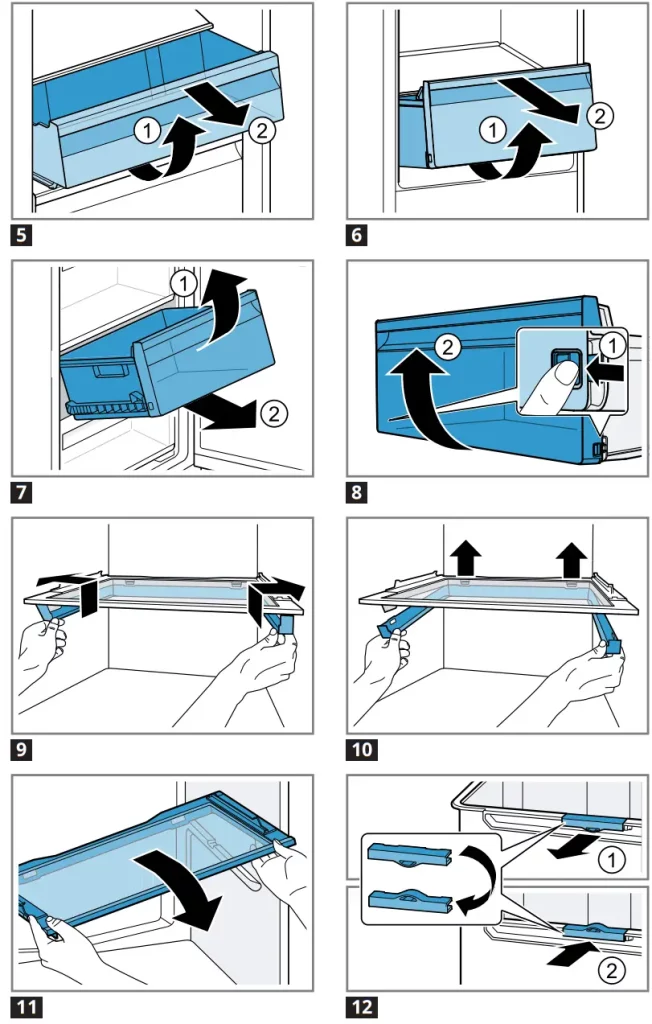
Remove platform
- Lifting the platform from behind 0 and deleting.
- faq MI
Remove door rack
Lift the door rack and widen it. - faq ■
Remove storage drawer
- Pull out the drawer as far as it will go.
- Lift the front storage drawer and relieve it. 0
- file ■
Remove fruit and vegetable drawer
- Pull out the fruit and vegetable drawer as far as it will go.
- Lift and remove the fruit and vegetable driver at the front
- file ■
Remove freezer drawer
- Pull out the freezer drawer as far as it will
- Lift and remove the freezer O drawer at the fent.
- file ■
Remove drawer front
You can remove the drawer in front of the fruit and vegetable drawer and the frozen food drawer for easier cleaning.
- Press the snap hooks on the side of the tray and @move it
drawer front by turning the drawer.
— Fig. ■
Disassembling device components
To thoroughly clean your device, you can disassemble certain parts from your device.
Remove the shelf above the fruit and vegetable drawer
- Remove the fruit and vegetable
—Page 106 - Remove the storage drawer
— Page 106 - To release the hooks on the sides, push the sealing frame up and
— Fig. - To release the rear hooks, lift the sealing frame and slide it
— Fig. PM - Remove the sealing frame.
- Lift the shelf above the fruit and vegetable drawer and turn it out to the side.
— Fig. MI
Troubleshooting
You can remedy minor faults on the device yourself. Before contacting customer service, please refer to the troubleshooting information. This way you avoid unnecessary costs. WARNING
Risk of electric shock!
Improper repairs are dangerous.
- Only qualified personnel may carry out repairs on the device to carry out.
- Only original spare parts may be used for the repair ration of the device.
- If the power cord of this appliance is damaged, it must be of risk must be replaced by the manufacturer, its service agent or another qualified person.
| Malfunction | Cause and Troubleshooting |
| The device does not cool, indicators and lighting are on. | The presentation light is turned on. 1. Press and hold (refrigerator compartment) for 50 seconds until a sound signal is heard. 2. After a short time, check whether your appliance is cooling. |
| Side panels of the appliance are hot. | No malfunction. Pipes run in the sidewalls, which become hot during the cooling process. Furniture against the appliance will not be damaged by the heat. No action is required. No action is required. |
| Temperature displays and burn. | A sensor is defective. Contact customer service. The service number can be found in the enclosed service overview. |
| A warning signal sounds, the temperature display (refrigerator compartment), and blink. | The refrigerator compartment door is open. Close the refrigerator compartment door. |
| The door alarm is turned on. |
| Malfunction | Cause and Troubleshooting |
| A warning signal sounds, the temperature display (freezer compartment), and blink. The door alarm is turned on. | The freezer door is open. Close the freezer compartment door. |
| A warning signal sounds, the set temperature ture (freezer compartment), and blink. The temperature alarm is enabled. | Various causes are possible. Press. a Turn off the alarm. |
| Ventilation grilles on the outside are covered. Remove blockages to the external ventilation grille ter. |
|
| Larger quantities of fresh foodstuffs have been placed in storage. Do not exceed the freezing capacity. → “Freezing capacity”, page 103 |
|
| Set temperature ture is not reached. Fully automatic de- thaw doesn’t work more. |
The freezer compartment door was open too long. There is a lot of ice on the evaporator (cold generator) in the NoFrost system. Required: Frozen foods are well insulated and stored in a cool place. 1. Switch off the device. →Page 99 2. Disconnect the device from the power supply. Unplug the power cord from the socket or switch off the fuse in the meter box. 3. Contact customer service. The service number can be found in the enclosed service overview. |
| Temperature varies a lot depending on the setting. | Various causes are possible. 1. Switch off the device. →Page 99 2. Switch the device on again after approx. 5 minutes. → Page 98 If the temperature is too high, check the temperature again after a few hours. If the temperature is too low, check the temperature again the next day. |
| Malfunction | Cause and Troubleshooting |
| Condensation forms on the surface of the device and the shelves in the device. | The water vapor in warm and humid air condenses on the colder surfaces of the device. 1. Wipe off the water with a soft, dry cloth. 2. Open the device as briefly as possible. 3. Make sure that the device is always closed properly. |
| collects in the fruit and vegetable drawer often a lot of condensation her. | Depending on the storage quantity and the product, condensation forms in the fruit and vegetable drawer. 1. Remove the fruit and vegetable drawer. →Page 106 2. Remove the breather clips and reverse bet. → Fig. 12 |
| The device hums, bubbles, buzzes, gurgles, clicks, or makes popping noises. | No malfunction. A motor is running, eg cooling unit, fan. The refrigerant flows through the pipes. Motor, switches, or solenoid valves switch on or off. The automatic defrost system operates. No action is required. No action is required. |
| The device produces sounds. | The appliance is not level. Adjust the appliance horizontally using a spirit level and the leveling feet. |
| The device is not freestanding. Keep the minimum distances from the device. | |
| Equipment parts wobble or jam. Check the removable equipment and put them back into the device if necessary. |
|
| Bottles or containers touch each other. Separate bottles or containers. |
|
| Super freeze is enabled. No action is required. No action is required. |
Power failure
During a power failure, the temperature in the appliance rises, which shortens the storage time and reduces the quality of the frozen products.
On our website for your appliance, you will find in the technical data the storage time of the frozen products in the event of a malfunction.
Remarks
The appliance during a power outage opens the trap as little as possible and do not put in any other food.
Food quality immediately after the power failure.
- Discard frozen foods that are thawed and warmer than 5°C.
- Cook or bake slightly thawed frozen foods and either consume or refreeze.
Running the device self-test
- Turn off the device.
— Page 99 - Unplug the appliance from the
Pull the mains plug out of the socket or switch off the fuse in the fuse box. - Reconnect the appliance electrically after 5 minutes.
- Within 10 seconds after switching on the electrical connection (refrigerator compartment) for Press and hold for 3 to 5 seconds until an acoustic signal sounds.
The device self-test starts.
If after the end of the device self-test 2 acoustic signals sound and the temperature display shows the set temperature, your appliance is OK. The device returns to normal operation.
a When after the end of the self-test of the device 5 acoustic signals sound and the LEDs of the temperature display light up with different brightness, please contact customer service. The LEDs provide the service department with information about the current fault.
Store and Discard
Here you will find an explanation of how to prepare the device for storage. We also explain how to dispose of old appliances.
15.1 Decommissioning the device
- Turn off the device.
— Page 99 - Unplug the appliance from the
Pull the mains plug out of the socket or switch off the fuse in the fuse box. - Remove all food.
- Clean the device.
— Page 105 - To ensure ventilation of the interior, leave the appliance open.
Disposal of your old device
Environmentally-friendly disposal allows valuable raw materials to be reused.
WARNING
Risk of health hazard!
Children can lock themselves in the appliance and endanger their lives.
- To prevent children from entering the appliance do not crawl shelves and drawers out of the appliance.
- Keep children away from keeping discarded devices.
WARNING
Risk of fire!
If the pipes are damaged, flammable refrigerant and harmful gases can escape and ignite.
- The pipes of the refrigerant circuit do not damage the insulation.
- Unplug the power cord from the outlet.
- Cut the power cord.
- Dispose of the device in an environmentally friendly way.
You can obtain information about the current disposal methods from your dealer and your municipal or district council office.
This appliance is marked in accordance with ming with the European Directive 2012/19/EU on waste electrical and electronic
chemical equipment (waste electrical and electronic equipment – WEEE). The directive sets the framework for the takeback valid in the EU and disposal of old ppliances.
Customer Service
If you have any questions, cannot rectify a malfunction of the device yourself or if the device needs to be repaired, please contact our service department. Original replacement parts that are relevant for the function in accordance with the respective Ecodesign Regulation can be obtained from our service department for a period of at least 10 years from the time of placing the device on the market within the European Economic Area.
Remark: Calling in the service is free of charge under the locally applicable manufacturer’s warranty conditions. The minimum duration of the warranty (manufacturer’s warranty for private users) in the European Economic Area is 2 years in accordance with the applicable local warranty conditions. The warranty terms are without prejudice to any other rights or claims you may have under local law.
Detailed information about the warranty period and warranty conditions in your country can be obtained from our after-sales service, your dealer or on our website.
When contacting customer service, you will need the product number (ENr.) and the production number (FD) of the device. The contact details of the customer service can be found in the service list provided or on our website.
Product number (E no.)
and production number (FD)
The product number (E-Nr.) and the production number (FD) can be found on the type plate of the device. → fig. 1 / 5 In order to quickly find your device data and the service telephone numbers, you can write down the data.
17 Technical data
Refrigerant, net content, and other technical data can be found on the type plate. → fig. 1 / 5
You can find more information about your model on the Internet at https://eprel.ec.Europa.eu/1. This web address refers to the official EU product database EPREL. Then follow the instructions when looking for the model. The model identification consists of the slash character of the E number (E-No.) on the type plate. Alternatively, you can also find the model identifier in the first line of the EU energy label.
Only applies to countries in the European Economic Area
BSH Hausgeräte GmbH
Carl-Wery-Straße 34
81739 Munich
GERMANY
www.siemens-home.bsh-group.com
* 9001632354*
9001632354
(010527)
de, fr, it, nl
SIEMENS HB13AB521B Stainless Steel Oven Instruction Manual
Control Panel
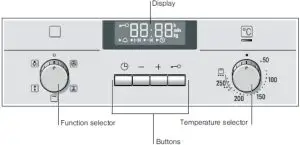
Buttons and display
| Button | Use |
 Time-setting options Time-setting options |
Selects  Timer, Timer,  Cooking time, Cooking time,  End time and Clock. End time and Clock. |
| – Minus + Plus |
Reduces the settings. Increases the settings. |
 Childproof lock Childproof lock |
Locks and unlocks the control panel. |
Function Selector
| Setting Use | Use |
 Off position Off position |
The oven is switched off. |
 3D hot air 3D hot air |
For cakes and pastries on one to three levels. The fan distributes the heat of the ring heating element in the rear wall evenly throughout the cooking compartment. |
 Circulated air grilling Circulated air grilling |
For roasting meat, poultry and whole fish. The grill element and the fan switch on and off alternately. The fan circulates the hot air around the dish. |
 Grill, large area Grill, large area |
For grilling steaks, sausages, toast and pieces of fish. The whole area below the grill element becomes hot. |
 Defrosting Defrosting |
For defrosting, e.g. meat, poultry, bread and cakes. The fan causes the warm air to circulate around the dish. |
 Oven light Oven light |
Switches on the oven light |
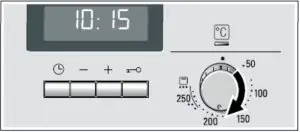
Temperature selector
The temperature selector is used to set the temperature or grill setting.
| Setting Use | Meaning |
 Off position Off position |
The oven does not heat up. |
| 50-270 Temperature Range | The temperature in the cooking compartment in °C. |
 Grill Setting Grill Setting |
The grill settings for “Grill, large area”  . .• = setting 1, low •• = setting 2, medium ••• = setting 3, high |
Setting the oven
Use the function selector to set the type of heating
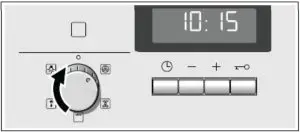
Set the temperature or grill using the temperature selector
The oven will then begin to heat up.
Switching the oven off
Turn the function selector to the off position
Changing the settings
The type of heating and temperature or grill setting can be changed at any time using their respective selectors.
Setting the time-setting options
Your oven has various time-setting options. You can use the  button to call up the menu and switch between the individual functions. All the time symbols are lit when you can make settings. The
  arrow shows you the timesetting option that is active. A time-setting option that has already been set can be changed direction with the + or – button when the arrow is next to the relevant time symbol.
Timer
You can use the timer as a kitchen timer. It runs independently of the oven. The timer has its own signal. In this way,
you can tell whether it is the timer or a cooking time which has elapsed.
- Press the button once. The time symbols light up in the display and the arrow is next to

- Use the + or – button to set the timer duration.
Default value for + button = 10 minutes
Default value for – button = 5 minutes
After a few seconds, the time setting is adopted. The timer starts. The  symbol lights up in the display and the timer duration counts down. The other time symbols go out.
The timer duration has elapsed
A signal sounds 0:00 is shown in the display. Use the button to switch off the timer.
Changing the timer duration
Use the + or – button to change the timer duration. After a few seconds, the change is adopted.
Cancelling the timer duration
Use the – button to reset the timer duration to 0:00. The change will be adopted after a few seconds. The timer is switched off.
Checking the time settings
If several time-setting options are set, the relevant symbols are illuminated on the display. The time-setting options symbol is in the foreground preceded by the arrow.
To call up the timer, cooking time, end time or clock, press the button repeatedly until the arrow is next to the relevant symbol. The display shows the value for a few seconds.
Cooking time
The cooking time for your dish can be set on the oven. When the cooking time has elapsed, the oven switches itself off automatically. This means that you do not have to interrupt other work to switch off the oven. The cooking time cannot be accidentally exceeded.
- Use the function selector to set the type of heating
- Set the temperature or grill setting using the temperature selector
- Press the button twice. 0:00 is shown in the display. The time symbols light up and the arrow is next to
- Use the + or – button to set the cooking time.
Default value for + button = 30 minutes
Default value for – = 10 minutes
The oven will start up after a few seconds. The cooking time counts down in the display and the symbol lights up. The other time symbols go out.
The cooking time has elapsed
A signal sounds. The oven stops heating. 0:00 is shown in the display. Press the button. You can set a new cooking time using the + or – button. Or press the button twice and turn the function selector to the off position. The oven switches off.
Changing the cooking time
Use the + or – button to change the cooking time. After a few seconds, the change is adopted. If the timer has been set, press the button beforehand.
Cancelling the cooking time
Use the – button to reset the cooking time to 0:00. After a few seconds the change is adopted. The cooking time is cancelled. If the timer has been set, press the button beforehand.
End time
You can change the time at which you wish your dish to be ready. The oven starts automatically and finishes at the desired time. You can, for example, put your dish in the cooking compartment in the morning and set the cooking time so that it is ready at lunch time. Ensure that food is not left in the cooking compartment for too long as it may spoil.
- Adjust the function selector
- Set the temperature selector
- Press the button twice
- Use the + or – button to set the cooking time
- Press the button. The arrow is next to . The time when the dish will be ready is displayed.
- Use the + or – button to set a later end time
After a few seconds, the oven adopts the settings and switches to standby position. The display shows the time at which the dish will be ready and the arrow is next to the symbol.
The and symbols go out. When the oven starts, the cooking time counts down in the display and the arrow is next to the symbol. The symbol goes out.
The cooking time has elapsed
A signal sounds. The oven stops heating. 0:00 is shown in the display. Press the button. You can set a new cooking time using the + or – button. Or press the button twice and turn the function selector to the off position. The oven switches off.
SIEMENS Extractor Hood Instruction Manual

Additional information on products, accessories, replacement parts and services can be found at www.siemens-home.com parts and in the Online shop www.siemens-home.com.bsh-group.com/eshops
Important safety information
Read these instructions carefully. Only then will you be able to operate your appliance safely and correctly. Retain the instruction manual and installation instructions for future use or for subsequent owners.
The appliance can only be used safely if it is correctly installed according to the safety instructions. The installer is responsible for ensuring that the appliance works perfectly at its installation location.
This appliance is intended for domestic use and the household environment only. The appliance is not intended for use outside. Do not leave the appliance unattended during operation. The manufacturer is not liable for damage which is caused by improper use or incorrect operation.
This appliance is intended for use up to a maximum height of 2000 metres above sea level.
This appliance is not intended for use by persons (including children) with reduced physical, sensory or mental capabilities, or lack of experience and knowledge, unless they have been given supervision or instruction concerning use of the appliance by a person responsible for their safety.
Children must not play with, on, or around the appliance. Children must not clean the appliance or carry out general maintenance unless they are at least 8 years old and are being supervised.
Keep children below the age of 8 years old at a safe distance from the appliance and power cable.
Check the appliance for damage after unpacking it. Do not connect the appliance if it has been damaged in transport.
This appliance is not intended for operation with an external clock timer or a remote control.
![]() Danger of suffocation!
Danger of suffocation!
Packaging material is dangerous to children. Never allow children to play with packaging material.
![]() Danger of death!
Danger of death!
Risk of poisoning from flue gases that are drawn back in.
Always ensure adequate fresh air in the room if the appliance is being operated in exhaust air mode at the same time as room air-dependent heat-producing appliance is being operated.
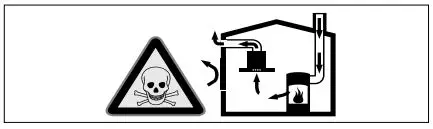
Room air-dependent heat-producing appliances (e.g. gas, oil, wood or coal-operated heaters, continuous flow heaters or water heaters) obtain combustion air from the room in which they are installed and discharge the exhaust gases into the open air through an exhaust gas system (e.g. a chimney). In combination with an activated vapour extractor hood, room air is extracted from the kitchen and neighbouring rooms – a partial vacuum is produced if not enough fresh air is supplied. Toxic gases from the chimney or the extraction shaft are sucked back into the living space. Adequate incoming air must therefore always be ensured.
An incoming/exhaust air wall box alone will not ensure compliance with the limit.
Safe operation is possible only when the partial vacuum in the place where the heat-producing appliance is installed does not exceed 4 Pa (0.04 mbar). This can be achieved when the air needed for combustion is able to enter through openings that cannot be sealed, for example in doors, windows, incoming/ exhaust air wall boxes or by other technical means.

In any case, consult your responsible Master Chimney Sweep. He is able to assess the house’s entire ventilation setup and will suggest the suitable ventilation measures to you. Unrestricted operation is possible if the vapour extractor hood is operated exclusively in the circulating-air mode.
![]() Risk of fire!
Risk of fire!
- Grease deposits in the grease filter may catch fire. Replace the grease filter at least every two months. Never operate the appliance without the grease filter.
- Grease Risk of fire! deposits in the grease filter may catch fire. Never work with naked flames close to the appliance (e.g. flambéing). Do not install the appliance near a heat producing appliance for solid fuel (e.g. wood or coal) unless a closed, non-removable cover is available. There must be no flying sparks.
- Hot Risk of fire! oil and fat can ignite very quickly. Never leave hot fat or oil unattended. Never use water to put out burning oil or fat. Switch off the hotplate. Extinguish flames carefully using a lid, fire blanket or something similar.
- When gas burners are in operation without any cookware placed on them, they can build up a lot of heat. A ventilation appliance installed above the cooker may become damaged or catch fire. Only operate the gas burners with cookware on them.
- Operating Risk of fire! several gas burners at the same time gives rise to a great deal of heat. A ventilation appliance installed above the cooker may become damaged or catch fire. Never operate two gas burners simultaneously on the highest flame for longer than 15 minutes. One large burner of more than 5 kW (wok) is equivalent to the power of two gas burners.
![]() Risk of burns!
Risk of burns!
The accessible parts become very hot when in operation. Never touch hot parts. Keep children at a safe distance.
![]() Risk of injury!
Risk of injury!
- Components inside the appliance may have sharp edges. Wear protective gloves.
- Items Risk of injury! placed on the appliance may fall down. Do not place any objects on the appliance.
- The Risk of injury! light emitted by LED lights is very dazzling, and can damage the eyes (risk group 1). Do not look directly into the switched on LED lights for longer than 100 seconds.
![]() Risk of electric shock!
Risk of electric shock!
- A defective appliance may cause electric shock. Never switch on a defective appliance. Unplug the appliance from the mains or switch off the circuit breaker in the fuse box. Contact the after-sales service.
- Incorrect Risk of electric shock! repairs are dangerous. Repairs may only be carried out and damaged power cables replaced by one of our trained after-sales technicians. If the appliance is defective, unplug the appliance from the mains or switch off the circuit breaker in the fuse box. Contact the after-sales service.
- Do Risk of electric shock! not use any high-pressure cleaners or steam cleaners, which can result in an electric shock.
Causes of damage
Caution!
Risk of damage due to corrosion. Always switch on the appliance while cooking to avoid condensation. Condensate can produce corrosion damage.
Risk of damage due to ingress of humidity into the electronic circuitry. Never clean operator controls with a wet cloth.
Surface damage due to incorrect cleaning. Clean stainless steel surfaces in the direction of the grain only. Do not use any stainless steel cleaners for operator controls.
Surface damage due to strong or abrasive cleaning agents. Never use strong and abrasive cleaning agents.
Risk of damage from returning condensate. Install the exhaust duct in such a way that it falls away from the appliance slightly (1° slope).
Environmental protection
Your new appliance is particularly energy-efficient. Here you can find tips on how to save even more energy when using the appliance, and how to dispose of your appliance properly.
Saving energy
- During cooking, ensure that there is a sufficient supply of air so that the extractor hood can work efficiently and with a low level of operating noise.
- Adjust the fan speed to the intensity of the cooking fumes. Only use intensive mode where this is required. A lower fan speed means that less energy is consumed.
- If there are intensive cooking fumes, select a higher fan speed in good time. If cooking fumes have already spread in the kitchen, the extractor hood must be operated for longer.
- Switch off the extractor hood if you no longer require it.
- Switch off the lighting if you no longer require it.
- Clean and, if required, replace the filter at regular intervals in order to increase the effectiveness of the ventilation system and to prevent the risk of fire.
Environmentally-friendly disposal
![]() Dispose of packaging in an environmentally-friendly manner. This appliance is labelled in accordance with European Directive 2012/19/EU concerning used electrical and electronic appliances (waste electrical and electronic equipment – WEEE). The guideline determines the framework for the return and recycling of used appliances as applicable throughout the EU.
Dispose of packaging in an environmentally-friendly manner. This appliance is labelled in accordance with European Directive 2012/19/EU concerning used electrical and electronic appliances (waste electrical and electronic equipment – WEEE). The guideline determines the framework for the return and recycling of used appliances as applicable throughout the EU.
Operating mode
This appliance can be used in air extraction mode.
Exhaust air mode
 The air which is drawn in is cleaned by the grease filters and conveyed to the exterior by a pipe system.
Note: The air must not be discharged into a flue that is used for exhausting fumes from appliances burning gas or other fuels (not applicable to appliances that only discharge the air back into the room).
Before conveying the exhaust air into a non-functioning smoke or exhaust gas flue, obtain the consent of the heating engineer responsible.
Operating the appliance
Note: Switch on the extractor hood when you start cooking and switch it off again several minutes after you have finished cooking. This is the most effective way of removing the kitchen fumes.
Controls
In the control panel, use the buttons to set the appliance’s different functions.
Control panel

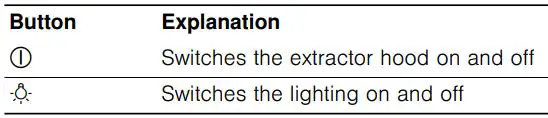
Extractor hood
Switching on or off
Press the button.
Note: It can take up to 25 seconds for the backflow preventer valve to open fully and for the appliance to reach its full capacity.
Lighting
The lighting will work even if the extractor hood is switched off.
Switching on or off
Press the B button.
Cleaning and maintenance
![]() Risk of burns!
Risk of burns!
The appliance becomes hot during operation. Allow the appliance to cool down before cleaning.
![]() Risk of electric shock!
Risk of electric shock!
Penetrating moisture may result in an electric shock. Clean the appliance using a damp cloth only. Before cleaning, pull out the mains plug or switch off the circuit breaker in the fuse box.
![]() Risk of electric shock!
Risk of electric shock!
Do not use any high-pressure cleaners or steam cleaners, which can result in an electric shock.
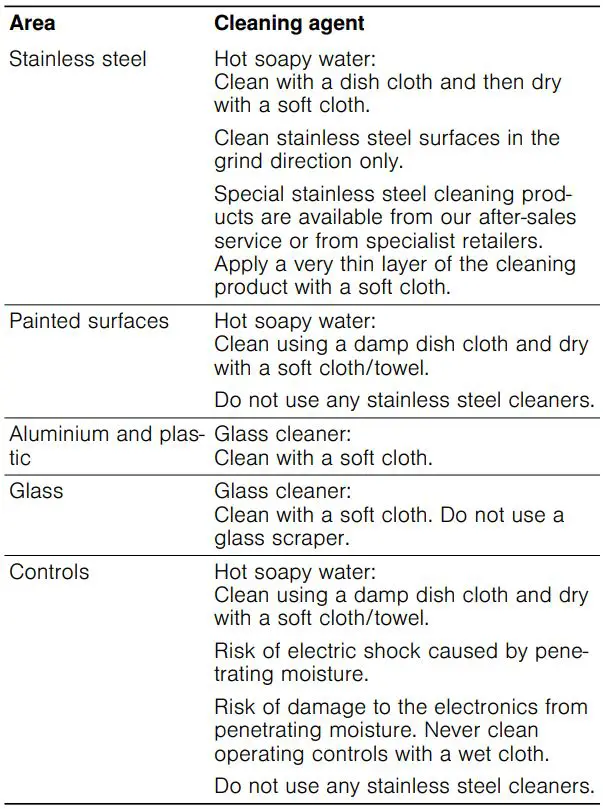
Cleaning agents
To ensure that the different surfaces are not damaged by using the wrong cleaning agent, observe the information in the table. Do not use any of the following:
- Harsh or abrasive cleaning agents,
- Cleaning agents with a high alcohol content,
- Hard scouring pads or cleaning sponges,
- High-pressure cleaners or steam cleaners.
Wash new sponge cloths thoroughly before use.
Follow all instructions and warnings included with the cleaning agents.
Removing and installing the filter
The filter must be serviced regularly in order to guarantee efficient filtration of odours and grease.
Metal grease filter
The metal grease filters must be cleaned every 100 operating hours or at least every two months.
![]() Risk of fire!
Risk of fire!
Grease deposits in the grease filter may catch fire.
Clean the grease filter at least every 2 months.
Never operate the appliance without the grease filter.
Removing metal grease filter
The metal grease filters filter the grease out of kitchen steam. To keep them in good working order, the filters should be cleaned at least every two months.
- Open the lock on the metal grease filters and remove the filters from the retainer.
Notes
• When you do this, take hold of the metal grease filters from underneath with your other hand. Make sure that the metal grease filters do not fall and damage the hob.
• Fat may accumulate in the bottom of the metal grease filters. Hold the filters level to prevent fat from dripping out. - Clean the metal grease filters.
- Clean the inside of the appliance.
Cleaning the metal mesh grease filters
Notes
- Do not use any aggressive, acidic or alkaline cleaning agents.
- When cleaning the metal mesh grease filters, also clean the
holder for the metal mesh grease filters in the appliance using a damp cloth. - The metal mesh grease filters can be cleaned in the dishwasher or by hand.
By hand:
Note: You can use a special grease solvent for stubborn dirt. It can be ordered via the Online Shop.
- Soak the metal mesh grease filters in a hot soapy solution.
- Clean the filters with a brush and then rinse them thoroughly.
- Leave the metal mesh grease filters to drain.
In the dishwasher:
Note: If the metal mesh grease filters are cleaned in the dishwasher, slight discolouration may occur. This has no effect on the function of the metal mesh grease filters.
- Do not clean heavily soiled metal mesh grease filters together with utensils.
- Place the metal mesh grease filters loosely in the dishwasher. The metal mesh grease filters must not be wedged in.
Installing the metal mesh grease filter
- Insert metal grease filter.
- Fold up metal grease filter and engage the lock.
Note: Make sure that the filter lock engages properly.
Trouble shooting
Malfunctions often have simple explanations. Please read the following notes before calling the after-sales service.
![]() Risk of electric shock!
Risk of electric shock!
Incorrect repairs are dangerous. Repairs may only be carried out and damaged power cables replaced by one of our trained after-sales technicians. If the appliance is defective, unplug the appliance from the mains or switch off the circuit breaker in the fuse box. Contact the after-sales service.
LED lights
Defective LED lights may be replaced by the manufacturer, their after-sales service or a qualified technician (electrician) only.
Fault table
After-sales service
Our after-sales service is there for you if your appliance needs to be repaired. We will always find the right solution in order to avoid unnecessary visits from a service technician.
When calling us, please give the product number (E no.) and the production number (FD no.) so that we can provide you with the correct advice. The rating plate with these numbers can be found inside the appliance (remove the metal mesh grease filter to gain access).
You can make a note of the numbers of your appliance and the telephone number of the after-sales service in the space below to save time should it be required.
E no._____________________
FD no._______________________
After-sales service_____________________
Please be aware that a visit by an after-sales engineer will be charged if a problem turns out to be the result of operator error, even during the warranty period.
Please find the contact data of all countries in the enclosed customer service list.
To book an engineer visit and product advice
GB 0344 892 8999
Calls charged at local or mobile rate.
IE 01450 2655 0.03 per minute at peak. Off peak 0.0088 per minute.
Rely on the professionalism of the manufacturer. You can therefore be sure that the repair is carried out by trained service technicians who carry original spare parts for your appliances.
Special accessories
(not supplied)
Note: Follow the installation instructions supplied with the accessories.
Accessory
Backboard, 60 cm
Backboard, 90 cm
Order number
LZ50660
LZ50960
BSH Hausgeräte GmbH Carl-Wery-Straße 34, 81739 München, GERMANY
ssiieemmeennss–hhoommee..bcoshm-group.com
Manufactured by BSH Hausgerate GmbH under Trademark License of Siemens AG

SIEMENS Clinitest Rapid Covid-19 Antigen Self-Test Instructions
For Emergency Use Authorization (EUA) Only. In vitro diagnostic use only.
In the USA, this product has not been FDA cleared or approved; but has been authorized by FDA under an Emergency Use Authorization. This product has been authorized only for the detection of proteins from SARS-CoV-2, not for any other viruses or pathogens. The emergency use of this product is only authorized for the duration of the declaration that circumstances exist justifying the authorization of emergency use of in vitro diagnostics for detection and/or diagnosis of COVID-19 under Section 564(b)(1) of the Federal Food, Drug, and
Cosmetic Act, 21 U.S.C. § 360bbb-3(b)(1), unless the declaration is terminated or authorization is revoked sooner.
INTRODUCT ION
IMPORTANT
- Read instructions carefully before starting the test. – For non-prescription home use with self-collected anterior nasal swab samples from individuals aged 14 years or older, or adult-collected anterior nasal swab samples from individuals aged 2 years or older with symptoms of COVID-19 within the first 7 days of symptom onset. Also for non-prescription home use with self-collected anterior nasal swab samples from individuals aged 14 years or older, or adult-collected anterior nasal swab samples from individuals aged 2 years or older, with or without symptoms or other epidemiological reasons to suspect COVID-19 when tested twice over three days with at least 24 hours (and no more than 48 hours) between tests.
- Test setup is about 5 minutes. The result must be read at 15 minutes.
- All test materials must be at room temperature before use.
- You should wear a face mask if swabbing others.
- You must follow the test directions carefully to get an accurate result. If you have any questions about using the test or reading the results please call our customer care hotline.
Telephone: 1-833-933-2340 E-Mail: [email protected] www.clinitest.siemens-healthineers.com/us.
WASH HANDS
Wash your hands with soap and water for 30 seconds or use hand sanitizer. Make sure hands are dry before starting.

GATHER MATERIALS
Check expiration date of the test kit before use. Expiration date is printed on the box and each test pouch. Do not use if test is expired.
PREP
Remove all contents in the box. Read instructions.
Do not start Step 1 until you are ready to begin the test.
STEP 1.
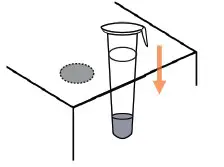
PLACE TUBE IN TUBE HOLDER
Find tube holder shown on the back of the box. Push tube through outlined hole.
STEP 2.
OPEN TUBE
Remove the seal from the tube. Avoid spilling the liquid. Make sure the tube is standing up straight.
STEP 3.
OPEN SWAB PLACE TUBE IN TUBE HOLDER
Find tube holder shown on the back of the box. Push tube through outlined hole.
Open the swab pouch on the end opposite the swab tip by peeling back the pouch cover.
Hold the plastic stick end of the swab and remove from pouch. Be careful not to touch the tip of the swab.
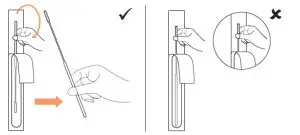
SWAB BOTH NOSTRILS
Carefully insert swab tip into one nostril about 1/2 to 3/4 of an inch deep.
Do not insert the swab any further if you feel any resistance. Rub the insides of the nostril in a complete circle at least 5 times. Make sure that you are rubbing the insides of the nostril. Take approximately 15 seconds to collect the specimen.
Be sure to collect any nasal drainage that may be present on the swab. Remove swab from the nostril and repeat in your other nostril.
NOTE: If you are swabbing others, please wear a face mask. With children, you may not need to insert the swab as far into the nostril. For very young children, you may need another person to steady the child’s head while swabbing.
NOTE: Failure to swab properly may cause false negative results.

STEP 4.
PLACE SWAB IN TUBE
Remove the swab from your nostril. Immediately take the tube out of the tube holder and insert swab tip into the liquid inside the tube. Mix vigorously
by rolling the swab tip at least 6 times on the bottom and sides of the tube.

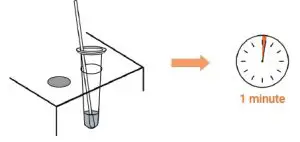
PLACE TUBE IN TUBE HOLDER
Place the tube back into the tube holder. Keep the swab inside of the tube. Start timer for 1 minute.
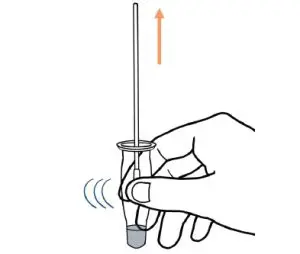
REMOVE SWAB FROM TUBE
After 1 minute take the tube out of the tube holder. As you remove the swab from the tube, squeeze swab tip several times from outside of the tube. Try to release as much liquid from the swab as possible.
Dispose the swab in the trash.
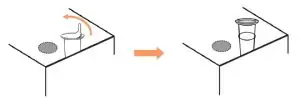
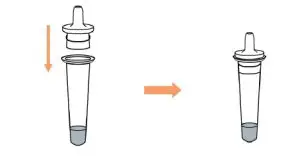
INSERT TIP
Take a tube tip from the kit and push it into the top of the tube. Make sure there is a tight fit.
STEP 5.
OPEN TEST DEVICE
Open the test device pouch by tearing the area circled below. Place the test device on a flat surface.

ADD 4 DROPS
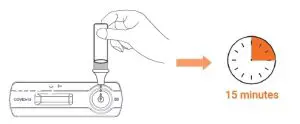
Hold the tube straight up and down above the test device and gently squeeze to add 4 drops of solution into the sample well, labeled as “S” on the test device. Adding more or less than 4 drops of solution into the sample well may result in incorrect results.
START TIMER
Start timer for 15 minutes.
Do not move the test device. Keep on a flat surface.
STEP 6.
READ TEST RESULT
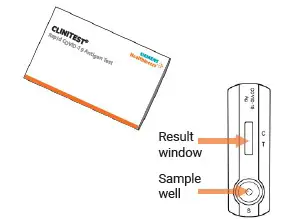
After 15 minutes find result window, labeled as “C” (for Control) and “T” (for Test) on the test device. It is important to read your test result at 15-20 minutes.
False negative or false positive results can occur if test results are read before 15 minutes or after 30 minutes.
Below are examples for positive, negative and invalid test results. Used test materials should be thrown away as household waste.
COVID-19 POSITIVE
If the test device looks like the examples below, then protein from the virus that causes COVID-19 was detected in the sample. The test is positive if there are two pink/red lines present, one at the Control “C” line and one at the Test “T” line. Look very closely for line next to “T”. This line can be very faint. Any visible pink/red “T” line is a positive result when the “C” line is also present.
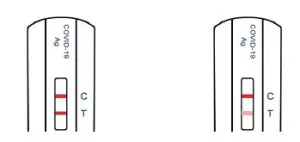
IF THE TEST IS POSITIVE
A positive test result means that the virus that causes COVID-19 was detected in your sample and it is very likely you have COVID-19 and it is important to be under the care of a healthcare provider. It is likely you will be asked to isolate yourself at home to avoid spreading the virus to others. There is a very small chance that this test can give a positive result that is incorrect (a false positive). If you test positive with the CLINITEST Rapid COVID-19 Antigen Self-Test you should self-isolate and seek follow-up care with your healthcare provider as additional testing may be necessary. Your healthcare provider will work with you to determine how best to care for you based on your test results along with medical history and your symptoms.
COVID-19 NEGATIVE
If the test device looks like the example below then protein from the virus that causes COVID-19 was not detected. You will only see one line next to “C” and there will not be any line visible next to”T”.
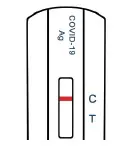
IF THE TEST IS NEGATIVE
A negative test result means that protein from the virus that causes COVID-19 was not detected in your sample. If you took this test while you have symptoms, a negative test result usually means that your current illness was not caused by COVID-19. However, it is possible for this test to give a negative result that is incorrect (a false negative) in some people with COVID-19. Negative results do not rule out COVID-19. This means you could possibly still have COVID-19 even though the test is negative. If you test negative and continue to experience
COVID-19-like symptoms of fever, cough and/or shortness of breath, you should seek follow up care with your healthcare provider. Your healthcare provider will consider the test result with all other aspects of your history such as symptoms and possible exposures to decide how to care for you.
For example, your healthcare provider may suggest you need another test to determine if you have the virus causing COVID-19. It is important you work with your healthcare provider to help you understand the next steps you should take. If you DO NOT have COVID-19 symptoms and your result is negative, you should test again with at least 24 hours and no more than 48 hours between tests. If
both your first an second test results are negative, you may not have COVID-19.
INVALID
If the test device looks like the examples below then the test was not able to give a result and you must repeat the test with a new swab, a new tube, and
a new test device. The test is INVALID if there is no line next to “C”.
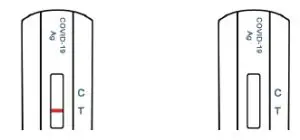
IF THE TEST IS INVALID
If at 15 minutes the line next to the “C” does not appear, even if any shade of pink/red “T” line appears, the test result is invalid. If the test result is invalid, a new swab should be collected, and the test should be performed again with a new tube and test device.
For FDA Emergency Use Authorization (EUA) Only
- For more information on EUAs please visit: https://www.fda.gov/emergency-preparedness-andresponse/ mcm-legal-regulatory-and-policy-framework/emergency-use-authorization
- For the most up to date information on COVID-19, please visit: www.cdc.gov/COVID19
- For detailed instructions, please visit: www.clinitest.siemens-healthineers.com/us.
Intended Use
The CLINITEST® Rapid COVID-19 Antigen Self-Test is a lateral flow chromatographic immunoassay intended for the qualitative detection of nucleocapsid protein antigen from SARS-CoV-2. This test is authorized for non-prescription home use with self-collected anterior nasal (nares) swab samples from individuals aged 14 years or older with symptoms of COVID-19 within the first 7 days of symptom onset. This test is also authorized for non-prescription home use with adult-collected anterior nasal (nares) swab samples from individuals aged 2 years or older with symptoms of COVID-19 within the first 7 days of symptom onset. This test is also authorized for non-prescription home use with self-collected anterior nasal (nares) swab samples from individuals aged 14 years or older, or adult-collected anterior nasal (nares) swab samples from individuals aged 2 years or older, with or without symptoms or other epidemiological reasons to suspect COVID-19 when tested twice over three days with at least 24 hours (and no more than 48 hours) between tests.
The CLINITEST® Rapid COVID-19 Antigen Self-Test does not differentiate between SARS-CoV and SARS-CoV-2.
Results are for the identification of SARS-CoV-2 nucleocapsid protein antigen. Antigen is generally detectable in anterior nasal (nares) swabs during the acute phase of infection. Positive results indicate the presence of viral antigens, but clinical correlation with past medical history and other diagnostic information is necessary to determine infection status. Positive results do not rule out bacterial infection or co-infection with other viruses. The agent detected may not be the definite cause of disease. Individuals who test positive with CLINITEST® Rapid COVID-19 Antigen Self-Test should self-isolate and seek
follow-up care with their physician or healthcare provider as additional testing may be necessary.
Negative results should be treated as presumptive and confirmation with a molecular assay, if necessary, for patient management, may be performed. Negative results do not rule out SARS-CoV-2 infection and should not be used as the sole basis for treatment or patient management decisions, including infection control decisions. Negative results should be
considered in the context of an individual’s recent exposures, history, and the presence of clinical signs and symptoms consistent with COVID-19.
For serial testing programs, additional confirmatory testing with a molecular test for negative results may be necessary, if there is a high likelihood of COVID-19, such as in an individual with a close contact with COVID-19 or with suspected exposure to COVID-19 or in communities with high prevalence of infection. Additional confirmatory testing with a molecular test for
positive results may also be necessary, if there is a low likelihood of COVID-19, such as in individuals without known exposures to COVID-19 or residing in communities with low prevalence of infection.
Individuals who test negative and continue to experience COVID-like symptoms of fever, cough and/or shortness of breath may still have SARS-CoV-2 infection and should seek follow up care from their healthcare provider. Individuals should provide all results obtained with this product to their healthcare provider for public health reporting. All healthcare providers will report all test results they receive from individuals who use the authorized product to relevant public health authorities in accordance with local, state, and federal requirements using appropriate LOINC and SNOMED codes, as
defined by the Laboratory In Vitro Diagnostics (LIVD) Test Code Mapping for SARS-CoV-2 Tests provided by CDC.
The CLINITEST® Rapid COVID-19 Antigen Self-Test is intended for non-prescription self-use and/or, as applicable, for an adult lay user testing another aged 2 years or older. The CLINITEST® Rapid COVID-19 Antigen Self-Test is only for use under the Food and Drug Administration’s Emergency Use Authorization.
Warnings, Precautions, and Safety Information
Read the CLINITEST® Rapid COVID-19 Antigen Self-Test Package Insert carefully before performing a test. Failure to follow directions may produce inaccurate test results.
- Follow directions for use.
- The Test is intended to aid in the diagnosis of a current COVID-19 infection. Please consult a healthcare professional to discuss your results and if any additional testing is required.
- Keep test kit and materials out of the reach of children and pets before and after use.
- You should wear a face mask if swabbing others.
- This test is read visually. Users with impaired vision or color-impaired vision may not be able to read the test.
- Children aged 2 to 13 years of age should be tested by an adult.
- The control line may show up within a few minutes of starting the test. It may take up to 15 minutes for a test line to show up.
- Do not use on anyone under two years of age.
- Do not open the kit contents until ready for use. If the test cassette is open for an hour or longer, invalid test results may occur.
- Do not use the test after the expiration date shown on the test cassette pouch.
- Do not use if any of the test kit contents or packaging is damaged or open.
- Test components are single-use. Do not re-use.
- Make sure there is sufficient light when testing. For best results, read test in a well-lit area.
- Do not use nasal sprays for at least 30 minutes before collecting a nasal sample.
- Remove any piercings from the nose before starting the test.
- Do not use on anyone who is prone to nosebleeds or has had facial injuries or head injuries/surgery in the past six months.
- Inadequate or improper nasal swab sample collection may yield false negative test results.
- Do not touch the swab tip (specimen collection area) when handling the swab.
- The test is intended to be read at 15 minutes. If the test is read before 15 minutes or after 30 minutes, false negative or false positive results may occur, and the test should be repeated with a new test cassette.
- Do not ingest any kit components.
- Avoid exposure of your skin, eyes, nose, or mouth to the solution in the tube.
- The solution in the tube and the test device contains an ingredient that is hazardous to skin and eyes (see table below). If contact with the body occurs, rinse with water. If irritation persists, seek medical advice. https://www.poison.org/contact-us or 1-800-222-1222
| Chemical Name/CAS | GHS Code for applicable Ingredient | Concentration (%) |
| Sodium Azide/26628-22-8 | Acute Tox. 2 (Oral), H300 Acute Tox. 1 (Dermal), H310 | 0.02% (device)
and 0.05% (tube) |
| Triton/9002-93-1 | Acute Tox. 4 (Oral), H302 | 1.5% |
Serial Testing Information and Limitations
- If you have symptoms of COVID-19 that started within the last 7 days, you can use a single test.
- Testing for asymptomatic individuals should be performed at least twice over three days, with at least 24 hours and no more than 48 hours between tests. You may need to purchase additional tests to perform this serial (repeat) testing. For serial testing, if your first test result is negative, you should test again with a new test in 24 to 48 hours.
- Serial testing (i.e., testing every day or every other day) is more likely to detect COVID-19, especially when you do not have any symptoms.
- If your first or second test is positive, then proteins from the virus that causes COVID-19 have been found in your sample and you likely have COVID-19.
- If both your first and second tests are negative, you may not have COVID-19, however you should follow-up with your healthcare provider if you are at high risk for COVID-19.
Frequently Asked Questions
Q: WHAT IS COVID-19?
A: COVID-19 is an acute respiratory infectious
disease caused by the SARS-CoV-2 virus, a novel Betacoronavirus. SARS-CoV-2 is mostly spread person-to-person, both by individuals with symptoms of COVID-19 infection and by infected people without symptoms. Based on the current knowledge, the incubation period is 1 to 14 days, mostly 4-5 days. Symptoms include fever, fatigue, and cough.
For a full list of symptoms, see: https://www.cdc.gov/coronavirus/2019-ncov/symptoms-testing/symptoms.html.
Q: WILL THIS TEST HURT?
A: No, the nasal swab is not sharp, and it should not hurt. Sometimes the swab can feel slightly uncomfortable.
If you feel pain, please stop the test and seek advice from your healthcare provider.
Q: WHAT ARE THE KNOWN POTENTIAL RISKS AND BENEFITS OF THIS TEST?
A: Potential risks include:
- Possible discomfort during sample collection.
- Possible incorrect test results (see Result Interpretation section). Potential benefits include:
- The results, along with other information, can help you and your healthcare provider make informed decisions about your care.
- The results of this test may help limit the spread of COVID-19 to your family and others in your community.
Q: WHAT IS SERIAL TESTING?
A: Serial testing is when one person tests themselves multiple times for COVID-19 on a routine basis, such as every day or every other day. By testing more frequently, you may detect COVID-19 more quickly and reduce spread of infection. Serial testing (i.e. testing every day or every other day) is more likely to detect COVID-19, especially when you do not have any symptoms. Testing for asymptomatic individuals should be performed at least twice over three days, with at least twenty-four hours and no more than 48 hours between tests. You may need to purchase additional tests to perform this
serial (repeat) testing.
Q: WHAT IS THE DIFFERENCE BETWEEN AN ANTIGEN AND MOLECULAR TEST?
A: There are different kinds of tests for the virus that causes COVID-19. Molecular tests detect genetic material from the virus.
Antigen tests, such as the CLINITEST® Rapid COVID-19 Antigen Self-Test, detect proteins from the virus. Antigen tests are very specific for the SARS-CoV-2 virus but are not as sensitive as molecular tests. This means that a positive result is highly accurate, but a negative result does not rule out infection. If your test result is negative, you should discuss with your healthcare provider whether an additional test is necessary and if you should continue isolating at home. There is a higher chance of false negative results with antigen tests than with laboratory-based molecular tests. This means that there is a
higher chance this test will give you a negative result when you have COVID-19.
Q: HOW ACCURATE IS THIS TEST?
A: A clinical evaluation comparing the CLINITEST® Rapid COVID-19 Antigen Self-Test to an EUA authorized Molecular
SARS-COV-2 test was conducted. For clinical evaluation results please use the following QR code or web address.

The performance of this test is still being studied in patients without signs and symptoms of respiratory infection and for serial screening. Performance may differ in these populations.
Q: WHAT IF YOU TEST POSITIVE?
A: A positive test result means that antigens from the virus that causes COVID-19 were detected and it is very likely you currently have COVID-19. If you test positive you should self-isolate at home per CDC recommendations to stop spreading the virus to others. Please consult the CDC recommendations regarding self-isolation at www.cdc.gov/coronavirus. There is
a chance that this test can give a positive result that is wrong (a false positive result). Seek follow-up care with your healthcare provider immediately. Your healthcare provider will work with you to determine how best to care for you based on your test result(s) along with your medical history, and your symptoms.
Q: WHAT IF YOU TEST NEGATIVE?
A: A negative test result indicates that antigens from the virus that causes COVID-19 were not found in your sample. If you have symptoms, you likely do not have COVID-19. If you do not have symptoms and you receive a second negative result 24 to 48 hours after your first negative result, then you are likely not infected with COVID-19. However, negative results do not rule out SARS-CoV-2 infection.
It is possible for this test to give a negative result that is incorrect (false negative) in some people with COVID-19. This means that you could possibly still have COVID-19 even though the test is negative. For example, you may get a false negative result if you did not perform the test correctly or if the level of antigen from the virus causing COVID-19 was below the test limits. The amount of antigen in a sample may decrease the longer you have symptoms of infection. If you test negative and continue to experience symptoms of fever, cough and/or shortness of breath you should seek follow up
care with your healthcare provider. Your healthcare provider will consider the test result together with all other aspects of your medical history (such as symptoms, possible exposures, and geographical location of places you have recently traveled) in deciding how to care for you. Your healthcare provider may suggest you need another test to determine if you have contracted the virus causing COVID-19.
It is important that you work with your healthcare provider to help you understand the next steps you should take.
The performance of this test was established based on the evaluation of a limited number of clinical specimens. Clinical performance has not been established with all circulating variants but is anticipated to be reflective of the prevalent variants in circulation at the time and location of the clinical evaluation. Performance at the time of testing may vary depending on the variants circulating, including newly emerging strains of SARSCoV-2 and their prevalence, which change over time.
Q: WHAT DOES AN INVALID TEST RESULT MEAN?
A: If no control line shows up on the test, the result is invalid (even if any test line shows up). An invalid result means the test was not able to tell if you have COVID-19 or not. If the test is invalid, a new swab should be used to collect a new nasal specimen and the test should be run again, using a new test and tube.
Important
This test is intended to be used as an aid in the clinical diagnosis of a current COVID-19 infection. Do not use this test as the only guide to manage your illness. Please consult your healthcare provider if your symptoms persist or become more severe, or if you are concerned at any time.
Individuals should provide all results obtained with this product to their healthcare provider for public health reporting.
Healthcare Providers
Please visit www.clinitest.siemens-healthineers.com/us to obtain the complete instructions for use and fact sheet for healthcare providers.
Index of Symbols
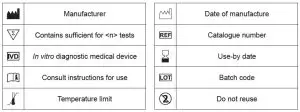
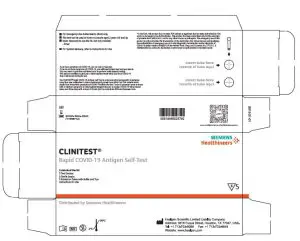
Tandem Combination Type Arc-Fault Circuit Interrupters (CAFCI)
Siemens Tandem AFCI Breakers are the perfect solution to wiring made easier. The design allows for more circuits in a smaller loadcenter. Installed indicator flags disappear when the load wires are inserted correctly. Siemens CAFCI Plug-On breakers now have a single load lug(s) only. Wiring made easier with the neutral lug removed. These breakers can be installed in the same manner as the thermal magnetic breakers. This allows the installer to land ground and neutral conductors in the load center before installing the breaker and load conductor. Tandem AFCI breakers without the rejection feature can be installed in any panel that lists that breaker type or where a substitution letter exists for that breaker type. The schematic, located on the wiring diagram, will indicate the positions where these breakers can be placed by showing two circuits per space. The total circuits listed for panel should not be exceeded.
Pigtail
Features
- One breaker feeds two circuits to save on space and time
- Installed indicator flags disappear when the load wires are inserted correctly
- Load Lug(s) only
- Available in pigtail and Plug-On neutral types
- Trusted Plug-On Neutral connection
- LED indicators for troubleshooting
- Insta-wire connectors
Technical Data
- 10,000 AIC
- 120V
- UL Listed
- HACR and SWD rated
Wiring Diagrams
Pigtail
Plug-On Neutral
Dimension Diagrams
Pigtail
Plug-On Neutral

Time Current Characteristic Curve – 15A

Time Current Characteristic Curve – 20A Time in
The technical data presented in this document is based on an actual case or on as-designed parameters, and therefore should not be relied upon for any specific application and does not constitute a performance guarantee for any projects. Actual results are dependent on variable conditions. Accordingly, Siemens does not make representations, warranties, or assurances as to the accuracy, currency or completeness of the content contained herein. If requested, we will provide specific technical data or specifications with respect to any customer’s particular applications. Our company is constantly involved in engineering and development. For that reason, we reserve the right to modify, at any time, the technology and product specifications contained herein
]]>