

Thank you very much for purchasing a Sigma Lens. In order to get the maximum performance and enjoyment out of your Sigma lens, please read this instruction booklet thoroughly before you start to use the lens.
SAFETY PRECAUTIONS
Do not look directly at the sun, through the lens. Doing so can cause damage to the eye or loss of eyesight. Do not leave the lens in direct sunlight without the lens cap attached, whether the lens is attached to the camera or not. This will prevent the lens from concentrating on the sun’s rays, which may cause a fire. The shape of the mount is very complex. Please be careful when handling it so as not to cause injury.
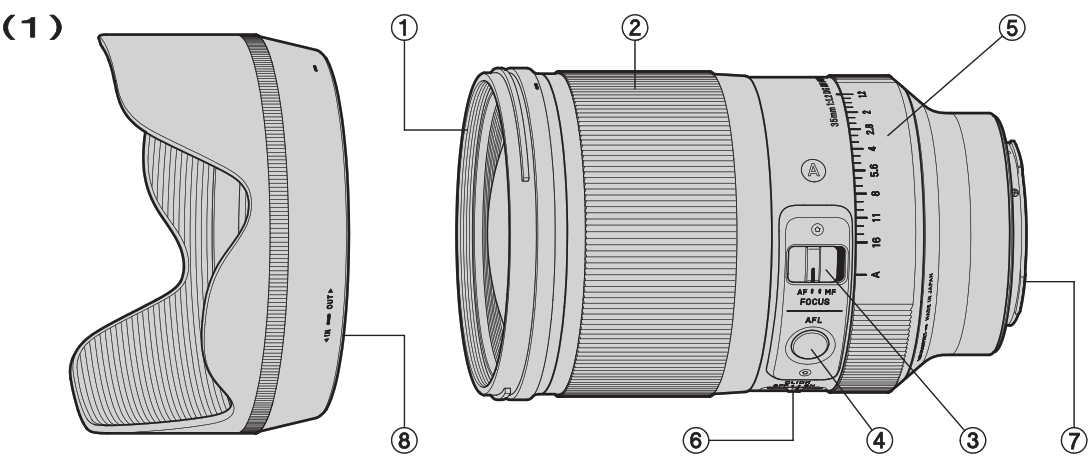
DESCRIPTION OF THE PARTS
| 1. Filter Attachment Thread | 5. Iris ring |
| 2. Focus Ring | 6. Iris ring click switch |
| 3. Focus Mode Switch | 7. Mount |
| 4. AFL button | 8. Lens Hood |
ATTACHING TO THE CAMERA BODY
Please refer to the camera’s instruction manual for details on how to attach it to or detach it from the camera body.
- On the lens mount surface, there are electrical contacts. Please be careful with their handling as scratches or dirt on them could cause malfunctions or damage.
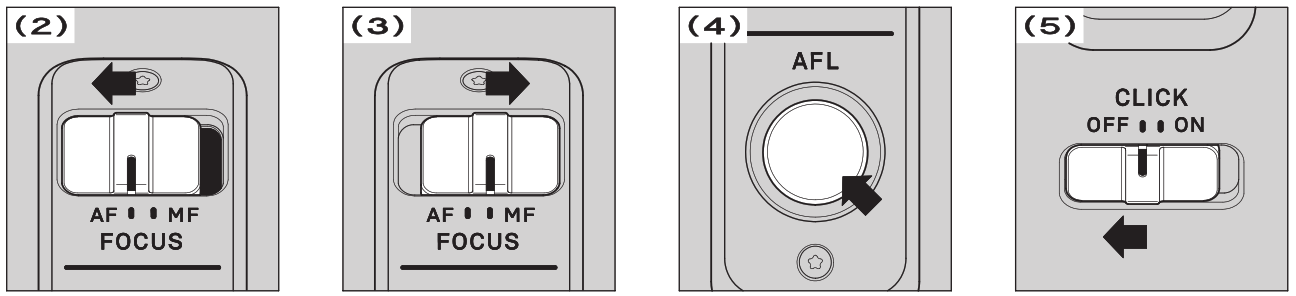
FOCUSING
For autofocus operation, set the focus mode switch on the lens to the “AF” position (fig.2). If you wish to focus manually, set the focus mode switch on the lens to the “MF” position (fig.3). You can adjust the focus by turning the focus ring.
Please refer to the camera’s instruction manual for details on changing the camera’s focusing mode.
AFL BUTTON
It is possible to cancel autofocus by pressing the AFL button while the AF is operating (AF lock / AF stop function) (fig.4).
- With some cameras, the AFL button does not work.
- Some camera bodies can customize the function of the AFL button, so please check the details of the camera’s instruction manual.
IRIS RING
It incorporates an iris ring that is useful to adjust the aperture value during Aperture Priority Auto mode and Manual Exposure mode.
- With some cameras, the iris ring does not work.
- Check the camera’s instruction manual for how to adjust exposure.
IRIS RING CLICK SWITCH
It is possible to select to activate/deactivate the click of the iris ring, and this function would be effective for movie shooting. To deactivate the click of the iris ring, set the switch to “OFF” (fig.5).
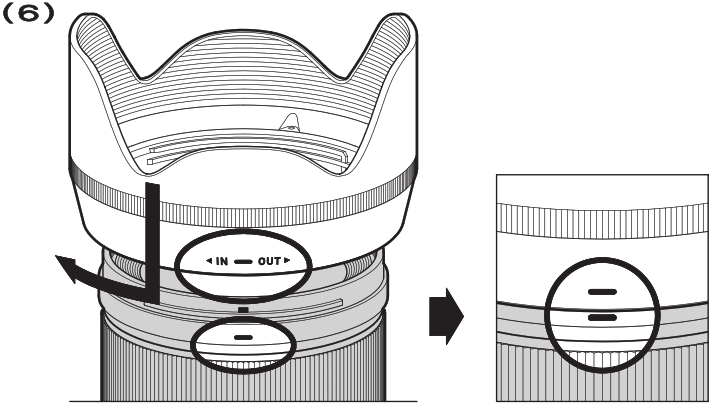
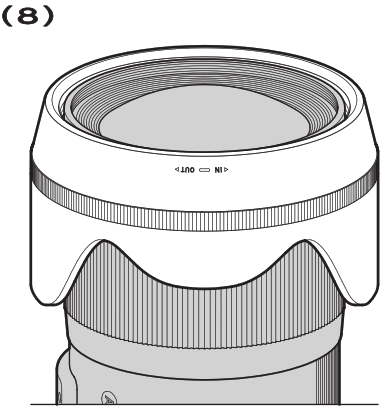
LENS HOOD
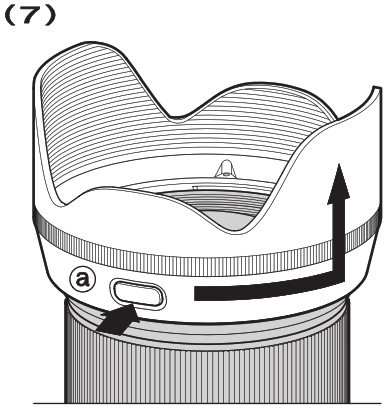
The lens hood helps to prevent flare and ghost images caused by bright illumination from outside the picture area. Attach the hood and turn clockwise until it stops rotation (fig.6). To detach the hood, turn counter-clockwise while pushing the button until it stops rotating (fig.7).
- When not in use, the lens hood can be attached upside-down (fig.8).
FILTER
Only one filter should be used at a time. Two or more filters and/or special thicker filters, like a polarizing filter, may cause vignetting. When using a polarizing filter with AF camera, use the “circular” type.
FLASH PHOTOGRAPHY
The camera’s built-in flash will cause barrel shadow if used with this lens. For best results, please only use an external flash unit.
BASIC CARE AND STORAGE
- Avoid any shocks or exposure to extremely high or low temperatures or to humidity.
- For extended storage, choose a cool and dry place, preferably with good ventilation. To avoid damage to the lens coating, keep away from mothballs or naphthalene gas.
- Do not use thinner, benzene, or other organic cleaning agents to remove dirt or fingerprints from the lens elements. Clean by using a soft, moistened lens cloth or lens tissue.
- This lens benefits from a dust and splash-proof construction. Although this construction enables the lens to be used under light rain, it is not the same as being waterproof. Please pay attention to prevent a large amount of water from splashing on the lens, especially when using it by a waterside. It is often impractical to repair the internal mechanism, lens elements, and electric components if damaged by water.
- Sudden temperature changes may cause condensation or fog to appear on the surface of the lens. When entering a warm room from the cold outdoors, it is advisable to keep the lens in the case until the temperature of the lens approaches room temperature.
TECHNICAL SPECIFICATIONS
| Lens construction | 17-Dec | Magnification | 01:05.1 |
| Angle of View | 63.4° | Filter Size | 82mm |
| Minimum Aperture | 16 | Dimensions | 87.8 x 136.2mm |
| Minimum Focusing | 30cm | Dia. x Length | (3.46 x 5.36 in) |
| Distance | (0.98ft) | Weight | 1090g (38.45oz) |
- Dimensions and weight include the L-Mount.
- The glass materials used in the lens do not contain environmentally hazardous lead and arsenic.

The CE mark is a Directive conformity mark of the European Community (EC)
SIGMA (Deutschland) GmbH Carl Zeiss Str. 10/2, D 63322 Rödermark, F.R.GERMANY
Sales: 06074 / 865 16 0 Service: 06074 / 865 16 65 Support: 06074 / 865 16 88

This device complies with Part 15 of the FCC Rules. Operation is subject to the following two conditions: (1) this device may not cause harmful interference, and (2) this device must accept any interference received, including interference that may cause undesired operation.
![]()
Disposal of Electronic Equipment
Disposal of used Electrical & Electronic Equipment (Applicable in the European Union and other European countries with separate collection systems)
This symbol indicates that this product shall not be treated as household waste. Instead, it shall be collected separately for the recycling of electrical and electronic equipment.
If the new products are purchased, this product might be handed over to the distributor or the collection system of waste electrical and electronic equipment eventually.
By ensuring this product is disposed of correctly, you will help prevent potential negative consequences for the environment and human health, which could otherwise be caused by inappropriate waste handling of this product or components of this product.
If this product is disposed of illegally, it might cause a possibility of penalties.
For more detailed information about the recycling of this product, please contact your local city office, your household waste disposal service or the shop where you have purchased the product.
]]>
SIGMA ROX 4.0 GPS Cycle Computer
REMARKS
This manual is a quick guide.You can access the detailed instructions by following this link: goto.sigmasport.com/rox4-0
CONTENTS
INSTALLATIONBUTTON FUNCTIONS
HEART RATE SENSOR
HEART RATE SENSOR BATTERY CHANGE
INSTALLATION
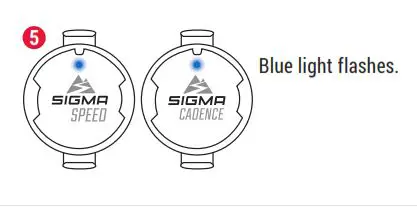
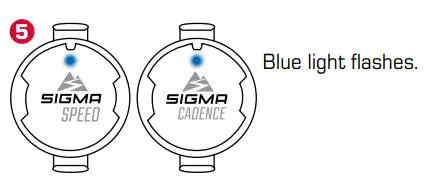
SPEED / CADENCE SENSOR FIRST START


SPEED SENSOR / CADENCE SENSOR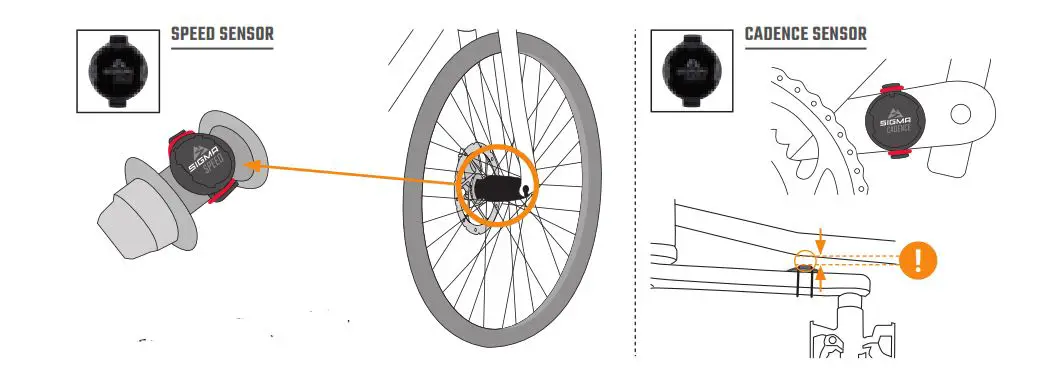
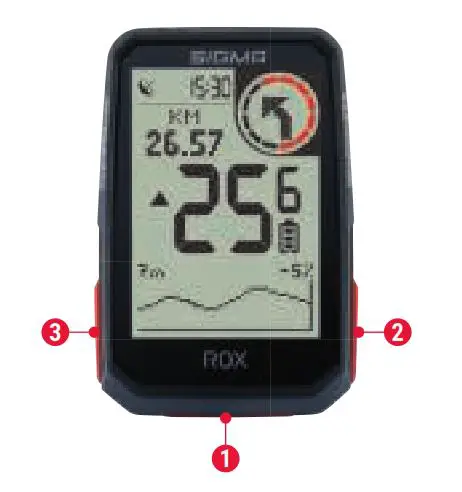
BUTTON FUNCTIONS
- START/STOP/MENU Button
- Start training
- Stop training
- Confirm input
- One menu level down
- Switch on the device (press for 3s)
Press and hold the button:- Open and close menu
- PLUS Button
- One page forward
- Increase value
Press and hold the button:- Save and reset training values
- MINUS button
- One page backward
- Decrease value
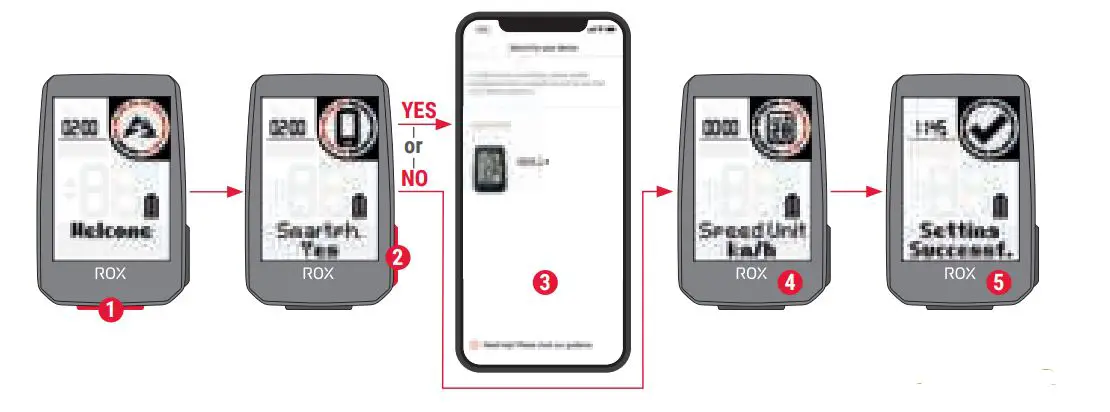
FIRST START
- Press START Button for 5s to Wake-Up.
- Choose YES to pair a Smartphone, choose NO to manually set the device.
- Download SIGMA RIDE App and follow App instructions to configure your device.
- OR set device and user settings manually.
- Enjoy your device and start your first ride!

The app offers you many functions for setting up and customising the ROX 4.0. For more information on the app functions, see the „SIGMA RIDE app“ page.
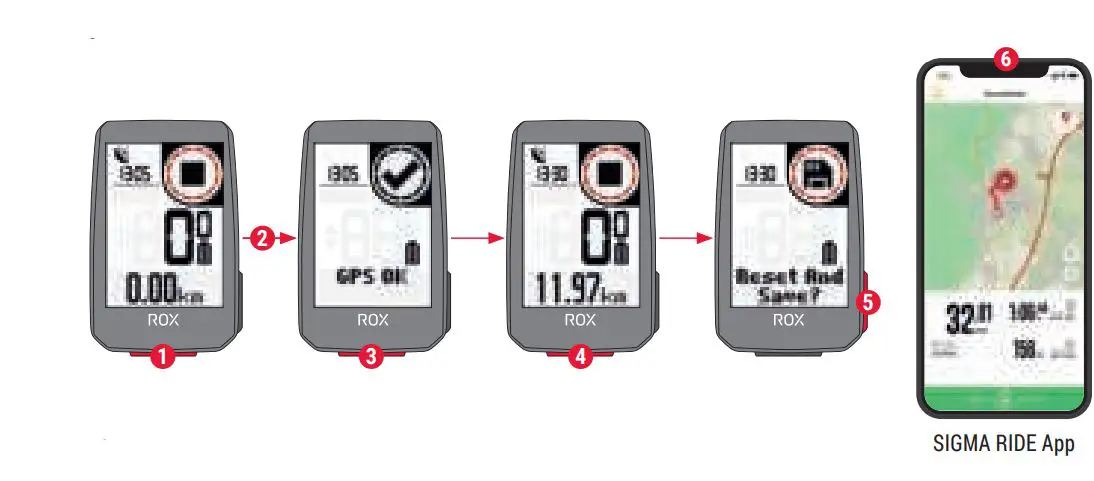
TRAINING
- Press START button for 3s to start the device.
- Don‘t move and search for clear sky location for fast GPS fix.
- Wait for „GPS OK“. Press START button to start the training session.
- Press START button to stop the training session.
- Hold „+“ button to reset training values and save your training.
- Sync with Smartphone for full data analysis and sharing.
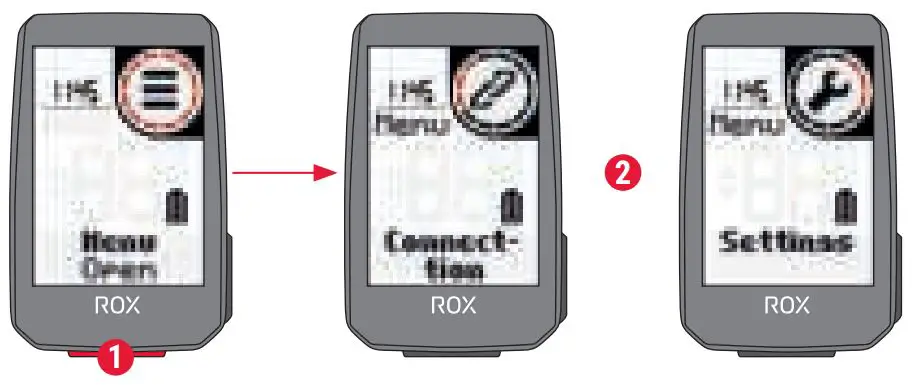
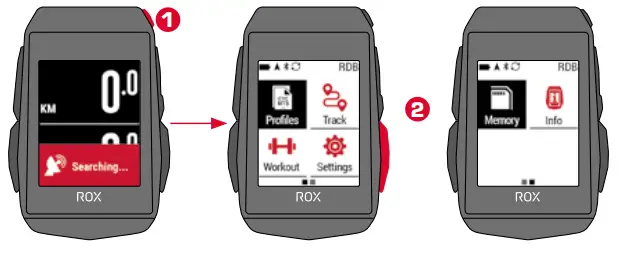
MENU OVERVIEW
MAIN MENU
- Hold START button, when training is NOT started.
- You have access to the main menu with all the functions of the ROX 4.0.
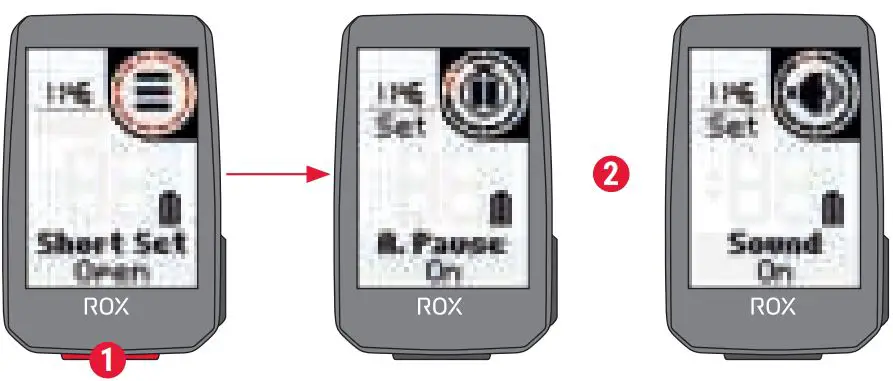
SHORT CUT MENU
- Hold START button, when training is active or in auto pause.
- You can edit the most important settings during training.
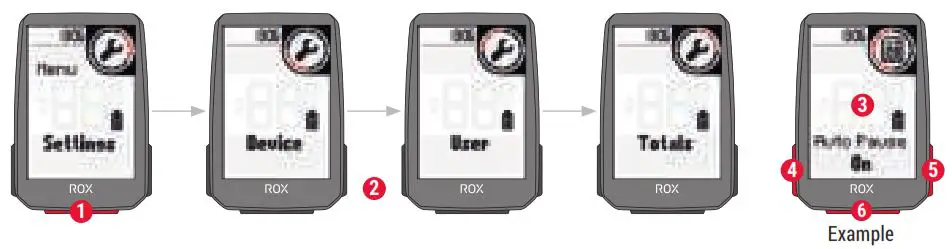
SETTINGS
- Choose Settings in main menu to set the device.
- You can edit Device settings and Totals.
- Choose a setting you want to edit and press START button to set.
- Press „-“ button to decrease a value or to toggle through options.
- Press “+” button to increase a value or to toggle through options.
- Press START button to confirm the settings
- Use the App to set your training views.
- Use the App or SIGMA DATA CENTER to update your firmware.
SENSOR CONNECTION
- Choose SETTINGS > CONNECT to edit connections.
- Choose SENSORS to pair new sensors or manage paired sensors.
- Choose „SEARCH NEW“ to add new sensors.
- Make sure that sensors are switched on!
- Select Sensor with + or – and press START to pair sensor. Repeat, if you want to pair more sensors.
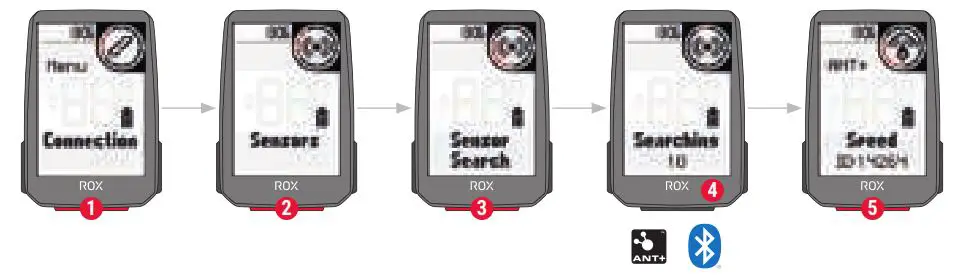
TIP: Some sensors are available in Bluetooth and ANT+ at the same time. We recommend to choose the ANT+ connection.
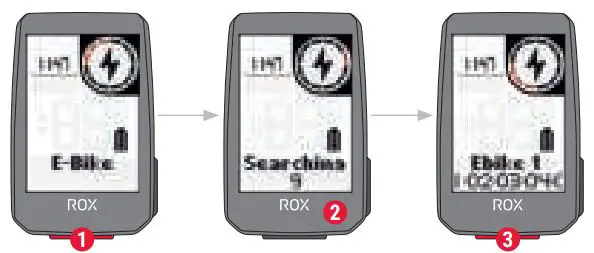
E-BIKE CONNECTION
- Choose Main Menu > Connection > E-Bike to pair a new E-Bike or manage paired Bike.
- Make sure that E-Bike is switched on!
- Press START button to pair E-Bike.

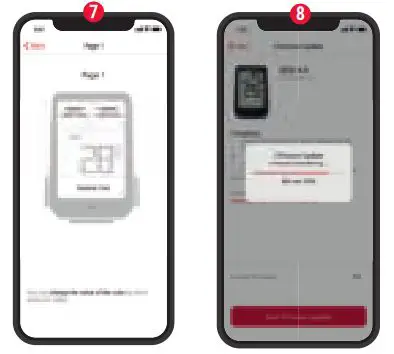
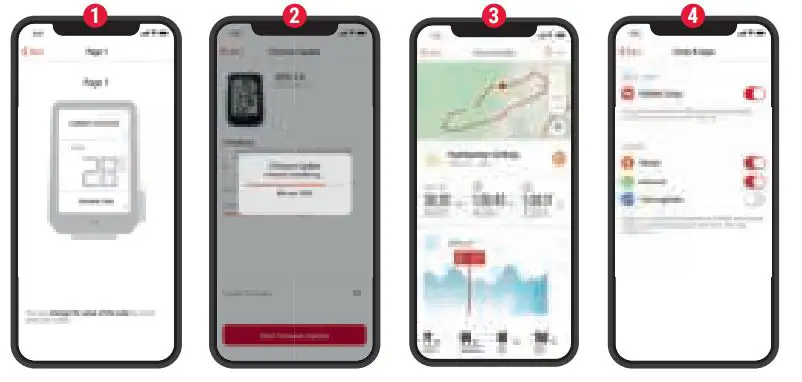
SIGMA RIDE APP
- Set Device and Training Views
- Firmware Update
- Analyze your training
- Share your data and many more…

CHARGING AND DATA TRANSFER
- Open USB Cover.
- Insert USB-C cable. Check that the cable and port are dry!
- Charge with 5V max. 1000mA.
- Connect to PC for data transfer.
IMPORTANT: Please ensure that the USB cover is always closed before starting a training session.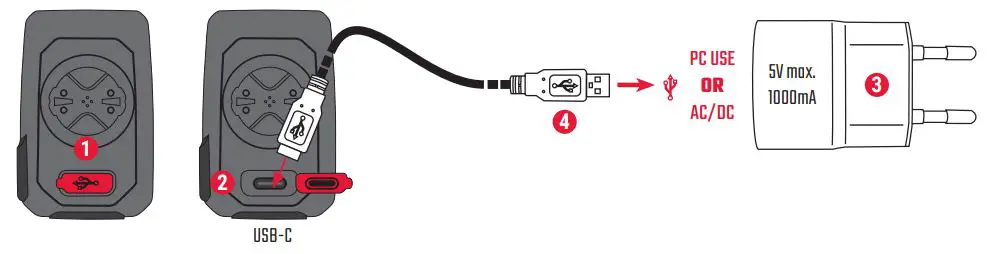
TECHNICAL INFORMATION
| ROX 4.0 | |
| Battery type | Rechargeable 550 mAh, 3.7 V Battery |
| Operation temperature | 0 °C to 60 °C |
| Operation frequency | ANT+ 2.4 GHz @ 1 dBm nominal Bluetooth 2.4 GHz @ 1 dBm nominal GPS 1575.42 MHz (receiver only) GLONASS 1602 MHz (receiver only) |
| Transmission power | <4 dBm |
| Water and Dust rating | IPX7 |
Important:You can find the CE declaration at: ce.sigmasport.com/rox40
SIGMA-ELEKTRO GmbH Dr. – Julius- Leber- Straße 15 67433 Neustadt/Weinstraße Germany [email protected]


SIGMA Rox 11.1 EVO Cycling Computer
CONTENTS
INSTALLATION
HEART RATE SENSOR BATTERY CHANGE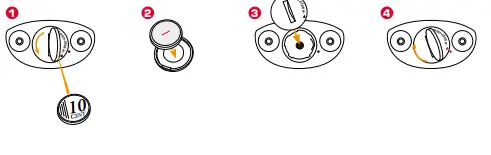
SPEED / CADENCE SENSOR FIRST START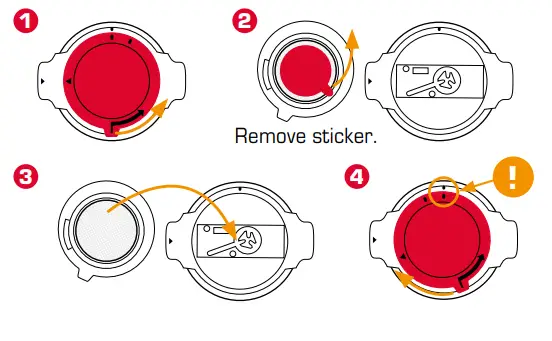
BUTTON FUNCTIONS
MENU Button
- Gerät einschalten/ausschalten (3s drücken)
- Menü öffnen oder schließen
START/ENTER Button
- Training starten/fortsetzen
- Eingabe bestätigen
- Eine Menüebene runter
- Manuelle Runde nehmen im Training
STOP/BACK Button
- Training stoppen
- Training nach beenden speichern
- Eine Menüebene rauf
Button
- Eine Seite Weiter
- In Listen runter
- Wert erhöhen

FIRST START
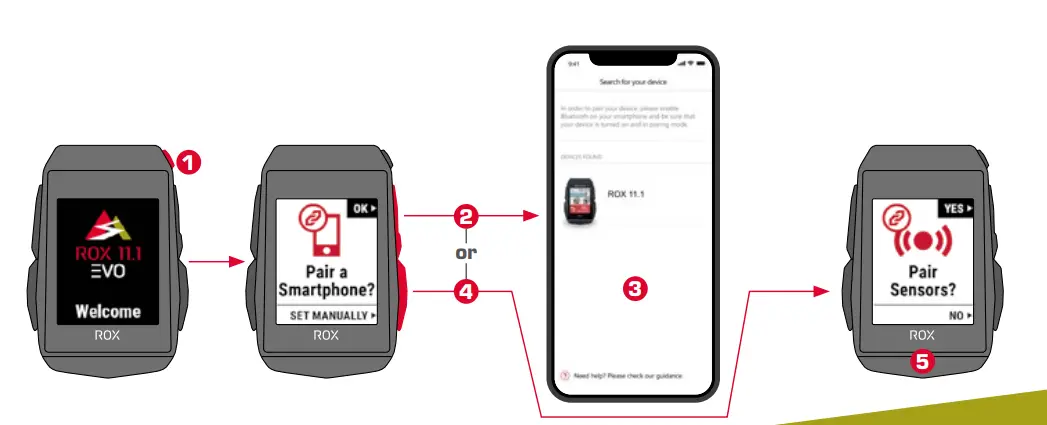
- Press MENU Button for 5s to Wake-Up.
- Press START to pair your Smartphone.
- Download SIGMA RIDE App and follow App instructions to configure your device.
- Or press the button to set the device manually.
- Pair sensors and finish initial settings.
TRAINING
- Press MENU Button for 3s to switch on the device.
- Wait for the “GPS OK” message, search for clear sky, and do not move for a fast GPS fix.
- Press START to start the training session.
- Press STOP to stop the training session.
- Press STOP again to save the training session OR
- Press START again to continue the training session.
- Press STOP to leave the summary.
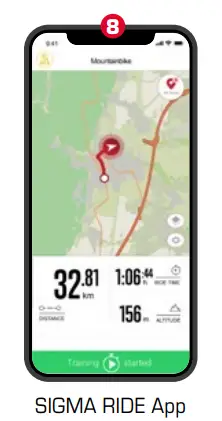
- Use your Smartphone and the SIGMA RIDE App to sync the training for full data analysis and sharing.
MENU OVERVIEW
MAIN MENU
- Press MENU button, when training is NOT started.
- Sie haben Zugriff auf das Hauptmenü mit alle Funktionen des ROX 11.1.
SHORT CUT MENU
- Press MENU button, when training is active or in auto pause.
- Hier können sie schnell auf die wichtigsten Einstellungen während der Fahrt zugreifen.

SENSOR CONNECTION
- In MAIN MENU > SETTINGS choose to CONNECT to edit connections.
- Choose SENSORS to pair new sensors or manage paired sensors.
- Choose SEARCH NEW to add new sensors.
- Make sure that sensors are switched on!
- Press START to pair sensor.
E-BIKE CONNECTION
- In Main Menu > Settings > Connect choose E-Bike to pair a new E-Bike or manage paired Bike.
- Make sure that E-Bike is switched on!
- Select the E-BIKE with or and press START button to pair E-Bike.
SIGMA RIDE APP
- Set Device and Training Views
- Firmware Update
- Analyze your training
- Share your data
- Navigation/Tracks and many more…
CHARGING AND DATA TRANSFER
- Open USB Cover.
- Insert USB-C cable. Check that the cable and port are dry!
- Charge with 5V max. 1000mA.
- Connect to PC for data transfer
TECHNICAL INFORMATION
| ROX 11.1 EVO | |
| Battery type | Rechargeable 1000 mAh /3.7 Wh Battery |
| Maximum operating altitude | 5000 m |
| Operation temperature | 0 °C to 40 °C |
| Operation frequency | ANT+ 2.4 GHz @ 1 dBm nominal Bluetooth 2.4 GHz @ 1 dBm nominal GPS 1575.42 MHz (receiver only) GLONASS 1602 MHz (receiver only) Galileo 1575.42 MHz (receiver only) |
| Transmission power | Value xx (ref to testing report) |
| Water and Dust rating | IP67 |