IMPORTANT SAFETY INSTRUCTIONS
Read all instructions before using this household sewing machine. When using an electrical appliance, basic safety precautions should always be followed, including the following: Keep the instructions at a suitable place close to the machine. Make sure to hand them over if the machine is given to a third party. This appliance is intended for use by adults. The appliance can be used with adult supervision by (i) children aged from 8 to 12 years and (ii) persons with reduced physical, sensory or mental capabilities or lack of experience and knowledge if they have been given instruction concerning use of the appliance in a safe way and understand the hazards involved. Cleaning and user maintenance shall not be made by children without supervision. It is not allowed for anyone to play with the machine. Children up to 8 years are not allowed to use the machine.
WARNING – TO REDUCE THE RISK OF BURNS, FIRE, ELECTRIC SHOCK, OR INJURY TO PERSON:
- A sewing machine should never be left unattended when plugged in. The electrical socket, to which the machine is plugged in should be easily accessible. Always unplug this sewing machine from the electric outlet immediately after using and before cleaning, removing covers, lubricating or when making any other user servicing adjustments mentioned in the instruction manual.
- Do not allow to be used as a toy. Close attention is necessary when this sewing machine is used by or near children.
- Use this sewing machine only for its intended use as described in this manual. Use only attachments recommended by the manufacturer as contained in this manual.
- Never operate this sewing machine if it has a damaged cord or plug, if it is not working properly, if it has been dropped or damaged, or dropped into water. Return the sewing machine to the nearest authorized dealer or service center for examination, repair, electrical or mechanical adjustment.
- Never operate the sewing machine with any air openings blocked. Keep ventilation openings of the sewing machine and foot control free from the accumulation of lint, dust, and loose cloth.
- Keep fingers away from all moving parts. Special care is required around the sewing machine needle.
- Always use the proper needle plate. The wrong plate can cause the needle to break.
- Do not use bent needles.
- Do not pull or push fabric while stitching. It may deflect the needle causing it to break.
- Wear safety glasses.
- Switch the sewing machine off (“0”) when making any adjustment in the needle area, such as threading needle, changing needle, threading bobbin, or changing presser foot, etc.
- Never drop or insert any object into any opening.
- Do not use outdoors.
- Do not operate where aerosol (spray) products are being used or where oxygen is being administrated.
- To disconnect, turn all controls to the off (“0”) position, then remove plug from outlet.
- Do not unplug by pulling on cord. To unplug, grasp the plug, not the cord.
- The foot control is used to operate the machine. Never place other objects on the foot control.
- Do not use the machine if it is wet.
- If the LED lamp is damaged or broken, it must be replaced by the manufacturer or its service agent or a similarly qualified person, in order to avoid a hazard.
- If the cord connected with the foot control is damaged, it must be replaced by the manufacturer or its service agent or a similarly qualified person, in order to avoid a hazard. For Overlock Machines only:
- Never operate without a cutter cover or a securely installed cover stitch table.
SAVE THESE INSTRUCTIONS
INTRODUCTION
Intended Use
Optimal use and maintenance are described in these instructions. This product is not intended for industrial or commercial use. Additional assistance, by region, may be found online at www.singer.com.
Machine Overview
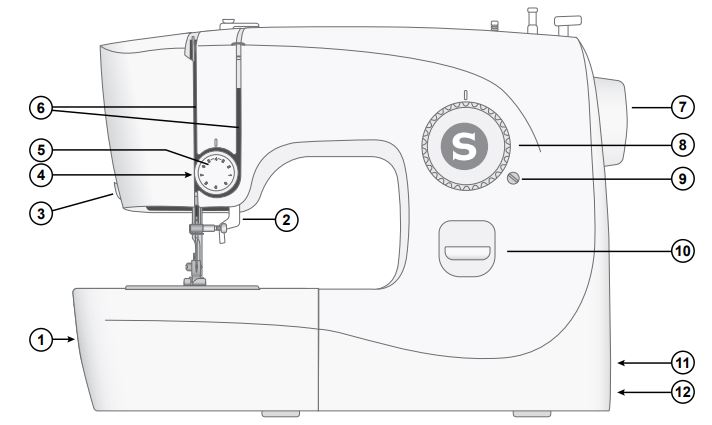
- Accessory Tray / Free Arm — provides a flat surface when sewing and allows storage for your accessories. Remove the accessory tray to use the free arm which makes it easier to sew, e.g., trouser hems and sleeves.
- Presser Foot Lifter
- Thread Knife — for trimming thread ends at the end of sewing.
- Thread Tension Disks — positioned behind the thread tension dial.
- Thread Tension Dial — adjustable for setting the desired tension for your stitch, thread and fabric.
- Threading Slots — thread paths with tension discs and take up lever.
- Hand Wheel — used to manually control the movement of the needle and the thread take-up lever.
- Stitch Selector Dial — is used to select stitch patterns and buttonhole settings (see page 12).
- Buttonhole Balance
- Reverse Sewing Lever — press and hold to sew in reverse, e.g., when securing the beginning or ending of a seam.
- Power and foot control socket
- On/Off switch
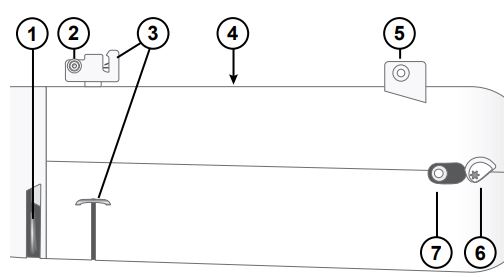
Top of Machine
- Thread take-up lever
- Bobbin winding tension disc
- Thread guides
- Handle
- Spool pin
- Bobbin winding stopper
- Bobbin winding spindle
Needle Area
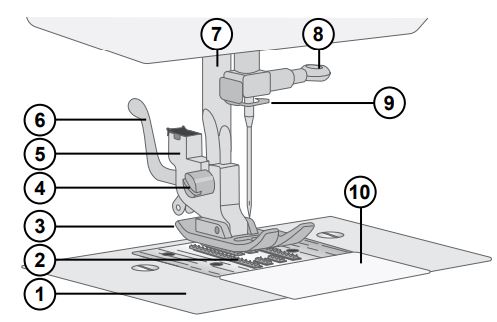
- Needle Plate — provides a flat area around presser foot for sewing. Guidelines indicate various seam allowances used to guide fabric while sewing.
- Feed Teeth — feed the fabric under the presser foot when sewing.
- Presser Foot — holds fabric against feed teeth which draw fabric under the presser foot as you sew.
- Presser Foot Holder Screw — loosen the screw to remove the presser foot holder.
- Presser Foot Holder — holds the presser foot.
- Presser Foot Release Lever — press this lever to release the presser foot from the holder.
- Presser Foot Bar — accommodates the presser foot holder.
- Needle Clamp Screw — secures the needle.
- Needle Thread Guide — helps maintain thread flow when sewing.
- Bobbin Cover — protects the bobbin while sewing.
Accessories
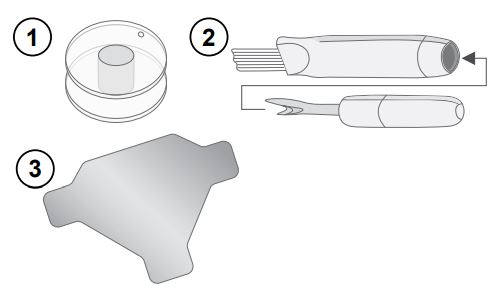
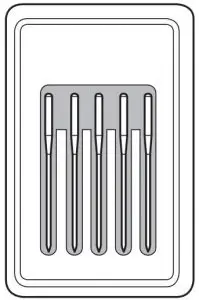
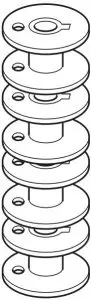
- Bobbin x3 — Only use the type of transparent bobbins de-livered with your machine (SINGER® Class 15 transparent bobbins). One of the bobbins is inserted in the machine upon delivery.
- Brush and Seam Ripper — Used to remove stitches/brush off lint.
- Screwdriver — Used to remove the needle plate, presser foot holder or needle screw.
Included Accessories (Not Pictured)
- Needles
- Foot control
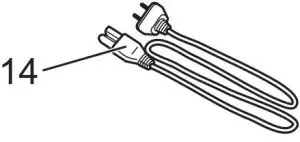
- Power cord
Presser Feet
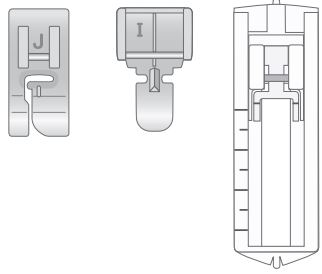
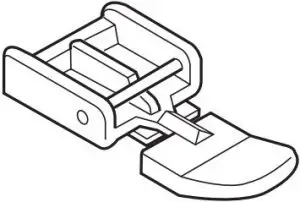
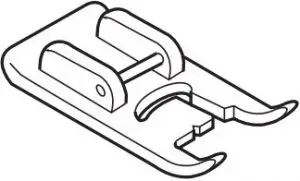
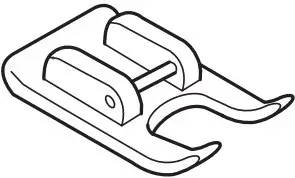
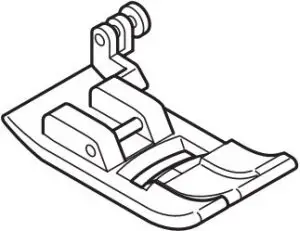
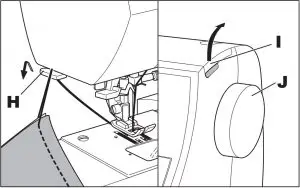
All-purpose Foot (J) (attached to the machine upon delivery) This foot is used for general sewing on most types of fabric. The bottom of the foot is flat, so that the fabric is held down firmly against the feed teeth while sewing. It also has a wide slot so that the needle can move from left to right, depending on which stitch you sew.
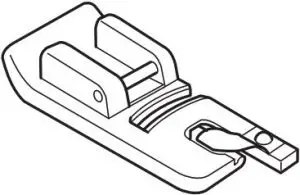
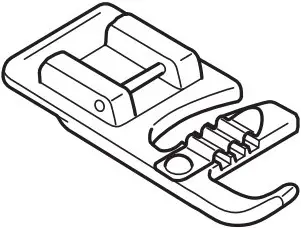
Zipper Foot (I)
This foot is used for inserting zippers. Attach the foot to the presser foot holder on either side of the foot, depending on which side of the zipper is being sewn. The Zipper Foot can also be used to create and insert piping.
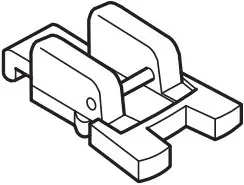
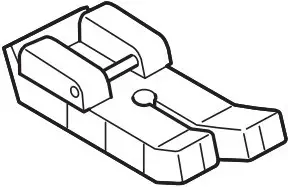
Four Step Buttonhole Foot (D)
This foot is used for making a 4step buttonhole. This foot holds the fabric securely as you sew the top, bottom, left side and right side of your buttonhole.
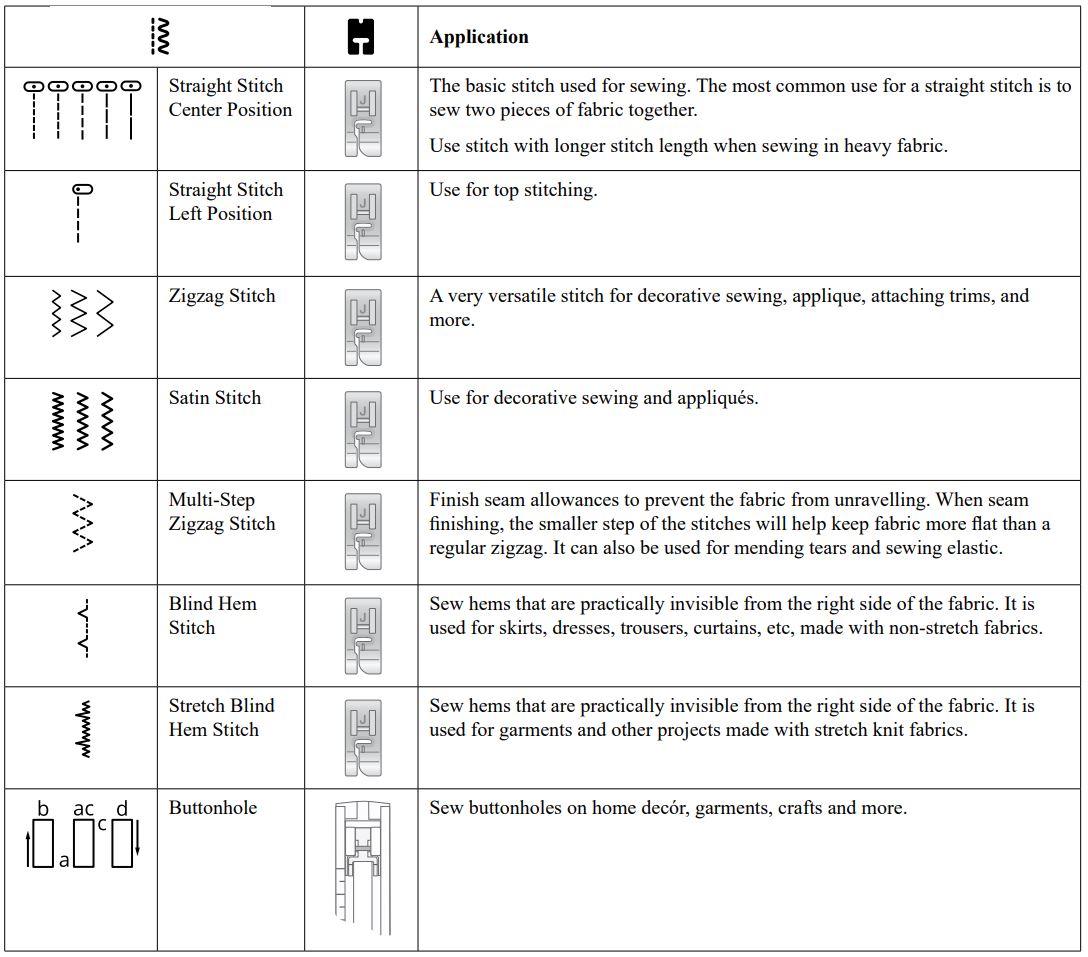
Stitch Overview
The stitches described in the below chart are utility stitches, used mainly for utility sewing. When sewing, use a thread tension between 35. Always test sew on a piece of scrap fabric, and adjust the tension if necessary.
PREPARATIONS
Unpack the Machine
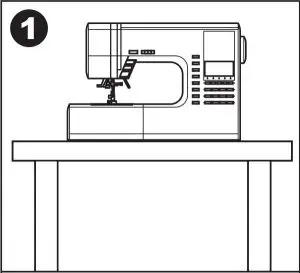
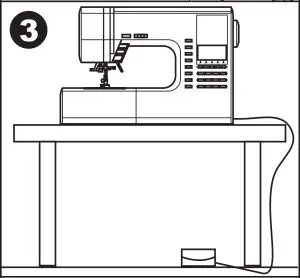
- Place the box on a steady, flat surface. Lift the machine out of the box, and remove the packaging.
- Remove all outer packing material and the plastic bag.
- Wipe off the machine with a dry cloth to remove any lint and/or excess oil around the needle area.
Note: Your sewing machine is adjusted to provide the best stitch result at normal room temperature. Extreme hot and cold temperatures can affect the sewn result.
Connect to the Power Supply
Among the accessories you will find the power cord and the foot control.
For this sewing machine, foot control model HKT7 (110-120V,50/60HZ,2.0A) / HKT72C (GS AX200-240V, 50HZ,0.5A) manufactured by Zhejiang Huaxing Electric Motor Co.,Ltd (China) must be used.
Note: Consult a qualified electrician if in doubt as how to connect the machine to the power source. Unplug the power cord when the machine is not in use.
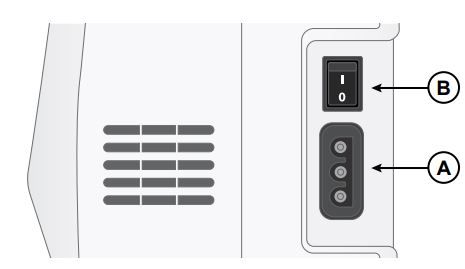
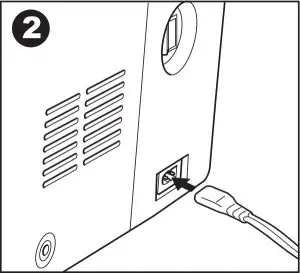
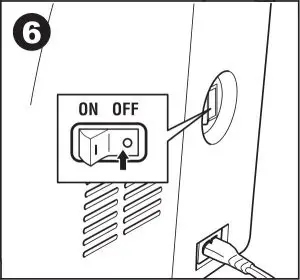
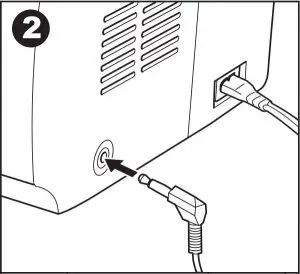
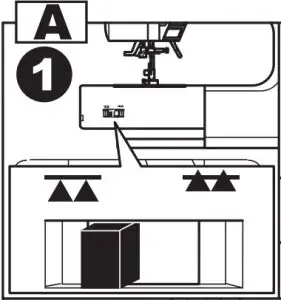
On the bottom right side of the sewing machine, you find the connecting sockets and the ON/OFF button.
- Connect the power cord to the socket on the bottom right side of the machine (A). Plug the cord into the wall socket.
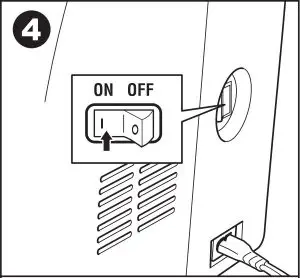
- Press the ON/OFF switch (B) to “I” to turn on power and light.
Sewing speed is regulated by pressing the foot control.
Note: After turning off the machine, residual power may remain in the machine. This could cause the light to stay on for a few seconds while the power is consumed. This is normal for an energy efficient appliance.
For the USA and Canada
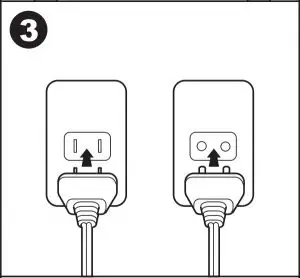
This sewing machine has a polarized plug (one blade wider than the other). To reduce the risk of electric shock, this plug is intended to fit in a polarized outlet only one way. If the plug does not fit fully in the outlet, reverse the plug. If it still does not fit, contact a qualified electrician to install the proper outlet. Do not modify the plug in any way.
Pack Away after Sewing
- Switch the main switch off. After switching off, residual power may still remain in the machine. This may cause the light to stay on for a few seconds while the power is consumed. This is normal behaviour for an energy efficient appliance.
- Unplug the cord from the wall socket and then from the machine.
- Wind the cord around the foot control for easy storage.
- Place all accessories in the accessory tray. Slide the tray on to the machine around the free arm.
- Place the foot control and cord in the space above the free arm.
- Place the soft cover on the machine to help protect it from dust and lint.
Free Arm/Removable Accessory Tray
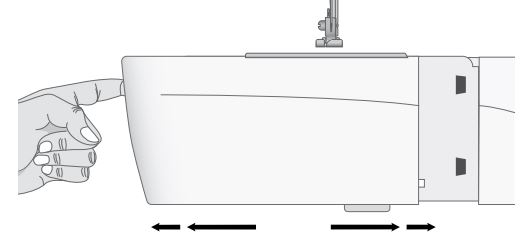
Store presser feet, bobbins, needles and other accessories in the accessory tray so that they are easily accessible. Keep the accessory tray on the machine to provide a larger, flat work surface. Use the free arm to facilitate sewing trouser legs and sleeve hems. To use the free arm, slide off the accessory tray. When attached, a hook keeps the accessory tray securely attached to the machine. Remove the tray by sliding it to the left.
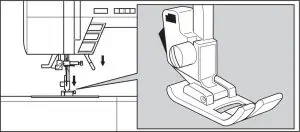
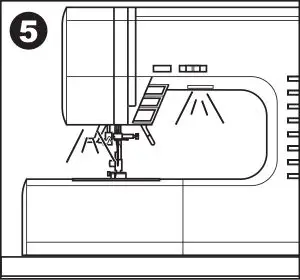
Presser Foot Lifter
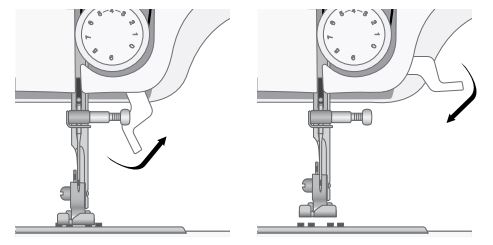
The presser foot lever is located at the side of the sewing machine head. The lever is used to raise and lower the presser foot. Raise the lever up for machine threading, lower it for sewing. When the foot is in the raised position, press the lever further upward for more room under the presser foot. This is good for sewing thick projects.
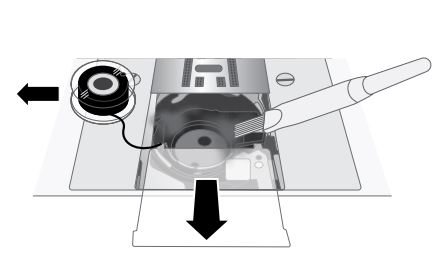
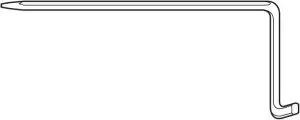
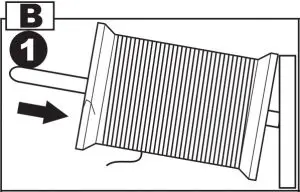
Thread Knife
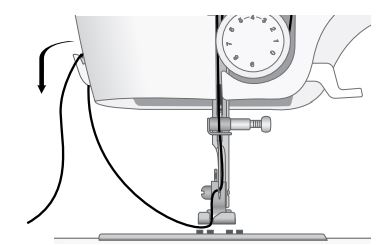
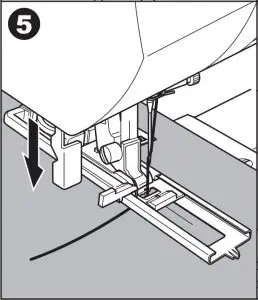
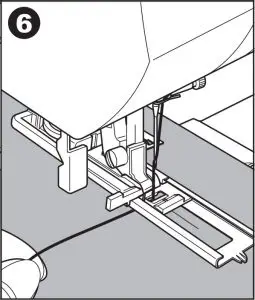
To use the thread knife, pull the thread from back to front as illustrated. Doing this will leave the thread ends long enough so that the needle doesn’t become unthreaded when you start to sew again.
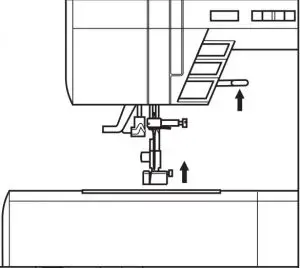
Change the Presser Foot
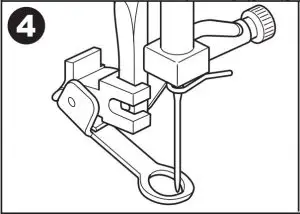
- Make sure that the needle is in the highest position and the presser foot is lifted. The presser foot release lever extends out the back of the presser foot holder. Press this lever to release the presser foot.
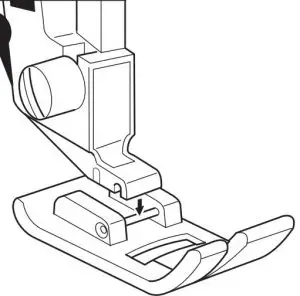
- To attach a presser foot to the holder, place the desired presser foot with its pin directly under the slot in the presser foot holder. Lower the presser foot lifter and the presser foot will snap into place.
Note: If you find it difficult to place the presser foot in the correct position, keep the release lever pressed while lowering the presser foot. Use your thumb to carefully guide the presser foot into the correct position and it will snap into place.
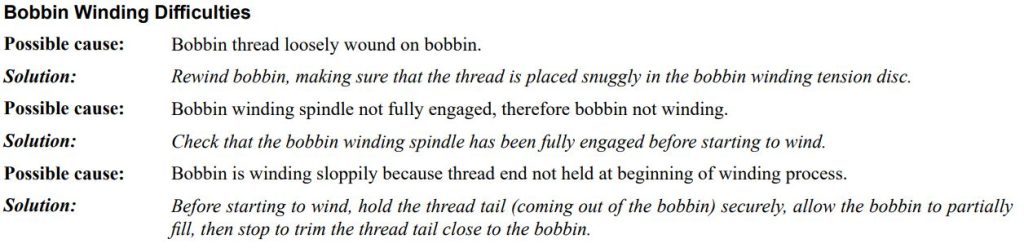
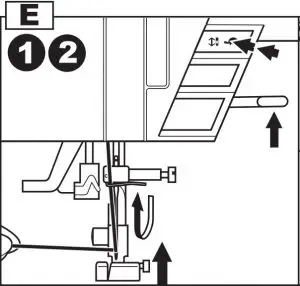
Wind the Bobbin
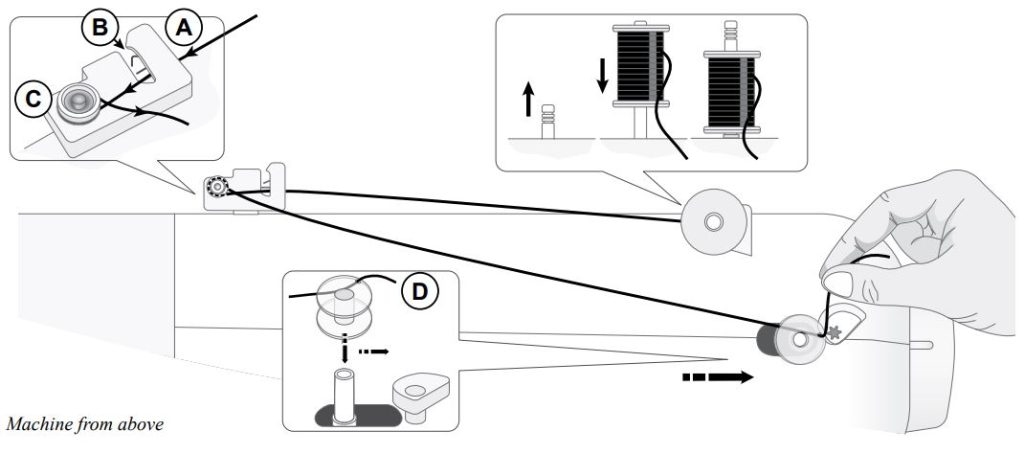
- Pull up the spool pin to its full extent.
- Place a thread spool on the spool pin.
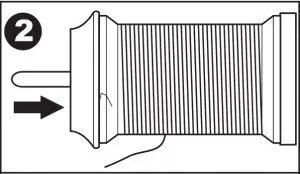
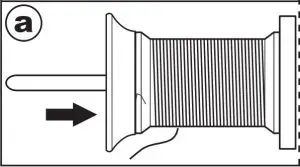
- Place the thread into the thread guide (A) from back to the front. Make sure the threads slips into the spring (B). Bring the thread clockwise around the bobbin winding tension disc (C).
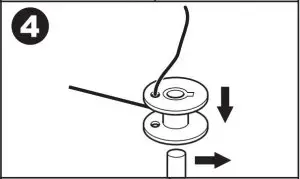
- Thread through the hole in the bobbin (D) from the inside to the outside.
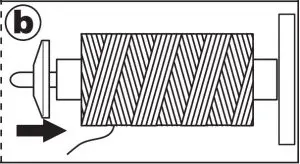
- Place the bobbin on the bobbin winding spindle. Make sure the bobbin is pushed down firmly.
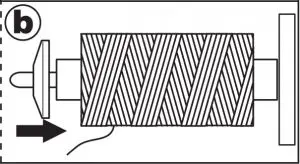
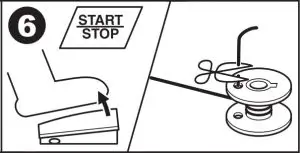
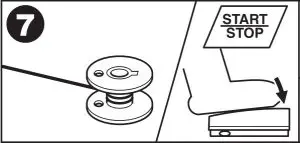
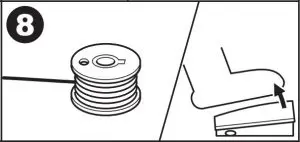
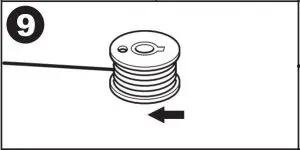
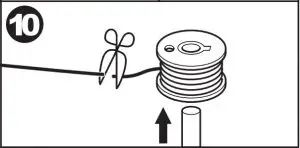
- Push the bobbin winding spindle to the right. Hold the thread end, and press the foot control to start winding. After a few turns, take your foot off the foot control to stop winding. Cut the excess thread tail above the bobbin, making sure to trim it close to the bobbin. Step on the foot control to resume winding. When the bobbin is full, the bobbin winding will slow down.
- Remove your foot from the foot control to stop winding.
- Push the bobbin winding spindle to the left. Remove the bobbin and cut the thread.
Note: When the bobbin winding spindle is pushed to the right, the machine will not sew. Make sure to push the bobbin spindle back to the sewing position (left) before sewing.
Insert the Bobbin
Note: Make sure that the needle is fully raised and the machine is turned off before inserting or removing the bobbin.
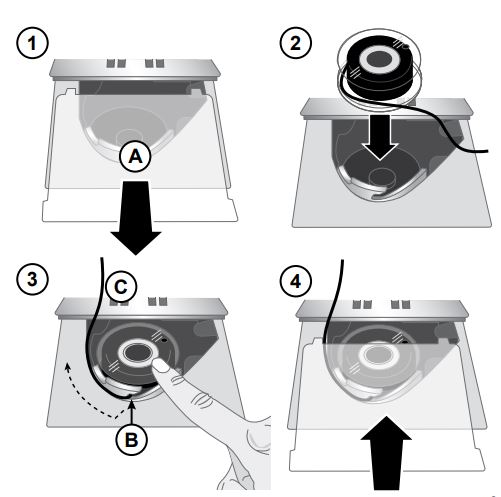
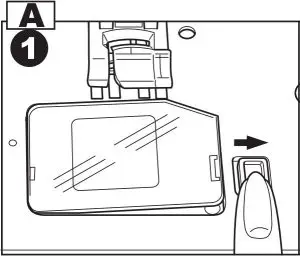
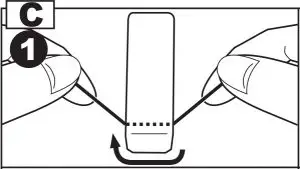
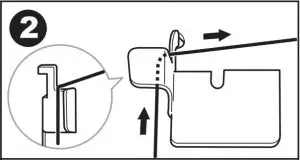
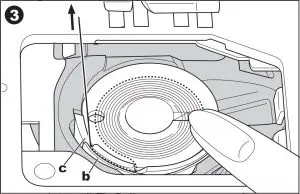
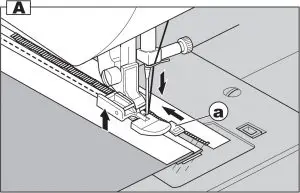
- Remove the bobbin cover (A) by sliding it towards you.
- Insert the bobbin in the bobbin case with the thread running in a counter clockwise direction.
- Pull the thread through the slit (B). Pull out about 15cm (6 inches) of thread and place it to the back over the stitch plate (C).
- Attach the bobbin cover plate.
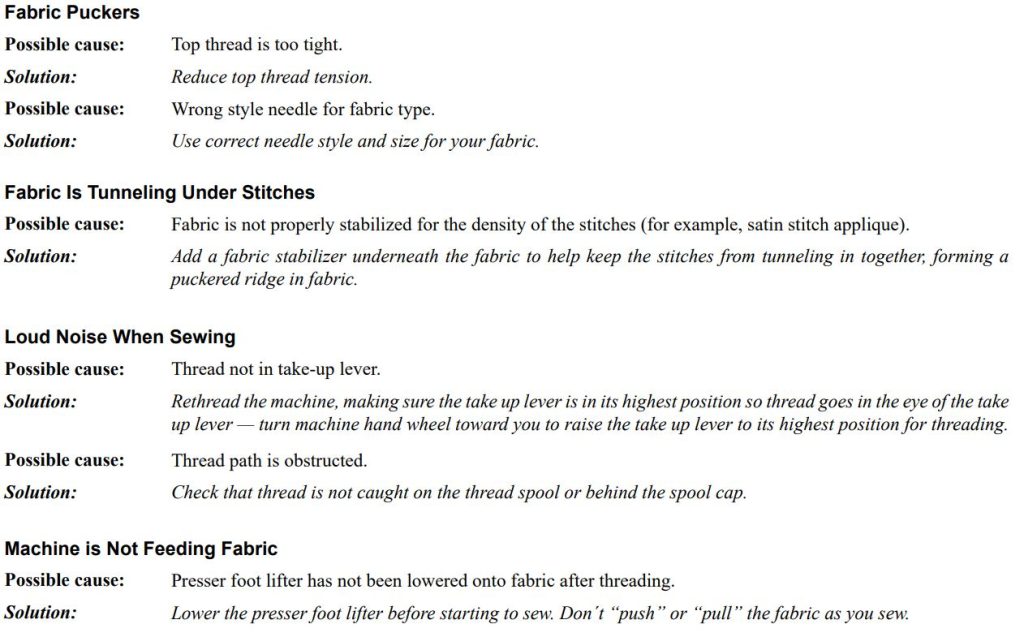
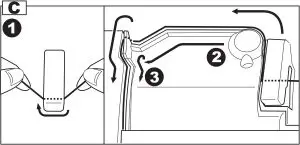
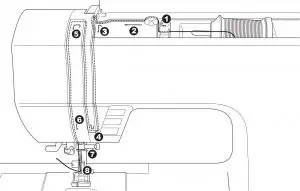
Thread the Machine
Important! Make sure that the presser foot is raised and the needle is in its highest position by turning the handwheel toward you. This is very important to help ensure that the machine is correctly threaded. Not doing so can result in poor stitch quality when you start to sew.
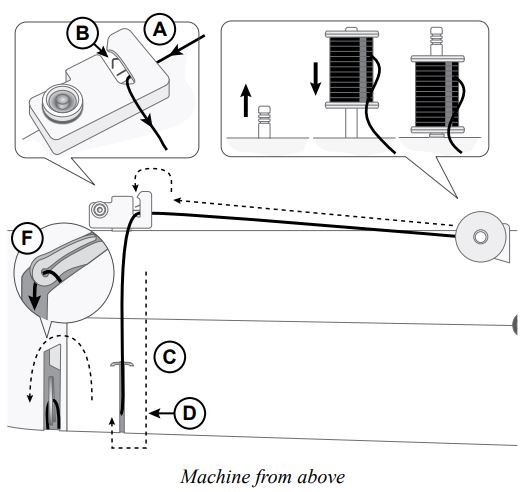
- Pull up the spool pin to its full extent.
- Place a thread spool on the spool pin.
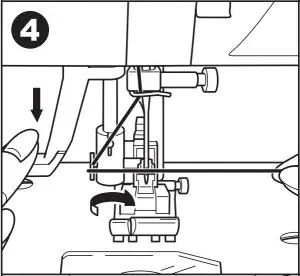
- Place the thread into the thread guide (A) from back to the front. Make sure the threads slips into the spring (B).
- Pull the thread over the thread guide (C) and down in the threading slot (D).
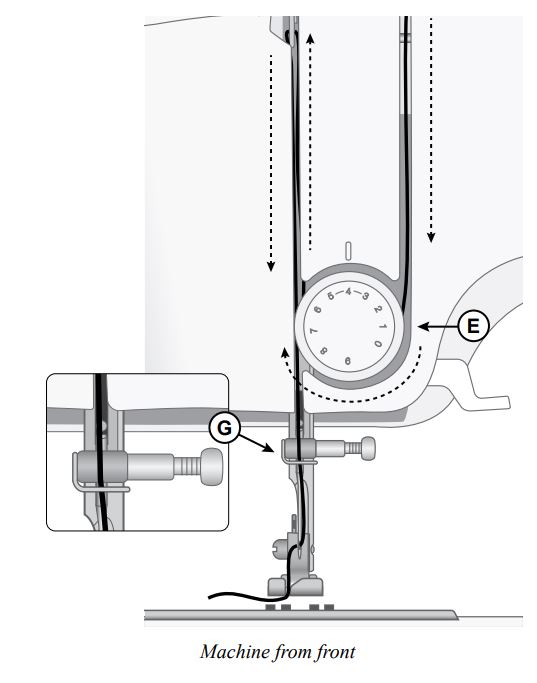
- Continue bringing the thread down through the right threading slot, around the the tension dial (E) (make sure the thread slips into the tension discs). Then bring the thread back upwards through the left threading slot.
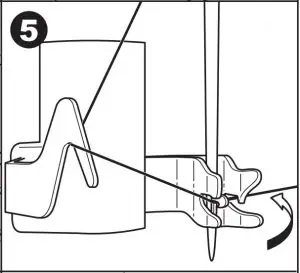
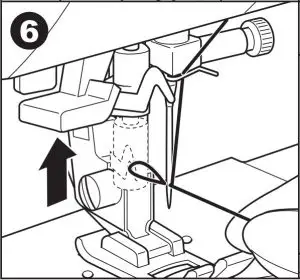
- Bring the thread from the right into the take-up lever (F) and down in the left-hand threading slot, and into the needle thread guide (G).
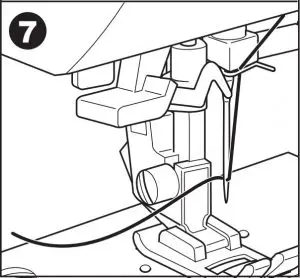
- Thread the needle from front to back.
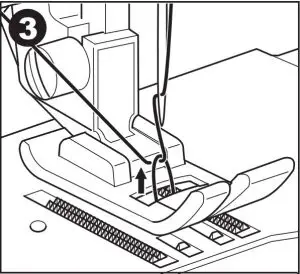
Bring Up the Bobbin Thread
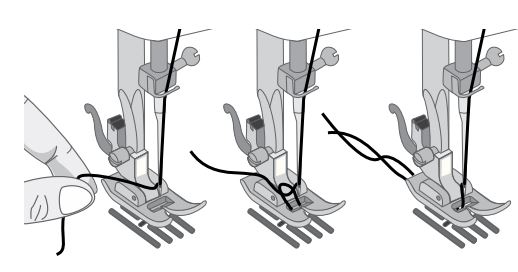
- Hold the upper thread with the left hand. Turn the hand wheel towards you lowering, then raising needle.
- If it is difficult to raise the bobbin thread, check to make sure the thread is not trapped in the bobbin cover.
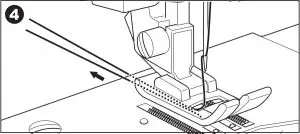
- Gently pull on the upper thread to bring the bobbin thread up through the needle plate hole.
- Lay both threads to the back under the presser foot. Pull out about 68″ (1520cm) of thread behind the needle.
Needles
The sewing machine needle plays an important role in successful sewing. Use only quality needles. We recommend needles of system 130/705H. The needle package included with your machine contains needles of the most frequently used sizes.
![]() Be sure to match the needle to the thread you are using. Heavier threads require a needle with a larger needle eye. If the needle eye is too small for the thread the needle threader may not work properly.
Be sure to match the needle to the thread you are using. Heavier threads require a needle with a larger needle eye. If the needle eye is too small for the thread the needle threader may not work properly.
Note: To avoid the needle break, use only medium/low speed and recommended needle on thick fabrics works.
Important Needle Information
 Change the needle often. As a general rule, needles should be changed every 6-8 hours of actual stitching time.
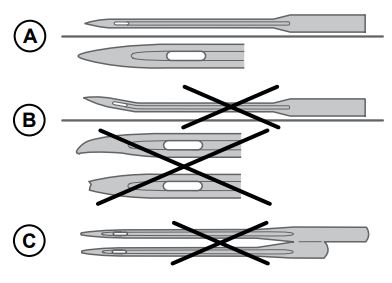
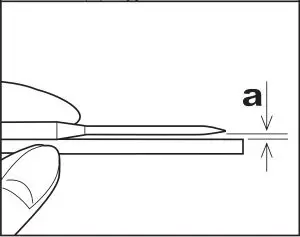
Always use a straight needle with a sharp point and make sure the point is not bent or damaged (A).
A damaged needle (B) can cause skipped stitches, breakage or snapping of the thread. It can also damage the needle plate.
Do not use asymmetrical twin needles (C), they can damage your sewing machine.
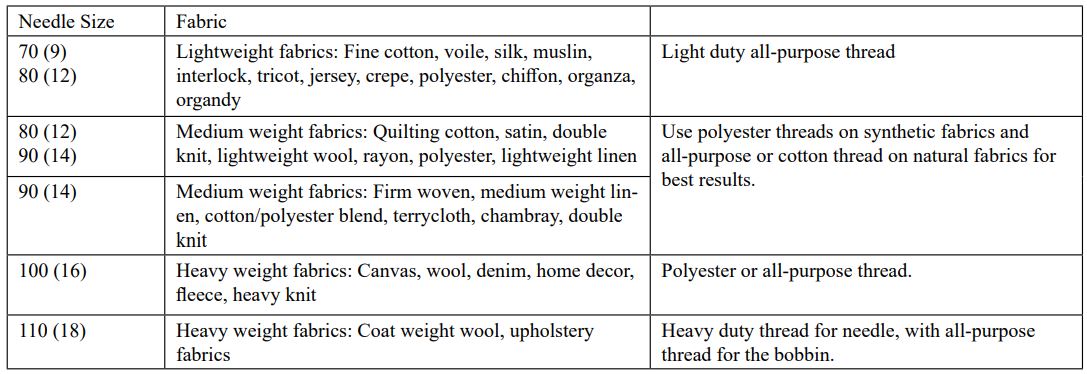
Selection Guide — Needle Size, Fabric, Thread
Change the Needle
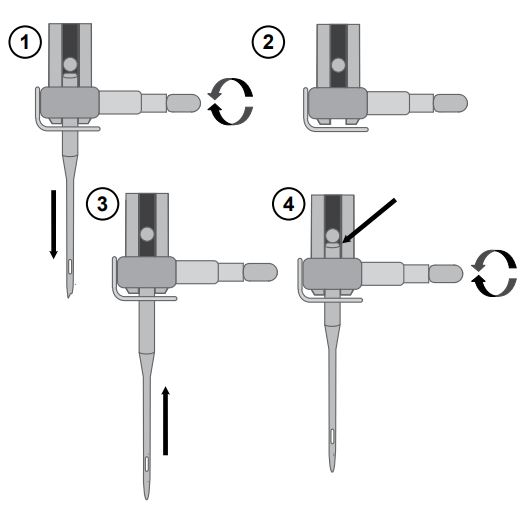
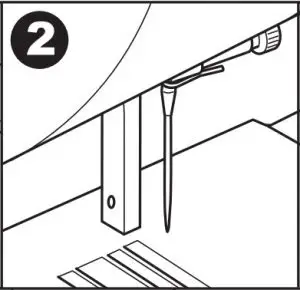
Note: Before you begin changing the needle, it can be helpful to place a small piece of paper or fabric underneath the needle area, over the hole in the needle plate, so that the needle doesn’t accidentally fall down into the machine.
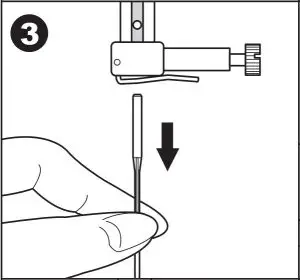
- Loosen the needle clamp screw. If it feels tight, use the screwdriver from your accessories to aid with loosening the screw.
- Remove the needle.
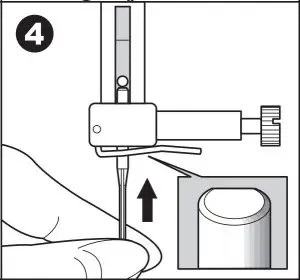
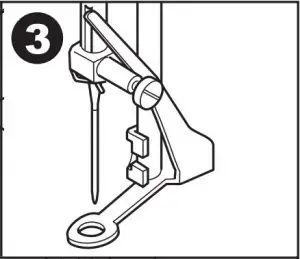
- Push the new needle upwards into the needle clamp with the flat side of the needle away from you.
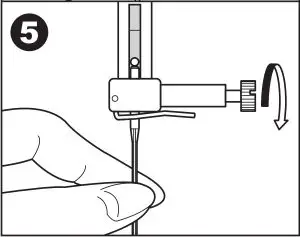
- When the needle will go up no further, tighten the screw securely.
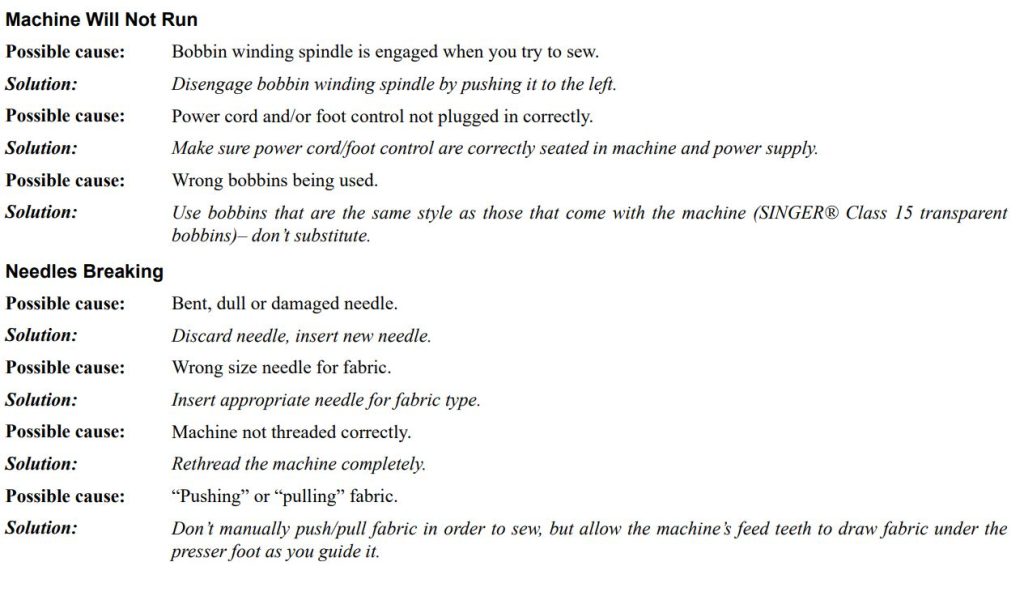
Thread Tension
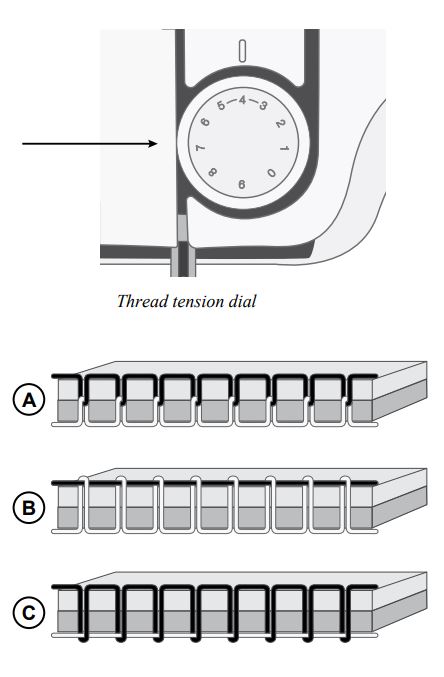
To set the thread tension, turn the dial on the front of the machine. Depending on the fabric, thread, etc, the tension may need to be adjusted. For the best stitch appearance and durability, make sure the needle thread tension is correctly adjusted.
When sewing, use a thread tension between 35
For general sewing, the threads evenly meet between the two layers of fabric (A).
If the bobbin thread is visible on the top side of the fabric, the needle thread tension is too tight (B). Reduce the needle thread tension.
If top thread is visible on the underside of the fabric, the needle thread tension is too loose (C). Increase the needle thread tension.
For decorative stitches and buttonholes, the top thread should be visible on the underside of the fabric.
Make a few tests on a scrap piece of the fabric you are going to sew and check the tension.
Select a Stitch
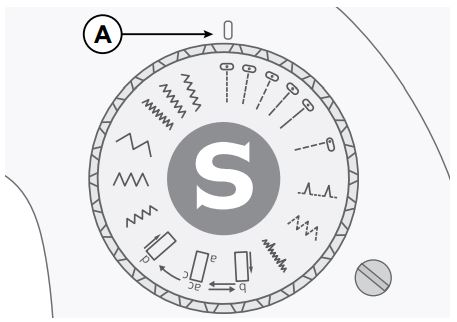
Turn the stitch selector dial to the left or right until the stitch you want to sew is lined up with the dot marking above the dial.
Reverse Sewing
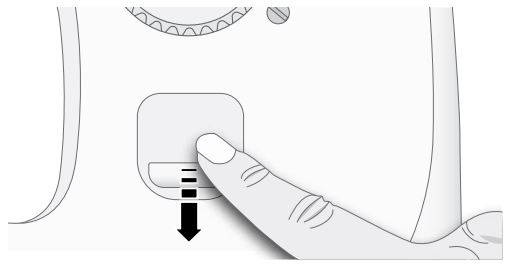
To secure the beginning and the end of a seam, press down the reverse lever. Sew a few reverse stitches. Release the lever and the machine will sew forward again.
SEWING
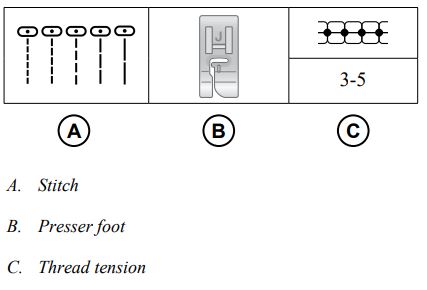
Next to each stitch or sewing technique described in this section of the manual is a chart showing the recommended settings and presser foot. See sample of the chart to the right.
The recommended settings are also shown on the display, but might need adjustment to fit a special technique.
Note: Some fabrics have a lot of excess dye which can cause discoloration on other fabric but also on your sewing machine. This discolouring may be very difficult or impossible to remove. Fleece and denim fabric in especially red and blue often contain a lot of excess dye. If you suspect that your fabric/ready-to-wear garment contains a lot of excess dye, always pre-wash it before sewing to avoid the discolouring.
Note: For best sewing result, use the same thread on top and bobbin. If sewing with specialty/decorative threads, use regular sewing thread in the bobbin.
Note: When sewing in light weight fabrics, always use stabilizer under the fabric. This is to make sure the fabric feed correctly and that the stitches are formed correctly.
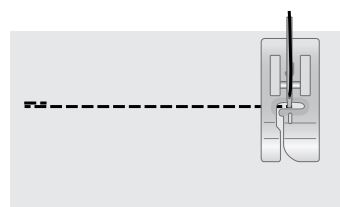
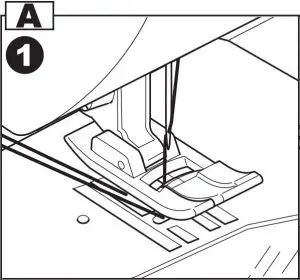
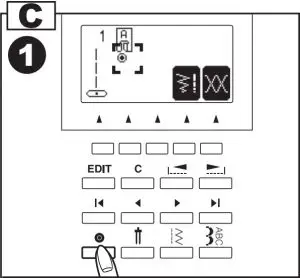
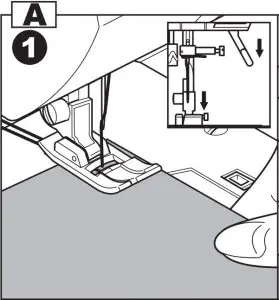
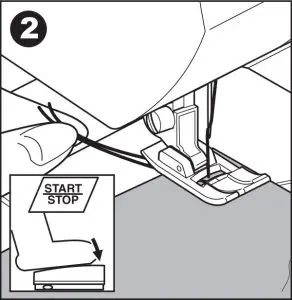
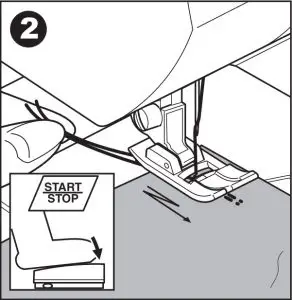
Start to Sew Straight Stitch
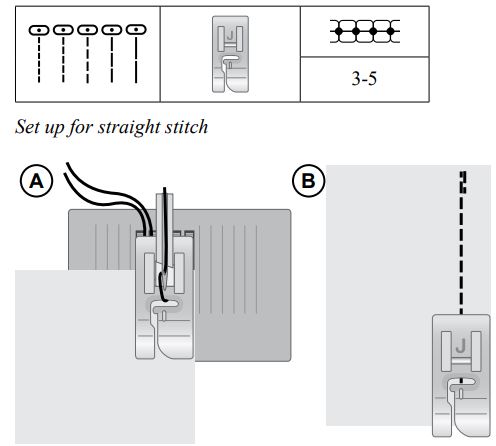
Set your machine for straight stitch (see chart to the right).
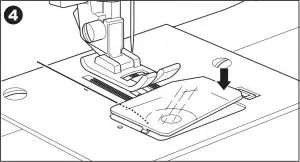
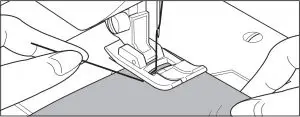
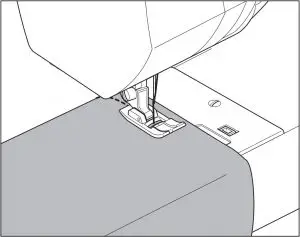
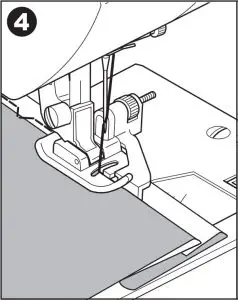
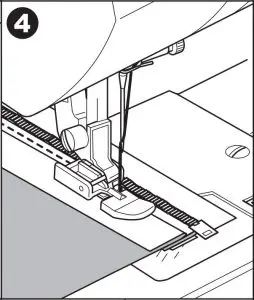
Raise the presser foot and position the fabric under it, next to a seam allowance guide line on the needle plate or bobbin cover.
Place the top thread underneath the presser foot.
Lower the needle to the point where you want to start. Bring the threads toward the back and lower the presser foot. Press the foot control. Gently guide the fabric along the seam guide letting the machine feed the fabric (A).
Note: Do not forget to bring up the bobbin thread before starting to sew (see page 10.)
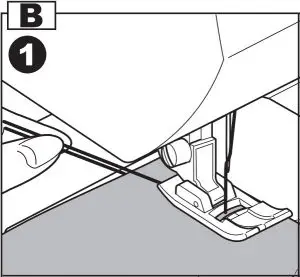
To secure the beginning of a seam, press and hold the reverse lever. Sew a few reverse stitches. Release the reverse lever and the machine will sew forward again (B).
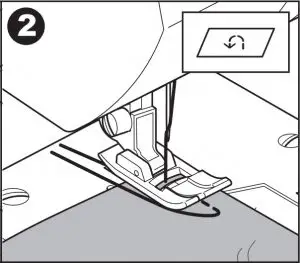
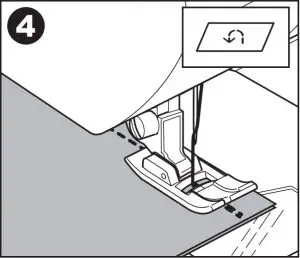
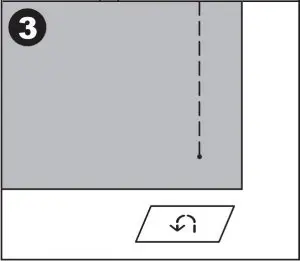
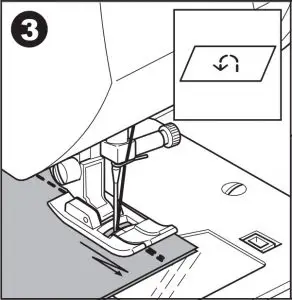
Change Sewing Direction
To change sewing direction, stop the machine and turn the handwheel toward you to bring the needle down into the fabric.
Raise the presser foot.
Pivot the fabric around the needle to change sewing direction as desired. Lower the presser foot and continue sewing in the new direction.
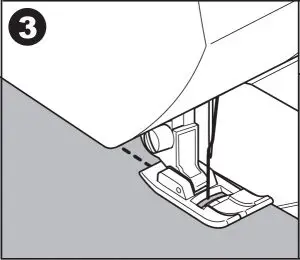
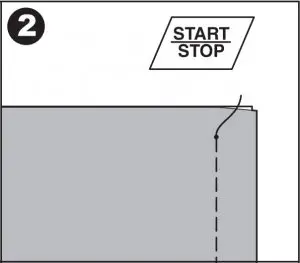
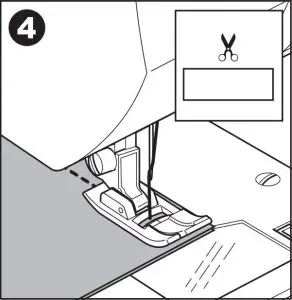
Finish Sewing
Press and hold the Reverse lever and sew a few stitches in reverse when you reach the end of the seam. Release the button and sew forward again to the end of the seam. This will secure the seam so the stitches don’t unravel.
Turn the handwheel toward you to raise the needle to its highest position. Raise the presser foot and remove the fabric, pulling the threads to the back.
Pull the threads up and into the thread knife so that the threads are cut the proper length and your needle won’t come unthreaded when you start the next seam.
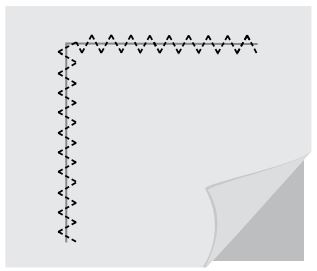
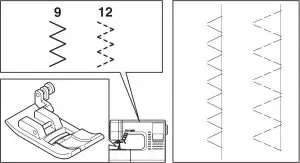
Multi-Step Zigzag Stitch
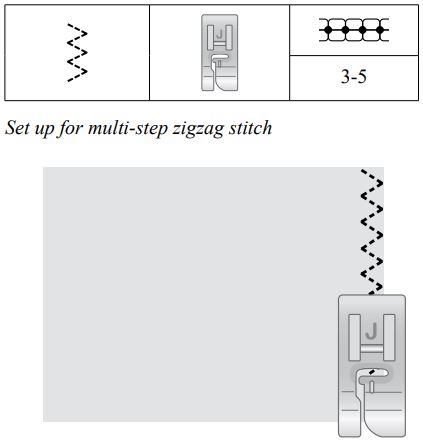
Multi-step zigzag stitch is used to overcast raw edges. Make sure the needle pierces the fabric on the left side and overcasts the edge on the right side.
The stitch can also be used as an elastic stitch to allow seams to stretch when sewing knit fabrics.
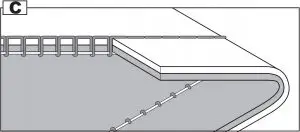
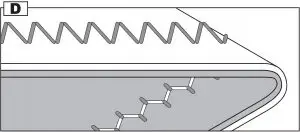
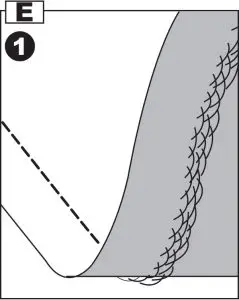
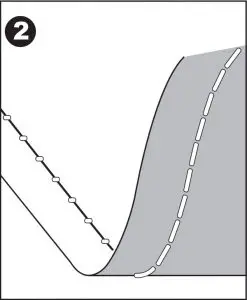
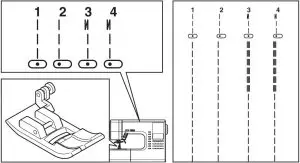
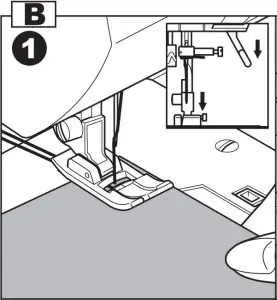
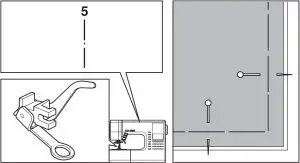
Blind Hems
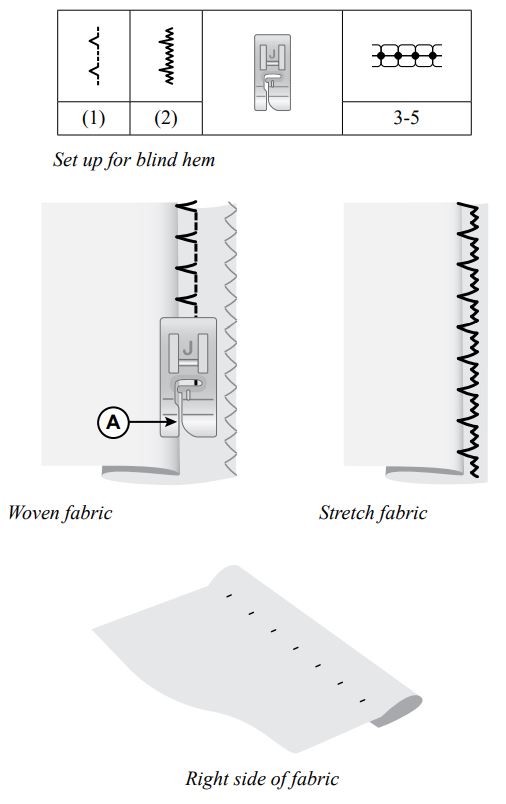
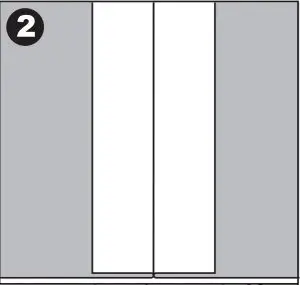
The blind hem stitch is used to make invisible hems on skirts, trousers and home décor projects. There are two types of blind hem; one is recommended for medium to heavy woven fabric (1), the other for medium to heavy stretch fabric (2).
- Finish the raw edge of the hem if sewing on a woven fabric. There is no need to finish the raw edge first on most knits.
- Fold and press the hem allowance to the wrong side.
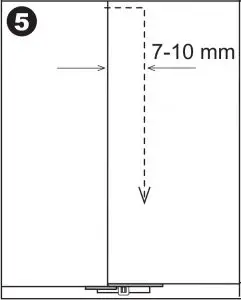
- Fold the hem back on itself so approximately 3/8″ (1 cm) of the finished edge extends beyond the fold. The wrong side of your project should now be facing up.
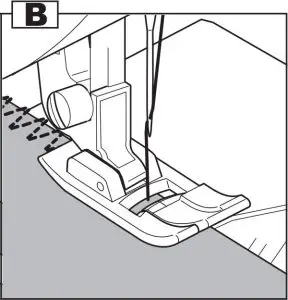
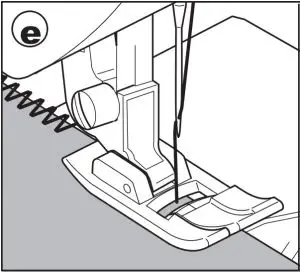
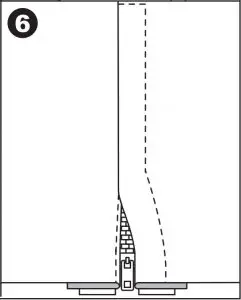
- Place the fabric under the presser foot so that the fold runs along the presser foot as illustrated (A).
- When the needle swings into the fold it should catch a small amount of fabric.
Darning and Mending
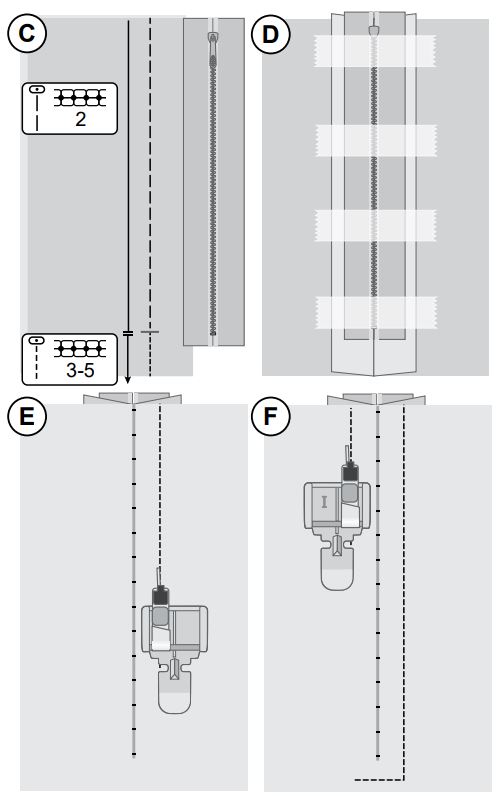
Repair Large Holes
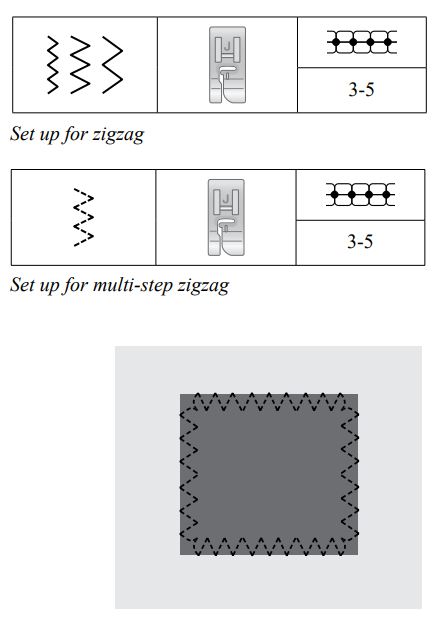
To cover large holes it is necessary to sew a new piece of fabric onto the damaged area.
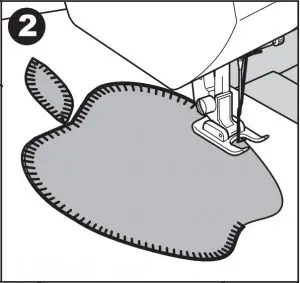
Baste the new piece of fabric onto the damaged area on the right side of the fabric.
Sew over the fabric edges with the zigzag or the multi-step zigzag stitch.
Trim the damaged area close to the seam from the wrong side
of the fabric. 3-5
Repair Tears
On tears, frayed edges or small holes it is useful to lay a piece of fabric on the wrong side of the fabric. The underplayed fabric reinforces the damaged area.
Lay a piece of fabric underneath the damaged fabric. It must be a little larger than the damaged area.
Sew over the damaged area using the zigzag or multi-step zigzag stitch.
Trim the piece of fabric used as reinforcement.
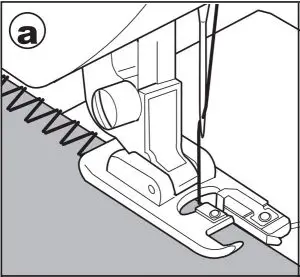
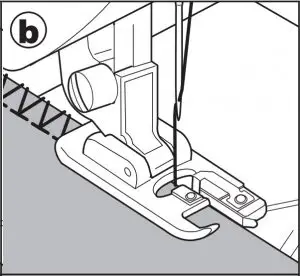
Four-Step Buttonhole
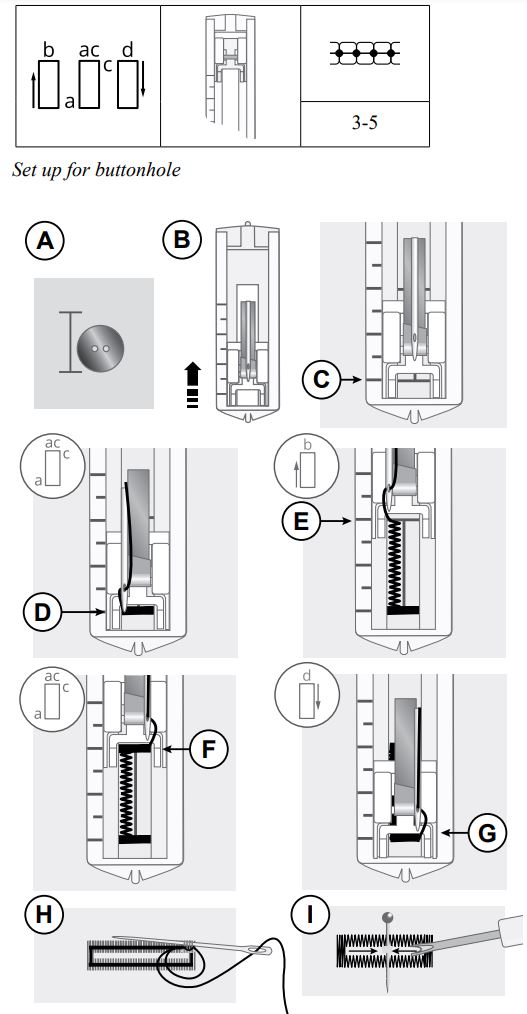
Sew buttonholes perfectly sized for your button. The fabric should be interfaced and/or stabilized where buttonholes are to
be sewn.
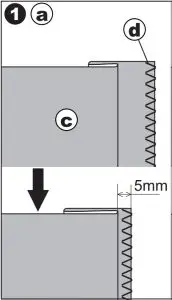
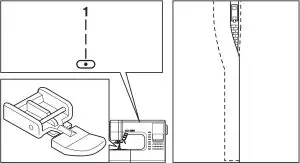
- Measure the button to use for your project. Add 5/8 inch (3mm). Use a fabric marking pencil to mark the starting position and length of the buttonhole on the fabric (A).
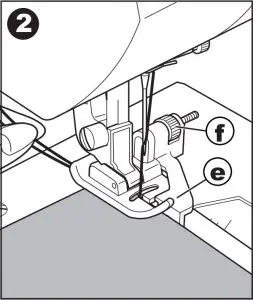
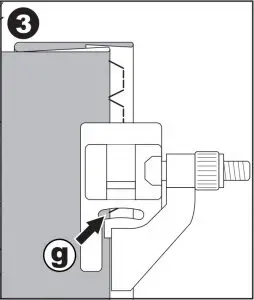
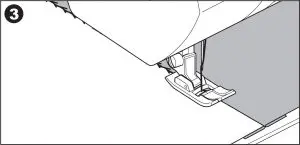
- Attach the buttonhole foot and slide the foot backwards as far as it will go (B).
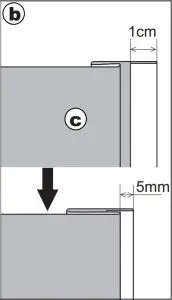
- Place the fabric underneath the foot, aligning the marks on the foot with lines marked on the fabric (C).
- Select buttonhole stitch “ac”. Lower the foot and sew 5-6 stitches, to create the first barrack of the buttonhole (D). Stop when the needle is at the left side of the barrack.
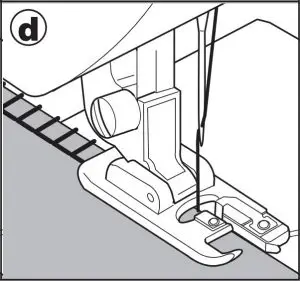
- Raise the needle to its highest position and select buttonhole stitch “b”. Sew the left column backwards to the desired length of the buttonhole (E). Stop when the needle is at the left side of the column.
- Raise the needle to its highest position and select button-hole stitch “ac”. Sew the second barrack (F). Stop when the needle is at the right side of the barrack.
- Raise the needle to its highest position and select buttonhole stitch “d”. Sew the right side of the buttonhole to the same length as the first column (G).
- To secure the barrack, thread the end of the top thread into a hand sewing needle, pull to the wrong side and tie the end before cutting excess thread ((H).
- Use a seam ripper and cut the buttonhole open from both ends towards the middle (I).
Note: Always sew a test buttonhole on a piece of scrap fabric.
Buttonhole Balance
If the density of the buttonhole columns differ, you can adjust the stitch density of the buttonhole. The buttonhole balance dial (A) is found on the right side of the stitch selection dial. Only the left column of the buttonhole will be adjusted. Balance it to match the right buttonhole column.
Normally, the dial should be placed in a neutral position (B).
If the stitches of the left buttonhole column are too dense, turn the dial to the left (C).
If the stitches of the left buttonhole column are too sparse, turn the dial to the right (D).
Sew Zippers
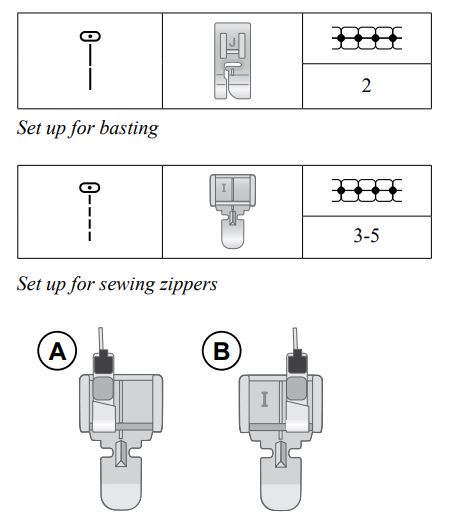
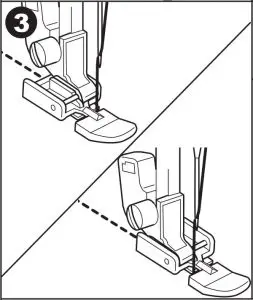
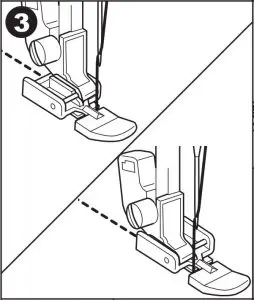
The Zipper Foot can be attached on either the right or the left of the needle, making it easy to sew both sides of the zipper.
To sew the right side of the zipper, attach the foot in the left presser foot position (A).
To sew the left side of zipper, attach the foot in the right presser foot position (B).
Cantered Zipper
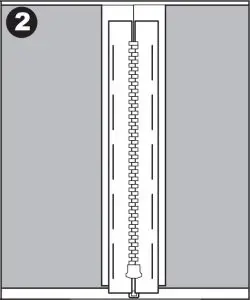
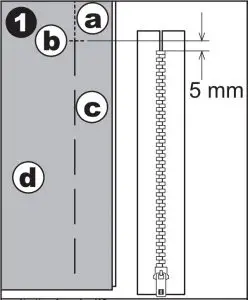
- Place the fabric pieces right sides together and pin. Mark the zipper length on your fabric.
- Baste the zipper seam using the specified seam allowance (use straight stitch with the longest stitch length, thread tension 2). Baste to the end of zipper marking (C).
- Set up the machine for straight stitch (see table above), backstitch a few stitches and sew the rest of the seam using the specified seam allowance (C).
- Press the seam allowances open. Place the right side of the zipper to the wrong side of the seam, tape in place (D).
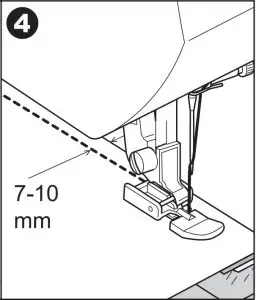
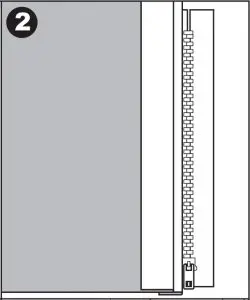
- Flip your project, making sure that the right side is facing up. Snap on the Zipper Foot, to the left side of the needle (A).
- Sew along the right side of the zipper to the end of your zipper, remember to backstitch in the beginning. Stop with the needle down in the fabric, lift the presser foot and turn your project to sew across the bottom of the zipper (E).
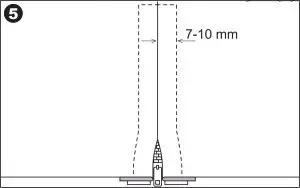
- Attach the Zipper Foot to the right side of the needle (B). Sew the remaining zipper side as you did with the first side
- Flip your project to remove the tape on the back side.
- Flip your project to the right side again and remove the basting stitches.
MAINTENANCE
Cleaning the Machine
To keep your sewing machine operating well, clean it often. No lubrication (oiling) is needed. Wipe the exterior surface of your machine with a soft cloth to remove any dust or lint built up.
Cleaning the Bobbin Area
![]() Raise the needle and turn off the machine.
Raise the needle and turn off the machine.
Remove the presser foot. Slide off the bobbin cover and remove the bobbin. Clean the feed teeth and the bobbin area with the brush found among the accessories. Attach the presser foot, insert the bobbin and replace the bobbin cover.
Cleaning under the Bobbin Area

![]() Raise the needle and turn off the machine.
Raise the needle and turn off the machine.
Clean the area under the bobbin case after sewing several projects or any time you notice an accumulation of lint in the bobbin case area.
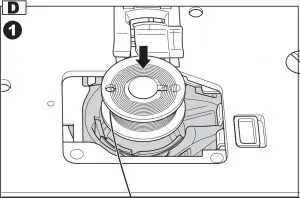
Remove the presser foot. Remove the screws in the needle plate by using the screwdriver. Lift up and remove the needle plate.
Remove the bobbin case by lifting it up.
Clean the area with the brush or with a dry cloth.
Note: Do not blow air into the bobbin case area. The dust and lint will be blown into your machine.
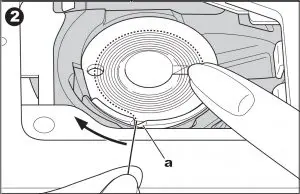
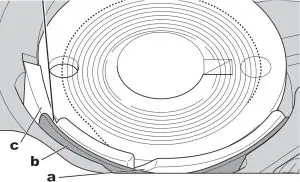
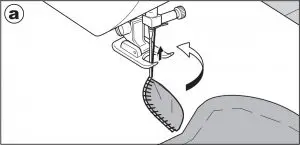
Guide the “forked” end of the bobbin case (A) under the feed
teeth from left to right. The bobbin case should be placed udder the feed teeth and under the spring (B). The mark (C) on the bobbin case should be aligned with the mark (D) on the the hook race for easy placement. Move the bobbin case slightly until it slips correctly into the hook race (E). To make sure the bobbin case is properly replaced, turn the handwheel towards you. The hook race should rotate freely in a counter-clockwise direction.
Place the needle plate over the feed teeth, replace and tighten the screws.
Attach the presser foot and replace the bobbin.
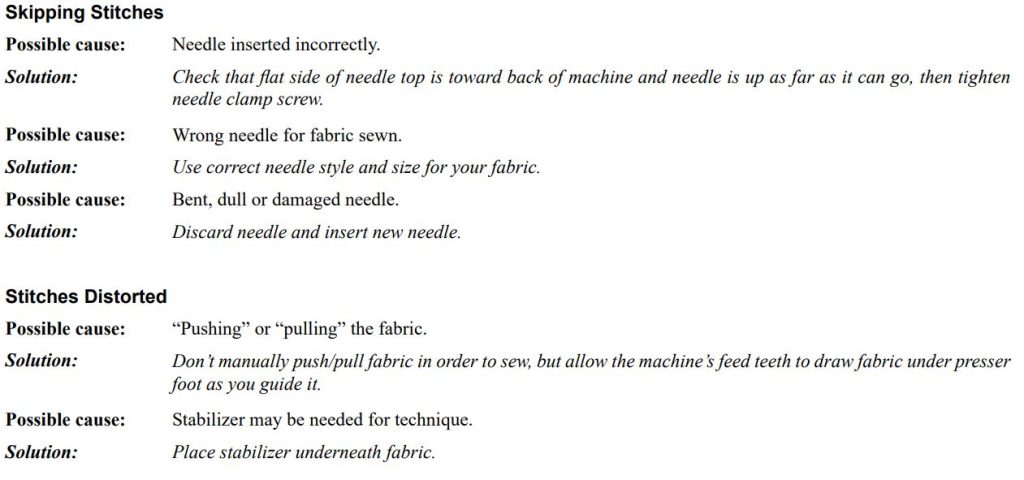
Troubleshooting

Technical Specification
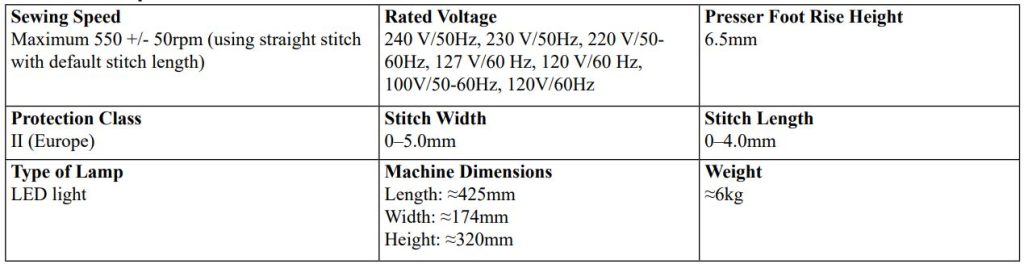
We reserve the right to change the machine equipment and the assortment of accessories without prior notice, or make modifications to the performance or design. Such modifications, however, will always be to the benefit of the user and the product.
INTELLECTUAL PROPERTY
SINGER, and the Cameo “S” Design, are exclusive trademarks of The Singer Company Limited S.à.r.l. or its Affiliates.
![]() Please note that on disposal, this product must be safely recycled in accordance with relevant National legislation relating to electrical/electronic products. Do not dispose of electrical appliances as unsorted municipal waste, use separate collection facilities. Contact your local government for information regarding the collection systems available. When replacing old appliances with new ones, the retailer may be legally obligated to take back your old appliance for disposal free of charge. If electrical appliances are disposed of in landfills or dumps, hazardous substances can leak into the groundwater and get into the food chain, damaging your health and well-being.
Please note that on disposal, this product must be safely recycled in accordance with relevant National legislation relating to electrical/electronic products. Do not dispose of electrical appliances as unsorted municipal waste, use separate collection facilities. Contact your local government for information regarding the collection systems available. When replacing old appliances with new ones, the retailer may be legally obligated to take back your old appliance for disposal free of charge. If electrical appliances are disposed of in landfills or dumps, hazardous substances can leak into the groundwater and get into the food chain, damaging your health and well-being.
MANUFACTURER
VSM Group AB Soldattorpsgatan 3, SE-55474 Jönköping, SWEDEN
![]()
471081526A · English· ©2021 The Singer Company Limited S.à.r.l. or its Affiliates. · All rights reserved · Printed on environment friendly paper
]]>This sewing machine is intended for household use.
This sewing machine is not intended for use by young children or infirm persons without supervision.
IMPORTANT SAFETY INSTRUCTIONS
When using a sewing machine, basic safety precautions should always be followed, including the following.
Read all instructions before using.
 DANGER – To reduce the risk of electric shock:
Never leave unattended when plugged in. Always unplug this machine from the electric outlet immediately after using and before cleaning.
WARNING – To reduce the risk of burns, fire, electric shock, or injury to persons:
- Do not allow to be used as a toy. Close attention is necessary when this sewing machine is used by or near children.
- Use this sewing machine only for its intended use as described in this manual. Use only attachments recommended by the manufacturer as contained in this manual.
- Never operate this sewing machine if it has a damaged cord or plug, if it is not working properly, if it has been dropped or damaged, or dropped into water. Return the sewing machine to the nearest authorized dealer or service center for examination, repair, electrical or mechanical adjustment.
- Never operate the sewing machine with any air openings blocked. Keep ventilation openings of the sewing machine and foot controller free from the accumulation of lint, dust, and loose cloth.
- Never drop or insert any object into any opening.
- Do not use outdoors.
- Do not operate where aerosol (spray) products are being used or where oxygen is being administered.
- To disconnect, turn the power switch to the off position (symbol “O”), then remove plug from outlet.
- Do not unplug by pulling on cord. To unplug, grasp the plug, not the cord.
- Keep fingers away from all moving parts. Special care is required around the sewing machine needle.
- Always use the proper needle plate. The wrong plate can cause the needle to break.
- Do not use bent needles.
- Do not pull or push fabric while stitching. It may deflect the needle causing it to break.
- Switch the sewing machine off (symbol “O”) when making any adjustments in the needle area, such as threading needle, changing needle, threading bobbin, or changing presser foot.
- Always unplug sewing machine from the electrical outlet when removing covers, lubricating, or when making any other user servicing adjustments mentioned in the instruction manual.
- Handle the foot controller with care and avoid dropping it on the floor. Be sure not to place anything on top of it.
- Use only the handle to lift and move the machine.
- Do not expose the machine or machine case to sunlight directly. Also, do not keep it in a very warm or damp place.
SAVE THESE INSTRUCTIONS
Servicing should be performed by an authorized service representative.
SINGER is a registered Trademark of The Singer Company Ltd.
MODEL 9960
PREFACE
Thank you for your purchase of this sewing machine.
This machine intended for household use will provide you with excellent performance in sewing from light to heavy material.
Please refer to this booklet for proper use and optimum service. To get the most out of your sewing machine, read the entire instruction manual before attempting to operate the machine. Then familiarize yourself with the machine by following the instruction manual page by page.
To ensure that you are always provided with the most modern sewing capabilities, the manufacturer reserves the right to change the appearance, design or accessories of this sewing machine when considered necessary without notification or obligation.
FOR EUROPEAN AND SIMILAR TERRITORIES:
This product is suppressed for radio and television interference with the International Electrotechnical Commission requirements of the CISPR.
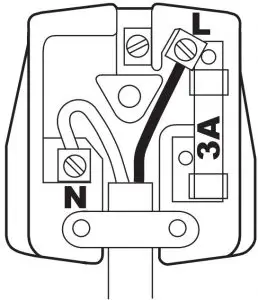
The wires in this mains lead are colored in accordance with the following code. Blue: neutral (N) Brown: live (L) As the colors of the wires in the mains lead of this appliance may not correspond with the colored markings identifying the terminals in your plug, proceed as follows:
The wire which is colored blue must be connected to the terminal which is marked with the letter N or colored black. The wire which is colored brown must be connected to the terminal which is marked with letter L or colored red. If a 13 Amp.(BS 1363) plug is used, a 3 Amp. Fuse must be fitted, or if any other type of plug is used, a 5 Amp. fuse must be fitted either in the plug or adaptor or at the distribution board.
Neither cord is to be connected to the earth terminal of a three-pin plug.
- This appliance is not intended for use by persons (including children) with reduced physical, sensory or mental capabilities, or lack of experience and knowledge, unless they have been given supervision or instruction concerning use or the appliance by a person responsible for their safety.
- Children should be supervised to ensure that they do not play with the appliance.
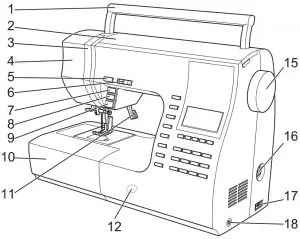
MAIN PARTS
- Handle
- Top Cover
- Thread Take-Up Lever (Inside)
- Face Plate
- Thread Cutter Button
- Speed Control Button
- Needle Up-Down / Slow Button
- Reverse Stitch Button
- Start/Stop Button
- Extension Table (Accessories)
- Presser Foot Lifter
- Forward / Reverse Adjusting Screw (underneath machine)
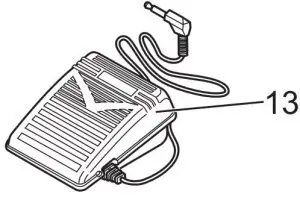
- Foot Controller
- Power Line Cord
- Hand Wheel
- Power Switch
- Terminal Box
- Controller Jack
- Direct Stitch Selection Buttons
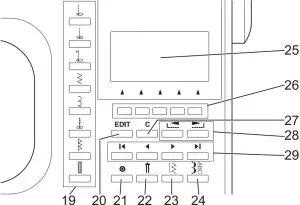
- EDIT Button
- Tack Button
- Twin Needle Button
- Utility Stitch Button
- Decorative Stitch & Letter Button
- Liquid Crystal Display (L.C.D.)
- Function Buttons (F1 – F5)
- Clear Button
- Scroll Buttons
- Cursor Buttons
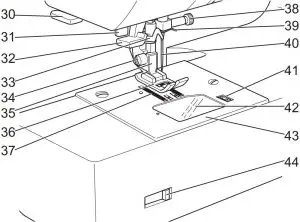
- Thread Cutter
- Buttonhole Lever
- Needle Threader Lever
- Needle Threader
- Presser Foot Thumb Screw
- Presser Foot Holder
- Presser Foot
- Fabric Feed Dogs
- Needle Clamp Screw
- Needle Thread Guide
- Needle
- Bobbin Cover Latch
- Bobbin Cover
- Needle Plate
- Drop Feed Lever
- Pattern Chart
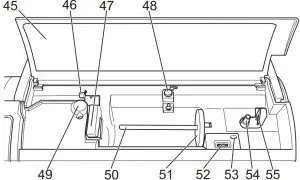
- Thread Guide
- Thread Guide
- Bobbin Winder Thread Guide
- Thread Tension Regulator
- Spool Stand
- Felt Washer
- L.C.D. Contrast Control
- Auxiliary Spool Holder
- Bobbin Winder Shaft
- Bobbin Winder Stop
ACCESSORIES
Accessories are provided in the accessory case. (See next page, [EXTENSION TABLE]).
- Needle Pack
- 4 Bobbins ( 1 is in the machine)
- Seam Ripper

- Brush

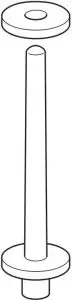
- Auxiliary Spool Pin with Felt Washer
- Screw Driver

- Driver for Needle Plate
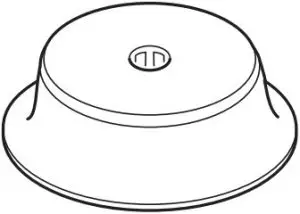
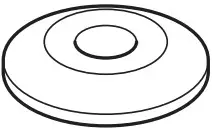
- Thread Cap (On the machine when delivered)
- Small Thread Cap
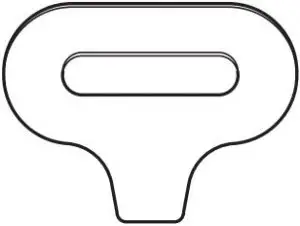
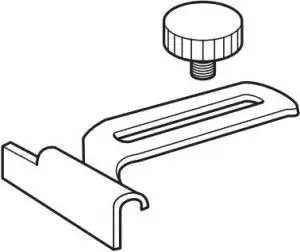
- Seam Guide and Screw
- Overcasting Foot (C)
- Blind Hem Foot (D)

- Zipper Foot (E)
- Rolled Hem Foot
- Button Sewing Foot
- Satin Foot (B)
- Quilting Bar
- Open Toe Foot
- Cording Foot
- Straight Stitch / Patch Quilting Foot
- Darning Embroidery Foot
- Even-feed Foot
- Buttonhole Foot (F) and Under Plate
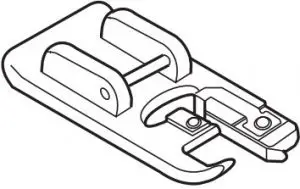
- General Purpose Foot (On machine when delivered) (A)
- An Extra Wide Table is provided with this machine.
DUST COVER
Cover the machine with dust cover when it is not to be used.
a. The manual may be stored in the compartment of the dust cover by opening the front cover towards you.
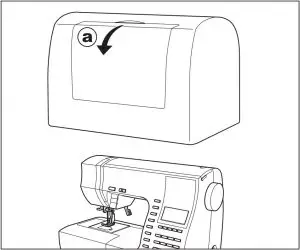
Do not remove the styrofoam located inside of this cover.
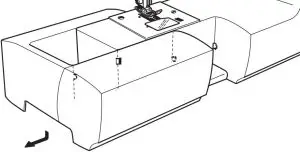
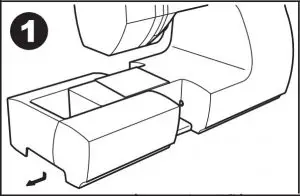
EXTENSION TABLE
- a. REMOVING THE EXTENSION TABLE
Hook your finger to the left bottom side of extension table and slide it to the left. To attach, insert to the right.
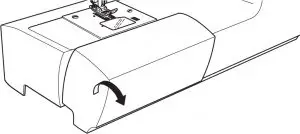
- b. OPENING THE ACCESSORY CASE
Hook your finger to the left side of accessory case and pull toward you.
CHANGING THE PRESSER FOOT
The presser foot must be changed according to the stitch you sew, or work you do.
CAUTION: To prevent accidents. Turn off the power switch before you change the presser foot.
A. Changing the presser foot
- Turn the hand wheel toward you until the needle is at its highest point.
- Raise the presser foot lifter.
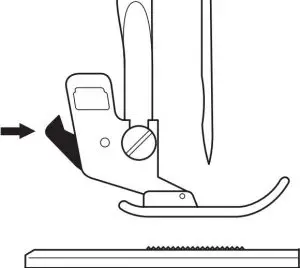
- Remove the presser foot by pushing the presser foot release lever toward you.
- Place desired foot with its pin directly under the slot in presser foot holder.
- Lower the presser foot lifting lever and the presser foot will snap into place.
B. Removing the presser foot holder
When attaching the special presser foot or cleaning the machine, you should remove the presser foot holder.
- Remove the presser foot.
- Loosen the presser foot thumb screw and remove the presser foot holder.
- To replace the holder, pull up the holder as far as it will go from bottom of presser bar.
- Tighten the thumb screw.

INSERTING THE NEEDLE
Select a needle of the right type and size for the fabric to be sewn.
CAUTION: To prevent accidents. Turn off the power before removing the needle
- Turn the hand wheel toward you until the needle is at its highest point.

- Loosen the needle clamp screw.
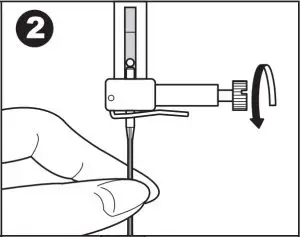
- Remove the needle.
- Insert new needle into needle clamp with the flat side to the back and push it up as far as it will go.
- Tighten the needle clamp screw.
a. Do not use the bent or blunt needle. Place needle on a flat plate and check straightness.
FABRIC, THREAD AND NEEDLE TABLE
Select size of thread and needle in accordance with fabric to be sewn.
| Type of Fabric | Thread Size | Needle Type | Needle Size |
| Light Weight – thin georgette, organdy, voile, taffeta, silk, etc. | Ctn #80 -100 Silk 60 – 80 Syn 80 – 100 |
2000 gray shank | 9/70-11/80 |
| Medium Weight – gingham, pique, linen, cotton, satin, thin corduroy, velvet | Ctn 50 – 80 Silk 50 Syn 50 – 80 |
2000 gray shank | 11/80-14/90 |
| Heavy Weight – gabardine, tweed, denim, corduroy | Ctn 40 – 50 Silk 50 Syn 50 – 60 |
2000 gray shank | 14/90-16/100 |
| Stretch – double knit, tricot, spandex, jersey | Syn 50 – 80 Silk 50 Polyester |
2001 green shank | 11/80-14/90 Needle for knit and synthetic fabric |
| Sweatshirt, Swimwear, Double Knit, Sweater Knit | Polyester | 2001 green shank | |
| Leather | 2032 Leather |
Use a Singer brand needle for better sewing results.
CONNECTING THE MACHINE
DANGER: To reduce the risk of electric shock.
Never leave unattended when plugged in. Always unplug this machine from the electric outlet immediately after using and before maintenance.
WARNING: To reduce the risk of burns, fire, electric shock, or injury to persons.
Do not unplug by pulling on cord. To unplug, grasp the plug, not the cord.
- Place machine on stable table.
- Connect the power line cord to the machine by inserting the 2-hole plug into the terminal box.
- Connect the power line plug to the electric outlet.
- Turn on the power switch.
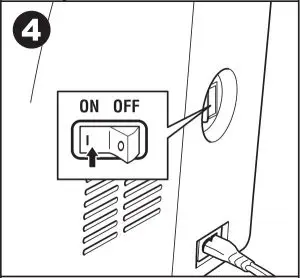
- A lamp will light up when switch is turned on.

- To disconnect, turn the power switch to the off position (symbol O), then remove plug from outlet.
FOR UNITED STATES AND CANADA USERS: POLARIZED PLUG INFORMATION
This appliance has a polarized plug (one blade wider than the other). To reduce the risk of electric shock, this plug is intended to fit in a polarized outlet only one way. If the plug does not fit fully in the outlet, reverse the plug. If it still does not fit, contact a qualified electrician to install the proper outlet. Do not modify the plug in any way.
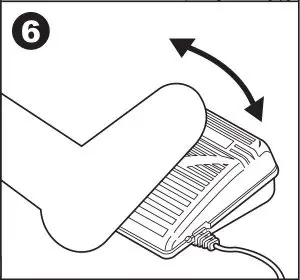
FOOT CONTROLLER
Use of foot controller will permit control of start, stop and speed with your foot.
When the foot controller is connected, start/stop button will be deactivated.
- Turn off the power switch. (symbol O)

- Push foot controller plug into the jack on machine.
- Place foot controller at your feet.
- Turn on the power switch.
- A lamp will light up when switch is turned on.
- The harder you press the foot controller, the faster the machine will sew. The machine will stop when foot controller is released.
WARNING: To reduce the risk of burns, fire, electric shock, or injury to persons.
- Turn off the power when connecting the foot controller to the machine.
- Handle the foot controller with care and avoid dropping it on the floor. Be sure not to place anything on top of it.
- Use only foot controller provided with this machine. (Type 4C-337B)
FUNCTION OF EACH PART
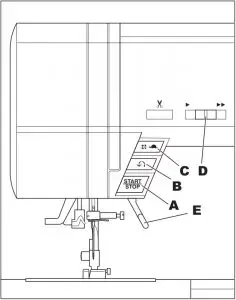
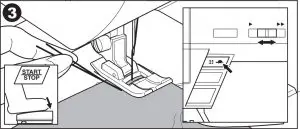
A.START/STOP BUTTON
The machine will start running when start/stop button is pressed and will stop when pressed the second time. The machine will rotate slowly at start of sewing.
MONITOR LAMP
Green Light “ON”
Ready to sew or bobbin winding.
Red Light “ON”
Presser foot is not in down position or buttonhole lever is not lowered.
If the red light is on, the machine will not start even when start/stop button is pressed.
If upper thread is not threaded, machine will stop after a few turns. (Upper thread sensor)
Note: When the foot controller is connected, start/stop button will be deactivated.
B.REVERSE STITCH BUTTON
The machine will continue to sew in reverse at low speed while this button is pressed and stop when this button is released.
Note: When the foot controller is connected, machine will sew in reverse while this button is pressed. When released, machine will sew forward.
C.NEEDLE UP-DOWN / SLOW BUTTON
Pressing this button when the machine is stopped, will change the needle position from down to up or from up to down.
While sewing, by pressing this button, machine will sew in slow speed. Pressing this button again, the speed will return.
D.SPEED CONTROL BUTTON
The machine will sew faster when the button is slid to the right, and sew slower when the button is slid to the left.
Note: When the foot controller is connected, this button limits the maximum speed.
E. PRESSER FOOT LIFTER
The presser foot is lifed up or down by this lever.
Note: Machine will not start when the presser foot is lifted. (Except for bobbin winding).
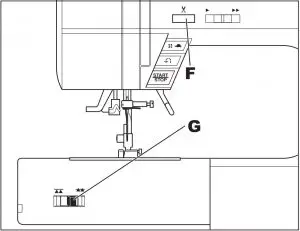
F. THREAD CUTTER BUTTON
Press this button after sewing to cut the upper and bobbin threads.
The machine will cut both threads automatically.
CAUTION
- Do not press this button when there is no fabric in the machine or no need to cut the threads. The thread may tangle, resulting in damage.
- Do not use this button when cutting thread thicker than #30, nylon thread or other speciality threads. In this case, use the thread cutter (H).
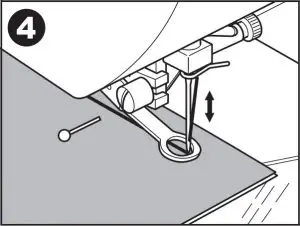
G.DROP FEED LEVER
The fabric feed dogs project up through the needle plate, directly below the presser foot. Their function is to move the fabric being sewn. The drop feed lever controls the fabric feed dogs. For ordinary sewing, move the lever to the right. This raises feed dogs to their highest position. For most sewing, the lever should be in this position. For darning or free motion embroidery or whenever fabric is to be moved by hand, move the lever to the left to lower the fabric feed dogs.
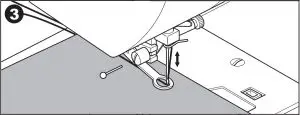
H.THREAD CUTTER
Use this cutter if the thread cutter button is not used.
- Raise the presser foot and bring fabric and threads backward after sewing.
- Hook the threads to the thread cutter from back to front.
- Pull fabric and cut threads.
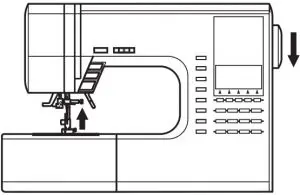
I. TOP COVER
To open the top cover, lift up the right side of cover.
J. HAND WHEEL
By turning the hand wheel, the needle will raise or lower. You should turn hand wheel toward you.
EXTRA WIDE TABLE
If you need wide sewing space, attach the extra wide table as below.
Set the machine and extra wide table on the stable table.
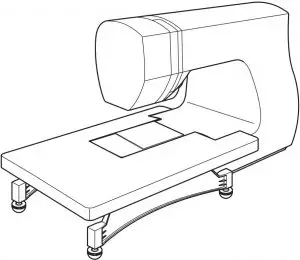
- Remove the extension table.
- Stand up the two legs of extra wide table.
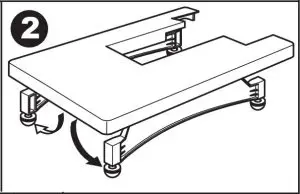
- Insert wide table to the machine sliding to the right.
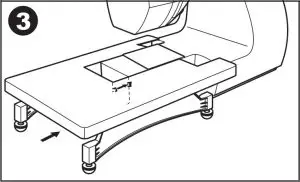
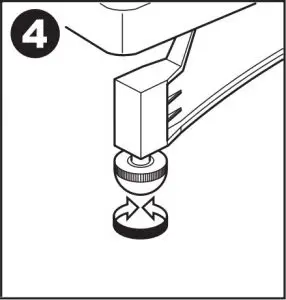
- Adjust the height of table by turning the four rubber feet.
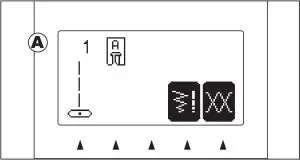
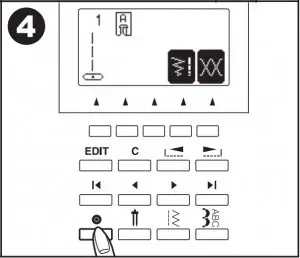
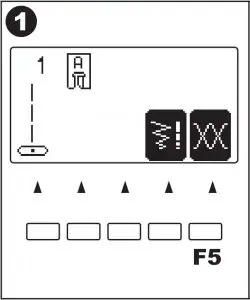
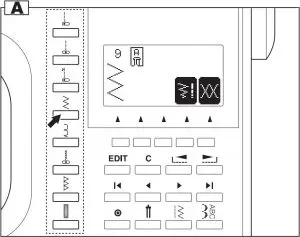
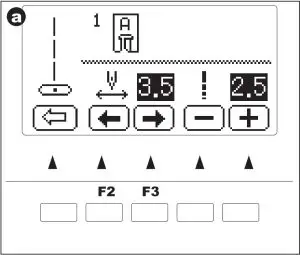
CONTROL PANEL
When you turn on the power, machine will select the straight stitch and indicate information of stitch on the L.C.D.
- A. L.C.D. DISPLAY
Stitch information is indicated on this display.
According to the pattern or mode, information will be changed.
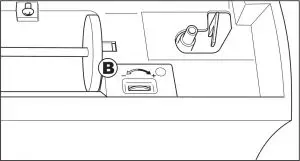
- B. L.C.D. CONTRAST CONTROL
The contrast of L.C.D. is adjusted by turning this dial.
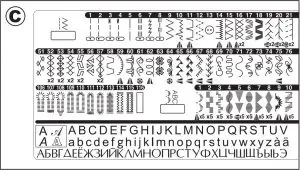
- C. PATTERN CHART
Pattern chart is located inside of the top cover.
All patterns and letters of this machine are indicated on this chart.
They are separated: Utility stitch and Decorative & Letter stitch.
- D. DIRECT STITCH SELECTION BUTTONS
By pressing these buttons, you can select basic utility stitch patterns directly.
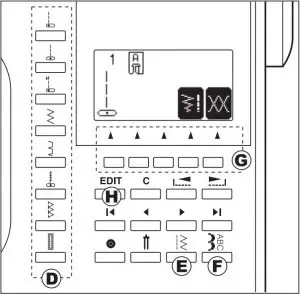
- E. UTILITY STITCH BUTTON
By pressing this button, you may select a utility stitch pattern.
FOR SELECTING AND SETTING OF UTILITY STITCHES. - F. DECORATIVE & LETTER STITCH BUTTON
By pressing this button, you can select decorative & letter stitch patterns.
These patterns and letters are combined easily by selecting each pattern.
FOR SELECTING AND SETTING OF DECORATIVE & LETTER STITCH. - G. FUNCTION BUTTONS
Functions of these buttons are changed by selected stitch pattern and mode. - H. EDIT BUTTON
When selecting decorative & letter stitch, you can change the setting of each pattern by pressing this button. - I. CLEAR BUTTON UTILITY STITCH SEWING
If you changed the setting (mirror/reverse, elongation, stitch width, length and thread tension) of utility stitch pattern, you can return to preset setting by pressing this button.
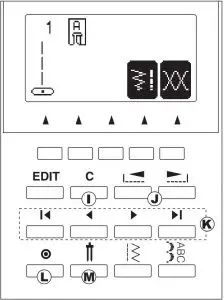
DECORATIVE & LETTER STITCH SEWING
By pressing this button, you can delete one combined stitch pattern or all stitch patterns. - J. SCROLL BUTTONS
During stitch pattern selection, 5 patterns or letters will scroll up or down by pressing these buttons. - K. CURSOR BUTTONS
When decorative & letter stitch sewing, you can check and edit combined patterns or letters by pressing these buttons. - L. TACK BUTTON UTILITY STITCH SEWING
By pressing this button, you can sew a tack stitch at the beginning and at the end of a stitch.DECORATIVE & LETTER STITCH SEWING
If this button is pressed at the end of a decorative stitch pattern, machine will stop automatically at the end of the stitch pattern and tie off the stitch with a locking stitch. - M. TWIN NEEDLE BUTTON
If you attach the twin needle, press this button. Machine will reduce the stitch width.
TO TURN OFF THE AUDIBLE BEEP
You can operate the machine without the audible beep.
- Turn off the power switch.
Turn on the power switch while pressing the EDIT button and the function F1 button. - This function is kept off until the machine is turned off.
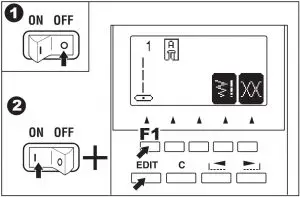
This function turns off the single beep only. Multiple beeps will not turn off.
BOBBIN SETTING
A.REMOVING THE BOBBIN
- Pull the bobbin cover latch to the right and remove the bobbin cover.
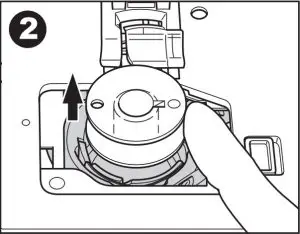
- Lift up the bobbin from the machine.
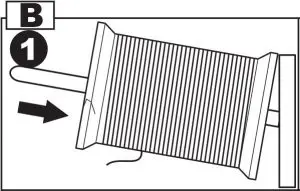
B.SETTING SPOOL OF THREAD ON SPOOL PIN
- Pull up the left end of spool pin and set the spool of thread on spool pin so that the thread unrolls from the front of the spool.
2. Set the spool cap on spool pin as far as it will go.

a: Reverse spool cap direction according to the size of spool.
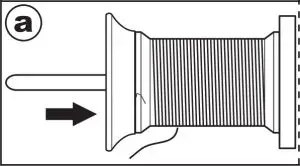
b. Use the small spool cap when you use cross wound thread. Leave small opening between cap and spool as illustration.
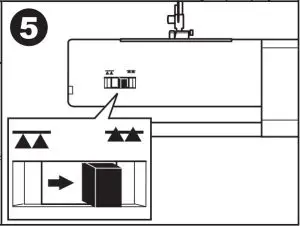
C. WINDING THE BOBBIN
- Hold thread in both hands and hook thread to the guide from front opening.
- Bring thread towards the rear of the machine and pass through the thread guide from left to right.
- Bring thread to the right and pass thread through the thread guide from rear side. Pass thread under tension disc in counter clockwise direction.
- Insert thread through hole in bobbin and place the bobbin on bobbin winder spindle. Push bobbin to the right to engage bobbin winder. LCD will indicate the bobbin winding mode.
- Hold the end of the thread and start the machine by pressing the start/stop button or pressing the foot controller pedal.

- After the bobbin winds a few turns, stop the machine by pressing the start/stop button or releasing the foot controller pedal. Cut the thread near hole.
- Start the machine again.
- The bobbin winding will stop automatically when bobbin is full. (Release the pedal.)
- Push the bobbin and spindle to the left.
- Remove the bobbin from the spindle and cut the thread.

D. INSERTING THE BOBBIN
- Place bobbin into bobbin holder with the thread unwinding counter clockwise.
- Draw thread into notch (a) while holding the bobbin.
- Pull thread toward the left and along the inside of spring (b) until it slips into notch (c) making sure that thread does not slip out of notch (a).
- Pull thread out about 10 cm (4 inches).
Replace the bobbin cover. Set the left tab into the hole in needle plate and push the right side of bobbin cover down until it clicks into place.
NOTE: Use Singer bobbins only
THREADING THE MACHINE
A.PREPARING TO THREAD MACHINE
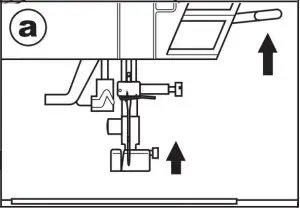
- Raise the presser foot lifter.
- Press the needle up/down button and set the needle in up position. (Keep this position until needle eye threading.)

B. SETTING SPOOL OF THREAD ON SPOOL PIN
- Pull up the left end of spool pin and set the spool of thread on spool pin so that the thread unrolls from the front of the spool.
- Set the spool cap on spool pin as far as it will go.
a: Reverse spool cap direction according to the size of spool.
b. Use the small spool cap when you use cross wound thread. Leave small opening between cap and spool as illustration.
C. THREADING THE UPPER THREAD
- Hold thread in both hands and pass thread to the guide from front opening.
- Bring thread backward and pass through the slit from right to left.
- Bring thread to the left and pull thread down toward you along the slit.
- Pull up thread.
- To thread the take-up lever, draw thread up and bring thread back down again from right to left along the slit.
- Pull thread downward along the slit.
- Draw thread through thread guide from right side opening.
- Pass through needle eye from front to back. Refer instructions on how to use needle threader.
D. THREADING THE NEEDLE EYE
CAUTION: To prevent accidents.
- Keep fingers away from all moving parts. Special care is required around the needle.
- Do not lower the threader lever while machine is operating.
Note: The needle threader is used for needle sizes 11/80, 14/90, and 16/100.
- Lower the presser foot.
- Check that the needle is raised. If it is not so, raise needle by pressing needle up/down button.
- Lower the threader slowly and draw thread through thread guide (a) and pull toward the right.
- Lower the lever as far as it will go. The threader will turn and the hook pin will go through the needle eye.
- Draw thread into the guide.
- Hold thread loosely and release the lever. Hook will turn and pass thread through needle eye while making a loop.
- Pull thread out about 10 cm (4 inches) from needle eye.
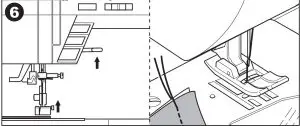
E. DRAWING UP THE BOBBIN THREAD
- Raise the presser foot.
- Hold thread loosely and press needle up/down button twice from up position. The hand wheel will turn one complete turn.
- Pull upper thread lightly. Bobbin thread will come up in a loop.
- Pull both upper and bobbin threads about 10 cm (4 inches) toward the back of presser foot.
STARTING TO SEW
The machine will be set to sew straight stitch when power switch is turned on.

CAUTION: To prevent accidents.
While sewing, special care is required around the needle.
Machine automatically feeds the fabric, do not pull or push the fabric.
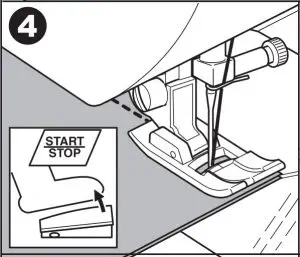
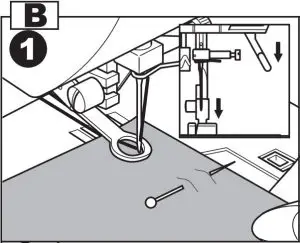
A. START AND END OF SEAM
- Check the presser foot (General Purpose Presser Foot). Refer for changing the presser foot.
- Place the fabric under the presser foot and lower the presser foot.
- Hold back both threads and press the start/stop button or press the foot controller pedal. Keep holding threads after sewing a few stitches.
Lightly guide the fabric while sewing.
You can regulate the sewing speed by sliding the speed control button.
Also, you can reduce the sewing speed by pressing the slow button.
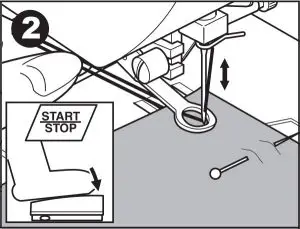
- When you reach end of seam, press the start/ stop button to stop sewing or release the foot controller pedal.
- Press the thread cutter button.

- Raise the presser foot lifter and remove the fabric.
Upper Thread Sensor
If upper thread is broken or missing, machine will stop automatically. Rethread the upper thread and resume sewing.
CAUTION
- Do not press the thread cutter button when there is no fabric in the machine or no need to cut the threads. The thread may tangle, resulting in damage.
- Do not use the thread cutter button when cutting thread thicker than #30, nylon thread or other speciality threads.
In this case, use the thread cutter located on the left side of the machine.
NOTE
After you cut the threads by using the thread cutter button, hold upper thread only at the next starting of seam. (No need to draw up the bobbin thread).
B. REVERSE STITCHING
Reverse stitching is used for reinforcing the ends of the seams.
- Place the fabric in position where back stitching is to be made and lower the presser foot.
- Press and hold the reverse button. Sew 4-5 reverse stitch.
- Release the reverse button and press the start/ stop button (or press the pedal). Machine will change to forward sewing.
- When you reach the end of seam, press and hold reverse button and sew 4-5 reverse stitches.
Note:
The pattern No. 3 and No. 4 have a built-in reverse stitch. Sew this stitch.
C. AUTO TACK STITCH
You may sew tack stitches at the beginning and end of the stitch.
This function can be used with all utility patterns.
- Press the Tack button. Tack mark “
 ” will appear on the L.C.D..
- Start to sew.
Machine will sew tacking stitches automatically and then start to sew the selected pattern.
- When you reach the end of seam, press the reverse button once.
Machine will sew tacking stitches and stop automatically.
- If you want to cancel this function, press the tack button again. Tack mark will disappear.
D. TURNING CORNERS
- Stop the machine when you reach a corner. The machine will stop the needle into the fabric.
- Raise the presser foot.
- Use the needle as a pivot and turn fabric.
- Lower the presser foot and resume sewing.
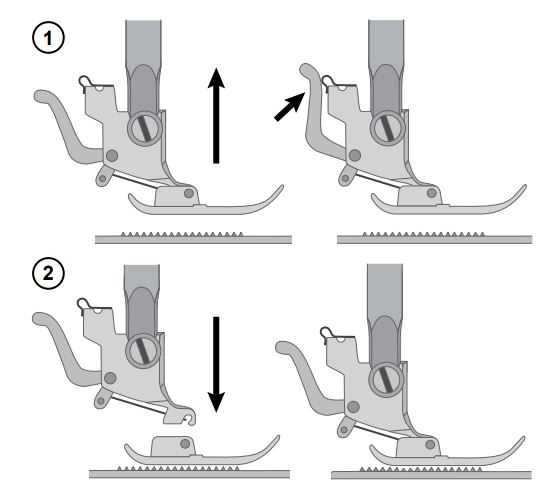
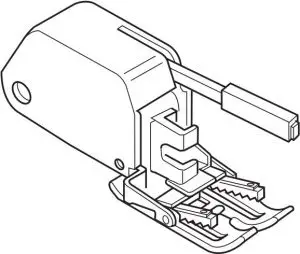
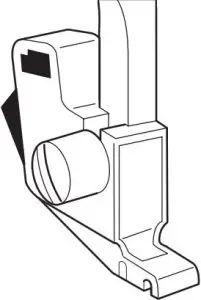
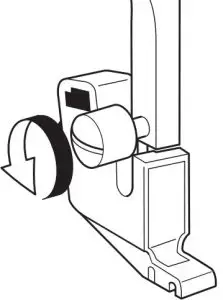
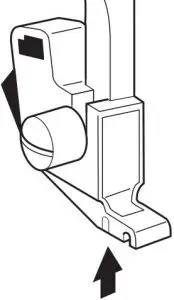
E. SEWING HEAVY FABRIC
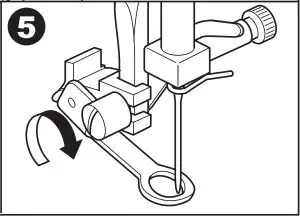
When sewing heavy fabrics, the toe end of presser foot tends to lift up and sewing cannot be started smoothly. In such case, set as follows.
- Raise the presser foot.
- Push the lock button located on the right side of general purpose foot and lower the foot.
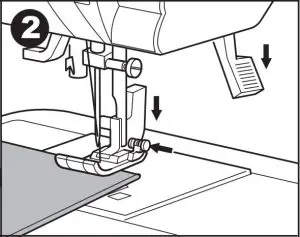
- Start sewing.
As presser foot hinge is locked, fabric will be feeded smoothly.
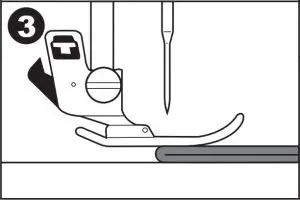
a. The presser bar lifter can be raised 1 step higher for placing heavy materials under the presser foot easily
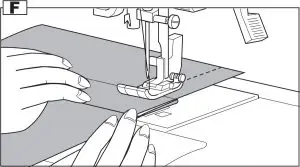
F. SEWING OVER OVERLAPPED AREAS
Guide the fabric with your hand when sewing over overlapped areas.
G. WIDTH OF SEAM ALLOWANCE
Guide lines on the needle plate indicate the distance from the center needle position.
To keep the width of seam allowance, guide fabric edge aligning this guide line.
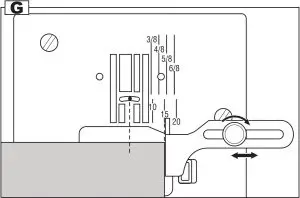
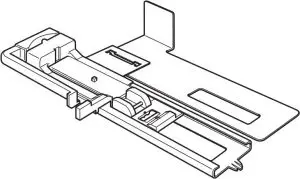
Seam Guide
Use the seam guide to guide the fabric. Attach the seam guide and screw to the needle plate.
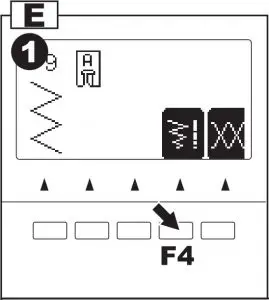
THREAD TENSION
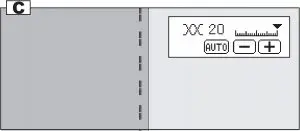
This machine adjusts the thread tension automatically when pattern is selected. However you can change the thread tension as follows.
- Press the function F5 button directly under the tension mark.
LCD changes to the thread tension mode.
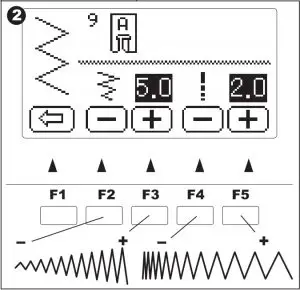
- To increase the upper thread tension, press the
function F5 (+) button.
To decrease the upper thread tension, press the function F4 (–) button.
Pre-set tension number is highlighted.
The mark “  ” is indicating the absolute thread
tension.
By pressing the function F3 (AUTO) or clear “C”
button, thread tension will return to pre-set.
By pressing the function F1 button, LCD return to the previous mode (Stitch information mode). When another stitch pattern is selected, thread tension will return to pre-set.
You can start sewing at this mode and change tension while sewing.
A. Preset thread tension
Upper and bobbin thread will lock approximately in the middle of fabric.
B. When thread tension is increased.
Bobbin thread will appear on the top side of fabric.
C. When thread tension is decreased.
Upper thread will appear on the bottom side of fabric.
D. Thread tension except for straight stitch
Thread tension except for straight stitch is set to a slightly weaker tension than when sewing straight stitch.
You will obtain a nicer stitch when upper thread appears on bottom side of fabric.
E. Helpful Hints
- If your sewing appears as shown on drawing, stitches on top side of fabric are good but bottom side tends to look like a towel, it could be that the upper thread is not threaded correctly.
- If after checking the top thread and the bobbin thread is still showing on the top side, check the bobbin to see if it is set correctly.
SELECTING UTILITY STITCH PATTERN
Utility stitches are indicated in the pattern chart located inside of the top cover.
When you turn on the machine, straight stitch will be selected automatically.
Select utility stitch pattern as follows.
A.DIRECT STITCH PATTERN
You can select basic utility stitch patterns directly by pressing the Direct Stitch Selection Buttons. Selected pattern will be indicated on the LCD.
B.SELECTING OTHER UTILITY STITCH PATTERNS
- Press the utility button.
First 5 patterns will be indicated on the LCD.
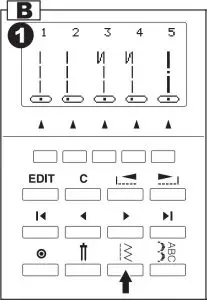
- Press the right scroll button, next 5 patterns will appear.
By pressing the left or right scroll button, you can scroll up or down in increments of 5 patterns. (You can also scroll down by pressing the utility button.)
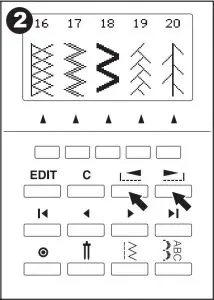
- To select a pattern, press the function button directly under the desired pattern.
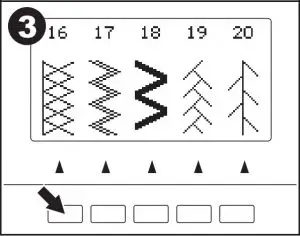
- When pattern is selected, LCD will indicate the information of selected pattern. (Stitch information mode)
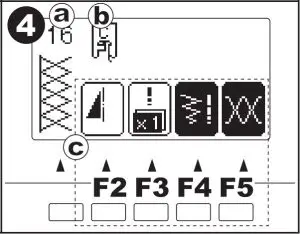
- a. Stitch Number and pattern
- b. Suitable presser foot
- c. Function of function button
F2 Mirror/reverse
F3 Elongation
F4 Stitch Width, Length
F5 Thread Tension
If the function mark is not indicated, its function can not be used.
C. MIRROR/REVERSE STITCH
You can set the mirror stitch, or reverse stitch or mirror/reverse stitch.
Pressing the function button (F2) directly under the mirror/reverse icon, stitch will flip from left to right or from front to back.
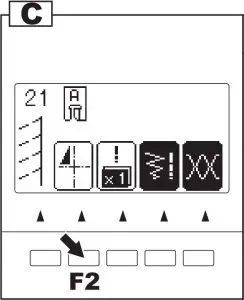
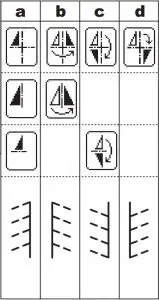
The icon on the LCD indicates the selected stitch as follows:
- a. Regular stitch (normal stitch)
- b. Mirror stitch (reverse left and right)
- c. Reverse stitch (reverse front and back)
- d. Mirror and Reverse stitch
If the mark is not indicated, the pattern cannot change to mirror or reverse stitch. When you pressed clear “C” button, machine will return to regular stitch (also elongation will return to regular length.)
D. ELONGATION
Some patterns may be elongated from the original length. You may elongate the pattern by pressing the function button (F3) directly under the elongation icon.
- a. Regular length
- b. Elongated
A pattern cannot be elongated if the elongation icon is not indicated.
When you pressed clear “C” button, machine will return to regular length (also mirror/reverse will return to regular stitch.)
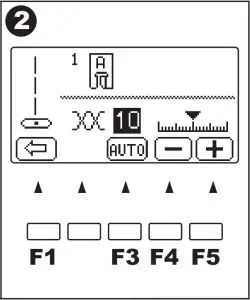
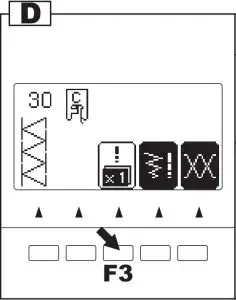
E. SETTING STITCH WIDTH AND LENGTH
Machine will set the stitch width and length suitable for the pattern.
- You can make changes by pressing the function button (F4) directly under the width and length mark.
- LCD will change to show the stitch width and length.
For narrower width, press function button F2 (–).
For wider width, press function button F3 (+).
For shorter length, press function button F4 (–).
For longer length, press function button F5 (+).
Pre-set stitch width and length will be indicated as a highlighted number.
When you pressed clear “C” button, machine will return to preset stitch width and length.
When you press the return button (F1), LCD will indicate previous mode (Stitch Information mode).
- a. For straight stitch patterns (No. 1, 2, 3, 4, 6, 8), Stitch width buttons will change the needle position.
To shift the needle to the left, press function button F2.
To shift the needle to the right, press function button F3.
Note: When further width or length adjustments are not possible, machine will emit multiple audible beeps.
If the width, length or number icons are not indicated, the pattern cannot be changed. Adjustments to the patterns may be made while sewing.
WHERE TO USE EACH STITCH
- 01. Straight stitch center needle positon • For top stitching, zipper sewing etc.
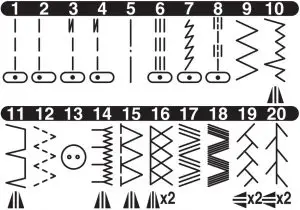
- 02. Straight stitch left needle position • For top stitching etc.
- 03. Straight stitch with auto-reverse stitch center needle position.
- 04. Straight stitch with auto-reverse stitch left needle position.
- 05. Basting
- 06. Straight stretch stitch • Reinforcement straight stitch
- 07. Stem stitch for stretch fabrics
- 08. Quilt stitch like hand made
- 09. Zigzag stitch • For overcasting, applique, patch work etc.
- 10. Elastic blind hem
- 11. Blind Hem
- 12. Multiple stitch zigzag • For overcasting knit fabrics, elastic sewing.
- 13. Button sewing
- 14. Decorative stitch
- 15. Overcasting
- 16. Overcasting of stretch fabric, decorative stitch
- 17. Ric Rac stitch
- 18. Double Ric Rac stitch
- 19. Fagoting
- 20. Patch work
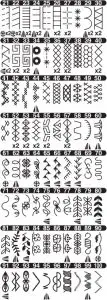
- 21-100. Decorative and Functional stitches
- 101. Eyelet
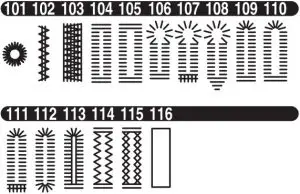
- 102. Bar-tack
- 103. Darning
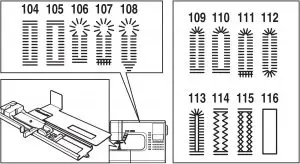
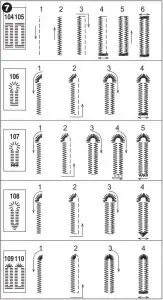
- 104. Bar-tack Buttonhole (Narrow)
- 105. Bar-tack Buttonhole (Wide)
- 106. Keyhole Buttonhole
- 107. Keyhole Buttonhole with cross bar
- 108. Tapered Keyhole Buttonhole
- 109. Round Ended Buttonhole (Narrow)
- 110. Round Ended Buttonhole (Wide)
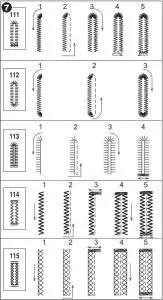
- 111. Round Ended Buttonhole with cross bar
- 112. Both Round Ended Buttonhole
- 113. Decorative Buttonhole
- 114. Stretch Buttonhole
- 115. Heirloom Buttonhole
- 116. Bound Buttonhole
Description of Chart Symbols:
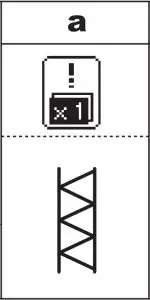
![]() Mirror Stitch possible
Mirror Stitch possible
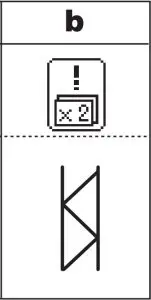
![]() Reverse Stitch possible
Reverse Stitch possible
![]() Mirror and Reverse stitches possible
Mirror and Reverse stitches possible
X2 Elongation possible
STRAIGHT STITCH SEWING
Straight stitch patterns should be selected to suit the type of fabric being sewn.
Left needle position (No.2) is most suited for sewing light weight fabrics.
- No. 1. Center needle Position
- No. 2. Left needle Position
- No. 3. Center needle with built-in reverse stitch
- No. 4. Left needle with built-in reverse stitch
General Purpose Foot (A)
A.Straight Stitch
- Position the fabric under the presser foot and lower it.
- Hold the upper thread and bobbin thread loosely and start sewing.
Place hand lightly on the fabric while sewing.
- When you reach the end of seam, stop sewing.

- Press the thread cutter button.

B.Straight Stitch With Auto-lock Stitch (Pattern No. 3, 4)
- Position the fabric under the presser foot and
lower it.
- Hold the upper thread and bobbin thread loosely and start sewing.
Machine will sew 4-5 stitches forward and sew 4-5 stitches backward and continue sewing forward.
- When you reach the end of seam, press the reverse button.
Machine will sew a few stitches backward and sew a few stitches forward and stop automatically.
- Press the thread cutter button.
BASTING
You can baste a garment before trying it on.
No. 5 Basting Stitch
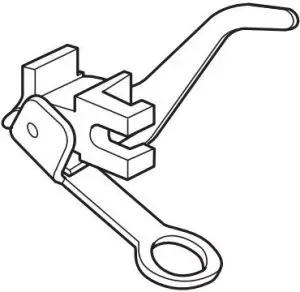
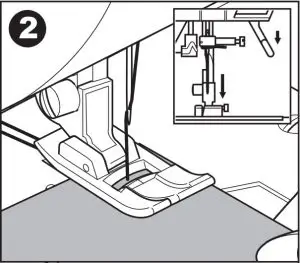
Darning/Embroidery Foot
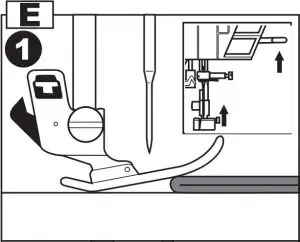
A. ATTACHING THE DARNING/ EMBROIDERY FOOT
- Lower the feed dogs by moving the drop feed lever to the left.
- Remove the presser foot and holder.
- The arm of darning/embroidery foot should ride onto the shaft of the needle clamp screw.
- Slide the plastic attaching head from your left to right so that it is fitted into the presser bar.
- Tighten the presser foot thumb screw.
B. BASTING
When this pattern is selected, thread tension will be reduced automatically.
- Place the fabric under the presser foot and lower it.
- Hold the upper thread and bobbin thread loosely and start to sew.
Machine will make one stitch only.
- Pull the fabric required amount to the rear and sew one stitch.
- Repeat this as many times as you need to finish the seam.
- Raise the fabric feed dogs for next regular sewing.
Note: To prevent the fabric layers from shifting, insert dress pins crosswise to the basting position.
CAUTION: To prevent accidents. Be sure the needle does not hit the dress pin, while sewing.
ELASTIC STITCH SEWING
Elastic stitches are strong and flexible and will give with the fabric without breaking. Good for easy to ravel and knit fabrics as well as joining durable fabrics such as denims.
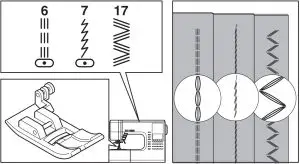
No. 6 Straight Stretch Stitch
No. 7 Stem Stitch for Stretch fabrics
No.17 Ric-rac Stitch
General Purpose Foot (A)
We recommend that you use a needle for knit and synthetic fabrics to prevent skipping stitches and thread breakages.
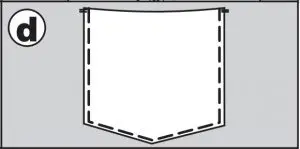
- a. Jacket
- b. Trousers
- c. Bag
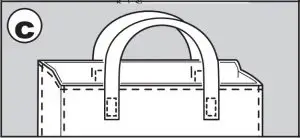
- d. Pocket
QUILTING
A quilt always consists of three layers of material. The top, middle and bottom.
The top layer is formed by multiple geometrically shaped pieces of materials joined together.
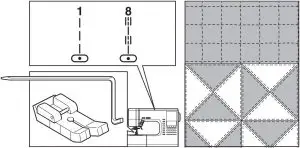
- No. 1 Straight stitch (Center Needle Position)
- No. 8 Hand look Quilting Stitch
Straight Stitch / Patch Quilting Foot
Quilting Bar
CAUTION: To prevent accidents. Do not change the needle position. Otherwise, needle could hit the presser foot and break.
A.Joining the pieces of fabric
Join the pieces of fabric using Pattern No. 1 with a seam allowance of 1/4 inch (6.3 mm)

B.Quilting
Sew three layers of material.
Use quilting bar to sew successive rows.
Insert quilting bar into the hole of presser foot holder and set the space as you desire.

C.Hand Look Quilting Stitch (No. 8)
Use invisible nylon sewing thread or very lightweight thread that matches the fabric on top. Place thread that contrasts to the color of the fabric on the bobbin.
Set the upper tension to maximum.
When you sew, bobbin thread will pull to the top and give the appearance of a traditional hand quilting stitch.
ZIGZAG STITCH SEWING
Your machine can sew zigzag stitches of various widths and lengths by changing the settings of the stitch width and stitch length.
No. 9 Zigzag Stitch
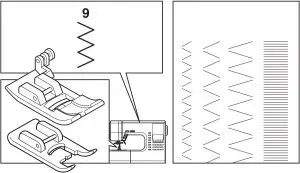
General or Satin Foot (A, B)
Zigzag stitches are very good for joining two pieces of fabrics, applique and sewing various decorative patterns.
SATIN STITCHING
To sew a satin stitch, shorten the stitch length and attach the satin foot. (B)
Refer next for overcast.
MULTI-STITCH ZIGZAG
Used for sewing on elastic and overcast stitching on knit fabrics.
No. 12 Multi-Stitch Zigzag
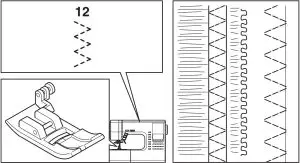
General Purpose Foot (A)
A.Elastic Band Sewing
Pull elastic in front and back of needle while sewing.

B.Overcast Stitching
Used for easy to ravel and knit fabrics.
Needle should fall on extreme edge of fabric. Refer to next for overcasting.
FREE ARM SEWING
By simply removing the extension table, machine becomes a free arm machine making hard to reach areas readily accessible.
Note: for Removing The Extension Table.
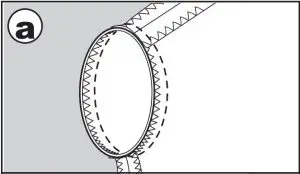
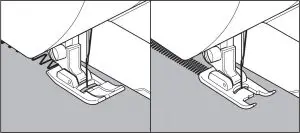
OVERCASTING OVERLOCKING
A.USING THE OVERCASTING FOOT
No. 9 (Stitch Width 5.0)
No. 15, 16, 30 (Stitch Width 5.0-7.0)
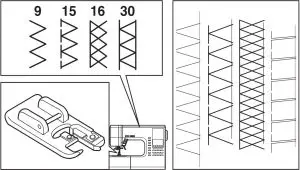
Overcasting Foot (C)
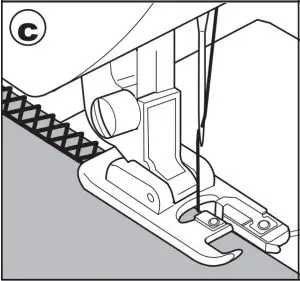
Press fabric against the guide plate of the overcasting foot so that needle falls near the edge of seam.
- a. No. 9 (Width=5.0) is used for preventing
raveling of fabrics.
- b-d. No. 15, 16, 30 can sew overcasting and regular stitches at the same time. Therefore it is convenient for sewing easy to ravel and stretch fabrics.
CAUTION: To prevent accidents. Overcasting foot should be used for sewing patterns 9, 15, 16, 30 only. Do not change the stitch mode or elongation. It is possible that the needle could hit the presser foot and break when sewing other patterns and widths.
B.USING THE GENERAL PURPOSE FOOT
No. 9, 12
General Purpose Foot (A)
Place fabric so that needle will fall nearest to edge of fabric when using the General Purpose Foot.
- e. For narrower zigzag width (Width=2.0-4.5).
- f. Use No. 12 when sewing easy to ravel or stretch fabrics.
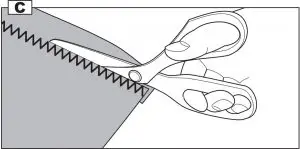
C. NOTE:
You can also cut off the excess material after sewing the inside of fabric.
Be careful not to cut thread when cutting excess fabric.
BLIND HEM STITCHING
This stitch will sew without stitches showing on
right side of fabric.
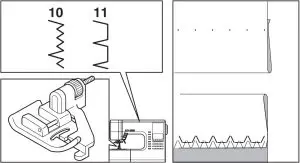
No. 10 Blind hemming for stretch fabric.
No. 11 Blind hem for regular fabric.
Blind Hem Foot (D)
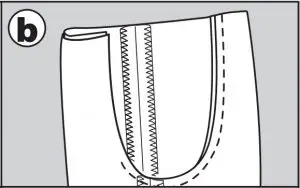
- Fold the fabric as shown on drawing.
- a. Medium, Heavy weight fabric
- b. Light weight fabric
- c. Wrong side of fabric
- d. Overcasting
- The guide (e) on the blind foot ensures even feeding of the fabric when blind hem stitching. The guide (e) is adjusted by turning the adjusting screw (f).
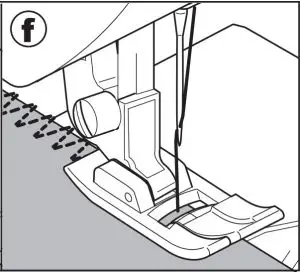
- Place fabric so that the straight stitches (or small zigzag stitches) are on the protruding hem edge and the large zigzag stitches just catch one thread of the folded edge (g). Turn the screw so that the needle barely touches the folded edge of fabric.
- Lower the presser foot and sew hem, guiding fabric evenly along the guide.
- Turn the fabric over when you have completed sewing.
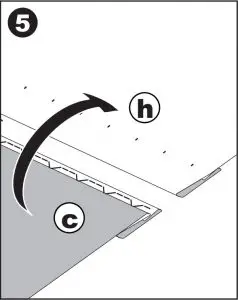
- c. Wrong side of fabric
- h. Right side of fabric
PATCH WORK
For additional decorative purposes, use different
kind of materials.
No. 19, 20
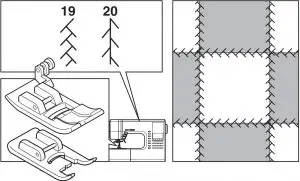
General Purpose or Satin Foot (A, B)
- Place two pieces of fabric right sides together and sew a long straight stitch.
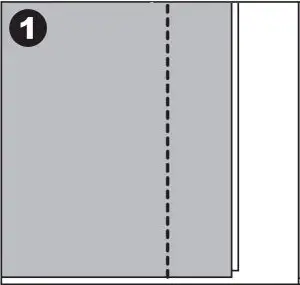
- Press the seam open.
- Be sure that stitches fall on both sides of fabric.
APPLIQUE
No. 23, 24
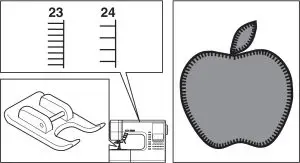
Open Toe Foot
CAUTION: To prevent accidents. Do not change the stitch width to wider than 5.0. Otherwise, needle could hit the presser foot and break.
- Fix applique on fabric with fabric glue, fusible iron-on or basting stitches.
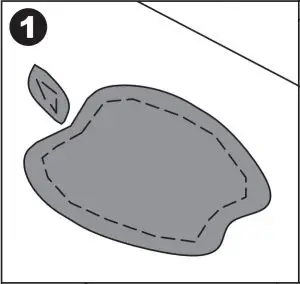
- Sew edge of applique, while dropping the needle as close to the edge as possible.
The straight stitch is almost entirely sink-stitched and a hand-made effect is obtained.
a. When sewing sharp angles
Bring needle to lowest position and raise the presser foot.
Use needle as pivot and turn fabric.
INSERTING ZIPPERS CENTERED INSERTION
No. 1 Straight Stitch (Center Needle Position)
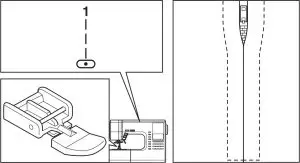
Zipper Foot (E)
CAUTION: To prevent accidents. Zipper foot should be used for sewing center needle position straight stitch No. 1 only. It is possible that needle could hit the presser foot and break when sewing other patterns.
- Baste the zipper opening to the seam line.
- a: Straight stitch,
- b: End of opening,
- c: Basting
- d: Wrong Side of fabric
- Press open the seam allowance.
Baste the zipper tape.
Place the open zipper face down on the seam allowance with the teeth against the seam line.
- Attach the zipper foot.
Attach the left side of the presser foot pin to the presser foot holder when sewing the right side of the zipper, and right side of the presser foot pin to the holder when sewing the left side of the zipper.
- Stitch left side of the zipper from bottom to top.
- Stitch across the lower end and right side of zipper.
Remove the basting and press.
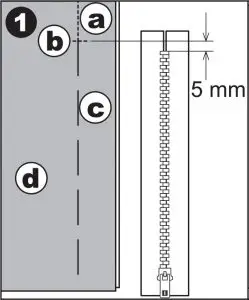
INSERTING ZIPPERS LAPPED INSERTION
No. 1 Straight Stitch (Center Needle Position)
Zipper Foot (E)
CAUTION: To prevent accidents. Zipper foot should be used for sewing center needle position straight stitch No. 1 only. It is possible that needle could hit the presser foot and break when sewing other patterns.
- Baste the zipper opening to the seam line.
- a: Straight stitch,
- b: End of opening,
- c: Basting
- d: Wrong Side of fabric
- Fold back to the left seam allowance.
Turn under the right seam allowance to form 3 mm fold.
- Attach the zipper foot.
Attach the left side of the presser foot pin to the presser foot holder when sewing the right side of the zipper, and right side of the presser foot pin to the holder when sewing the left side of the zipper.
- Stitch the left side of zipper from bottom to top.
- Turn the fabric right side out stitch across the lower end and right side of zipper.
- Stop stitching with the needle down in the fabric when the zipper foot reaches the zipper tab, about 5 cm from the top of the zipper.
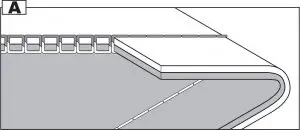
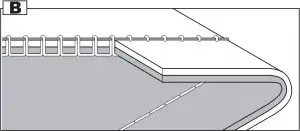
To stitch around the zipper tab: (Diagram A)
- Stop stitching before you reach the zipper tab.
- Lower the needle into fabric.
- Raise the presser foot and slide the zipper tab backwards to clear the zipper foot.
- Lower the presser foot and continue stitching.
- Remove the basting stitches.
- a. Zipper tab
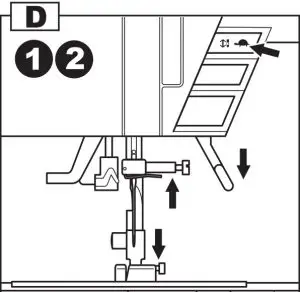
BUTTONHOLE SEWING
This machine can sew 13 types of buttonholes.
- 104. Bar-tack Buttonhole (Narrow) for light to medium weight fabrics
- 105. Bar-tack Buttonhole (Wide) for large buttons
- 106. Keyhole Buttonhole for heavy weight fabrics
- 107. Keyhole Buttonhole with reinforced bar tack
- 108. Tapered Keyhole Buttonhole
- 109. Round Ended Buttonhole (Narrow) for light to medium weight fabrics
- 110. Round Ended Buttonhole (Wide) for large buttons
- 111. Round Ended Buttonhole with cross bar
- 112. Both Round Ended Buttonhole
- 113. Decorative Buttonhole
- 114. Stretch Buttonhole
- 115. Heirloom Buttonhole
- 116. Bound Buttonhole
Buttonhole Foot (F)
Note: Density of buttonhole legs may be adjusted with stitch length control.
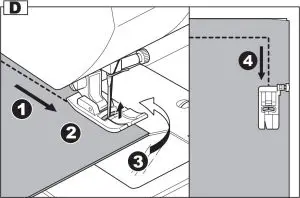
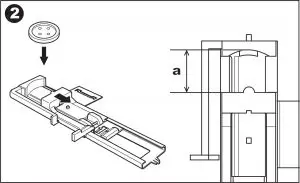
- Mark position and length of buttonhole on fabric.

- Set button on the base.
If button does not fit on the base, adjust slide on base to diameter of button plus thickness of button.
a = Length of button + thickness
- Pass upper thread through the hole of buttonhole foot and bring upper and bobbin threads to the left.
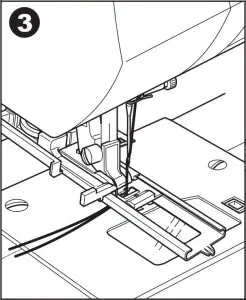
- Position fabric under presser foot so that the center line mark is in the center of the buttonhole foot.
Lower the foot while pulling the frame of the buttonhole foot towards you.
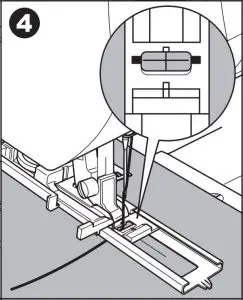
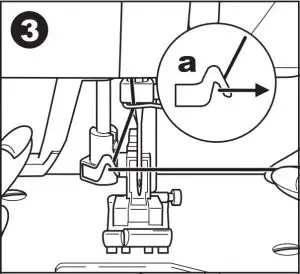
Note: When sewing stretch fabrics, it is suggested that you use interfacing on the backside of the fabric. - Lower the buttonhole lever completely.
Note: Machine will not start to sew if buttonhole lever is not lowered properly or frame of buttonhole foot is not positioned extremely forward. - Hold upper thread lightly and start the machine.
- Machine will sew the buttonhole in the order as shown and stop automatically after sewing.
- Press the thread cutter button and raise the presser foot to remove the fabric.
b. To sew over same buttonhole, raise presser foot to return to original position.
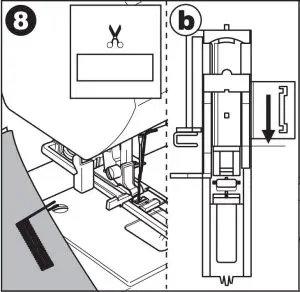
- Cut center of buttonhole being careful not to cut stitches on either side. Use a pin as a stopper.
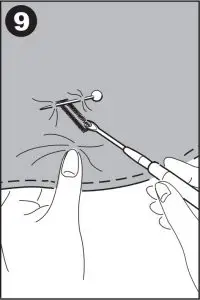
CAUTION: To prevent accidents. When using seam ripper, do not put your finger in the path of ripper.
A. Note:
For sewing buttonholes on hard-to-sew fabrics or along the edge of multi-layered garments, install the underplate to create perfect buttonholes. Place the fabric between the underplate and buttonhole foot.
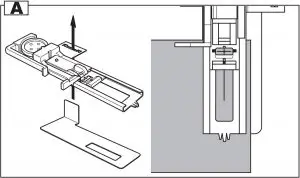
BOUND BUTTONHOLE
A bound buttonhole provides a professional tailored touch to women’s dresses, suits and coats.
116. Bound Buttonhole

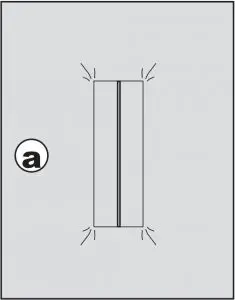
Buttonhole Foot (F)
- Cut a patch of fabric 2.5 cm wide, 1 cm longer than the finished buttonhole.
Baste a patch so that the center line of patch will align with the center line mark of buttonhole.
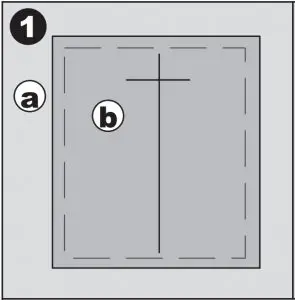
- a. Right side of fabric
- b. Wrong side of patch
- Lower the buttonhole lever and sew buttonhole.
Machine will sew the buttonhole in the order as shown and stop automatically after sewing.
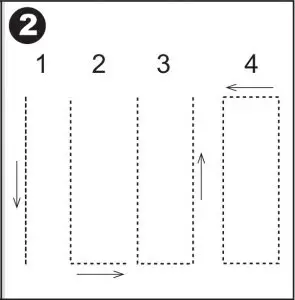
- Press the thread cutter button and raise the presser foot to remove the fabric.
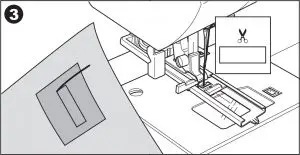
- Carefully cut through the center of buttonhole to within 3 mm of each end. Cut diagonally to each corner as shown.
Remove the basting.
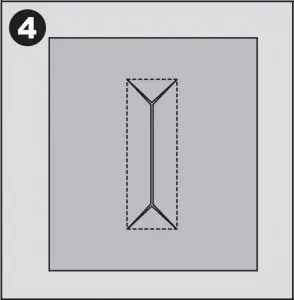
- Draw the patch through the opening to the underside.
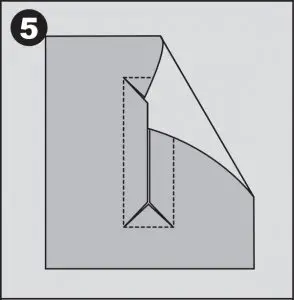
- Turn the fabric and pull the patch through the buttonhole rectangle.
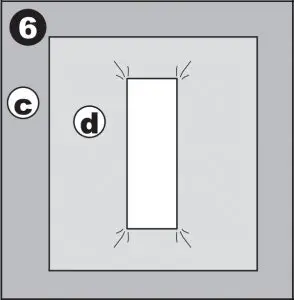
Press the patch.- c. Wrong side of fabric
- d. Right side of patch
- Turn the patch and press the side seam allowance.
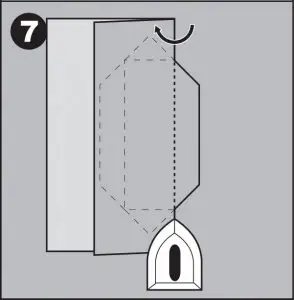
- Fold each side of the patch to form pleats that meet at the center of the buttonhole and cover the opening. Press the patch.
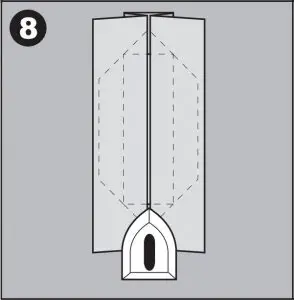
- Turn the fabric to right side and baste along the center of each fold.
- a. Right side of fabric
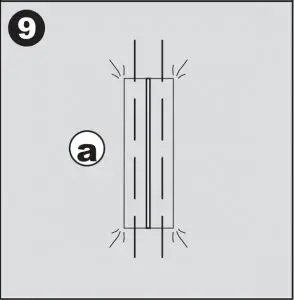
- a. Right side of fabric
- Fold the fabric and stitch along the seams on each side, just a needle width from the original stitching line. Remove the basting.
- c. Wrong side of fabric
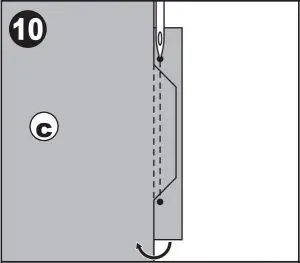
- c. Wrong side of fabric
- Fold the fabric along the buttonhole end and stitch triangular ends on the original stitching line.
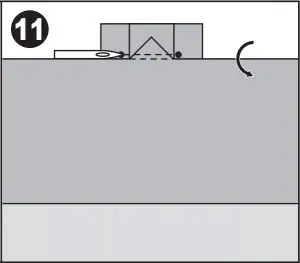
- Press and trim the patch to within 5 mm of the stitching.
- a. Right side of fabric
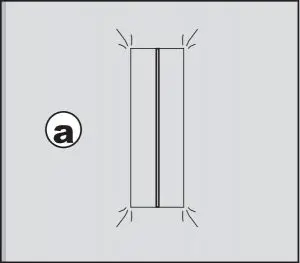
- c. Wrong side of fabric
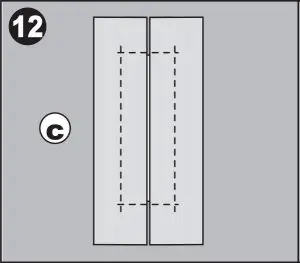
- a. Right side of fabric
NOTE: When sewing weaker fabric, reinforce buttonhole area. Cut a patch of fusible interfacing 3 cm wider and 2 cm longer than the buttonhole. Fuse to wrong side over each buttonhole marking.

EYELET
This stitch pattern is used for making belt holes and other similar applications.
101 Eyelet
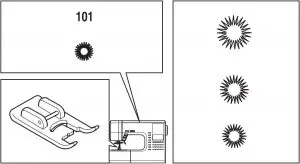
Satin Foot (B)
You can choose 3 sizes of eyelets by changing the stitch length.
- Place the fabric under the presser foot and lower the presser foot. Start the machine. Machine will sew the eyelet and stop automatically.

- Press the thread cutter button and raise the presser foot.
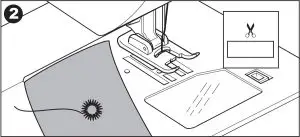
- Make a hole in the center of the eyelet.
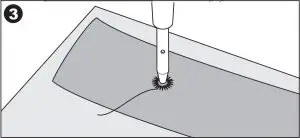
Note: Eyelet punch is not provided with this machine.
AUTOMATIC BAR-TACK AND DARNING
You can sew automatic bar-tack and darning using the buttonhole foot.
No. 102 Bar-tack, to reinforce areas that will be subject to strain, such as pocket corners.
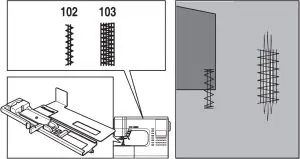
No.103 Darning, mending and other applications.
Buttonhole Foot (F)
- Adjust slide on base according to the length of bar-tack or darning.
a= Length of bar-tack or darning
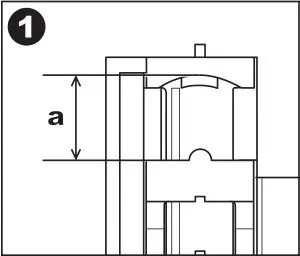
- Pass upper thread through the hole of buttonhole foot and bring upper and bobbin threads to the left.
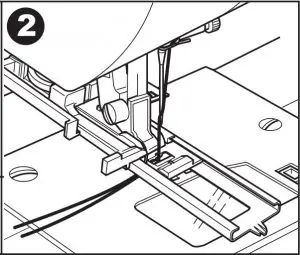
- Position fabric under presser foot so that the starting point comes depth side. Lower the foot.
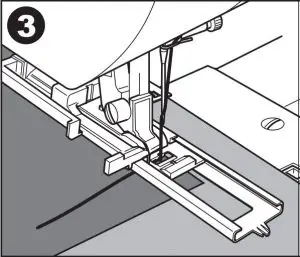
- b. Sewing bar-tack on edge of thick fabric such as pocket, place same thickness fabric or cardboard beside the fabric.
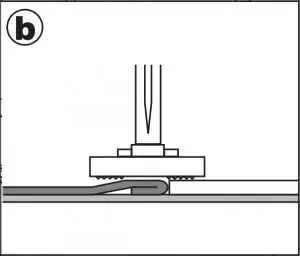
- b. Sewing bar-tack on edge of thick fabric such as pocket, place same thickness fabric or cardboard beside the fabric.
- Lower the buttonhole lever completely.
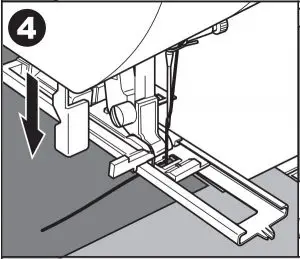
Note: Machine will not start to sew if buttonhole lever is not lowered properly or buttonhole foot is not positioned correctly. - Hold upper thread lightly and start the machine.
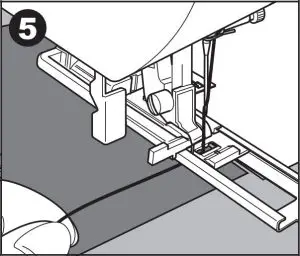
- Machine will sew bar-tack or darning stitch as shown. Machine will stop automatically when the pattern is finished.
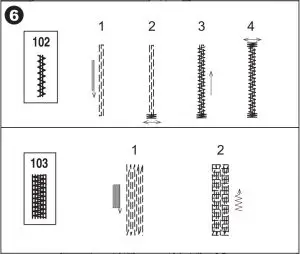
- Press the thread cutter button and raise the presser foot lifter to remove the fabric.
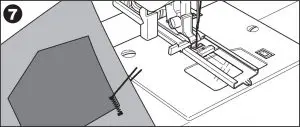
SEWING ON BUTTONS
No. 13
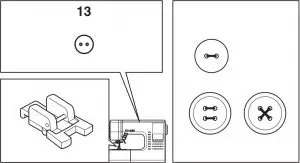
Button Sewing Foot
- Lower the feed dogs by moving the drop feed lever to the left.
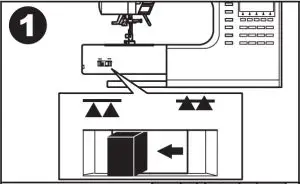
- Attach the button sewing foot. Align two holes of the button with slot of presser foot and lower foot to hold the button securely.
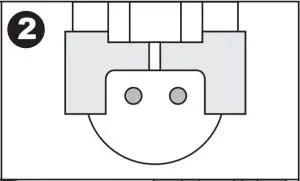
- Adjust the stitch width so that the needle enters the left hole of button.
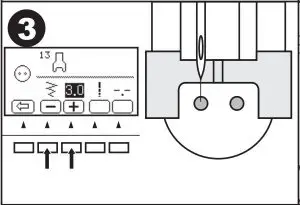
- Turn hand wheel by hand so needle enters the second hole. You may need to adjust the stitch width again.
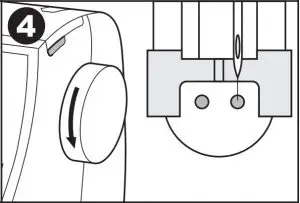
CAUTION: To prevent accidents. Make sure that the needle does not hit the button during sewing. Otherwise needle may break. - Sew approximately 10 stitches at slow speed.
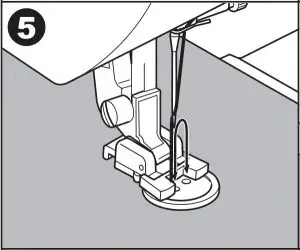
- Raise the foot and cut the threads remaining about 10 cm to the fabric.
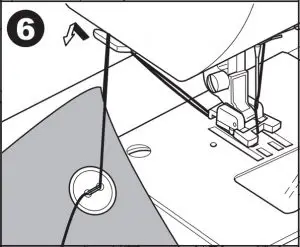
- Pull the end of bobbin thread and pull upper thread to the wrong side of fabric. Tie them together.
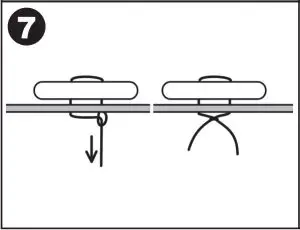
- After sewing, move the drop feed lever to the right.
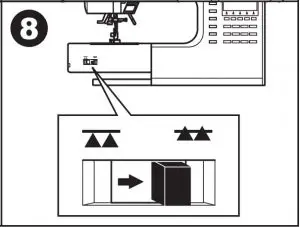
Note:
To sew a 4-hole button, follow the procedure above for the first two holes. Then lift presser foot slightly and move fabric to permit stitching the other two holes, either independently, or crisscross over the first two holes.
A. Thread Shank
Buttons on coats and jackets should have a thread shank to make them stand away from the fabric. Insert a straight pin or sewing machine needle under the center slit of the foot from the front. Sew over the pin or needle.
Pull thread to back of button and wind around stitches to form a firm shank. Tie thread ends securely.
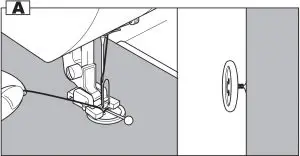
NARROW HEMMING
No. 1 Straight Stitch (Center Needle Position)
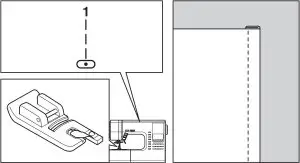
Rolled Hem Foot
- Fold edge of fabric over about 3 mm (1/8 inch), then fold it over again 3 mm for about 5 cm (2 inches) along edge of fabric.
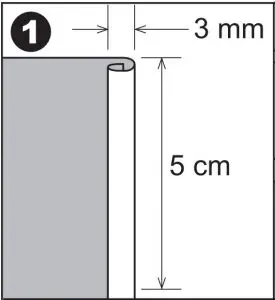
- Insert needle into the fold by rotating the hand wheel toward you, and lower the presser foot. Sew several stitches and raise the presser foot. Insert fabric fold into spiral of rolled hem foot. Move fabric back and forth until the fold forms a scrolled shape.
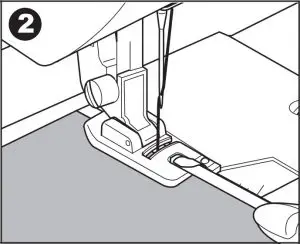
- Lower the presser foot and start sewing slowly, while guiding raw edge of fabric scroll evenly into front of rolled hem foot.
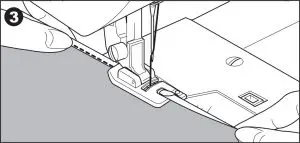
CORDING
No. 9 Zigzag Stitch for Single Cording
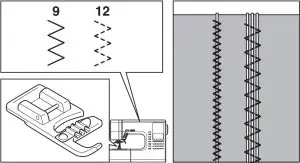
No. 12 Multi Zigzag for Triple Cording
Cording Foot
A.SINGLE CORDING
- Set stitch pattern to No. 9. Insert the cord in the center groove of cording foot from the right side opening. Pull cord about 5 cm (2 inches) behind the foot.
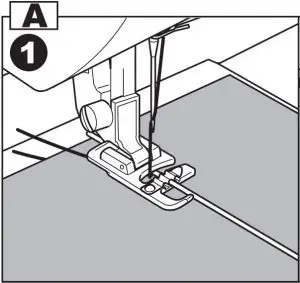
- Adjust the stitch width so that the stitches are just cover the cord. Lower the foot and sew slowly, guiding the cord.
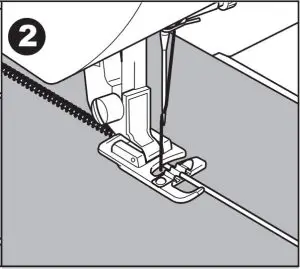
B.TRIPLE CORDING
Set the stitch pattern to No. 12 and set the stitch
width to 6.0-7.0.
Insert three cords into the slots of cording foot.
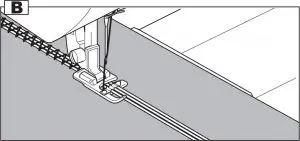
CONTINUOUS DECORATIVE PATTERN
Use the satin foot for continuous decorative stitch patterns.
This foot has a full indentation on the underside to easily allow closely spaced zigzag stitches and fabric to feed freely under foot.
No. 19-100
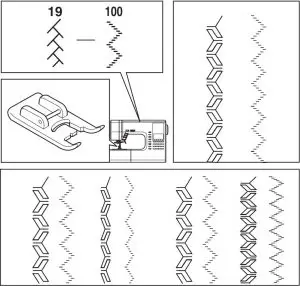
Satin foot (B)
To tailor the continuous decorative stitch pattern, you may adjust the length and width of pattern. Also you may change reverse or mirror stitch of pattern and elongate the pattern.
Experiment with fabric scraps until you get the desired length and width.
A.SEWING THIN FABRICS
When sewing thin fabrics, it is suggested that you use stabilizer on the backside of the fabric.

USING THE EVEN-FEED FOOT
The Even-feed foot accessory equalizes the feeding of the upper and lower layers of fabric and improves the matching of plaids, stripes, and patterns. This foot helps to prevent uneven feeding of very difficult fabrics.
No. 1, 2, or 9
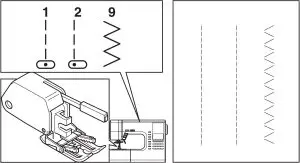
Even-feed foot
A. ATTACHING THE EVEN-FEED FOOT
- Remove the presser foot and holder.

- The arm of even-feed foot should ride onto the shaft of the needle clamp screw.
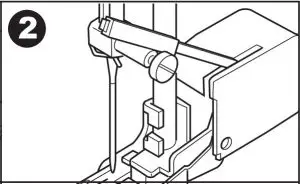
- Slide the attaching head from your left to right so that it is fitted into the presser bar.
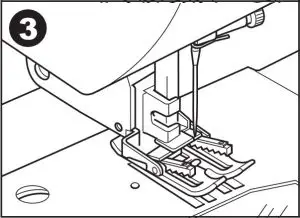
- Tighten the presser foot thumb screw.
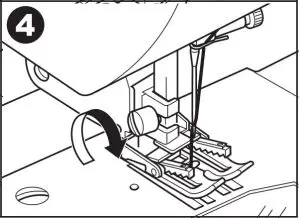
B. SEWING
Hold both thread lightly at start of sewing and sew in slow (1/2) speed.
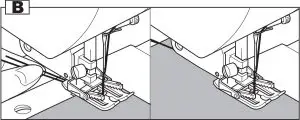
DARNING/FREE-HAND EMBROIDERY
No. 1.Center needle Position
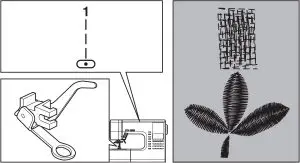
Darning/Embroidery Foot
A.ATTACHING THE DARNING/ EMBROIDERY FOOT
- Lower the feed dogs by moving the drop feed lever to the left.
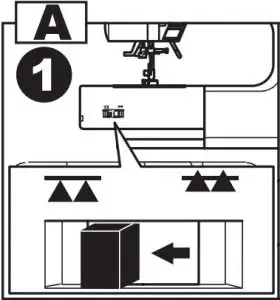
- Remove the presser foot and holder.

- The arm of darning/embroidery foot should ride onto the shaft of the needle clamp screw.
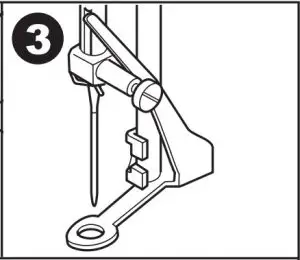
- Slide the plastic attaching head from your left to right so that it is fitted into the presser bar.

- Tighten the presser foot thumb screw.
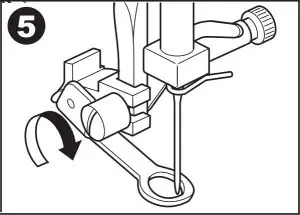
B.DARNING
- Place fabric under foot and lower.
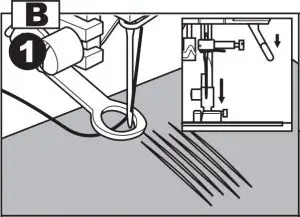
- Grasp fabric firmly in front and back of area to be darned. Operate machine, moving fabric by hand forward and backward with an even motion, stitching in closely spaced rows over the hole or worn area.
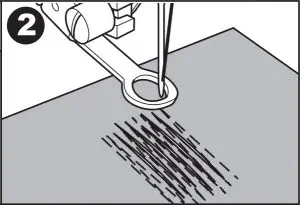
- When the area is filled with new stitches, move fabric from side to side in a similar manner to weave or reinforce the stitching.
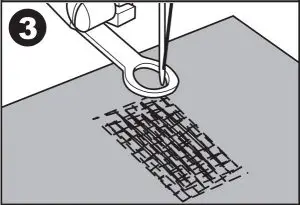
- a. Note:Reinforce open areas with an underlay; baste underlay in place before darning.
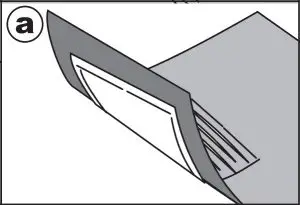
- a. Note:Reinforce open areas with an underlay; baste underlay in place before darning.
C. FREE-HAND EMBROIDERY
- Outline the design for embroidery on the surface of the fabric.
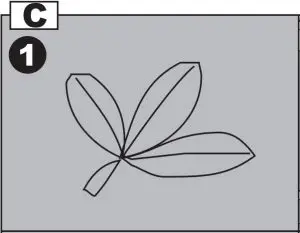
- Place design to be embroidered between the two sections of embroidery hoop.
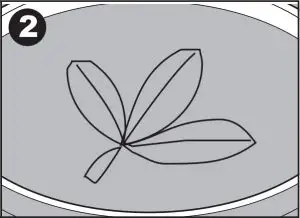
Note: Embroidery hoop is not included with this machine. - Set embroidery hoop under needle and lower the foot.
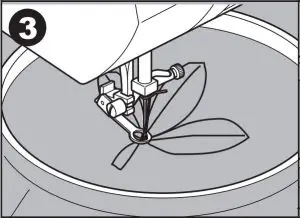
- Start the machine at medium speed, guiding hoop carefully so needle moves along line of the pattern.
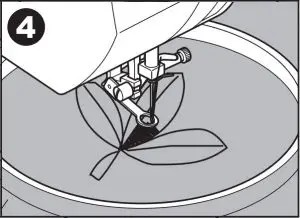
D.After darning or free-hand embroidery
Raise the feed degs by moving the drop feed lever to the right.
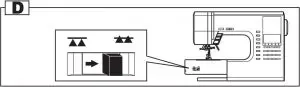
TWIN NEEDLE SEWING
Interesting decorative stitches can be produced by using twin needles and threading the machine with two different colors of thread. Always make test samples to help you determine the settings best suited to a specific purpose.
All patterns except No. 101-116 may be sewn with a twin needle.
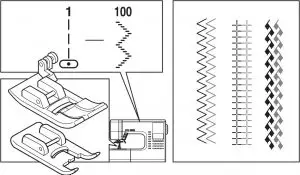
General Purpose Foot or Satin Foot (A, B)
Note:
A twin needle is not provided with this machine. Call for your Singer Dealer to purchase.
CAUTION: To prevent accidents.
- a. Use only needle designed for this machine (Singer Style 2025). Other needles may break.
- b. The needle threader cannot be used. Thread each needle eye by hand.
- Remove the single needle and insert twin needle.
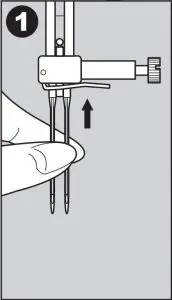
- Thread the first thread as usual, following threading route.
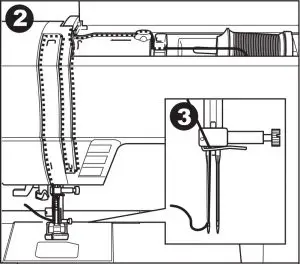
- Thread the left needle eye by hand from front to back .
- Push the Auxiliary Spool Pin with felt washer into the hole.
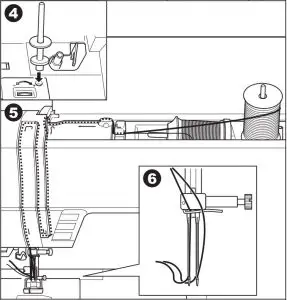
- Place second spool of thread and thread second thread the same as first.
- For better sewing results, do not place the thread into the needle bar thread guide. Thread right needle eye by hand from front to back.
- Press the twin needle button. LCD will indicate twin needle mark and the stitch width will be reduced automatically.
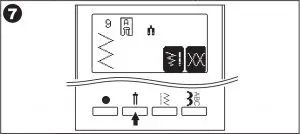
CAUTION: To prevent accidents. If you did not switch to twin needle mode, needle may hit the needle plate and break. - Always test sew selected stitch,
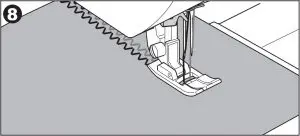
Note: Some stitches look better than others sewn with a twin needle. - Sew project.
Twin needle mode will remain until you press the twin needle button again or turn off the machine.
Note:
Twin needle sewing may be used with decorative & letter stitch patterns by pressing twin needle button. Twin needle icon will appear on the LCD.
DECORATIVE & LETTER STITCH SEWING
You can combine decorative & letter stitches into a string by selecting each pattern.
A.SELECTING DECORATIVE & LETTER STITCH (selecting mode)
- Press the decorative & letter stitch button.
First 5 patterns of decorative patterns will be indicated on the lower line of LCD.
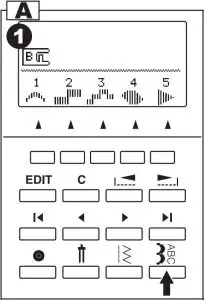
- By pressing the decorative & letter stitch button, selecting group will change as below.
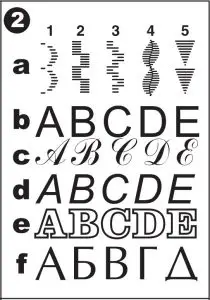
- a. Decorative pattern
- b. Gothic letter stitch
- c. Script letter stitch
- d. Italic letter stitch
- e. Outline letter stitch
- f. Russian letter stitch
- After you select the group, press the scroll down button. Next 5 patterns of selected group will appear.
By pressing the scroll up or down button, you can scroll up or down in increments of 5 patterns.
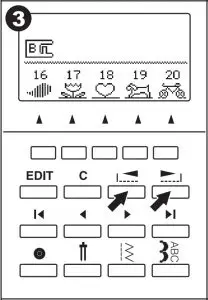
- To select a pattern, press the function button directly under the indicated pattern.
Selected pattern will be indicated on the top left side of LCD.
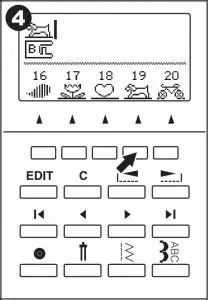
- Using this same procedure, select the next patterns.
Patterns will appear at the top of the LCD in the order selected.
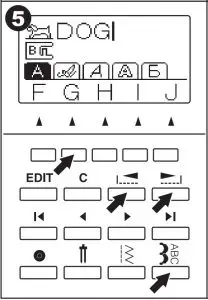
- As selected patterns over the indicating area, disappear from the screen, you can check them by pressing the cursor buttons.
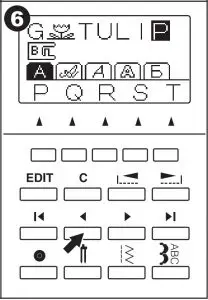
NOTE: Machine can memorize a maximum of 60 patterns. You can combine the tack stitch by pressing the tack button. This is used for sewing a single combination of patterns.
B.SHIFTING THE CURSOR
Additional patterns may be added to the end of a string of combined patterns. Shift the “I” cursor over to the right, following the pattern string and then select new patterns.
By pressing the cursor buttons, cursor will shift left or right. The cursor position will be highlighted.
- a. Press the cursor left button”<“ and cursor will shift to the left.
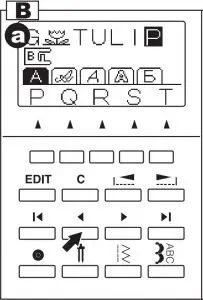
- b. By pressing the cursor right “>” button, cursor will shift right.
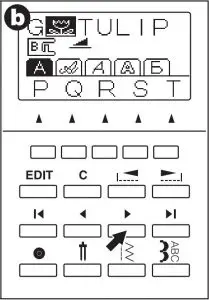
- c. By pressing the far left cursor “I<” button, the first selected pattern will be highlighted.
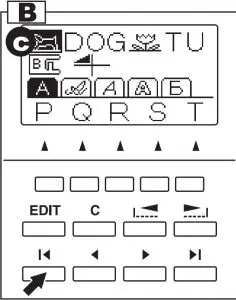
- d. By pressing the far right cursor “I>” button, the cursor is moved to the right side of selected patterns.
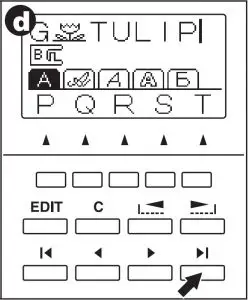
The cursor is used to check selected patterns, insert patterns, delete patterns or editing of each pattern as described below.
If the settings of the highlighted pattern can be changed, it will be noted in the center line of the LCD.
C.TO CHECK SELECTED PATTERNS
As the length of the string increases, patterns will disappear from sight.
You can check patterns by shifting cursor to the left.
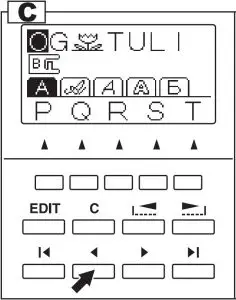
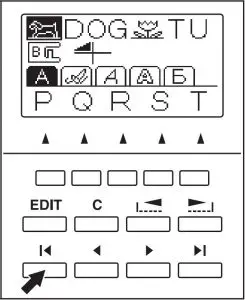
D. INSERTING PATTERN
- Machine will insert a pattern to the left of the highlighted letter or pattern.
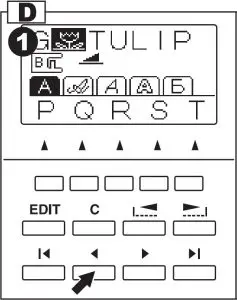
- Using the cursor buttons, move the cursor to highlight the pattern just before the desired position for the new pattern. Select the pattern.
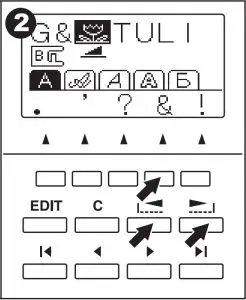
E. TO DELETE PATTERN
- Shift the cursor to the pattern you want to delete.
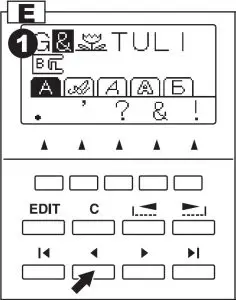
- Press the clear “C” button quickly (less than 0.5
sec.).
Machine will delete the pattern and cursor will shift to next pattern.
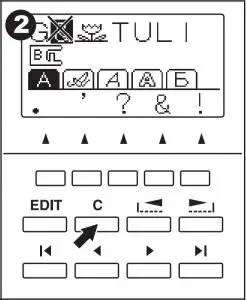
- a. When the cursor is at furthest right side,
machine will delete just before pattern.
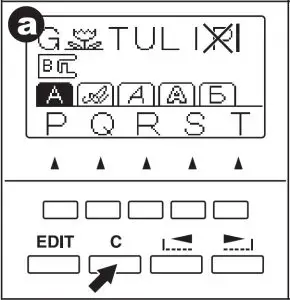
- a. When the cursor is at furthest right side,
- If you want to delete all patterns, press and hold the clear “C” button (over 0.5 sec.).
Machine will delete all selected patterns.
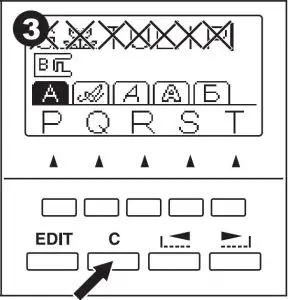
F. EDITING OF EACH PATTERN
You can change the stitch width, length, mirror/ reverse stitch and elongation of each pattern. And you can change the thread tension of selected all patterns
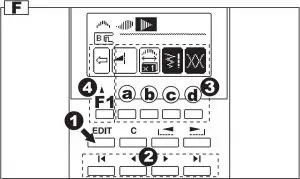
- Press the EDIT button.
LCD will change to the editing mode. - As you shift the cursor, the setting of each pattern will be indicated.
- By pressing each function button, you can change setting as below a-d.
- After you have completed the editing, press the return button (F1) or EDIT button.
Machine will return to selecting mode.
Note:
Letter stitches cannot change settings. (except for thread tension).
a. Mirror / Reverse stitch
Press the function button (F2) directly under mirror/reverse icon, stitch will change alternately or in rotation.
The descriptions of the mirror/reverse icons are below.
a1. Regular stitch (normal stitch)
a2. Mirror stitch (flips from left to right)
a3. Reverse stitch (reverse front and back)
a4. Mirror and Reverse stitch, pattern will flip from left to right and from front to back.
If symbol is not indicated, its pattern cannot change (mirror/reverse stitch).
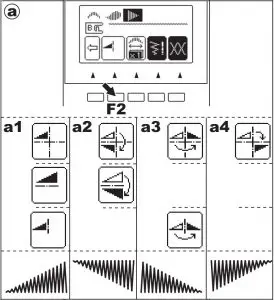
b. Elongation
By pressing the function button (F3) directly under the elongation mark, stitch will elongate five different sizes. (b1-b5).
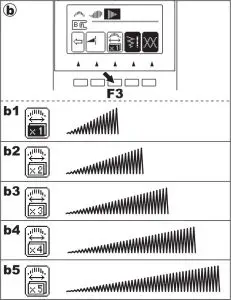
If symbol is not indicated, its pattern cannot elongate.
c. Setting the stitch width and length
Machine will pre-set the stitch width and length suitable for the pattern.
- You can make changes by pressing the function button (F4) directly under the witdh and length mark.
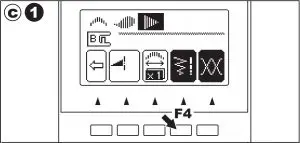
- For narrower width, press function button F2 (–).
For wider width, press function button F3 (+).
For shorter length, press function button F4 (–).
For longer length, press function button F5 (+).

Pre-set stitch width and length will be indicated as a highlighted number.
You can change the width and length of other patterns by shifting the position of the cursor.
By pressing the return button (F1), machine will
return to editing mode.
By pressing EDIT button, machine will return to selecting mode.
d. Setting the thread tension
By pressing the function button (F5) directly under the tension mark, LCD will indicate the tension mode.
This setting will change the thread tension of all combined patterns.
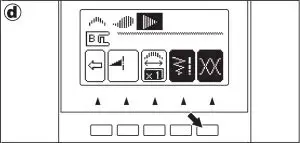
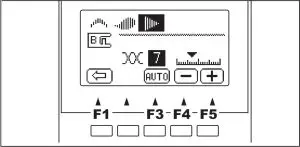
To increase the upper thread tension, press function button F5 (+).
To decrease the upper thread tension, press function button F4 (–).
Pre-set tension number is highlighted.
By pressing the function F3 (AUTO) button, thread tension will return to pre-set.
By pressing the return button (F1), machine will return to editing mode.
By pressing EDIT button, machine will return to selecting mode.
Note:
If you press the clear “C” button at editing mode, highlighted pattern will be deleted.
G. TO RECALL THE SELECTED PATTERNS
If you change the pattern to utility stitch, machine will retain the combination of patterns until the machine is turned off.
To recall these patterns, press the decorative & letter stitch button. Machine will recall the selected patterns. (Thread tension will return to pre-set.)
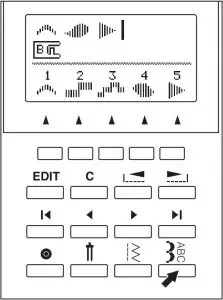
To delete all patterns, press and hold the clear “C” button for a long time.
H. SEWING THE SELECTED PATTERNS
- a. Single sewing
You can combine the tack stitch by pressing the tack button at selecting mode.
When you combined the tack stitch or letter stitch at the end of pattern, machine will stop automatically after sewing selected patterns.
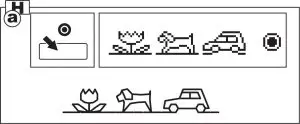
- b. Repeat sewing
The pattern combination will sew repeatedly without combining the tack stitch at the end of the pattern sequence.
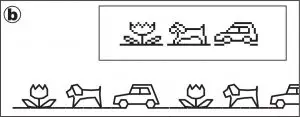
SEWING
- Attach the satin foot when sewing decorative & letter stitch.
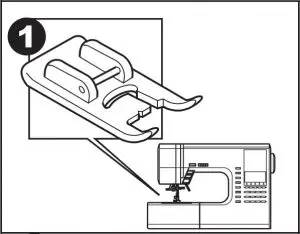
- Machine will start sewing from highlighted pattern. You must shift the cursor to the pattern you where you wish to start sewing.
(When the “I” mark cursor is indicated on the right side of selected patterns, machine will start from first pattern.)
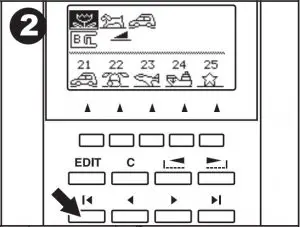
- Lower the presser foot and start sewing. Machine will indicate the sewing pattern on the top left side of LCD.
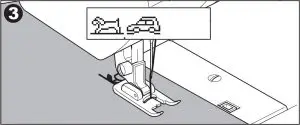
I. TO SEW PATTERN FROM BEGINNING
- a. When you stop sewing at the middle of selected patterns, LCD will indicate the setting of sewing pattern and the arrow mark “
 “ on the second line.
This mark is meaning that sewing is interrupted. You can continue sewing by starting the machine again.
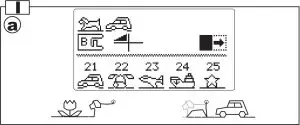
- b. When you stopped sewing at the middle of selected patterns, and If you have raised the presser foot lifter, the arrow mark will change to
” “, In this time, when you start sewing again, machine will sew from the beginning of interrupted pattern.
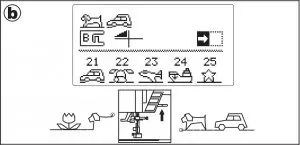
- c. If you want to sew from the beginning of all patterns, shift the cursor by using the cursor buttons. (Arrow icon will disappear)
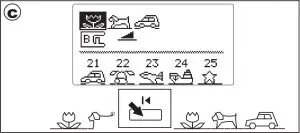
DECORATIVE AND LETTER STITCH CHART
The decorative patterns in bold print are one unit of the stitch pattern.
Description of Chart Symbols:
 Mirror Stitch included
 Reverse Stitch included
 Mirror and Reverse stitch included
- X5 Elongation included
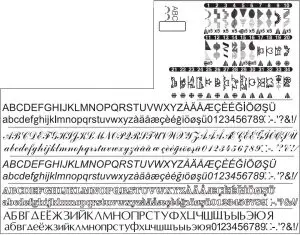
ADJUSTING THE FORWARD AND REVERSE STITCHES
Depending on the type of fabric you sew, it may be necessary to adjust the forward and reverse stitches.
The adjustment is needed when the decorative or letter stitch is distorted.
Turn screw which is located bottom of the machine in either direction as may be required.
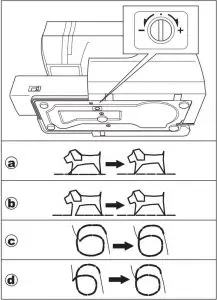
DECORATIVE STITCH PATTERN
- If patterns are distorted as illustration (a), turn screw in direction of symbol (+).
- If patterns are distorted as illustration (b), turn screw in direction of symbol (–).
LETTER STITCH PATTERN
- If patterns are distorted as illustration (c), turn screw in direction of symbol (+).
- If patterns are distorted as illustration (d), turn screw in direction of symbol (–).
MAINTENANCE
DANGER: To reduce the risk of electric shock. Disconnect the power line plug from electric outlet before carrying out any maintenance.
CLEANING
If lint and bits of thread accumulate in the hook, this will interfere with the smooth operation of the machine. Check regularly and clean the stitching mechanism when need.
A.Bobbin Holder
Remove the bobbin cover and bobbin.
Clean the bobbin holder with a brush.
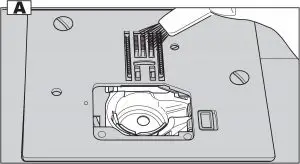
B.Hook Race and Feed Dog
- Remove the needle, presser foot and holder.
Remove the bobbin cover and bobbin. Remove the screws holding the needle plate.
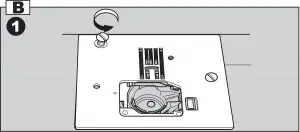
- Remove the needle plate by lifting up the right side of the plate.
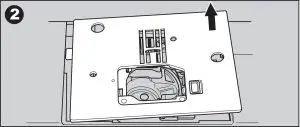
- Lift up the bobbin holder and remove it.
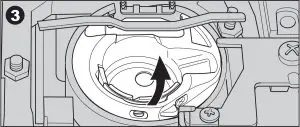
- Clean the hook race, feed dogs and bobbin holder with a brush. Also clean them, using a soft, dry cloth.
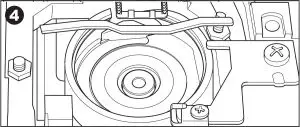
- Replace the bobbin holder into the hook race so that the tip (a) fits to the stopper (b) as shown.
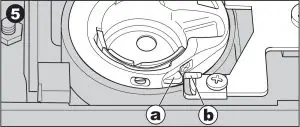
- Replace the needle plate inserting the hook into the machine.Replace the screws and tighten.
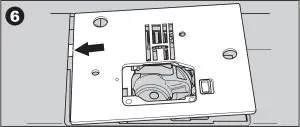
Note:
- An LED lamp is used to illuminate the stitching area. It does not require replacement. In the unlikely event it does not light, call your dealer for service.
- There is no need to lubricate this machine.
Messages on LCD
- Winding the bobbin.
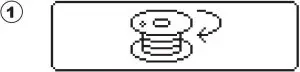
- Lower the buttonhole lever.
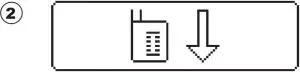
- After sewing buttonhole, raise the presser foot lifter and set the frame of buttonhole foot to starting position.

- Release the foot controller pedal.
- Lower the presser foot.
- Machine cannot memory any more.
- Select a pattern.
- Release the reverse button.
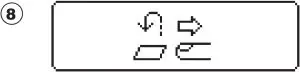
- Release the start/stop button.
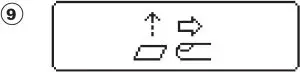
- Rethread the upper thread.
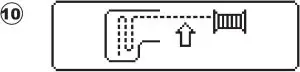
- Foot controller is connected.
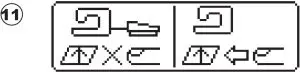
- Release the needle up-down / slow button.
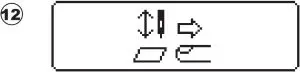
- Release the thread cutter button.
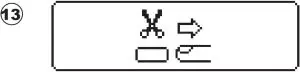
- Turn off the power switch.

HELPFUL HINTS
| PROBLEM | CAUSE | CORRECTION |
| Upper thread breaks |
|
|
| Lower thread breaks |
|
|
| Machine skips stitches |
|
|
| Fabric puckers |
|
|
| Machine makes loose stitches or loops |
|
|
| Stitch pattern is distorted |
|
|
| Threader does not thread needle eye |
|
|
| Machine does not feed properly |
|
|
| Needle breaks |
|
|
| Machine runs with difficulty |
|
|
| Machine will not run |
|
|
FAQS
Does this machine include a seam finisher in it’s features? Maybe similiar to serging?
Th 9960 has several stitces that sew a seam and overcast the edge at the same time. To complete the look of a serged seam you would need to attach the side-cutter. This attacment is not part o the standard accessories however and would need to be purchased separately.
What is the size of the throat for quilting?
The latest answer from yesterday by “susan0624” is right.
what is the return policy for this item?
The return policy is 30 days from what Amazon told me….but if you buy from Amazon they also said you only get a 1 year warranty from Singer.
Does the machine come with a hard travel case?
The SINGER 9960 Quantum Stylist sewing machine comes with a hard dust cover which fits over the top of the machine. You use the machine’s handle to carry the machine when the cover is on the machine. The manual can also be stored in the front cover compartment of the dust cover.
can this sewing machine sew jeans?
This machine comes with an attachment for sewing shanks on buttons, but it can also be used for the high pile created by the thick seams on jeans. This accessory is also called a hump jumper. Check out U-Tube videos on easy methods of sewing & hemming jeans.
Does this have a low shank?
This is a low shank machine and arrived with the adapter installed which allows use with snap on presser feet.
Does it handle the larger spools of thread (ie: 3000 yard spools)?
Yes it does.
How many feed dogs does this machine have?
There is a long one on each side, three smaller ones in the rear and to mini ones in the front. The machine feeds all kinds of fabric beautifully.
does it do free motion quitilng (stipling)?
you can do free motion sewing on it. It does not have the stipling stich programed.
lower fabric feed dogs and now I can not upload !!! What is the correct procegimiento to upload again?
After moving the feed dog lever back to the left you then must rotate the handwheel toward you one complete turn to finish raising the feed. You may hear them click in place.
Does it have an auto up down needle position button?
Yes. With the push of a button. Needle always stops down and you raise it with a button. You can use the button or the wheel to lower the needle. Very convenient feature.
can i use safely this machine with a transformer in 220 volt area ?
If you have the proper plugs to change the current from 220 to 110 then you would be able to use it, however if you do not have the right connections, the machine will not work and you could do damage to the machine.
How does this sew with twin needles? Does it hold two thread spools or do I have to buy a seperate stand to hold the additional spoool?
It will hold both spools. Try viewing the Singer 9960 twin needle tutorial on YouTube–video #9. You can learn a lot by viewing the videos!
Does this machine have a surging capabilities?
The SINGER 9960 Quantum Stylist sewing machine has a selection of stitches that can be used to sew a seam and seam finish simultaneously, for both woven (non-stretch) and stretch knit fabrics. After sewing, you would simply trim away excess seam allowance with scissors. The machine does not cut the excess seam allowance while stitching, as a serger does. You could, however, add an optional Side Cutter attachment to the SINGER 9960 sewing machine, which would allow you to trim away excess seam allowance as you sew. This attachment is available on Amazon, here:
http://www.amazon.com/SINGER-Attachment-Low-Shank-Sewing-Machines/dp/B00G6TW7ZK/ref=sr_1_1?ie=UTF8&qid=1436196615&sr=8-1&keywords=singer+side+cutter
Can you upload your own stitch file?
No. The Singer Quantum Stylist model 9960 sewing machine isn’t a sewing machine with programmable embroidery capabilities. The Singer Quantum Stylist model 9960 sewing machine is capable of Free Motion Embroidery. You can purchase a hand embroidery hoop to make free motion embroidery easier. For more information regarding Free motion Embroidery please email us at: [email protected] or call our Customer Service line at 1-800-474-6437 and one of our Customer Care representatives will be happy to assist you. Our Customer Care line is open from 8:00 AM – 8:00 PM CST, Monday to Friday and Saturday from 8:00 AM till 2:00 PM CST.
What is the throat dimension singer 9960?
The measurements of the “arch area” of the Singer model 9960 are as follows: – from needle to machine tower is approximately 6 3/8 inches and the interior height at the neck is approximately 4 inches tall.
What is the throat size or work area dimensions?
The throat/harp is 9″. The retention table adds 7″ more from the left edge to the left side of the metal plate.
Does the singer 9960 uantum stylist 600-stitch computerized sewing machine can be used for the regular sewing as well?
Absolutely! The fancy stitches are fun, but it excels as an all-purpose sewing machine, as well. Very easy to thread and to use. There are quite a few youtube videos on this machine that you might find useful.
is there model that is good for europe 220 volt?
Yes, Although it is more expensive It can be purchased from Costco.
VIDEO
]]>This household sewing machine is designed to comply with IEC/EN 60335-2-28 and UL1594
IMPORTANT SAFETY INSTRUCTIONS
When using an electrical appliance, basic safety precautions should always be followed, including the following:
Read all instructions before using this household sewing machine. Keep the instructions at a suitable place close to the machine. Make sure to hand them over if the machine is given to a third party
DANGER – To reduce the risk of electric shock:
- A sewing machine should never be left unattended when plugged in. The electrical socket, to which the machine is plugged in should be easily accessible. Always unplug this sewing machine from the electric outlet immediately after using and before cleaning, removing covers, lubricating or when making any other user servicing adjustments mentioned in the instruction manual.
To reduce the risk of burns, fire, electric shock, or injury to person:
- Do not allow to be used as a toy. Close attention is necessary when this sewing machine is used by or near children.
- Use this sewing machine only for its intended use as described in this manual. Use only I attachments recommended by the manufacturer as contained in this manual.
- Never operate this sewing machine if it has a damaged cord or plug, if it is not working properly, if it has been dropped or damaged, or dropped into water. Return the sewing machine to the nearest authorized dealer or service center for examination, repair, electrical or mechanical adjustment.
- Never operate the sewing machine with any air openings blocked. Keep ventilation openings of the sewing machine and foot control free from the accumulation of lint, dust, and loose cloth.
- Keep fingers away from all moving parts. Special care is required around the sewing machine needle.
- Always use the proper needle plate. The wrong plate can cause the needle to break.
- Do not use bent needles.
- Do not pull or push fabric while stitching. It may deflect the needle causing it to break.
- Wear safety glasses.
- Switch the sewing machine off (“0”) when making any adjustment in the needle area, such as threading needle, changing needle, threading bobbin, or changing presser foot, etc.
- Never drop or insert any object into any opening.
- Do not use outdoors.
- Do not operate where aerosol (spray) products are being used or where oxygen is being administrated.
- To disconnect, turn all controls to the off (“0”) position, then remove plug from outlet
- Do not unplug by pulling on cord. To unplug, grasp the plug, not the cord.
- The foot control is used to operate the machine. Never place other objects on the foot control.
- Do not use the machine if it is wet.
- If the LED lamp is damaged or broken, it must be replaced by the manufacturer or its service agent or a similarly qualified person, in order to avoid a hazard.
- If the cord connected with the foot control is damaged, it must be replaced by the manufacturer or its service agent or a similarly qualified person, in order to avoid a hazard.
- This sewing machine is provided with double insulation. Use only identical replacement parts. See instructions for Servicing of Double-Insulated Appliances.
SAVE THESE INSTRUCTIONS
FOR CENELEC COUNTRIES ONLY:
This appliance can be used by children aged from 8 years and above and persons with reduced physical, sensory or mental capabilities or lack of experience and knowledge if they have been given supervision or instruction concerning use of the appliance in a safe way and understand the hazards involved. Children shall not play with the appliance. Cleaning and user maintenance shall not be made by children without supervision
The noise level under normal operating conditions is less than 75dB(A).
The machine must only be used with foot control of type FC-2902D, (220 240V) manufactured by Zhejiang Founder Motor Corporation, LTD. (Vietnam) / 4C-326G (230V) / 4C-336G (240V) manufactured by Wakaho Electric Ind. Co., Ltd. (Vietnam).
FOR NON CENELEC COUNTRIES:
This sewing machine is not intended for use by persons (including children) with reduced physical, sensory or mental capabilities, or lack of experience and knowledge, unless they have been given supervision or instruction concerning use of the sewing machine by a person responsible for their safety. Children should be supervised to ensure that they do not play with the sewing machine.
The noise level under normal operating conditions is less than 75dB(A). The machine must only be used with foot control of type KD-1902, FC-1902 (110 120V) / KD2902, FC-2902A, FC-2902C, FC-2902D, (220-240V) manufactured by Zhejiang Founder Motor Corporation, LTD. (Vietnam) / 4C-316B (110-125V) / 4C-316C (127V) /4C-326C (220V) / 4C-326G (230V) / 4C-336G (240V) manufactured by Wakaho Electric Ind. Co., Ltd. (Vietnam)
SERVICING OF DOUBLE INSULATED PRODUCTS
In a double-insulated product, two systems of insulation are provided instead of grounding. No ground means is provided on a double-insulated product, nor should a means for grounding be added to the product. Servicing of a double-insulated product requires extreme care and knowledge of the system and should be done only by qualified service personnel. Replacement parts for a double-insulated product must be identical to those parts in the product. A double insulated product is marked with the words ‘DOUBLE INSULATION’ or ‘DOUBLE INSULATED’
Principal Parts of the Machine
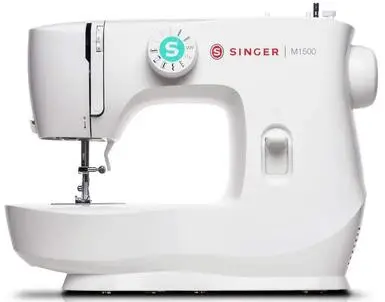
- Thread tension dial
- Thread take-up lever
- Thread cutter
- Presser foot
- Needle plate
- Removable extension table/ accessory storage
- Pattern selector dial
- Bobbin winding stopper
- Reverse sewing lever
Unpacking
- Place the box on a steady, flat surface. Lift your machine out of the box and remove the outer packaging.
- Remove all other packing material and the plastic bag
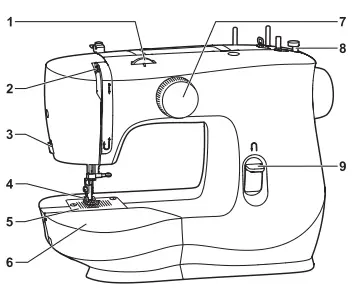
- Thread guide
- Bobbin winder spindle
- Spool pin
- Handwheel
- Power and light switch
- Main plug socket
- Bobbin thread guide
- Handle
- Face plate
- Presser foot lifter
- Foot speed control
- Power cord
Connecting Machine to Power Source

Connect the machine to a power source as illustrated. (1)
This appliance is equipped with a polarized plug which must be used with the appropriate polarized outlet. (2)
Attention
Unplug power cord when machine is not in use.
Foot control
The foot control pedal regulates the sewing speed. (3)
Attention
Consult a qualified electrician if in doubt of how to connect machine to power source.
Sewing light
Press main switch (A) to “ l “ for power and light.
IMPORTANT NOTICE
For appliance with a polarized plug (one blade is wider than the other). To reduce the risk of electric shock, this plug is intended to fit in a polarized outlet only one way. If it does not fit fully in the outlet, reverse the plug. If it still does not fit, contact a qualified electrician to install the proper outlet. Do not modify the plug in any way
- Polarized attachment plug
- Conductor intended to be grounded
Two Step Presser Foot Lifter
When sewing several layers or thick fabrics, the presser foot can be raised to a higher position for easy positioning of the work. (A)
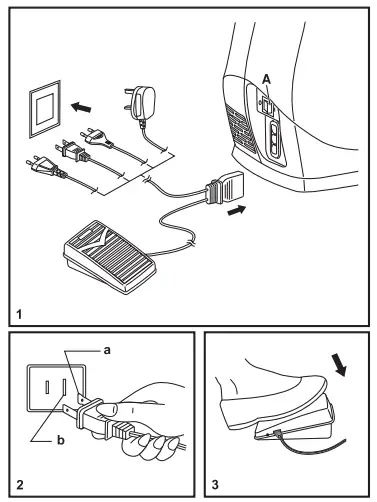
Attention
Your SINGER® machine is adjusted to provide the best stitch result at normal room temperature. Extreme hot and cold temperatures can affect the sewn result.
Accessories

Standard accessories
- All purpose foo
- Zipper foot
- Buttonhole foot
- Button sewing foot
- L-screwdriver
- Seam ripper/ brush
- Spool pin felt (2x)
- Pack of needles (3x)
- Edge/ quilting guide
- SINGER® Class 15 bobbins (4x)
- Darning plate
- Soft cover
Optional Accessories:
For information about additional presser feet, attachments and accessories that may be available for your machine, visit www.singer.com.
Winding the Bobbin

- Place the thread and spool pin felt (a) onto the spool pin. (1)
- Draw the thread from the spool through the upper thread guide. (2)
- Wind the thread clockwise around bobbin winder tension discs. (3)
- Thread bobbin as illustrated and place on spindle. (4)
- Push bobbin spindle to right. (5)
- Hold thread end. (6)
- Step on foot control pedal. (7)
- Release the pedal after a few turns. Release the thread and cut as close as possible to the spool. Press the pedal again. Once the spool is full, it rotates slowly. Release the pedal and cut thread. (8)
- Push bobbin spindle to left (9) and remove
Please Note:
When the bobbin winder spindle is in “bobbin winding” position, the machine will not sew and the hand wheel will not turn. To start sewing, push the bobbin winder spindle to the left (sewing position).
Inserting the Bobbin

When inserting or removing the bobbin, the needle must be fully raised
- Open the hinged cover. (1)
- Pull the bobbin case tab (a) and remove the bobbin case. (2)
- Hold the bobbin case with one hand. Insert the bobbin so that the thread runs in a clockwise direction (arrow(3)
- Pull the thread through the slit and under the finger. Leave a 6 inch tail of thread. (4)
- Hold the bobbin case by the hinged latch. (5)
- Insert it into the shuttle. (6)
Attention
Turn power switch to off (“O”) before inserting or removing the bobbin
Threading the Upper Thread
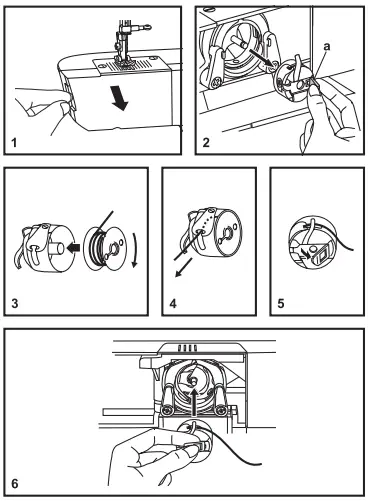
This is a simple operation but it is important to carry out
correctly as by not doing so several sewing problems could result.
- Raise the needle to its highest position by turning the handwheel towards you (counterclockwise) so that the mark on the handwheel points directly up. Raise the presser foot to release the tension discs. (1)
- Place the thread and spool pin felt (a) onto the spool pin. (2)
Note: For safety, it is strongly suggested you turn off the power before threading. - Draw the thread from the spool through the upper thread guide. (3)
- Guide the thread around the thread guide as illustrated. (4)
- Thread tension module by leading thread down right channel and up left channel. (5) During this process it is helpful to hold the thread between the spool and thread guide.
- At the top of this movement pass thread from right to left through the slotted eye of the take-up lever and then downwards again. (6)
- Now pass thread behind the thin wire needle clamp guide (7) and then down to the needle which should be threaded from front to back.
- Pull about 6-8 inches of thread to the rear beyond the needle eye. Trim thread to length with built in thread cutter. (8)
Raising the Bobbin Thread

Hold the upper thread with the left hand. (1) Turn the handwheel towards you (counterclockwise) lowering, then raising needle.
Note:
If it is difficult to raise the bobbin thread, check to make sure the thread is not trapped by the hinged cover or the Removable Extension Table.
Gently pull on the upper thread to bring the bobbin thread up through the needle plate hole. (2)
Lay both threads to the back under the presser foot. (3)
Thread Tension
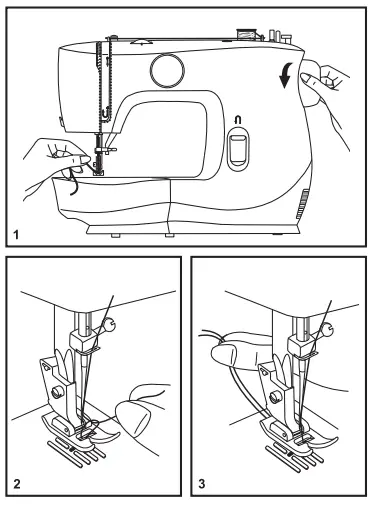
Upper thread tension
Basic thread tension setting: “4”
To increase the tension, turn the dial to the next number up. To reduce the tension, turn the dial to the next number down.
- Normal thread tension for straight stitch sewing.
- Thread tension too loose for straight stitch sewing. Turn dial to higher number.
- Thread tension too tight for straight stitch sewing. Turn dial to lower number.
- Normal thread tension for zig zag and decorative sewing. Correct thread tension is when a small amount of the upper thread appears on the bottom side of fabric.
Lower thread tension
The bobbin tension has been set correctly at the factory, so you do not need to adjust it.
Please note:
- Proper setting of tension is important to good sewing.
- There is no single tension setting appropriate for all stitch functions, thread or fabric.
- A balanced tension (identical stitches both top and bottom) is usually only desirable for straight stitch construction sewing.
- 90% of all sewing will be between ”3” and ”5”.
- For zig zag and decorative sewing stitch functions, thread tension should generally be less than for straight stitch sewing.
- For all decorative sewing you will always obtain a nicer stitch and less fabric puckering when the upper thread appears on the bottom side of your fabric.
How to Choose Your Pattern


To select a stitch, simply turn the pattern selector dial. The pattern selector dial may be turned in either direction.
For straight stitch, select pattern ”  ” with the pattern
selector dial.
For zigzag stitch, select pattern ”  ” with the pattern
selector dial.
- Pattern Selector Dial
- Reverse Sewing Lever
Sewing Straight Stitch
- To begin sewing, set the machine for straight stitch. (1)
- Place the fabric under the presser foot with the fabric edge lined up with the desired seam guide line on the needle plate. (2)
- Lower the presser foot lifter, and then step on the foot control to start sewing. (3)

Reverse Sewing
To secure the beginning and the end of a seam, press down the reverse sewing lever (A). Sew a few reverse stitches. Release the lever and the machine will sew forward again. (1)

Removing the Work
Turn the handwheel toward you (counterclockwise) to bring the thread take up lever to its highest position and the needle begins to descend, raise the presser foot and remove work behind the needle and presser foot. (2)
Cutting the Thread
Pull the threads under and behind the presser foot. Guide the threads to the side of the face plate and into thread cutter (B). Pull threads down to cut. (3)
Blind Hem
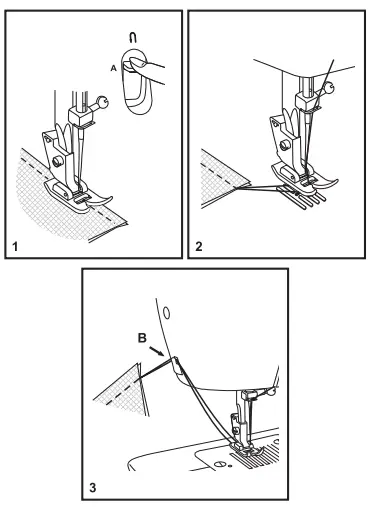
- For hems on curtains, trousers, skirts, etc.
 Blind hem for stretch fabrics.
 Blind hem for firm fabrics.
Note:
It takes practice to sew blind hems. Always make a sewing test first.
Blind Hem:
Turn up the hem to the desired width and press. Fold back (as shown in Fig. 1) against the right side of the fabric with the top edge of the hem extending about 7 mm. (1/4″) to the right side of the folded fabric.
Start to sew slowly on the fold, making sure the needle touches slightly the folded top to catch one or two fabric threads. (2) Unfold the fabric when hemming is completed and press.
Note:
To make blind hem sewing even easier, use a blind hem foot, available from your SINGER® retailer.
Buttonholes

Prepare
- Take off the all purpose foot and attach the buttonhole foot.
- Measure diameter and thickness of button and add 0.3 cm (1/8”) for bar tacks to obtain correct buttonhole length; mark buttonhole length on fabric (a).
- Place fabric under the foot, so that marking on the buttonhole foot aligns with starting marking on fabric. Lower the foot, so that the buttonhole center line marked on the fabric aligns with the center of the buttonhole foot (b).
Note:
Density varies according to the fabric.
Always test sew a buttonhole on the fabric you are using to sew the buttonhole.
Follow the 4-step sequence changing from one step to another with the Pattern Selector Dial. When moving from step to step through the buttonhole process, be sure that the needle is raised before turning the Pattern Selector Dial to the next step. Take care not to sew too many stitches in steps 2 and 4. Use seam ripper and cut buttonhole open from both ends towards the middle.
Tips:
- Slightly reducing upper thread tension will produce better results.
- Use a stabilizer for fine or stretchy fabrics.
- It is advisable to use heavy thread or cord for stretch or knit fabrics. The zig-zag should sew over the heavy thread or cord. (A)

Sewing on Buttons
Install the darning plate. (1)
Change the all purpose foot to the button sewing foot(2)
Position the work under the foot.
Place the button in the desired position and lower the foot. Set the Pattern Selector Dial for the second zig-zag pattern (as shown), which should correspond to the distance between the two holes of the button. Turn the handwheel toward you to check if the needle goes into the right and left hole of the button without hitting the button. Slowly sew on the button with about 10 stitches. (3) Bring the thread tails to the back of the work, then tie off manually
If a shank is required, place a darning needle on top of the button and sew. (4)
For buttons with 4 holes, sew through the front two holes first, push the work forward and then sew through the back two holes.
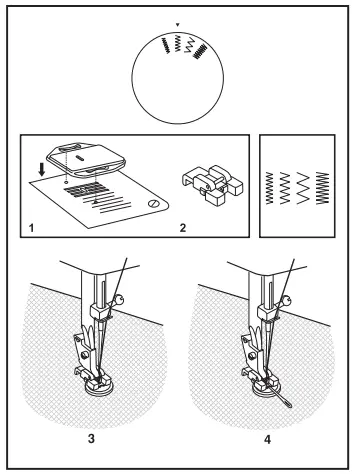
Zippers and Piping
Set the machine as illustrated.
Change to zipper foot.
The zipper foot can be attached right or left, depending on which side of the foot you are going to sew. (1)
To sew past the zipper tab, lower the needle into the fabric, raise the presser foot and push the zipper tab behind the presser foot. Lower the foot and continue to sew.
It is also possible to sew a length of cord into a bias strip to form a “welt” or piping. (2)

Free Motion Darning, Stippling
- * The darning/ embroidery foot is an optional accessory not included with your machine. (1)
Darning:
Install the darning plate. (2)
Remove the presser foot shank. (3)
Attach the darning/ embroidery foot to the presser foot bar. The lever (a) should be behind the needle clamp screw (b). Press the darning/ embroidery foot on firmly from behind with your index finger and tighten the screw (c). (4) For darning, first sew around the edge of the hole (to secure the threads). (5)
First row: Always work from left to right. Turn work by 90 degrees and sew over previous stitching. A darning hoop is recommended for easier sewing and better results.
Note:
Free motion darning is accomplished without the sewing machine internal feed system. Movement of the fabric is controlled by the operator. It is necessary to coordinate sewing speed and movement of fabric.
Stippling:
Set the machine for straight stitch. Using the optional darning/ embroidery foot will help guide you as you sew, in a meandering fashion to create small curving lines to hold layers of fabric and batting together.
Installing the Removable Extension Table
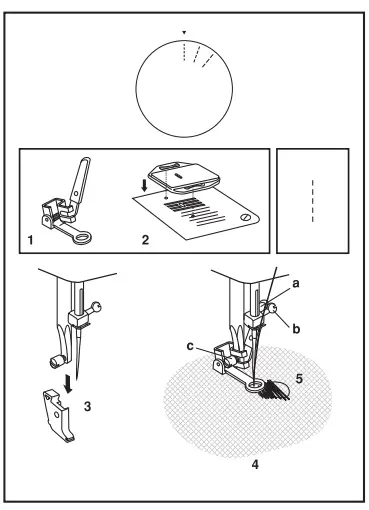
- Hold the removable extension table horizontally, and push it in the direction of the arrow. (1)
- To remove the extension table, pull it toward the left.
- The inside of the removable extension table can be utilized as an accessory box.
- To open, flip cover down as shown. (2)
Changing the Presser Foot

Removing the presser foot
Push the presser foot (e) to disengage from the cut-out (c). (1)
Attaching the presser foot
Install the pin (d) of the presser foot (e) into the cut-out (c) of the presser foot holder. (2)
Removing and attaching the presser foot shank
Raise the presser bar (a) with the presser foot lifter.
Remove and attach the presser foot shank (b) as illustrated. (3)
Attaching the edge/ quilting guide
Attach the edge/quilting guide (f) in the slot as illustrated. Adjust as needed for hems, pleats, quilting, etc. (4)
Attention:
Turn power switch to off (“O”) when carrying out any of the above operations!
Needle/ Fabric/ Thread Chart
| NEEDLE SIZE | FABRICS | THREAD |
|
9-11 (70-80) |
Lightweight fabrics-thin cottons, voile, silk, muslin, interlocks, cotton knits, tricots, jerseys, crepes, woven polyester, shirt & blouse fabrics. | Light-duty thread in cotton, nylon, polyester or cotton wrapped polyester. |
| 11-14 (80-90) | Medium weight fabrics-cotton, satin, kettlecloth, sailcloth, double knits, lightweight woolens. | Most threads sold are medium size and suitable for these fabrics and needle sizes.
Use polyester threads on synthetic materials and cotton on natural woven fabrics for best results. Always use the same thread on top and bottom. |
| 14 (90) | Medium weight fabrics-cotton duck, woolen, heavier knits, terrycloth, denims. | |
| 16 (100) | Heavyweight fabrics-canvas, woolens, outdoor tent and
quilted fabrics, denims, upholstery material (light to medium). |
|
| 18 (110) | Heavy woolen, overcoat fabrics, upholstery fabrics, some leathers and vinyls. | Heavy duty thread. |
IMPORTANT: Match needle size to thread size and weight of fabric.
NEEDLE, FABRIC SELECTION
| NEEDLES | EXPLANATION | TYPE OF FABRIC |
| SINGER® 2020 | Standard sharp needles. Sizes range thin to large. 9 (70) to 18 (110). | Natural woven fabrics-wool, cotton, silk, etc. Not recommended for double knits. |
| SINGER® 2045 | Ball point needle, scarfed. 9 (70) to 18 (110). | Natural and synthetic woven fabrics, polyester blends.
Knits-polyesters, interlocks, tricot, single and double knits. Also sweater knits, Lycra®, swimsuit fabric, elastic. |
| SINGER® 2032 | Leather needles. 12 (80) to 18 (110). | Leather, vinyl, upholstery.
(Leaves smaller hole than standard large needle.) |
Note:
- For best sewing results always use genuine SINGER® needles.
- Replace needle often (approximately every other garment) and/ or at first thread breakage or skipped stitches.
Darning Plate
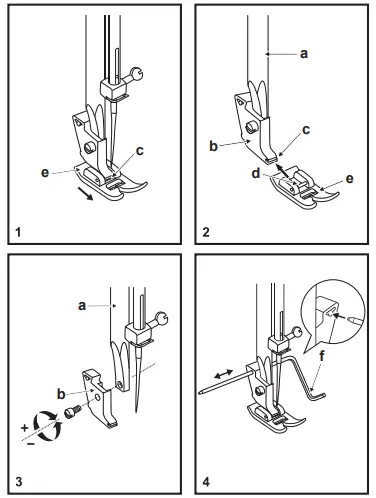
- For certain types of work, (e.g. darning or free-hand embroidery), the darning plate must be used.
- Install the darning plate as illustrated.
- For normal sewing, remove the darning plate.
- For free-motion sewing it is recommended to use a darning/ embroidery foot, available as an optional accessory from authorized SINGER® retailers.
Inserting the Needle

Change the needle regularly, especially if it is showing signs of wear and causing problems. For best sewing results always use SINGER® Brand Needles.
Insert the needle as illustrated as follows:
- Loosen the needle clamp screw and tighten again after inserting the new needle. (1)
- The flat side of the shaft should be towards the back. C/D. Insert the needle as far up as it will go.
Attention:
- Turn power switch to off (“O”) before inserting or removing the needle.
- Needles must be in perfect condition. (2)
Problems can occur with:
- Bent needles
- Damaged points
- Blunt needles
Maintenance
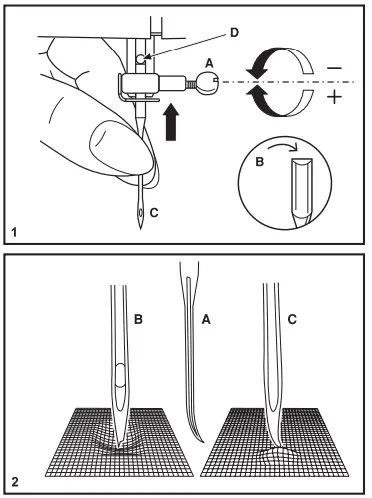
Attention:
Disconnect the machine from the electrical supply by removing the plug from the main socket. When cleaning the machine, it must always be disconnected from the electrical supply.
Remove the needle plate:
Turn the handwheel until the needle is fully raised. Open the hinged front cover and unscrew the needle plate screws with the screw driver. (1)
Cleaning the feed teeth:
Use the brush supplied to clean the whole area. (2)
Cleaning and lubricating the hook:
Remove the bobbin case. Snap the two hook retaining arms (3) outwards. Remove the hook race cover (4) and the hook (5) and clean with a soft cloth. Lubricate at the point (6) (1-2 drops) with sewing machine oil. Turn the handwheel until the hook race (7) is in the left position. Replace the hook (5). Replace the hook race cover and snap back the two hook retaining arms. Insert the bobbin case and bobbin and replace the needle plate.
Important:
- Fabric lint and threads must be removed regularly.
- Your machine should be serviced at regular intervals at one of our service centers
Troubleshooting Guide
| Problem | Cause | Correction |
| Upper thread breaks |
|
|
| Lower thread breaks |
|
|
| Skipped stitches |
|
|
| Needle breaks |
|
|
| Loose stitches |
|
|
| Seams gather or pucker |
|
|
| Uneven stitches, uneven feed |
|
|
| The machine is noisy |
|
|
| The machine jams | Thread is caught in the hook | Remove the upper thread and bobbin case, turn the handwheel backwards and forwards by hand and remove the thread. |
This household sewing machine is designed to comply with IEC/EN 60335-2-28 and UL1594
IMPORTANT SAFETY INSTRUCTIONS
When using an electrical appliance, basic safety precautions should always be followed, including the following:
Read all instructions before using this household sewing machine. Keep the instructions at a suitable place close to the machine. Make sure to hand them over if the machine is given to a third party
DANGER – To reduce the risk of electric shock:
- A sewing machine should never be left unattended when plugged in. The electrical socket, to which the machine is plugged in should be easily accessible. Always unplug this sewing machine from the electric outlet immediately after using and before cleaning, removing covers, lubricating or when making any other user servicing adjustments mentioned in the instruction manual.
To reduce the risk of burns, fire, electric shock, or injury to person:
- Do not allow to be used as a toy. Close attention is necessary when this sewing machine is used by or near children.
- Use this sewing machine only for its intended use as described in this manual. Use only I attachments recommended by the manufacturer as contained in this manual.
- Never operate this sewing machine if it has a damaged cord or plug, if it is not working properly, if it has been dropped or damaged, or dropped into water. Return the sewing machine to the nearest authorized dealer or service center for examination, repair, electrical or mechanical adjustment.
- Never operate the sewing machine with any air openings blocked. Keep ventilation openings of the sewing machine and foot control free from the accumulation of lint, dust, and loose cloth.
- Keep fingers away from all moving parts. Special care is required around the sewing machine needle.
- Always use the proper needle plate. The wrong plate can cause the needle to break.
- Do not use bent needles.
- Do not pull or push fabric while stitching. It may deflect the needle causing it to break.
- Wear safety glasses.
- Switch the sewing machine off (“0”) when making any adjustment in the needle area, such as threading needle, changing needle, threading bobbin, or changing presser foot, etc.
- Never drop or insert any object into any opening.
- Do not use outdoors.
- Do not operate where aerosol (spray) products are being used or where oxygen is being administrated.
- To disconnect, turn all controls to the off (“0”) position, then remove plug from outlet
- Do not unplug by pulling on cord. To unplug, grasp the plug, not the cord.
- The foot control is used to operate the machine. Never place other objects on the foot control.
- Do not use the machine if it is wet.
- If the LED lamp is damaged or broken, it must be replaced by the manufacturer or its service agent or a similarly qualified person, in order to avoid a hazard.
- If the cord connected with the foot control is damaged, it must be replaced by the manufacturer or its service agent or a similarly qualified person, in order to avoid a hazard.
- This sewing machine is provided with double insulation. Use only identical replacement parts. See instructions for Servicing of Double-Insulated Appliances.
SAVE THESE INSTRUCTIONS
FOR CENELEC COUNTRIES ONLY:
This appliance can be used by children aged from 8 years and above and persons with reduced physical, sensory or mental capabilities or lack of experience and knowledge if they have been given supervision or instruction concerning use of the appliance in a safe way and understand the hazards involved. Children shall not play with the appliance. Cleaning and user maintenance shall not be made by children without supervision
The noise level under normal operating conditions is less than 75dB(A).
The machine must only be used with foot control of type FC-2902D, (220 240V) manufactured by Zhejiang Founder Motor Corporation, LTD. (Vietnam) / 4C-326G (230V) / 4C-336G (240V) manufactured by Wakaho Electric Ind. Co., Ltd. (Vietnam).
FOR NON CENELEC COUNTRIES:
This sewing machine is not intended for use by persons (including children) with reduced physical, sensory or mental capabilities, or lack of experience and knowledge, unless they have been given supervision or instruction concerning use of the sewing machine by a person responsible for their safety. Children should be supervised to ensure that they do not play with the sewing machine.
The noise level under normal operating conditions is less than 75dB(A). The machine must only be used with foot control of type KD-1902, FC-1902 (110 120V) / KD2902, FC-2902A, FC-2902C, FC-2902D, (220-240V) manufactured by Zhejiang Founder Motor Corporation, LTD. (Vietnam) / 4C-316B (110-125V) / 4C-316C (127V) /4C-326C (220V) / 4C-326G (230V) / 4C-336G (240V) manufactured by Wakaho Electric Ind. Co., Ltd. (Vietnam)
SERVICING OF DOUBLE INSULATED PRODUCTS
In a double-insulated product, two systems of insulation are provided instead of grounding. No ground means is provided on a double-insulated product, nor should a means for grounding be added to the product. Servicing of a double-insulated product requires extreme care and knowledge of the system and should be done only by qualified service personnel. Replacement parts for a double-insulated product must be identical to those parts in the product. A double insulated product is marked with the words ‘DOUBLE INSULATION’ or ‘DOUBLE INSULATED’
Principal Parts of the Machine

- Thread tension dial
- Thread take-up lever
- Thread cutter
- Presser foot
- Needle plate
- Removable extension table/ accessory storage
- Pattern selector dial
- Bobbin winding stopper
- Reverse sewing lever
Unpacking
- Place the box on a steady, flat surface. Lift your machine out of the box and remove the outer packaging.
- Remove all other packing material and the plastic bag

- Thread guide
- Bobbin winder spindle
- Spool pin
- Handwheel
- Power and light switch
- Main plug socket
- Bobbin thread guide
- Handle
- Face plate
- Presser foot lifter
- Foot speed control
- Power cord
Connecting Machine to Power Source

Connect the machine to a power source as illustrated. (1)
This appliance is equipped with a polarized plug which must be used with the appropriate polarized outlet. (2)
Attention
Unplug power cord when machine is not in use.
Foot control
The foot control pedal regulates the sewing speed. (3)
Attention
Consult a qualified electrician if in doubt of how to connect machine to power source.
Sewing light
Press main switch (A) to “ l “ for power and light.
IMPORTANT NOTICE
For appliance with a polarized plug (one blade is wider than the other). To reduce the risk of electric shock, this plug is intended to fit in a polarized outlet only one way. If it does not fit fully in the outlet, reverse the plug. If it still does not fit, contact a qualified electrician to install the proper outlet. Do not modify the plug in any way
- Polarized attachment plug
- Conductor intended to be grounded
Two Step Presser Foot Lifter
When sewing several layers or thick fabrics, the presser foot can be raised to a higher position for easy positioning of the work. (A)
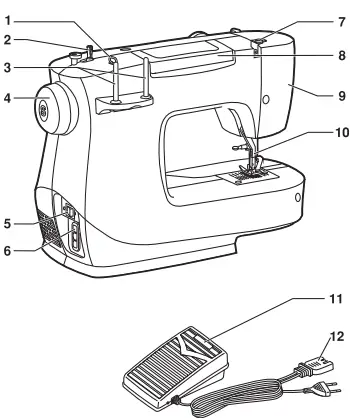
Attention
Your SINGER® machine is adjusted to provide the best stitch result at normal room temperature. Extreme hot and cold temperatures can affect the sewn result.
Accessories

Standard accessories
- All purpose foo
- Zipper foot
- Buttonhole foot
- Button sewing foot
- L-screwdriver
- Seam ripper/ brush
- Spool pin felt (2x)
- Pack of needles (3x)
- Edge/ quilting guide
- SINGER® Class 15 bobbins (4x)
- Darning plate
- Soft cover
Optional Accessories:
For information about additional presser feet, attachments and accessories that may be available for your machine, visit www.singer.com.
Winding the Bobbin
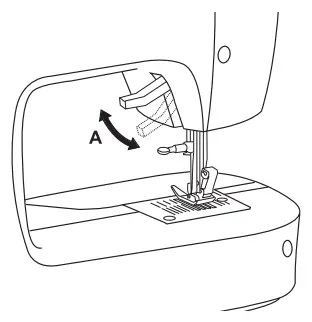
- Place the thread and spool pin felt (a) onto the spool pin. (1)
- Draw the thread from the spool through the upper thread guide. (2)
- Wind the thread clockwise around bobbin winder tension discs. (3)
- Thread bobbin as illustrated and place on spindle. (4)
- Push bobbin spindle to right. (5)
- Hold thread end. (6)
- Step on foot control pedal. (7)
- Release the pedal after a few turns. Release the thread and cut as close as possible to the spool. Press the pedal again. Once the spool is full, it rotates slowly. Release the pedal and cut thread. (8)
- Push bobbin spindle to left (9) and remove
Please Note:
When the bobbin winder spindle is in “bobbin winding” position, the machine will not sew and the hand wheel will not turn. To start sewing, push the bobbin winder spindle to the left (sewing position).
Inserting the Bobbin
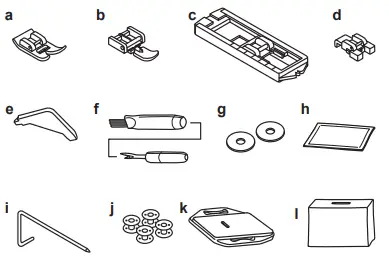
When inserting or removing the bobbin, the needle must be fully raised
- Open the hinged cover. (1)
- Pull the bobbin case tab (a) and remove the bobbin case. (2)
- Hold the bobbin case with one hand. Insert the bobbin so that the thread runs in a clockwise direction (arrow(3)
- Pull the thread through the slit and under the finger. Leave a 6 inch tail of thread. (4)
- Hold the bobbin case by the hinged latch. (5)
- Insert it into the shuttle. (6)
Attention
Turn power switch to off (“O”) before inserting or removing the bobbin
Threading the Upper Thread

This is a simple operation but it is important to carry out
correctly as by not doing so several sewing problems could result.
- Raise the needle to its highest position by turning the handwheel towards you (counterclockwise) so that the mark on the handwheel points directly up. Raise the presser foot to release the tension discs. (1)
- Place the thread and spool pin felt (a) onto the spool pin. (2)
Note: For safety, it is strongly suggested you turn off the power before threading. - Draw the thread from the spool through the upper thread guide. (3)
- Guide the thread around the thread guide as illustrated. (4)
- Thread tension module by leading thread down right channel and up left channel. (5) During this process it is helpful to hold the thread between the spool and thread guide.
- At the top of this movement pass thread from right to left through the slotted eye of the take-up lever and then downwards again. (6)
- Now pass thread behind the thin wire needle clamp guide (7) and then down to the needle which should be threaded from front to back.
- Pull about 6-8 inches of thread to the rear beyond the needle eye. Trim thread to length with built in thread cutter. (8)
Raising the Bobbin Thread

Hold the upper thread with the left hand. (1) Turn the handwheel towards you (counterclockwise) lowering, then raising needle.
Note:
If it is difficult to raise the bobbin thread, check to make sure the thread is not trapped by the hinged cover or the Removable Extension Table.
Gently pull on the upper thread to bring the bobbin thread up through the needle plate hole. (2)
Lay both threads to the back under the presser foot. (3)
Thread Tension
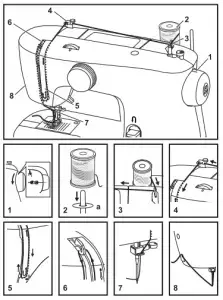
Upper thread tension
Basic thread tension setting: “4”
To increase the tension, turn the dial to the next number up. To reduce the tension, turn the dial to the next number down.
- Normal thread tension for straight stitch sewing.
- Thread tension too loose for straight stitch sewing. Turn dial to higher number.
- Thread tension too tight for straight stitch sewing. Turn dial to lower number.
- Normal thread tension for zig zag and decorative sewing. Correct thread tension is when a small amount of the upper thread appears on the bottom side of fabric.
Lower thread tension
The bobbin tension has been set correctly at the factory, so you do not need to adjust it.
Please note:
- Proper setting of tension is important to good sewing.
- There is no single tension setting appropriate for all stitch functions, thread or fabric.
- A balanced tension (identical stitches both top and bottom) is usually only desirable for straight stitch construction sewing.
- 90% of all sewing will be between ”3” and ”5”.
- For zig zag and decorative sewing stitch functions, thread tension should generally be less than for straight stitch sewing.
- For all decorative sewing you will always obtain a nicer stitch and less fabric puckering when the upper thread appears on the bottom side of your fabric.
How to Choose Your Pattern


To select a stitch, simply turn the pattern selector dial. The pattern selector dial may be turned in either direction.
For straight stitch, select pattern ” 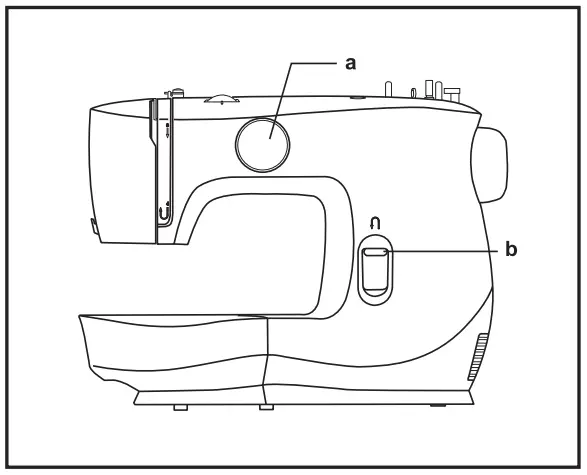 ” with the pattern
selector dial.
For zigzag stitch, select pattern ” 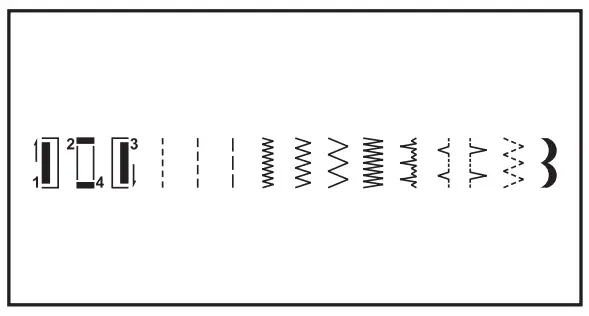 ” with the pattern
selector dial.
- Pattern Selector Dial
- Reverse Sewing Lever
Sewing Straight Stitch
- To begin sewing, set the machine for straight stitch. (1)
- Place the fabric under the presser foot with the fabric edge lined up with the desired seam guide line on the needle plate. (2)
- Lower the presser foot lifter, and then step on the foot control to start sewing. (3)

Reverse Sewing
To secure the beginning and the end of a seam, press down the reverse sewing lever (A). Sew a few reverse stitches. Release the lever and the machine will sew forward again. (1)

Removing the Work
Turn the handwheel toward you (counterclockwise) to bring the thread take up lever to its highest position and the needle begins to descend, raise the presser foot and remove work behind the needle and presser foot. (2)
Cutting the Thread
Pull the threads under and behind the presser foot. Guide the threads to the side of the face plate and into thread cutter (B). Pull threads down to cut. (3)
Blind Hem
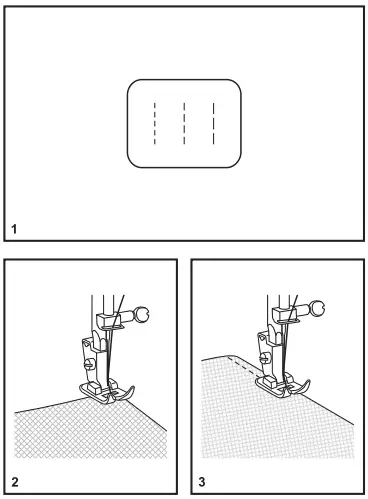
- For hems on curtains, trousers, skirts, etc.
 Blind hem for stretch fabrics.
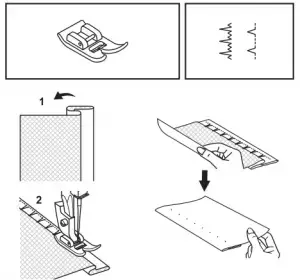 Blind hem for firm fabrics.
Note:
It takes practice to sew blind hems. Always make a sewing test first.
Blind Hem:
Turn up the hem to the desired width and press. Fold back (as shown in Fig. 1) against the right side of the fabric with the top edge of the hem extending about 7 mm. (1/4″) to the right side of the folded fabric.
Start to sew slowly on the fold, making sure the needle touches slightly the folded top to catch one or two fabric threads. (2) Unfold the fabric when hemming is completed and press.
Note:
To make blind hem sewing even easier, use a blind hem foot, available from your SINGER® retailer.
Buttonholes

Prepare
- Take off the all purpose foot and attach the buttonhole foot.
- Measure diameter and thickness of button and add 0.3 cm (1/8”) for bar tacks to obtain correct buttonhole length; mark buttonhole length on fabric (a).
- Place fabric under the foot, so that marking on the buttonhole foot aligns with starting marking on fabric. Lower the foot, so that the buttonhole center line marked on the fabric aligns with the center of the buttonhole foot (b).
Note:
Density varies according to the fabric.
Always test sew a buttonhole on the fabric you are using to sew the buttonhole.
Follow the 4-step sequence changing from one step to another with the Pattern Selector Dial. When moving from step to step through the buttonhole process, be sure that the needle is raised before turning the Pattern Selector Dial to the next step. Take care not to sew too many stitches in steps 2 and 4. Use seam ripper and cut buttonhole open from both ends towards the middle.
Tips:
- Slightly reducing upper thread tension will produce better results.
- Use a stabilizer for fine or stretchy fabrics.
- It is advisable to use heavy thread or cord for stretch or knit fabrics. The zig-zag should sew over the heavy thread or cord. (A)

Sewing on Buttons
Install the darning plate. (1)
Change the all purpose foot to the button sewing foot(2)
Position the work under the foot.
Place the button in the desired position and lower the foot. Set the Pattern Selector Dial for the second zig-zag pattern (as shown), which should correspond to the distance between the two holes of the button. Turn the handwheel toward you to check if the needle goes into the right and left hole of the button without hitting the button. Slowly sew on the button with about 10 stitches. (3) Bring the thread tails to the back of the work, then tie off manually
If a shank is required, place a darning needle on top of the button and sew. (4)
For buttons with 4 holes, sew through the front two holes first, push the work forward and then sew through the back two holes.
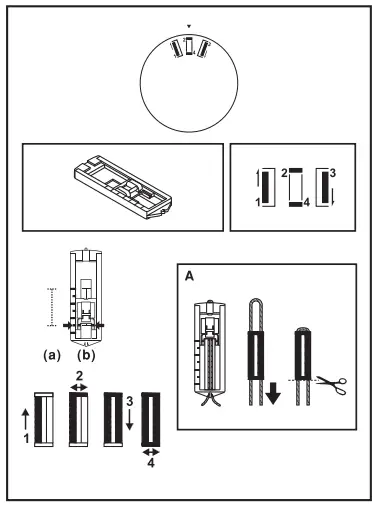
Zippers and Piping
Set the machine as illustrated.
Change to zipper foot.
The zipper foot can be attached right or left, depending on which side of the foot you are going to sew. (1)
To sew past the zipper tab, lower the needle into the fabric, raise the presser foot and push the zipper tab behind the presser foot. Lower the foot and continue to sew.
It is also possible to sew a length of cord into a bias strip to form a “welt” or piping. (2)

Free Motion Darning, Stippling
- * The darning/ embroidery foot is an optional accessory not included with your machine. (1)
Darning:
Install the darning plate. (2)
Remove the presser foot shank. (3)
Attach the darning/ embroidery foot to the presser foot bar. The lever (a) should be behind the needle clamp screw (b). Press the darning/ embroidery foot on firmly from behind with your index finger and tighten the screw (c). (4) For darning, first sew around the edge of the hole (to secure the threads). (5)
First row: Always work from left to right. Turn work by 90 degrees and sew over previous stitching. A darning hoop is recommended for easier sewing and better results.
Note:
Free motion darning is accomplished without the sewing machine internal feed system. Movement of the fabric is controlled by the operator. It is necessary to coordinate sewing speed and movement of fabric.
Stippling:
Set the machine for straight stitch. Using the optional darning/ embroidery foot will help guide you as you sew, in a meandering fashion to create small curving lines to hold layers of fabric and batting together.
Installing the Removable Extension Table

- Hold the removable extension table horizontally, and push it in the direction of the arrow. (1)
- To remove the extension table, pull it toward the left.
- The inside of the removable extension table can be utilized as an accessory box.
- To open, flip cover down as shown. (2)
Changing the Presser Foot

Removing the presser foot
Push the presser foot (e) to disengage from the cut-out (c). (1)
Attaching the presser foot
Install the pin (d) of the presser foot (e) into the cut-out (c) of the presser foot holder. (2)
Removing and attaching the presser foot shank
Raise the presser bar (a) with the presser foot lifter.
Remove and attach the presser foot shank (b) as illustrated. (3)
Attaching the edge/ quilting guide
Attach the edge/quilting guide (f) in the slot as illustrated. Adjust as needed for hems, pleats, quilting, etc. (4)
Attention:
Turn power switch to off (“O”) when carrying out any of the above operations!
Needle/ Fabric/ Thread Chart
| NEEDLE SIZE | FABRICS | THREAD |
|
9-11 (70-80) |
Lightweight fabrics-thin cottons, voile, silk, muslin, interlocks, cotton knits, tricots, jerseys, crepes, woven polyester, shirt & blouse fabrics. | Light-duty thread in cotton, nylon, polyester or cotton wrapped polyester. |
| 11-14 (80-90) | Medium weight fabrics-cotton, satin, kettlecloth, sailcloth, double knits, lightweight woolens. | Most threads sold are medium size and suitable for these fabrics and needle sizes.
Use polyester threads on synthetic materials and cotton on natural woven fabrics for best results. Always use the same thread on top and bottom. |
| 14 (90) | Medium weight fabrics-cotton duck, woolen, heavier knits, terrycloth, denims. | |
| 16 (100) | Heavyweight fabrics-canvas, woolens, outdoor tent and
quilted fabrics, denims, upholstery material (light to medium). |
|
| 18 (110) | Heavy woolen, overcoat fabrics, upholstery fabrics, some leathers and vinyls. | Heavy duty thread. |
IMPORTANT: Match needle size to thread size and weight of fabric.
NEEDLE, FABRIC SELECTION
| NEEDLES | EXPLANATION | TYPE OF FABRIC |
| SINGER® 2020 | Standard sharp needles. Sizes range thin to large. 9 (70) to 18 (110). | Natural woven fabrics-wool, cotton, silk, etc. Not recommended for double knits. |
| SINGER® 2045 | Ball point needle, scarfed. 9 (70) to 18 (110). | Natural and synthetic woven fabrics, polyester blends.
Knits-polyesters, interlocks, tricot, single and double knits. Also sweater knits, Lycra®, swimsuit fabric, elastic. |
| SINGER® 2032 | Leather needles. 12 (80) to 18 (110). | Leather, vinyl, upholstery.
(Leaves smaller hole than standard large needle.) |
Note:
- For best sewing results always use genuine SINGER® needles.
- Replace needle often (approximately every other garment) and/ or at first thread breakage or skipped stitches.
Darning Plate
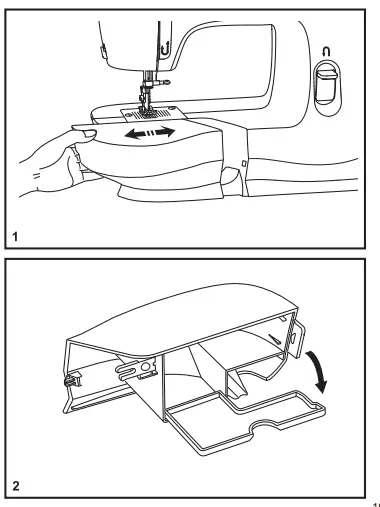
- For certain types of work, (e.g. darning or free-hand embroidery), the darning plate must be used.
- Install the darning plate as illustrated.
- For normal sewing, remove the darning plate.
- For free-motion sewing it is recommended to use a darning/ embroidery foot, available as an optional accessory from authorized SINGER® retailers.
Inserting the Needle

Change the needle regularly, especially if it is showing signs of wear and causing problems. For best sewing results always use SINGER® Brand Needles.
Insert the needle as illustrated as follows:
- Loosen the needle clamp screw and tighten again after inserting the new needle. (1)
- The flat side of the shaft should be towards the back. C/D. Insert the needle as far up as it will go.
Attention:
- Turn power switch to off (“O”) before inserting or removing the needle.
- Needles must be in perfect condition. (2)
Problems can occur with:
- Bent needles
- Damaged points
- Blunt needles
Maintenance
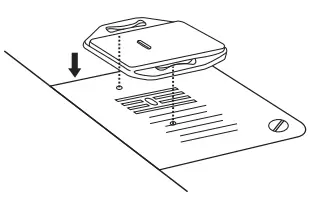
Attention:
Disconnect the machine from the electrical supply by removing the plug from the main socket. When cleaning the machine, it must always be disconnected from the electrical supply.
Remove the needle plate:
Turn the handwheel until the needle is fully raised. Open the hinged front cover and unscrew the needle plate screws with the screw driver. (1)
Cleaning the feed teeth:
Use the brush supplied to clean the whole area. (2)
Cleaning and lubricating the hook:
Remove the bobbin case. Snap the two hook retaining arms (3) outwards. Remove the hook race cover (4) and the hook (5) and clean with a soft cloth. Lubricate at the point (6) (1-2 drops) with sewing machine oil. Turn the handwheel until the hook race (7) is in the left position. Replace the hook (5). Replace the hook race cover and snap back the two hook retaining arms. Insert the bobbin case and bobbin and replace the needle plate.
Important:
- Fabric lint and threads must be removed regularly.
- Your machine should be serviced at regular intervals at one of our service centers
Troubleshooting Guide
| Problem | Cause | Correction |
| Upper thread breaks |
|
|
| Lower thread breaks |
|
|
| Skipped stitches |
|
|
| Needle breaks |
|
|
| Loose stitches |
|
|
| Seams gather or pucker |
|
|
| Uneven stitches, uneven feed |
|
|
| The machine is noisy |
|
|
| The machine jams | Thread is caught in the hook | Remove the upper thread and bobbin case, turn the handwheel backwards and forwards by hand and remove the thread. |