
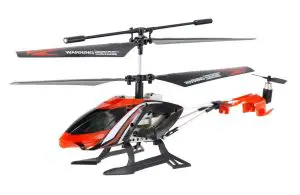
SKY ROVER 858922 Knightforce 2.4 GHz Radio Control Helicopter
- Keep these instructions for future reference as they contain important information.
INDOOR/OUTDOOR | STABLE AND EASY CONTROL | UP TO 7 MINUTES OF FLIGHT TIME
2.4 GHz Radio Control Helicopter
Contents and overview
Functions and Specifications
- Full function : Rise, Fall, Turn Left, Turn Right, Forward, Backward, Stop.
- Power supply : 3 AAA (LR03) alkaline batteries for remote controller
( Batteries sold separately), built-in high-performance lipo battery for helicopter. - Flight height : 6 meters
- Remote control distance : < 10 meters
- Flight time : <7 minutes
Pack List: (Fig.A)

- USB Charging Cable x1
- Main Blade a x1
- Main Blade b x1
- Tail Blade x1
- Fastener x2
Components: (Fig.B and C)
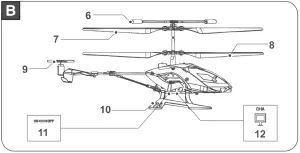
6. Balance Bar
7. Main Blade a
8. Main Blade b
9. Tail Blade
10. Landing Gear
11. Power Switch
12. Charging Socket
13. Throttle Lever
14. Speed mode
15. Power switch(OFF-ON)
16. Steering Lever
17. Power light
18. Left/Right Trimmer
Assembly instructions
Remote Control Battery Installation: (Fig.D)
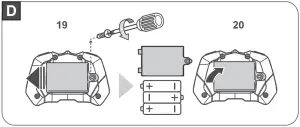
Locate the locking screw on the back of the controller and remove it from the battery cover(Fig.18) , insert 3 AAA (LR03) batteries in correct polarity(Fig.19), and then close the battery cover(Fig.20). Reinstall locking screw to secure the battery door.
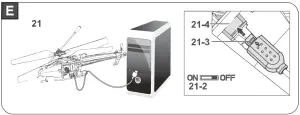
Charging helicopter: (Fig.E)
Adult supervision is required when charging the helicopter.
USB charging:(Fig.21)
Move the power switch on the helicopter to the “OFF” position.(Fig.21-2) Insert the USB Port on your PC. Connect the charging cable to the socket on the underside of the helicopter. There is a recessed side on the charging socket (Fig.21-4). When inserted correctly, the raised triangle shape on the Charging Cable (Fig.21-3) lines up with this recessed side of the charging socket and the light on the USB will illuminate. The charging time is about 60 minutes. When your helicopter is fully charged, the light will turn off.
Flying the helicopter:
Adult supervision is recommended when flying the helicopter.
Move the power switch on the helicopter to the “ON” position and place the helicopter on a flat surface.
Move the power switch on the controller to the “ON” position.
Push the throttle lever all the way up and down. LEDs on Heli and Remote will change from fast flashing light to solid light, indicating successful pairing.
Up and Down: (Fig.F)

When the helicopter flies steadily, you can slowly push the throttle lever up to make helicopter fly higher, or release the lever a bit to make helicopter fly lower. Only small lever position changes are required for smooth flying.
Rotation: (Fig .G)

Hold the helicopter at a steady height. Push the steering lever towards left to turn counter clockwise, and push the steering lever towards right to turn clockwise.
Forward and Backward: (Fig .H)
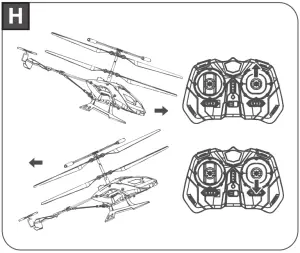
When you push the steering lever up, the helicopter moves forward; when you push the steering lever down, the helicopter moves backward.
If the helicopter rotates while in operation, please use the lever trim to adjust. (Fig .I)
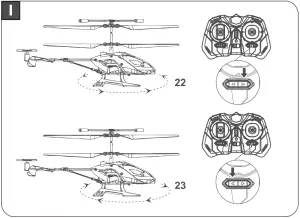
(Fig.22). If the helicopter spins counter clockwise, you can press the trim button to the right until the helicopter stops spinning.
(Fig.23). If the helicopter spins clockwise, you can press the trim button to the left until the helicopter stops spinning.
Attention:
If the helicopter spins during forward or backward operation or constantly wobbles while in flight mode, check the blades for damage or warping.
Blades replacement: (Fig. J)
Adult supervision is required when replacing the helicopter blades.
- Remove the screws that lock down the damaged blade or blades to replace them.
- Remove the damaged blade or blades, check that they are the properly marked blade/s. (check underneath the blade will be marked AA or BB).
- Reinstall locking screw to lock down the blades.
- To remove a damaged tail propeller gently push on the propeller until it is removed.
- To install a new tail propeller, first align the bottom of the propeller opening with the motor pin and press on the top of the propeller until it is completely down. There should not be any of the motor pin exposed.
Environment for flight
- It is recommended to fly in a space area over 20ft(W)*30ft(L)*10ft(H).
- Fly in a wide-open room av-Jay from breakable items. Avoid flying near vents and/or fans, these may overpower the aircraft and make it difficult to control
- Make sure there are no obstades that will interfere with flight causing potential danger and/or electrical hazards.
- A flat surface is required, or smart hovering height will be affected.
Important safety information
- Adult supervision advised. Keep away from obstacles and electrical hazards.
- Actual product styling and/or color may vary.
- Carefully open packages with safety scissors to avoid damaging product.
- Please retain package and instructions for important information. Please remove all packaging materials before giving to children.
- If rotors become damaged or broken, do not fly. Flying with broken rotors may damage helicopter and/or lead to injury.
FOR LED PRODUCTS: It is rare but possible for seizures to be triggered by light flashes.
To reduce exposure to such potential,do not flash lights directly into eyes.
FCC Statement
This equipment has been tested and found to comply with the limits for a Class B digital device, pursuant to Part 15 of the FCC Rules. These limits are designed to provide reasonable protection against harmful interference in a residential installation. This equipment generates, uses and can radiate radio frequency energy and, if not installed and used in accordance with the instructions, may cause harmful interference to radio communications. However, there is no guarantee that interference will not occur in a particular installation. If this equipment does cause harmful interference to radio or television reception, f.Jhich can be determined by turning the equipment off and on, the user is encouraged to try to correct the interference by one or more of the following measures:
- Reorient or relocate the receiving antenna.
- Increase the separation between the equipment and receiver.
- Connect the equipment into an outlet on a circuit different from that to which the receiver is connected.
- Consult the dealer or an experienced radio/TV technician for help.
This device complies with Part 15 of the FCC rules. Operation is subject to the following two conditions:
(1) This device may not cause harmful interference, and
(2) This device must accept any interference received, including interference that may cause undesired operation.
Note: Changes or modifications not expressly approved by the party responsible for compliance could void the user’s authority to operate the equipment.
This device complies with Industry Canada licence-exempt RSS standard( s ).
Operation is subject to the following two conditions: (1) This device may not cause interference, and (2) This device must accept any interference, including interference that may cause undesired operation of the device.
CAN ICES-3(B)/NMB-3(B)
Battery safety information
- Batteries are small objects.
- Replacement of batteries must be done by adults.
- Follow the polarity(+/-) diagram in the battery compartment.
- Promptly remove dead batteries from the toy.
- Dispose of used batteries properly.
- Remove batteries for prolonged storage.
- Only batteries of the same or equivalent type as recommended are to be used.
- DO NOT incinerate used batteries.
- DO NOT dispose of batteries in fire, as batteries may explode or leak.
- DO NOT mix old and new batteries or types of batteries (i.e.alkaline/standard).
- DO NOT use rechargeable batteries.
- DO NOT recharge non-rechargeable batteries.
- DO NOT short-circuit the supply terminals.
- Rechargeable batteries are to be removed from the toy before being charged
- Batteries are only to becharged by adults or by children at least 8 years old.
Charging unit to be used with the toy should be regula~y examined for potential hazard, such as damage to the cable or cord, plug, enclosure of other parts and that in the event of such damage; the toy must not be used until that damage had been properly removed.
Requires 3 x 1.5 V (AAA) batteries.
Batteries or battery packs must be recycled or disposed of properly. When this product has reached the end of its useful life it should not be disposed of with other household waste. The Waste Electrical and Electronic Equipment
Regulations require it to be separately collected so that it can be treated using the best available recovery and recycling techniques. This will minimize the impact on the environment and human health from soil and water contamination by any hazardous substances, decrease the resources required to make new products and avoid using up landfill space.
Please do your part by keeping this product out of the municipal waste stream! The “wheelie bin” symbol means that it should be collected as “waste electrical and electronic equipment”. You can return an old product to your retailer when you buy a similar new one. For other options, please contact your local council.
This toy is only to be connected to equipment bearing either of the following symbols: 

ALPHA GROUP CO., LTD.
Alpha Animation Industrial Area,
Jinhong Road East & Fengxiang Road North,
Chenghai District, Shantou, Guangdong, P.R.China(515800)
[email protected]
www.alphatoys.com
ALPHA GROUP US, LLC
13048 Valley Blvd, Fontana,CA92335,USA
Tel: (844) 303-8936

| Supplier’s Declaration of Conformity 47 CFR § 2.1077 Compliance Information Product name: Sky Rover Knight Force Responsible Party- U.S. Contact Information ALPHA GROUP US, LLC FCC Compliance Statement This device complies with Part 15 of the FCC rules. Operation is subject to the following two conditions: |