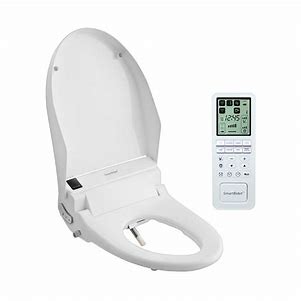
SmartBidet SB-3000 Electronic Bidet User Manual
“Important safeguards/general cautions ” are information that can protect the user from safety hazards and also prevent losses. Please be sure to read the manual correctly for proper usage.
- Please read the manual carefully before installation and utilization.
- This product is made for the US and Canada.
- The function and design of the product may be changed for quality improvements.
Important Functions

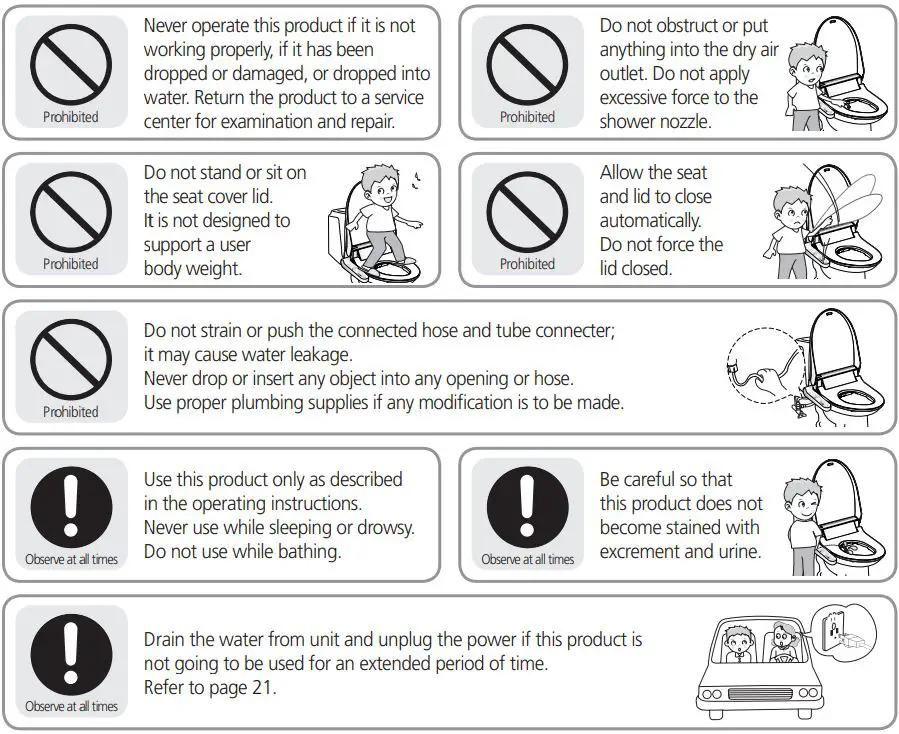
1 IMPORTANT SAFEGUARDS
- READ ALL INSTRUCTIONS BEFORE INSTALLATION AND USE
The following terms are used in this manual to indicate hazards of varying degrees of severity.
DANGER Indicates an imminently hazardous situation which, if not avoided, will result in death or serious injury.
WARNING Indicates potentially hazardous situation which, if not avoided, could result in death or serious injury.
CAUTION Indicates potentially hazardous situation which, if not avoided, may result in minor or moderate injury or in damage to the product or other property.
![]()
![]()
![]()


![]()
– SAVE THESE INSTRUCTIONS –
2 CAUTION BEFORE INSTALLATION
WIRING REQUIREMENT
THIS PRODUCT MUST BE PLUGGED into a regular voltage grounded GFCI outlet (North America 120Vac). The rated power consumption is 1400W. In locations where only a standard two-prong outlet is available, it is the responsibility of the user to install a grounded three-prong outlet. Using a higher voltage is dangerous and may result in a fire or other accident. This product is not responsible for damage resulting from the use of it on other than specified voltage, or operating it without proper grounding.
![]()
This Product must be on a separate circuit. No other appliance should share the circuit with this product. Sharing a circuit could cause the branch circuit fuse to blow or the circuit breaker to trip. Continuous usage under these conditions could result in fire or property damage.
GROUND INSTRUCTIONS
(1) This product has a three-prong grounding plug, which must be plugged into an outlet that is properly installed and grounded. In the event of an electrical short circuit, grounding reduces the risk of electric shock by providing an escape wire for the electric current. If repair or replacement of the cord or plug is necessary, do not connect the grounding wire to either flat blade terminal. The wire with insulation having an outer surface that is green with or without yellow stripes is the grounding wire. Check with a qualified electrician or service person if the grounding instructions are not completely understood, or if in doubt as to whether the product is properly grounded.
(2) This product is for use on a nominal 120Vac circuit, and has a grounding plug that looks like the plug illustrated in sketch A in Figure 1. A temporary adapter, which looks like the adapter illustrated in sketches B and C, may be used to connect this plug to a 2-pole receptacle as shown in sketch B if a properly grounded outlet is not available. The temporary adapter should be used only until a properly grounded outlet (sketch A) can be installed by a qualified electrician. The green colored rigid ear, lug, or the like extending from the adapter must be connected to a permanent ground such as a properly grounded outlet box cover. Whenever the adapter is used, it must be held in place by the screw.

This appliance has to be earthed.
![]()
IMPROPER GROUNDING CAN RESULT IN A RISK OF ELECTRIC SHOCK. Electric wiring has to be done in accordance with all local codes, or in the absence of local codes, with the National Electrical Codes.
The use of an extension cord is not recommended or advised. If it is necessary to use an extension cord, use only a three-prong extension cord (one to one), and a three slot built-in GFCI receptacle that will accept the plug on this product. The marked rating of the extension cord should be equal to or greater than the electrical rating of the unit (10amp). Consult a qualified electrician or service person if you are not sure whether the unit is properly grounded.
3 Identification
1 MAIN UNIT

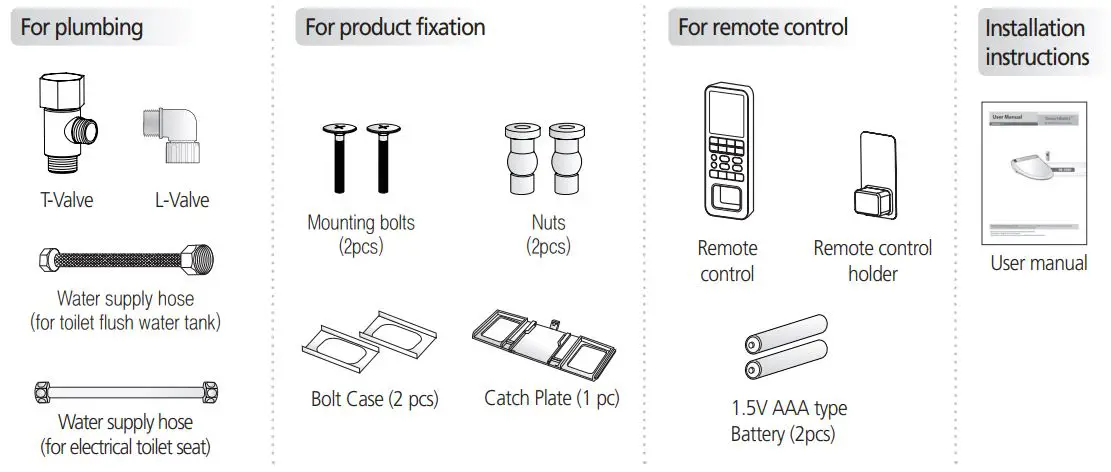
2 ACCESSORIES
3 Remote Control
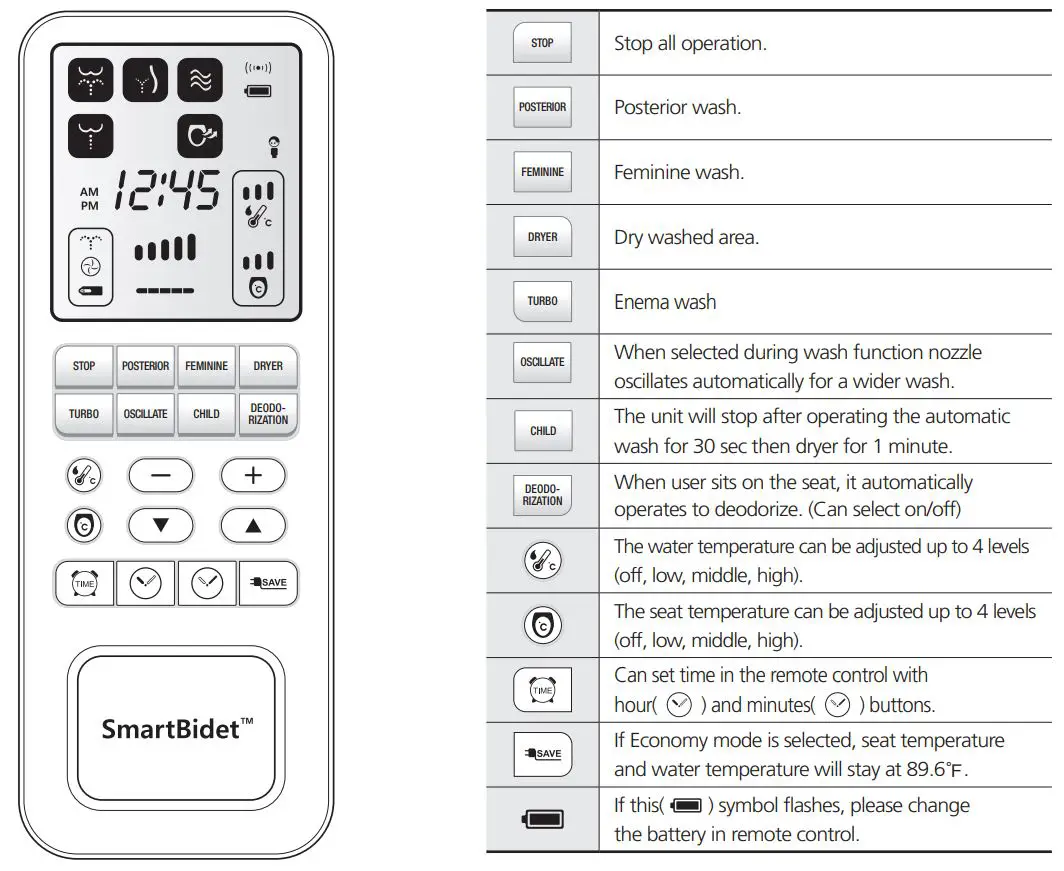
Simple Operation Panel

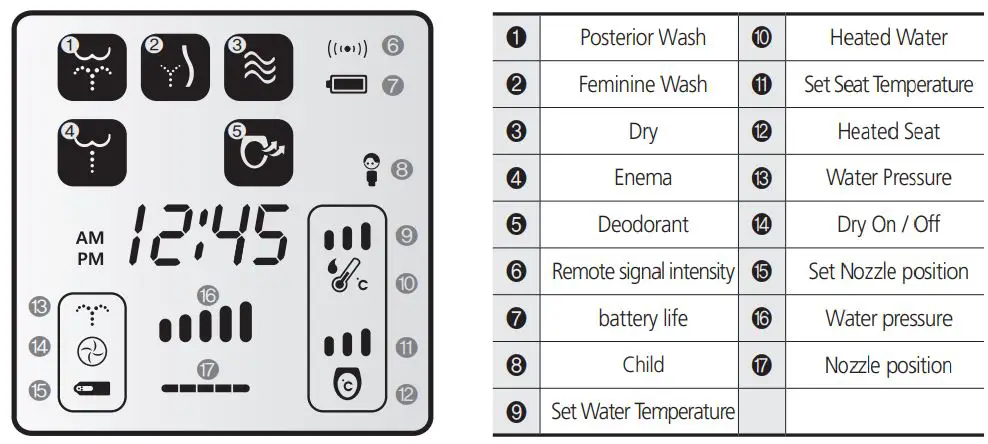
Display
– When you sit down on this product, sit in the center in order to activate the sensor. (If the unit’s input water temperature is lower than 54(12.2C) , the water temperature could be lower than the above noted temperatures)
![]()
![]()
(1) Check for any water leaks.
- Please turn on the water supply valve and check connected spots(1~5) for the leakage.

(2) PREPARATION
- Please plug the power cord into 120Vac power outlet.
- Plug the unit into the proper power source and the LED power light will start flashing.
- Wait until the LED power light stops flashing and becomes solid red.
- The water tank will be filled after pushing a

- When the water tank is filling the buzzer “Beeps” continuously. After the water tank is full, the buzzer will end with “One Solid Beep”.

![]()
DO NOT ALLOW CHILDREN TO USE THE TURBO WASH or VORTEX WASH FUNCTION! SUPERVISION IS STRONGLY RECOMMENDED FOR THE ELDERLY OR OTHER PERSONS THAT MAY HAVE LIMITATIONS IN BODY MOVEMENT, ILLNESS OR DISABILITIES!
3 OPERATION
● SIT DOWN ON THE SEAT
- When the digital sensor on the seat is activated, the operation LED window on the main unit will light “Occupied sensor” and simultaneously, the deodorizer fan will start to work.
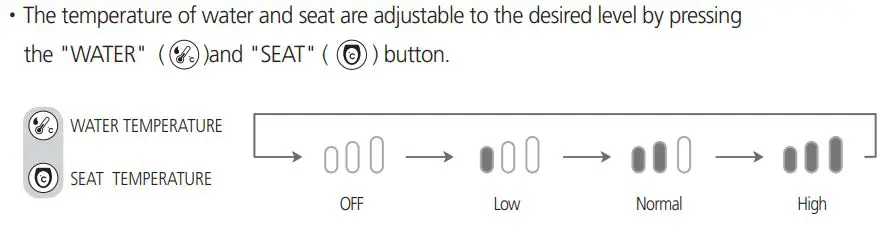
- See page 12 for details about changing the seat or water temperature.
● STOP
- Press this button to stop all operation.
● CLEANSING
• CLEANSING 1. (Posterior Wash)
1- Press “Posterior Wash”( 
2- Additional functions during your Posterior Wash experience are available. See Oscillation, page 13
• CLEANSING 2. (Feminine Wash)
1- Press “Feminine Wash”( 
2- Additional functions during your Feminine Wash experience are available. See Oscillation, page 13
• CLEANSING 3. (Enema Wash)
1- Press “Enema wash”( 
2- Press “Water pressure – High & Low button” to adjust the water pressure.
● CLEANSING cont.
CLEANSING 3. (Enema wash)
- Press “Enema wash” Automatically, the water nozzle comes out and sprays a warm stream of water to the posterior center of the rectum.
- If necessary, adjust “Position” of water stream with the (

- Press “Water pressure High & Low button” (


- Press the “STOP” button when you feel your abdomen is full or wait until the “Enema wash” function stops, approximately 1 minute.
- You will shortly feel the urge to push the water out of your colon, push the water and feces out as thoroughly as you can.
- Relax for a few minutes and be sure you feel your colon is empty and then use the “Posterior Wash” and “Air Dry” function to finish.


5 Operation (Details)
● WARM AIR DRYER
- Press “Dry”(

- You may adjust the warm air temperature by pressing High(
❄ This product memorizes the air temperature of prior use.

● WATER PRESSURE ADJUSTMENT
- After sitting down on the this product, the LED lamp for water pressure on the Power Control will light at third or middle level.
- Press high(
● WARM WATER TEMPERATURE AND SEAT TEMPERATURE ADJUSTMENT
● DEODORIZER
◼◾ Deodorizer ON/Off (initial setting is Off)
– Press button for(
– After setting Deodorizer function, it is automatically activated when sensing the human body.

– Once used, the Deodorizer function automatically stops after 1 minute of operation.
Reference – Deodorizer function stops while dryer is selected. After dryer function completes, deodorizer automatically is activated.
● OSCILLATION ( Nozzle Movement Function)
- When using Posterior or Feminine Washing functions, pressing the “OSCILLATE”(

- You may change the position of the Oscillating spray by pressing the “OSCILLATE”(


- Push the “OSCILLATE”(
Auto-Setting of Oscillation Feature
• You can set this function to automatically oscillate whenever the seat is occupied and the Posterior or
Feminine washes are in operation.
Step 1: Sit on this product.
Step 2: Press the “OSCILLATE”( 
Step 3: Sit on the this product and proceed with Posterior or Feminine Wash. Note: In the automatic setting, you may still adjust the position of the Oscillating spray by pressing the
“Front”(

Canceling the Automatic Oscillation function
Step 1: Sit on this product.
Step 2: Press the “OSCILLATE”(
● NOZZLE POSITION ADJUSTMENT
- Nozzle position is adjustable to the desired position by pressing “Front”(
● Child Wash
- When pressing button, the unit will automatically run Posterior Wash 3rd level for 30 seconds then Dryer 3rd level for 1 minute. While using, if you press the stop button, the function will stop.
- This function adjusts nozzle position and dryer temperature for a child’s specification.
The recommended minimum child ‘s age to use the bidet seat is 5 years old. We recommend adult supervision while the child is using the unit.
● Power ON/OFF
- When the power is OFF, all of the LED lights will also be turned off and the unit will be turned OFF.
- If push the


● ECONOMY (Energy Save Mode)
◾ Saver On/ Off
– When pressing(
– Energy saver mode automatically maintains a water and seat temperature of 89.6(32).
– When using bidet in saver mode, it is turned to automatic saver.
– When you rise from the seat, it goes into saver mode.
– Seat temperature is maintained 32 ºC.

![]()
Other energy saver tips
In order to save energy, please abide by the following instructions:
– Keep seat cover closed when not in use to prevent heat from being lost.
– Keep temperature set to low.
– Unplug the power cord if you do not plan to use the unit for a long period of time.
● Night Light on/off setting
– Press “Stop” and “Temperature” remote buttons simultaneously until night light is turned on or off.

● Nozzle Cleaning (Automatic)
– This product has an automatic nozzle self-cleaning function that cleans the nozzle before and after each use.
6 Installation
![]()
- This product requires 120V usage.
- Please do not plug in the electrical cord prior to installation.
- Please consult with a licensed electrician if electrical work is needed. In case a grounded outlet is not available, grounding should be done in order to prevent short circuits or electric shock.
STEPS
(1) Turn Off Water.
- Shut off the water supply shut off valve.
- Drain the toilet tank completely.
- Then remove the existing fill valve water supply hose.

(2) Removing the existing seat and lid.
- Remove mounting bolts to release existing toilet seat from toilet.

(3) Connect T-Valve.
- Remove existing supply hose at the valve, connect T-valve with packing.

(4) Connect T-Valve.
- Connect toilet tank supply hose to t-valve, use supplied hose if existing hose is damaged.

❄ Check for any water leaks.
(5) Put the rubber nuts into the fixing holes of the toilet.

(6) Put the bolt into the bolt case and align it with the top of the base plate. Insert bolt with bolt case onto the base plate. After this is done, insert it into the rubber nuts with screwdriver.

(7) Push the main unit onto the base plate until hearing “click” sound.

8 Connect the flexible tube from side of T-Valve to this product, Open the Angle Stop valve to fill water.

❄Check for any water leaks.
❄Customers should use the new hose set provided with the product. Do not use used set again.
(9) Wireless remote mounting guide.
Install wireless remote with adhesive tape
- Remove adhesive from back of bracket and place bracket where desired.

Inserting batteries
- Insert supplied batteries (1.5V AAA) and close battery cover.
(Please check the polarity, before insert the batteries.)

(Please check the polarity, before insert the batteries.)
7 Water Draining / Separation Of Unit From The Toilet Bowl
Please follow the instructions below when moving or separating the unit from the toilet for cleaning purposes.
(1) Disconnect the power plug.
(2) Shut the water supply valve.
(3) Push and hold the button on the right side of the unit to completely drain the water from the water tank.

(4) Loosen the nut on the hose that is connected to the unit, and then separate the electronic toilet seat from the toilet in the following order as illustrated.
- While pushing the button (area shown as an arrow) push the electronic toilet seat slightly toward to the front and then the body unit will begin to slide out. Next, lightly pull the unit toward the front and it will detach from the toilet.
![]()

(5) Disconnect the T-valve from the water tank.
(6) Connect the water hose to the toilet which was disassembled while installing the electronic toilet seat, and turn the water valve to the left to open it. See if there is any leaking from the water hose connection.
(7) Re-install the toilet seat and lid that was separated when installing the electronic toilet seat.
- As explained above, steps 1~4 are instructions for separation of the unit for basic cleaning purposes, and steps 5~7 are instructions for separation when moving, etc.
8 Maintenance
● CLEANING THE NOZZLE
- When the “Posterior Wash” (

- After cleaning the nozzle, push the “Stop” (


● CLEANING THE BODY OF UNIT
- When you clean this product, do not use thinner, benzene or toilet bowl cleaner. It may cause damage to the surface of unit.
- Use a wet cloth when you clean this product.
- Do not spray water directly on to this product.
- When you clean this product, disconnect the power plug.
● CLEANING THE STRAINER
This product will not operate properly if the strainer is clogged. Please clean the strainer regularly.
1) Close the water shut off valve.
2) Flush the toilet to empty the water reservoir.
3) Unscrew the water filter nut.
4) Clean the strainer with a small brush or water.
5) Re-screw the water filter nut.
6) Open the water shut off valve.

● MAINTENANCE FOR WINTER SEASON
- Check the power cord if it is plugged in or not.
- Keep the water temperature on “Middle or High Level” to prevent water from freezing.
- If you do not intend to use the unit for 14 days or longer, disconnect the power plug and drain the water.
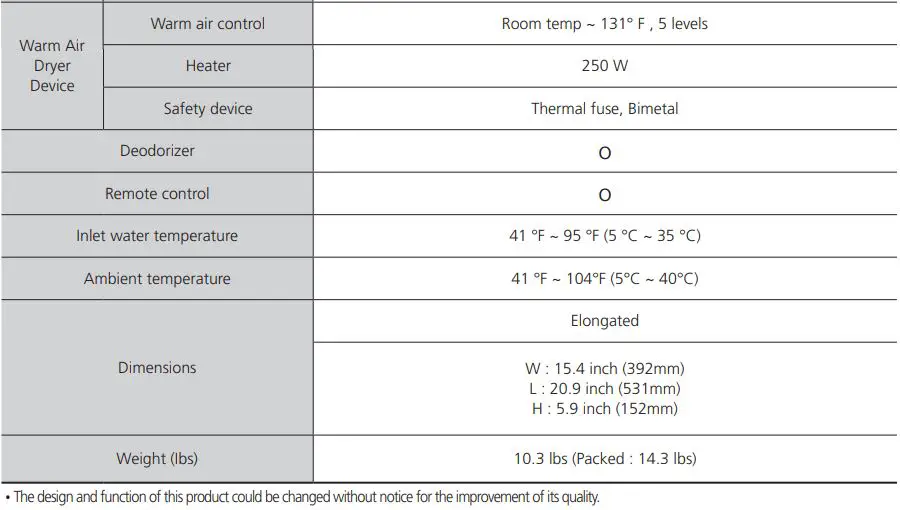
9 Trouble Shooting

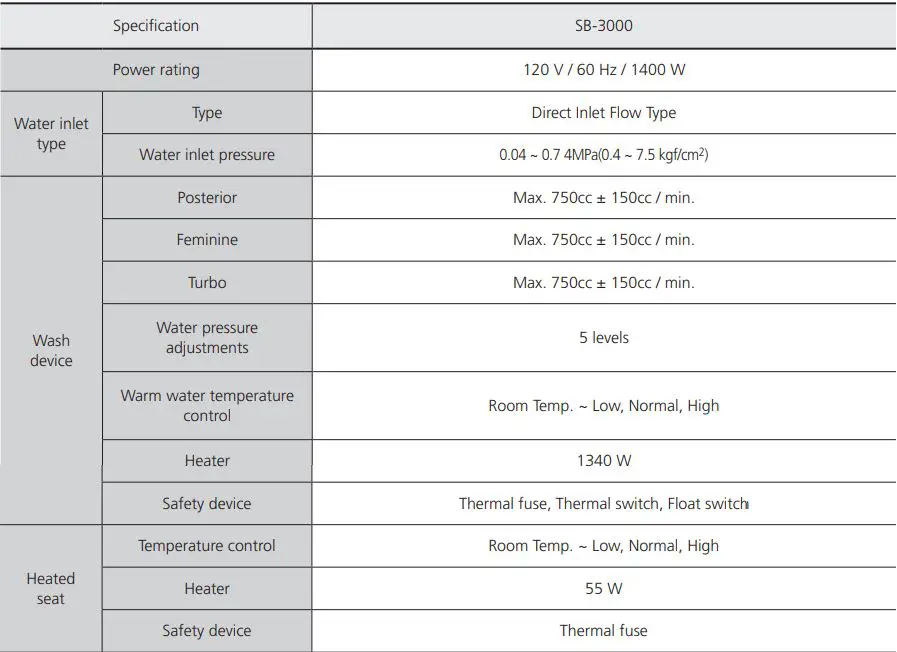
10 Specifications
Information to the user
This equipment has been tested and found to comply with the limits for a Class B digital device, pursuant to part 15 of the FCC Rules. These limits are designed to provide reasonable protection against harmful interference in a residential installation. This equipment generates, uses and can radiate radio frequency energy and, if not installed and used in accordance with the instructions, may cause harmful interference to radio communications. However, there is no guarantee that interference will not occur in a particular installation. If this equipment does cause harmful interference to radio or television reception, which can be determined by turning the equipment off and on, the user is encouraged to try to correct the interference by one more of the following measures:
– Reorient or relocate the receiving antenna.
– Increase the distance between the equipment and receiver.
– Connect the equipment into an outlet on a circuit different from that to which the receiver is connected.
– Consult the dealer or an experienced radio/TV technician for help.
WARNING
Any changes or modifications not expressly approved by the manufacturer could void the users authority to operate the equipment and limited warranty.
Warranty
Hitrons Solutions Inc. Limited Warranty
General Limited Warranty Covered Hitrons Solutions Inc will warrant to the original retail buyer only, which falls in normal user and within the applicable periods specified below. Hitrons Solutions Inc replacements will be warranted to the original purchaser of the products only.
The Parts Warranty if the parts fail within Twelve(12)months after original purchase from authorized retailer, following the installation manual and normal operation, Hitrons Solutions Inc will furnish replacement part(s) after warranty registration.
· This Warranty does not cover the following
- Defects and/or malfunctions from failure to properly install, operate and/or maintain the unit in accordance with the installation manual.
- Damage from abuse, fire, flood, freeze, and any other acts of Nature.
- Damage resulting from unauthorized alterations, attachments and/or repairs.
- If the product was not installed properly.
- Damage to the unit by animals, mice or insects.
- Damage caused by excess moisture or from water clogging the bathroom or restroom.
- Damage from not being installed in accordance with all applicable local codes, ordinances and good trade practices.
- Color fading due to use in wrong environment.
- Damage from chemicals.
- The warranty will not be covered without providing the date of purchase with original receipt.
———————————————————————-
WARRANTY REGISTRATION
To ensure your warranty protection, please complete and return this registration with a copy of the original sales receipt to [email protected] or via mail within 15 days after data of purchase to validate your warranty. If you choose to send through email, in the Subject link, please write “Warranty Information: Your SmartBidet Serial number”
Model_____________________
* Serial Number #_____________________
Purchaser ____________
Company______________
Address______________
City__________________
Country_______________
Dealer(Company)
___________________________ Dealer Code_______________
Address___________________________________________________
* The serial number is located in the lid of the unit.
PLEASE SEND TO
Attn: Warranty Dept. Hitrons Solutions Inc. [email protected]
Service Department
Hitrons Solutions Inc.
Inquiries and Support
Email : [email protected]
Phone : 1-800-515-3430
![]()
Service Department
Hitrons Solutions Inc.
Inquiries and Support
Email : [email protected]
88 Portland Avenue, Suite M, Bergenfield, NJ 07621
Phone : 1-800-515-3430
2018 AUG 0.0