![]()
STEALTH CAM Fusion Cellular – Verizon Brown
![]()

![]() Fusion ® Instruction Manual
Fusion ® Instruction Manual
Powered by Stealth Cam COMMAND PRO, available on iOS
and Android, or on the web at www.stealthcamcommand.com
 Notice
To ensure the product is being utilized to its full potential, we recommend checking the Stealth Cam COMMAND PRO app for new product updates. If your camera is having an issue, please check Stealth Cam COMMAND PRO to determine if you are using the latest software version.
Camera Overview
 QR and IMEI Label


Camera Accessories (Not included)
Pair these Stealth Cam accessories with your Fusion ® camera to maximize your camera’s utility.
 |
Tree Screw Mounts: Versatile screw-in mount allows you to secure your trail camera at various heights and angles for the desired field of view. |
 |
Solar Power Panel: Efficiently powers your camera in all weather conditions including cloudy days. The Solar Power Panel uses a built-in rechargeable lithium-ion battery to provide maintenance-free operation and prevent the natural drain of batteries over time. |
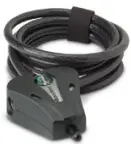 |
6′ Python Lock Cable: Keep your trail camera safe from theft with this Master Python lock. The Cut-resistant 6′ x 5/16″ braided steel cable a distant finish. |
About Your Camera
 |
Remote Cellular Connection Access your camera from any location with on-the-go remote access through our COMMAND PRO app. |
 |
Powered by Stealth Cam COMMAND PRO Control your camera on iOS or Android, or on the web at www.stealthcamcommand.com. |
 |
Retina Advanced Lowlight Sensitivity Enhanced low light performance for extended nighttime coverage and range. |
 |
Reflex < 0.4 Second Trigger Ultra-fast trigger speed, never miss a crucial moment. |
 |
Matrix Blur Reduction Technology Advanced blur reduction dramatically reduces blur effects resulting in sharper, clearer images. |
 |
Geo-Tag GPS Meta-Tagging Track and recall all your favorite locations with optional GPS tagging. |
 |
Multi-Zone Detection Covers multiple zones of angle and distance, maximizing the camera’s triggering accuracy. |
 |
Burst Rapid-Fire Mode Rapid-fire Burst Mode, 1-6 exposures per triggering. |
Quick Setup Guide
 |
Download the “Stealth Cam COMMAND PRO” app on iOS or Android Navigate to the Google Play Store/iOS App Store and Install “Stealth Cam COMMAND PRO” by Good Sportsman Marketing. |
 |
Create a Stealth Cam Account and Sign In Open the app and follow on-screen guides to set up your Stealth Cam Account and sign in to app. |
 |
Add Your Device Press the plus sign in the top left corner of the app to begin a new device setup. Access your QR code underneath the battery tray. Follow the directions on-screen to set up your camera and data plan. |
 |
Configure Your Camera Tap on your camera within the app and select “Camera Setup” to begin customizing your camera settings. Or, use our default configuration for a quick setup. Alternatively, use www.stealthcamcommand.com for camera configuration. |
Camera Setup
 Battery Installation
Open the camera and lift out the battery tray by the notches provided. With the tray removed, insert 8 new AA batteries, being careful to match the orientation marked on the tray. After batteries are inserted, align metal contacts and reinsert the battery tray into the camera. If you are using an external power source, ensure that it is 12V. Other voltage levels could damage your camera. NOTE: Do not mix new and old batteries or alkaline and lithium batteries.
 SD Card Installation
The SD card slot is located on the left side of your camera. A class 10 SD card is recommended, use of a different card may result in unexpected results. Insert SD card with the label facing you, as shown in the diagram on the left. When inserting an SD card you should only feel minimal resistance and a click when the card is fully inserted.
Antenna Installation Screw on the device antenna until it is hand-tight. The antenna must be screwed tight to ensure the camera is sealed from water. Be careful that the antenna is not overtightened.
Power On and Check Status Power on your camera to automatically begin the sync. After the sync is complete, press the SYNC button at any time to take and upload a test photo to ensure your camera is functioning properly.
LED Indicator Codes
Test your camera connection at any time by pressing the SYNC button. The SYNC button will take a test photo and instantly attempt to upload it. If your camera is successful you will see the photo appear in the COMMAND PRO app. Otherwise, one of the following LED codes will display.

Successful Connection Sequence
 |
A flashing green Battery indicates checking the camera hardware status. |
 |
A solid green Battery and flashing Network indicate checking the camera for internet connection. |
 |
A solid green Battery, Network, and flashing Account indicates checking the camera for an account. |
 |
3 Solid LEDs indicate account found and the camera is successfully registered. |
 |
All 3 LEDs will blink green to indicate a photo upload in progress. LEDs will turn off to indicate the camera is asleep and ready for deployment. |
LED Status Codes
 |
Solid Red Battery indicates low battery or no SD card. |
 |
A solid green Battery and solid red Network indicate no SIM card, low signal, or no data plan. |
 |
Solid green Battery, Network, and solid Red Account indicate no account found. |
Other LED Codes
 |
3 alternating flashing red LEDs and 3 green LEDs indicate a software update is available. A brief press of the SYNC button starts the software update. After 10 seconds, normal sync starts. |
 |
3 flashing red LEDs indicate that the software is updating. Do not disturb the camera as the update completes. |
 |
Solid 3 red LEDs indicate the software update is complete. Remove and reinsert batteries. |
Software Update Guide
To ensure the product is being utilized to its full potential, we recommend checking the Stealth Cam COMMAND PRO app for new product updates.
Over-the-Air Upgrade
 |
When a software update is ready, your LEDs will alternate flashing red and green. Press the SYNC button on your camera to begin the upgrade. |
 |
While the update is in progress, all 3 LEDs will flash red. Do not disturb or press any buttons on the camera while this is in place. |
 |
3 solid red lights indicate that the upgrade is complete. The camera will automatically restart once the update is complete. |
SD Card Local Upgrade
This method will allow you to upgrade your software without the use of data.
- Clear all files from your SD card, download software upgrade from www.stealthcamcommand.com, and insert the SD card into the camera.
- The camera will automatically detect new software and begin the process as defined above.
- If the camera does not detect new software, remove the SD card and verify that the only file present on your card is the software update file.
Mounting Guide
With the included mounting strap, you are able to mount your Fusion ® camera to a vertical surface. To ensure that you receive optimal performance with your Fusion ® camera, use the following guide to set your camera up to our specifications.
An optimal camera will be set:
i. 3 ft 4 ft off the ground
ii. North Facing
iii. Angled slightly downward
The Fusion ® camera has a Field of View of 52° diagonal, with a PIR sensing range of 80 ft.
Antenna Guide
For optimal network reception with your Fusion ® camera, use the following antenna placement guide:
i. Mount the camera away from any type of metal.
ii. Antenna should be vertical from the camera as seen in the image on right.
iii. As much as possible, the antenna should be away from obstructions.
iv. Ensure the antenna is screwed in tight so a proper connection is made.
Camera Configuration
After your camera has been added through the Stealth Cam COMMAND PRO mobile app, setup for your Fusion ® camera will happen entirely in the Stealth Cam COMMAND PRO app or on the internet at www.stealthcamcommand.com.
To begin setup, first, make sure you have created a Stealth Cam account and have purchased a cellular data plan. After signing into the app, navigate to the Camera Setup options screen by tapping on your camera in the app.
In the app, we offer 3 Quick Setup options based on our most popular configurations.
| Name | Quality | Timeout | Detail |
| QSET 1 | 8.0 MP | Delay | 3 Photos |
| QSET 2 | 8.0 MP | The 30s | 1 Photo |
| QSET 3 | 720P | The 30s | 10s Video |
You are not able to edit our provided QSETs. For alternate custom configurations, read on for more information.
Visit our mobile app Stealth Cam COMMAND PRO or www.stealthcamcommand.com to manage your Stealth Cam data plan and receive additional information regarding plan options.
Camera Settings
| TIME ZONE: This setting allows you to set your camera to different time zones. OPTIONS: Eastern | Central | Mountain | Pacific | Alaskan | Hawaiian |
| TIME FORMAT: This setting is used by the camera to change the display format for the time in the Info Bar of the image. OPTIONS:12 hr | 24 hr NOTE: If 24-hour format is selected, previous SETUP TIME will be adjusted and AM/PM will be removed |
| OPERATION MODE: This setting will change the operation mode of the camera. Different operation modes will have different adjustment settings. OPTIONS: PIR Photo | PIR Video |
| PHOTO RES: This setting will determine the megapixel (MP) resolution of each image. A higher MP count will result in better photos and take more memory space. OPTIONS: 4 MP | 8 MP | 16 MP | 26 MP |
| VIDEO RESOLUTION: This setting will determine the quality of each video. Higher quality will result in better videos and take more memory space. Video records at 1280 x 720 |
| PIR DELAY: This setting is used to determine how long the camera will wait before reinitializing the PIR sensor after taking a photo. OPTIONS: 00m 03s 59m 59s |
| PHOTO BURST: This setting determines how many photos are taken each time the camera is activated. OPTIONS: 1 photo 6 photos NOTE: When the resolution is set to 26 MP, Max Photo Burst is 3 Photos |
| REDUCE BLUR: This setting is used to determine if the camera should use the MATRIX Blur technology to dramatically reduce the blur effect, resulting in more clear nighttime infrared shots. OPTIONS: STANDARD: Minimize blurring effect in images while retaining long-range night image capability. ADVANCED: Enhanced blur reduction providing a balance between brightness and image sharpness. |
| CAMERA NAME: This setting is used to adjust the camera name. The camera name can be up to 13 characters long using alpha (A-Z) numeric (0-9) characters. |
| DVR MODE: This setting allows you to continuously record new images. Turning this setting ON will continuously delete the oldest recorded files to make space for new files. When turned OFF, the camera will stop recording new files when the SD card reaches capacity. OPTIONS: On | Off |
| TEMPERATURE: This setting is used to change the temperature format on Info Bar. OPTIONS: Fahrenheit | Celsius |
| LONGITUDE and LATITUDE: This setting allows you to manually enter the longitude and latitude of your camera. |
| OPERATING HOURS: This feature allows you to designate a time for the camera to be active. OPTIONS: 24/7: The camera is always on SCHEDULED: Selecting this will allow you to enter a time range for the camera to be active and operational. The camera will not take photos outside of the defined time range. START TIME (HH: MM): Start time for the camera to be active END TIME (HH: MM): The time at which you want the camera to no longer be active |
| INFORMATION BAR: This setting is used to tell the camera whether the Info Bar should be displayed at the bottom of the images. OPTIONS: On | Off |
| VIDEO LENGTH: This setting is used to determine the length of time, in seconds, of a video recording OPTIONS 10 sec |
| ERASE CARD: This setting is used to format the SD memory card installed. Formatting your SD card will ERASE ALL DATA PRESENT. NOTE: After the card is formatted it is impossible to restore data that was present on the card. |
Cellular Settings
| TRANSMIT FILES: This setting allows you to turn your data transmission on and off. While data transmission is off, no photos will be sent on your cellular data plan. OPTIONS: On | Off |
| UPLOAD FREQUENCY: This setting changes how often photos are uploaded to your phone. NOTE: This setting has a large effect on your Data and Battery usage. OPTIONS: INSTANT (Least Efficient): As soon as your sensor detects motion it will take a photo and upload it. INSTANT GROUP: Similar to instant, if motion is detected within 10 seconds of the original photo, the camera will continue to take photos until motion ceases before uploading. HOURLY: The camera will upload photos every hour. TWICE PER DAY: The camera will upload twice per day, based on upload time. i.e. If the upload time is set to 5:00 PM, the camera will upload at 5:00 AM and 5:00 PM ONCE PER DAY (Most Efficient): The camera will upload photos once per day, based on upload time. |
| UPLOAD TIME: This setting will allow you to set the time that you would like your camera to upload photos. NOTE: Your camera will take a Daily Test Photo each day at the set Upload Time. This photo will be indicated with a “D” in the info bar. |
| IMEI: This number is used to reference your physical camera. |
| ICCID: This number is used to reference your camera’s SIM card. |
Camera Care
 Operating Conditions
This camera is designed to function in 14°F – 104°F (-10°C – 40°C) with 20%-85% relative humidity, non-condensing.
 Product Care
- When not in use, store the camera in a cool, dust-free, environment.
- Handle the camera with care.
- The camera is weather-resistant only. Do not fully submerge the camera in water or other liquid. Doing so will void the camera warranty.
- Only use the same type of battery to power the camera. Do not mix old and new batteries.
- Do not touch the camera lens directly. Clean only with a soft lens cloth.
- Use a damp cloth to clean. DO NOT submerge the camera.
- Remove batteries when the camera is not in use for an extended time.
- Do not open the camera housing to access internal parts. Doing so could damage the camera and void the warranty.
Notice
The camera is an active electronic device. Attempting to service internal parts may expose you to dangerous voltages and other risks.
Frequently Asked Questions
General Troubleshooting
Q: What does formatting my SD card do?
A: Formatting your SD card will PERMANENTLY ERASE all files present on your card. Formatting a card can resolve a variety of odd errors that may be preventing your camera from working properly and should be used as one of the first troubleshooting steps.
Images already uploaded to the COMMAND PRO app will NOT be affected.
Q: How do I format my SD card?
A: To format your card, first power off your camera and wait 10 seconds. Hold down the SYNC button, and power on your camera. Continue holding the SYNC button until you see all 3 LEDs flash red, at this point your card will be formatted.
Q: I was receiving photos before, and I am not anymore.
A: This could be caused by several things. First, press the sync button and ensure all 3 LEDs light up green, if an LED shows red, see below. Next, log onto your COMMAND PRO account and make sure your camera is in an ACTIVE status on a cellular plan. If the above does not resolve your issue, please call support at 1.888.508.5922 for further assistance.
General Troubleshooting (cont.)
Q: Why is my battery LED (  ) showing red?
A: Your battery LED indicates that there is a hardware issue with your batteries or your SD card. To resolve this issue, place fresh batteries in your camera and/or format your SD card.
Q: Why is my network LED (  ) showing red?
A: Your network LED indicates that there is an issue with your camera connecting to our app over the AT&T or Verizon network. Please first ensure your camera is attached to a cellular data plan, then ensure you are in a location with strong 4G cellular service with your camera’s carrier.
Occasionally, this issue can also be solved by formatting your SD card and removing and reinserting your SIM card.
Q: Why is my account LED (  )showing red?
A: Your account LED indicates that there is an issue with your camera connecting to your Stealth Cam COMMAND PRO account. Please ensure that you see your camera on your account in the app and that the IMEI and ICCID numbers on your QR code sticker match what is seen in the app.
Camera Hardware
Q: Will I lose my images and settings if the batteries die?
A: No, the images are stored on your external SD memory card so your images will be intact only on your card. Your settings are saved on your app.
Q: Why is my camera taking pictures with nothing in front of it?
A: This camera is powered by motion activation. This can cause objects, like a tree branch or moving water, within the camera frame to cause the camera to take a photo.
Q: Is my camera waterproof?
A: No, your camera is weather resistant but not waterproof.
Q: Is there a warranty that comes with my camera or an extended warranty I can purchase?
A: Your Stealth Cam Camera comes with a Limited 1-year warranty. Please contact support at 1.888.508.5922 for more information.
Q: Can I mix batteries together?
A: No, you should never mix batteries. After your camera batteries die, always install brand new batteries in your camera.
Q: Can I use rechargeable batteries in the camera?
A: Rechargeable batteries will cause incorrect battery percentages for the camera in the app. We do not recommend using rechargeable batteries.
Stealth Cam COMMAND PRO and Cellular
Q: Do I need to have my phone next to my camera while it syncs?
A: No, you can sync your camera remotely from your phone. However, we recommend syncing in the proximity of your phone to verify sync was successful.
Q: I have a new phone. Is it necessary to re-sync the camera or will it still be displayed once I download the App?
A: It is not necessary to re-sync your camera to your new device. Your camera will be displayed on your account once you download the “Stealth Cam COMMAND PRO”
app and log in with your credentials.
Q: My camera showed that it synced successfully, why do I not see it on my app?
A: In order to connect to our app, your cell phone will need to have 4G/LTE reception or a Wi-Fi connection. If you are in a remote location, there is likely not enough data
coverage to properly use our app.
Q: Why does my monthly bill higher than my plan cost?
A: You have likely incurred data overages. Data charges are incurred after you reach your plan’s allotted data limit. For more information on rates visit www.stealthcamcommand.com.
What is the difference between the Fusion Cellular and Fusion Cellular Brown?
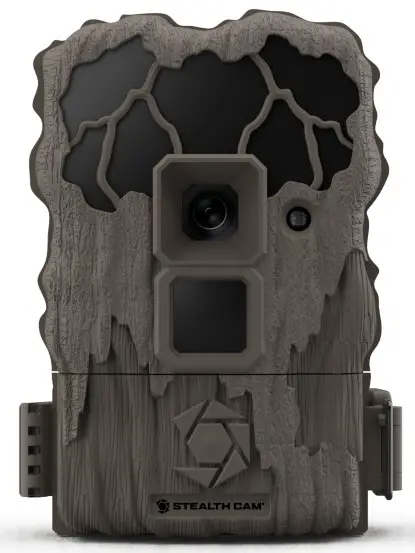
The Fusion Cellular Brown is a new model that has been designed to be more discreet. It features a brown camouflage pattern on the camera housing, and a brown strap that attaches to the tree.
Does the Fusion Cellular Brown come with a brown strap?
Yes, it does.
What are the dimensions of the Fusion Cellular Brown?
The dimensions are 4.5″ x 4.5″ x 3″.
What is the battery life of the Fusion Cellular Brown?
The battery life is up to 12 months in standby mode, and up to 6 months when actively taking pictures or videos.
How do I change out the SD card in my Fusion Cellular Brown?
You can change out your SD card by removing the back panel of your camera. To do this, you will need to unscrew two screws on the bottom of your camera using a Phillips head screwdriver. Once you have removed these two screws, you can slide off your camera’s back panel. To insert or remove an SD card, simply slide it into or out of the SD card slot until it clicks into place. You can then reattach your back panel by sliding it back onto your camera and replacing the two screws you removed earlier.
Video
To ensure optimal performance of your Stealth Cam camera, it is best to always check for periodical free software updates on Stealth Cam COMMAND PRO or at www.stealthcamcommand.com.
FCC COMPLIANCE
![]() GSM, LLC
GSM, LLC
STC-FATWX V2
NOTE: This equipment has been tested and found to comply with the limits for Class B digital devices, pursuant to part 15 of the FCC Rules. These limits are designed to provide reasonable protection against harmful interference in a residential installation. This equipment generates uses and can radiate radio frequency energy and, if not installed and used in accordance with the instructions, may cause harmful interference to radio or television receptions, which can be determined by turning the equipment off and on, the user is encouraged to try to correct the interference by one or more of the following measure:
- Reorient or relocate the receiving antenna.
- Increase the separation between the equipment and the receiver.
- Connect the equipment into an outlet on a circuit different from that to which the receiver is connected.
- Consult the dealer or an experienced radio/TV technician for help.
Caution: Changes or Modifications not expressly approved by the party responsible could void the user’s authority to operate this device.
IC WARNING
This device contains license-exempt transmitter(s) that comply with Innovation, Science, and Economic Development Canada’s license-exempt RSS(s).
Operation is subject to the following two conditions:
- This device may not cause interference.
- This device must accept any interference, including interference that may cause undesired operation of the device. This equipment meets the exemption from the routine evaluation limits in the section of RSS-102. It should be installed and operated with a minimum distance of 20cm between the radiator and any part of your body.
Product specifications are subject to change. Good Sportsman Marketing, LLC is not responsible for any photographic or typographical errors.
May be protected by one or more U.S. Patent numbers: 6,735,387 / 6,768,868 /
6,834,162 / 7,149,422 / 7,308,196 / 7,593,632 / 7,710,457 / 8,895,926.
Limited Warranty Information
Your Stealth Cam scouting camera is covered by a 365 Day Limited Warranty on parts and labor from the date of original purchase, and purchases must be made through an authorized dealer. The warranty covers defects in workmanship and materials. The warranty does not apply to units, which have been damaged or abused intentionally or unintentionally. Purchase from individuals or unauthorized Internet sites such as eBay voids the warranty.
Tampering with or altering the unit will void the warranty.
Any unauthorized service will void the warranty.
A copy of your original sales receipt must be produced for any warranty service and a Return Authorization (RA) Number must be obtained from customer service at 1.888.508.5922 prior to returning the product. Stealth Cam is not responsible for any lost untraceable packages or those without a Return Authorization at the time of return.
Contact Us
TECHNICAL SUPPORT EMAIL: [email protected]
Please allow 48 hours for an email response.
GSM, LLC
P.O. Box 535189
Grand Prairie, TX 75053-9504
CUSTOMER SERVICE CONTACT & HOURS
Toll-Free: 1.888.508.5922
CALL CENTER HOURS
Mon Fri / 8 AM 5 PM (CST)
WEBSITE
www.stealthcam.com
www.stealthcamcommand.com
![]()
STC-QS20
Instruction Manual
 Notice
To ensure the product is being utilized to its full potential, we recommend checking our website for new product updates. If your camera is having an issue, please check our website to determine you are using the latest firmware or software version.
Contact Us
| TECHNICAL SUPPORT EMAIL: [email protected] Please allow 48 hours for an email response.GSM, LLC P.O. Box 535189 Grand Prairie, TX 75053-9504 |
CUSTOMER SERVICE CONTACT & HOURS Toll-Free: 877-269-8490CALL CENTER HOURS Mon – Fri / 8 AM – 5 PM (CST) WEBSITE www.stealthcam.com |
About Your Camera
 80 Foot Detection and Flash Range
See farther with long-distance PIR sensor and LEDs.
 0.8 Second Trigger Speed
Never miss a shot with lightning fast 0.8-second trigger speed.
 Quick Set Options
Set up in seconds with pre-programmed options.
 Burst Rapid-Fire Mode
Rapid-fire Burst Mode, multiple exposures per triggering.
 18 IR LEDs
Perfectly illuminate your nighttime photos with 18 IR LED lights.
Quick Setup Guide
 Insert Batteries and SD Card
Install 8 AA batteries and a class 10 SD card into the camera.
 Mount Camera
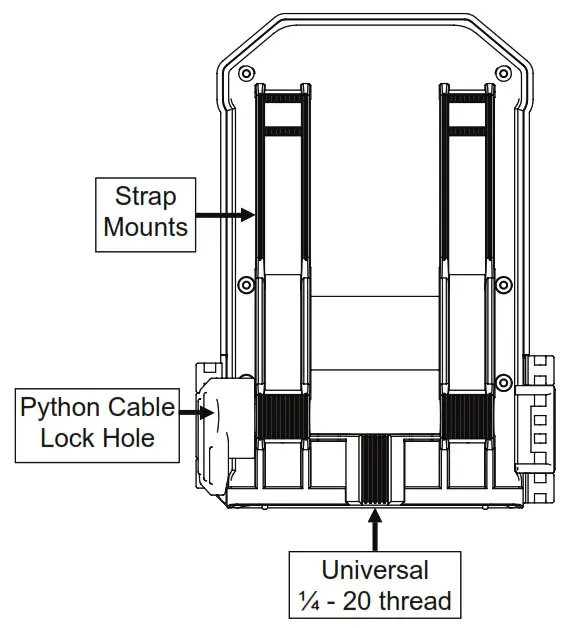
Mount the camera at the desired location using the strap mount, Python Lock cable, Articulating Ball Joint Mount, or other desired mounting mechanism. Position the camera so that it does not face East or West directly as the rising and setting of the sun can cause false-positive triggers.
 Activate Camera
Set camera to desired Quick Set (QSET) or to custom configuration and place in the desired vantage point to start capturing photos of the game.
Camera Overview
Camera Setup
 Battery Installation
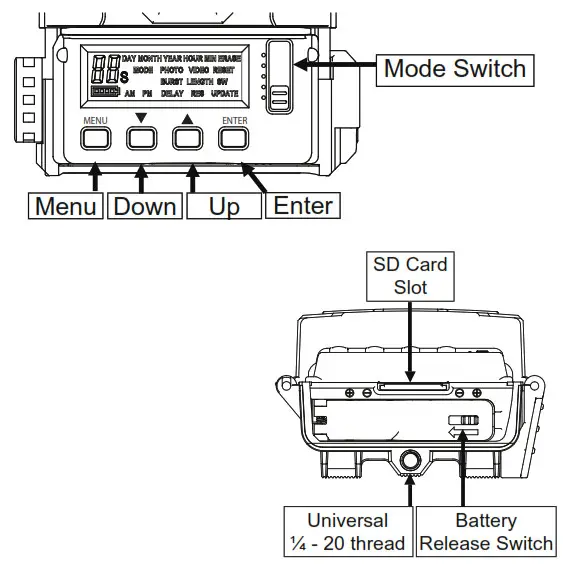
To remove batteries from the unit, simply open the camera and slide the battery release switch to the left. Once the battery compartment is open, insert batteries into the camera, being careful to match the orientation marked on your camera. After batteries are inserted, close the battery compartment and secure the battery release switch.
SD Card Installation
SD card slot is located on the bottom of the camera, above the battery compartment. Insert SD card with the label facing back of the camera. Only minimal resistance should be felt as the card is inserted and a click when the card is fully inserted.

Camera Configuration
This camera features 4 distinct modes of operation:
SET 1 | QSET 2 | QSET 3 | CUSTOM |.
Each setting is activated based on the position of the switch inside the unit.
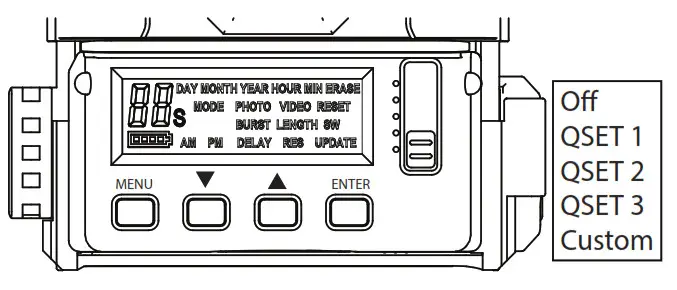
Quick Sets
Once selected, the screen will display the Quick Set (QSET) that has been chosen and then count down from 9 to 0 seconds. When the countdown has been completed camera is ready and in an active state.
See table for a breakdown of Quick Set modes.
| Name | Type | Quality | Timeout Delay | Detail |
| QSET 1 | Photo | Medium | 30 sec | 3 Photos |
| QSET 2 | Photo | Medium | 30 sec | 1 Photo |
| QSET 3 | Video | 640 x 368 | 30 sec | 10-sec video |
Custom Configuration
The CUSTOM setting on your camera allows you to customize every setting to fit your exact needs. To begin, move the slider to the CUSTOM position and press the menu button on the camera.
Once inside the custom settings menu, use the Up and Down arrows to scroll through the different settings. To change a setting that is displayed, press the Enter key and the setting will begin flashing. At this point use the Up and Down arrows to change the setting. When finished press the Enter button to save the change or press Menu to cancel the change.
When you are finished configuring your camera’s settings, press the Menu button to return your camera to an active state.
Camera Configuration cont.
DATE: This setting is used by the camera to display the correct date on the Info Bar of the image.
TIME: This setting is used by the camera to display the correct time on the Info Bar of the image.
OPERATION MODE: The operation mode setting is accessible immediately after the Time setting.
The screen will be blank with either Video or Photo displayed on the right side of the screen. Press Enter to change between Photo and Video mode.
OPTIONS: Photo | Video
PIR DELAY: This setting is used to determine how long the camera will wait before reinitializing the PIR sensor after taking a photo.
OPTIONS: 5 sec | 10 sec | 15 sec | 30 sec |60 sec
PHOTO BURST: This setting determines how many photos are taken each time the camera is activated.
OPTIONS: 1 photo – 3 photos
Note: This setting is only applicable in photo mode.
RESOLUTION: This setting will determine the quality of each image. Higher quality will result in better photos and take more memory space.
OPTIONS: High | Med | Low Note: This setting is only applicable in photo mode.
VIDEO LENGTH: This setting is used to determine the length of time, in seconds, of a video recording
OPTIONS: 5 sec | 10 sec | 20 sec
Note: This setting is only applicable in video mode.
Viewing and Deleting Images
There are a few methods for viewing and deleting your files.
i. Using an SD Memory Card Reader/Viewer: You will simply need to remove the SD card from the camera and insert it into
the reader to view the files; you can also delete them from this device.
ii. Using your computer: This method requires an SD card slot to be installed to your computer. Please refer to your computer’s Owner’s Manual for the proper way of viewing the files.
iii. Obtain a mobile device adapter: This will allow you to plug one end into the device, and, at the other end, insert the SD card. Please refer to the vendor’s User Manual for the proper way of viewing the files.
Frequently Asked Questions
Q: Will I lose my images and settings if the batteries die?
A: You will lose your settings but not your images. The images are stored on your external SD memory card so your images will be intact only on your card.
Q: Why is my camera taking pictures with nothing in front of it?
A: This camera is powered by motion activation. This can cause objects, like a tree branch or moving water, within the camera frame to cause the camera to take a photo.
Q: Is there a warranty that comes with my camera or an extended warranty I can purchase?
A: Your Stealth Cam Camera comes with a Limited 1-year warranty. Please contact support at 1.877.269.8490 for more information.
Q: Can I mix batteries together?
A: No, you should never mix batteries. After your camera batteries die, always install brand new batteries in your camera.
Q: Can I use rechargeable batteries in the camera?
A: Rechargeable batteries can be used but will cause battery percentage to be reported incorrectly.
Camera Care
 Operating Conditions
This camera is designed to function in 14°F – 104°F (-10°C – 40°C) 20%-85% relative humidity, non-condensing.
 Product Care
- When not in use, store the camera in a cool, dust-free, environment.
- Handle the camera with care.
- The camera is weather-resistant only. Do not fully submerge the camera in water or other liquid. Doing so will void the camera warranty.
- Only use the same type of battery to power the camera. Do not mix old and new batteries.
- Do not touch the camera lens directly. Clean only with a soft lens cloth.
- Use a damp cloth to clean. DO NOT submerge the camera.
- Remove batteries when the camera is not in use for an extended time.
- Do not open camera housing to access internal parts. Doing so could damage the camera and void the warranty.
Notice
The camera is an active electronic device. Attempting to service internal parts may expose you to dangerous voltages and other risks.
FCC COMPLIANCE
![]()
GSM, LLC
STC-QS20A v2
NOTE: This equipment has been tested and found to comply with the limits for Class B digital devices, pursuant to part 15 of the FCC Rules. These limits are designed to provide reasonable protection against harmful interference in a residential installation. This equipment generates uses and can radiate radio frequency energy and, if not installed and used in accordance with the instructions, may cause harmful interference to radio or television receptions, which can be determined by turning the equipment off and on, the user is encouraged to try to correct the interference by one or more of the following measure:
- Reorient or relocate the receiving antenna.
- Increase the separation between the equipment and the receiver.
- Connect the equipment into an outlet on a circuit different from that to which the receiver is connected.
- Consult the dealer or an experienced radio/TV technician for help.
Caution: Changes or Modifications not expressly approved by the party responsible could void the user’s authority to operate this device.
Product specifications are subject to change. Good Sportsman Marketing, LLC is not responsible for any photographic or typographical errors.
May be protected by one or more U.S. Patent numbers: 6,735,387 / 6,768,868 / 6,834,162 / 7,149,422 / 7,308,196 / 7,593,632 / 7,710,457 / 8,895,926.
IC WARNING
This device contains license-exempt transmitter(s) that comply with Innovation, Science and Economic Development Canada’s license-exempt RSS(s).
Operation is subject to the following two conditions:
(1) This device may not cause interference.
(2) This device must accept any interference, including interference that may cause undesired operation of the device. This equipment meets the exemption from the routine evaluation limits in the section of RSS-102. It should be installed and operated with a minimum distance of 20cm between the radiator and any part of your body.
Limited Warranty Information
Your Stealth Cam Trail Camera is covered by a 365 Day Limited Warranty on parts and labor from the date of original purchase, and purchases must be made through an authorized dealer. The warranty covers defects in workmanship and materials. The warranty does not apply to units that have been damaged or abused intentionally or unintentionally. Purchase from individuals or unauthorized Internet sites such as eBay voids the warranty. Tampering with or altering the unit will void the warranty. Any unauthorized service will void the warranty. A copy of your original sales receipt must be produced for any warranty service and a Return Authorization (RA) Number must be obtained from customer service at 877269-8490 prior to returning the product. Stealth Cam is not responsible for any lost untraceable packages or those without a Return Authorization at the time of return.
]]>STEALTH CAM QV20 20MP IR Trail Camera
Device Features

Camera Overview
Set-up Guide
Insert Batteries and SD Card 
Install 8 AA batteries and a class 10 SD card into camera.
Mount Camera  Mount the camera at the desired location using the strap mount, Python Lock cable, Articulating Ball Joint Mount, or other desired mounting mechanism. Position the camera so that it does not face East or West directly as the rising and setting of the sun can cause false-positive triggers.
Activate Camera 
Set camera to “On” position and place in desired vantage point to start capturing photos of game.
Camera Care
Operating Conditions
This camera is designed to function in 14°F – 104°F (10°C – 40°C). 20%-85% relative humidity, non-condensing.
Product Care
- When not in use, store the camera in a cool, dust-free, environment.
- Handle the camera with care
- The camera is weather-resistant only. Do no fully submerge the camera in water or other liquid. Doing so will void camera warranty.
- Only use the same type of battery to power the camera. Do not mix old and new batteries.
- Do not touch the camera lens directly. Clean only with soft lens cloth.
- Use a damp cloth to clean. DO NOT submerge the camera.
- Remove batteries when the camera is not in use for an extended time.
- Do not open camera housing to access internal parts. Doing so could damage the camera and void the warranty.
Notice The camera is an active electronic device. Attempting to service internal parts may expose you to dangerous voltages and other risks.
Camera Setup
Battery Installation 
To remove batteries from unit, simply open camera, and slide the battery release switch to the left. Once the battery compartment is open, insert batteries into camera, being careful to match the orientation marked on your camera. After batteries are inserted, close the battery compartment and secure the battery release switch.
SD Card Installation SD card slot is located on the bottom of the camera, above the battery compartment. Insert SD card with the label facing back of camera. Only minimal resistance should be felt as card is inserted and a click when the card is fully inserted.
Camera Configuration
Cycle between camera modes by pressing the UP and DOWN arrows. The camera mode will be displayed on the left side of the LCD Screen. This camera comes equipped with two Quick Sets (QSET) containing some of our most popular configurations. QSET 1 and 2 are defined in the table below. For alternate configurations, press the UP or DOWN arrows until CUSTOM is displayed on the left of the LCD screen and press ENTER.
| Name | Quality | Timeout Delay | Detail |
| QSET 1 | Med | 30s | 1 Photo |
| QSET 2 | Med | 30s | 10 sec Video |
Continue to next page for more information regarding each setting.
Custom Settings
- DATE: This setting allows you to enter the date as it will appear on the info bar of each photo.
- OPERATION MODE: The operation mode setting is a ccessible immediately after the Time setting. The screen will be blank with either Video or Photo displayed on the right side of screen. Press Enter to change between Photo and Video mode
- TIME: This setting allows you to enter the time as it will appear on the info bar of each photo.
Advanced Options
To navigate to the following advanced options, PRESS and HOLD ENTER button.
- will completely format the SD card inserted into the camera. Formatting an SD card will completely erase any data present on the card. It is recommended to format an SD card before use inside a Stealth Cam camera.
- RESET: Selecting “Yes” on this option will reset every setting back to the default configuration. Selecting “Yes” will completely wipe your custom configuration.
PHOTO
: In this mode the camera will take a photo when trigger is activated activated.
- PHOTO RES: This setting will determine the megapixel (MP) resolution of each image. A higher MP count will result in better photos and take more memory space. OPTIONS: High | Med | Low
- DELAY: This setting is used to determine how long the camera will wait before restarting sensor after taking a photo. OPTIONS 5 sec| 10 sec | 15 sec | 30 sec | 60 sec | 120 sec
- PHOTO BURST: This setting determines how many photos are taken each time the camera is activated. OPTIONS: 1 photo – 3 photos
VIDEO:
In this mode the camera will take a video when trigger is activated.
- DELAY: This setting is used to determine how long the camera will wait before restarting sensor after taking a video. OPTIONS: 5 sec| 10 sec | 15 sec | 30 sec | 60 sec | 120 sec
- VIDEO LENGTH: This setting is used to determine the length of time, in seconds, of a video recording. OPTIONS: 5 sec | 10 sec | 15 sec | 30 sec
Viewing and Deleting Images
There are a couple of methods for viewing and deleting your files.
- Using an SD Memory Card Reader/Viewer available from our website. You will simply need to remove the SD card from the camera and insert it into the Reader to view the files; you can also delete them from this device.
- Using your computer. Your computer would need to have an SD card slot installed for this to work. Please refer to your computer’s Owner’s Manual for the proper way of viewing the files.
- Obtain a mobile device adapter. This will allow you to plug one end into the device and the other end insert the SD card. Please refer to the vendor’s User Manual for the proper way of viewing the files.
Frequently Asked Questions
- Q: Will I lose my images and settings if the batteries die?
A: You will lose your settings but not your images. The images are stored on your external SD memory card so your images will be intact only on your card. - Q: Why is my camera taking pictures with nothing in front of it?
A: This camera is powered by motion activation. This can cause objects, like a tree branch or moving water, within the camera frame to cause the camera to take a photo. - Q: Is my camera waterproof?
A: No, your camera is weather resistant but not waterproof. - Q: Is there a warranty that comes with my camera or an extended warranty I can purchase?
A: Your Stealth Cam Camera comes with a Limited 1-year warranty. Please contact support at 1.877.269.8490 for more information. - Q: Can I mix batteries together?
A: No, you should never mix batteries. After your camera batteries die, always install brand new batteries in your camera. - Q: Can I use rechargeable batteries in the camera?
A: Rechargeable batteries can be used but will cause battery percentage to be reported incorrectly. - Q: Do I need to recharge my 12V Battery Kit during the seasons if it’s not in use?
A: The 12V Battery Kit should be recharge at least every 3 months, regardless if it is being used or not, in order to preserve the working condition of the battery inside the unit.
To ensure optimum performance of your Stealth Cam camera, it’s best to always check for periodical free software updates. For the latest firmware downloads, please check http://www.stealthcam.com/downloads Sign up for our weekly newsletter to stay informed on updates & new product news.
FCC COMPLIANCE
NOTE: This equipment has been tested and found to comply with the limits for Class B digital device, pursuant to part 15 of the FCC Rules. These limits are designed to provide reasonable protection against harmful interference in a residential installation. This equipment generates uses and can radiate radio frequency energy and, if not installed and used in accordance with the instructions, may cause harmful interference to radio or television receptions, which can be determined by turning the equipment off and on, the user is encouraged to try to correct the interference by one or more of the following measure:
- Reorient or relocate the receiving antenna.
- Increase the separation between the equipment and the receiver.
- Connect the equipment into an outlet on a circuit different from that to which the receiver is connected.
- Consult the dealer or an experienced radio/TV technician for help.
Caution: Changes or Modifications not expressly approved by the party responsible could void the user’s authority to operate this device.
Product specifications are subject to change. Good Sportsman Marketing, LLC is not responsible for any photographic or typographical errors.
May be protected by one or more U.S. Patent numbers: 6,735,387 / 6,768,868 / 6,834,162 / 7,149,422 / 7,308,196 / 7,593,632 / 7,710,457 / 8,895,926.
IC WARNING
This device contains license-exempt transmitter(s) that comply with Innovation, Science and Economic Development Canada’s license- exempt RSS(s). Operation is subject to the following two conditions:
- This device may not cause interference.
- This device must accept any interference, including interference that may cause undesired operation of the device. This equipment meets the exemption from the routine evaluation limits in section of RSS-102. It should be installed and operated with a minimum distance of 20cm between the radiator and any part of your body.
Limited Warranty Information
Your Stealth Cam scouting camera is covered by a 365 Day Limited Warranty on parts and labor from the date of original purchase, and purchases must be made through an authorized dealer. The warranty covers defects in workmanship and materials. The warranty does not apply to units, which have been damaged or abused intentionally or unintentionally. A purchase from individuals or unauthorized Internet sites such as eBay voids the warranty. Tampering with or altering the unit will void the warranty. Any unauthorized service will void warranty. A copy of your original sales receipt must be produced for any warranty service and a Return Authorization (RA) number must be obtained from customer service at 877-269-8490 prior to returning product. Stealth Cam is not responsible for any lost untraceable packages or those without a Return Authorization at the time of return.
Notice
To ensure the product is being utilized to its full potential, we recommend checking our website for new product updates. If your camera is having an issue, please check the website to determine you are using the latest firmware or software version.
Contact Us
TECHNICAL SUPPORT EMAIL:
[email protected]
Please allow 48 hours for email response.
STEALTH CAM LLC
P.O. Box 535189
Grand Prairie, TX 75053-9504
WEBSITE: www.stealthcam.com