TOGUARD Ultra HD 4K Dash Camera Owner’s Manual
Important Notice:
This product is intended for use in motor vehicle only. Do NOT install the camera where it might block the driver’s view of road(including the mirrors) or the deployment of the airbag. Before using this camera, please insert the memory card first, and format the memory card in camera menu first. This camera records video at high resolution, Be sure to use high speed Micro SD card, Class 10 or above is recommended, 16GB or 32GB cards are recommended. For safety reasons, this camera has a small built-in battery, It’s used only for saving the video file after external power supply cuts off (car turns off). Be sure the camera lens is clean and there is nothing blocking the lens.
DO NOT leave the camera in direct sunlight for a long period of time or where the temperature could go above 170°F(75°C).
Interface and Button Function
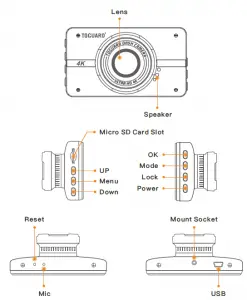
Button Function:
| UP | In Setting Menu. Short press to select option and adjust values.
In Playback, short press to select media files. |
| MENU | In Video / Photo / playback mode (video /playback stopped), short press to access the menu settings for that particular mode, and press twice to access System Setting Menu. |
| Down/ Mute | In Setting Menu. Short press to select option and adjust values.
In Playback, short press to select media files. During video recording, short press to turn on/off audio recording. |
| OK | In Video Mode, short press to start / stop video recording In Photo Mode. short press to take a photo.
In Setting Menu, short press to confirm selection and adjustment. In Playback short press to select and play recorded files |
| MODE | In standby, press to switch mode between Video
/ Photo / Playback |
| Lock | During video recording, short press to lock /Unlock current video file. |
| Power | When power off, Press & Hold to turn on the camera.
In any status, Press & Hold to turn off the camera. In any mode, short press to turn OFF/ON the screen display. |
Set up and Installation:
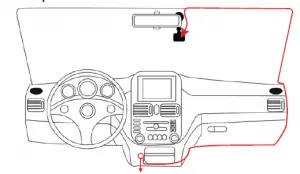
Cigarette lighter Socket
- Use the suction cup mount / 3M sticker mount to install the CE52 dash cam on the windshield, recommended place near the rearview mirror facing front, adjust the lens angle for best coverage.
- Plug the included power adapter into the car cigarette lighter socket, the indicator will light up means power on.
- Connect the power adapter and the dash cam, and route the excess cable alongside the interior trim for better looking.
Operating Mode:
The CE52 operates in 3 modes: Video Recording Mode, Photo Mode and Playback Mode, These modes also have menu to help you configure recording and taking photos,
Press MODE button to switch between different modes and access the mode you want. Watch the icon on top left corner of the screen for each mode.
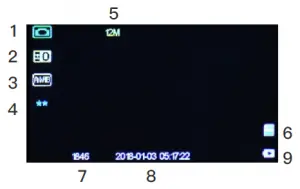
A. Video recording Mode:
The camera will automatically enter Video Recording Mode and start recording when connected to a car charger and power on. A Red dot flashing on the top left corner indicates recording is in progress. Press the OK to stop recording, or start recording again.
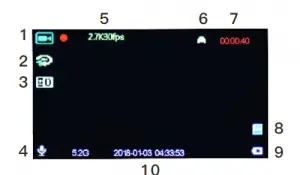
- Video Mode Icon
- Loop Recording Status
- Exposure Value
- Audio Recording Status
- Video Resolution
- Parking Monitor Status
- Recording Time
- Memory Card Status
- Power Status
- Date & Time
Exposure:Adjust exposure value to adjust the brightness of the video. Power-On Recording:Turn on this function so when the car starts and camera powers on, it will automatically start video recording. Time Stamp:Enable/Disable the date and time marks in video files. Plate Number Stamp:With this function on, your plate number will be
marked in the video files,The plate number can be edited in the menu
B. Photo Taking Mode
The CE52 camera can operate in Photo Taking Mode, and take HD photo up to 12 Mega pixels,
To take a photo: Simply power on the CE52 camera. Press MODE to select Photo Mode, and Press OK to take a photo.
Like the Video Recording Mode, you can press the MENU button once to access the setting menu for Photo Mode, Press MENU twice to enter System Setting Menu.In all 3 operating mode, you can press the MENU button once to access the menu settings for that particular mode, and press twice to enter System Setting Menu. The System Setting Menu is common to all modes, See Page 09-11. Press UP and DOWN to scroll through the various setting options and press OK to select and confirm selection, Press MENU again to exit the setting menu.
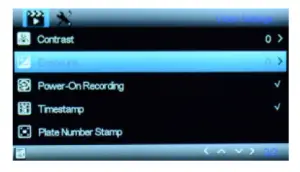
Video Recording Menu:
Video Resolution: Adjust recording video resolution, 4K 25fps / 2.7K 30fps / 1080P 60fps / 1080P 30fps / 720P 30fps available. Video Quality:Adjust video quality, General / Good / Very Good available. Loop Recording: This function allows you to set video file length to 1/2/5minutes, Select a value to activate loop recording, so when storage fills up, it will automatically loop back to the earliest file and overwrite it. White Balance:Adjust white balance according to the surroundings to get best color effect, We recommend keep it on Auto, Automatically / Sunny / Cloudy / Incandescent / Fluorescence available. Contrast:Adjust video contrast to enhance video quality.
- Photo Taking Mode Icon 6. Memory Card Status
- Exposure Value 7. Remaining Photo Storage
- White Balance 8. Date & Time
- Photo Quality 9. Power Status
- Photo Resolution
Photo Mode Setup Menu:
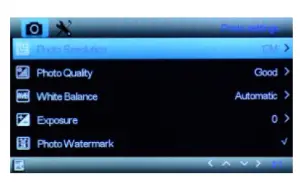
Photo Resolution:
Set the photo resolution, 12 MP/ 8 MP/ 5 MP/ 2 MP available. Photo Quality: Adjust photo quality, General / Good / Very Good available. Exposure: Adjust exposure value to adjust the brightness of the photo.
White Balance
Adjust white balance according to the surroundings to get best color effect, We recommend keep it on Auto. Automatically / Sunny / Cloudy / Incandescent / Fluorescence
available.
Photo Watermark::
Enable/Disable the date and time marks in photos.
C. Playback Mode:
This mode allows you to play back recorded video or view photos,
and manage the recorded files.
- Stop video recording, and press MODE button twice to enter Playback Mode.
- Use UP and DOWN button to scroll through the recorded files/ photos, and press OK to view recorded video.
- Press Menu button to delete the selected file.
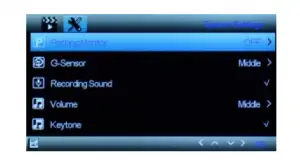
D. System Setting Menu:
In video or photo mode, press MENU button twice to access System Setting Menu. The TOOL icon is highlighted in the upper left corner.
Parking Monitor
OFF / Low / Middle / High
It’s used to protect your car after parking, with this function on, after you stop the car and the camera turns off, it stays standby, when camera detects shaking, it will automatically turn on and take a 15 seconds video, then return to standby automatically. The detection sensitivity can be adjusted.
G-Sensor:
OFF / Low / Middle / High G-sensor will detect significant or sudden shock and movement then the camera will automatically locks current recording file from loop recording, detection sensitivity can be adjusted accordingly.
Record Sound:
Turn ON/OFF audio recording in video.
Volume:
Low / Middle / High Adjust camera speaker volume
Keytone:
Turn ON/OFF button operation prompts.
Language
Adjust menu language. English / Simplified Chinese / Traditional Chinese / Japanese / Korean / G erman/French / Italian / Spanish

Light Frequency:
Auto / 50Hz / 60Hz Set light frequency according to local regulation.
Card Info
a. Available / Total Remaining available storage / total storage on the memory card.
b. Locked Files Occupied
Storage space taken by locked files
c. Card Speed Test
Press OK to run speed test of the memory card. Recommended card write speed should be over 10MB/S.
Delay Shutdown
OFF / 5S / 10S / 15S
Adjust the time delay when the camera will power off after external
power supply cuts off.
Format
Choose to format the memory card.
Recommended to format the memory card if the memory card is
never used on this camera before.
Date & Time
Set the system date and time.
Change the date and time by using the UP and DOWN button, then press OK to confirm adjustment.
Screen Saver
OFF / 10S / 30S / 60S
Set the time to automatically turn off the LCD display after no operation.
Restore Factory Settings
Reset all settings back to factory default.
Firmware Version
Check firmware version.
Specification:
| Model | Toguard CE52 |
| Image Sensor | High Resolution CMOS Sensor |
| Screen | 3 inches LCD Display |
| Lens | 170°High-Resolution Wide Angle Lens |
| Video Resolution | 4K 25fps / 2.7K 30fps / 1080P 60fps / 1080P 30fps / 720P 30fps |
| Video Format | MP4 |
| Video Coding | H.264 |
| Video Mode | Normal / Loop Record |
| Picture Format | JPEG |
| Photo Resolution | 12MP/10MP/8MP/5MP/3MP / 2MP |
| Loop Recording | 1 / 2 / 5 minutes |
| Power on recording | Supported |
| G-Sensor Lock | Supported |
| Language | English / Simplified Chinese / Traditional Chinese
/ Japanese / Korean / German/French / Italian / Spanish |
| Audio Recording | Built-in microphone, On / Off optional |
| Storage | Micro SD Card (up to 32GB) |
| USB interface | Mini USB |
| Operating System | Windows 7/10 or MAC |
| Internal Power | Built-in Li-ion Battery |
| External power supply | DV 5V / 2A |
| Storage temperature | -20℃~60℃ (-4℉-140℉) |
| Operating temperature | -10℃~50℃ (14℉-122℉) |
Common Problems and Answers:
Q The dash cam will stop automatically while recording.
- A Check whether the memory is full.
- Check whether the loop recording function is turned ON.
- Check whether the Micro SD card is high-speed above C10
- Check the memory card, there might be too many locked video that the loop recording won’t work right.
Q: The camera powers on automatically.
A : That could be the parking monitor function being triggered, check the setup menu.
Q: If the video played on the computer is somehow not fluent or jammed.
- . A Try to play the video with different video players, like : Potplayer
or VLCplayer. - Format your Micro SD card in the camera.
- Run speed test on the memory card to make sure the memory ard fits the requirement: Write Speed is over 10MB/S.
Q : There are stripes interference in the image.
A: That should be wrong light frequency. According to the local regulation, choose the appropriate frequency settings 50HZ or 60HZ.
Q: Suction mount cannot attach on windshield well?
A:1.Please clean the windscreen where attaching with a glass cleaning wipe. Removed the protective film, If it does not work, warming your windscreen then try it again.
2. Please soak suction mount to warm water for a moment.
3. If it is still not working, we are glad to send a new suction mount to you, please contact us to get a replacement.
Q: Without external power supply, the camera only lasts very short time,or it just can’t turn on.
A: The built-in battery is low capacity for safety reasons, and the battery is used to save the video and parking monitor only. It is not designed to work without external power supply
If you have any other questions or problems, Please feel free
tocontact us at [email protected]
We have professional team at your service, and your satisfaction is guaranteed.
]]>
 TOGUARD Trail Camera Instruction Manual
TOGUARD Trail Camera Instruction Manual
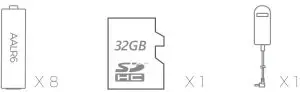
PACKING LIST
Please carefully unpack camera and check that below accessories are contained in the box.
- Wildlife Camera x 1
- USB cable x 1

- Instruction Manual x 1
- Mounting Belt x 1
- Wall Mount x 1
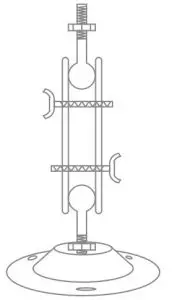
- Screws x 3

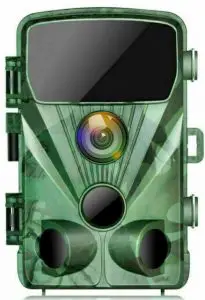
INTRODUCTION
The Wildlife Camera is a wildlife and surveillance camera with an infrared sensor. The sensor can detect sudden changes to the ambient temperature within an evaluation area. The signals of the highly sensitive infrared sensor (PIR, passive infrared sensor) switch on the camera, activating picture of video mode.
Features Of Wildlife Camera
- CMOS sensor.
- 20 Megapixels photo and 1080P HD video.
- 6.1 cm (2.4’)’ color TFT LCD: 320×240 pixels
- 42 pcs IR LEDs.
- Full automatic IR filter.
- Trigger speed: Approx. 0.3 second.
- Setup Serial No. to record the position.
- Time, date, temperature, phase and Serial No. will be stamped on the photo.
- Password protection.
- Power indicating.
- Built-in test function about environmental temperature.
- Built-in microphone and speaker.
- Mini USB 2.0 interface.
- Waterproof standard IP56.
- Working temperature: -20°C to 60°C.
- Extremely low power consumption in standby operation providing extremely long operating time, lasts 6 months with 8 pcs batteries when taking 50 pcs photos every day.
Features Of Wildlife Camera
- Camera trap for hunting.
- Animal or incident observation.
- Motion triggered security camera for domestic, office or public use.
- Any internal and external surveillance.
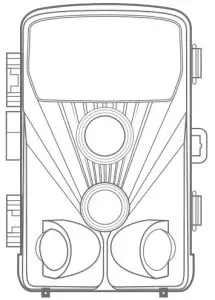
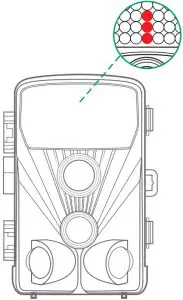
STRUCTURE
Understanding the camera structure helps to use this product more skillfully.1-
- Infrared LEDs
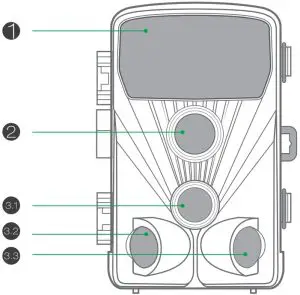
- Lens
- 3.1-Front motion sensor
3.2-Left motion sensor
3.3-Right motion sensor - Display screen
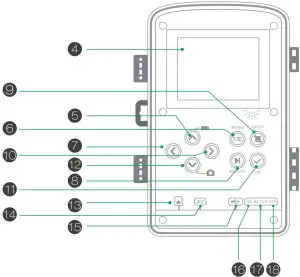
- Up button
- Menu button
- Left button
- Replay button
- Shot button
- Right button
- OK button
- Down button
- TF Slot
- AV jack
- USB jack
- ON
- SETUP
- OFF
- Battery compartment
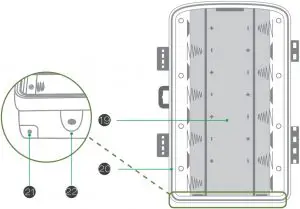
- Seal ring
- DC connection 6V/1.5A
- 1/4″ Tripod thread
- Locking brackets
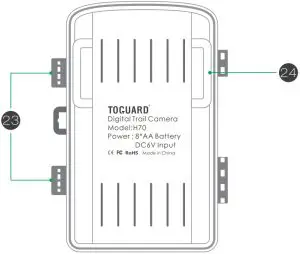
- Slot for mounting belt
- The monitor is only switched on in the SETUP mode for changing menu settings or viewing existing photos and videos.
- A micro SD memory card must have been inserted into the memory card slot to save photos and videos.
- Using the mini USB connection (USB 2.0), the camera can be connected to a computer to download photos and videos.
- Using the mode switch, the three operating modes:OFF,SETUP and ON can be selected.
PREPARING THE CAMERA
Note :
- Micro SD memory cards up to a capacity of 32 GB are supported.
- 2.Instead of type LR6 (AA) batteries with the same specification (with 2000 mAh or higher) may be used. We recommend Alkaline batteries with low self discharge (not supplied).
- The camera must be inserted 4 or 8 x 1.5V AA batteries . Do not use new and old batteries together. DC interface need 6V/1.5A adaptor with 3.5 mm (outer diameter) s*l .3 mm (inner D) plug head.
- Insert CLASS6 or higher class micro SD card (CLASS10 recommend). Prior to insert into memory card, ensure that the lateral write protection on the memory card has not been locked.
- Switch on the camera. 3 switches: power off (OFF),setup menu /SETUP mode (SETUP)and live mode (ON).
- New memory card is recommended to be formatted when using (as below described).
- Please note that the camera will power off when power is very low.
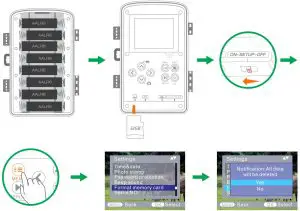
Operation
Open the locking brackets and the protective cover of the battery compartment – insert batteries -insert memory card—switch to SETUP—enter system menu by pressing MENU button -choose to format memory card—choose to reset to factory.
(this step can be skipped)—choose to setup system time. Open the battery cover ► Insert 8pcs batteries. Battery model:
AALR6 > Ensure that the lateral write protection on the memory card has not been activated > Insert CLASS6 or above Micro SD memory card in the memory card slot before switching on the camera and select SETUP mode to adjust settings
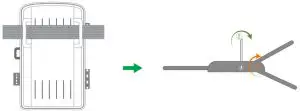
Assembly With Strap
USING THE CAMERA AND SETUP MENU
Using The Camera
Operating Buttons
Functions of operating buttons in recording mode:
Below, the operating buttons are described in the recording mode with non-activated menu.
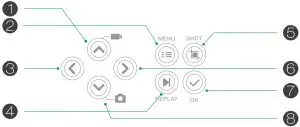
- UP Key: Page up (Menu mode): Switch to Video recording mode
- MENU: Open or exit this Setting menu/Stop playing video (Replay Mode)
- Left Key: Page left
- Replay Key: Review photos and videos
- SHOT Key: shot video recording/capturing
- Right Key: Page right
- OK: Play/Pause play video files (Replay mode)
- Down Key: Page down(Menu mode)/Switch to Photo mode.
Mode Switch
- Shift the switches to choose work mode:
Power off (OFF)

Setup system (SETUP)

Live mode (ON)

- Press Up/Down key to switch modes between Video and Photo mode.
- Press the MENU key to open setting menu.Press OK to confirm the setting changes.
- Press the MENU key one more time to return to previous menu or exit the settings MENU.
- Switch the mode selector to “OFF” to power off the camera.
Setup Menu
Mode
Photo, Video, Photo+Video, Select whether photos or videos should be taken when motion is detected. When in the “Photo+Video” mode, the camera first takes a set number of photos prior to recording a video.
Photo Resolution
20MP (5200*3900) ; 16MP (4608*3456); 12MP (4000*3000), 8MP (3264×2448), 5MP (2592 x 1944). 3MP (2048×1536).
Select the desired resolution for photos. We recommend the resolution 16M.A higher resolution produces a somewhat better photo quality but results in larger files requiring more space on the memory card .
Taking 16GB memory card for example:
| Photo Pixels | Size (MB) (approximately) | Photo Quantity (approximately) |
| 20MP | 3.5 | 4100 |
| 16MP | 2.7 | 5300 |
| 12MP | 2.0 | 7000 |
| 8MP | 1.4 | 10500 |
| 5MP | 0.9 | 16600 |
| 3MP | 0.54 | 26600 |
Photo series : 1 P, 2P. 3P
Video resolution
1920x1080P@25fps, 1280x720P@30fps, 720x480P@30fps, 640x480P@30fps, 320x240P@30fps. Select the required video resolution.
Select the number of photos to be taken in succession when the camera is triggered in the Photo mode. Please also observe the parameter interval! A higher resolution produces higher quality videos but results in larger files requiring more space on the memory card. Videos are recorded in AVI format which can be played back on most video devices.
Taking 16GB memory card for example:
| Video Resolution | Video Length:10 seconds | Total Recording Length (Minutes) | |
| Video size (MB) | Video quantity | ||
| 1920×1080 | 38 | 380 | 63.5 |
| 1280×720 | 22 | 659 | 106 |
| 720 x480 | 17 | 852 | 141 |
| 640×480 | 12.8 | 1132 | 189 |
| 320*240 | 6.3 | 2300 | 385 |
Video Length
- Default 5 seconds, optional 3s-59s, 1-10Minutes
Specify the duration of a video recording when the camera is trigged automatically. The recording period for videos is not limited in the SETUP mode.
- In the SETUP mode in daytime and at night.
- When recording manually, the camera will stop automatically after 29 minutes’ recording;
- When recording manually, the camera will stop when one video clip size gets to 4 GB,
- When recording manually, the camera will stop when the memory card is full or ultra low power.
- In live mode (ON) at night the camera will work automatically as per the video length setting. For low power, it will stop recording in advance.
- Please set the shorter video length to guarantee a long-time usage of batteries.
Audio recording
Turn on/off audio recording.
Shot lag
- Defaulted 1 MIN. optional from 5 seconds-60 minutes.
Select the shortest period for the camera to wait before it reacts to the successive triggering of the main sensor after an animal has first been detected. The camera does not record any photos or videos during the selected interval. This prevents the memory card from being filled with unnecessary shots.
- The shot lag is short, the camera shooting frequency would be high, and there would be high consumption of the power. It would affect the usage days of the batteries.
- On the opposite, if the shot lag is long, it would be a lower consumption of power to guarantee a long-time usage.
Side motion sensors
During the alignment consider whether the use of the side motion sensors may be useful for attaining the desired observation results or not.
Sensitivity of motion sensors
- Select “High” For interior areas and environments with little interference.
- Select “Medium” for exterior areas and environment with a normal amount of interference,
- select “Low” for an environment with a high level of interference.
Target recording time
Press “OK”, and then select “ON” to set the starting working and ending working time. After finishing setting, the camera only works during the set time every day. Beyond the period, the camera is in standby. If the start time is, for instance set to 18:35 and the end time to 8:25, the camera will be operational from 6:35 pm of the current day until 8:25 am of the following day. The camera will not be triggered and will not take any photos or videos outside of this period.
Time lapse
Press “MENU” to find “Time lapse”. Press “OK”, then select “ON” to set the time interval, and set the values of Hr, Min and Sec. For example, if the process of flowers blooming has to be recorded, time lapse can be used. The camera automatically takes pictures in every set time intervals.
Language
Select the desired menu language.
The following languages are available: English, German, French, Spanish, Chinese, etc.
Time&date
Find the “Time & Date” in the setup menu, then press OK to enter.
Use the “Time Format” and “Date Format” to configure time and date format. Choose “Set time & date” to change the camera time. Press Left/Right to choose number and press Up/Down to change value. Press OK to confirm changes.
Photo stamp
Turn on/off display of watermark on photo.
Password protection
Select “Password protection”. Press “OK”, and then select “ON” to set the password of the camera. The password is a 4-digit number selected between 0-9.
If the password is lost, press MENU key and REPLAY at the same time, and slide the operating mode selector from OFF to SETUP position. The camera is unlocked.
Beep sound
Turn on/off beep sound
Format memory card
Select to format memory card on this camera, we suggest format the memory card on computer then format it on this camera again for first use.
Serial NO.
Press “OK”, and then select “ON” to set the serial number for the camera. You can use a combination of 4 digits to documents the location on the photos. When using several cameras, this makes it easier to identify the location when viewing photos.
Reset settings
Select to reset the camera to the default settings.
Please note to set date and time again.
Version
Select to check the camera’s current firmware version number
Playback
Slide the operating mode selector switch to “SETUP” position. Press replay key and Up/Down key to review the photos/videos.While reviewing photos, press Up/Down key to page up/down. While reviewing videos, press OK key to start playing, press OK one more time to stop. Press replay key to return to standby.
- Delete selection
You can use this function to delete individual recordings from the memory card. Press MENU key under the mode of playback, move the select bar to “Delete current file” and press OK to delete the selected recording. - Delete all recordings
You can use this function to delete all recordings from the memory card. Press MENU key under the mode of playback, move the selection bar to “Delete all files” and press OK to delete all recordings. - Activate slide show
This function can be used to play back the photos stored on the memory card automatically. Each photo is shown for about 2 seconds. To stop the slide show and keep the current image permanently on the screen, press the OK button.
Write protection
- This function can be used to protect individual recordings of all saved recordings from accidental deletion.
- Select “Write-protect current file” to protect the currently selected recording from accidental deletion.
- Select “Write-protect all files” to protect all saved recordings from accidental deletion.
- Select “Unlock current file” to remove the write protection for the currently selected recording.
- Select “Unlock all files” to remove the write protection for all saved recordings.
ENTERING LIVE MODE
Adjusting And Installing The Camera
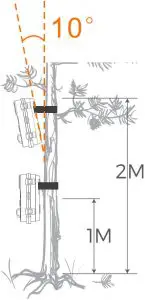
The SETUP mode is advantageous for determining the best possible detection angle and range of the movement sensor. For this purpose, attach the camera at approx. 1 -2m height to a tree and align the camera with a desired direction.
Move slowly from one side of the observed area to the other. Move parallel to the camera. Try out different angles and distances.The green LED flashing indicated that you were detected by side PIR sensor.And the blue LED flashing indicated that you were detected by main PIR sensor.
NOTE:green LED only lights up when “Side motion sensor” is ON. In this way you can determine the best position for aligning the camera.The blue/green LED only flash in the SETUP mode as soon as the PIR sensor has detected movement.
The red LED will flash for 15 times when you just switch to Live mode (ON), and then the camera work automatically and enters the Standby mode. To prevent incorrect signals and unnecessary photos, we recommend not using the camera at sunny points and check that no branches are in the active area of the sensor.
Also check that the camera is set to the correct height in line with the point to be observed. Where necessary, point the camera down for optimum alignment
For 1 meter height, Place the camera parallel to the ground.
For 2 meters height, Tilt the camera down five degrees to the ground.
Note:
Please do the horizontal movement before the PIR. vertical movement could not detect correctly. Please quicken your steps when you do the test in a long distance before PIR detection area.
The PIR detection distance would be shorter if the environment temperature reaches or above 30 °.
The screen would automatically turn off without any operation within 3 minutes in SETUP mode, press any button will make turn it on again.
Setting Up The Live Mode
The standard application of the Wildlife Camera is the Live mode. In this mode , photos are either triggered by movement sensors or at intervals according to the respective setting.
To set up the Live mode , switch mode switch to ON position. The red LED will flash for 15 times when you just switch to Live mode (ON), and then the camera work automatically and enters the Standby mode. As soon as wild animals or other objects directly enter the detection area of the sensor zone, the camera starts to record photos and videos.
Note:
In the daytime. IR LEDs will not light up. The photos and videos are in color.
At night. IR LEDs will give lights, and the photos and videos are in black and white.
The Shot lag is 1 minute defaulted. The optional is 5s-60 min.
Please set up recording mode and related parameters before entering Live mode.
When Flash Light is set to “Auto”, the camera will adjust the brightness of IR LEDs automatically in low power. When shooting at night, the brightness will decrease automatically, and the shooting effect will become a little poor. For ultra low power, shooting will stop at night.
Connection to computer
Please shift Mode to “SETUP”, and connect the camera to computer with USB cable, the camera LCD will show “MSDC prompt .This indicates connecting successfully. And then read or copy the data in SD card to the computer.
- Connect the camera to your computer using the USB cable.
- The camera switches on automatically in the USB mode, irrespective of the selection on the mode switch.
- The camera installs itself on the computer as an additional drive under the name “Removable storage device”
- Double click on the device to detect the folder “DCIM*
- The photos and videos are in the sub folders of the “DCIM” folder.
- You can copy or move photos and video files on the computer.
Alternatively, you can insert the memory card in a card reader on the computer.
TECHNICAL SPECIFICATION
| Element | Macintosh |
| Image sensor | 20 Megapixel CMOS sensor |
| Photo resolution |
|
| Screen | 6.1cm (2.4”) color TFTLCD; 320×240 pixels |
| Recording medium | Supports Micro SD memory cards up to 32 GB (Not Included) |
| Video resolutions |
|
| Lens | F2.5, f=3.6mm,FOV=130° |
| The distance of night version | 20m |
| Triggering distance | Up to 20 meters |
| Triggering time | 0.3-0.5 second |
| Shot lag | 5 seconds to 60 minutes |
| IR flash | 42 pcs infrared LEDs |
| Detection angle of sensor | 130° |
| Spray water protected | Yes (IP56) |
| Storage formats | Photo:JPEG; Video:AVI. MJPC |
| Connections | Mini USB 2.0 |
| Standby time | Approx.6 months (with 8 batteries) |
| Dimensions | 97x140x67mm |
| Power |
|
SIMPLE TROUBLESHOOTING
| The camera will not turn on |
|
| The camera turns off automatically |
|
| It shows ‘SD card Error” |
|
| Videos are choppy or jumpy when played on a computer |
|
| The image is not clear | Please ensure that you have removed the protective films on IR LEDs and lens before using. |
| The camera does not take images or record videos | Check If the memory of SD card is full, transfer images or videos to your computer or delete some files in the Replay Mode. |
Care
Do not use any corrosive cleaners, such as methylated spirits, thinners, etc. to clean the camera housing and supplied accessory. When required, the clean system components with a soft dry cloth.
Storage
Always remove the battery from the housing if the camera is not being used for some time and store the battery separately. On a day to day basis and over longer periods the batteries can be kept at a dry location out of the reach of children.
IF YOU HAVE ANY QUESTIONS OR PROBLEMS.
Please contact us by
USA&Canada [email protected]
Europe [email protected]
UK [email protected]
We will offer prompt and authoritative reply within 24 hours, and try our best to resolve your problem ASAP. More Safe Guarantee with TOGUARD! If you are not satisfied with our product. Please tell us about your thought. That will be much appreciated.
FAQS
Worked for a few months then stopped taking video. Have not changed settings. Also, most pictures are almost a white out. Why would this happen?Because it’s junk. Mine stopped working just after A couple months. The batteries were still practically full. It just stopped and can’t power it on. does video have sound?yes, video with audio. But generally, to get fast triggle time, we suggest photo taken only. Please set it up according to your need, we will always here to help you, any questions please contact us after-sale service email.Is a wifi or internet needed?
No, you can view pictures right on the screen, or hook up to your tv
Are Toguard cameras good?
The TOGUARD offers the highest video resolution (1296P HD) of all the trail cameras featured in our review, which makes it a shoo-in for buyers who prioritize the quality of their camera’s video footage over its still image captures.
Do you need Wi-Fi for wireless trail camera?
Wireless Wi-Fi cameras transmit data through Wi-Fi networks where no data plans are needed for the wireless trail camera. These types of cameras are prevalent in the security marketplace where power and Wi-Fi signal is readily available, not so much in the outdoors where power and Wi-Fi are non existent.
Is ToGuard a good brand?
A ToGuard dash camera is a good buy for the price. Even the more advanced cameras like the 5” HD dash cameras are cheap when compared to competitors. While the ToGuard cameras do not come with some of the advanced features of other cameras, they serve their purpose for most people.
Who is ToGuard?
Toguard was founded in 2008 as an idea for creating a range of trail camera, dash camera ,security camera,IPS Monitor etc for the Camera Lovers. It was a simple thought: Let’s give the world something cool so that they travel the world with the best Companion!
Are cellular trail cameras worth it?
To put it simply, yes. These trail cameras are worth it for anyone who regularly relies on them for hunting, wildlife watching and photography or home security. For a long time, using a trail camera involved weekly or monthly treks to it to retrieve your SD card that — with any luck — was filled with clear thumbnails.
What trail cameras will send pictures to your phone?
Yes, there is one trail cam that will send photos to your phone via a mobile app for free. It’s the Spypoint Link Micro and its available for just $79 from multiple suppliers. It sends the first 100 pictures to your phone for free each month.
What trail cam is the easiest to use?
Outdoor Expert 20MP Mini Trail Camera.
WOSODA Trail Camera -1080P HD Video.
Stealth Cam G42NG Trail Camera.
What’s the difference between a Wi-Fi trail camera and a cellular trail camera?
Though both wireless and cellular trail cameras eliminate the need for regular trips to and from the camera, they are not the same. While wireless cameras rely on a steady Wi-Fi signal to transmit images to you, cellular cameras use 4G cellular networks and data plans.
Is there an app for Toguard dash cam?
TOGUARD GO – Apps on Google Play.
How far will a Wi-Fi trail camera work?
Even the best Wi-Fi trail camera will have a range of only perhaps 20 meters(or 66 feet). This limitation prevents these cameras from being able to transmit data directly to a cell phone or computer from the types of vast distances at which cellular game cameras operate.
What is the range of a Wi-Fi trail camera?
The range of the connection in optimal conditions is around 50 to 60 feet. The cameras do not send images via a cellular network.
How far can a trail camera take a picture?
Range: Different trail cameras have varying ranges that determine how far away they take photos. Ranges can vary from 20 feet to 80 feet. Multi-shot mode: Some cameras have a feature that takes multiple pictures after sensing movement. This way, it’s easy to capture a series of animal movements.
How do you reset a Toguard trail camera?
Open the locking brackets and the protective cover of the battery compartment – insert batteries -insert memory card—switch to SETUP—enter system menu by pressing MENU button -choose to format memory card—choose to reset to factory.
Is there an app to use your phone as a dash cam?
For Android, you can download AutoBoy dashcam- BlackBox, and Droid Dashcam, and for iOS Roav DashCam. Once you have downloaded the app, accept all the permission like camera, location, and even audio. Connect your phone to a power source and open the required application.
Why does my dashcam keep switching off?
There are a few reasons why dash cams may turn off. One common reason is that the battery in the dash cam may be low and needs to be charged. Another reason may be that the memory card in the dash cam is full and needs to be replaced or erased. If there is no power going to the dash cam, it will turn off.
How do trail cameras detect motion?
The trail camera has a passive infrared sensor (also called a PIR sensor) that detects heat and motion. When an animal walks in front of the PIR sensor, the heat triggers the camera to snap a photo. The PIR sensor is detecting anything warmer than the surrounding temperature.
Can deer see trail camera flash?
If you’re not careful, a bright flash can send the deer you’re tracking on the run and ruin hours of your hard work. Deer can see camera trail camera flashes, but by using infrared and invisible flash cameras, you can eliminate the risks of spooking deer while scouting.
Where is the best place to put a trail camera?
Best defined as the downwind side of a ridge, leeward ridges commonly serve as bedding areas. Deer use these areas due to the winding advantages they provide. When deer enter the open, they seem to prefer inside field corners where two perpendicular tree lines meet. This makes such areas good for cameras.
How high off the ground should a trail camera be?
While there’s no set height, and you may occasionally need to get lower to avoid limbs, it’s usually best to keep cameras at a deer’s height — about 3 feet tall. If you feel deer will be alarmed by the camera’s presence, you can place them 6 to 7 feet higher and out of their line-of-sight.
How do you fix a trail camera that won’t turn on?
If your trail camera won’t turn on, the battery or SD card might be the problem. Check your battery’s charge and installation. And put in a fresh memory card. Troubleshoot by checking the Off-Setup-On button and looking for water damage.
VIDEO