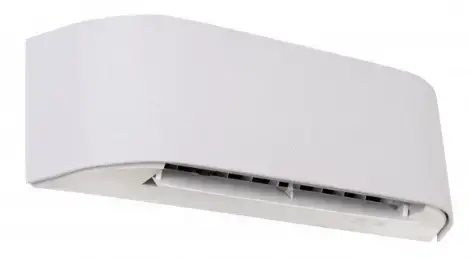
TOSHIBA 16N4KVRG-UA Air Conditioner
PRECAUTIONS FOR SAFETY
Read the precautions in this manual carefully before operating the unit.
- Keep this manual where the operator can easily fi nd it.
- Read the precautions in this manual carefully before operating the unit.
- This appliance is intended to be used by expert or trained users in shops, in light industry and on farms, or for commercial use by lay persons.
- The precautions described herein are classifi ed as DANGER, WARNING and CAUTION. They both contain important information regarding safety. Be sure to observe all precautions without fail.
DANGER
- Do not install, repair, open or remove the cover. It may expose you to dangerous voltages. Ask the dealer or the specialist to do this.
- Turning off the power supply will not prevent potential electric shock.
- The appliance shall be installed in accordance with national wiring regulation.
- Means for disconnection from the supply having a contact separation of at least 3 mm in all poles must be incorporated in the fi xed wiring.
- The appliance must be stored in a room without continuously operating ignition sources (for example, open fl ames, an operating gas appliance or an operating electric heater).
- In order to avoid fi re, explosion or injury, do not operate the unit when harmful gases (e.g. fl ammable or corrosive) are detected near the unit.
- Do not expose your body directly to cool or warm air for a long time.
- Do not insert your fi nger or any article into the air inlet/outlet.
- When an abnormality (burning smell, etc.) occurs, stop the air conditioner and disconnect the power supply or turn off the breaker.
- This appliance can be used by children aged from 8 years and above and persons with reduced physical, sensory or mental capabilities or lack of experience and knowledge if they have been given supervision or instruction concerning use of the appliance in a safe way and understand the hazards involved. Children shall not play with the appliance. Cleaning and user maintenance shall not be made by children without supervision.
- This appliance is not intended for use by person (including children) with reduced physical, sensory or mental capabilities, or lack of experience and knowledge, unless they have been given supervision or instruction concerning use of the appliance by a person responsible for their safety.
- The air conditioner must be installed, maintained, repaired and removed by a qualifi ed installer or qualifi ed service person. When any of these jobs is to be done, ask a qualifi ed installer or qualifi ed service person to do them for you.
- Children should be supervised to ensure that they do not play with the appliance.
- Do not use any refrigerant different from the one specifi ed (R32) for complement or replacement. Otherwise, abnormally high pressure may be generated in the refrigeration cycle, which may result in a failure or explosion of the product or an injury to your body.
- Do not use means to accelerate the defrosting process or to clean, other than those recommended by the manufacturer.
- The appliance shall be stored in a room without continuously operating ignition sources (for example: open fl ames, an operating gas appliance or an operating electric heater).
- Be aware that refrigerants may not contain an odour.
- Do not pierce or burn as the appliance is pressurized. Do not expose the appliance to heat, fl ames, sparks, or other sources or ignition. Else, it may explode and cause injury or death.
- Do not wash the unit with water. It may cause an electric shock.
- Do not use this air conditioner for other purposes such as preserving food, breeding animal, etc.
- Do not step or put anything on the indoor/outdoor unit. It may cause an injury or damage the unit.
- Do not touch aluminium fi n because it may cause an injury.
- Before cleaning the unit, turn off the main switch or the circuit breaker.
- When the unit won’t be used for a long time, turn off the main switch or the circuit breaker.
- It is recommended that maintenance be performed by a specialist when the unit has been operated for a long time.
- The manufacturer shall not assume any liability for the damage caused by not observing the description of this manual.
- Remote controller and Holder are contained with magnet please keep far from product that effect with magnet (such as electronics appliance magnetic strip card and etc.)
- High temperature, high magnet fi eld and direct force collisions may effect to magnet force down.
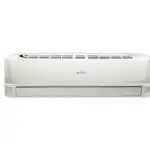
1 INDOOR UNIT DISPLAY
- ECO (White)
- Wi-Fi access (White) 3 PURE (White)
- Timer (White)
- Operation Mode
- Cool (Blue)
- Heat (Orange)
Display brightness can be adjusted, follow procedure on
preparation before use
Preparing Filters
- Open the air inlet grille and remove the air filters.
- Attach the filters. (see detail in the Installation Manual).
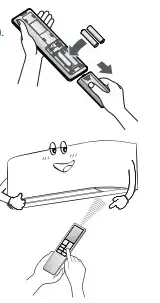
Loading Batteries (when use wireless operation.)
- Remove the slide cover.
- Insert 2 new batteries (AAA type) following the (+) and (–) positions.
Remote Control Reset
- Remove the batteries.
- Press .
- Insert the batteries.
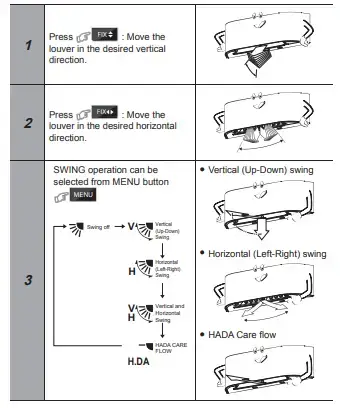
AIR FLOW DIRECTION
Note:
- Do not move the louver manually by hands or others.
- The louver may automation positioning by some operation mode.
remote control
COOLING / FAN ONLY OPERATION
- Press MODE MOD : Select Cool , or Fan only .
- Press : Set the desired temperature. Min. 17°C, Max. 30°C. Fan Only: No temperature indication
- Press FAN : Select AUTO, LOW , LOW+ , MED , MED+ , HIGH or Quiet
AUTOMATIC OPERATION
To automatically select cooling, heating, or fan only operation
- Press MODEMOD : Select Auto A.
- Press : Set the desired temperature. Min. 17°C, Max. 30°C.
- Press FAN : Select AUTO, LOW , LOW+ , MED , MED+ , HIGH or Quiet
HEATING and 8°COPERATION
- Press MODEMOD : Select Heat .
- Press : Set the desired temperature. Min = 5°C, Max = 30°C.
- Temperature range 5-16°C is Heat mode with 8°C operation with less of
energy usage
- Temperature range 5-16°C is Heat mode with 8°C operation with less of
- Press FAN : Select AUTO, LOW , LOW+ , MED , MED+ , HIGH or Quiet
Note: During 8°C mode active (temperature range 5-16°C), some operation such as QUIET, Hi POWER, TIMER OFF cannot use
DRY OPERATION
For dehumidification, a moderate cooling performance is controlled automatically.
- Press MODEMOD : Select Dry .
- Press : Set the desired temperature. Min. 17°C, Max. 30°C.
Note: DRY mode fan speed is set to Auto only.
MENU SETUP
To select more setting of Air conditioner such as Louver select, Hi Power, OFF Timer and other use MENU button MENU
LOUVER SWING and HADA CARE FLOW OPERATION
Comfortable air fl ow can select from feature.
Louver swing opearation:
- To distribute air flow in both vertical and horizontal by swing the louver automatically.
HADA care fl ow operation:
- Air flow upward to the ceiling, provide Indirect air flow to body and homogenize room temperature.
Note:
During HADA CARE FLOW mode, FIX button cannot active.
Louver Swing and HADA Care Flow Operation Setting
- Press MENU button for enter menu selection During triangle mark blink can select menu by press TEMP. button
- Enter Louver set by press MENU button again.
- triangle mark will stop blink and setting feature will be blink instead
- Select Louver swing or HADA CARE FLOW by press TEMP. button Confi rm selected feature by press MENU button again. When feature had selected will return to menu selection display triangle mark will blink
- Leave from menu setting display by select exit and press menu button Leave from menu setting to normal display (no triangle and feature blink).
SILENT OPERATION (Outdoor Unit)
Keep outdoor unit operating silently to ensure either yourself or neighborhood
will have a tight sleep in nighttime. By this feature, the heating capacity will
be optimized to deliver such silent experience. The silent operation can be
selected from one of two purposes (Silent 1 and Silent 2).
There are three setting parameters: Standard level > Silent 1 > Silent 2
Silent 1:
- Though operating silently, the Heating (or Cooling) capacity is still prioritized to ensure having sufficient comfort inside the room.
- This setting is a perfect balance between the Heating (or Cooling) capacity and the Sound level of outdoor unit.
Silent 2:
- Compromising the Heating (or Cooling) capacity to the Sound level in any circumstance where the outdoor unit’s sound level is highly prioritized.
- This setting has a purpose to reduce the maximum sound level of outdoor unit by 4 dB(A).
Note:
While activating of Silent operation, inadequate heating (or cooling) capacity may occur.
Silent Operation Setting
- Press the MENU button for enter menu selection During triangle mark blink can select menu by press TEMP. button
- Enter SILENT set by press MENU button. triangle mark will stop blink and setting feature will be blink instead.
- Select SILENT operation by press TEMP. button. Confi rm selected feature by press MENU button again
- When feature had selected will return to menu selection display triangle mark will blink
- Leave from menu setting display by select EXIT.
Hi POWER OPERATION
To automatically control room temperature and airfl ow for faster cooling or heating operation (except in DRY and FAN ONLY mode)
- Press MENU button for enter menu setting and press TEMP. button to select Hi POWER
- Confi rm selected feature by press MENU button again.
- Leave from menu setting display by select EXIT
ECO OPERATION
To automatically control room temperature to save energy (except in DRY and FAN ONLY mode)
- Press MENU button for enter menu setting and press TEMP. button to select ECO
- Confi rm selected feature by press MENU button again.
- Leave from menu setting display by select EXIT.
Note:
Cooling operation; the set temperture will increase automatically 1 degree/hour for 2 hours (maximum 2 degrees increase). For heating operation the set temperature will decrease
FIREPLACE OPERATION
Keep indoor unit’s fan blowing continuously during thermo off, to circulate
heat from other sources over the room. There are three setting parameters:
Default setting > Fireplace 1 > Fireplace 2
Fireplace 1:
During thermo off period, the indoor unit’s fan will continue to run by the same speed, previously selected by end-user.
Fireplace 2:
During thermo off period, the indoor unit’s fan will continue to run at super-low speed, programmed from factory.
Fireplace Operation Setting
- Press MENU button for enter menu setting and press TEMP. button to select FIREPLACE
- Enter FIREPLACE set by press MENU button. triangle mark will stop blink and setting feature will be blink instead.
- Select FIREPLACE operation by press TEMP. button.
- Confi rm selected feature by press MENU button again. When feature had selected will return to menu selection display triangle mark will blink
- Leave from menu setting display by select EXIT.
While Fireplace operation on heating mode, indoor unit fan always runs and cold air breezing might be occurred.
Fireplace will operate in Heating mode only.
TIMER OFF OPERATION
To set the timer OFF when the air conditioner is operating.
- Press MENU button for enter menu setting and press TEMP. button to select TIMER OFF.
- Enter TIMER set by press MENU button. triangle mark will stop blink and setting feature will be blink instead.
- Select TIMER OFF by press TEMP. button.
- Can select TIMER OFF from 0.5 – 12hrs.
- Confi rm TIMER OFF by press MENU button
- Leave from menu setting display by select EXIT.
Note: The setting will be saved for the next same operation.
Cancel TIMER OFF - During TIMER OFF already set (no.5) press MENU button and press TEMP. button to select TIMER OFF. Press MENU button again will cancel TIMER OFF.
- Leave from menu setting display by select EXIT.
PLASMA ION OPERATION
Capture effi ciency of fl oating impurities in the air is accelerated by plasma ion contaminates such as bacteria, odor, smoke, dust and virus are caught and deactivated by Plasma Ion.
- Press MENU button for enter menu setting and press TEMP. button to select PURE
- Confi rm selected feature by press MENU button again.
- Leave from menu setting display by select EXIT.
Note: Plasma Ion operation dose not remove harmful substances from cigarette smoke (carbon monoxide etc.). Open a window occasionally for ventilation
POWER-SELECTION OPERATION
This function is used when the circuit breaker is shared with other electrical appliances. It limits the maximum current and power consumption to 100%, 75%, or 50% and can be implemented by POWER-SELECTION. The lower percentage, the higher saving and also longer compressor lifetime.
Notes : Due to the reason that the POWER-SELECTION function limits the maximum current, inadequate cooling or heating capacity may occur.
- Press MENU button for enter menu setting and press TEMP. button to select POWER-SE
- Enter the POWER-SEL setting by press MENU button again
- Select POWER-SEL level by press TEMP. button
- Confi rm POWER-SEL level by press MENU button.
- Leave from menu setting display by select EXIT.
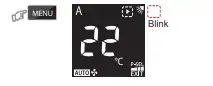
MANUAL DEFORST OPERATION
To defrosting the heat exchanger of the outdoor unit during Heating operation Press and hold MENU : for 5 seconds , then remote control display will show as picture 1 for 2 seconds
DISPLAY LAMP BRIGHTNESS ADJUSTMENT
To decrease the display lamp brightness or turn it off.
- Press and hold FAN for 3 seconds until brightness level ( , , or ) is shown on remote control LCD then release the button.
- Press Rise or Decrease to adjust brightness in 4 levels.

AUTO-RESTART FUNCTION SETTING
This product is designed so that, after a power failure, it can restart automatically in the same operating mode as before the power failure.
Information
The product was shipped with Auto Restart function in the OFF position. Turn it ON as required.
How to turn ON the Auto Restart Function
Press and hold the [OPERATION] button on the indoor unit for 3 seconds (3 beep sounds and OPERATION lamp blink 5 time/sec for 5 seconds).
How to turn OFF the Auto Restart Function
Press and hold the [OPERATION] button on the indoor unit for 3 seconds (3 beep sounds but OPERATION lamp does not blink).
Notes :
In case of ON timer or OFF timer are set, AUTO RESTART OPERATION does not activate.
SELF CLEANING OPERATUION
To protect bad smell caused by the humidity in the indoor unit.
- If the button is pressed once during “Cool” or “Dry” mode, the fan will continue to run for other 30 minutes, then it will turn off automatically. This will reduce the moisture in the indoor unit.
- To stop the unit immediately, press the more 2 times within 30 seconds.
TEMPORARY OPERATION
In case of the misplaced or discharged remote control
- Pressing the RESET button, the unit can start or stop without using the remote control.
- Operation mode is set on AUTOMATIC operation, preset temperature is 24°C and fan operation is automatic speed.
REMOTE CONTROL A-B SELECTION
To separate using of remote control for each indoor unit in case of 2 air conditioners are installed nearly.
Remote Control B Setup.
- Press RESET button on the indoor unit to turn the air conditioner ON.
- Point the remote control at the indoor unit.
- Push and hold button on the back side of Remote Control “00” will be shown on the display. (Picture 1)
- Press MODEMOD during pushing . “B” will show on the display and “00” will disappear and the air conditioner will turn OFF. The Remote
Control B is memorized. (Picture 2)
- Note: Repeat above step to reset Remote Control to be A.
- Remote Control A has not “A” display.
- Default setting of Remote Control from factory is A.
OPERATION AND PERFORMANCE
- Three-minute protection feature: To prevent the unit from being activated for 3 minutes when suddenly restarted or switched to ON.
- Preheating operation: Warm up the unit for 5 minutes before the heating operation starts.
- Warm air control: When the room temperature reaches the set temperature, the fan speed is automatically reduced and the outdoor unit will stop.
- Automatic defrosting: Fans will stop during defrost operation.
- Heating capacity: Heat is absorbed from outdoors and released into the room. When the outdoor temperature is too low, use another recommended heating apparatus in combination with the air conditioner.
- Consideration for accumulated snow: Select the position for outdoor unit where it will not be subjected to snow drifts, accumulation of leaves or other seasonal debris.
- Some minor cracking sound may occur when unit operating. This is normal because the cracking sound may be caused by expansion/contraction of plastic.
Note: Item 2 to 6 for Heating model Air conditioner operating conditions
MAINTENANCE
Indoor Unit and Remote Control
- Clean the indoor unit and the remote control with a wet cloth when needed.
- No benzine, thinner, polishing powder or chemically-treated duster.
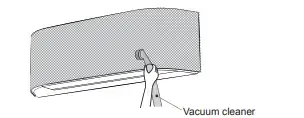
Air filters
Clean every 2 weeks.
- Open the air inlet grille.
- Remove the air filters.
- Vacuum or wash and then dry them.
- Reinstall the air filters and close the air inlet grille.
TROUBLESHOOTING (CHECKPOINT)
WIRELESS LAN CONNECTION
Toshiba Home AC Control
Please visit the application store on your device to download and install Toshiba Home AC Control application
About Toshiba Home AC Control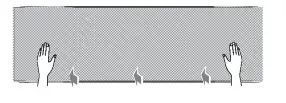
About Toshiba Home AC Control
- Toshiba Home AC Control can control AC operation by Smartphone or tablet (mobile device) via internet connection.
- Everywhere control, control software run on Cloud system and mobile device can set and monitor AC operation via internet connection.
- Everyone can control, 1 Wireless adapter maximum 5 User (use 1 email register).
- Multi AC system control, 1 user can control 10 AC.
- Group control.
- Can create and control 3 groups of AC.
- Can control max 10 AC per group.
Note:- Adapter can register only 1 email address, if register with new email, current email will be invalid.
- email address can use for register 5 devices for control same AC.
Toshiba Home AC Control application support
Register process
Open an application and follow register for User registration.
- Tab Register
- Enter password by 6-10 characters, combination of
- alphabet and number
- Enter email address
- Check for term and condition
- Select country
- Confi rm information Enter user name
- Information will be submitted to email, click link to confi rm

Log in to Toshiba Home AC Control application
- Connect Wireless adapter to A/C and turn on power supply.

- Open application and select Log in.
- Enter user name and password.
- Log in successful
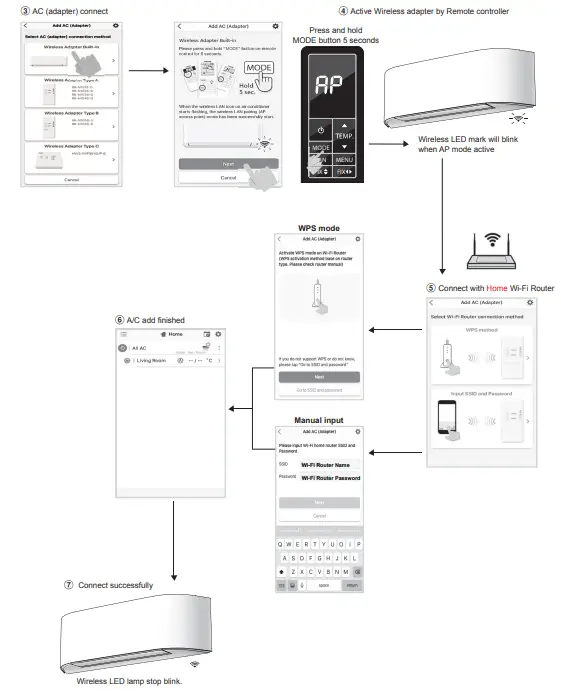
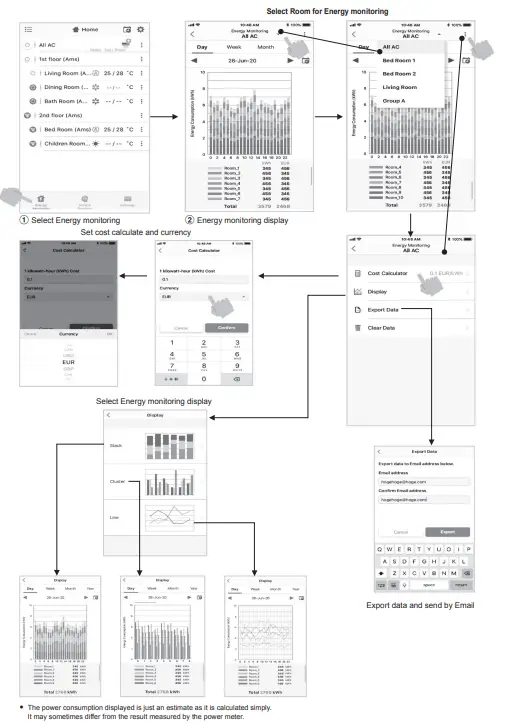
Add Wireless adapter for control by Toshiba Home AC Control application.
Select “Add AC (Adapter)” from both display above. 2 Select AC (adapter) connection method
Note
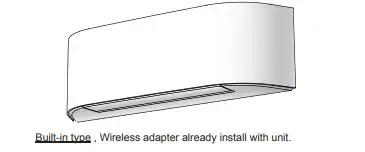
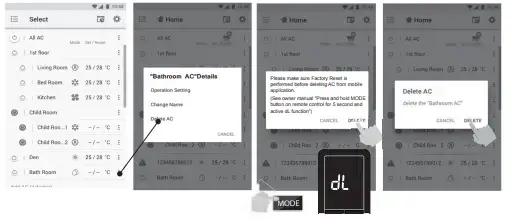
- In case of Wi-Fi router change or Email for register change need to re-process for add Wireless adapter again (Built in type : Press MODE button at Remote controller 5 seconds for a ctive AP mode).
- In case of change Wireless adapter to use with other A/C need to factory reset and re-process for add Wireless adapter again (Built in type : Press MODE button at Remote controller 5 seconds and select “rb”).
Add Wireless adapter for control by Toshiba Home AC Control application.
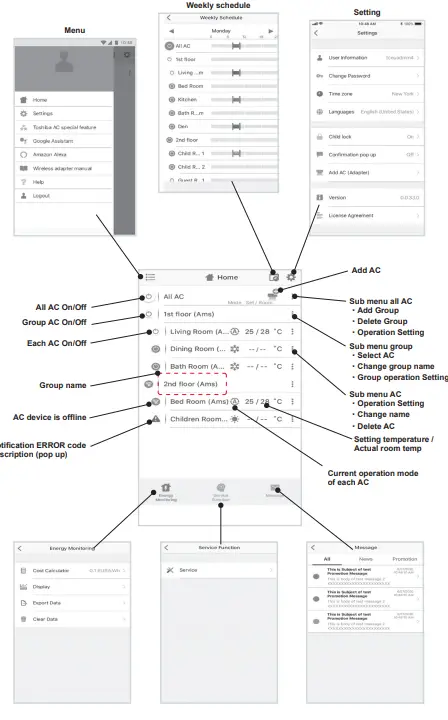
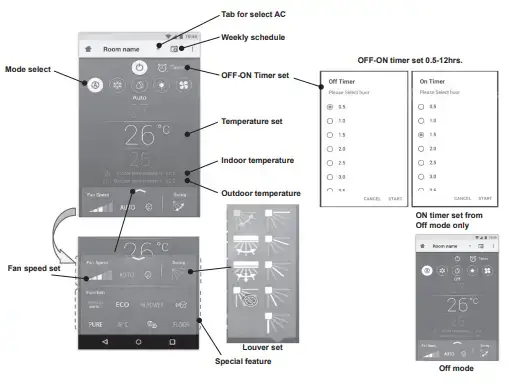
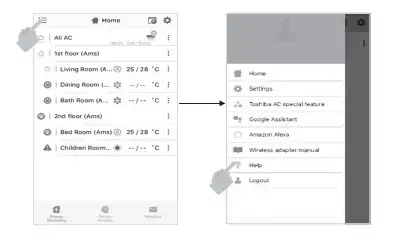
Toshiba Home AC Control application
Mode and Condition setting.
Mode select for Toshiba Home AC Control application.
Setting in operation mode.
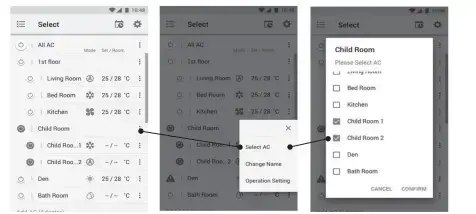
Group operation.
Maximum 3 groups 1 Group maximum = 10 units.
Add group
Add AC in group
Delete AC in group
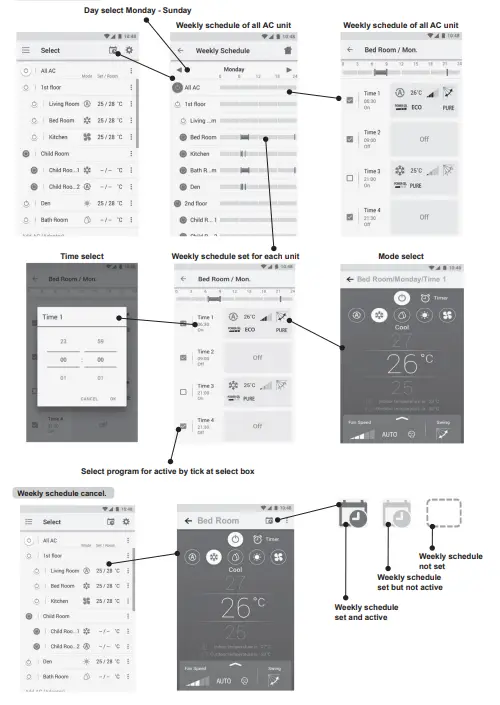
Weekly schedule set.
Energy monitoring
In case of have some problem can check from Help menu.
Note :
- The Wireless Adapter must be installed, maintained, repaired and removed by a qualified installer or qualified service person.
- Contact dealer and/or service center when equipment is malfunction
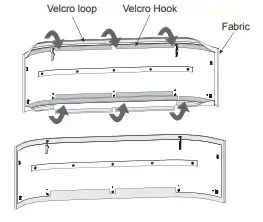
DECORATIVE FABRIC INSTALLATION
The decorative fabric for cover on the air inlet grille of indoor unit was put in the accessories. User can use it as required.
The method of installation is as follows.
- Remove the air inlet grille. Open the air inlet grille upward and pull it toward you. As shown on figure as below.

- Prepare the fabric that you choose for install.
- Insert the fabric into the left and right side of the air inlet grille. Attach the hook and loop of velcro tape fully together. As shown on figure as below.

- Insert the fabric into the top and bottom side of the air inlet grille. Attach the hook and loop of velcro tape fully together. As shown on figure as below.


- Reassembly the air inlet grille by reverse process of 1.
Note:
- The tightness of the fabric depends on attaching the hook and loop of velcro around the air inlet grille, take appropriate action.
Maintenance & Shelf-life
- Clean when dust stuck or covers the decorative fabric.
- Take extra care when cleaning the decorative fabric.
- Vacuum the decorative fabric with soft brush nozzle that use for cleaning on furniture or curtain.
- In case of getting heavy dirty on decorative fabric, please use dry cleaning service or wash by hand with warm water separated from other clothes (to avoid color staining), then line dry in the shade.
Note:
- Switch ‘‘OFF’’ and unplug the air conditioner before removing the air inlet grille and decorative fabric.
- Ensure decorative fabric are completely dry before refitting to the air inlet grille.
- Do not put the decorative fabric in a dishwasher, washing machine, tumble dryer, oven, microwave or near an open flame.
CAUTION
- If clean decorative fabric by washing, it may affect to appearance and fitting of the decorative fabric.
- Recommend to use vacuum cleaner to removing the dusts from decorative fabric.
Model: 50C350KU
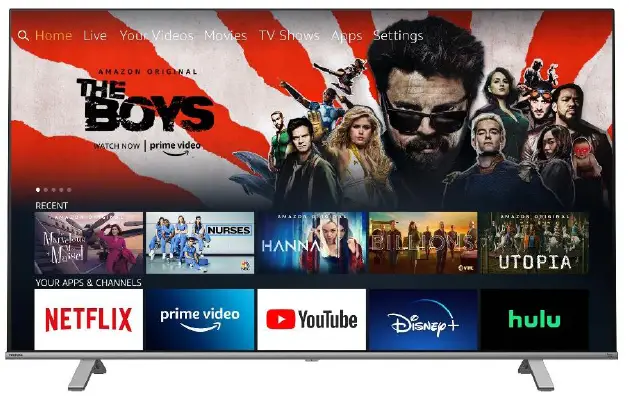
4K ULTRA HD
Toshiba’s C350 series sets up a stunning, heart-shaking, smart world for your relaxing viewing experience, thanks to the consistent innovation of advanced technologies. True-to-life images jump off the screen with amazing 4K Ultra HD resolution, ultimately beauty of details, and original natural color. For a more immersive audio experience, a premium audio post-processing solution brings height to the entertainment experience that elevates surround sound formatting from DTS Virtual:.X.
With the Fire TV experience built-in and an Alexa Voice Remote, you can easily get to the movies and TV shows you love. Elevate your TV viewing experience with new enhancements like a sleek, thinner bezel and twice the flash memory (16 GB) over the previous generation plus superior screen brightness and color accuracy. Enjoy new features such as Live View Picture-in-Picture and a TV experience that gets smarter every day. The Alexa Voice Remote works like a traditional remote and also lets you use your voice to launch apps, search for titles, play music, switch inputs, control smart home devices, and more.
Fire TV
Fire TV brings live, over-the-air TV, streaming channels, and your favorite apps together onto one convenient home screen. Subscriptions may be required. Content availability subject to change.
Regza Engine 4k
Regza Engine 4K is Toshiba’s high performance 4K engine for stunning picture quality, with ultra essential PQ technology combined with high quality LCD panel, you can get an incredible ultra HD 4K images with breath-taking picture quality. Now fully immerse yourself in whatever you are watching with heart shaking excitement.
4K resolution
4 times resolution of Full HD, four times the detail. With Toshiba 4K TV, you can enjoy uncompromisingly crisp, clear visuals for a fully immersive, professional theater quality.
Dolby Vision™ HDR and HDR10*
Dolby Vision HDR and HDR10 transforms your TV into an entertainment powerhouse. The image technology from cinemas, now brought together in the home, provide amazing realism that you’ll see, hear, and feel like never before.
Ultra-essential PQ Technology
Ultra HD 4K Panel expresses picture quality four times as detailed in pixel as Full HD. Furthermore, Regza 4K Engine optimizes every detail of picture and color output to achieve ‘real as it is’ picture quality to maximize your emotions. Detailed as real. Colorful as real. This is the ultimate combination for ultimate beauty of picture quality.
Color Remaster
Color Re-master technology is there to restore the original color of original image as natural and colorful as it should be.
DTS® Virtual: X™
DTS Virtual: X technology is a scalable and versatile advanced post processing package that creates an immersive audio experience by virtualizing height content over traditional stereos.
Press & Ask Alexa
Use the included Alexa Voice Remote to manage TV power, volume, navigation, playback, and input switching. You can also quickly launch Prime Video and Netflix with preset app buttons. Or just press the microphone button and say, “Find dramas,” and Alexa will show you search results from a central catalog of hundreds of integrated apps and channels.
Auto Low Latency Game Mode
Enjoy a better gaming experience. In Game Mode, input lag is significantly improved, so your commands from the controller are virtually instantaneous on the screen. The C350 is ready for the whatever the latest generation gaming consoles can throw at it.
Designed in Japan
Toshiba TV pursues the philosophy of “Essential Beauty” which is made based on the horizontal and vertical lines in the living space, it makes the living room look stylish by merging into its surroundings.
Bezel-less Design
The C350 is designed with a gorgeous bezel-less design to give you more viewable screen area.
TECHNICAL SPECIFICATIONS
DIMENSIONS/WEIGHT

*HDR viewing experience will vary by model, content availability and internet connection.
Version2021.04.16
All product, product specifications, and data are subject to change without notice to improve reliability, function, design or otherwise. ©2020 Hisense USA, All rights reserved
Hisense USA Corporation
7310 McGinnis Ferry Road, Suwanee, GA, 30024
1-888-935-8880
www.hisense-usa.com

TOSHIBA HD Smart Tv
TOSHIBA HD Smart Tv
Building And Fitting Stand
Inserting The Batteries Into The Remote
Remove the back cover to reveal the battery compartment. Insert two size AAA batteries. Make sure the (+) and (-) signs match (observe correct polarity). Do not mix old and new batteries. Replace only with same or equivalent type. Place the cover back on. A message will be displayed on the screen when the batteries are low and must be replaced.
Connections
Connect the antenna cable/s to your TV.
PLEASE ENSURE BOTH UNITS ARE SWITCHED OFF BEFORE CONNECTING
Use the proper cable to connect two units together.
To select the desired input source, press the Source button on the remote control. Or press the centre of the control switch inwards consecutively until the Sources list is displayed.
After unpacking, allow the TV set to reach the ambient room temperature before you connect the set to the mains. Plug the power cable to the mains socket outlet.
Plug the power cable to the mains socket whilst in ‘off’ position, and then turn the mains socket on.
IMPORTANT: The TV set is designed to operate on a 220-240V AC, 50 Hz supply.
Switching On The Tv
In order to turn the TV on from standby mode:
- Press the Standby button, a numeric button or Programme +/- button on the remote control
Press the centre of the control switch inwards, located at the rear left hand side of the TV
Internet Connection
You can set up your TV so that it can access the Internet through your local area network (LAN) using a wired or wireless connection.
Note: The figures are for representation only
Remote Control
- Standby
- Source
- Numeric buttons
- Language
- Menu
- Volume +/-
- Info
- Directional buttons
- OK
- Back/Return
- Coloured Buttons
- Prime Video
- Rewind
- Record
- Pause
- Play
- Stop
- Fast Forward
- Netflix
- Freeview Play
- Exit
- Guide
- Programme +/-
- Text
- Mute
First Time Installation
When turned on for the first time, the TV’s welcome screen will be displayed. Select your language and press OK. Follow the on screen instructions to set your TV and install channels. The installation wizard will guide you through the setup process. You can perform First Time Installation anytime using the related option in the Settings>Installation menu.
Accessing E-manual And The Full User Manual
You can find instructions for your TV’s features in the E-Manual. To use E Manual, enter Settings menu, select Manuals and press OK. For quick access to E-Manual press Menu “” button and then Info “![]() ” button.
” button.
You can also review your TV user manual online or download as you like. Scan this QR code or visit https://toshiba-tv.com/uk-uk/support
Accessories Included
- Remote Control
- Batteries: 2 x AAA
- Quick Start Guide
Feature Overview
Media Browser
Browse the media content stored on USB devices that are connected to your TV
Common Interface
Decode encrypted digital TV channels with a Conditional Access Module(CAM) and a card provided by a digital TV service operator
USB Recording
Record your favourite TV programmes
Electronic Programme Guide
Display the scheduled digital TV programmes
CEC
Control basic functions of the connected HDMI-CEC compatible audio/video devices with the remote control of the TV
Audio Video Sharing
Access your media files stored on media server devices, such as PC’s or handheld devices, that are connected to your home network
HbbTV
Access to HbbTV services (services are dependent on broadcast)
Apps
Access the applications installed on your TV, add more from the market
Open Browser
Browse the internet from the comfort of your sofa
Wireless Display
Wirelessly stream video and sound content and use your TV as a second screen for your compatible PC or handheld device
Smart Center
Use the Smart Center application installed on your mobile device to launch your applications, control your TV, share media files and stream TV programmes
Virtual Remote
Control your TV via a wireless handheld device
Bluetooth®
Connect audio devices or remote controllers wirelessly to your TV
| Some features may not be available dependent on your TV model, please check the product fiche for your product specifications
For more detailed information on installation, function and control refer to the full manual on our the website at https://toshiba-tv.com/uk-uk/support |
Safety Information
|
| CAUTION: TO REDUCE THE RISK OF ELECTRIC SHOCK DO NOT REMOVE COVER (OR BACK). NO USER-SERVICEABLE PARTS INSIDE. REFER SERVICING TO QUALIFIED SERVICE PERSONNEL. |
In extreme weather (storms, lightning) and long inactivity periods (going on holiday) disconnect the TV set from the mains.
The mains plug is used to disconnect TV set from the mains and therefore it must remain readily operable. If the TV set is not disconnected electrically from the mains, the device will still draw power for all situations even if the TV is in standby mode or switched off.
Note: Follow the on screen instructions for operating the related features.
IMPORTANT – Please read these instructions fully before installing or operating
WARNING: This device is intended to be used by persons (including children) who are capable / experienced of operating such a device unsupervised, unless they have been given supervision or instruction concerning the use of the device by a person responsible for their safety
- Use this TV set at an altitude of less than 2000 meters above the sea level, in dry locations and in regions with moderate or tropical climates.
- The TV set is intended for household and similar general use but may also be used in public places.
- For ventilation purposes, leave at least 5cm of free space around the TV.
- The ventilation should not be impeded by covering or blocking the ventilation openings with items, such as newspapers, table-cloths, curtains, etc.
- The power cord plug should be easily accessible. Do not place the TV, furniture, etc. on the power cord.
A damaged power cord/plug can cause fire or give you an electric shock. Handle the power cord by the plug, do not unplug the TV by pulling the power cord. Never touch the power cord/plug with wet hands as this could cause a short circuit or electric shock. Never make a knot in the power cord or tie it with other cords. When damaged it must be replaced, this should only be done by qualified personnel. - Do not expose the TV to dripping or splashing of liquids and do not place objects filled with liquids, such as vases, cups, etc. on or over the TV (e.g., on shelves above the unit).
- Do not expose the TV to direct sunlight or do not place open flames such as lit candles on the top of or near the TV.
- Do not place any heat sources such as electric heaters, radiators, etc. near the TV set.
- Do not place the TV on the floor and inclined surfaces.
- To avoid danger of suffocation, keep plastic bags out of the reach of the babies, children and domestic animals.
- Carefully attach the stand to the TV. If the stand is provided with screws, tighten the screws firmly to prevent the TV from tilting. Do not over-tighten the screws and mount the stand rubbers properly.
- Do not dispose of the batteries in fire or with hazardous or flammable materials.
WARNING
- Batteries must not be exposed to excessive heat such as sunshine, fire or the like.
- Excessive sound pressure from earphones or headphones can cause hearing loss.
ABOVE ALL – NEVER let anyone, especially children, push or hit the screen, push anything into holes, slots or any other openings in the case.
| Caution |
Serious injury or death risk |
| Risk of electric shock |
Dangerous voltage risk |
| Maintenance |
Important maintenance component |
Markings on the Product
The following symbols are used on the product as a marker for restrictions and precautions and safety instructions. Each explanation shall be considered where the product bears related marking only. Note such information for security reasons.
Class II Equipment: This appliance is designed in such a way that it does not require a safety connection to electrical earth.
Hazardous Live Terminal: The marked terminal(s) is/are hazardous live under normal operating conditions.
Caution, See Operating Instructions: The marked area(s) contain(s) user replaceable coin or button cell batteries.
Class 1 Laser Product: This product contains Class 1 laser source that is safe under reasonably foreseeable conditions of operation.
| WARNING
Do not ingest the battery, Chemical Burn Hazard This product or the accessories supplied with the product may contain a coin/button cell battery. If the coin/button cell battery is swallowed, it can cause severe internal burns in just 2 hours and can lead to death. – – – – – – – – – – – – Never place a television set in unstable or inclined locations. A television set may fall, causing serious personal injury or death. Many injuries, particularly to children, can be avoided by taking simple precautions such as;
– – – – – – – – – – – – Apparatus connected to the protective earthing of the building installation through the MAINS connection or through other apparatus with a connection to protective earthing – and to a television distribution system using coaxial cable, may in some circumstances create a fire hazard. Connection to a television distribution system has therefore to be provided through a device providing electrical isolation below a certain frequency range (galvanic isolator) Using the special functions to change the size of the displayed image (i.e. changing the height/width ratio) for the purposes of public display or commercial gain may infringe on copyright laws. The LCD display panels are manufactured using an extremely high level of precision technology; however, sometimes some parts of the screen may be missing picture elements or have luminous spots. This is not a sign of a malfunction. The set should be operated only from a 220-240 V AC 50 Hz outlet. Ensure that the television is not standing on the mains lead. Do not cut off the mains plug from this equipment, this incorporates a special Radio Interference Filter, the removal of which will impair its performance. It should only be replaced by a correctly rated and approved type. IF IN DOUBT PLEASE CONSULT A COMPETENT ELECTRICIAN |
WALL MOUNTING WARNINGS
|
| Figures and illustrations in this user manual are provided for reference only and may differ from the actual product appearance. Product design and specifications may be changed without notice |
Licenses
The terms HDMI and HDMI High-Definition Multimedia Interface, and the HDMI Logo are trademarks or registered trademarks of HDMI Licensing Administrator, Inc. in the United States and other countries.
The terms HDMI and HDMI High-Definition Multimedia Interface, and the HDMI Logo are trademarks or registered trademarks of HDMI Licensing Administrator, Inc. in the United States and other countries.
For DTS patents, see http://patents.dts.com. Manufactured under license from DTS Licensing Limited. DTS, the Symbol, & DTS and the Symbol together are registered trademarks, and DTS TruSurround is a trademark of DTS, Inc.© DTS, Inc.
All Rights Reserved.
For DTS patents, see http://patents.dts.com. Manufactured under license from DTS Licensing Limited. DTS, DTS-HD, the Symbol, & DTS or DTS-HD and the Symbol together are registered trademarks of DTS, Inc.© DTS, Inc. All Rights Reserved.
The Bluetooth®
word mark and logos are registered trademarks owned by the Bluetooth SIG, Inc. and any use of such marks by Vestel Elektronik Sanayi ve Ticaret A.S. is under license. Other trademarks and trade names are those of their respective owners. DVB is a registered trademark of the DVB Project.
[1] EIA/CEA-861-D compliance covers the transmission of uncompressed digital video with high band width digital content protection, which is being standardized for reception of high-definition video signals. Because this is an evolving technology, it is possible that some devices may not operate properly with the television.
This product contains technology subject to certain intellectual property rights of Microsoft. Use or distribution of this technology outside of this product is prohibited without the appropriate license(s) from Microsoft.
Content owners use Microsoft PlayReady™ content access technology to protect their intellectual property, including copyrighted content. This device uses PlayReady technology to access PlayReady protected content and/or WMDRM-protected content.
If the device fails to properly enforce restrictions on content usage, content owners may require Microsoft to revoke the device’s ability to consume PlayReady protected content. Revocation should not affect unprotected content or content protected by other content access technologies. Content owners may require you to upgrade PlayReady to access their content. If you decline an upgrade, you will not be able to access content that requires the upgrade.
This product incorporates copyright protection technology that is protected by U.S. patents and other intellectual property rights. Use of this copyright protection technology must be authorized by Rovi Corporation, and is intended for home and other limited viewing uses only unless otherwise authorized by Rovi Corporation. Reverse engineering and disassembly are prohibited.
The “CI Plus” Logo is a trademark of CI Plus LLP.
This product is protected by certain intellectual property rights of Microsoft Corporation. Use or distribution of such technology outside of this product is prohibited without a license from Microsoft or an authorized Microsoft subsidiary.
Wireless LAN Transmitter Specifications
| Frequency Ranges | Max Output Power |
| 2400 – 2483,5 MHz (CH1-CH13) | < 100 mW |
| 5150 – 5250 MHz (CH36 – CH48) | < 200 mW |
| 5250 – 5350 MHz (CH52 – CH64) | < 200 mW |
| 5470 – 5725 MHz (CH100 – CH140) | < 200 mW |
This device is intended for home and office use in all EU countries (and other countries following the relevant EU directive) without any limitation except for the countries mentioned below.
| Country | Restriction |
| Bulgaria | General authorization required for outdoor use and public service |
| France | In-door use only for 2454-2483.5 MHz |
| Italy | If used outside of own premises, general authorization is required |
| Greece | In-door use only for 5470 MHz to 5725 MHz band |
| Luxembourg | General authorization required for network and service supply(not for spectrum) |
| Norway | Radio transmission is prohibited for the geographical area within a radius of 20 km from the centre of Ny-Ålesund |
| Russian Federation | In-door use only |
The requirements for any country may change at any time. It’s recommended that user checks with local authorities for the current status of their national regulations for both 2.4 GHz and 5 GHz wireless LAN’s.
Specification
| TV Broadcasting | PAL BG/I/DK SECAM BG/DK |
| Receiving Channels | VHF (BAND I/III) – UHF (BAND U) – HYPERBAND |
| Digital Reception | Fully integrated digital terrestrial-cable-satellite TV(DVB-T-C-S) (DVB-T2, DVB-S2 compliant) |
| Number of Preset Channels | 11000 |
| Channel Indicator | On Screen Display |
| RF Aerial Input | 75 Ohm (unbalanced) |
| Operating Voltage | 220-240V AC, 50Hz. |
| Audio | DTS TruSurround DTS-HD |
| Audio Output Power (WRMS.) (10% THD) | 2 x 6 |
| Power Consumption (W) | 65 W |
| Networked Standby (W) | < 2 |
| Weight (Kg) | 6.0 |
| TV Dimensions DxLxH (with foot) (mm) | 189 x 735 x 471 |
| TV Dimensions DxLxH (without foot) (mm) | 93 x 735 x 437 |
| Display | 16:9 32” |
| Operation temperature and operation humidity | 0ºC up to 40ºC, 85% humidity max |
Disposal…
The following information is only for EU-member states:
Disposal of products
The crossed out wheeled dust bin symbol indicates that products must be collected and disposed of separately from household waste.
Integrated batteries and accumulators can be disposed of with the product. They will be separated at the recycling centres. The black bar indicates that the product was placed on the market after August 13, 2005. By participating in separate collection of products and batteries, you will help to assure the proper disposal of products and batteries and thus help to prevent potential negative consequences for the environment and human health.
For more detailed information about the collection and recycling programmes available in your country, please contact your local city office or the shop where you purchased the product.
Disposal of batteries and/or accumulators
The crossed out wheeled dust bin symbol indicates that batteries and/or accumulators must be collected and disposed of separately from household waste.
If the battery or accumulator contains more than the specified values of lead (Pb), mercury (Hg), and/or cadmium (Cd) defined in the European Battery Directive, then the chemical symbols for lead (Pb), mercury (Hg) and/or cadmium (Cd) will appear below the crossed out wheeled dust bin symbol.
By participating in separate collection of batteries, you will help to assure the proper disposal of products and batteries and thus help to prevent potential negative consequences for the environment and human health. For more detailed information about the collection and recycling programmes available in your country, please contact your local city office or the shop where you purchased the product.
REACH information
The European Union (EU) chemical regulation, REACH (Registration, Evaluation, Authorization and Restriction of Chemicals), entered into force on 1 June 2007.
Toshiba will meet all REACH requirements and is committed to provide our customers with information about the presence in our articles of substances included on the candidate list according to REACH regulation.
Please consult the following website www.toshibatv.com for information about the presence in our articles of substances included on the candidate list according to REACH in a concentration above 0.1 % weight by weight.
| EU Conformity Statement
This product is carrying the CE-Mark in accordance with the related European Directives. Responsible for CE-Marking is Vestel UK, Langley, Berkshire, SL3 6EZ. This product is labeled with the CE Mark in accordance with the related European Directives, notably RoHS Directive 2011/65/EU. Furthermore the product complies with the Ecodesign Directive 2005/32/EC (EuP) and 2009/125/EC (ErP) and its related implementing measures. |
| This equipment corresponds to requirements of the Technical Regulation on limitation of usage of certain dangerous substances in electrical and electronic equipment. |
| Find out all you need to know about the latest, trend-setting TV technology on our website. w |
| Hereby, VESTEL Elektronik Sanayi ve Ticaret A.Ş., declares that the radio equipment type TV is in compliance with Directive 2014/53/EU. The full text of the EU declaration of conformity is available at the following internet address: doc. vosshub.com |
| Product Fiche | ||
| Commercial Brand: TOSHIBA | ||
| Model No. | 32LL3A63DB | |
| Energy efficiency class | A+ | |
| Visible screen size (diagonal, approx.) (inch/cm) | 32 inches | 80 cm |
| On mode average power consumption (Watt) | 31.0 W | |
| Annual energy consumption (kWh/annum)(*) | 45.0 kWh | |
| Standby power consumption (Watt) | 0.50 W | |
| Off mode power consumption (Watt) | N/A | |
| Display resolution (px) | 1920×1080 | |
(*) Energy consumption kWh per year, based on the power consumption of the television operating 4 hours per day for 365 days. The actual energy consumption will depend on how the television is used.
| A | VESA WALL MOUNT MEASUREMENTS | ||
| B | Hole Pattern Sizes (mm) | W | H |
| 200 | 100 | ||
| C | Screw Sizes | ||
| D | Length (X) | min. (mm) | 5 |
| max. (mm) | 8 | ||
| E | Thread (Y) | M4 | |
| A | B | C | D | E | |
| English | VESA WALL MOUNT MEASUREMENTS | Hole Pattern Sizes (mm) | Screw Sizes | Length (X) | Thread (Y) |
Why is there no sound or picture?
Check the power cord connection and power switch. If the problem persists, please contact your dealer.
Why is there no picture but there is sound?
Check the antenna connection and signal strength. If the problem persists, please contact your dealer.
Why is the picture blurred or noisy?
Check for local interference such as an electrical appliance or power tool. If the problem persists, please contact your dealer.
Why does vertical bar appear on the screen?
This is normal, there is no need to be alarmed. It will disappear after a few minutes when the TV warms up.
Why does my screen have a shadow in some colours?
This is normal for LCD screens, there is no need to be alarmed. It will disappear after a few minutes when the TV warms up.
How do I use my Toshiba Smart Tv?
You live in the Best Buy store. Choose your Wi-Fi network enter. The password select connect and wait for the TV to join your network.
Where is the setting menu on Toshiba Smart Tv?
Then scroll down to settings scroll right to picture press the up button and select mode scroll right and select yes change the picture mode to optimize the television for what you are using it for.
Is there a reset button on a Toshiba TV?
Continue holding the Physical Power Button on the TV and when you see the Fire TV logo on the TV screen, release the Power Button and follow the on screen instructions. Quickly press and release the power button to scroll through the options until you highlight Factory Reset.
Why is my Toshiba Smart TV not working?
Reset Your Toshiba Smart TV: Switch off the TV for few minutes, then press and hold the power button on your TV for at least 30 seconds to reset it. Still it is not working, it may be problem with defective power supply board then replace the board.
Why won’t my Toshiba TV connect to WiFi?
Your Toshiba TV may not connect to WiFi because the connection is not routed properly, the password is incorrect, the cables need to be replaced, or the TV/Router needs to be reset. If your TV is not connecting to WiFi, you can try to: Guarantee the WiFi signal is reaching and is not obstructed
How do I reboot my smart TV?
If TV is turned off, turn it on first and perform the following operation.
Point the remote control to the illumination LED or status LED and press and hold the POWER button of the remote control for about 5 seconds, or until a message Power off appears.
The TV should restart automatically.
How do I use Toshiba remote?
The power source wait 5 to 10 seconds plug it back in then hold the home button down on the remote for 10 to 30 seconds. For it to pair. Now.
VIDEO
TOSHIBA HD Smart Tv
www://toshiba-tv.com/uk-uk/full-hd-tv/40LL3A63DB
Microwave Oven
Instruction
ML-EM45P(BS)
![]()
PRECAUTIONS TO AVOID POSSIBLE EXPOSURE TO EXCESSIVE MICROWAVE ENERGY
(a) Do not attempt to operate this oven with the door open since an open-door operation can result in harmful exposure to microwave energy. It is important not to defeat or tamper with the safety interlocks.
(b) Do not place any object between the oven front face and the door or allows soil or cleaner residue to accumulate on sealing surfaces.
(c) Do not operate the oven if it is damaged. It is particularly important that the oven door close properly and that there is no damage to the:
- DOOR (bent)
- HINGES AND LATCHES (broken or loosened)
- DOOR SEALS AND SEALING SURFACES
(d) The oven should not be adjusted or repaired by anyone except properly qualified service perxonnel.
Specifications
| Model: | ML-EM45P(BS) |
| Rated Voltage: | 120V— 60Hz |
| Rated Input Power(Microwave): | 1600W |
| Rated Output Power(Microwave): | 1200W |
| Oven Capacity: | 45L |
| Turntable Diameter: | 0 13.58inch |
| External Dimensions: | 21.77X17.9 1X12.87inch |
| Net Weight | Approx. 36.6 lbs |
IMPORTANT SAFETY INSTRUCTIONS WARNING
When using electrical appliances basic safety precautions should be followed, including the following:
WARNING – To reduce the risk of burns, electric shock, fire, injury to persons or exposure to excessive microwave energy:
- Read all instructions before using the appliance.
- Read and follow the specific:”PRECAUTIONS TO AVOID POSSIBLE EXPOSURE TO EXCESSIVE MICROWAVE ENERGY” found on page 2.
- This appliance must be grounded. Connect only to properly grounded outlet. See “GROUNDING INSTRUCTIONS” found on page 4.
- Install or locate this appliance only in accordance with the provided installation instructions.
- Some products such as whole eggs and sealed containers – for example, closed glass jars – are able to explode and should not be heated in this oven.
- Use this appliance only for its intended use as described in the manual. Do not use corrosive chemicals or vapors in this appliance. This type of
oven is specifically designed to heat, cook or dry food. It is not designed for industrial or laboratory use. - As with any appliance, close supervision is necessary when used by children.
- Do not operate this appliance if it has a damaged cord or plug, if it is not working properly, or if it has been damaged or dropped.
- This appliance should be serviced only by qualified service personnel. Contact nearest authorized service facility for examination, repair, or adjustment.
- Do not cover or block any openings on the appliance.
- Do not store this appliance outdoors. Do not use this product near water – for example, near a kitchen sink, in a wet basement, near a swimming pool, or similar location.
- Do not immerse cord or plug in water.
- Keep cord away from heated surface.
- Do not let cord hang over edge of table or counter.
- When cleaning surfaces of door and oven that comes together on closing the door, use only mild, nonabrasive soaps, or detergent applied with a sponge or soft cloth.
- . To reduce the risk of fire in the oven cavity:
1). Do not overcook food. Carefully attend appliance when paper, plastic, or other combustible materials are placed inside the oven to facilitate cooking.
2). Remove wire twist-ties from paper or plastic bag before placing bag in the oven.
3). If material inside of the oven ignite, keep the oven door closed, turn oven off, and disconnect the power cord, or shut off the power at the fuse or circuit breaker panel.
4). Do not use the cavity for storage purposes. Do not leave paper products, cooking utensils, or food in the cavity when not in use. - Liquids, such as water, coffee, or tea are able to be overheated beyond the boiling point without appearing to be boiling. Visible bubbling or boiling when the container is removed from the microwave oven is not always present.
THIS COULD RESULT IN VERY HOT LIQUID SUDDENLY BOILING OVER WHEN THE CONTAINER IS DISTURBED OR A UTENSIL IS INSERTED INTO THE LIQUID.
To reduce the risk of injury to persons:
1) Do not overheat the liquid.
2) Stir the liquid both before and halfway through heating it.
3) Do not use straight-sided containers with narrow necks.
4) After heating, allow the container to stand in the microwave oven for a short time before removing the container.
5) Use extreme care when inserting a spoon or other utensil into the container. - As with any appliance, close supervision is necessary when the microwave oven is used by children.
- If material inside of the oven should ignite, the oven door should be kept closed, the appliance turned off, the power cord disconnected, or the power shut off at the fuse or circuit breaker panel.
SAVE THESE INSTRUCTIONS
GROUNDING INSTRUCTIONS
This appliance must be grounded. In the event of an electrical short circuit, grounding reduces the risk of electric shock by providing an escape wire for the electric current. This appliance is equipped with a cord having a grounding wire with a grounding plug. The plug must be plugged into an outlet that is properly installed and grounded.
WARNING – Improper use of the grounding can result in a risk of electric shock. Consult a qualified electrician or serviceman if the grounding instructions are not completely understood, or if doubt exists as to whether the appliance is properly grounded. If it is necessary to use an extension cord, use only a 3wire extension cord that has a 3-blade grounded plug, and a 3-slot receptacle that will accept the plug on the appliance. The marked rating of the extension cord shall be equal to or greater than the electrical rating of the appliance.
DANGER – Electric Shock Hazard Touching some of the internal components can cause serious personal injury or death. Do not disassemble this appliance.
WARNING – Electric Shock Hazard Improper use of the grounding can result in electric shock. Do not plug into an outlet until the appliance is properly installed and grounded.
- A short power-supply cord is provided to reduce the risks resulting from becoming entangled in or tripping over a longer cord.
- Longer cord sets or extension cords are available and may be used if care is exercised in their use.
- If a long cord or extension cord is used:
1) The marked electrical rating of the cord set or extension cord should be at least as great as the electrical rating of the appliance.
2) The extension cord must be a grounding-type 3-wire cord.
3) The longer cord should be arranged so that it will not drape over the countertop or tabletop where it can be pulled on by children or tripped over unintentionally.
RADIO INTERFERENCE
- Operation of the microwave oven may cause interference to your radio, T V or similar equipment.
- When there is interference, it may be reduced or eliminated by taking the following measures:
1) Clean door and the sealing surface of the oven
2) Reorient the receiving antenna of radio or television.
3) Relocate the microwave oven with respect to the receiver.
4) Move the microwave oven away from the receiver.
5) Plug the microwave oven into a different outlet so that the microwave oven and receiver are on different branch circuits.
UTENSILS
CAUTION – Personal Injury Hazard
Tightly closed utensils could explode. Closed containers should be opened and plastic pouches should be pierced before cooking.
See the instructions on “Materials you can use in microwave oven or to be avoided in a microwave oven.”
There may be certain non-metallic utensils that are not safe to use for microwaving. If in doubt, you can test the utensil in question following the procedure below.
Utensil Test:
1. Fill a microwave-safe container with 1 cup of cold water (250ml) along with the utensil in question.
2. Cook on maximum power for 1 minute.
3. Carefully feel the utensil. If the empty utensil is warm, do not use it for microwave cooking.
4. Do not exceed 1 minute of cooking time.
MATERIALS YOU CAN USE IN MICROWAVE OVEN
| UTENSILS | REMARKS |
| Browning dish | Follow manufacturer* instructions. The bottom of the browning dish must be at least 3/16 inches (5mm) above the turntable. Incorrect usage may cause the turntable to break. |
| Dinnerware | Microwave-safe only. Follow manufacturer’s instructions. Do not use cracked or chipped dishes. |
| Glass jars | Always remove lid. Use only to heat food until just warm. Most glass jars are not heat resistant and may break. |
| Glassware | Heat-resistant oven glassware only. Make sure there is no metallic trim. Do not use cracked or chipped dishes. |
| Oven cooking bags | Follow manufacturer* instructions. Do not close with metal tie. Make slits to allow steam to escape. |
| Paper plates and cups | Use for short*erm cooking/warming only. Do not leave oven unattended while cooking. |
| Paper towels | Use to cover food for reheating and absorbing fat. Use with supervision for short-term cooking only. |
| Parchment paper | Use to cover food for reheating and absorbing fat. Use with supervision for short-term cooking only. |
| Plastic | Microwave-safe only. Follow the manufacturer* instructions. Should be labeled “Microwave Safe”. Some plastic containers soften, as the food inside gets hot. “Boiling bags” and tightly closed plastic bags should be slit, pierced or vented as directed by the package. |
| Plastic wrap | Microwave-safe only. Use to cover food during cooking to retain moisture. Do not allow plastic wrap to touch food. |
| Thermometers | Microwave-safe only (meat and candy thermometers). |
| Wax paper | Use as a cover to prevent splattering and retain moisture. |
| Aluminum tray | May cause arcing. Transfer food into microwave-safe dish. |
| Food carton with metal handle | May cause arcing. Transfer food into microwave-safe dish. |
| Metal or metal-trimmed utensils | Metal shields the food from microwave energy. Metal trim may cause arcing. |
| Metal twist ties | May cause arcing and could cause a re in the oven. |
| Paper bags | May cause a re in the oven. |
| Plastic foam | Plastic foam may melt or contaminate the liquid inside when exposed to high temperatures. |
| Wood | Wood will dry out when used in the microwave oven and may split or crack. |
SETTING UP YOUR OVEN
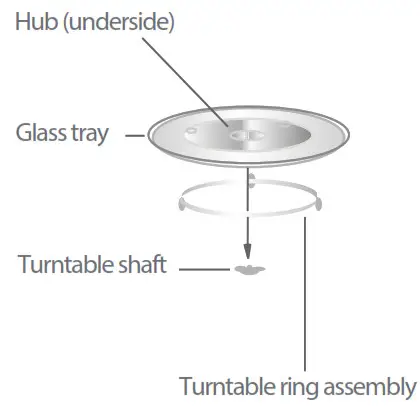
NAMES OF OVEN PARTS AND ACCESSORIES
Remove the oven and all materials from the carton and oven cavity.
Your oven comes with the following accessories:
| Glass tray 1 Turntable ring assembly 1 Instruction Manual 1 |

A) Control panel
B) Turntable shaft
C) Turntable ring assembly
D) Glass tray
E) Observation window
F) Door assembly
G) Safety interlock system
TURNTABLE INSTALLATION

a. Never place the glass tray upside down. The glass tray should never be restricted.
b. Both glass tray and turntable ring assembly must always be used during cooking.
c. All food and containers of food are always placed on the glass tray for cooking.
d. If glass tray or turntable ring assembly cracks or breaks, contact your nearest authorized service center.
SETTING UP YOUR OVEN
Remove all packing material and accessories. Examine the oven for any damage such as dents or broken doors. Do not install if oven is damaged.
Cabinet: Remove any protective film found on the microwave oven cabinet surface. Do not remove the light brown Mica cover that is attached to the oven cavity to protect the magnetron.
INSTALLATION
- Select a level surface that provides enough open space for the intake and/or outlet vents.
 A minimum clearance of 3.0 inches
(7.5cm) is required between the oven and any adjacent walls. One side must be open.
(1) Leave a minimum clearance of 12 inches (30cm) above the oven.
(2) Do not remove the legs from the bottom of the oven.
(3) Blocking the intake and/or outlet openings can damage the oven.
(4) Place the oven as far away from radios and TV as possible.
Operation of microwave oven may cause interference to your radio or TV reception. - Plug your oven into a standard household outlet. Be sure the voltage and the frequency is the same as the voltage and the frequency on the rating label. WARNING: Do not install oven over a range cooktop or other heat-producing appliance. If installed near or over a heat source, the oven could be damaged and the warranty would be void.
OPERATION
- Power Level
Ten power levels are available.Number key 0 9 8 7 6 5 4 3 2 1 Level 10 9 8 7 6 5 4 3 2 1 Power 100% 90% 80% 70% 60% 50% 40% 30% 20% 10% Display PL10 PL9 PL8 PL7 PL6 PL5 PL4 PL3 PL2 PL1 - Clock Setting
When the microwave oven is plugged into a outlet, the oven will display ” 0:00 ”
CLOCK “, the screen will display 00:00. The hour figure will flash;
1) Press ” “:” and other “0” will be lighted.
2) Press the number keys and enter the correct time. For example,time is 10:12 now, please press “1,0,1,2 ” in turn.
CLOCK” to finish clock setting. “:” will flash and the clock will be lighted.
3) Press ” CLOCK” to finish the clock setting. “:” will flash and the clock will be lighted.
4) If the numbers input are not within the range of 1:00–12:59, the setting will be invalid until valid numbers are input.
Note: In the process of clock setting, if the ” STOP/CANCEL ” button is pressed or if there is no operation within 1 minute, the oven will go back to the former state automatically. - Kitchen Timer “, the screen will display 00:00 .
1) Press “KITCHEN TIMER
2) Press the number keys and enter the correct timer.(The maximum time is 99 minutes and 99 seconds) START/30SEC. ” to confirm the setting .
3) Press “START/30SEC. the screen will display 00:00 .
4) When the kitchen time arrives, the buzzer will ring 5 times.
If the clock be set (12-hour system), the screen will display the current time by counting down.
Note 1)The kitchen time is differ from the 12-hour system, Kitchen Timer is a timer.
That is to say it possesses the function of the alarming clock.
2)During the timer process, any program cannot be set. Time cannot be increased by pressing the ” START/30SEC. ” key. - Microwave cook
1) Press “COOK TIME ” once, the screen will display “00:00″.
2) Press number keys to input the cooking time; the maximum cooking time is 99 minutes and 99 seconds.
POWER LEVEL ” once, the screen will display “PL10″. The default power is 100%
power. Now you can press number keys to adjust the power level.
3) Press ” START/30SEC. ” to start cooking.
4) Press ” Example: to cook the food with 50% microwave power for 15 minutes.
a. Press ” COOK TIME ” once.”00:00″ displays.
b.Press “1”,”5″,”0″,”0″ in order.
c.Press ” POWER LEVEL “once,then press “5” to select 50% microwave power.
d.Press ” START/30SEC. ” to start cooking.
Note: In the process of cooking, if the ” STOP/CANCEL ” button is pressed or if there is no operation within 1 minutes, the oven will go back to the former setting automatically. - Speedy Cooking
1) In waiting for state, instant cooking at 100% power level can be started by selecting a cooking time from 1 to 6 minutes by pressing number pads1 to 6.
2) In waiting for state, instant cooking at 100% power level with 30 seconds’ cooking time can be started by pressing ” START/30SEC “. Each press on the same button will increase cooking time by 30 seconds. the maximum cooking time is 99 minutes and 99 seconds.
Note:1) Under microwave and auto menu cooking states, press the ” START/30SEC ” button to increase cooking time by 30 seconds - lb Defrost Function
DEFROST “, the screen will display “1.0”.
1) Press ” 1 lb DEFROST “, the screen will display “1.0”.
2) Press ” START/30SEC. ” to start defrosting and the cooking time remained will be displayed. - Custom Defrost Function
1) Press ” AUTO DEFROST ” once, the screen will display “dEF1”. Press “AUTODEFROST ” repeatedly to choose “dEF1″,”dEF2” or “dEF3″
2) Press number button to set the weight of food.
3) Press ” START/30SEC. ” to start defrosting and the cooking time remained will be displayed. - Sensor Cook
1) In waiting state, put the food in the oven, press the menu key in the sensor cook.
2) Press ” START/30SEC .” to start the sensor cook function and no need to set a time.
3) When the steaming is emanated, the surplus time will display.
The buzzer will sound 5 beeps when finishing. At last, the oven will turn back to the waiting state.
Note:
1)When cooking or reheating food, you should do these in order to have the best efiect.
a.The room temperature cannot be over 35 degrees.
b.The weight of food must be more than 110g (4 Oz).
c.The cavity, glass tray and utensils must be kept drying before putting the food in.
d.The reheat food can be covered with the lid.But the lid must has vent hole in order to emanate the steam. Sealed utensil is forbidden.
2) During the cooking process, the following points must be done.
a.Keep the door close when the surplus time does not display or the buzzer does not sound twice.
b.When the buzzer sound twice, the time will count down and display the surplus time, you can open the door to mix the food up , turn over or replace the food. And then go on the next operation.
3) Please leave the food alone for a while after cooking has been finished.
4) During the sensor cooking process, if the time does not count down, please do not open the oven door or press the ” STOP/CANCEL ” key. Otherwise,the sensor will make mistakes.Menu button Food Food Code Weight/
PortionSensor Reheat Sensor Reheat SC-1 8.0-32.0 oz Frozen Pizza Frozen Pizza SC-2 6.0-12.0 oz Frozen Entrée Frozen Entrée SC-3 8.0-32.0 oz Potato Potato SC-4 1-4 potatoes
8.0 oz eachRic e Rice SC-S 8 .0 oz—16.0oz Vegetable Fresh
VegetableSC-6 4.0-16.0 oz Vegetable Frozen
VegetableSC-7 4.0-16.0 oz EXAMPLE: Sensor Reheat Menu, press “SENSOR REHEAT ”
1) In waiting states, put the food into the microwave oven “SC-1” is displayed.
2) Press “START/30SEC ” to start sensor reheat function and no need to set time.
3) The buzzer will sound 5 beeps when finishing. At last, the oven will turn back to the waiting state.
Note:1) Food to be avoided in sensor reheating.
a.Bread and other dry food, such as biscuits,cake.
b.For raw or uncooked foods.
c.Beverage and frozen food.
2)The oven cannot cook automatically when the temperature of the oven cavity is high.
3)The reheat food can be covered with the lid.But the lid must has vent hole in order to emanate the steam. Sealed utensil is forbidden.
4) During sensor cooking process, please do not open the oven door or press ” STOP/CANCEL ” key. Otherwise,the sensor will make mistakes.
5)The sensor reheat has different requests for different food.
Casseroles- Add to 4 tablespoons of water, cover with lid or vented plastic wrap. Stir when time appears in the display window. Canned foods-Empty contents into a casserole dish or serving bowl,cover dish with lid or vented plastic wrap. After reheating, let stand for a few minutes. A plate of food- Arranged food on plate; top with butter, gravy,etc. Cover with lid or vented plastic wrap. After reheating, let stand for a few minutes. Sensor Cook Chart . - POPCORN
1) In standby mode, press the Popcorn button and the display displays the default amount of popcorn.
For example, press ” POPCORN ” once, “3.5” displays.
2) Press ” START/30SEC. ” START” sign extinguished. - CUSTOM COOK
1) Press ” AUT0/COOK ” repeatedly until the menu you needed appears in t h e display.
2) After choosing the menu, press a number pad to select the weight or portion of the food.
3) Press ” START/30SEC. ” to cook .Food Display Weight/Portion Bacon CC 1 2-6 SLICES Frozen roll/Muffin-reheat CC-2 1-6 PIECES Beverage CC-3 1 CUP
2 CUPSChicken Pieces CC-4 0.5-2.0 LB Oatmeal
(with milk)CC5 20 Oz
40 Oz - SOFTEN/MELT
1) Press ” SOFTEN/MELT ” repeatedly until the menu you needed appears in the display.
2) After choosing the menu, press a number pad to select the weight or portion of the food.
3) Press “START/30SEC. ” to cook.
Auto Menu Chart:Food Display Weight/ Portion Melt-Butter/
MargarineS-1 1-3 ST1CHS Melt-Chocolate S-2 4 Oz 8 Oz
Melt-Cheese 5-3 8 Oz 16 Oz
Melt-Marshmallows S-4 S Oz 10 Oz
Soften-Butter S-S 1-3 S1CHS Soften-Ice cream/
Frozen juiceS-6 11 Oz
18 OzSoften-Cream cheese S-7 3 Oz
8 Oz - MEMORY FUNCTION
START/30SEC. ” to use it. If not, continue to set
1)Press “MEMORY” to choose the memory 1-3 procedure. 1,2,3 will display.
2)If the procedure has been set, press ”
the procedure. Only one or two microwave stages can be set.
3)After finishing the setting, press “MEMORY” to save the procedure and turn back to the waiting states.If press ” START/30SEC. ” ,it can save and operate the setting.
Example: save one program as memory 2. To cook the food with 80% microwave power for 3 minutes and 20 seconds. Operate the following steps:
a. In waiting states, press “MEMORY” twice, “2” displays.
b. Press “COOK TIME”,then input number keys “3”,”2″,”0″ to choose the cooking time.
c. Press “POWER LEVEL” once,then press the number button “8”, “PL8″ displays.
d. Press ” MEMORY ” to save the current setting. If press ” START/30SEC.”,the cooking program can be operated and save it as memory 2.
e. To run the saved program, in waiting states, press ” and press “START/30SEC.” to run the saved cooking program.
Note: Auto menu cannot be set as memory cooking. MEMORY ” twice, “2” displays - Multi-section cooking
At most 2 sections can be set for cooking. In multi-section cooking, if one section is defrosting, then defrosting shall be placed in the first section. When the first stage finish, the buzzer will sound once and the next stage will begin cooking. Example: if you want to cook with 80% microwave power for 5 minutes + 60% microwave power for 10 minutes. The cooking steps are as follows. COOK TIME” once, then press “5”,”0″,”0″ to set 5 minutes. POWER LEVEL” once.
1) Press “COOK TIME” once, then press “5”,”0″,”0″ to set 5 minutes.
2) Press “POWER LEVEL” once
3) Press number button “8” to set 80% microwave power.
4) Press “COOK TIME” once, then press “1”,”0″,”0″,”0″ to set 10 minutes.
5) Press “POWER L EVEL ” once.
6) Then press number button “6” to set 60% microwave power .
COOK TIME” once, then press “1”,”0″,”0″,”0″ to set 10 minutes.
POWER L EVEL ” once. START/30SEC. ” to start cooking.
Note: auto menu cannot be set as one of the multi-section.
7) Press ” START/30SEC. ” to start cooking. - INQUIRING FUNCTION
1) If the clock has been set, in cooking state, press ” CLOCK”, the clock will displays for three seconds. After that, the oven will turn back to the clock state.
2) In the microwave cooking state, press ” POWER LEVEL” to inquire microwave power level the current microwave power will be displayed. After three seconds, the oven will turn back to its previous state. - LOCK FUNCTION FOR CHILDREN
Lock: In the waiting state, press ” STOP/CANCEL” for 3 seconds, there will be a long “beep” denoting the entering into the children-lock state; If the clock has been set, the current time will display .
Lock quitting: In locked state, press ” STOP/CANCEL” for 3 seconds, there will be a long “beep” denoting that lock is released. - COOKING END REMINDING FUNCTION
When the cooking is over, the screen will display “End” to reminds the user the cooking is finished. In order to make the appliance into the normal operating state, please press ” STOP / CANCEL ” or open the door . - OTHER SPECIFICATIONS
1) ” START/30SEC. ” must be pressed to continue cooking if the door is opened during cooking;
2) The buzzer sounds once by eficient press, ineficient press will be no responce. - TURNTABLE RESET FUNCTION
When cooking is finished, if the turntable is not at the initial position, it will enter the turntable reset function. At this time, the lamp, fan and turntable are working, ”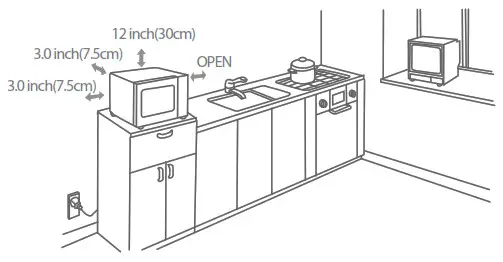 ” will dynamic display. After the turntable has reset, the oven stops cooking and reminds cooking is finished.
(1) This function only works for one completed cooking. If pause or open the oven door during cooking, the current cooking cannot enter the turntable reset function.
(2) In waiting for state, press number key “5” for 3 seconds, there will be a long “beep” and the turntable reset function is turned off. To turn on the turntable reset unction, in waiting for state press number key “5” for 3 seconds, there will be a long “beep” denoting that the turntable reset function is released.
Note 1) Under the reset state, opening the door or “ STOP/Cancel ” button is pressed, the oven will go back to waiting state.
2) The function will be reserved after power loss - SCREEN-OUT FUNCTION
(1) In standby, click the key(less than 3 seconds, and lift the but- ton respond because to has already attached 3 seconds long “STOP/Cancel ”“STOP/Cancel ” pressing the child lock event, so you must click and lift to respond) into the black screen save electricity mode.
(2) Under the child lock, click the
key(less than 3 seconds, and lift).
“STOP/Cancel ”
(3) Other modes other than the above can not enter the power saving mode, and can not enter the black screen power saving mode under the opening state.
MAINTENANCE
TROUBLESHOOTING
Check your problem by using the chart below and try the solutions for each problem. If The microwave oven still does not work properly, contact the nearest authorized service center.
| TROUBLE | POSSIBLE CAUSE | POSSIBLE REMEDY |
| Oven will not start | a. Electrical cord for the oven is not plugged in. b. Door is open. c. Wrong operation is set. |
a. Plug into the outlet. b. Close the door and try again. c. Check instructions. |
| Arcing or sparking | a. Materials to be avoided in microwave oven were used. b. The oven is operated when empty. c. Spilled food remains in the cavity. |
a. Use microwave-safe cookware only. b. Do not operate with oven empty. c. Clean cavity with wet towel. |
| Unevenly cooked foods | a. Materials to be avoided in microwave oven were used. b. Food is not defrosted completely. c. Cooking time, power level does not suit ble. d. Food is not turned or stirred. |
a. Use microwave-safe
cookware only. b. Completely defrost food. c. Use correct cooking time, power level. d. Turn or stir food. |
| Overcooked foods | Cooking time, power level is not suitable. | Use correct cooking time, power level. |
| Undercooked foods | a. Materials to be avoided in microwave oven were used. b. Food is not defrosted completely. c. Oven ventilation ports are restricted. d. Cooking time, the power level is not suitable. |
a. Use microwave-safe cookware only. b. Completely defrost food. c. Check to see that oven ventilation ports are not restricted. d. Use the correct cooking time, power level. |
| Improper defrosting | a. Materials to be avoided in microwave oven were used. b. Cooking time, power level is not suitable. c. Food is not turned or stirred. |
a. Use microwave-safe cookware only. b. Use correct cooking time, power level. c. Turn or stir food. |
.![]() Customer Assistance: 855- -5313 204
Customer Assistance: 855- -5313 204
Midea America Corp
5 Sylvan Way, Parsippany, NJ 07054
TDDP5012ES2P Dehumidifier User Manual
Read This Manual
Inside you’ll find many helpful hints on how to use and maintain your dehumidifier properly. Just a little preventive care on your part can save you a great deal of time and money over the life of your dehumidifier. You’ll find many answers to common problems in the troubleshooting tips you should be able to fix most of them quickly before calling service. These instructions may not cover every possible condition of use, so common sense and attention to safety is required when installing, operating and maintaining this product.
![]() CAUTION
CAUTION
- Contact an authorized service technician for repair or maintenance of this unit.
- The unit is not intended for use by young children or persons with reduced physical, sensory or mental capabilities without supervision.
- Young children should be supervised to ensure that they do not play with the unit.
- If the power cord needs to be replaced, please contact our consumer service or an authorized technician.
- Electrical installation, if needed, must be performed in accordance to national regulation standards by qualified personnel only.
SAFETY PRECAUTIONS
To prevent injury to the user or other people and property damage, the following instructions must be followed. Incorrect operation due to ignoring of instructions may cause harm or damage. The level of risk is shown by the following indications.
![]() WARNING: This symbol indicates the possibility of death or serious injury.
WARNING: This symbol indicates the possibility of death or serious injury.
![]() CAUTION: This symbol indicates the possibility of injury or damage to property.
CAUTION: This symbol indicates the possibility of injury or damage to property.
![]() WARNING
WARNING
- Plug in power cord plug properly. Otherwise, it may cause electric shock or fire due to excess heat generation.
- Do not modify power cord length or share the outlet with other appliances as it may cause electric shock or fire due to overheating.
- Always ensure effective grounding. Incorrect grounding may cause electric shock.
- Unplug the unit if you notice unusual sounds or smells, or smoke comes from it. A damaged product may cause fire and electric shock.
- Ventilate room before operating the unit if there is a gas leak from other appliances.
- Do not operate or stop the unit by inserting or pulling out the power cord plug. It may cause electric shock.
- Do not allow water to come into contact with any electric parts. It may cause failure or electric shock.
- Do not use the wall outlet if it is loose or damaged. It may cause fire and electric shock.
- Do not use or keep the power cord close to heating appliances or heat sources such as fireplaces. It may cause fire and electric shock.
- Do not disassemble or modify unit. It may cause failure and electric shock.
- Do not damage or use an alternate power cord. It may cause fire and electric shock.
- If the power cord is damaged, it must be replaced by the manufacturer or an authorized service center or a similarly qualified person in order to avoid electrical risk.
- Do not use the unit near flammable gas or combustibles, such as gasoline, benzene, thinner, etc. It may cause fire.
- Before cleaning, turn off the power and unplug the unit.
- Do not take the water bucket out during operation, the bucket full protection may be activated and risk electric shock.
![]() CAUTION
CAUTION
- Do not use the unit in small spaces. Lack of ventilation can cause overheating and fire.
- Do not use in places where water may splash onto the unit. Water may enter the unit and degrade the insulation. It may cause an electric shock or fire.
- Place the unit on a level, sturdy section of the floor. If the unit falls over, it may cause water to spill and damage belongings, or cause electrical shock or fire.
- Never insert your finger or other foreign objects into grills or openings. Take special care to warn children of these dangers. It may cause failure or electric shock.
- Do not climb up on or sit on the unit. You may be injured if you fall or if the unit falls over.
- Always insert the filters securely, and take caution to avoid injuries to hand and fingers. Clean filter once every two weeks.
- If water enters the unit, turn the unit off and disconnect the power, contact a qualified service technician.
- Do not place flower vases or other water containers on top of the unit. Water may spill inside the unit, causing insulation failure and electrical shock or fire.
- If the unit is knocked over during use, turn off the unit and unplug it from the main power supply immediately. Visually inspect the unit to ensure there is no damage. If you suspect the unit has been damaged, contact a customer service or a qualified technician.
- In a thunderstorm, the power must be cut off to avoid damage to the unit due to lightning.
- Do not run cord under carpeting. Do not cover cord with throw rugs, runners, or similar coverings. Do not route cord under furniture or appliances. Arrange cord away from traffic area and where it will not be tripped over.
![]() WARNING – Electrical Information
WARNING – Electrical Information
- The manufacturer’s nameplate is located on the rear panel of the unit and contains electrical and other technical data specific to this unit.
- Be sure the unit is properly grounded. To minimize shock and fire hazards, proper grounding is important. The power cord is equipped with a three-prong grounding plug for protection against shock hazards.
- Your unit must be used in a properly grounded wall receptacle. If the wall receptacle you intend to use is not adequately grounded or protected by a time delay fuse or circuit breaker, have a qualified electrician install the proper receptacle.
- Ensure the receptacle is accessible after the unit installation.
- Do not use extension cords or an adapter plugs with this unit. However, if it is necessary to use an extension cord, use an approved “dehumidifier” extension cord only (available at most local hardware stores).
- To avoid the possibility of personal injury, always disconnect the the unit from power supply, before installing and/or servicing.
![]() WARNING – For your safety
WARNING – For your safety
- Do not store or use gasoline or other flammable vapors and liquids in the vicinity of this or any other appliance.
- Avoid fire hazard or electric shock. Do not use an extension cord or an adaptor plug. Do not remove any prong from the power cord.
OPERATING INSTRUCTIONS

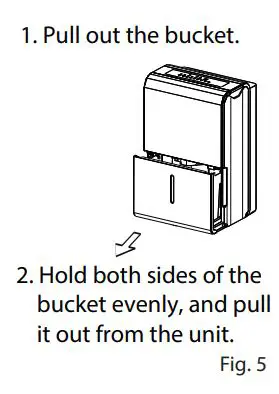
Accessories
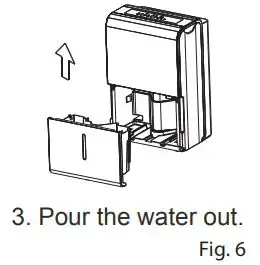
![]() CAUTION
CAUTION
Clean your unit occasionally to keep it looking new. Be sure to unplug the unit before cleaning to prevent shock or re hazards.
Key Pad Features
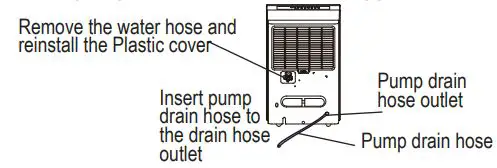
![]() NOTE
NOTE
The appearance of the control panel may vary slightly by model.
Control Pads
When you push the button to change operation modes, the unit will make a beep sound to indicate that it is changing modes.
PUMP Button(Pump models only)
Press to activate the pump operation.
NOTE: Make sure the pump drain hose is installed into the unit and the continuous drain hose is removed from the unit before the pump operation is activated. When the bucket is full, the pump starts to work. Refer to the next pages for removing the collected water. Do not use this operation when the outdoor temperature is equal to or less than 0ºC (32ºF).
![]() NOTE
NOTE
When COMFORT function is turned on, set humidity level is automatic and cannot be changed manually.
COMFORT Button
Press to activate the comfort dehumidifying operation.
FILTER Button
This feature is a reminder to clean the Air Filter for more efficient operation. The LED (light) will flash after 250 hours of fan motor operation. To reset after cleaning the filter, press the Filter button and the light will go off .equal to or less than 0ºC (32ºF).
CONT (continuous) Button
Press to activate the continuous dehumidifying operation.
![]() NOTE
NOTE
When CONTINUOUS function is turned on, set humidity level is automatic and cannot be changed manually.
TURBO Button
Control the Turbo speed. Press to select either Turbo or normal fan speed. Set the Turbo control to high for maximum moisture removal. When room humidity is at your preferred level, it is advised to turn off Turbo speed.
TIMER Button
Starts the Timer ON and Timer OFF function setting.
Up/Down Buttons (◀/▶ )
- Humidity Set Control Buttons The humidity level can be set within a range of 35% RH (Relative Humidity) to 85% RH (Relative Humidity) in 5% increments. For drier air, press the◀ button and set to a lower value (%). For damper air, press the ▶ button and set a higher value (%).
- TIMER Set Control Buttons Use the ◀and▶ key buttons to set the Timer ON or Timer OFF from 0 to 24 hours.
POWER Button
Press to turn the dehumidifier on and off.
LED Display
Shows the set % humidity level from 35% to 85% or auto start/stop time (0 ~ 24) while setting, then shows the actual (+/- 5% accuracy) room % humidity level in a range of 30% RH (Relative Humidity) to 90% RH (Relative Humidity).
Error Codes and Protection Code:
AS – Humidity sensor error – Unplug the unit and plug it back in. If error persists, contact Customer Service.
ES – Tube Temperature sensor of the evaporator error – Unplug the unit and plug it back in. If error persists, contact Customer Service.
P2 – Bucket is full or bucket is not in right position – Empty the bucket and replace it in the right position. (only available for the unit with no pump feature.)
Eb – Bucket is removed or not in right position Replace the bucket in the right position. (only available for the unit with pump feature.)
Other Features
Bucket Full Light
Lights up when the bucket is ready to be emptied.
Auto Shut Off
The dehumidifier shuts off when the bucket is full, or when the bucket is removed or not replaced in the proper position. When the setting humidity is reached, the compressor will be shut off automatically. The fan motor will continue operating additional 3 minutes.
Auto Defrost
When frost builds up on the evaporator coils, the compressor will cycle off and Auto Defrost function will run automatically. Wait 3 minutes before resuming operation After the unit has stopped, it can not be restarted in the first 3 minutes to protect compressor operation. The unit will restart automatically after 3 minutes.
Auto-Restart
If the unit stops unexpectedly due to a power cut, it will restart with the previous function setting automatically when the power resumes.
Setting the Timer ON and Timer OFF
- When the unit is on, first press the Timer button, the Timer OFF indicator light illuminates. It indicates the Timer OFF program is initiated. Press it again the Timer ON indicator light illuminates. It indicates the Timer ON is initiated.
- When the unit is off , first press the Timer button, the Timer ON indicator light illuminates. It indicates the Timer ON program is initiated. Press it again the Timer OFF indicator light illuminates. It indicates the Timer OFF is initiated.
- Press or hold the ◀and▶ key buttons to change the Timer by 0.5 hour increments, up to 10 hours, then at 1 hour increments up to 24 hours. The control will count down the time remaining until start.
- The selected time will register in 5 seconds and the system will automatically revert back to display the previous humidity setting.
- When the Timer ON and Timer OFF times are set, within the same program sequence, indicator lights illuminate identifying both ON and OFF times are now programmed.
- Turning the unit ON or OFF at any time or adjusting the timer setting to 0.0 will cancel the Timer function.
- When LED display window displays the code of P2, the Auto Start/Stop function will also be cancelled
![]() NOTES
NOTES
- When first using the dehumidifier, operate the unit continuously 24 hours. Make sure the plastic cover on the continuous drain hose outlet install slightly properly so there are no leaks.
- This unit is designed to operate with a working environment between 5°C/41°F and 32°C/90°F.
- Make sure the water bucket is positioned correctly so that the unit can operate properly. When the water in the bucket reaches to a certain level, please be careful to move the unit to avoid it spill.
Removing Collected Water
There are two ways to remove collected water:
1. Use the bucket
- When the unit is off, if the bucket is full, the Full indicator light will light.
- When the unit is on, if the bucket is full, the compressor and the fan turn off, and the Full indicator light will light, the digital display shows P2.
- Slowly pull out the bucket. Grip the left and right handles securely, and carefully pull out straight so water does not spill. Do not put the bucket on the as because the bottom of the bucket is uneven. Otherwise water may be spilled.
- Throw away the water and reposition the bucket.
- The unit will restart operation when the bucket back in place.

![]() NOTES
NOTES
- When you remove the bucket, do not touch any parts inside the unit. Doing so may damage the product.
- Be sure to push the bucket gently all the way into the unit.
- When the unit is on, if the bucket is removed, the compressor, then the unit will beep 8 times and the digital display shows Eb.
- When the unit is off, if the bucket is removed, the unit will beep 8 times and the digital display shows Eb.
2. Continuous draining
![]() NOTE
NOTE
When the continuous draining feature is not being used, remove the drain hose from the outlet, and dry the water in the continuous drain hose outlet.
3. Pump draining (on some models)
Water can be automatically emptied into a floor drain or a suitable drainage facility by attaching the pump drain out with a pump drain hose (od=1/4″ , supplied).
NOTE: The pump may cause big noise when it starts to work for 3~5 minutes. It is a normal phenomenon. NOTE: The pump operation on light blinks at 1Hz when the pump is operational failure. Please turn off the unit and plug the power cord out. Check the following things: Cleaning the filter of the pump.
-Remove the bucket from the unit, take down the pump and clean the filter of the pump.
-Check that the pump drain hose does not link or block.
-Empty the water of the bucket.
-Reinstall the pump hose if it drops and reinstall the bucket properly. Turn on the unit. If the error repeats, call for service.

NOTE:
-Make sure the connection is tight and there is no leak.
-Lead the water hose to the floor drain or a suitable drainage facility, the drainage facility and the water hose should be lower than the drain outlet of the unit. -Be sure to run the water hose sloping downward to let the water flow out smoothly. -When the continuous drain feature is not being used, remove the drain hose from the outlet.
![]() NOTE
NOTE
Do not use this operation when the outdoor temperature is equal to or less than 32°F (0°C), otherwise water may freeze causing blockages and the unit may cease to function properly. Make sure to empty the bucket at least once a week when using the pump draining feature. When the pump draining feature is not being used, remove the pump drain hose from the outlet. Press the pump drain hose outlet in and take the pump drain hose out from it . Make sure do not let the water in the pump hose drip to the floor.
INSTALLATION INSTRUCTIONS
Positioning the Unit
A dehumidifier operating in a basement will have little or no e ect in drying an adjacent enclosed storage area, such as a closet, unless there is adequate circulation of air in and out of the area. (See Fig. 9)
- Do not use outdoors.
- This dehumidifier is intended for indoor residential applications only. This dehumidifier should not be used for commercial or industrial applications.
- Place the dehumidifier on a smooth, level floor strong enough to support the unit with a full bucket of water.
- Allow at least 8 inches of air space on all sides of the unit for air circulation (at least 16 inches for air outlet).
- This unit is designed to operate with a working environment between 41°F (5°C) and 90°F (32°C), and between 30%(RH) and 80%(RH). The coils can become covered with frost at lower temperatures, which may reduce performance.
- Place the unit away from any clothes dryer, heater or radiator.
- Close all doors, windows and other outside openings to the room.

CARE AND CLEANING
Turn the dehumidifier off and disconnect the plug from the wall before cleaning.
1. Clean the Grill and Case
- Use water and a mild detergent. Do not use bleach or abrasives.
- Do not splash water directly onto the unit. Doing so may cause an electrical shock, cause the insulation to deteriorate, or cause the unit to rust.
- The air intake and outlet may get dirty during operation, use a vacuum cleaner or brush to clean.
2. Clean the bucket
Every few weeks, clean the bucket thoroughly to prevent growth of mold, mildew and bacteria. Partially fill the bucket with clean water and mild detergent. Swish it around in the bucket, empty and rinse.
![]() NOTE
NOTE
Do not use a dishwasher to clean the bucket.
3. Clean the air filter
- To remove the filter, pull filter outwards (See Fig. 10).
- Wash the filter with clean water then dry.
- Re-install the filter, replace bucket.
![]() CAUTION
CAUTION
DO NOT operate the dehumidifier without a filter to avoid loss of performance and damage to the unit.
4. When not using the unit for long time periods
- Before storing the unit, let it rest for one full day so that the system can dry out naturally.
- Clean the unit, water bucket and air filter.
- Wrap the cord with the power cord buckle.
- Cover the unit with a plastic bag.
- Store the unit upright in a dry, well-ventilated place.

TROUBLESHOOTING TIPS
Before calling for service, review this list. It may save you time and money. This list includes common occurrences that are not the result of defective workmanship or materials in this appliance.

]]>
Congratulations on the purchase of your Toshiba TV! Please use one of the following methods below to contact us:
The model and serial number of the TV is located on the back and/or on one side of the TV. We recommend that you record this if you ever need service.
| COUFltFg | Customer Care Center | Support Page | Register your TV |
U.S.A
|
https://www.toshibatv-usa.com/support
For software issues, contact Amazon Fire TV Customer Service: www.amazon.com/deviceservices/support |
https://www.toshibatv-usa.com/support/register/ |
|
Disclaimer: This Quick Setup Guide is intended as a general guideline to help you set up your TV. Images throughout this document are for illustrative purposes only and may differ from the actual product.
What’s in the box
Your Toshiba TV cornes with the following items:
- TV
- Quick Setup Guide (this document)
- Power cord
- 1 set of AAA batteries
- Remote control
- Important Safety Information and Warranty Card
- 2 base stands
- 4 screws
- 1 IR Blaster cable
- 1 RCA jack to AV Cable
IMPORTANT:
To prevent accidentally discarding items that came with your TV, be sure to check ALL of the foam in the carton box.
 Please Check foam for accessories before discarding.
You will also need the following items (which are not included) to set up your TV:
- Wireless router for Internet connectivity
- Phillips screwdriver to secure the TV stand
- HDMI and other types of cables to connect external devices to the TV
- Wall mount bracket and screws if you prefer to mount the TV on the wall
Getting started
Attach stand or mount
Before you start using your TV, attach your TV stand or mount it on the wall.
CAUTION:
- Disconnect the AC power cord before installing a stand or a wall mount bracket.
- The display on your TV is fragile. Make sure the TV screen is not scratched or damaged by hard objects or from pressure.
- After the installation is complete, make sure the TV is steady on a table or firmly attached to a wall mount, before removing all protective film, if any.
To attach the TV stand legs to your TV:
- Carefully place your TV face down on a clean, soft, flat surface.
- Insert the TV Base Stand into the bottom slots on your TV.
- Use the screws provided to secure each stand tightly.

Note: If your table is long enough to place the TV, then insert the legs into the screw holes ‘A’ that are shown in the illustration. If your table is not long enough, then insert the legs into the screw holes ‘B’ that are shown in the illustration. Note that these two installation methods types cannot be mixed.


NOTE:
- The TV is designed with two cable clamps(left and right). You can tidy your external cables conveniently.
- Please follow the direction of the arrow to slide the covers up, put wires in the cable clamps and slide the covers down to recover.
Before you begin the third-party manufacturer instructions, be sure to do the following things:
- Place the TV face down on a clean, safe and cushioned surface.
- Remove the TV stand if you have already attached it.
- Place spacers (not included) in the corresponding bracket holes.
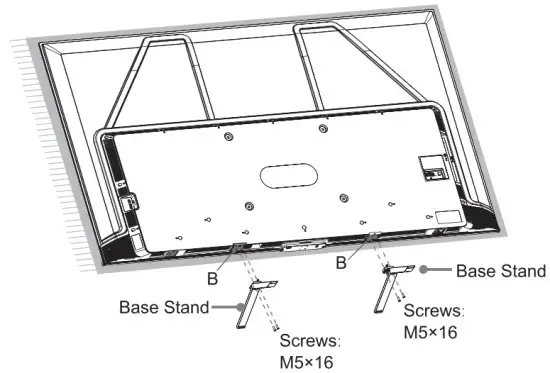
CAUTION:
- Follow instructions provided with the wall mount bracket. If it is not correctly mounted, the TV may fall and cause property damage or personal injury.
- When you attach the mount, be sure to use spacers (provided by the third-party manufacturer) between the TV and the bracket.
- To prevent internal damage to the TV and to ensure it is mounted securely, be sure to use fixing screws (not included) that are 9.5 – 11.5 mm (55″/65″) / 8.0 – 10.0 mm (75″) in length when measured from the attaching surface of the rear cover.
- The TV screen should be parallel with the vertical surface. Make sure the TV screen does not lean forward.

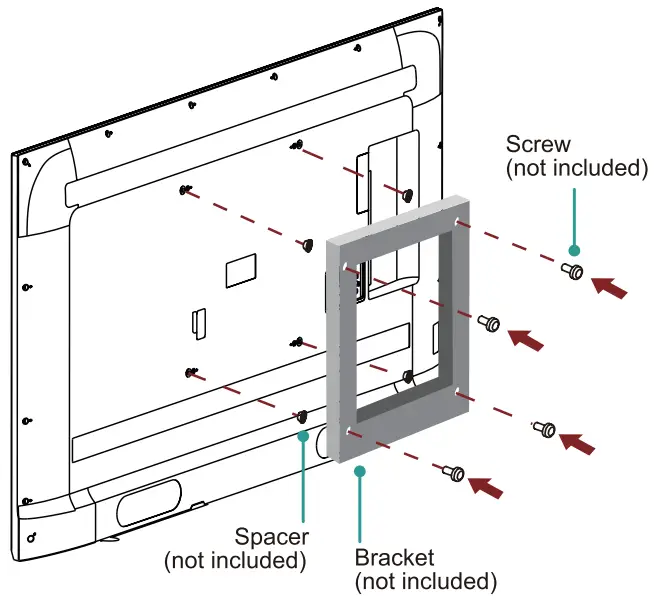
| Wall mount hole pattern(mm) | 300 200 (55″)
400 • 200 (65″) 400 300 (75″) |
| Wall mount screw size | M6 |
NOTE:
If you have additional questions, please contact the wall mount manufacturer or the retailer from which you purchased the TV.
The diameter and length of the screws differ depending on the wall mount bracket model.
Connect devices to your TV
Check to ensure that you have connected the right cables to the right ports securely.
Loose connections can affect the quality of the picture image and color.
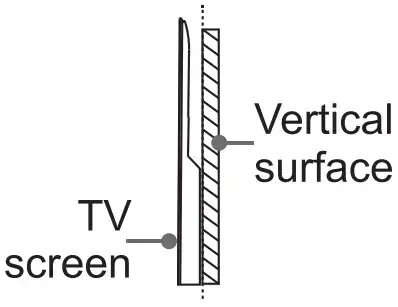
| TV label | Port | Cable | External Equipment | Brief Description |
| ANT/CABLE |  |
 |
 |
Connect an outdoor VHF/UHF antenna. |
| HDMI IN |  |
 |
 |
Connect a High Definition Multimedia Interface (HDMI) cable from an external device. |
| AV IN | 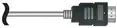 |
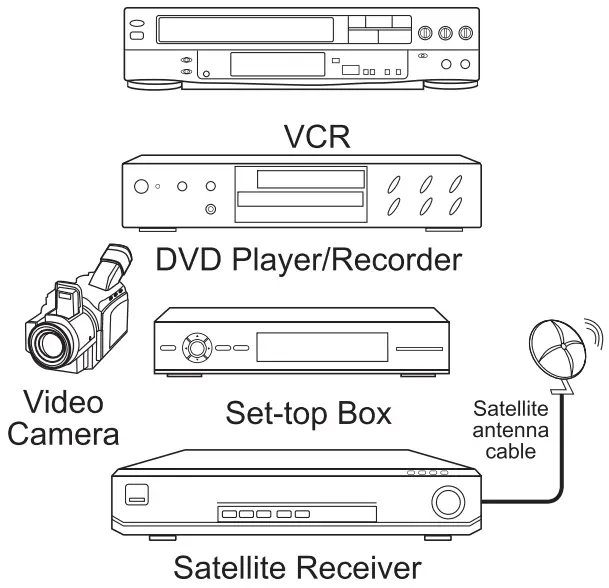 |
Connect a composite video cable and left-right audio cables from an external AV device. | |
| DIGITAL AUDIO OUT |  |
 |
 |
Connect an optical cable from an external digital audio system. |
| HEADPHONE |  |
 |
Connect headphones to hear audio from the TV. Headphones with microphones are not supported. | |
| USB |  |
 |
Connect a USB device for browsing photos, music and movies. Hard disks with a total current consumption or impulse current consumption greater than 500mA are not supported. | |
| LAN |  |
 |
 |
Connect an Ethernet cable to access a network or the Internet. The TV also has a wireless connectivity feature. |
| IR Blaster |  |
 |
Connect the IR Blaster cable to the IR Blaster port to control compatible soundbars and A/V receivers. | |
Get to know controls
Control on the TV


Introduction
This TV has microphones so you can use Alexa hands-free. Enjoy hands-free voice control of content, including search, play, pause, fast forward, and more. Now you can put down the remote and dive straight into your favorite movies and TV shows with just the sound of your voice. From across the room, say, “Alexa, play The Mandalorian on Disney+,” and Alexa will respond to your request. Switch inputs and go from watching your favorite TV show to the big game. You can also ask Alexa to check the weather, set timers and reminders, and more—even when the TV screen is off. Here are a few things that you can do with your Toshiba Fire TV:
Copyright statement
© 2021 Hisense Group All Rights Reserved.
Copyright protected material in this Quick Setup Guide may be owned by Hisense group, its contractors or other third parties. Unless otherwise stated, the exercise of any of the exclusive rights under the copyright laws in relation to the material on this site is not permitted without the consent of the rights owner or as otherwise covered by a statutory license.
No part of this publication may be stored, reproduced, transmitted or distributed, in whole or in part, in any manner, electronic or otherwise, whether or not for a charge or for other or no consideration, without the prior written permission of Hisense group.
Requests for permission to store, reproduce, transmit or distribute materials may be made to the following address:
USA:
Hisense USA Corporation
7310 McGinnis Ferry Road
Suwanee, GA 30024
Hisense USA hereby declares that we are the licensed entities of using, promoting, advertising “TOSHIBA” trademark in relation to licensed products via permitted method. In no event shall anyone be allowed to use, transfer, reproduce, distribute, or transmit in any manner any materials under “TOSHIBA” without written consent by us.
Disclaimer
Disclaimer: Subscriptions or other payments may be required to access content through some applications. Some or all of the included or downloaded application services in this Toshiba device may not function depending on the Internet connection, local limitations of included applications or other reasons outside of Hisense group’s control. Hisense group EXPRESSLY DISCLAIMS RESPONSIBILITY FOR ANY APPLICATION SERVICE FROM FUNCTIONING AT ANY TIME, FOR CONTENT IN ANY APPLICATION SERVICE, FOR DISRUPTIONS OF SERVICE, LOCAL OR REGIONAL LIMITATIONS, WARRANTIES OF TITLE, NO INFRINGEMENT, AND FOR IMPLIED WARRANTIES OF MERCHANTABILITY OR FITNESS FOR A PARTICULAR PURPOSE. By purchasing this device, you accept such Disclaimer without any claim on Hisense group at any time.
| To do this on your Toshiba Fire TV… | Say this… |
| Play a movie or TV show
Alex a can play content from a range of supported apps installed on your Fire TV. |
“Watch [title].”
“Play [title].” “Play [title] on [app].” |
| Change antenna channels
Your Toshiba Fire TV can switch to TV channels that are received by an antenna. |
“Stitch to [input type].”
“Tune to [channel number] on TV.” “Tune to [channel name] on TV.” |
| Live TV controls
For supported apps that feature Live TV access, you can use Alexa to change |
“GO to [channel/network] on [app].” “Watch [channel/network].”
Go to Channel Guide.” “Go to Live.” |
| Search for movies and TV shows
Alexa can find movies and TV shows from a range of supported installed apps. |
“Search for [title].” “Find [title/genre].”
“Show me [tv shows/movies] with [actor].” |
| Alexa requests
See the responses on Fire TV when you an Alexa request. make |
“Show me the weather.” “Show me my To Do List.” “Show me songs by [artist].”
“Show me restaurants nearby.” |
| Control your TV
Alexa can turn on your TV and dive straight into your favorite movies and TV shows with the sound of your voice. |
Alexa, turn on TV.”
“Alexa, increase the volume.” “Alexa, pause.” |
Alexa is designed to protect your privacy. For example, you can slide the Microphone switch on the bottom of the TV to turn off or on the microphones. When set to OFF, power will be disconnected from the microphones, you will see a red LED on the front of your TV, and the TV cannot record or stream audio requests to the cloud even if you say the wake word. If you have an Alexa-enabled remote control, you will still be able to use Alexa through the remote. Alexa doesn’t begin listening until your TV detects the wake word (for example, “Alexa”). A blue light lets you know when audio is being sent to Amazon’s secure cloud.
For best Alexa performance
- To ensure that Alexa can hear you, this TV should be unobstructed and not in a closed cabinet.
- Do not place a sound bar or other external speakers directly in front of or behind the TV. If you must place a sound bar or external speakers in front of or behind the TV, please leave 1 foot gap between them and the TV.
- Your TV speakers will cause vibration. Placing objects on or near the TV may cause those objects to vibrate which may affect how well Alexa can hear you.
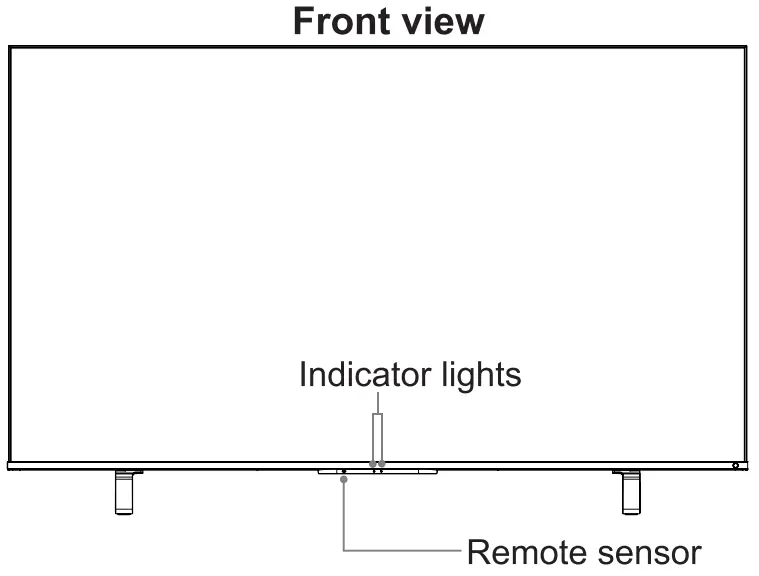
Get your remote ready
The following table shows the buttons on your remote control and describes what they are for.

- POWER: Turn your TV on or off
- Voice button: Hold down the Voice button to activate the microphone
- Select: Confirm a selection or action
- D-pad (up/down/left/right navigation buttons)
- Back: Return to the previous place in the menu or app
- REWIND: Rewind streaming video
- PLAY/PAUSE: Pause or resume playback. This button is also used to activate and use the Live TV pause feature
- VOLUME + / VOLUME -: Increase/decrease the volume
- Guide: Open the Live TV Channel Guide
- MUTE: Mute or un-mute the sound
- App buttons: Quick access buttons to apps
- Microphone: Receive the voice
- HOME: Display your TV’s Home screen
- MENU: The button for the Menu
- FAST FORWARD: Fast forward streaming video
- Channel A / Channel ‘ : Switch channel
- Quick Settings: Activate quick settings overlay
- Recent: Open a row of recently watched content so you can easily switch between content
NOTE:
The picture is only for reference. Check information according to the actual remote control.
Insert the batteries
Remove the battery door and insert the two AAA batteries into your Alexa Voice Remote.
Important information about the remote and batteries
- Discard batteries in a designated disposal area. Do not throw them into a fire.
- Remove old batteries immediately to prevent them from leaking into the battery compartment.
- If you do not intend to use the remote control for a long time, then remove the batteries.
- Battery chemicals can cause a rash. If the batteries leak, clean the battery compartment with a cloth. If chemicals touch your skin then wash it immediately.
- Do not mix old and new batteries.
- Only use new 1.5v alkaline or 1.2NiMH rechargeable AAA sized batteries. Do not mix alkaline or rechargeable NiMH batteries.
- Do not continue using the remote if it gets warm or hot.
- Call our Support Center immediately on the support website.
Using your cable set-top box or satellite receiver remote as a ‘universal’ remote
If you prefer to use your Cable Set-top Box or Satellite Receiver Remote as a ‘universal’ remote, then visit the Support page to view a list of the codes.
Power on the TV
Connect your power cord to the TV and plug it into a power outlet.
Your TV will display a launch screen showing the Toshiba logo.

Complete the first-time setup
The first time you turn on your TV, there is a guided setup to make it easy to connect your TV to the Internet and complete the setup of your TV.
Your TV will automatically pair with your new Alexa Voice Remote.
- If there are issues with the remote pairing, you will be prompted to pair your remote by pressing the HOME button. If you continue to have issues, try reinserting or replacing your batteries.
- Select your Wi-Fi network from the list of Wi-Fi networks displayed on the screen.
NOTE:
If your Wi-Fi network is password protected, please have your Wi-Fi network password handy to connect your TV to the Internet. If your network is hidden, select the Join Other Network. If required, enter your network password using the onscreen keyboard.
Enjoy your TV!
Now that you’ve completed the first-time setup, your Home screen is your starting point for using your TV. Your Toshiba TV provides a variety of entertainment options, so you’ll always find something new. Use your TV to watch live channels, access video on demand to watch movies, and much more.
Troubleshooting
If you are having trouble with your TV, first try turning it off and on again. If this does not fix the problem, check the tips in the following table. If your problem is not listed in the following table, then contact us at one of the phone numbers on Page 2.
| Issues | Possible solutions |
| No sound or picture |
|
| I have connected an external source to my TV and I get no picture and/or sound. |
|
| When I turn on my TV, there is a delay for a few seconds before the picture appears. Is this normal? |
|
| The picture is normal but there is no sound |
|
| Sound but no picture or black and white picture |
|
| The sound and/or picture is distorted or appears wavy |
|
| The sound and picture is blurry or cuts out |
|
| A horizontal or vertical stripe appears on the picture and/or the picture is shaking |
|
| The plastic cabinet makes a “clicking” type of sound |
This is normal and the TV is OK. |
| The remote control does not work |
|
Product Specifications
| Model Name | SSMSSOKU | 65M550KU | |
| Dimension (W • H • D) | Without Stand | 48.5 28.1 • 3.0 inches
(1232 • 713 76 mm) |
57.0 • 33.0 • 3.0 inches
(1447 • 839 • 76 mm) |
| With Stand | 48.5 • 30.7 • 10.5 inches
(1232 • 781 • 267 mm) |
57.0 • 35.7 • 10.9 inches
(1447 • 906 • 277 mm) |
|
| Weight | Without Stand | 31.5 lbs (14.3 kg) | 41.2 lbs (18.7 kg) |
| With Stand | 32.4 lbs (14.7 kg) | 42.3 lbs (19.2 kg) | |
| TV Stand Width(W D) | 34.3 • 10.5 inches (872 • 267 mm) | 40.7 = 10.9 inches (1034 • 277 mm) | |
| Class | 55″ | 65″ | |
| Active Screen Size (Diagonal) | 54.6 inches | 64.5 inches | |
| Screen Resolution | 3840 • 2160 | ||
| Audio Power | 10 W + 10 W | ||
| Power consumption | 180 W | 190 W | |
| Power Supply | 120 V – 60 Hz | ||
| Connectivity | Built-in Wireless feature (2×2 dual band) | ||
| Ports | 4 HDMI ports, 1 USB port, 1 LAN port for Ethernet, 1 Digital Audio Output, 1 RF Input, 1 Headphone Audio Output, 1 AV IN port, 1 IR Blaster port | ||
| Receiving Channels | VHF: 2 – 13, UHF: 14 – 69, CATV: 1 – 125
Digital Terrestrial Broadcast (8VSB): 2 – 69 Digital cable (64/256 QAM): 1 – 135 |
||
| Tuner Type | Frequency synthesized | ||
| Receiving System | Analog: NTSC
Digital: ATSC/QAM |
||
| Operating Temperature | 41°F – 95°F (5°C – 35°C) | ||
| Operating Humidity | 20% to 80% non-condensing | ||
| Storage Temperature | 5°F to 113°F (-15°C to 45°C) | ||
| Storage Humidity | 10% to 70%, non-condensing | ||
Disclaimer: All products, product specifications, and data are subject to change without notice to improve reliability, function, design or otherwise.
| Model Name | 75M550KU | |
| Dimension (W • H • D) | Without Stand | 65.9 37.8 • 3.1 inches
(1675 • 960 78 mm) |
| With Stand | 65.9 • 40.7 • 14.4 inches
(1675 1035= 367 mm) |
|
| Weight | Without Stand | 61.5 lbs (27.9 kg)
63.1 lbs (28.6 kg) 23.2 • 14.4 / 45.5 =14.4 inches (590 • 367 / 1156 • 367 mm) 75″ 74.5 inches |
| With Stand | ||
| TV Stand Width(W D) | ||
| Class | ||
| Active Screen Size (Diagonal) | ||
| Screen Resolution | 3840 • 2160 | |
| Audio Power | 10 W + 10 W | |
| Power consumption | 280 W | |
| Power Supply | 120 V – 60 Hz | |
| Connectivity | Built-in Wireless feature (2×2 dual band) | |
| Ports | 4 HDMI ports, 1 USB port, 1 LAN port for Ethernet, 1 Digital Audio Output, 1 RF Input, 1 Headphone Audio Output, 1 AV IN port, 1 IR Blaster port | |
| Receiving Channels | VHF: 2 – 13, UHF: 14 – 69, CATV: 1 – 125
Digital Terrestrial Broadcast (8VSB): 2 – 69 Digital cable (64/256 QAM): 1 – 135 |
|
| Tuner Type | Frequency synthesized | |
| Receiving System | Analog: NTSC
Digital: ATSC/QAM |
|
| Operating Temperature | 41°F – 95°F (5°C – 35°C) | |
| Operating Humidity | 20% to 80% non-condensing | |
| Storage Temperature | 5°F to 113°F (-15°C to 45°C) | |
| Storage Humidity | 10% to 70%, non-condensing | |
Disclaimer: All products, product specifications, and data are subject to change without notice to improve reliability, function, design or otherwise.
Certification and Compliance
FCC Notice
This device has been tested and found to comply with the limits for a Class B digital device pursuant to Part 15 of the FCC Rules. These limits are designed to provide reasonable protection against harmful interference in a residential installation. This device generates, uses, and can radiate radio frequency energy and, if not installed and used in accordance with the instructions, may cause harmful interference to radio communications.
However, there is no guarantee that interference will not occur in a particular installation. If this device does cause harmful interference to radio or television reception, which can be determined by turning the device off and on, the user is encouraged to try to correct the interference by one or more of the following measures:
- Reorient or relocate the receiving antenna.
- Increase the separation between the device and receiver.
- Connect the device into an outlet on a circuit different from that to which the receiver is connected.
- Consult the dealer or an experienced radio/TV technician for help.
NOTE: The manufacturer is not responsible for any radio or TV interference caused by unauthorized modifications to this equipment. Such modifications could void the user’s authority to operate the equipment.
The Wi-Fi Module complies with FCC radiation exposure limits set forth for an uncontrolled environment. This device should be installed and operated with a minimum distance of 20 centimeters between the radiator and your body.
Declaration of Conformity
Trade Name: Toshiba
Model: SSMSSOKU / 65M550KU / 75M550KU
Responsible Party: Hisense USA Corporation
Address: 7310 McGinnis Ferry Road, Suwanee, GA 30024
Telephone Number: 678-318-9060
This device complies with Part 15 of the FCC Rules. Operation is subject to the following two conditions: (1) this device may not cause harmful interference, and (2) this device must accept any interference received, including interference that may cause undesired operation.
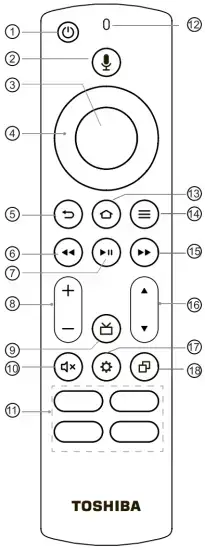
The terms HDMI and HDMI High-Definition Multimedia Interface, and the HDMI Logo are trademarks or registered trademarks of HDMI Licensing Administrator, Inc. in the United States and other countries.

Dolby, Dolby Vision, Dolby Audio, and the double-D symbol are trademarks of Dolby Laboratories Licensing Corporation. Manufactured under license from Dolby Laboratories. Confidential unpublished works. Copyright0 1992—2021 Dolby Laboratories. All rights reserved.

For DTS patents, see http://patents.dts.com. Manufactured under license from DTS Licensing Limited. DTS, DTS-HD Master Audio, DTS-HD, Virtual:X, and the DTS-HD logo are registered trademarks or trademarks of DTS, Inc. in the United States and other countries. 2020 DTS, Inc. ALL RIGHTS RESERVED.
NOTE:
This product does not support decoding of DTS CD bitstreams. Playback of this format may produce undesirable noise.
 This mark indicates that this product should not be disposed together with other domestic garbage, to avoid damage to the environment or human health due to the disposal of uncontrolled waste.
Recycle it responsibly for promoting the sustainable reuse of material resources. To return your used device, please use the return systems available in your location or contact the vendor where you purchased your product they could take this product for recycling and protection of the environment.
02021. All rights reserved.
Amazon, Fire, and all related marks are trademarks of Amazon.com, Inc. or its affiliates
AMAZON TERMS & POLICIES
Before using Fire TV Edition, please read the terms located at www.amazon.com/deviceservices/support. Please also read all terms and policies for services related to
Fire TV Edition, including but not limited to Amazon’s Privacy Notice located at www.amazon.com/privacy, Amazon’s Conditions of Use located at www.amazon.com/conditionsofuse, and any other terms or usage provisions available at www.amazon.com/deviceservices/support. All terms, rules, notices, policies, and provisions are, collectively, the “Agreements.” By using Fire TV Edition, you agree to be bound by the terms of the Agreements.
![]()
Introduction
Thank you for choosing our TOSHIBA Canvio Basics Hard Drive.
Please read this User’s Manual carefully, as it contains all relevant information for installation, usage and maintenance of the drive, as well as security and safety advice.
In case it does not behave as expected, please refer to the “Frequently Asked Questions” section at the end of this manual.
Check the Components
- Canvio Basics
- USB 3.0 Micro-B cable
- Support document
This User’s Manual is also available for download: www.toshiba-storage.com/downloads/
Please refer to “Instruction Manual for Safety and Comfort” that is preloaded on this external hard drive.
System Requirements
- Formatted NTFS for Windows 10 and Windows 8.1
- Requires reformatting for macOS v10.15 / v10.14 / v10.13
- One free port of USB 3.0 or USB 2.0
NOTE: USB 3.0 is backward compatible with USB 2.0.
Installing the drive
Some information about bus-powered operation and the supplied USB cable:
- Your drive is bus-powered. Therefore, there is no need to connect an external power supply as all needed current will be supplied by the connected USB port(s).
- Passive USB hubs or USB connectors like keyboards, mice or similar products cannot be used or connected to the drive.
- Make sure that the connectors will be inserted correctly.
- Never use pressure for connecting the cables. Check the polarity before connecting!
Connecting the drive to your computer
- Plug the USB 3.2 Gen 1 micro-B connector into the corresponding port of the drive itself.

NOTE: Requires USB Type-A port. - With your computer powered on and fully booted up, plug the USB Type-A connector into a USB Type-A port of your computer.
< Windows PC >
Immediately,
- the Power/Data indicator light will illuminate
- the drive will power up
- the drive should mount and a new drive icon should appear in “My Computer”
< Mac >
Immediately,
- the Power/Data indicator light will illuminate
- the drive will power up and is ready to use
Dismount and disconnect the drive
It is strongly recommended not to unplug the drive by just unplugging the cable connection as it may be that data is written to the drive at that time. Such data will be lost and the drive may be damaged physically!
Please follow the steps below for a safe dismount of the drive.
< Windows PC >
- Click the “Hardware and Eject Media – icon”.
A pop-up message box will appear listing the external devices connected to your computer. - Select the TOSHIBA drive to eject.
After a few seconds, you will get the notification that it is now safe to remove the device. - Click “OK” and you can unplug the drive now.
< Mac >
- Ctrl-click on the hard disk icon and choose “Eject”.
OR - Drag the hard disk icon to the trashcan.
- You can unplug the drive now.
Cleaning the drive case / enclosure
Before cleaning the drive, make sure that it’s physically disconnected from the computer. We suggest to use standard products for cleaning it and to make sure that possible remaining liquid on the surface will be wiped off.
Further Advise
For any further action of normal operation such as renaming the drive, backup data, or file management, we suggest to read your operation system user’s manual.
Also for maintenance tasks such as defragmenting and optimisation we suggest to refer to the operating system user’s manual.
We also strongly suggest having anti-virus software installed to protect your data against intended damage caused by virus or trojan programs.
Frequently Asked Questions
- Q: Do I need USB drivers for Windows?
A: No, they are already available with your operating system. - Q: Can I boot my system from the drive?
A: No, because Windows does not support booting from external hard drives. - Q: Why doesn’t the drive need a fan?
A: The drives are designed to have optimal heat dissipation, and therefore no fan is required. This results in a near silent operation. - Q: Why is the capacity of my drive (as shown in Windows) lower than the drives actual stated capacity?
A: This difference can be explained because of the different methods of calculating the capacity.
Hard drive manufacturers calculate on the decimal system, while the operating system calculates in the binary system.
Example decimal:
1TB = 1,000GB
1GB = 1,000MB = 1,000,000KB = 1,000,000,000 bytes
Example binary:
1GB = 1,024MB = 1,048,576KB = 1,073,741,824 bytes
As a result, a 1TB (decimal) hard disk appears in Windows to have just 931GB (binary). - Q: Can I use my drive to copy an operating system from one computer to another?
A: No, you must follow the operating system supplier instructions for installation. A simple copy does not work.
Troubleshooting
- My computer does not recognize the disk drive at all.
- Make sure all of your connections are secure.
- If your drive is connected via a USB hub, make sure that it has its own power supply.
- If using an add-on card, make sure it is working properly and update the software/firmware.
- Is it dangerous if the drive feels warm whilst in operation?
- A: This is normal, and therefore not dangerous.
- The drive gives me a “Device cannot start.”
- A: Two possible reasons. It is either a power problem and you should check the connections, or the drive has a malfunction and requires service.
- I cannot see my drive in “My Computer”, but it does appear in the Device Manager.
A: Follow these instructions:- Right-click “My Computer”.
- Select “Manage” in the pop-up menu.
- Select “Disk Management”.
You should see a list of available storage devices. - Check whether your drive is listed.
- Right-click the right hand box and select “Delete Partition” in the pop-up menu.
- Right-click the box and select “Create New Partition” in the pop-up menu.
- Then select “Primary Partition” in the partition wizard window. Click next.
- A drive letter will be displayed, which you can change. Click next.
- Confirm to format the drive.
NOTE: When you format the drive all the data on your drive will be deleted.
- As I try to format the drive, I receive the message “Could not complete format”.
A: This can be caused by formatting the drive with FAT file system. Try “NTFS” file system. This should solve the problem.
TOSHIBA Support
Need help?
Please contact TOSHIBA’s hard drive and storage products support page: www.toshiba-storage.com/support
For warranty claims, please check:
www.toshiba-storage.com/warranty-claims
Regulatory statements
CE Compliance
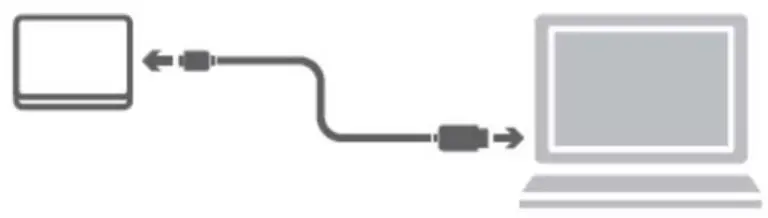 This product is CE marked in accordance with the requirements of the applicable EU Directives.
Responsible for CE marking is Toshiba Electronics Europe GmbH, Hansaallee 181, 40549 Düsseldorf, Germany.
UKCA compliance
 This product is UKCA marked in accordance with the requirements of the applicable UK Standards. Responsible for UKCA marking is Toshiba Electronics Europe GmbH-UK branch, 1 Princes Road, KT13 9TU Weybridge Surrey, UK.
Working Environment
The Electromagnetic Compliance (EMC) of this product has been verified typically for this product category for a so called Residential, Commercial & Light Industry Environment. Any other working environment has not been verified by Toshiba and the use of this product in these working environments is maybe restricted or cannot be recommended. Possible consequences of the use of this product in non verified working environments can be: Disturbances of other products or of this product in the nearby surrounding area with temporarily malfunction or data loss/ corruption as result. Example of non verified working environments and related advices:
- Industrial environment (e. g. where 3-phase 380V mains is being used mainly): Danger of disturbances of this product due to possible strong electromagnetic fields especially near to big machinery or power units.
- Medical environment: The compliance to the Medical Product Directive has not been verified by Toshiba, therefore this product cannot be used as a medical product without further verification. The use in usual office environments e.g. in hospitals should be no problem if there is no restriction by the responsible administration.
- Automotive environment: Please search the owner instructions of the related vehicle for advices regarding the use of this product (category).
- Aviation environment: Please follow the instructions of the flight personnel regarding restrictions of use.
Additional Environments not Related to EMC - Outdoor use: As a typical home/office equipment this product has no special resistance against ingress of moisture and is not strong shock proofed.
- Explosive atmosphere: The use of this product in such special working environment (Ex) is not allowed.
Following information is only valid for EU-member States:
REACH – Compliance Statement
Toshiba will meet all REACH (Registration, Evaluation, Authorization and Restriction of Chemicals) requirements and is committed to provide customers with information about the chemical substances in our products according to REACH regulation.
Disposal of products
 The use of the symbol indicates that this product may not be treated as household waste. By ensuring this product is disposed of correctly, you will help prevent potential negative consequences for the environment and human health, which could otherwise be caused by inappropriate waste handling of this product. For more detailed information about recycling of this product, please contact your local city office, your household waste disposal service or the shop where you purchased the product.
The following information is valid only for Turkey:
Compliant with AEEE Regulation.
Notices
©2021 TOSHIBA Electronics Europe GmbH. All rights reserved.
TOSHIBA reserves the right to make technical changes. TOSHIBA assumes no liability for damages incurred directly or indirectly from errors, omissions or discrepancies between this product and the documentation. The Toshiba name and its logos are registered trademarks of Toshiba.
macOS is a trademark of Apple Inc.
Other company names, product names, and service names may be trademarks of their respective companies.
Product specifications, configurations, colours, components and service are subject to change without notice.
One Gigabyte (GB) means one billion bytes and one Terabyte (TB) means one trillion bytes. Total available capacity will vary based on operating environment, and your results and storage capacity will vary accord-ingly.
A computer operating system, however, reports storage capacity using powers of 2 for the definition of 1TB = 240 = 1 099 511 627 776 bytes and therefore shows less storage capacity.
NOTE
- When using this product, use the provided USB cable to connect it directly to the USB port.
- If sufficient power is not supplied via the USB port, the product will not function.
- Depending on the specifications of the device you are connecting to, the transfer speed may be that of USB 2.0. For details, refer to the manual of the device you are connecting to.
- As a precaution against losing data stored on this product, be sure to regularly back up as much of your data as possible on another storage device.
Toshiba Electronics Europe GmbH
Hansaallee 181
40549 Düsseldorf, Germany
Further information
toshiba-storage.com
Copyright 2021 Toshiba Electronics Europe GmbH. Product specifications are all subject to change without notice. Product design specifications and colours are subject to change without notice and may vary from those shown. One billion bytes, accessible capacity may be less and actual capacity depends on the operating environment and formatting.
Errors and omissions excepted.
TY-SBX130B
Sound Bar
Operation Manual
Thank you for purchasing this product.
To use this product safely, read and understand this operation manual thoroughly before using it. After reading this manual, keep it in a safe place so that it can be used when necessary.
5020501
![]()
Safety precautions
The information you need to prevent danger to the user and other people, as well as property damage, is described below. “Description of signs” shows different categories of the degree of danger or damage that may occur due to wrong handling. “Description of symbols” shows the meaning of the symbols.
Important notes
- This book is only a guide for the user’s operation, not a criterion for configuration.
- Only use attachments/accessories specified by the manufacturer.
 |
The lightning flash is intended to alert the user to the presence of dangerous voltage within the product’s enclosure, and touching the internal components may result in a risk of electric shock to persons. |
 |
The exclamatory mark is intended to alert the user to the presence of important operating instructions. |
 |
To reduce the risk of electric shock or fire, do not open the cover. Refer servicing to qualified service personnel. |
Description of signs
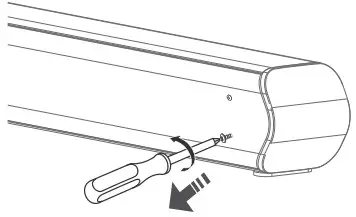 WARNING WARNING |
Indicates that there is a risk of death or serious injury. |
 CAUTION CAUTION |
This indicates that there is a risk of light injury or property damage. |
Description of symbols
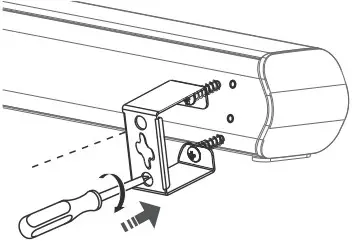 |
Indicates “Prohibition” or “You must not do” with pictures and text. |
 |
Indicates “Mandatory Action” or “Do as indicated” with pictures and text. |
What to do in the case of an abnormality
WARNING
| • Stop using the device immediately in case of an abnormality or failure. • Remove the USB cable immediately when water or any foreign object enters the interior of the device. It may cause a fire or electric shock. Remove the USB cable immediately, and contact your dealer for a repair. |
Usage
| WARNING |
|
| To reduce the risk of fire, electric shock, or product damage, • Do not disassemble, repair, or modify the unit. Refer servicing to qualified service personnel. • Do not step on, throw, or drop the battery or the power supply or unit, or expose them to a strong shock. • Do not throw the unit into the fire. The battery could explode causing injury or death. • Do not install this unit in a confined or built-in space such as a bookcase or similar unit, and keep well-ventilated conditions. The ventilation should not be impeded by covering the ventilation openings with items such as newspaper, tablecloths, curtains, etc. • Do not expose this unit to rain, moisture, dripping, or splashing. • Do not place objects filled with liquids, such as vases, on this unit. |
|
|
• Place the unit on a flat surface away from sources of direct sunlight or excessive heat. • The unit is not for use by children, and keep it out of reach of children. |
Battery
| WARNING |
|
|
DO NOT INGEST BATTERY, CHEMICAL BURN HAZARD • The remote control supplied with this product contains a coin/button cell battery. If the coin/button cell battery is swallowed, it can cause severe internal burns in just 2 hours and lead to death. Keep new and used batteries away from children. If the battery compartment does not close securely, stop using the product and keep it away from children. If you think batteries might have been swallowed or placed inside any part of the body, seek immediate medical attention. |
| • Danger of explosion if the battery is incorrectly replaced. • Replace only with the same or equivalent type. • The battery (batteries or battery pack) must not be exposed to excessive heat such as sunshine, fire, or the like. |
|
Important Safety Instructions
- Read these instructions – All the safety and operating instructions should be read before this product is operated.
- Keep these instructions – The safety and operating instructions should be retained for future reference.
- Heed all warnings – All warnings on the appliance and in the operating instructions should be adhered to.
- Follow all instructions – All operating and use instructions should be followed.
- Do not use this apparatus near water – The appliance should not be used near water or moisture – for example, in a wet basement or near a swimming pool and the like.
- Clean only with a dry cloth.
- Do not block any ventilation openings. Install in accordance with the manufacturer’s instructions.
- Do not install near any heat sources such as radiators, heaters, stoves, or other apparatus (including amplifiers) that produce heat.
- Do not defeat the safety purpose of the polarized or grounding-type plug. A polarized plug has two blades with one wider than the other. A grounding-type plug has two blades and a third grounding prong. The wide blade or the third prong is provided for your safety. If the provided plug does not fit into your outlet, consult an electrician for the replacement of the obsolete outlet.
- Protect the power cord from being walked on or pinched, particularly at plugs, convenience receptacles, and at the point where they exit from the apparatus.
- Only use attachments/accessories specified by the manufacturer.
- Use only with the cart, stand, tripod, bracket, or table specified by the manufacturer, or sold with the apparatus. When a cart or rack is used, use caution when moving the cart/apparatus combination to avoid injury from tip-over.
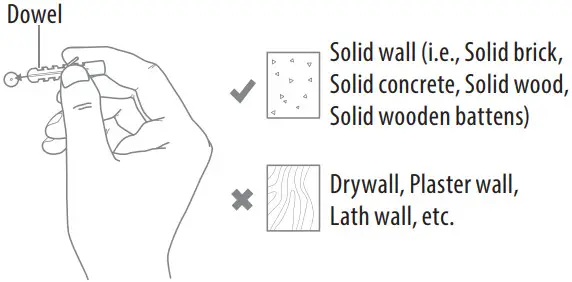
- Unplug the apparatus during lightning storms or when unused for long periods of time.
- Refer all servicing to qualified personnel. Servicing is required when the apparatus has been damaged in any way, such as power supply cord or plug is damaged, liquid has been spilled or objects have fallen into the apparatus, the unit has been exposed to rain or moisture, does not operate normally, or has been dropped.
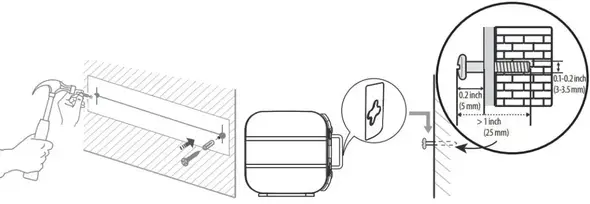 This equipment is a Class II or double insulated electrical appliance. It has been designed in such a way that it does not require a safe connection to electrical earth.
- The apparatus shall not be exposed to dripping or splashing. No objects filled with liquids, such as vases, shall be placed on the apparatus.
- The minimum distance around the apparatus for sufficient ventilation is 5 cm.
- The ventilation should not be impeded by covering the ventilation openings with items, such as newspapers, tablecloths, curtains, etc…
- No naked flame sources, such as lighted candles, should be placed on the apparatus.
- The mains plug/appliance coupler is used as the disconnect device, the disconnect device must remain readily operable.
- The rating label is pasted on the bottom or back of the equipment.
FCC Statement:
This device complies with Part 15 of the FCC Rules. Operation is subject to the following two conditions:
1) This device may not cause harmful interference, and 2) This device must accept any interference received, including interference that may cause undesired operation.
Note: This equipment has been tested and found to comply with the limits for a Class B digital device, pursuant to part 15 of the FCC Rules. These limits are designed to provide reasonable protection against harmful interference in a residential installation. This equipment generates, uses, and can radiate radio frequency energy and, if not installed and used in accordance with the instructions, may cause harmful interference to radio communication. However, there is no guarantee that interference will not occur in a particular installation. If this equipment does cause harmful interference to radio or television reception, which can be determined by turning the equipment off and on, the user is encouraged to try to correct the interference by one or more of the following measures:
• Reorient or relocate the receiving antenna.
• Increase the separation between the equipment and receiver.
• Connect the equipment into an outlet on a circuit different from that to which the receiver is connected.
• Consult the dealer or an experienced radio/TV technician for help.
IC-CANADA :
This device contains license-exempt transmitter(s)/receiver(s) that comply with Innovation, Science, and Economic Development Canada’s license-exempt RSS(s).
Operation is subject to the following two conditions:
(1) This device may not cause interference.
(2) This device must accept any interference, including interference that may cause undesired operation of the device.
FCC&IC-Caution:
- Changes or modifications not expressly approved by the party responsible for compliance could void the user’s authority to operate the equipment.
- This equipment complies with FCC and IC radiation exposure limits set forth for an uncontrolled environment. This equipment should be installed and operated with a minimum distance of 20cm between the radiator & your body.
California Prop 65 Warning:
This product can expose you to chemicals including Lead, which is known to the State of California to cause cancer.
For more information go to: www.P65Warnings.ca.gov.
Disclaimer
- Toshiba shall not be responsible for any damage caused by an earthquake, thunderstorm, flood damage, fire for which Toshiba is not responsible, acts of a third party, other accidents, or damages caused by the user’s willful acts or negligence, misuse, or use in abnormal conditions.
- Toshiba shall not be responsible for any damage caused by failure to observe the information described in the operation manual.
Disposal
- When disposing of this device, observe the laws, or ordinances, and rules of the local government.
- When disposing of the battery, make a request to a recycling agency for disposal.
About using Bluetooth®
This unit is designed for use with Bluetooth® wireless devices compatible with the HFP, HSP, A2DP, and AVRCP streaming audio profiles. Refer to your Bluetooth® device’s user manual or technical support to determine if your Bluetooth® device supports these profiles.
Frequency band used
This unit uses the 2.4 GHz, frequency band. However other wireless devices may use the 2.4 GHz frequency band as well and may cause interference with each other. To avoid interference, please refrain from the use of the unit at the same time as other wireless devices.
Certification of this device
This unit conforms to frequency restrictions and has received certification based on frequency laws, so a wireless permit is not necessary.
However, the following action is punishable by law in some countries:
- Taking apart/modifying the unit.
Usage restrictions
- Wireless transmission and/or use with all Bluetooth® equipped devices is not guaranteed.
- A device featuring the Bluetooth® function is required to conform to the Bluetooth® standard specified by Bluetooth SIG, and be authenticated. Even if the connected device conforms to the above-mentioned Bluetooth® standard, some devices may not be connected or work correctly, depending on the features or specifications of the device.
Range of use
Use this device within an unobstructed 10 m range. The range of use or perimeter may be shortened depending on any obstructions, devices causing interference, other people in the room, or the construction of the building. Please note that the range mentioned above is not guaranteed.
The Bluetooth® word mark and logos are owned by the Bluetooth SIG, Inc. and are used under license.
Note
- This unit may receive radio interference caused by mobile telephones during use. If such interference occurs, please increase the separation between this unit and the mobile telephone.
Placement and mounting
Wall mounting
Note
- Installation must be carried out by qualified personnel. Incorrect assembly can result in severe personal injury and property damage (if you intend to install this product yourself, you must check for installations such as electrical wiring and plumbing that may be buried inside the wall). It is the installer’s responsibility to verify that the wall will safely support the total load of the Main Unit and wall brackets.
- Additional tools (not included) are required for the installation.
- Do not overtighten screws.
- Keep this operation manual for future reference.
- Use an electronic stud finder to check the wall type before drilling and mounting.
- Remove the screws from the Main Unit.

- Attach the wall brackets to the Main Unit with the screws removed from the Main Unit.

- Drill 2 parallel holes (Ø 3 – 8 mm each according to wall type) in the wall.
The distance between the holes should be 760 mm.
- Firmly fix 1 dowel into each hole in the wall if necessary.

- Leave a 5 mm gap between the wall and the screw’s head. Lift the Main Unit with the attached wall brackets over the heads of the screws and slot into place.

Identifying the parts
Terminals of the Main Unit
| AC∼ | AC power plug | Connect an AC power cord. |
| AUX 1 | AUX socket | Connect to an external audio device. |
| OPTICAL | OPTICAL socket | Connect a digital optical cable. |
| SERVICE ONLY | SERVICE ONLY socket | The USB socket is for service only. It is not designed to charge smartphones, tablets, or similar devices. |
Indicators and buttons of the Main Unit
| LED indicators | Indicates the current mode. Indicator color: STANDBY: Red AUX: Green OPTICAL: Orange Bluetooth®: Blue |
|
 |
Power button | Switch the unit between ON and STANDBY mode. |
 |
Function button | Select a mode AUX, OPTICAL, or Bluetooth. |
EQ |
EQ button | Select a preset sound effect (NEWS, MOVIE, or MUSIC) |
VOL+/VOL- |
Volume +/- buttons | Increase/decrease the volume level. |
Remote control
 |
Power button | Switch the unit between ON and STANDBY mode. |
 |
MUTE button | Mute or resume the sound. |
 |
Function buttons | Select the play function. |
 |
Volume +/- buttons | Increase/decrease the volume level. |
 |
EQ buttons | Select a preset sound effect. |
 |
Play/Pause/Pairing button | Play/pause playback in Bluetooth® mode. Press and hold to activate the pairing function in Bluetooth® mode or disconnect the existing paired Bluetooth® device. |
 |
Fast forward/ backward buttons | Skip to the next/previous track in Bluetooth® mode. |
Information:
- Remove the protective tab to activate the remote control battery before use.
- Use a CR2025 lithium battery for the remote control. When replacing the battery, remove it and place a CR2025 lithium battery into the battery tray with correct polarity (+/-) as engraved on the remote control rear panel. There is a risk of injury due to fire, explosion, or leakage if the battery is not replaced, used, handled, or disposed of properly. Dispose of the used battery immediately as required by local regulations. Do not disassemble, charge, crush the battery or expose it to fire or high temperature.
Power supply
- Insert the supply plug of the attached AC power cord fully into the AC power plug on the back.
- Insert the power plug into an AC outlet.
Basic operation
Information:
- The operations of the buttons on the remote control are explained in this manual. Refer to “Identifying the parts” in “Indicators and buttons of the Main Unit”, regarding the operation buttons on the main unit.
Turning on/off the power
Press the  button.
When the power is on, the standby indicator (red) will go off and one of the function indicators will light up.
When the power is off, the standby indicator (red) will light up.
Information:
- Auto power off
When the unit has no input signal (or weak input signal) for over 30 minutes, it will automatically switch off.
Adjusting the volume
Press VOL +/VOL – button.
Press the MUTE button.
Select a mode
Press the Function button, or Press the AUX, OPTICAL, or BT (Bluetooth®) button to select the desired mode.
Select a preset sound effect
While playing, press the EQ button, or press the NEWS, MOVIE, or MUSIC button to select the desired sound effect.
AUX/OPTICAL operation
- Ensure that the unit is connected to the TV or audio device.
- Press the AUX or OPTICAL button to select the desired mode.
Note
- While the unit is in OPTICAL mode, if there is no sound output and the OPTICAL indicator on the unit flashes, you may need to activate PCM signal output on your source device (e.g. TV, DVD, or Blu-ray player).
Information:
- Operate your audio device directly for playback features.
Bluetooth® operation
Pairing:
- Press the BT button to select Bluetooth® mode.
The blue indicator will light flash. - The unit has entered pairing mode.
– Or press and hold the /PAIR button.
The blue indicator will flash rapidly and the unit has entered pairing mode. - Activate your Bluetooth® device and select the search mode.
“TY-SBX130B” will appear on your Bluetooth® device list. - Select “TY-SBX130B” in the pairing list.
After the “Pairing” voice prompt, the unit is successfully connected and the blue indicator will light up solidly.
Information:
- Enter “0000” for the password if necessary.
Playing Bluetooth® music:
- Pair your device with the unit.
- Play music via your device (by pressing the
 /PAIR,
  ,
,  or button).
Specifications
| Bluetooth® | |
| Bluetooth® spec. | Version 5.1 |
| Wireless equipment classification | Class 2 |
| Supported profile | A 2D P, AV R CP |
| Frequency range | 2.402 – 2.480 GHz (2.4 GHz ISM Segment) |
| Service distance | Up to 10 m |
| Main Unit | |
| Power supply | AC 100-240 V~ 50/60 Hz |
| Power consumption | 15 W |
| Output power | 13 W x 2 |
| Audio input sensitivity | 500 mV |
| Frequency response | 40 Hz – 20 kHz |
| Speaker impedance | 8 Ω x 2 |
| Dimension (W x H x D) | 800 x 60 x 63 mm |
| Weight | 1.3 kg |
| Accessories | |
| AC power cord x 1, Remote control x 1, 3.5 mm to 3.5 mm audio cable x 1, 3.5 mm – RCA audio cable x 1, Wall bracket x 2, Screw x 2, Dowel x 2, Operation manual x 1 | |
The specifications may be changed without prior notice to improve product performance.
The images included in this guide may differ from the actual image and may change without notice.
TOSHIBA LIFESTYLE ELECTRONICS TRADING CO., LTD
1-1-8, Sotokanda, Chiyoda-ku Tokyo 101-0021, Japan
SAFETY GUIDE
Please follow all the safety precautions listed below for safety and to reduce the risk of injury or electrical shock.
- Do not touch the body of the kettle when it is hot. Always hold the appliance by the handle when using it.
- Always ensure the lid is closed when in use. Failure to close the lid will prevent the thermostat from switching off and cause the kettle to boil dry.
- Keep the appliance well away from hot surfaces, and objects that can be damaged by heat.
- Ensure there is at least 20 cm space left to operate the kettle and that steam can escape safely. Never use the kettle under a cupboard or shelf where the steam may damage the surface.
- Avoid contact with the steam from the spout when the water is boiling or just after it has switched off.
- Be careful when opening the lid for re-filling when the kettle is hot.
- Ensure that the kettle cannot fall into water.
- Do not fill or pour water from the kettle while it is on the base.
- Disconnect the kettle at the mains supply before filling or emptying the jug, before cleaning any of its components, and when it is not in use.
- Do not immerse the connecting cord in water or other liquids.
- Do not allow liquids to come into contact with the body connector of the kettle, its base or the connecting cord.
- Do not let the connecting cord overhang the edge of the work surface or allow it to touch hot surfaces or sources of heat or flame.
- If any part of this appliance is damaged or malfunctions in any way, or the connecting cord or mains plug is broken, do not continue to use it. Seek expert assistance.
- “This appliance can only be used by children aged from 8 years and above and persons with reduced physical sensory or mental capabilities or lack of experience and knowledge if they have been given supervision or instruction concerning use of the appliance in a safe way and understand the hazards involved. Children shall not play with the appliance. Cleaning and user maintenance shall not be made by children unless they are older than 8 and supervised .
- Keep the appliance and its cord out of reach for children less than 8 years.
 WARNING: Some accessible surfaces may be hot during operation of this appliance
CAUTIONS
- Do not place the power base unit on a metal tray or metal surface when plugged into any power source.
- This appliance is for indoor domestic use only. Do not use it at outdoors.
- This kettle jug and power base form an integral appliance. Do not use other kettle jugs with this power base, or this kettle jug with other bases.
- The switch on this appliance must be readily operable at any times. Do not hinder its operation by incorrect placement or by placing obstacles that may restrict its free movement.
- This appliance is intended to be used in household and similar applications such as:
-Staff kitchen areas in shops, office and other working environments;
-farm houses;
-by clients in hotels, motels and other residential type environments;
-In bed and breakfast type environments. - If the supply cord is damaged, it must be replaced by the manufacturer, its service agentor similarly qualified persons in order to avoid a hazard.
- If the kettle is overfilled, boiling water may be ejected.
Warning: Misuse may cause potential injury.
ABOUT YOUR KETTLE
USING YOUR KETTLE
PRELIMINARIES
Unpack your kettle and any accessories carefully. Retain the packaging so that you can transport the appliance safely. If you dispose of it please do so with regard to any recycling regulations in your area.
Before using your kettle: Check that the voltage marked on the rating plate under the kettle or the base matches your mains voltage. Please read all the instructions in this User Guide with particular reference to the safety notes.
OPERATION
Separate the kettle from the base. Ensure that the mains socket is switched off at the wall. Lead the power cord out through the recess in the base. Place the kettle base on a stable level surface and connect the power cord to the wall socket. Excess cord may be safely stowed by feeding it carefully into the stowage compartment in the base. Ensure the power cable exits the cut out slot otherwise the kettle base will not be stable.
Pour away previously boiled water.
Push the lid release button to lift up the lid.
Fill the kettle with fresh water. The MIN and MAX marks are located on the water scale . The water level must always cover the MIN (0.5 litres) mark . Do NOT fill the kettle above the MAX mark (1.5litres) , or boiling water may be ejected.
Close the lid. Place the filled kettle correctly on the power base.
Boiling the Kettle
Switch on the power at the wall socket.
The kettle ON/OFF switch is located below the handle. Press the switch down to switch the kettle on.
The power switch will illuminate showing the kettle is in operation. When the water has reached the correct temperature, the power switch will switch off.
You can stop the boiling at any time by lifting the switch up. To re-boil, press the switch again. If the water is very hot, it may be necessary to wait until the switch resets.
Always ensure the lid is tightly fitted and never lift it while the kettle is boiling or you run the risk of scalding. If the lid is not correctly fitted while boiling, the automatic cut-out will not operate, you may boil the kettle dry and cause damage due to excessive steam emissions.
After boiling, switch off the appliance at the mains. The kettle now could be safely removed from its base and pour out the boiled water. Always pour boiling water slowly and carefully without tipping the kettle too quickly
Never leave hot water in the kettle while it is unattended.
After use, replace the kettle on its base.
Before first use or after storage:
Fill the kettle with fresh water. Boil the water. Pour away the boiled water. Repeat this two or three times. The kettle is now ready for use.
Boil Switch with Auto Shut-Out
When boiling water, do NOT hold the switch down or steam will be ejected from the lid and you may damage the automatic shut off mechanism. Always ensure that the ON/OFF switch is clear of obstructions, readily operable and is not prevented from switching off.
Boil Dry Protection
Your kettle is fitted with a safety device which switches it off if the appliance is operated with insufficient water. If this occurs, the kettle should be switched off at the mains and allowed to cool thoroughly before refilling with cold water. The safety device will then reset.
Overheating Shut -Off
In the status of gross overheating, your kettle will automatically shut down status to prevent further damage. Should this occur, take it to a qualified service person for examination and repair.
CLEANING
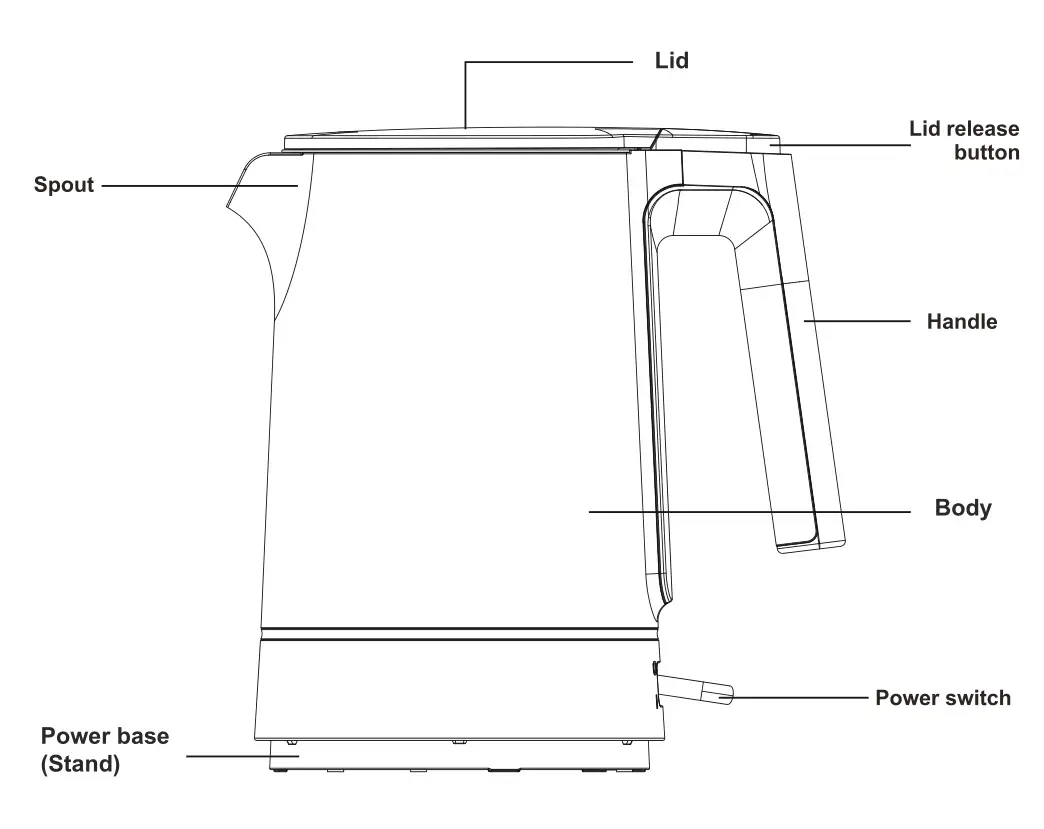
STORAGE
Excess cord can be stowed by feeding the cord into the storage cavity in the base of the unit. When the kettle is not in use, it should be stored on its base and out of the reach of children and pets.
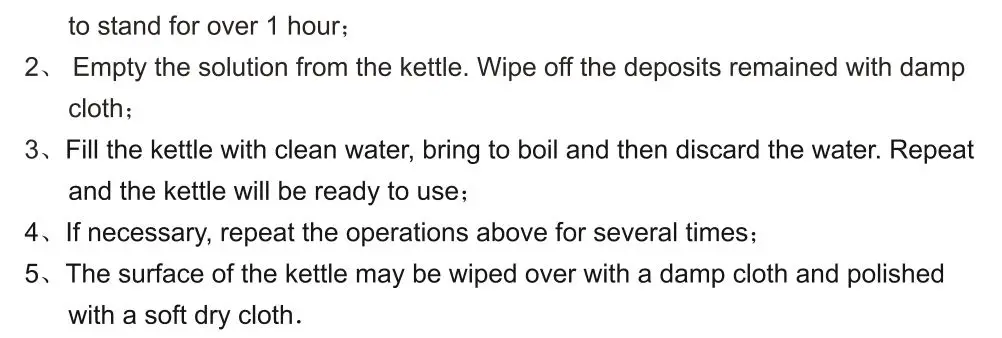
THIS APPLIANCE MUST BE EARTHED
THIS APPLIANCE MUST BE ATTENDED AT ALL
TIMES WHEN IN OPERATION
Instruction Manual

Model:
MW2-MM20PF(BK)
MW2-MM23PF(BK)
Read these instructions carefully before using your microwave oven, and keep it carefully.
If you follow the instructions, your oven will provide you with many years of good service.
SAVE THESE INSTRUCTIONS CAREFULLY
PRECAUTIONS
PRECAUTIONS TO AVOID POSSIBLE EXPOSURE TO EXCESSIVE MICROWAVE ENERGY
(a) Do not attempt to operate this oven with the door open since this can result in harmful exposure to microwave energy. It is important not to break or tamper with the safety interlocks.
(b) Do not place any object between the oven front face and the door or allow cleaner residue to accumulate on sealing surfaces.
(c) WARNING: If the door or door seals are damaged, the oven must not be operated until it has been repaired by a competent person.
ADDENDUM
If the apparatus is not maintained in a good state of cleanliness, its surface could be degraded and affect the life span of the apparatus and lead to a dangerous situation.
SPECIFICATIONS
| Model: | MW2-MM2OPF(BK) | MW2-MM23PF(BK) |
| Rated Voltage: | 230-240V-50Hz | 230-240V-50Hz |
| Power Consumption (Microwave): | 1200-1270W | 1200-1250W |
| Rated Output Power (Microwave): | 750-800W | 750-800W |
| Oven Capacity: | 20L | 23L |
| Turntable Diameter: | 0 255mm | 0 288mm |
| Outside Dimensions (W x D x H): | 440x357x259mm | 485x405x293mm |
| Net Weight: | Approx. 11.4 kg | Approx. 13.0 kg |
IMPORTANT SAFETY INSTRUCTIONS
WARNING
To reduce the risk of fire, electric shock, injury to persons or exposure to excessive microwave oven energy when using your appliance, follow basic precautions, including the following:
- Read and follow the specific: “PRECAUTIONS TO AVOID POSSIBLE EXPOSURE TO EXCESSIVE MICROWAVE ENERGY”.
- This appliance can be used by children and persons with reduced physical, sensory or mental capabilities or lack of experience and knowledge if they have been given supervision or instruction concerning use of the appliance in a safe way and understand the hazards involved. Children shall not play with the appliance. Cleaning and user maintenance shall not be made by children unless they are supervised.
- Keep the appliance and its cord away from children unless they are continuously supervised.
- If the supply cord is damaged, it must be replaced by the manufacturer, its service agent or similarly qualified persons in order to avoid a hazard.
- WARNING: Ensure that the appliance is switched off before replacing the lamp to avoid the possibility of electric shock.
- WARNING: It is hazardous for anyone other than a competent person to carry out any service or repair operation that involves the removal of a cover which gives protection against exposure to microwave energy.
- WARNING: Liquids and other foods must not be heated in sealed containers since they are liable to explode.
- When heating food in plastic or paper containers, keep an eye on the oven due to the possibility of ignition.
- Only use utensils that are suitable for use in microwave ovens.
- If smoke is emitted, switch off or unplug the appliance and keep the door closed in order to stifle any flames.
- Microwave heating of beverages can result in delayed eruptive boiling, therefore care must be taken when handling the container.
- The contents of feeding bottles and baby food jars shall be stirred or shaken and the temperature checked before consumption, in order to avoid burns.
- Eggs in their shell and whole hard-boiled eggs should not be heated in microwave ovens since they may explode, even after microwave heating has ended.
- The oven should be cleaned regularly and any food deposits removed.
- Failure to maintain the oven in a clean condition could lead to deterioration of the surface that could adversely affect the life of the appliance and possibly result in a hazardous situation.
- Only use the temperature probe recommended for this oven.(for ovens provided with a facility to use a temperature-sensing probe.)
- The microwave oven shall not be placed in a cabinet unless it has been tested in a cabinet.
- This appliance is intended to be used in household and similar applications such as:
– staff kitchen areas in shops, offices, and other working environments;
– by clients in hotels, motels, and other residential type environments;
– farmhouses;
– bed and breakfast type environments. - The microwave oven is intended for heating food and beverages. Drying of food or clothing and heating of warming pads, slippers, sponges, damp cloth and similar may lead to the risk of injury, ignition, or fire.
- Metallic containers for food and beverages are not allowed during microwave cooking.
- The appliance shall not be cleaned with a steam cleaner.
- The appliance is intended to be used freestanding.
- The rear surface of appliances shall be placed against a wall.
- The appliances are not intended to be operated by means of an external timer or separate remote-control system.
READ CAREFULLY AND KEEP FOR FUTURE REFERENCE
To Reduce the Risk of Injury to Persons Grounding Installation
DANGER
Electric Shock Hazard
Touching some of the internal components can cause serious personal injury or death. Do not disassemble this appliance.
WARNING
Electric Shock Hazard
Improper use of the grounding can result in electric shock.
Do not plug into an outlet until the appliance is properly installed and grounded.
This appliance must be grounded. In the event of an electrical short circuit, grounding reduces the risk of electric shock by providing an escape wire for the electric current.
This appliance is equipped with a cord having a grounding wire with a grounding plug. The plug must be plugged into an outlet that is properly installed and grounded.
Consult a qualified electrician or serviceman if the grounding instructions are not completely understood or if doubt exists as to whether the appliance is properly grounded.
If it is necessary to use an extension cord, use only a 3-wire extension cord.
- A short power-supply cord is provided to reduce the risks resulting from becoming entangled in or tripping over a longer cord.
- If a long cord set or extension cord is used:
1) The marked electrical rating of the cord set or extension cord should be at least as great as the electrical rating of the appliance.
2) The extension cord must be a grounding-type 3-wire cord.
3) The long cord should be arranged so that it will not drape over the countertop or tabletop where it can be pulled on by children or tripped over unintentionally.
CLEANING
Be sure to unplug the appliance from the power supply.
- Clean the cavity of the oven after using a slightly damp cloth.
- Clean the accessories in the usual way in soapy water.
- The door frame and seal and neighboring parts must be cleaned carefully with a damp cloth when they are dirty.
- Do not use harsh abrasive cleaners or sharp metal scrapers to clean the oven door glass since they can scratch the surface, which may result in the shattering of the glass.
- Cleaning Tip—For easier cleaning of the cavity walls that the food cooked can touch: Place half a lemon in a bowl, add 300ml (1/2 pint) water, and heat on 100% microwave power for 10 minutes. Wipe the oven clean using a soft, dry cloth.
UTENSILS
CAUTION
Personal Injury Hazard
It is hazardous for anyone other than a competent person to carry out any service or repair operation that involves the removal of a cover that gives protection against exposure to microwave energy.
See the instructions on “Materials you can use in microwave oven or be avoided in a microwave oven.” There may be certain non-metallic utensils that are not safe to use for microwaving. If in doubt, you can test the utensil in question following the procedure below.
Utensil Test:
- Fill a microwave-safe container with 1 cup of cold water (250ml) along with the utensil in question.
- Cook on maximum power for 1 minute.
- Carefully feel the utensil. If the empty utensil is warm, do not use it for microwave cooking.
- Do not exceed 1 minute of cooking time.
Materials you can use in a microwave oven
| Utensils | Remarks |
| Browning dish | Follow manufacturer’s instructions. The bottom of the browning dish must be at least 3/16 inch (5mm) above the turntable. Incorrect usage may cause the turntable to break. |
| Dinnerware | Microwave-safe only. Follow manufacturer’s instructions. Do not use cracked or chipped dishes. |
| Glass jars | Always remove lid. Use only to heat food until just warm. Most glass jars are not heat resistant and may break. |
| Glassware | Heat-resistant oven glassware only. Make sure there is no metallic trim. Do not use cracked or chipped dishes. |
| Oven cooking bags | Follow manufacturer’s instructions. Do not close with a metal tie. Make slits to allow steam to escape. |
| Paper plates and cups | Use for short-term cooking/warming only. Do not leave the oven unattended while cooking. |
| Paper towels | Use to cover food for reheating and absorbing fat. Use with supervision for a short-term cooking only. |
| Parchment paper | Use as a cover to prevent splattering or a wrap for steaming. |
| Plastic | Microwave-safe only. Follow the manufacturer’s instructions. Should be labeled “Microwave Safe”. Some plastic containers soften, as the food inside gets hot. “Boiling bags” and tightly closed plastic bags should be slit, pierced or vented as directed by the package. |
| Plastic wrap | Microwave-safe only. Use to cover food during cooking to retain moisture. Do not allow plastic wrap to touch food. |
| Wax paper | Use as a cover to prevent splattering and retain moisture. |
Materials to be avoided in a microwave oven
| Utensils | Remarks |
| Aluminum tray | May cause arcing. Transfer food into a microwave-safe dish. |
| Food carton with metal handle | May cause arcing. Transfer food into a microwave-safe dish. |
| Metal or metal-trimmed utensils | Metal shields the food from microwave energy. Metal trim may cause arcing. |
| Metal twist ties | It May cause arcing and could cause a fire in the oven. |
| Paper bags | May cause a fire in the oven. |
| Plastic foam | The plastic foam may melt or contaminate the liquid inside when exposed to high temperatures. |
| Wood | Wood will dry out when used in the microwave oven and may split or crack. |
SET UP & INSTALLATION
SETTING UP YOUR OVEN
Names of Oven Parts and Accessories
Remove the oven and all materials from the carton and oven cavity.
Your oven comes with the following accessories:
Glass tray 1
Turntable ring assembly 1
Turntable Shaft 1
Instruction Manual 1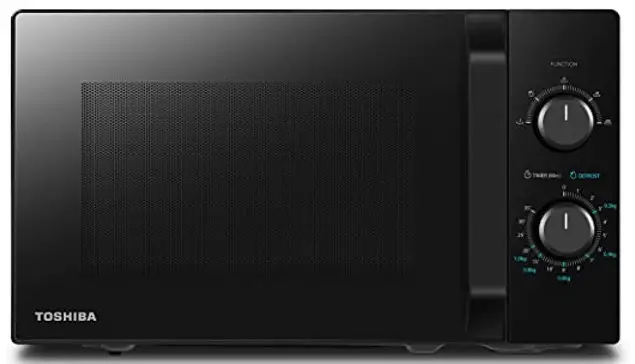
| A) Control panel | E) Observation window |
| B) Turntable shaft | F) Door assembly |
| C) Turntable ring assembly | G) Safety interlock system |
| D) Glass tray | |
Turntable Installation
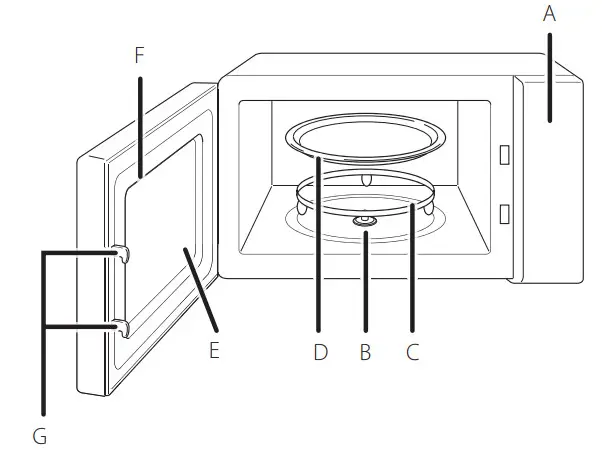
a. Never place the glass tray upside down.
Follow the instruction to place the glass tray on the turntable ring in the correct direction. The glass tray should rotate smoothly.
b. Both glass tray and turntable ring assembly must always be used during cooking.
c. All food and containers of food are always placed on the glass tray for cooking.
d. If the glass tray or turntable ring assembly cracks or breaks, contact your nearest authorized service center.
Countertop Installation
Remove all packing material and accessories. Examine the oven for any damage such as dents or broken doors. Do not install if the oven is damaged.
Cabinet: Remove any protective film found on the microwave oven cabinet surface.
Do not remove the light brown Mica cover that is attached to the oven cavity to protect the magnetron.
Installation
Select a level surface that provides enough open space for the intake and/or outlet vents.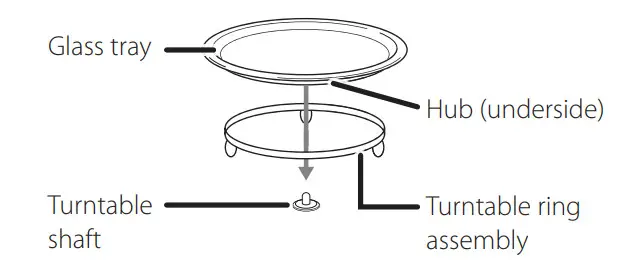
- The minimum installation height is 85cm.
- The rear surface of the appliance shall be placed against a wall.
Leave a minimum clearance of 30cm above the oven, a minimum clearance of 20cm is required between the oven and any adjacent walls. - Do not remove the legs from the bottom of the oven.
- Blocking the intake and/ or outlet openings can damage the oven.
- Place the oven as far away from radios and TV as possible. Operation of a microwave oven may cause interference to your radio or TV reception.
Plug your oven into a standard household outlet. Be sure the voltage and the frequency is the same as the voltage and the frequency on the rating label.
WARNING: Do not install an oven over a range cooktop or other heat-producing appliance.
If installed near or over a heat source, the oven could be damaged and the warranty would be void.
The accessible surface may be hot during operation.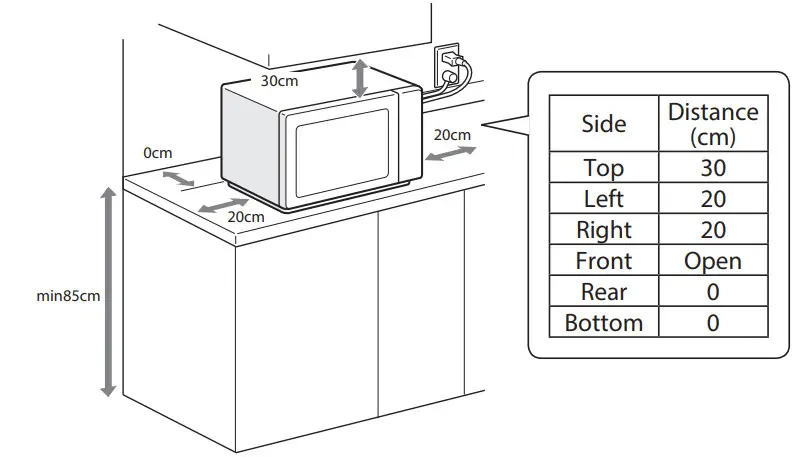
OPERATION
 1. POWER knob
2. TIMER knob
- To set cooking power by turning the POWER knob to the desired level.
- To set the time of cooking by turning the TIMER knob to desired time per your food cooking guide.
- The microwave oven will automatically start cooking after the power level and time are set.
- After the cooking time is up, the unit will “Dong” to stop.
- If the unit is not in use, always set the time to “0”.
| Function/Power | Output | Application |
| Low | 17% Micro. | Soften Ice Cream |
| Med. Low (Defrost) | 33% Micro. | Soup Stew, Soften Butter, or Defrost |
| Med. | 55% Micro. | Stew, Fish |
| Med. High | 77% Micro. | Rice, Fish, Chicken, Ground Meat |
| High | 100% Micro. | Reheat, Milk, Boil Water, Vegetables, and Beverage |
Notice: When removing food from the oven, please ensure that the oven power is switched off by turning the timer switch to 0 (zero). Failure to do so, and operating the microwave oven without food in it, can result in overheating and damage to the magnetron.
TROUBLESHOOTING
| Normal | |
| Microwave oven interfering with TV reception |
Radio and TV reception may interfere when the microwave oven operating. It is similar to the interference of small electrical appliances, like mixers, vacuum cleaners, and electric fans. It is normal. |
| Dim oven light | In low-power microwave cooking, the oven light may become dim. It is normal. |
| Steam accumulating on the door, hot air out of vents | In cooking, steam may come out of food. Most will get out from vents. But some may accumulate in a cool place like the oven door. It is normal. |
| The oven started accidentally with no food in. | It is forbidden to run without any food inside. It is very dangerous. |
| Trouble | Possible Cause | Remedy |
| Oven can not be started. | (1)Power cord not plugged in tightly. | Unplug. Then plug again after 10 seconds. |
| (2)Fuse blowing or circuit breaker works. | Replace fuse or reset circuit breaker (repaired by professional personnel of our company) | |
| (3)Trouble with outlet. | Test outlet with other electrical appliances. | |
| Oven does not heat. | (4)Door is not closed well. | Close the door well. |