
Traxxas Blast RC Speed Boat Instruction Manual

Your model does NOT accept LiPo batteries. Do not operate your model with LiPo batteries. Damage due to over-discharging may result. Your model uses rechargeable batteries that must be handled with care for safety and long battery life. Make sure to read and follow all instructions and precautions that were provided with the battery packs and your charger. It is your responsibility to charge and care for the battery packs properly. In addition to your battery and charger instructions, here are some more tips to keep in mind:
- Use the supplied NiMH charger to charge the included battery (see Charging your Battery Pack in the Preparing to Run section). DO NOT attempt to charge LiPo batteries or any other type of battery with this charger to avoid damage to the battery or potentially causing fire or personal injury.
- BEFORE you charge, ALWAYS confirm that the charger settings exactly match the type (chemistry), specification, and configuration of the battery to be charged.
- DO NOT attempt to charge non-rechargeable batteries (explosion hazard), batteries that have an internal charge circuit or a protection circuit, batteries that have been altered from original manufacturer configuration, or batteries that have missing or unreadable labels, preventing you from properly identifying the battery type and specifications.
- DO NOT exceed the maximum manufacturer recommended charge rate.
- DO NOT let any exposed battery contacts or wires touch each other. This will cause the battery to short circuit and create the risk of fire.
- While charging or discharging, ALWAYS place the battery (alltypes of batteries) in a fire retardant/fire proof container and on a non-flammable surface such as concrete.
- DO NOT charge batteries inside of an automobile.
- DO NOT charge batteries while driving in an automobile. This charger is equipped with a long cord intended to allow the battery to be charged outside of an automobile when using the automobile’s auxiliary power socket. If the cord will not reach outside of the automobile, find another power source
- NEVER charge batteries on wood, cloth, carpet, or on any other flammable material.
- ALWAYS charge batteries in a well-ventilated area.
- REMOVE flammable items and combustible materials from the charging area.
- DO NOT leave the charger and battery unattended while charging, discharging, or anytime the charger is ON with a battery connected. If there are any signs of a malfunction or in the event of an emergency, unplug the charger from the power source and disconnect the battery from the charger.
- DO NOT operate the charger in a cluttered space, or place objects on top of the charger or battery.
- If any battery or battery cell is damaged in any way, DO NOT charge, discharge, or use the battery.
- Keep a Class D fire extinguisher nearby in case of fire.
- DO NOT disassemble, crush, short circuit, or expose the batteries to flame or other source of ignition. Toxic materials could be released. If eye or skin contact occurs, flush with water.
- If a battery gets hot to the touch during the charging process (temperature greater than 110°F / 43°C), immediately disconnect the battery from the charger and discontinue charging.
- Allow the battery pack to cool off between runs (before charging).
- ALWAYS unplug the charger and disconnect the battery when not in use.
- ALWAYS unplug the battery from the electronic speed control when the model is not in use and when it is being stored or transported.
- DO NOT disassemble the charger.
- REMOVE the battery from your model or device before charging.
- DO NOT expose the charger to water or moisture.
- ALWAYS store battery packs safely out of the reach of children or pets. Children should always have adult supervision when charging and handling batteries.
- Nickel-Metal Hydride (NiMH) batteries must be recycled or disposed of properly.
- Always proceed with caution and use good common sense at all times.
Personal Safety Precautions
All of us at Traxxas want you to safely enjoy your new model. Operate your model sensibly and with care, and it will be exciting, safe, and fun for you and those around you. Failure to operate your model in a safe and responsible manner may result in property damage and serious injury. The precautions outlined in this manual should be strictly followed to help ensure safe operation. You alone must see that the instructions are followed and the precautions are adhered to. The Blast is not intended for use by children without the supervision of a responsible adult. Every precaution outlined in this manual should be followed to help ensure safe operation. Traxxas is not liable for any loss or damages, whether direct, indirect, special, incidental, or consequential, arising from the use, misuse or abuse of this product including any chemical or accessory required to operate it.
- Do not operate your Blast at night, or anytime your line of sight to the model may be obstructed or impaired in any way.
- Never, under any circumstances, operate the Blast in any water where people are swimming or wading. The Blast is very fast and could cause injury if it should collide with anyone.
- Because the Blast is controlled by radio, it is subject to radio interference from many sources that are beyond your control. Since radio interference can cause momentary loss of radio control, always allow a safety margin in all directions around the boat in order to prevent collisions
- Do not reach underneath the rear of the Blast. The propeller could spin unexpectedly. Always pick up the boat from the front or the side.
- Because of the many dangers involved with any body of water, Traxxas recommends that you never try to wade or swim to retrieve the boat. The Boat Retrieval section of this manual outlines safer methods for boat retrieval.
- Due to the high-performance nature of the Stinger 20-turn electric motor, it will become extremely hot during use. Do not touch the motor when installing and removing battery packs.
- Allow the motor to cool between battery changes, or anytime excessive heating is noted
- Most importantly, use good common sense when you are near water to avoid mishaps such as slipping on a muddy bank. Always observe water safety rules and regulations.
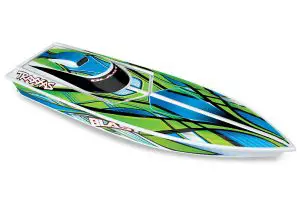
Introduction
Thank you for purchasing a Traxxas Blast high-performance racing boat. This manual contains the instructions you’ll need to operate and maintain your new Blast. Look over the manual and examine the Blast carefully before running it. If for some reason you think the Blast is not what you wanted, then do not continue any further. Your hobby dealer absolutely cannot accept a Blast for return or exchange after it has been run. Please read all of the operating instructions and precautions before attempting to drive your new Blast. These instructions are written with the assumption that this is your first radio controlled model. Even if you are an experienced R/C enthusiast, it is important for you to read and follow the procedures in this manual. Pay special attention to the mechanical and safety precautions outlined in this manual. If you have any questions about your new model, then call Traxxas’ technical support line at 1-888-TRAXXAS (1-888-872-9927, U.S. residents only. Outside the U.S., call 972-549-3000). Technical support is available Monday through Friday from 8:30am to 9:00pm central time. We hope that you will enjoy your Blast for many hours to come.
Required Equipment
To operate the Blast, you will need four (4) “AA” size batteries for your transmitter.
Where to Run
Select a body of water (must be at least 10 inches deep) that is calm and free of debris, tree stumps, moss, etc. Also, find a clean, stable area of shoreline for launching. Be aware that some ponds restrict the use of model boats. Always choose a launch site which is downwind so that the wind and waves will drift the boat back to you if it should ever flip over. Do not run the Blast in salt water.
Preparing to Run
Charging your battery pack The Traxxas Battery Charger is a fully featured NiMH (Nickle Metal Hydride) charger. It features 4-amp charge current for fast charging and advanced peak detection to optimize every charge. Take this compact charger with you wherever you want to have radio controlled fun!
Note: This charger is designed for use only with Traxxas NiMH batteries with iD. Legacy Traxxas High-Current Connectors are not compatible with this charger. DO NOT try to force legacy connectors into the charge connector.Do not charge batteries inside of an automobile. Read the Safety Precautions section of this guide.
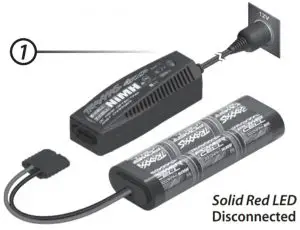
- Plug the charger into a 12-volt automotive auxiliary power socket. The charger is compatible with 12-volt automotive auxiliary power sockets only. The LED on the charger will glow red to indicate it is ready to charge a battery.
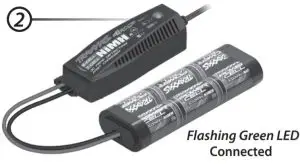
- Connect the battery to begin charging. Plug the battery into the charger. The charger’s LED will flash green, indicating that charging has begun. The flashing green LED on the charger indicates the charge progress.
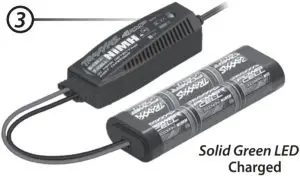
- Disconnect the battery when charging is complete. The Traxxas 4-amp DC charger uses sophisticated voltage-detection circuitry to monitor the battery and automatically stop charging when the pack has reached maximum capacity. When the battery is fully charged, the LED will light solid green. The battery will be warm in your hand. Disconnect the battery.
CHARGE PROGRESS
| LED INDICATION | MEANING |
| Solid Red LED | Ready for Charging |
| Slowly Flashing Green LED | Charging (see Charge Progress chart) |
| Solid Green LED | Battery Fully Charged |
| Flashing Red LED | Charger error |
Note: If there is a problem with the battery, such as a short circuit, the charger’s LED will flash red. Disconnect the battery and unplug the charger from its power source to clear the error. Determine the cause of the error before continuing.
Installing Transmitter Batteries The transmitter requires 4 AA alkaline or rechargeable batteries (not included).
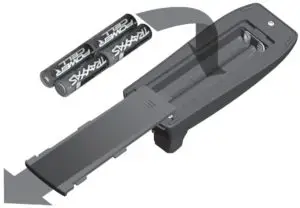
Opening the Hatch
The top hatch is held secure with a rubber band. To open the top hatch, pull it up and rotate it. This will provide access to the battery compartment and on/off switch. For full access to the radio compartment, unhook the rubber band from the top hatch.
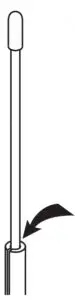
Setting Up the Antenna
- Slide the antenna wire into the bottom of the antenna tube until the white tip of the antenna is at the top of the tube under the black cap.
- Insert the base of the tube into the antenna post. Take care not to crimp the antenna wire.
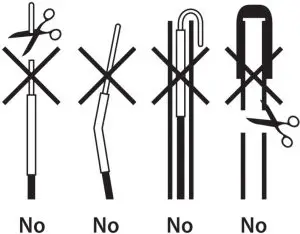
- To prevent loss of radio range, do not kink or cut the black wire, do not bend or cut the metal tip, and do not bend or cut the white wire at the end of the metal tip.

Installing the Battery Pack
The included battery installs in the bow (front) of the boat. Remove the foam block and slide the battery pack into the battery tray. Slide the foam block back into place to secure the battery. The Blast is not designed to use 7-cell (8.4 volt) battery packs.
Transmitter Controls
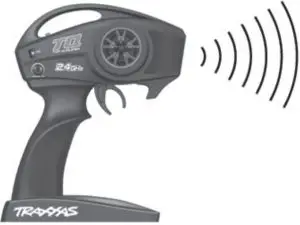
 The TQ 2.4GHz transmitter has a directional antenna. For maximum range, hold the antenna upright and pointed in the direction of the model. Pointing the transmitter away from the model will reduce radio range.
Radio System Adjustment
Your radio system was pre-adjusted before it left the factory however, the adjustment should be checked prior to running the Blast. These instructions are for Traxxas radio systems only. If you installed your own radio, refer to your radio system’s instructions.
- Always turn your transmitter on first and off This procedure will help to prevent your Blast from receiving stray signals from another transmitter, or other source, and running out of control.
- Turn the transmitter switch The status LED on the transmitter should be solid green (not flashing).
- Turn on the receiver switch inside the boat. The steering servo should jump and move to its idle (neutral) Keep fingers and obstacles away from the propeller.
- Operate the steering control on the Check for rapid operation of the steering servo and that none of the steering mechanism is loose or binding. If the servo operates slowly, check for weak batteries. Adjust the “steering trim” control on the transmitter to adjust the servo so that the outdrive is pointing straight out from the back of the boat. Also, check to be sure that the outdrive does not turn more in one direction than in the other. If you cannot align the outdrive, refer to the section “Centering Your Servos.”
- Operate the throttle trigger on the transmitter to ensure that you have full operation (propeller reaches full speed), and that the propeller stops spinning when the throttle trigger is at neutral.
- Once adjustments are made, turn off the receiver on your Blast, followed by the hand-held transmitter.
- The radio system should be range-tested before each session of With the radio system on, have a friend carry the boat away from you a distance equal to the maximum range you plan to operate the Blast. At distance, once again test for complete radio control. Never attempt to run the Blast if the radio appears to be malfunctioning in any way.
Centering your Servos
Whenever your radio system has been removed for service or cleaning, the steering servo must be re-centered prior to installing the radio system in the model. If the radio system is already installed in the boat, disconnect the servo horn from the servo. Connect the steering servo to channel 1 on your receiver and the electronic speed control to channel 2. Nothing connects to the other terminals on the receiver. Place fresh “AA” batteries in the transmitter and turn the power switch on. Adjust trim to “0” position. Connect a fresh 7.2V battery pack to the electronic speed control and turn the power switch to the ON position. The servo will automatically jump to its center position. Turn off the electronic speed control switch followed by the transmitter. The servo is now ready to be installed. Be careful not to move the servo shaft when installing the steering linkage.
Piloting the Blast
Your new Traxxas Blast is designed with water-resistant features to protect the electronics in the model (receiver, servo, electronic speed control). This gives you the freedom to have fun piloting your Blast. Though highly water resistant, the Blast should not be treated as though it is submersible or totally, 100% waterproof. Water resistance applies only to the installed electronic components. Additional care and maintenance is required when water contacts the mechanical and electrical components to prevent corrosion of metal parts and maintain their proper function. Before you go on, here are some important precautions to keep in mind.
- Without proper care, some parts of your model can be seriously damaged due to contact with Know that additional maintenance procedures will be required after running in order to maintain the performance of your model.
- Not all batteries can be used in wet Consult your battery manufacturer to see if their batteries can be used in wet conditions. Do not use LiPo batteries in wet conditions. Note: The Nautica ESC is not LiPo compatible.
- The Traxxas TQ 4GHz transmitter is not water resistant.
- Do not operate your model during a rain storm or other inclement weather where lightning may be present.
- Do not allow your model to come in contact with salt water (ocean water), brackish water (between fresh water and ocean water), or other contaminated water. Salt water is highly conductive and highly Use caution if you plan to run your model near a beach.
- Select a body of water (at least 10 inches deep) that is clear of moss and Do not drive the Blast in rough, choppy water or in high wind (more than 15 mph). These conditions could cause your Blast to flip over.
- The Blast’s steering is very sensitive. A slight input on the steering control will have a large effect on the When the boat is in open water, adjust the steering trim on the transmitter until the boat travels in a straight line on its own. (Note: The Blast will only travel in a straight line on its own when it is heading straight into or away from the wind. Crosswinds will require constant steering input to maintain a straight course.)
- To prevent spin outs, avoid sharp turns at high
- Always be ready to reduce the throttle if the Blast appears to be unstable or “chine walking” (rocking violently from side-to-side). Always reduce the throttle when turning, especially in rough water. Jumping the Blast or towing anything with it should not be
- Return the Blast to shore at the first sign of weak batteries (Blast will begin to slow and the controls will become sluggish).
Cavitation
If the Blast is running at full throttle but is only barely moving forward, the propeller is cavitating. Try advancing the throttle slowly to get the Blast on plane. If you are having trouble with cavitation, check the propeller for nicks or tangled debris. The Blast’s propeller is specially designed for its application; therefore, it is very sensitive to any changes or modifications. If the propeller is damaged, it should be replaced.
Before Running Your Blast
- Consult the section “After Running Your Blast” before Make sure you understand the maintenance required.
- Confirm that the receiver box O-ring and cover are installed correctly and Make sure the screws are tight and the blue O-ring is not visibly protruding from the edge of the cover.
- Confirm that your batteries can be used in wet conditions.
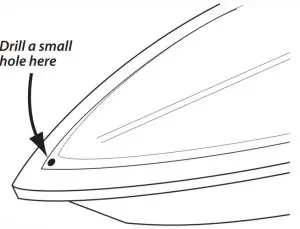
- out of the back of the boat (near the radio system)Normally, very little water will accumulate inside the boat. Empty any standing water from the boat between Drill a small hole 1/16” from the front of the boat to drain the water. Do not drain the water out of the back of the boat (near the radio system).
- Check the wiring for any frayed wires or loose
- Check the tightness of the set screws in the collars on the steering linkages and in the universal joint yokes (connecting the outdrive to the driveshaft and the driveshaft to the motor). Thread locking compound can be applied to these screws to prevent them from
- Check the mounting of the receiver and
- Check the rubber driveshaft seal for cuts and Do not attempt to run the Blast if this seal is damaged.
- Check the tightness of the propeller. Hold the u-joint and turn the propeller clockwise until it’s fingertight. Visually inspect the propeller for nicks, dings and Replace if damaged.
- Check the operation of the radio system, especially the condition of the batteries.
- Visually inspect the hull for any cracks, damage or possible leaks.
- Check for deterioration of the rubber band that holds the top hatch.
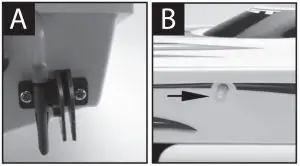
- Before operating the Blast, make certain the water pickup Aand the exit tube (B) are clear of debris and are properly Otherwise, motor overheating may occur.
After Running Your Blast
- Spray all the bearings, drive train, and fasteners with WD-40® or similar water displacing light oil.
- Let the boat stand or blow it off with compressed air. Removing the hatch and placing the boat in a warm sunny spot will help with drying.
- As a precautionary step, remove the sealed receiver box cover. While unlikely, humidity or tiny amounts of moisture or condensation may enter the receiver box during running. This can cause long-term problems with the sensitive electronics in the receiver. Removing the receiver box cover during storage allows the air inside to dry. This step can improve the long-term reliability of the receiver. It is not necessary to remove the receiver or unplug any of the wires.
Receiver Box: Maintaining a Watertight Seal
Removing and Installing Radio Gear The unique design of the receiver box allows the removal and installation of the receiver without losing the ability to maintain a watertight seal in the box. The patented wire clamp feature gives you the ability to also install aftermarket radio systems and maintain the watertight features of the receiver box.
Removing the Receiver
- To remove the cover, remove the two 3x10mm button-head cap screws.
- To remove the receiver from the box, simply lift it out and set to the side. The antenna wire is still inside the clamp area and cannot be removed yet.
- Remove the wire clamp by removing the two 2.5x8mm cap screws.
- Unplug the servo and ESC cables from the receiver and remove the receiver.
Receiver Installation
- Always install the wires into the receiver box before installing the receiver.
- Install the antenna wire and the servo cables into the receiver box.
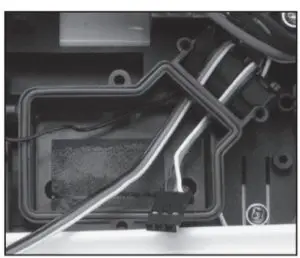
- Arrange the wires neatly using the wire guides in the receiver box. The excess wire will be bundled inside the receiver box. Label which wire is for
which channel. - Apply a small bead of silicone grease (Traxxas part #1647) to the wire clamp.
- Install the wire clamp and tighten the two 2.5x8mm cap screws securely.
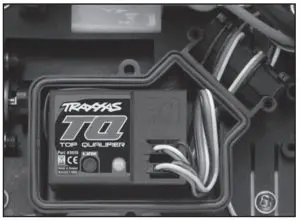
- Install the receiver into the box and plug the wires into the receiver.
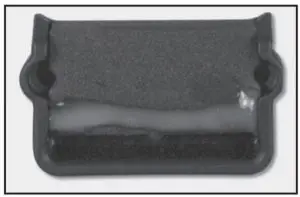
- Make sure the O-ring is properly sea ed into the groove in the receiver box so that the cover will not pinch it or damage it in any way
- Install the cover and tighten the two 3x10mm button-head cap screws securely.
- Inspect the cover to make sure that the O-ring seal is not visible.
Tuning Adjustments
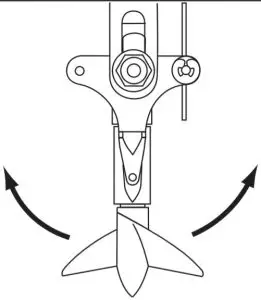
Adjusting the Trim Angle The out drive strut on the Blast will allow you to adjust the trim angle of the propeller. The trim angle changes how high the bow of the boat rides out of the water. Setting the trim angle correctly will provide the maximum speed and efficiency from the Blast.

As the out drive is trimmed up, the bow (front) of the boat will ride higher causing the boat to run slightly faster; however, it will be more unstable in the wind. Do not trim the out drive up on windy days or when running in choppy water. If the trim is set to high, the bow will bounce up and down (“porpoise”), and the propeller may begin to cavitation. As the out drive is trimmed down, the bow of the boat is lowered, increasing the whetted surface of the boat. This will slow the Blast slightly, but stability and control will be improved. Experiment with this adjustment to find out what works best for your particular conditions.
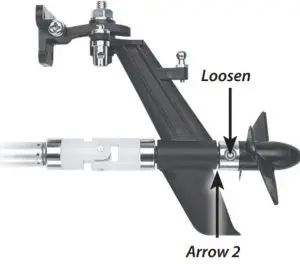
Adjusting the Out drive Shaft End Play
There should be a slight amount of shaft end play in the outdrive housing. To adjust the end play, loosen the set screw on the U-joint yoke (see image). Pull the propeller shaft until there is no more than 1mm of distance at “arrow 2” in the drawing. Retighten the set screw.
Boat Retrieval
If the Blast accidentally flips over and fills with water, it is equipped with foam flotation to help prevent it from sinking. Traxxas does not recommend ever trying to swim or wade to retrieve a boat. If you have chosen your launch sight carefully (downwind), the Blast will probably drift back to you on its own. If there is no wind, you will need a tennis ball and a length of string. Tie the tennis ball securely to one end of the string; then, throw the ball over the drifting boat. Pull the ball in and try to entangle the boat in the string. Pull the boat back slowly to shore. If only the bow of the boat remains visible, try using a fishing lure with many hooks and a fishing pole. Try to snag the lip of the upper deck or drive mechanism with the hooks.
Maintenance
- Keep the Blast clean of accumulated dirt and oil.
- Re-oil the motor bushings before each day of running. Use an oil made for electric motors such as 3-in-1 Oil™.
- Periodically re-oil the bushing in the out drive housing and the driveshaft tube. The oil hole for the driveshaft tube is located underneath the sealed receiver box.
Storage
Drain all water out of the Blast and thoroughly dry it before storage. Store the Blast with the hatch cover removed so that any remaining moisture can to evaporate.
Painting the Hull
If you wish to paint your hull some other color besides the factory white, choose your paint with caution. Only use paint made for plastic models (available from your hobby dealer). Test the paint on an inconspicuous and non-critical area before painting the entire boat. The paint on the bottom must be smooth to prevent a loss of performance.
Battery iD
Your model’s included battery pack is equipped with Traxxas Battery iD. This exclusive feature allows Traxxas battery chargers (sold separately) to automatically recognize connected battery packs and optimize the charge settings for the battery. This eliminates the need to fumble with charger settings and menus for the easiest and safest charging solution possible. Visit Traxxas.com to learn more about this feature and available Traxxas chargers and batteries
Radio System Troubleshooting Guide
Transmitter LED Code
LED Color / Pattern Name
| Solid green Slow red
(0.5 sec on / 0.5 sec off) Flashing medium red (0.25 sec on / 0.25 sec off) |
Normal Driving Mode Binding
See binding instructions below. Low Battery Alarm Put new batteries in the transmitter. |
| Flashing fast red
(0.125 sec on / 0.125 sec off) |
Link Failure / Error
Transmitter and receiver are no longer bound.Turn the system off and then back on to resume normal operation. Find source of the link failure (i.e., out of range, low batteries, damaged antenna). |
Receiver LED Codes
LED Color / Pattern Name
| Solid green | Normal Driving Mode |
| Slow red | Binding |
| (0.5 sec on / 0.5 sec off) | See binding instructions below. |
| Flashing fast red | Fail-Safe / Low-Voltage Detect |
| (0.125 sec on / 0.125 sec off) | Consistent low voltage in the receiver triggers Fail Safe so that |
| there is enough power to center the throttle before it completely | |
| loses power. |
TQ 2.4GHz Binding Instructions
For proper operation, the transmitter and receiver must be electronically ‘bound.’ This has been done for you at the factory. Should you ever need to re-bind the system or bind to an additional transmitter or receiver, follow these instructions.
- Press and hold the SET button on the transmitter.
- Turn on the transmitter and release the SET button. The status LED will flash red slowly, indicating that the transmitter is in bind mode.
- Press and hold the LINK button on the receiver.
- Turn on the vehicle and release the LINK button. The LED on the receiver will flash red, indicating that the receiver is in bind mode.
- When the LEDs on both the transmitter and the receiver turn solid green, the system is bound and ready for use. Confirm that the steering and throttle operate properly before
driving your model.
FCC Compliance
This device contains a module that complies with the limits for a Class B digital device as described in part 15 of the FCC rules. Operation is subject to the following two conditions: (1) This device may not cause harmful interference, and (2) this device must accept any interference received, including interference that may cause undesired operation. The limits for a Class B digital device are designed to provide reasonable protection against harmful inference in residential settings. This product generates, uses, and can radiate radio frequency energy, and, if not operated in accordance with the instructions, may cause harmful interference to radio communications. The user is cautioned that changes or modifications not expressly approved by the party responsible for compliance could void the user’s authority to operate the equipment.
Canada, Industry Canada (IC)
This Class B digital apparatus complies with Canadian ICES-003 and RSS-210. This device complies with Industry Canada license exempt RSS standard(s). Operation is subject to the following two conditions: This device may not cause interference, and This device must accept any interference, including interference that may cause undesired operation of the device.
Radio Frequency (RF) Exposure Statement
This equipment complies with radio frequency exposure limits set forth by FCC and Industy Canada for an uncontrolled environment. This equipment should be installed and operated with a minimum distance of 20 centimetres between the radiator and your body or bystanders and must not be co-located or operated in conjunction with any other antenna or transmitter
TQ Radio System
Operation Frequency: 2406~2453 MHz
Maximum Radio Frequency Power: Maximum Peak Power -1 dBm
Traxxas High-Current Connector
Operation Frequency: 13.56 MHz
Maximum Radio Frequency Power: Maximum Peak Power -29.27 dBuA/m @ 10m