Owner’s Manual
SAVE THESE INSTRUCTIONS – FOR HOUSEHOLD USE ONLY
MODEL: CM-007
When using electrical appliances, basic safety precautions should always be followed. Do not use the PowerXL Vortex Air Fryer Pro™ until you have read this manual thoroughly.
Visit TristarCares.com for tutorial videos, product details, and more. Guarantee Information Inside
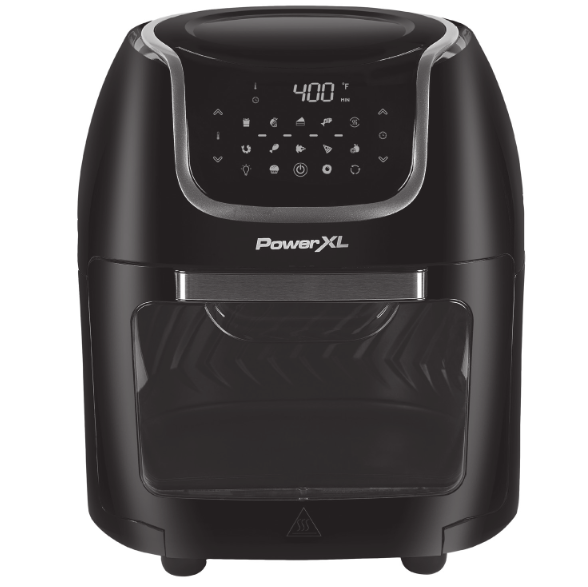
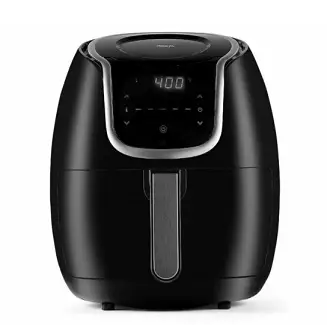
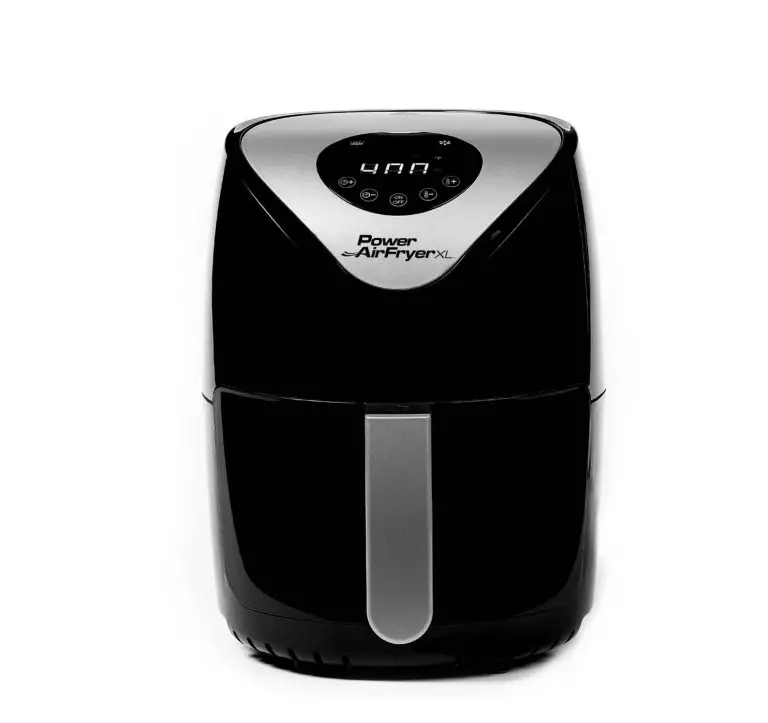
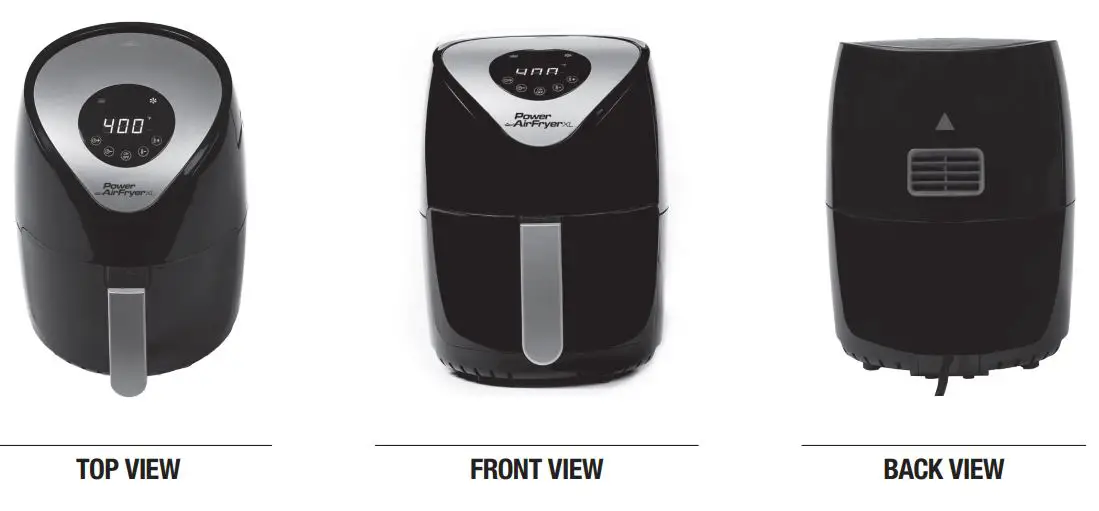
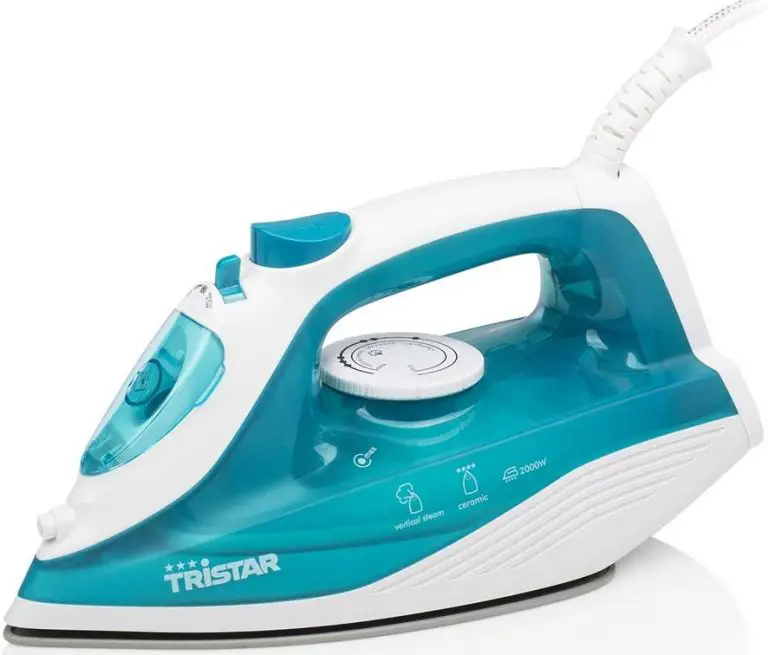
PowerXL Vortex Air Fryer Pro
BEFORE YOU BEGIN
The PowerXL Vortex Air Fryer Pro™ will provide you many years of delicious family meals and memories around the dinner table. But before you begin, it’s very important that you read this entire manual, making certain that you are totally familiar with this appliance’s operation and precautions.
IMPORTANT SAFEGUARDS
When using electrical appliances, always follow these basic safety precautions.
- NEVER IMMERSE the Main Unit Housing, which contains electrical components and heating elements, in water. Do not rinse under the tap.
- TO AVOID ELECTRICAL SHOCK, do not put liquid of any kind into the Main Unit Housing containing the electrical components.
- This appliance has a polarized plug (one blade is wider than the other). To REDUCE THE RISK OF ELECTRIC SHOCK, this plug is intended to fit into a polarized outlet only one way. If the plug does not fit fully into the outlet, reverse the plug. If it still does not fit, contact a qualified electrician. Do not attempt to modify the plug in any way.
- MAKE SURE the appliance is plugged into a dedicated wall socket. Always make sure that the plug is inserted into the wall socket properly and without any other appliances on the same outlet.
- To prevent food contact with the interior upper screen and heat element, DO NOT OVERFILL the accessories.
- DO NOT COVER the Air Intake Vent or Air Outlet Vent while the appliance is operating. Doing so will prevent even cooking and may damage the appliance or cause it to overheat.
- While cooking, the internal temperature of the appliance reaches several hundred degrees Fahrenheit. TO AVOID PERSONAL INJURY, never place hands inside the appliance unless it is thoroughly cooled.
- This appliance is NOT INTENDED FOR USE by persons with reduced physical, sensory, or mental capabilities or a lack of experience and knowledge unless they are UNDER THE SUPERVISION of a responsible person or have been given proper instruction in using the appliance. This appliance is NOT INTENDED FOR USE BY CHILDREN.
- When cooking, DO NOT PLACE the appliance against a wall or against other appliances. Leave at least 5 inches of free space on the back and sides and above the appliance. Do not place anything on top of the appliance.
- DO NOT USE this appliance if the plug, the power cord, or the appliance itself is damaged in any way.
- DO NOT PLACE your appliance on a cooktop, even if the cooktop is cool, because you could accidentally turn the cooktop on and damage the appliance, your cooktop and your home.
- If the power cord is damaged, YOU MUST HAVE IT REPLACED by Tristar, its service agent, or a similarly qualified person in order to avoid hazard.
- Keep the appliance and its power cord OUT OF THE REACH OF CHILDREN when it is in operation or in the cooling process.
- KEEP THE POWER CORD AWAY from hot surfaces. DO NOT PLUG in the power cord or operate the appliance controls with wet hands.
- NEVER CONNECT this appliance to an external timer switch or separate remote-control system.
- NEVER USE this appliance with an extension cord of any kind.
- A short power-supply cord (or detachable powersupply cord) is provided to reduce the risk resulting from becoming entangled in or tripping over a longer cord.
- DO NOT OPERATE the appliance on or near combustible materials, such as tablecloths and curtains.
- DO NOT USE the appliance for any purpose other than described in this manual.
- NEVER OPERATE the appliance unattended.
- When in operation, air is released through the Air Outlet Vent. KEEP YOUR HANDS AND FACE at a safe distance from the Air Outlet Vent. Also avoid the air while removing accessories from the appliance. The appliance’s outer surfaces may become hot during use. The ACCESSORIES WILL BE HOT. WEAR OVEN MITTS or use the Fetch Tool when handling hot components. Wear oven mitts when handling hot surfaces.
- Should the appliance emit black smoke, UNPLUG IMMEDIATELY and wait for smoking to stop before removing oven contents.
- When the cooking cycle ends, cooking will stop but the fan WILL CONTINUE RUNNING for 20 secs. to cool down the appliance.
- ALWAYS OPERATE the appliance on a horizontal surface that is level, stable, and noncombustible.
- This appliance is intended for normal household use only. It is NOT INTENDED for use in commercial or retail environments.
- Before using your appliance on any countertop surface or other fragile surface, such as a glass tabletop, CHECK WITH your manufacturer or installer for recommendations about using appliances on your surfaces. Some manufacturers and installers may recommend protecting your surface by placing a hot pad or trivet under the appliance for heat protection. Your manufacturer or installer may recommend that hot pans, pots, or electrical appliances should not be used directly on top of the countertop. If you are unsure, place a trivet or to pad under the appliance before using it.
- DO NOT place your appliance on a hot cooktop because it could cause a fire or damage the appliance, your cooktop, and your home.
- ALWAYS UNPLUG the appliance after use.
- Let the appliance cool down for approximately 30 mins. before handling, cleaning, or storing.
 WARNING
For California Residents
This product can expose you to Bisphenol A, which is known to the State of California to cause cancer and/or birth defects or other reproductive harm. For more information, go to www.P65Warnings.ca.gov.
SAVE THESE INSTRUCTIONS — FOR HOUSEHOLD USE ONLY.
CAUTION
- Always operate the appliance on a horizontal surface that is level, stable, and noncombustible.
- This appliance is intended for normal household use only. It is not intended for use in commercial or retail environments.
- If the appliance is used improperly or for professional or semi-professional purposes or if it is not used according to the instructions in the user manual, the guarantee becomes invalid and the manufacturer and Tristar will not be held liable for damages.
- Always unplug the appliance after use.
- When the cooking time has completed, cooking will stop and the fan will continue running for 20 secs. Let the appliance cool down for approximately 30 minutes before handling, cleaning, or storing.
- The appliance is equipped with an internal microswitch that automatically shuts down the fan and heating element when the door is open.
Overheating Protection: Should the inner temperature control system fail, the overheating protection system will be activated and the appliance will not function. Should this happen, unplug the appliance. Allow time for the appliance to cool completely before restarting or storing.
Automatic Shut-Off: The appliance has a builtin shut-off device that will automatically shut off the appliance when the cooking time has completed. You can manually switch off the appliance by pressing the Power Button. The fan will continue running for 20 secs. to cool down the appliance.
Electric Power: If the electrical outlet is being used by other appliances, your new appliance may not operate properly. The appliance should be operated on a dedicated electrical outlet
Electromagnetic Fields: This appliance complies with all standards regarding electromagnetic fields. If handled properly and according to the instructions in this user manual, the appliance is safe to use based on scientific evidence available today.
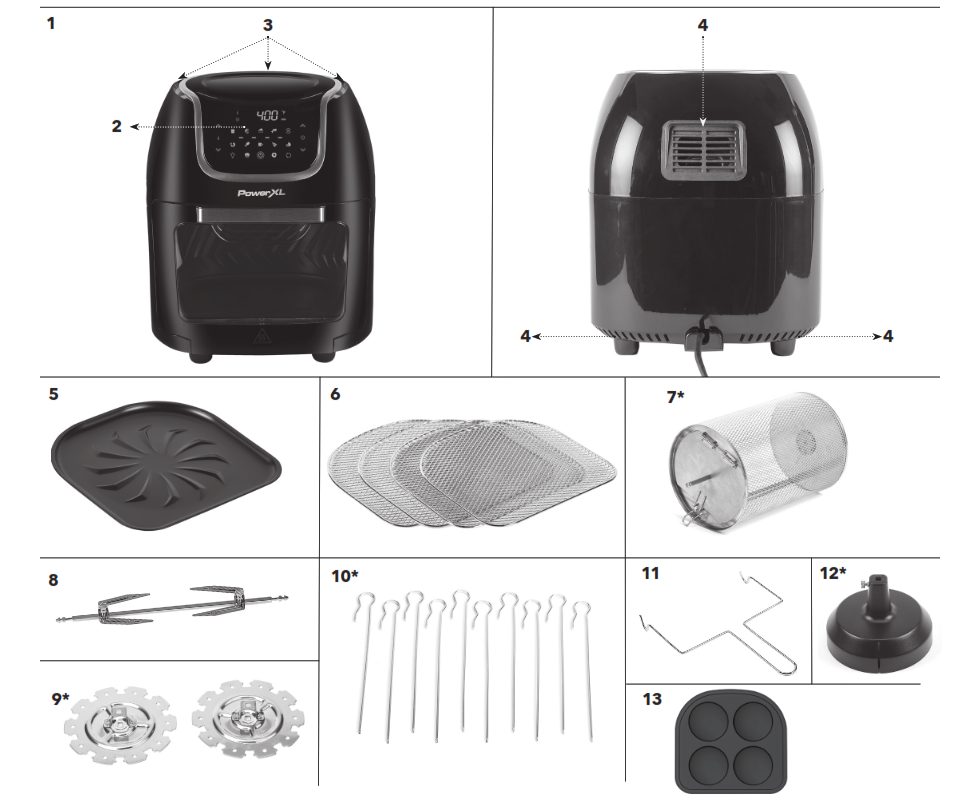
Parts & Accessories
NOTE: Unpack all contents from the packaging. Contents vary by model. Check all packaging material carefully for parts. Please remove any clear or blue protective film on the components. *Optional items may be sold separately.
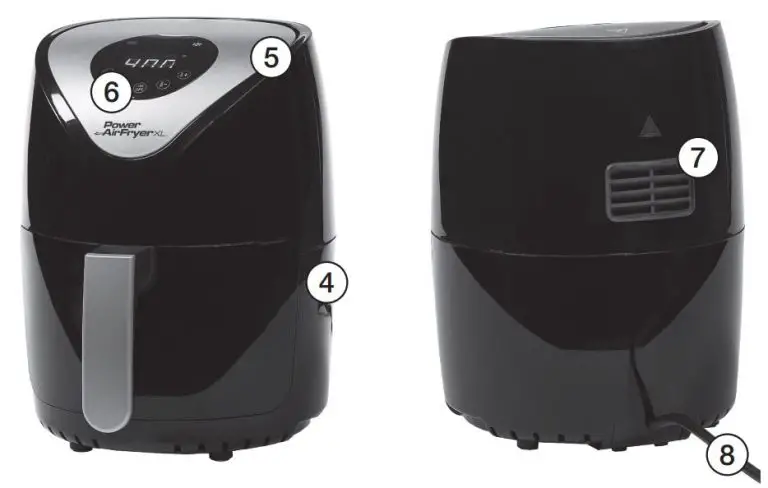
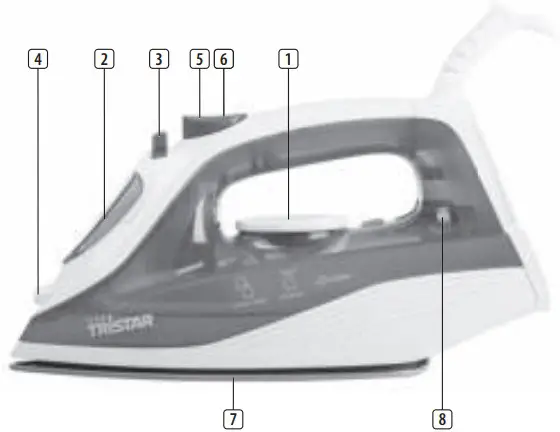
1. Main Unit
2. Control Panel
3. Air Intake Vents
4. Hot Air Outlet Vents
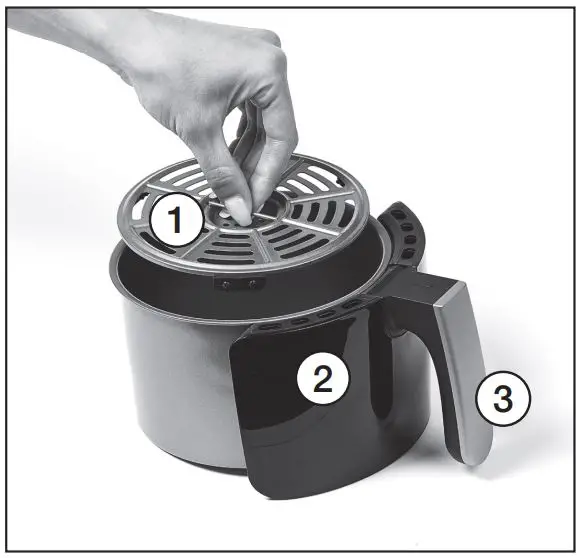
5. Drip Tray
6. Air Flow Racks (4)
7.* Rotating Basket
8. Rotisserie Shaft, Forks & Set Screws
9.* Adjustable Skewers Rack (2)
10.* Skewers (10)
11. Rotisserie Fetch Tool
12.* Rotisserie Stand
13. Muffin Pan
Parts & Accessories
IMPORTANT: Please make sure that your appliance has been shipped with the components that you ordered (some accessories may be sold separately). Check everything carefully before use. If any part is missing or damaged, do not use this product. Contact Customer Service using the number located in the back of the owner’s manual.
5. Drip Tray
Cook with the Drip Tray in place for easy cleanup. Always use the Drip Tray when cooking.
6. Air Flow Racks
Can be used for dehydration and to cook crispy snacks or reheat items like pizza.
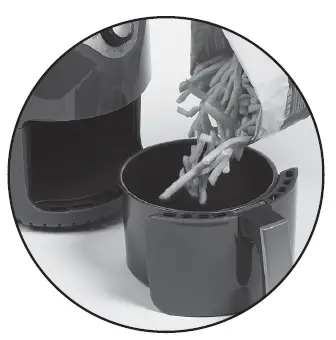
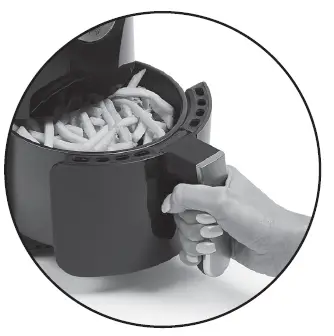
7. Rotating Mesh Basket*
Great for fries, roasted nuts, and other snacks. Use the Rotisserie Fetch Tool when inserting or removing the Basket..
8. Rotisserie Shaft, Forks & Set Screws
Use for roasts and whole chicken. Slide the Shaft lengthwise through the center of the meat. Slide the Forks onto the Shaft from each end and then into the meat. Lock in place with the Set Screws. There are indentations on the Shaft for the Set Screws. You can adjust the Screws closer to the center of the Shaft if needed but never beyond the indentation.
NOTE: Ensure that the roast or chicken rotates freely within the appliance. If the item being cooked is too large, it will not rotate or cook evenly (3.5–4 lb on average). Wrap the meat with kitchen string to help with even rotation.
9. Adjustable Skewers Rack*
Used when making kabobs. Skewer Racks fit over Shaft and lock in place with Set Screws.
10. Skewers*
Great for all your kabob recipes, meat, fish or veggies.
11. Rotisserie Fetch Tool
The Rotisserie Fetch Tool should be used to insert and remove any foods prepared using the Rotisserie Shaft or Skewers. Place under the Rotisserie Shaft and lift (left side first) and then gently extract the food.
12. Rotisserie Stand
Use for placing the Rotisserie Shaft when removing hot food from the Unit.
13. Muffin Pan
Makes eggs, sunny side up, mini frittatas, omelets, pancakes, and more. *May be sold separately
CAUTION: The appliance may get hot. Be careful not to touch the appliance while in use. Keep the appliance away from other objects.
WARNING
The Forks, Shaft, and other metal parts with this appliance are sharp and will get extremely hot during use. Great care should be taken to avoid personal injury. Wear protective oven mitts or gloves.
Appliance Specifications

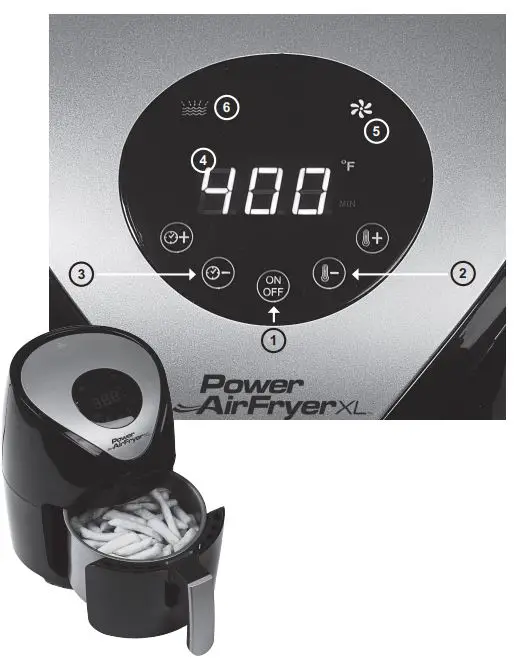
Using the Control Panel
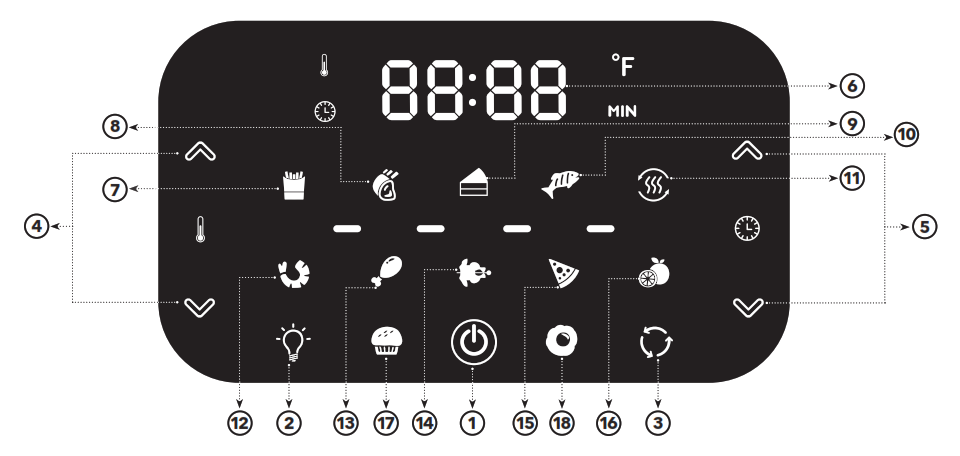
1. Power Button: Once the appliance is plugged in, the Control Panel will light up. Pressing the Power Button will set the appliance to a default temperature of 370° F (188° C) and time of 15 minutes. Pressing the Power Button again will start the cooking process. Pressing the Power Button during the cooking cycle will shut off the appliance.
2. Internal Light: Selecting this button will help you check cooking progress while appliance is in operation. Note: Opening the door during the cooking process will pause the appliance. Internal light will illuminate if the door opens.
3. Rotation Button: Select this button when cooking anything using the Rotisserie Mode. The icon will blink while in use.
4. Temperature Control Buttons: These buttons enable you to raise or lower cooking temperature by 5° F (2.7° C) intervals ranging from 150° F (66° C) to 400° F (204° C). Dehydration ranges from 90° F (32° C) to 170° F (77° C).
5. Time Control Buttons: These buttons enable you to select an exact cooking time to the minute, from 1 min. to 60 mins. in all modes except when dehydrating, which uses 30-min. intervals and an operating time of 2–24 hrs.
6. LED Digital Display: The Digital Numeric Display will alternate between displaying the temperature and the remaining time during the cooking process.
7–18. Cooking Presets: Selecting any Preset Button sets the time and temperature to the preset’s default value. The cooking process starts automatically 5 secs. after the Preset has been selected, or the Power Button can be pressed after the Preset Button to start the appliance immediately. You may use the Time and Temperature Buttons to override the preset settings.
Using the Control Panel
Preset Button Cooking Chart
*Cooking time for whole roasted chicken will vary with weight. Use meat thermometer to check internal temperature as per chart below.

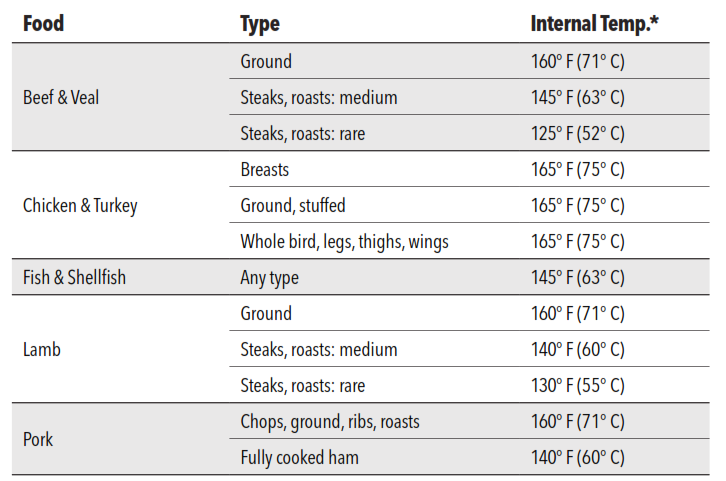
Internal TemperatureMeat Chart
Use this chart and a food thermometer to ensure that meat, poultry, seafood, and other cooked foods reach a safe minimum internal temperature.
*For maximum food safety, the U.S. Department of Agriculture recommends 165° F (75° C) for all poultry; 160° F (71° C) for ground beef, lamb, and pork; and 145° F (63° C), with a 3-minute resting period, for all other types of beef, lamb, and pork. Also review the USDA Food Safety Standards.
Using the Appliance Without Presets
Once you are familiar with the appliance, you may want to experiment with your own cooking times and temperatures.
WARNING
Never use a cooking vessel filled with cooking oil or any other liquid with this appliance! Fire hazard or personal injury could result.
Using the Accessories
Placing Air Flow Racks
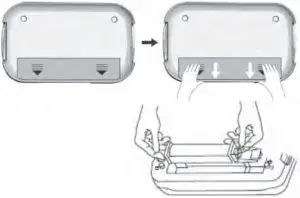
1. Insert the Drip Tray into the bottom of the appliance (Fig. A).
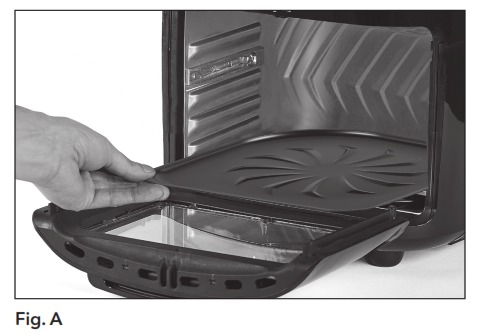
2. Place Air Flow Racks into the appliance by sliding them through the side grooves and onto the back lip (Fig. B).
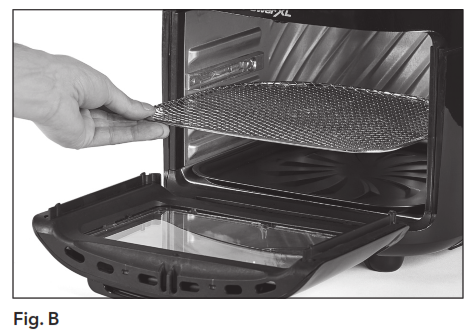
3. Place the Air Flow Racks closer to the top heating element for faster cooking and added crisp.
4. Rotate the Air Flow Racks mid-cycle for even cooking.
Placing Muffin Pan
1. Insert the Drip Tray into the bottom of the appliance (Fig. A).
2. Place Muffin Tray into the appliance by sliding them through the side grooves and onto the back lip (Fig. C).
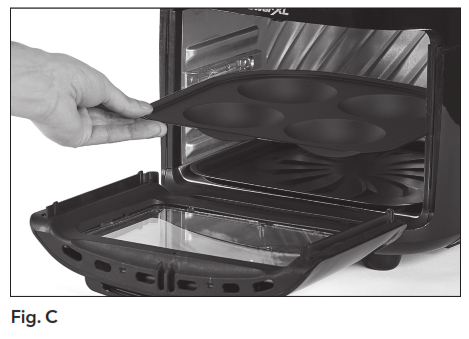
3. Place the Muffin Tray closer to the top heating element for faster cooking and added crisp.
Using The Rotisserie Spit
- With the Forks removed, force the Rotisserie Shaftthrough the center of the food lengthwise.
NOTE: To support the food on the Rotisserie Spitbetter, insert the Rotisserie Forks into the food at different angles (see Fig. D).
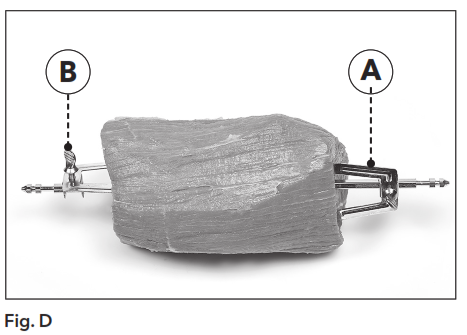
- Slide the Forks (A) onto each side of the Spit and secure them in place by tightening the two Set Screws (B).
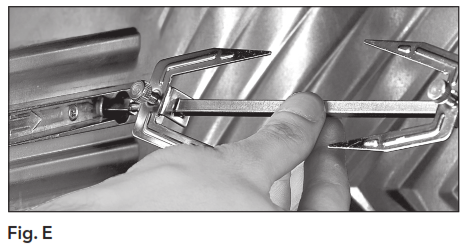
- Hold the assembled Rotisserie Spit at a slight angle with the right side higher than the left side and insert the left side of the Spit into the Rotisserie connection inside the appliance (see Fig. E).
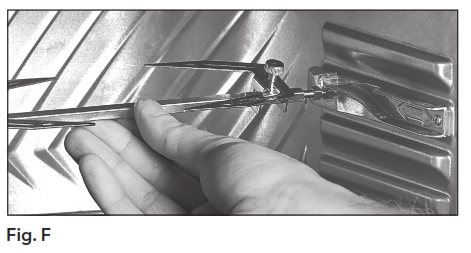
- With the left side securely in place, lower the rightside of the Spit into the Rotisserie connection on the right side of the appliance (see Fig. F).
- To remove cooked food, insert a large fork into the food, twist left, and raise to remove the Spit from the left slot and then remove the food from appliance with slight lifting motion. Transfer the food to a carving board or serving plate.
Removing Rotisserie Spit
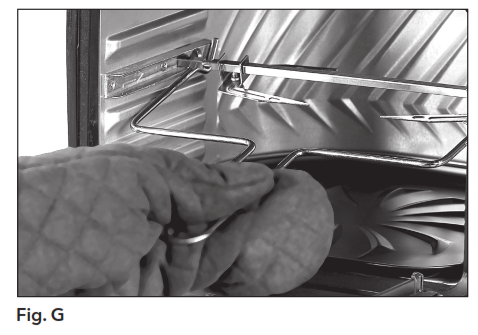
1. Using the Fetch Tool, hook the bottom of the left and right sides of the shaft attached to the Rotisserie Spit (Fig. G).
2. Pull the Rotisserie Spit slightly to the right to disconnect the accessory from the Rotisserie Socket.
3. Carefully pull and remove the Rotisserie Spit from the appliance.
General Operating Instructions
Before Using The Appliance For The First Time
1. Read all material, warning stickers and labels.
2. Remove all packing materials, labels, and stickers.
3. Wash all parts and accessories used in the cooking process with warm, soapy water.
NOTE: Only the accessories are dishwasher safe.
4. Wipe the inside and outside of the cooking appliance with a clean, moist cloth.
NOTE: Never wash or submerge the cooking appliance in water.
NOTE: When using this appliance, never fill any cooking vessel with oil or liquid of any kind. This appliance cooks with hot air only.
Preparing For Use
1. Place the appliance on a stable, level, horizontal, and heat-resistant surface.
2. Before initial use, wipe the inside and outside of the appliance with a warm, moist cloth and mild detergent. Rinse with a warm, moist cloth. Hand wash all cooking accessories. Before cooking food, preheat the appliance for a few minutes to allow the appliance to burn off the manufacturer’s protective coating of oil. Wipe the appliance with warm, soapy water and a washcloth after the burn-in cycle.
3. Select the cooking accessory for your recipe.
WARNING
• NEVER cover the air vents on the top and back of the cooking appliance or place anything on top of the appliance.
• NEVER fill any cooking vessel with oil or liquid of any kind. This appliance cooks with hot air only.
• NEVER use the appliance Door as a place to rest hot food or accessories. The hot food or accessory could damage the appliance Door or cause the appliance to tip. Personal injury could result.
• ALWAYS use oven mitts when removing hot accessories or food. Always place hot food or accessories on a heat-resistant surface.
NEVER place them directly on the countertop.
General Operating Instructions
Cooking With The Appliance
- Put your chosen cooking accessory into the appliance and shut the appliance door. Plug the power cord into a 120V dedicated outlet.
- Place the ingredients on your chosen accessory.
- When the chosen cooking accessory is in place, close the door and press the Power Button once (see #1 on page 8).
- Select a preset function (see #7–16 on page 9) or manually set the Temperature and then the Time (see #4–5 on page 8). Refer to the detailed Control Panel instructions on page 8.
- The appliance will automatically start the cooking cycle a few seconds after a preset function is selected or the Time and/or Temperature are adjusted manually.
Alternatively, you can press the Power Button to begin the cooking cycle immediately once the desired cooking time and temperature have been selected. Add 3 mins. to the cooking time when starting with a cold appliance.
NOTE: You may open the appliance door to view the food at any time during the cooking process to check the progress.
NOTE: Consult the charts in this manual or the recipe books to determine the correct settings for the specific item and weight being cooked.
Tips
• Foods that are smaller in size usually require a slightly shorter cooking time than larger ones.
• Flipping or turning foods halfway through the cooking process ensures that all the pieces are evenly fried.
• Misting a bit of vegetable oil on fresh potatoes is suggested for a crispier result. When adding a little oil, do so just before cooking.
• Snacks normally cooked in an oven can also be cooked in the appliance.
• Use the premade dough to prepare filled snacks quickly and easily. Premade dough also requires a shorter cooking time than homemade dough.
• Place fragile or filled foods in a baking tin or oven dish in the appliance. A baking tin or oven dish is also suggested when baking a cake or quiche.
• You can use the appliance to reheat foods. Simply set the temperature and time to however warm you want your food.
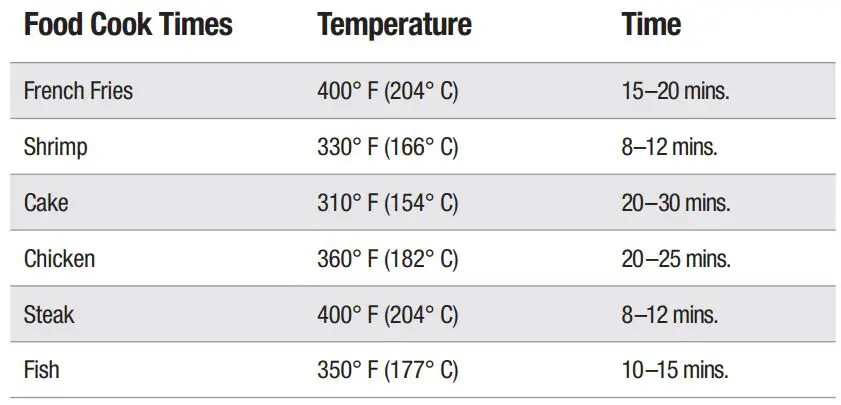
Cooking Chart
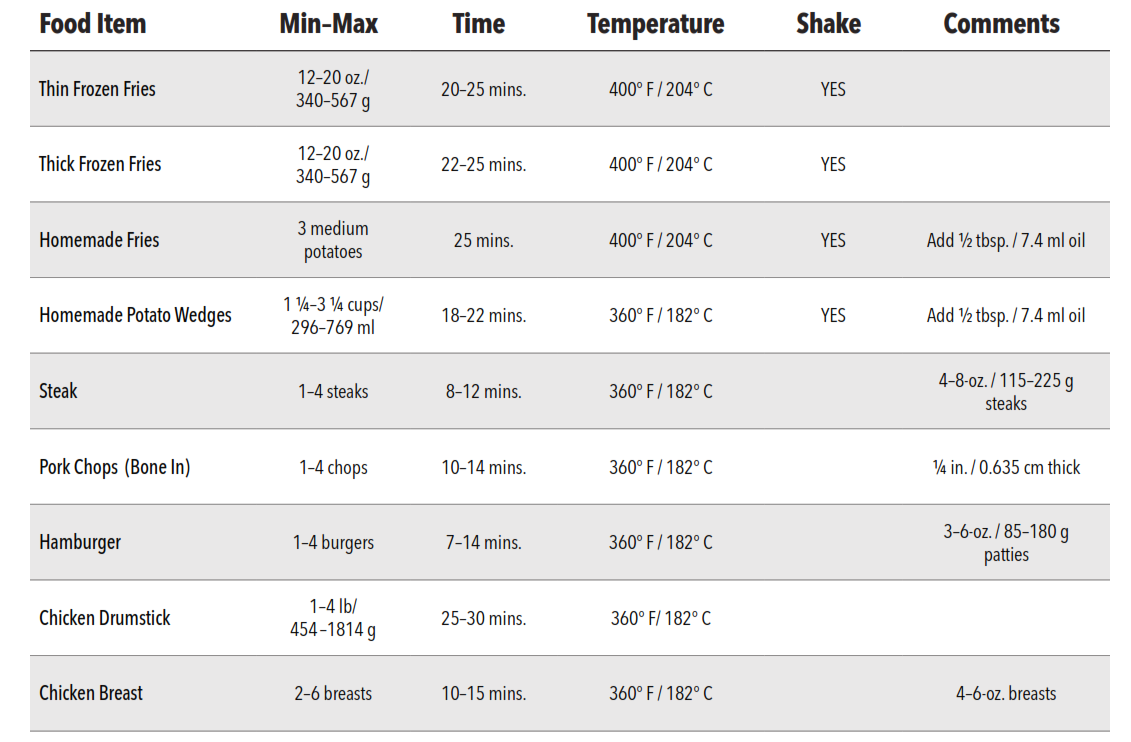
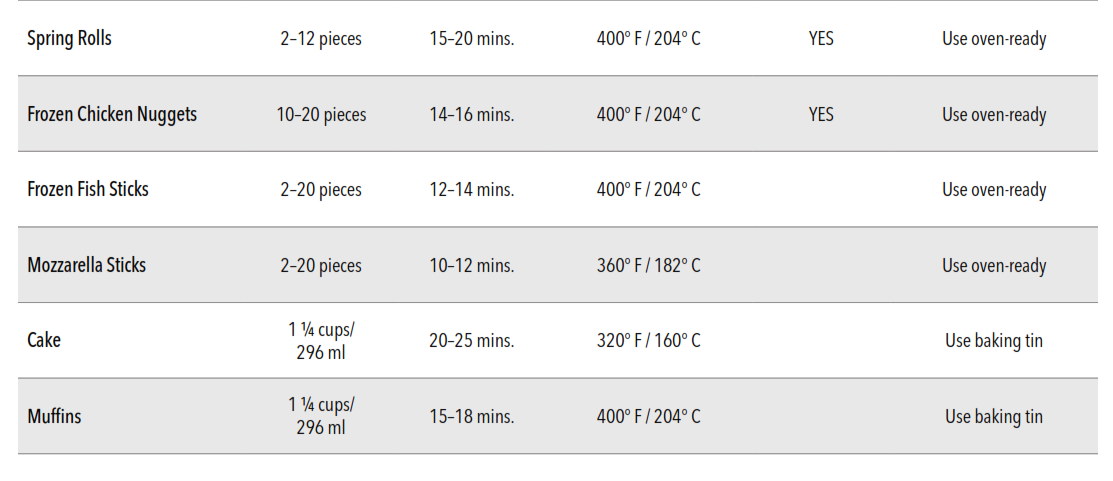
Cooking Chart
Settings
The table on page 14 will help you select the correct temperature and time for best results. As you become more familiar with the appliance cooking process, you may adjust these settings to suit your own personal tastes.
NOTE: Keep in mind that these settings are guides. Since ingredients differ in origin, size, shape, and brand, we cannot guarantee the exact settings for your ingredients.
Tip
For food you want to flip, set the Timer to half the time needed for the recipe and the Timer bell will alert you when it’s time to flip your food. When you hear the timer bell, the preset preparation time has elapsed. Flip your food and reset the appliance to the remaining time and temperature needed to finish cooking the food.
Cleaning & Storage
Cleaning
Remove the power cord from the wall socket and be certain the appliance is thoroughly cooled before cleaning.
Clean the appliance after each use. The cooking accessories are made of durable stainless steel and are dishwasher safe. Never use abrasive cleaning materials or utensils on these surfaces. Parts with caked-on food should be soaked in warm, soapy water for easy removal.
1. Wipe the outside of the appliance with a warm, moist cloth and mild detergent.
2. To clean the appliance door, remove it by lifting it to a 45° angle while gently pulling it upward. Clean both sides with warm, soapy water on a damp cloth. Do not soak or submerge the door in water or wash in the dishwasher.
3. Clean the inside of the appliance with hot water, a mild detergent, and a non-abrasive sponge.
4. If necessary, remove unwanted food residue from the upper screen with a soft cleaning brush.
Storage
1. Once the fan has stopped running, unplug the appliance and let it cool thoroughly.
2. Make sure all components are clean and dry.
3. Place the appliance in the clean, dry place.
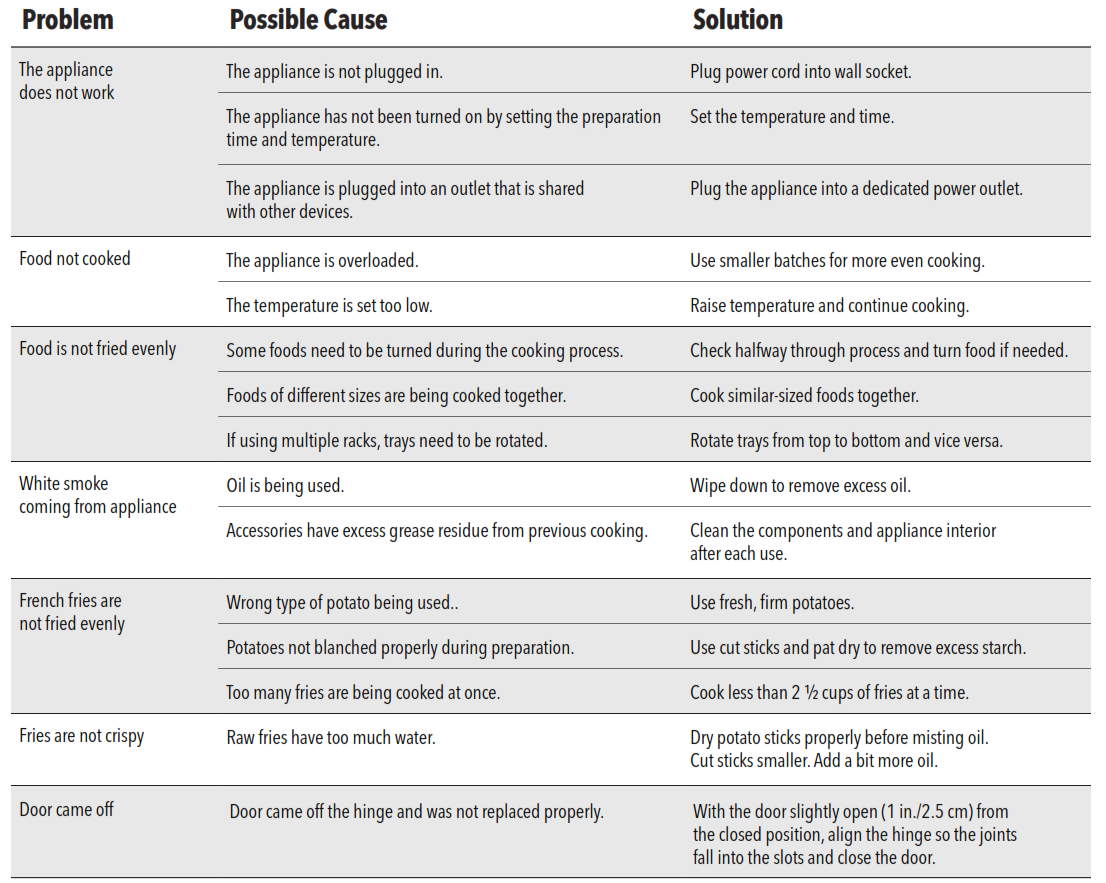
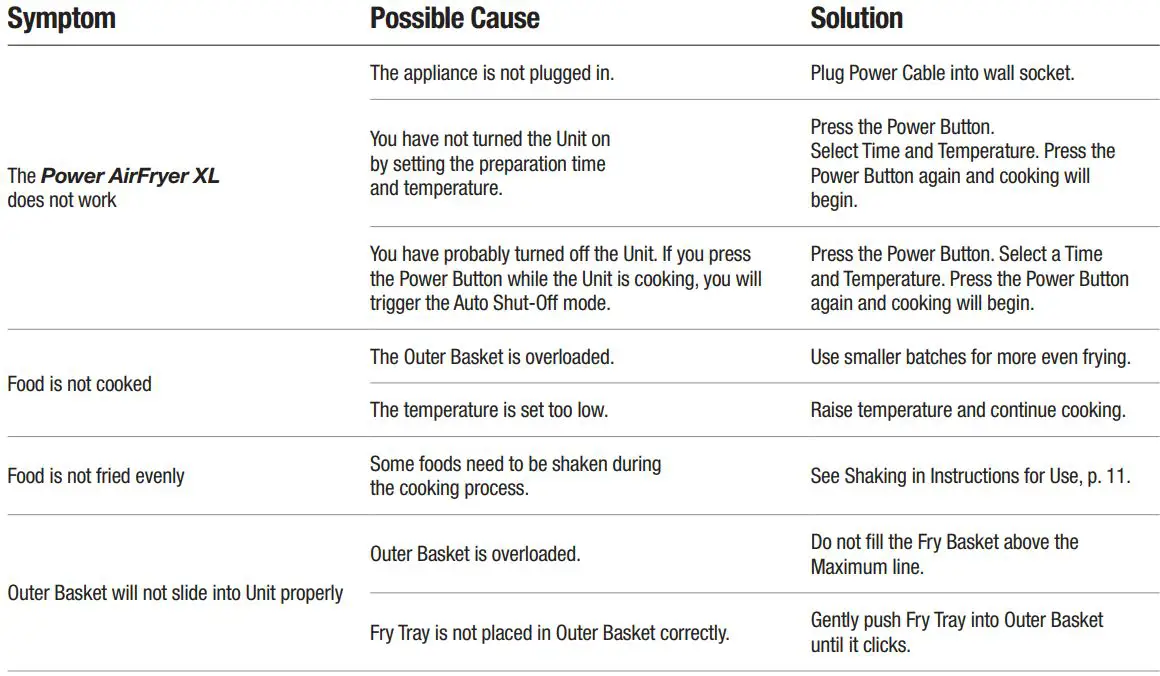
Troubleshooting

Frequently Asked Questions
- Can I prepare foods other than fried dishes with my appliance?
You can prepare a variety of dishes, including steaks, chops, burgers, and baked goods. See the appliance Recipe Guide. - Is the appliance good for making or reheating soups and sauces?
Never cook or reheat liquids in the appliance. - What do I do if the appliance shuts down while cooking?
As a safety feature, the appliance has an Auto Shut-Off device that prevents damage from overheating. Unplug and allow the appliance to cool down. Plug back in and restart with the Power Button. - Does the appliance need time to heat up?
Preheating is needed when you are cooking from a cold start, add 3 mins. to the cook time to compensate. - Is it possible to shut off the appliance at any time?
Press the Power Button once. - Can I check the food during the cooking process?
You can check on the progress of the cooking cycle at any time. If you open the door, the cooking time and temperature should resume from where they left off when you close the door. - Is the appliance dishwasher safe?
Only the accessories are dishwasher safe. The appliance itself containing the heating coil and electronics should never be submerged in liquid of any kind or cleaned with anything more than a hot, moist cloth or nonabrasive sponge with a small amount of mild detergent. - What happens if the appliance still does not work after I have tried all the troubleshooting suggestions?
Never attempt a home repair. Contact the retailer and follow the procedures set forth by the guarantee. Failure to do so could render your guarantee null and void. - Can the door come off?
Yes. Removing the door will allow you to clean the appliance and windows more easily. Open the door slightly (about 1 in./2.5 cm from the closed position), and gently lift up on the door hinge. The joints will slide out. To reattach the door, position the door to be slightly open as before. Then, align the hinge so that the joins fall into the slots. Close the door. Do not clean the door in the dishwasher.
![]()
90-Day Money-Back Guarantee
The PowerXL Vortex Air Fryer Pro is covered by a 90-day money-back guarantee. If you are not 100% satisfied with your product, return the product and request a replacement product or refund. Proof of purchase is required. Refunds will include the purchase price, less processing and handling. Follow the instructions in the Return Policy below to request a replacement or refund.
Replacement Guarantee Policy
Our products, when purchased from an authorized retailer, include a 1-year replacement guarantee if your product or component part does not perform as expected, the guarantee extends only to the original purchaser and is not transferable. If you experience an issue with one of our products within 1 year of purchase, return the product or the component part for replacement with a functionally equivalent new product or part. The original proof of purchase is required, and you are responsible to pay to return the unit to us. In the event a replacement unit is issued, the guarantee coverage ends six (6) months following the receipt date of the replacement unit or the remainder of the existing guarantee, whichever is later. Tristar reserves the right to replace the unit with one of equal or greater value.
Return Policy
If, for any reason, you would like to replace or return the product under the money-back guarantee, your order number can be used as the return merchandise authorization number (RMA). If the product was purchased in a retail store, return the product to the store or use “RETAIL” as the RMA. Return your product to the address provided below for a replacement, which will incur no additional processing and handling fees, or for the refund of your purchase price, less processing and handling. You are responsible for the cost of returning the product. You can locate your order number at www.customerstatus.com. You can call customer service at 973-287-5129 or email [email protected] for any additional questions. Pack the product carefully and include in the package a note with (1) your name, (2) mailing address, (3) phone number, (4) email address, (5) reason for return, and (6) proof of purchase or order number, and (7) specify on the note whether you are requesting a refund or replacement. Write the RMA on the outside of the package.
Send the product to the following return address:
PowerXL Vortex Air Fryer Pro
Tristar Products
500 Returns Road
Wallingford, CT 06495
If the replacement or refund request has not been acknowledged after two weeks, please contact Customer Service at 973-287-5129.
Refund
Refunds requested within the money-back guarantee timeframe will be issued to the payment method used at purchase if the item was purchased directly from Tristar. If the item was purchased from an authorized retailer, proof of purchase is required, and a check will be issued for the item and sales tax amount. Processing and handling fees are non-refundable.
![]()
We are very proud of the design and quality of our
PowerXL Vortex Air Fryer ProTM.
This product has been manufactured to the highest standards. Should you have any questions, our
friendly customer service staff is here to help you.
Visit us at www.TristarCares.com, email us at [email protected],
or call us at 973-287-5129
VS-3915 Slowcooker
Instruction Manual![]()

VS-3915
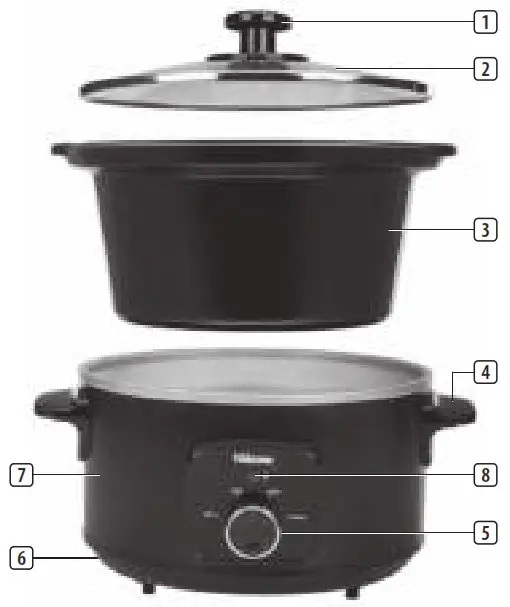
PARTS DESCRIPTION 
Instruction manual
SAFETY
- By ignoring the safety instructions the manufacturer can not be held responsible for the damage.
- If the supply cord is damaged, it must be replaced by the manufacturer, ts service agent or similarly qualified persons in order to avoid a hazard.
- Never move the appliance by pulling the cord and make sure the cord can not become entangled.
- The appliance must be placed on a stable, level surface
- The user must not leave the device unattended while it is connected to the supply.
- This appliance is only to be used for household purposes and only for the purpose, it is made for.
- This appliance shall not be used by children aged less than 8 years. This appliance can be used by children aged from 8 years and above and persons with reduced physical, sensory or mental capabilities or lack of experience and knowledge if they have been given supervision or instruction concerning the use of the appliance in a safe way and understand the hazards involved. Children shall not play with the appliance. Keep the appliance and its cord out of reach of children aged less than 8 years. Cleaning and user maintenance shall not be made by children unless older than 8 and supervised.
- To protect yourself against an electric shock, do not immerse the cord, plug, or appliance in the water or any other liquid.
- This appliance is intended to be used in household and similar applications such as:
– Staff kitchen areas in shops, offices, and other working environments.
– By clients in hotels, motels, and other residential-type environments.
– Bed and breakfast type environments.
– Farmhouses. - To protect yourself against an electric shock, do not immerse the cord, plug or appliance in the water or any other liquid.
 Surface are liable to get hot during use.
PARTS DESCRIPTION
- Lid handle
- Glass lid
- Ceramic cooking pot
- Slow cooker handle
- Power selector switch
- Plug with cord
- Stainless steel exterior base
- Pilot light
BEFORE THE FIRST USE
- Remove all packaging of the device.
- Check if the voltage of the appliance corresponds to the main voltage of your home. Rated voltage: AC220-240V 50Hz. The socket must be at least 16A or 10 A slow- rotected
- Place the device on a flat stable surface and ensure a minimum of 10 cm. free space around the device. This device is not suitable for installation in a cabinet or for outside use.
- Wash before using the device for the first time all loose parts in warm soapy water. Rinse and dry thoroughly below. These parts are also dishwasher safe.
- The heating element on the inner side of the base becomes very hot. Never touch this, you can get very serious burns.
- During the operation of the machine, steam arises which is very ot, always use the handles and oven mitts when the steaming bowls, rice bowl, the drip tray or base are being touched.
USE
The slow cooker has three power settings: LOW, HIGH, and WARM. Use the recommended guidelines offered in the recipe being used to determine cooking time and power setting. Dishes can be prepared well in advance of mealtime and cooking time regulated so that food is ready to serve at a convenient time.
| Cooking Time | Recommended power setting |
| 6-8 hours | Low |
| 4-6 hours | High |
| Food | Weight | Time (low) | Time (high) |
| Beef | 2.0 – 2.5 kg | 8 hours | 6 hours |
| Whole chicken | 2.0 – 3.0 kg | 6 hours | 4 hours |
| Pork | 1.0 – 1.5 kg | 6 hours | 4 hours |
Tabel 1: Slow cooker cooking table
- Prepare recipe according to instructions. Place food into the cooking pot and cover.
- Plug the slow cooker into an electrical outlet and select LOW, HIGH or WARM settings. Slow cooking will commence. The power on the indicator will illuminate.
- Always cook with the lid on.
IMPORTANT! Do not remove the lid often when cooking as this will prolong the cooking time.
- Serving. Turn the slow cooker to the WARM setting for a short period of time prior to serving or turn to the OFF position to unplug the appliance.
IMPORTANT! The slow cooker will operate until switched OFF. Do not overcook food. Monitor cooking and ensure to switch OFF the slow cooker when the food is cooked properly.
- Using pot holders, remove the cover.
CAUTION: When removing the cover, grasp the designed area on the lid and lift to allow steam to escape before setting the cover aside. To avoid burns, always hold cover so that escaping steam flows away from hands and face.
- Grasp the cooking pot by the handles and remove it from the body.
- Tableside serving. If serving directly from the cooking pot, always place a trivet or protective padding under the pot before placing it on a table or countertop.
CAUTION: The pot will be hot and can cause burns.
RECIPES
Portuguese Garlic Chicken
1 medium onion, finely sliced
6 cloves of garlic, finely sliced
2 medium tomatoes cut into quarters ⅓ cup of chopped roast ham
½ cup of raisins (Golden Raisins)
1.7 kg chicken ½ cup of Port
½ cup of Brandy
1 teaspoon of Dijon mustard
2 teaspoons of tomato puree
1.5 teaspoons of corn starch
2 tablespoons of cold water
1 teaspoon of red wine vinegar parsley sprigs salt
Mix the onion slices, garlic, tomato ham, and raisins. Remove the chicken giblets and put them aside for use another time; rinse the inside and outside of the chicken and dry. Secure the wings and tie up the thighs.Place the chicken on the onion mixture. Mix the Port, Brandy, mustard, and tomato puree and pour over the chicken. Cover and slow cook on low (LOW) until the meat on the thighs is tender (7 to 8 hours) Carefully place the chicken on an oven tray and sear for about 5 minutes. Put the chicken on a hot plate. Skim the fat from the cooking liquid and mix in the corn starch solution. Select the high setting (HIGH), cover, and simmer, stirring 2 or 3 times until the sauce thickens (about 10 -15 minutes). Add the vinegar and season according to taste. To serve, garnish the chicken with some parsley and quartered tomatoes. Cut the chicken and add a little sauce. The remaining sauce can be served in a sauce boat.
Cranberry Chicken
1 finely sliced small onion
1 cup of fresh or frozen (unthawed) cranberries
1 kg of skinless deboned chicken thighs
¼ cup of ketchup
2 teaspoons of raw sugar
1 teaspoon dry mustard
2 teaspoons of cider vinegar
1.5 teaspoons corn starch
2 tablespoons of cold water Salt
Mix the onions and the cranberries in the slow cooker. Rinse and dry the chicken thighs and place them into the cooker. In a small bowl mix the ketchup, sugar, mustard, and vinegar and place this mixture onto the chicken. Cover and simmer on low (LOW) until the chicken is tender (6 ½ -7 ½ hours). Carefully place the chicken onto a serving dish. ix the corn starch with the water and stir this into the cooking liquid. Turn the heat to high (HIGH), cover with the lid, and simmer, stirring 2 or 3 times until the sauce thickens about 10 -15 minutes). Season according to taste. Pour the sauce over the chicken.
Beef and Potato Stew
1-1.25 kg very lean beef
2 tablespoons of bacon fat or other fat
2 large diced onions
5 large potatoes chopped into eighths
4 or 5 large carrots cut into 5cm pieces
Salt and pepper to season 1 can of tomato soup Sear the meat in the fat or bacon grease. Add the diced onions. Place the meat, onions, vegetables, seasoning, and can of tomato soup, along with some water, into the slow cooker. Simmer for 7 hours on low (LOW). Add more water if necessary. Serve with bread.
CLEANING AND MAINTENANCE
- Remove the plug from the socket and allow all parts to cool down.
- Clean the steaming bowls, and rice bowl, cover, and drip tray in warm soapy water. These parts are also dishwasher safe.
- Do not immerse the base in water or other liquid. Place the base, not in the dishwasher, but clean it with a damp cloth.
- Clean the outside with a damp cloth. Never use harsh and abrasive cleaners, steel wool, or a scouring pad as this will damage the device. Do not immerse in water or other liquid.
- The unit should be regularly decalcified. Pour about 0.7 liters of vinegar into the base and place the first steaming bowl with the lid on the base. Turn on the device and have it enabled for about 20 minutes. Then rinse the parts thoroughly and fill the tank with water, switch it on and let it stand for about 10 minutes. Then rinse the loose parts and the base thoroughly with clean water and make them dry.
ENVIRONMENT
 This appliance should not be put into the domestic garbage at the end of its durability but must be offered at a central point for the recycling of electric and electronic domestic appliances. This symbol on the appliance, instruction manual, and packaging put your attention to this important issue. The materials used in this appliance can be recycled. By recycling used domestic appliances, you contribute an important push to the protection of our environment. Ask your local authorities for information regarding the point of recollection.
Support
You can find all available information and spare parts at www. tristar.eu
 www.tristar.eu
WWW.TRISTAR.EU
ristar Europe B.V. | Jules Verneweg 87
5015 BH Tilburg | The Netherlands
Quick Start Guide
*See owner’s manual for complete assembly and operating instructions and important safety information before using this product.
STEP 1
Remove Outer Basket
Remove the Outer Basket by pulling the Easy-Grip Handle straight out.
STEP 2

Load Outer Basket
Arrange the food you are cooking on top of the nonstick Fry Tray.

STEP 3
Return Outer Basket to Unit
Use the Easy-Grip Handle to push the Outer Basket into the Unit until the Outer Basket clicks.
STEP 4
Power Unit On
Set the Time and Temperature. Follow instructions specific to your recipe.
STEP 5
Remove Outer Basket
Set the Unit on a secure, heat-resistant surface. Use tongs to remove food.
NOTE:
- Before plugging the Power AirFryer into a power outlet, make sure all packaging material is removed from both outside and inside the Unit.
- After the cooking cycle has completed, the Operating Light will shut off and the Unit will beep. Check to see if your food is fully cooked and then transfer it to a serving dish.
Tristar PAFXL-2QT Power AirFryer XL

Quick Start Guide
See owner’s manual for complete assembly and operating instructions and important safety information before using this product.
STEP 1
Remove Outer Basket
Pull the Easy-Grip Handle straight out.
STEP 2
Load Outer Basket
Arrange the food you are cooking on top of the nonstick Fry Tray.
STEP 3
Return Outer Basket to Unit
Push the Easy-Grip Handle straight in, until it clicks.
STEP 4
Power Unit On
Set the Time and Temperature. Follow instructions specific to your recipe.
STEP 5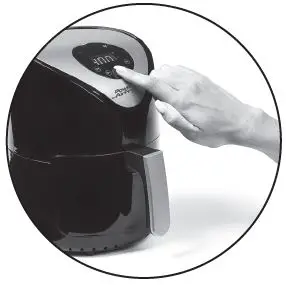
Remove Outer Basket
Set the Unit on a secure, heat-resistant surface. Use tongs to remove food.
NOTE:
- Before plugging the Power AirFryer XL into a power outlet, make sure all packaging material is removed from both outside and inside the Unit.
- After the cooking cycle has ended, the Digital Control Panel will shut off and the Unit’s internal fan will run for an additional 10 secs. to cool down. After the Unit beeps five times, check to see if your food is fully cooked and transfer to a serving dish.


TRISTAR YJ-803A Power AirFryer XL. Owner’s Manual
Save These Instructions – For Household Use Only
- MODEL: YJ-803A
- POWER: 120V, 60Hz
- WATTAGE: 1,000W
When using electrical appliances, basic safety precautions should always be followed. Do not use the Power AirFryer XL™ until you have read this manual thoroughly.
Guarantee Information Inside
![]()
BEFORE YOU BEGIN
The Power AirFryer XL will provide you many years of delicious family meals and memories around the dinner table. But before you begin, it’s very important that you read this entire manual, making certain that you are totally familiar with this appliance’s operation and precautions.
IMPORTANT SAFEGUARDS
 WARNING
PREVENT INJURIES! – CAREFULLY READ ALL INSTRUCTIONS BEFORE USE!
When using electrical appliances, always follow these basic safety precautions.
- READ AND FOLLOW all instructions carefully.
- NEVER immerse the Main Unit Housing, which contains electrical components and heating elements, in water. Do not rinse under the tap.
- THIS APPLIANCE IS NOT INTENDED FOR use by persons with reduced physical, sensory, or mental capabilities or lack of experience and knowledge unless they are under the supervision of a responsible person or have been given proper instruction in using the appliance. This appliance is not intended for use by children.
- TO AVOID ELECTRICAL SHOCK, do not put liquid of any kind into the Main Unit Housing containing the electrical components.
- THIS APPLIANCE HAS A POLARIZED PLUG (one blade is wider than the other). To reduce the risk of electric shock, this plug is intended to fit into a polarized outlet only one way. If the plug does not fit fully into the outlet, reverse the plug. If it still does not fit, contact a qualified electrician. Do not attempt to modify the plug in any way.
- MAKE SURE the appliance is plugged into a wall socket. Always make sure that the plug is inserted into the wall socket properly.
- DO NOT place the Unit on the stove top. Place on a flat, horizontal surface with adequate space for air flow. Do not place other appliances within 5 in. of the Unit.
- TO PREVENT food contact with the heating elements, do not overfill.
- DO NOT cover the Air Intake Vent or Hot Air Outlet Vent while the Power AirFryer XL is operating. Doing so will prevent even cooking and may damage the Unit or cause it to overheat.
- NEVER pour oil into the Outer Basket. Fire and personal injury could result.
- WHILE COOKING, the internal temperature of the Unit reaches several hundred degrees F. To avoid personal injury, never place hands inside the Unit unless it is thoroughly cooled down.
- DO NOT use this Unit if the plug, the power cord, or the appliance itself is damaged in any way.
- IF THE POWER CORD IS DAMAGED, you must have it replaced by the manufacturer, its service agent, or a similarly qualified person in order to avoid hazard.
- KEEP the appliance and its power cord out of the reach of children when it is in operation or in the cooling down process.
- KEEP the power cord away from hot surfaces. Do not plug in the power cord or operate the Unit controls with wet hands.
- NEVER connect this appliance to an external timer switch or separate remote-control system.
- NEVER use this appliance with an extension cord of any kind. A short power-supply cord (or detachable power-supply cord) is provided to reduce the risk of becoming entangled in or tripping over a longer cord.
- DO NOT operate the appliance on or near combustible materials, such as tablecloths, paper towels, or curtains.
- WHEN COOKING, do not place the appliance against a wall or against other appliances. Leave at least 5 in. free space on the back and sides and above the appliance. Do not place anything on top of the appliance.
- DO NOT USE the Power AirFryer XL for any purpose other than described in this manual.
- NEVER operate the appliance unattended.
- WHEN IN OPERATION, hot steam is released through the Hot Air Outlet Vent. Keep your hands and face at a safe distance from the Hot Air Outlet Vent. Also avoid the hot steam and air while removing the Outer Basket and Fry Tray from the appliance.
- THE UNIT’S OUTER SURFACES may become hot during use. The Outer Basket and Fry Tray will be hot. Wear oven mitts when handling hot components or touching hot surfaces.
- SHOULD THE UNIT EMIT BLACK SMOKE, unplug immediately and wait for smoking to stop. Allow the Unit to cool and wipe out excess oil and grease from the Unit.
WARNING:
For California Residents
This product can expose you to Bisphenol A, which is known to the State of California to cause birth defects or other reproductive harm. For more information, go to www.P65Warnings.ca.gov.
CAUTION
- Always operate the appliance on a horizontal surface that is level, stable, and noncombustible.
- This appliance is intended for normal household use only. It is not intended for use in commercial or retail environments.
- If the Power AirFryer XL is used improperly or for professional or semi-professional purposes or if it is not used according to the instructions in the user manual, the warranty becomes invalid and the manufacturer will not be held liable for damages.
- Always unplug the appliance after use.
- When the cooking time has completed, cooking will stop and the fan will continue running for 10 secs. to cool down the Unit.
- Let the appliance cool down for approximately 30 mins. before handling, cleaning, or storing.
- The Power AirFryer XL is equipped with an internal microswitch that automatically shuts down the fan and heating element when the Outer Basket is removed.
Overheating Protection
Should the inner temperature control system fail, the overheating protection system will be activated and the Unit will not function. Should this happen, unplug the Unit. Allow time for the Unit to cool completely before restarting or storing.
Automatic Shut-Off
The Unit has a built-in shut-off device that will automatically shut off the Unit when the cooking time has completed. You can manually switch off the Unit by pressing the Power Button. The fan will continue running for 10 secs. to cool down the Unit.
Electric Power
The unit should be operated on a dedicated electrical outlet. If the electrical outlet is being used by other appliances, your new Unit may not operate properly.
Electromagnetic Fields
This appliance complies with all standards regarding electromagnetic fields. If handled properly and according to the instructions in this user manual, the appliance is safe to use based on scientific evidence available today.
SAVE THESE INSTRUCTIONS – FOR HOUSEHOLD USE ONLY
Parts & Accessories
- FRY TRAY
- OUTER BASKET
- EASY-GRIP HANDLE
- MAIN UNIT HOUSING
- AIR INLET VENT
- CONTROL PANEL
- HOT AIR OUTLET VENT
- POWER CABLE
NOTE: Unpack all listed contents from the packaging. Contents vary by model. Please remove any clear or blue protective film on the components before use.
CAUTION: Unit may be hot. Be careful not to touch the Unit while in use. Keep the Unit away from other objects.
IMPORTANT: Please make sure that your Power AirFryer XL has been shipped with the components that you ordered (some accessories may be sold separately). Check everything carefully before use. If any part is missing or damaged, do not use this product. Contact the shipper using the customer service number located on the back of this manual.
Using The Control Panel
- Power Button
Once the Outer Basket and Fry Tray are properly placed in the Main Unit Housing, the LCD Panel will be illuminated. Pressing the Power Button once will set the Unit to a default cooking temperature of 400° F and time of 10 mins. Pressing the Power Button a second time will start the cooking process.
Pressing the Power Button during the cooking cycle will turn the Unit off. - Temperature Control Buttons
The + and − symbols enable you to add or decrease cooking temperature 10° F at a time. Keeping a button held down will rapidly change the temperature.
Temperature control range: 180° F–400° F. - Timer Control Buttons
The + and – symbols enable you to add or decrease cooking time 1 min. at a time. Keeping the Button held down will rapidly change the time. Time control range: 1– 60 mins. - Time and Temperature Display
This display will keep track of the temperature and remaining cook time. - Blue Fan Icon
The Blue Fan Icon will appear when the Unit is turned on and will remain illuminated until cooking cycle is complete. - Heating Element Icon
The Heating Element Icon will blink when the Unit is heating up to reach the desired temperature. The Icon will disappear once the Unit has reached its set temperature.
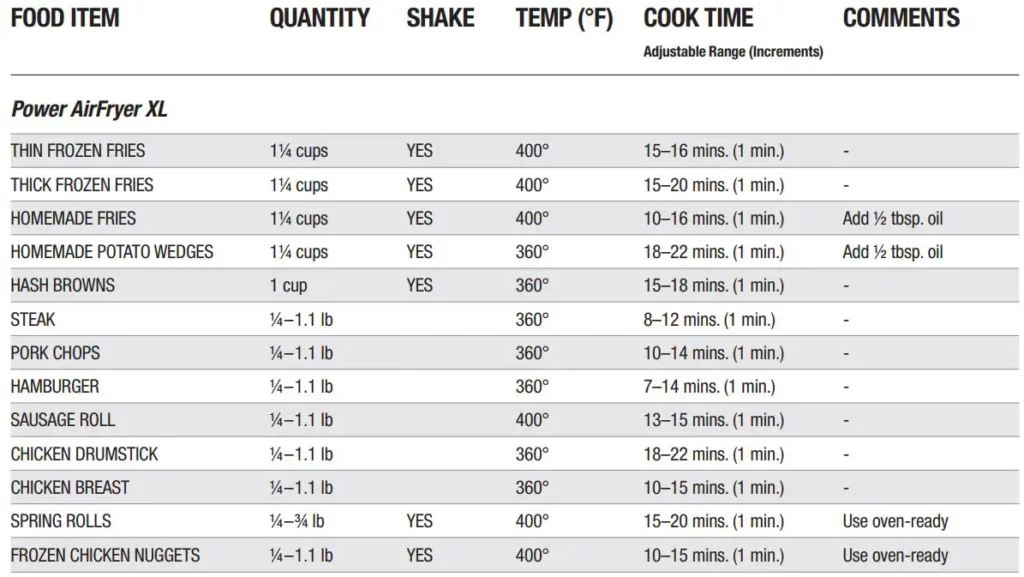
Cooking Chart
Once you are familiar with the Unit, you may want to experiment with your own recipes. Simply choose the time and temperature that suits your personal taste.
Instructions for Use
Before First Use
- Remove all the packaging material.
- Remove any stickers or labels from the Unit.
- Before initial use, wipe the inside and outside of the Unit with a warm, moist cloth and mild detergent. Handwash all cooking accessories.
- Before cooking food, preheat the Power AirFryer XL for a few minutes to allow the Unit to burn off the manufacturer’s protective coating of oil. Wipe the Unit with warm, soapy water and a washcloth after this burn-in cycle.
- Place the Unit on a stable, horizontal, and level surface. Do not place the Unit on a surface that is not heat resistant. Ensure that the Unit is used in an area with good air circulation and away from hot surfaces and any combustible materials. Do not place on the stove top.
- Place the Fry Tray in the Outer Basket. Slide the Outer Basket into the Unit. If the Basket is placed properly, it will click into place.
- The Power AirFryer XL cooks using hot air. Do not fill the Outer Basket with oil or frying fat.
- Do not put anything on top of the Unit. This disrupts the airflow and affects the cooking results.
Using the Power AirFryer XL
- Plug the Unit into a grounded wall socket.
- To preheat, push the Power Button.
- Press the Temperature Increase or Decrease Buttons to set the cooking temperature.
- Press the Time Decrease Button to set the preheat time to 3 mins. When the preheat cycle finishes, carefully pull the Outer Basket out of the Unit and place the ingredients inside. NOTE: Never use the Outer Basket without the Fry Tray.
- Do not touch the Outer Basket directly because the Outer Basket becomes very hot during operation. Only hold the Outer Basket by its handle.
- Press the Power Button. Set the appropriate time and temperature for the ingredients you
are cooking. - When the timer beeps five times, the set cooking time has elapsed. Pull the Outer Basket out of the Unit and place it on a heat-resistant surface.
- If the food is fully cooked, use tongs to remove food. CAUTION: Do not turn the Outer Basket upside down because any excess oil that has collected on the bottom of the basket will leak onto the ingredients.
- If the food is not fully cooked, simply slide the Outer Basket back into the Unit and add a few minutes to the cooking time.
- The Unit is instantly ready for preparing another batch.
Instructions for Use
Shaking
To ensure even cooking, some foods require shaking during the cooking process. Remove the Outer Basket from the Unit. Gently shake the contents as needed and place them back in the Unit to continue cooking.
CAUTION: The Outer Basket will be hot. Wear an oven mitt during this procedure.
- Place the Outer Basket on a heat-resistant surface.
- Shake the ingredients in the Basket.
- Return the Outer Basket to the Unit to finish cooking.
Tips
- Foods that are smaller in size usually require a slightly shorter cooking time than larger foods.
- Large quantities of food only require a longer cooking time than smaller quantities.
- Shaking smaller-sized foods halfway through the cooking process ensures that all the pieces are fried evenly.
- Adding a bit of vegetable oil to fresh potatoes is suggested for a crispier result. When adding oil, do so just before cooking and add only a small amount onto the potato.
- Snacks normally cooked in an oven can also be cooked in the Power AirFryer XL.
- Use premade dough to prepare filled snacks quickly and easily. Premade dough also requires a shorter cooking time thanhomemade dough.
- You can use the Power AirFryer XL to reheatfoods. Simply set the temperature and time to however warm you want your food.
Cooking Chart

NOTE
Keep in mind that these settings are guidelines. Since ingredients differ in origin, size, shape, and brand, we cannot guarantee the best settings for your ingredients.
Troubleshooting

Frequently Asked Questions
- Can I prepare foods other than fried dishes with my Power AirFryer XL?
You can prepare a variety of dishes, including steaks, chops, burgers, and baked goods. See the Power AirFryer XL Recipe Guide. - Is the Power AirFryer XL good for making or reheating soups and sauces?
Never cook or reheat liquids in the Power AirFryer XL. - Is it possible to shut off the Unit at any time?
Press the Power Button once or remove the Outer Basket. - What do I do if the Unit shuts off while cooking?
As a safety feature, the Power AirFryer XL has an Auto Shut-Off device that prevents damage from overheating. Remove the Outer Basket and set it on a heat-resistant surface. Allow the Unit to cool down. Remove the Power Cable from the outlet. Once cool, plug the Power Cable back into the socket.Restart with the Power Button. - Does the Unit need time to heat up?
If you are cooking from a cold start, add 3 mins. to the cooking time to compensate. - Can I check the food during the cooking process?
You can remove the Outer Basket at any time while cooking is in progress. During this time, you can shake the contents in the Outer Basket if needed to ensure even cooking. - Is the Power AirFryer XL dishwasher safe?
Only the Fry Tray is dishwasher safe. The Unit itself, which contains the heating coil and electronics, should never be submerged in liquid of any kind or cleaned with anything more than a warm, moist cloth or nonabrasive sponge with a small amount of mild detergent. - What happens if the Unit still does not work after I have tried all the troubleshooting suggestions?
Never attempt a home repair. Contact the manufacturer and follow the procedures set forth by the warranty. Failure to do so could render your warranty null and void
Cleaning
Clean the Power AirFryer XL after each use. The Outer Basket
and the Fry Tray are coated with a special nonstick surface.
Never use abrasive cleaning materials or utensils on these
surfaces.
- Remove the Power Cable from the wall socket and be certain the appliance is thoroughly cooled before cleaning.
- Wipe the outside of the appliance with a warm, moist cloth and mild detergent.
- Clean the Outer Basket and the Fry Tray with hot water, a mild detergent, and a nonabrasive sponge.
NOTE: The Fry Tray is dishwasher safe. TIP: Should the Fry Tray contain difficult-to-remove food particles, soak in hot, soapy water for 10 mins. - Clean the inside of the appliance with hot water, a mild detergent, and a nonabrasive sponge.
- If necessary, remove unwanted food residue from the heating element with a soft cleaning brush.
Storage
- Unplug the appliance and let it cool down thoroughly.
- Make sure all components are clean and dry.
- Place the appliance in a clean, dry place.
60-Day Money-Back Guarantee
If you decide that you don’t love this product, your order is covered by our 60-Day Money-Back Guarantee. You have 60 days from the day you receive your product to request a replacement product or refund of the purchase price minus processing and handling fees.
To receive a refund or replacement, you must return the product to us at your expense. To return the product, call customer service at 1-973-287-5129 and request a return merchandise authorization number. Pack the product carefully and include in the package a note with (1) your name, (2) mailing address, (3) phone number, (4) email address, (5) reason for return, and (6) proof of purchase or order number, and (7) specify on the note whether you are requesting a refund or replacement. Write the return merchandise authorization number on the outside of the package.
Send the product to the following return address:
Power AirFryer XL
Tristar Products
500 Returns Road
Wallingford, CT 06495
We are very proud of the design and quality of our Power AirFryer XL.
This product has been manufactured to the highest standards. You can visit www.TristarCares.com to find answers to questions, read recipes and find additional items to compliment your Unit. Should you have any questions, our friendly customer service staff is here to help you. 1-973-287-5129
 Distributed by:
Tristar Products, Inc.
Fairfield, NJ 07004
© 2019 Tristar Products, Inc.
Made in China
PAFXL-2QT_IB_TP_ENG_V1_190207
When using electrical appliances, basic safety precautions should always be followed. Do not use The Power XL Smokeless Grill until you have read this manual thoroughly
Before You Begin
It is very important that you read this entire manual, ensuring that you are totally familiar with its operation and precautions.
IMPORTANT SAFEGUARDS
When using electrical appliances, basic safety precautions should always be followed, including:
- NEVER IMMERSE the Main Unit Housing, which contains electrical components and heating elements, in water. Do not rinse under the tap.
- TO AVOID ELECTRICAL SHOCK, DO NOT put liquid of any kind into the Main Unit Housing containing the electrical components.
- This appliance has a three-prong plug. This plug is intended to fit into a polarized outlet only one way. DO NOT ATTEMPT to modify the plug in any way.
- MAKE SURE the appliance is plugged into a wall socket.
- While cooking, the internal temperature of the Unit reaches several hundred degrees Fahrenheit. TO AVOID PERSONAL INJURY, never place hands inside the Unit unless it is thoroughly cooled.
- This appliance is NOT INTENDED FOR USE by persons with reduced physical, sensory, or mental capabilities or a lack of experience and knowledge unless they are UNDER THE SUPERVISION of a responsible person or have been given proper instruction in using the appliance. This appliance is NOT INTENDED FOR USE by children.
- When cooking, DO NOT PLACE the appliance against a wall or against other appliances. Leave at least 5 in. free space on the back and sides and above the appliance. Do not place anything on top of the appliance.
- DO NOT USE this Unit if the plug, the Power Cable, or the appliance itself is damaged in any way.
- DO NOT PLACE The Unit on stove top surfaces.
- DO NOT USE outdoors.
- If the power cord is damaged, YOU MUST HAVE IT REPLACED by the manufacturer, its service agent, or a similarly qualified person in order to avoid hazard.
- Keep the appliance and its Power Cable OUT OF THE REACH of children when it is in operation or in the cooling process.
- KEEP THE POWER CORD AWAY from hot surfaces. DO NOT PLUG in the Power Cable or operate the Unit controls with wet hands.
- NEVER CONNECT this appliance to an external timer switch or separate remote-control system.
- NEVER use with an extension cord. A short power-supply cord (or detachable powersupply cord) is provided to reduce the risk from becoming entangled in or tripping over a longer cord.
- DO NOT OPERATE the appliance on or near combustible materials, such as tablecloths and curtains.
- DO NOT USE the Power XL Smokeless Grill for any purpose other than described in this manual.
- NEVER OPERATE the appliance unattended.
- WEAR OVEN MITTS when handling hot components or touching hot surfaces.
- Should the Unit emit black smoke, UNPLUG IMMEDIATELY and wait for smoking to stop before removing oven contents.
- Always operate the appliance on a horizontal surface that is level, stable, and noncombustible.
- his appliance is intended for normal household use only. It is not intended for use in commercial or retail environments.
- If the Power XL Smokeless Grill is used improperly or for professional or semiprofessional purposes or if it is not used according to the instructions in the user manual, the guarantee becomes invalid and the manufacturer will not be held liable for damages.
- Always unplug the appliance after use.
- Let the appliance cool for approximately 30 mins. before handling, cleaning, or storing.
- The glass lid and handle get very hot. Always use oven mitts.
SAVE THESE INSTRUCTIONS – FOR HOUSEHOLD USE ONLY.
Electric Power
If the electrical circuit is overloaded with other appliances, your new Unit may not operate properly. This Unit should be operated on a dedicated electrical circuit.
Shut-Off
You can manually shut off the appliance by pressing the Power Button at any time during cooking.
Electromagnetic Fields
This appliance complies with all standards regarding electromagnetic fields. If handled properly and according to the instructions in this user manual, the appliance is safe to use based on scientific evidence available today.
![]() Caution
Caution
- Do not operate Unit without the Grill or Griddle Plate.
- Do not place lid on the Unit without the Grill or Griddle Plate.
![]() WARNING: For California Residents
WARNING: For California Residents
This product can expose you to Bisphenol A, which is known to the State of California to cause birth defects or other reproductive harm. For more information, go to www.P65Warnings.ca.gov.
Unit Specifications
- Model Number: PG-1500FDR
- Supply Power: AC 120V 60Hz
- Rated Power: 1500W
Parts & Accessories

IMPORTANT:
Griddle Plate availability varies by model.
NOTE: Unpack all listed contents from packaging. Contents vary by model. Please remove any clear or blue protective film on the components before use.
NOTE: Ensure that your Power XL Smokeless Grill has been shipped with the components that you ordered (some accessories may be sold separately). Check everything carefully before use. If any part is missing or damaged, do not use this product. Contact shipper using the customer service number located in the back of the owner’s manual.
NOTE: This unit has been designed and engineered to reduce the smoke and visible vapors usually associated with grilling to a minimum. Delivers outdoor results indoors.
![]() Caution
Caution
Wait for all components to cool thoroughly after use before disassembling. Always handle hot components with oven mitts while cooking.
Using the Control Panel

- Plug the Power Cord (3) into an outlet.
LED Light (A) will blink on and off. - Select Power Button (B), and LED (A) will stay lit.
- Select Fan Button (C). Fan will run and Fan LED (D) will light up. NOTE: Fan should be kept running throughout the grilling process to prevent grease build up.
- Use Temperature Buttons (E) to adjust cooking temperature from 200° F to 450° F. NOTE: You may raise or lower the cooking temperature at any time during the cooking process. To keep food warm, set the temperature between 200° F and 250° F.
- When you are finished grilling, press the Power and Fan Buttons to shut down the Unit. Unplug the Power Cord and allow unit to cool fully before disassembling for cleaning.
Special Features
- Smokeless grill with built-in fan
- Silicon-sealed hinged lid
- Heats up quickly and maintains constant temperature
- Dishwasher-safe parts and easy to clean
- Heats up to 450° F
- Nonstick coating
Removable Glass Lid Assembly
- Insert the Screw through the Metal Washer and the Rubber Gasket.
- Attach handle to the Glass Lid with a Phillips screwdriver.
- Attach the assembled Glass Lid onto the Base Unit.
NOTE: Glass Lid is removable for certain cooking and cleaning. May come preassembled.
General Operating Instructions
Before First Use
- Remove all packing materials, labels, and stickers.
- Hand wash the Glass Lid, Nonstick Grill Plate, Drip Tray, and Collection Pan
with warm, soapy water. - Wipe the inside and outside of the Base Unit with a clean, moist cloth. NEVER wash or submerge the Heating Element, Electric Fan, or Base Unit in water or liquid of any kind.
- Finally, heat up Unit for a few minutes to burn off any residue.
Using the Power XL Smokeless Grill
- Place the appliance on a stable, level, horizontal, and heat-resistant surface.
- Assemble the Unit as shown on page 6.
- Add about 2 cups water to the Collection Pan.
- Leave ample air space on all sides of the Unit to facilitate air flow.
- Plug the Power Cord into a dedicated outlet.
- If you are starting with a cold grill, you may preheat the grill using a medium or high heat setting for 4–6 mins.
- Prepare and season your food according to your favorite recipe. You may spray or wipe the Grill Plate’s cooking surface with cooking oil.
- Select the cooking temperature, add the food, put the Lid* in place, and grill to your personal taste. Turn the food as needed.
- Cooking with the Lid on the Unit is recommended because it maintains the cooking temperature, seals in flavor, and prevents splatter.
CAUTION: The glass lid and handle get very hot. Always use oven mitts.
Removing the Electric Fan
If you are thoroughly cleaning the Base Unit with water and detergents, remove the Electric Fan. When reinserting the Fan, make sure to insert the two-prong connection into the receptacle.
CAUTION: Unplug Unit before removing fan. Fan blades are sharp; use care when removing and reinserting.
- Turn over the Base Unit.
- Remove the screw in the Fan Cover and remove the cover.
- Lift the Fan out of the Base Unit. You may need to press on the fan prongs to push the fan out if it will not lift out easily.
Switching Out the Grill and Griddle Plates
To remove the Grill Plate or Griddle Plate from the Power XL Smokeless Grill, use two hands to hold the two metal handles on each side of the Plate. Pull straight upward to remove the Plate from the Power XL Smokeless Grill.
NOTE: If the Power XL Smokeless Grill was recently used to cook food, the Plate and its handles will be hot. Use oven mitts to handle the Plate.
To attach the new Plate, use two hands to hold the two metal hands on each side of the Plate. Lay the Plate evenly on top of the Heating Element and let go of the handles.
Tips
- Be careful not to transfer germs from raw meat to cooked meat. Use separate utensils and platters for raw and cooked meat.
- Always marinade in a tightly covered nonmetal dish and turn the food occasionally. Be sure to refrigerate all meats while marinating.
- If leftover wet marinade is to be used as a sauce with the cooked food, be sure to place it in a small pan and heat to a rolling boil before serving to eliminate bacterial growth.
- Similar to a stove top frying pan, grease from high-fat foods, such as bacon or sausage, may splatter on the countertop. Protect the countertop as necessary.
- Before grilling, partially cook bone-in chicken, ribs, and uncooked smoked or fresh sausages for best results. If not partially cooked, these meats may become overbrowned on the outside before the center is done.
- To prevent scratching the coating, use only nonmetallic utensils. Do not cut food on the Grill Plate using sharp utensils, such as forks or knives, that can scratch the cooking surface.
- Do not use steel wool or other metal pads. They could leave coarse scratches. Always rinse thoroughly and dry immediately with a soft towel.
Cooking Chart
| Food Item | Time | Internal Temperature | It’s Done When |
| Fish | 12–15 mins. (1-in. thick) | 155° F | Opaque/Flaky Texture |
| Shrimp | 2–4 mins. (per side) | 155° F | Opaque & Red Edges |
| Chicken Drumsticks | 30–45 mins. | 176° F | Juice Runs Clear |
| Chicken Wings | 20–25 mins. | 176° F | Juice Runs Clear |
| Kabobs | 12–15 mins. | – | Your Preference |
| Steak | 3–9 mins. (per side) | 140° F–165° F | Your Preference |
| Pork Chops | 20–25 mins. | 160° F | No Pink Meat |
| Burgers | 10–15 mins. | 160° F | Your Preference |
| Sausages | 15–25 mins. | 160° F | No Pink Meat |
| Bacon | 1–2 mins. (per side) | NA | Crispy |
- Use a meat thermometer to check internal meat temperature.
- Cooking times are suggested and will vary depending on the thickness of the food and personal preferences. Foods can be grilled at maximum temperature. However, you may wish to reduce the temperature for certain items. Low temperatures will keep foods warm once cooked.
Troubleshooting
If Your Unit Is Not Working Properly:
- Make sure the Power Cord is plugged into an electrical socket.
- Make sure the Power Cord is properly connected to the Heating Element.
- Make sure you have set the temperature higher than 120° F.
- The Unit may not be able to draw enough operating power from the outlet.
Try switching the Power Cord to an outlet that has no other appliances attached to it. - If food is undercooked or overcooked, change the cooking time and temperature accordingly.
- If the Electric Fan is not working, the assembly may not be fully connected. Disassemble the Unit and reattach the Fan component. Follow instructions on page 8.
Care & Cleaning
- Before cleaning, be sure to unplug the cord from the outlet. If necessary, wipe the cord with a damp cloth.
- Allow the appliance to cool completely before cleaning. The Grill Plate, Drip Tray, Collection Pan, and Glass Lid can be placed in the bottom rack of the dishwasher or washed by hand. The Base Unit can be washed by hand with a warm, damp cloth and mild cleaning liquid. For more thorough cleaning of the Base Unit, remove the Electric Fan.
- Always be sure to wash the Grill surface after each use to remove any grease that may have accumulated. To keep grease from dripping outside of the base, always ensure that you are using your Grill on a level surface and that the Drip Tray is completely clear of food particles.
- Do not use scouring pads or harsh cleaners on this unit. If necessary, use a nylon bristle brush or plastic scrubbing pad.
- Any other servicing should be performed by an authorized service representative
60-Day Money-Back Guarantee
If you decide that you don’t love this product, your order is covered by our 60-Day Money-Back Guarantee. You have 60 days from the day you receive your product to request a replacement product or refund of the purchase price minus processing and handling fees.
To receive a refund or replacement, you must return the product to us at your expense. To return the product, call customer service at 1-973-287-5129 and request a return merchandise authorization number. Pack the product carefully and include in the package a note with (1) your name, (2) mailing address, (3) phone number, (4) email address, (5) reason for return, and (6) proof of purchase or order number, and (7) specify on the note whether you are requesting a refund or replacement. Write the return merchandise authorization number on the outside of the package.
Send the product to the following return address:
Power XL Smokeless Grill
Tristar Products
500 Returns Road,
Wallingford, CT 06495
Contact Us
We are very proud of the design and quality of our Power XL Smokeless Grill.
This product has been manufactured to the highest standards. Should you have any questions, our friendly customer service staff is here to help you.
Visit us at www.TristarCares.com,
email us at [email protected],
or call us at 973-287-512
Distributed by:
Tristar Products, Inc.
Fairfield, NJ 07004
© 2019 Tristar Products, Inc.
Made in China
PXLSG_IB_TP_ENG_V2_191206
ST 8300
PARTS DESCRIPTION
- Temperature knob
- Water tank cover
- Steam rate control button (for decreasing steam)
- Spray head
- Spray button
- Burst of steam button
- Soleplate
- Indicator light
SAFETY INSTRUCTIONS
- By ignoring the safety instructions the manufacturer can not be hold responsible for the damage.
- If the supply cord is damaged, it must be replaced by the manufacturer, its service agent or similarly qualified persons in order to avoid a hazard.
- Never move the appliance by pulling the cord and make sure the cord can not become entangled.
- The appliance must be placed on a stable, level surface.
- This appliance is only to be used forhousehold purposes and only for the purpose it is made for.
- This appliance shall not be used by children aged less than 8 years. This appliance can be used by children aged from 8 years and above and persons with reduced physical, sensory or mental capabilities or lack of experience and knowledge if they have been given supervision or instruction concerning use of the appliance in a safe way and understand the hazards involved. Children shall not play with the appliance. Keep the appliance and its cord out of reach of children aged less than 8 years. Cleaning and user maintenance shall not be made by children unless older than 8 and supervised.
- To protect yourself against an electric shock, do not immerse the cord, plug or appliance in the water or any other liquid.
- Keep the appliance and its cord out of reach of children less than 8 years of age when it is energized or cooling down.
- Do not left the iron unattended while it is connected to the mains supply.
- Do not open the waterreservoir during use.
- Do not use the iron when it’s dropped, if there are visible signs of damage or if it is leaking.
- Make sure the iron will be used and rest on a stable surface.
- Remove the plug from the socket before the water reservoir will be filled with water.
 Surface are liable to get hot during use.
BEFORE THE FIRST USE
- Carefully read all instructions before using the iron.
- Clean the soleplate with a soft damp cloth before the iron will be used for the first time.
- Pull out the water tank cover and slowly fill the water tank with clean cold water using the measuring cup.
- Smell or smoke may disperse at the beginning as caused by the warming up of the insulation material.
- NOTE: Some particles may come out of the soleplate when you use the iron for the first time. This is normal; the particles are harmless and stop coming out of the iron after a short while.
USING INSTRUCTIONS
Selecting the temperature
- Check the ironing instructions on the garment to be ironed.
- If the garment does not have any ironing instructions but you know the kind of fabric in question, use the chart below.
- Fabrics that have some kind of finish(polishing, wrinkles, contrast)can be ironed at the lowest temperatures.
- If the fabric contains several kinds of fibres ,always select the temperature applicable, if an article contains 60% polyester and 40% cotton, you must always choose the temperature corresponding to polyester and without steam.
- First classify the garments to be ironed according to the most suitable ironing temperature: wool with wool, cotton with cotton, etc. as the iron heats up as fast as it cools, start by ironing the articles requiring the lowest temperature such as those made of synthetic fibres. Progress towards those that require the highest temperatures.
- Turn the temperature control until it is in front of the appropriate signal according to the following:
- · position for nylon and acetate
- ·· position for wool ,silk or mixures
- ··· position for cotton or linen (steam).
How to fill the water tank
- Unplug the iron.
- Set the steam ruler to dry ironing .
- Fill the tank through the filling hole.
- If you have hard water, it is advisable to use only distilled or demineralized water.
- Note: Do not use chemically de-limed water or perfumed.
- Note: Do not store the iron with water in the tank.
Steam ironing
- Fill the iron as described in the section “how to fill the water tank”.
- Plug the iron into the mains.
- Steam ironing is only possible when the highest temperature shown on the temperature control is selected. Otherwise water may escape through the soleplate.
- Turn the steam button to the required position.
- When the ironing is finished and during breaks, place the iron in its upright position.
- Disconnect the iron from the mains supply. Pour of any remaining water and leave the iron to cool off.
Spray
- The spray can be used in any position, either in dry or steam ironing, as long as the water tank is filled with water.
- Press the spray button for this function.
- NOTE: This button has to be pressed repetitively to start this function for the first time.
Shot of steam
- Shot of steam give extra steam for removing persistent wrinkles.
- Wait for a few seconds for the steam to penetrate the fibre before pressing again.
- NOTE: For the best steam quality, do not use more than three successive bursts each time.
CLEANING AND MAINTENANCE
- Always unplug the device and let it cool down completely before cleaning
- To avoid damage to the soleplate, never use any sharp object or metal utensil to scrap the soleplate
- To remove build up scales in the steam holes, use a cotton wool tip moistened with mild descaling solution.
- Use a soft damp cloth to clean the housing of the device.
- Do not use any abrasive detergent or steel wool to clean the iron, as it may scratch the surfaces.
- Empty any remaining water from the water tank, do not allow water to stay overnight in the water tank.
- Always allow the iron to cool completely before winding the cord around the soleplate.
ENVIRONMENT

This appliance should not be put into the domestic garbage at the end of its durability, but must be offered at a central point for the recycling of electric and electronic domestic appliances. This symbol on the appliance, instruction manual and packaging puts your attention to this important issue. The materials used in this appliance can be recycled. By recycling of used domestic appliances you contribute an important push to the protection of our environment. Ask your local authorities for information regarding the point of recollection.
Support
You can find all available information and spare parts at www.tristar.eu!


Tristar Europe B.V. | Jules Verneweg 87
5015 BH Tilburg | The Netherlands

TRISTAR Multi Crispy Fryer Oven

- By ignoring the safety instructions the manufacturer cannot be held responsible for the damage.
- If the supply cord is damaged, it must be replaced by the manufacturer, its service agent or similarly qualified persons in order to avoid a hazard.
- Never move the appliance by pulling the cord and make sure the cord cannot become entangled.
- The appliance must be placed on a stable, level surface.
- This appliance is only to be used for household purposes and only for the purpose it is made for. In worst case the food can catch fire. (i.e. do not use more than one tea spoon of oil, no meat that will release to much grease or water intended for boiling foods.
- This appliance shall not be used by children aged less than 8 years. This appliance can be used by children aged from 8 years and above and persons with reduced physical, sensory or mental capabilities or lack of experience and knowledge if they have been given supervision or instruction concerning use of the appliance in a safe way and understand the hazards involved. Children shall not play with the appliance. Keep the appliance and its cord out of reach of children aged less than 8 years. Cleaning and user maintenance shall not be made by children unless older than 8 and supervised.
- To protect yourself against an electric shock, do not immerse the cord, plug or appliance in the water or any other liquid.
- The appliance is to be connected to a socket outlet having an earthed contact (for class I appliances).
- WARNING: If the surface is cracked, switch off the appliance to avoid the possibility of an electric shock.
- Keep the appliance and its cord out of reach of children less than 8 years.
- The temperature of accessible surfaces may be high when the appliance is operating.
- The appliance is not intended to be operated by means of an external
- Surfaces indicated with this logo are liable to get hot during use.
- In order to prevent disruptions of the airflow do not put anything on top of the appliance and make sure there is always 10 centimeter of free space around the appliance.
- After the baking process the appliance needs to cooldown, this cooling process will activate automatically when the timer is done. Avoid to unplug the appliance from the net socket before the cooling process is finished because
the remaining hot air can damage the appliance. - This appliance is intended to be used in household and similar applications such as:
- Staff kitchen areas in shops, offices and other working environments.
- By clients in hotels, motels and other residential type environments.
- Bed and breakfast type environments.
- Farm houses.
PARTS DESCRIPTION
- Main unit
- Display
- Basket
- Removal handle
- Baking rack (2 x)
- Fat collecting tray / baking tray
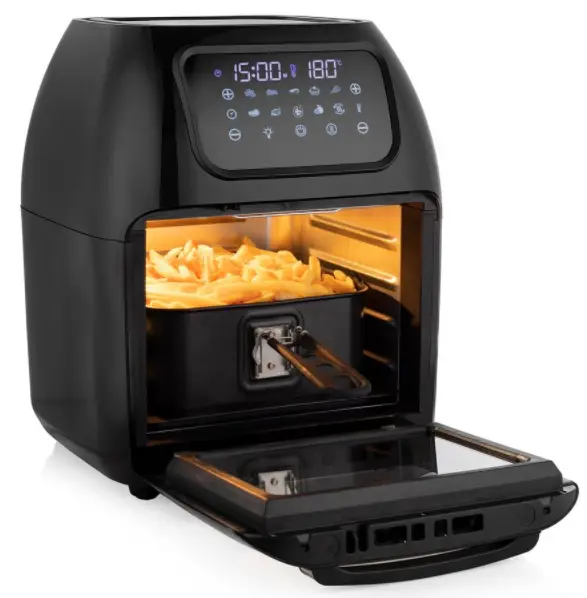
BEFORE THE FIRST USE
• When the device is turned on for the first time, a slight odour will occur. This is normal, ensure adequate ventilation. This fragrance is only temporary and will disappear soon.
• Remove all packaging material.
• Remove any stickers or labels from the appliance.
• Wipe the inside and outside of the appliance with a moist cloth.
Fat collecting/baking tray
Always place the fat collecting tray in the lower rails of the cooking space to collect dripping fat, food residues or crumbs. It can also be used as a baking tray by placing food on it, place the baking tray in the middle rails.
Basket
Don’t overfill the basket with ingredients, if it’s to full, the food will not cook evenly.
Baking racks
- The baking racks are slid onto the rails in the cooking space.
- The heating element is located at the top of the cooking space.
- The higher a rack is placed, the more intense the heat is from above.
- In the upper part, the food is cooked faster and crispy.
- The middle position can be selected to achieve uniform heating from all sides.
- The bottom rails are suitable for gentle cooking.
USE
- Put the mains plug in an earthed wall socket.
- Open the door.
- If the fat collecting tray is not to be used as a baking tray, slide it into the lowest rails of the cooking space
- Select a suitable accessory for the food to be prepared.
- Process the food and place it on or in the accessory and attach this accessory in the device.
- Close the door.
- Press the on/off switch. The display will become active.
- Set the temperature and cooking time manually or choose between one of the 11 programs.
Manual setting:
- Touch the + or – symbol at the temperature setting to set the desired temperature (lowest 65°C, highest 200°C).
- Touch the + or – symbol at the time setting to set the desired time (1 minute to 60 minutes).
Program setting:
- Activate the desired program by touching the program symbol, it’s activated when the symbol starts flashing.
- Touching the same symbol again will cancel the selection.
- See for presetting information the table below:
| Program | Icon | Default temperature | Default cooking time |
| Fries | 200°C | 15 minutes | |
| Chops | 160°C | 10 minutes | |
| Shrimp | 160°C | 12 minutes | |
| Baking | 160°C | 30 minutes | |
| Drumsticks | 180°C | 20 minutes | |
| Steak | 200°C | 12 minutes | |
| Fish | 200°C | 13 minutes | |
| Pizza | 180°C | 10 minutes | |
| Dehydrate | 70°C | 4 hours | |
| Defrost | 70°C | 12 minutes | |
| Preheat | 200°C | 3 minutes |
- The cooking time depends on the thickness of the food. Times can also vary due to the quantity and consistency of the food. The time settings are only guidelines and can be adapted to your taste. Double the time for tough meat and extend the time by at least 20% for deep-frozen food.
| Min-max amount (g) | Time (min) | Temperature (°C) | Shake | Extra information | |
| Fries | 600-700 | 15-20 | 200 | shake | |
| Homemade fries | 600-700 | 20-25 | 200 | shake | add 1/2 a tablespoon of oil |
| Frozen fish fingers | 500-800 | 6-10 | 200 | ||
| Drumsticks | 100-500 | 18-22 | 180 | ||
| Hamburger | 400-800 | 25-30 | 180 | ||
| Spring rolls | 500-800 | 8-10 | 200 | shake | |
| Cake | 800 | 20-25 | 160 | Use baking tin | |
| Quiche | 800 | 20-22 | 180 | Use baking tin | |
| Muffins | 800 | 15-18 | 200 | Use baking tin |
- Make sure that meat and poultry are thoroughly cooked before serving.
- To change the temperature or cooking time of a selected program, touch the temperature and time setting buttons, the same as for manual setting and set a new value.
- Successively illuminating operating lamps indicate that the device is operating. If operation is interrupted, they flash.
- Switch on the light pushing the button to check the condition of the food during use or open the door, the light will switch on and the operation is interrupted automatically. Operation is resumed once the door is closed again.
- After the cooking time has elapsed, the device switches off automatically and it will give a beep sound. If the device must be stopped prematurely, press the on/off switch.
- Open the door and take the cooked items out of the device. Always use oven gloves and use the removal handle/tool to take out the accessories.
- After use, remove the mains plug from the wall socket.
- Allow the used accessories and device to cool down and then clean them.
CLEANING AND MAINTENANCE
- Before cleaning, unplug the appliance and wait for the appliance to cool down.
- Never immerse the device in water or any other liquid. The device is not dishwasher proof.
- Clean the appliance with a damp cloth. Never use harsh and abrasive cleaners, scouring pad or steel wool, which damages the device.
- Rinse all other used parts with dish soap and warm water or in the dishwasher. In the case of stubborn dirt, we recommend soaking the accessories in warm water and washing-up liquid beforehand.
- The door is detachable for easy cleaning, open the door to a 30° angle and gently take off the door. The door is not dishwasher safe.
- Allow all parts to dry completely or dry them with a towel.
ENVIRONMENT
This appliance should not be put into the domestic garbage at the end of its durability, but must be offered at a central point for the recycling of electric and electronic domestic appliances. This symbol on the appliance, instruction manual and packaging puts your attention to this important issue. The materials used in this appliance can be recycled. By recycling of used domestic appliances you contribute an important push to the protection of our environment. Ask your local authorities for information regarding the point of recollection.
Support
You can find all available information and spare parts at www.tristar.eu
![]()