Uniden Solar Portable Power Bank
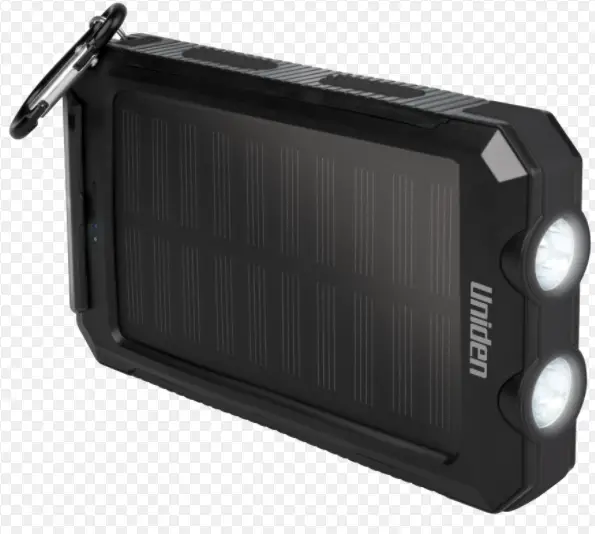
FEATURES
- 8000mAh Capacity
- Water-Resistant IP54
- Dust Proof
- Dual USB Charging Port
- LED Flashlight
SAFETY INSTRUCTIONS
- Do not use if it has been dropped or damaged in any way. The internal circuit might be damaged.
- Do not use this unit for anything other than the intended use.
- Never charge unattended. When charging, you should always remain under constant observation to monitor the charging process and react to potential problems that may occur.
- Do not attempt to disassemble the device as it may cause damage and repairs should only be performed by a qualified electrician.
- Stop using the battery if the battery starting to swell or heat up, discontinue charging process immediately, disconnect the battery and let it cool down for approximately 15 minutes.
- Do not expose the UPP80S to extreme temperatures or excessive heat as it may damage the battery or distort certain plastic parts or it could ignite a fire.
- Do not use abrasive cleaning solvents to clean the UPP80S.
- Do not immerse the UPP80S in water.
WHAT’S INCLUDED
- UPP80S portable power bank
- Micro USB charging cable
- Carabiner
OVERVIEW
USING THE UPP80S POWER BANK
CHARGING THE UPP80S VIA USB AC ADAPTER (NOT INCLUDED)
Please use the micro USB charging cable that comes with the unit to connect the micro USB charging port and the other end to a reliable USB power source.
While charging the UPP80S, the LED indicator will flash. Once it is fully charged, the LED indicator will stay solid.
Before using the UPP80S for the first time, please charge it until all 4 Blue LED Lights stay solid. To preserve battery life, fully charge the Power Bank every three months.
CHARGING THE UPP80S VIA SOLAR POWER
Place the solar panel under direct sunlight, and the green LED indicator will switch on to indicate the UPP80S is being charged in sunlight
While charging the UPP80S, the LED indicator will flash. Once it is fully charged, the LED indicator will stay solid.
Charging via solar panel is an alternative method of USB charging. The solar charging time depends on the intensity of the sunlight, which varies at times. We recommend the USB charging as the primary source of charging.
LED INDICATORS
The UPP80S has five LED lights to show the charging status, working status and the remaining power as follows:
| Green LED on | Charging via solar panel |
| 1 Blue LED on | 1%-25% charge |
| 2 Blue LED on | 26%-50% charge |
| 3 Blue LED on | 51%-75% charge |
| 4 Blue LED on | 76%-100% charge |
CHARGING YOUR USB CHARGEABLE DEVICES
Please ensure that the UPP80S is fully charged.
Please use the micro USB charging cable to connect one end to the USB charging port and the other end to your device.
Press the ON/OFF button and it would start charging your device.
TURN ON FLASHLIGHT
Press and hold the ON/OFF button until the LED flashlight is turned on.
Press the ON/OFF button to switch mode from Steady -> Slow Strobe -> Fast Strobe -> OFF.
SPECIFICATIONS
| UPP80S | |
| Capacity | Li-Po 8000mAh |
| USB Output | DC 5C 2.1A (Max) |
| USB Input | DC 5V 1.8A (Max) |
| Solar Input | DC 5V 0.2A |
| Operating Temperature | – 10° ~ + 60° C |
| Dimension | 138.5 x 75 x 20mm |
| Weight | 246.5 g |
TROUBLESHOOTING
| PROBLEM | SOLUTION |
| LED Indicator does not light up when charging the UPP80S | Please ensure that the USB charging cable power source is connected properly. If connected to PC, ensure the PC is turned on. |
| UPP80S does not charge device | Please ensure that the USB charging cable is well connected. |
ONE-YEAR LIMITED WARRANTY
UPP80S
IMPORTANT Satisfactory evidence of the original purchase is required for warranty service
Please refer to our Uniden website for any details or warranty durations offered in addition to those contained below.
Warrantor
The warrantor is Uniden Australia Pty Limited ABN 58 001 865 498.
Terms of Warranty
Uniden Aust warrants to the original retail purchaser only that the UPP80S (“the Product”), will be free from defects in materials and craftsmanship for the duration of the warranty period, subject to the limitations and exclusions set out below.
Warranty Period
This warranty to the original retail purchaser is only valid in the original country of purchase for a Product first purchased either in Australia or New Zealand and will expire one (1) year from the date of the original retail sale.
If a warranty claim is made, this warranty will not apply if the Product is found by Uniden to be:
- (A) Damaged or not maintained in a reasonable manner or as recommended in the relevant Uniden Owner’s Manual;
- (B) Modified, altered or used as part of any conversion kits, subassemblies or any configurations not sold by Uniden Aust;
- (C) Improperly installed contrary to instructions contained in the relevant Owner’s Manual
- (D) Repaired by someone other than an authorized Uniden Repair Agent in relation to a defect or malfunction covered by this warranty; or
- (E) Used in conjunction with any equipment, parts or a system not manufactured by Uniden.
Parts Covered
This warranty covers the Product and included accessories.
User-generated Data
This warranty does not cover any claimed loss of or damage to user-generated data (including but without limitation phone numbers, addresses and images) that may be stored on your Product.
Statement of Remedy
If the Product is found not to conform to this warranty as stated above, the Warrantor, at its discretion, will either repair the defect or replace the Product without any charge for parts or service. This warranty does not include any reimbursement or payment of any consequential damages claimed to arise from a Product’s failure to comply with the warranty.
Our goods come with guarantees that cannot be excluded under the Australian Consumer Law. You are entitled to a replacement or refund for a major failure and for compensation for any other reasonably foreseeable loss or damage. You are also entitled to have the goods repaired or replaced if the goods fail to be of acceptable quality and the failure does not amount to a major failure.
This warranty is in addition to and sits alongside your rights under either the COMPETITION AND CONSUMER ACT 2010 (Australia) or the CONSUMER GUARANTEES ACT (New Zealand) as the case may be, none of which can be excluded.
Procedure for Obtaining Warranty Service
Depending on the country in which the Product was first purchased, if you believe that your Product does not conform with this warranty, you should deliver the Product, together with satisfactory evidence of your original purchase (such as a legible copy of the sales docket) to Uniden. Please refer to the Uniden website for address details. You should contact Uniden regarding any compensation that may be payable for your expenses incurred in making a warranty claim. Prior to delivery, we recommend that you make a backup copy of any phone numbers, images or other data stored on your Product, in case it is lost or damaged during warranty service.
UNIDEN AUSTRALIA PTY LTD
Phone number: 1300 366 895
Email: [email protected]
Uniden DECT 3035+1 Premium DECT Digital Technology Cordless Phone System User Manual
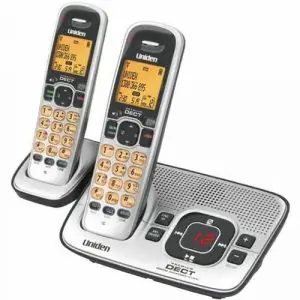
DECT 3035 + 1
Designed and engineered in Japan, Uniden’s DECT 3035 + 1 uses the Wireless Friendly DECT technology and has an integrated digital answering machine so you don’t miss those important phone calls. This handset derived from cutting-edge American DECT 6.0 Technology the DECT 3035 + 1 Cordless Phone System is nothing but a premium choice.
These futuristic styled phones are ideally suited to high density living environments and have a comprehensive array of features suitable for any home. They have enhanced talking range, unique styling, a large 4 line backlit display LCD display and are Wireless (WiFi) Network friendly. The digital duplex speakerphone on the handset makes handsfree communication a breeze.
Another brilliant feature of the DECT 3035 + 1 is the DND (Do Not Disturb Function), this button allows you to mute the ringer on the handset and the base at once. Ideal for young families and shift workers.
The DECT 3035 + 1 also has an ECO Friendly Mode, which allows the cordless handset to automatically adjusts electrical consumption to save power.
This phone is multi handset capable, allowing up to 6 handsets to be connected to just one phone socket. Uniden quality and performance make the DECT 3035 + 1 an outstanding and reliable digital choice..
Multi Handset Capabilities”
- Up to 6 Handsets using the One Phone Socket () 2 Handsets included
- Intercom/Announce Call Transfer
- Handset Conferencing (2 Handsets + Outside Call) with Optional DECT 3005*
Suggested Retail: $99.95
The DECT 3005 is available as an additional handset and charging base.
Suggested Retail: $39.95
Key Features
Designed and Engineered in Japan
DECT Digital Technology Phone System
This cordless phone design is derived from the cutting edge
American DECT 6.0™ Technology and engineered specifically to meet Australian and New Zealand Conditions
ECO Friendly Mode
Wireless (WiFi) Network Friendly
Multi (6) Handset Capabilities
- Up to 6 Handsets using One Phone Socket
- Intercom/Announce Call Transfer
- Handset Conferencing (2 Handsets + Outside Call) with Optional DECT 3005#
Uniden Australia
Advanced Alpha Display Caller ID
- 100 Phonebook Memories with 50 Caller ID Memories
- Alpha Display Caller ID
- POP ID* – Caller Name Identification
- Caller ID* (Type 1 & Type 2)
Large Orange Backlit LCD Display and Keypad
Polyphonic Ring Tones
Maxi-Sound Extra Loud Handset Volume Control
Hearing Aid Compatible (T-Coil)
VMWI Visual Message Waiting Indicator
Digital Duplex Speakerphone on Handset
4 Line Full Dot Matrix LCD Display
Redial
Time and Date Display
Optional Additional Handset: DECT 30
Additional Features :
Talk Time: 8 Hours
Standby Time: 7 Days
Battery Level Status on Screen
Battery Capacity: DC 2.4V, 650mAH Wall/Desk Mountable
Dimensions DECT 3035: 170mm (H) X 160mm (W) X 100mm (D)
DECT 3035 Weight: 298 grams
Dimensions DECT 3005: 165mm (H) X 70mm (W) X 90mm (D)
DECT 3005 Weight: 169 gram
*Caller ID and POP features work only if you subscribe to the service provided by your local telephone company. There is usually a fee for this service. Caller Type 2 service is currently not available in New Zealand.
#Diagram Illustrates Concept Only. The actual enclosed product and its colour is shown on the front of the box.
™ The DECT6.0 Interference Free Communication logo is a trademark of DECT forum.
]]>Uniden 5.8GHz Digital Spread Spectrum Cordless Phone with Water and Dust Proof Additional Handset User Manual


Product Comparison Technology Difference Talking Distances
Introductions
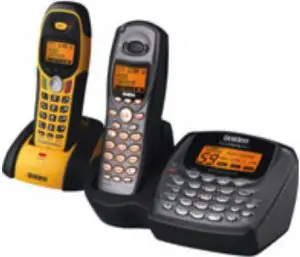
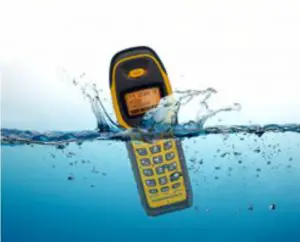
Introducing the world’s first 100% Water and Dust Proof Cordless phone in the market. Submersible and Ideal for taking those calls in the pool. The DSS 7855 + 1WP is ideal for those that spend a lot of time on the run as the additional handset is durable and rugged enough to use indoor or outdoor. The additional handset meets JIS7 waterproof specifications allowing it to withstand all the elements. Alternatively for those that need a cordless phone in the factory or garage the additional handset is dust and dirt proof and with its rubber side grips makes it ideal.
For Optimum Clarity, Superior Technology and Sophisticated Styling you cannot overlook Uniden’s 5.8GHz Digital Spread Spectrum (DSS) range of cordless phones.
Utilising a wider 5.8GHz Digital Spread Spectrum Bandwidth, these phones are equipped with an array of powerful features including the versatility of being able to operate with up 10 handsets using the one phone socket.
The DSS 7855 + 1WP includes an Integrated Digital Answering Machine with remote access, Advanced Alpha Display Caller ID, 100 Caller ID Memories on each handset and the ability to allocate individual caller ring tones to enable easy caller identification. Enjoy the ease of hands-free communication with a Digital Duplex Speakerphone and the exclusive Uniden feature of Dual LCD Display, on both the handset and base. This model also gives you the option of diverting all incoming calls directly to the Integrated Digital Answering Machine by using the Do No Disturb feature.
Combine all these with the added convenience that 5.8GHz Technology will not interfere with typical wireless networks, and you have the perfect communication accessory to suit households of any size.
Uniden quality, performance and powerful features make the DSS 7855 + 1WP a truly innovative model of technological excellence and contemporary design.
Suggested Retail: $269.00.
The DSS 7805WP is available as an additional handset and charging base.
Suggested Retail: $149.00.
Key Features
- Designed and Engineered in Japan
- 5.8GHz Digital Spread Spectrum Technology Phone System
- Submersible Waterproof Additional Handset
- Meets JIS7 Waterproof Specifications^
- Durable and Rugged Enough to Use Indoors or Outdoors
- Floats and is Submersible in the Pool
- Rubber Side Grips
- Dust and Dirt Proof Handset Ideal for Factory Use
- Multi Handset Capabilities
- 2 Handsets Included
- Up to 10 Handsets using One Phone Socket
- Two-Way Communication between Handsets Anywhere without the Base
- Intercom/Announce Call Transfer
- Handset Conferencing (2 Handsets + Base + Outside Call)
- Advanced LCD and Caller ID Display*
- 4 Line Backlit Full Dot Matrix LCD Display
- POP ID* – Caller Name Identification
- Alpha Display Caller ID
- 100 Caller ID* Memories with Phonebook on Each Handset
- 20 Individual Caller Tone Allocations*
- Caller ID* (Type 1 and Type 2)
- Digital Duplex Speakerphone on Handset and Base
- Integrated Digital Answering Machine with Remote Access
- Wireless Network Friendly
- Clock/Date/Banner/Battery and Animation Display
- Built-in Clarity Plus Antenna
- Alphabetical Search and Dial
- Polyphonic Ring Tones
- Orange Backlit LCD Display
- Alpha Memory Dialing
- Maxi-Sound – Extra Loud Handset Volume Control
- Voice Guidance Help and Function System
- Download Phonebook Between Handsets
- Dual Keypad
- Room/Baby Monitor
- Do Not Disturb Button
- Plus Belt Clip, Wall or Desk Mountable
- And More!
Additional Features:
- Belt Clip Included
- Wall/Desk Mountable
- Talk Time: 7 Hours
- Standby Time: 8 Days
- Battery Capacity: DC 3.6V, 800mAH
- Dimensions: 170mm (H) x 170mm (W) x 100mm (D)
- Additional Handset: 185mm (H) x 73mm (W) x 80mm (D)
*Caller ID and POP ID Features only work if you subscribe to the service provided by your local telephone company. There is usually a fee for these services.
** 5.8GHz Technology will not interfere with typical wireless networks such as 802.11b, 802.11g or 802.11n.
^ Meets the standard JIS4 Standards, which allows for the cordless handset to be submersed in water up to 1 meter for 30 minutes.
Vist: https://www.uniden.com.au/AUSTRALIA/default_print.asp?product=p_dss7855_1wp.htm

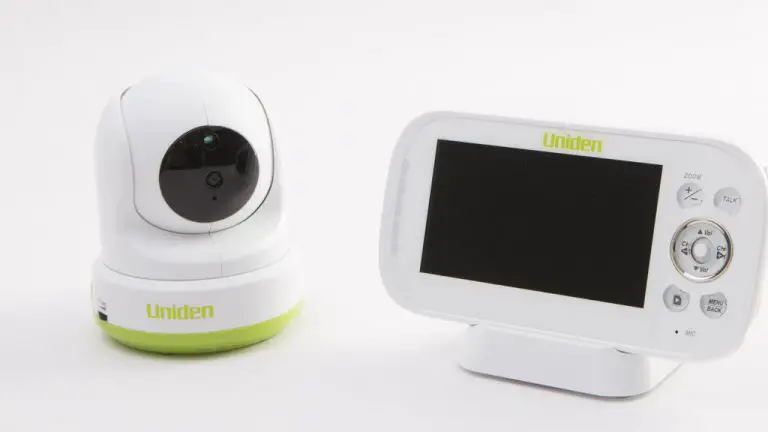
Uniden Baby Monitor
IMPORTANT SAFETY INSTRUCTIONS
This guide contains important information about this product’s operation. If you are installing this product for others, you must leave this manual or a copy with the end user. nWhen using your equipment, always follow basic safety precautions to reduce the risk of fire, electric shock and injury to persons, including the following:
- This unit is NOT WATERPROOF. Never submerge the devices in water or rinse them in running water.
- Always position the device and power cord out of the reach of children. The power cord could result in strangulation or cause injury to children.
- Keep small parts out of the reach of children (risk of swallowing).
- Keep packaging material away from children (risk of suffocation).
- Never place the Baby Unit in the cot or within the reach of your child.
- Make sure that cables are out of the reach of your child (risk of electric shock).
- Always make sure that the devices are fully functioning before use.
- Only use the AC adaptors included with the unit.
- Do not use the cable to pull the AC adaptor plug out of the socket.
- Disconnect the AC adaptor plug from the mains when the device is not in use.
- The device and the AC adaptor should not come into contact with hot surfaces or sharp objects.
- Do not use any additional parts that are not recommended by the manufacturer or offered as equipment.
- After use, before cleaning and changing any accessory parts, the AC adaptor should always be disconnected.
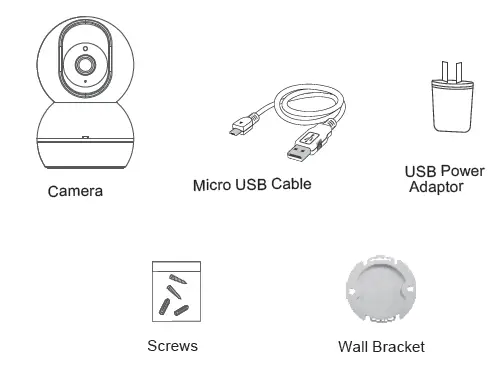
WHAT’S INSIDE THE BOX

- Image may vary slightly from the actual product.
- If any item is missing or damaged, contact your place of purchase immediately. Never use damaged products!
- Need help? Get answers at our website:
www.uniden.com.au for Australian model. All trademarks are registered trademarks of their respective owners.
GETTING STARTED
- Light sensor
- Camera lens
- Microphone
- Micro SD Card Slot
- Night Light/ Status Indicator
- Temperature sensor
- Speaker
- Micro USB port
- Reset Button
INSTALLATION
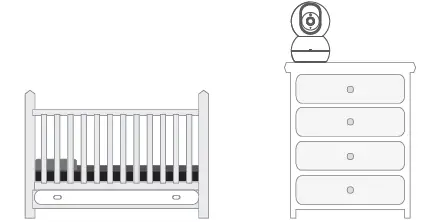
General Placement Considerations
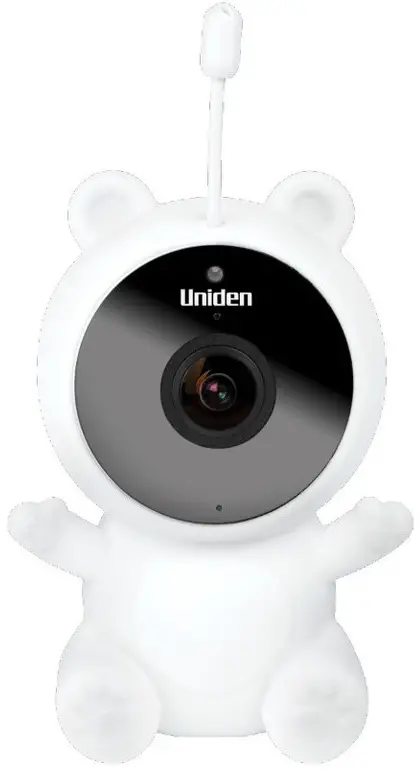
The BW150R camera can be placed on a shelf or other flat surface. You may also mount it on the wall with the provided wall bracket.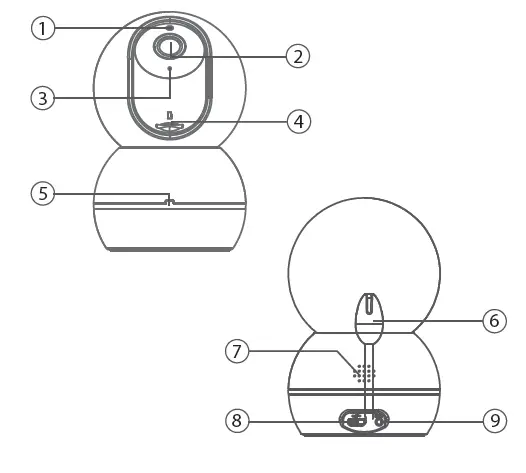
- The camera included is NOT weatherproof; it is an indoor camera.
- The clearest line-of-sight between the camera and the Wi-Fi router is best. Walls, especially brick and concrete, can affect connection quality.
- Avoid having a direct light source in view of the camera (ceiling or floor lamps).
- Carefully plan where and how the camera will be positioned, and where you will route the cable that connects the camera to the power adaptor.
- Do not cover or obstruct the inlet holes for the temperature sensors and leave the sensor horizontal for more accurate reading. The temperature reading is for reference only and there may be some variance between the actual temperature and the temperature reading.
Mounting the Camera on the Wall
- If you are mounting the camera on the wall, hold the wall bracket where you want to mount it and mark the location of the screw holes.
- Use the included bracket screws to secure the wall bracket to the wall.
- Align the wall bracket with the holes on the base of the camera and rotate the base until it snaps into place.
Wi-Fi Operating Considerations
- Ensure the Wi-Fi signal reception is acceptable between the BW150R and the Wi-Fi router. If necessary, reduce the distance between them to improve overall system performance.
As the Wi-Fi environments may vary including home construction type and wireless interference from other electronic devices, your device may indicate that the camera is disconnected or may display a black screen. - Please note the camera can only connect to 2.4G Wi-Fi and does not support 5G Wi-Fi connection. If you’re getting a weak Wi-Fi signal or you can’t connect to Wi-Fi at all on your phone at the installation area, we recommend moving your router closer or install a Wi-Fi extender to improve signal reception or selecting another installation location.
Powering the Camera
- Insert one end of the micro USB cable to the micro USB port on the camera (at the back of the camera).
- Connect the other end of the USB cable into the USB power adaptor.
- Connect the USB power adaptor into a 240 volt AC (standard indoor) power outlet.
- Switch on the plug and allow the camera to power up. This can take up to a minute.
- When the camera starts flashing red, it is ready to be paired with your Wi-Fi network.
| Status Indicator | Camera Status |
| Solid Red | Camera is booting up. |
| Red Flashing | Waiting for Wi-Fi configuration. |
| Green Flashing | Connecting to Wi-Fi |
| Solid Green | Camera is online |
INITIAL CAMERA SETUP
To set up your new BW150R baby monitor camera, please make sure it’s successfully installed and powered on, and that the status indicator on the camera is flashing red. This flashing RED status means that your camera is ready to be paired to your My Uniden App.
Prerequisites
- You must have an available Wi-Fi-enabled Smartphone (Android or iOS smartphone).
- The BW150R baby monitor and your mobile device must within the same Wi-Fi network range for initial setup (ideally within 3m from the router).
- Wi-Fi router connection is 2.4GHz and password if any.
- Search and download the free My Uniden App from the App Store for iOS devices or Play Store for Android devices. You will need to create an account specifically for the My Uniden app. If you already have a My Uniden app account, you will log into the My Uniden App using your My Uniden account email and password. You can skip to Step 6.
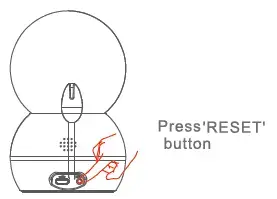
- When the status indicator starts flashing red, the camera is ready to be paired with your Wi-Fi network. If the status indicator is not red and flashing quickly, press and hold the reset button for 5 seconds, wait for the status indicator to flashing red.
 * Please note that app screenshots are for reference only. User Interface for iPhone and Android Phones might differ in terms of icons layout and functionality and may change without notice. As the My Uniden App is constantly under development to enrich user experience, the icons/screens shown in this QSG may vary slightly from the actual app.
 - When you open the My Uniden app for the first time, you will see the login page. Tap the “Register” button to create a new My Uniden account. Once you select Register, you’ll be prompted to add your email address, and tap “Get Verification Code Button”.
- Retrieve the verification code from your email inbox and enter the code in the space provided. Then, you’ll be prompted to choose a password for your My Uniden App Account.
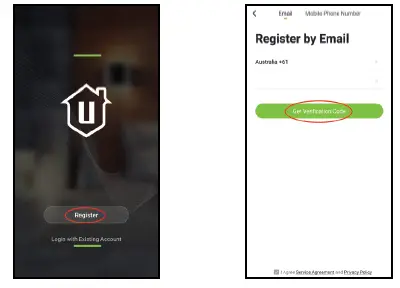
- As soon as you have entered your password, tap Done button and you’ll be all set. Your My Uniden App account has now been created.
- You will see the Home tab. To pair a device, tap the “Add Device” button or the “+” button on the top right-hand side of the screen if you already have shared access or a paired device. Once you have tapped the Add Device button, tap the Baby Monitor icon to set up the BW150R camera.
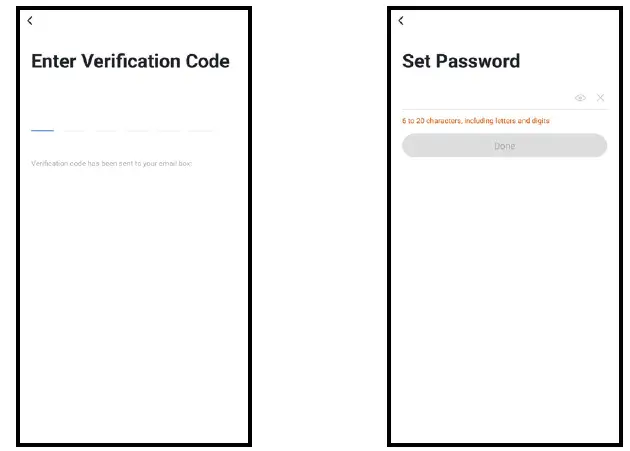
- Tap “next step” to continue. Enter the Wi-Fi password of the selected Wi-Fi network and press “Confirm” to enter the next page.
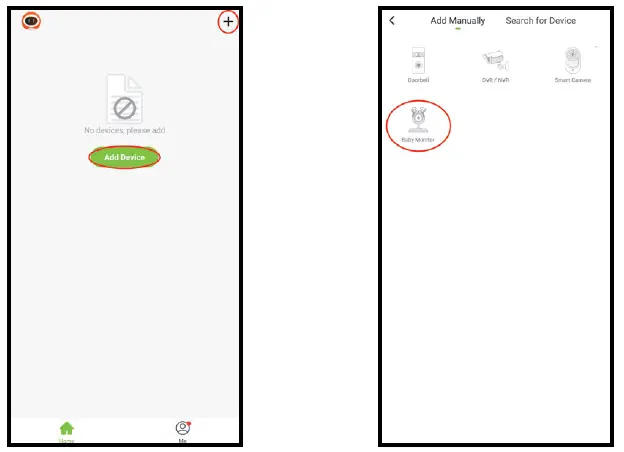
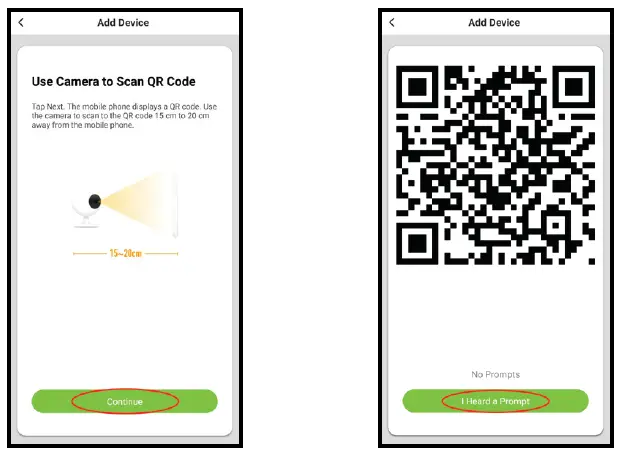
- Tap “Continue” to proceed. A QR code will be generated on the phone. Please place the QR code on your phone towards the camera lens at a distance of about 15~20cm to let the camera scan the QR code. Please make sure that you’ve ripped the protection film off the camera’s lens. After you hear the voice prompt from the camera, please press “I heard a Prompt” to continue.
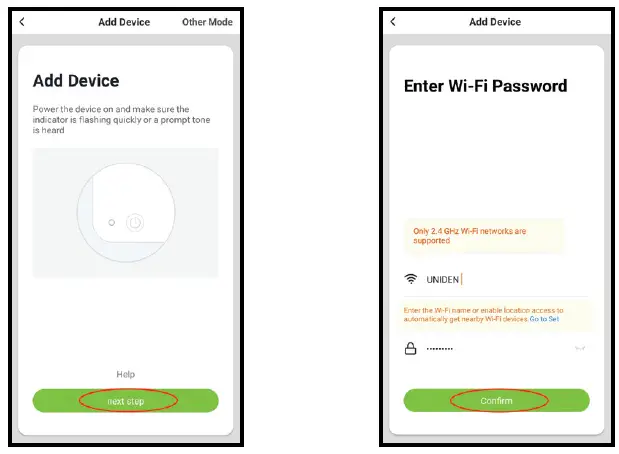
- Please wait while the app is configuring your BW150R camera. Once completed, you’ll be prompted to name your camera and tap “Done”. You are now ready to start using your new BW150R camera.
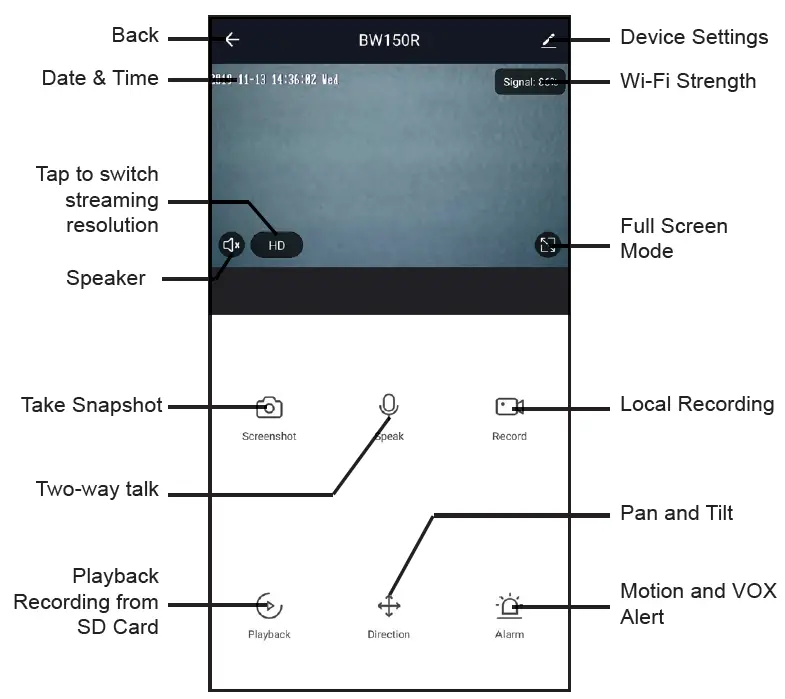
Live View
Scroll up more for more icons.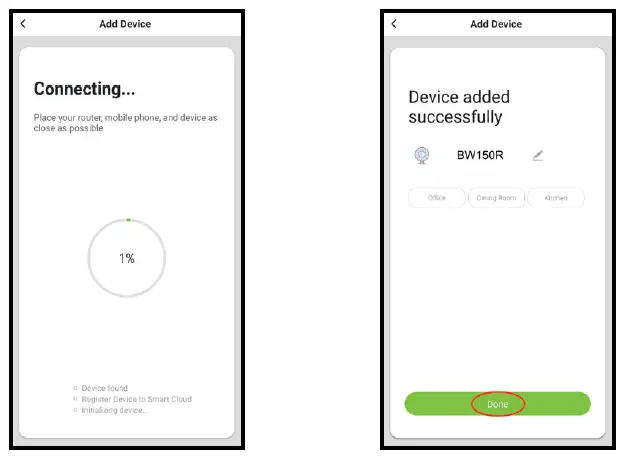
TROUBLESHOOTING
| If… | Try This… |
| The camera does not find or connect the router. | Make sure the Wi-Fi router supports DHCP protocol.
Make sure that the DHCP option is turned on. Make sure the camera and your mobile device connect to the same Wi-Fi router. Make sure you selected the correct 2.4GHz router only in your device Wi-Fi setting. Make sure you entered the correct password for the router you selected. Make sure you are within the Wi-Fi range of the router. Make sure the Wi-Fi router is enabled. Make sure the camera is properly powered on. Make sure the Wi-Fi router has enabled SSID broadcasting. |
| Poor video stream or video quality is not clear. | Please check your home upload speed to meet the minimum requirement.
Clean the lens. |
| There is no video or light indicator. | Verify that the camera is powered on and is plugged in properly. |
SPECIFICATION
| Item | Specification |
| Image Sensor | 1/2.7” Colour CMOS |
| Recording Resolution | 1920 x 1080 15fps, 640 x 480 20 fps |
| Viewing Angle | 80°(H) |
| Night Vision | up to 5m |
| Video Compression | H.264 |
| Audio | Two-way talk |
| WIFI | 2.4GHz |
| Wireless Security | WEP, WPA, WPA2 |
| Power Consumption | up to 5W |
| Micro SD Card | up to 64GB Class 10 |
TWO-YEAR LIMITED WARRANTY
Important:
Satisfactory evidence of the original purchase is required for warranty service. Please refer to our Uniden website for any details or warranty durations offered in addition to those contained below.
Warrantor:
The warrantor is Uniden Australia Pty Limited ABN 58 001 865 498 (“Uniden Aust”).
Terms of Warranty: Uniden Aust warrants to the original retail purchaser only that the BW150R (“the Product”), will be free from defects in materials and craftsmanship for the duration of the warranty period, subject to the limitations and exclusions set out below.
Warranty Period: This warranty to the original retail purchaser is only valid in the original country of purchase for a Product first purchased either in Australia or New Zealand and will expire two (2) year from the date of the original retail sale. If a warranty claim is made, this warranty will not apply if the Product is found by Uniden to be:
- .Damaged or not maintained in a reasonable manner or as recommended in the relevant Uniden Owner’s Manual;
- Modified, altered or used as part of any conversion kits, subassemblies or any configurations not sold by Uniden Aust;
- Improperly installed contrary to instructions contained in the relevant Owner’s Manual
- Repaired by someone other than an authorized Uniden Repair Agent in relation to a defect or malfunction covered by this warranty; or
- Used in conjunction with any equipment, parts or a system not manufactured by Uniden.
Parts Covered: This warranty covers the Product and included accessories.
User-generated Data: This warranty does not cover any claimed loss of or damage to user-generated data (including but without limitation phone numbers, addresses and images)that may be stored on your Product.
Statement of Remedy: If the Product is found not to conform to this warranty as stated above, the Warrantor, at its discretion, will either repair the defect or replace the Product without any charge for parts or service. This warranty does not include any reimbursement or payment of any consequential damages claimed to arise from a Product’s failure to comply with the warranty. Our goods come with guarantees that cannot be excluded under the Australian Consumer Law. You are entitled to a replacement or refund for a major failure and for compensation for any other reasonably foreseeable loss or damage. You are also entitled to have the goods repaired or replaced if the goods fail to be of acceptable quality and the failure does not amount to a major failure. This warranty is in addition to and sits alongside your rights under either the COMPETITION AND CONSUMER ACT 2010 (Australia) or the CONSUMER GUARANTEES ACT (New Zealand) as the case may be, none of which can be excluded.
Procedure for Obtaining Warranty Service: Depending on the country in which the Product was first purchased, if you believe that your Product does not conform with this warranty, you should deliver the Product, together with satisfactory evidence of your original purchase (such as a legible copy of the sales docket) to Uniden at the address shown below. You should contact Uniden regarding any compensation that may be payable for your expenses incurred in making a warranty claim. Prior to delivery, we recommend that you make a backup copy of any phone numbers, images or other data stored on your Product, in case it is lost or damaged during warranty service.
UNIDEN AUSTRALIA PTY LTD
Phone number: 1300 366 895
Email: [email protected]
IMPORTANT SAFETY INSTRUCTIONS
his guide contains important information about this product’s operation. If you are installing this product for others, you must leave this manual or a copy with the end user.
When using your equipment, always follow basic safety precautions to reduce the risk of fire, electric shock and injury to persons, including the following:
- This unit is NOT WATERPROOF. Never submerge the devices in water or rinse them in running water.
- Always position the device and power cord out of the reach of children. The power cord could result in strangulation or cause injury to children.
- Keep small parts out of the reach of children (risk of swallowing).
- Keep packaging material away from children (risk of suffocation).
- Never place the Baby Unit in the cot or within the reach of your child.
- Make sure that cables are out of the reach of your child (risk of electricshock).
- Always make sure that the devices are fully functioning before use.
- Only use the AC adaptors included with the unit.
- Do not use the cable to pull the AC adaptor plug out of the socket.
- Disconnect the AC adaptor plug from the mains when the device is not in use.
- The device and the AC adaptor should not come into contact with hot surfaces or sharp objects.
- Do not use any additional parts that are not recommended by the manufacturer or offered as equipment.
- After use, before cleaning and changing any accessory parts, the AC adaptor should always be disconnected
WARNING TO PARENTS AND OTHER USERS
Failure to follow these warnings and the assembly instruction could result in serious injury or death. This product is not designed or intended for use as a medical monitor, nor should this product be used as a substitution for medical or parental supervision. Always be sure that both the transmitter and receiver are working properly, and are within range of each other.
STRANGULATION HAZARD. Keep the cable out of the reach of children.
WARNING: KEEP OUT OF THE REACH OF CHILDREN.
Allow for proper ventilation when units are in use. Do not cover the camera with any object such as a blanket. Do not place it in a drawer or in any location which would muffle the sound or interfere with the normal flow of air.
SAVE THESE INSTRUCTIONS!
WHAT’S INSIDE THE BOX
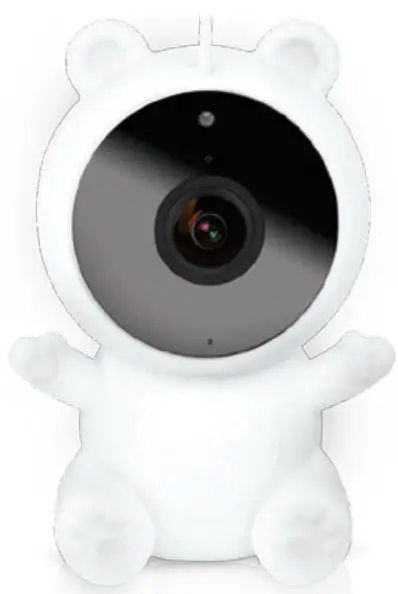
- BW140R Camera with Silicon Cover

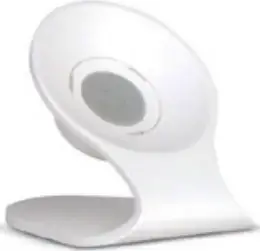
- Magnetic Base

- Reset Pin
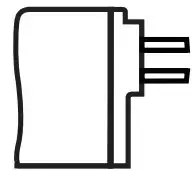
- USB Power Adaptor
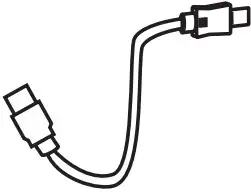
- micro USBCable

- Image may vary from the actual product.
- If any item is missing or damaged, contact your place of purchase immediately. Never use damaged products!
- Need help? Get answers at our website: www.uniden.com.au for Australian model.
GETTING STARTED
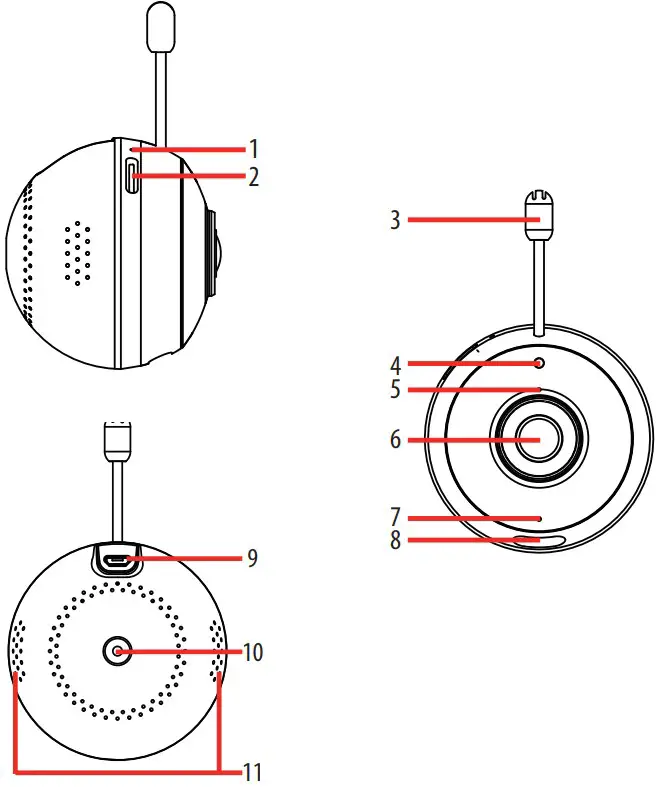
| 1 | Reset |
2 |
Micro SD Card Slot (supported up to 32GB) |
| 3 | Temperature Sensor |
| 4 | Microphone |
| 5 | Lens |
| 6 | Light Indicator |
| 7 | Night Light |
| 8 | Micro USB port |
| 9 | Flexible Mount Attachmen |
| 10 | Speakers |
INSTALLATION
General Placement Considerations
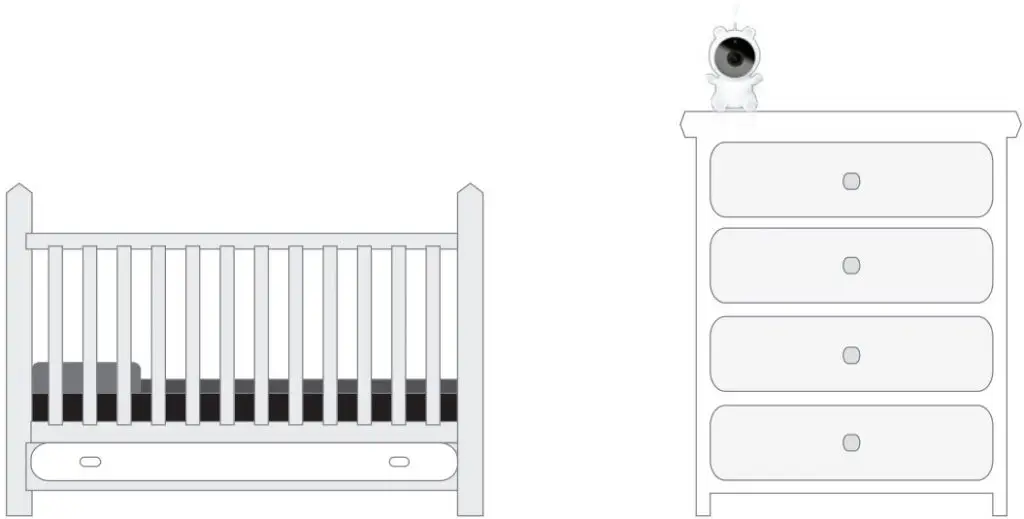
The BW140R camera can be placed on a shelf or other flat surface. You may also use the flexible to mount it along the railing.
- The camera included is NOT weatherproof; it is an indoor camera.
- The clearest line-of-sight between the camera and the Wi-Fi router
is best. Walls, especially brick and concrete, can affect connectionquality. - Avoid having a direct light source in view of the camera (ceiling orfloor lamps).
- Carefully plan where and how the camera will be positioned, and where you will route the cable that connects the camera to the power adaptor.
- Do not cover or obstruct the inlet holes for the temperature sensors and leavethe sensor horizontal for more accurate reading. The
temperature reading is for reference only and there may be some variance between the actual temperature and the temperature reading.
Wi-Fi Operating Considerations
- Ensure the Wi-Fi signal reception is acceptable between the BW140R and the Wi-Fi router. If necessary, reduce the distance between them to improve overall system performance.
- As the Wi-Fi environments may vary including home construction type and wireless interference from other electronic devices, your device may indicate that the camera is disconnected or may display a black screen.
- Please note the camera can only connect to 2.4GHz Wi-Fi and does not support 5GHz Wi-Fi connection.
If you’re getting a weak Wi-Fi signal or you can’t connect to Wi-Fi at all on your phone at the installation area, we recommend moving your router closer or install a Wi-Fi extender to improve signal reception or selecting another installation location.
Powering the Camera
- Insert one end of the micro USB cable to the micro USB port on the camera (at the back of the camera).
- Connect the other end of the USB cable into the USB power adaptor.
- Connect the USB power adaptor into a 240 volt AC (standard indoor) power outlet.
- Switch on the plug and allow the camera to power up. This can takeup to a minute. When the camera starts flashing red, it is ready to be paired with your
Wi-Fi network.
| Status Indicator | Camera Status |
| Solid Red | Camera is booting up. |
| Red Flashing | Waiting for Wi-Fi configuration. |
| Blue Flashing | Connecting to Wi-Fi |
| Solid Blue | Camera is online |
INITIAL CAMERA SETUP
To set up your new BW140R baby monitor camera, please make sure it’s successfully installed and powered on, and that the status indicator on the camera is flashing red.
This flashing RED status means that your camera is ready to be paired to your My Uniden App.
Prerequisites
- You must have an available Wi-Fi-enabled Smartphone (Android or iOS smartphone).
- The BW140R baby monitor and your mobile device must within thesame Wi-Fi network range for initial setup (ideally within 3m from the router).
- Wi-Fi router connection is 2.4GHz and password if any.
- Search and download the free My Uniden App from the App Store for iOS devices or Play Store for Android devices. You will need to create an account specifically for the My Uniden app. If you already have a My Uniden app account, you will log into the My Uniden App using your My Uniden account email and password. You can skip to Step 6.
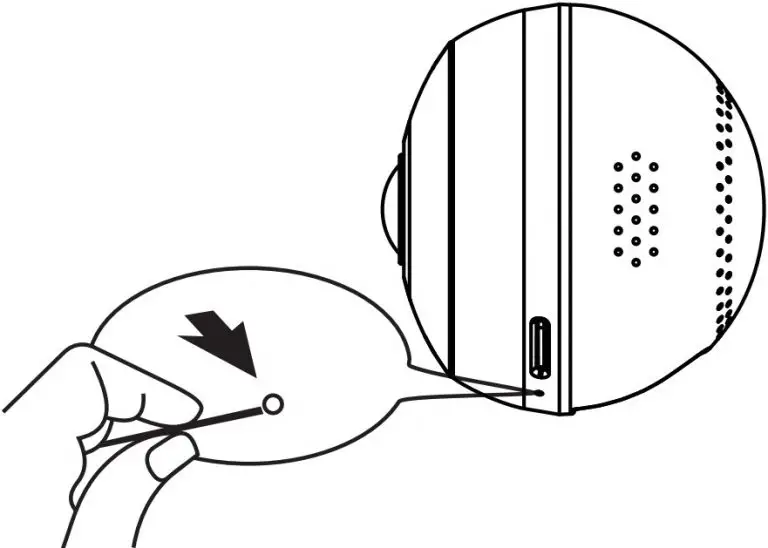
- When the status indicator starts flashing red, the camera is ready to be paired with your Wi-Fi network. If the status indicator is not red andflashing quickly, press and hold the reset button for 5 seconds, wait for the status indicator to flashing red.
Please note that app screenshots are for reference only. User Interface for iPhone and Android Phones might differ in terms of icons layout and functionality and may change without notice.
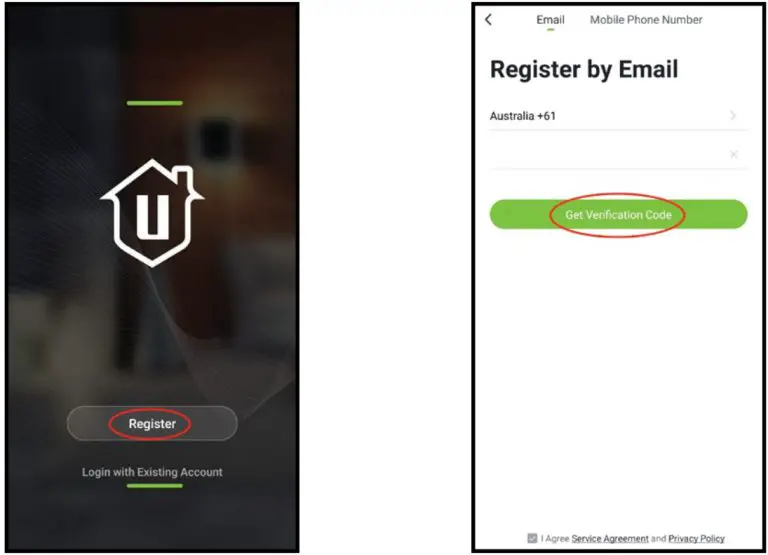
As the My Uniden App is constantly under development to enrich user experience, the icons/screens shown in this QSG may vary slightly from the actual app. - When you open the My Uniden app for the first time, you will seethe login page. Tap the “Register” button to create a new My Uniden account. Once you select Register, you’ll be prompted to add your email address, and tap “Get Verification Code Button”.
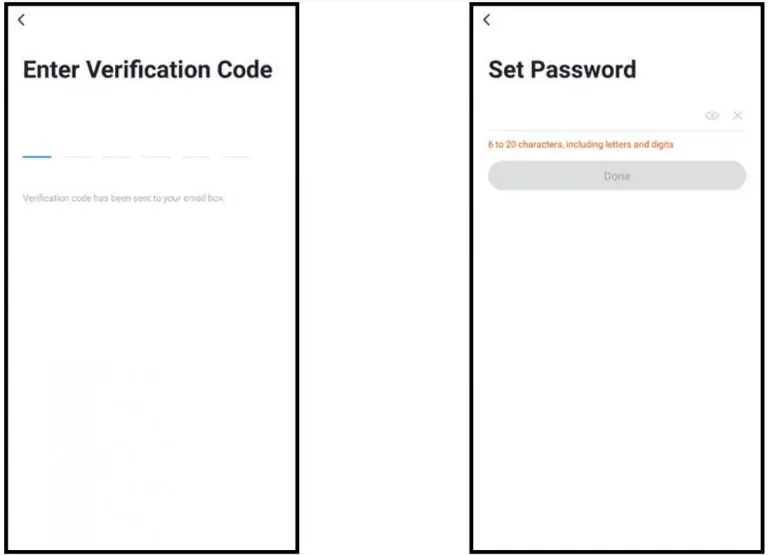
- Retrieve the verification code from your email inbox and enter the code in the space provided. Then, you’ll be prompted to choose a password for your My Uniden App Account.
- As soon as you have entered your password, tap Done button and you’ll be all set. Your My Uniden App account has now been created.
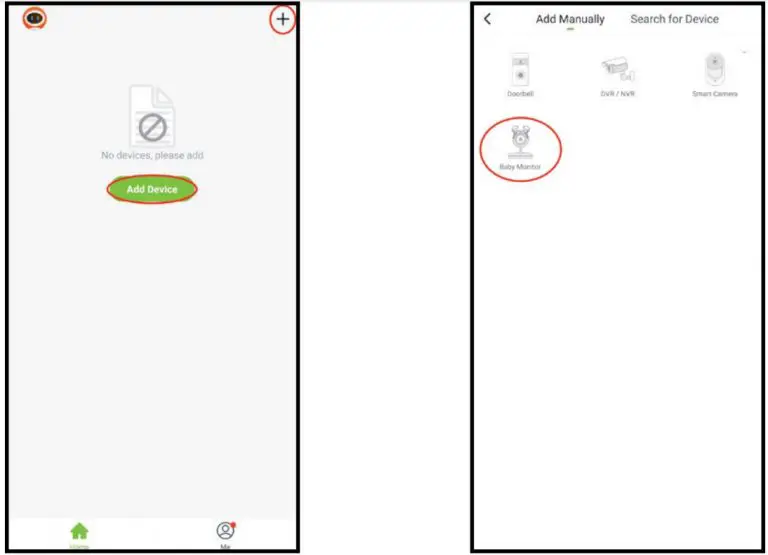
- You will see the Home tab. To pair a device, tap the “Add Device” button or the “+” button on the top right-hand side of the screen if you already have shared access or a paired device. Once you have tapped the AddDevice button, tap the Baby Monitor icon to set up the BW140R camera.
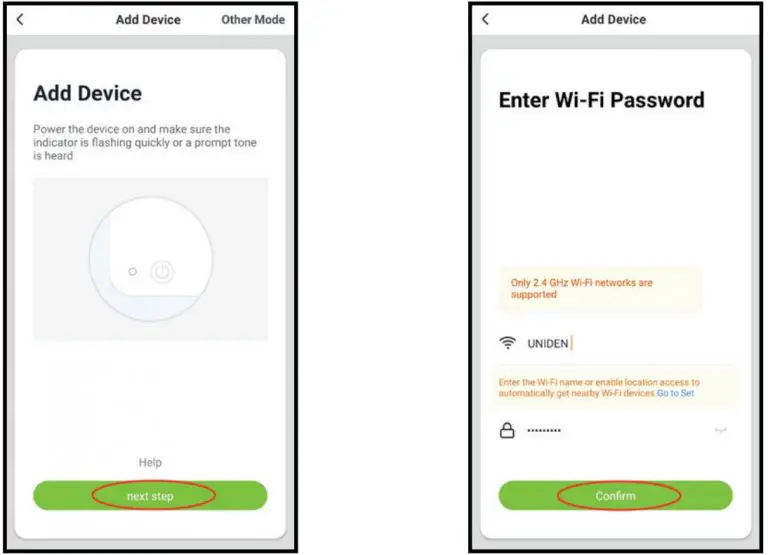
- Tap “next step” to continue. Enter the Wi-Fi password of the selected Wi-Fi network and press “Confirm” to enter the next page.
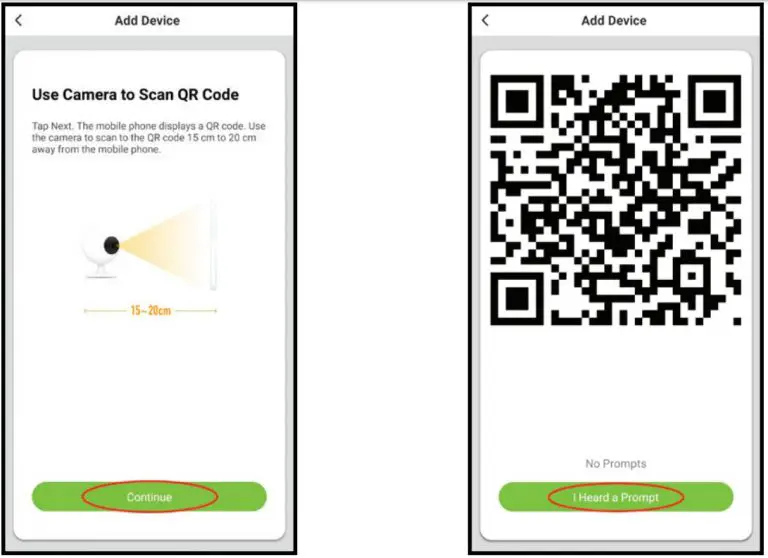
- Tap “Continue” to proceed. A QR code will be generated on the phone. Please place the QR code on your phone towards the camera lens at a distance of about 15~20cm to let the camera scan the QR code. Please make sure that you’ve ripped the protection film off the camera’s lens. After you hear the voice prompt from the camera, please press “I hearda Prompt” to continue.
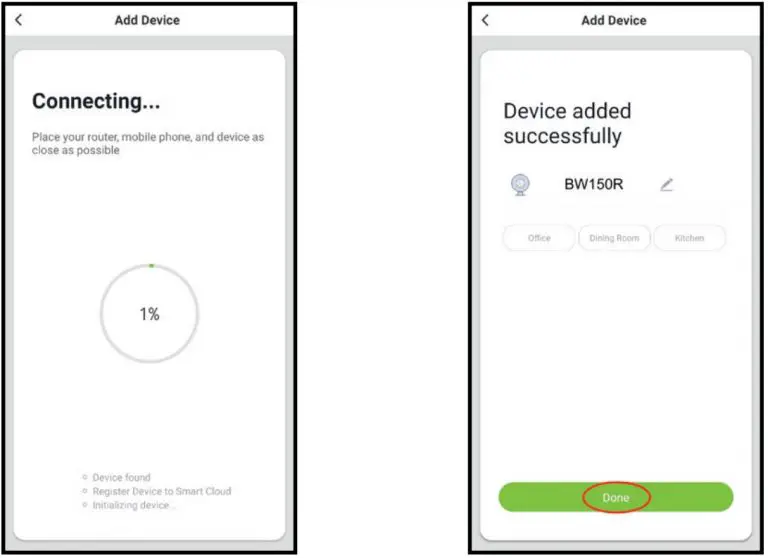
- . Please wait while the app is configuring your BW140R camera. Once completed, you’ll be prompted to name your camera and tap “Done”. You are now ready to start using your new BW140R camera.
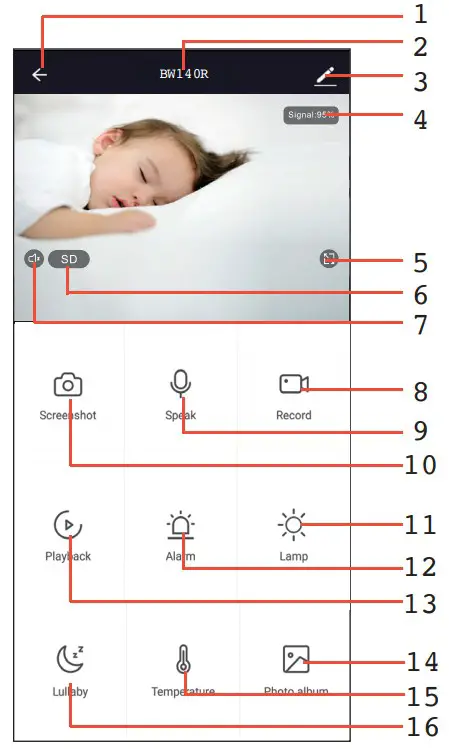
Live View
Note : Please note that app screenshots are for reference only. User Interface for iPhone and Android Phones might differ in terms of icons layout and functionality and may change without notice.
As the My Uniden App is constantly under development to enrich user experience, the icons/screens shown in this QSG may vary slightly from the actual app.
| 1 | Back to the home page |
| 2 | Device name |
| 3 | Device settings |
| 4 | Wi-Fi strength 15.Temperature (Check the current temperature and set the alert temperature range) 16.Photo Album (Quick to check the recorded images which save in your mobile phone by the app) |
| 5 | Switch to full screen mode |
| 6 | Tap to switch streaming resolution |
| 7 | Speaker |
| 8 | Local Recording |
| 9 | Two-way talk |
| 10 | Take Snapshot |
| 11 | Night light switch |
| 12 | Motion and VOX Alert |
| 13 | Playback Recording from SD Card |
| 14 | View snapshots |
| 15 | View and set the temperature alerts |
| 16 | Play, repeat or shuffle lullabies |
Device Setting
- Device Name:User could modify the device name. Share Device: User could share the device to another account.
- Device Information: Users could see the IP address, device ID, etc.Use
- Echo: Instruction for how to work with Amazon Alexa.
- Basic Function Settings: Access Indicator light on/off, Flip screen, time watermark, speech method for one/two way talk settings.
- Motion detection: User could switch on/off the motion detection alarm and set the sensitivity of motion detection.
- Memory card settings: Users could check the memory of the card and wipe off the SD card memory.
- Feedback: Users could submit problems or suggestions to optimise the app.
- Firmware Information: To view the current firmware version and check for firmware update.
- Remove Device:
- When users wish to change the internet connection, please press ‘Remove Device’ and reset the camera to repairing with new Wi-Fi.
- No longer wish to use the camera or returning the camera.
TROUBLESHOOTING
| If… | Try This… |
| The camera does not find or connect the router. | Make sure the Wi-Fi router supports DHCP protocol. |
| Make sure that the DHCP option is turned on | |
| Make sure the camera and your mobile device connect to the same Wi-Fi router. | |
| Make sure you selected the correct 2.4GHz router only in your device Wi-Fi setting. | |
| Make sure you entered the correct password for the router you selected. | |
| Make sure you are within the Wi-Fi range of the router. | |
| Make sure the Wi-Fi router is enabled. | |
| Make sure the camera is properly powered on. | |
| Make sure the Wi-Fi router has enabled SSID broadcasting. | |
| Poor video stream or video quality is not clear. | Please check your home upload speed to meet the minimum requirement. 1Mbps for 480P stream, 2Mbps for 720P and 4Mbps for 1080P. |
| Clean the lens if it’s dirty or has fingerprint marks on it. | |
| There is no video or light indicator. | Verify that the camera is powered on and is plugged in properly |
SPECIFICATION
| Item | Specification |
| Image Sensor | 1/2.7″ Colour CMOS |
| Recording Resolution | 1920 x 1080 15fps, 640 x 480 20 fps |
| Viewing Angle | 100*(D) |
| Night Vision | up to 5m |
| Video Compression | H.264 |
| Audio | Two-way talk |
| WIFI | 2.4GHz |
| Wireless Security | WEP, WPA, WPA2 |
| Power Consumption | up to 5W |
| Micro SD Card | up to 32GB Class 10 |
TWO-YEAR LIMITED WARRANTY
BW140R
Important:
Satisfactory evidence of the original purchase is required for warranty service. Please refer to our Uniden website for any details or warranty durations offered in addition to those contained below.
Warrantor
The warrantor is Uniden Australia Pty Limited ABN 58 001 865 498 (“Uniden Aust”).
Terms of Warranty: Uniden Aust warrants to the original retail purchaser only that the BW140R (“the Product”), will be free from defects in materials and craftsmanship for the duration of the warranty period, subject to the limitations and exclusions set out below.
Warranty Period: This warranty to the original retail purchaser is only valid in the original country of purchase for a Product first purchased either in Australia or New Zealand and will expire two (2) year from the date of the original retail sale. If a warranty claim is made, this warranty will not apply if the Product is found by Uniden to be:
- Damaged or not maintained in a reasonable manner or as recommended in the relevant Uniden Owner’s Manual;
- Modified, altered or used as part of any conversion kits, sub assemblies or any configurations not sold by Uniden Aust;
- Improperly installed contrary to instructions contained in the relevant Owner’s Manual
- Repaired by someone other than an authorized Uniden Repair Agent in relation to a defect or malfunction covered by this warranty; or
- Used in conjunction with any equipment, parts or a system
not manufactured by Uniden.
Parts Covered: This warranty covers the Product and included accessories.
User-generated Data: This warranty does not cover any claimed loss of or damage to user-generated data (including but without limitation phone numbers, addresses and images)that may be stored on your Product.
Statement of Remedy: If the Product is found not to conform to this warranty as stated above, the Warrantor, at its discretion, will either repair the defect or replace the Product without any charge for parts or service. This warranty does not include any reimbursement or payment of any consequential damages claimed to arise from a Product’s failure to comply with the warranty. Our goods come with guarantees that cannot be excluded under the Australian Consumer Law. You are entitled to a replacement or refund for a major failure and for compensation for any other reasonably foreseeable loss or damage. You are also entitled to have the
goods repaired or replaced if the goods fail to be of acceptable quality and the failure does not amount to a major failure. This warranty is in addition to and sits alongside your rights under either the COMPETITION AND CONSUMER ACT 2010 (Australia) or the CONSUMER GUARANTEES ACT (New Zealand) as the case may be, none of which can be excluded.
Procedure for Obtaining Warranty Service: Depending on the country in which the Product was first purchased, if you believe that your Product does not conform with this warranty, you should deliver the Product, together with satisfactory evidence of your original purchase (such as a legible copy of the sales docket) to Uniden at the address shown below. You should contact Uniden regarding any compensation that may be payable for your expenses incurred in making a warranty claim. Prior to delivery, we recommend that you make a backup copy of any phone numbers, images or other data stored on your Product, in case it is lost or damaged during warranty service.
UNIDEN AUSTRALIA PTY LTD
Phone number: 1300 366 895
Email: [email protected]
