User Manual
![]()

vangoa Worlde Panda MINIc MIDI Controller
Introduction
Thank you for purchasing the Worlde Panda MINIc USB controller. To help you get the most out of your new instrument, please read this manual carefully.
In order to use the functions of this product, you’ll need to make settings in the application you’re using. Make settings as described in the owner’s manual for your application.
Features
- 8 high quality velocity & pressure sensitive performance pads with RGB backlit , can be assigned easily as pads, MIDI CC buttons or Program change switches.
- 25 keys with velocity assignable to controllers, with 3 velocity curve and one constant velocity
- 4 assignable control knobs
- 4 assignable control sliders
- 4 banks for different settings
- USB interface, adaptable to USB 2.0(FULL SPEED). Power supplied by USB.
- Compatible with Win10/8/7/XP/Vista and Mac OSX. Drive free and hot-plug supported.
- Edited by the Panda MINI Editor, the picture below is the main screen.
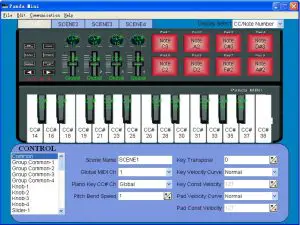
Parts and their functions

1. Trigger pads
These pads can transmit note messages or control change messages. Hold CC MODE and ◄ or ► to select the backlit RGB color of 8 pads, 7 different colors available.
2. Keyboard
There are twenty-five velocity-sensitive keys that can transmit note messages. When CC mode
is on, they transmit control change messages.
3. MIDI control group
A knob, slider, are collectively called a MIDI control group. The Panda MINI has 4 MIDI control groups.
a. Knob
This knob transmits control change messages.
b. Slider
This slider transmits control change messages.
4. [OCTAVE DOWN] / [OCTAVE UP]
The [◄] button and the [►] button can be used to adjust the octave acquiescently. The pitch will shift downward by one octave each time you press the [◄] button. The pitch will shift upward by one octave each time you press the [►] button.
5. Bank button
The Panda MINIc has four banks. When bank button is on, you can use the [◄] button and the
[►] button to switch the four banks. A “bank” is a set of parameter assignments for the
controllers (pads and knobs, etc.). You can use Worlde Panda MINI Editor to change the
assignment of each controller. ( “Making detailed settings”)
6. Program button
When program button is on, you can use the [◄] button and the [►] button to change the
program.
7. [PITCH DOWN] / [PITCH UP]
The [PITCH DOWN] button and the [PITCH UP] button can be used to send a note’s pitch up or down in cents.
8. Modulation button
The MOD button is used to introduce some sort of vibrato effect.
9. USB connector
Connect the Panda MINIc to your computer with a USB cable via this port.
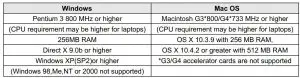
Setup
Minimum System Requirements
Making detailed settings
The following settings cannot be edited on the Panda MINIc instrument, so you need to use the
Worlde Panda MINIc control Editor. You can download the Worlde Panda MINIc control Editor from Worlde website www.worlde.com.cn.
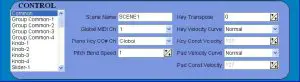
Global MIDI channel
Global MIDI channel [1…16] This specifies the MIDI channel which Panda MINIc will use to
transmit note messages. This should be set to match the MIDI channel of the MIDI application that you’re controlling.
Keyboard CC mode channel
Piano keyboard CC mode channel is to specify which MIDI channel the keyboard will use to
transmit control messages.
Transpose
It is to adjust the pitch by semi-tone, adjusting scale of the value is -12~12.
Pitch bend speed
It is to adjust the speed of the pitch up or down, adjusting scale of the value is 1~4.
Key velocity curve
It has 3 velocity curves, the light, the normal and the heavy, if choose the CONST, the velocity
value is const to 127.
Pad velocity curve
It has 3 velocity curves, the light, the normal and the heavy, if choose the CONST, the velocity
value is const to 127.
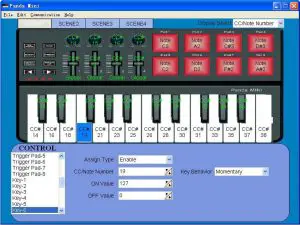
Trigger pads
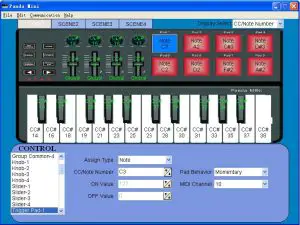
Depending on the assign type, the trigger pads can transmit note messages or control change
messages. For each trigger pad, you can individually specify the assigned message, the MIDI
transmit channel, the behavior of the trigger pad, the note number, the control change number, the values transmitted when the pad turns on or off.
Depending on its assign type, note number or control change number can be assigned to a single
trigger pad and transmitted. If you transmit note messages or control change message from a
trigger pad, all of the messages will be transmitted at the velocity or On Value/Off Value.
MIDI Channel [1…16/Global MIDI Channel] This specifies the MIDI channel of the MIDI
messages that are transmitted when you strike the trigger pad. If you set this to “Global MIDI
Channel,” the messages will be transmitted on the global MIDI channel.
Assign Type [No Assign/Note/Control Change]
This specifies the type of message that will be assigned to the trigger pad. You can disable the
pad (no assignment), or assign a note message or a control change.
Pad Behavior [Momentary/Toggle]
You can choose one of the following two types of behavior for the trigger pad.
Momentary The Note On or On Value will be transmitted when you press the trigger pad, and the Note Off or Off Value will be transmitted when you release it.
Toggle The Note On or On Value will be transmitted alternately with the Note Off or Off Value each time you press the trigger pad.
Note Number [C-1…G9/No Assign]
This specifies the note number of the note message that is transmitted.
Control Change Number [0…127/No Assign] [0…127] This specifies the control change number
of the control change message that is transmitted.
On Value [0…127] This specifies the value of the message that is transmitted when the trigger pad turns on.
Off Value [0…127] This specifies the value of the message that is transmitted when the trigger pad turns off.
You can set this only if the assign type is “Control Change.”
Knobs
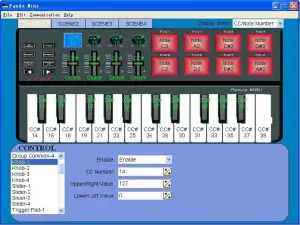
Operating a knob will transmit a control change message. You can enable/disable each knob,
specify its control change number, and specify the values transmitted when the knob is turned fully left or fully right..
Knob Enable [Disable/Enable]
Enables or disables the knob. If you’ve disabled a knob, turning it will not transmit a MIDI message.
Control Change Number [0…127]
Specifies the control change number of the control change message that is transmitted.
Left Value [0…127] Specifies the value of the control change message transmitted when you turn the knob all the way to the left.
Right Value [0…127] Specifies the value of the control change message transmitted when you
turn the knob all the way to the right.
Sliders
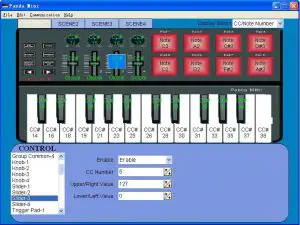
Operating a slider will transmit a control change message. You can enable/disable each slider,
specify its control change number, and specify the values transmitted when the slider is moved
fully upward or fully downward.
Slider Enable [Disable/Enable]
Enables or disables the slider. If you’ve disabled a slider, moving it will not transmit a MIDI
message.
Control Change Number [0…127]
Specifies the control change number of the control change message that is transmitted.
Upper Value [0…127]
Specifies the value of the control change message transmitted when you move the slider all the way upward.
Lower Value [0…127]
Specifies the value of the control change message transmitted when you move the slider all the
way downward.
Keyboard operation in Edit mode
The twenty-five keys of the keyboard will function as independent buttons to transmit control
change messages. You can specify which MIDI channel the control change message is transmitted on, whether or not each key is enabled, the key type, the control change number, as
well as the On and Off value.
CC MIDI Channel [1…16]
This specifies the MIDI channel that control change messages will be transmitted on. Set this to
match the MIDI channel of the application you’re controlling.
Key Enable [Disable/Enable]
Enables or disables the key. If a key is disabled, operating that key will not transmit a MIDI
message.
Key Behavior [Momentary/Toggle]
Selects one of the following two modes:
Momentary Pressing the key will send a control change message with the On value, releasing
the key will send a control change message with the Off value.
Toggle Each time you press the key the control change message will alternate between the On
value and the Off value.
Control Change Number [0…127]
Specifies the CC number of the control change message that will be transmitted.
On Value [0…127]
Specifies the On value of the control change message.
Off Value [0…127]
Specifies the Off value of the control change message.
Specifications
- Connectors: USB connector (mini B type)
- Power supply: USB bus power mode
- Current consumption: 100 mA or less
- Dimensions (W x D x H): 12.6 x 7.5 x 1.6 inches / 320 x 190 x 40 mm
- Weight: 28 oz / 800 g
- Included items: USB cable, Owner’s manual
*Specifications and appearance are subject to change without notice.
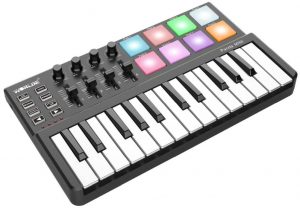
USB MIDI CONTROLLER INTRODUCTION
This is an ultra-compact MIDI controller which serves to control music software. It is equipped with 25/49/61 velocity-sensitive keys, 8 velocity-sensitive drum pads as well as 9 faders (PANDA49/61) and 8 rotary controls. The controller connects both PC and Mac(OTG convertor cable is required for connecting to Mobile phone and Pad). You can do without a bulky power adapter as power supply is via the USB bus. It’s also available to download the full user manual and other setting instructions from http://en.worlde.com.cn/.
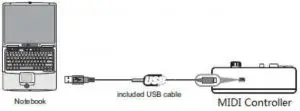
2 STEPS FOR PANDA TO WORK
- Connect your PANDA to the computer by USB cable.
- Open your DAW in your computer and select PANDA as your hardware controller in your DAW. Now you are ready to go.
CONNECTING A COMPUTER Use the included USB cable to connect the USB MIDI controller to a USB2.0 port on your computer. The power will turn on. Select the PANDA as MIDI controller within your music software and you are ready to go.
DEVICE SETUP IN SOFTWARE
To select PANDA as a controller for your digital audio workstation (DAW):
- Connect PANDA to your computer using a standard USB cable. (If you are connecting PANDA to a USB hub, make sure it is a powered hub. If another device with USB3.0 is connected to USB hub at the same time, PANDA will not work properly at this time.)
- Open your DAW.
- Open your DAW’s Preferences, Options, or Device Setup, select PANDA as your hardware controller, and then close that window. Your PANDA is now able to communicate with your software. For more info of mapping setting of PANDA to DAW, please visit the download page of http://en.worlde.com.cn/
SYSTEM REQUIREMENTS
- Windows 10/8/7/XP/Vista
- Mac OS X 10.3.9 and better
All information is subject to change without prior notice.
Important: Visit worlde.com.cn to download the complete User Guide and Software application Mapping Setting Instructions.
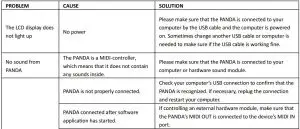
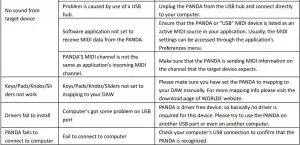
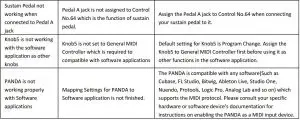
TROUBLESHOOTING:
- Make sure it is correctly connected to you computer. (Check the device manager in Windows or the system preferences on the Mac)
- If you are using Windows then use MIDI-OX. First, open up the software, go to the options, select MIDI Devices and select the right one on MIDI input and click “OK” . Second, start playing some notes on the keyboard, if the data appear on the screen when you press down a key or a button, then you could know it is working. If you are on a Mac then the SNOIZE MIDI Monitor software can help. If the data appear on the screen but you did not adjust any keys, knobs and etc. Then turn to us for help.
- Worlde Editor doesn’t work or blank page MIDI keyboard will be connected to your DAW software first if you are using the editor at the same time. Please make sure that your DAW software quit completely. (You could check it on task manager of you computer) If quitting the DAW software does not work, please turn to us for help.
- The Manual could be download from the Technical Specification of Product Information.
- The editor could be downloaded on this website(Faster Download Speed): http://suo.im/4UeML5