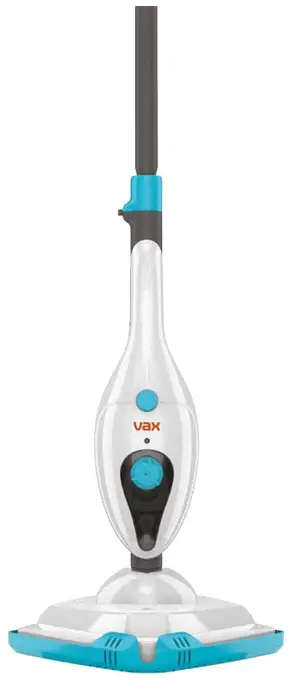
 Steam
Steam
QUICK AND EASY STEAM
CLEANING
LET’S GET STARTED.
S85-CM
CDHF-SGXS
SAFETY GUIDE
BASIC SAFETY PRECAUTIONS
This machine is intended for household use only and NOT for commercial or industrial use.  CAUTION: Danger of scalding.
PLEASE KEEP INSTRUCTIONS FOR FURTHER USE AND USE ONLY AS INSTRUCTED IN THIS GUIDE.
- Only use the machine indoors and keep the area you’re cleaning well lit.
- Keep fingers, hair, and loose clothing away from moving parts and openings whilst using the machine.
- This machine is not intended to be used or cleaned by persons with reduced physical, sensory or mental capabilities, or lack of experience or knowledge unless they have been given instructions concerning the safe use of the machine by a person legally responsible for their safety. They should be supervised whilst using the machine. Children shall not use, clean or play with this machine, which when not in use should be secured out of their reach.
- Please refer to the floor manufacturer’s care recommendations before use and test your flooring/carpet/rugs by running the machine over a small hidden area, if no pile distortion or no damage occurs continue cleaning. Not suitable for unsealed or water sensitive flooring, wax polished floors or furniture, acrylic surfaces and synthetic, velvet or steam/water-sensitive materials.
- Test for colorfastness in a small hidden area of upholstery/fabric to check for color removal before use.
- This machine should not be used to clean electrical appliances such as microwaves, televisions and electrical heating systems etc.
- Only VAX recommended clothes and accessories should be used with this machine.
- This machine is to be used with water only, putting detergent into the water tank can cause damage and will invalidate the guarantee.
DON’TS - Don’t touch any hot areas/accessories on your machine. It’s normal for the machine and accessories to heat up during use, always allow them to cool down before handling.
- Don’t use the machine if it has been dropped, damaged, immersed in water, or left outdoors.
- Don’t handle the plug or use the machine with wet hands.
- Don’t pull or carry the machine by the power cord.
- Don’t run over the power cord or use the machine if the power cord or plug is damaged. If the power cord is damaged, it must be replaced by a qualified person in order to avoid a hazard.
- Don’t use the power cord as a handle, don’t pull the power cord around corners or sharp edges or close a door over the power cord.
- Don’t unplug the machine by pulling on the power cord.
- Don’t attempt to remove blockages with sharp objects as this may cause damage to the machine. Remove blockages only as instructed in this guide.
- Don’t aim the machine at people, animals, plants, and electrical components or wires. Never touch the steam jet (there is a risk of scalding).
- Don’t use the machine with incorrect voltage as this may result in damage or injury to the user. The correct voltage is listed on the rating label.
- Don’t use the machine to clean or refresh any items of clothing that are still being worn on the body.
- Don’t leave the machine turned on when unattended.
- Don’t use it on a surface that is damaged, uneven, or incorrectly fitted.
DO’S
- Always fill the water tank with water only. Never add detergent, perfume, stain remover or products containing alcohol. Filling the water tank with hot or boiling water will damage the machine and invalidate the guarantee.
- Always vacuum your carpets thoroughly and ensure hard floor areas are free from grit and debris before using your machine.
- Always switch off and unplug the machine allowing it to cool before performing maintenance or troubleshooting checks.
- Turn off all controls on the machine before disconnecting or connecting the power cord, after use always wrap the power cord around the cord clips.
- Take extra care when cleaning the stairs.
- Always replace the fuse in the plug with a British 13amp fuse.
- Always protect the power cord from heated surfaces and open flames.
- Use only CE-approved 13amp extension cords, non-approved extension cords may overheat. Care should be taken to arrange the extension cord as it can be a trip hazard.
- Store the machine in a cool, dry area away from children. Before storing the machine please make sure the water tank is thoroughly clean and empty.
- Always switch off the machine before disconnecting or connecting clothes and accessories.
WARRANTY & TECHNICAL
WARRANTY
If a VAX machine is used in the way it is intended and it breaks down within the guarantee period, it’s our responsibility to repair or replace it.
Here’s what isn’t covered:
- Functional parts, tools, and accessories after 12 months may suffer premature failure due to everyday wear and tear.
- Consumables after 3 months such as belts, filters, brushbars, fuses, etc.
- Accidental damage.
- Cosmetic damage that does not affect the functioning of the product.
- Damage as a result of use is not in accordance with the user guide.
- Damage caused by not carrying out regular maintenance.
- Damage to the cable.
- Blockages; please refer to the user guide.
- Poor product performance caused by:
– Negligent use, misuse, or careless operation of the machine.
– Failure to clean or maintain the product in accordance with the user guide.
– Use of the machine which is not in accordance with the user guide.
– Use of a VAX product for anything other than normal domestic household purposes in the country in which it was purchased.
– Use of parts, accessories, and consumables, which are not genuine VAX components.
– Faulty installation or repairs – unless carried out by a qualified electrician or engineer.
TECHNICAL
EU Statement of Compliance: Manufacturer/EU importer: VAX Limited, hereby on our own responsibility, declare that the VAX Steam series is manufactured in compliance with the following Directives:
Safety: 2014/35/EU Low Voltage Directive.
EMC: 2014/30/EU Electromagnetic Compatibility Directive.
![]() Waste electrical products should not be disposed of with household waste. Please recycle where facilities exist. Check with your Local Authority or retailer for recycling advice.
Waste electrical products should not be disposed of with household waste. Please recycle where facilities exist. Check with your Local Authority or retailer for recycling advice.
VAX is a trademark of Techtronic Cordless GP.
© 2020 Techtronic Cordless GP. All rights reserved.
VAX Ltd, Artillery House, Heritage Way, Droitwich, WR9 8YB, UK.
Included with your machine
Steam Glide
Standard tools
 |
Measuring Jug |
 |
Concentration Nozzle |
 |
Small Round Brush |
 |
Grout Brush |
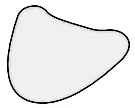 |
Microfibre Pad |
 |
Carpet Glider |
Steam Clean Multi
Standard tools, plus
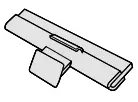 |
Squeegee |
 |
Utility Head |
 |
Utility Head Pad |
GETTING IN TOUCH
Thank you for buying this Steam product.
Taking care of your sealed hard floors and surfaces
Vax Steam products are designed to make steam cleaning your hard floors and surfaces regularly, as effective and efficient as possible, and this user guide will help you get the most out of your machine.
Maintaining your hard floors and surfaces with our Steam products will ensure they keep looking beautiful and are hygienically clean.
Taking care of your Multifunction Steamer
Also inside this guide are instructions on maintaining your new machine, so that it’s always ready when you are to tackle your hard floors and surfaces.
Receive your FREE 1-year guarantee †
Register your product online:
vax.co.uk/registration
We’re here if you need us
Visit our online support:
support.vax.co.uk
Still, need to get in touch?
Our UK-based Customer Care Team is here to support you.
For help with assembly, operational or performance problems, or buying and fitting new accessories, you can find all our contact details at vax.co.uk/contact
This user guide can be found online at: support.vax.co.uk
† Registration required. Terms and conditions apply, see vax.co.uk for details.
GETTING TO KNOW YOUR MACHINE
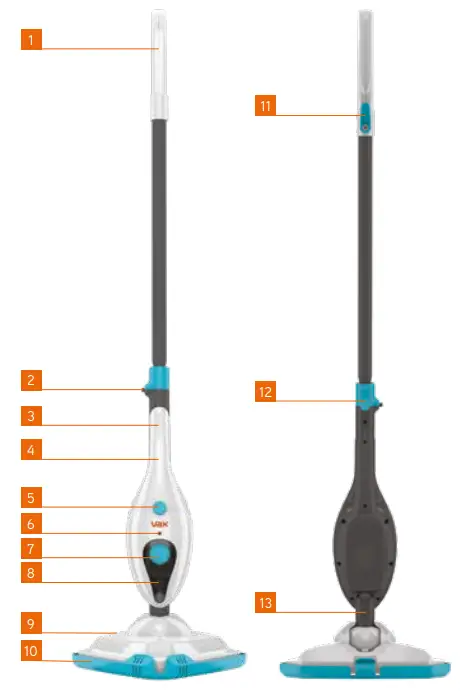
| 1 Handle 2 Handle release button 3 Handheld handle 4 Handheld steam trigger (hidden) 5 On/Off and steam control dial 6 Power on indicator 7 Water tank cap |
8 Water tank (part of the unit) 9 Floorhead 10 Carpet glider 11 Quick release cord hook 12 Quick release cord hook 13 Accessory floorhead release button |
TECHNICAL SPECIFICATION
Vax Steam Clean Multi & Steam Glide S85-CM & CDHF-SGXS
| Voltage | 220-240v~50Hz |
| Wattage | 1300w |
| Cord length | 5m |
| Weight | 2.5kg |
To purchase accessories and consumables visit: vax.co.uk
Subject to technical change without notice. Images are illustrative only.
GETTING STARTED
PLEASE READ THE SAFETY PRECAUTIONS ON PAGES 2 & 3 BEFORE USE.
CAUTION: The machine and accessories get very hot during use. Always allow them to cool down before handling.
Always switch off and unplug the machine when assembling or disassembling.
Always switch off the machine before emptying the water tank or changing the clothes/accessories.
IMPORTANT: Please refer to the floor manufacturer’s care recommendations before use and test the machine on a hidden area of flooring, to begin with. Only suitable for use on sealed hard floors.
Test for colorfastness in a small hidden area of upholstery/fabric to check for color removal before use.
When using the machine, basic safety precautions should always be observed.
Don’t aim the machine at people, animals, plants, and electrical components or wires. Never touch the steam jet or floorhead from a short distance (there is a risk of scalding).
The machine is equipped with a thermostat and a thermal cut-out. If for any reason the machine overheats it will switch off.
If this happens switch off and unplug the machine, allow it to cool for at least 2 to 4 hours and re-try.
Don’t use hot or boiling water to fill or clean the water tank.
Assembly
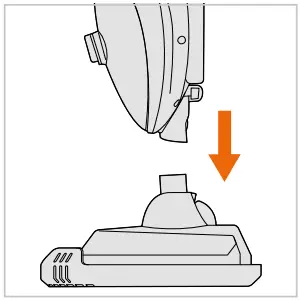 |
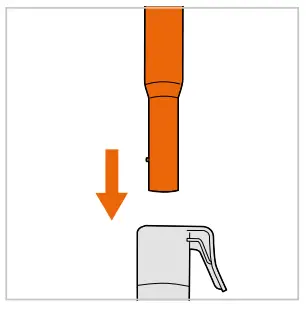 |
| Push the main body down into the floorhead until it clicks into place. | Push the handle into the main body until it clicks into place. |
USING YOUR MACHINE
Filling the water tank
IMPORTANT: Never turn the machine over when water is in the tank, as some water may leak through the air valve.
It is normal for the water tube to make a rattling sound inside the water tank during use.
This machine is to be used with water only, putting detergent into the water tank can cause damage and invalidate the guarantee.
For hard water, areas use filtered water.
 |
 |
 |
 |
 |
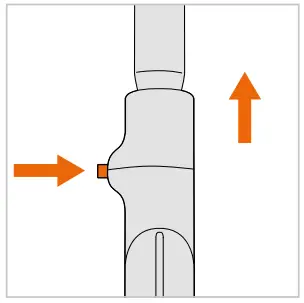
| Press the handle release button and lift the handle to remove. |
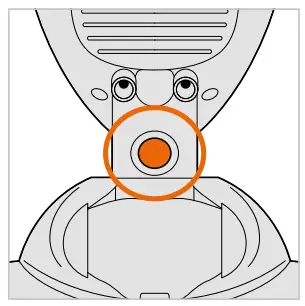
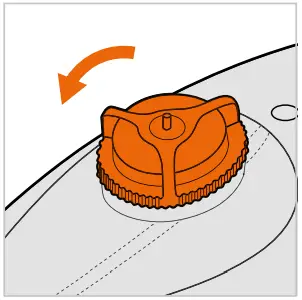
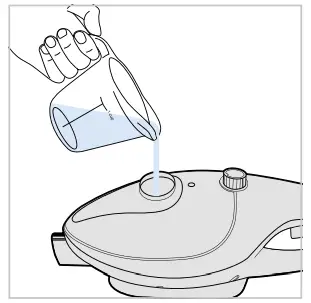
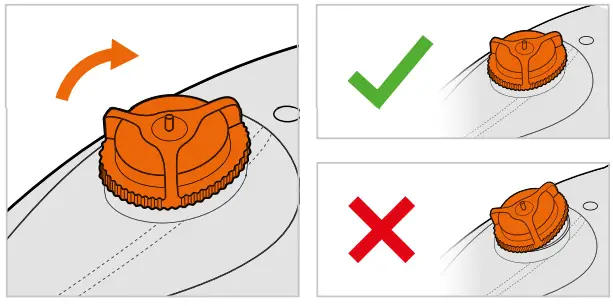
Press the accessory release button and lift the machine out of the floorhead. | Place the machine on a flat surface. Twist the water tank cap anticlockwise and lift to remove. | Use the measuring jug to fill the tank with 330ml (2 x 165ml) of water. | Replace the cap so that it sits flush against the tank and twist clockwise to lock into position. |
Cleaning hard floors
IMPORTANT: Never use the floorhead without a microfibre pad attached. Never leave the machine on one spot for an extended period of time or with a damp or wet microfibre pad attached as this may damage the floor surface.
 |
 |
 |
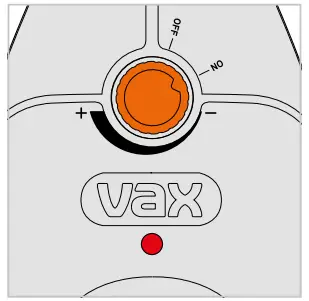 |
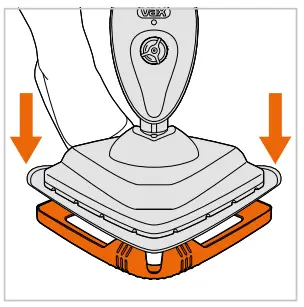
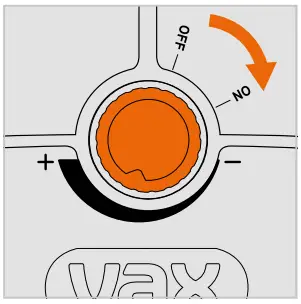
| Push the main body down into the floorhead until it clicks into place. | Push the handle into the main body until it clicks into place. | Place the microfibre pad on the floor white side facing up. Place the floorhead onto the microfibre pad making sure the microfibre pad covers the entire floorhead. | Plug into the mains and turn the dial to ‘ON’. The red light will illuminate. The machine will be ready after approximately 30 seconds. During this time there will be no sound whilst it is heating up. |
 |
 |
 |
 |
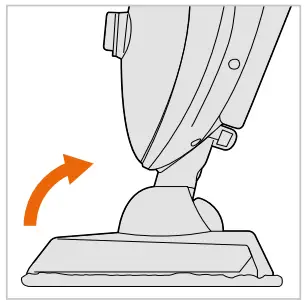
| Twist the steam control dial to the desired setting. Steam is activated automatically. | Place foot onto the floorhead and pull the handle backward to recline. |
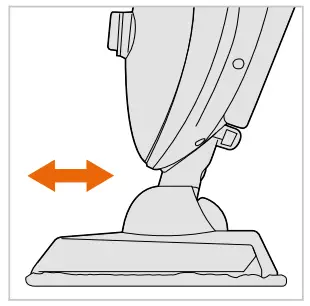
Move the machine slowly backward and forwards across the floor paying particular attention to high traffic areas. |
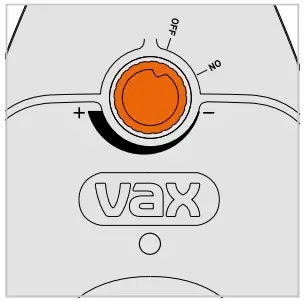
Turn the dial to the ‘OFF’ position and allow the machine to cool. The red light will switch off. |
Hold the corner of the pad down with your foot and lift the machine to peel away.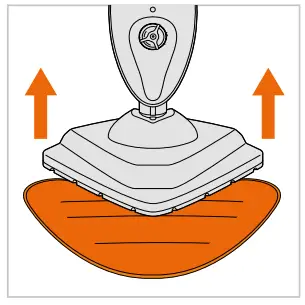
Refreshing carpets
IMPORTANT: When using on carpets, always make sure the microfibre pad is used and covers the floorhead entirely before using the carpet glider. Only use the carpet glider when refreshing carpets.
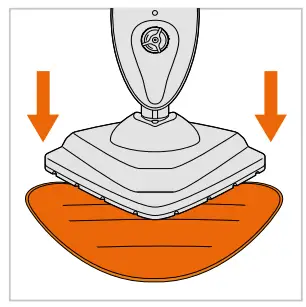 |
 |
 |
 |
| Place the microfibre pad on the floor white side facing up. Place the floorhead onto the microfibre pad making sure the microfibre pad covers the entire floorhead. | With the microfibre pad attached, push the machine into the front of the carpet glider, then place the back of the floorhead into the clip. |
Plug into the mains and turn the dial to ‘ON’. The red light will illuminate. The machine will be ready after approximately 30 seconds. During this time there will be no sound whilst it is heating up. |
Twist the steam control dial to the desired setting. Steam is activated automatically. |
 |
 |
 |
 |
| Place foot onto the floorhead and pull the handle backward to recline. |
Move the machine slowly backward and forwards across the carpet paying particular attention to high traffic areas. |
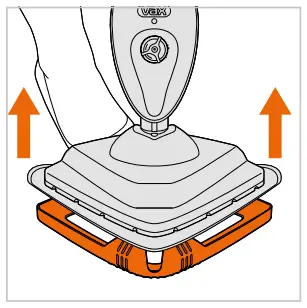
To release the carpet glider, place your foot on the clip and push down. Lift the machine to remove. | Turn the dial to the ‘OFF’ position and allow the machine to cool. The red light will switch off. |
Hold the corner of the pad down with your foot and lift the machine to peel away.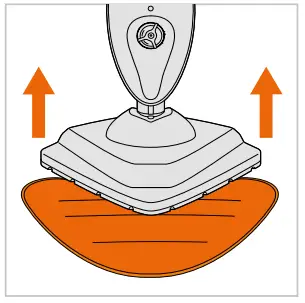
Using as a handheld
IMPORTANT: Always check the tools are clean and free from debris, don’t use if damaged, broken or worn.
Always switch OFF the machine before attaching the concentration tool and accessories.
 |
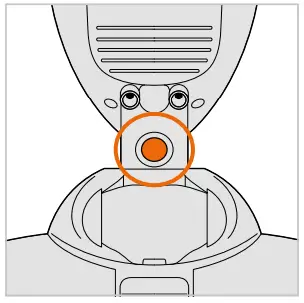 |
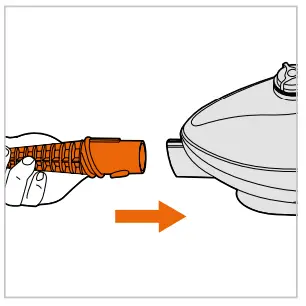 |
| Press the handle release button and lift the handle to remove it. | Press the accessory release button and lift the machine to release the floorhead. |
Push the concentration nozzle into the machine until it clicks into place. |
 |
 |
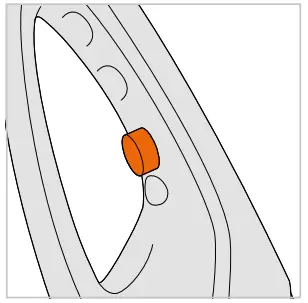 |
| Plug into the mains and turn the dial to ‘ON’. The red light will illuminate. The machine will be ready after approximately 30 seconds. During this time there will be no sound whilst it is heating up. |
Twist the steam control dial to the desired setting. |
Hold the trigger in until steam appears from the nozzle. During use release and squeeze the trigger in short bursts. Don’t hold the trigger continuously to prevent overwetting. |
Using the accessories
CAUTION: Never use the machine on cold glass/windows as it may cause damage.
IMPORTANT: Taps should be turned off when steaming around them. Don’t steam clean ovens, oven surfaces, or grills when hot, allow cooling to room temperature first.
Always check the tools are clean and free from debris. Don’t use the tools if they’re damaged, broken, or worn.
| Concentration nozzle | Small brush | Grout brush | Utility head and pad | Squeegee |
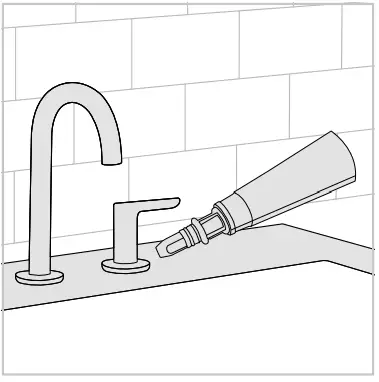 |
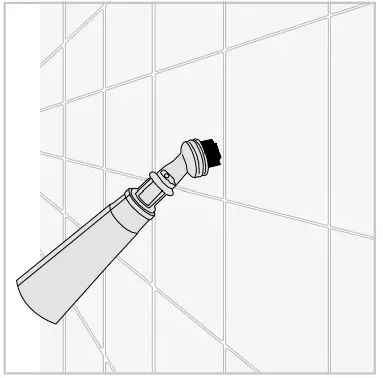 |
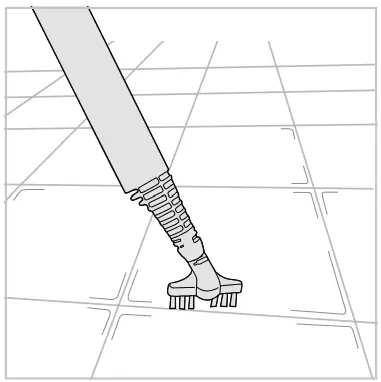 |
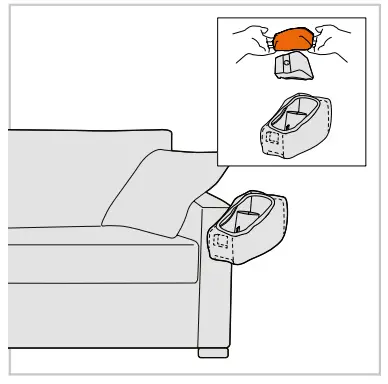 |
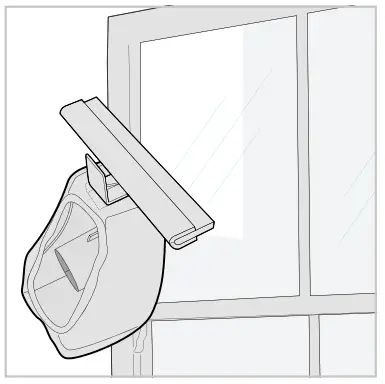 |
| Use to remove soap scum in baths and shower enclosures and to clean heavily soiled areas in kitchens. | Ideal for any surface from tiles, sinks, toilets, and oven tops. |
Lifts embedded dirt from in between tiles. | Attach the utility pad to the utility head for use on upholstery and clothes. | Great for leaving your windows, tiles, and mirrors gleaming. |
The utility head, utility pad, and squeegee are only included with the Steam Clean Multi variant.
Attaching accessories
CAUTION: Never use the machine on cold glass/windows as it may cause damage.
IMPORTANT: Always check the tools are clean and free from debris. Don’t use the tools if they’re damaged, broken or worn.
| Attaching the brushes | Attaching the utility head | ||
 |
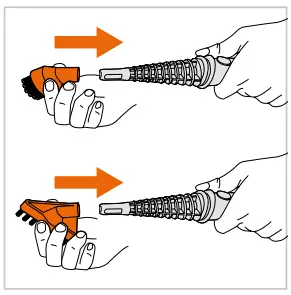 |
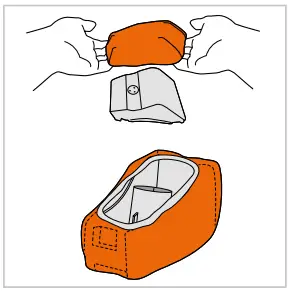 |
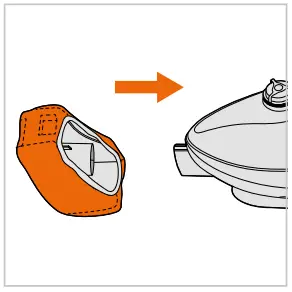 |
| Push the concentration nozzle into the machine until it clicks into place. | Firmly push the selected brush onto the concentration nozzle. |
Stretch the utility pad over the utility head. |
Push the utility head and pad into the machine until secure. It will not lock into place. Pull to test it is secure. |
Attaching the squeegee
IMPORTANT: The utility pad must be attached to the utility head when fitting the squeegee.
 |
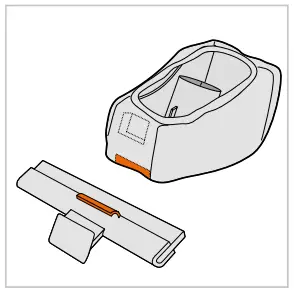 |
 |
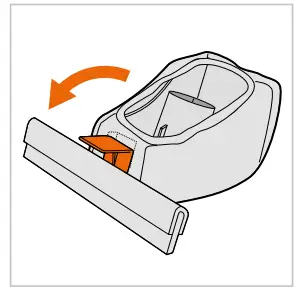 |
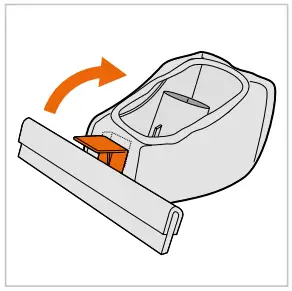
| Stretch the utility pad over the utility head. | Hook the tab on the squeegee into the indent on the utility head (this will be hidden by the utility pad). | Firmly push the clip on the squeegee onto the utility head until it locks into position. | To remove, pull the clip on the squeegee down. |
The utility head, utility pad, and squeegee are only included with the Steam Clean Multi variant.
MAINTENANCE AND CLEANING
Emptying the water tank
IMPORTANT: Never remove the water tank cap with the product upright as water could leak out.
Always remove the floorhead and handle, and place them on a flat surface before removing the water tank cap.
 |
 |
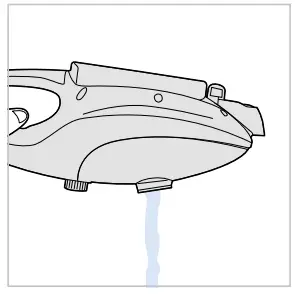 |
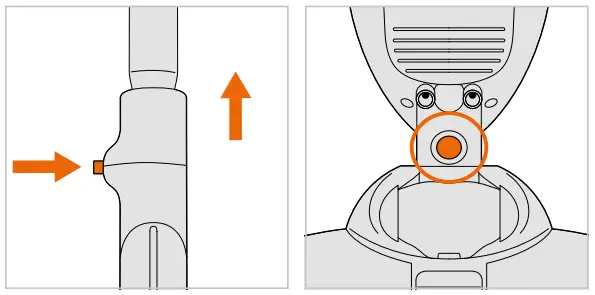
| Unplug, remove the handle, floorhead and place the machine on a flat surface. | Twist the water tank cap anticlockwise and lift to remove. | Empty any excess water over an empty sink. |
Cleaning the microfibre/utility head pad
IMPORTANT: Always allow the machine to fully cool down before removing the microfibre pad.
Don’t use bleach or fabric softener when washing.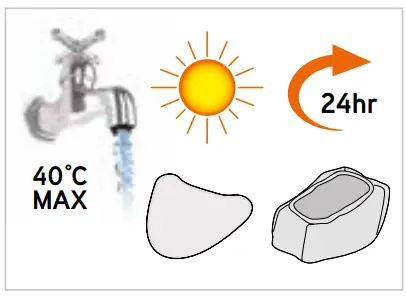
The microfibre pad is machine washable (max 40°C).
The utility head pad is hand wash only.
Allow both pads to fully dry before use.
The utility head and utility pad are only included with the Steam Clean Multi variant.
Clearing blockages
IMPORTANT: Turn the dial on the machine to ‘OFF’ position, switch off at the mains and unplug safely.
Allow to fully cool down before performing maintenance or troubleshooting checks.
 |
 |
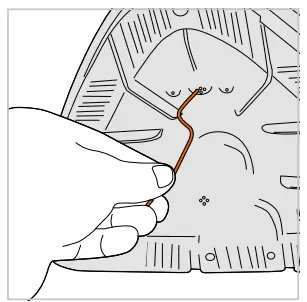 |
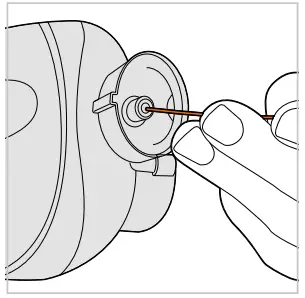
| Press the accessory release button and lift the machine to release the floorhead. | Use a small thin object such as a paperclip to insert into the nozzle and clear any blockage. | To clear a blockage in the floorhead remove the microfibre pad from the floorhead. Insert a small thin object, such as a paperclip into the steam holes to remove any blockages. |
WHAT TO DO IF IT GOES WRONG
WARNING: Always switch off and unplug the machine before performing any maintenance or troubleshooting checks.
There is an accessory missing
- Check the contents on the box to make sure the part is definitely included with your machine.
Why won’t the machine turn on?
- The plug may not be fully pushed into the electrical socket.
- The fuse in the plug may need replacing. Always replace with a British 13amp fuse.
- Check the on/off control dial position. See Cleaning hard floors page 10.
- Check the red light is illuminated. See Cleaning hard floors page 10.
Why won’t the machine produce steam?
- There may be no or little water in the water tank. Check the water tank has water. See Filling the water tank on page 9.
- Check the water tank cap is securely fitted onto the water tank. See Filling the water tank on page 9.
- The water may not yet be at temperature. The machine will take approximately 30 seconds to heat up.
See Cleaning hard floors page 10. - The steam dial may be set to low. See Cleaning hard floors page 10.
- The stream path may be blocked. See Clearing blockages page 16.
- If used as a stick mop – the handle may not be fully inserted. Release the handle and press the handheld trigger to check steam is working. Re-insert the handle until it clicks into place.
- If used as a handheld – the ball in the water tank may be stuck. Tilt the machine to release the ball.
Why won’t the microfibre pad pick up dirt?
- The microfibre pad may already be saturated or dirty. Wash the microfibre pad. See Cleaning the microfibre pad page 15.
GET IN TOUCH
]]>

USER GUIDE
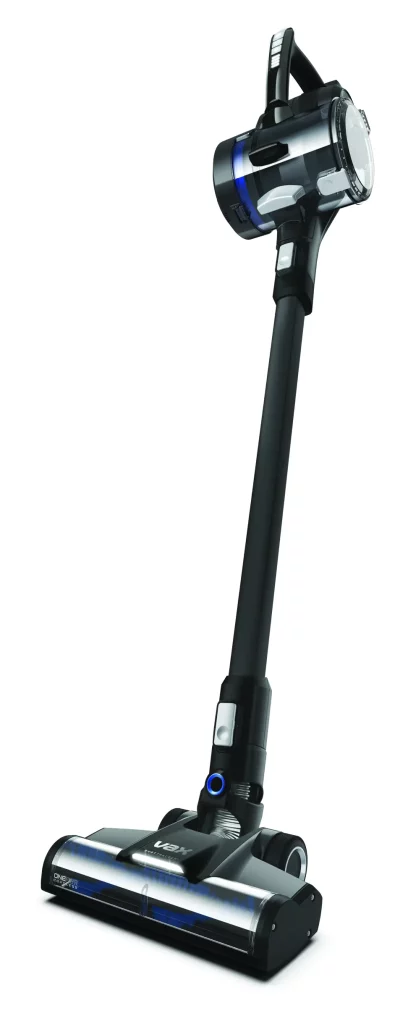
CLSV-B4KS CLSV-B4BS
SAFETY GUIDE
This machine is intended for household use only and NOT for commercial or industrial use.
PLEASE KEEP INSTRUCTIONS FOR FURTHER USE AND USE ONLY AS INSTRUCTED IN THIS GUIDE.
DON’TS
- Don’t leave the charger plugged in when unattended.
- Don’t use the machine if it is faulty or has been dropped, damaged or left outdoors.
- Don’t use the machine to pick up any flammable or combustible materials (lighter fluid, petrol, kerosene etc.) or use the machine in an area with explosive vapours or liquid.
- Don’t use the machine to pick up hot coals, cigarette butts, matches or smoking hot burning items or use in an area where there may be harmful fluids (chlorine, bleach and ammonia drain cleaner).
- Don’t handle the charger, battery or use the machine with wet hands. Don’t unplug the charger by pulling on the power cord.
- The power cord cannot be replaced. If the cord is damaged the charger should be scrapped.
- Don’t attempt to remove blockages with sharp objects as this may cause damage to the machine.
- Don’t use the machine with the incorrect battery or charger as this may result in damage or injury to the user. The correct battery charger information is listed on the battery pack rating label.
- Don’t charge the battery outdoors, or leave the charger connected to the mains when not in use.
- Don’t use a machine with a damaged battery. If the battery is damaged contact us on 08000 927737.
- Don’t use it on a surface that is damaged, uneven or incorrectly fitted.
- The brushbar in the powered floorhead constantly rotates when switched on. Never use the powered floorhead on one spot for an extended period of time as the brushbar may damage the floor surface.
DO’S
- Only VAX ONEPWR batteries (BV15020/BV15030/BV25040) and chargers (BV05100UK) should be used with this machine.
- Always stand the charger on a stable, level surface, uncovered and away from any heat source.
- Only VAX ONEPWR recommended tools and accessories should be used with this machine.
- Always remove the battery from the machine before carrying out any maintenance or if stored unused for a long period of time.
- Keep all openings clear, free from debris, and don’t overfill the dirt container as this may affect the airflow/suction.
- Turn off all controls on the machine before disconnecting or connecting the battery.
- Only use the machine indoors on dry surfaces and keep the area you’re cleaning well lit.
- This machine is not intended to be used or cleaned by persons with reduced physical, sensory or mental capabilities, or lack of experience or knowledge unless they have been given instructions concerning the safe use of the machine by a person legally responsible for their safety. They should be supervised whilst using the machine. Children shall not use, clean, or play with this machine, which when not in use should be secured out of their reach
- Keep fingers, hair, and loose clothing away from moving parts and openings whilst using the machine.
- Store the machine in a cool, dry area. Keep the machine away from rain and moisture.
- Use only CE-approved 13amp extension cords, non-approved extension cords may overheat. Care should be taken to arrange the extension cord as it can be a trip hazard.
- Take extra care when using the machine on the stairs.
- Always turn the powered floorhead brushbar off when cleaning hard floors. To prevent any damage from being sustained, test on an inconspicuous area of the flooring first.
- Always make sure the separator and filter are fitted correctly before using your machine and only use the machine with the filter and separator in place.
- Always check the powered floorhead and accessories are free from damage, dirt, and debris before using.
- This machine does not stay upright without constant support. Between uses, lie flat on the floor in a suitable location so that it does not become a trip hazard or can be stepped on.
BATTERY SAFETY PRECAUTIONS
- Replace the battery with a VAX ONEPWR battery only. The use of another battery may present a risk of fire or explosion.
- Do not attempt to disassemble the battery, remove any component projecting from the battery terminals, and do not dispose of it in a fire. The battery and charger have no user-serviceable parts. Fire or injury may result.
- Prior to disposal, protect exposed terminals with heavy insulating tape to prevent shorting. The battery is to be disposed of safely at your local battery recycling center. · When the battery pack is not in use, keep it away from other metal objects that can make a connection from one terminal to another. Shorting the battery terminals together may cause burns or a fire.
- In case of battery leakages, avoid any contact with skin and contact us on 08000 927737.
WARRANTY & TECHNICAL
WARRANTY
If a VAX ONEPWR machine is used in the way it is intended and it breaks down within the guarantee period, it’s our responsibility to repair or replace it. Here’s what isn’t covered:
- Normal wear and tear of consumable
items, for example, belts, filters, brushbars, fuses, etc. - Batteries have become faulty as a result of improper handling.
- Batteries have a reduced service life as a result of normal wear.
- Accidental damage – Damage as a result of use not in accordance with the product user guide.
– Damage caused by not carrying out regular maintenance.
– Damage to the charger cable.
– Blockages caused by misuse. - Faults caused by:
– Negligent use, misuse, neglect, or careless operation of the machine.
– Use of the machine cleaner which is not in accordance with the user guide.
– Use of a VAX ONEPWR machine for anything other than normal domestic household purposes in the country in which it was purchased.
– Use of parts, accessories, and consumables, which are not genuine VAX components.
– Faulty installation or repairs unless carried out by a qualified electrician or engineer.
TECHNICAL
EU Statement of Compliance: Manufacturer/EU importer: VAX Limited, hereby on our own responsibility, declare that the VAX ONEPWR Blade 4 is manufactured in compliance with the following Directives: Safety: 2014/35/EU Low Voltage Directive. EMC: 2014/30/EU Electromagnetic Compatibility Directive.
![]() Waste electrical products should not be disposed of with household waste. Please recycle where facilities exist. Check with your Local Authority or retailer for recycling advice.
Waste electrical products should not be disposed of with household waste. Please recycle where facilities exist. Check with your Local Authority or retailer for recycling advice.
VAX is a trademark of Techtronic Cordless GP. © 2020 Techtronic Cordless GP. All rights reserved.
VAX Ltd, Artillery House, Heritage Way, Droitwich, WR9 8YB, UK.
GETTING TO KNOW YOUR MACHINE
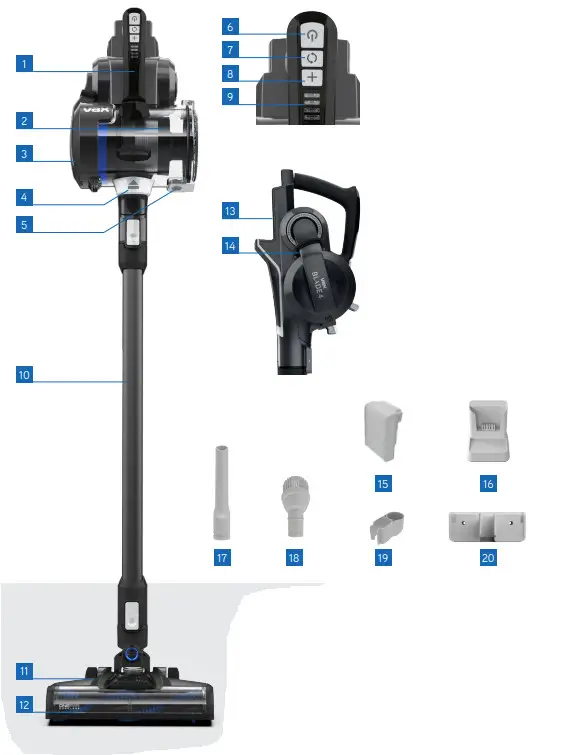
- Carry handle
- Dirt container
- Filter cover and filter
- Dirt container release latch
- Dirt release button
- Power ON/OFF
- Brushbar ON/OFF
- Boost ON/OFF
- Battery level indicator light
- Reach wand
- Powered floorhead
- Brushbar
- Battery dock
- Filter cover release tab (hidden)
- ONEPWR Battery*
- ONEPWR Charger*
- Crevice tool
- Dusting brush
- Crevice tool storage caddy
- Wall mount screws and wall plugs
TECHNICAL SPECIFICATION
VAX ONEPWR Blade 4
| Weight (without battery pack) | 2.8kg |
| Dirt bin capacity | 0.6L |
Runtime and charge time are dependent on the battery pack and power mode used.
- Included with model CLSV-B4KS only. Subject to technical change without notice. Images are illustrative only.
GETTING STARTED
ASSEMBLY
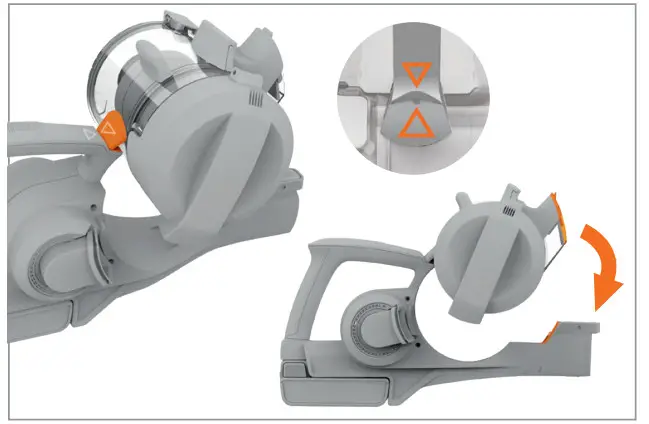
To assemble the dirt container, line up the arrow on the dirt container connection with the arrow on the handle. Push the dirt container onto the handle until it clicks into place.
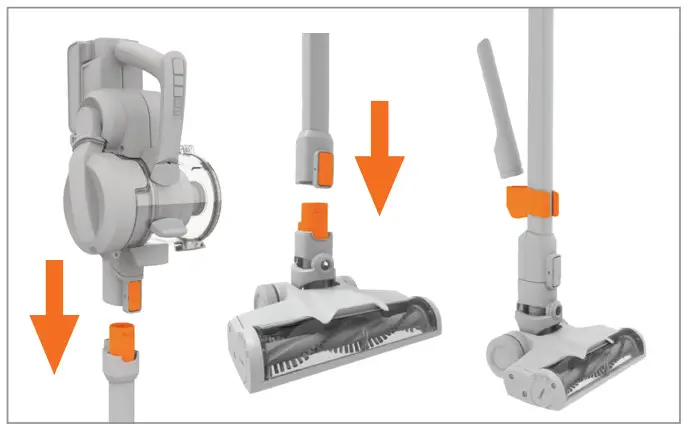
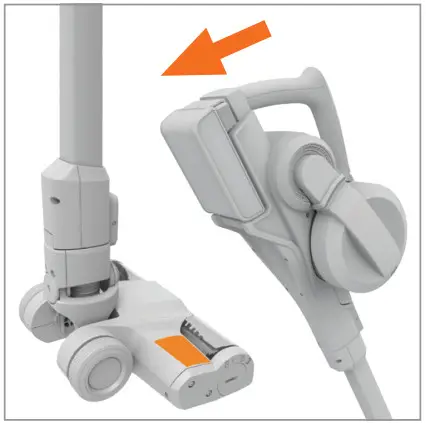
Attach the handheld to the reach wand until it clicks into place. Attach the reach wand to the powered floorhead until it clicks into place. Push the tool caddy onto the reach wand and slot the crevice tool into place.
ATTACHING THE WALL MOUNT
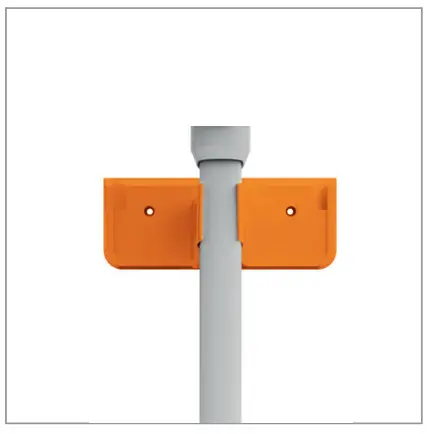
Without the handheld attached to the reach wand and powered floorhead, push the wall bracket onto the top and back of the reach wand.
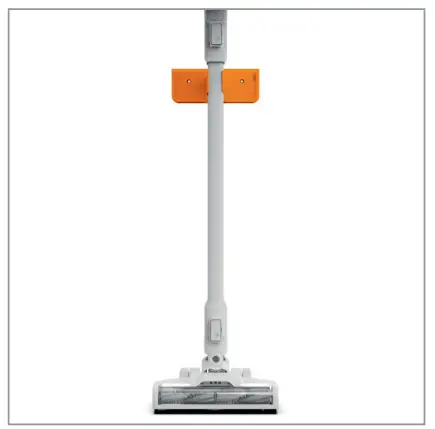
Choose a location for the machine to be stored, preferably near to a mains supply although not directly above or below a mains socket. Stand the machine-powered floorhead and wand against the wall, ensuring the powered floorhead is flat on the floor.
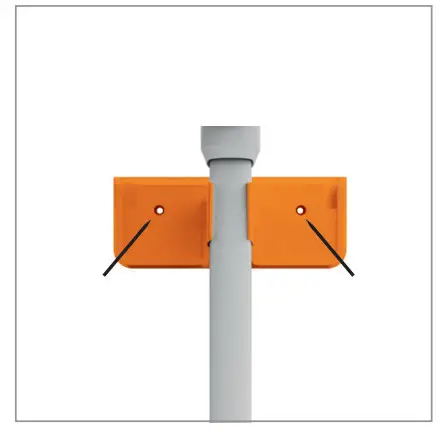
Holding the wall bracket securely against the wall, make a small mark for each screw. Secure the wall bracket to the wall using the wall plugs and screws.
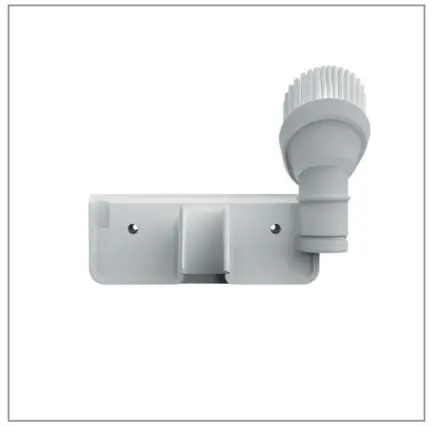
The dusting brush can be fitted onto the wall bracket.
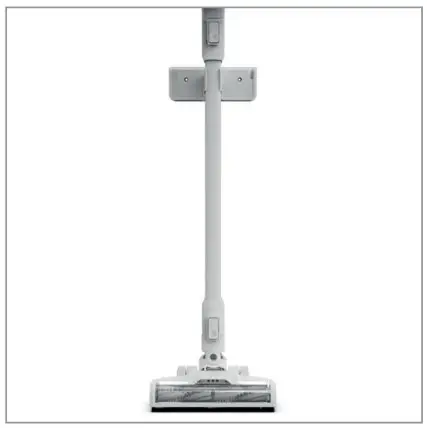
Fully assemble the machine and firmly press the machine into the wall bracket to secure. Always ensure the machine is securely locked into place.
CHARGING THE BATTERY
THIS MACHINE IS ONLY TO BE USED WITH VAX ONEPWR BATTERIES AND CHARGER. PLEASE READ THE SAFETY GUIDE BEFORE USE.
NOTE: Before first use, ensure the battery is fully charged. Failure to fully charge the battery before first use may result in poor battery performance. The life expectancy of the battery will vary depending on the usage of the machine.
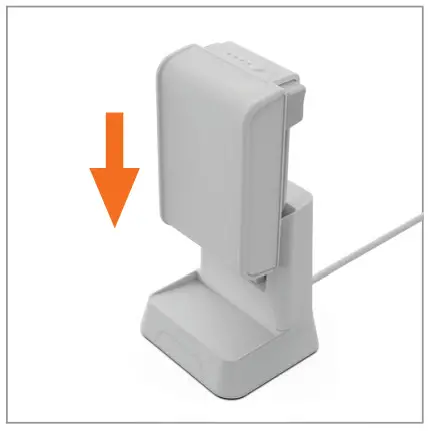
Slide the battery down onto the charger.
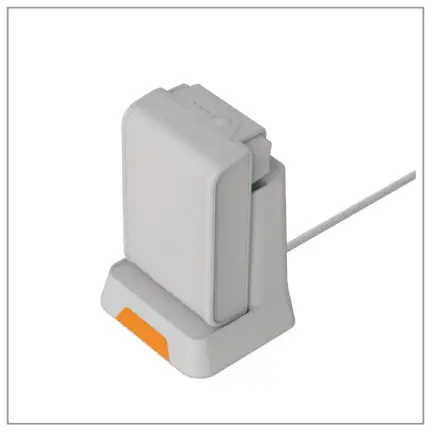
The charger light will flash white to show when the battery is charging. The light on the charger will stop flashing and go off when the batteries are fully charged.
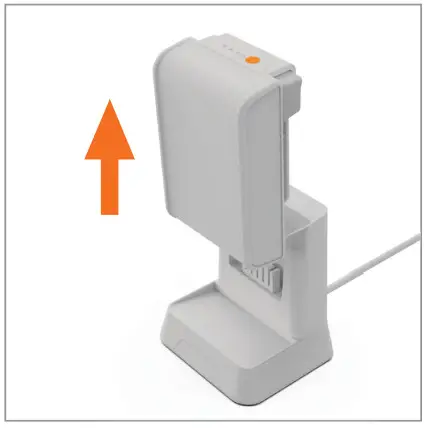
Once fully charged, slide the battery off the charger to remove it.
![]() To check the battery charge level press the battery symbol.
To check the battery charge level press the battery symbol.
OPERATION
WARNING: The brushbar in the powered floorhead constantly rotates when switched on. Never use the powered floorhead on one spot for an extended period of time as the brushbar may damage the floor surface. Always turn the powered floorhead brushbar off when cleaning hard floors. To prevent any damage from being sustained, test on an inconspicuous area of the flooring first.
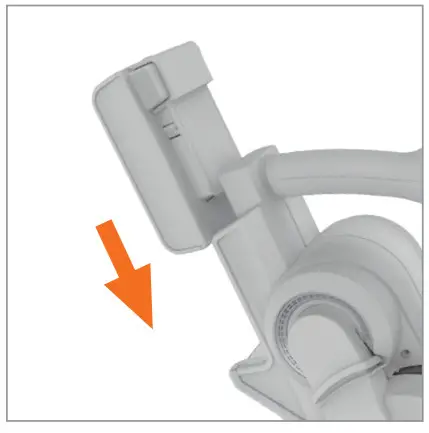
Slide the battery into the handheld until it clicks into place.
Place your foot on the powered floorhead. Pull the handle backwards to recline.
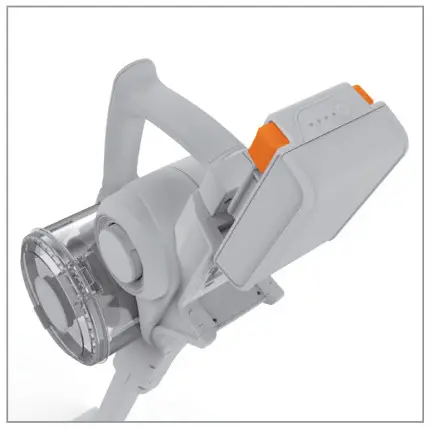
To remove the battery press both the buttons to release.
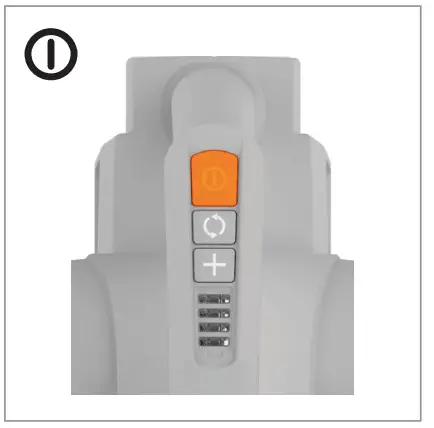
Press the on/off button to switch the machine on.
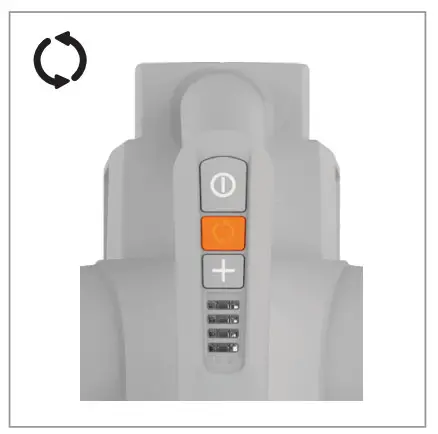
Press the brushbar on/off button to switch the brushbar on.
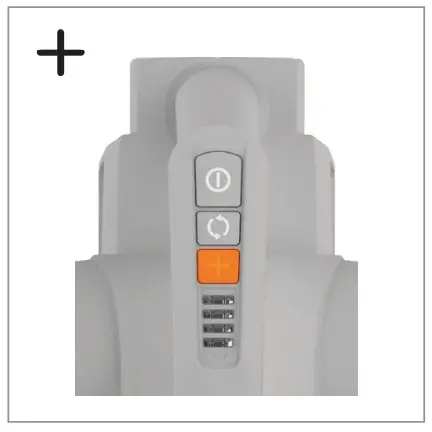
Press the boost button to increase the suction for particularly dirty areas.
NOTE: The powered floorhead brushbar should be ON for carpets and OFF for hard floors. Constant use of the boost mode and brushbar will reduce the battery runtime.
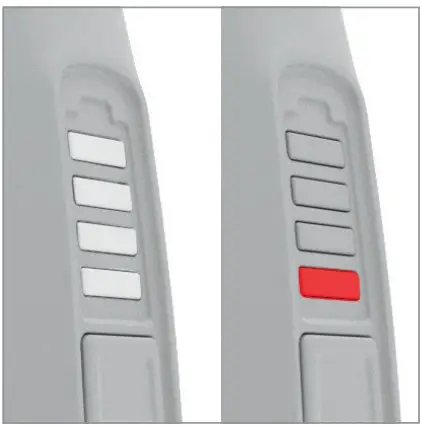
When the machine is in use the battery level indicator lights will illuminate indicating how much charge is remaining. When less than 20% charge is remaining the bottom light will flash red indicating the battery is running low and charging is required.
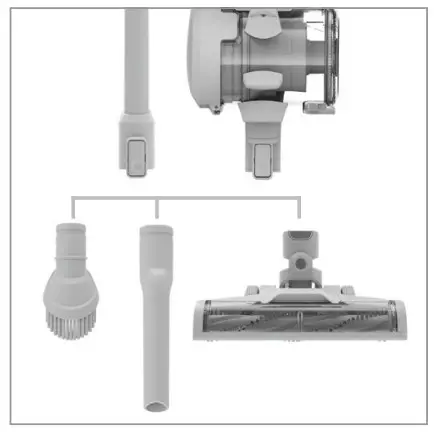
All of the accessories, including the powered floorhead can be attached directly onto the handheld or the reach wand. The crevice tool and dusting brush can be used for hard to reach places and at different heights for above-floor cleaning.
CAUTION: If the brushbar in the powered floorhead has been obstructed, the brushbar motor protection sensor may have been activated. The brushbar will stop, the light on the powered floorhead will illuminate red and the machine may switch off. To reset remove the powered floorhead from the reach wand/handheld and clear any obstruction. Wait 1 minute before refitting the powered floorhead tool, switch the machine on and press the brushbar ON/OFF button.
CLEANING & MAINTENANCE
REMOVING AND REFITTING THE DIRT CONTAINER
WARNING: Always remove the battery before carrying out any maintenance or troubleshooting.
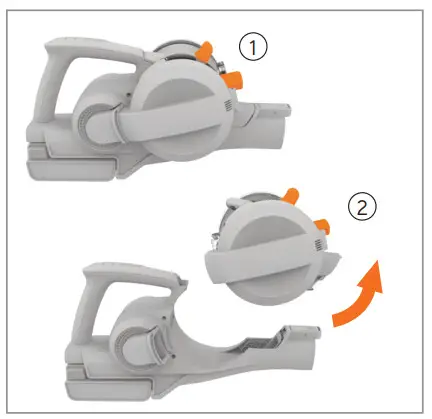
- Squeeze the latch on the dirt container to release.
- Tilt and lift to remove from the handheld.
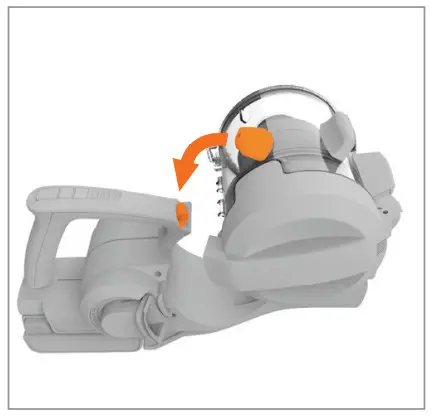
To refit, line up the dirt container connection with the handheld handle. Push the dirt container back onto the handle until it clicks into place.
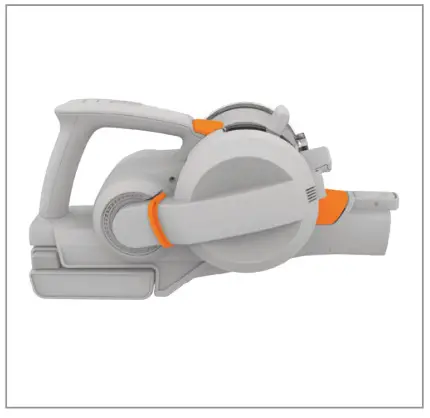
When correctly fitted all 3 connection points will be aligned and will sit flush.
EMPTYING THE DIRT CONTAINER
CAUTION: Don’t overfill the dirt container to avoid blocking the airflow through the machine. For best cleaning results, empty the dirt container after every use. Filters should be tapped over a bin every 4-6 uses to remove dirt and debris and washed every 3 months. Filters should be replaced every 6-9 months depending on the level of use.
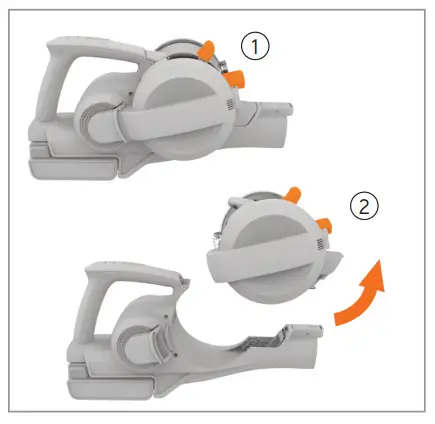
- Squeeze the latch on the dirt container to release.
- Tilt and lift to remove from the handheld.
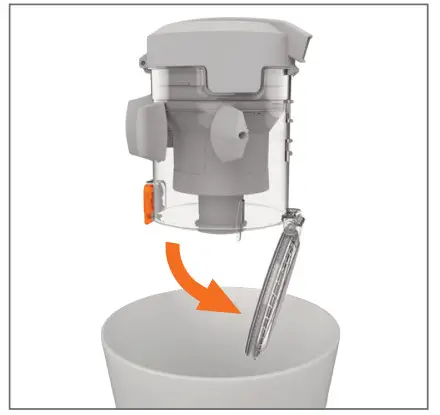
Hold the dirt container over a bin and press the dirt release button to allow dirt and debris to fall out.
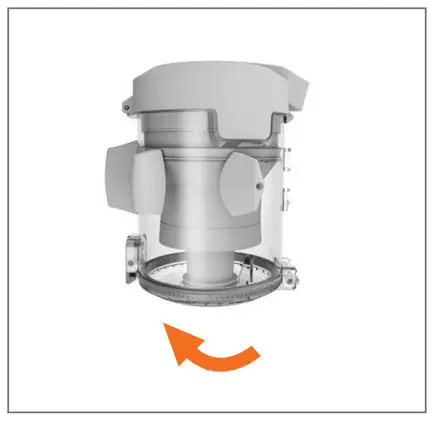
To close, push the dirt release door until it clicks into place.
CLEANING THE FILTER AND SEPARATOR
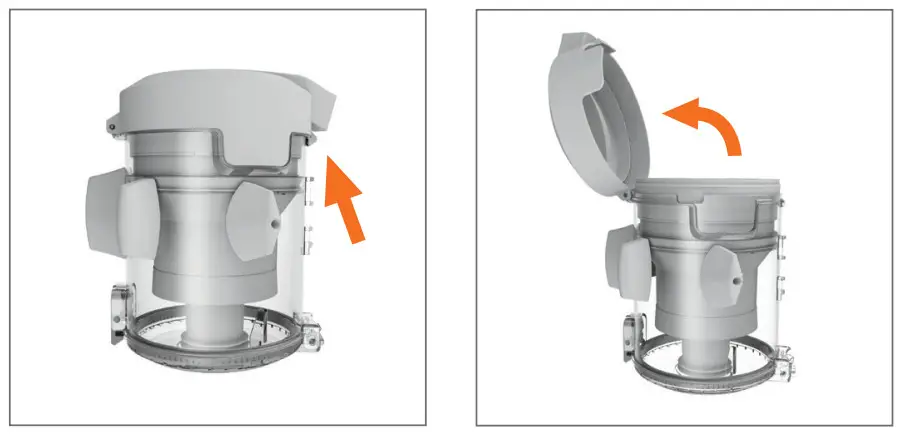
Push the tab on the lid of the dirt container and lift the cover to access the filter.
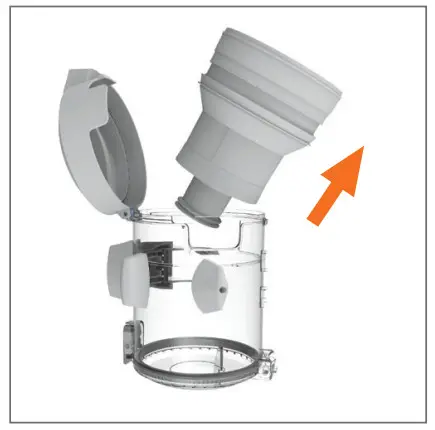
Lift the filter and separator from the dirt container.
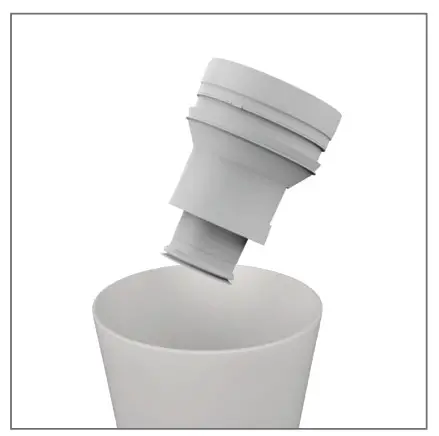
Tap the separator over a bin to remove dirt and debris and wipe over the metal shroud with a dry cloth.
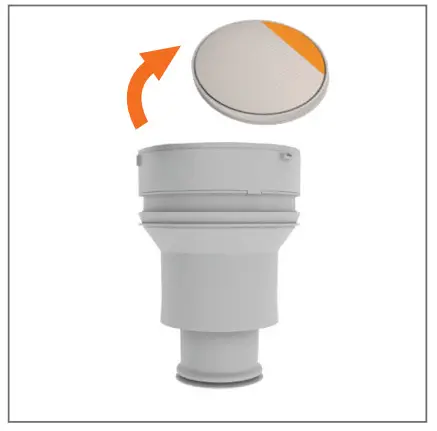
Pull the tab on the filter to remove it from the separator.
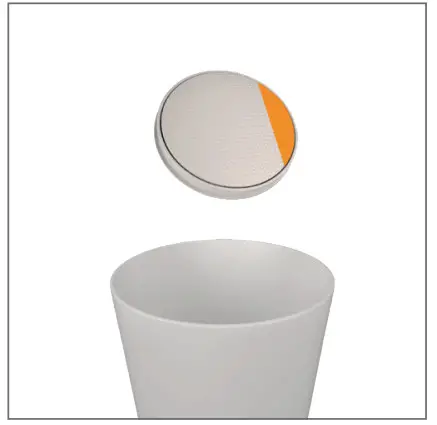
Tap the filter against the bin to remove any dirt and debris.
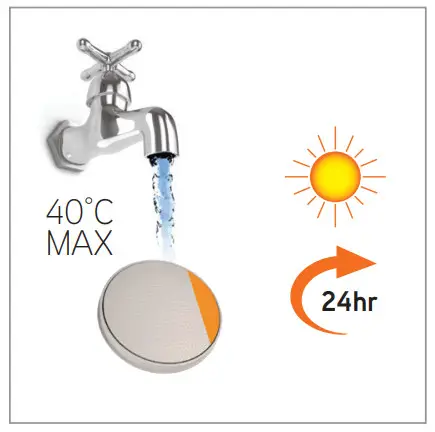
Wash the filter under running water (40°C max). Leave for at least 24hrs or until fully dry before replacing.
CAUTION: Ensure both the filter and separator are refitted before use.
CLEANING AND REPLACING THE POWERED FLOORHEAD BRUSHBAR
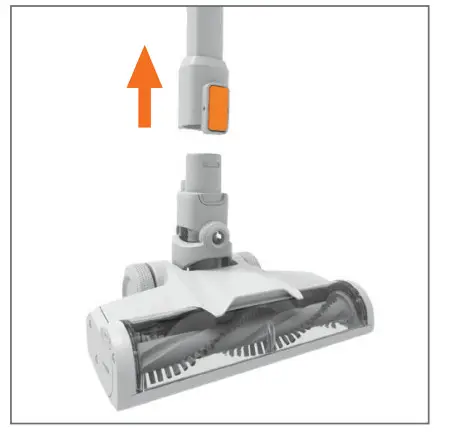
Press the floorhead release button to remove the floorhead from the machine.
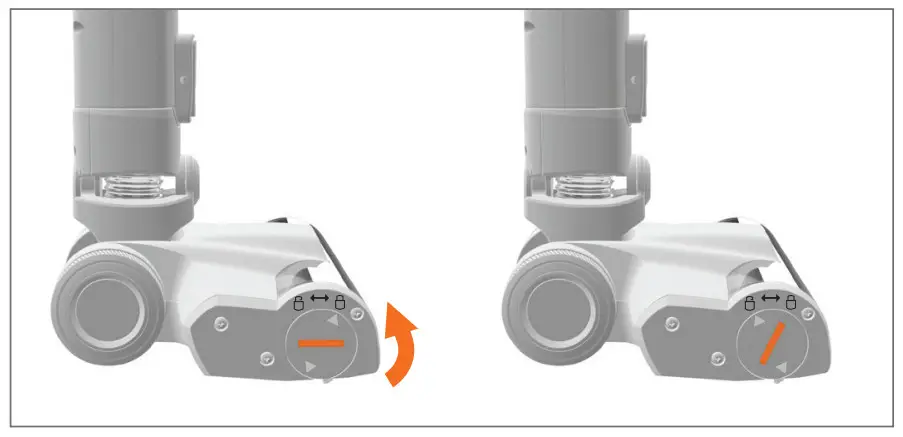
Using a coin, push and turn the brushbar lock anticlockwise to release the brushbar.
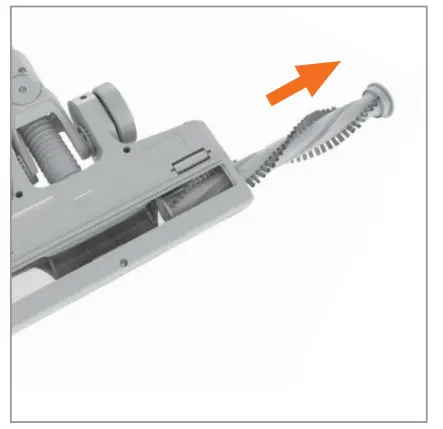
Pull the brushbar out from the brushbar housing.
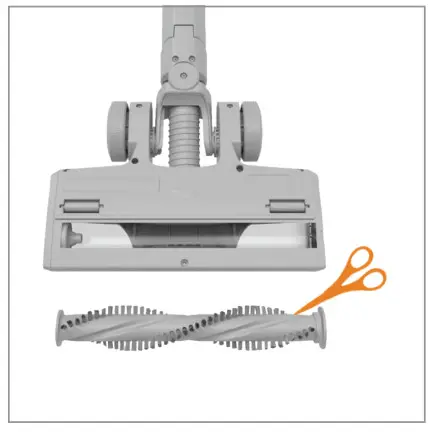
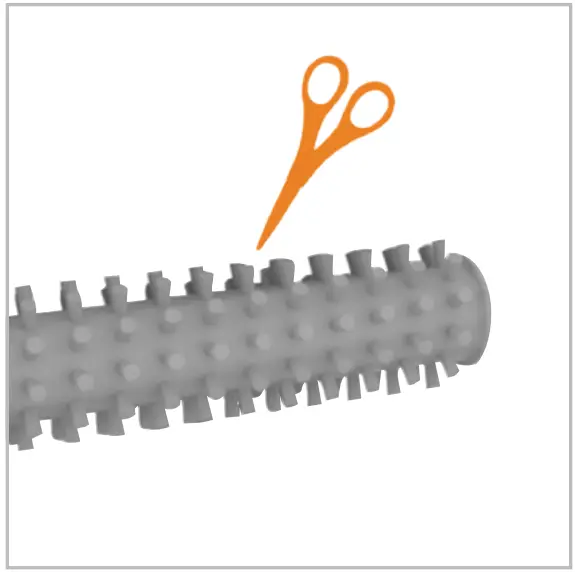
To remove any threads or hair, slide the blade of a pair of scissors into the groove on the brushbar and cut along the groove.
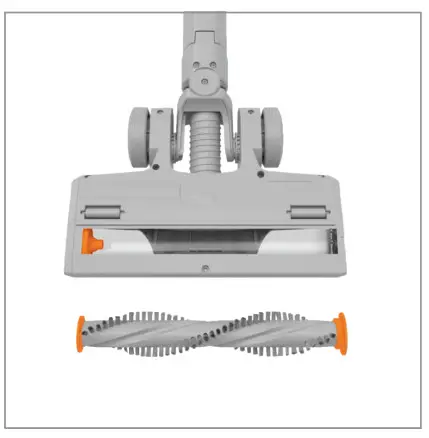
Clear any dirt/debris from the end caps and inside the housing of the powered floorhead.
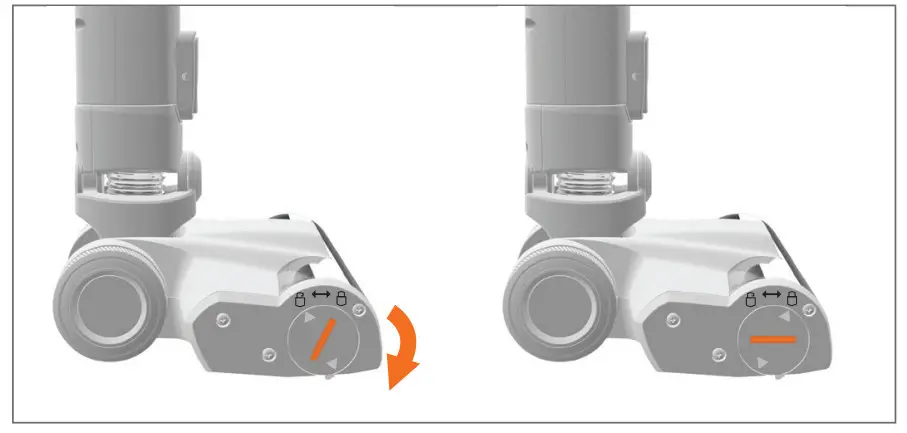
Refit the brushbar into the floorhead. Align the arrow on the brushbar cover so it points north, firmly pushes, and twist clockwise to lock.
CHECKING FOR BLOCKAGES
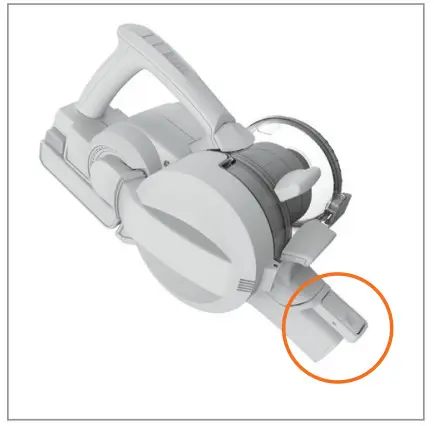
Press the handheld release button and remove the reach wand. Check and clear any dirt and debris from the handheld connection point.
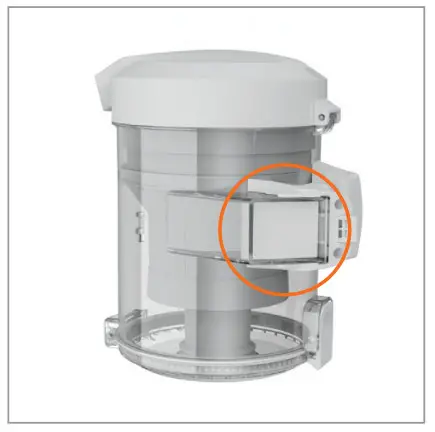
Press the dirt container release button and remove the dirt container. Check and clear any dirt and debris from behind the dirt container flap.
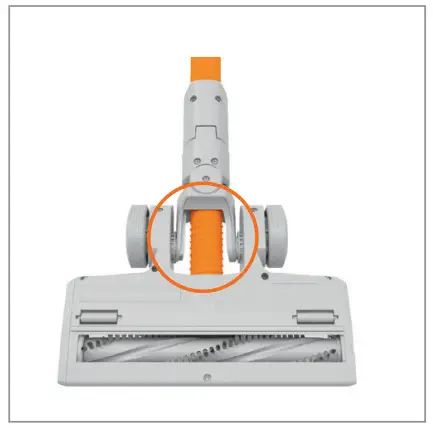
Check the powered floorhead for any blockages and use a blunt object to remove the blockage.
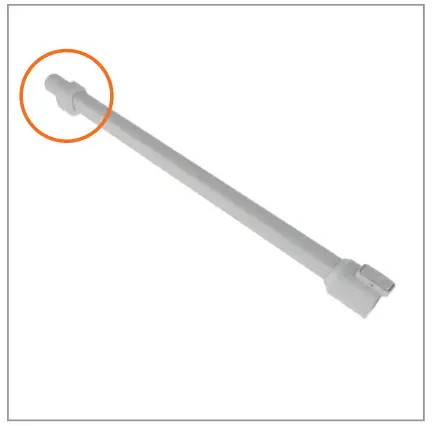
To test for a blockage in the reach wand, drop a small ball of paper into the wand. The paper will drop through if the wand is clear. Use a broom handle or similar blunt object to remove any blockage.
TROUBLESHOOTING
THERE IS AN ACCESSORY MISSING
Check the contents on the back of the box.
WHY DOES THE MACHINE HAVE NO POWER?
- The battery is not fitted correctly. See OPERATION page 7.
- The battery has no charge. See CHARGING THE BATTERY page 7.
- The motor thermostat may have tripped. Empty the dirt container and check for blockages. Clean the filters and allow the machine to cool for approximately 1 hour. If you have washed the filters, wait 24 hours to fully dry them before placing them back on the machine. See CLEANING THE FILTER AND SEPARATOR page 10.
- The brushbar motor sensor has been activated. To reset remove the powered floorhead from the reach wand/handheld and clear any obstruction. Wait 1 minute before refitting the powered floorhead, switch the machine on and press the brushbar ON/OFF button. See OPERATION page 8.
WHY WON’T THE MACHINE PICK UP?
- The dirt container may not be correctly fitted. See REMOVING AND REFITTING THE DIRT CONTAINER page 9.
- The dirt container may be blocked. Check the dirt container and handheld inlet for blockages. See EMPTYING THE DIRT CONTAINER page 9.
- The filters may be clogged. See CLEANING THE FILTER AND SEPARATOR page 10.
- There may be a blockage. See CHECKING FOR BLOCKAGES page 12.
- The brushbar on the powered floorhead has not been activated. See OPERATION page 8.
- The powered floorhead may be blocked. See CLEANING AND REPLACING THE POWERED HEAD BRUSHBAR page 11.
- The machine-powered floorhead and reach wand may not be correctly fitted. See ASSEMBLY page 6.
WHY IS THERE A RED LIGHT?
- Battery charge is running low (<20%). See CHARGING THE BATTERY page 8.
WHY IS THERE A RED LIGHT ON THE POWERED FLOORHEAD?
- The powered floorhead brushbar has been obstructed. See CLEANING AND REPLACING THE POWERED FLOORHEAD BRUSHBAR page 11.
WHY WON’T THE BRUSHBAR TURN?
- The brushbar on the powered floorhead has not been activated. Go to OPERATION page 8.
- The tool/brushbar may be obstructed. See CLEANING AND REPLACING THE POWERED HEAD BRUSHBAR page 11.
- The machine-powered floorhead and reach wand may not be correctly fitted. See ASSEMBLY page 6.
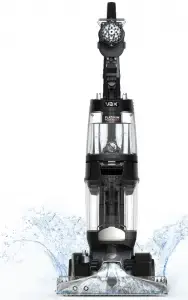
SAFETY GUIDE
This machine is intended for household use only and NOT for commercial or industrial use.
- Only use the machine indoors and keep the area you’re cleaning well lit.
- Keep fingers, hair and loose clothing away from moving parts and openings whilst using the machine.
- Before using the machine test your carpets/rugs/upholstery for colourfastness and pile distortion.
- This appliance can be used by children aged from 8 years and above and persons with reduced physical, sensory or mental capabilities or lack of experience and knowledge if they have been given supervision or instruction concerning use of the appliance in a safe way and understand the hazards involved. Children shall not play with the appliance. Cleaning and user maintenance shall not be made by children without supervision.
- Only VAX recommended tools and solution should be used with this machine.
Using other solutions may invalidate the guarantee.
- Don’t leave the machine plugged in when unattended.
- Don’t use the machine if it has been dropped, damaged, immersed in water or left outdoors.
- Don’t run over the cord or use the machine if the cord or plug is damaged.
If the supply cord is damaged, it must be replaced by the manufacturer, its
service agent or similarly qualified persons in order to avoid a hazard. - Don’t use the machine to pick up any flammable or combustible materials (lighter fluid, petrol, kerosene etc) or use the machine in an area with explosive vapours or liquid.
- Don’t handle the plug or use the machine with wet hands.
- Don’t leave the machine in one spot for an extended period of time when it is switched on. This machine is fitted with a rotating brush bar which, if left in one place, may cause damage to the floor surface.
- Don’t use the machine to pick up hot coals, cigarette butts, matches or smoking hot burning items or use in an area that is wet or where there may be harmful fluids (chlorine, bleach and ammonia drain cleaner).
- Don’t pull or carry the machine by the power cord.
• Don’t use the power cord as a handle, pull the power cord around corners or sharp edges, or close a door over the power cord. - Don’t unplug the machine by pulling on the cord.
- Don’t carry the machine whilst it’s switched on.
- Don’t attempt to remove blockages with sharp objects as this may cause damage to your machine. Remove blockages only as instructed in this guide
- Don’t use the machine with incorrect voltage as this may result in damage or injury to the user. The correct voltage is listed on the ratings label.
- Don’t over saturate your flooring. Always finish on a dry stroke.
- Don’t use on a surface that is damaged, uneven or incorrectly fitted.
- Check with the manufacturer of your flooring prior to using the machine. Test all carpets/rugs/upholstery before full usage. Run the machine over a small hidden area. If no damage or pile distortion occurs continue cleaning.
- The clean water/solution tank should be filled with warm water (max 40°C) only. Filling the clean water/solution tank with hot or boiling water will damage the machine and invalidate the guarantee.
- Always vacuum your carpets thoroughly before using the machine.
- Always replace the fuse in the plug with a British 13amp fuse.
- Always turn off or unplug the machine from the mains before carrying out any maintenance and before connecting or disconnecting the hose/accessories.
- Always check the machine, tools and accessories are free from damage, dirt/ debris before using.
- Take extra care when cleaning on the stairs.
- Always protect the power cable from heated surfaces and open flames.
- Turn off all controls on the machine before disconnecting or connecting the power cord. After use always wrap the power cord around the cord clips provided.
- Always keep the power cord away from the brushes whilst using the machine.
- Use only CE approved 13amp extension cords, non-approved extension cords may overheat. Care should be taken to arrange the extension cord as it can be a trip hazard.
- Always use the machine with all water/solution tanks and filters in place.
- Keep all openings clear and free from debris as this may affect the airflow/ suction/water pick up.
- Always use the machine in an upright position. To prevent motor damage from dirty water, never hold the machine upside down or on its side.
- Store the machine in a cool, dry area. Before storing the machine ensure all water/solutions tanks and filters are thoroughly clean and dry
PLEASE KEEP INSTRUCTIONS FOR FURTHER USE AND USE ONLY AS INSTRUCTED IN THIS GUIDE.
WARRANTY & TECHNICAL
If a VAX machine is used in the way it is intended and it breaks down within the guarantee period, it’s our responsibility to repair or replace it.
Here’s what isn’t covered:
- Functional parts, tools and accessories after 12 months that may suffer premature failure due to every day wear and tear.
- Consumables after 3 months such as belts, filters, brushbars, fuses etc
- Accidental damage.
- Cosmetic damage that does not affect the functioning of the product.
- Damage as a result of use not in accordance with the user guide.
- Damage caused by not carrying out regular maintenance.
- Damage to the power cord.
- Blockages; please refer to the user guide.
- Poor product performance caused by:
– Negligent use, misuse or careless operation of the machine.
– Failure to clean or maintain the product in accordance with the user guide.
– Use of the machine which is not in accordance with the user guide.
– Use of a VAX product for anything other than normal domestic household purposes in the country in which it was purchased.
– Use of parts, accessories and consumables, which are not genuine VAX components.
– Faulty installation or repairs – unless carried out by a qualified electrician or engineer.
EU Statement of Compliance: Manufacturer/EU importer: VAX Limited, hereby on our own responsibility, declare that the VAX Platinum Power Max is manufactured in compliance with the following Directives:
Safety: 2014/35/EU Low Voltage Directive.
EMC: 2014/30/EU Electromagnetic Compatibility Directive
 Waste electrical products should not be disposed of with household waste. Please recycle where facilities exist. Check with your Local Authority or retailer for recycling advice.
VAX is a trade mark of Techtronic Cordless GP.
© 2019 – 2021 Techtronic Cordless GP. All rights reserved.
VAX Ltd, Artillery House, Heritage Way, Droitwich, WR9 8YB, UK.
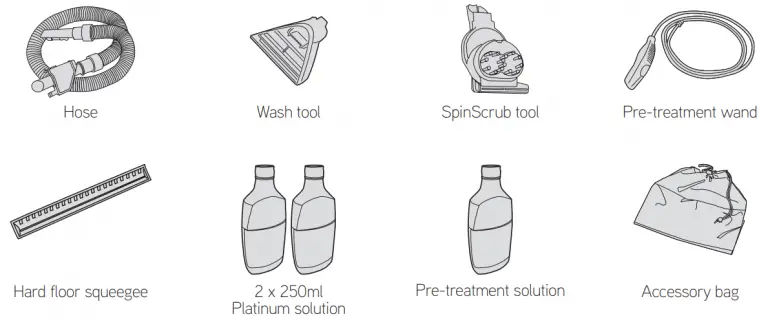
Included with your machine

GETTING IN TOUCH
Receive your FREE 6 year guarantee†
Register your product online:
We’re here if you need us
Visit our online support:
Still need to get in touch?
Our UK based Customer Care Team are here to support you.
For help with assembly, operational or performance problems, or buying and fitting new accessories, you can find all our contact details at vax.co.uk/contact
This user guide can be found online at: support.vax.co.uk
† Registration required. Terms and conditions apply, see vax.co.uk for details.
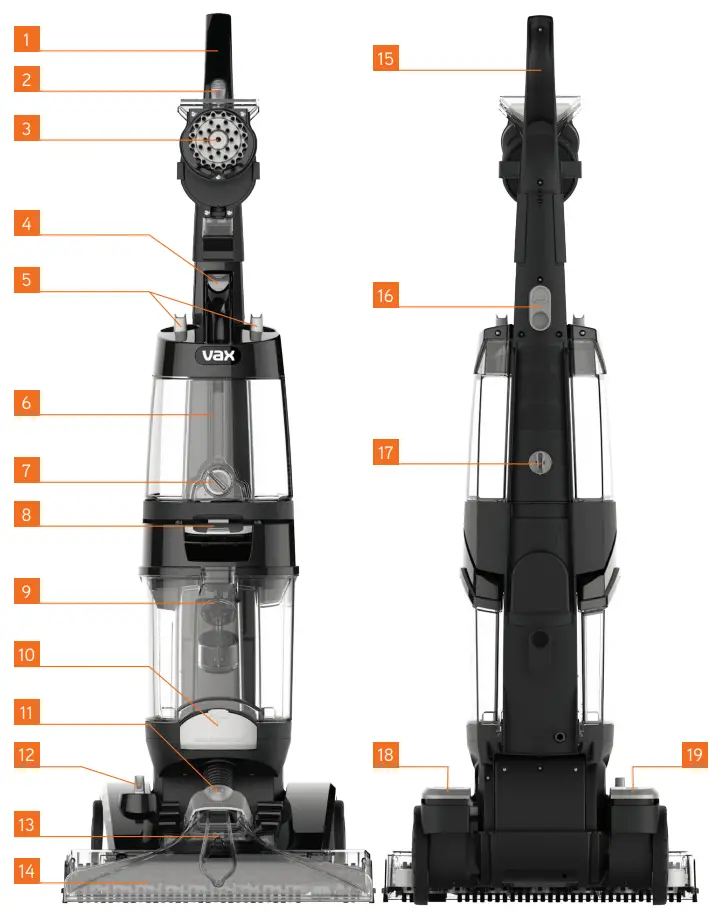
GETTING TO KNOW YOUR MACHINE

- Handle
- Boost trigger
- SpinScrub tool & caddy
- Clean water/solution tank release button
- Clean water/solution tank caps
- Clean water/solution tank
- Rinse/wash dial
- Dirty water tank release latch
- Dirty water tank
- Hose connection port cover
- Nozzle release clip
- Quick clean function
- Nozzle
- SpinScrub brushes & brushbar
- Solution trigger (hidden)
- Quick cord release hook
- Handle lock dial
- Recline pedal
- On/Off pedal
TECHNICAL SPECIFICATION
| Name | VAX Platinum PowerMax |
| Code | ECB1SPV1 |
| Cord length | 9m |
| Weight | 9.5kg |
| Wattage | See rating label on machine for details. |
| Voltage | See rating label on machine for details. |
To purchase accessories and consumables visit:
Subject to technical change without notice. Images are illustrative only.
GETTING STARTED
PLEASE READ THE SAFETY PRECAUTIONS ON PAGES 2 & 3 BEFORE USE.
IMPORTANT: Carpets should be dry vacuumed thoroughly before washing.
|
Assembly
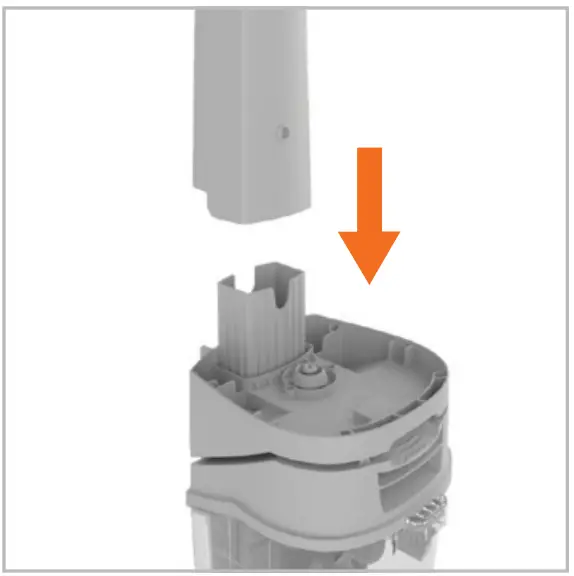
- Stand the base of the machine on the floor in the upright position. Line up the handle with the main body and push into place.
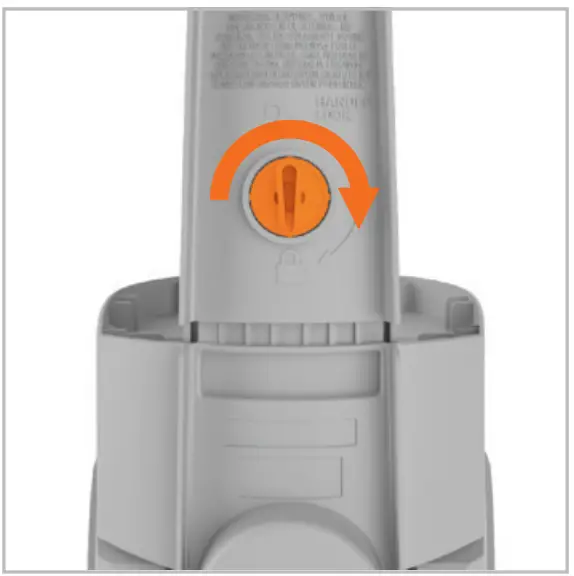
- Turn the handle lock dial clockwise to lock in position.
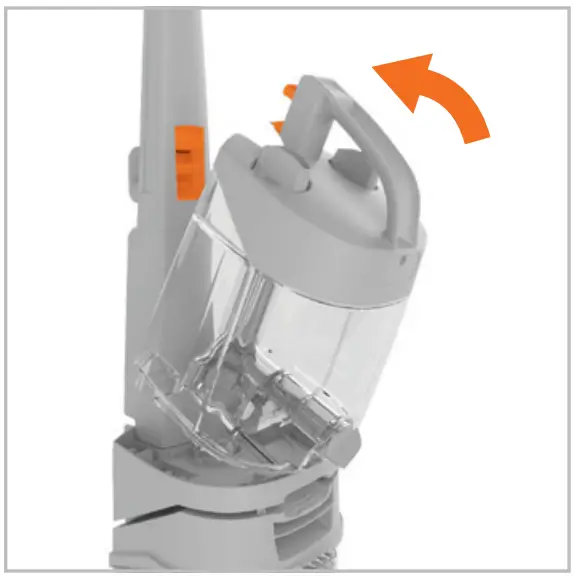
- Assemble the tanks by tilting and lining up the front of the tank to the washer and pushing the tank back until it clicks into place.
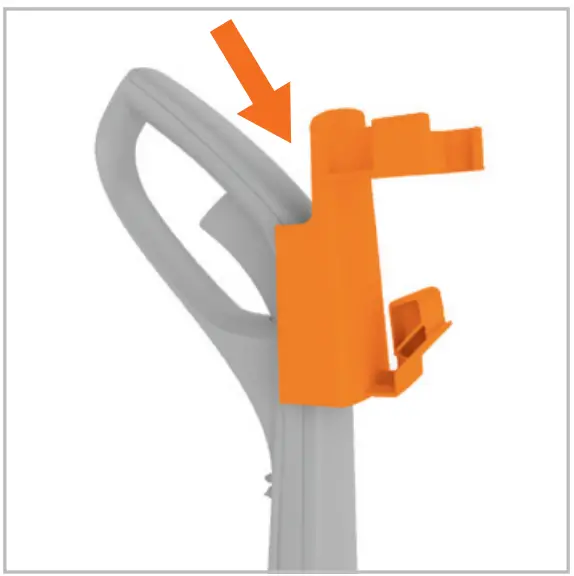
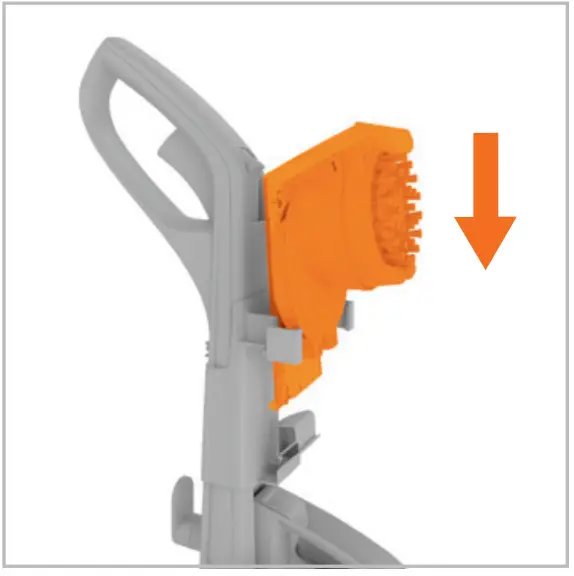
- Slide the SpinScrub tool holder over and down the handle.
- Line up the SpinScrub tool with the holder and slide the tool downwards into place.
USING YOUR MACHINE
Filling the water/solution tank
| IMPORTANT: Do not leave the solution stored in the tanks between uses |
| NOTE: This machine has an auto mix tank so any solution not used can be poured back into the bottle. |
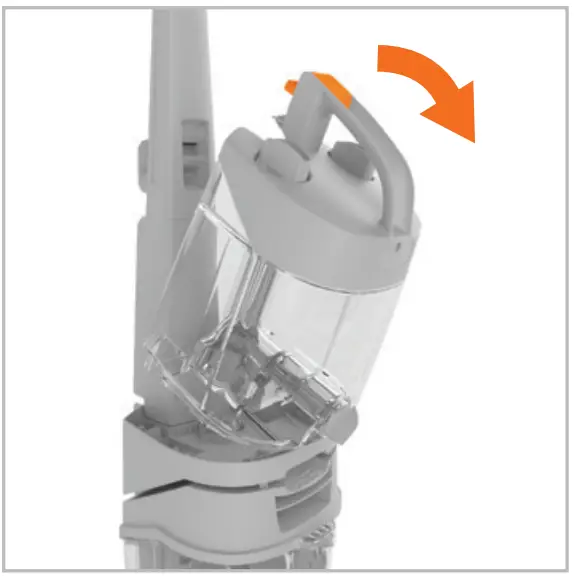
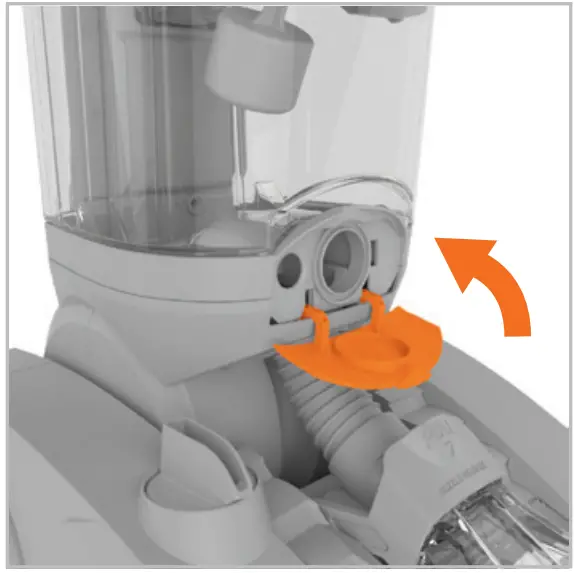
- Press the clean water/ solution tank release button, pull and lift to remove the tank.
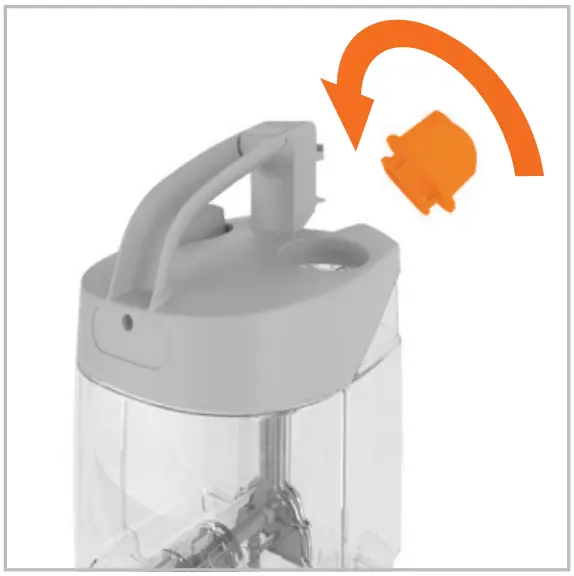
- Twist the water/solution tank cap anti-clockwise and remove.
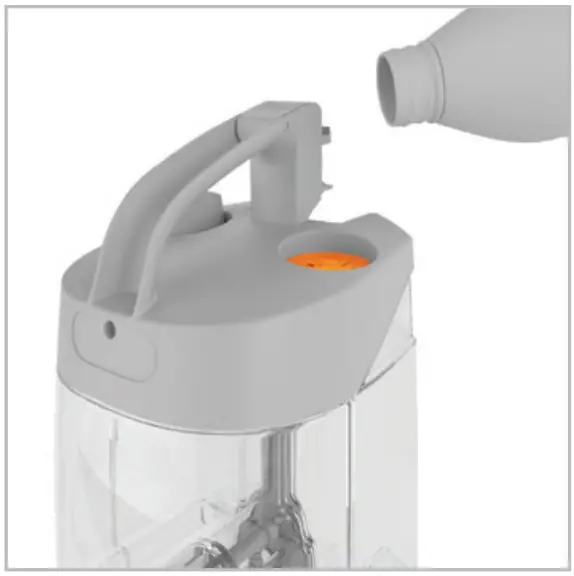
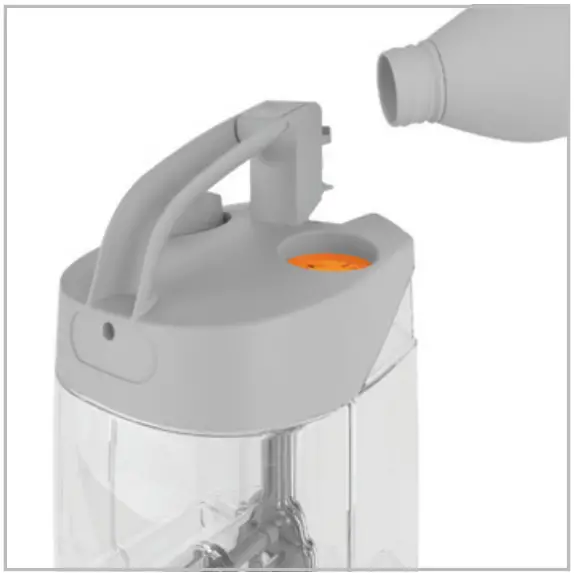
- Pour the required amount of carpet cleaning solution into the tank. Tighten the cap before returning the tank to the washer.
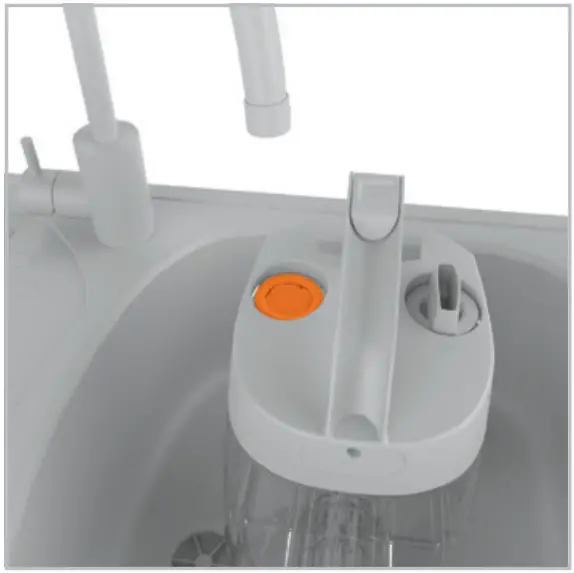
- Fill the clean water tank with warm water (max 40°C). Fill to the max fill line for a Deep Clean, and fill to the Quick Clean fill line for a quick surface clean.
- Tilt and line up the front of the tank to the washer and push the tank back until it clicks into place.
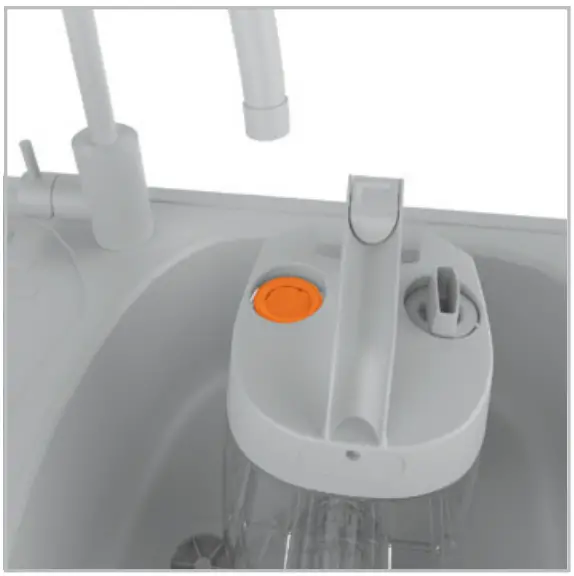
Operation
| CAUTION: The brushbar constantly rotates when switched on and the machine is reclined. Never use on one spot for an extended period of time as the brushbar may damage the floor surface. |
| IMPORTANT: Carpets should be dry vacuumed thoroughly before washing. For heavily soiled areas, it may be necessary to repeat the cleaning process. Make crisscrossing strokes across the original pattern and overlap with each pass. Do not over saturate the carpet. |
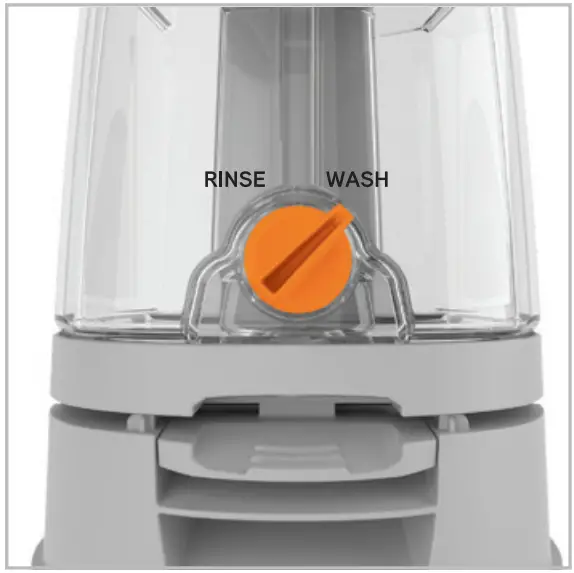
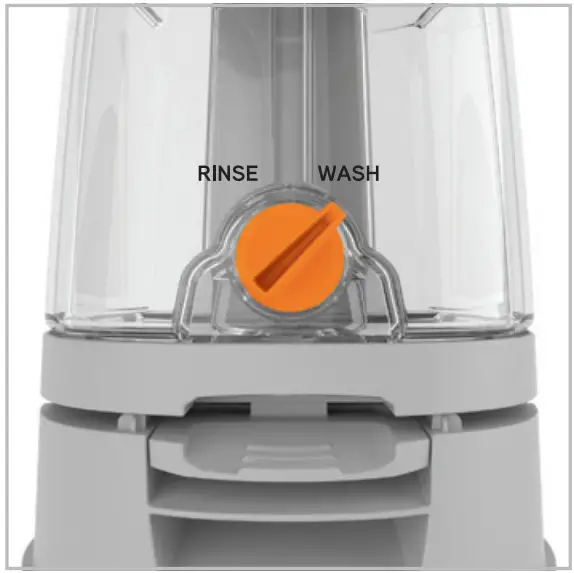
- Turn the rinse/wash dial to WASH. The SpinScrub brushes and brushbar deep cleans your carpets with water and solution, removing dirt and stains.
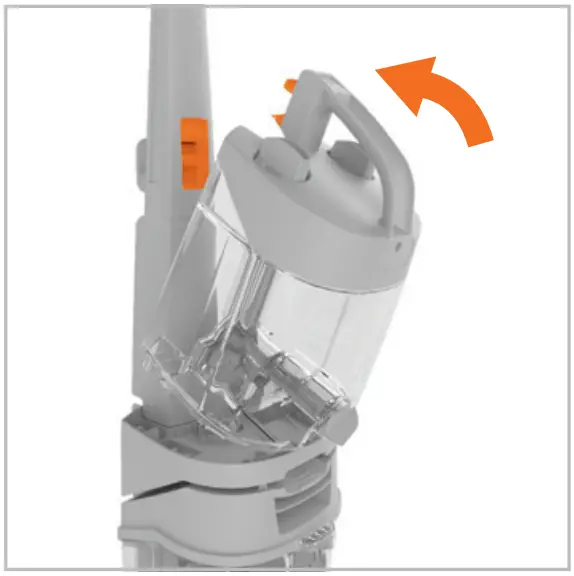
- Plug the machine into the mains and press the On/Off pedal to switch on.
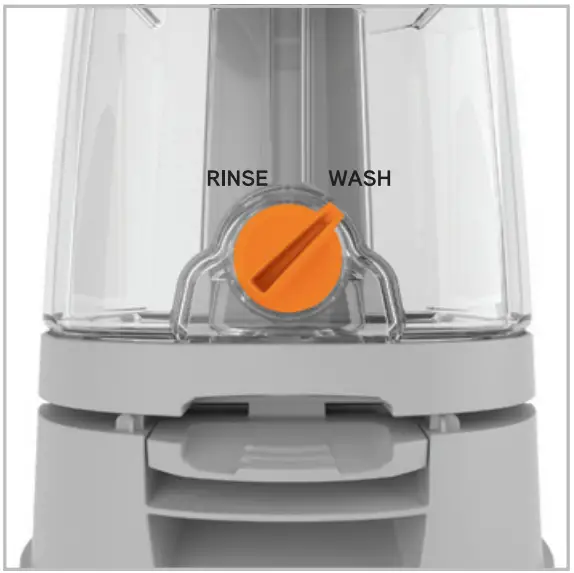
- Choose the cleaning mode by turning the dial on the base.
Quick Clean Mode:
Best for a quick, surface clean – carpets dry in as little as 1 hour.*
Deep Clean Mode:
Best overall results for a thorough, deep clean.
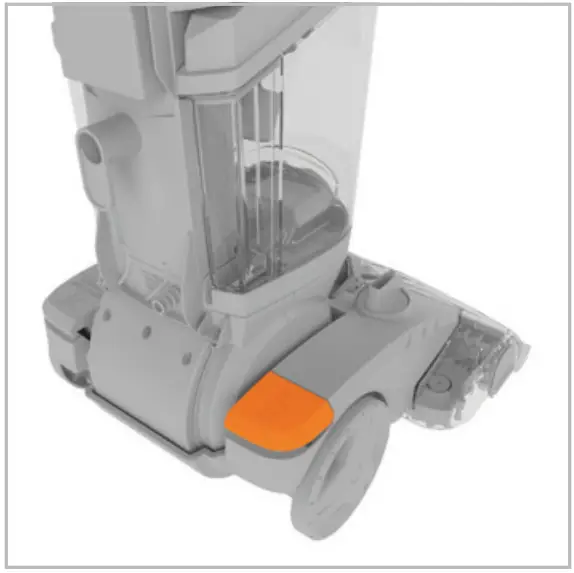
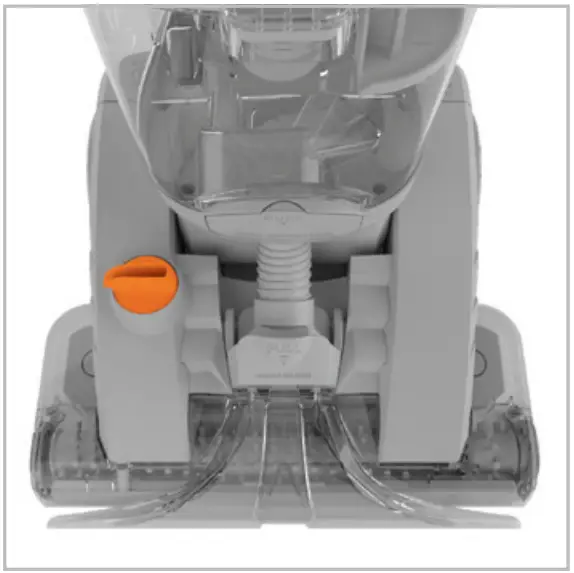
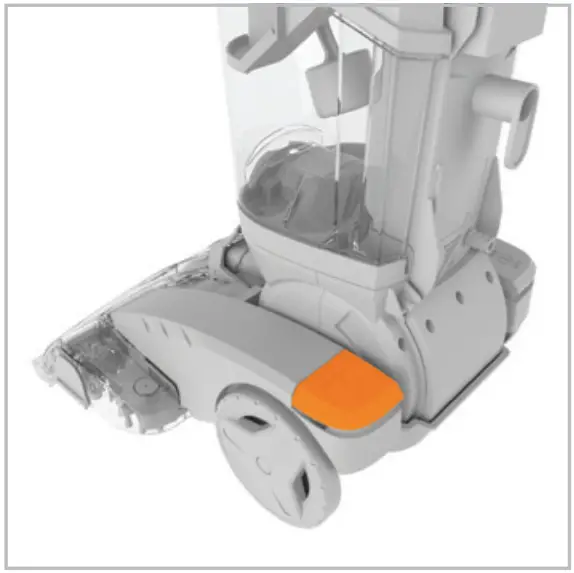
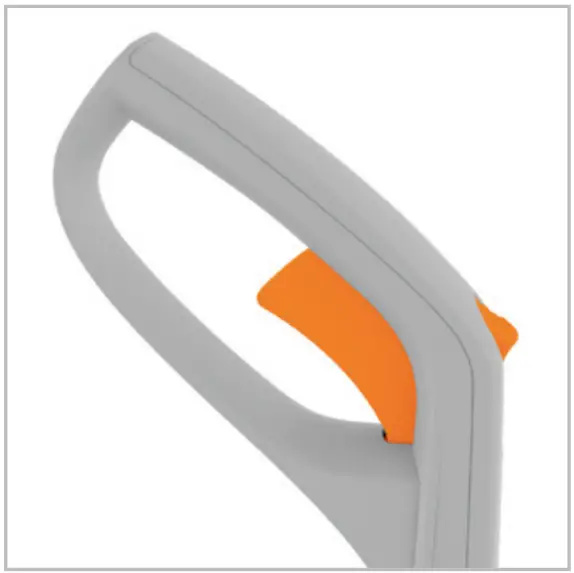
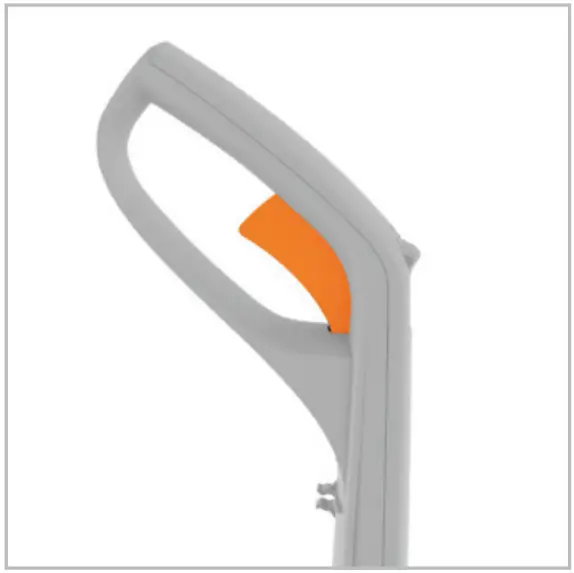
- Press the recline pedal and pull the handle backwards.
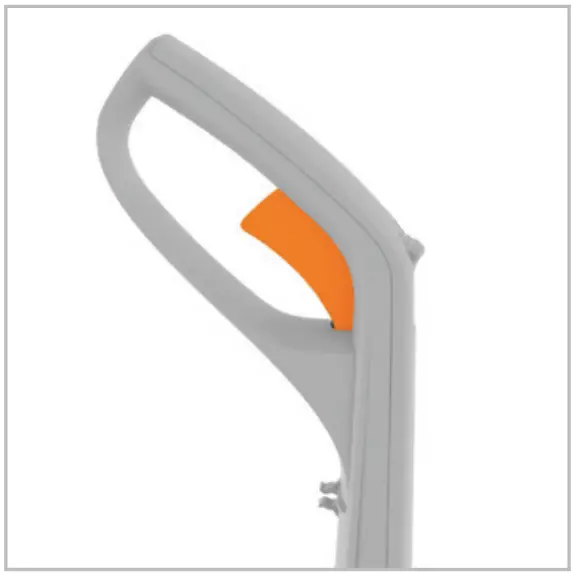
- Squeeze the trigger to release the solution and water mix.
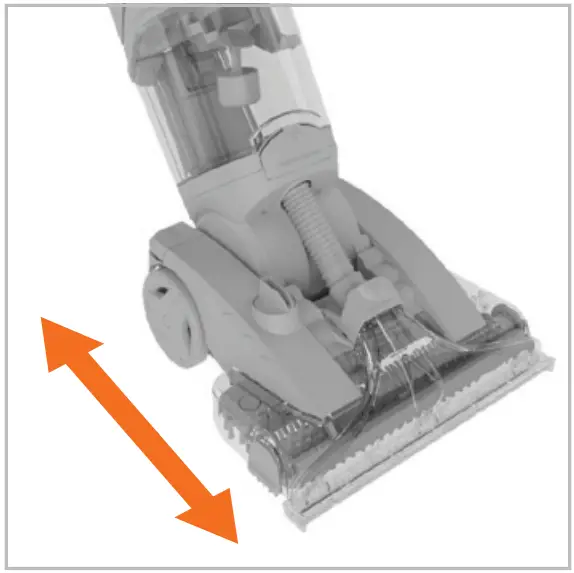
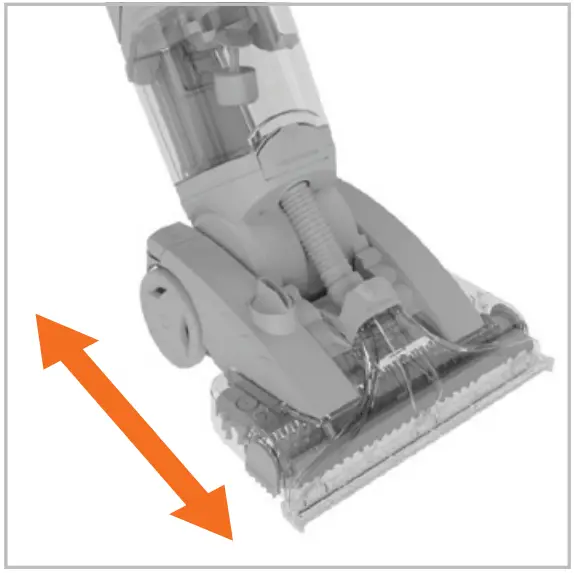
- For best results apply water/solution on the forward stroke and release the trigger on the backward stroke to pick up water/solution. For a dryer finish, follow with an additional dry stoke with no trigger pressed.
- For tough stains press the boost trigger together with the solution trigger to release more water and solution mix.
Rinsing the carpet
| IMPORTANT: Optional step. To extract any remaining solution from your carpet, rinse your carpets with water only. |
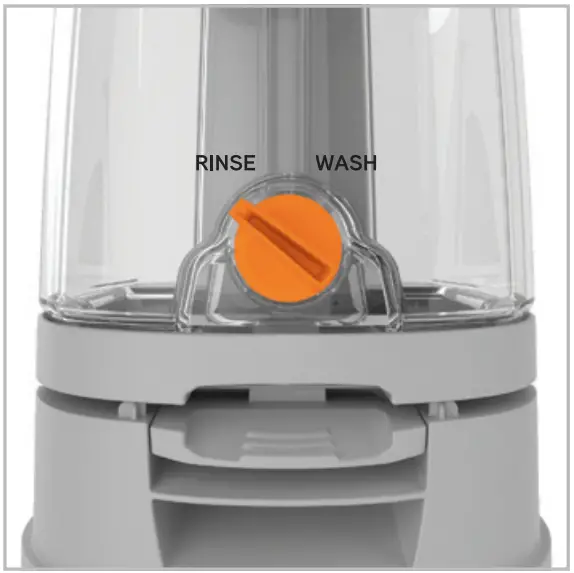
- Turn the rinse/wash dial to RINSE. Only water is released to remove solution residue.
- Plug the machine into the mains and press the On/Off pedal to switch on.
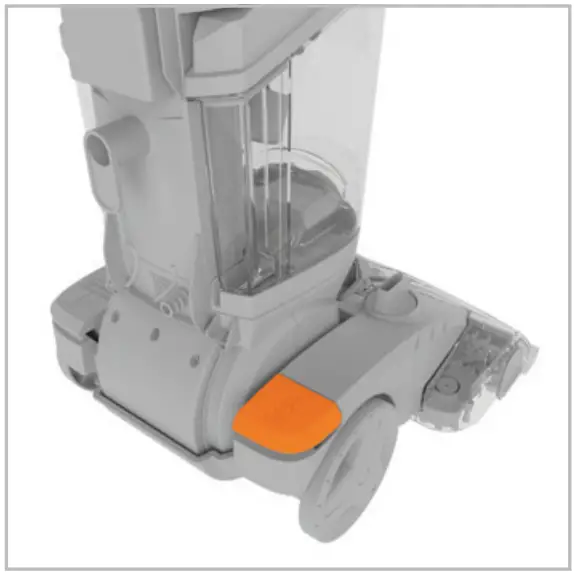
- Press the recline pedal and pull the handle backwards.
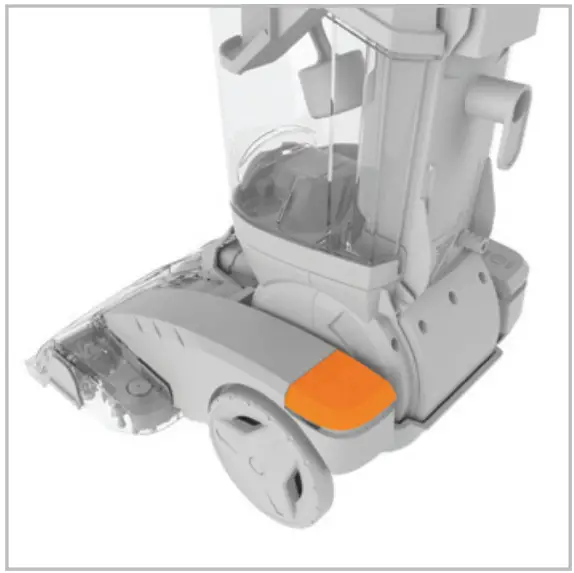
- Squeeze the trigger to release water.
- For best results apply water on the forward stroke and release the trigger on the backward stroke to pick up water/solution. For a dryer finish, follow with an additional dry stoke with no trigger pressed.
Using the hose and tools
| MPORTANT: The machine should be in the upright position when using the hose and tools; this will de-activate the brushes. To avoid saturating the carpet, do not use more than 4 wet strokes over any one area. Always end with dry strokes (trigger released). |
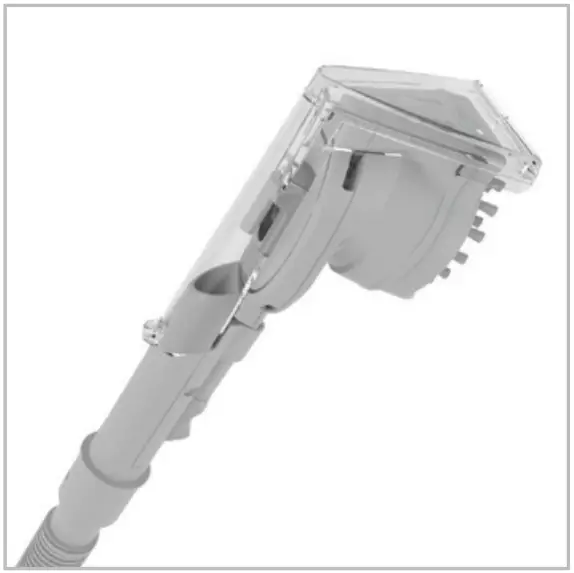
- SpinScrub
Tool Suitable for targeting stains and stubborn marks on rugs and carpet.
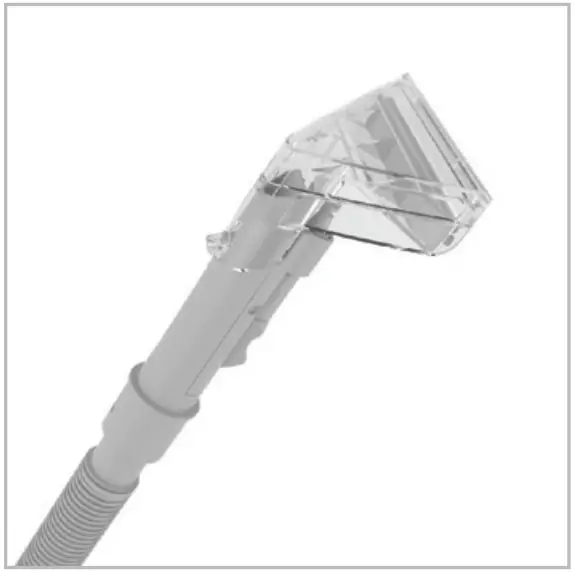
- Wash Tool
Suitable for use on upholstery and carpeted stairs.
Perfect for reaching into crevices.
- Turn the rinse/wash dial to WASH.
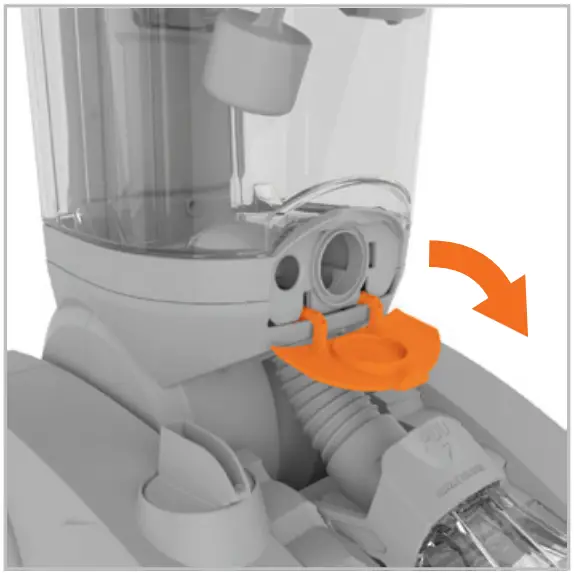
- Open the hose connection port cover.
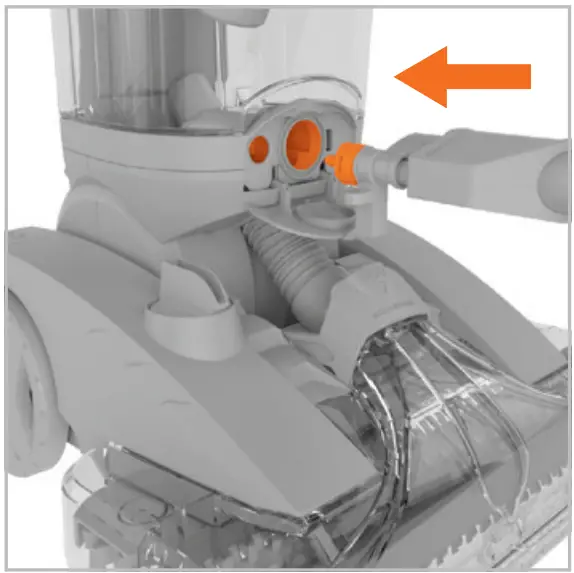
- Push the hose end and hose solution connector into the hose connection port.
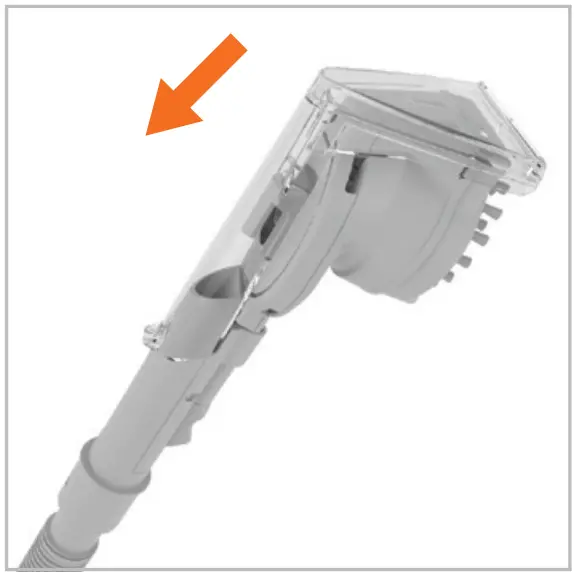
- Select the SpinScrub or Wash tool. Slide the tool over the tab at end of the hose until it clicks into place.
- Plug the machine into the mains and press the On/Off pedal to switch on.
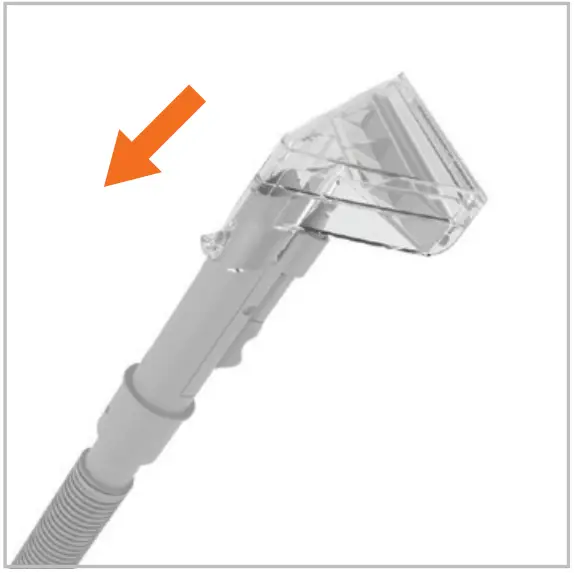
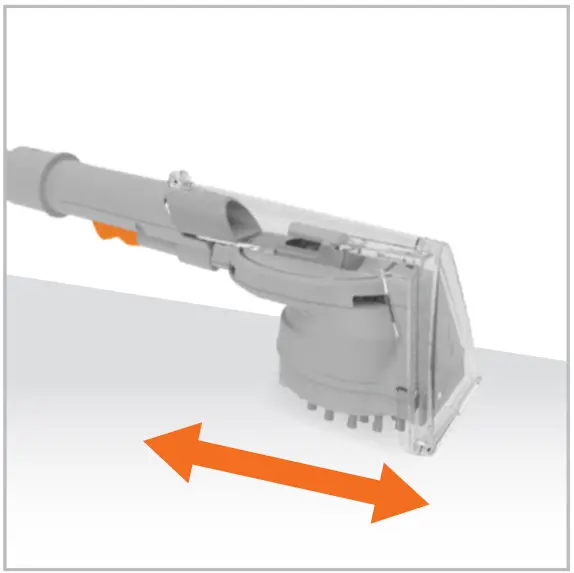
- Press the trigger on the forward stroke to release water/solution.
Release the trigger on the backward stroke to pick up water/solution. For a dryer finish continue using dry strokes (trigger released) until little water is visibly passing through the tool.
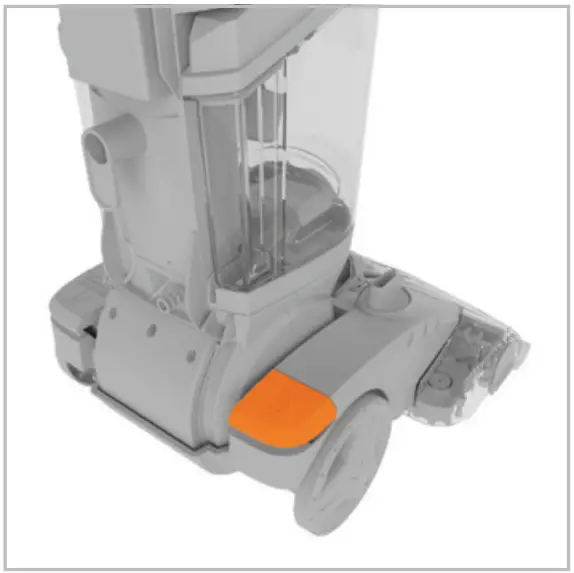
- To remove the hose press the hose release clip on the end of the hose and pull to remove.
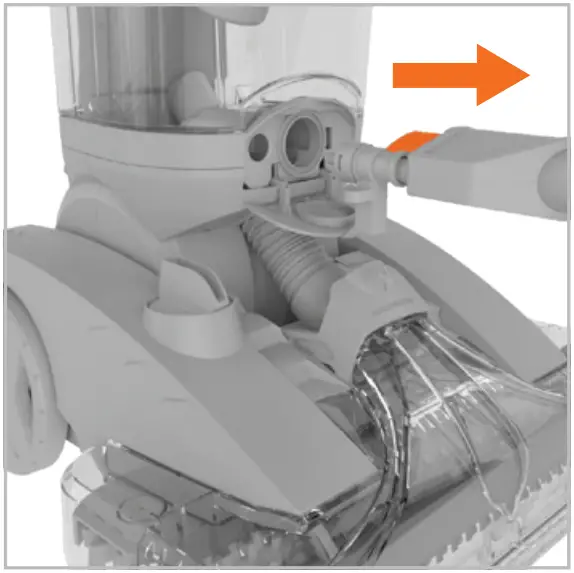
- Always close the hose connection port cover after using the hose.
The machine may lose suction if it is not closed properly.
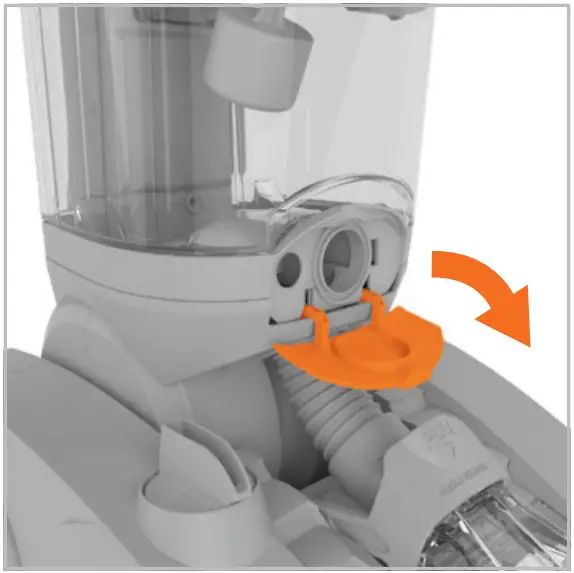
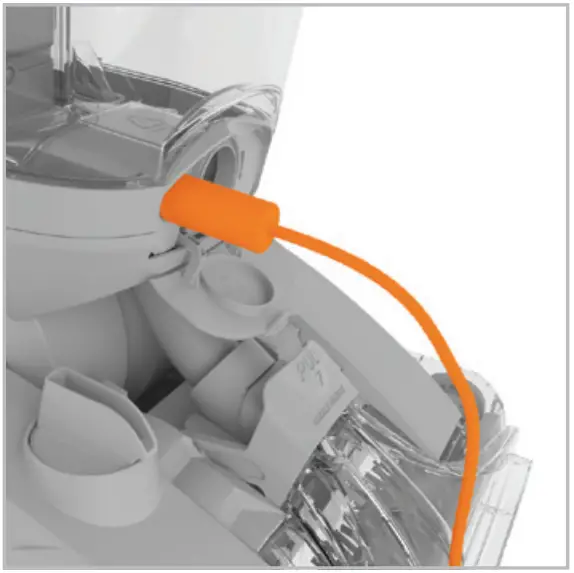
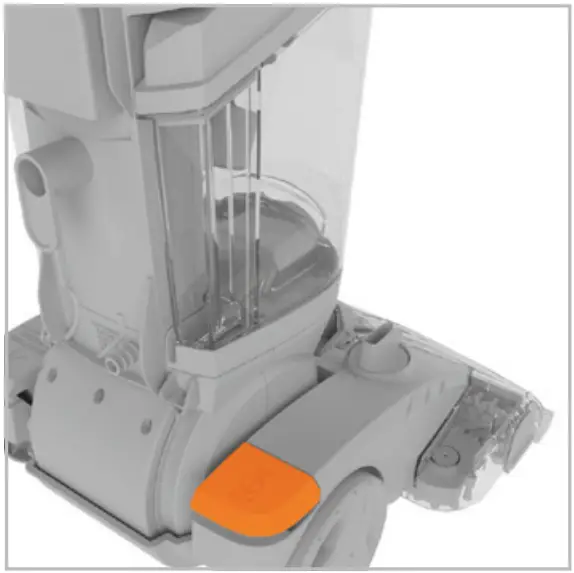
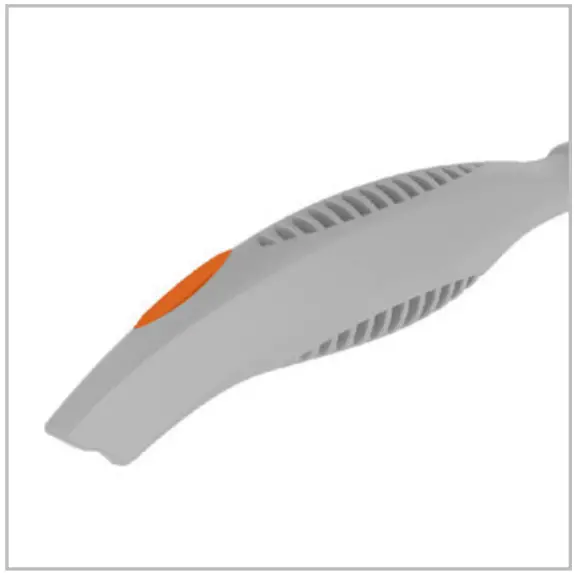
Using the pre-treatment wand
Pre-treating your carpet before washing will help to remove stubborn stains. Do not saturate your carpet.
- Pour the required amount of pre-treatment solution into the tank.
- Fill the clean water tank with warm water (max 40°C).
- Turn the rinse/wash dial to WASH.
- Open the hose connection port cover.
- Push the wand connector into the solution tube port
- Plug the machine into the mains and press the On/Off pedal to switch on.
- Press and hold the trigger on the pre-treatment wand, spraying evenly over stubborn stains.
- Leave the solution for 10-15 minutes before washing the carpet.
Washing hard floors
| CAUTION: To prevent damage to wood floors and other hard floors, follow the flooring manufacturer’s cleaning recommendations. Inspect the floor surface for a worn finish, bare wood or separated joints. It is not recommended to use the machine on floors if any of these conditions exist. Test on an inconspicuous area first. |
| IMPORTANT: Hard floors should be dry vacuumed thoroughly before washing. Before attaching the hard floor squeegee onto the machine, either remove the tanks or make sure the tanks are empty before lying the machine on its back. |
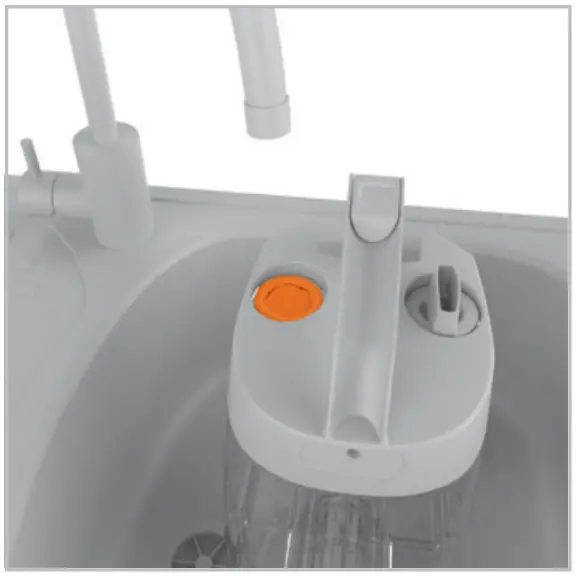
- Pour the required amount of solution into the tank.

- Fill the clean water tank with warm water (max 40°C).
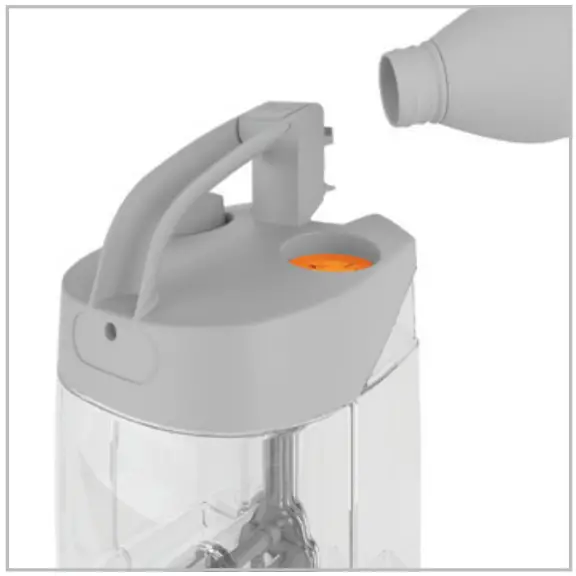
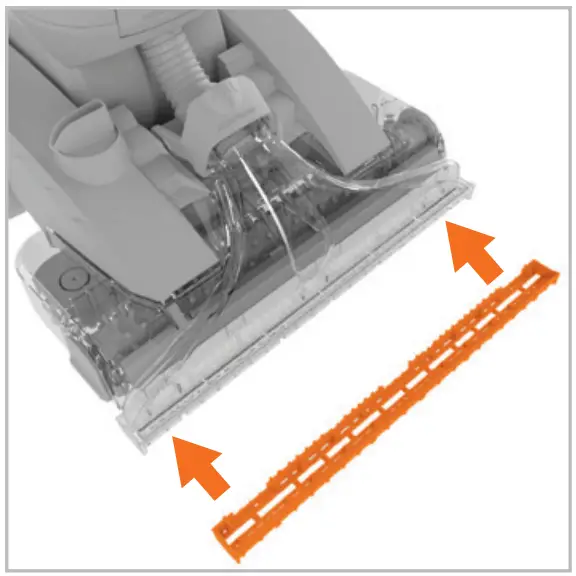
- Lie the machine on its back and line up the squeegee with the nozzle.
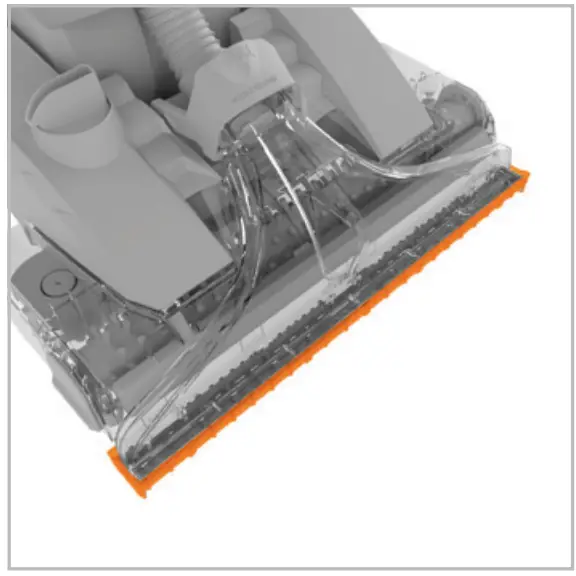
- Hold the front of the squeegee onto the edge of the nozzle and push the squeegee under the nozzle until it clicks into place.
MAINTENANCE & CLEANING
| CAUTION: Always switch off and unplug the machine before performing any maintenance/troubleshooting checks.
The dirty water tank is fitted with a float. When the dirty water tank is full or the floorhead is not in contact with the carpet, the float will activate by shutting off the suction on the machine. This will be noticeable as the motor noise on the machine will increase. If the float has been activated empty the dirty water tank if it is full. If the dirty water tank is not full turn off the machine at the power switch and wait for the float to settle before restarting your machine. Empty and rinse out the clean and dirty water tanks and leave to air dry before replacing. Do not leave solution stored in the tanks between uses. |
Emptying and cleaning the dirty water tank
- Press the dirty water tank release latch and pull the tank to remove.
- Pull and lift the dirty water tank clip to release the lid.
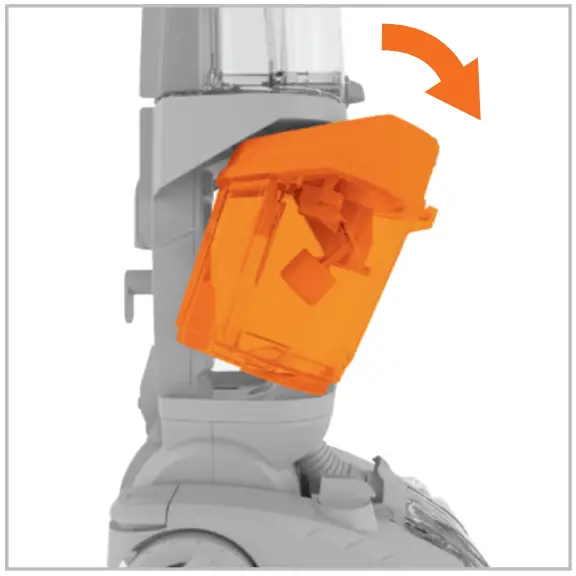
- Lift the tank lid to remove.
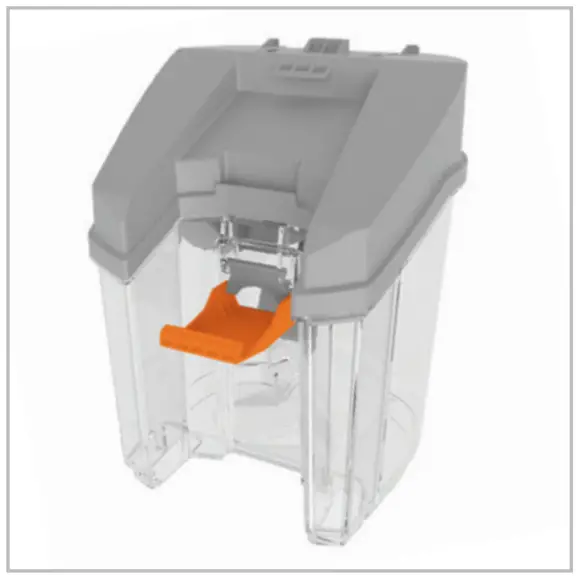
- Empty the dirty water over the sink or toilet. Rinse the dirty water tank and lid under water (max 40°C) to remove dirt/debris.
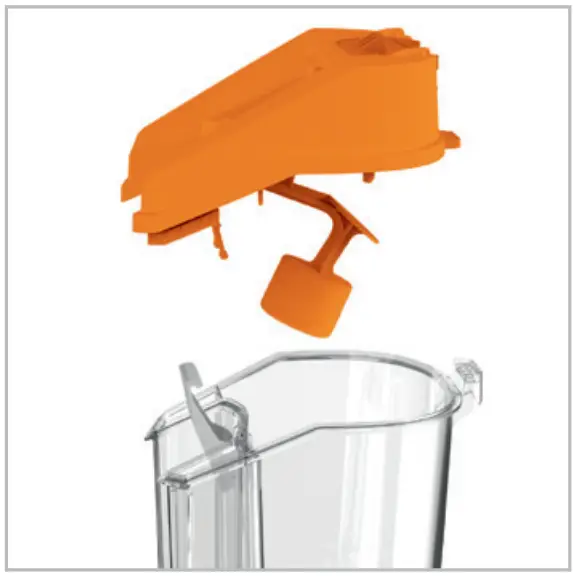
- Clean the filter screen located at the back of the dirty water tank.
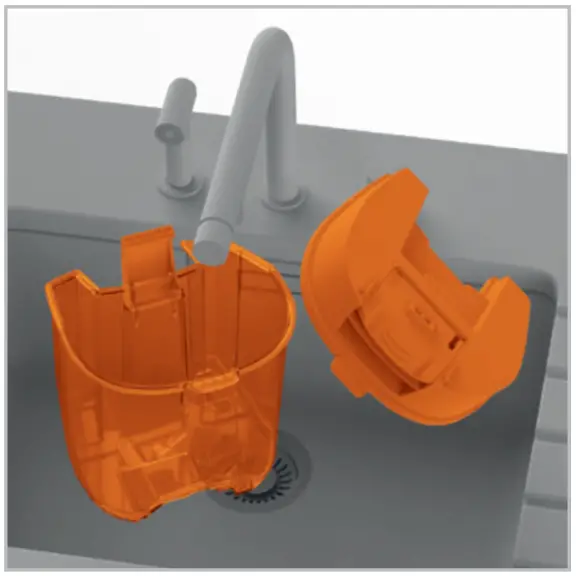
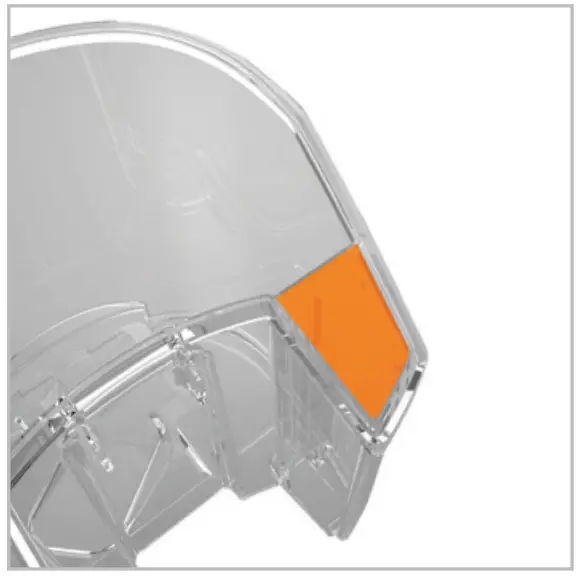
- To replace the lid, hook the tab on the front of the lid into the front of the dirty water tank.
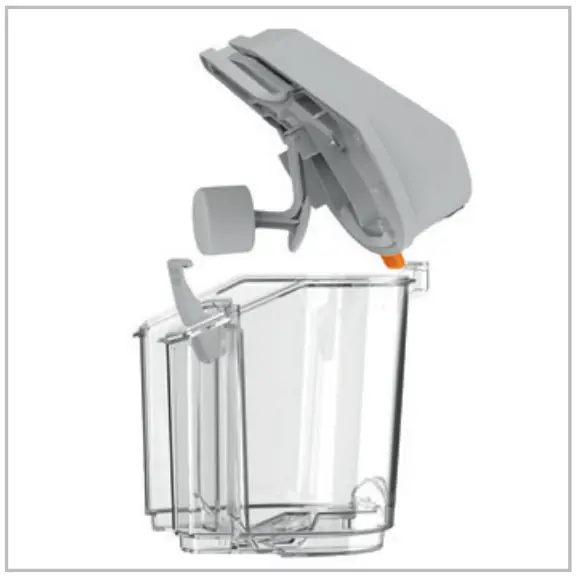
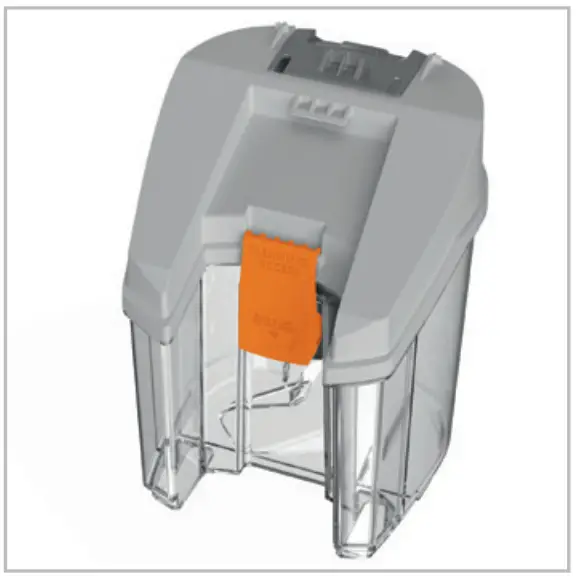
- Hook the dirty water tank clip onto the lid and push down to lock into place.
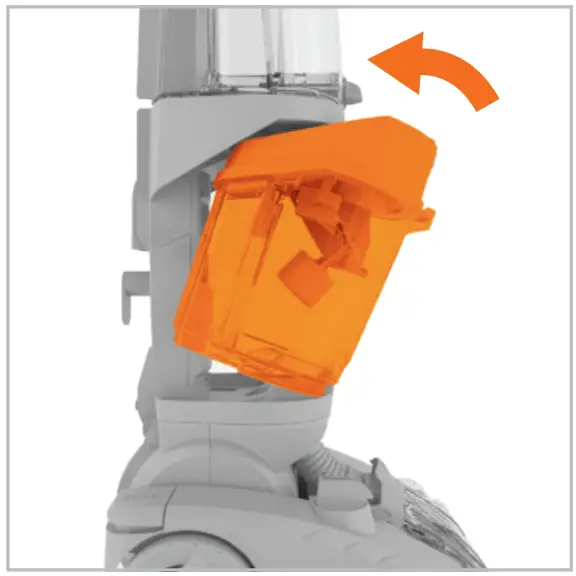
- To refit the dirty water tank, tilt and line up the front of the tank onto machine. Push back until it clicks into place.
Removing and cleaning the nozzle
| IMPORTANT: If the nozzle is fitted incorrectly, this will cause poor dirty water pick up. |
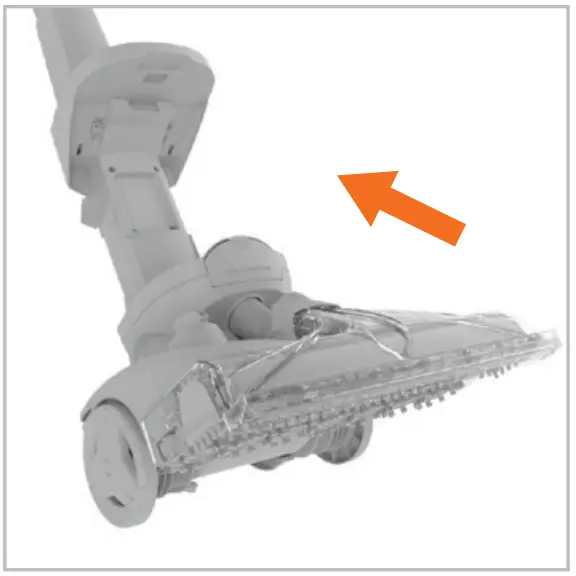
- Remove both tanks and tilt the machine back.
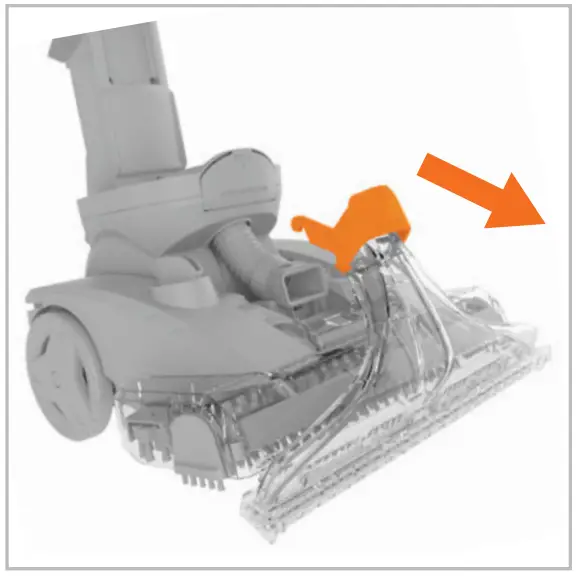
- Lift the nozzle release clip and pull the nozzle forward, separating the tabs on the nozzle and machine.
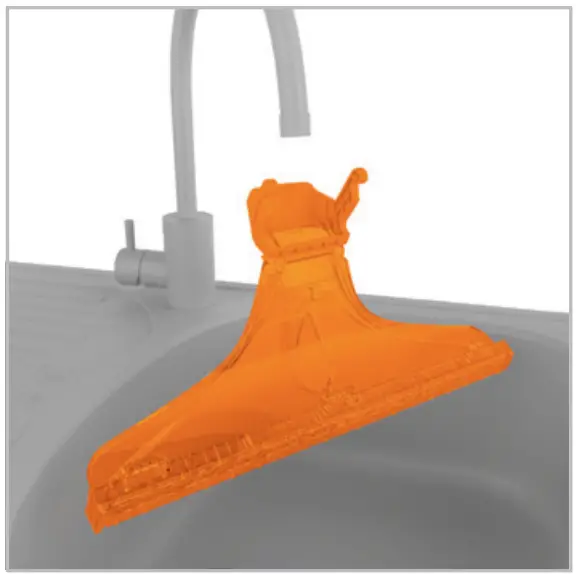
- Rinse the nozzle under water to remove dirt/debris.
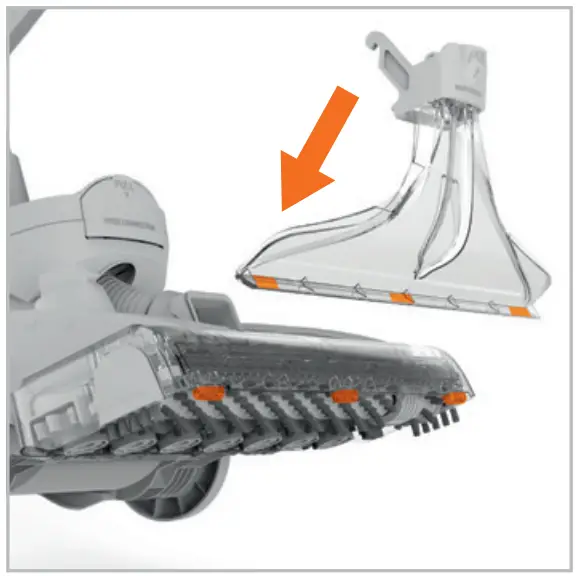
- To replace the nozzle, tilt the machine backwards. Line up the tabs on the nozzle with the tabs underneath the front of the machine. Lower the nozzle backwards and push the nozzle down until it clicks into place.
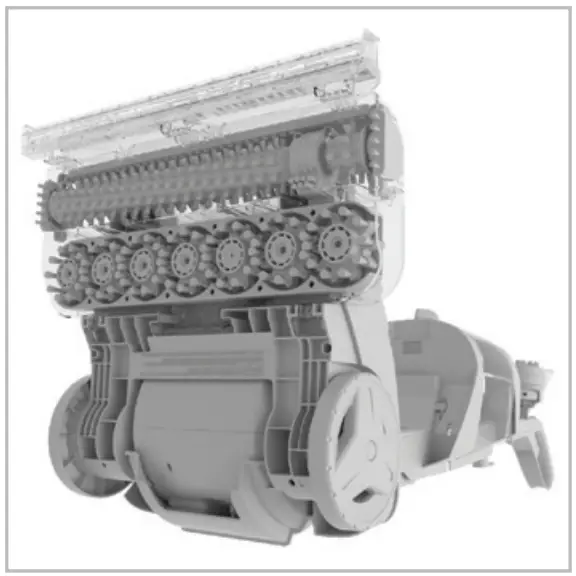
Removing and cleaning the SpinScrub brushes
- Lie the machine on its back exposing the SpinScrub brushes and brushbar.
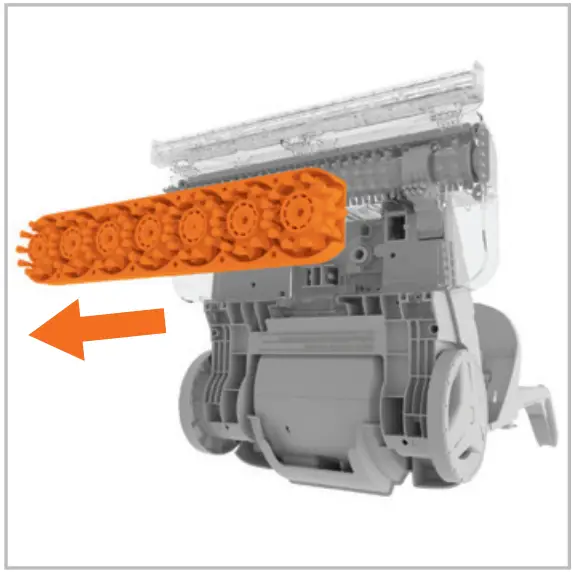
- Firmly pull the sides of the SpinScrub cover and remove the SpinScrub brushes.
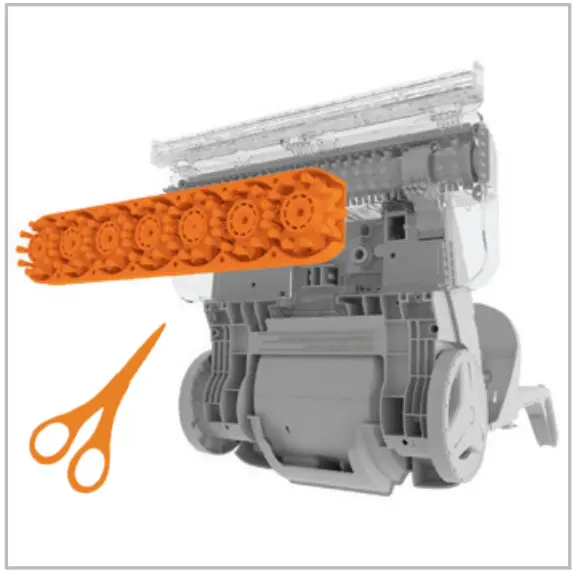
- Using a pair of scissors, remove any threads or hair caught around the brushes. Rinse under water to remove debris.
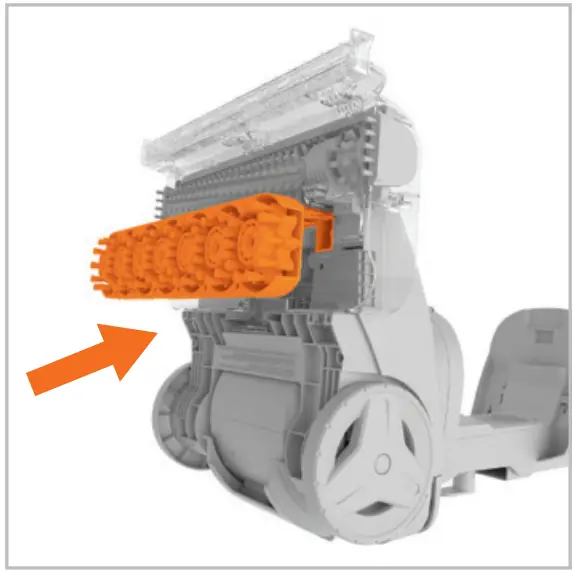
- Line up the spindle and the tabs on the side of the SpinScrub cover into the machine. Push firmly until it clicks into place.
Removing and cleaning the brushbar
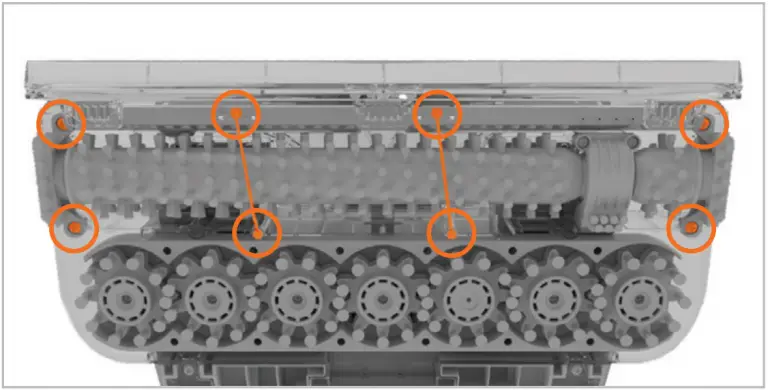
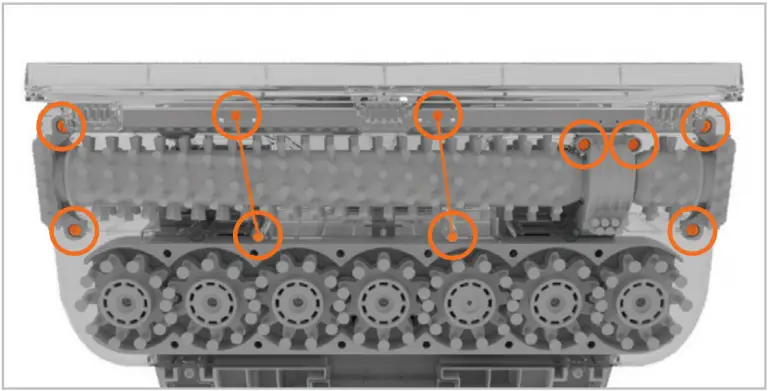
- Using a crosshead screwdriver, undo the 2 screws and remove the belt guard.
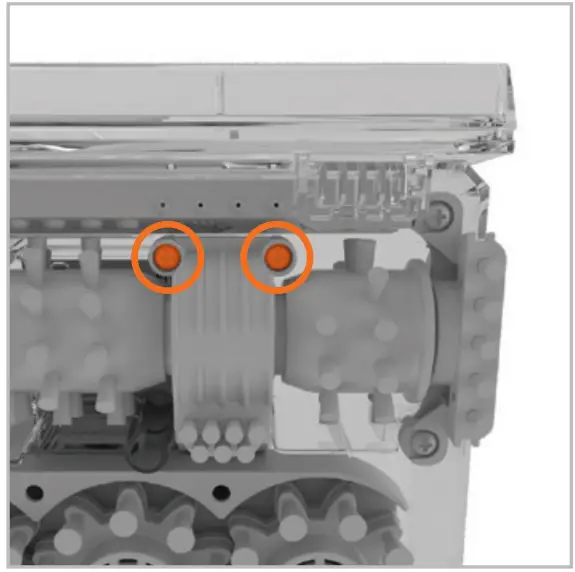
- Using a crosshead screwdriver remove the 4 screws on the side brushes and the top and bottom screws from each of the rug guards (metal pins) to get access to the brushbar.
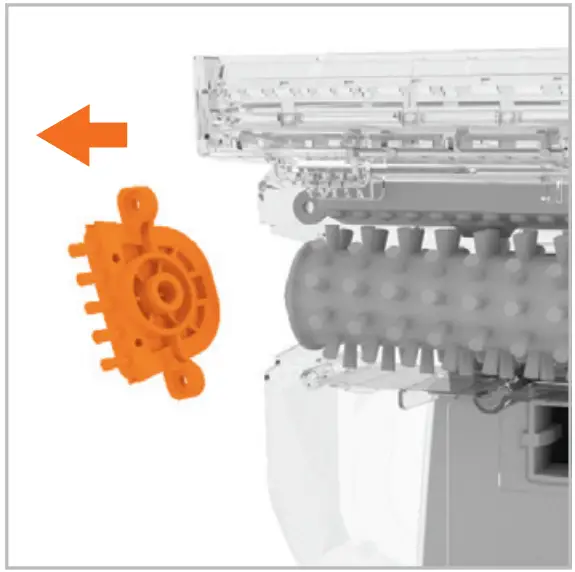
- Pull and slide the left side brushes and remove the side cap from the brushbar.
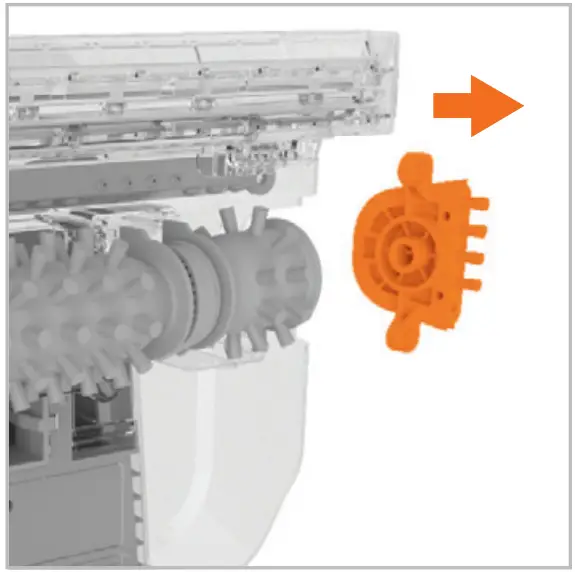
- Pull and slide the right side brushes together with the brushbar. Remove the side cap from the brushbar and unloop the brushbar from the belt.
- Using a pair of scissors, remove any threads or hair caught around the brushes. Rinse under water to remove debris.
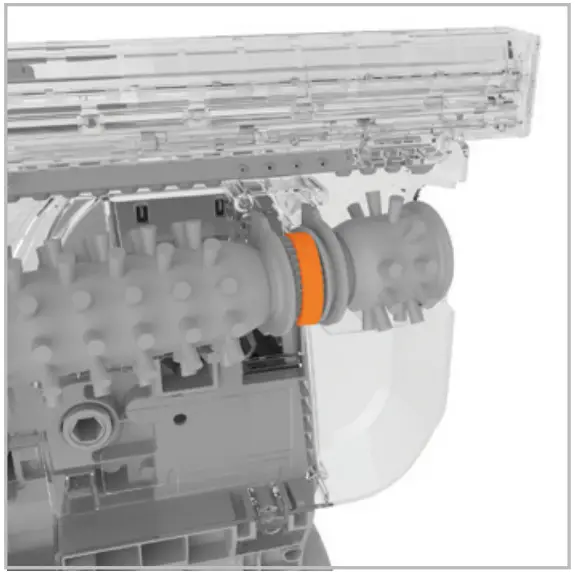
- To refit, loop the brushbar through the belt and onto the belt grip.
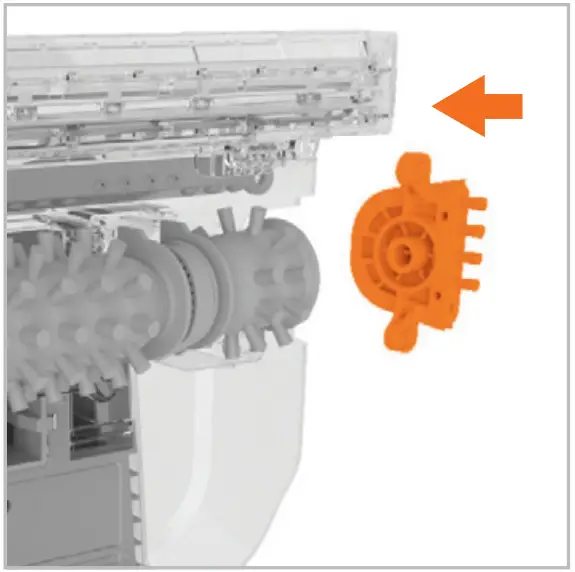
- Line up the ‘right’ side brushes with the base and slide into place. Attach the brushbar to the side brushes.
- Attach the other side of the brushbar to the side brushes. Slide onto the side of the base and into place.
- Refit the belt guard and tighten the 2 screws. Replace and tighten the 4 screws on the side brushes and refit the rug guards, tightening the 4 screws to secure.
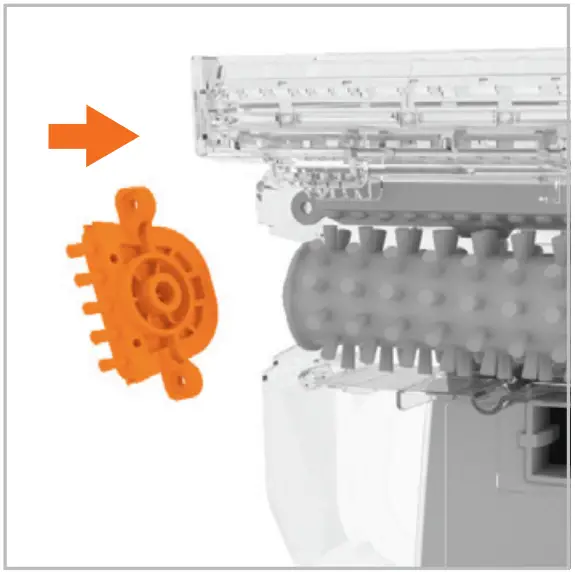
ACCESSORIES
Order at: www.vax.co.uk/spares-and-solutions
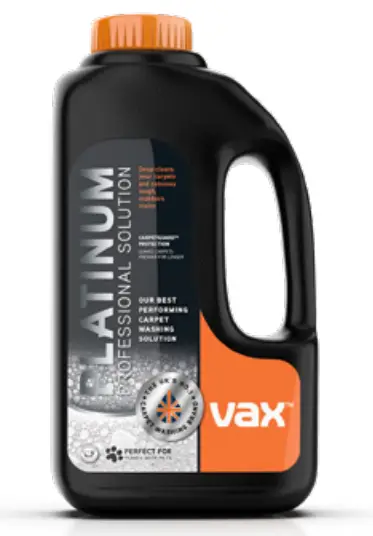
Platinum (1.5l)
1-9-139136
Platinum Carpet Cleaning Solution deepcleans carpets and removes stubborn stains.
Safe to use on wool carpets – Woolsafe approved.
WHAT TO DO IF IT GOES WRONG
| IMPORTANT: Always unplug the machine before performing any maintenance/troubleshooting checks. |
• Check the contents on the box to make sure the part is definitely included with your machine.
• The plug may not be fully pushed into the electrical socket.
• The fuse in the plug may need replacing. Always replace with a British 13amp fuse
- The float in the dirty water tank may have been activated. Empty the dirty water tank and wait for the float to settle before restarting your machine. See Emptying and cleaning the dirty water tank above.
- Check the SpinScrub and brushbar for blockages and clear. See Removing and cleaning the SpinScrub brushes above and Removing and cleaning the brushbar above.
- The dirty water tank and/or lid may not be fitted correctly. See Emptying and cleaning the dirty water tank above.
- Check the nozzle for blockages and clear. See Removing and cleaning the nozzle above.
- Check the nozzle is correctly fitted. See Removing and cleaning the nozzle above.
- Check the filter screen in the dirty water tank for dirt/debris. Remove and clean.
- The hose connector port cover maybe open, close and retry. See Using the hose and tools above
- Make sure the clean water/solution tank is fitted securely. See Filling the water/solution tank above.
- Rinse/wash dial has been set to Rinse, set dial to Wash to dispense solution. See Rinsing the carpet above.
- The clean water/solution tank valve may be stuck. Hold the tank over the sink and press the valve underneath to release.
- Squeeze the trigger on the handle to release solution and water mix.
- The clean water/solution tank is empty. Refill the tank. See Filling the water/solution tank above.
- Make sure the clean water/solution tank is fitted securely. See Filling the water/solution tank above.
- Rinse/wash dial has been set to Rinse, set dial to Wash to dispense solution. See Rinsing the carpet above.
- Trigger on the hose may not be depressed. See Using the hose and tools above.
- The clean water/solution tank valve may be stuck. Hold the tank over the sink and press the valve underneath to release.
- The clean water/solution tank is empty. Refill the tank. See Filling the water/solution tank above.
- The brushes will only spin when the machine is reclined.
- Check the nozzle is correctly fitted. See Removing and cleaning the nozzle above.
- Check the SpinScrub and brushbar for blockages and clear. See Removing and cleaning the SpinScrub brushes above and Removing and cleaning the brushbar above.
- Check that the SpinScrub and brushbar are correctly fitted. See Removing and cleaning the SpinScrub brushes above and Removing and cleaning the brushbar above.
- Check for damage to the brushbar and the spindle on the back of the SpinScrub brush.
GET IN TOUCH
[email protected] vax.co.uk
