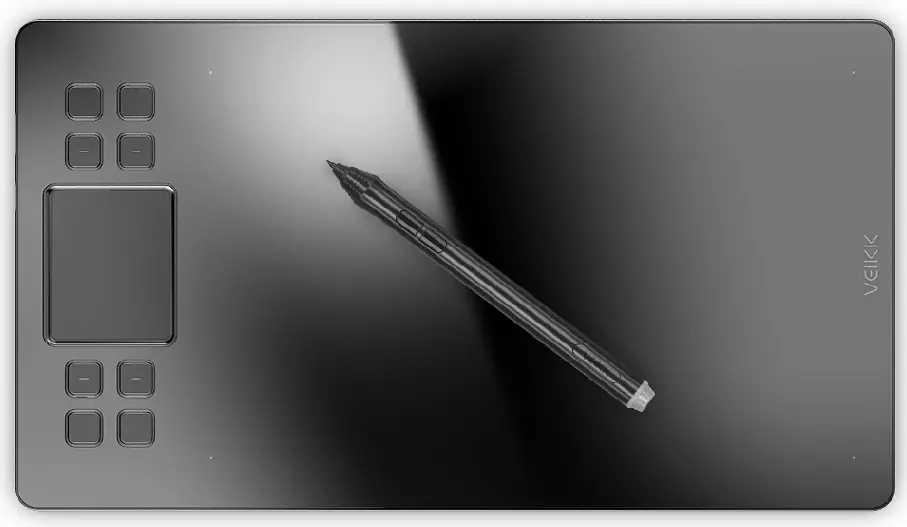
VEIKK A50 Graphic Pen Tablet
Safety Precautions
WARNING
- Do not use this product in a control system that requires a high degree of safety and reliability.
- In such a system, this product could negatively affect other electronic devices and could malfunction due to the effect of those devices.
- Turn the power off in areas where use of electronic devices is prohibited.
- On board an aircraft or in any other location where use of electronic devices is prohibited, this product, if left on, could negatively affect other electronic devices.
- Do not use this product in a location frequented by little children.
- Make sure that a child does not put the pen or pen tip in his/her mouth.
- The pen tip or side switch cover could be detached and be accidentally swallowed.
CAUTION
- Do not place this product on an unstable surface.
- Placing this product or an unstable or tilted surface or in a location exposed to excessive vibrations could cause it to fall off resulting in injury.
- Do not place heavy objects on top of this product.
- Do not step or place heavy objects on this product as this could damage it.
WARNING
Avoid high or low-temperature locations for storage.
Do not store this product in a location where the temperature drops below 5℃ or goes above 40℃ and in locations subject to excessive temperature fluctuations. Failure to heed this caution could result in damage to the product and its components.
Do not disassemble.
Do not disassemble or modify this product as this could expose you to heat, fire, electric shock and injury. Disassembling the product will also void your warranty.
Do not use alcohol for cleaning.
Never use alcohol, thinner, benzene or other mineral solvents as they could discolor or cause deterioration to the product.
Do not expose to water.
Do not place glasses or vases filled with water or other liquids near this product. Exposure to water or liquid could damage the product.
CAUTION
Do not place metal objects on this product during operation.
Placing metal objects on this product during operation could cause it to malfunction or damage it.
Do not strike the pen against hard objects.
Striking the pen against hard object could damage it.
Do not handle the pen with soiled hands.
The pen is a high-precision instrument. Handling it with soiled hands or using it in locations exposed to dust or strong odors may cause the entry of foreign matter which will result in breakdown.
Limitation of Liability
VEIKK shall in no event be liable for damages resulting from fires or earthquakes, those caused by third parties and those arising from user misuse, abuse or neglect.
VEIKK shall in no event be liable for incidental damages-including but not limited to loss of business income, interruption of business activities, corruption or loss of data-that arise out of the use or failure to use this product.
VEIKK shall in no event be liable for damages resulting from uses not documented in this manual.
VEIKK shall in no event be liable for damages from malfunction caused by connection to other devices or use of third party software.
Product Overview
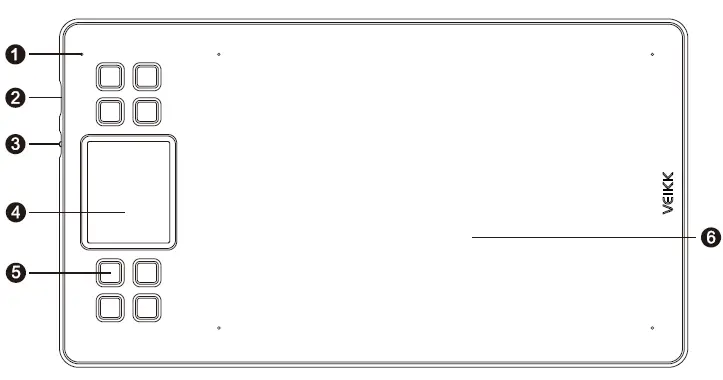
- LED Indicator
- USB Port
- Switch for Gesture Touch Area
- Gesture Touch Area
- Shortcut Keys
- Active Area
Pen Note: The passive pen requires neither battery nor charging.
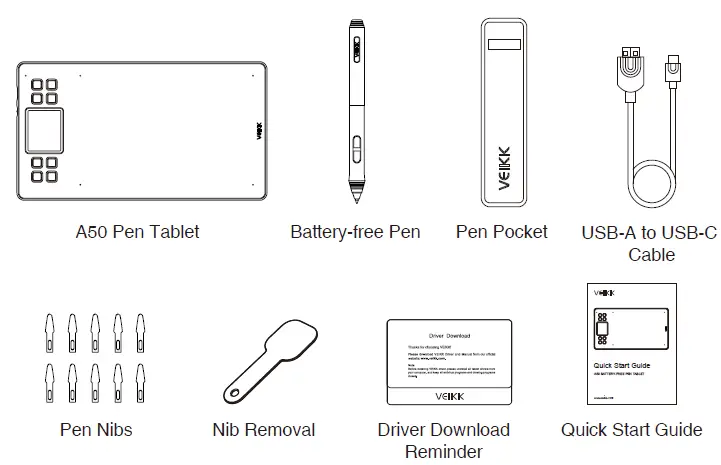
Packing List
Installing Driver
OS Support
Windows 11/10/8/7(32/64 bits) / Mac OS 10.12 or later Linux OS / Chrome 88 or later
Android 6.0 or later (Except Samsung Android device)
Installation
For Mac OS, Windows and Linux OS computer:
- Before installing the driver, please uninstall all tablet drivers from your computer and keep all antivirus programs and the drawing software closed.
- Connect the tablet to your computer before installation (Please refer to 4.Tablet Connection).
- Please download the driver from www.veikk.com.
- Click Set up.exe and follow onscreen instructions.
- Restart your computer after installation.
For Chrome OS computer and the Android mobile phone:
No need to install VEIKK driver on the Chrome OS computer and the Android mobile phone.
Tablet Connection
For Mac OS, Windows and Linux OS computer: 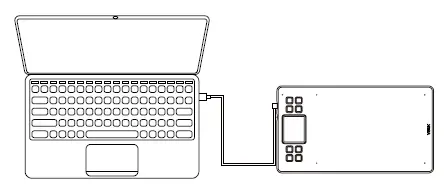
- Connect the tablet to your computer with USB cable.
- Open the driver interface. If the product model shows at the upper left corner, this indicates that the tablet has been connected successfully. You can start using your tablet.
For Chrome OS computer:
Connect the tablet to your Chrome OS computer with the USB cable, then you can start using your tablet.
Note: The shortcut keys of the pen and tablet can’t work on the Chrome OS computer.
For Android mobile phone:
- Please connect the tablet to your mobile phone with the OTG adapter.
- Choose the most comfortable way you like to use the tablet.
- By default, the working area of the tablet is 10*6 inch, but you need to rotate the tablet as shown in Figure 1.
- Press K1 and K8 at the same time, the working area of the tablet is 3*6 inch, but you can use the tablet in the normal direction as shown in Figure 2.
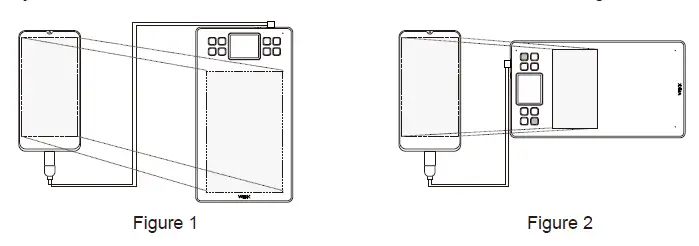
Note1: Works in mobile phone vertical screen mode only.
Note2: For some mobile phones, you need to enable the OTG function manually in the phone’s settings.
Note3: The shortcut keys of the pen and tablet can’t work on Android mobile phone.
Replacing the Nibs
When the pen nib is heavily worn, please replace the nib with the removal.
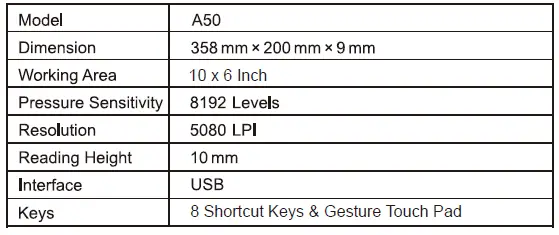
Specifications
Driver Settings
Windows:
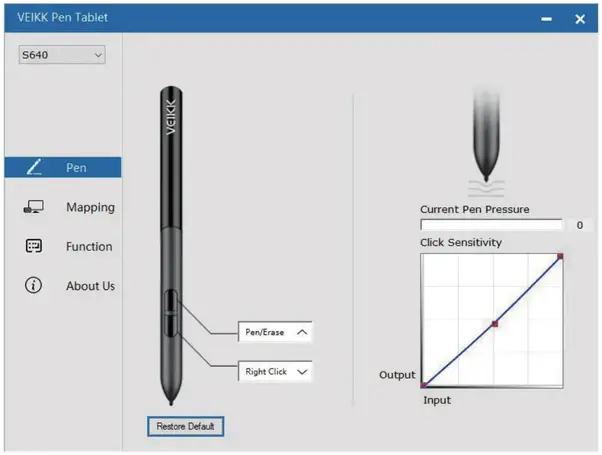
Pen:
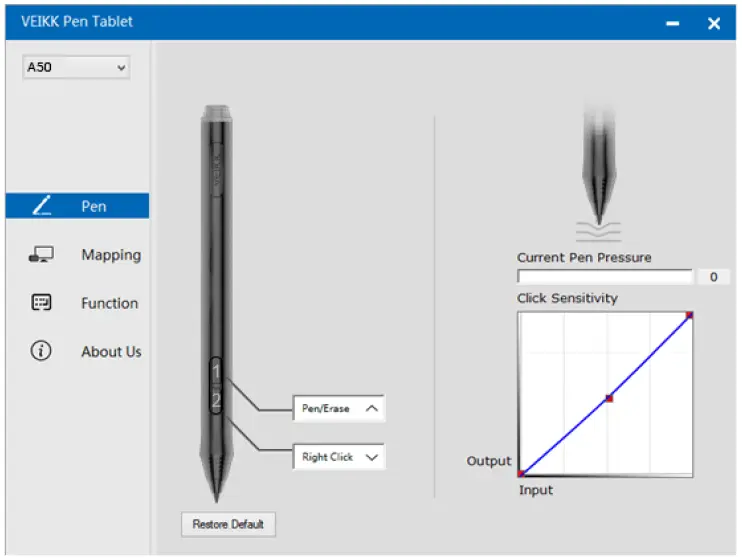
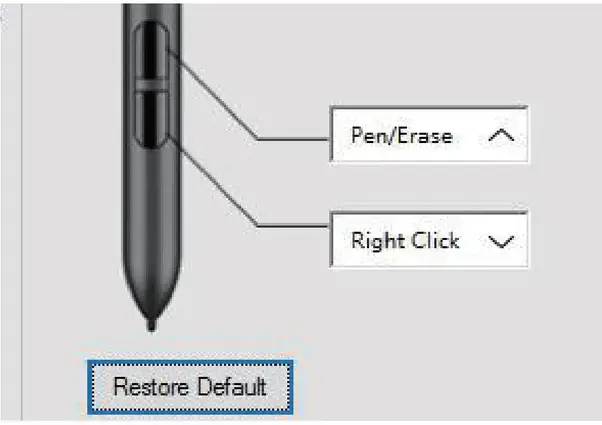
Pen Function Settings
You may customize the functions of pen buttons. Use the “Pen” option to program custom keystrokes.
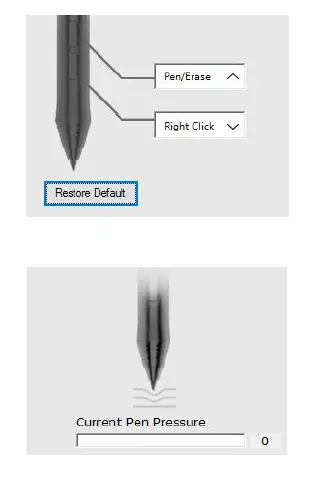
Current Pen Pressure
Current Pen Pressure shows the current pressure level being exerted on your tablet and can be used to test pen pressure.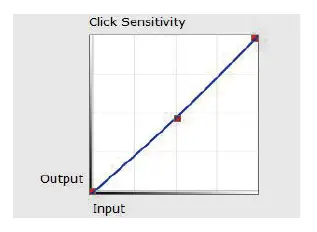 Click Sensitivity
You can adjust pen pressure to “Output” or “Press” sensitivity on here.
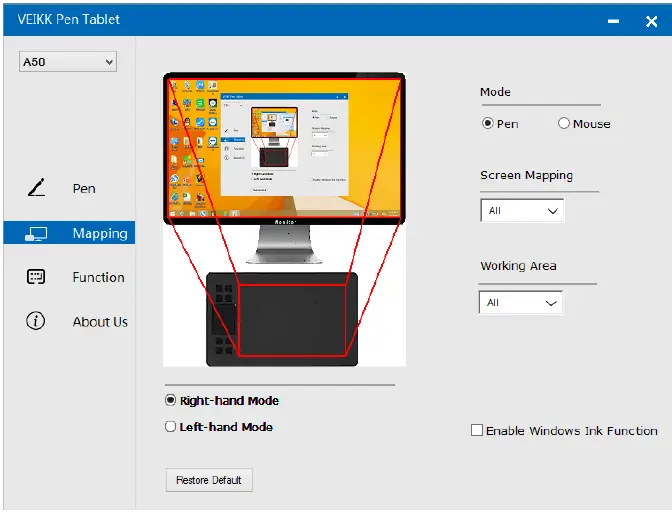
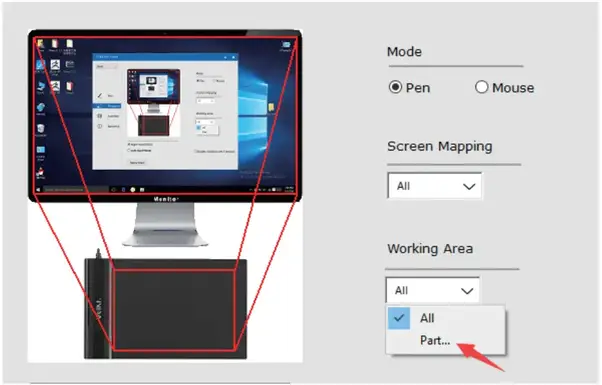
Mapping
Define the tablet area that will be mapped to the screen area. 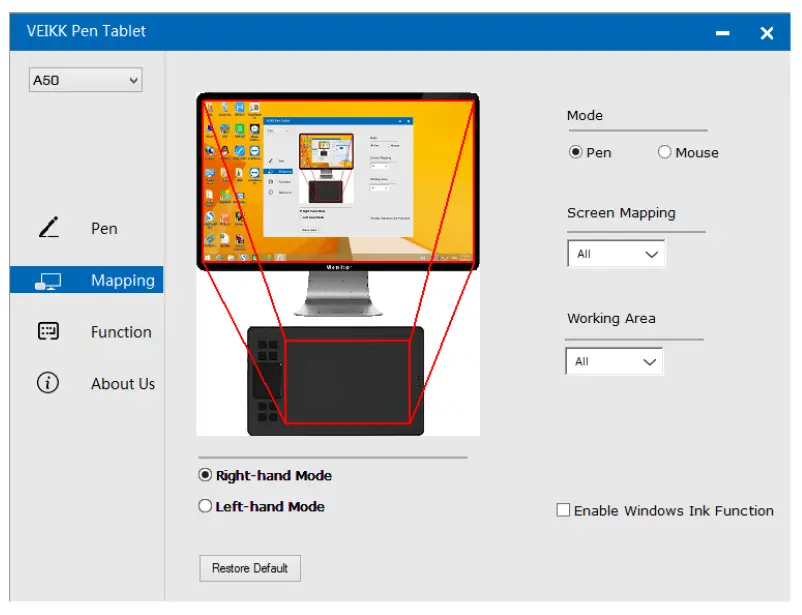
Screen Mapping
All Area: the entire active area of the tablet. This is the default setting.
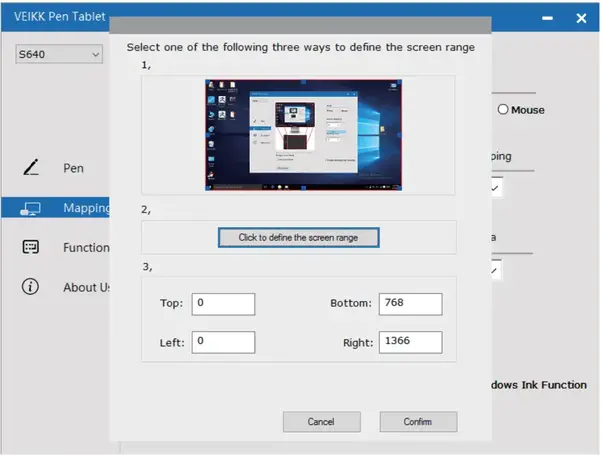
Part Area: Click Part
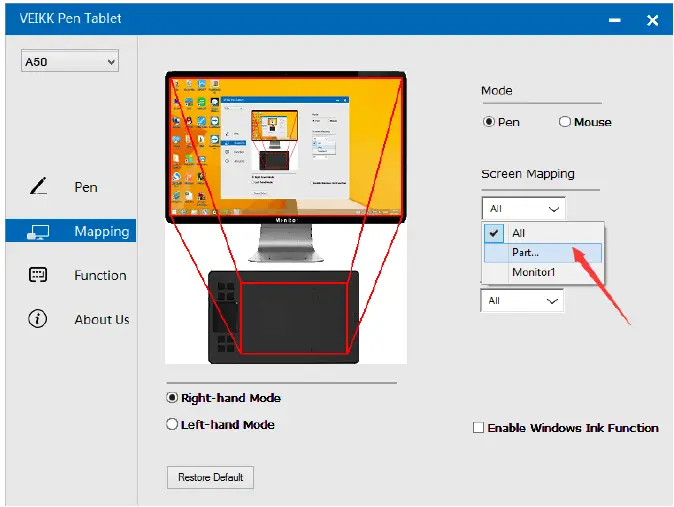
Then go to the next page, select one of the following three ways to define the screen range. 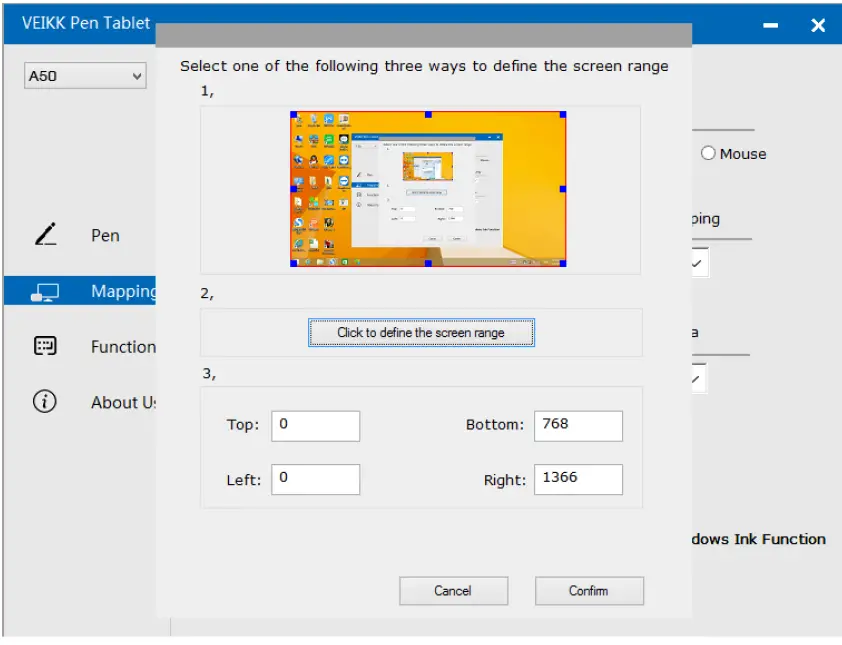
Monitor1: If more than one monitor is in use and you are in extended mode, you need to choose the related monitor on the driver interface which you are going to map to. If your monitors are in mirror mode(All monitors display the same content), the tablet maps to the entire space on each monitor and the screen cursor is displayed on each monitor simultaneously. 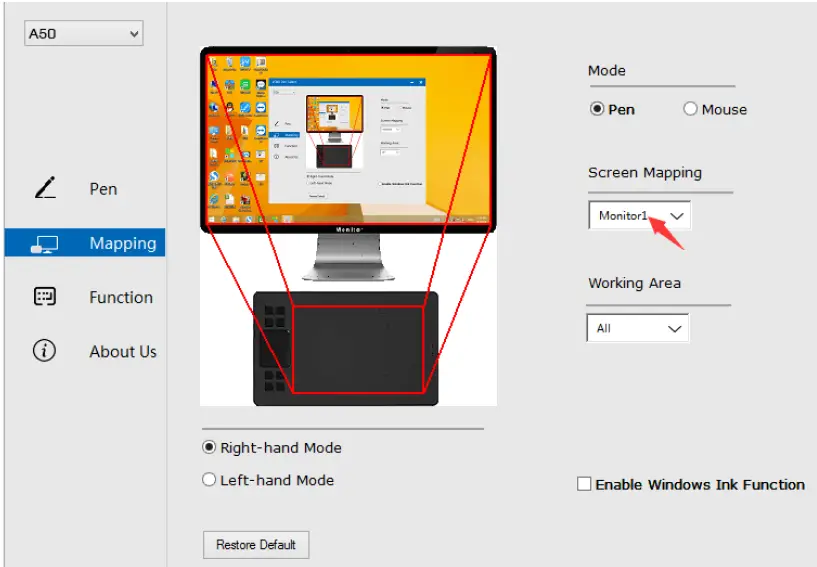
Working Area
All Area:the entire active area of the tablet.This is the default setting.
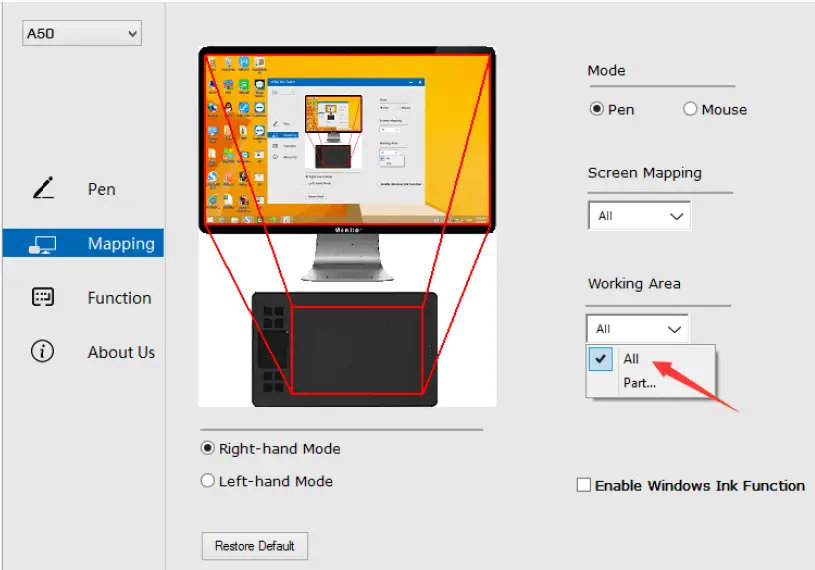
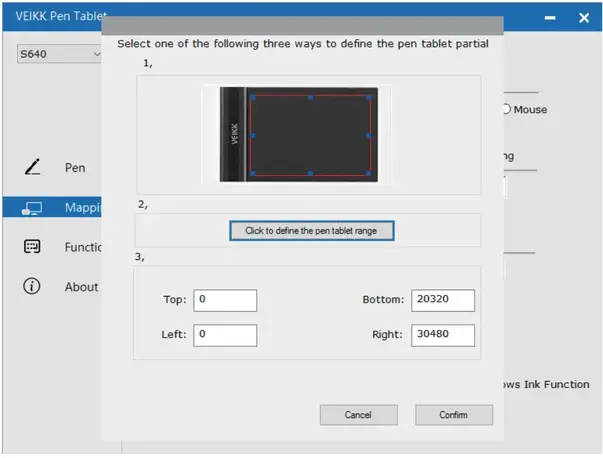
Part Area:Click Part 
Then go to the next page, select one of the following three ways to define the pen tablet partial. 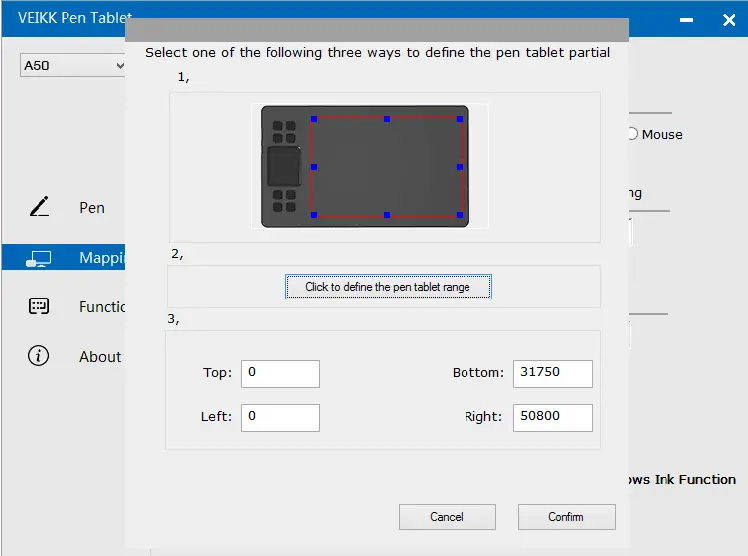
Enable Windows Ink Function
Microsoft Windows provides extensive support for pen input.Pen features are supported in such as Microsoft Office,Adobe Photoshop CC,AI and so on. 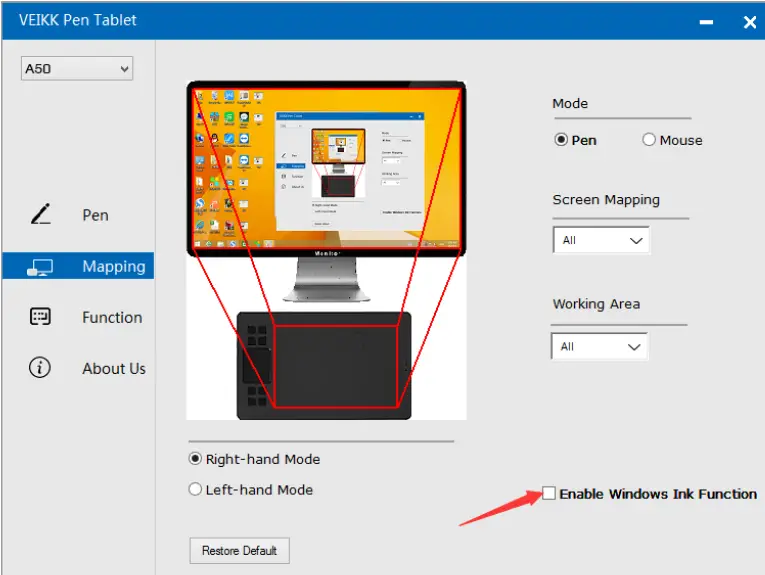
Function
Customize the Keys and Smart Gesture Touch
Application List:You can add or remove software by “+”or “-” 
“+”: Click “+” to add softwares, you have two ways to select an application.
- Choose from the dropdown
- Choose from the browser

“-”: Click “-” to remove the softwares you added before.
Hotkey
Redefine Hotkey: Click on the title of the button. A dropdown menu will appear with a list of tool options. Choose the one you want to use.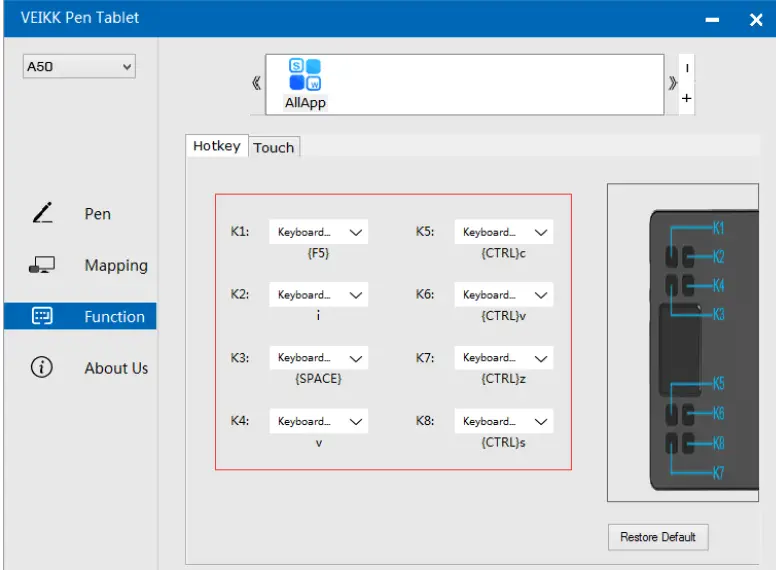
Touch
Click on the title of the button. A dropdown menu will appear with a list of tool options. Choose the one you want to use.

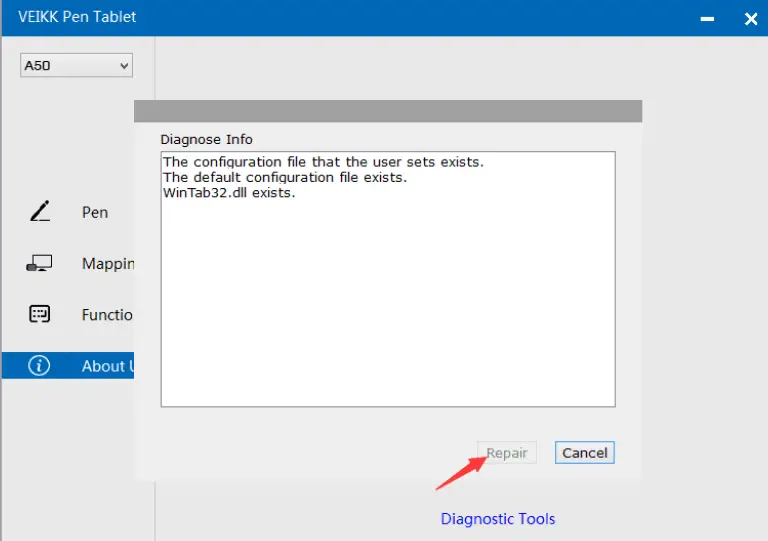
About Us 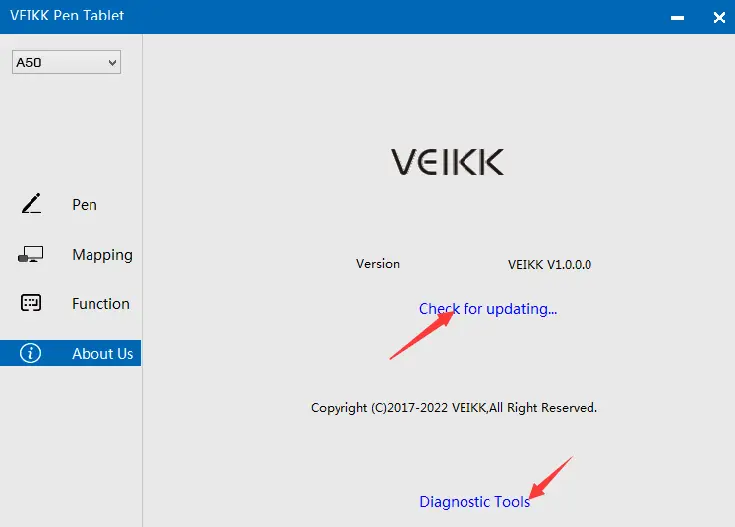
Check for updating:If you want to install the newest driver,click”Check for updating”, if there is no response,that means the driver you installed is the newest;if you find newest driver in the list,you just need to update. 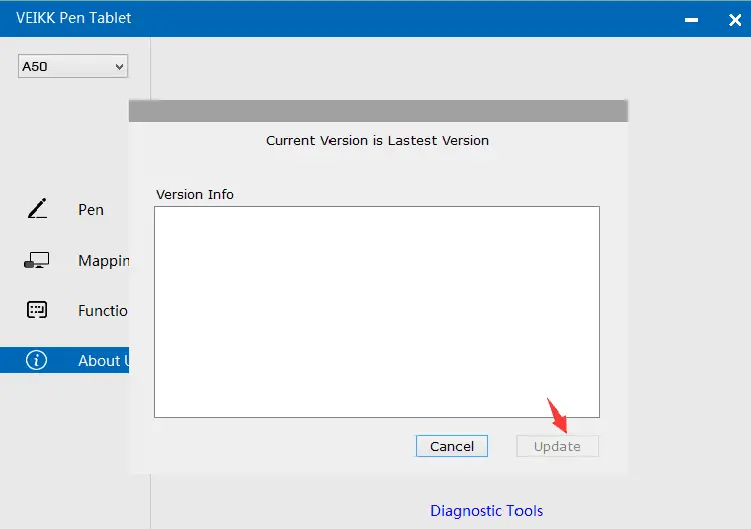
Diagnostic Tools:Check for missing key files
Mac:
Note:Driver settings in Mac system are the same in Windows system. Users who use Mac system can take reference to Windows system.
Any question, please contact us
Beijing Veikk E-commerce Co., Ltd.
Email : [email protected]
Skype : veikk service
Website : www.veikk.com
VEIKK S640 Battery-Free Pen Tablet User Guide
PRODUCT OVERVIEW

- LED Indicator
- Upper Marking Line
- Active Area
- Lower Marking Line
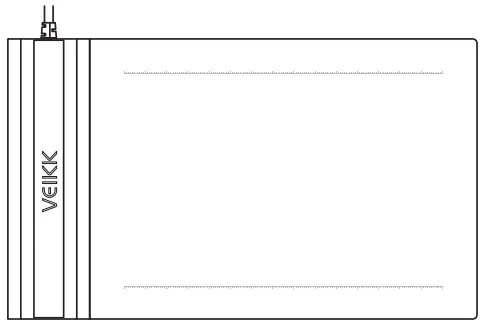
Tips: During the normal working state, when the pressure pen is suspended in the active area of the S640 tablet, the indicator light flashes; when the pen touches the tablet, the indicator light is always on.
PEN

NOTE: The stylus pen is battery-free, no need to charge or battery.
PACKING LIST
- S640 Pen Tablet
- Battery-free Pen

- Pen Pocket

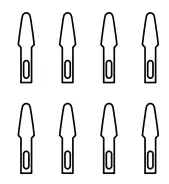
- Pen Nibs
- Nib Removal

- Driver Download Reminder

- Quick Start Guide
Installing Driver
- OS Support Windows 10/8/7(32/64 bits) Mac OS 10.12 or later Android 6.0 or later (Except Samsung Android device)
- Installation For a PC/laptop:
- Before installing driver, please uninstall all tablet drivers from your computer and keep all antivirus program and drawing software closed
- Connect the tablet to your computer before installation(Please refer to 4.Tablet Connection)
- Please download updated driver from www.veikk.com
- Click Set up.exe and follow onscreen instructions
- After installation then restart your computer. For an Android mobile phone:
No need to install VEIKK driver on your phone.
Tablet Connection
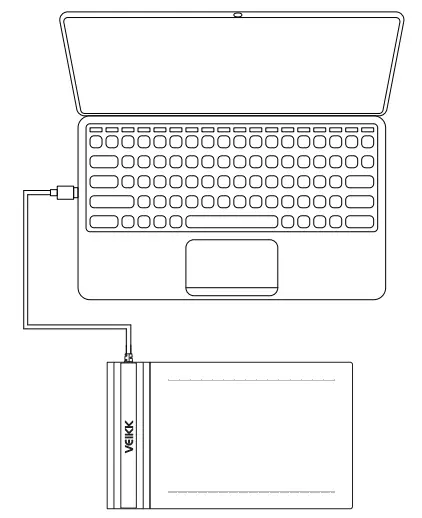
For a PC/laptop:
- Connect the tablet to your computer with USB cable.
- Open the driver interface, if the upper left corner shows the product model, indicating that the tablet has been connected successfully, you can start using your tablet now.
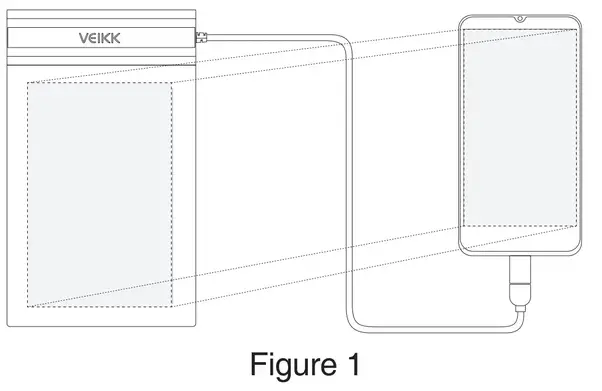
For an Android mobile phone:
- Please connect the tablet to your phone with the OTG adapter.
- Rotate the tablet as shown in Figure1,then you can start using your tablet.
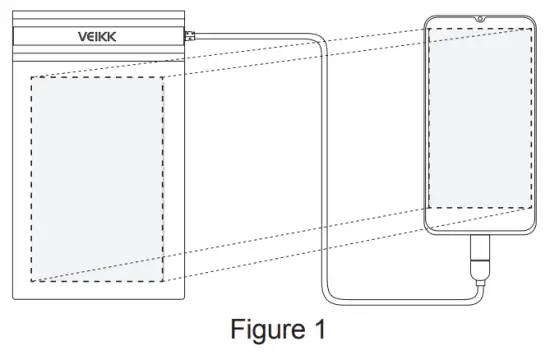
Note1: Works in mobile phone vertical screen mode only.
Note2: For some mobile phones, you need to enable the OTG function manually in the phone’s Settings.
Note3: The shortcut keys on the pen can’t work on Android mobile phone
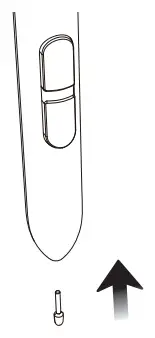
Replacing the nibs
When the pen nib is heavily worn,please replace the nib with the nib removal.
- Insert the pen nib into the pen holder hole
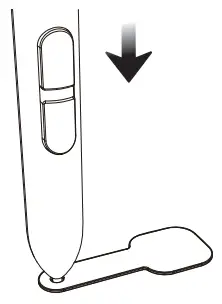
- Tilt the pen so that the pen holder can fully catch the pen nib
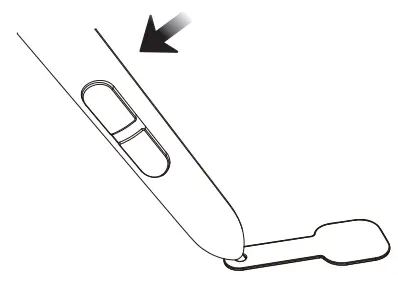
- Pull out the nib
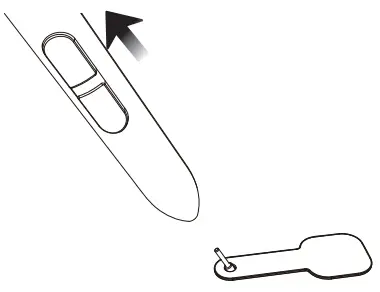
- Insert a new nib into the pen and push it straightly until it stops
Specifications
| Model | S640 |
| Dimension | 218mm x 130mm x 9mm |
| Working Area | 6 x 4 inch |
| Pressure Sensitivity | 8192 levels |
| Resolution | 5080 LPI |
| Reading Height | 10 mm |
| Interface | USB |
Any questions, please contact us
Beijing Veikk E-commerce Co., Ltd.
Email : [email protected]
Skype : veikk service
Website : www.veikk.com

VEIKK A15 Graphic Pen Tablet
- Do not use this product in a control system that requires a high degree of safety and reliability.
- In such a system, this product could negatively affect other electronic devices and could malfunction due to the effect on those devices.
- Turn the power off in areas where the use of electronic devices is prohibited.
- Onboard an aircraft or in any other location where the use of electronic devices is prohibited, this product, if left on, could negatively affect other electronic devices.
- Do not use this product in a location frequented by little children.
- Make sure that a child does not put the pen or pen tip in his/her mouth.
The pen tip or side switch cover could be detached and be accidentally swallowed.
- Make sure that a child does not put the pen or pen tip in his/her mouth.
- Do not place this product on an unstable surface.
- Placing this product on an unstable or tilted surface or in a location exposed to excessive vibrations could cause it to fall off resulting
in injury.
- Placing this product on an unstable or tilted surface or in a location exposed to excessive vibrations could cause it to fall off resulting
- Do not place heavy objects on top of this product.
- Do not step or place heavy objects on this product as this could damage it.
- Avoid high or low-temperature locations for storage.
- Do not store this product in a location where the temperature drops below 5℃ or goes above 40℃ and in locations subject to excessive temperature fluctuations. Failure to heed this caution could result in damage to the product and its components.
- Do not disassemble.
- Do not disassemble or modify this product as this could expose you to heat, fire, electric shock, and injury. Disassembling the product will also void your warranty.
- Do not use alcohol for cleaning.
- Never use alcohol, thinner, benzene, or other mineral solvents as they could discolor or cause deterioration to the product.
- Do not expose to water.
- Do not place glasses or vases filled with water or other liquids near this product. Exposure to water or liquid could damage the product.
- Do not place metal objects on this product during operation.
- Placing metal objects on this product during operation could cause it to malfunction or damage it.
- Do not strike the pen against hard objects.
- Striking the pen against a hard object could damage it.
- Do not handle the pen with soiled hands.
The pen is a high-precision instrument. Handling it with soiled hands or using it in locations exposed to dust or strong odors may cause the entry of foreign matter which will result in a breakdown.
Limitation of Liability
- VEIKK shall in no event be liable for damages resulting from fires or earthquakes, those caused by third parties, and those arising from user misuse, abuse, or neglect.
- VEIKK shall in no event be liable for incidental damages-including but not limited to loss of business income, interruption of business activities, corruption, or loss of data-that arising out of the use or failure to use this product.
- VEIKK shall in no event be liable for damages resulting from uses not documented in this manual.
- VEIKK shall in no event be liable for damages from malfunction caused by connection to other devices or use of third-party software.
Product Overview
- Product Brand
- TYPE-C Port
- LED Indicators
- Hotkeys
- Active Area
During the normal working state, when tablet connected with the computer, power indicator flashes, then always on; when pen suspended in the reading height, pen indicator flashes, then always on when pen touches the active area; when hotkeys being pressed, key indicator always on.
Pen(P002)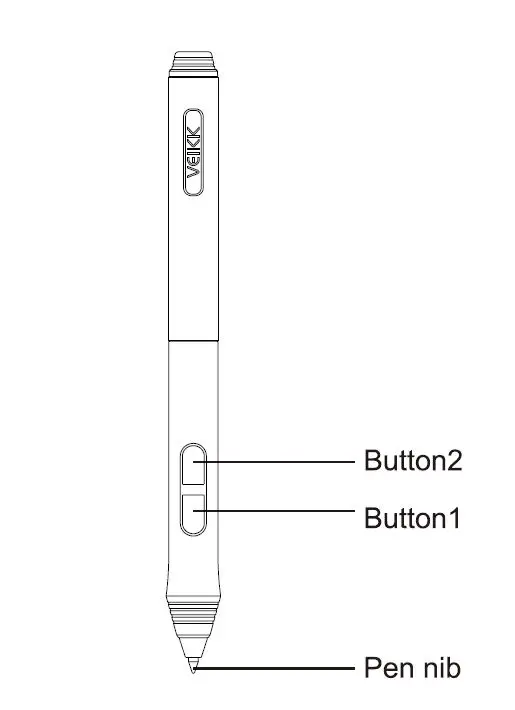
Note: The stylus pen is battery-free, no need to charge or battery.
Packing List
- A15 Pen Tablet
- Battery-free Pen
- Pen Pocket
- Pen Nibs

- Driver Download
Reminder - Quick Start Guide
- Type-C Cable
- Nib Removal
- Artist Glove
Installing Driver
OS Support
Windows 10/8/7/Vista/XP(32/64 bits) or later
Mac OS 10.6 or later
Installation
- Before installing the driver, please uninstall all tablet drivers from your computer, and keep all antivirus programs closed.
- Connect the tablet to your computer before installation(Please refer to 4. Tablet Connection).
- Please download the updated driver from www.veikk.com.
- Unzip the downloaded file to the desktop, and open it.
- Click Set up.exe and follow onscreen instructions.
- After installation then restarts your computer.
Tablet Connection
- Take out the A15 from the package, and connect the tablet to your computer with a USB cable.
- Open the driver interface, the upper left corner shows the device is connected, indicating that the tablet has been successfully mounted to the driver, you can start using your tablet now.

Replacing the Nibs
When the pen nib is heavily worn, please replace the nib with the nib removal.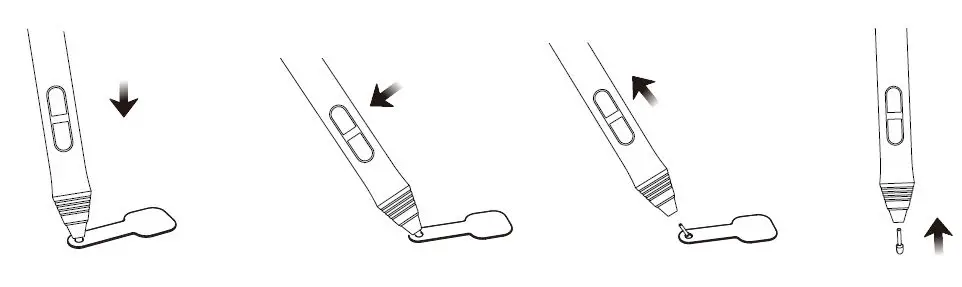
- Insert the pen nib into the pen holder hole
- Tilt the pan so that the pen holder can fully catch the pen nib
- Pull out the nib
- Insert a new nib into the pen and push it straightly until it stops
Specifications
| Model | A15 |
| Dimension | 358mm x 200mm x 9mm |
| Working Area | 10 x 6 inch |
| Pressure Sensitivity | 8192 levels |
| Report Rate | 250 PPS |
| Resolution | 5080 LPI |
| Reading Height | 10 mm |
| Interface | Type-C |
| Keys | 12 Hotkeys |
Driver Settings
Windows:
Pen: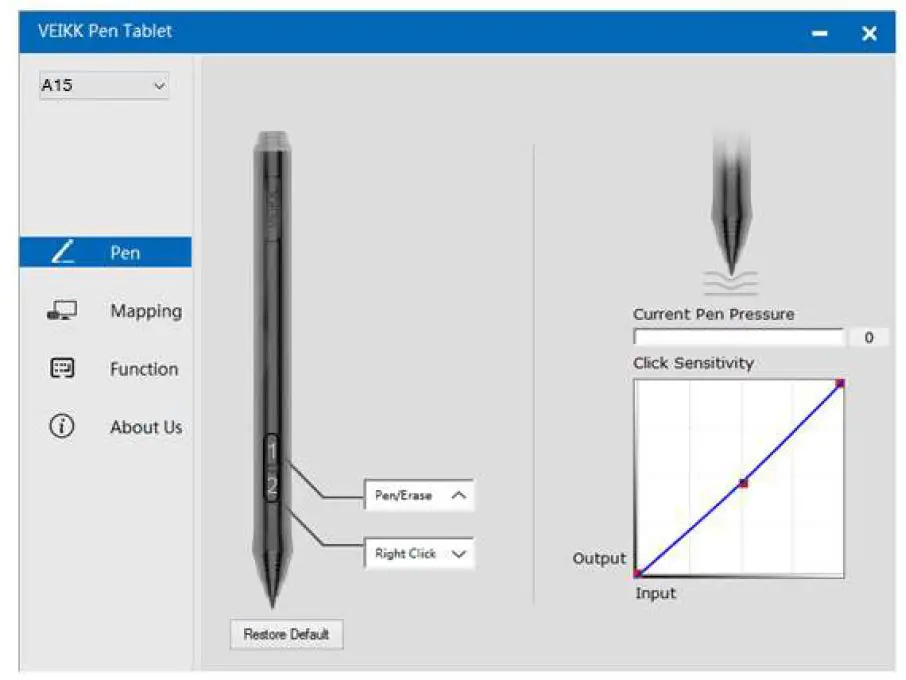
- Pen Function Settings
You may customize the functions of your tablet pen’s barrel buttons here. Use the
“Function Key” option to program custom keystrokes.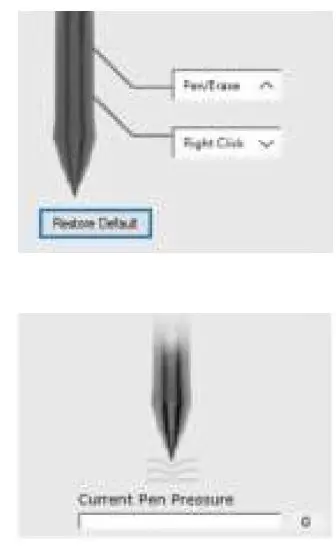
- Current Pen Pressure
Current Pen Pressure shows the current pressure level being exerted on your tablet and can be used to test pen pressure.
- Click Sensitivity
You can adjust pen pressure to “Output” or “Press” sensitivity on here.
Mapping
Define the tablet area that will be mapped to the screen area.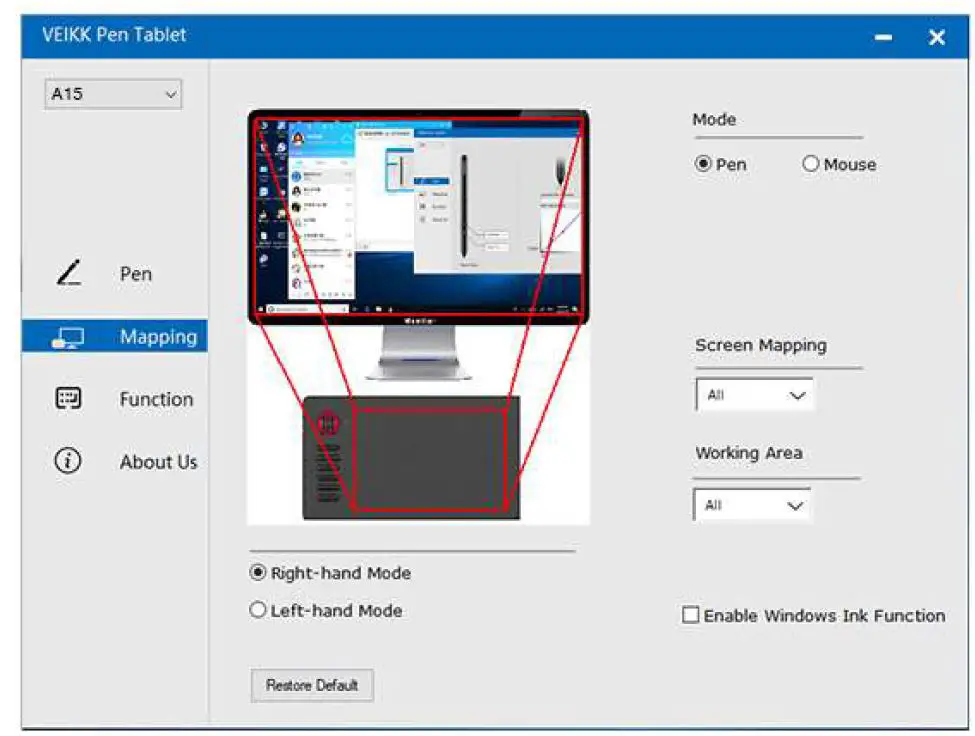
- Screen Mapping
All Area: the entire active area of the tablet. This is the default setting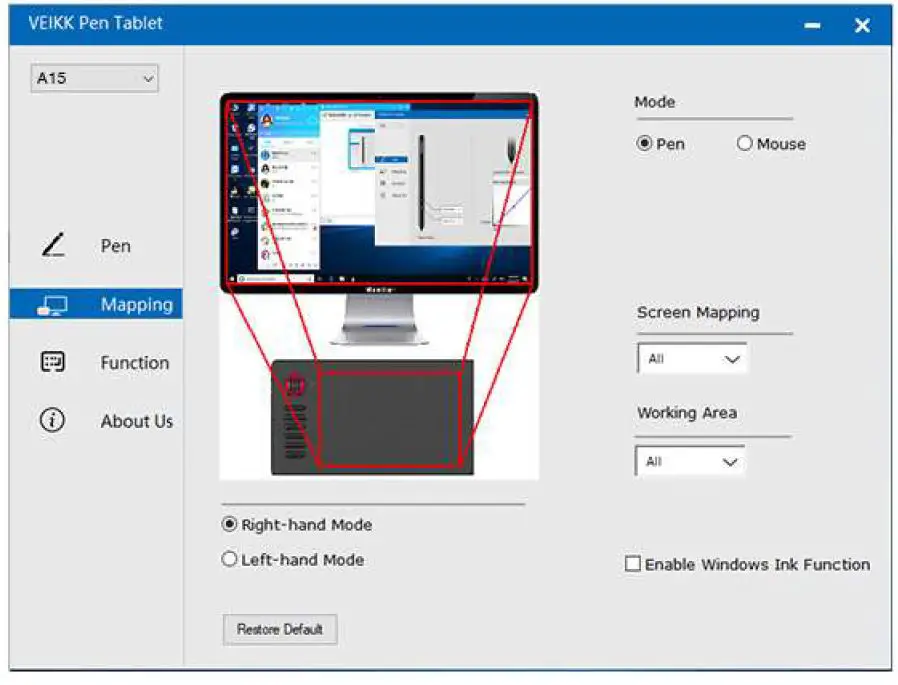
Part Area: Click Part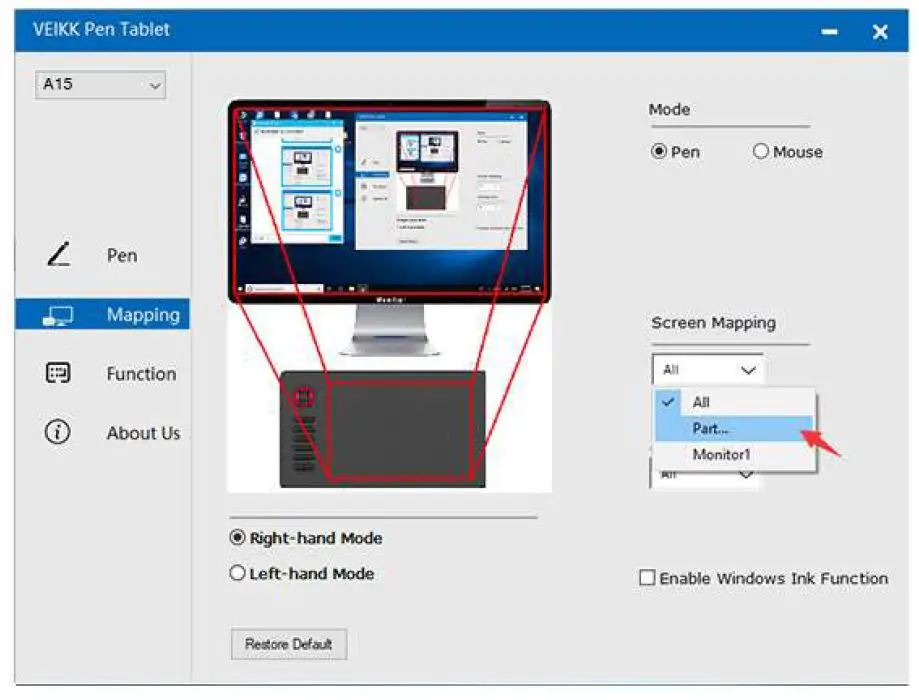
Then go to the next page, select one of the following three ways to define the screen range.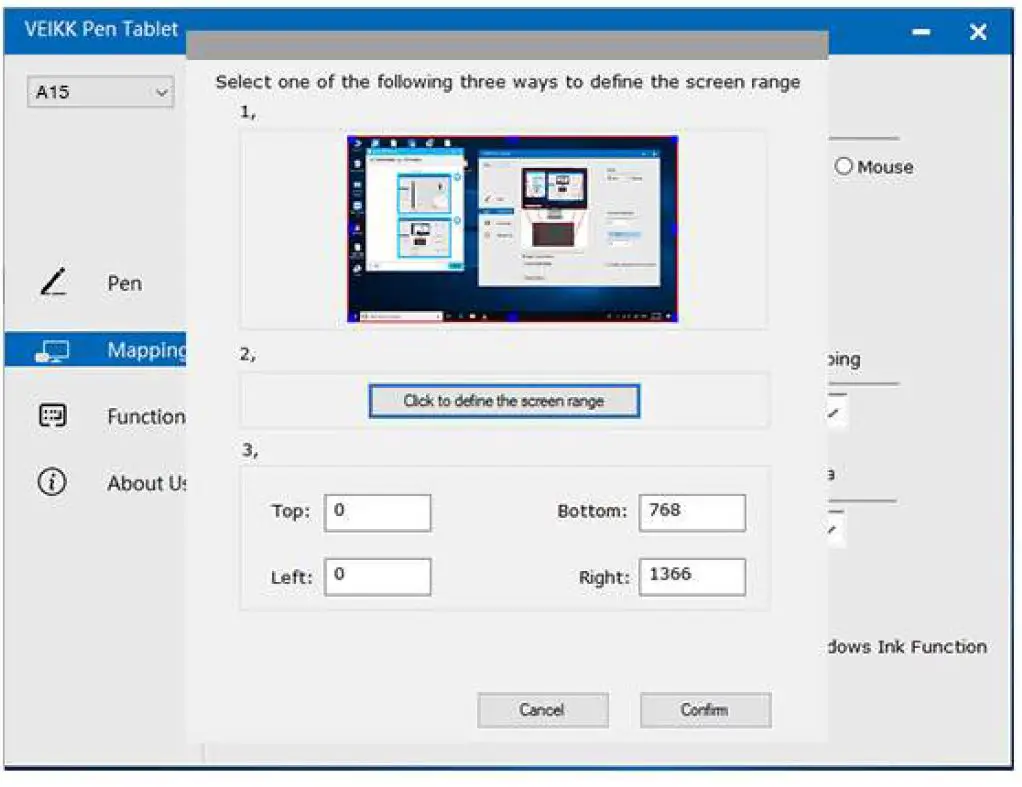
Monitor1: If more than one monitor is in use and you are in extended mode, you need to choose the related monitor on the driver interface which you are going to map to. If your monitors are in mirror mode(All monitors display the same content), the tablet maps to the entire space on each monitor and the screen cursor is displayed on each monitor simultaneously.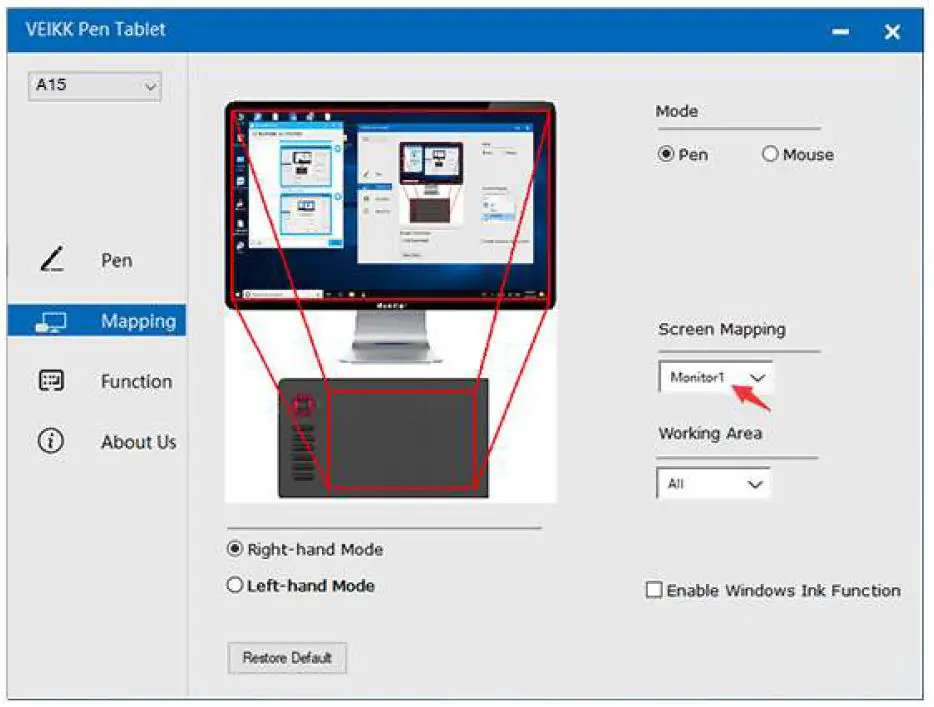
- Working Area
All Area:the entire active area of the tablet.This is the default setting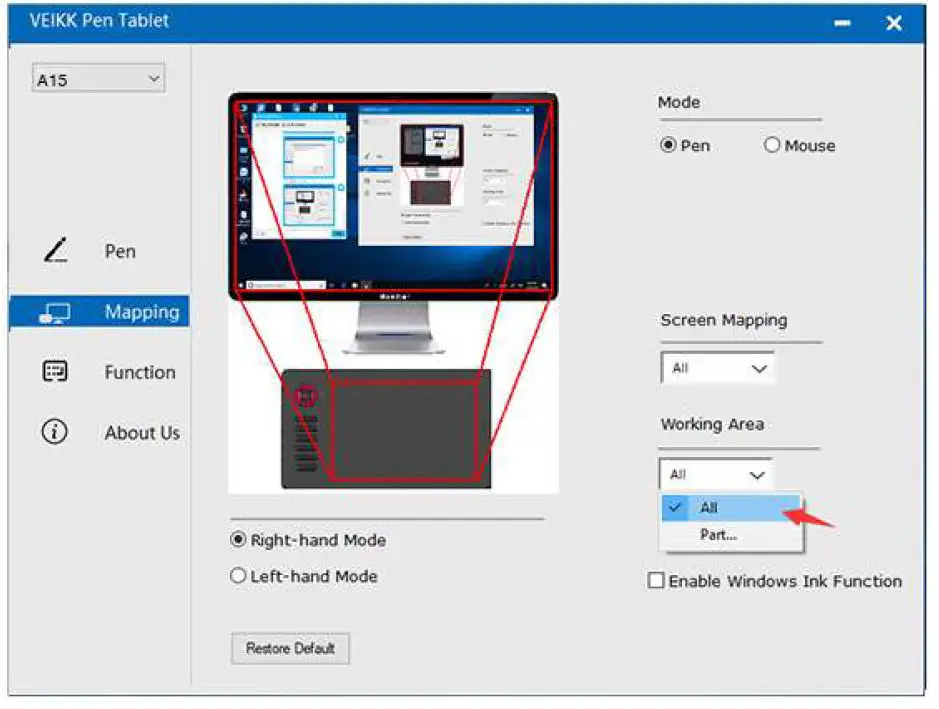
Part Area:Click Part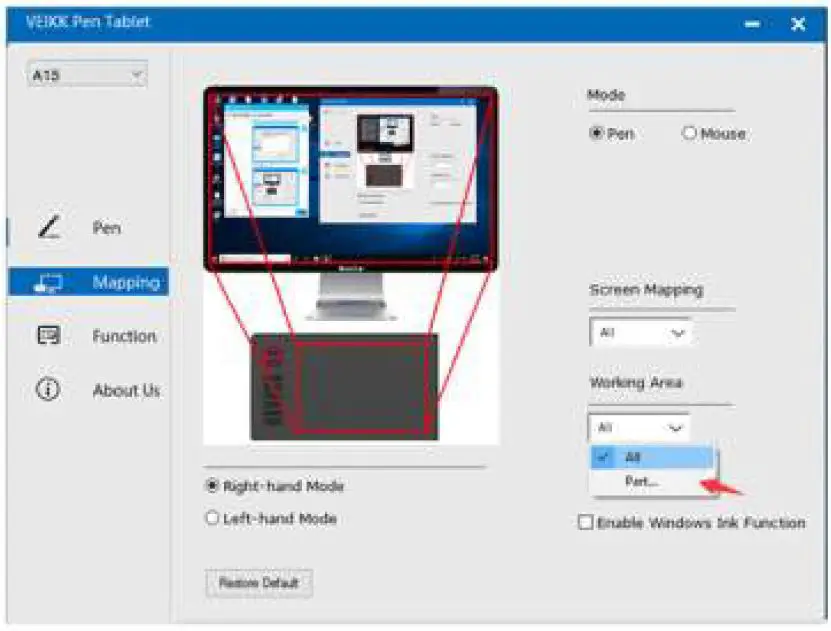
Then go to the next page, select one of the following three ways to define the pen tablet partial.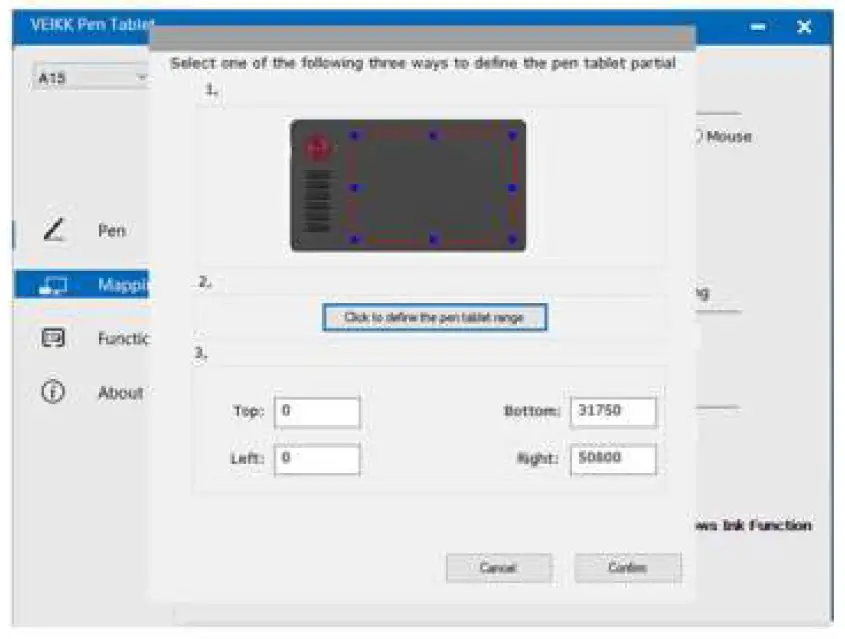
- Enable Windows Ink Function
Microsoft Windows provides extensive support for pen input.Pen features are supported in such as Microsoft Office,Adobe Photoshop CC,AI and so on.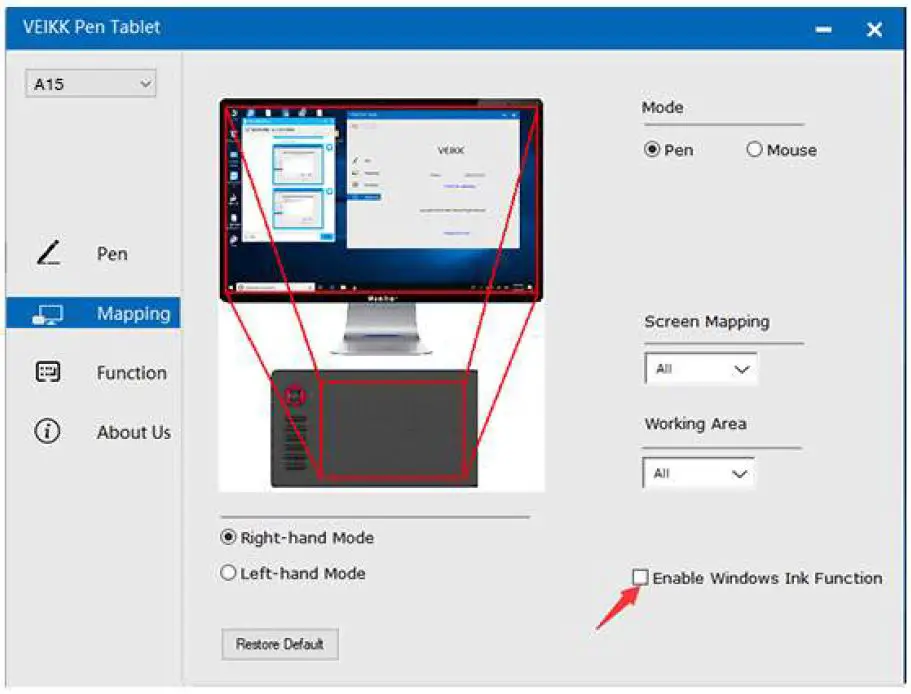
Function
Customize the Touch Keys
- Application List:You can add or remove software by “+”or “-”
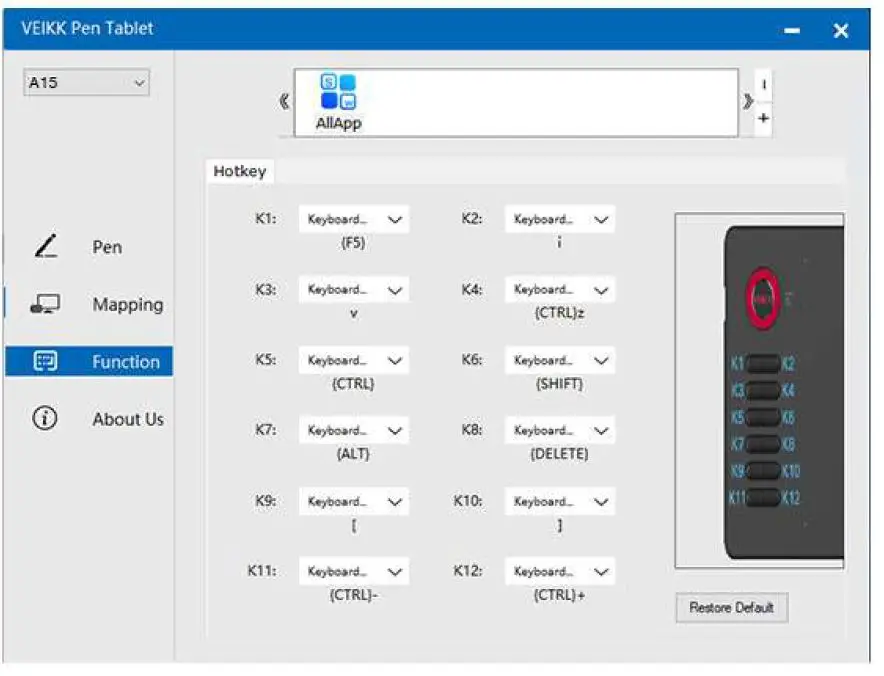
“+”: Click “+” to add softwares, you have two ways to select an application,
1、Choose from the dropdown
2、Choose from the browser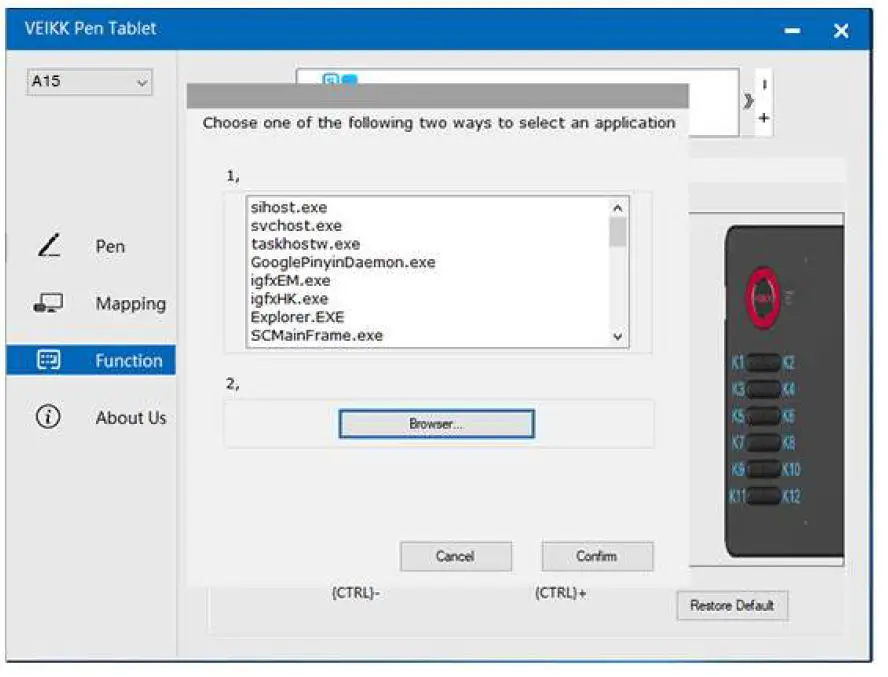
“-”: Click “-” to remove the software you added before. - Hotkey
Redefine Hotkey: Click on the title of the button. A dropdown menu will appear with a list of tool options. Choose the one you want to use.” sizes=”(max-width: 713px) 100vw, 713px” alt=”VEIKK-A15-Graphic-Pen-Tablet-FIG-21″ width=”713″ height=”544″ data-ezsrcset=”https://manuals.plus/wp-content/uploads/2022/05/VEIKK-A15-Graphic-Pen-Tablet-FIG-21.jpg 824w,https://manuals.plus/wp-content/uploads/2022/05/VEIKK-A15-Graphic-Pen-Tablet-FIG-21-550×420.jpg 550w,https://manuals.plus/wp-content/uploads/2022/05/VEIKK-A15-Graphic-Pen-Tablet-FIG-21-768×586.jpg 768w” data-ezsrc=”https://manuals.plus/wp-content/uploads/2022/05/VEIKK-A15-Graphic-Pen-Tablet-FIG-21.jpg” />
- About Us
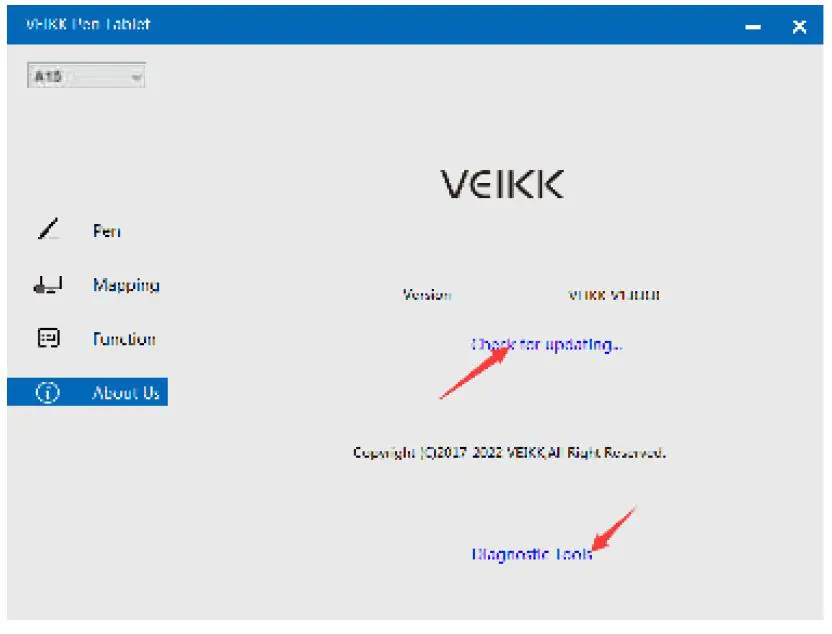
Check for updating:If you want to install the newest driver,click”Check for updating”, if there is no response,that means the driver you installed is the newest;if you find newest driver in the list,you just need to update.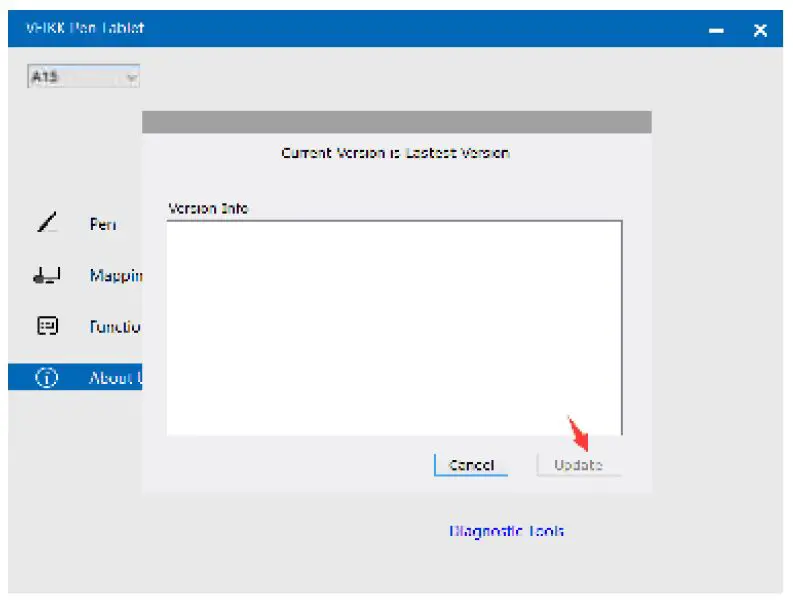
Diagnostic Tools:Check for missing key files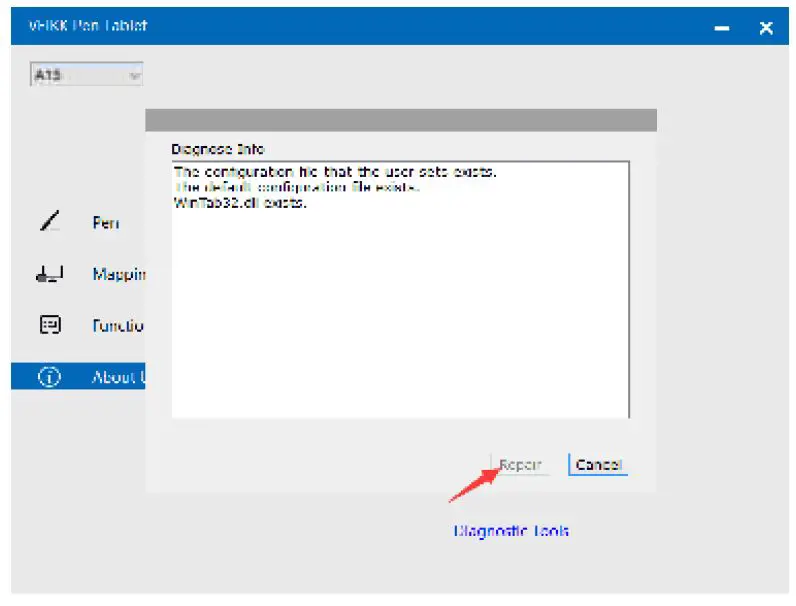
Mac:
Note:Driver settings in Mac system are the same in Windows system. Users who use Mac system can take reference to Windows system.
FAQ
- The stylus can’t control the cursor.
A. Whether the tablet’s status indicator light turn on when the stylus is in contact with the working area? If yes, uninstall the A15 driver and reboot, then connect the tablet to your computer and test your stylus.If the cursor responds to your pen input, the tablet’s hardware is functional.Go to our official website
http://www.veikk.com/download/ download the newest driver and re-install.
B. Connect the tablet then run the driver installation, complete the installation, then reboot. - How do i know that the A15 driver was installed successfully?
A. After installing the driver, the A15 driver icon would be visible in your system tray on the bottom-right corner of your screen(Windows OS) and desktop.
B. Or open the driver interface, the upper left corner shows the A15, indicating that the tablet has been successfully mounted to the driver, you can start using your tablet now. - How do i determine if a problem is a software or hardware related?
A. Connect and install the A15 on a different computer. If the tablet functions properly on the new computer, you are experiencing a software problem. Please uninstall all tablet drivers(including A15 driver)from your computer, download the newest driver from our official website http://www.veikk.com/download/ and then re-install.
B. The A15 indicator lights will help you determine if an issue is hardware-related. When functioning properly, the blue status indicator light will light up when the stylus pen is in range of or touching the tablet’s working area. - There is no pressure in the graphics software, but the cursor moves.
You may have installed other tablet drivers or opened the drawing software when installing the driver. Please uninstall all drivers and close the drawing software, then re-install A15 driver.That is better to restart your computer after completing the installation. - The stylus pen does not work.
A. Make sure you are using the pen that originally came with your tablet.
B. Make sure you installed the driver correctly. - The computer can’t recognize the tablet.
Make sure the USB port is functional, if not, please change to another USB port.
Any questions, please contact us
Beijing Veikk E-commerce Co., Ltd.
- Email: [email protected]
- Skype: veikk service
- Website : www.veikk.com
User Manual
BATTERY-FREE PEN TABLET
S640 for OSU! Game Playing & Drawing
www.veikk.com
Safety Precautions
WARNING
Do not use this product in a control system that requires a high degree of safety and reliability.
In such a system, this product could negatively affect other electronic devices and could malfunction due to the effect of those devices.
Turn the power off in areas where the use of electronic devices is prohibited.
Onboard an aircraft or in any other location where the use of electronic devices is prohibited, this product, if left on, could negatively affect other electronic devices.
Do not use this product in a location frequented by little children.
Make sure that a child does not put the pen or pen tip in his/her mouth.
The pen tip or side switch cover could be detached and be accidentally swallowed.
CAUTION
Do not place this product on an unstable surface.
Placing this product or an unstable or tilted surface or in a location exposed to excessive vibrations could cause it to fall off resulting in injury.
Do not place heavy objects on top of this product.
Do not step or place heavy objects on this product as this could damage it.
WARNING
Avoid high or low-temperature locations for storage.
Do not store this product in a location where the temperature drops below 5¥ or goes above 40¥and in locations subject to excessive temperature fluctuations. Failure to heed this caution could result in damage to the product and its components.
Do not disassemble.
Do not disassemble or modify this product as this could expose you to heat, fire, electric shock and injury.
Disassembling the product will also void your warranty.
Do not use alcohol for cleaning.
Never use alcohol, thinner, benzene or other mineral solvents as they could discolor or cause deterioration to the product.
Do not expose to water.
Do not place glasses or vases filled with water or other liquids near this product. Exposure to water or liquid could damage the product.
CAUTION
Do not place metal objects on this product during operation.
Placing metal objects on this product during operation could cause it to malfunction or damage it.
Do not strike the pen against hard objects.
Striking the pen against a hard object could damage it.
Do not handle the pen with soiled hands.
The pen is a high-precision instrument. Handling it with soiled hands or using it in locations exposed to dust or strong odors may cause the entry of foreign matter which will result in a breakdown.
Limitation of Liability
VEIKK shall in no event be liable for damages resulting from fires or earthquakes, those caused by third parties, and those arising from user misuse, abuse, or neglect.
VEIKK shall in no event be liable for incidental damages-including but not limited to loss of business income, interruption of business activities, corruption, or loss of data-that arising out of the use or failure to use this product.
VEIKK shall in no event be liable for damages resulting from uses not documented in this manual.
VEIKK shall in no event be liable for damages from malfunction caused by connection to other devices or use of third-party software.
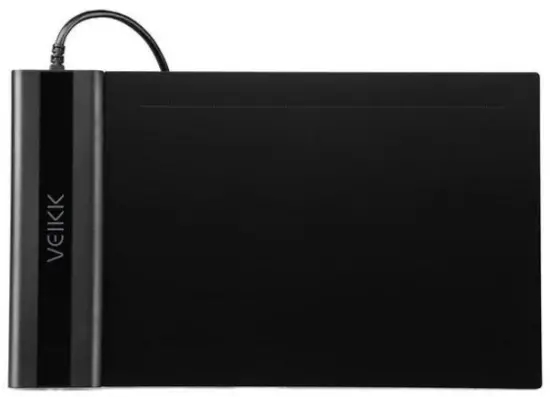
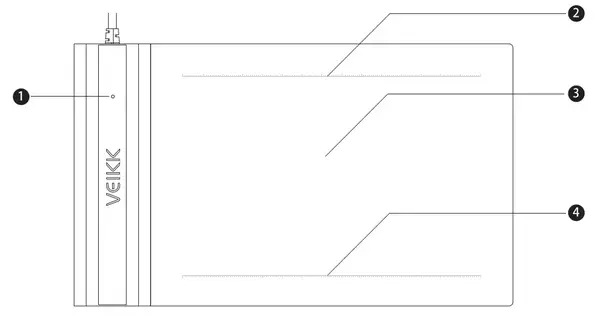
Product Overview
- LED Indicator
- Upper Marking Line
- Active Area
- Lower Marking Line
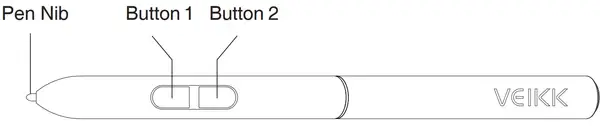
Pen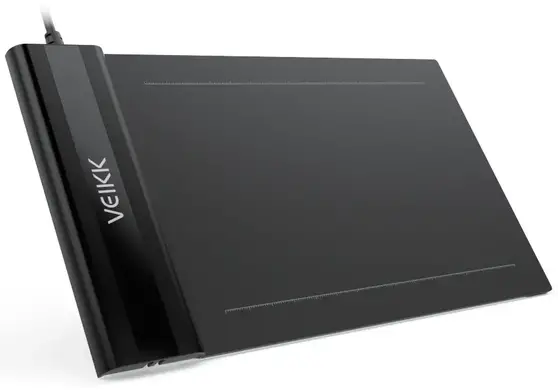
Note: The passive pen requires neither battery nor charging.
Packing List
3.1 OS Support
Windows 11/10/8/7(32/64 bits) / Mac OS 10.12 or later
Linux OS / Chrome 88 or later
Android 6.0 or later (Except Samsung Android device)
3.2 Installation
For Mac OS, Windows, and Linux OS computers:
- Before installing the driver, please uninstall all tablet drivers from your computer and keep all antivirus programs and the drawing software closed.
- Connect the tablet to your computer before installation (Please refer to 4. Tablet Connection).
- Please download the driver from www.veikk.com.
- Click Set up.exe and follow onscreen instructions.
- Restart your computer after installation.
For Chrome OS computer and the Android mobile phone: No need to install the VEIKK driver on the Chrome OS computer and the Android mobile phone.
Tablet Connection
For Mac OS, Windows, and Linux OS computers:
- Connect the tablet to your computer with a USB cable.
- Open the driver interface. If the product model shows in the upper left corner, this indicates that the tablet has been connected successfully. You can start using your tablet.
For Chrome OS computer: Connect the tablet to your Chrome OS computer with the USB cable, then you can start using your tablet
Note: The shortcut keys of the pen and tablet can’t work on the Chrome OS computer.
For Android mobile phones:
- Please connect the tablet to your phone with the OTG adapter.
- Rotate the tablet as shown in Figure1, then you can start using your tablet.
Note1: Works in mobile phone vertical screen mode only.
Note2: For some mobile phones, you need to enable the OTG function manually in the phone’s settings.
Note3: The shortcut keys of the pen can’t work on an Android mobile phone.
Replacing the Nibs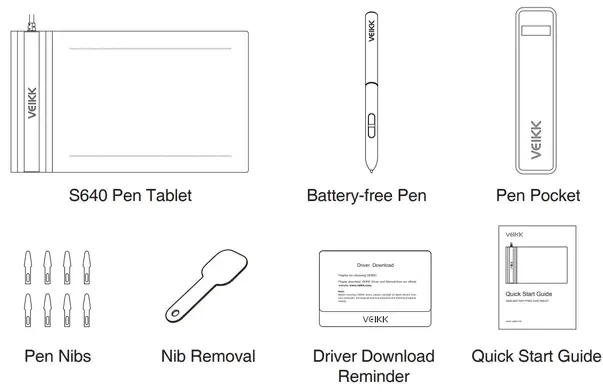
- Insert the pen nib into the penholder hole
- Tilt the pen so that the pen holder can fully catch the pen nib
- Pull out the nib
- Insert a new nib into the pen and push it straightly until it stops
Specifications
| Model | S640 |
| Dimension | 218mm x 130mm x 9mm |
| Working Area | 6 x 4 inch |
| Pressure Sensitivity | 8192 levels |
| Resolution | 5080 LPI |
| Reading Height | 10 mm |
| Interface | USB |
Driver Settings
Windows:
7.1 Pen: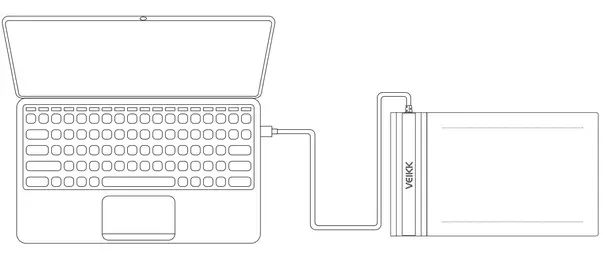 7.1.1 Pen Function Settings
You may customize the functions of pen buttons. Use the “Pen” option to program custom keystrokes.
 7.1.2 Current Pen Pressure
Current Pen Pressure shows the current pressure level being exerted on your tablet and can be used to test pen pressure.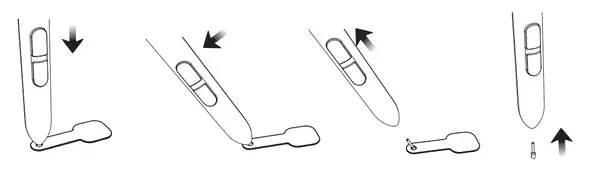 7.1.3 Click Sensitivity
You can adjust pen pressure to “Output” or “Press” sensitivity on here.
 7.2 Mapping
Define the tablet area that will be mapped to the screen area.
 7.2.1 Screen Mapping
Full Area: the entire active area of the tablet. This is the default setting.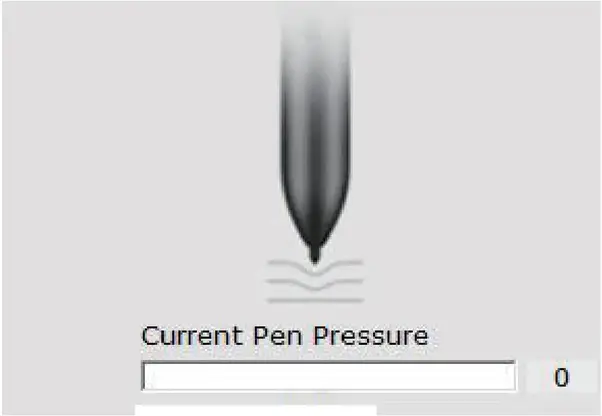
Part Area: Click Part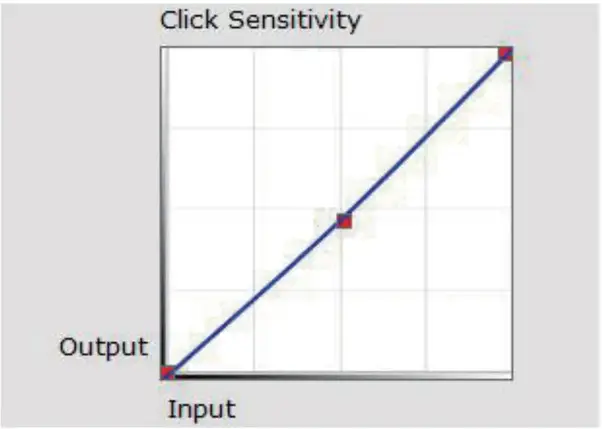 Then go to the next page, select one of the following three ways to define the screen range.
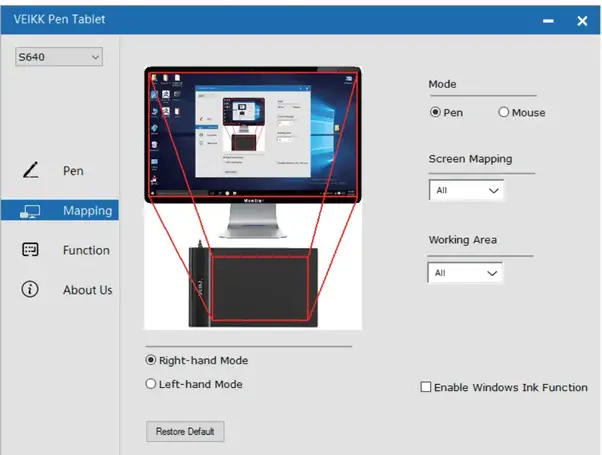 Monitor1:If more than one monitor is in use and you are in extended mode, you need to choose the related monitor on the driver interface which you are going to map to. If your monitors are in mirror mode(All monitors display the same content), the tablet maps to the entire space on each monitor and the screen cursor is displayed on each monitor simultaneously.
 7.2.2 Working Area
Full Area: the entire active area of the tablet. This is the default setting.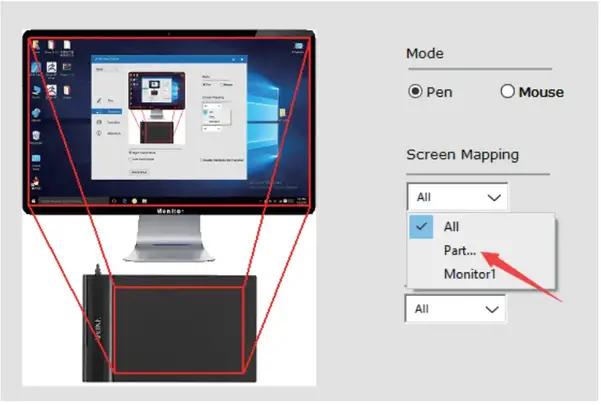
Part Area: Click Part
 Then go to the next page, and select one of the following three ways to define the pen tablet partial.
 7.2.3 Enable Windows Ink Function
Microsoft Windows provides extensive support for pen input. Pen features are supported in such as Microsoft Office Adobe Photoshop CC AI and so on.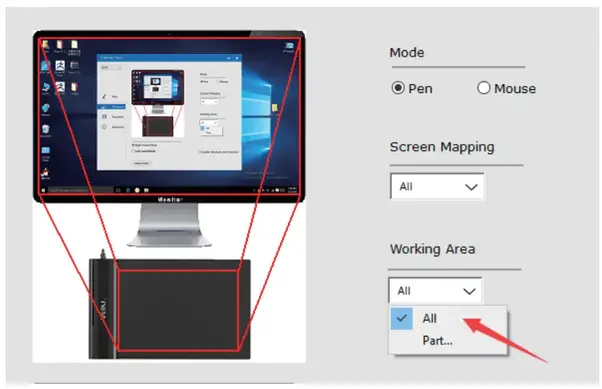 7.3 About Us Check for updating:
If you want to install the newest driver, click”Check for updating”. If there is no response, that means the driver you installed is the newest. If you find the newest driver in the list, you just need to update it.
 Diagnostic Tools: Check for missing key files.
Any questions, please contact us
Beijing Veikk E-commerce Co., Ltd.
Email: [email protected]
Skype: like service
Website: www.veikk.com