VORNADO® Whole Room Air Circulator Owner’s Guide
READ AND SAVE THESE IMPORTANT INSTRUCTIONS
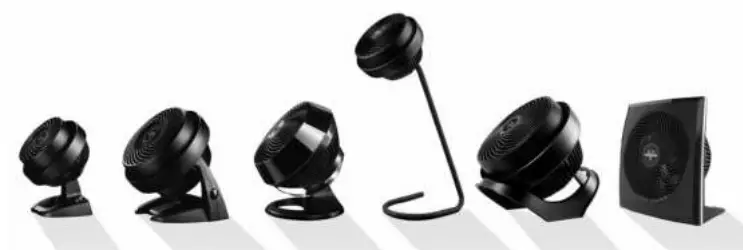
models VH102, 133, 160, 270, 360, 510, 530, 533, 573, 610, 630, 633, 660, 673, 679, 723, 733, 735, 743, 745, 753, 783, 795
Designed, engineered and supported in Andover, Kansas.
Questions or comments?
 www.vornado.com

 800.234.0604
Important Instructions
READ ALL INSTRUCTIONS BEFORE USING.
This appliance has a polarized plug. (One blade is wider than the other.) To reduce the risk of electrical shock, this plug is intended to fit in a polarized outlet only one way. If the plug does not fit fully in the outlet, reverse the plug. If it still does not fit, contact a qualified electrician. Do not attempt to defeat this safety feature.
WARNING – To reduce the risk of fire or electrical shock, do not use this product with any solid state speed control device. To reduce the risk of fire or electric shock and injury to persons, do not use in a window.
This product employs overload protection (fuse). A blown fuse indicates an overload or short-circuit situation. If the fuse blows, unplug the product from the outlet. Replace the fuse as per the user servicing instructions (follow product marking for proper fuse rating) and check the product. If the replacement fuse blows, a short-circuit may be present and the product should be discarded or returned to an authorized service facility for examination and/or repair.
- Do unplug your circulator before cleaning.
- Do clean your Vornado Air Circulator regularly. Refer to the CLEANING instructions provided. Never clean the air circulator in any manner other than as instructed in this manual.
- Do Not use gasoline, thinners, solvents, ammonias or other chemicals for cleaning.
- Do Not immerse this product in water or allow water to drip into the motor housing.
- Do Not use near furnaces, fireplaces, stoves or other high-temperature heat sources.
- Do Not position this product too close to draperies because they may be drawn into the rear grill, cutting off airflow.
- Do Not use this product outdoors.
- Do Not use this product on wet surfaces.
- Do Not use this product in a bathtub or shower.
- Do Not operate any fan with a damaged cord or plug. Discard fan or return to an authorized service facility for examination and/or repair.
- Do Not carry this product by the cord, or use the cord as a handle.
- Do Not attempt to repair or replace parts.
- Do Not run cord under carpeting. Do not cover cord with throw rugs, runners, or similar coverings. Do not route cord under furniture or appliances. Arrange cord away from traffic area and where it will not be tripped over.
- Do use common sense when using this product and/or any electrical appliance.
User Servicing Instructions
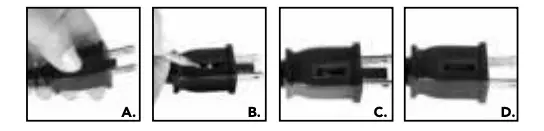
Grasp plug and remove from the receptacle or other outlet device. Do not unplug by pulling on cord. Open fuse cover (A.) by sliding access cover on top of attachment plug towards blades. Remove fuse carefully (B.) by gently prying out the ends of the fuse from the receptacle.
Risk of fire. Replace fuse only with 2.5 Amp, 125 Volt fuse.
Contact Vornado customer service for replacement fuse. Phone: 1-800-234-0604, email: [email protected]
Install replacement fuse (C.) by first placing the end of the fuse into the fuse receptacle which is opposite of the blades of the plug, then carefully push in the other end. Only push against the metal end of the fuse, not the glass center portion. Close the fuse access cover (D.) by sliding the cover back into the plug until it is completely closed, latches and is flush with the face of the plug. Risk of fire. Do not replace attachment plug. Contains a safety device (fuse, AFCI, LCDI) that should not be removed. Discard product if the attachment plug is damaged.
Models 660 & 270 only
Note: This equipment has been tested and found to comply with the limits for Class B digital device, pursuant to part 15 of the FCC Rules. These limits are designed to provide reasonable protection against harmful interference in a residential installation. This equipment generates, uses and can radiate radio frequency energy and, if not installed and used in accordance with the instructions, may cause harmful interference to radio or television reception, which can be determined by turning the equipment off and on, the user is encouraged to try to correct the interference by one or more of the following measures:
- Reorient or relocate the receiving antenna.
- Increase the separation between the equipment and the receiver.
- Connect the equipment into an outlet on a circuit different from that to which the receiver is connected.
- Consult the dealer or an experienced radio/TV technician for help.
This device complies with part 15 of the FCC Rules. Operation is subject to the following two conditions: (1) This device may not cause harmful interference, and (2) his device must accept any interference received, including interference that may cause undesired operation.
This Class B digital apparatus complies with Canadian ICES-003. Cet appareil numérique de la classe B est conforme à la norme NMB-003 du Canada.
SAVE THESE INSTRUCTIONS
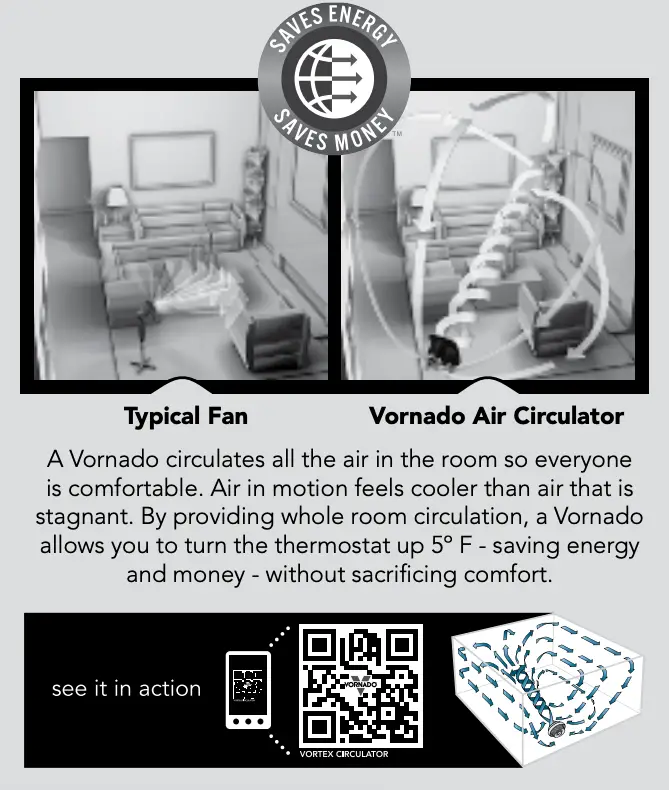
Whole Room Circulation
Maximize your cooling efficiency.
Features and Benefits
 Benefit
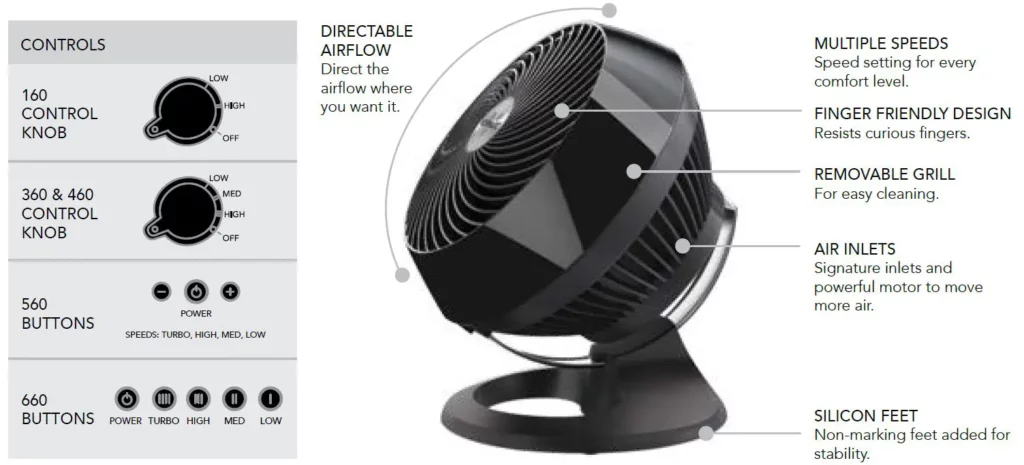
With multiple speeds, any circulation need will be met. To turn on unit – rotate knob one position clockwise. Turn the knob clockwise to decrease airflow. Turn counterclockwise to increase airflow. On models equipped with push button speed controls: Press Power, then select speed.
Provides movement of air at any angle–up stairs, down a hallway, room to room and everywhere in between.
Models V102, 270, 573, 673 and 679 provide movement of air in two positions – vertically or horizontally.
Saves energy by maximizing the performance of heating and cooling systems. When you use a Vornado Air Circulator, you will not have to set your summertime thermostat as low or your wintertime thermostat as high.
(Model 783 and 795 only)
28” or 40” heights make this model perfect for outof- the-way placement behind furniture and office furnishings. The extension tube must be used to achieve the 40” height. To shorten the height of the circulator, remove the extension tube. (See the Adjustable Height assembly instructions in the shipping carton.)
Assembly
Installing Protective Feet
Use the feet to protect floors when using your air circulator on uncarpeted surfaces such as hardwood, vinyl, or tile. The feet are simple to install and will help maintain the whisper-quiet operation.
 Cushion Ring Feet
(Models 723, 745, 783 and 795 only)
The cushion ring feet are packaged separately in the box. To install, roll or clip all feet onto the base and space evenly. For balanced support it is recommended to use 4 ring feet.
 Cushion Pads
(Model 733 and 735 only)
Use guide marks on base bottom for location.
- Place 4 pads over the 4 edge bends.
- Place 2 pads on each of the curved ends.
 Base Assembly
(Model 743 only)
- Align the pins (A) located on each base piece and insert into the holes (B) on each base piece.
- Align and insert pivot knob (C) into hole located on the base (D).
- Place rubber washer (E) onto pivot knob. Then screw pivot knob into the head of unit (F) until secure. Repeat on opposite side of the base.
How To Use
When To Use – Saves Energy Year-Round
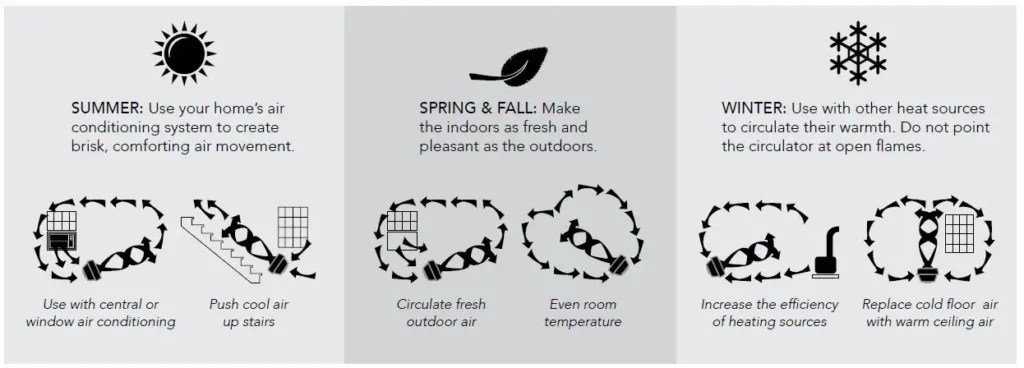
Summer: Use your Air Circulator with your home’s air conditioning system to create brisk, comforting air movement. This breeze will eliminate stagnant air and remove body heat to make you feel cooler.
With Vornado Air Circulators, you can save money on energy bills by raising your thermostat several degrees and still maintaining the same comfort level.

Spring & Fall: Your Air Circulator can make the indoors as fresh and pleasant as the outdoors. Place the Air Circulator near an open window, sliding door or French door to take full advantage of mild temperatures and seasonal breezes.

Winter: Position your Air Circulator in a place with unobstructed upward air movement. Run it only as fast as necessary to lower the heated air from the ceiling – but not fast enough to create a draft. Or, use your Air Circulator with other available heat sources (furnace vents, wood stoves or baseboard heaters) to circulate their warmth, taking full advantage of all available heat in the room. Do not point the Air Circulator at open flames.

Getting Started
- Position your Air Circulator so the beam of air has an unobstructed path from one side of the room to the other.
- Set speed to medium and allow a few minutes for an airflow pattern to be established. (Different airflow patterns can be established by changing the location, angle and speed of the Air Circulator.)
- Adjust the speed accordingly until a desired comfort level is achieved. You will quickly determine the precise amount of circulation required to maintain your personal comfort in a given room for the prevailing temperature and humidity conditions. Once you discover the added comfort of air circulation, you will use your Vornado Air Circulator season after season.
Where to Use
| Air Circulator | Ideal Rooms |
| 100, 300 and 500 series | Kitchen, Smaller Bedroom, Dorm Room, Office Cubicle |
| 600 series | Den, Home Office, Hearth Room, Dining Room, Average Bedroom |
| 660, V102, 270 and 700 series | Living Room, Master Bedroom, Family Room, Recreation Room Workshop/Hobby Room, Sunroom |
Grill Removal
WARNING: To avoid risk of fire, electrical shock, or injury to persons, unplug the Air Circulator before removing the grill.
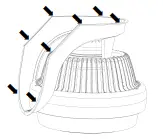
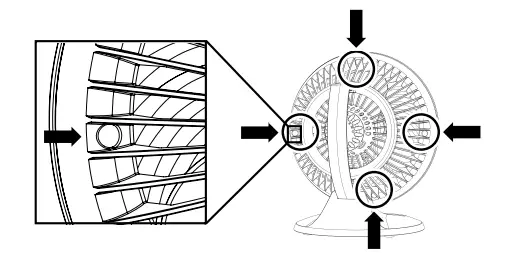
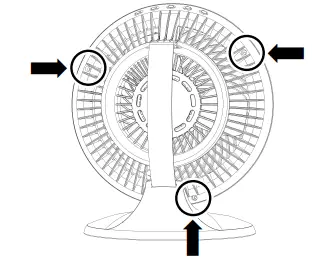
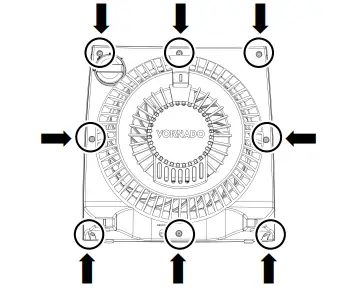
Models 510, 530, 610, 630, 723, 733, 743, 783, 735, 745, 795 • Remove the screw (only necessary on model 530). Depress one of the grill clips (A) by placing your thumb against the outside surface of the clip and pressing downward towards the motor, applying slight pressure forward. A flathead screwdriver can also be used if the clips are difficult to release. Usually by releasing one clip, the grill can be removed. If the grill cannot be removed, repeat the process on remaining clips. Replace by lining up the clips with the holes and firmly snapping the grill back into place. Replace the screw (model 530 only).

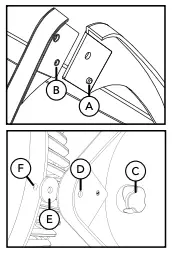
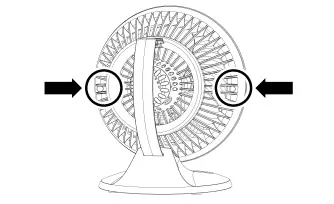
Models 533, 633, 753 • Remove the 3 screws located in between the ribs of the inlet grill at roughly 10, 2, and 6 o’clock positions. Screw locations are indicated by an arrow on the side of air inlet (B). Do Not remove the 2 screws on the pivot arms. Place the circulator facing you. Position your hands at the 10 and 2 o’clock positions, lift up and back on the outer grill to release the grill clips (C). If necessary repeat the process against the remaining two clips at the 5 and 7 o’clock positions. Replace by lining up the clips with the holes and firmly snapping the grill back into place. Replace all the screws.
Model 133 • Remove the 4 screws located at the back at the outer most edge of the inlet grill at roughly 2, 5, 7 and 11 o’clock positions, releasing the grill. To reattach – position the grill so the logo in the center of the grill is straight and replace screws.
Model 160 • Remove the 4 screws located in between the ribs of the inlet grill at roughly 12, 3, 6 and 9 o’clock positions, releasing the grill. To reattach – position grill so the logo in the center of the grill is straight and replace screws.

Model 360 • The grill on your model will be able to be removed in one of two ways. Check the back of your unit to see how many screws your unit has and follow the appropriate instructions.
Instruction A • Feel for bumps on back of product, close to inlets, that help to locate screws at roughly 12, 3, 6 and 9 o’clock positions. Remove the 4 screws located at these positions, releasing the grill. To reattach – position grill so the logo in the center of the grill is straight and replace screws.
Instruction B • Remove the 2 screws located in between the ribs of the inlet grill at roughly 9 and 3 o’clock positions, releasing the grill. To reattach – position grill so the logo in the center of the grill is straight and replace the 2 screws.
Model 660 • The grill on your model will be able to be removed in one of two ways. Check the back of unit and follow Instructions A if you do not have buttons along the side. Follow Instructions B if you do have buttons along the side of unit.
Instruction A • Remove the 3 screws as indicated. Replace by lining up the holes and replacing all 3 screws securely into place.
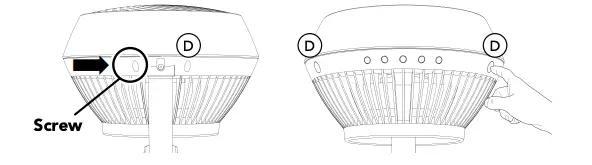
Instructions B • Remove screw on the bottom of head of unit on the left side of the chrome glide bar. Depress the 3 buttons (D) to release the grill. Replace by lining up the buttons with the holes and firmly snapping the grill back into place. Replace the screw.
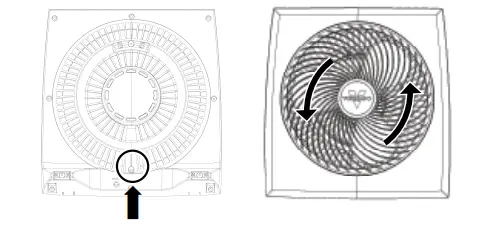
Models V102, 270 • Remove the screw located at the 6 o’clock position. Rotate the grill counter-clockwise to unlock and then lift off. To reinstall the grill, position the grill with the logo slightly turned to the left and rotate clockwise. Replace the screw.
Models 573, 673, 679 • Remove the 8 screws around the perimeter of the frame and lift off. To reinstall the grill, line up screw holes and replace screws.
Blade Removal
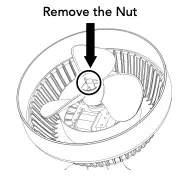 It is possible to remove the blade should something accidentally get wrapped around the motor shaft. First, remove the nut from the shaft (only necessary on V102, 133, 270, 573, 533, 633, 673, 679, 743 and 753 models.) Turn the nut clockwise to loosen. Pull the blade straight out from the shaft. When replacing, the blade can only go on the shaft one way. Be certain the flat side of the shaft aligns directly with the corresponding flat side on the blade’s socket. Push the blade all the way on the shaft until it bottoms out. Do not use a hammer as this could result in bearing damage. Reinstall nut on applicable models.
Cleaning and Maintenance
Because your Air Circulator moves a substantial amount of air, it will need regular cleaning. To avoid risk of fire, electrical shock, or injury to persons, unplug the unit before any cleaning activity.
 The motor is permanently lubricated and requires no oiling.
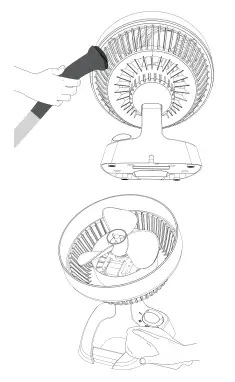 To clean motor cap and inlet ribs: Use a common household vacuum. Do not use water to clean these parts of the Air Circulator.
To clean grill: Remove grill (See GRILL REMOVAL instructions) and dust or wash with a mild dishwashing soap. Do not place grill in the dishwasher. The excessive heat can distort the plastic.
To clean blade: Wipe with a damp cloth. If your Air Circulator is used in a greasy environment, such as a kitchen, mild soap or a common household cleaner may be necessary. Do not use solvents.
To clean base: Wipe with a damp cloth.
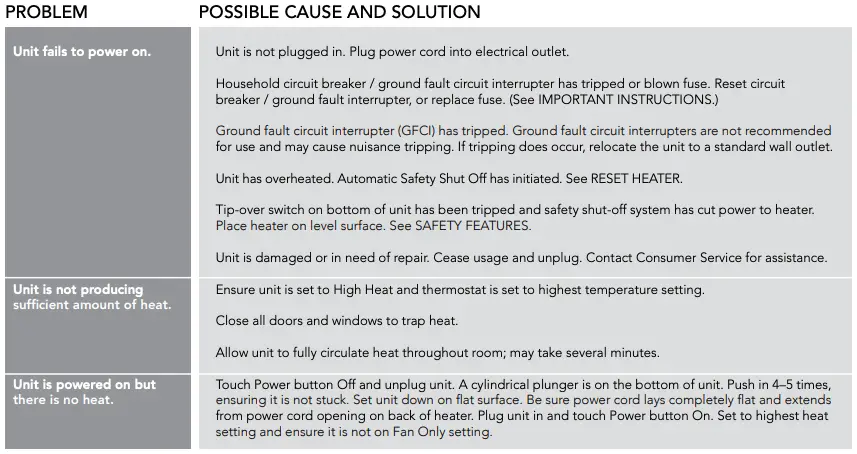
Troubleshooting
| Problem | Possible Cause and Solution |
| Unit fails to power on. | Unit is not plugged in. Plug Power Cord into electrical outlet. |
| Ensure unit fan speed setting is selected. | |
| Plug fuse has blown. Replace fuse (See USER SERVICING INSTRUCTIONS on page 4). | |
| Unit is damaged or in need of repair. Cease usage and unplug. Contact Consumer Service for assistance. | |
| The outlet is worn or damaged. Try another outlet or contact a qualified electrician. | |
| Airflow is weak or slow. | Unit set to a low speed setting. Adjust to a higher speed setting. |
| Airflow is blocked. Remove obstruction. | |
| Adjust direction of airflow towards the user. |
Vornado Air, LLC
415 East 13th Street, Andover, Kansas 67002
800.234.0604 │ www.vornado.com
Speak your mind www.vornado.com/reviews
CL3-0071 RK
CL7-0071 RK, V01
Vornado AWRH Whole Room Heater User Manual
READ ALL INSTRUCTIONS BEFORE USING THIS HEATER
IMPORTANT SAFETY INSTRUCTIONS
This owner’s guide and any additional inserts are considered part of the product. They contain important information about safety, use and disposal. Before using the product, please familiarize yourself with all operating and safety instructions. Please keep all documents for future reference and pass these documents on, together with the product, to any future owner. See www.vornado.com to view, download and print the most current version of this owner’s guide.
INTENDED USE: This product is intended to heat and circulate the air in indoor living spaces only. This product is not intended for commercial or industrial use. This heater is not intended for use in bathrooms, laundry areas, and similar damp locations. The manufacturer assumes no responsibility for damage or injury due to unauthorized use or product modification. Failure to follow these directions will void the product warranty. This product is intended for floor use only.
WARNING: When using electrical appliances, basic precautions should always be followed to reduce the risk of fire, electric shock, and injury to persons, including the following:

WARNING: Chemical burn hazard. Keep batteries away from children.
WARNING: KEEP NEW AND USED BATTERIES AWAY FROM CHILDREN. This product contains a lithium button/coin cell battery. If a new or used lithium button/coin cell battery is swallowed or enters the body, it can cause severe internal burns and can lead to death in as little as 2 hours. Always completely secure the battery compartment. If the battery compartment does not close securely, stop using the product, remove the batteries, and keep it away from children. If you think batteries might have been swallowed or placed inside any part of the body, seek immediate medical attention.
WARNING: Risk to Children and Impaired Persons
- Extreme caution is required during the installation, operation, cleaning and maintenance of this product by or around children 12 years of age and younger and anyone with reduced physical, sensory or mental capabilities, and whenever the heater is left operating and unattended. Children should be supervised to ensure that they do not play with the appliance, its parts and packaging material.
INSTALLATION WARNING—To reduce risk of fire, electrical shock and injury to persons, observe the following:
- A heater has hot and arcing or sparking parts inside. Do not use it in areas where gasoline, paint, or flammable liquids are used or stored.
- Do not use this heater in an RV, boat or during any application where battery power is converted to AC power.
- Place this product at least 3 feet away on all sides from electrical outlets, furniture, pillows, bedding, papers, clothes, curtains and other objects that may cause or catch on fire. Do not place the heater near a bed because objects such as pillows or blankets can fall off the bed and be ignited by the heater.
- To prevent a possible fire, do not place the heater on soft surfaces, like a bed, where air intakes or exhaust can be blocked in any manner.
- No part of this product (the appliance, power cord, plug, packaging, etc.) should be placed near furnaces, fireplaces, stoves or other high temperature heat sources. Do not use in a window, on an uneven or unstable surface, or near water.
- Do not use this product on an elevated surface such as a shelf or desktop. Use only while placed on the floor. Operate only in the upright position.
- The appliance, power supply, power cord and plug cannot come into contact with water. Do not use this product on wet surfaces. Do not use this product in a bathtub or shower or position product where it may fall into a bathtub, laundry, swimming pool or other water container. Do not use this product outdoors or expose it to weather or elements.
- Do not run cord under carpeting. Do not cover cord with throw rugs, runners, or similar coverings. Do not route under furniture or appliances. Arrange cord away from traffic area and where it will not be tripped over. The cord should not hang over edges of counters or be placed where it can be crimped or closed in doors. Place appliance near an easily accessible outlet so the product can be unplugged quickly during an emergency.
- Do not modify the product with any aftermarket accessory.
SAFE USE WARNING—To reduce risk of fire, electrical shock and injury to persons, observe the following:
- Use this heater only as described in this manual. Any other use not recommended by the manufacturer may cause fire, electric shock, or injury to persons.
- Extreme caution is required at all times a heater is in operation. Always unplug heater when not in use. Vornado does not recommend unattended and unsupervised use of this heater.
- This heater is hot when in use. To avoid burns, do not let bare skin touch hot surfaces. If provided, use handles when moving this heater.
- Always plug heaters directly into a wall outlet/receptacle. Never use with an extension cord or relocatable power tap (outlet/power strip). Do not use this heater on a surge-protected unit or Ground Fault Circuit Interrupted (GFCI) outlet.
- Before plugging power cord into electrical outlet, be sure that all electrical information on the rating label, including voltage, is compatible with your outlet’s power supply.
- WARNING: To reduce likelihood of circuit overload, fire and electric shock, do not operate with a solid state speed device, such as a dimmer control switch. Use of this appliance on the same electrical circuit as another high energy use product, such as a vacuum cleaner, blender, variable speed fan or circular saw is not advised. Do not use this heater with a timer designed to automatically turn the unit on or off, as this may accidentally disable the heater’s thermal cutout safety feature.
- Risk of fire. Do not operate any heater with a damaged cord or plug or after the heater malfunctions, has been dropped or damaged in any manner. Discard heater, or return to a Vornado authorized service facility for examination and/or repair.
- Do not sit or stand on product.
- Never use the cord as a handle or otherwise yank, strain or stretch the power cord.
- Do not insert or allow foreign objects to enter any ventilation or exhaust opening as this may cause an electric shock or fire, or damage the heater.
- Check your heater cord and plug connections. A loose fitting outlet can cause the plug to overheat or cause a fire. Be sure plug fits tight in the outlet. Check frequently during use to make sure plug and outlet are not hot. If so, discontinue using heater and have outlet replaced by a qualified electrician.
- Never ignore the signs of an electrical problem, such as: warm outlet coverplates, sparks when plugging in or operating, lights flickering/dimming during operation. Immediately turn off and unplug the appliance if any such problems are noticed. Contact a qualified electrician to investigate possible causes before operating the appliance again.
- Note: Heaters draw more current than small appliances, overheating of the outlet may occur even if it has not occurred with the other appliances.
- This appliance has a polarized plug (one blade is wider than the other.) To reduce the risk of electrical shock, this plug is intended to fit in a polarized outlet only one way. If the plug does not fit fully in the outlet, reverse the plug. If it still does not fit, contact a qualified electrician. Do not attempt to defeat this safety feature.
- Before moving, repositioning, servicing, cleaning and when not in use, use the product controls to turn off the power and then unplug. To disconnect from outlet, grasp and pull only the plug. Also, power off and unplug if the product will be left unattended for an extended period of time or during electrical storms.
- If your heater suddenly stops working:
- This heater is equipped with a thermal cutout safety feature designed to automatically shut off when overheating is detected. See the “RESET HEATER” instructions in this guide to determine how to check and reset the heater.
- If the heater and other electrical products suddenly stop working at the same time, your home circuit breaker or fuse may have tripped due to an overload of power. Consider only running your heater on the “low” setting, only running one heater at once and unplugging all other electrical products while running the heater, and/or hiring an electrician to install an additional circuit to your home’s electrical system.
SERVICING WARNING—To reduce risk of fire, electrical shock and injury to persons, observe the following:
- Clean your product regularly, only as is instructed in this manual. Prior to cleaning, turn off the power on your product and unplug. Do not use gasoline, thinners, solvents, ammonias or other chemicals for cleaning. Refer to the CLEANING instructions provided.
- Do not open appliance housing while product is plugged in. To avoid risk of shock, all service and/or repairs must be done by a Vornado Authorized Service Center.
WARNING: Batteries may pose a choking hazard. Do not let children handle batteries.
BATTERY DISPOSAL: Please dispose of batteries according to the local laws and regulations of your region, and while keeping them away from children. Some batteries may be recycled and accepted for disposal at your local recycling center. DO NOT DISPOSE OF BATTERIES IN FIRE. BATTERIES MAY EXPLODE OR LEAK. New and used batteries may cause injury. Keep new and used cells (or batteries) away from children.
SAVE THESE INSTRUCTIONS
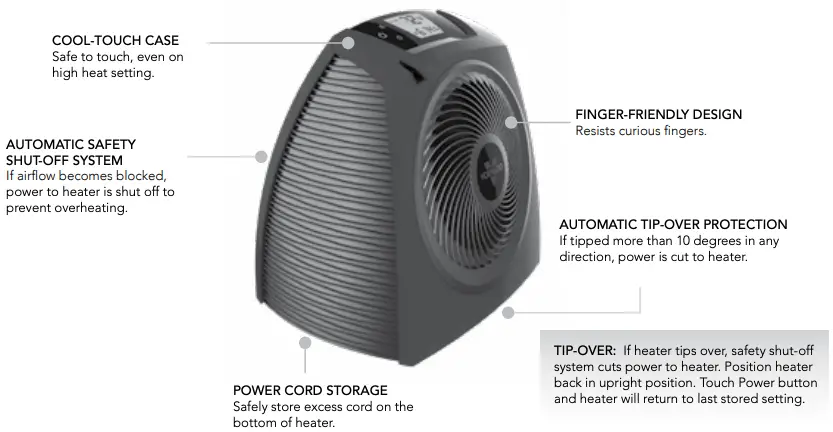
SAFETY FEATURES
CONTROLS
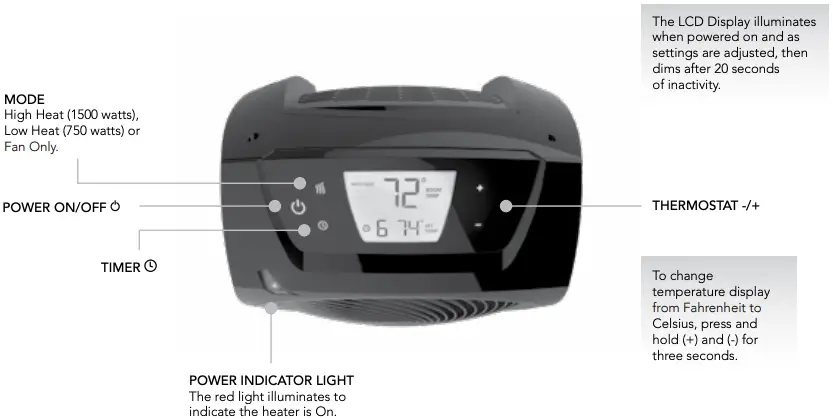
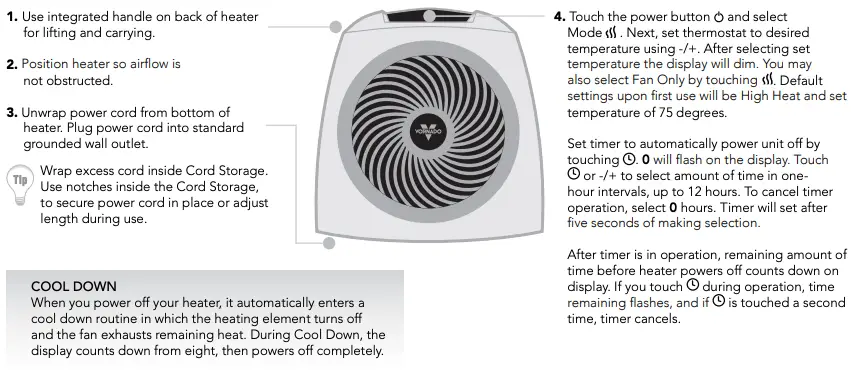
HOW TO USE
Before use, check appliance for visible damage. DO NOT USE THIS HEATER if there is evidence of damage. If any damage is found, contact Vornado Air LLC at 1-800-234-0604.
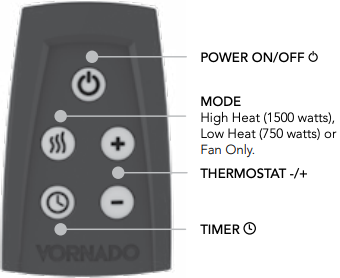
REMOTE CONTROL
Screwdriver required. 
Your AWRH heater remote includes (1) coin-style CR2025 battery. Battery comes pre-installed. Remove battery pull tab before first use. The remote is wrapped inside a polybag and packed inside the top section of molded pulp that is placed securely around the top and bottom of heater.
- For battery replacement, the remote requires one coin-style 3V CR2025 battery. Always use the correct size and grade of battery for this product.
- To replace battery, open battery door on the back side of the remote control (you will need to loosen the small screw on door using a #1 Phillips screwdriver). If necessary, clean the battery contacts and also those of the device prior to battery installation. Remove any plastic protection from the battery and place it in the remote with the + side facing up. Replace the battery door and screw.
 Note: Remove battery from the remote control when not in use for an extended period of time and always remove dead battery immediately and replace with fresh. Do not store dead battery in remote.
The remote control functions are the same as the control panel on the heater.
The remote requires a line-of-sight path to allow for the signal to be received by the heater. Position the heater so the receiver lens (inside the power indicator light) is visible from the remote control.
CAUTION: DO NOT INGEST BATTERIES.
WARNING: This product contains a button battery. If swallowed, it could cause severe injury or death in just 2 hours. Seek medical attention immediately.
WARNING – KEEP BATTERIES OUT OF REACH OF CHILDREN-
- Swallowing may lead to serious injury in as little as 2 hours or death, due to chemical burns and potential perforation of the esophagus.
- If you suspect your child has swallowed or inserted a button battery, immediately seek urgent medical assistance.
- Examine devices and make sure the battery compartment is correctly secured, e.g. that the screw or other mechanical fastener is tightened. Do not use if compartment is not secure.
- Dispose of used button batteries immediately and safely. Flat batteries can still be dangerous.
- Tell others about the risk associated with button batteries and how to keep their children safe.
CLEANING
Because your heater moves a substantial amount of air, it will need regular cleaning. Cleaning the outside of the heater is recommended on a weekly basis. If service is required, return your heater to Vornado. (See WARRANTY for instructions.)
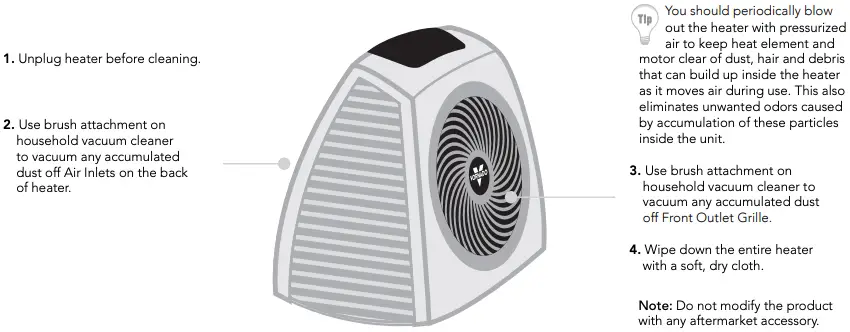
STORAGE
During the off-season or after extended periods of non-use, you may choose to store your heater. To ensure long life of the product, it is recommended to store your heater by following these instructions:

Cleaning is recommended before storage.
- Unplug power cord and wrap around Cord Storage on bottom of heater.
- Cover, or place back in retail carton if available. This prevents the heater from accumulating dust overtime.
- Store heater in cool and dry location.
DISPOSAL
Dispose of all packaging materials in an environmentally responsible manner. Battery disposal — Always dispose of batteries at a suitable recycling location.
RESET HEATER
RESETTING YOUR VORNADO HEATER
Your Vornado Heater has a multilevel safety shut-off system designed to prevent overheating. Overheating may occur when the inlets or outlet are blocked. If this happens, the safety shut-off system cuts power to the heater and you must manually reset the heater.
- Power heater off, then unplug power cord.
- Remove any obstructions.
- Wait 5–10 minutes, allowing heater to cool down.
- Plug in power cord and place heater in desired position.
- Touch Power button On. Your Vornado Heater should now function normally and return to last stored setting.
Note: If the safety shut-off system repeatedly shuts off your heater or if it will not reset after following the above procedure, call Vornado Consumer Services Department toll-free at 1-800-234-0604.
TROUBLESHOOTING
VORNADO Whole Room Circulator

IMPORTANT SAFETY INSTRUCTIONS
This owner’s guide and any additional inserts are considered part of the product. They contain important information about safety, use and disposal. Before using the product, please familiarize yourself with all operating and safety instructions. Please keep all documents for future reference and pass these documents on, together with the product, to any future owner. See our website to view, download and print the most current version of this owner’s guide.
INTENDED USE: This product is intended to circulate the air in indoor living spaces only in the United States and Canada. This product is not intended for commercial or industrial use. The manufacturer assumes no responsibility for damage or injury due to unauthorized use or product modification. Failure to follow these directions will void the product warranty.
WARNING: Risk to Children and Impaired Persons
- Supervision is required during the installation, operation, cleaning and maintenance of this product by children under age 12 and anyone with reduced physical, sensory or mental capabilities. Children should be supervised to ensure that they do not play with the appliance, its parts and packaging material.
INSTALLATION WARNING—To reduce risk of fire, electrical shock and injury to persons, observe the following:
- Place this product away from curtains, draperies, tablecloths and other fabrics, since they may be drawn into the fan, damage the motor and/or cause a fire.
- No part of this product (the appliance, power cord, plug, packaging, etc.) should be placed near furnaces, fireplaces, stoves or other high temperature heat sources. Do not use this product in a window, on an uneven or unstable surface, or near water.
- The appliance, power supply, power cord and plug cannot come into contact with water. Do not use this product on wet surfaces. Do not use this product in a bathtub or shower or position product where it may fall into a bathtub, laundry, swimming pool or other water container. Do not use this product outdoors or expose it weather or elements.
- Do not run cord under carpeting. Do not cover cord with throw rugs, runners, or similar coverings. Do not route under furniture or appliances. Arrange cord away from traffic area and where it will not be tripped over. The cord should not hang over edges of counters or be placed where it can be crimped or closed in doors. Place appliance near an easily accessible outlet so the product can be unplugged quickly during an emergency.
SAFE USE WARNING—To reduce risk of fire, electrical shock and injury to persons, observe the following:
- WARNING: To reduce likelihood of circuit overload, fire and electric shock, do not operate with a solid state speed device, such as a dimmer control switch.
- Do not operate unit if the unit has been dropped or damaged. Do not use this product if it has a damaged power cord or plug. To avoid risk of electrical shock, do not attempt to repair or replace parts. Only original replacement parts may be used. If the power cord is damaged, it must be replaced by the manufacturer, its service agent, or similarly qualified persons in order to avoid a hazard. Contact Vornado Consumer Service at 1-800-234-0604
(phone) or [email protected] (email) for further instructions about replacement and repair. - Risk of fire. Your appliance may be equipped with a detachable power supply or a cord/plug with a safety device such as a fuse. Use only the power cord and plug provided.
- Before plugging power cord into electrical outlet, be sure that all electrical information on the rating label, including voltage, is compatible with your outlet’s power supply.
- Never use the cord as a handle or otherwise yank, strain or stretch the power cord.
- While the product is plugged in, do not insert or allow foreign objects to enter any input or output opening as this may cause risk of electric shock or fire, or damage the product.
- A loose fit between wall outlet (receptacle) and plug may cause overheating and distortion of the plug. Discontinue use of the product in this outlet. Contact a qualified electrician to replace loose or worn outlets.
- This appliance has a polarized plug (one blade is wider than the other.) To reduce the risk of electrical shock, this plug is intended to fit in a polarized outlet only one way. If the plug does not fit fully in the outlet, reverse the plug. If it still does not fit, contact a qualified electrician. Do not attempt to defeat this safety feature.
- Before moving, repositioning, servicing, cleaning and when not in use, use the product controls to turn off the power and then unplug. To disconnect from outlet, grasp and pull only the plug. Also, power off and unplug if the product will be left unattended for an extended period of time or during electrical storms.
SERVICING WARNING—To reduce risk of fire, electrical shock and injury to persons, observe the following:
- Clean your product regularly, only as is instructed in this manual. Prior to cleaning, turn off the power on your product and unplug. Do not use gasoline, thinners, solvents, ammonias or other chemicals for cleaning. Refer to the CLEANING instructions provided.
- Do not open appliance housing. To avoid risk of shock, all service and/or repairs must be done by a Vornado Authorized Service Center.
- This product may have an overload protection (fuse) located in the plug. A blown fuse indicates an overload or short-circuit. If the fuse blows, follow these instructions to replace and reinstall the safety device:
User Servicing Instructions
- Using the product controls, turn off the appliance.
- Grasp the plug (not the cord) and disconnect from the outlet.
- Risk of Fire. Replace fuse only with 2.5 Amp, 125 Volt fuse as approved by Vornado Consumer Service. For an authorized replacement fuse, please contact Vornado Consumer Service.
- Once the replacement is received, use a small flat-head screwdriver to slide open the fuse cover (located on the plug)(See Fig. A).
- Remove fuse by using the screwdriver to gently lift each end of the fuse (See Fig. B).
- Install the replacement fuse by using the screwdriver to gently push each metal end of the fuse into the receptacle one at a time. Do not push on the center of the fuse—it is fragile and may break.
- Slide the fuse cover closed using the screwdriver. When closed, the cover should fit completely in the plug. No part of the cover should stick out (See Fig. C).
- Plug your appliance into the outlet and turn the power on.
- If the replacement fuse blows, a short-circuit may be present and the product should be discarded or returned to an authorized service facility for examination and/or repair.
Risk of fire. Do not replace attachment plug. Contains a safety device (fuse, AFCI, LCDI) that should not be removed. Discard product if the attachment plug is damaged.
FCC Compliance Statement (Models 560, 660 only)
This device complies with Part 15 of the FCC Rules. Operation is subject to the following two conditions: (1) This device may not cause harmful interference, and (2) this device must accept any interference received, including interference that may cause undesired operation.
NOTE: This equipment has been tested and found to comply with the limits for a Class B digital device, pursuant to Part 15 of the FCC Rules. These limits are designed to provide reasonable protection against harmful interference in a residential installation. This equipment generates, uses and can radiate radio frequency energy and, if not installed and used in accordance with the instructions, may cause harmful interference to radio communications. However, there is no guarantee that interference will not occur in a particular installation. If this equipment does cause harmful interference to radio or television reception, which can be determined by turning the equipment off and on, the user is encouraged to try to correct the interference by one or more of the following measures:
- Reorient or relocate the receiving antenna.
- Increase the separation between the equipment and receiver.
- Connect the equipment into an outlet on a circuit different from that to which the receiver is connected.
- Contact Vornado Customer Service or dealer or an experienced radio/TV technician for help.
This Class B digital apparatus complies with Canadian ICES-003.
Changes or modifications not expressly approved by the party responsible for compliance could void the user’s authority to operate the equipment.
Supplier’s FCC Declaration of Conformity
Unique Identifier: Vornado Model 560, 660
Responsible Party: Vornado Air LLC
Mailing Address : 415 E. 13th St., Andover, KS 67002
Contact: www.vornado.com
FEATURES
Save energy by maximizing the performance of heating and cooling systems. When you use a Vornado Air Circulator, you will not have to set your summertime thermostat as low or your wintertime thermostat as high. Refer to page 9 for further details.

CIRCULATION 101
GETTING THE MOST OUT OF YOUR VORNADO – ALL YEAR LONG
With Vornado Air Circulators, you can save money on energy bills by adjusting your thermostat several degrees and still maintaining the same comfort level.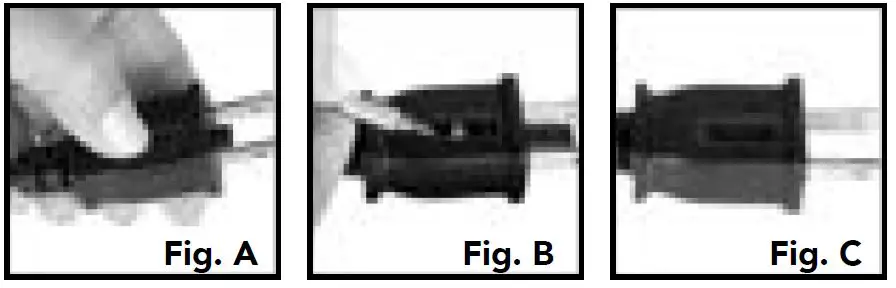
HOW TO USE
Before use, check appliance for visible damage. DO NOT USE THIS CIRCULATOR if there is evidence of damage. If any damage is found, contact Vornado Air LLC at 1-800-234-0604.
- Plug in and position the circulator so airflow is not obstructed.
- Set desired speed and allow a few minutes for an airflow pattern to be established. Different airflow patterns can be established by changing the location, angle and speed. Adjust until a de-sired comfort level is achieved.
CLEANING
GRILL REMOVAL (MODELS 160 & 560)
WARNING: To reduce the risk of electrical shock and injury to persons, unplug the circulator before removing grill.
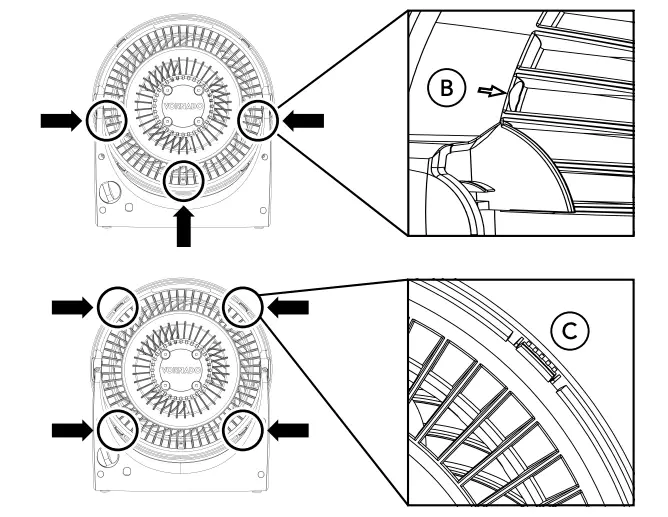
- To release the Front Grill, re-move the 4 screws located on the back of the inlet grill, located roughly at 2, 5, 7 and 10 o’clock positions.
- Dust or wash Front Grill with a mild dishwashing soap. Do not place grill in the dishwasher. The excessive heat can distort the plastic.
- To reattach – position the Front Grill so the Vornado logo in the center of the Front Grill is straight. Replace all the screws.
Use the brush attachment on your household vacuum cleaner to vacuum any accumulated dust off the Front Grill and Air Inlets.
GRILL REMOVAL (MODELS 360 & 460)
WARNING: To reduce the risk of electrical shock and injury to persons, unplug the circulator before removing grill.
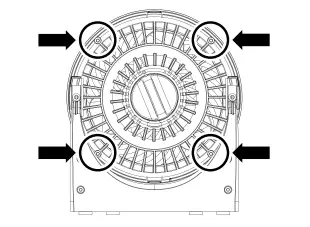
- Feel for bumps on back of prod-uct, close to inlets, that help to locate screws at roughly 12, 3, 6 and 9 o’clock positions. Remove the 4 screws located at these positions, releasing the grill.
- Dust or wash Front Grill with a mild dishwashing soap. Do not place grill in the dishwasher. The excessive heat can distort the plastic.
- To reattach – position the Front Grill so the Vornado logo in the center of the Front Grill is straight. Replace all the screws.
Use the brush attachment on your household vacuum cleaner to vacuum any accumulated dust off the Front Grill and Air Inlets.
GRILL REMOVAL (MODELS 660)
WARNING: To reduce the risk of electrical shock and injury to persons, unplug the circulator before removing grill.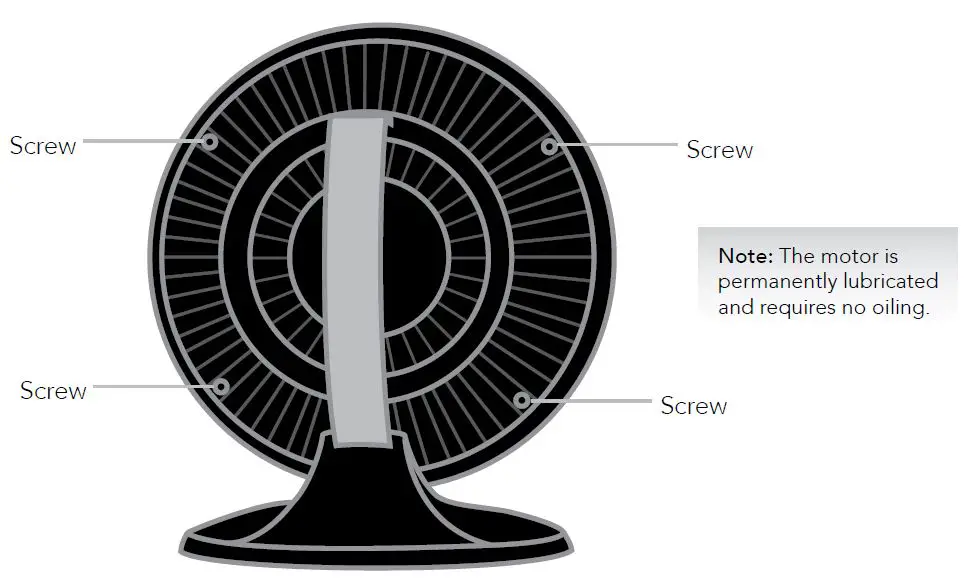
- To release the Front Grill, remove the 3 screws on the back of the inlet grill, located at roughly 10, 2 and 6 o’clock positions.
- Dust or wash Front Grill with a mild dishwashing soap. Do not place grill in the dishwasher. The excessive heat can distort the plastic.
- To reattach – position the Front Grill so the Vornado logo in the center of the Front Grill is straight. Replace all the screws.
Use the brush attachment on your household vacuum cleaner to vacuum any accumulated dust off the Front Grill and Air Inlets.
BLADE REMOVAL
WARNING: To reduce the risk of electrical shock and injury to persons, unplug the circulator before removing blade.
- First, remove the nut from the shaft by turning the nut clockwise to loosen. Remove the washer. Pull the blade straight out from the shaft.
- Wipe the Blade with a damp cloth. If your circulator is used in a greasy environment, such as a kitchen, mild soap or a common household cleaner may be necessary. Do not use solvents. Do not place blade in the dishwasher. The excessive heat can distort the plastic.
- To reattach – be certain the flat side of the shaft aligns directly with the corresponding flat side on the blade’s socket. Push the blade all the way on the shaft until it bottoms out. Do not use a hammer as this could result in bearing damage. Reinstall nut.
TROUBLESHOOTING
PROBLEM POSSIBLE CAUSE AND SOLUTION
| The unit fails to power on. | Unit is not plugged in. Plug Power Cord into electrical outlet. Ensure unit fan speed setting is selected.
Plug fuse has blown. Replace fuse (See USER SERVICING INSTRUCTIONS on page 6). Unit is damaged or in need of repair. Cease usage and unplug. Contact Consumer Service for assistance. The outlet is worn or damaged. Try another outlet or contact a qualified electrician. |
|
| Airflow is weak or slow. | Unit set to a low speed setting. Adjust to a higher speed setting.
Airflow is blocked. Remove obstruction. Adjust direction of airflow towards the user. |
|
| GFCI has tripped. | Under certain conditions, it is possible for a reset GFCI (Ground Fault Circuit Interrupter) outlet to trip when the user is changing speeds on a Vornado circulator. In this event, change to an outlet that is not connected to a GFCI device. It could also indicate a weak or defective GFCI outlet. Contact a qualified electrician to check the GFCI outlet. |
WARRANTY
We expect this product to be perfect. If you’re not satisfied with this product, let us know.
Vornado Air LLC (“Vornado”) warrants to the original consumer or purchaser this Vornado® Whole Room Circulator (“Product”) is free from defects in material or workmanship for a period of five (5) years from the date of purchase. If any such defect is discovered within the warranty period, Vornado, at its discretion, will repair or replace the Product at no cost.
For warranty or repair service: Call 1-800-234-0604 or email [email protected] to obtain a Return Authorization (“RA”) form. Please have or include your Product’s model number and serial number, as well as your name, address, city, state, zip code and phone number when contacting Vornado for warranty service.
After receiving the RA form, ship your Product to: Vornado Air LLC Attn: Warranty & Repair 415 East 13th Street Andover, KS 67002. For your convenience, please have your model number and serial number when contacting Vornado with service inquiries. To assure proper handling, packages must be clearly marked with the RA number. Packages not clearly marked with the RA number may be refused at the receiving dock. Please allow 1-2 weeks for repair and return of your Product after the Product is received.
Repairs not covered by the warranty or outside the warranty period will require a fee to cover the cost of materials, labor, handling and shipping.
This warranty does not apply to defects resulting from abuse of the Product, modification, alteration, mishandling, improper maintenance, commercial use or repair or service of the Product by anyone other than Vornado; damages which occur in shipment or are attributed to acts of God. Improper product use, which includes using an external device that alters or converts the voltage or frequency of electricity, or shipping a Vornado product to a country not intended for use will void all warranties. Any unauthorized product modification, repair by unauthorized repair center, or use of non-approved replacement parts is not recommended and any consequences will not be covered by support services or product warranties. The product warranty will be honored only on models that are being used in the country intended. REPAIR OR REPLACEMENT AS PROVIDED UNDER THIS WARRANTY IS THE EXCLUSIVE REMEDY OF THE CONSUMER. VORNADO SHALL NOT BE LIABLE FOR ANY INCIDENTAL OR CONSEQUENTIAL DAMAGES FOR BREACH OF ANY EXPRESS OR IMPLIED WARRANTY ON THIS PRODUCT. EXCEPT TO THE EXTENT PROHIBITED BY APPLICABLE LAW, ANY IMPLIED WARRANTY OF MERCHANTABILITY OR FITNESS FOR A PARTICULAR PURPOSE ON THIS PRODUCT IS LIMITED IN DURATION TO THE DURATION OF THIS WARRANTY. Some states do not allow the exclusion or limitation of incidental or consequential damages, or allow limitations on how long an implied warranty lasts, so the above limitations or exclusions may not apply to you. This warranty gives you specific legal rights, and you may have other rights that vary from state to state. The manufacturer assumes no responsibility for damage caused by failure to follow these instructions or improper product use. Any such actions will invalidate the product warranty.
All company names and product names are trademarks of their respective owners. ©
All rights reserved. All technical information, data, and instructions for the installation, connection, and operation contained in these instructions for use correspond to the latest available information at time of printing. The contents of this manual may differ slightly from the actual product. Observe any additional supplements.
![]()
Vornado Air, LLC
415 East 13th Street, Andover, Kansas 67002 800.234.0604 | vornado.com