
CLIP `N TRIM INSTRUCTIONS
Please read all instructions carefully to familiarise yourself with your new clipper before using.
Save these instructions for further reference.
For any further assistance or information call Customer Services on
T: 01227 740066
or visit
W: www.wahl.co.uk
E:
GENERAL USER INFORMATION
Information about using the operation manual
►Before using the appliance for the first time, you must read and understand the operation manual completely.
►Consider the operation manual as part of the product and store it in a safe and accessible place.
►Include this operation manual if passing the appliance on to a third party.
►In the case of conflicts with national safety specifications or instructions, the national requirements must be followed.
Please retain this leaflet for future reference.
READ ALL INSTRUCTIONS BEFORE USING.
IMPORTANT SAFEGUARDS
When using this electrical appliance, especially when children are present, basic safety precautions should always be observed including the following.
Requirements
►Read the instruction manual in full to familiarize yourself with the product before the first use.
►This appliance can be used by children from aged 14 years and above and persons with reduced physical, sensory or mental capabilities, or lack of experience and knowledge, if they have been given supervision or instruction concerning use of the appliance in a safe way and understand the hazards involved. Children shall not play with the appliance. Cleaning and user maintenance shall not be made by children without supervision.
►Use this appliance only for its intended purpose.
 Hazards
Danger! Electric shock due to damage to appliance
►Do not operate the appliance with a broken cord, plug or charger, or if the appliance malfunctions, or is dropped or damaged in any way.
►Any servicing or repair must be performed by an authorized service representative.
►The use of attachments that are not supplied by the manufacturer may cause fire, electric shock or injury and damage to the appliance.
 Danger! Electric shock due to penetration of liquid.
►To protect against risk of electrical shock, never immerse the unit or let it come into contact with water or any other liquids. Do not use the unit with wet hands. If the appliance should become wet, damp or fall in water, remove plug from mains socket immediately.
Do not put your hands in the water. Do not take into bathroom.
Warning! Injuries due to incorrect handling
►Switch off the appliance and unplug from outlet when not in use, before putting on or taking off attachments and also before cleaning the appliance.
Caution! Danger of product damage
►Never use your appliance without paying attention! Always unplug this appliance from the electrical outlet immediately after use.
►Do not wrap the cord around the appliance.
►Do not use outdoors or in damp areas.
►Never carry the unit by its power cord.
►Do not drop or insert any object into any opening.
OPERATING INSTRUCTIONS
BEFORE YOU CUT HAIR
- Your clipper should be clean, oiled and in perfect working condition.
- If your kit includes a plastic cape, place it around the neck, tying the strings and overlapping the cape portion to prevent the hair from falling down inside the collar. If no cape is provided, a towel will do nicely.
- Position the person whose hair is to be cut on a stool or chair so that the top of the head is about even with your eyes.
- After combing through the hair to remove all tangles, hold the clipper in a relaxed, comfortable grip, with the nameplate under the palm near your index finger. This grip will help you maintain comfortable, accurate cutting control.
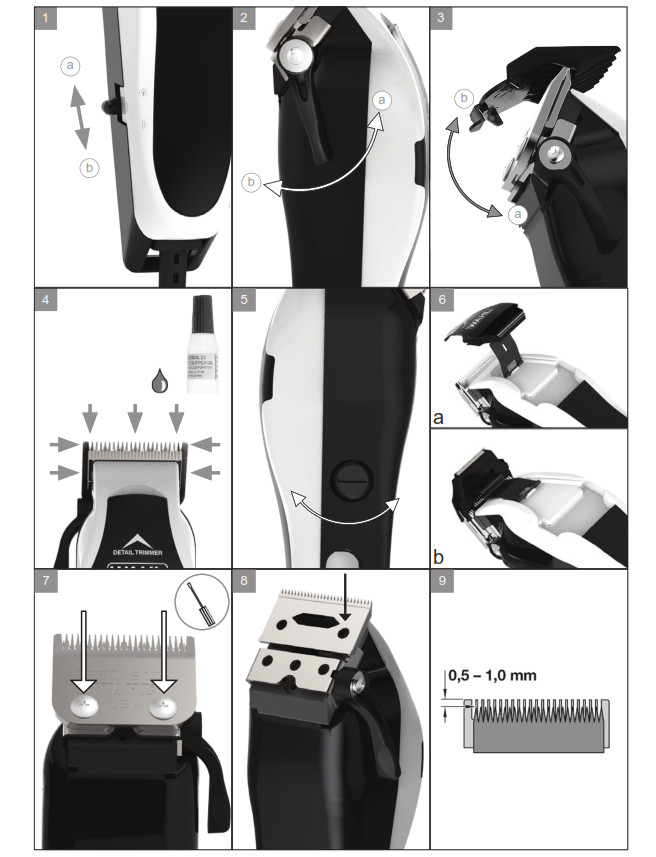
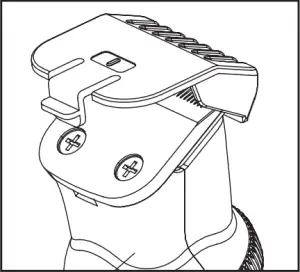
![]() To attach guide combs, hold comb with the teeth up. Snap guide comb attachment firmly to the bottom of the clipper blade (Fig. 3).
To attach guide combs, hold comb with the teeth up. Snap guide comb attachment firmly to the bottom of the clipper blade (Fig. 3).
![]() Guide combs attach to the clipper, not the detail trimmer.
Guide combs attach to the clipper, not the detail trimmer.
USING THE DETAIL TRIMMER
Use your detail trimmer to cut closer than the clipper, such as outlining and finishing the haircut. The blades of your detail trimmer are narrower and designed for easier detail work.
The blades extend further from the unit, so you can feel comfortable detailing around the ears, sideburns and neckline.
- Turn the unit to the OFF position (Fig. 1a).
- Adjust the taper lever to the close cut position(Fig. 2a).
- Open your detail trimmer.
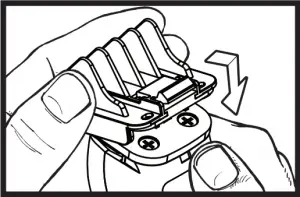
• First unsnap the detail trimmer lid by lifting up at the edges of the lid. Lift the detail trimmer lid around the clipper blade (Fig. 6a).
• Guide the detail trimmer lid over the clipper blade. In order for the detail trimmer to function properly, the clipper blade must be positioned between the trimmer lid and detail trimmer guide fingers.
• Press down on the top centre of the detail trimmer lid and snap on the clipper blade (Fig. 6b). Do not push on the detail trimmer blade. - Turn the control to the ON position and use for detail trimming. (See cutting hair tips on technique). Pages 7, 8 & 9.
- After trimming, turn the control to the OFF position. Clean your detail trimmer blade with the cleaning brush.
- Close your detail trimmer.
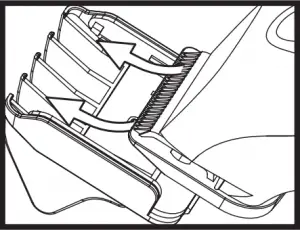
• Unsnap the detail trimmer lid from the clipper lid by lifting the back of the trimmer lid. Lift the detail trimmer lid around the detail clipper blade.
• Tuck the detail trimmer blade down and snap into place by pressing down on the top centre of the detail trimmer lid. - When exposed to excessive force such as dropping, the detail trimmer is designed to pop off rather than break off. To re-attach your detail trimmer, simply snap the detail trimmer arm back into place.
GENERAL INFORMATION
- Always start by placing the largest guide comb on the clipper, then use shorter combs if a shorter length is desired.
- Cut only a small amount until you become accustomed to how long each guide comb leaves the hair.
- Allowing the clipper to cut its way through the hair gives a uniform cut. Do not force the clipper through hair at a faster rate.
- Your hair grows evenly all over your head. A simple, light trimming at the lower neck and sides between professional haircuts may be all you need to bring back that well-groomed look.
- Remember this procedure requires practice, and it’s always better to leave too much hair the first few haircuts.
FOR MEDIUM TO LONG CUTS
- Comb the hair so it falls into its natural direction.
- Place the largest guide comb into your clipper.
- Trim the sides from the bottom upwards. Begin by holding the clipper lightly against the hair. The teeth of the guide comb should be pointing up but flat against the head. Slowly lift the clipper up and outward through the hair (similar to a rocking motion).
- Cut only a small amount at a time.
- Repeat around sides and back of head.
- For slightly shorter hair, either change to a shorter guide comb or apply more pressure and less lift away from head with the present attachment.
- Now cut the hair at the top of the head. Use the 1-inch guide comb for a fairly shortcut. If your kit includes 1-1/4-inch or 1-1/2inch guide comb, you may use this for a slightly longer cut. Place the teeth against the head, and slowly trim from the front to back.
- Comb the hair to assess if further cutting is necessary.
- Outline sideburns and necklines by using the detail trimmer.
FOR LONGER HAIR ON TOP
By not using a guide comb, a longer cut can be achieved. Use either a barber comb or a regular comb, lift the hair on top of the head, cutting over the comb. You may also grasp the hair between the fingers and cut to the desired length. Continue this procedure from the front to the back of the head, gradually cutting the hair shorter by reducing the space between the comb or fingers and the head. Comb frequently to remove trimmed hair and check for uneven strands.
FOR SHORTCUTS
- Repeat point 1 from General Information.
- Cut from the back of the neck to the crown. Hold the guide comb flat against the head and slowly move the clipper through the hair.
- Cut the hair against the direction in which it grows, from the front to the crown.
- Use closer cutting guide combs to taper the hair down to the neckline, as desired.
- Comb hair and check for uneven spots.
- Outline sideburns and neckline using the detail trimmer.
USING LEFT AND RIGHT EAR COMBS
Left Ear Taper
- Attach the left ear taper comb to your clipper and stand facing the left ear.
- Hold the clipper at a slight angle against the head. Position the comb just back of the left ear at the hairline.
- Move the clipper in a small half circle pattern around the ear toward the front of the head. Several small strokes may work best, depending on the length of the hair. Slowly move the clipper upward and outward. Be mindful of the ear. This procedure will allow you to guide hair into the comb towards the clipper blades.
![]() You may also achieve a tapering of sideburns by including the sideburn area as you begin to move the clipper around the ear.
You may also achieve a tapering of sideburns by including the sideburn area as you begin to move the clipper around the ear.
Right Ear Taper
Attach the right ear taper guide comb to your clipper. Stand facing the right ear and repeat the process described above for the left ear.
OUTLINING
The narrower blades of the detail trimmer make trimming and outlining around the ears, neckline, and sideburns easier.
- Engage your detail trimmer.
- Comb hair into desired style.
- Start between the ear and the sideburns.
- Hold detail trimmer with corner edge of blade against the hairline.
- Slowly follow the desired outline of the hair over, around, and behind the ears.
- To define sideburns and the back of the neck, hold the detail trimmer upside down, against the skin at the desired length and move down.
- Comb hair and check that sides are even. Check for uneven spots throughout the haircut.
CARE AND CLEANING
TAPER LEVER (Fig. 2)
Your clipper has an adjustable taper lever, it is conveniently located near your thumb (if you are right-handed), and so it can easily be adjusted while the clipper is in your hand.
The taper lever adds versatility to your clipper by allowing you to gradually change the closeness of your cut without a guide comb. When the lever is in the uppermost position, the blades will give you the closest cut and leave the hair very short. Pushing the lever downward gradually increases the cutting length. In its lowest position, the taper lever will leave the hair approximately the same length as the 1/8 inch guide comb.
The taper lever will also extend the use of your blades since a different cutting edge is used in each setting. In addition, if extremely heavy haircutting has jammed the blades, it will help you remove hair that has become wedged between the two blades. While the clipper is running, rapidly move the lever from close cut to longer cut a couple of times. Doing this each time you’ve finished using your clipper will help keep the blades clear of cut hair. If your clipper stops cutting and this does not help, your cutting blades must be blunt. Either replace them or return to Wahl for sharpening.
OIL (Fig. 4)
The blades of your new clipper should be oiled every few haircuts. Simply place a few drops of Wahl Clipper Oil on the teeth of the blades. Use only one drop on the detail trimmer blades. Use only Wahl Clipper Oil included in this kit. Due to the high speed of your clipper the correct type of oil must be used. Do not use hair oil, grease, or any oil mixed with kerosene or any solvent, as the solvent will evaporate and leave the thick oil, slowing down the blades. Wahl Clipper Oil is a very thin, natural oil which will not evaporate and not slow down the blades.
CORD
The cord should not be used to pull the clipper. Since freedom of movement needs to be maintained, care should be used to keep the cord untwisted and unobstructed. When stored, the cord should be coiled and the unit placed in original box or storage case. Do not change the plugin anyway.
POWER SCREW (Fig. 5)
Your clipper has a power screw and it has been adjusted for peak efficiency before leaving the factory. However, if your voltage in your home is low, you may need to adjust it.
To adjust, turn your clipper to ON. Use the end of the cleaning brush, a screwdriver, or coin to turn the power screw in a clockwise direction until you hear a noise. Then slowly turn the power screw out (counterclockwise), just until noise stops, and then an additional half turn. This is the maximum power setting.
DISPOSAL
Handle with care! Environmental damage in the case of incorrect disposal.
Correct disposal will ensure environmental protection and prevent any potentially harmful impacts on people and the environment.
Adhere to the relevant legal requirements when disposing of the appliance. Information on the disposal of electrical and electronic appliances in the European Community:
 Within the European Community, national regulations are specified for the disposal of electrical appliances, based on EU Waste Electrical and Electronic Equipment Directive 2002/96/EC (WEEE). In accordance with this, the appliance can no longer be disposed of with local or domestic waste. The appliance will be accepted free of charge by local collection points or recycling centres.
WIRING
WARNING: If the supply cord is damaged it must be replaced by the manufacturers service agent or a similarly qualified person in order to avoid a hazard.
The wires in the mains lead are coloured in accordance to the following code:
Blue Neutral (N) Brown live (L)
This lead is fitted with a 3 pin plug which has a 3 amp fuse fitted. If the plug supplied is not suitable for your socket or becomes damaged, it should be cut off and disposed of, and a suitable plug fitted as detailed below.
The wire which is coloured BLUE must be connected to the terminal in the plug which is marked with the letter ‘N’ or coloured BLACK or BLUE.
The wire which is coloured BROWN must be connected to the terminal in the plug which is marked with the letter ‘L’ or coloured RED or BROWN.
DO NOT connect either wire to the terminal in the plug which is marked with the letter ‘E’ or has the Earth symbol, or coloured GREEN or GREEN/YELLOW.
This lead has been specifically designed for use with Wahl mains powered clippers and should not be used with any other product. Wahl (UK ) Ltd. accept no responsibility for any accidental injury or damage resulting from the incorrect fitting of this product.
PRODUCT REGISTRATION
Wahl are constantly developing and launching new products in the UK. We would like to understand your product needs and expectations and we value any comments you may have. As part of Wahl Customer Services, we are offering you the chance to be kept up to date with the latest product launches, innovations and special offers.
Please take a minute to register your product online at www.wahl.co.uk.
GUARANTEE
This product is guaranteed against defects in material and workmanship for a period of three years from the date of original purchase or receipt as a gift.
Should this product become defective during the guarantee period, return it to the store of purchase together with your proof of purchase for repair or replacement.
Alternatively, within the guarantee period you can return the product to Wahl (UK) Ltd who will repair any such defect or elect to replace the product or any part of it, without charge, provided that there is proof of purchase. Should a replacement be offered this will not extend the original guarantee period.
The guarantee becomes invalid in the case of misuse, alteration or repair by unauthorised persons.
This guarantee does not include blades, cables, shaver heads, foils and cutters etc which are consumable parts.
This product is design for domestic use only and use within a professional environment will invalidate the guarantee.
This guarantee in no way affects your rights under statutory law in the United Kingdom.
CLIP `N TRIM INSTRUCTIONS
WAHL (UK) LIMITED
HERNE BAY TRADE PARK
SEA STREET
HERNE BAY
KENT
CT6 8JZ.
CUSTOMER SERVICES T: 01227 740066
www.wahl.co.uk
Form No. ZA787 Rev4 06-14
]]>Wahl Clipper
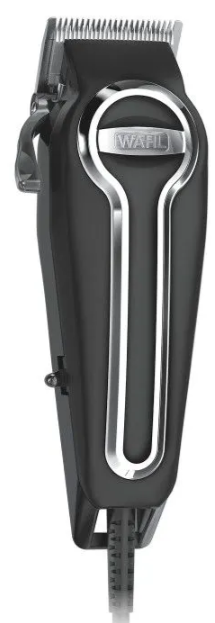
Wahl Clipper
OVERVIEW
USING
IMPORTANT SAFEGUARDS
When using an electrical appliance, basic precautions should always be followed, including the points listed below. Read all instructions and safeguards before using.
DANGER
To reduce the risk of injury or death by electric shock:
- Do not reach for an appliance that has fallen into water. Unplug immediately from the outlet.
- Do not use while bathing or in a shower.
- Do not place or store appliance where it can fall or be pulled into a tub or sink. Do not place in or drop into water or other liquid.
- Always unplug this appliance from the electrical outlet immediately after using.
- Always unplug this appliance before cleaning.
WARNING
To reduce the risk of burns, fire, electric shock or injury to persons:
- This appliance can be used by children aged from 8 years and above and persons with reduced physical, sensory or mental capabilities or lack of experience and knowledge if they have been given supervision or instruction concerning use of the appliance in a safe way and understand the hazards involved. Children shall not play with the appliance. Cleaning and user maintenance shall not be made by children without supervision.
- Warning: Keep the Product Dry. It is essential to PREVENT electrical equipment from coming into contact with water or other liquids.
- Use this appliance only for its intended use as described in this manual. Do not use attachments not recommended by the manufacturer.
- If the power cord is damaged, it must be replaced by the manufacturer or authorized agent or similarly qualified person in order to
avoid risks. - Keep the cord away from heated surfaces.
- Do not use outdoors or operate where aerosol (spray) products are being used or where oxygen is being administered.
- Do not use this appliance with a damaged or broken comb nor with teeth missing from the blades, as injury may occur.
UK appliance : If a 13 amp (BS 1363) plug is used, a 3 amp fuse must be fitted, or if any other type of plug is used, a 5 amp fuse must be fitted either in the plug or adapter at the distribution board. Replacement fuses should be ASTA approved to BS 1362. Fuse cover must be fitted when changing the fuse. If fuse cover is lost, the plug must not be used until a replacement is obtained. Information for obtaining the correct fuse carrier is marked on the carrier itself and in the bottom of the fuse cavity on the plug. These may be obtained from Wahl UK. If the supply cord is damaged, it must be replaced by the manufacturer or its service agent or a similarly qualified person in order to avoid a hazard.
SAVE THESE INSTRUCTIONS
This clipper has been designed for household use.
A- Bottom blade
B- Blade slide (on Multi-cut (MC) clipper only)
C- Taper lever (on Multi-cut (MC) clipper only)
D- Switch
E-Top blade
F- Power screw
CLIPPER MAINTENANCE
Your Wahl clipper blades were oiled and aligned before leaving our factory; however, it is possible for blades to get bumped out of alignment. Blades must be realigned if they have been removed for cleaning or replacement. To determine if realignment is necessary, compare your clipper blades with diagram G.
- If your clipper has a taper lever, position the taper lever in the close cut position. (H)
- End of top blade teeth should be approximately 1/32″ (.64 mm) back from bottom blade. This is important so that the clipper does not cut too close or allow the moving cutter to touch the skin.
- Extreme left-hand tooth of top blade must be covering or to the left of the first small tooth of bottom blade.
- Extreme right-hand tooth of top blade must be touching the big tooth on the bottom blade.
If blade alignment is incorrect, add a few drops of Wahl Clipper Oil to the blades, turn clipper “On” for a few moments, turn “Off” and unplug. Loosen screws slightly and adjust (steps 2-4 listed above). Tighten screws after blades are aligned. Other than blades this clipper has no user serviceable parts. (diagram I)
OIL (J)
The blades of your new clipper should be oiled every few haircuts. Simply place a few drops of Wahl Clipper Oil on the teeth of the blades. Use only the Wahl Clipper Oil included in the pack. Due to the high speed of your Wahl clipper, the correct type of oil must be used. Do not use hair oil, grease or any oil mixed with kerosene or any solvent, as the solvent will evaporate and leave the thick oil, slowing down the blades. Wahl Clipper Oil is a very thin, natural oil which will not evaporate and will not slow down the blades.
POWER SCREW
(Not found on all models of Wahl Clippers)
If your clipper has a power screw, it has been adjusted for peak efficiency before leaving the factory. However, if voltage in your home is low, you may need to readjust it.
To adjust power, use the plastic brush, a screwdriver or a thin coin to turn power screw in a clockwise direction until the arm strikes the coil, making a noise. Then, slowly turn power screw out (counterclockwise), just until noise stops.
This is the maximum power setting. (K)
CORD
The cord should not be used to pull the clipper. Since freedom of movement needs to be maintained, care should be used to-keep the cord untwisted and unobstructed. When stored, the cord should be coiled and the unit placed in original box or-storage pouch (if provided).
If your clipper has a polarized plug: To reduce the risk of electric shock, this appliance has a polarized plug (one blade is wider than the other). This plug fits in a polarized outlet only one way. In the event the plug does not fit fully in the outlet, reverse the plug. In the event it still does not fit, contact a qualified electrician to install the proper outlet. Do not change the plug in any way.
TAPER LEVER
(Not found on all models of Wahl Clippers)
If your clipper has an adjustable taper lever, it is conveniently located near your thumb (if you’re right-handed), so it can easily be adjusted while the clipper is in your hand.
The taper lever adds versatility to your clipper by allowing you to gradually change the closeness of your cut without a guide comb. When the lever is in the uppermost position, the blades will give you the closest cut and leave the hair very short. (diagram H1) Pushing the lever downward gradually increases the cutting length. In its lowest position, the taper lever will leave the hair approximately the same length as the 1/8″ guide comb. (diagram H2)
The taper lever will also extend the use of your blades since a different cutting edge is used in each setting. In addition, if extremely heavy haircutting has jammed the blades, it will help you remove hair that has become wedged between the two blades without removing the blades. While the clipper is running, rapidly move the lever from “close cut” to “longer cut” a couple of times. Doing this each time you’ve finished using your clipper will help keep the blades clear of cut hair. If your clipper stops cutting and this does not help, your cutting blades may be dull. Either replace them or return them to Wahl for sharpening.
WAHL’S GUIDE TO FOOLPROOF HOME HAIRCUTTING
Before you cut your hair
- Your clipper should be clean, oiled and in perfect working condition.
- If your kit includes a plastic cape, place it around the neck, tying the strings and overlapping the cape portion to prevent hair from falling down inside the collar. If no cape is provided, a towel will do nicely.
- Position the person whose hair is to be cut on a stool or chair so that the top of his head is about even with your eyes.
- After combing the hair to remove all tangles, hold the clipper in a relaxed, comfortable grip, with the nameplate under the palm near your index finger. This grip will help you maintain comfortable, accurate cutting control.
NOTE: To attach guide combs, hold comb with the teeth up. Snap guide comb attachment firmly to the bottom of the clipper blade. (L)
Depending on the kit you purchased your kit may include one of the following:
Adjustable Guide Combs – allowing multiple cutting lengths in the convenience of a single comb.
Individual Black Guide Combs – providing predetermined lengths indicated on each guide comb.
Individual Color Guide Combs – providing predetermined lengths indicated on each guide comb. Combs are also color coded for quick cutting length reference.
Using adjustable guide combs:
The small adjustable guide comb has five settings from 1/8” to 5/8” (3mm to 16mm) in 1/8” (3mm) increments. (M)
The large adjustable guide comb has five settings from 3/4” to 1-1/4” (19mm to 32mm) in 1/8” (3mm) increments. (N)
Using individual (black or colored) guide combs:
Some kits do not include all Wahl guide combs. However, any of these combs (or additional accessories not listed here) may be available from your dealer or can be ordered directly from Wahl.
INDIVIDUAL GUIDE COMB LISTING:
• 3mm – Black/Red
• 6mm – Black/Purple
• 10mm – Black/Dark Blue
• 13mm – Black/Orange/Pink
• 16mm – Black/Yellow
• 19mm – Black/Lavender
• 22mm – Black/Green
• 25mm – Black/Light Blue
• 31mm – Black/White
• 38mm – Black only
• Right Ear Taper – Black only
• Left Ear Taper – Black only
CUTTING HAIR
FOR MEDIUM TO LONG CUTS: (P)
The first time you cut the hair, cut only a small amount until you become accustomed to how long each guide comb leaves the hair. Always start by placing the largest guide comb on the clipper, then use shorter combs (or settings – if using adjustable guide combs) if a shorter length is desired.
Remember, between professional haircuts, the hair grows evenly all over the head and a light trimming at the lower neck and sides may be all that is needed to bring back that neat, well-groomed look.
For uniform cutting, allow the clipper to cut its way through the hair. Do not force it through at a faster rate.
- Start by combing the hair so it falls into its natural direction.
- Place the largest guide comb onto your clipper and start by trimming the sides from the bottom upwards. Hold the clipper lightly against the hair, with teeth of the guide comb pointing up but flat against the head. Slowly lift the clipper up and outward through the hair, cutting only a small amount at a time.
Repeat around sides and back of head.
If you desire shorter hair, either change to a shorter guide comb (or setting – if using adjustable guide combs) or apply more pressure and less lift away from head with the present attachment.
This entire procedure requires practice, and it is always better to leave too much hair the first few haircuts.
For the top of the head, you will give a fairly short cut if you use the 1″ guide comb (If your kit includes the 1-1/4” or 1-1/2” guide comb, you may use this for a slightly longer cut.) With the teeth flat against the head, slowly start trimming from the front to the back. Again, it is better to leave the hair longer the first few haircuts.
FOR LONGER HAIR ON TOP:
By not using a guide comb, a longer cut can be achieved. Use either a barber comb or a regular comb and lift the hair on top of the head, cutting over the comb, or grasp the hair between the fingers and cut to desired length. Continue this procedure from the front to the back of the head, gradually cutting the hair shorter by reducing the space between the comb or fingers and the head. Comb frequently to remove trimmed hair and check for uneven strands.
TAPERING AROUND EARS:
USING LEFT AND RIGHT EAR GUIDE COMBS
The Left and Right Ear Guide Combs have a built in taper ranging from 1/8” to 1/2”. By following the outline of the ear with the appropriate comb you achieve a gradual taper and blending without having to use multiple combs.
TO TAPER THE AREA BORDERING THE LEFT EAR:
Attach the Left Ear Taper Comb to your clipper and stand facing the left ear. While holding the clipper at a slight angle against the head, position the guide comb just back of the left ear at the hairline. Then move the clipper in a small half circle pattern around the left ear toward the front of the head. Depending on the length of hair you are working with you may need to take several small strokes as you proceed around the ear. When doing so, slowly move the clipper upward and outward being mindful of the ear. This will allow you to guide hair into the comb towards the clip- per blades.
Note: You may also achieve a tapering of sideburns by including the sideburn area as you begin to move the clipper around the ear.
TO TAPER THE AREA BORDERING THE RIGHT EAR:
Attach the Right Ear Guide Comb to your clipper. Stand facing the right ear and repeat the process described above for the left ear.
Finish by outlining the area around the ear as described in the following section.
OUTLINING: (Q)
No attachments are needed. (On a multi-cut clipper, push the taper lever up to the “close-cut” position.) Comb hair into desired style. Starting between the ear and the sideburns, as shown at left, hold clipper with corner edge of blade against the hairline. Slowly follow the desired outline of the hair over, around and behind the ears. For defining side-burns and the back of the neck, hold the clipper upside down, against the skin at the desired length and move down. Comb hair and check that sides are even. Check for uneven spots throughout the haircut.
CREW CUTS AND SHORT CUTS (R)
Starting with the longest guide comb, cut from the back of the neck to the crown. Hold the guide comb flat against the head and slowly move the clipper through the hair, as shown.
Use the same procedure from the lower side to the upper side of the head, as shown. Then cut the hair against the direction in which it grows, from the front to the crown, and even up the cut with the sides.
To give a “flattop” look, the hair on top of the head must be cut over the top of a flat comb, rather than using the guide comb.
Use closer-cutting guide combs to “taper” the hair down to the neckline, as desired. Comb hair and check for uneven spots. Outline sideburns and neckline as previously described.
If a short, tapered cut on the sides and back is desired, follow diagram S.
The five basic areas illustrated on the Wahl haircutting guide are your “road map” to easy, do-it-yourself haircutting.
For tips on the latest trends and fashions in haircutting, visit us at www.wahl.com.

This marking indicates that this product should not be disposed with other household wastes throughout the EU. To prevent possible harm to the environment or human health from uncontrolled waste disposal, recycle it responsibly to promote the sustainable reuse of material resources. To return your used device, please use the return and collection systems or contact the retailer where the product was purchased. They can take this product for environmental safe recycling.
DOWNLOAD RESOURCES
- WAHL Wahl Clipper [pdf] Instruction Manual Wahl Clippe, 93267-002
- Read more: https://manuals.plus/wahl/wahl-clipper-manual#ixzz7eA2PnluF
FAQ’S
Does the Wahl Clipper come with a power cord?
Yes, it does.
Does the Wahl Clipper have a warranty?
Yes, it is covered by a 2 year warranty.
What is the voltage of the Wahl Clipper?
The voltage of the Wahl Clipper is 110V-120V.
Can I use the Wahl Clipper on 220V?
No, you cannot use it on 220V.
Is there any additional accessories for the Wahl Clipper?
Yes, there are additional accessories for the Wahl Clipper such as combs and guards.
How do you charge Wahl clippers?
Plug power cord directly into unit. Be sure clipper is switched OFF when charging. During charging, the charge indicator is illuminated. The charge indicator will begin to blink when almost fully charged and may shut off when fully charged.
How long does it take Wahl clippers to charge?
The clipper will take approximately 3 to 5 hours to charge. The power indicator light will not turn off or change color after clipper is charged. After 3 to 5 hours, unplug charger from plug and clipper. The charger is designed to charge the clipper battery without overcharging.
How do I know if my clipper is fully charged?
The charging indicator on your device will start flashing to indicate that the groomer is charging. Once the groomer is fully charged, the charging indicator lights up continuously for approximately 30 minutes and then automatically turns off to save energy.
Can clipper blades be replaced?
You can’t stop that. Luckily, there are lots of affordable clipper and trimmer replacement blades.
Why do hair clipper stop cutting?
If you can stop the cutting blade with very little pressure, then your power is too weak, and you will need to clean out your tool and/or adjust the power (upcoming article). If all the teeth are present and your power is good, then you will need to clean your blades.
Should I wet my hair before using clippers?
Hair that is unwashed can cause electric hair clippers to become clogged with grease and hairstyling products left in the hair. Don’t leave hair wet to cut it either – towel dry hair and then comb out if needed, to remove any tangles (if hair is longer or thicker).
What is the difference between Clipper and trimmer?
A clipper is intended for bulk hair cutting on larger areas, but does not cut extremely close to the skin. On the other hand, a trimmer is designed for edging, outlining, dry shaving and light shaping on smaller areas such as the back of the neck, around the ears, around sideburns etc.
VIDEO
Wahl Clipper
www://wahlusa.com/
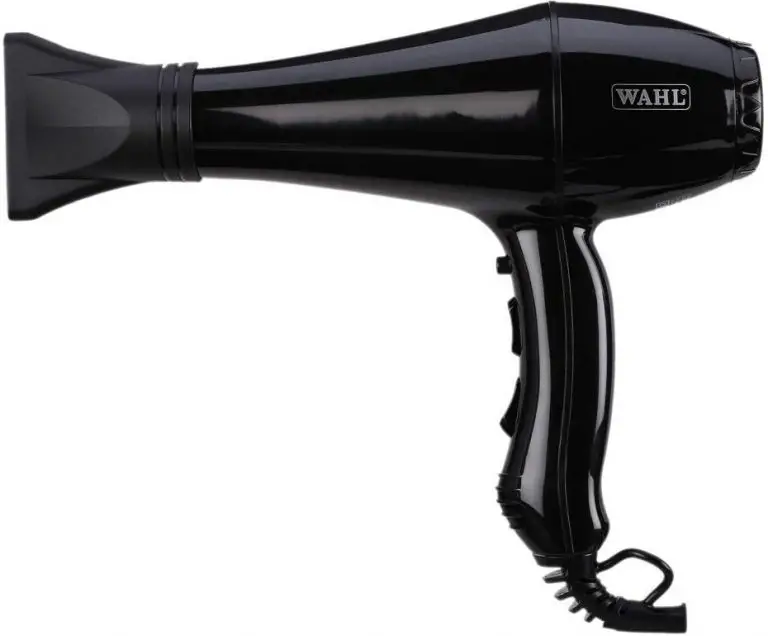
Please read all instructions carefully to familiarise yourself with your new Hairdryer before using.
Save these instructions for further reference.
GENERAL USER INFORMATION
Information about using the operation manual
- Before using the appliance for the first time, you must read and understand the operation manual completely.
- Consider the operation manual as part of the product and store it in a safe and accessible place.
- Include this operation manual if passing the appliance on to a third party.
- In the case of conflicts with national safety specifications or instructions, the national requirements must be followed.
Explanation of symbols and notes
 DANGER: Danger of electric shock which may result in serious physical injury or death.
![]() DANGER: Danger of explosion which may result in serious physical injury or death.
DANGER: Danger of explosion which may result in serious physical injury or death.
![]() WARNING: Warning of possible physical injury or a health risk.
WARNING: Warning of possible physical injury or a health risk.
![]() CAUTION: Information about danger of material damage.
CAUTION: Information about danger of material damage.
 Note with useful information and tips.
► Action to be taken by owner.
Carry out these actions in the sequence described.
Please retain this leaflet for future reference.
READ ALL INSTRUCTIONS BEFORE USING.
IMPORTANT SAFEGUARDS
When using this electrical appliance, especially when children are present, basic safety precautions should always be observed including the following.
Requirements
- Read the instruction manual in full to familiarize yourself with the product before the first use.
- This appliance can be used by children from aged 8 years and above and persons with reduced physical, sensory or mental capabilities, or lack of experience and knowledge, if they have been given supervision or instruction concerning use of the appliance in a safe way and understand the hazards involved. Children shall not play with the appliance. Cleaning and user maintenance shall not be made by children without supervision.
- Keep the appliance and its cord out of reach of children less than 8 years.
- Use this appliance only for its intended purpose.
- Do not use with a voltage converter.
Hazards
 Danger! Electric shock due to damage to appliance
- Do not operate the appliance with a broken cord or plug, or if the appliance malfunctions, or is dropped or damaged in anyway.
- If the supply cord is damaged, it must be replaced by the manufacturer or its service agent or a similarly qualified person in order to avoid a hazard.
- Do not let the cord hang over the edge of the work surface or let it touch any hot surfaces.
- The use of attachments that are not supplied by the manufacturer may cause fire, electric shock or injury and damage to the appliance.
 WARNING: Do not use this appliance near bathtubs, showers, basins or other vessels containing water.
 Danger! Electric shock due to penetration of liquid.
 - To protect against risk of electrical shock, never immerse the unit or let it come into contact with water or any other liquids. Do not use the unit with wet hands. If the appliance should become wet, damp or fall in water, remove plug from mains socket immediately. Do not put your hands in the water. Do not take into bathroom.
- When the hairdryer is used in the bathroom, unplug it after use since the proximity of water presents a hazard even when the hairdryer is switched off.
- For additional protection, the installation of a residual current device (RCD) having a rated residual operating current not exceeding 30 mA is advisable in the electrical circuit supplying the bathroom. Ask your installer for advice. (NOTE: Mains sockets might not be permitted in average sized bathrooms according to local wiring regulations.)
 Warning! Injuries due to incorrect handling
 - Switch off the appliance and unplug from outlet when not in use, before putting on or taking off attachments and also before cleaning the appliance.
- Care should be taken to avoid contact with the skin, the face and neck.
 Caution! Danger of product damage
 - Never use your appliance without paying attention!
- Always unplug the unit when not in use or left unattended.
- Do not wrap the cord around the appliance.
- Do not obstruct the inlet or outlet grills.
- If however, the airflow is inadvertently obstructed during use, the built in thermal safety device will automatically cut out the appliance. The hairdryer will switch on again automatically after cooling down for a few minutes.
- Do not use outdoors or in damp areas.
- Never carry the unit by its power cord.
- Do not drop or insert any object into any opening.
- Allow the appliance to cool before storing away.
OPERATING INSTRUCTIONS
- Before plugging in check the voltage on the rating label corresponds to the local mains voltage.
- As a general guide, use the HIGH heat and speed setting for rough drying for thicker hair, and the LOW setting for finer hair and more precise control when styling. The cool setting can be used at the end to set the style.
- Wash and condition the hair, then gently towel dry hair to remove excess water. DO NOT use the hair dryer on hair that is dripping wet.
- Start styling at the back of the hair and work forwards.
- Do not concentrate the airflow on any one area for an extended period of time.
HAIR DRYER SETTINGS
Your Hair dryer has 3 temperature settings and 2 speed settings, which provides 6 different heat and speed variations plus cool shot
- High Heat – High Speed
- Medium Heat – Medium Speed
- Low Heat – Low Speed
 NOTE: During the first few minutes of the initial use you may notice smoke and a slight odour. This is normal and will quickly disappear
CONCENTRATOR ATTACHMENTS
The air concentrator nozzle is useful for directing airflow or spot drying. We recommend using a round brush to speed the drying of hair. The concentrator is easily fitted to the front of the dryer and may be turned to the desired position.
![]() IMPORTANT: Do not use the attachments on high settings as overheating can cause damage to both the dryer and the attachments.
IMPORTANT: Do not use the attachments on high settings as overheating can cause damage to both the dryer and the attachments.
PIK ATTACHMENT(If included)
Ensure that the pik is securely positioned and correctly aligned.
Only use accessories provided with this hairdryer.
REAR FILTER
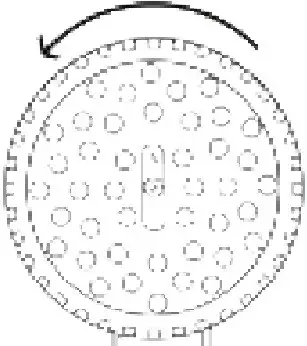
- At the motor end of the dryer there is a filter cover which may be removed for cleaning.
- The filter prevents hair from being sucked into the motor end of your hair dryer.
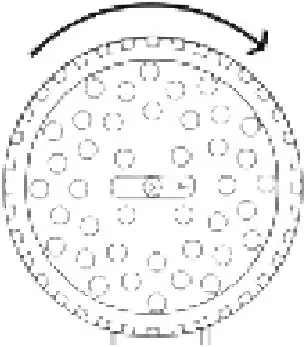
- To remove the filter cover, simply hold filter cover and twist until the centre of the cover (A) is in a Horizontal position (Figure: 1).
Figure: 1 - To refit the filter cover, simply replace it in the horizontal position and turn until the centre of the cover is in a Vertical position (Figure: 2).

Figure: 2 - It is recommended that the filter cover is removed regularly for cleaning, and thereby allowing air to flow freely through the motor and fan unit.
CLEANING AND MAINTENANCE
- Always unplug the hair dryer before cleaning.
- Do not immerse in water.
- Use a slightly damp cloth to clean the body of the hair dryer, and dry with a clean cloth.
- Store the appliance in a drawer or hang-up away from dust or moisture.
- The Hair dryer is fitted with a removable filter for easy cleaning.
WIRING
![]() WARNING: IF THE SUPPLY CORD IS DAMAGED IT MUST BE REPLACED BY THE MANUFACTURERS SERVICE AGENT OR A SIMILARLY QUALIFIED PERSON IN ORDER TO AVOID A HAZARD.
WARNING: IF THE SUPPLY CORD IS DAMAGED IT MUST BE REPLACED BY THE MANUFACTURERS SERVICE AGENT OR A SIMILARLY QUALIFIED PERSON IN ORDER TO AVOID A HAZARD.
The wires in the mains lead of this Hairdryer are coloured in accordance to the following code:
Blue Neutral (N) Brown Live (L)
This appliance is fitted with a 3 pin plug which has a 13amp fuse fitted.
If the plug supplied is not suitable for your socket or becomes damaged, it should be cut off and disposed of, and a suitable plug fitted as detailed below.
As the colours of the wires in the mains lead of this Hairdryer may not correspond with the colour markings identifying the terminals in your plug, proceed as follows.
The wire which is coloured BLUE must be connected to the terminal in the plug which is marked be with the letter ‘N’ or coloured BLACK OR BLUE.
The wire which is coloured BROWN must be connected to the terminal in the plug which is marked with the letter ‘L’ or coloured RED OR BROWN.
DO NOT connect either wire to the terminal in the plug which is marked with the letter ‘E’, has the Earth symbol, or coloured GREEN OR GREEN AND YELLOW
DISPOSAL
Handle with care! Environmental damage in the case of incorrect disposal. Correct disposal will ensure environmental protection and prevent any potentially harmful impacts on people and the environment.
Adhere to the relevant legal requirements when disposing of the appliance.
Information on the disposal of electrical and electronic appliances in the European Community:

Within the European Community, national regulations are specified for the disposal of electrical appliances, based on EU Waste Electrical and Electronic Equipment Directive 2002/96/EC (WEEE). In accordance with this, the appliance can no longer be disposed of with the local or domestic waste.
The appliance will be accepted free of charge by local collection points or recycling centres.
PRODUCT REGISTRATION
Wahl are constantly developing and launching new products in the UK. We would like to understand your product needs and expectations and we value any comments you may have. As part of Wahl Customer Care, we are offering you the chance to be kept up to date with the latest product launches, innovations and special offers.
Please take a minute to register your product online at www.wahl.co.uk.
GUARANTEE
This product is guaranteed against defects in material and workmanship for a period of one year from the date of original purchase or receipt as a gift.
Should this product become defective during the guarantee period, return it to the store of purchase together with your proof of purchase for repair or replacement.
Alternatively within the guarantee period you can return the product to Wahl (UK) Ltd who will repair any such defect or elect to replace the product or any part of it, without charge, provided there is proof of purchase. Should a replacement be offered this will not extend the original guarantee period.
The guarantee becomes invalid in the case of misuse, alteration or repair by unauthorised persons.
This guarantee in no way affects your rights under law in the United Kingdom.
CUSTOMER SERVICES
WAHL (UK) LIMITED
HERNE BAY TRADE PARK
SEA STREET
HERNE BAY
KENT
CT6 8JZ.
CUSTOMER SERVICES
For any further assistance or information call Customer Services on
Tel: 01227 740066
Visit: www.wahl.co.uk
Form No. ZA514 Rev6 09-14
Email: [email protected]
]]>
Important safety information
For your own protection from injuries and electric shocks, the following information must be observed when using electrical equipment:
Read these operating instructions carefully and make sure you understand them before using the appliance!
- Only use shaver to shave human facial hair.
- Only use the appliance for its proper purpose as described in the operating instructions.
- This appliance can be used both by children aged 14 years and above and persons with reduced physical, sensory or mental capabilities, or lack of experience and/or knowledge, if they have been given supervision or instruction concerning the use of the appliance in a safe way and understand the hazards involved. Children must not play with the appliance. Cleaning and user maintenance must never be carried out by children, unless they are supervised by an adult.
- The operating instructions should be retained so that they can be referred to at a later date and should be passed on to all subsequent owners or users of the appliance.
- Never leave the appliance unattended during use.
- Only operate the appliance with the voltage stated on the nameplate.
 WARNING!
· Do not use the appliance near bathtubs, showers or other water-filled containers. It should also not be used in areas of high humidity. Always disconnect from the mains power supply after use since water can pose a hazard, even when the appliance is switched off.
· Always position or store electrical equipment where it cannot fall into water (e.g. washbasin). Keep the appliance away from water and other liquids.
· Never touch electrical equipment that has fallen into water or reach into water to retrieve it. Disconnect from the mains immediately.
· If the appliance is dropped into water, it may not be used again subsequently. - Disconnect from the mains before cleaning or servicing the appliance.
- Never use the appliance if it is defective, if it has fallen onto the floor or if the mains cable is damaged.
- Repairs may only be performed at an authorised service centre using original parts. Only specialists properly trained in the handling of electrotechnical appliances may repair electrical
equipment. Only use accessories recommended by the manufacturer. - Keep the mains cable and appliance away from hot surfaces.
- Make sure that the mains cable is not twisted or kinked when used and stored.
- Only use and store the appliance in dry rooms.
- Only use the mains cable that is included in the scope of supply for charging the appliance. Only replace defective mains cables with original spare parts which you can order via our service centres.
- Do not attempt to replace the battery.
- Batteries may only be exchanged for types approved by the manufacturer and may only be replaced at service centres.
- Never use the appliance if the shaver foil is damaged.
- We are not liable for damage caused as a result of improper use or failure to observe these operating instructions.
Product description
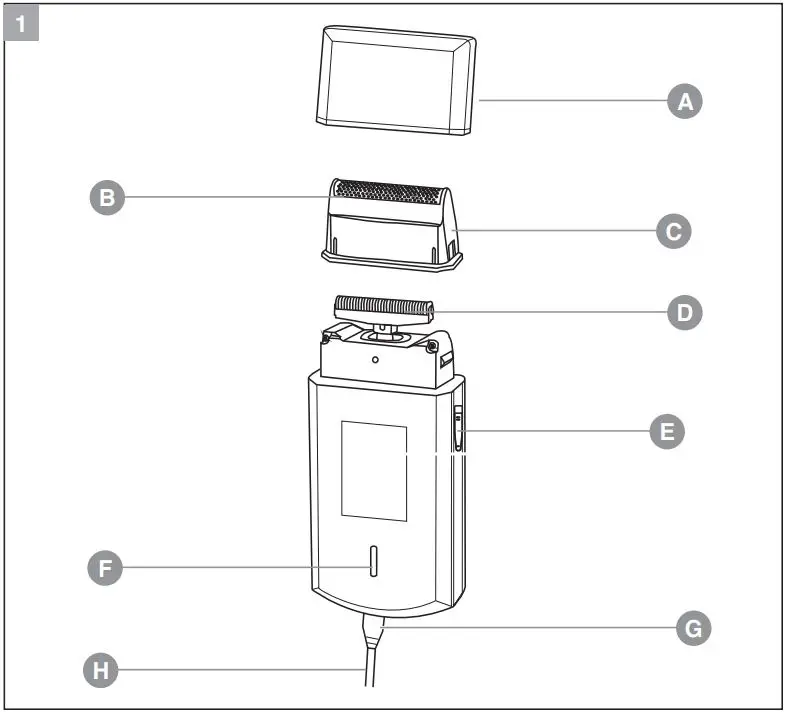
Description of parts (Fig. 1)
A Protective cap
B Shaver foil
C Shaving head with shaver foil
D Cutter
E On/off switch
F Charging indicator
G Appliance socket
H Mains cable with small appliance plug
Technical data
Hand-held appliance
- Drive: DC motor
- Battery: NiMH battery
- Battery operating time: up to 45 minutes
- Dimensions
(WxHxD): 46 x 100 x 20 mm
Weight: approx. 90 g - Emission sound pressure level: max. 63 dB(A) @ 25 cm
- Vibration: < 2.5 m/s²
- Ambient temperature: 0°C – +40°C
The appliance is safety insulated and radio screened. It meets the requirements of EU Directive 2014/30/EU regarding electromagnetic compatibility and Low Voltage Directive 2014/35/EU.
Operation
Charging the battery
- Before the appliance is used for the first time, it should be charged for 16 hours.
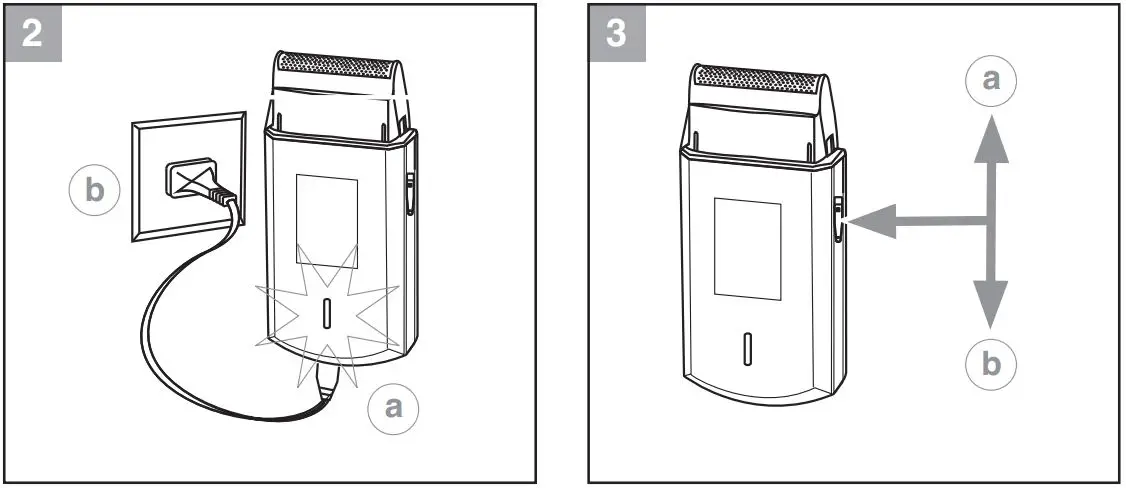
- Switch off the appliance using the on/off switch (Fig. 3ⓑ).
- Plug the small appliance plug into the appliance socket (Fig 2ⓐ).
- Plug the mains cable into the mains socket (Fig 2ⓑ).
- During charging, the green charging indicator is illuminated.
- For the appliance to charge to full capacity, it should take around 8 hours.
- Note: In order to ensure a long operating life of the battery pack, it should always be completely empty prior to recharging.
Battery operation
- Switch on the appliance using the on/off switch (Fig. 3ⓐ) and, after use, switch it off again (Fig. 3ⓑ).
- When the batteries are fully charged, the appliance can be used for up to 45 minutes without mains connection.
Foil shave
The shaving system perfectly adjusts to the contours of the face as well as the chin and the neck area to give you an optimum shaving result. Prior to shaving, it is recommended to clean the face and neck area thoroughly and to pat it dry.
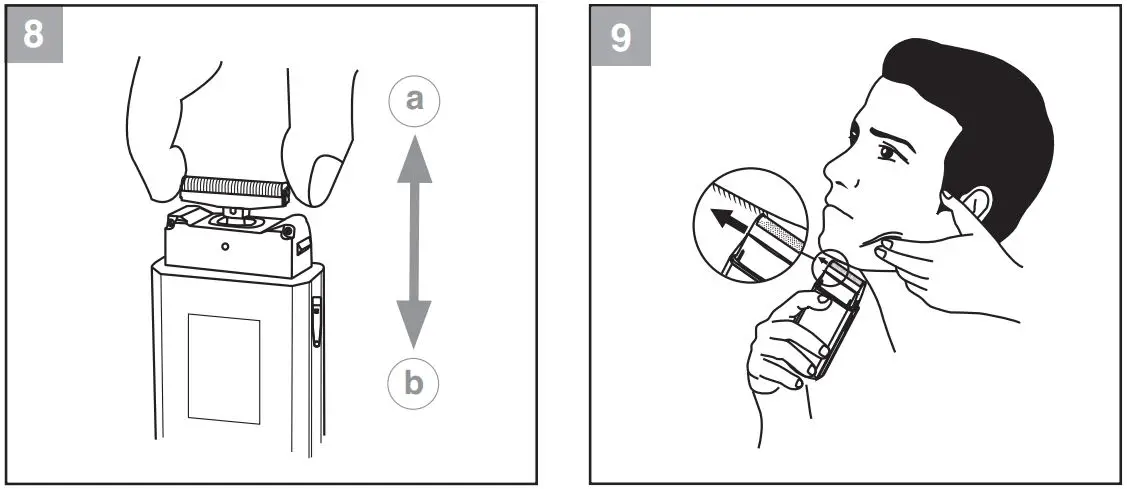
- Gently press the shaver upward against the skin surface and shave against the direction of the beard growth (Fig. 9). At the same time, pull the skin tight with your free hand so that the stubble stands up.
- Avoid too much pressure on the shaver foil; this could lead to foil breakages.
- Use the protective cover when the appliance is not in use.
- The skin must get used to the foil shave. Generally, this takes 2 – 3 weeks.
Maintenance
Cleaning and care
- Do not immerse the appliance in water!
- Disconnect the mains cable from the mains power-supply before cleaning the appliance.
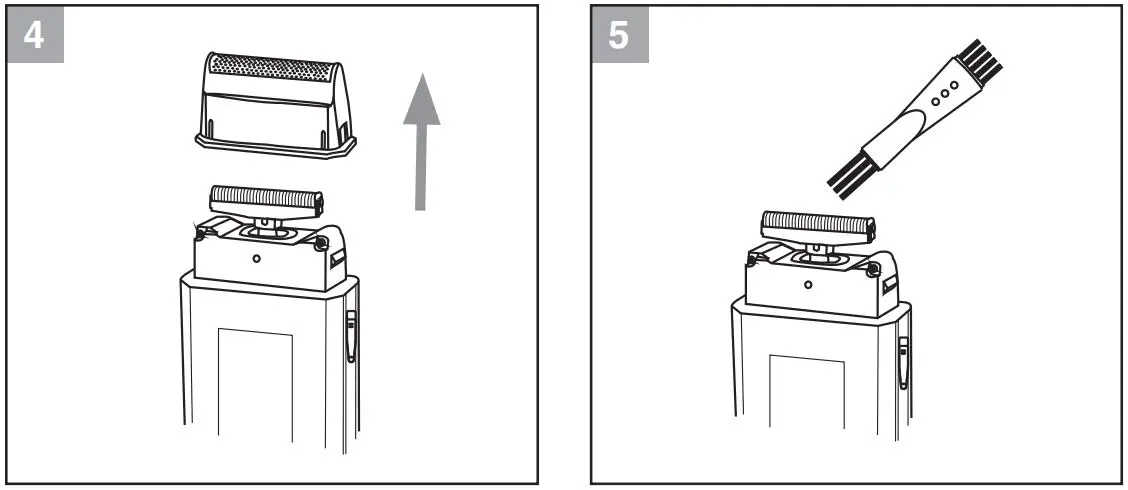
- After each use, remove the shaving head from the housing (Fig. 4), then tap it on a level surface and blow off the hair. Use the cleaning brush to clean the cutter (Fig. 5).
- The shaver foil must not be cleaned with the cleaning brush. Otherwise, the foil could be damaged.
- Only wipe the appliance with a soft cloth, which may be dampened slightly. Do not use solvents or abrasives!
- Put on the protective cap again after cleaning.
- If the shaving performance deteriorates after long use despite regular cleaning, the cutter and the shaver foil should be replaced.
- The cutter and shaver foil (order no. 3615-7000) are available from your dealer or our service centre.
Changing the cutter and shaver foil
Replace the cutter and shaver foil as follows, if necessary:
Switch off the appliance using the on/off switch (Fig. 3ⓑ).
Changing of the shaver foil
- Remove the protective cap from the shaving head.
- Remove the shaving head together with the shaver foil (Fig. 4).
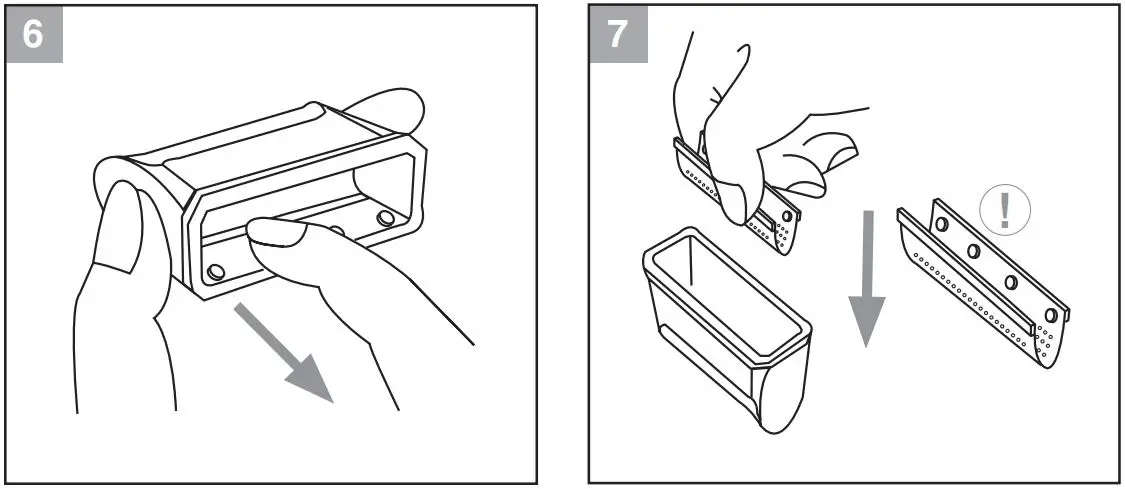
- Pull out the shaver foil from the shaving head (Fig. 6).
- Inserting the new shaver foil is done by holding it only on its side and sliding it into the shaving head as far as it will go (Fig. 7).
- Caution! Only bend the shaver foil, do not damage it!
Changing the cutter
- Hold the cutter on its side and remove it from the holder (Fig. 8ⓐ).
- Attach the new cutter and press it downward (Fig. 8ⓑ).
- Reattach the shaving head together with the shaver foil and let them snap into place.
Disposal
![]() Handle with care! Environmental damage in the event of incorrect disposal.
Handle with care! Environmental damage in the event of incorrect disposal.
- Discharge batteries prior to disposal!
- Correct disposal will ensure environmental protection and prevent any potentially harmful impact on people and the environment.
Adhere to the relevant legal requirements when disposing of the appliance.
Information on the disposal of electrical and electronic appliances in the European Community:
![]() Within the European Community, national regulations are specified for the disposal of electrical appliances, based on EU Waste Electrical and Electronic Equipment Directive 2012/19/EC (WEEE). In accordance with this, the appliance can no longer be disposed of with the local or domestic waste.
Within the European Community, national regulations are specified for the disposal of electrical appliances, based on EU Waste Electrical and Electronic Equipment Directive 2012/19/EC (WEEE). In accordance with this, the appliance can no longer be disposed of with the local or domestic waste.
The appliance will be accepted free of charge by local collection points or recycling centres.
The packaging for this product is made from recyclable materials. Dispose of this in an environmentally friendly manner by recycling it.
]]>
RECHARGEABLE TRIMMER INSTRUCTIONS
Rechargeable Trimmer
Please read all instructions carefully to familiarise yourself with your new Wahl trimmer before using.
Save these instructions for further reference.
For any further assistance or information call Customer Services on
T: 01227 740066
or visit
W: www.wahl.co.uk
E: [email protected]
2
GENERAL USER INFORMATION
Information about using the operation manual
- Before using the appliance for the first time, you must read and understand the operation manual completely.
- Consider the operation manual as part of the product and store it in a safe and accessible place.
- Include this operation manual if passing the appliance on to a third party.
- In the case of conflicts with national safety specifications or instructions, the national requirements must be followed.
Explanation of symbols and notes

DANGER
Danger of electric shock which may result in serious physical injury or death.
 DANGER
Danger of explosion which may result in serious physical injury or death.
WARNING
Warning of possible physical injury or a health risk.

CAUTION
Information about danger of material damage.
Note with useful information and tips.

Action to be taken by owner.
1. Carry out these actions in the sequence described.
· List
3
Please retain this leaflet for future reference.
READ ALL INSTRUCTIONS BEFORE USING.
IMPORTANT SAFEGUARDS
When using your electrical appliance, basic safety precautions should always be followed, including the following:
- This appliance can be used by children from aged 14 years and above and persons with reduced physical, sensory or mental capabilities, or lack of experience and knowledge, if they have been given supervision or instruction concerning use of the appliance in a safe way and understand the hazards involved. Children shall not play with the appliance. Cleaning and user maintenance shall not be made by children without supervision.
- Switch off the appliance and unplug from outlet when not in use, before putting on or taking off attachments and also before cleaning the appliance.
- Never use your appliance without paying attention! Except when charging always unplug this appliance from the electricity outlet immediately after using.
- Do not operate the appliance with a broken cord, plug or charger, or if the appliance malfunctions, or is dropped or damaged in anyway.
- Do not wrap the cord around the appliance.
- Any servicing or repair must be performed by an authorised service representative.
- Do not use outdoors or in damp areas.
- The use of attachments that are not supplied by
the manufacturer may cause fire, electric shock or injury and damage to the appliance. - To protect against risk of electrical shock, never immerse the unit or let it come into contact with water or any other liquids. Do not use the unit with wet hands. If the appliance should become wet, damp or fall in water, remove plug from mains socket immediately. Do not put your hands in the water. Do not take into bathroom.
- Never carry the unit by its power cord.
- Do not drop or insert any object into anyopening.
- Use this appliance only for its intended purpose.
- Exhausted batteries/ rechargeable batteries should not be disposed of in the household waste. Dispose of them in a completely discharged state in accordance with local legal regulations. Do not throw into fire where heat could cause them to rupture.
5

Danger of explosion
 Never use the appliance where aerosol (spray) products are being used or where oxygen is released.
WARNING: KEEP THE APPLIANCE DRY
TRAVEL PLUG (Stainless Steel trimmer only)
REMOVE BEFORE USE!
The travel plug is used to prevent the trimmer from accidentally powering on when traveling. When travel plug is engaged, the power button will not function.
OPERATING INSTRUCTIONS
Recharging your Lithium Ion Trimmer (Models 9854-802, WM80801 and 9864)
- This trimmer is conveniently designed for household use. It should be allowed to charge 1 hour before first use.
- Remove the trimmer, transformer and accessories from packing material.
- Connect the transformer to the trimmer. BE SURE THE TRIMMER IS IN THE OFF 0 POSITION WHEN CHARGING.
- Plug the transformer into any convenient electrical outlet at the correct voltage.
- When the trimmer is low in power, it should be connected to the transformer and plugged into an outlet to assure maximum power is available when it is next used. This transformer is designed to completely charge the battery without over charging.
- The battery will take approximately 60 minutes to charge. The lithium ion trimmer also has a quick charge capability, 1 minute quick charge for over 3 minutes use.
- Lithium Ion battery life may be extended with the following procedure:
- Only charge the device when charging is required. A charge is required when the product begins to slow down or has trouble maintaining speed while performing its intended function.
- If the device is fully discharged, apply a charge right away to prevent damage or inability to recharge.
- A partial charge is fine; Li-Ion does not require a full charge.
- Charge the device at moderate temperatures. Do not charge below freezing.
- Do not leave the device connected to the charger when it is not plugged into an outlet.

NOTE: It is okay to leave the device in its stand for storage if the stand allows for the charger to be disconnected from the stand or product.
- Perform regular maintenance on the device including keeping the blades oiled, clean, and free of debris to prevent taxing the battery.
- When not in use, store the partially charged device in a cool and dry place away from heat sources and direct sunlight (25°C Ambient or less recommended)

WARNING: ONLY USE THE TRANSFORMER SUPPLIED WITH THE TRIMMER. (For Lithium models please use S004MB0400090 charger. For non Lithium models, please use SPE024012B charger).
Recharging Your NiMH Trimmer (Models 9854-800 and 9860-806)
- This Trimmer is conveniently designed for household use. It should be allowed to charge overnight before first use.
- Remove the trimmer, recharging transformer and accessories from the packaging.
- Connect the transformer to the trimmer. BE SURE THE TRIMMER IS IN THE OFF 0 POSITION WHEN CHARGING.
- Plug the recharging transformer into any convenient electrical outlet at the correct voltage.
- When the trimmer is low in power, it should be connected to the transformer and plugged into an outlet to assure maximum power is available when it is next used. This transformer is designed to continuously charge the battery without over charging.
- Ni-MH battery life may be extended with the following procedure: Once every month, let the trimmer run until the motor stops. Move the switch to the OFF 0 position and recharge fully overnight.
CARE AND CLEANING
OILING BLADES
For best results, put one or two drops of Wahl Clipper Oil on the blades before and after every use. Motor bearings are permanently lubricated–do not attempt to oil. When oiling your trimmer, turn the trimmer “ON – I,” hold the unit with the blades facing DOWN and squeeze one or two drops of oil onto the blades. Wipe off excess oil with soft cloth.
 NOTE: DO NOT OVER OIL! Excessive oiling or application of liquids will cause damage if allowed to seep back into motor.
BLADE CARE
Trimmer blades have precision-hardened, ground and lapped cutting teeth. Blades should be handled carefully and never bumped or used to cut dirty or abrasive material.
CLEANING/STORAGE
Before storing your trimmer, use the cleaning brush to whisk any loose hairs from the unit and the blades. Always store the unit in such a manner so that blades are protected from damage. When the trimmer is not in use, the trimmer guide/blade guard attachment should be in place to protect the blades. (if included in your kit). Water getting into the charging socket may cause corrosion. When your trimmer is not in use, please store in the storage pouch or return to the stand provided. Avoid standing/laying/storing your trimmer in a damp area without the stand.
8
TROUBLESHOOTING FOR BOTH MODELS
If your trimmer does not seem to be charging, check the following before returning it for repair:
- Check outlet to make sure it is working by plugging in another appliance.
- Be sure the trimmer is properly connected to the recharging transformer, all the connections are secure and the switch on the trimmer is turned OFF.
- If your electricity is connected to a master power switch, we suggest the trimmer be disconnected from the charger anytime the master switch is off. Leaving the unit plugged into a dead outlet or an unplugged charger will drain the battery.
- If the trimmer does not run and it is completely charged, turn the unit ON and pinch or push the blades manually. Oil may have dried out between the blades, so they may be temporarily stuck together.
BATTERY REPLACEMENT, REMOVAL AND DISPOSAL (for MiMH models only)
Battery Replacement
For battery replacement the entire, intact clipper/ trimmer should be sent to: Wahl (UK) Ltd Customer Services (the address can be found on the reverse of this booklet) or taken to a suitably qualified professional. The battery should only be replaced by the original manufacturers spare.
Battery Removal and Disposal
At the end of its life, when it will no longer take a full charge, the battery in your clipper/ trimmer must be removed and recycled/disposed of correctly. Batteries should be disposed of at an official collection point separately from the clipper/ trimmer. If you are having trouble removing the battery you can also return the product to Wahl (UK) Ltd Customer Services who will dispose of it in an environmentally safe way.
To remove the battery, follow these steps:
- Unplug the transformer from the outlet, disconnect from trimmer and allow the battery to completely run down before disassembly.
- Remove the blade by pushing on the teeth away from the trimmer head.
- Remove the switch assembly from the front of the trimmer by inserting a small flat blade screwdriver into the silver surround, and then peel back the rubber from the case of the trimmer, and remove.
- Insert the screwdriver into the slots in the plastic case to split it in two. The battery and motor unit can then be removed from the case.
- Cut or break the wire stamps on both ends of the battery and remove the battery
- Apply tape to both ends of the battery before recycling/disposing.
BATTERY REPLACEMENT, REMOVAL AND DISPOSAL (for Lithium battery models only)
Lithium-Ion Battery Replacement
For battery replacement the entire, intact clipper or trimmer should be sent to: Wahl (UK) Ltd Customer Services (the address can be found on the reverse of this booklet) or taken to a suitably qualified professional. The battery should only be replaced by the original manufacturers spare, for safety reasons a substitute should not be used.
Do not attempt to remove the battery. Lithium-Ion batteries can explode, catch fire, and/or cause burns if disassembled, damaged or exposed to water or high temperatures.
Lithium Battery Disposal
Do not dispose of this product or the Lithium battery in the normal household waste.
The product should be returned to Wahl Customer Services where we offer a take back service or taken to a local collection facility where they will be dealt with safely and sent for the appropriate recycling.
TIPS FOR SUCCESSFUL STYLING
The first time you cut hair, cut only a small amount until you become accustomed to how long each guide comb leaves the hair. Always start by placing the largest guide comb on the clipper, then use shorter combs (or settings if using adjustable guide combs) if a shorter length is desired.
Remember, between professional haircuts, the hair grows evenly all over the head and a light trimming at lower neck and sides may be all that is needed to bring back that neat, well groomed look.
For uniform cutting, allow the trimmer to cut its way through the hair. Do not force it through at a faster rate.
- Start by combing the hair so it falls in its natural direction.
- Place the largest guide comb onto your trimmer and start by trimming the sides from the bottom upwards. Hold the trimmer lightly against the hair, with teeth of the guide comb pointing up but flat against the head. Slowly lift the trimmer up and outward through the hair, cutting only a small amount at a time. Repeat around sides and back of head.
If you desire shorter hair, either change to a shorter guide comb (or setting if using adjustable combs) or apply more pressure and less lift away from head with the present attachment.
This entire procedure requires practice, and it is always better to leave to much hair the first few haircuts.
For the top of the head, you will give a fairly short cut if you use the No.1 guide comb (if your kit includes the 1-1/4″ or 1-1/2″ guide comb, you may use this for a slightly longer cut.) With the teeth flat against the head, slowly start trimming from front to back. Again, it is better to leave the hair longer the first few haircuts.
FADE CUT using a T-Blade
- Start at the temple and cut all the way around the head to establish ultimate location of the fade line. Always cut against the grain for the shortest cut. Don’t force the blade through the hair. Let the trimmer do the work.
- Next, cut around the head again and up the nape of the neck to the fade line, brushing away the cut hair as you go. Pull the scalp taut with the thumb for the closest cut. Turn the trimmer upside down when necessary to keep cutting against the grain. Make sure both sides of the head are even.
- For the top of the head, cut with the grain using the individual guide comb attachments. The smaller the number of the comb, the shorter the cut. Comb or brush the hair as you cut for an even end result.
- To complete the fade, blend the hair at the base line by trimming up and out across the line and against the grain all the way around the head. Then, repeat all around, turning the trimmer upside down and cutting downward. The final objective is to blend the hair so there is no real line, just a perfect fade from bald to very short hair. You can achieve this by using the #1 individual comb attachment. Continue combing and cutting until you achieve the desired effect.
- To create a part, pick a spot off-centre. Pull the scalp tight and with the end of the blade perpendicular to the head, move the trimmer back and forth to cut a line. Comb through it and cut again to make sure the cut is precise.
SPECIAL FEATURES
Your trimmer has been designed with several advanced features to help you get perfect results every time you trim. Your trimmer may be used to neatly trim goatees, beards, moustaches, neckline, sideburns around the ears and eyebrows, or anywhere you may need grooming. It also makes a great allaround family trimmer for mini haircuts and touch ups between trips to the barber or to clean up the shape of the neck.
A 6-Position Trimming Guide makes achieving a consistent trim easy every time.
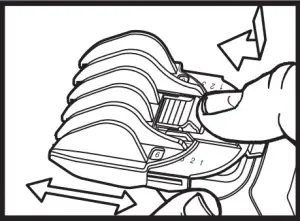
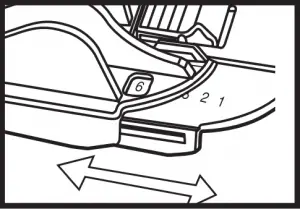
The guide can be removed (providing a seventh cutting position) and reattached without changing the pre-set cutting length, so once you have found the perfect length, there’s no guesswork in achieving it every trim. The trimming guide is a two-piece assembly, consisting of a base and a comb. It should not be disassembled. To attach the guide, simply slide it on at a slight angle and press the release tab down to secure in position.
To remove the guide, gently push up on the release tab and slide the assembly away from the trimmer. Adjust the trimming length by pressing on the thumb lever and moving the comb forward or backward to the desired setting.
12
DETACHABLE BLADE SYSTEM
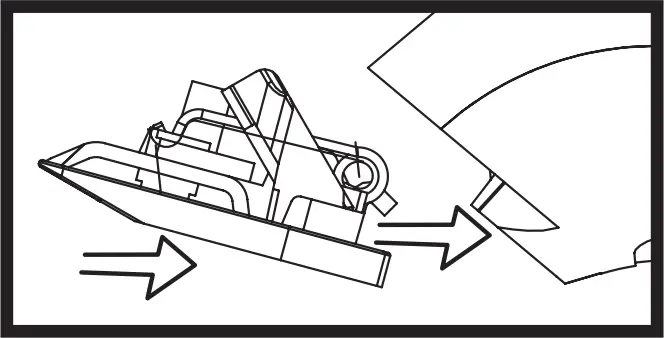
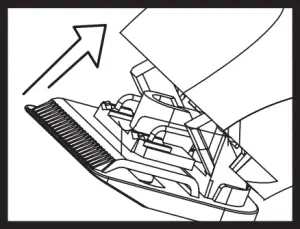
A Detachable blade system enables you to quickly change from a standardwidth blade for full grooming to a narrow-width blade for detail trimming around a moustache, goatee, or anywhere to define the hair line and clip any stray whiskers.
To remove attachment, simply pull top edge of blade away from body unit. To attach, align back tab of attachment head to cavity on the inner edge of trimmer unit.


Should blades become damaged or dull or if you want replacement attachment heads for your trimmer, you can purchase these from Wahl (UK) Ltd.
13
The following attachments will all fit on your trimmer but your product may not include all these attachment heads. These can be ordered from our Customer Services department
Models Attachment Head: Wahl Part Number
9854, 9860, 9818 Trimmer Head: #59300-800
9864 Detail Head: #59301
WM80801 T-Blade Head: #59302
Shaver Head: #59303
Ear/ Nose Head: #58067-100
Detail Shaver Head: #59307
59300-800 59302 58067-100 7196-001


59301 59303 59307 92020-100
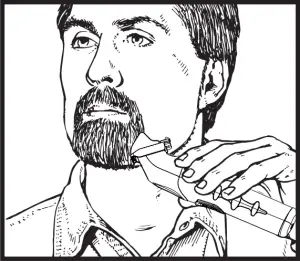
TRIMMING AND EDGING YOUR FACIAL HAIR
The following are suggested trimming steps and trimmer positions. You may find different procedures work better for you.
- Comb your beard in the direction that it grows to help reveal stray hairs that may be longer than the others.
- Attach the 6-position trimming guide to trim and taper your beard. Begin with the guide set at a long trimming length. Trim toward your chin in smooth, overlapping strokes, following the lay of your beard. If you trim against the way your beard naturally lays, the trimmer will cut the hair much shorter and the result may be patchy.
#1 Stubble Length (2 mm)
#2 Short (4 mm)
#3 Medium Short (6 mm)
#4 Medium (8 mm)
#5 Medium Long (10 mm)
#6 Long (12 mm)
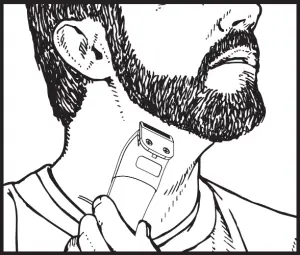
3. To cut the outline of your beard, remove the trimming guide. Starting under your chin and working back toward your jawbone and ears, cut the outer perimeter of your beard underneath the jawbone. Continue the line all the way up to the ears and hairline.
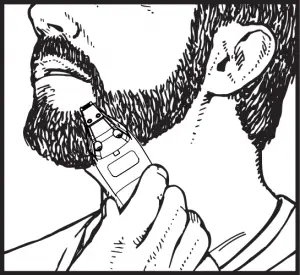
4. Accentuate your beard line by using the trimmer in a downward motion. Start at the line you’ve created and, working from the chin back toward the ears, trim the area right under your beard line.
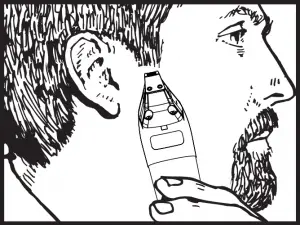
5. Define the upper part of your beard using the same technique. 6. For a neater finished look, replace attachment blade with the detail blade. Use this blade for fine, detail trimming anywhere it is needed, such as at the sideburns near the ears, goatees, etc.
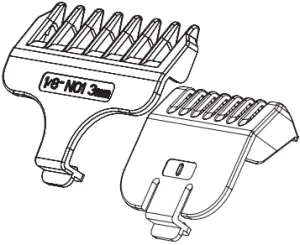
TRIMMING WITH ATTACHMENT COMBS
Your Trimmer includes three trimming attachments; stubble, medium and long. The stubble guide has 1 bar, the medium-cut attachment has two bars and the long-cut attachment has three bars. These attachments are ideal for blending, tapering and defining beards, as well as for achieving a “close trim” stubble look around the face. To use the attachments, go with the hair direction. To achieve closer looks, go against the hair direction.
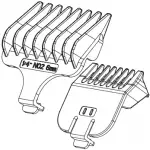
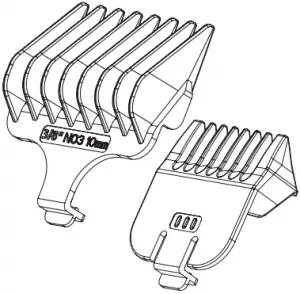


1 2 3
TRIMMING NOSE HAIR USING DETAILER HEAD
Make sure the nasal passages are clean. Slowly move the detailer in and out of each nostril, no more than 1/4-inch deep.
TRIMMING EAR HAIR
Make sure the outer areas of the ears do not contain any wax. Hold the ear flat with one hand and carefully insert detailer no more than 1/4-inch into the outer ear.
 WARNING: DO NOT INSERT THE DETAILER OR ANY OTHER FOREIGN OBJECT INTO THE INNER EAR. FOR HAIR GROWING ON THE OUTSIDE OF THE EAR, SIMPLY MOVE THE DETAILER SLOWLY ALONG THE EDGES OF THE EAR.
TRIMMING EYEBROWS
Slowly move detailer to neatly trim stray hairs. For precise, even trimming, slowly move the detailer closer or farther away from eyebrows to achieve desired length. Do not press against brow as it may remove too much hair.
TRIMMING EYEBROWS WITH COMB
Snap on the No. 1 Comb on your trimmer head. Slowly move the trimmer to neatly trim stray hairs. Do not press hard against brow as it may remove too much hair. You may also use your trimmer blade with the #2 or #3 guide comb. Move the trimmer with the direction of the hair flow (from the bridge of your nose to the temple). Be sure to mind your eyelashes as you trim.
DETAILING NECKLINES, SIDEBURNS, MOUSTACHES & BEARDS using trimmer head.
Slowly move trimmer downward on desired areas to neatly trim and shape.
TRIMMING ARM & LEG HAIR using trimmer head.
Simply glide the trimmer over your arm or leg until desired hair length is achieved. The first time you trim the hair, start by using a longer setting on the guide comb on the trimmer, then use progressively shorter settings if a shorter length is preferred.
TRIMMING CHEST & STOMACH using trimmer head.
Glide the trimmer over your torso region, in an upward motion until desired hair length is achieved. For tight, scratch-free trimming, use the #1 guide comb.
FOR THE CLOSEST LOOK
After trimming, attach the shaver head. The shaver makes for the perfect tool to groom the total body. Using the same technique, as mentioned prior, you can groom wherever you feel a need. Shave against hair growth while stretching the skin. After every use, remove the shaver foil by pressing both side buttons and carefully clean using cleaning brush provided.
TRIMMING PRIVATE AREAS with the trimmer & detailer head.
- Volume reduction using trimmer head. Attach guide comb and select a long trimming length. Begin trimming, starting at the top and working down. Use progressively closer settings to get the “look” and length you prefer.
- For hard to reach or tight areas, use the detailer head. Always pull skin taut. Then slowly move the detailer through area to trim until desired look is accomplished.
- Shave in your private areas by gently shaving in the desired area and always keep the skin taut.
WIRING
 WARNING: IF THE TRANSFORMER IS DAMAGED IT MUST BE REPLACED IN ORDER TO AVOID A HAZARD. THIS PRODUCT MUST ONLY BE USED WITH THE TRANSFORMER SUPPLIED. SHOULD A REPLACEMENT BE REQUIRED CONTACT WAHL CUSTOMER SERVICES.
WASTE ELECTRICAL & ELECTRONIC EQUIPMENT DIRECTIVE 2002/96/EC (WEEE)
 At the end of this products life it should not be disposed of with general household waste.
Care should be taken to dispose of in a suitable manner in accordance with your Local Authority regulation.
17
GUARANTEE
LITHIUM BATTERY MODELS
This product is guaranteed against defects in material and workmanship for a period of 5 years from the date of original purchase or receipt as a gift.
Should this product become defective during the guarantee period, return it to the store of purchase together with your proof of purchase for repair or replacement.
Alternatively within the guarantee period you can return the product to Wahl (UK) Ltd who will repair any such defect or elect to replace the product or any part of it, without charge, provided there is proof of purchase. Should a replacement be offered this will not extend the original guarantee period.
The guarantee becomes invalid in the case of misuse, alteration or repair by unauthorised persons.
This guarantee does not include blades, cables, shaver heads, foils and cutters etc., which are consumable parts.
This product is designed for domestic use only and use within a professional environment will invalidate the guarantee.
This guarantee in no way affects your rights under law in the United Kingdom.
18
NiMH BATTERY MODELS
This product is guaranteed against defects in material and workmanship for a period of 3 years from the date of original purchase or receipt as a gift.
Should this product become defective during the guarantee period, return it to the store of purchase together with your proof of purchase for repair or replacement.
Alternatively within the guarantee period you can return the product to Wahl (UK) Ltd who will repair any such defect or elect to replace the product or any part of it, without charge, provided there is proof of purchase. Should a replacement be offered this will not extend the original guarantee period.
The guarantee becomes invalid in the case of misuse, alteration or repair by unauthorised persons.
This guarantee does not include blades, cables, shaver heads, foils and cutters etc., which are consumable parts.
This product is designed for domestic use only and use within a professional environment will invalidate the guarantee.
This guarantee in no way affects your rights under law in the United Kingdom.
19
WAHL (UK) LTD
STERLING HOUSE
CLIPPER CLOSE
RAMSGATE, KENT
CT12 5GG
CUSTOMER SERVICES T: 01227 740066
www.wahl.co.uk
Form No. ZB333
Rev.4 09-18
20
]]>