WEST BIKING Wireless Bicycle Computer

WEST BIKING Wireless Bicycle Computer
INTRODUCTION
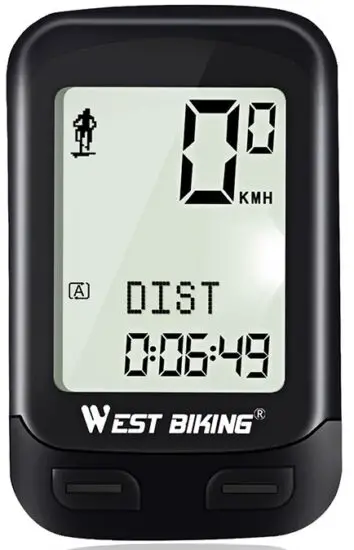
Bicycle microcomputer uses the low frequency wireless transmission technology, with convenient operation, easy to install, and to enhance the performance of wireless electromagnetic waves, make more accurate, the measured data of super screen LCD dot matrix display, make you easy access to in the process of riding data, it also has an accurate records, automatic storage and update you within a week of riding data.
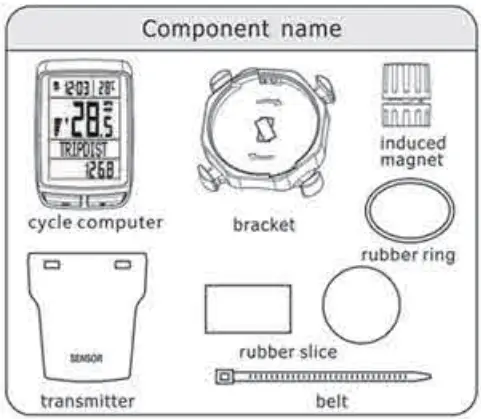
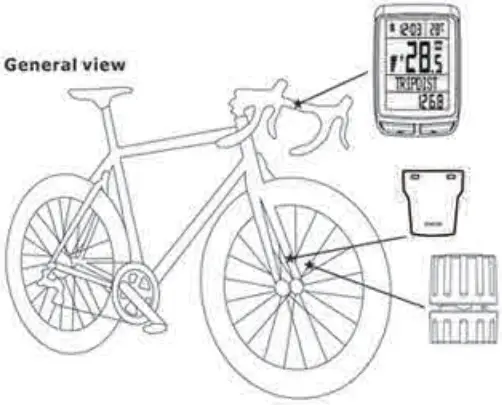
COMPONENTS NAME
FUNCTION INTRODUCTION
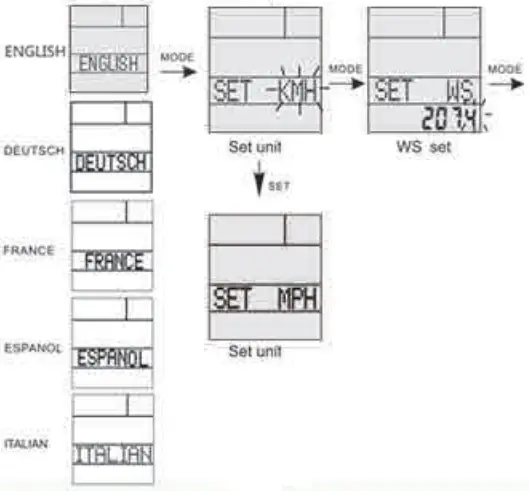
- Display Five languages
- Calorie consumption (KCAL)
- Clock
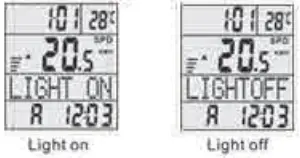
- LED backlight
- Stop Watch Current speed
- Temperature
- AVG speed/MAX speed
- Metric/imperial alternative
- Speed comparison prompts
- Scan: Automatic Circulation
- Riding Time/Distance
- Wheel setting
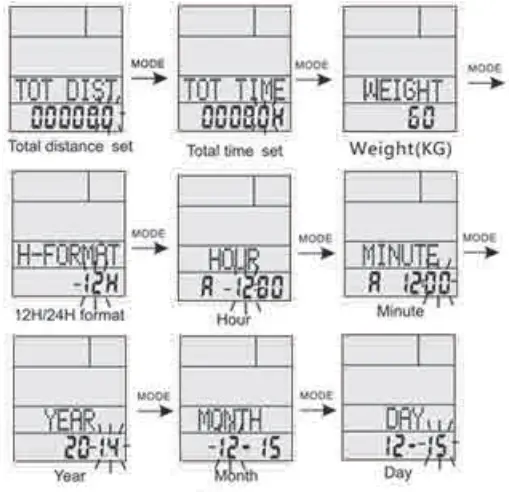
- Total distance/time
- Analogy Speed indicator
- Weekly riding time/distance
- AUTO ON/OFF
- Automatic memory and updated every weekly
- Trip up/down
INSTALATION INSTRUCTIONS
How to mount battery of computer?
Inserting one-dollar coin into the gap of the battery cover, then counterclockwise rotate to open battery cover, mount battery and cover it up.
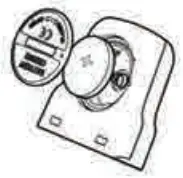

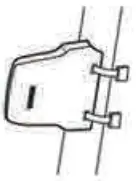
How to install bracket ?
Add rubber slice on the handle bar to fix the bracket on the bicycle handle bar wit! ribbon cord.
How to install bicycle computer gauge outfit?
Inserting the gauge outfit into the end along the bracket slot, just press shrapnel to slip off.
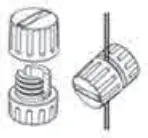
How to install transmitter?
Add rubber slices on bicycle tube, and fix the transmitter with ribbon cord to the required position. One side of transmitter marked with SENSOR should face forward magnet.
How to install magnet?
Disassemble the nut at the bottom of the magnet, fasten the magnet with screw to the spokes of the wheel, tighten the nut.
Note:
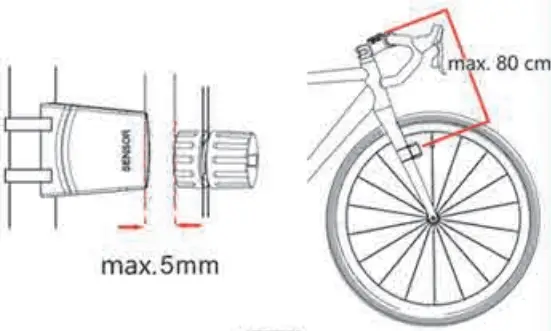
- The max. distance between bicycle computer gauge outfit and transmitter is 80cm. Try to adjust the location of transmitter within this scope.
- The min. distance between transmitter and magnet should be less than 5mm, try to adjust the location of magnet within this scope.
- The transmitter and gauge outfit should be placed vertically, the angle should not be over 30° .
Operation Instruction
The all information will clean to zero when you replace the battery again
- Please set the parameter first time Otherwise will be let the riding data not correct
- How to get into the System initialization parameter is set? Two methods
- a: When you replace the battery again, will setting speed unit, wheel circumference ,total riding time, total riding distance, date, height, weight, age, etc.
- b: In the CLOCK (CLOCK) MODE. press and hold (MODE) for 2 seconds to enter the system parameter setting, as shown in the figure below:
NOTE: It will influence the riding data accuracy if the
Wheel Circumference data not correct.
Two method for measure the wheel Circumference:
- Record the wheel size, See the table below to find the perimeter set value.
- Make a mark point on wheel, push the bike, when ‘k roll a circle, a distance which is through the wheel circumference (MM).
| Wheel diameter | Set value (mm) |
| 18 Inch | 1436 |
| 20 Inch | 1596 |
| 22 Inch | 1759 |
| 24×1.75 | 1888 |
| 24 Inch | 1916 |
| 24×1 3/8 Inch | 1942 |
| 26×1.40 | 1995 |
| 26×1.50 | 2030 |
| 26×1.75 | 2045 |
| 26×1.95 | 2099 |
| 26×2.1 | 2133 |
| 700C TUBULAR | 2117 |
| 700×200 | 2092 |
| 700x23C | 2112 |
| 700x25C | 212. |
| 700x28C | 2131; |
| 700x32C | 2155 |
| 700x35C | 2164 |
| 700x38C | 2174 |
| 27.5 Inch | 2193 |
| 28 Inch (Iens) | 2234 |
| 2c.. I: inch | 2281 |
1n any MODE and hold [SET] + [MODE, shows the LIGHT ON or LIGHT OFF, when in LIGHT ON MODE, press any key the backlight on 3 seconds, when the LIGHT OFF MODE. closing the backlight.
As shown in the figure below, press [MODE] key to switch different display modes. As shown in figure 2.
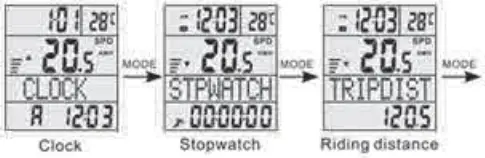
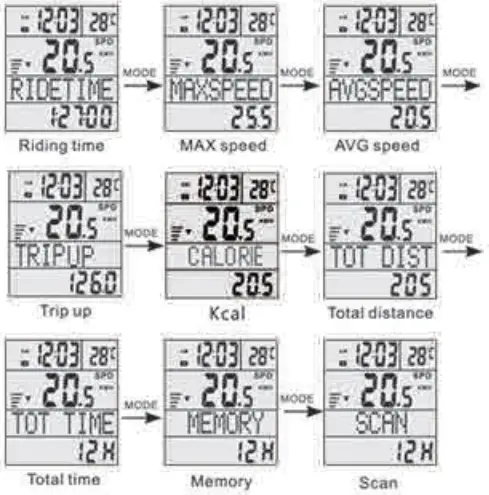
CLOCK
Display the current time, 12H or 24H.
STOPWATCH
Press [SET] start stopwatch, then [SET] key stopwatch once stopped, press [SET] key for 2 seconds, stopwatch numerical reset.
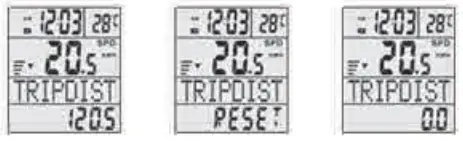
Clean up after the mileage records from the last data.
RIDE TIME
Clean up after the riding time records from the last data.
AVG SPEED
Average cycling speed by mileage divided by riding time and, by starting the last clear information.
TRIP UP/DOWN
Press MODE button switch to the TRIP UP ,hold down SET button for 3 seconds to enter value setting, press SET button to select TRIP UP or TRIP DOWN., press MODE button to change digit location, press SET button for 3 seconds to exit the setting mode. e records from the last data.
Measured in KCAL
MAX SPEED
Record after removing data from the last top cycling speed
TOT DIST
Record riding state total mileage, the system can be reset, the total mileage with the battery again will be reset, needs to be set.
TOT TIME
Records the total cycling time riding condition, the system can be reset, and the total cycling with the battery again time will be reset and needs to be set.
SCAN
Press [MODE] key to switch to the SCAN MODE, this MODE will automatically every 4 seconds in the ride DIST, RIDE TIME, AVG SPEED, MAX SPEED of these four display MODE switching cycle
SPEED PACE
Speed is more prompt function to up triangle, Said the
current cycling speed is higher than the average speed,
the downward triangle According to the current speed is
lower than the average speed of riding.
MEMORY
- In record storage (MEMORY) mode, press (SET) wilisee one day riding data, it automatically scans show date, distance, riding time, maximum speed, average speed, etc,
- 1f you want to see yesterday riding on data, can press the SET button to enter to view, like this, you can find the cycling data for seven days.
- Record store function can not clear and set up the data.
- Every day in the evening 12:00 cycling data stored on yesterday.
In speeding distance (ride DIST) , riding TIME (RIDE TIME), the maximum speed (MAX SPEED), avg speed {AVG SPEED). the pattern of heart rate (HR- TIME). hold the [SET] key for 3 seconds, until the show “RESET” character data RESET after flashing 3 times, the current mode of cycling data has been RESET.
Information clear will not affect the total mileage (TOT – DIST), total cycling TIME (TOT – TIME), and the data in the MEMORY.
No received speed signal from the bicycle computer in 4 minutes. it will automatically enter a dormant state. Speed numerical did not show at this time.
- In a dormant state, press any key [MODE] or [SET] key, it will be automatically switched on
- In addition, this product has a built-in vibration switch, when you ride, it detects the vibration, will also be automatically switched on.
In order to save battery power, when the bike spec 4 minutes speed signal is not received, it will automatically enter the dormancy standby, al this time to press any buttons or ride it automatically boot
Replace the battery
- All of the recorded data will be reset. After replace the battery.
- The total mileage (TOT – DIST) and riding TIME (TOT – TIME) can be reset, before replace the battery, please record the data.
- Need to use CR2032 battery, battery positive electrode (+) toward the battery cover.
Note
- The bicycle computer can be used on rainy days, but not used underwater.
- Don‘t put bicycle computer in bike and don’t let the sun exposure when you don’t ride it.
- Check regularly the distance between sensor and magnets.
- Don’t use alcohol, thinner or other organic solvent to clean bicycle computer and its accessories,
- Remind you to pay attention on road condition to ensure safety traffic.
Trouble Shooting
| Problems | Reasons | Solution |
| Menu display blacken | Under non-riding status, the bicycle computer was burnt in the sun for long time. | Put it on shady and cool places. |
| D4AlaY ‘levity update | Climate temperature is low | Place it in normal temperature |
| No display |
|
|
| No speed display or faulty display |
|
|
| Malfunction display 3/4. | Set up again referring to setup Manila! |
Speed sensor: non-contact type magnetic sensors
Battery Type: One pieces of 3V battery
Battery life: (Model No. CR2032) is approximately 1.5 years (based on two hours of daily riding)
Size and weight: 47×63 mm/40g
The wheel circumference input Unit: mm
Operating Temperature ; -200 ~ 70°C
FCC Statement
This equipment has been tested and found to comply with the limits for a Class 8 digital device, pursuant to Part 15 of the FCC Rules. These limits are designed to provide reasonable protection against harmful interference in a residential installation. This equipment generates uses and can radiate radio frequency energy and, if not installed and used in accordance with the instructions, may cause harmful interference to radio. communications. However, there is no guarantee that interference will not occur in a particular installation, If this equipment does cause harmful interference to radio or television reception, which can be determined by turning the equipment off and on, the user is encouraged to try to correct the interference by one or more of the following measures:
- Reorient or relocate the receiving antenna.
- Increase the separation between the equipment and receiver,
- Connect the equipment into an outlet on a circuit different from that to which the receiver is connected.
- Consult the dealer or an experienced radio/TV technician for help,
This device complies with part 15 of the FCC Rules.
Operation is subject to the following two conditions:
- This device may not cause harmful interference.
- this device must accept any interference received, including interference that may cause undesired operation.
Changes or modifications not expressly approved by the party responsible for compliance could void the user’s authority to operate the equipment.
DOWNLOAD RESOURCES
- WEST BIKING Wireless Bicycle Computer [pdf] User Manual YP0702, 2A426-YP0702, 2A426YP0702, Wireless Bicycle Computer, Wireless Bicycle Computer
- Read more: https://manuals.plus/west-biking/wireless-bicycle-computer-manual#ixzz7dlOAu9On
FAQ’S
How to check the battery of computer?
It is a button battery, which is in the back of computer.
How to check the computer is working or not?
Press the button on the back of computer, if it shows time and date, then it means that the computer is working.
How to check the computer has been connected with receiver or not?
Press the button on the back of computer, if it shows “RUN”, then it means that the computer has been connected with receiver.
How to check whether there is any data in memory or not?
Press “MODE” key on the back of computer, if there are some data in memory, then it will show “MEMORY” and then press “MODE” key again to show “END”, which means there are some data in memory. If there are no data in memory, then it will show “MEMORY” and press “MODE” key again to show “END”, which means there are no data in memory.
How do I update my riding data?
You need to connect with PC firstly by USB cable. Then you can update your riding data by WEST BIKING software. If you want to connect with PC without USB cable, you need to install software before connecting with PC. Please visit our website for more information about how to install software and how to update your riding data.
Why is my bike computer not working?
There are three basic causes of the vast majority of cycle computer malfunctions: Battery problems, wiring problems, and misalignment between the magnet and the sensor.
How do I program my bike computer?
Right there press the right button and then we’re going to go to 18 right there so everything is programmed. And now let’s say that you’re going to take a test drive.
Where do you put the sensor on a bike computer?
Front or back wheel
Putting the sensor on the front wheel is good for keeping things simple. It is much easier to route a wire to the front fork than it is to route it to the rear fork. The only problem is that a kit will give you enough wire to go all the way to the rear fork.
What should you display on a cycling computer?
A bicycle computer, aka: a head unit, is a key tool in your power training arsenal. After all, all that power training data needs to be displayed somewhere.
Current Interval information in a main screen:
Watts.
Average Watts.
Max Watts.
Elapsed Time.
HR.
Cadence.
How do I install a wireless cycling computer?
The first step to installing the handlebar mount is getting it oriented. The right way you want to take this clip at the bottom and face it towards you second you’re going to take your zip ties.
Can I use my Android phone as a bike computer?
Jepster is an android app to use your mobile phone as a bike computer. Jepster uses GPS to track your ride. Furthermore, it supports ANT+™ and Bluetooth heart rate monitors, speed/cadence sensors and power meters. Put the stuff that you care about on the screen: maps, power data, heart rate or many more.
Can I use Strava as a bike computer?
Strava turns every iPhone and Android into a sophisticated running and cycling computer (and we work with your GPS watches and head units, too).
VIDEO
WEST BIKING Wireless Bicycle Computer
www://westbiking.us/