![]() DISHWASHER ZMYWARKI
DISHWASHER ZMYWARKI
User manual
Item: 230299,230305,230312,230220,233023
 |
|
You should read this user manual carefully before using the appliance.
Dear Customer,
Thank you for purchasing this Hendi appliance. Before using the appliance for the first time, please read this manual carefully, paying particular attention to the safety regulations outlined below.
Safety regulations
- This appliance is intended for commercial use only and must not be used for household use.
- The appliance must only be used for the purpose for which it was intended and designed.
The manufacturer is not liable for any damage caused by incorrect operation and improper use. - Keep the appliance and electrical plug away from water and any other liquids. In the event that the appliance should fall into the water, immediately remove the plug from the socket and do not use until the appliance has been checked by a certified technician. Failure to follow these instructions could cause a risk to lives.
- Never attempt to open the casing of the appliance yourself.
- Do not insert any objects in the casing of the appliance.
- Do not touch the plug with wet or damp hands.
- Danger of electric shock! Do not attempt to repair the appliance yourself. In case of malfunctions, repairs are to be conducted by qualified personnel only.
- Never use a damaged appliance! Disconnect the appliance from the electrical outlet and contact the retailer if it is damaged.
- Warning! Do not immerse the electrical parts of the appliance in water or other liquids.
Never hold the appliance under running water. - Regularly check the power plug and cord for any damage. If the power plug or power cord is damaged, it must be replaced by a service agent or similarly qualified persons in order to avoid danger or injury.
- Make sure the cord does not come in contact with sharp or hot objects and keep it away from an open fire. To pull the plug out of the socket, always pull on the plug and not on the cord.
- Ensure that the cord (or extension cord) is positioned so that it will not cause a trip hazard.
- Always keep an eye on the appliance when in use.
- Warning! As long as the plug is in the socket the appliance is connected to the power source.
- Turn off the appliance before pulling the plug out of the socket.
- Never carry the appliance by the cord.
- Do not use any extra devices that are not supplied along with the appliance.
- Only connect the appliance to an electrical outlet with the voltage and frequency mentioned on the appliance label.
- Connect the power plug to an easily accessible electrical outlet so that in case of emergency the appliance can be unplugged immediately. To completely switch off the appliance pull the power plug out of the electrical outlet.
- Always turn the appliance off before disconnecting the plug.
- Never use accessories other than those recommended by the manufacturer. Failure to do so could pose a safety risk to the user and could damage the appliance. Only use original parts and accessories.
- This appliance is not intended for use by persons (including children) with reduced physical, sensory or mental capabilities, or lack of experience and knowledge.
- This appliance must not be used by children under any circumstances.
- Keep the appliance and its cord out of reach of children.
- Always disconnect the appliance from the mains if it is left unattended or is not in use, and before assembly, disassembly or cleaning.
- Never leave the appliance unattended during use.
Special safety regulations
- Never pull the appliance by the power lead.
- Do not apply any additional agents other than the ones supplied with the appliance.
Water softeners
 CAUTION: all appliances requiring constant connection with the water supply system (including this appliance) must have an additional water softener attached in order to remove calcium and magnesium compounds. The softener must be used in compliance with the manufacturer’s recommendations set out in the user’s manual.
- If the softener is not attached or is misused and/or regenerated, the distributor shall reject all complaints entailing repairs required due to the limescale build-up in the appliance.
- It is recommended to use softeners from the wide range offered by HENDI. Ask your HENDI sales representative for assistance in the selection of the appropriate model. We recommend the following agents for the proper regeneration of the softeners: Salt tablets, 25 kg bags – code: 231265
| General Hardness of water | ||||
| °dGH | °fH | mmol/l | °e | Water softener |
| above 24 | above 40 | above 4,2 | above 28 | Necessary |
| 18 – 24 | 32 – 40 | 3,2 – 4,2 | 22 – 28 | Necessary |
| 12 – 18 | 19 – 32 | 2,1 – 3,2 | 13 – 22 | Necessary |
| 4 – 12 | 7 – 19 | 0,7 – 2,1 | 5 – 13 | Necessary |
| below 4 | below 7 | below 0,7 | below 5 | Not required |
Intended use
- The appliance is intended for professional use and can be operated only by qualified personnel.
- This appliance is intended for washing crockeries, such as glasses, cups, plates and cutlery. Any other use may lead to damage of the appliance or personal injury.
- Operating the appliance for any other purpose shall be deemed a misuse of the device. The user shall be solely liable for improper use of the device.
Grounding installation
This appliance is classified as protection class I and must be connected to protective ground. Grounding reduces the risk of electric shock by providing an escape wire for the electric current.
This appliance is equipped with a cord having a grounding wire with a grounding plug. The plug must be plugged into an outlet that is properly installed and grounded.
Preparation before the first use
- Check the appliance for defects. If you discover any defects, contact your supplier without delay and DO NOT operate the appliance.
- Remove the whole packaging and the protective film.
- Clean the appliance with lukewarm water and soft cloth.
- Unless recommended otherwise, place the appliance on a flat and stable surface.
- Allow adequate space around the appliance to enable proper ventilation.
- Place the appliance in such a way that you always have easy access to the power plug.
Installation instructions
Introduction
• This appliance complies with the needs of modern and professional cooking.
• Please read these instructions carefully before operating this appliance.
• In this manual you will find all significant safety indications, as well as other essential information needed for the regular start-up – and the operation itself – of the appliance.
• The person undertaking, on behalf of the user, installation, start-up, maintenance and repair of the dishwasher should be familiar with the opera- ing instructions or trained by our customer service department. This is the only way to ensure the correct operation of the appliance and to avoid extra repair expenses.
• Keep these instructions in a safe place for future reference.
• As a condition to any warranty service obligation, the client must complete and send the Warranty Certificate to our company within 10 days of purchase date.
Advantages
This dishwasher has the following advantages:
- is made of Stainless Steel 18/8 304
- is manufactured and tested for continuous operation.
- easy and simple cleaning
- no jamming during the door opening and closing: simple use
- perfect dish and glass washing
- less environmental pollution
- excellent and friendly service; all spare parts available
- reduced water consumption
Installation suggestions
- This dishwasher is delivered with a water inlet and outlet hoses.
- According to its construction, the connection of the machine to water and power supply must be performed by an authorized and locally recognized installer by keeping the existing specifications.
Before connecting the appliance, check that the connection data on the data plate (voltage and connected load) match the mains electricity supply.
Installation
- Open the package. Before setting up the appliance, check it for any externally visible damage due to transportation. If in any doubt, call for a specialist to check it (from the authorized local dealer who sold the appliance).
- Place the dishwasher at the installation area, close to the necessary water and power supply (the ground should be sufficiently stable).
- Remove the protective foil protecting the steel housing of the dishwasher from scratches. Any remaining adhesive residue should be carefully removed. Do not use any scouring materials. Leaving the protective foil can cause difficulty removing adhesive glue foil to the dishwasher’s steel housing.
- The appliance should be placed horizontally.
Possible inclinations should be corrected using a spirit level. - Following the successful installation, the dishwasher should be cleaned thoroughly with a conventional detergent before it is put into operation.
Connection to the water supply
- ATTENTION: The connection with the water supply should be made according to the current safety standards.
- The dishwasher may be connected only to a cold water supply.* (In case you want to connect it to a hot water supply, please contact our company)
- The water supply hose should have a flap valve (non-return valve) according to DIN 1988.
- The water supply hose/pipe should be rinsed before the appliance’s connection.
- The water supply hose/pipe should have a minimum internal diameter of 16 mm and the connection with the hose should be 3/4 inch.
- All hose collars should be adjusted in a fixed position before the appliance is put into operation.
- The dishwasher can be only connected to a well-functioning softener.
- ATTENTION: The water pressure must be between 2 and 5 bar.
Drainage connection
- The outflow is accomplished through gravity force (natural flow). The outlet hose should be connected either directly to the main drainage – where a pipette for odors is anticipated, or water runs directly to the drainage well in the ground, which has a pipette for odors.
- ATTENTION: The outlet hose should not be placed higher than a level (as given for each appliance’s type) from the lower side of the dishwasher’s dispenser.
Electrical Network connection
- ATTENTION: All electrical work must be carried out by a suitably qualified and competent person.
- The dishwasher operates under a specific voltage depending on the type of dishwasher.
- You should supply the power, depending on the appliance’s power reception (the electrical connection should be made by authorized electricians). Specifications should be met according to the corresponding parts of DIN, VDE, D100, the EVU connection terms, the relevant ZH 1/37, chapter 7.2 – as well as the current specifications for accident prevention.
- Respectively, the appliance must be connected to a direct power supply electrical installation through an HO7 RN-F cable with load relief of the appliance.
Protective duct connection and voltage compensation
- The electrical safety of this appliance is ensured only if the protective duct has been connected and checked properly. The corresponding specifications should be met at this point (see paragraph 1.5).
- In addition, the appliance should include a voltage compensation system.
- For this reason, the backside of the appliance has a screw with the indication “voltage compensation”.
- Following the electrical connection, the action of the protective duct, the voltage compensation, and the insulation value should be checked according to the existing provisions of DIN VDE.
Technical specification
You can find the technical data of each appliance at the adhesive label of the dishwasher.
| Item no. | 230299 | 230305 | 230312 | 230220 |
| Intended use | Washing glass, cups up to a maximum height of 290 mm |
Washing tableware of max. Height: 325 mm for glass and 335 mm for plates |
Washing tableware of max. Height: 395 mm for glass and 400 mm for plates | Washing tableware of max. Height: 325 mm for glass and 335 mm for plates |
| Operating voltage and frequency | 230V- 50 Hz | 400V- 50 Hz | 230V- 50 Hz | |
| Rated input power | 2800W | 6600W | 8600W | 3600W |
| Protection class | Class I | |||
| Waterproof protection class | IPX4 | |||
| Amount (pcs.)/lenght
of washing cycle (s.I |
1/120 | 1/120 | 1/120 | 1/120 |
| Net weight [approx.) | 39kg | 57kg | 111kg | 39kg |
| Outer dimension | 470x510x(H1710mm | 570x6004H1830mm | 750x880x -H)1390/1830mm
570×600(+3701 |
x(H)830mm |
Remark: Technical specification is subjected to change without prior notification.
Operating instructions
Instructions for the dishwasher’s regular operation
- The appliance is exclusively used to clean dishes, cups, glasses, silverware, etc. following their use during lunches/dinners.
- You should pay special attention that the items to be washed are suitably placed for dishwashing.
- Silverware should be cleaned from food residues, if not washed right after lunch/dinner (coloring and spots from certain foodstuffs).
- Do not wash in this appliance items which have been in contact with acids, mineral oil, grease, gasoline or colors and solvents (industrial chemicals).
Preparation of dishes for washing
- Do not let food residues dry onto the dishes. In order to avoid filter blockage as well as the cleaning water becoming dirty quickly, you should remove large food residues, olive pips, lemon peels, toothpicks, etc., before you place the dishes in the basket.
- We recommend you to leave in water for a while or rinse the glassware that has food residues dried on.
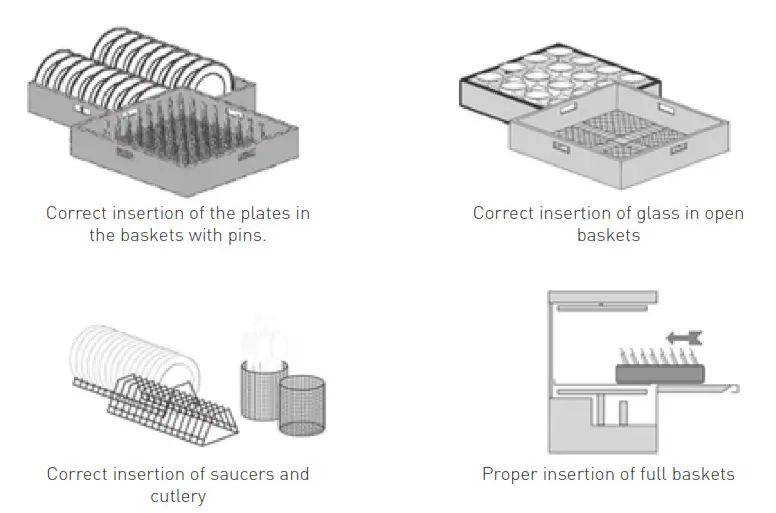
Filling of basket
- Put glasses, cups, large plates, etc. with the opening facing down in the anticipated baskets. Do not pile one on top of the other.
- Glasses should not touch each other (damage in glass, stains due to contact).
- Place cutlery in the appropriate basket made of synthetic material, with the handle facing down.
- Silverware may be placed freely on the leveled plastic basket.
- In any case, you should avoid overloading the basket.
- Water supply hoses should remain free (not blocked or stretched).

- The detergent to be used should be suitable for dishwashers. After the recommended operating temperature is accomplished, you may put the detergent directly into the dispenser.
- If the dishwasher has an integrated detergent pump, we put the pump’s elastic pipe indicated as DETERGENT in the detergent dispenser.
- Use exclusively detergent with little foam effect.
- We recommend that you use detergent and rinse aid from the same manufacturer.
Rinse-aid dozer
- The dishwashers have an automatic rinse aid dozer. Put the elastic pipe indicated as “RINSE AID” in the storage compartment.
- The dozer is adjusted from the manufacturer’s premises at its maximum value and may be adjusted accordingly – depending on water hardness, how dirty the dishes are, and the detergent used – following the successful installation of the dishwasher.
- Turning the adjustment screw clockwise, the flow is reduced (-), turning it counter-clockwise the low is increased (+). We recommend that you let the constructor to adjust it (or the specialized personnel of the authorized local dealer who sold the appliance).
ATTENTION: Do not use detergent for hand-wash.
- The correct detergent dosage depends on the water hardness and the amount of dirt on the dishes. Follow the dosage information of the detergent’s manufacturer.
- Less detergent quantity affects negatively the washing result, while more detergent quantity does not present better results, but rather more consumption and environmental pollution.
- Before you perform these works, you should turn off the switch of the appliance or turn off the corresponding switches so that no current flows, or turn off the power supply switch.
- INDICATION: The dozer should not operate while dry, since it will lose its suction properties. It is necessary that you have filled the storage compartment before the appliance’s installation so that the dozer operates correctly during the first wash.
- Do not use caustic products. If you do not follow this indication, you will not be covered by the guarantee.
Control panel operation
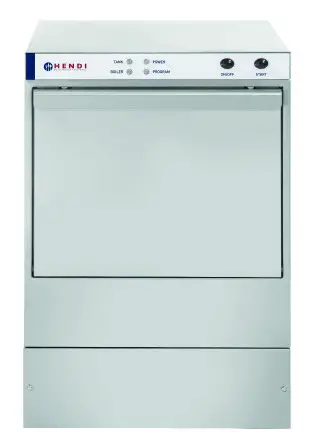
Start of the washing program in glass rinser 230299 and dishwasher 230305
- Open the main external water control valve and press on the power safety switch dedicated to the cup washer.
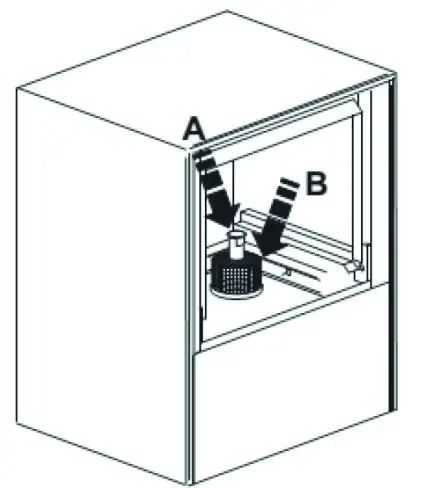
- Make sure the tank filter “B” of the cup washer has been properly placed in the bottom (see figure opposite).
- Make sure the overflow pipe “A” (overflow tube) has been fitted properly (see figure opposite).
- Turn on the cup washer by pressing the “ON/ OFF” button – the green “POWER” indicator will light up – this means that the appliance is powered on.
- The cup washer tank starts filling with water (on the first start-up of the appliance, the boiler will start filling first).
- When the tank is full, the boiler heater will come on followed by the tank heater – this is signaled by the lighting up of the orange “TANK” indicators for the tank heater and “BOILER” indicator for the boiler heater. The heating time is about 30-40 minutes. Do not start the washing cycle until the heater indicators turn off – the water will not be hot enough.
- When both the orange indicators turn off, put the rack with crockery, close the washer’s door and start the washing cycle by pressing and holding the “START” button down for 5 seconds. During the washing cycle, the green “PROGRAM” indicator will remain lit. If the “TANK” and/or “BOILER” indicator turns on during the washing cycle, it is a normal event and indicates the operation of the heater.
- The full washing cycle lasts 2 minutes. It is composed of 1 min. 40 sec. of the main washing with water heated to +62°C and of 20 sec. of rinsing/scalding with water heated
to +85°C. - When the washing cycle ends, the “PROGRAM” indicator will turn off and the cup washer is ready for another washing cycle.
- To start another washing cycle, repeat the steps from 7 to 9.

CAUTION: It is recommended to start subsequent washing cycles when the “TANK” and “BOILER” indicators are off.
Dishwasher 230305 has an additional component of the control panel – a boiler water thermometer. When the dishwasher is operating correctly, the thermometer reading should be +85°C (or more).
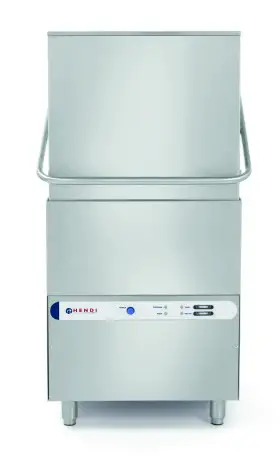
Start of the washing program in hood dishwasher 230312

- Open the main external water control valve and press on the power safety switch dedicated to the cup washer.
- Make sure the tank filter “B” of the cup washer has been properly placed in the bottom (see figure opposite).
- Make sure the overflow pipe “A” (overflow tube) has been fitted properly (see figure opposite).
- Turn on the cup washer by pressing the “ON/OFF” button – the green “POWER” indicator will light up – this means that the appliance is powered on.
- The cup washer tank starts filling with water (on the first start-up of the appliance, the boiler will start filling first).
- When the tank is full, the boiler heater will come on followed by the tank heater – this is signaled by the lighting up of the orange “TANK” indicators for the tank heater and “BOILER” indicator for the boiler heater. The heating time is about 40-50 minutes. Do not start the washing cycle until the heater indicators turn off – the water will not be hot
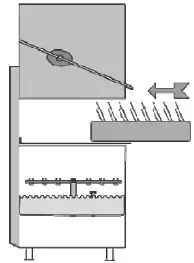
enough. - When both the orange heater indicators turn off, lift the hood – then the orange “DOOR” indicator will light up – and put the rack with crockery (see figure opposite), close the dishwasher door. The washing cycle will start automatically when the hood is pulled down. During the washing cycle, the green “PROGRAM” indicator will remain lit. If the “TANK” and/or “BOILER” indicator turns on during the washing cycle, it is a normal event and indicates the operation of the heater.
- The full washing cycle lasts 2 minutes. It is composed of 1 min. 40 sec. of the main washing with water heated to +62°C and of 20 sec. of rinsing/scalding with water heated to +85°C.
- When the washing cycle ends, the “PROGRAM” indicator will turn off and the cup washer is ready for another washing cycle.
- To start another washing cycle, repeat the steps from 7 to 9.

CAUTION: When the hood is not closed properly, the dishwasher will not start; instead, the “DOOR” indicator will light up.
Hood dishwasher 230312 has additional components of the control panel – a boiler water thermometer and a tank water thermometer. When the dishwasher is operating correctly, the boiler water thermometer should read +85°C and the tank water thermometer 62°C.
General comments regarding all models of honda dishwashers
- When the “TANK” indicator turns off, the dishwasher is ready to wash.
- Before you insert the rack, make sure all the food residues are removed.
- Add liquid detergent to the dispenser by hand unless the dishwasher is fitted with a detergent dispenser. See if there is enough shine and rinse agent and detergent in the inside tanks.
- When the washing program ends, the “PROGRAM” indicator will come off. Open the door and remove the ack with clean crockery.
- Leave to dry.If there are any dirt stains or watermarks after the washing cycle, this may be due to:
- inappropriate amount of detergent,
- the large mineral content of the rinse water,
- insufficient amount of shine and rinse agent,
- incorrect arrangement of the dishes in the rack,
- low water pressure during rinsing,
- low temperature of the water during rinsing,
- clogging or improper fitting of the filters,
- dirty water in the tank and/or boiler.
Safety arrangements
- There is a safety adjustment at the door, which interrupts the appliance’s operation during washing if the door opens by mistake. There is thermal protection integrated into the pump motor winding with automatic start-up, which interrupts power supply to the pump, in case of overcharge.
- There are thermal safety fuses, which interrupt the power supply in case of boiler or dispenser overheating.
Further significant indications / Safety indications
- No technical modifications are allowed in this appliance. The manufacturer is not responsible for any possible damages resulting due to modifications.
- The same applies in case that the appliance is used for any other purpose except the one anticipated, in case of fault or improper use. The water inside the dishwasher is not potable.
- Use, maintenance, and repair of dishwashers should be performed only by persons familiar with these works and informed of any possible risks.
Daily works
- Turn off the operation switch
 of appliance 230312.
 - Turn off the main switch/fuses.
- Turn off the water supply faucet.
- Empty the dishwasher by removing the overflow pipe “A” (overflow pipe) but leaving the Pump filter “B”.
Maintenance / Care / Repair
The perfect operation and safe use may be ensured only through the correct use of the appliance, as well as the compliance with the operation instructions, the corresponding
specifications and the care and cleaning indications.
This applies both for the compliance of the provisions of the law on appliance safety (GSG) and the existing specifications of ZH 1 and VBG on accident prevention.
RECOMMENDATION: Before cleaning or maintenance works, the appliance should not be connected with voltage through the installed main switch/fuse. The appliance should never be sprayed with water or high-pressure cleaning aid, because any insertion of water in the electrical elements may affect the regular operation of the appliance as well as the protection against electrical shock (insulating protection).
We recommend that you prepare a relevant maintenance agreement for all maintenance and repair works with our company (or with a service team/workshop of an authorized local dealer who sold the appliance).
All works/repairs performed in this appliance must be reported on the last page of the operating instructions, along with the signature/company name.
Substantially, no safety the arrangement should be put out of operation. If the disassembly of individual safety arrangements is required, e.g. for maintenance or repair works, the reassembly of the relevant safety arrangements should be performed immediately after the completion of works.
Unloading the water from the dishwasher’s tank (dispenser)
- Turn OFF the power of the dishwasher
- Empty the washing dispenser removing the overflow hose A.
- Remove filter B and clean it carefully with water.
- Rinse the washing compartment to remove any dirt residues.
- Then, reassemble the parts in reverse order. The appliance should never operate without a filter.
- During non-operation, the door should remain half-open or completely open (in order to avoid odors).
Regular maintenance and cleaning works
Regularly, you should remove the rotating arms and sprinkler, clean them carefully with water and reposition the parts in reverse order. This work should be performed with great care.
Pay attention to the correct position of filters and sprinklers!
- Do not clean the sprinkler’s injectors with tools or sharp objects.
- You may clean the appliance with warm water and conventional cleaning aids. Rub with water and then let it dry. The stainless steel parts should be treated with special means for steel and you should never clean them with steel wire, brush, etc. Also, you should never let them touch the surface, since even the slightest contact with the surfaces may cause rust formation. You should use brushes made of polymer plastic or natural brushes or thin wire.
- You should take care to move towards the smoothing direction so that you will not scratch the surface. Finally, rinse with clean water and dry thoroughly.
- We remind you that corrosion (rust formation) on stainless steel surfaces is not created by itself, but rather due to the use of improper cleaning aid (e.g. whitening or particularly caustic cleaning aid based on chlorine). Following a particular period of use, calcium sediments are formed in the internal walls of the dispenser (due to mineral particles in the water), which may affect the correct operation of the appliance. For this reason, regular emoving of salt formations is required.
- We recommend letting this work (removing of salt formations) be performed by specialized personnel (or by an authorized local dealer who sold the appliance).
Spare parts, Accessories, and Components
- All spare parts and components can be found in the authorized local dealer, who sold this appliance, or directly in our company.
- In case of claims or complaints, you should necessarily report the model and the serial number of the appliance/machine. These can be found on the label that is attached to the appliance.
| PROBLEM | CAUSE | SOLUTION |
| The dishwasher does not operate properly | Connection interruption | Check the connection |
| You have not turned the switch off the appliance ON | Turn the switch ON | |
| The main switch / or fuse has not been activated / or it is faulty |
Check the main switch / or fuse | |
| The switch of the appliance is faulty |
Refer to the authorized local a dealer who sold the appliance or directly to the manufacturer |
|
| The water inlet valve is faulty | ||
| The door is not closed | Close the door | |
| You have not turned the water supply on |
Turn the supply on | |
| The appliance operates, but the switch LED does not light on | The LED is faulty | Change the LED |
| Boiler heating does not operate | Switch or main switch or fuse has not been activated |
Check the switch of the appliance and the main switch or fuse |
| The safety thermostat of the boiler is faulty |
Refer to the authorized Local dealer or the manufacturer |
|
| The 93° thermal fuse of the boiler is faulty |
||
| The pressure regulator is faulty | Refer to the authorized Local dealer or the manufacturer |
|
| -Boiler heating” relay is faulty | ||
| The boiler fuse is burned out | Refer to the authorized local dealer or the manufacturer |
|
| Boiler heating operates, but LED does not turn on | Faulty LED | Change LED |
| Dispenser heating does not operate | Switch NI of the appliance or main switch or fuse has not been activated |
Activate the corresponding switch or fuse |
| Boiler heating is open | Wait | |
| The 85° thermal fuse is faulty. The dispenser’s fuse is burned out | The thermostat switch of 60° heating is faulty |
Refer to the authorized local dealer or the manufacturer |
| -Compartment heating” relay is faulty |
||
| Dispensers heating operates, but LED does not turn on | Faulty LED | Change LED |
| The pump motor does not operate | The main switch or fuse is not activated. The door is not closed. |
Activate the main switch or fuse |
| Close the door | ||
| The main relay is faulty | Refer to the authorized local dealer or the manufacturer |
|
| The pump motor is faulty | ||
| The program selection switch is faulty | ||
| The motor operates, but the pump does not rotate | An object has jammed the pump fin | Refer to the authorized local dealer or the manufacturer |
| Salts or detergent have been petrified following non-operation of the appliance |
Rotate the screw on the backside of the motor, until it rotates freely |
|
| Items do not dry (dishes, glasses, etc.) | The compartment has no drying aid | Insert drying aid to the compartment |
| The drying valve is faulty | Refer to the authorized local dealer or the manufacturer d | |
| The program switch is faulty | ||
| Rinsing arms do not rotate | ||
| The basket does not rotate |
Warranty
Any defect affecting the functionality of the appliance which becomes apparent within one year after purchase will be repaired by free repair or replacement provided the appliance has been used and maintained in accordance with the instructions and has not been abused or misused in any way your statutory rights are not affected. If the appliance is claimed under warranty, a state where and when it was purchased and include proof of purchase (e.g. receipt). In line with our policy of continuous product development, we reserve the right to change the product, packaging, and documentation specifications without notice.
Discarding & Environment
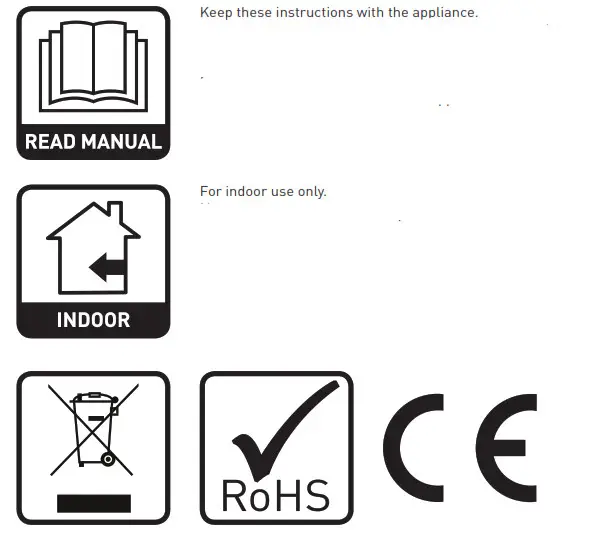
When decommissioning the appliance, the product must not be disposed of with other household waste. Instead, it is your responsibility to dispose of your waste equipment by handing it over to a designated collection point. Failure to follow this rule may be penalized in accordance with applicable regulations on waste disposal. The separate collection and recycling of your waste equipment at the time of disposal will help conserve natural resources and ensure that it is recycled in a manner that protects human health and the environment. For more information about where you can drop off your waste for recycling, please contact your local waste collection company. The manufacturers and importers do not take responsibility for recycling, treatment, and ecological disposal, either directly or through a public system.
![]()
Hendi B.V.
Steenoven 21
3911 TX Rhenen, The Netherlands
Tel:+31 (0)317 681 040
Email: [email protected]
Find Hendi on internet:
www.hendi.eu
www.facebook.com/HendiFoodServiceEquipment
www.linkedin.com/company/hendi-food-service-equipment-b.v.
www.youtube.com/HendiEquipment
– Changes, printing and typesetting errors reserved.
© 2019 Hendi BV/PL Rhenen – The Netherlands
Ver: 28-10-2019