WHYNTER ECO-FRIENDLY 12,000 BTU PORT ABLE AIR CONDITIONER
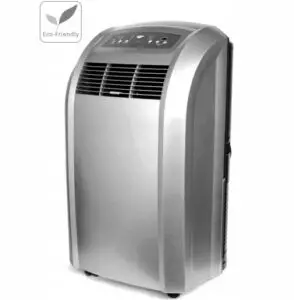
Thank you for choosing the Whynter portable air conditioner. Please follow the instructions provided in this user guide to obtain the very best performance from your portable air conditioner and take full advantage of the many features your portable air conditioner offers you. We trust that your Whynter air conditioner will provide the performance and reliability that we stand for.
Please keep this user manual in a safe place for future reference.
DISPOSAL
This symbol on the product or its packaging indicates that the appliance cannot be treated as normal domestic trash, but must be handed in at a collection point for recycling electric and electronic appliances. Your contribution to the correct disposal of this product protects the environment. Further information about the recycling of this product can be obtained from your local municipal authority.
SAFETY PRECAUTIONS
Before the portable air conditioner is used, it must be properly positioned and installed as detailed in this manual.
DANGER
- Do not under any circumstances cut or remove the third (ground) prong from the power cord.
- Make sure this unit is connected to a correctly grounded power supply outlet. Do not use an extension cord or power strip.
- The power cord is UL listed. It has a built-in L.C.D.I. (leakage, current, detection, interruption) circuit breaker for added safety. If the power supply is interrupted, press the reset button to reconnect the unit to power source.
- It is recommended to use a separate circuit that its size should be 15 Amps for the air conditioner.
- Do not use an excessively wet cloth, industrial solvents, oil-based products to clean this portable air conditioner.
- To avoid the risk of shock, the product should never be used in bathrooms, shower rooms, or in any other steamy or wet areas.
- Do not store or use gasoline or other flammable vapors and liquids in the vicinity of this or any other appliances.
- Do not repair, disassemble and/or modify the unit by yourself.
- Always turn off the portable air conditioner when cleaning the air filter, and transporting.
- Do not turn this unit on and off by plugging and unplugging. Always use the ON/OFF switch.
WARNING - Transport the unit in an upright position only, or leave it in an upright position for a minimum of 4 hours before first use.
- Ensure curtains or other objects are not obstructing the air inlet filters.
- Do not bend or crush the exhaust hose while in use.
- Always allow at least 20″ of clearance around the unit for ventilation. Do not use this unit inside closets, cabinets and/or cramped spaces between furniture.
- This unit is optimized to operate in an ambient temperature of 64 ° F – 95° F.
- This unit must be installed in an area protected from the elements, such as wind, rain, water spray or drips.
- The unit should not be placed next to ovens, grills or other heat sources.
- Always place the unit on even and hard and level surface.
- Do not sit or place objects on the unit.
- Do not allow children to climb, stand or hang on the unit. The air conditioner could tip over and get damaged and/or seriously injure somebody.
- Keep fingers out of the air intakes and air outlets.
- The unit is an electrical appliance. To avoid injury from electrical shock do not operate it with wet hands, while standing on a wet surface or while standing in water. Do not use it in outdoors or in wet conditions.
- When positioning or moving the unit, ensure it is not turned upside down or greater than 45° or more off level.
- This unit is designed for household, non-commercial use only. Any other use will void the warranty.
- Do not plug into the power outlet before set up is completed.
- Do not operate this unit without the air filter(s).
- Do not use harsh chemicals to clean the filter(s). Dry thoroughly before inserting the filter(s) into the unit.
- Do not add extra length to the exhaust hose by more than a total length of 9′. This will reduce the cooling efficiency of the portable air conditioner.
- At the end of each season, all water must be drained from the unit and filter(s) must be cleaned before storage.
THE MANUFACTURER DISCLAIMS ANY RESPONSIBILITY IF THE ABOVE INSTRUCTIONS ARE NOT FOLLOWED.
OPERATING CONDITION

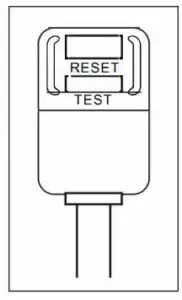
Your portable air conditioner is supplied with a Leakage-Current
Detection and Interruption (LCDI) plug. This plug reduces the risk of fire due to arcing faults in the power supply cord. Please follow the instructions below to ensure that LCDI plug works properly.
- Plug the power cord to a grounded wall outlet. Do not plug to a power strip or extension cord.
- Press the TEST button on the plug. This should trip the plug and cut the power to the air conditioner. If the plug does not trip and the unit comes on, please contact technical support.
- Press the RESET button to start the air conditioner.
- Do NOT use the TEST and RESET buttons to turn the air conditioner on and off.
IDENTIFICATION OF ACCESSORIES
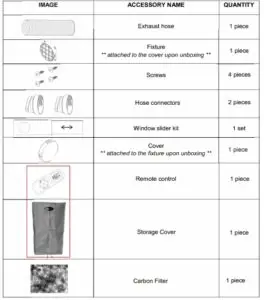
** The fixture piece may come attached to the cover piece. To remove, twist the cover piece to allow the tab from the fixture to disengage from the cover, and twist the cover to remove from the fixture.
Note: Please visit whynter.com for optional accessories information.
IDENTIFICATION OF PARTS
Front
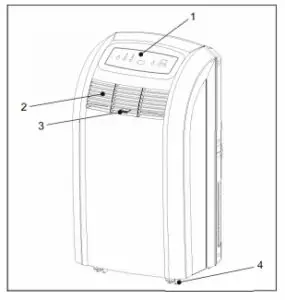
- Control panel
- Air vent
- Air deflector (Left – Right)
- Caster wheel
Rear
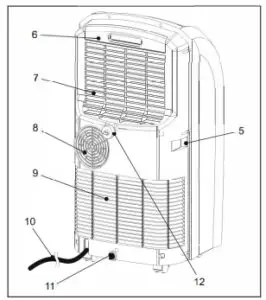
5. Handle
6. Air filter
7. Evaporator air intake
8. Air exhaust
9. Condenser air intake
10. Power cord
11. Drain plug and cover
12. Upper drain plug
OPERATING YOUR AIR CONDITIONER
Before you begin, thoroughly familiarize yourself with the control panel, remote control and all of the functions. Follow the symbol for the desired function. The unit can be controlled by the unit control panel alone or with the remote control.
CONTROL PANEL
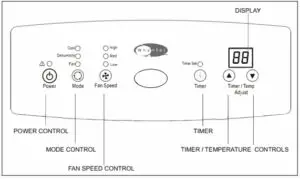
Power Control
Turns the unit on and off.
Warning Light
Condensation water may accumulate in the unit. If the internal reservoir becomes full, the warning light and the STOP light will come on and the unit will stop until the water is drained.
Mode Control
Controls the 3 function modes: COOL, DEHUMIDIFYING and FAN ONLY.
Fan Speed Control
Controls the 3 fan speeds: High, Medium & Low.
NOTE: Unit does not need to be vented in Fan mode.
Timer
Turns the timer function on and off.
Timer I Temperature Set Control Adjusts set thermostat temperature and timer. The display temperature is the set temperature. NOTE: This unit is capable of displaying set temperature in Fahrenheit or in Celsius. To convert from one to the other, press and hold the Up and Down buttons for 3 seconds.
INSTALLATION INSTRUCTIONS
Location
The air conditioner should be placed on a hard and level surface strong enough to support its weight. The unit is equipped with caster wheels for portability. It should only be rolled on smooth, flat surfaces. Use caution when rolling on carpet surfaces. Do not attempt to roll the unit over objects.
The air inlet and outlet should be free of any obstructions and be placed with at least 20″ of clearance for efficient air-conditioning and circulation.
Exhaust hose Installation
When using the air conditioner, the hot air from the exhaust hose must be exhausted out of the room to complete the air exchange of the condenser. When the unit is operating in dehumidifying or fan-only mode, installation of the exhaust hose is optional.
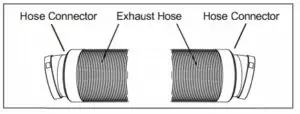
- Fully expand each end of the exhaust hose about 6″.
- Install the hose connectors onto the exhaust hose by threading counterclockwise.
- Align the tab cut-outs on one of the hose connectors to the tabs on the air exhaust at the rear of the unit and snap in place.
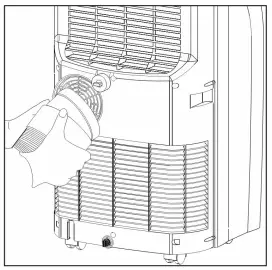
Only extend the hose to the necessary length, keeping it as short and as straight as possible. We do not recommend extending the hose more than 9′ long. If you are interested in purchasing an additional 5′ exhaust hose, please contact [email protected] for retail sales information or visit whynter.com for a list of optional accessories.
Window kit Installation
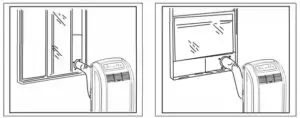
The window kit has been designed to fit most standard vertical and horizontal windows. However, it may be necessary to modify the installation procedures to accommodate your window.
- If your window opening is smaller than the minimum length of the window slider kit, the window slider kit can be cut to fit the window opening. Never cut into the exhaust hose cut-out on the window slider kit.
- If your window opening is larger than the maximum length of the window slider kit, additional material will be needed to cover the open space such as, Plexiglas, PVC plastic, ply wood, etc. Alternately, an additional window slider kit can be purchased to be used in combination with the included kit.
- When using the window slider kit on a window or sliding door, additional security measures may be needed.
- Open the window approximately 5″.
- Adjust the length of the window slider to the same length and width of the opening of the window. Cut the window slider if necessary to fit the length of your window.
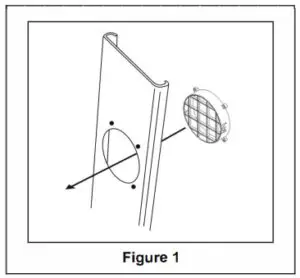
- Insert the fixture through the back grooved side of the window slider hose-cutout, aligning the screw holes on the fixture with the screw holes on the unit. Place the screws in the holes from the front of the window slider kit and tighten. (Fig. 1)
- Adjust the slider kit to fit your window. The slider kit comes with screws installed on the main window piece. The long and short extension pieces can be adjusted to fit your window, and the screws can be tightened to keep the extension pieces from sliding. Additional holes can be drilled in the window kit to allow for a further range of adjustment.
- Fit the window slider kit into the window opening and close the window to secure the window slider kit. For long term installation, you may screw the window kit into your window frame.
- Move the air conditioner close to the window, extend the hose to the necessary length, keeping it as short and as straight as possible and attach the other end of the hose to the window slider kit.
- Align the tab cut-outs of the hose connector to the tabs on the fixture and snap the hose connector to the window slider kit.
AIR FILTERS INSTALLATION
Your Whynter portable air conditioner is equipped with a washable Pre Filter and an Activated Carbon Filter. The washable Pre-Filter removes large particles such as dust, pet hair and dander.
The Activated Carbon Filter which is designed to remove smoke and other odors. It is recommended you replace the Activated Carbon Filter every 2-3 months or as needed. Follow the steps below to install the filters.
WARNING: NEVER OPERATE THE AIR CONDITIONER WITHOUT THE PRE-FILTER
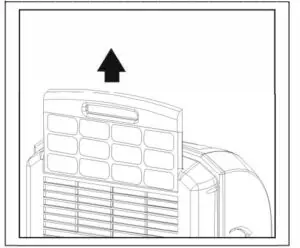
- Pull up the pre-filter frame
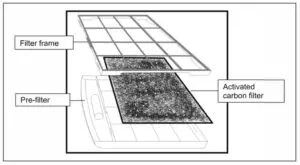
- Remove the Pre-Filter from the filter frame.
- Place the Activated Carbon Filter on the Pre-Filter.
- Reattached the filter frame.
- Insert the assembled filter frame into the unit
OPERATION INSTRUCTIONS
- Remove the exterior and interior packaging
- Before connecting the appliance to a power source and operating, let the unit stand upright for a minimum of 4 hours. This will reduce the possibility of a malfunction in the cooling system from handling during transportation.
SWITCHING ON/OFF THE AIR CONDITIONER
- The unit can be switched ON or OFF by pressing the Power button on the control panel or the Power button on the remote control.
COOLING MODE
- In this mode, the air conditioner cools and dehumidifies the room. To activate the cooling function, press the Mode Control button until the GREEN indicator illuminates. When cooling mode is set, the compressor will start in approximately 3 minutes.
NOTE: In cooling mode, hot air is exhausted from the outdoor exhaust port and the exhaust hose must be connected to exhaust out the hot air. - The temperature setting range is 61 ° F to 89° F. To set the temperature, press the+ orbuttons. The air conditioner has a 5° F temperature cushion; if the set temperature is within 5 ° F of the ambient temperature, the unit runs in fan only mode. This saves energy and prolongs the life of the compressor. Once the set temperature is achieved, the compressor will turn off and the fan runs continuously to circulate the air within the room.
- To set the fan speed, press the Fan Speed button. In cooling mode, the difference in noise level between the 3 fan speeds is not very noticeable when the compressor is on. Try setting the unit to Fan only mode, you should be able to hear the difference between high and low fan speed settings.
DEHUMIDIFYING MODE
- In this mode, the air conditioner dehumidifies the room, the compressor will activate intermittently depending on the ambient temperature and the fan speed is set to Low. To activate dehumidifying mode, press the Mode Control button until the PURPLE indicator illuminates. When switching between functions, there will be an approximate 3 minute transition time.
- In dehumidifying mode, the exhaust hose does not need to be vented. If the exhaust hose is vented, the room will be cooled as it dehumidifies. To prevent cooling, remove the exhaust hose from the window kit and allow the warm air from the rear to be re circulated into the room. If room temperature is higher than 77° F, the fan speed can be adjusted. If room temperature is lower than 77° F, the fan speed is set at Low.
Note: - When using dehumidifying mode, venting the exhaust hose to the outside is not required. If vented, the warm air is exhausted to the outside and cooling within the room may occur. Additionally, if the exhaust hose is not vented, the unit may require more frequent draining.
- The air conditioner does not have a humidistat in which a specific humidity level can be set
FAN ONLY MODE
- In this mode, only the fan of the air conditioner runs and circulates the air within the room. To activate fan only mode, press the Mode Control button until the YELLOW indicator illuminates. In this mode, the temperature cannot be set. Subsequently, set the desired fan speed by pressing the Fan Speed button.
- Note: When using fan only mode, venting the exhaust hose to the outside is not required.
COMPRESSOR LOCK OUT
- This portable air conditioner is optimized to operate in an ambient temperature of 64 ° F – 90° F. The compressor circuit has an automatic 3 minute time delayed start if the unit is turned off and on quickly. This prevents over-heating of the compressor and possible circuit breaker tripping.
TIMER (DELAYED SWITCH ON/ OFF) FUNCTION
- This function mode enables a delayed switch ON or delayed switch OFF of the air conditioner. The time (hours) delay can be set, enabled and disabled. The timer is adjustable between 1-24 hours.
SETTING SWITCH OFF TIMER
With the air conditioner operating in any function mode, press the Timer Control button. Then set the desired time delay OFF hours by pressing the+ or – buttons. When the delay time set has elapsed, the air conditioner switches off.
SETTING DELAYED SWITCH ON TIMER
With the air conditioner is off, press the Timer Control button. Then set the desired time delay ON hours by pressing the+ or – buttons. When the delay time set has elapsed, the air conditioner switches on.
AUTO RESTART
In the event of a power outage, the air conditioner restarts at the previously set function mode and settings when power is restored.
NOISE LEVEL
Portable air conditioners may make sounds that are not familiar to you. The sounds listed below are normal. Noise reflecting off hard surfaces such as a floor or wall can make the sounds seem louder than they actually are.
- The compressor may make a pulsating or high-pitched sound.
- Water running from the evaporator to the water tank may make a splashing sound.
- Refrigerant flowing may make a gurgling sound.
- Fan sound may come from front and back air vents.
WATER DRAINAGE
During the process of cooling, some water will be extracted from the air into the unit. Most of this water is used to cool and exhausted to the outside. If the unit is operated in high humidity or low temperature environment, water will collect in the reservoir inside the unit. If the reservoir is full, the compressor will stop. To continue the cooling function, please drain the water. The air conditioner has the capacity to dehumidify up to 81 pints per day. The patented selfevaporating function of the unit fully exhausts all condensation automatically in most environments when humidity is less than 70%. Areas with more than 70% humidity, the self-evaporating function can still exhaust about 98% of the moisture and the remaining 2% of moisture will be collected in the water tank of the air conditioner. When there is excess water condensation inside the unit, the air conditioner stops running and the RED Stop light illuminates. The Stop light indicates that the water condensation needs to be drained manually:
Manual Drainage
- Turn off the unit.
- Carefully roll the unit to a drain location or position a flat container, dish or optional drain bucket accessory (sold separately) under the drain area of the lower drain port.
- Remove the drain cover and rubber plug and the condensed water will drain out automatically.
- Once all the condensed water is drained, replace the drain rubber plug and cover into the drain firmly.
Continuous Gravity Drainage Option
This option is recommended if uninterrupted operation is desired.
- . Remove the drain plug cover and rubber plug from the upper drain port.
- Install the drain hose (sold separately) through the drain cover.
- Thread the drain cover onto the upper drain port.
- Place the open end of the drain hose downward to an area appropriate for draining.
WARNING: The hose must be directed downward from the upper drain port to allow the condensed water to flow with gravity.
Note: Please contact [email protected] for retail sales information or visit whynter.com for a list of optional accessories.
REMOTE CONTROL
The portable air conditioner can be switched on by the remote control.
NOTE:
- Other appliances in the same room controlled by a remote control (TV, radio, stereo, etc.), may cause interferences.
- Electronic and fluorescent lamps may interfere with the signal transmissions between the remote control and the air conditioner.
- Remove the batteries if the remote control is not used for long periods.
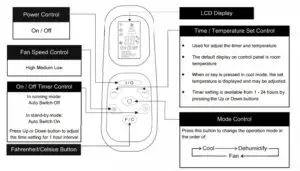
Notes:
- Do not drop the remote control
- Do not place the remote control in a location exposed to direct sunlight
- The remote control should be placed about 1 meter or more away from the TV or any electrical appliances.
CARE AND MAINTENANCE
IMPORTANT
- Switch off the air conditioner and disconnect the plug from the power outlet
- Drain al collected condensation from the upper and lower drain ports.
- Only transport the air conditioner in an upright position.
CLEANING THE PRE-FILTER
This unit has two air filters; a washable pre-filter and an activated carbon filter.
To ensure the air intake is filtered properly and to assure that your air conditioner runs efficiently, it is recommended that the pre-filter is washed at least once every two weeks depending on use.
- Switch off the air conditioner.
- Pull the pre-filter frame from the unit.
- Remove the activated carbon filter from the pre-filter.
- Use a vacuum cleaner or tap lightly to remove loose dust and dirt from the pre-filter.
- Rinse the pre-filter thoroughly under warm running water (no hotter than 100° F.)
- Dry thoroughly before re-inserting the filters.
NOTE: The activated carbon filter is not washable. It is an optional filter and should be replaced every 2-3 months or as needed if used.
Please contact [email protected] for retail sales information or visit whynter.com for a list of optional accessories.
WARNING! Never operate the air conditioner without the pre-filter in place
CLEANING THE AIR CONDITIONER
- Always switch off the air conditioner and disconnect the plug from the power supply outlet before cleaning the air conditioner.
- Use a soft damp cloth to wipe the body of the unit.
- Never use harsh chemicals, oil-based products, detergents, chemically treated cloths or other cleaning solutions. These could possibly damage the body of the air conditioner.
END OF SEASON STORAGE
This portable air conditioner comes with one end of season storage cover. We highly recommend that storage cover bag is utilized when the unit is not going to be used for a period of time.
WARNING: To avoid danger of suffocation, keep this bag away from babies and children.
- Switch off the air conditioner and disconnect the power plug from the power supply outlet before cleaning the air conditioner.
- Clean the pre-filter.
- Drain the condensed water completely.
- On a warm day, set the unit to Fan only mode for half a day to dry the unit internally.
- Gather the power cord and bundle it.
- Remove the batteries from the remote.
- If leaving the window kit in place, disconnect the exhaust hose from the window slider kit and place the included cover on the fixture. Otherwise, remove the window kit from the window opening. To remove the hose connector from the fixture on the window kit, slightly turn, push and gently pull the connector to release.
- Place the storage cover over the air conditioner.
Note: Depending on use, it is recommended that the air conditioner be cleaned internally annually. Please contact Whynter at [email protected] for internal maintenance cleaning instructions.
Tips:
- Keep the exhaust hose as short and straight as possible
The exhaust hose removes heat from the room. It should remain as short and straight as possible without sharp bends or twists to maximize efficiency. If the exhaust hose must be extended, do not exceed 9′. - Turn the air conditioner on early Turning the air conditioner on early instead of waiting until the hottest point of the day will allow the unit to be more effective. The air conditioner will not have to work as hard to cool the room down and maintain the set temperature.
- Reduce heat sources Direct sunlight, televisions, computers and other heat generating appliances work against the air conditioner by introducing heat into the space.
• Close window curtains and blinds to keep direct sunlight out
• Close doors and windows
• Keep ovens and stoves off
• Turn off unused lights
• Add weather stripping around windows and doors - Keep the air filter clean
Regular cleaning will help keep your air conditioner working properly. Dusty filters and vents greatly
reduce the airflow and efficiency of the unit.
- Clean the washable pre-filter regularly
- Replace the activated carbon filter every 2-3 weeks depending on use
- Vacuum any accumulated dust from around all vents
TECHNICAL DATA
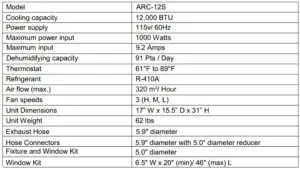
TROUBLESHOOTING
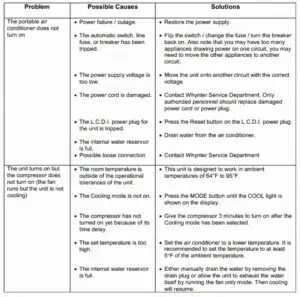
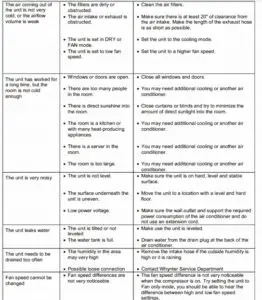
ONE YEAR LIMITED WARRANTY & THREE YEAR WARRANTY ON COMPRESSOR
This WHYNTER product is warranted to the original owner, purchased from an authorized Whynter dealer within the 48 U.S. continental states, for one year from the original purchase date against defects in material and workmanship under normal residential usage. Should your WHYNTER product prove defective within one year from the date of purchase, contact Whynter’s Customer Support team with the serial number and proof of purchase to make a warranty claim. A Return Authorization number must be issued before returning any parts or products. Parts or products received without a Whynter issued Return Authorization number will be refused. Under this warranty, Whynter will repair or replace any parts found defective with new or remanufactured parts or exchange the defective product with a new, refurbished, or remanufactured product at our discretion. All defective products and parts covered by this warranty will be repaired or replaced on a mail-in basis to Whynter’s Service Center. This warranty is not transferable. After the expiration of the warranty, the cost of labor and parts will be the responsibility of the original owner.
The compressor of portable air conditioners is warranted for an additional two years after the one year limited warranty expires from the date of purchase.
Return freight is prepaid by Whynter within two months of purchase. After two months to one year, the customer will be responsible for the return freight cost to Whynter’s Service Center. Please package the product carefully in its original packaging to avoid damage in transit. Whynter is not responsible for damage resulting from shipper mishandling or improper packaging. Please retain the original box and packaging materials.
THIS WARRANTY DOES NOT COVER:
- Improper power supply such as power surge, low voltage, defective household wiring or inadequate fuses.
- Use in commercial or industrial applications.
- Damage, accidental or otherwise, to the product while in the possession of a consumer not caused by a defect in material or workmanship.
- Damage caused by consumer misuse, tampering, lack of maintenance or failure to follow the care and special handling provisions in the instructions.
- Damage to the finish of the case, or other appearance parts caused by wear.
- Damage caused by repairs or alterations to the product by anyone other than authorized by the manufacturer.
- Removal, Replacement Packaging, Freight and Insurance cost for the warranty service.
- Products sold AS IS or from an unauthorized reseller.
- Products that have had their serial numbers removed or defaced.
DISCLAIMER OF IMPLIED WARRANTIES; LIMITATION OF REMEDIES
CUSTOMER’S SOLE AND EXCLUSIVE REMEDY UNDER THIS LIMITED WARRANTY SHALL BE PRODUCT REPAIR OR REPLACEMENT AS PROVIDED HEREIN. CLAIMS BASED ON IMPLIED WARRANTIES, INCLUDING WARRANTIES OF MERCHANTABILITY OR FITNESS FOR A PARTICULAR PURPOSE, ARE LIMITED TO ONE YEAR OR THE SHORTEST PERIOD ALLOWED BY LAW, BUT NOT LESS THAN ONE YEAR. WHYNTER SHALL NOT BE LIABLE FOR CONSEQUENTIAL OR INCIDENTAL DAMAGES SUCH AS PROPERTY DAMAGE AND INCIDENTAL EXPENSES RESULTING FROM ANY BREACH OF THIS WRITTEN LIMITED WARRANTY OR ANY IMPLIED WARRANTY. SOME STATES AND PROVINCES DO NOT ALLOW THE EXCLUSION OR LIMITATION OF INCIDENTAL OR CONSE- QUENTIAL DAMAGES, OR LIMITATIONS ON THE DURATION OF IMPLIED WARRANTIES, SO THESE LIMITATIONS OR EXCLUSIONS MAY NOT APPLY TO YOU. THIS WRITTEN WARRANTY GIVES YOU SPECIFIC LEGAL RIGHTS. YOU MAY ALSO HAVE OTHER RIGHTS THAT VARY FROM STATE TO STATE.
The warranty, product contents and specifications are subject to change at any time without notice; please refer to www.whynter.com for the most current information.
Please retain the original proof of purchase.
To register your warranty, please visit www.whynter.com and fill out the online Warranty Registration form. Please be sure to include a copy of your purchase invoice.
To obtain service or information, contact Whynter LLC via email at [email protected] or call 866-WHYNTER (866-949-6837).

WHYNTER 14,000 BTU PORTABLE AIR CONDITIONER WITH 3M SILVERSHIELD FILTER
Model # : ARC-148MS
INSTRUCTION MANUAL
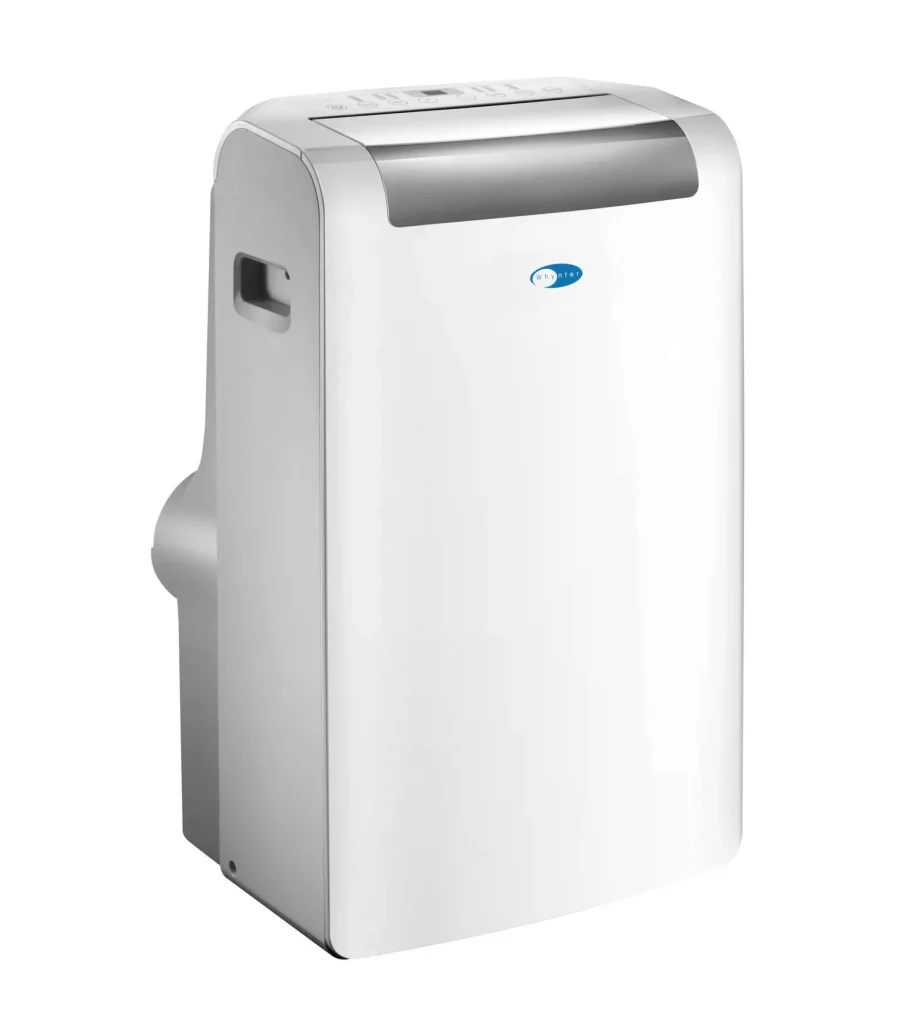
Congratulations on your new Whynter product. To ensure proper operation, please read this Instruction Manual carefully before using this product. Keep this manual in a safe place for future reference.
DISPOSAL INFORMATION
Thank you for choosing the Whynter 14,000 BTU Portable Air Conditioner with 3M Silvershield filter. Please follow the instructions provided in this user guide to obtain the very best performance from your portable air conditioner and take full advantage of the many features your portable air conditioner offers you. We trust that your Whynter air conditioner will provide the performance and reliability that we stand for. Please keep this user manual in a safe place for future reference.
This symbol on the product or its packaging indicates that the appliance cannot be treated as normal domestic trash, but must be handed in at a collection point for recycling electric and electronic appliances. Your contribution to the correct disposal of this product protects the environment. Further information about the recycling of this product can be obtained from your local municipal authority.
SAFETY PRECAUTIONS
WARNING
TO REDUCE THE RISK OF FIRE, ELECTRICAL SHOCK, OR INJURY WHEN USING YOUR AIR CONDIITIONER, FOLLOW THESE BASIC PRECAUTIONS:
Before the appliance is used, it must be properly positioned and installed as detailed in this manual.
- Do not under any circumstances cut or remove the third (ground) prong from the power cord
- Make sure this unit is connected to a correctly grounded power supply outlet. Do not use an extension cord or power strip
- The power cord is UL listed. It has a built-in L.C.D.I. (leakage, current, detection, interruption) circuit breaker for added safety. If the power supply is interrupted, press the reset button to reconnect the unit to a power source
- It is recommended to use a separate circuit that its size should be 15 Amps for the air conditioner
- Do not use an excessively wet cloth, industrial solvents, oil-based products to clean this portable air conditioner
- To avoid the risk of shock, the product should never be used in bathrooms, shower rooms, or in any other steamy or wet areas
- Do not store or use gasoline or other flammable vapors and liquids in the vicinity of this or any other appliances Do not repair, disassemble and/or modify the unit by yourself
- Always turn off the portable air conditioner when cleaning the air filter, and transporting
- Do not turn this unit on and off by plugging and unplugging. Always use the ON/OFF switch
- Transport the unit in an upright position only, or leave it in an upright position for at least 4 hours before first use
- Ensure curtains or other objects are not obstructing the air inlet filters
- Do not bend or crush the exhaust hose while in use
- Always allow at least 20” of clearance around the unit for ventilation. Do not use this unit inside closets, cabinets and/or cramped spaces between furniture
- This unit is optimized to operate in an ambient temperature of 64°F – 90°F
- This unit must be installed in an area protected from the element, such as wind, rain, water spray or drips
- The unit should not be located next to ovens, grills, or other sources of high heat
- Always place the unit on an even and hard and level surface
- Do not sit or place objects on the unit
- Do not allow children to climb, stand or hang on the appliance. The air conditioner could tip over and get damaged and/or seriously injure somebody
- Keep fingers out of the air intakes and air outlets
- An appliance is an electrical appliance. To avoid injury from electrical shock do not operate it with wet hands while standing on a wet surface or while standing in water. Do not use it outdoors or in wet conditions
- When positioning or moving the appliance, ensure it is not turned upside down or greater than 45° or more off level
- This appliance is designed for household, non-commercial use only. Any other use will void the warranty
- Do not plug into the power outlet before set up is completed
- Do not operate this unit without the air filter(s)
- Do not use harsh chemicals to clean the filter(s). Dry thoroughly before inserting the filter(s) into the unit
- Do not add extra length to the exhaust hose by more than a total length of 9’. This will reduce the cooling efficiency of the portable air conditioner
- At the end of each season, all water must be drained from the unit, and filter(s) must be cleaned before storage
THE MANUFACTURER DISCLAIMS ANY RESPONSIBILITY IF THE ABOVE INSTRUCTIONS ARE NOT FOLLOWED.
INTRODUCTION / TECHNICAL DATA
HOW IT WORKS
The Whynter compact CFC-free, lead-free, and energy-efficient 14,000 BTU portable air conditioner, helps you stay cool while working with better environmental standards and reducing energy consumption.
This high output portable air conditioner, specially designed to be mobile, can be easily set up in almost any indoor location and is most commonly used in data closets/server rooms, bedrooms, classrooms, and garages/workshops.
This Whynter ARC-148MS portable air conditioner features an ECO-FRIENDLY CFC-free GREEN R-410A refrigerant and lead-free RoHS compliant components.
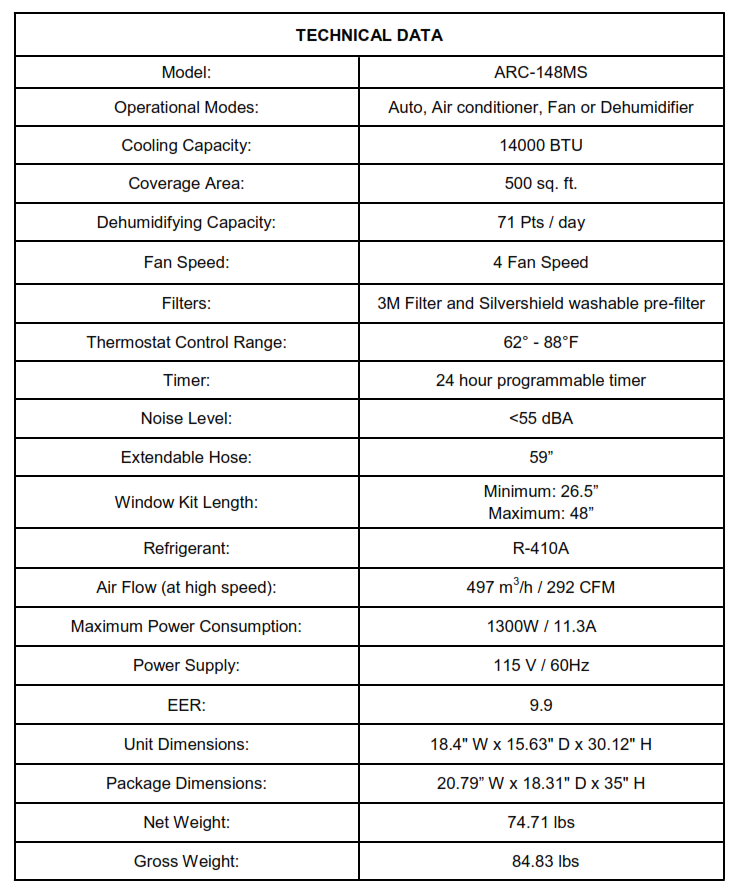
PARTS IDENTIFICATION
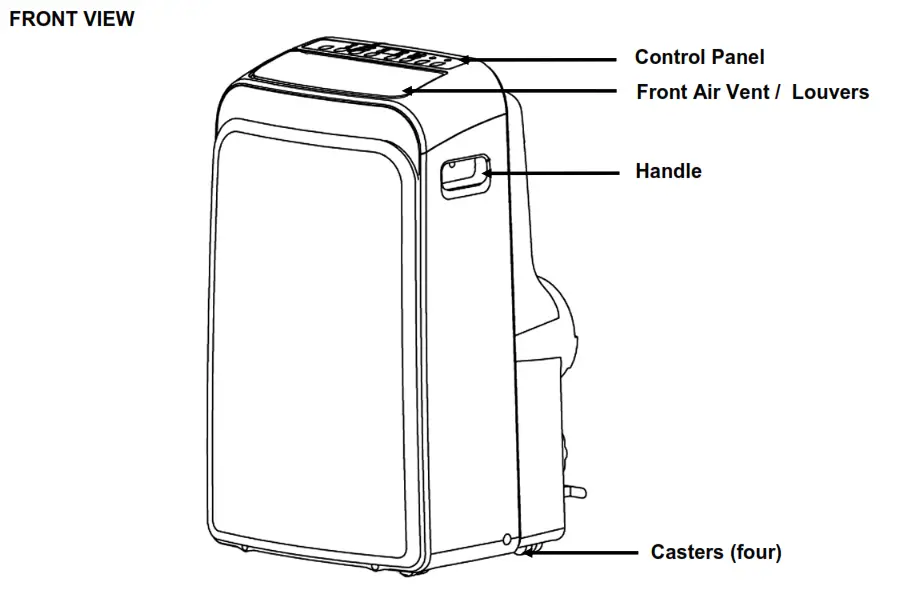
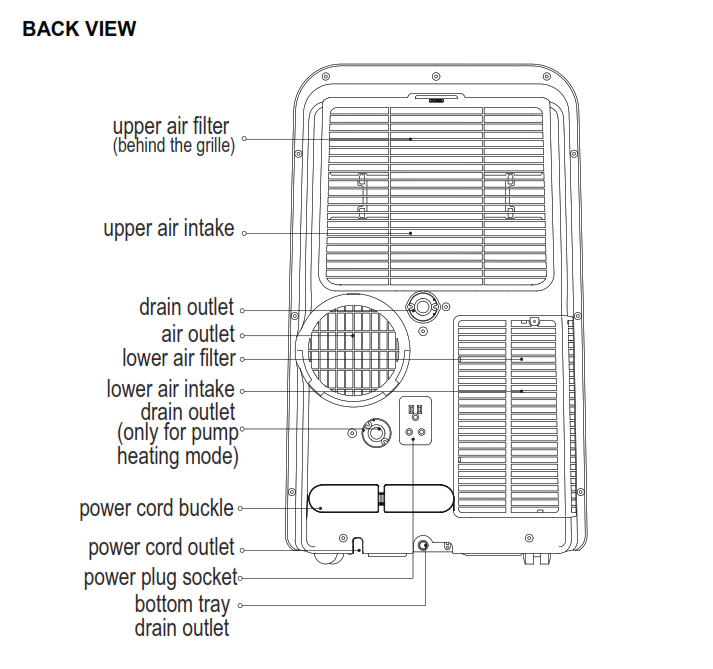
PARTS IDENTIFICATION
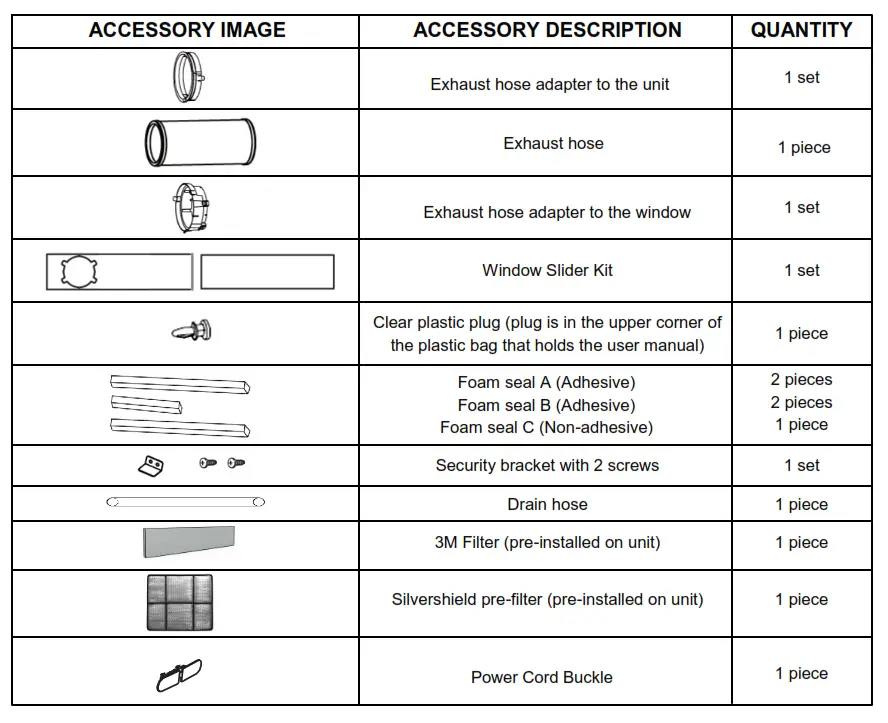
Operating Conditions

Leakage-Current Detection and Interruption (LCDI)
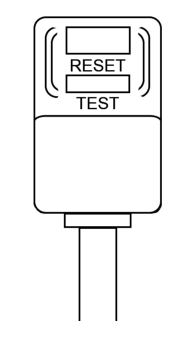
Your portable air conditioner is supplied with a Leakage-Current Detection and Interruption (LCDI) plug. This plug reduces the risk of fire due to arcing faults in the power supply cord. Please follow the instructions below to ensure that LCDI plug works properly.
- Plug the power cord into a grounded wall outlet. Do not plug into a power strip or extension cord.
- Press the TEST button on the plug. This should trip the plug and cut the power to the air conditioner. If the plug does not trip and the unit comes on, please contact technical support.
- Press the RESET button to start the air conditioner.
- Do NOT use the TEST and RESET buttons to turn the air conditioner on and off.
CONTROL PANEL

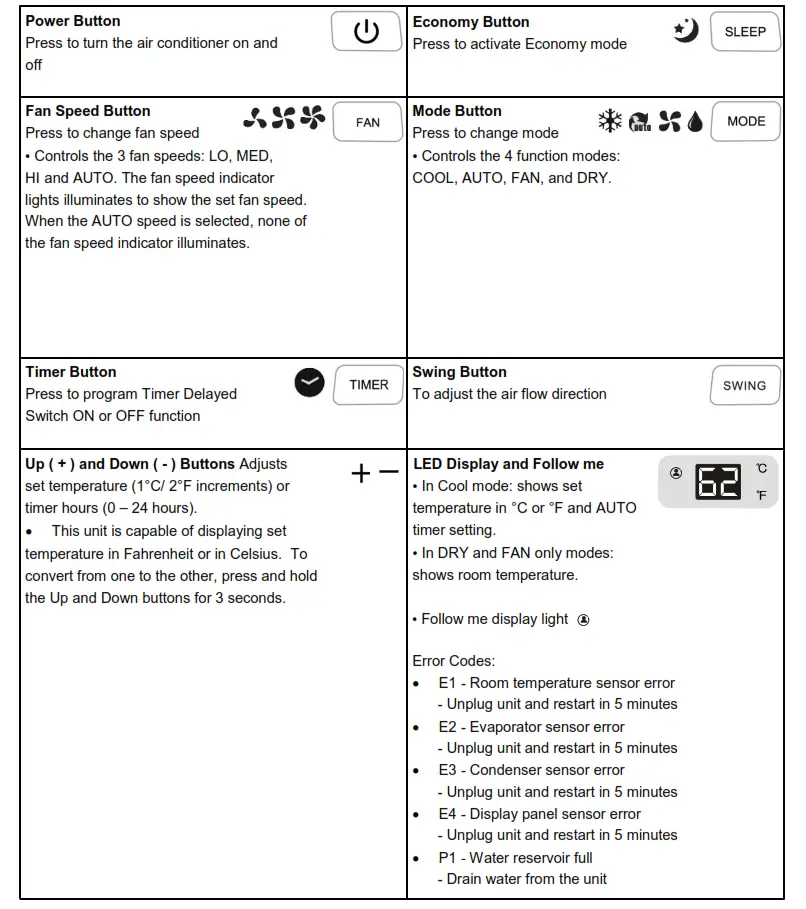
INSTALLATION
WARNING: NEVER OPERATE THE AIR CONDITIONER WITHOUT THE AIR FILTER
AIR FILTERS
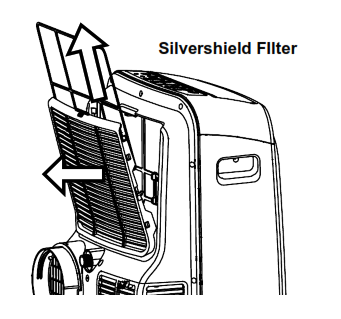
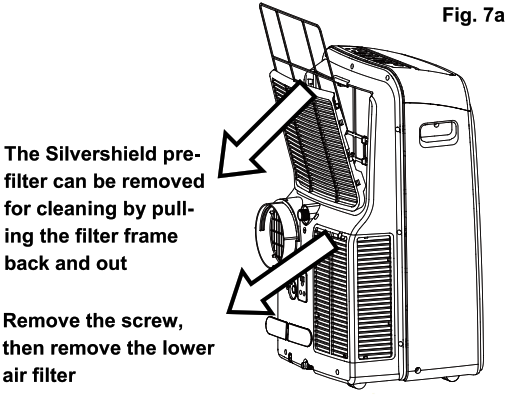
- Silvershield Pre-filter
This portable air conditioner is equipped with a Silvershield pre-filter, which removes large particles such as dust, pet hair, and dander. This pre-filter can be removed for cleaning by pulling the filter frame back and out.
- 3M™ Antimicrobial High Air Flow Filter
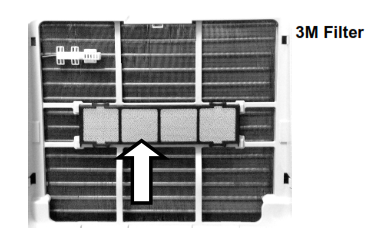
This portable air conditioner comes with the 3M™ Antimicrobial High Air Flow Filter which is designed to remove particles such as dust, pet hair, and dander, antimicrobial agent helps inhibit the growth of mold and mildew, and the micro-structured electrostatically charged filtration media traps and retains particles. The 3M Filter is pre-installed.
Note: The 3M Filter should be replaced every 2-3 months depending on usage. please contact [email protected] for retail sales information.
WATER DRAINAGE
The dehumidifying capacity of this unit is 71 pints per day. The patented self-evaporating function of the ARC-148MS unit fully exhausts all condensation automatically in most environments when humidity is less than 70%. In areas with more than 70% humidity, the self-evaporating function can still exhaust about 98% of the moisture and the remaining 2% of moisture will be collected in the water tank of the air conditioner.
When the water reservoir reaches its maximum level, the unit will beep 8 times and the digital display will show P1. When the unit displays P1, all operation modes will be disabled temporarily, while the fan continuously running. The P1 code
will disappear when the water is completely drained.
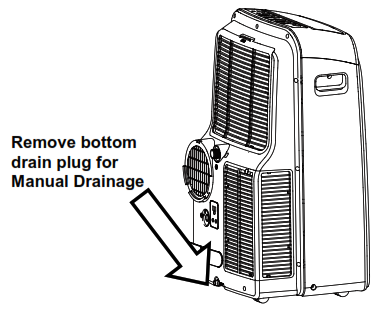
• Manual drainage (Fig. 1a)
Carefully move the unit to a drain location or position a flat container, dish, or optional drain bucket accessory (sold separately) under the drain area of the lower drain port. Remove the bottom drain plug and let the water drain. Replace the drain plug and plug it in to resume operation.
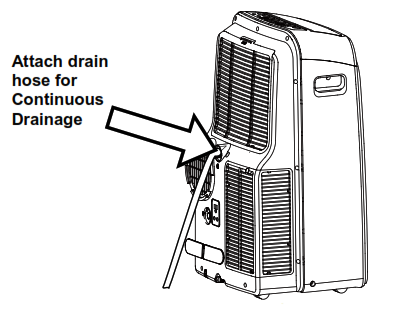
• Continuous drainage (Fig. 1b)
Remove the upper drain plug from the back of the unit and install the drain hose. Place the open end of the hose in a drain area. This method is recommended if the uninterrupted operation is desired.
INSTALLATION
LOCATION
The air conditioner should be placed on a hard and level surface strong enough to support the unit. The unit has casters and it should only be rolled on smooth, flat surfaces. Use caution when rolling on carpet surfaces. Do not attempt to roll the unit over objects. Never place any obstacles around the air inlet or outlet and allow at least 20 of clearance for efficient air-conditioning.
EXHAUST HOSE INSTALLATION
When using the air conditioner in COOL mode, hot air must be exhausted out of the room to complete the air exchange of the condenser. When the unit is operating in DRY or FAN-only mode, installation of the exhaust hose is optional.
- Snap the hose connector to the unit onto one end of the hose and then snap the hose connector to the window onto the other end. See Fig. 1
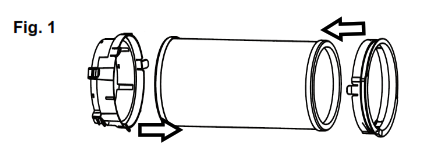
- Line-up the hose connector hooks onto the back of the unit and slide into the hole seat. See Fig. 2
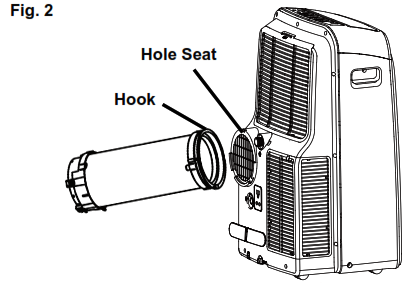
- Only extend the exhaust hose to the necessary length keeping it as short and straight as possible.
WINDOW KIT INSTALLATION
The window kit has been designed to fit most standard vertical and horizontal windows. However, it may be necessary to modify the installation procedures to accommodate your window. Please refer to Fig. 3a and Fig. 3b for minimum and maximum window openings. If your window opening is less than the mentioned minimum length of the window slider kit, the window slider kit can be cut to fit the window opening. Never cut into the exhaust hose cut-out on the window slider kit.
If your window opening is larger than the maximum length of the window slider kit, additional material will be needed to cover the open space such as Plexiglas, PVC plastic, plywood, etc. Alternately, an additional window slider kit can be purchased to be used in combination with the included kit.
NOTE: When using the window slider kit on a window or sliding door, additional security measures may be needed.
The window slide bars can be fixed with a clear plastic bolt. Fig. 4.
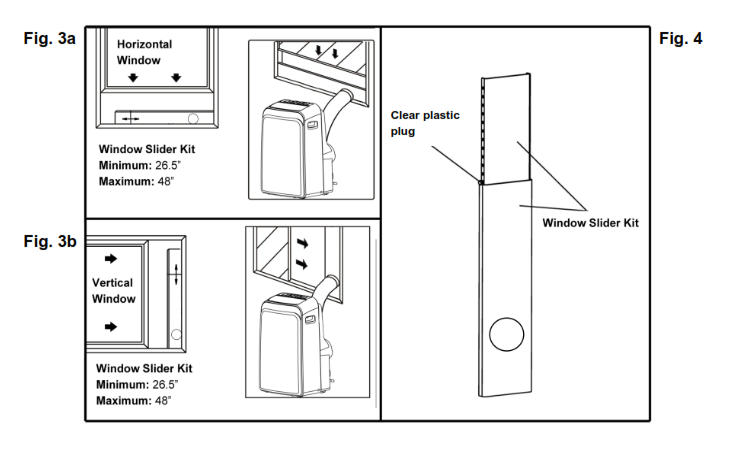
INSTALLATION
WINDOW KIT INSTALLATION IN A DOUBLE-HUNG WINDOW
- Open window or sliding door for approximately 5”
- Cut the foam seal A and B (adhesive type) to the proper length and attach it to the bottom of the window. Fig. 5a.
- Adjust the length of the window slide bars to the same length and width of the opening of the window. Cut the window piece if necessary to fit the length of your window. Never cut into the exhaust hose cut-out on the window slider kit. Fig. 5b.
- Close the window on the window slide bars. For long-term installation, you may screw the window kit into your window frame using the security bracket. Fig. 5c.
- Cut the foam seal C (non-adhesive) to the length and seal the open gap between the top window sash and outer window sash. Fig. 5d.
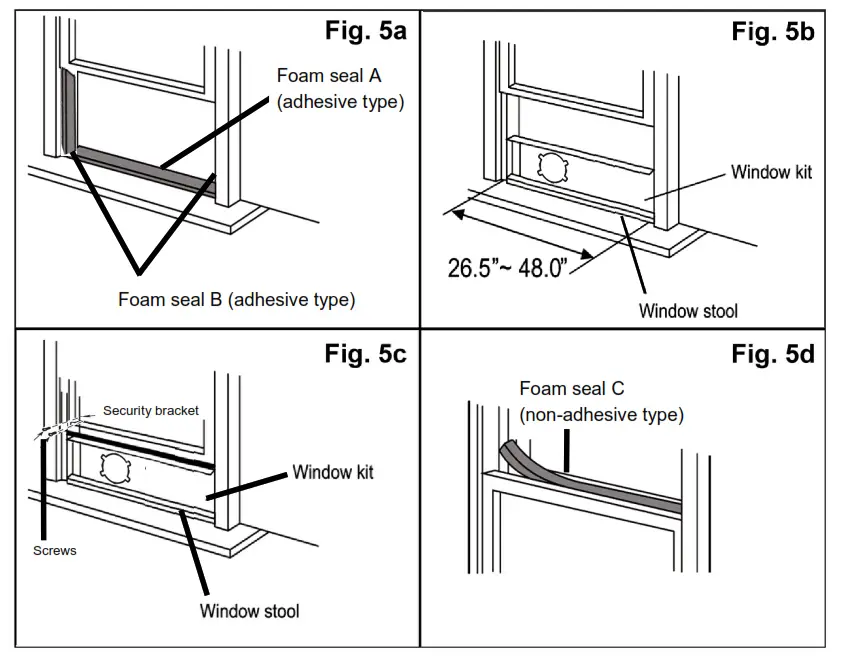
WINDOW KIT INSTALLATION IN A SLIDING WINDOW/ DOOR
- Open window or sliding door for approximately 5”
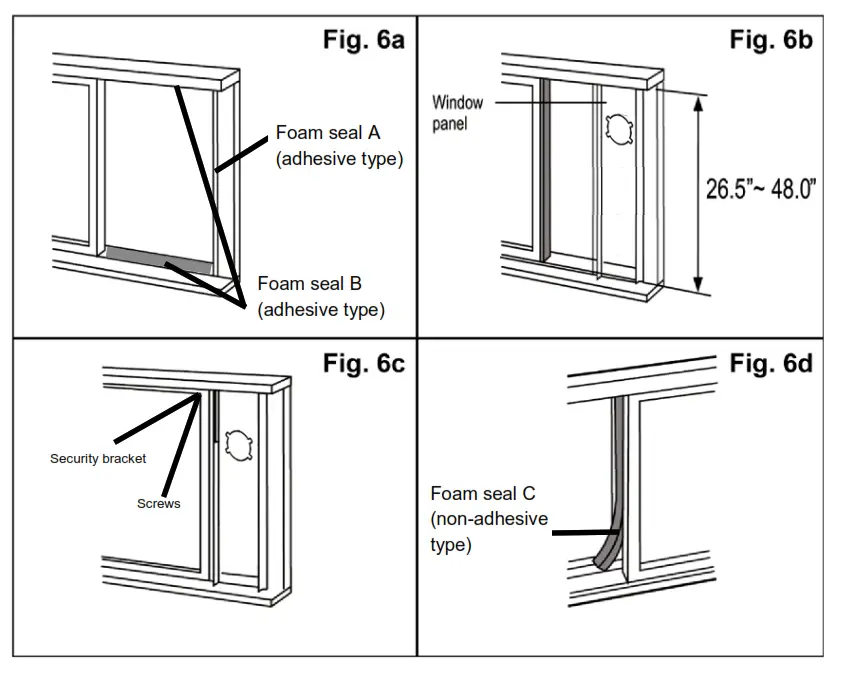
- Cut the foam seal (adhesive type) to the proper length and attach it to the bottom of the door/window. Fig. 6a.
- Adjust the length of the window bars to the same length and width of the opening of the window. Cut the window piece if necessary to fit the length of your window. Never cut into the exhaust hose cut-out on the window slider kit. Fig. 6b.Fig. 6b.
- Close the door/ window on the window slide bars. For long-term installation, you may screw the window kit into your window frame using the security bracket. Fig. 6c.
- Cut the foam seal C (non-adhesive) to the length and seal the open gap between the top window sash and outer window sash. Show in Fig. 6d.
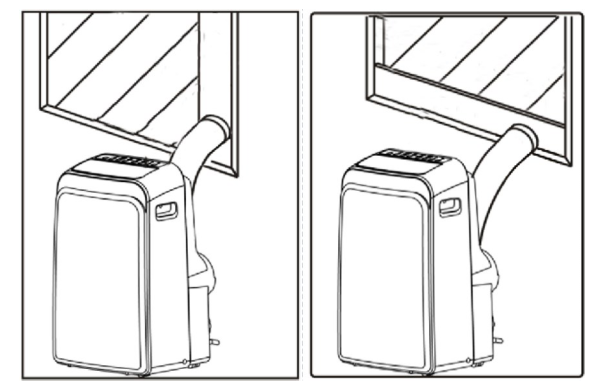
EXHAUST AND INTAKE HOSE INSTALLATION TO THE WINDOW KIT
1. Make sure that the window slider kit is securely installed.
2. Move the unit to the window, extend the exhaust hose, align the hose connector and snap it into the window kit
OPERATION INSTRUCTIONS
BEFORE USING YOUR APPLIANCE
- Remove the exterior and interior packing
- Before connecting the appliance to the power source, let it stand upright for approximately 4 hours. This will reduce the possibility of a malfunction in the cooling system from handling during transportation
SWITCHING ON/OFF THE AIR CONDITIONER
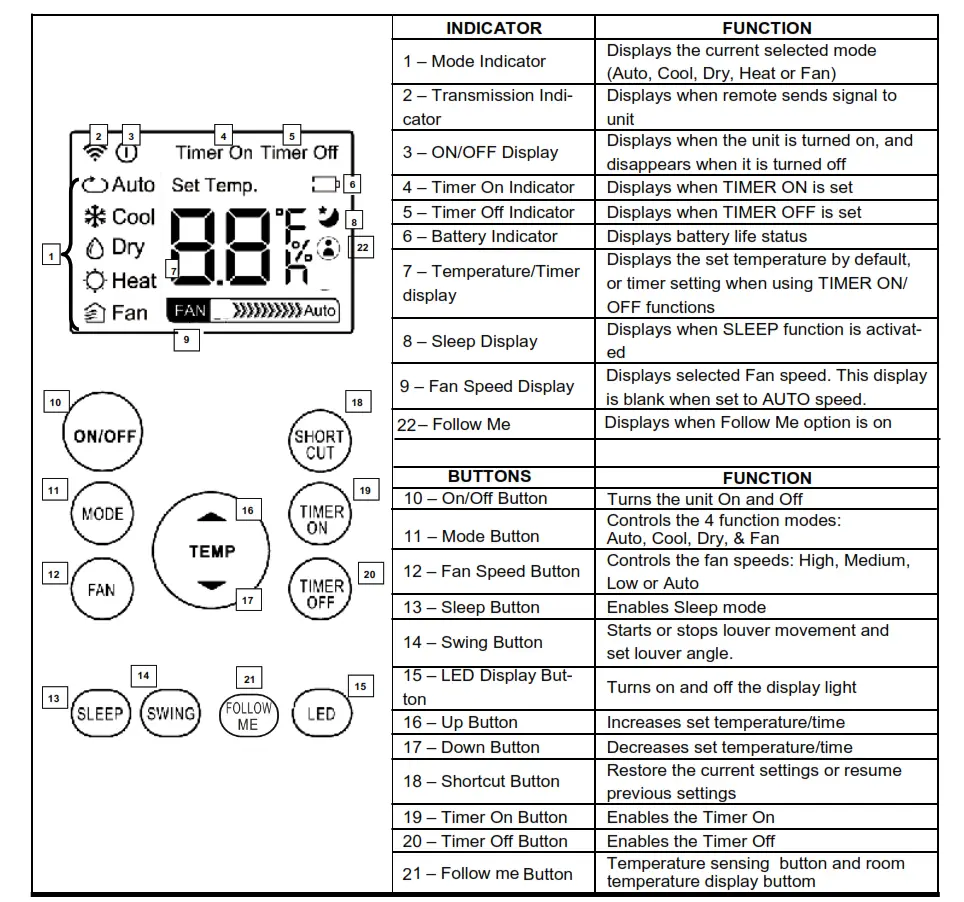
The appliance can be switched ON or OFF by pressing the POWER button on the control panel or the ON/OFF button on the remote control
COOLING MODE
In this mode, the air conditioner cools and dehumidifies the room. To activate this function mode, press the MODE button until the COOL  indicator light comes on. When the cooling mode is set, the compressor will start in approximately 3 minutes. In cooling mode, hot air is exhausted from the outdoor exhaust port and the exhaust hose must be connected to exhaust out the hot air.
The temperature setting range of this air conditioner is from 62°F / 17°C to 88°F / 30°C. To set the temperature, press the + or – buttons. This air conditioner has a 5°F temperature cushion which if the set temperature is within 5°F of the ambient temperature, the unit runs on fan-only mode. This saves energy and prolongs the life of the compressor of the air conditioner.
To set the fan speed, press the FAN button. In cooling mode, the difference in noise level between the fan speeds is not very noticeable when the compressor is on. Try setting the unit to Fan only mode, you should be able to hear the difference between high and low fan speed settings.
DRY (DEHUMIDIFYING) ONLY MODE
In this mode, the air conditioner only dehumidifies the room, the compressor will activate intermittently depending on the ambient temperature and the fan speed is set to LOW. To activate this function mode, press the MODE button until the DRY  indicator light is displayed. Please note that when switching function mode, there will be an approximately 3 minute transition time. In dehumidifying mode, the exhaust hose does not need to be vented. If the exhaust hose is vented, the room will be cooled as it dehumidifies. To prevent cooling, remove the exhaust hose from the window kit and allow the warm air from the rear to be re-circulated into the room. If the room temperature is higher than 77°F, the fan speed can be adjusted. If the room temperature is lower than 77°F, the fan speed is set at Low.
NOTE: When using the dehumidifying mode, venting the exhaust hose to the outside is not required. If vented, the warm air is exhausted to the outside, and cooling within the room may occur. Additionally, if the exhaust hose is not vented, the unit may require more frequent draining. Also, the air conditioner does not have a humidistat in which a specific humidity level can be set.
AUTOMATIC MODE
When you set the air conditioner in AUTO mode, it will automatically select cooling or fan-only operation depending on what temperature you have selected and the room temperature is close to the unit. The fan speed is automatically selected and cannot be changed. To operate the unit in Auto mode when the unit is on, press the MODE button until the AUTO  indicator light comes on.
FAN ONLY MODE
In this mode, only the fan of the air conditioner runs and circulates the air in the room. To activate this function mode, press the MODE button until the FAN indicator light comes on. In this function mode, the temperature cannot beset. Subsequently, set the desired fan speed by pressing the FAN  button. When using FAN-only mode, venting the exhaust hose to the outside is optional.
TIMER (DELAYED SWITCH ON / OFF) FUNCTION
This function mode enables a delayed switch ON or delayed switch OFF of the air conditioner. The time (hours) delay can be set, enabled and disabled.
OPERATION INSTRUCTIONS
SETTING SWITCH OFF TIMER
With the air conditioner operating in any function mode, press the TIMER button. The TIMER OFF light will come on. Then set the desired time delay OFF hours by pressing the UP and DOWN buttons. The time increments are at 0.5 hours to up to 10 hours, followed by a 1-hour increment up to 24 hours. When the delay time set has elapsed, the air conditioner switches off. To cancel the delayed switch-off function, turn off the air conditioner or adjust the time setting to 0.0.
SETTING DELAYED SWITCH ON TIMER
With the air conditioner is off, press the TIMER button. The TIMER ON light will come on. Then set the desired time delay ON hours by pressing the UP and DOWN buttons. The time increments are at 0.5 hours to up to 10 hours, followed by 1-hour increments up to 24 hours. When the delay time set has elapsed, the air conditioner switches on. To cancel the delayed switch-on function, turn on the air conditioner or adjust the time setting to 0.0.
SLEEP MODE
In this mode, the air conditioner gradually increases the set temperature in the cooling mode, decreases the noise level, and conserves energy. In Economy and cooling mode, the set temperature is increased by 1°C/ 2°F in the first 30 minutes. The temperature will then increase by another 1°C/ 2°F after an additional 30 minutes. This new temperature will remain the same for 7 hours. To activate this function mode, press the SLEEP button until the SLEEP indicator light comes on.
AUTO RESTART
In the event of a power outage, the air conditioner restarts at the previously set function mode and settings when power is restored.
CONTROLLING THE AIRFLOW DIRECTION
The louvers can be controlled to Auto-Swing or in a fixed direction. To control the airflow direction by Auto-Swing, press the SWING button. To set the louvers in a fixed angle or direction, press the SWING button while on Auto-Swing mode when the desired angle is chosen.
NOISE LEVEL
Portable air conditioners may make sounds that are not familiar to you. The sounds listed below are normal. Noise reflecting off hard surfaces such as a floor or wall can make the sounds seem louder than they actually are.
- The compressor may make a pulsating or high-pitched sound
- Water running from the evaporator to the water tank may make a splashing sound
- Refrigerant flowing may make a gurgling sound
- Fan sound may come from front and back air vents
COMPRESSOR LOCKOUT
This portable air conditioner is optimized to operate at an ambient temperature of 64°F – 90°F. The compressor circuit has an automatic 3 minute time delayed start if the unit is turned off and on quickly. This prevents overheating of the compressor and possible circuit breaker tripping.
SHORTCUT FUNCTION
Push this button when the remote controller is on, the system will automatically revert back to the previous settings including operating mode, setting temperature, fan speed level, and sleep feature (if activated). If the shortcut button is pushed for more than 2 seconds, the system will automatically store the current operation settings including operating mode, setting temperature, fan speed level, and sleep feature (if activated).
REMOTE CONTROL
The portable air conditioner can be switched on by the remote control. To transmit signals from the remote control to the air conditioner, point the front part of the remote handset towards the control panel on the air conditioner. Reception of the signal is confirmed by a beep. The maximum signal transmission distance is approximately 8 meters / 26 feet.
NOTE:
- Other appliances in the same room controlled by remote control (TV, radio, stereo, etc.), may cause interferences
- Electronic and fluorescent lamps may interfere with the signal transmissions between the remote control and the air conditioner
- Remove the batteries if the remote control is not used for long periods
INSTALLING BATTERIES
To insert the batteries, open the flap on the back of the remote control by sliding it off. Strictly adhere to the polarity signs on the bottom of the battery housing, close the flap once the batteries have been inserted.
- Only use two dry LR03 AAA 1.5V Batteries (included) in the remote control
- Always change both batteries at the same time

CARE AND MAINTENANCE
IMPORTANT:
- Switch off the air conditioner and disconnect the plug from the power outlet
- Drain the water by removing the lower drain port drain plug
- Always transport the air conditioner in an upright position only
CLEARING THE AIR FILTERS
- To ensure the air intake is filtered properly and to assure that your air conditioner runs efficiently, it is recommended to clean the air filters at least once every two weeks
- This unit has three air filters; the Silvershield pre-filter, 3M filter, and the lower air filter
- Switch off the air conditioner and the Silvershield pre-filter and 3M filter from the unit (Fig. 7a and Fig. 7b)
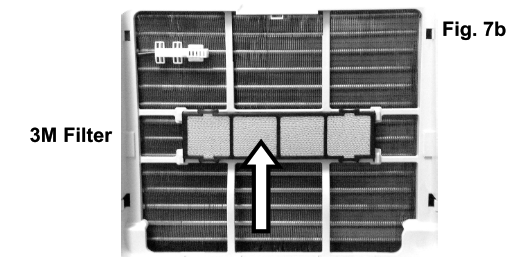
- Remove the lower filter by loosening the screw and taking down the air inlet grille. (Fig. 7a)
- Use a vacuum cleaner or tap lightly to remove loose dust and dirt from the filters. Then rinse them thoroughly under warm or cold running water (no hotter than 100F.)
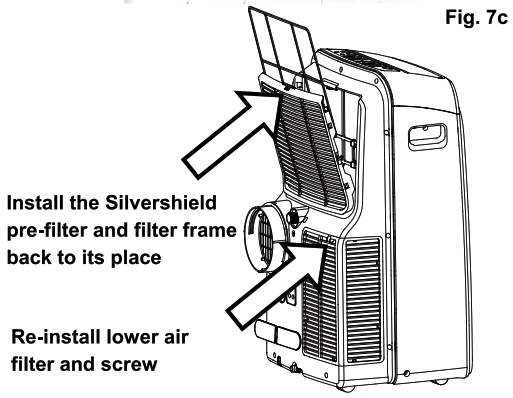
- Dry thoroughly before re-inserting the filters. (Fig. 7c)
WARNING! Never operate the air conditioner without the filter in place
CLEARING THE AIR CONDITIONER
- Always switch off the air conditioner and disconnect the plug from the power supply outlet before cleaning the air conditioner
- Use a soft damp cloth to wipe the body of the unit.
- Never use harsh chemicals, oil-based products, deter-gents, chemically treated cloths, or other cleaning solu-tions. These could possibly damage the body of the air conditioner
END OF SEASON STORAGE
- Switch off the air conditioner and disconnect the power plug from the power supply outlet before cleaning the air conditioner
- Clean the air filters
- Drain the condensed water completely
- On a warm day, turn on the Fan only mode for half a day so that the inside can dry out completely
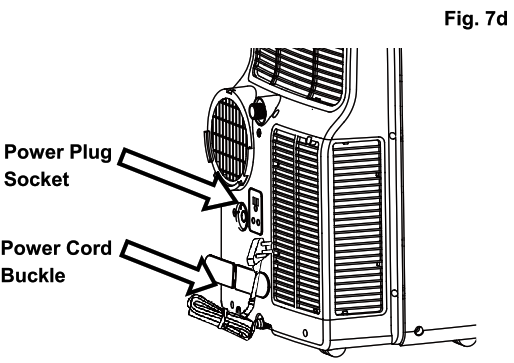
- Wrapped the power cord and bundle it with the tape (Fig.29)
- Remove the batteries from the remote controller
- Wrap the cord using the Power Cord Buckle and insert the plug into the Power Plug Socket. (Fig. 7d)
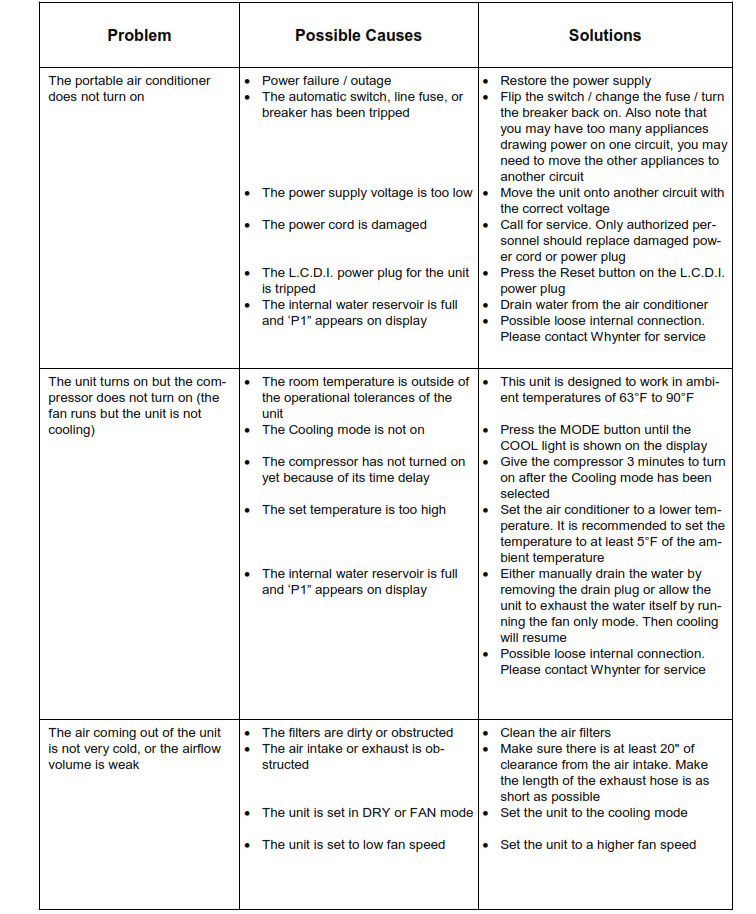
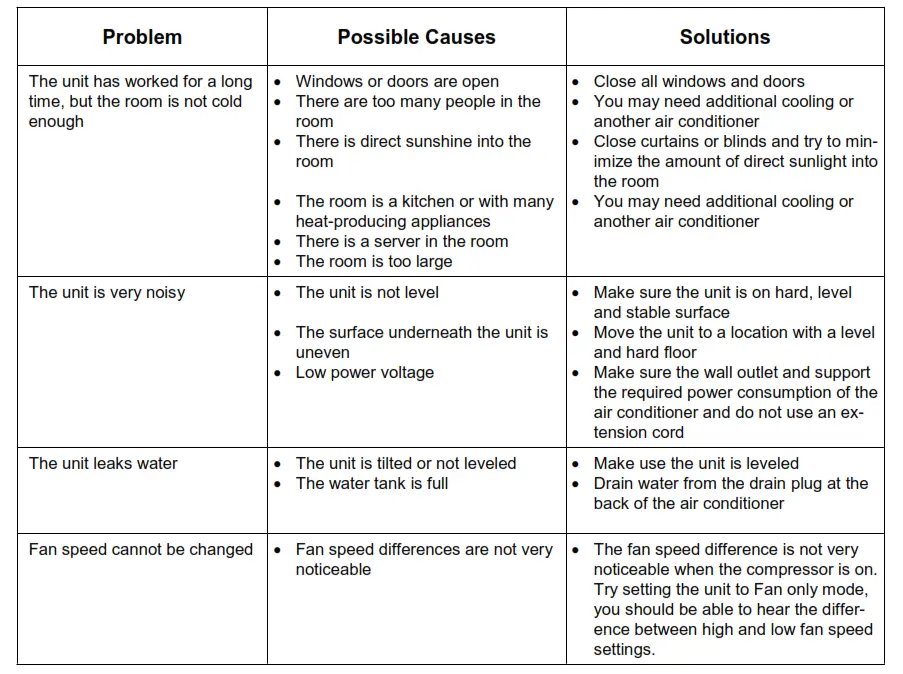
TROUBLESHOOTING
Many common portable air conditioner problems are easily resolved. Try the troubleshooting suggestions below to see if the problems can be resolved before having to contact the service department.
ONE YEAR LIMITED WARRANTY & THREE YEAR WARRANTY ON COMPRESSOR
This WHYNTER product is warranted to the original owner, purchased from an authorized Whynter dealer within the 48 U.S. continental states, for one year from the original purchase date against defects in material and workmanship under normal residential usage. Should your WHYNTER product prove defective within one year from the date of purchase, contact Whynter’s Customer Support team with the serial number and proof of purchase to make a warranty claim. A Return Authorization number must be issued before returning any parts or products. Parts or products received without a Whynter issued Return Authorization number will be refused. Under this warranty, Whynter will repair or replace any parts found defective with new or remanufactured parts or exchange the defective product with a new, refurbished, or remanufactured product at our discretion. All defective products and parts covered by this warranty will be repaired or replaced on a mail-in basis to Whynter’s Service Center. This warranty is not transferable. After the expiration of the warranty, the cost of labor and parts will be the responsibility of the original owner.
The compressor of portable air conditioners is warranted for an additional two years after the one-year limited warranty expires from the date of purchase.
Return freight is prepaid by Whynter within two months of purchase. After two months to one year, the customer will be responsible for the return freight cost to Whynter’s Service Center. Please package the product carefully in its original packaging to avoid damage in transit. Whynter is not responsible for damage resulting from shipper mishandling or improper packaging. Please retain the original box and packaging materials.
THIS WARRANTY DOES NOT COVER:
- Acts of God, such as fire, flood, hurricanes, earthquakes and tornadoes.
- An improper power supply such as power surge, low voltage, defective household wiring, or inadequate fuses.
- Use in commercial or industrial applications.
- Damage, accidental or otherwise, to the product while in the possession of a consumer not caused by a defect in material or workmanship.
- Damage caused by consumer misuse, tampering, lack of maintenance or failure to follow the care and special handling provisions in the instructions.
- Damage to the finish of the case, or other appearance parts caused by wear.
- Damage caused by repairs or alterations to the product by anyone other than authorized by the manufacturer.
- Removal, Replacement Packaging, Freight and Insurance cost for the warranty service.
- Products sold AS IS or from an unauthorized reseller.
- Products that have had their serial numbers removed or defaced.
DISCLAIMER OF IMPLIED WARRANTIES; LIMITATION OF REMEDIES
CUSTOMER’S SOLE AND EXCLUSIVE REMEDY UNDER THIS LIMITED WARRANTY SHALL BE PRODUCT REPAIR OR REPLACEMENT AS PROVIDED HEREIN. CLAIMS BASED ON IMPLIED WARRANTIES, INCLUDING WARRANTIES OF MERCHANTABILITY OR FITNESS FOR A PARTICULAR PURPOSE, ARE LIMITED TO ONE YEAR OR THE SHORTEST PERIOD ALLOWED BY LAW, BUT NOT LESS THAN ONE YEAR. WHYNTER SHALL NOT BE LIABLE FOR CONSEQUENTIAL OR INCIDENTAL DAMAGES SUCH AS PROPERTY DAMAGE AND INCIDENTAL EXPENSES RESULTING FROM ANY BREACH OF THIS WRITTEN LIMITED WARRANTY OR ANY IMPLIED WARRANTY. SOME STATES AND PROVINCES DO NOT ALLOW THE EXCLUSION OR LIMITATION OF INCIDENTAL OR CONSEQUENTIAL DAMAGES, OR LIMITATIONS ON THE DURATION OF IMPLIED WARRANTIES, SO THESE LIMITATIONS OR EXCLUSIONS MAY NOT APPLY TO YOU. THIS WRITTEN WARRANTY GIVES YOU SPECIFIC LEGAL RIGHTS. YOU MAY ALSO HAVE OTHER RIGHTS THAT VARY FROM STATE TO STATE.
The warranty, product contents and specifications are subject to change at any time without notice; please refer to www.whynter.com for the most current information.
To register your warranty, please visit www.whynter.com and fill out the online Warranty Registration
form. Please be sure to include a copy of your purchase invoice.
To obtain service or information, contact Whynter LLC via email at [email protected] or call
866-WHYNTER (866-949-6837).
Product contents and specifications may change without notice.
Copyright © 2019 Whynter LLC
WWW.WHYNTER.COM
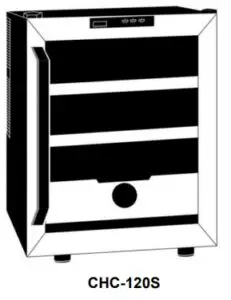
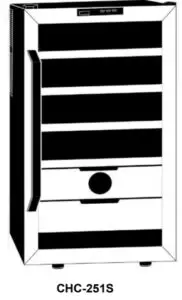
Whynter Stainless Steel Cigar Cooler Humidor
APPLIANCE SAFETY
Your safety and the safety of others are very important to us.
This is the Safety Alert Symbol. This symbol alerts you to potential hazards that may result in serious injury. All safety messages will follow the Safety Alert Symbol and either the words” DANGER” or “WARNING”.
Danger means that failure to heed this safety statement may result in severe injury or death.
Warning means that failure to heed this safety statement may result in extensive product damage, serious injury, or death.
Caution means that failure to heed this safety statement may result in minor or moderate injury, or property or equipment damage.
All safety messages will alert you to know what the potential hazard is, tell you how to reduce the chance of injury, and let you know what can happen if the instructions are not followed.
IMPORTANT SAFEGUIDES
Before the appliance is used, it must be properly positioned and installed as described in this manual, please read the manual carefully. To reduce the risk of fire, electrical shock or injury when using the appliance, follow basic precaution, including the following:
- Plug into a grounded 3-prong outlet, do not remove grounding prong, do not use an adapter, and do not use an extension cord.
- Do not use if the power supply cord is damaged. If damaged, it must be replaced by a qualified electrician.
- It is recommended that a separate circuit, serving only your appliance be provided. Use receptacles that cannot be turned off by a switch or pull chain.
- Never clean appliance parts with flammable fluids or harsh chemicals. These fumes can create a fire hazard or explosion.
- Do not store or use gasoline or other flammable vapors and liquids in the vicinity of the appliance or any other appliance.
- Before proceeding with cleaning and maintenance operations, make sure to unplug the appliance.
- Do not connect or disconnect the electric plug with wet hands.
- Do not attempt to repair or replace any part of your appliance unless it is specifically recommended in this manual. All other servicing should be referred to a qualified technician.
WARNING: FOLLOW WARNING CALL OUTS BELOW ONLY WHEN APPLICABLE TO YOUR MODEL
- Use two or more people to move and install the appliance. Failure to do so can result in injury.
- When positioning the cigar cooler humidor, ensure that there is . This will allow for adequate ventilation of any heat generated by the cigar cooler humidor.
- It is recommended you install the appliance in a place where the ambient temperature is between 68º-80ºF. This appliance must be installed in an area protected from the element, such as wind, rain, water spray or drips.
- The appliance should not be located next to ovens, grills or other sources of high heat.
- The appliance must be installed with all electrical connections in accordance with state and local codes.
- The fuse (or circuit breaker) size should be 15 amperes.
- It is important for the appliance to be leveled in order to work properly. For a stable installation, make sure the appliance is placed on a flat, level and solid surface.
- Ensure that the surface on which the appliance is placed is strong enough to hold the appliance and the items stored inside.
- This appliance is not intended for use by young children or physically-challenged persons without supervision/assistance. Young children must be supervised to ensure safety around this or any appliance.
- Do not use solvent-based cleaning agents of abrasives on the interior. These cleaners may damage or discolor the interior.
- Keep fingers out of the “pinch point” areas. Clearance between the doors and between the doors and cabinet are necessarily small. Be careful closing doors when children are in the area.
- The temperature range for this cigar cooler humidor designed to store and age cigars within the optimal humidity range of 62 % to 75% at a room temperature.
- Close the cigar cooler humidor immediately after putting in any items to keep the internal temperature relatively constant.
- Avoid placing any objects on top of the appliance.
- This is an electrical appliance, to avoid injury from electrical shock do not operate the unit with wet hands, while standing on a wet surface or while standing in water. Do not use outdoors or in wet conditions.
- When positioning or moving the appliance, ensure that it is not turned up side down or unleveled greater than 45°.
- Never pull the power cord to disconnect it from the outlet. Grasp the plug and pull it from the outlet.
- Never lift, carry or drag the appliance by the power cord.
- This appliance is designed for household, non-commercial use only. Any other use will void the warranty.
- Do not plug into the power outlet before set up is completed.
- Do not cut or remove the ground prong from the power cord.
- Do not move this appliance without emptying it and securing the door in a closed position.
Parts and Controls
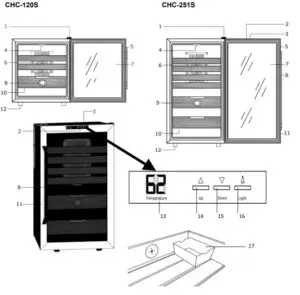
- Hinge Cover 1
- Temperature Control
- Light Switch
- Light 13. Temperature Display
- Door Seal
- Internal Fan
- Glass Door
- Handle
- Hygrometer
- Removable Spanish cedar drawers and shelves
- Stainless Steel Door Frame
- Leveling Legs ( 3 big, 1 small under door hinge
- Temperature Display
- Up Button
- Down Button
- Light Switch
- Humidity Tray
Introduction to Cigar Cooler Humidors
Our Whynter Cigar Cooler Humidor is designed to store and age cigars within the optimal humidity range 62% to 75% at room temperature. Our humidors contain a humidification system and equipped with a hygrometer which helps maintain the desired level of humidity. In addition to its main purpose of storing, preserving and aging cigars for a number of years, Whynter Cigar Cooler Humidor is also an attractive and elegant piece of appliance.
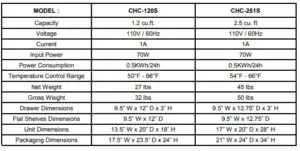
- Capacity:
CHC-120S : 1.2 cu. ft
CHC-251S : 2.5 cu. ft - Freestanding setup
- Vibration-free thermoelectric cooling
- Stainless steel trimmed glass door with sleek black cabinet
- Professional quality towel bar handle
- Removable Spanish cedar drawers and shelves
Shelf Count
CHC-120S – 2 flat shelves, 1 drawer
CHC-251S – 4 flat shelves, 2 drawers - Adjustable thermostat with temperature range from 50ºF – 66ºF
- Enhanced LCD temperature display
- Soft interior LED lighting with on/off switch
- Solid state components for long life- the only moving parts are fans to circulate air for even temperature distribution
- Internal fan-forced circulation for even temperature distribution throughout the cabinet
- ETL Certified
TECHNICAL DATA
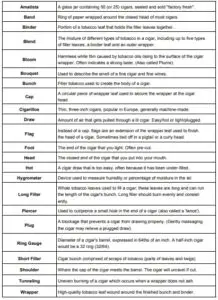
About Cigars/Terminology
Installation
IMPORTANT SAFETY INSTRUCTIONS
- Read all instructions before using the appliance.
- DANGER or WARNING: An empty cigar cooler humidor can be a hazardous for children or small pets. If disposing of the cigar cooler humidor, remove gasket seals, latches, lids or the entire door from your unused appliance, or take other action to ensure the appliance is harmless.
- Never allow children to operate, play with, or crawl inside the appliance.
- Never clean appliance parts with flammable fluids or harsh chemicals. The fumes can create a fire hazard or explosion.
- Do not store or use gasoline or any other flammable vapors and liquids in the vicinity of this or any other appliance. The fumes can create a fire hazard or explosion.
INSTALLATION INSTRUCTIONS
BEFORE USING YOUR APPLIANCE
- Remove the exterior and interior packing.
- Clean the interior surface with lukewarm water using a soft cloth.
- Install the handle on the door
HANDLE BAR
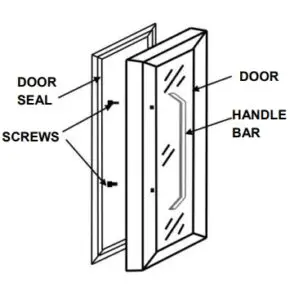
To install the handle, you will need a Phillips head screwdriver.
- Open the door.
- Locate the two screw holes on the inside of the door (they may be partially obscured by the door seal so you may need to remove the door seal).
- Insert the screws into the screw holes until they stick out of the front of the door.
- Line up the holes in the handle with the screws and give each screw about 2-4 full turns into the handle bar.
- Now the turn the screws in all the way, and your handles are installed.
- Replace seal into door frame.
INSTALLATION OF YOUR APPLIANCE
- The appliance is designed for a free standing installation.
- WARNING: Do not store or install the appliance outdoors.
- CAUTION: This appliance is designed for designed to storing and aging cigars . Do not store perishable food, medicine or other medical products.
- Place your appliance on a hard and level floor that is strong enough to support it when it is fully loaded.
- To level your appliance, adjust the leveling legs at the bottom of the appliance if needed.
- When positioning the appliance, ensure that there is. This will allow for adequate ventilation of any heat generated by appliance.
- We do not recommend installing the appliance on carpet.
- Do not install the appliance near an oven or other heating source. Direct sunlight may affect the acrylic coating and heat sources may increase electrical consumption. For best performance, do not install the appliance behind a cabinet door or block the base grille. Extreme cold ambient temperatures may also cause the appliance not to perform properly.
- Avoid locating the appliance in area that may be exposed to excessive moisture.
- Plug in the appliance into an exclusive, grounded wall power outlet. Do not under any circumstances cut or remove the third (ground) prong from the power cord. Any questions concerning power and/or grounding should be directed toward a qualified electrician or an authorized service center.
ELECTRICAL CONNECTION
This appliance requires a standard 115/120 Volt AC ~/60Hz electrical ground outlet with three-prong.
Have the wall outlet and circuit checked by a qualified electrician to make sure the outlet is properly grounded. The cord should be secured behind the appliance and not left exposed or dangling to prevent accidental injury.
The appliance should always be plugged into its own individual electrical outlet which has a voltage rating that matches the rating label on the appliance. This provides the best performance and also prevent overloading house wiring circuits that could cause a fire hazard from overheated. Never unplug the appliance by pulling the power cord. Always grip the plug firmly and pull straight out from the receptacle. Repair or replace immediately all power cords that have become frayed or otherwise damaged. Do not use a cord that shows cracks or abrasion damage along its length or at either end. When moving the appliance, be careful not to damage the power cord.
EXTENSION CORD
Because of potential safety hazards, it is strongly recommended that you do not use an extension cord with this appliance. However, if you must use an extension cord, it is absolutely necessary that it be a UL/CUL-Listed, 3-wire grounding type appliance extension cord having a grounding type plug and outlet and that the electrical rating of the cord be 115 volts and at least 10 amperes.
Operation and Controls
It is recommended you install the appliance in a place where the ambient temperature is between 68º-80ºF.
If the ambient temperature is above or below recommended temperatures, the performance may be affected.
For example, placing your appliance in extreme cold or hot conditions may cause interior temperatures to fluctuate.

SETTING THE TEMPERATURE
The interior temperature can be adjusted in increments of 1 degree (50°F – 66°F for CHC-120S and 54°F – 66°F for CHC-251S). You can set the temperature by pressing the Up and Down buttons on the control panel. Keeping to a storage temperature of between 50/54°F – 66°F is essential for preserving the quality of cigars .
INTERIOR LIGHT
You can turn on and off the interior light by pressing the “Light” button on the control panel.
LEVELING THE APPLIANCE
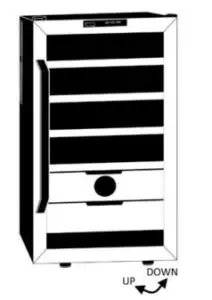
It is important for your appliance to be leveled in order to work properly. It can be raised or lowered by rotating each of the feet on the bottom of the machine. If you find that the surface is not level, rotate the feet until the appliance becomes level .You may need to make several adjustments to level it. We recommend using a carpenter’s level to check the machine.
Note: This unit has 3 large levelling legs and 1 small levelling leg under the door hinge.
- Place a carpenter’s level on top of the product to see if the appliance is level from front to back and side to side.
- Adjust the height of the feet as follows: Turn the leveling feet to the right to lower that side of the refrigerator. Turn the leveling feet to the left to raise that side of the refrigerator.
HUMIDITY CONTROL
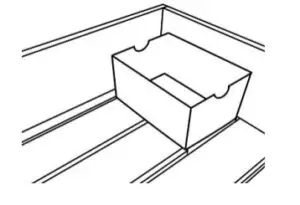
- This appliance is equipped with a system for maintaining the correct level of humidity. Fill the humidity tray (small plastic reservoir) to about ¾ full with 100% distilled water, then place it onto the runners found on the top shelf of the appliance. Check the water level regularly and refill as necessary.
- Please ensure the reservoir is positioned correctly on the runners on the top shelf to avoid the possibility of water spillage.
HYGROMETER
This unit is equipped with a hygrometer, which is a gauge used to measure humidity levels inside the humidor. It is recommended to maintain a humidity level of 62% to 75% inside of a humidor to properly preserve and age cigars.
Care and Maintenance
CLEANING YOUR APPLIANCE
- Turn off the power, unplug the appliance, and remove all cigars from the appliance and store them in a suitable place.
- Clean the inside, the door seal and the inside of the glass with a clean, damp cloth.
- Never use detergents or other substances that emit odors.
- Always keep the door closed when cleaning the outside of the appliance. Make sure no detergent odors penetrate into the appliance.
- Clean the side panels and door surfaces with a clean and soft cloth. If necessary, use a moist cloth. Alternatively, use a microfiber cloth.
- The humidity tray should be hand-washed with water and detergent. After cleaning, always make sure the tray is thoroughly rinsed with clean water before replacing.
VACATION TIME
- Short vacations: Leave the appliance operating during vacations of less than two days.
- Long vacations: If the appliance will not be used for an extended period, remove all items and turn off the appliance. Clean and dry the interior thoroughly.
MOVING YOUR APPLIANCE
- Remove all items inside the appliance.
- Securely tape down (we recommend using painter’s tape) all loose items (shelves) inside your appliance.
- Turn the adjustable leg up to the base to avoid damage.
- Tape (we recommend using painter’s tape) the door shut.
- Be sure the appliance stays secure in the upright position during transportation and protect the exterior of appliance with a blanket, or similar item.
PREPARING FOR STORAGE
If the appliance will not be used for a long time, or is to be moved to another place, it will be necessary to defrost the unit and dry the interior:
- Disconnect the appliance from the power supply by removing the power plug from the wall socket.
- Leave the door open to allow for air circulation and to prevent mold, mildew and unpleasant smells.
CAUTION: Store the unit out of the reach of children. If you have children, you may want to take additional precautions such as removing the door to prevent a child from being trapped inside the appliance.
ENERGY SAVING TIPS
- The appliance should be located in the coolest area of the room, away from heat producing appliances, and out of any direct sunlight.
- Ensure that the appliance is adequately ventilated. Never obstruct the air vents.
- Close the door tightly and do not open the appliance too frequently or for a long period of time.
- Store the content in an organized way.
- Do not over-fill the appliance to allow air to circulate.
Troubleshooting
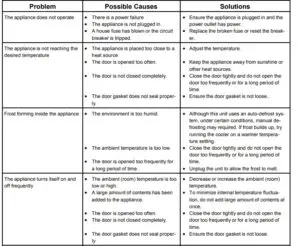
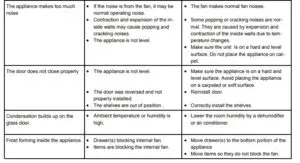
ONE YEAR LIMITED WARRANTY
This WHYNTER Cigar Cooler Humidor is warranted, to the original owner within the 48 continental states, for one year from the date of purchase against defects in material and workmanship under normal use and service. Should your WHYNTER Cigar Cooler Humidor prove defective within one year from the date of purchase, return the defective part or unit, freight prepaid (within two months of purchase; after two months to one year, customer will be responsible for freight cost to Whynter’s service department), along with an explanation of the claim to Whynter LLC. Please package the Cigar Cooler Humidor carefully in its original packaging material to avoid damage in transit. Please retain the original box and packaging material. Under this warranty, Whynter will repair or replace any parts found defective. This warranty is not transferable. After the expiration of the warranty, the cost of labor and parts will be the responsibility of the original owner of the unit.
THIS WARRANTY DOES NOT COVER:
- Acts of God, such as fire, flood, hurricanes, earthquakes and tornadoes.
- Damage, accidental or otherwise, to the Cigar Cooler Humidor while in the possession of a consumer not caused by a defect in material or workmanship;
- Damage caused by consumer misuse, tampering, or failure to follow the care and special handling provisions in the instructions.
- Damage to the finish of the case, or other appearance parts caused by wear.
- Damage caused by repairs or alterations to the product by anyone other than authorized by the manufacturer.
- Freight and Insurance cost for the warranty service.
DISCLAIMER OF IMPLIED WARRANTIES; LIMITATION OF REMEDIES
CUSTOMER’S SOLE AND EXCLUSIVE REMEDY UNDER THIS LIMITED WARRANTY SHALL BE PRODUCT REPAIR OR
REPLACEMENT AS PROVIDED HEREIN. CLAIMS BASED ON IMPLIED WARRANTIES, INCLUDING WARRANTIES OF MERCHANTABILITY OR FITNESS FOR A PARTICULAR PURPOSE, ARE LIMITED TO ONE YEAR OR THE SHORTEST PERIOD ALLOWED BY LAW, BUT NOT LESS THAN ONE YEAR. WHYNTER SHALL NOT BE LIABLE FOR CONSEQUENTIAL OR INCIDENTAL DAMAGES SUCH AS PROPERTY DAMAGE AND INCIDENTAL EXPENSES RESULTING FROM ANY BREACH OF THIS WRITTEN LIMITED WARRANTY OR ANY IMPLIED WARRANTY. SOME STATES AND PROVINCES DO NOT ALLOW THE EXCLUSION OR LIMITATION OF INCIDENTAL OR CONSE- QUENTIAL DAMAGES, OR LIMITATIONS ON THE DURATION OF IMPLIED WARRANTIES, SO THESE LIMITATIONS OR EXCLUSIONS MAY NOT APPLY TO YOU. THIS WRITTEN WARRANTY GIVES YOU SPECIFIC LEGAL RIGHTS. YOU MAY ALSO HAVE OTHER RIGHTS THAT VARY FROM STATE TO STATE.
To obtain service or information, contact Whynter LLC via email at [email protected] or call 866 WHYNTER.
]]>
WHYNTER ECO-FRIENDLY 12,000 BTU PORTABLE AIR CONDITIONER
MODEL# : ARC-12SD
Instruction Manual
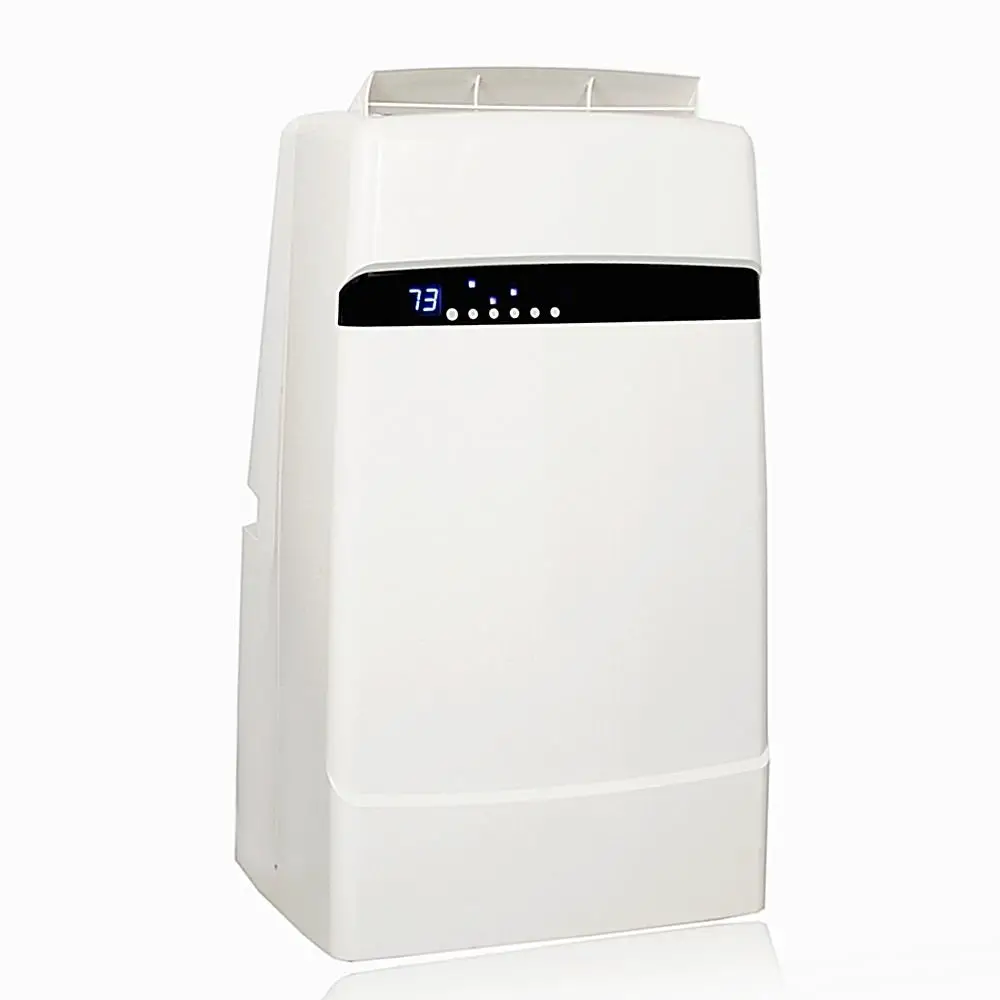
Congratulations on your new WHYNTER product. Please read this Instruction Manual carefully before using this product to ensure proper operation. Keep this manual in a safe place for future reference.
Thank you for choosing the Whynter portable air conditioner. Please follow the instructions provided in this user guide to obtain the very best performance from your portable air conditioner and take full advantage of the many features your portable air conditioner offers you. We trust that your Whynter air conditioner will provide the performance and reliability that we stand for.
Please keep this user manual in a safe place for future reference.
DISPOSAL

This symbol on the product or its packaging indicates that the appliance cannot be treated as normal domestic trash, but must be handed in at a collection point for recycling electric and electronic appliances. Your contribution to the correct disposal of this product protects the environment. Further information about the recycling of this product can be obtained from your local municipal authority.
Your safety and the safety of others are very important to us.
To reduce the risk of fire, electrical shock, or injury when using your appliance, follow these basic precautions.
 Before the portable air conditioner is used, it must be properly positioned and installed as detailed in this manual.

- Do not under any circumstances cut or remove the third (ground) prong from the power cord.
- Make sure this unit is connected to a correctly grounded power supply outlet. Do not use an extension cord or power strip.
- The power cord is UL listed. It has a built-in L.C.D.I. (leakage, current, detection, interruption) circuit breaker for added safety. If the power supply is interrupted, press the reset button to reconnect the unit to power source.
- It is recommended to use a separate circuit that its size should be 15 Amps for the air conditioner.
- Do not use an excessively wet cloth, industrial solvents, oil-based products to clean this portable air conditioner.
- To avoid the risk of shock, the product should never be used in bathrooms, shower rooms, or in any other steamy or wet areas.
- Do not store or use gasoline or other flammable vapors and liquids in the vicinity of this or any other appliances.
- Do not repair, disassemble and/or modify the unit by yourself.
- Always turn off the portable air conditioner when cleaning the air filter, and transporting.
- Do not turn this unit on and off by plugging and unplugging. Always use the ON/OFF switch.

- Transport the unit in an upright position only, or leave it in an upright position for a minimum of 4 hours before first use.
- Ensure curtains or other objects are not obstructing the air inlet filters.
- Do not bend or crush the exhaust hose while in use.
- Always allow at least 20” of clearance around the unit for ventilation. Do not use this unit inside closets, cabinets, and/or cramped spaces between furniture.
- This unit is optimized to operate at an ambient temperature of 64°F – 95°F.
- This unit must be installed in an area protected from the elements, such as wind, rain, water spray, or drips.
- The unit should not be placed next to ovens, grills, or other heat sources.
- Always place the unit on an even and hard and level surface.
- Do not sit or place objects on the unit.
- Do not allow children to climb, stand or hang on the unit. The air conditioner could tip over and get damaged and/or seriously injure somebody.
- Keep fingers out of the air intakes and air outlets.
- The unit is an electrical appliance. To avoid injury from electrical shock do not operate it with wet hands while standing on a wet surface or while standing in water. Do not use it outdoors or in wet conditions.
- When positioning or moving the unit, ensure it is not turned upside down or greater than 45° or more off level.
- This unit is designed for household, non-commercial use only. Any other use will void the warranty.
- Do not plug into the power outlet before set up is completed.
- Do not operate this unit without the air filter(s).
- Do not use harsh chemicals to clean the filter(s). Dry thoroughly before inserting the filter(s) into the unit.
- Do not add extra length to the exhaust hose by more than a total length of 9’. This will reduce the cooling efficiency of the portable air conditioner.
- At the end of each season, all water must be drained from the unit and filter(s) must be cleaned before storage.
THE MANUFACTURER DISCLAIMS ANY RESPONSIBILITY IF THE ABOVE INSTRUCTIONS ARE NOT FOLLOWED.
OPERATING CONDITION

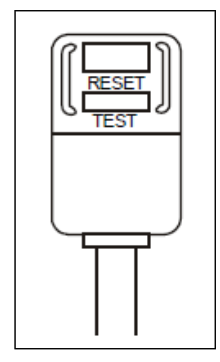
Your portable air conditioner is supplied with a Leakage-Current Detection and Interruption (LCDI) plug. This plug reduces the risk of fire due to arcing faults in the power supply cord. Please follow the instructions below to ensure that LCDI plug works properly.
- Plug the power cord into a grounded wall outlet. Do not plug to a power strip or extension cord.
- Press the TEST button on the plug. This should trip the plug and cut the power to the air conditioner. If the plug does not trip and the unit comes on, please contact technical support.
- Press the RESET button to start the air conditioner.
- Do NOT use the TEST and RESET buttons to turn the air conditioner on and off.
IDENTIFICATION OF ACCESSORIES
Note: Please visit whynter.com for optional accessories information
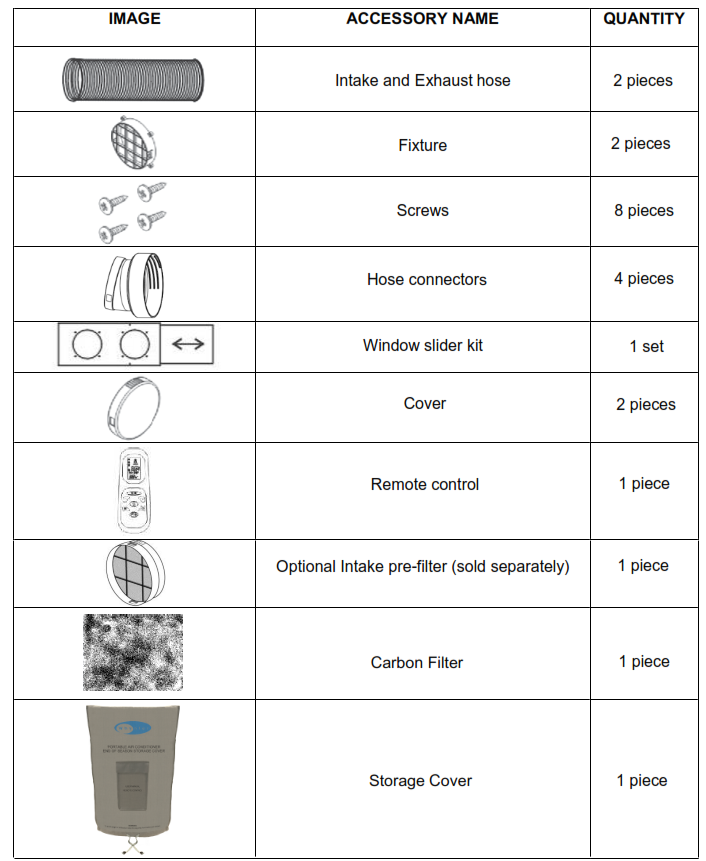
IDENTIFICATION OF PARTS
Front
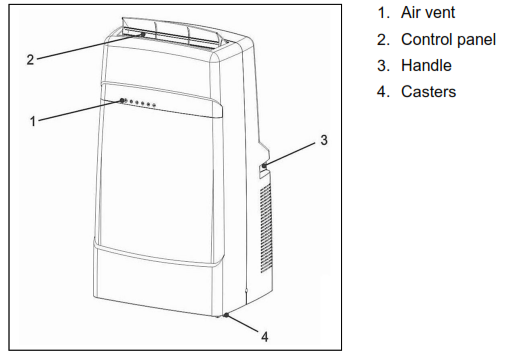
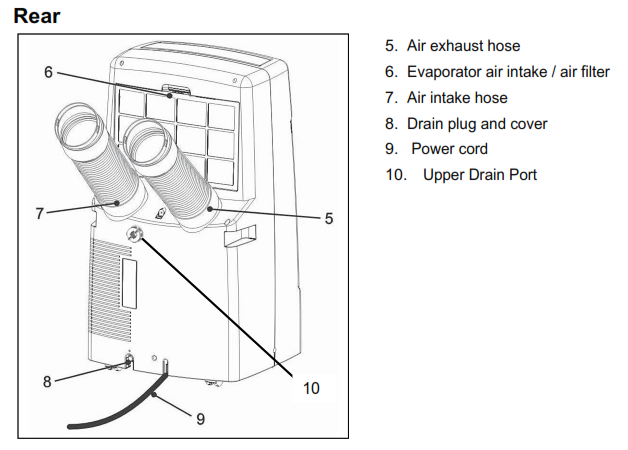
OPERATING YOUR AIR CONDITIONER
Before you begin, thoroughly familiarize yourself with the control panel, remote control and all of the functions. Follow the symbol for the desired function. The unit can be controlled by the unit control panel alone or with the remote control.
CONTROL PANEL
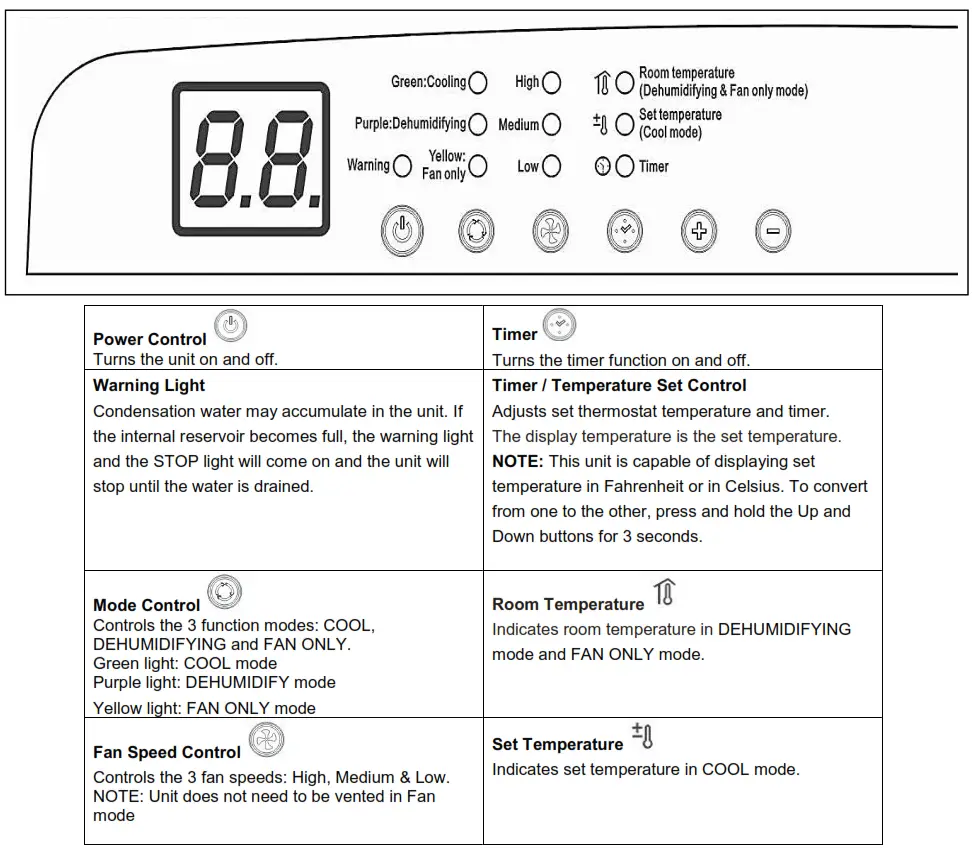
INSTALLATION INSTRUCTIONS
Location
The air conditioner should be placed on a hard and level surface strong enough to support its weight.
The unit is equipped with caster wheels for portability. It should only be rolled on smooth, flat surfaces.
Use caution when rolling on carpet surfaces. Do not attempt to roll the unit over objects.
The air inlet and outlet should be free of any obstructions and be placed with at least 20” of clearance for efficient air-conditioning and circulation.
Exhaust hose Installation
When using the air conditioner, the hot air from the exhaust hose must be exhausted out of the room to complete the air exchange of the condenser. The intake hose is optional. When the unit is operating in dehumidifying or fan-only mode, installation of the exhaust hose is optional.
1. Expand each end of the exhaust and intake hoses about 6”.
2. Install the hose connectors onto the exhaust and intake hoses by turning counterclockwise.
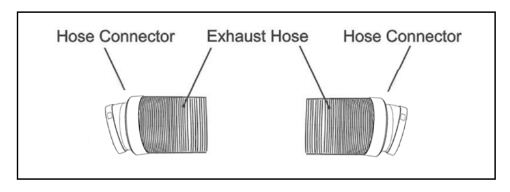
3. Align the tab cut-outs of each of the hose connectors to the tabs on the air exhaust and air intake at the rear of the unit and snap in place.
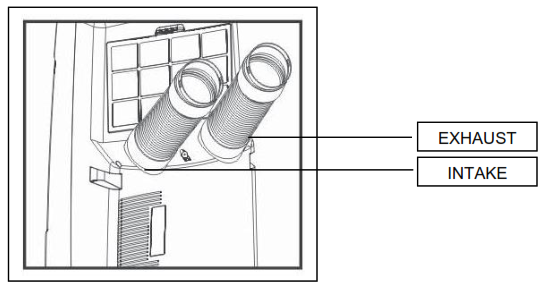
If installing the optional air intake hose in an area with poor air quality, we recommend purchasing the intake hose pre-filter accessory.
Only extend the hose to the necessary length, keeping it as short and as straight as possible.
We do not recommend extending the hose more than 9′ long.
If you are interested in purchasing an additional 5’ exhaust hose, please contact [email protected] for retail sales information or visit whynter.com for a list of optional accessories.
Window kit Installation
The window kit has been designed to fit most standard vertical and horizontal windows. However, it may be necessary to modify the installation procedures to accommodate your window.
NOTE:
- If your window opening is smaller than the minimum length of the window slider kit, the window slider kit can be cut to fit the window opening. Never cut into the exhaust and intake hose cut-outs on the window slider kit.
- If your window opening is larger than the maximum length of the window slider kit, additional material will be needed to cover the open space such as Plexiglas, PVC plastic, plywood, etc. Alternately, an additional window slider kit can be purchased to be used in combination with the included kit.
- When using the window slider kit on a window or sliding door, additional security measures may be needed.
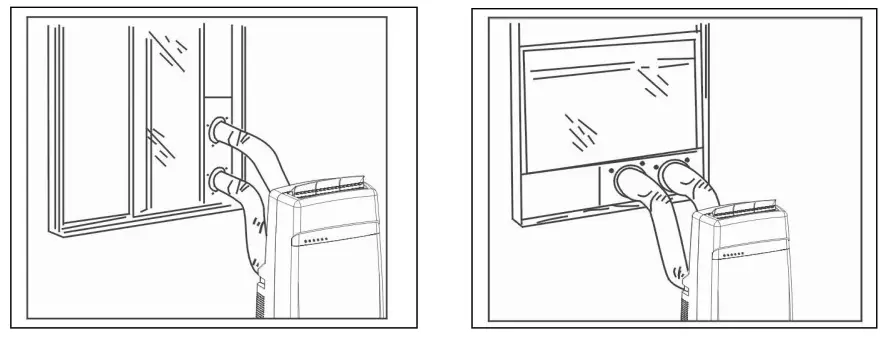
- Open the window at approximately 5”.
- Adjust the length of the window slider to the same length and width of the opening of the window. Cut the window slider if necessary to fit the length of your window.
- Insert the fixture through the back grooved side of the window slider hose cut-out. Line up the fixture with the 4 screw holes and tighten the fixture with 4 screws from the front side of the slider panel. (Fig. 1)
- Fit the window slider kit into the window opening and close the window to secure the window slider kit. For long-term installation, you may screw the window kit into your window frame.
- Move the air conditioner close to the window, extend the hose to the necessary length, keeping it as short and as straight as possible and attach the other end of the hose to the window slider kit.
- Align the tab cut-outs of the hose connector to the tabs on the fixture and snap the hose connector to the window slider kit.
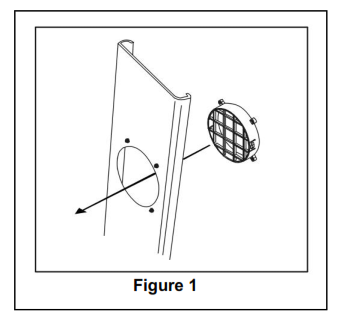
AIR FILTERS INSTALLATION
Your Whynter portable air conditioner is equipped with a washable Pre-Filter and an Activated Carbon Filter. The washable Pre-Filter removes large particles such as dust, pet hair and dander. The Activated Carbon Filter which is designed to remove smoke and other odors. It is recommended you replace the Activated Carbon Filter every 2-3 months or as needed. Follow the steps below to install the filters.
WARNING: NEVER OPERATE THE AIR CONDITIONER WITHOUT THE PRE-FILTER
- Pull the pre-filter grille up and out to remove it from the unit
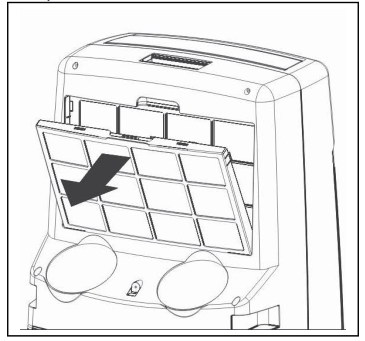
- Remove the filter frame from the pre-filter
- Place the activated carbon filter on top of the pre-filter
- Reattach the filter frame
- Insert the filter assembly into the unit
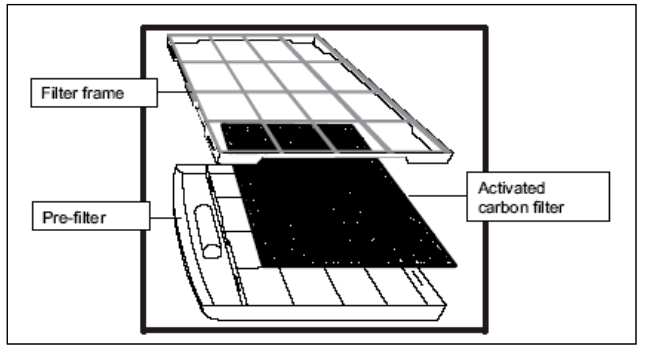
OPERATION INSTRUCTIONS
- BEFORE USING YOUR PORTABLE AIR CONDITIONER
- Remove the exterior and interior packaging.
- Before connecting the unit to the power source, let it stand upright for a minimum of 4 hours.
This will reduce the possibility of a malfunction in the cooling system from handling during transportation.
SWITCHING ON/OFF THE AIR CONDITIONER
- The unit can be switched ON or OFF by pressing the Power button on the control panel or the Power button on the remote control.
COOLING MODE
- In this mode, the air conditioner cools and dehumidifies the room. To activate the cooling function, press the Mode Control button until the GREEN indicator illuminates. When cooling mode is set, the compressor will start in approximately 3 minutes.
- NOTE: In cooling mode, hot air is exhausted from the outdoor exhaust port and the exhaust hose must be connected to exhaust out the hot air.
- The temperature setting range of this air conditioner is from 61°F to 89°F. To set the temperature, press the + or – buttons. This air conditioner has a 5°F temperature cushion; if the set temperature is within 5°F of the ambient temperature, the unit runs in fan-only mode. This saves energy and prolongs the life of the compressor of the air conditioner. Once the set temperature is achieved, the compressor will turn off and the fan runs continuously to circulate the air within the room.
- To set the fan speed, press the Fan Speed button.
Note: When the compressor is running, the sound difference between each fan speed is not very noticeable.
DEHUMIDIFYING MODE
- In this mode, the air conditioner dehumidifies the room, the compressor will activate intermittently depending on the ambient temperature and the fan speed is set to Low.
- To activate the dehumidifying mode, press the Mode Control button until the PURPLE indicator illuminates. When switching between functions, there will be an approximate 3 minute transition time.
- In dehumidifying mode, the exhaust hose does not need to be vented. If the exhaust hose is vented, the room will be cooled as it dehumidifies. To prevent cooling, remove the exhaust hose from the window kit and allow the warm air from the rear to be re-circulated into the room. If the room temperature is higher than 77°F, the fan speed can be adjusted. If the room temperature is lower than 77°F, the fan speed is set at Low.
NOTE: - When using the dehumidifying mode, venting the exhaust hose to the outside is not required. If vented, the warm air is exhausted to the outside and cooling within the room may occur. Additionally, if the exhaust hose is not vented, the unit may require more frequent draining.
- The air conditioner does not have a humidistat in which a specific humidity level can be set.
FAN ONLY MODE
- In this mode, only the fan of the air conditioner runs and circulates the air within the room. To activate the fan-only mode, press the Mode Control button until the YELLOW indicator illuminates. In this mode, the temperature cannot be set. Subsequently, set the desired fan speed by pressing the Fan Speed button.
- Note: When using the fan-only mode, venting the exhaust hose to the outside is not required.
TIMER (DELAYED SWITCH ON / OFF) FUNCTION
- This function mode enables a delayed switch ON or delayed switch OFF of the air conditioner. The time (hours) delay can be set, enabled, and disabled. The timer is adjustable between 1-24 hours.
SETTING SWITCH OFF TIMER
With the air conditioner operating in any function mode, press the Timer Control button. Then set the desired time delay OFF hours by pressing the + or – buttons. When the delay time set has elapsed, the air conditioner switches off.
SETTING DELAYED SWITCH ON TIMER
With the air conditioner is off press the Timer Control button. Then set the desired time delay ON hours by pressing the + or – buttons. When the delay time set has elapsed, the air conditioner switches on.
AUTO RESTART
In the event of a power outage, the air conditioner restarts at the previously set function mode and settings when power is restored.
NOISE LEVEL
Portable air conditioners may make sounds that are not familiar to you. The sounds listed below are normal. Noise reflecting off hard surfaces such as a floor or wall can make the sounds seem louder than they actually are.
- The compressor may make a pulsating or high-pitched sound.
- Water running from the evaporator to the water tank may make a splashing sound.
- Refrigerant flowing may make a gurgling sound.
- Fan sound may come from front and back air vents.
COMPRESSOR LOCKOUT
This portable air conditioner is optimized to operate in an ambient temperature of 64°F – 90°F. The compressor circuit has an automatic 3 minute time delayed start if the unit is turned off and on quickly. This prevents overheating of the compressor and possible circuit breaker tripping.
WATER DRAINAGE
The air conditioner has the capacity to dehumidify up to 96 pints per day. The patented self evaporating function of the unit fully exhausts all condensation automatically in most environments when humidity is less than 70%. In areas with more than 70% humidity, the self-evaporating function can still exhaust about 98% of the moisture and the remaining 2% of moisture will be collected in the water tank of the air conditioner. When there is excess water condensation inside the unit, the air conditioner stops running and the RED Stoplight illuminates. The Stoplight indicates that the water condensation needs to be drained manually:
Manual Drain:
- Turn off the unit.
- Carefully roll the unit to a drain location or position a flat container, dish or optional drain bucket accessory (sold separately) under the drain area of the lower drain port.
- Remove the drain cover and rubber plug and the condensed water will drain out automatically.
- Once all the condensed water is drained, replace the drain rubber plug and cover into the drain firmly.
Continuous Gravity Drainage Option:
This option is recommended if the uninterrupted operation is desired.
1. Remove the drain plug cover and rubber plug from the upper drain port.
2. Install the drain hose (sold separately) through the drain cover.
3. Thread the drain cover onto the upper drain port.
4. Place the open end of the drain hose down to an area appropriate for draining.
WARNING: The hose must be directed downward from the upper drain port to allow the condensed water to flow with gravity.
Note: Please contact [email protected] for retail sales information or visit whynter.com for a list of optional accessories
REMOTE CONTROL
The portable air conditioner can be switched on by the remote control.
NOTE:
- Other appliances in the same room controlled by remote control (TV, radio, stereo, etc.), may cause interferences.
- Electronic and fluorescent lamps may interfere with the signal transmissions between the remote control and the air conditioner.
- Remove the batteries if the remote control is not used for long periods.

INSTALLING BATTERIES
- Only use two AAA 1.5V Batteries in the remote control.
- Always change both batteries at the same time.
To insert the batteries, open the flap on the back of the remote control by sliding it off. Strictly adhere to the polarity signs on the bottom of the battery housing, close the flap once the batteries have been inserted.
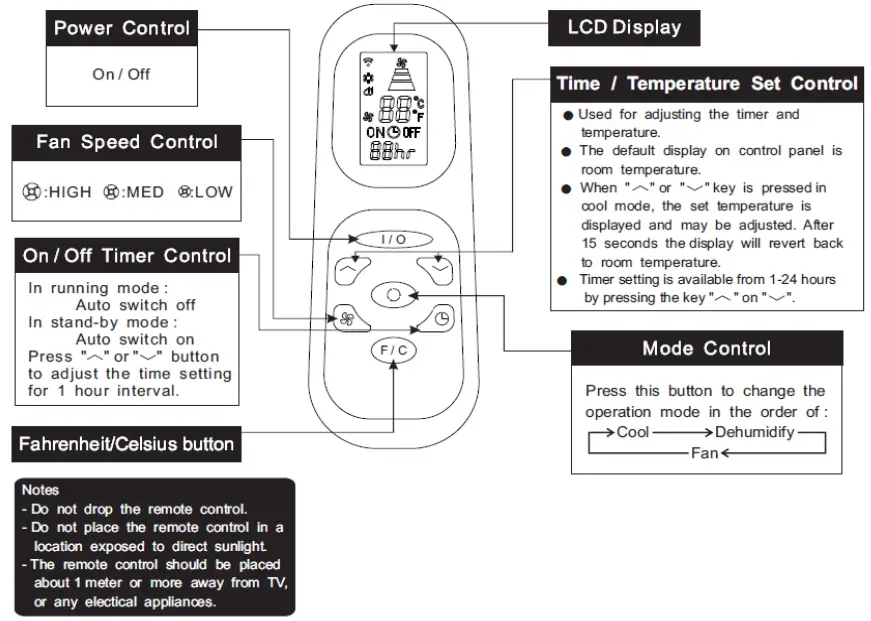
CARE AND MAINTENANCE
IMPORTANT:
- Switch off the air conditioner and disconnect the plug from the power outlet
- Drain al collected condensation from the upper and lower drain ports.
- Only transport the air conditioner in an upright position.
CLEANING THE PRE-FILTER
- This unit has two air filters; a washable pre-filter and an activated carbon filter.
- To ensure the air intake is filtered properly and to assure that your air conditioner runs efficiently, it is
recommended that the pre-filter is washed at least once every two weeks depending on use.
-
- Switch off the air conditioner.
- Pull the pre-filter frame from the unit.
- Remove the activated carbon filter from the pre-filter.
- Use a vacuum cleaner or tap lightly to remove loose dust and dirt from the pre-filter.
- Rinse the pre-filter thoroughly under warm running water (no hotter than 100F.)
- Dry thoroughly before re-inserting the filters.
- NOTE: The activated carbon filter is not washable. It is an optional filter and should be replaced every 2-3 months or as needed if used.
- Please contact [email protected] for retail sales information or visit whynter.com for a list of optional accessories.
WARNING! Never operate the air conditioner without the pre-filter in place
CLEARING THE AIR CONDITIONER
- Always switch off the air conditioner and disconnect the plug from the power supply outlet before cleaning the air conditioner.
- Use a soft damp cloth to wipe the body of the unit.
- Never use harsh chemicals, oil-based products, detergents, chemically treated cloths or other cleaning solutions. These could possibly damage the body of the air conditioner.
END OF SEASON STORAGE
This portable air conditioner comes with one end-of-season storage cover. We highly recommend that a storage cover bag is utilized when the unit is not going to be used for a period of time.
WARNING: To avoid the danger of suffocation, keep this bag away from babies and children.
- Switch off the air conditioner and disconnect the power plug from the power supply outlet before cleaning the air conditioner.
- Clean the pre-filter.
- Drain the condensed water completely.
- On a warm day, set the unit to Fan only mode for half a day to dry the unit internally.
- Gather the power cord and bundle it.
- Remove the batteries from the remote.
- If leaving the window kit in place, disconnect the exhaust and intake hose from the window slider kit and place the included covers on the fixtures. Otherwise, remove the window kit from the window opening. To remove the hose connectors from the fixtures on the window kit, slightly turn, push and gently pull the connector to release.
- Place the storage cover over the air conditioner.
Note: Depending on use, it is recommended that the air conditioner be cleaned internally annually.
Please contact Whynter at [email protected] for internal maintenance cleaning instructions.
TIPS
- Keep the exhaust hose as short and straight as possible
The exhaust hose removes heat from the room. It should remain as short and straight as possible without sharp bends or twists to maximize efficiency. If the exhaust hose must be extended, do not exceed 9’. - Turn the air conditioner on early
Turning the air conditioner on early instead of waiting until the hottest point of the day will allow the unit to be more effective. The air conditioner will not have to work as hard to cool the room down and maintain the set temperature. - Reduce heat sources
Direct sunlight, televisions, computers and other heat generating appliances work against the air conditioner by introducing heat into the space.
• Close window curtains and blinds to keep direct sunlight out
• Close doors and windows
• Keep ovens and stoves off
• Turn off unused lights
• Add weather stripping around windows and doors - Keep the air filter clean
Regular cleaning will help keep your air conditioner working properly. Dusty filters and vents greatly reduce the airflow and efficiency of the unit.
• Clean the washable pre-filter regularly
• Replace the activated carbon filter every 2-3 weeks depending on use
• Vacuum any accumulated dust from around all vents
TECHNICAL DATA
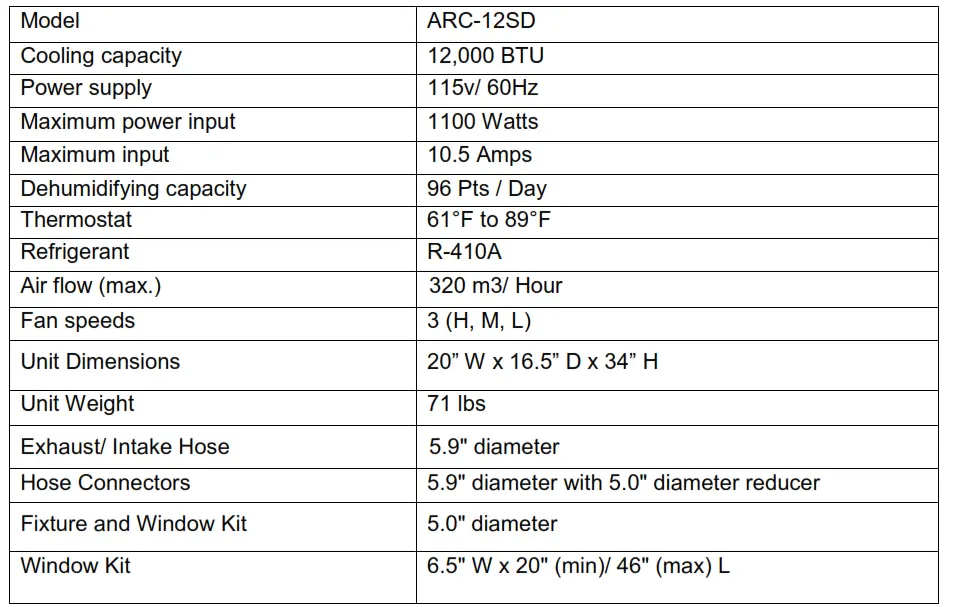
TROUBLESHOOTING
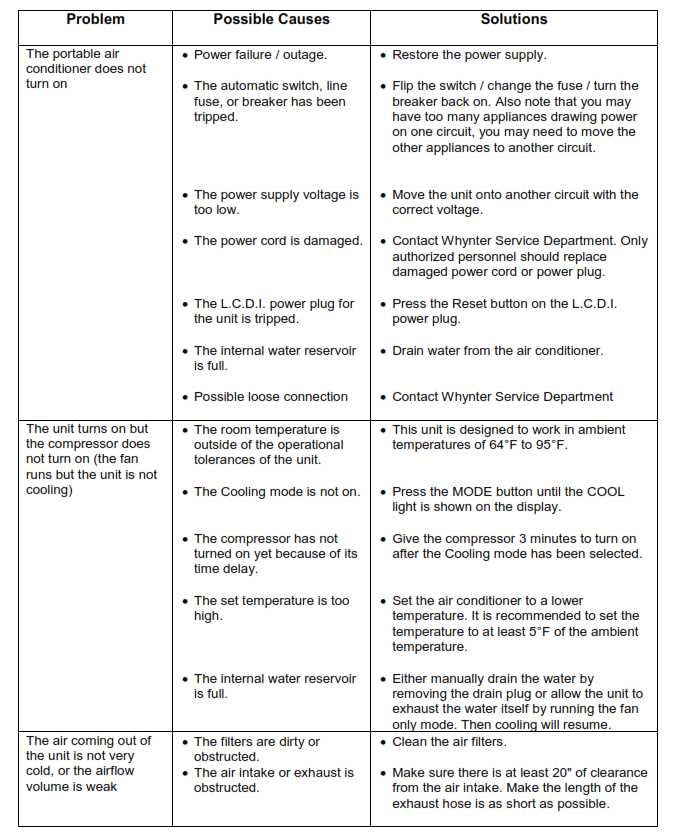
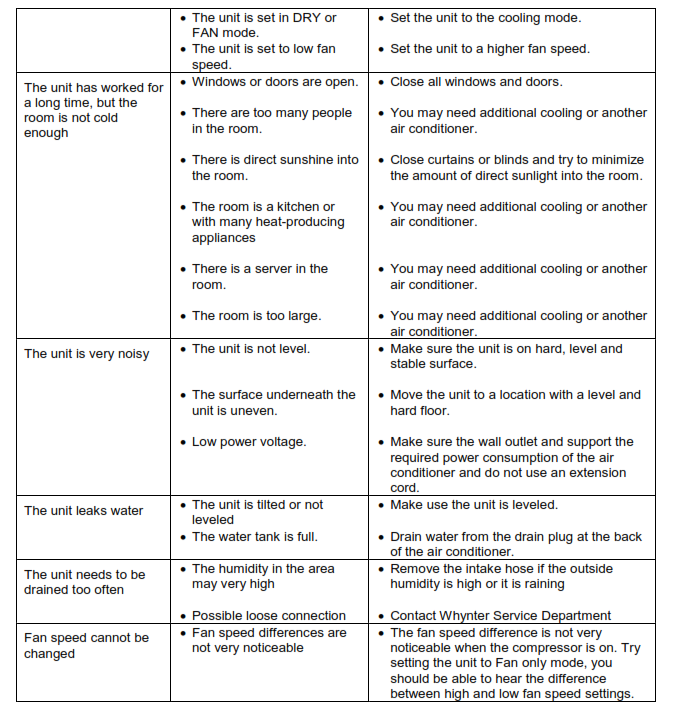
ONE YEAR LIMITED WARRANTY & THREE YEAR WARRANTY ON COMPRESSOR
This WHYNTER product is warranted to the original owner, purchased from an authorized Whynter dealer within the 48 U.S. continental states, for one year from the original purchase date against defects in material and workmanship under normal residential usage. Should your WHYNTER product prove defective within one year from the date of purchase, contact Whynter’s Customer Support team with the serial number and proof of purchase to make a warranty claim. A Return Authorization number must be issued before returning any parts or products. Parts or products received without a Whynter issued Return Authorization number will be refused. Under this warranty, Whynter will repair or replace any parts found defective with new or remanufactured parts or exchange the defective product with a new, refurbished, or remanufactured product at our discretion. All defective products and parts covered by this warranty will be repaired or replaced on a mail-in basis to Whynter’s Service Center. This warranty is not transferable. After the expiration of the warranty, the cost of labor and parts will be the responsibility of the original owner.
The compressor of portable air conditioners is warranted for an additional two years after the one-year limited warranty expires from the date of purchase.
Return freight is prepaid by Whynter within two months of purchase. After two months to one year, the customer will be responsible for the return freight cost to Whynter’s Service Center. Please package the product carefully in its original packaging to avoid damage in transit. Whynter is not responsible for damage resulting from shipper mishandling or improper packaging. Please retain the original box and packaging materials.
THIS WARRANTY DOES NOT COVER:
- Acts of God, such as fire, flood, hurricanes, earthquakes, and tornadoes.
- An improper power supply such as power surge, low voltage, defective household wiring, or inadequate fuses.
- Use in commercial or industrial applications.
- Damage, accidental or otherwise, to the product while in the possession of a consumer not caused by a defect in material or workmanship.
- Damage caused by consumer misuse, tampering, lack of maintenance, or failure to follow the care and special handling provisions in the instructions.
- Damage to the finish of the case, or other appearance parts caused by wear.
- Damage caused by repairs or alterations to the product by anyone other than authorized by the manufacturer.
- Removal, Replacement Packaging, Freight, and Insurance cost for the warranty service.
- Products sold AS IS or from an unauthorized reseller.
- Products that have had their serial numbers removed or defaced.
DISCLAIMER OF IMPLIED WARRANTIES; LIMITATION OF REMEDIES
CUSTOMER’S SOLE AND EXCLUSIVE REMEDY UNDER THIS LIMITED WARRANTY SHALL BE PRODUCT REPAIR OR REPLACEMENT AS PROVIDED HEREIN. CLAIMS BASED ON IMPLIED WARRANTIES, INCLUDING WARRANTIES OF MERCHANTABILITY OR FITNESS FOR A PARTICULAR PURPOSE, ARE LIMITED TO ONE YEAR OR THE SHORTEST PERIOD ALLOWED BY LAW, BUT NOT LESS THAN ONE YEAR. WHYNTER SHALL NOT BE LIABLE FOR CONSEQUENTIAL OR INCIDENTAL DAMAGES SUCH AS PROPERTY DAMAGE AND INCIDENTAL EXPENSES RESULTING FROM ANY BREACH OF THIS WRITTEN LIMITED WARRANTY OR ANY IMPLIED WARRANTY. SOME STATES AND PROVINCES DO NOT ALLOW THE EXCLUSION OR LIMITATION OF INCIDENTAL OR CONSEQUENTIAL DAMAGES, OR LIMITATIONS ON THE DURATION OF IMPLIED WARRANTIES, SO THESE LIMITATIONS OR EXCLUSIONS MAY NOT APPLY TO YOU. THIS WRITTEN WARRANTY GIVES YOU SPECIFIC LEGAL RIGHTS. YOU MAY ALSO HAVE OTHER RIGHTS THAT VARY FROM STATE TO STATE.
The warranty, product contents, and specifications are subject to change at any time without notice; please refer to www.whynter.com for the most current information.
Please retain the original proof of purchase.
To register your warranty, please visit www.whynter.com and fill out the online
Warranty Registration form. Please be sure to include a copy of your purchase invoice.
To obtain service or information, contact Whynter LLC via email at
[email protected] or call 866-WHYNTER (866-949-6837).
Copyright © 2020 Whynter LLC
www.whynter.com
Whynter 10,000 BTU Portable Air Conditioner Compact Size
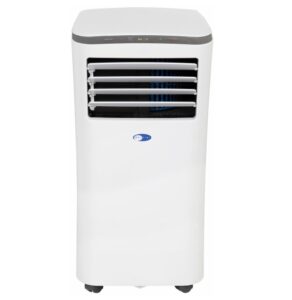
DISPOSAL INFORMATION
Thank you for choosing the Whynter 10000 BTU Portable Air Conditioner Compact Size. Please follow the instructions provided in this user guide to obtain the very best performance from your portable air conditioner and take full advantage of the many features your portable air conditioner offers you. We trust that your Whynter air conditioner will provide the performance and reliability that we stand for.
Please keep this user manual in a safe place for future reference.
This symbol on the product or its packaging indicates that the appliance cannot be treated as normal domestic trash, but must be handed in at a collection point for recycling electric and electronic appliances. Your contribution to the correct disposal of this product protects the environment. Further information about the recycling of this product can be obtained from your local municipal authority.
SAFETY PRECAUTIONS
WARNING: TO REDUCE THE RISK OF FIRE, ELECTRICAL SHOCK, OR INJURY WHEN USING YOUR AIR CONDIITIONER, FOLLOW THESE BASIC PRECAUTIONS:
Before the appliance is used, it must be properly positioned and installed as detailed in this manual.
- Do not under any circumstances cut or remove the third (ground) prong from the power cord
- Make sure this unit is connected to a correctly grounded power supply outlet. Do not use an extension cord or power strip
- The power cord is UL listed. It has a built-in L.C.D.I. (leakage, current, detection, interruption) circuit breaker for added safety. If the power supply is interrupted, press the reset button to reconnect the unit to power source
- It is recommended to use a separate circuit that its size should be 15 Amps for the air conditioner
- Do not use an excessively wet cloth, industrial solvents, oil-based products to clean this portable air conditioner
- To avoid the risk of shock, the product should never be used in bathrooms, shower rooms, or in any other steamy or wet areas
- Do not store or use gasoline or other flammable vapors and liquids in the vicinity of this or any other appliances
- Do not repair, disassemble and/or modify the unit by yourself
- Always turn off the portable air conditioner when cleaning the air filter, and transporting
- Do not turn this unit on and off by plugging and unplugging. Always use the ON/OFF switch
- Transport the unit in an upright position only, or leave it in an upright position for at least 4 hours before first use
- Ensure curtains or other objects are not obstructing the air inlet filters
- Do not bend or crush the exhaust hose while in use
- Always allow at least 20” of clearance around the unit for ventilation. Do not use this unit inside closets, cabinets and/or cramped spaces between furniture
- This unit is optimized to operate in an ambient temperature of 64°F 95°F
- This unit must be installed in an area protected from the element, such as wind, rain, water spray or drips
- The unit should not be located next to ovens, grills or other sources of high heat
- Always place the unit on even and hard and level surface
- Do not sit or place objects on the unit
- Do not allow children to climb, stand or hang on the appliance. The air conditioner could tip over and get damaged and/or seriously injure somebody
- Keep fingers out of the air intakes and air outlets
- The appliance is an electrical appliance. To avoid injury from electrical shock do not operate it with wet hands, while standing on a wet surface or while standing in water. Do not use it in outdoors or in wet condi-tions
- When positioning or moving the appliance, ensure it is not turned upside down or greater than 45° or more off level
- This appliance is designed for household, non-commercial use only. Any other use will void the warranty
- Do not plug into the power outlet before set up is completed
- Do not operate this unit without the air filter(s)
- Do not use harsh chemicals to clean the filter(s). Dry thoroughly before inserting the filter(s) into the unit
- At the end of each season, all water must be drained from the unit and filter(s) must be cleaned before storage
INTRODUCTION / TECHNICAL DATA
HOW IT WORKS
The Whynter compact CFC-free, lead-free, and energy efficient 10,000 BTU portable air condi-tioner, helps you stay cool while working with better environmental standards and reducing energy consumption.
This portable air conditioner is the ideal space-constrained climate-control solution. Designed with a compact modern style, the unit easily blends in with any room design and is ideal for for a kid’s room. This compact, yet powerful portable air conditioner can also function as a 68-pint dehumidifier to remove excess humidity from the air, allowing the ambient air to feel even cooler and improving air comfort.
This Whynter 10000 BTU Portable Air Conditioner Compact Size features an ECO-FRIENDLY CFC-free GREEN R-410A refrigerant and lead-free RoHS compliant components.
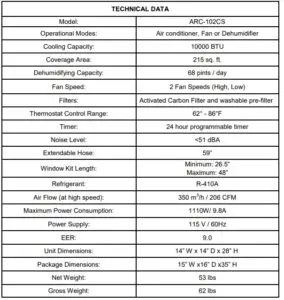
PARTS IDENTIFICATION
FRONT VIEW
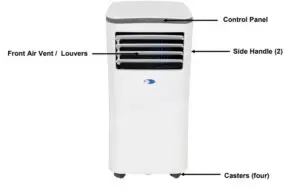
BACK VIEW
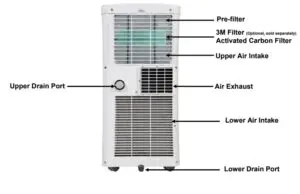
PARTS IDENTIFICATION
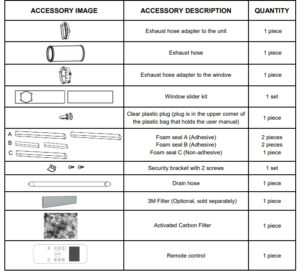
Operating Conditions

Leakage-Current Detection and Interruption (LCDI)
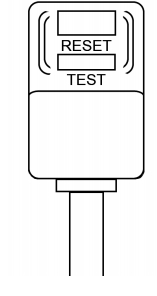 Your portable air conditioner is supplied with a Leakage-Current Detection and Interruption (LCDI) plug. This plug reduces the risk of fire due to arcing faults in the power supply cord. Please follow the instructions below to ensure that LCDI plug works properly.
- Plug the power cord to a grounded wall outlet. Do not plug to a power strip or extension cord.
- Press the TEST button on the plug. This should trip the plug and cut the power to the air conditioner. If the plug does not trip and the unit comes on, please contact technical support.
- Press the RESET button to start the air conditioner.
- Do NOT use the TEST and RESET buttons to turn the air conditioner on and off.
CONTROL PANEL

Power Button
Press to turn the air conditioner on and off
Mode Button
Press to change mode
- Controls the 3 function modes: COOL, FAN, and DRY.
Up ( + ) and Down ( – ) Buttons
Adjusts set temperature (1°C/ 2°F increments) or timer hours (0 – 24 hours).
- This unit is capable of displaying set temperature in Fahrenheit or in Celsius.
To convert from one to the other, press and hold the Up and Down buttons for 3 seconds.
LED Display
- In Cool mode: shows set temperature in °C or °F and AUTO timer setting.
- In DRY and FAN only modes: shows room temperature.
Error Codes:
- E1 – Room temperature sensor error
– Unplug unit and restart in 5 minutes - E2 – Evaporator sensor error
– Unplug unit and restart in 5 minutes - E3 – Condenser sensor error
– Unplug unit and restart in 5 minutes - E4 – Display panel sensor error
– Unplug unit and restart in 5 minutes - P1 – Water reservoir full
– Drain water from the unit
INSTALLATION
WARNING: NEVER OPERATE THE AIR CONDITIONER WITHOUT THE AIR FILTER
AIR FILTERS
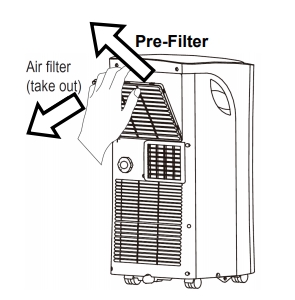
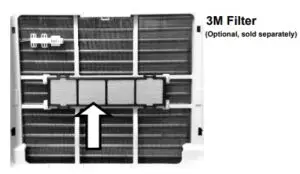
- Pre-Filter
This portable air conditioner comes with a Pre-Filter which removes large particles such as dust, pet hair and dander. This pre-filter can be removed for cleaning by pulling the filter frame back and out. This pre-filter washable and does not need to be replaced. - Activated Carbon Filter (Supplied)
This portable air conditioner comes with an Activated Carbon Filter, which removes smoke and other odors. This filter should be replaced every 2-3 months depending on usage. Please contact [email protected] for retail sales information. - 3M™ Antimicrobial High Air Flow Filter (Optional, soldseparately)
You may also add the 3M™ Antimicrobial High Air Flow Filter to this portable air conditioner. This filter is designed to remove particles such as dust, pet hair and dander, antimicrobial agent helps inhibit the growth of mold and mildew, and the microstructured elec-trostatically charged filtration media traps and retains particles. Note: The 3M Filter should be replaced every 2-3 months de- pending on usage. Please contact [email protected] for retail sales information.
WATER DRAINAGE
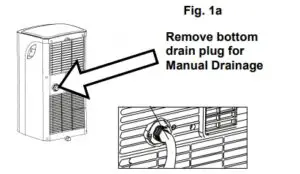
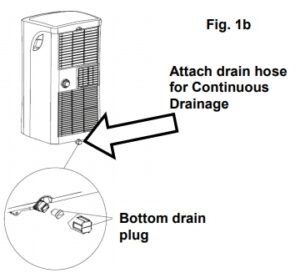
The dehumidifying capacity of this unit is 68 pints per day.
The patented self-evaporating function of the ARC-101CS unit fully exhausts all condensation automatically in most environments when humidity is less than 70%. Areas with more than 70% humidity, the self-evaporating function can still exhaust about 98% of the moisture and the remaining 2% of moisture will be collected in the water tank of the air conditioner. When the water reservoir reaches its maximum level, the unit will beep 8 times and the digital display will show P1. When the unit displays P1, all operation modes will be disabled temporarily, while the fan continuously running. The P1 code will disappear when the water is completely drained.
- Continuous drainage (Fig. 1a)
Remove the upper drain plug from the back of the unit and install the drain hose. Place the open end of the hose to a drain area in a downward direction with gravity. This method is recommended if uninterrupted op-eration is desired. - Manual drainage (Fig. 1b)
Carefully move the unit to a drain location, remove the bottom drain plug and let the water drain. Replace the drain plug and plug in unit to resume operation.
INSTALLATION
LOCATION
The air conditioner should be placed on a hard and level surface strong enough to support the unit. The unit has casters and it should only be rolled on smooth, flat surfaces. Use caution when rolling on carpet surfaces. Do not attempt to roll the unit over objects. Never place any obstacles around the air inlet or outlet and allow at least 20″ of clearance for efficient air conditioning.
EXHAUST HOSE INSTALLATION
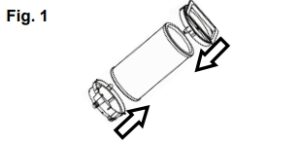
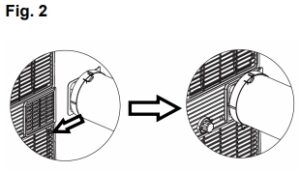
When you use this air conditioner unit, hot air must be exhausted out of the room to complete the air exchange of the condenser.
When the unit is operating in DRY or FAN only mode, installation of the exhaust hose is optional
- Snap the hose connector to the unit onto one end of the exhaust hose and then snap the hose connector to the window onto the other end of the exhaust hose. See Fig. 1
- Line-up the hose connector tab onto the back of the unit andslide in to install. See Fig. 2
- Only extend the hose to the necessary length.
WINDOW KIT INSTALLATION
When you use this air conditioner unit, hot air must be exhausted out of the room to complete the air exchange of the condenser. When the unit is operating in fan-only mode, installation of the exhaust hose is optional.
Your window kit has been designed to fit most standard vertical and horizontal windows.
However, it may be necessary for you to modify the installation procedures for your window. Please refer to Fig. 3a and Fig. 3b. If your window opening is less than the mentioned minimum length of the window slider kit, cut the slide bar with holes to fit window opening. Never cut out the holes on the window slide bar.
NOTE: When using the window kit on a window or sliding door it will cause the window or sliding door not to be properly closed and locked. Additional security measurements maybe needed.
The window slide bars can be fixed with the clear plastic plug. Fig. 4.
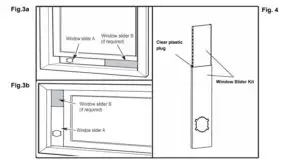
WINDOW KIT INSTALLATION IN A DOUBLE-HUNG WINDOW
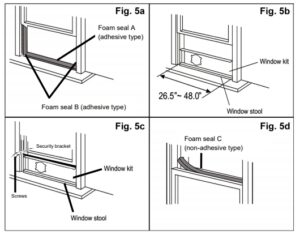
- Open window or sliding door for approximately 5”
- Cut the foam seal A and B (adhesivetype) to the proper length and attach it to the bottom of the window. Fig. 5a.
- Adjust the length of the window bars tothe same length and width of the opening of the window. Cut the window piece if necessary to fit the length of your window. Fig. 5b.
- Close the window on the window slide bars. For long term installation, you may screw the window kit into your window frame using the security bracket. Fig. 5c.
- Cut the foam seal C (non-adhesive) tothe length and seal the open gap between the top window sash and outer window sash. Shown in Fig. 5d.
WINDOW KIT INSTALLATION IN A SLIDING WINDOW/DOOR
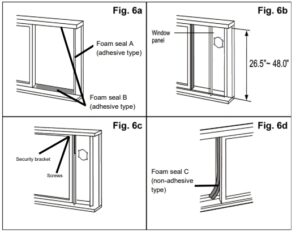
- Open window or sliding door for approximately 5”
- Cut the foam seal (adhesive type) to the proper length and attach it to the bottom of the door / window. Fig. 6a.
- Adjust the length of the window bars to the same length and width of the opening of the window. Cut the window piece if necessary to fit the length of your window. Fig. 6b.
- Close the door/ window on the windowslide bars. For long term installation, you may screw the window kit into your window frame using the security bracket. Fig. 6c.
- Cut the foam seal C (non-adhesive) to the length and seal the open gap between the top window sash and outer window sash. Show in Fig. 6d.
EXHAUST INSTALLATION TO THE WINDOW KIT WINDOW/DOOR
- Make sure that window slider kit is securely installed.
- Move the unit to the window, extend the hose, align the hose connector and snap them into the window kit.
OPERATION INSTRUCTIONS
BEFORE USING YOUR APPLIANCE
- Remove the exterior and interior packing
- Before connecting the appliance to the power source, let it stand upright for approximately 4 hours. This will reduce the possibility of a malfunction in the cooling system from handling during transportation.
SWITCHING ON/OFF THE AIR CONDITIONER
The appliance can be switched ON or OFF by pressing the POWER button on the control panel or the ON/OFF button on the remote control.
COOLING MODE
In this mode, the air conditioner cools and dehumidifies the room. To activate this function mode, press the MODE button until the COOL indicator light comes on. When the cooling mode is set, the compressor will start in approximately 3 minutes. In cooling mode, hot air is exhausted from the outdoor exhaust port and the exhaust hose must be connected to exhaust out the hot air.
The temperature setting range of this air conditioner is from 62°F / 17°C to 86°F / 30°C. To set the temperature, press the + or – buttons. This air conditioner has a 5°F temperature cushion which if the set temperature is within 5°F of the ambient temperature, the unit runs on fan only mode. This saves energy and prolongs the life of the compressor of the air conditioner.
To set the fan speed, press the FAN button on the remote. In cooling mode, the difference in noise level between the 2 fan speeds is not very noticeable when the compressor is on.
DRY (DEHUMIDIFYING) ONLY MODE
In this mode, the air conditioner only dehumidifies the room, the compressor will activate intermittently depending on the ambient temperature and the fan speed is set to LOW. To activate this function mode, press the MODE button until the DRY indicator light is displayed. Please note that when switching function mode, there will be an approximately 3 minute transition time. In dehumidifying mode, the exhaust hose does not need to be vented. If the exhaust hose is vented, the room will be cooled as it dehumidifies. To prevent cooling, remove the exhaust hose from the window kit and allow the warm air from the rear to be re-circulated into the room. If room temperature is higher than 77°F, the fan speed can be adjusted. If room temperature is lower than 77°F, the fan speed is set at Low.
NOTE: When using dehumidifying mode, venting the exhaust hose to the outside is not required. If vented, the warm air is exhausted to the outside and cooling within the room may occur. Additionally, if the exhaust hose is not vented, the unit may require more frequent draining. Also, the air conditioner does not have a humidistat in which a specific humidity level can be set.
FAN ONLY MODE
In this mode, only the fan of the air conditioner runs and circulates the air in the room. To activate this function mode, press the MODE button until the FAN indicator light comes on. In this function mode, the temperature cannot be set. Changing the fan speed requires the use of the remote control.
Fan Only mode does not require the use of the exhaust hose.
TIMER (DELAYED SWITCH ON / OFF) FUNCTION
This function mode enables a delayed switch ON or delayed switch OFF of the air conditioner. The time (hours) delay can be set, enabled and disabled.
SETTING SWITCH OFF TIMER
With the air conditioner operating in any function mode, press the TIMER button. The TIMER OFF light will come on.
Then set the desired time delay OFF hours by pressing the UP and DOW N buttons. The time increments are at 0.5 hour to up to 10 hours, followed by 1 hour increment up to 24 hours. When the delay time set has elapsed, the air conditioner switches off. To cancel the delayed switch off function, turn off the air conditioner or adjust the time setting to 0.0.
SETTING DELAYED SWITCH ON TIMER
With the air conditioner is off, press the TIMER button. The TIMER ON light will come on. Then set the desired time delay ON hours by pressing the UP and DOW N buttons. The time increments are at 0.5 hour to up to 10 hours, followed by 1 hour increment up to 24 hours. When the delay time set has elapsed, the air conditioner switches on. To cancel the delayed switch on function, turn on the air conditioner or adjust the time setting to 0.0.
SLEEP MODE
In this mode, the air conditioner gradually increases the set temperature in cooling mode, decreases the noise level and conserves energy. In Sleep and cooling mode, the set temperature is increased by 1°C/ 2°F in the first 30 minutes. The temperature will then increase by another 1°C/ 2°F after an additional 30 minutes. This new temperature will remain the same for 7 hours. To activate this function mode, press the SLEEP button until the SLEEP indicator light comes on.
AUTO RESTART
In the event of a power outage, the air conditioner restarts at the previously set function mode and settings when power is restored.
CONTROLLING THE AIR FLOW DIRECTION
The louvers can be controlled in a fixed direction. To set the louvers in a fixed angle or direction, manually adjust the louvers to you desired angle.
NOISE LEVEL
Portable air conditioners may make sounds that are not familiar to you. The sounds listed below are normal. Noise reflecting off hard surfaces such as a floor or wall can make the sounds seem louder than they actually are.
- The compressor may make a pulsating or high-pitched sound
- Water running from the evaporator to the water tank may make a splashing sound
- Refrigerant flowing may make a gurgling sound
- Fan sound may come from front and back air vents
COMPRESSOR LOCK OUT
This portable air conditioner is optimized to operate in an ambient temperature of 64°F – 90°F. The compressor circuit has an automatic 3 minute time delayed start if the unit is turned off and on quickly. This prevents over-heating of the compressor and possible circuit breaker tripping.
SHORTCUT FUNCTION
Push this button when remote controller is on, the system will automatically revert back to the previous settings including operating mode, setting temperature, fan speed level and sleep feature (if activated). If shortcut button is pushed for more than 2 seconds, the system will automatically store the current operation settings including operating mode, setting temperature, fan speed level and sleep feature (if activated ).
REMOTE CONTROL
The portable air conditioner can be switched on by the remote control. To transmit signals from the remote control to the air conditioner, point the front part of the remote handset towards the control panel on the air conditioner. Reception of the signal is confirmed by a beep. The maximum signal transmission distance is approximately 8 meters / 26 feet.
NOTE:
- Other appliances in the same room controlled by a remote control (TV, radio, stereo, etc.), may cause interferences
- Electronic and fluorescent lamps may interfere with the signal transmissions between the remote control and the air conditioner
- Remove the batteries if the remote control is not used for long periods
INSTALLING BATTERIES

To insert the batteries, open the flap on the back of the remote control by sliding if off. Strictly adhere to the polarity signs on the bottom of the battery housing, close the flap once the batteries have been inserted.
- Only use two dry LR03 AAA 1.5V Batteries (included) in the remote control
- Always change both batteries at the same time
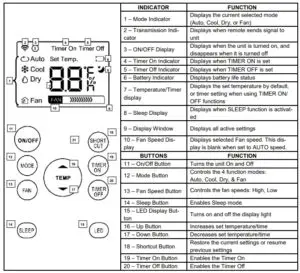
CARE AND MAINTENANCE
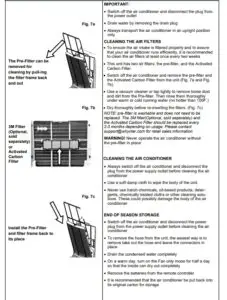
TROUBLESHOOTING
Many common portable air conditioner problems are easily resolved. Try the troubleshooting suggestions below to see if the problems can be resolved before having to contact the service department.
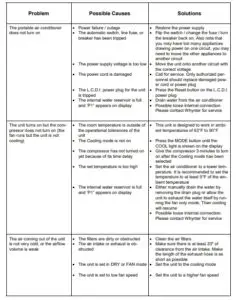
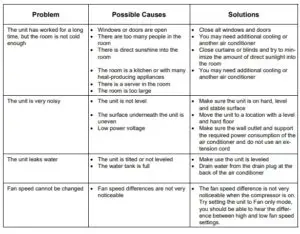
ONE YEAR LIMITED WARRANTY & THREE YEAR WARRANTY ON COMPRESSOR
This WHYNTER product is warranted to the original owner, purchased from an authorized Whynter dealer within the 48 U.S. continental states, for one year from the original purchase date against defects in material and workmanship under normal residential usage. Should your WHYNTER product prove defective within one year from the date of purchase, contact Whynter’s Customer Support team with the serial number and proof of purchase to make a warranty claim. A Return Authorization number must be issued before returning any parts or products. Parts or products received without a Whynter issued Return Authorization number will be refused. Under this warranty, Whynter will repair or replace any parts found defective with new or remanufactured parts or exchange the defective product with a new, refurbished, or remanufactured product at our discretion. All defective products and parts covered by this warranty will be repaired or replaced on a mail-in basis to Whynter’s Service Center. This warranty is not transferable. After the expiration of the warranty, the cost of labor and parts will be the responsibility of the original owner. The compressor of portable air conditioners is warranted for an additional two years after the one year limited warranty expires from the date of purchase. Return freight is prepaid by Whynter within two months of purchase. After two months to one year, the customer will be responsible for the return freight cost to Whynter’s Service Center. Please package the product carefully in its original packaging to avoid damage in transit. Whynter is not responsible for damage resulting from shipper mishandling or improper packaging. Please retain the original box and packaging materials.
THIS WARRANTY DOES NOT COVER:
- Acts of God, such as fire, flood, hurricanes, earthquakes and tornadoes.
- Improper power supply such as power surge, low voltage, defective household wiring or inadequate fuses.
- Use in commercial or industrial applications.
- Damage, accidental or otherwise, to the product while in the possession of a consumer not caused by a defect in material or workmanship.
- Damage caused by consumer misuse, tampering, lack of maintenance or failure to follow the care and special handling provisions in the instructions.
- Damage to the finish of the case, or other appearance parts caused by wear.
- Damage caused by repairs or alterations to the product by anyone other than authorized by the manufacturer.
- Removal, Replacement Packaging, Freight and Insurance cost for the warranty service.
- Products sold AS IS or from an unauthorized reseller.
- Products that have had their serial numbers removed or defaced.
DISCLAIMER OF IMPLIED WARRANTIES; LIMITATION OF REMEDIES
CUSTOMER’S SOLE AND EXCLUSIVE REMEDY UNDER THIS LIMITED WARRANTY SHALL BE PRODUCT REPAIR OR REPLACEMENT AS PROVIDED HEREIN. CLAIMS BASED ON IMPLIED WARRANTIES, INCLUDING WARRANTIES OF MERCHANTABILITY OR FITNESS FOR A PARTICULAR PURPOSE, ARE LIMITED TO ONE YEAR OR THE SHORTEST PERIOD ALLOWED BY LAW, BUT NOT LESS THAN ONE YEAR. WHYNTER SHALL NOT BE LIABLE FOR CONSEQUENTIAL OR INCIDENTAL DAMAGES SUCH AS PROPERTY DAMAGE AND INCIDENTAL EXPENSES RESULTING FROM ANY BREACH OF THIS WRITTEN LIMITED WARRANTY OR ANY IMPLIED WARRANTY. SOME STATES AND PROVINCES DO NOT ALLOW THE EXCLUSION OR LIMITATION OF INCIDENTAL OR CONSEQUENTIAL DAMAGES, OR LIMITATIONS ON THE DURATION OF IMPLIED WARRANTIES, SO THESE LIMITATIONS OR EXCLUSIONS MAY NOT APPLY TO YOU. THIS WRITTEN WARRANTY GIVES YOU SPECIFIC LEGAL RIGHTS. YOU MAY ALSO HAVE OTHER RIGHTS THAT VARY FROM STATE TO STATE.
The warranty, product contents and specifications are subject to change at any time without notice; please refer to www.whynter.com for the most current information.
]]>WHYNTER COOLSIZE 10,000 BTU COMPACT PORTABLE AIR CONDITIONER
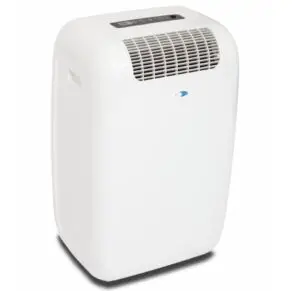
DISPOSAL INFORMATION
Thank you for choosing the Whynter CoolSize 10000 BTU Compact Portable Air Conditioner. Please follow the instructions provided in this user guide to obtain the very best performance from your portable air conditioner and take full advantage of the many features your portable air conditioner offers you. We trust that your Whynter air conditioner will provide the performance and reliability that we stand for. Please keep this user manual in a safe place for future reference.
This symbol on the product or its packaging indicates that the appliance cannot be treated as normal domestic trash, but must be handed in at a collection point for recycling electric and electronic appliances. Your contribution to the correct disposal of this product protects the environment. Further information about the recycling of this product can be obtained from your local municipal authority.
SAFETY PRECAUTIONS
Before the appliance is used, it must be properly positioned and installed as detailed in this manual.
- Do not under any circumstances cut or remove the third (ground) prong from the power cord
- Make sure this unit is connected to a correctly grounded power supply outlet. Do not use an extension cord or power strip
- The power cord is UL listed. It has a built-in L.C.D.I. (leakage, current, detection, interruption) circuit breaker for added safety. If the power supply is interrupted, press the reset button to reconnect the unit to power source
- It is recommended to use a separate circuit that its size should be 15 Amps for the air conditioner
- Do not use an excessively wet cloth, industrial solvents, oil-based products to clean this portable air conditioner
- To avoid the risk of shock, the product should never be used in bathrooms, shower rooms, or in any other steamy or wet areas
- Do not store or use gasoline or other flammable vapors and liquids in the vicinity of this or any other appliances
- Do not repair, disassemble and/or modify the unit by yourself
- Always turn off the portable air conditioner when cleaning the air filter, and transporting
- Do not turn this unit on and off by plugging and unplugging. Always use the ON/OFF switch
- Transport the unit in an upright position only, or leave it in an upright position for at least 4 hours before first use
- Ensure curtains or other objects are not obstructing the air inlet filters
- Do not bend or crush the exhaust hose while in use
- Always allow at least 20” of clearance around the unit for ventilation. Do not use this unit inside closets, cabinets and/or cramped spaces between furniture
- This unit is optimized to operate in an ambient temperature of 64°F – 90°F
- This unit must be installed in an area protected from the element, such as wind, rain, water spray or drips
- The unit should not be located next to ovens, grills or other sources of high heat
- Always place the unit on even and hard and level surface
- Do not sit or place objects on the unit
- Do not allow children to climb, stand or hang on the appliance. The air conditioner could tip over and get damaged and/or seriously injure somebody
- Keep fingers out of the air intakes and air outlets
- The appliance is an electrical appliance. To avoid injury from electrical shock do not operate it with wet hands, while standing on a wet surface or while standing in water. Do not use it in outdoors or in wet conditions
- When positioning or moving the appliance, ensure it is not turned upside down or greater than 45° or more off level
- This appliance is designed for household, non-commercial use only. Any other use will void the warranty
- Do not plug into the power outlet before set up is completed
- Do not operate this unit without the air filter(s)
- Do not use harsh chemicals to clean the filter(s). Dry thoroughly before inserting the filter(s) into the unit
- Do not add extra length to the exhaust hose by more than a total length of 9’. This will reduce the cooling efficiency of the portable air conditioner
- At the end of each season, all water must be drained from the unit and filter(s) must be cleaned before storage
INTRODUCTION / TECHNICAL DATA
HOW IT WORKS
The Whynter compact CFC-free, lead-free, and energy efficient 10,000 BTU portable air conditioner, helps you stay cool while working with better environmental standards and reducing energy consumption.
This compact portable air conditioner, specially designed to be mobile, can be easily setup in almost any indoor location and is most commonly used in data closets / server rooms, bedrooms, classrooms and garages / workshops.
This Whynter ARC-101CW compact portable air conditioner features an ECO-FRIENDLY CFCfree GREEN R-410A refrigerant and lead-free RoHS compliant components.
TECHNICAL DATA
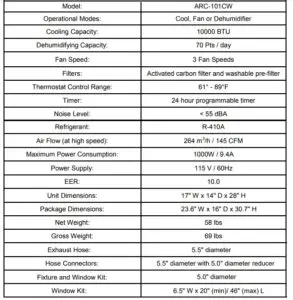
PARTS IDENTIFICATION
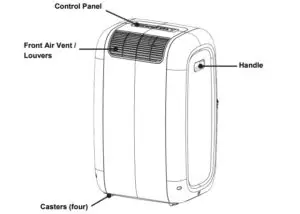
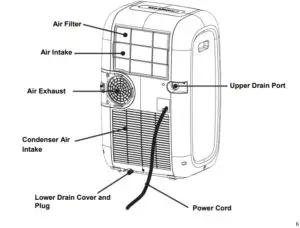
PARTS IDENTIFICATION
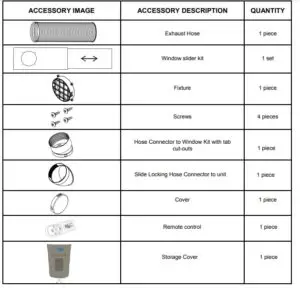
Operating Conditions

Leakage-Current Detection and Interruption (LCDI)
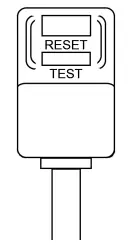
Your portable air conditioner is supplied with a Leakage Current Detection and Interruption (LCDI) plug. This plug reduces the risk of fire due to arcing faults in the power supply cord. Please follow the instructions below to ensure that LCDI plug works properly.
- Plug the power cord to a grounded wall outlet. Do not plug to a power strip or extension cord.
- Press the TEST button on the plug. This should trip the plug and cut the power to the air conditioner. If the plug does not trip and the unit comes on, please contact technical support.
- Press the RESET button to start the air conditioner.
- Do NOT use the TEST and RESET buttons to turn the air conditioner on and off.
CONTROL PANEL
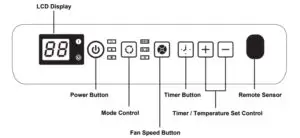
Indication symbols on LCD :
Cooling mode
Dehumidifying mode
Fan only mode
High Fan speed
Medium Fan speed
Low Fan speed
Display set temperature
Stop display
Display timer setting: Auto Switch On/Off
Power Button
Press to turn the air conditioner on and off
Mode Control
Press to change mode
- Controls the 3 function modes: COOL, FAN, and DEHUMIDIFY
Fan Speed Button
Press to change fan speed
- Controls the 3 fan speeds: HIGH, MEDIUM, and LOW. The fan speed indicator lights illuminates to show the set fan speed.
NOTE: Unit does not need to be vented in Fan Mode
Timer Button
Press to program Timer Delayed Switch ON or OFF function
Timer / Temp Set Control
Adjusts set temperature (1°C/ 2°F increments) or timer hours (0 – 24 hours).
- This unit is capable of displaying set temperature in Fahrenheit or in Celsius.
- To convert from one to the other, press and hold
the + and – buttons for 3 seconds.
LCD Display
- In Cool mode: shows set temperature in °C or °F
- In DEHUMIDIFY and FAN only modes: shows room temperature.
Stop display
Condensed water may accumulate in the unit. If the internal tank becomes full, the Stop display will come on and the unit will not operate until the unit has been drained.
INSTALLATION
Your Whynter portable air conditioner is equipped with a washable pre-filter and an Activated Carbon Filter.
The washable pre-filter removes large particles such as dust, pet hair and dander. The Activated Carbon filter is designed to remove smoke and other odors. It is recommended you replace the Activated Carbon filter every 2-3 months or as needed. Follow the steps below to install the filters.
- Pull out the washable pre-filter.
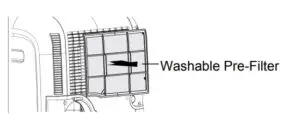
- Attach the activated carbon filter into the air intake frame.
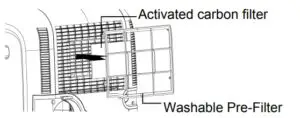
- Once the activated carbon filter is secured, reinstall the washable pre filter frame into the unit.
WATER DRAINAGE
The dehumidifying capacity of this unit is 70 pints per day. The patented self-evaporating function of the unit fully exhausts all condensation automatically in most environments when humidity is less than 70%. Areas with more than 70% humidity, the self-evaporating function can still exhaust about 98% of the moisture and the remaining 2% of moisture will be collected in the water tank of the air conditioner.
When there is excess water condensation inside the unit, the air conditioner stops running and illuminates the Stop light (refer to page 8). This Stop light indicates that the water condensation needs to be drained using the following procedures:
• Manual drainage
- Turn off the unit.
- Carefully roll the unit to a drain location or position a flat container, dish or optional drain bucket accessory (sold separately) under the drain area of the lower drain port.
- Remove the drain cover and rubber plug and the condensed water will drain out automatically.
- Once all the condensed water is drained, replace the drain rubber plug and cover into the drain firmly.
• Continuous Gravity Drainage Option
This option is recommended if uninterrupted operation is desired.
- . Remove the drain plug cover and rubber plug from the upper drain port.
- Install the drain hose (sold separately) through the drain cover.
- Thread the drain cover onto the upper drain port.
- Place the open end of the drain hose downward to an area appropriate for draining.
WARNING: The hose must be directed downward from the upper drain port to allow the condensed water to flow with gravity.
• Note: Please contact [email protected] for retail sales information or visit whynter.com for a list of optional accessories.
LOCATION
The air conditioner should be placed on a hard and level surface strong enough to support the unit. The unit has casters and it should only be rolled on smooth, flat surfaces. Use caution when rolling on carpet surfaces. Do not attempt to roll the unit over objects. Never place any obstacles around the air inlet or outlet and allow at least 20 inch of clearance for efficient air-conditioning.
EXHAUST HOSE INSTALLATION
When using the air conditioner, the hot air from the exhaust hose must be exhausted out of the room to complete the air exchange of the condenser. When the unit is operating in dehumidifying or fan-only mode, installation of the exhaust hose is optional.
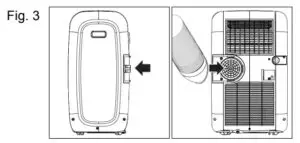
- Expand each end of the exhaust hose about 6”
- Install the hose connectors onto the exhaust hose by turning clockwise
- Slide the slide locking hose connector onto the rear of the unit (Fig. 3)
Only extend the both hoses to the necessary length. We do not recommend extending more than 9′ long. If you are interested in purchasing an additional 5’ exhaust hose, please contact [email protected] for retail sales information.
WINDOW KIT INSTALLATION
The window kit has been designed to fit most standard vertical and horizontal windows (Fig. 4a and Fig. 4b). However, it may be necessary to modify the installation procedures to accommodate your window.
NOTE:
- If your window opening is smaller than the minimum length of the window slider kit, the window slider kit can be cut to fit the window opening. Never cut into the exhaust hose cut-out on the window slider kit.
- If your window opening is larger than the maximum length of the window slider kit, additional material will be needed to cover the open space such as, Plexiglas, PVC plastic, ply wood, etc. Alternately, an additional window slider kit can be purchased to be used in combination with the included kit.
- When using the window slider kit on a window or sliding door, additional security measures may be needed.
- Open the window approximately 5”.
- Adjust the length of the window slider to the same length and width of the opening of the window. Cut the window slider if necessary to fit the length of your window.
- Insert the fixture through the back grooved side of the window slider hose cut-out. Line up the fixture with the 4 screw holes and tighten the fixture with 4 screws from the front side of the slider panel. (Fig. 4c)
- Fit the window slider kit into the window opening and close the window to secure the window slider kit. For 5. long term installation, you may screw the window kit into your window frame.
- Move the unit close to the window, extend the hose to the necessary length, keeping it as short and as straight as possible and attach the other end of the hose to the window slider kit.
- Align the tab cut-outs of the hose connector to the tabs on the fixture and snap the hose connector to the window slider kit.

OPERATION INSTRUCTIONS
BEFORE USING YOUR APPLIANCE
- Remove the exterior and interior packaging
- Before connecting the appliance to a power source and operating, let the unit stand upright for a minimum of 4 hours. This will reduce the possibility of a malfunction in the cooling system from handling during transportation.
SWITCHING ON/OFF THE AIR CONDITIONER
The appliance can be switched ON or OFF by pressing the POWER button on the control panel or the ON/OFF button on the remote control.
COOLING MODE
In this mode, the air conditioner cools and dehumidifies the room. To activate this function mode, press the Mode Control until the Cooling indicator light comes on. When the cooling mode is set, the compressor will start in approximately 3 minutes. In cooling mode, hot air is exhausted from the outdoor exhaust port and the exhaust hose must be connected to exhaust out the hot air.
The temperature setting range of this air conditioner is from 61°F / 16°C to 89°F / 32°C. To set the temperature, press + the – or buttons. This air conditioner has a 5°F temperature cushion which if the set temperature is within 5°F of the ambient temperature, the unit runs on fan only mode. This saves energy and prolongs the life of the compressor of the air conditioner.
To set the fan speed, press the FAN button. In cooling mode, the difference in noise level between the 3 fan speeds is not very noticeable when the compressor is on. Try setting the unit to Fan only mode, you should be able to hear the difference between high and low fan speed settings.
DEHUMIDIFYING ONLY MODE
In this mode, the air conditioner only dehumidifies the room, the compressor will activate intermittently depending on the ambient temperature and the fan speed is set to LOW. To activate this function mode, press the Mode Control until the Dehumidifying indicator light comes on. Please note that when switching functions, there will be an approximate 3 minute transition time. In dehumidifying mode, the exhaust hose does not need to be vented. If the exhaust hose is vented, the room will be cooled as it dehumidifies. To prevent cooling, remove the exhaust hose from the window kit and allow the warm air from the rear to be re-circulated into the room. If room temperature is higher than 77°F, the fan speed can be adjusted. If room temperature is lower than 77°F, the fan speed is set at Low.
NOTE: When using Dehumidifying mode, venting the exhaust hose to the outside is not required. If vented, the warm air is exhausted to the outside and cooling within the room may occur. Additionally, if the exhaust hose is not vented, the unit may require more frequent draining. The air conditioner does not have a humidistat in which a specific humidity level can be set.
FAN ONLY MODE
In this mode, only the fan of the air conditioner runs and circulates the air in the room. To activate this function mode, press the MODE button until the Fan indicator light comes on. In this function mode, the temperature cannot be set. Subsequently, set the desired fan speed by pressing the Fan button. Fan Only mode does not require the use of the exhaust hose.
TIMER (DELAYED SWITCH ON / OFF) FUNCTION
This function mode enables a delayed switch ON or delayed switch OFF of the air conditioner. The time (hours) delay can be set, enabled and disabled. The timer is adjustable between 1 – 24 hours.
SETTING SWITCH OFF TIMER
With the air conditioner operating in any function mode, press the Timer button. The display timer setting will come on. Set the desired time delay OFF hours by pressing the + and – buttons. The time increments are at 1 hour to up to 24 hours. When the delay time set has elapsed, the air conditioner switches off. To cancel the delayed switch off function, press the Timer button or turn off the air conditioner.
SETTING DELAYED SWITCH ON TIMER
With the air conditioner is off, press the Timer button. The display timer setting will come on. Set the desired time delay ON hours by pressing the + and – buttons. The time increments are at 1 hour to up to 24 hours. When the delay time set has elapsed, the air conditioner switches on. To cancel the delayed switch on function, press the Timer button or turn on the air conditioner.
AUTO RESTART
In the event of a power outage, the air conditioner restarts at the previously set function mode and settings when power is restored.
NOISE LEVEL
Portable air conditioners may make sounds that are not familiar to you. The sounds listed below are normal. Noise reflecting off hard surfaces such as a floor or wall can make the sounds seem louder than they actually are.
- The compressor may make a pulsating or high-pitched sound
- Water running from the evaporator to the water tank may make a splashing sound
- Refrigerant flowing may make a gurgling sound
- Fan sound may come from front and back air vents
COMPRESSOR LOCK OUT
This portable air conditioner is optimized to operate in an ambient temperature of 64°F – 90°F. The compressor circuit has an automatic 3 minute time delayed start if the unit is turned off and on quickly. This prevents over-heating of the compressor and possible circuit breaker tripping.
WATER DRAINAGE
During the process of cooling, some water will be extracted from the air into the unit. Most of this water is used to cool and exhausted to the outside. If the unit is operated in high humidity or low temperature environment, water will be collected in the reservoir inside the unit. If the reservoir is full, the compressor will stop. To continue the cooling function, please drain the water. See page 9.
REMOTE CONTROL
The portable air conditioner can be switched on by the remote control. To transmit signals from the remote control to the air conditioner, point the front part of the remote handset towards the control panel on the air conditioner. Reception of the signal is confirmed by a beep. The maximum signal transmission distance is approximately 8 meters / 26 feet.
NOTEL:
- Other appliances in the same room controlled by a remote control (TV, radio, stereo, etc.), may cause interferences
- Electronic and fluorescent lamps may interfere with the signal transmissions between the remote control and the air conditioner
- Remove the batteries if the remote control is not used for long periods
INSTALLING BATTERIES
To insert the batteries, open the flap on the back of the remote control by sliding if off. Strictly adhere to the polarity signs on the bottom of the battery housing, close the flap once the batteries have been inserted.
- Only use two dry LR03 AAA 1.5V Batteries (included) in the remote control
- Always change both batteries at the same time

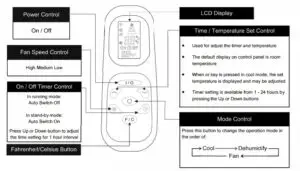
Notes
- Do not drop the remote control
- Do not place the remote control in a location exposed to direct sunlight
- The remote control should be placed about 1 meter or more away from the TV or any electrical appliances
CARE AND MAINTENANCE
IMPORTANT
- Switch off the air conditioner and disconnect the plug from the power outlet
- Drain water by removing the drain plug
- Always transport the air conditioner in an upright position only
CLEANING THE AIR FILTERS
To ensure the air intake is filtered properly and to assure that your air conditioner runs efficiently, it is recommended to clean the pre-filter at least once every two weeks.
This unit has two air filters; a washable pre-filter and an activated carbon filter.
- Switch off the air conditioner and remove the washable pre-filter and an activated carbon filter.
- Use a vacuum cleaner or tap lightly to remove loose dust and dirt from the pre-filter.
- Rinse the pre-filter thoroughly under warm running water (no hotter than 100F.)
- Dry thoroughly before re-inserting the filters.
NOTE: The activated carbon filter is not washable. It is an optional filter and should be replaced every 2-3 months or as needed if used. Please contact [email protected] for retail sales information or visit whynter.com for a list of optional accessories
WARNING! Never operate the air conditioner without the pre-filter in place
CLEANING THE AIR CONDITIONER
- Always switch off the air conditioner and disconnect the plug from the power supply outlet before cleaning the air conditioner.
- Use a soft damp cloth to wipe the body of the unit.
- Never use harsh chemicals, oil-based products, detergents, chemically treated cloths or other cleaning solutions. These could possibly damage the body of the air conditioner.
END OF SEASON STORAGE
This portable air conditioner comes with one end of season storage cover. We highly recommend that storage cover bag is utilized when the unit is not going to be used for a period of time.
WARNING: To avoid danger of suffocation, keep this bag away from babies and children.
- Switch off the air conditioner and disconnect the power plug from the power supply outlet before cleaning the air conditioner.
- Clean the pre-filter.
- Drain the condensed water completely.
- On a warm day, set the unit to Fan only mode for half a day to dry the unit internally.
- Gather the power cord and bundle it.
- Remove the batteries from the remote.
- If leaving the window kit in place, disconnect the exhaust hose from the window slider kit and place the included cover on the fixture. Otherwise, remove the window kit from the window opening. To remove the hose connector from the fixture on the window kit, slightly turn, push and gently pull the connector to release.
- Place the storage cover over the air conditioner.
Note: Depending on use, it is recommended that the air conditioner be cleaned internally annually. Please contact Whynter at [email protected] for internal maintenance cleaning instructions.
Tips
Keep the exhaust hose as short and straight as possible
The exhaust hose removes heat from the room. It should remain as short and straight as possible without sharp bends or twists to maximize efficiency. If the exhaust hose must be extended, do not exceed 9’.
Turn the air conditioner on early
Turning the air conditioner on early instead of waiting until the hottest point of the day will allow the unit to be more effective. The air conditioner will not have to work as hard to cool the room down and maintain the set temperature.
Reduce heat sources
Direct sunlight, televisions, computers and other heat generating appliances work against the air conditioner by introducing heat into the space.
- Close window curtains and blinds to keep direct sunlight out
- Close doors and windows
- Keep ovens and stoves off
- Turn off unused lights
- Add weather stripping around windows and doors
Keep the air filter clean
Regular cleaning will help keep your air conditioner working properly. Dusty filters and vents greatly reduce the airflow and efficiency of the unit.
- Clean the washable pre-filter regularly
- Replace the activated carbon filter every 2-3 weeks depending on use
- Vacuum any accumulated dust from around all vents
TROUBLESHOOTING
Many common portable air conditioner problems are easily resolved. Try the troubleshooting suggestions below to see if the problems can be resolved before having to contact the service department.
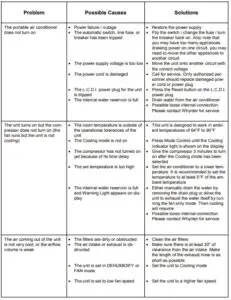
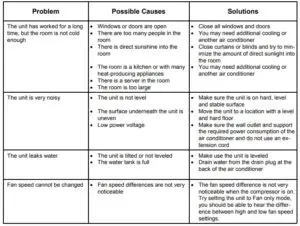
ONE YEAR LIMITED WARRANTY & THREE YEAR WARRANTY ON COMPRESSOR
This WHYNTER product is warranted to the original owner, purchased from an authorized Whynter dealer within the 48 U.S. continental states, for one year from the original purchase date against defects in material and workmanship under normal residential usage. Should your WHYNTER product prove defective within one year from the date of purchase, contact Whynter’s Customer Support team with the serial number and proof of purchase to make a warranty claim. A Return Authorization number must be issued before returning any parts or products. Parts or products received without a Whynter issued Return Authorization number will be refused. Under this warranty, Whynter will repair or replace any parts found defective with new or remanufactured parts or exchange the defective product with a new, refurbished, or remanufactured product at our discretion. All defective products and parts covered by this warranty will be repaired or replaced on a mail-in basis to Whynter’s Service Center. This warranty is not transferable. After the expiration of the warranty, the cost of labor and parts will be the responsibility of the original owner.
The compressor of portable air conditioners is warranted for an additional two years after the one year limited warranty expires from the date of purchase. Return freight is prepaid by Whynter within two months of purchase. After two months to one year, the customer will be responsible for the return freight cost to Whynter’s Service Center. Please package the product carefully in its original packaging to avoid damage in transit. Whynter is not responsible for damage resulting from shipper mishandling or improper packaging. Please retain the original box and packaging materials.
THIS WARRANTY DOES NOT COVER:
- Acts of God, such as fire, flood, hurricanes, earthquakes and tornadoes.
- Improper power supply such as power surge, low voltage, defective household wiring or inadequate fuses.
- Use in commercial or industrial applications.
- Damage, accidental or otherwise, to the product while in the possession of a consumer not caused by a defect in material or workmanship.
- Damage caused by consumer misuse, tampering, lack of maintenance or failure to follow the care and special handling provisions in the instructions.
- Damage to the finish of the case, or other appearance parts caused by wear.
- Damage caused by repairs or alterations to the product by anyone other than authorized by the manufacturer.
- Removal, Replacement Packaging, Freight and Insurance cost for the warranty service.
- Products sold AS IS or from an unauthorized reseller.
- Products that have had their serial numbers removed or defaced.
DISCLAIMER OF IMPLIED WARRANTIES; LIMITATION OF REMEDIES
CUSTOMER’S SOLE AND EXCLUSIVE REMEDY UNDER THIS LIMITED WARRANTY SHALL BE PRODUCT REPAIR OR REPLACEMENT AS PROVIDED HEREIN. CLAIMS BASED ON IMPLIED WARRANTIES, INCLUDING WARRANTIES OF MERCHANT ABILITY OR FITNESS FOR A PARTICULAR PURPOSE, ARE LIMITED TO ONE YEAR OR THE SHORTEST PERIOD ALLOWED BY LAW, BUT NOT LESS THAN ONE YEAR. WHYNTER SHALL NOT BE LIABLE FOR CONSEQUENTIAL OR INCIDENTAL DAMAGES SUCH AS PROPERTY DAMAGE AND INCIDENTAL EXPENSES RESULTING FROM ANY BREACH OF THIS WRITTEN LIMITED WARRANTY OR ANY IMPLIED WARRANTY. SOME STATES AND PROVINCES DO NOT ALLOW THE EXCLUSION OR LIMITATION OF INCIDENTAL OR CONSE- QUENTIAL DAMAGES, OR LIMITATIONS ON THE DURATION OF IMPLIED WARRANTIES, SO THESE LIMITATIONS OR EXCLUSIONS MAY NOT APPLY TO YOU. THIS WRITTEN WARRANTY GIVES YOU SPECIFIC LEGAL RIGHTS. YOU MAY ALSO HAVE OTHER RIGHTS THAT VARY FROM STATE TO STATE.
The warranty, product contents and specifications are subject to change at any time without notice; please refer to www.whynter.com for the most current information.
Please retain the original proof of purchase. To register your warranty, please visit www.whynter.com and fill out the online Warranty Registration form. Please be sure to include a copy of your purchase invoice.
To obtain service or information, contact Whynter LLC via email at [email protected] or call 866 WHYNTER (866-949-6837).

Congratulations on your new Whynter product. To ensure proper operation, please read this Instruction Manual carefully before using this product. Keep this manual in a safe place for future reference. Take on dessert making like never before! Make delicious homemade rolled ice cream that you can fully customize to taste in the comfort of your own home with the Whynter ICR-300SS Portable Instant Ice Cream Maker Frozen Pan Roller in Stainless Steel.
Rolled ice cream, also known as stir-fried ice cream, is made by stirring ingredients on an ice pan and simultaneously cooled to approximately 10°F ( -12°C). Rolled ice cream is chopped and scrapped while being frozen on an ice pan. This reduces the amount of air trapped inside ice cream make it taste more intense.
This portable ice cream maker with frozen pan offers premium functions that a commercial machine can do at any cafe or dessert shops. A built-in powerful compressor freezer allows for continuous use and can quickly freeze your favorite ice cream mix in less than 5 minutes! This unit includes two stainless steel spatula, and 4 suction legs to provide a more solid and steady base.
- Stainless steel housing
- Stainless steel pan top
- Powerful compressor and fast cooling speed
- 4 suction legs for solid base and stability
- 2 stainless steel spatulas
- High efficiency CFC-free compressor
- ETL Certified
TECHNICAL DATA
| MODEL | ICR-300SS |
| Capacity | 0.5 quart |
| Power Supply | 110/120V 60 Hz |
| Maximum power consumption | 120W |
| Cooling Temperature | 14ºF |
| Refrigerant | R600a |
| Noise Level | < 55dB |
| Net Weight | 24.25 lbs |
| Unit Dimensions | 12.5” W x 10.75” D x 14.25” H |
| Packaging Dimensions | 14” W x 12.75” D x 19.5” H |
Safety Precautions
APPLIANCE SAFETY
Your safety and the safety of others are very important to us.
To reduce the risk of fire, electrical shock, or injury when using your appliance, follow these basic precautions
![]() This is the Safety Alert Symbol. This symbol alerts you to potential hazards that may result in serious injury. All safety messages will follow the Safety Alert Symbol and either the words” DANGER” or “WARNING”.
This is the Safety Alert Symbol. This symbol alerts you to potential hazards that may result in serious injury. All safety messages will follow the Safety Alert Symbol and either the words” DANGER” or “WARNING”.
![]() DANGER
DANGER ![]() Danger means that failure to heed this safety statement may result in severe injury or death.
Danger means that failure to heed this safety statement may result in severe injury or death.
![]() WARNING
WARNING ![]() Warning means that failure to heed this safety statement may result in extensive product damage, serious injury, or death.
Warning means that failure to heed this safety statement may result in extensive product damage, serious injury, or death.
CAUTION: Caution means that failure to heed this safety statement may result in minor or moderate injury, or property or equipment damage.
All safety messages will alert you to know what the potential hazard is, tell you how to reduce the chance of injury, and let you know what can happen if the instructions are not followed.
IMPORTANT SAFEGUIDES
![]() Before the appliance is used, it must be properly positioned and installed as described in this manual, please read the manual carefully. To reduce the risk of fire, electrical shock or injury when using the appliance, follow basic precaution, including the following:
Before the appliance is used, it must be properly positioned and installed as described in this manual, please read the manual carefully. To reduce the risk of fire, electrical shock or injury when using the appliance, follow basic precaution, including the following:
![]() DANGER
DANGER ![]()
- Plug into a grounded 3-prong outlet, do not remove grounding prong, do not use an adapter, and do not use an extension cord.
- Do not use if the power supply cord is damaged. If damaged, it must be replaced by a qualified electrician.
- It is recommended that a separate circuit, serving only your appliance be provided. Use receptacles that cannot be turned off by a switch or pull chain.
- Never clean appliance parts with flammable fluids or harsh chemicals. These fumes can create a fire hazard or explosion.
- Do not store or use gasoline or other flammable vapors and liquids in the vicinity of the appliance or any other appliance.
- Before proceeding with cleaning and maintenance operations, make sure to unplug the appliance.
- Do not connect or disconnect the electric plug with wet hands.
- To protect against risk of electric shock, do not pour water on cord, plug and ventilation, immerse the appliance in water or any other liquid.
- Do not attempt to repair or replace any part of your appliance unless it is specifically recommended in this manual. All other servicing should be referred to a qualified technician.
![]() WARNING
WARNING ![]()
FOLLOW WARNING CALL OUTS BELOW ONLY WHEN APPLICABLE TO YOUR MODEL
- It is important for the appliance to be leveled in order to work properly. For a stable installation, make sure the appliance is placed on a flat, level and solid surface.
- When positioning or moving the appliance ensure that it is not turned upside down or greater than 45° or more off level.
- To ensure proper ventilation for your appliance, the air vents of the appliance must be completely unobstructed. Choose a well-ventilated area with temperatures above 60°F (16°C) and below 90°F (32°C). This appliance must be installed in an area protected from the element, such as wind, rain, water spray or drips.
- This appliance is not intended for use by young children or physically challenged persons without supervision/assistance. Young children must be supervised to ensure safety around this or any appliance.
- Never pull the cord to disconnect it from the outlet. Grasp the plug and pull it from the outlet.
- Never lift, carry or drag the appliance by the power cord.
- This appliance is designed for household, non-commercial use only. Any other use will void the warranty.
- Do not insert any foreign objects into the appliance.
- This is a self-contained ice cream maker and no pre-freezing is needed. Do not use pre-frozen ingredients as it can cause the mixture to freeze before ice cream is made.
- Avoid placing any objects on top of the appliance.
- This is an electrical appliance, to avoid injury from electrical shock do not operate the unit with wet hands, while standing on a wet surface or while standing in water. Do not use outdoors or in wet conditions.
- Do not plug into the power outlet before set up is completed.
Features and Parts
BEFORE USING YOUR APPLIANCE
- Remove the exterior and interior packing.
- Before connecting the appliance to the power source, let it stand upright for approximately 2 hours. This will reduce the possibility of a malfunction in the cooling system from handling during transportation.
- Wipe the exterior surface with lukewarm water using a soft cloth.
- Clean all parts that will come into contact with the ice cream.
Note: Please note that the stainless steel shovels are dishwasher safe. However, to prolong the quality of the materials of the stainless steel shovels, it is suggested to have these hand-washed.
PREPARE RECIPE INGREDIENTS
Prepare recipe ingredients from your own recipe or from ours.
Note: No pre-freezing is needed. This appliance has a built-in compressor which is designed to freeze the mixture in about 5 minutes.
Ice Cream mix recipes can be downloaded from the ICR-300SS product page on our website, www.whynter.com or just send us an email at [email protected] and we will send you a guide to introduce you to a variety of mixtures. Once you have mastered the basics, let your imagination run wild, as you try new flavors and fun combinations.
Installation and Operation
IMPORTANT SAFETY INSTRUCTIONS
| To reduce the risk of fire, electrical shock, or injury when using your appliance, follow these basic pre- cautions: | |
|
|
INSTALLATION OF YOUR APPLIANCE
- WARNING: Do not store or install the appliance outdoors.
- CAUTION: This appliance is designed for making ice cream desserts.
- Place your appliance on a hard and level surface that is strong enough to support it when ingredients are added.
- Allowance of at least 5 inches (127mm) of space around the appliance is suggested, which allows the proper air circulation to cool the compressor and condenser.
- Do not install the appliance near an oven or other heating source.
- Plug in the appliance into an exclusive, grounded wall power outlet. Do not under any circumstances cut or remove the third (ground) prong from the power cord. Any questions concerning power and/or grounding should be directed toward a qualified electrician or an authorized service center.
FREESTANDING INSTALLATION
A freestanding installation will allow you to install the ice cream maker in any place you desire provided that the required clearance space around the appliance is respected. In every setting, there must be an adequate ventilation and access for service. Never install or operate the unit in an enclosed area. Allowance of at least 5 inches (127mm) of space around the appliance is suggested, which allows the proper air circulation to cool the compressor and condenser.
ELECTRICAL CONNECTION
WARNING: Improper use of the grounded plug can result in the risk of electrical shock. If the power cord is damaged, have it replaced by a qualified electrician or contact Whynter Service Department.
This appliance requires a standard 115/120 Volt AC ~/60Hz electrical ground outlet with three-prong. Have the wall outlet and circuit checked by a qualified electrician to make sure the outlet is properly grounded. The cord should be secured behind the appliance and not left exposed or dangling to prevent accidental injury. The appliance should always be plugged into its own individual electrical outlet which has a voltage rating that matches the rating label on the appliance. This provides the best performance and also prevent overloading house wiring circuits that could cause a fire hazard from overheated. Never unplug the appliance by pulling the power cord. Always grip the plug firmly and pull straight out from the receptacle. Repair or replace immediately all power cords that have become frayed or otherwise damaged. Do not use a cord that shows cracks or abrasion damage along its length or at either end. When moving the appliance, be careful not to damage the power cord.
EXTENSION CORD
Because of potential safety hazards, it is strongly recommended that you do not use an extension cord with this appliance. However, if you must use an extension cord, it is absolutely necessary that it be a UL/CULListed, 3-wire grounding type appliance extension cord having a grounding type plug and outlet and that the electrical rating of the cord be 115 volts and at least 10 amperes.
INSTALLATION OF YOUR APPLIANCE

- Place the ice cream maker upright on a flat, level and solid surface.
- For stability, press the unit gently down onto the surface until the suction legs are securely attached
CONTROLS

- Power Button
After the appliance is installed and connected to the power supply, press the Power button to turn the machine on.
The Power button will illuminate a blue light indicating that the unit is in operation. When the unit is on and the Power button is pressed, the unit will turn off.
NOTE: The unit may enter a three minute compressor lockout when operation of the unit has been resumed. This three minute time delay helps extend the life of the compressor. Once delay elapses, the compressor will engage and the unit will start cooling again. - Operation Light
The operation light indicates when unit is ready for use.
Red Light – This indicates that the unit is starting up and in the process of reaching the optimal operation temperature point.
Green Light – This indicates that the unit has reached the optimal temperature (14ºF) necessary for ice cream making. This means that the ice cream mix can be poured on the freezing top plate.
NOTE: It takes approximately 8-10 minutes for the operation light to change from Red to Green.
BASIC ICE CREAM MIX
INGREDIENTS
- 1¾ cups heavy cream
- 1¼ cup whole milk
- ¾ cup sugar
- ⅛ teaspoon fine sea salt
- 1 tablespoon vanilla extract
Pour 1 cup of the mixture into a saucepan and add the sugar, salt. Scrape the seeds of the vanilla bean into the pot and then add the vanilla pod to the pot. Warm the mixture over medium heat, just until the sugar dissolves. Remove from the heat and add the remaining cream, milk, and vanilla extract (if using extract). Stir to combine. Set aside ice cream mix to cool down.
ICE CREAM MAKING
WARNING: Before first use, clean and wipe the top plate of the unit with a moist cloth. Do not clean the top plate or any of the parts with abrasive cleaners or hard implements.
- Press the power button to turn on the ice cream machine. Initially, the indicator light will illuminate in red color.
- The unit will then start the precooling process for about 8-10 minutes. When the indicator light changes from red to green, pour the ice cream (about 100g) on the freezing top plate(Fig 1). During the ice cream process, the compressor continues to work and the green indicator light will stay illuminated.

Fig 1 - Add fruits, brownies, chocolate, or any other toppings if desired. Using the stainless steel shovels, break down these ingredients to little pieces (Fig 2).

Fig 2 - When the ice cream mix has started to thicken, this is an indication that the ice cream mix has started to freeze. Evenly spread the the ice cream mix all throughout the freezing top plate(Fig 3).

Fig 3 - Once the ice cream mix has hardened, use the edges of the stainless steel shovels to divide, roll, and shovel out each rolled piece(Fig 4 and Fig 5).

Fig 4

Fig 5 - Place ice cream rolls in a cup and serve(Fig 6 and Fig 7)

Fig 6

Fig 7
Troubleshooting and Tips
Many common ice cream maker problems are easily resolved. Try the troubleshooting suggestions below to see if the problems can be resolved before having to contact the Whynter Service Department.
| Problem | Possible Causes | Solutions |
| Ice cream maker does not freeze |
|
|
| Ice cream maker compressor does not run when operation of the unit has been resumed | The ice cream maker has entered a three minute compressor lockout |
|
| Ice cream is not firm enough | Ingredients were warm or at room temperature before placing in the bowl |
|
| Ice cream too icy |
|
|
ONE YEAR LIMITED WARRANTY
This Whynter Ice Cream Maker is warranted, to the original owner within the 48 continental states, for one year from the date of purchase against defects in material and workmanship under normal use and service. When making a warranty claim, please have the original bill or invoice of purchase with purchase date available. Should your Whynter Ice Cream Maker prove defective within one year from the date of purchase, return the defective part or unit, freight prepaid (within two months of purchase; after two months to one year, customer will be responsible for freight cost to Whynter’s service department), along with an explanation of the claim to Whynter LLC. A return authorization number issued by Whynter is required for all warranty claims and returns. Please package the Whynter Ice Cream Maker carefully in its original packaging material to avoid damage in transit. The original box and packaging material should be retained, as Whynter is not responsible for the cost of replacement packaging. Under this warranty, Whynter will repair or replace any parts found defective at our discretion. This warranty is not transferable. After the expiration of the warranty, the cost of labor and parts will be the responsibility of the original owner of the unit.
THIS WARRANTY DOES NOT COVER:
- Acts of God, such as fire, flood, hurricanes, earthquakes and tornadoes.
- Improper power supply such as power surge, low voltage, defective household wiring or inadequate fuses. Use in commercial or industrial applications
- Damage, accidental or otherwise, to the Whynter Ice Cream Maker while in the possession of a consumer not caused by a defect in material or workmanship;
- Damage caused by consumer misuse, tampering, or failure to follow the care and special handling provisions in the instructions.
- Damage to the finish of the case, or other appearance parts caused by wear.
- Damage caused by repairs or alterations to the product by anyone other than authorized by the manufacturer.
- Removal, Replacement Packaging, Freight and Insurance cost for the warranty service.
DISCLAIMER OF IMPLIED WARRANTIES; LIMITATION OF REMEDIES CUSTOMER’S SOLE AND EXCLUSIVE REMEDY UNDER THIS LIMITED WARRANTY SHALL BE PRODUCT REPAIR OR REPLACEMENT AS PROVIDED HEREIN. CLAIMS BASED ON IMPLIED WARRANTIES, INCLUDING WARRANTIES OF MERCHANTABILITY OR FITNESS FOR A PARTICULAR PURPOSE, ARE LIMITED TO ONE YEAR OR THE SHORTEST PERIOD ALLOWED BY LAW, BUT NOT LESS THAN ONE YEAR. WHYNTER SHALL NOT BE LIABLE FOR CONSEQUENTIAL OR INCIDENTAL DAMAGES SUCH AS PROPERTY DAMAGE AND INCIDENTAL EXPENSES RESULTING FROM ANY BREACH OF THIS WRITTEN LIMITED WARRANTY OR ANY IMPLIED WARRANTY. SOME STATES AND PROVINCES DO NOT AL-LOW THE EXCLUSION OR LIMITATION OF INCIDENTAL OR CONSEQUENTIAL DAMAGES, OR LIMITATIONS ON THE DURATION OF IMPLIED WARRANTIES, SO THESE LIMITATIONS OR EXCLUSIONS MAY NOT APPLY TO YOU. THIS WRIT-TEN WARRANTY GIVES YOU SPECIFIC LEGAL RIGHTS. YOU MAY ALSO HAVE OTHER RIGHTS THAT VARY FROM STATE TO STATE.
Please retain the original proof of purchase in order to obtain warranty services. Warranty begins from the original date of purchase.
CONTACT UC
To obtain service or information, contact
Whynter LLC via email at [email protected] or call
866-WHYNTER.
Product contents and specifications may change without notice. Please visit our website for the most up to date information.
Copyright © 2020 Whynter LLC
WWW.WHYNTER.COM
]]>

IMPORTANT SAFETY INSTRUCTIONS
Whynter Sterymax Professional 360 Electrostatic Sprayer
MAIN COMPONENTS
| ITEMS INCLUDED | |
| 1 | SPRAYER |
| 1 | TANK |
| 1 | 16.8 VOLT BATTERY -3400 mAh |
| 1 | 16.8 VOLT CHARGER |
| 1 | NOZZLE WRENCH |
| 1 | TANK CAP |
| PRODUCT COMPONENTS | |
| 1.0 | TANK |
| 1.1 | TANK RELEASE |
| 1.2 | TANK LOCKING COLLAR |
| 1.3 | 16.8 VOLT BATTERY |
| 1.4 | UNIT ON/OFF |
| 1.5 | LOCK OFF SWITCH |
| 1.6 | ELECTROSTATIC CHARGE ON/OFF |
| 1.7 | 3 IN 1 NOZZLE |
| 1.8 | HEADLIGHT |
| 1.9 | GROUNDING STRAP |
| OPTIONAL ACCESSORIES SOLD SEPARATELY | |
| Model Number | Description |
| VP20B | Professional 16.8 Volt Battery |
| VP10 | Professional 16.8 Volt Charger |
| VP30 | VP200 Replacement Tank |
| VP49 | Nozzle Wrench |
| VP50 | 3 in 1 Nozzle |
| VP55 | Single 40 Nozzle |
| VP57 | Single 80 Nozzle |
| VP59 | Single 110 Nozzle |
NOZZLE WRENCH BATTERY CHARGER
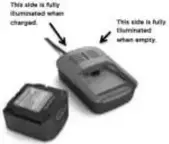
TANK CAP
WARNING: It is the operator’s responsibility to read and understand the cautions and warnings in this manual before attempting to operate this machine.
IMPORTANT: The Electrostatic Sprayer has been designed and engineered to be very safe during normal operation. As with all cordless products certain safety precautions should be taken.
Please read the following WARNINGS before operating the machine.
UNDERSTAND THESE SAFETY PRECAUTIONS BEFORE OPERATING MACHINE. FAILURE TO PROPERLY FOLLOW THESE PRECAUTIONS MAY LEAD TO A FIRE, EXPLOSION, OR ELECTRICAL SHOCK HAZARD.
IMPORTANT SAFETY INSTRUCTIONS
WARNING - When using electric appliances, basic precautions should always be followed, including the following:
- Read all the instructions before using the appliance.
- To reduce the risk of injury, close supervision is necessary when an appliance is used near children.
- Do not contact moving parts.
- Only use attachments recommended or sold by the manufacturer.
- To reduce the risk of electrical shock, do not put electrode in water or other liquid. Do not place or store appliance where it can fall or be pulled into a tub or sink.
- Use only the charger supplied by the manufacturer to recharge.
SAVE THESE INSTRUCTIONS

WARNING
READ AND UNDERSTAND OWNERS MANUAL AND ALL OTHER SAFETY INSTRUCTIONS BEFORE OPERATING THIS MACHINE.
 TO AVOID ELECTRICAL SHOCK
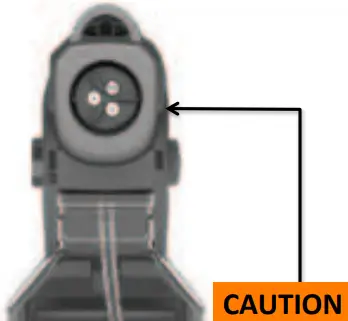
DO NOT TOUCH OR INSERT ANYTHING IN THE NOZZLE OF THE SPRAYER
WARNING: This product contains chemicals known to the State of California to cause cancer and birth defects or other reproductive harm.
WARNING: This machine contains an electrostatic device that may interfere with sensitive medical devices such as pacemakers, defibrillators, or similar devices. DO NOT operate this machine or stand within 10 feet if you use such medical devices. Contact your physician prior to operation if you are unsure if this machine will interfere with your medical device.
WARNING: Always have the machine serviced by a professional, qualified representative. Never attempt to service the machine or access its internal components.
General Safety Rules - For All Battery Operated Sprayers
WARNING: Read and understand all instructions. Failure to follow all instructions listed below may result in electric shock, fire and/or serious personal injury.
SAVE THESE INSTRUCTIONS
- Keep your work area clean and well lit.
- Do not operate cordless sprayer in explosive atmospheres, such as in the presence of flammable liquids, gases, or dust. Cordless Sprayers create sparks, which may ignite the dust or fumes.
- Keep bystanders, children, and visitors away while operating a cordless sprayer. Distractions can cause you to lose control.
ELECTRICAL SAFETY
- CAUTION: To avoid electrical shock do not touch or insert any foreign objects into the nozzle.
- A cordless sprayer with integral batteries or a separate battery pack must be recharged only with the specified charger for the battery. A charger that may be suitable for one type of battery may create a risk of fire when used with another battery.
- Use battery operated sprayer only with the specifically designated battery pack. Use of any other batteries may create a risk of fire.
PERSONAL SAFETY
- Stay alert, watch what you are doing and use common sense when operating a cordless sprayer. Do not use cordless sprayer while tired or under the influence of drugs, alcohol, or medication.
- A moment of inattention while operating cordless sprayer may result in serious personal injury,
- Avoid accidental starting. Be sure switch is in the locked or OFF position before inserting battery pack

- Carrying sprayer with your finger on the switch or inserting the battery pack into a tool with the switch ON invites accidents.
- Do not overreach. Keep proper footing and balance at all times. Proper footing and balance enables better control of the tool in unexpected situations.
- Use safety equipment. Always comply with any requirements for protective clothing, goggles, gloves, facial masks, or respirator required by the .
Formulations.
Most water based chemicals are suited for machine.
.
- Do not use oil base liquids.
- Store formulation in its original labeled container.
- Ensure that formulation is applied only in strict compliance with the formulation label as well as local, state, and federal regulations.
- Do not use oil-base or flammable formulations with this machine.
TOOL USE AND CARE
- Do not use a machine that is broken or damaged in any way.
- Do not alter the machine by adding or removing parts.
- Do not restrict the motor air inlet area.
- Do not tamper with the output nozzle.
- Do not allow the machine to operate unattended.
- Do not stand in water or hold over water while operating machine.
- Do not use outdoors when it’s raining.
- Do not use cordless sprayer if switch does not turn it on or off. A cordless sprayer that cannot be controlled with the switch is dangerous and must be repaired.
- Disconnect battery pack from cordless sprayer or place the switch in the locked or OFF position before making any adjustments, refilling the tank or storing the cordless sprayer. Such preventative safety measures reduce the risk of starting the cordless sprayer accidentally.
- Store idle cordless sprayer out of reach of children and other untrained persons. Cordless sprayers are dangerous in the hands of untrained users.
- When battery pack is not in use, keep it away from other metal objects like: paper clips, coins, keys, nails, screws, or other small metal objects that can make a connection from one terminal to another. Shorting the battery terminals together may cause sparks, burns, or a fire.
- To clean the sprayer use soap, water and a damp cloth to wipe clean. To clean internal components run water through the sprayer for 3 minutes.
Important Safety Instructions for Battery Packs
Your cordless sprayer uses a 16.8 volt Lithium Ion battery pack. The battery pack is not fully charged out of the carton. Before using the battery pack and charger, read the safety instructions below. Then follow charging procedures outlined.
CAUTION: The battery used in this device may present a risk of fire or chemical burn if mistreated. Do not disassemble, store in extreme heat or cold.
Keep away from children. Do not disassemble. Do not dispose of in fire.
Do not attempt to disassemble the battery or remove any component projecting from the battery terminals. The battery and charger have no user serviceable parts. Fire or injury may result from tampering prior to disposal, protect exposed terminals with heavy insulating tape to prevent shorting.
DANGER: Electrocution hazard. Never attempt to open the battery pack for any reason. If battery pack case is cracked or damaged, do not insert into charger. Electric shock or electrocution may result.
WARNING: Fire hazard. Do not store or carry battery so that metal objects can contact exposed battery terminals. For example, do not place battery in aprons, pockets, toolboxes, product kit boxes, drawers, etc., with loose nails, screws, keys, etc.
CAUTION: Battery pack must be securely attached to the cordless sprayer. If battery pack is detached, personal injury may result.
Do not incinerate the battery pack even if it is severely damaged or is completely worn out. The battery pack can explode in a fire.
Charge the battery packs only with the original charger.
DO NOT splash or immerse in water or other liquids.
Do not store or use the tool and battery pack in locations where the temperature may reach or exceed 105°F (40)° (such as outside sheds or metal buildings in summer).
Damaged battery packs should be recycled.
Transporting batteries can possibly cause fires if the battery terminals inadvertently come in contact with conductive materials such as keys, coins, hand tools and the like.
The US Department of Transportation Hazardous Material Regulations (HMR) prohibits transporting batteries in commerce or on airplanes (i.e., packed in suitcases and carry-on luggage) UNLESS they are properly protected from short circuits. When transporting individual batteries, make sure that the battery terminals are protected and well insulated from materials that could contact them and cause a short circuit.
Important Safety Instructions for Battery Chargers
SAVE THESE INSTRUCTIONS: This manual contains important safety instructions for battery chargers. Before using charger, read all instructions and cautionary markings on charger, battery pack, and product using battery pack.
DANGER: Electrocution hazard. 120 volts are present at charging terminals. Do not probe with conductive objects.
WARNING: Shock hazard. Do not allow any liquid to get inside charger.
CAUTION: Burn hazard. To reduce the risk of injury, charge only Whynter Innovations rechargeable batteries. Other types of batteries may burst causing personal injury and damage.
CAUTION: Under certain conditions, with the charger plugged in to the power supply, the exposed charging contacts inside the charger can be shorted by foreign material. Foreign materials of a conductive nature such as, but not limited to, steel wool, aluminum foil, or any buildup of metallic particles should be kept away from charger cavities. Always unplug the charger from the power supply when there is no battery pack in the cavity. Unplug charger before attempting to clean.
DO NOT attempt to charge the battery pack with any chargers other than the one noted in this manual. The charger and battery pack are specifically designed to work together.
These chargers are not intended for any uses other than charging Whynter Innovations rechargeable batteries. Any other uses may result in risk of fire, electric shock or electrocution. Do not expose charger to rain or snow.
Pull by plug rather than cord when disconnecting charger. This will reduce risk of damage to electric plug and cord.
Make sure that cord is located so that it will not be stepped on, tripped over, or otherwise subjected to damage or stress.
Do not use an extension cord unless it is absolutely necessary. Use of improper extension cord could result in risk of fire, electric shock, or electrocution.
An extension cord must have adequate wire size (AWG or American Wire Gauge) for safety. The smaller the gauge number of the wire, the greater the capacity of the cable, that is 16 gauge has more capacity than 18 gauge. When using more than one extension to make up the total length, be sure each individual extension contains at least the minimum wire size.
Recommended Minimum Wire Size for Extension Cords:
Total Length of Cord
25 ft., 50 ft., 75 ft., 100 ft., 125 ft., 150 ft., 175 ft.,
7.6 m, 15.2 m, 22.9 m, 30.5 m, 38.1 m, 45.7 m, 53.3 m,
Wire Size AWG
18, 18, 16, 16, 14, 14, 12
Do not place any object on top of charger or place the charger on a soft surface that might block the ventilation slots and result in excessive internal heat. Place the charger in a position away from any heat source. The charger is ventilated through slots in the top and the bottom of the housing.
Do not operate charger with damaged cord or plug — have them replaced immediately.
Do not operate charger if it has received a sharp blow, been dropped, or otherwise damaged in any way.
Disconnect the charger from the outlet before attempting any cleaning. This will reduce the risk of electric shock. Removing the battery pack will not reduce this risk.
NEVER attempt to connect 2 chargers together.
The charger is designed to operate on standard household electrical power (120 Volts)or (240) with proper country plug
Operation Instructions
1. To start the use of the Whynter Cordless Electrostatic Sprayer first charge your battery by inserting the Whynter 16.8 volt battery into the charger and plugging the charger into a wall socket.


NOZZLE WRENCH BATTERY CHARGER

TANK CAP
2. Next fill the tank (1.0) by first removing it from the unit by rotating the tank locking collar(1.2) and pulling the tank release ring (1.1). The tank can now be removed. Note: you must hold on to the tank when you pull the tank release ring or the tank will fall to the floor.
3. Fill the tank with the desired liquid.
4. Insert the tank into the sprayer and rotate the tank locking collar (1.2) until you hear the click of the tank release ring (1.1) snap into place.
5. Insert the charged battery into the battery socket and lock in place.
6. Pull the trigger and spray on your desired surface.
To insure maximized electrostatic performance always keep you hand firmly wrapped around the handle in contact with the grounding strap
Nozzle Instructions
To Adjust the Nozzle
- Remove the battery from the unit.
- Insert the nozzle wrench into the front end of the unit.
- Rotate wrench until the tabs on the nozzle and the slots on the wrench are lined up.
- When the wrench slots and the nozzle tabs are lined up, the wrench will be completely inserted into the front end, rotate the wrench clockwise to adjust to a different size spray. The largest particle tip has a line cut through it, rotate clockwise until you hear a click to get the medium particle and rotate clockwise again until it clicks again to get the smallest particle.
- Remove the wrench when complete.
To Remove the Nozzle
- Remove the battery from the unit.
- Insert the nozzle wrench into the front of the unit.
- Rotate wrench until the tabs on the nozzle line up with the slots in the wrench.
- When the tabs and slots are lined up the wrench will be completely inserted into the front end.
- To remove, rotate the wrench in the counter clockwise direction until the nozzle comes loose (1/4 rotation).
- Remove the wrench when complete.
To Insert Nozzle
- Remove the battery from the unit.
- Insert the nozzle into the wrench, lining up the tabs on the nozzle and the slots on the wrench.
- Insert the wrench with nozzle into the front end of the unit.
- Push in and rotate the wrench ¼ turn counter clockwise. When you hear a click the nozzle is in position.
- Remove the wrench when complete.
Cleaning Electric static sprayers
All users follow safe cleaning practices to protect themselves from harmful exposure when cleaning the sprayer.
It is recommended that user should purchase a second tank to wash out cordless electric static sprayers to prevent residual solution build up. Disconnect storage tank from sprayer use the black threaded cap that’s is provided inside caring case. Disconnect storage tank from sprayer use the locking threaded cap to secure tank and solution when not in use.
Cleaning Nozzle
If your nozzles becomes plugged soak in hot soapy water and blow out with pressurized air to remove blockage.
Example below dirty nozzle #1 and clean nozzle #2. Nozzle #1 have not been properly cleaned after being use. When not properly cleaned, the sprayer nozzles residual chemical deposits build up. Deposit build up results in decreased bar pressure and decreased spray patterns


#1 Nozzle (Dirty) #2 Nozzle (Clean)
To reduce the chance of blockage we recommend that after every few days of use spray a tank of water through the unit to rinse out any residual chemical build up that may have occurred.
How To:

Charge Battery

1. Rotate coller to unlock icon position.

2. Pull locking ring to remove.

3. Lift unit off the tank.
Remove Tank / Fill

1. Align tank grooves into slide rail, lower machine onto tank.

2. listen for a “click”.
3. Rotate coller to lock icon position.
Connect Tank
Rotate the nozzle clockwise to change the size of the particles.

The Largest Nozzle has a “line” Through it.
Adjust Nozzle

Optimum Sprayer Distance is 24 inches.
Spray

After use, spray a tank of water to rinse.
Clean Up
This WHYNTER Electrostatic Sprayer is warranted, to the original owner for one year from the date of purchase against defects in material and workmanship under normal use and service. When making a warranty claim, please have the original bill or invoice of purchase with purchase date available. Should your WHYNTER Electrostatic Sprayer prove defective within one year from the date of purchase, return the defective part or unit, freight prepaid (within two months of purchase; after two months to one year, customer will be responsible for shipping cost to Whynter’s service department), along with an explanation of the claim to Whynter LLC. A return authorization number issued by Whynter is required for all warranty claims and returns. Please package the WHYNTER Electrostatic Sprayer carefully in its original packaging material to avoid damage in transit. The original box and packaging material should be retained, as Whynter is not responsible for the cost of replacement packaging. Under this warranty, Whynter will repair or replace any parts found defective at our discretion. This warranty is not transferable. After the expiration of the warranty, the cost of labor and parts will be the responsibility of the original owner of the unit.
THIS WARRANTY DOES NOT COVER:
- Acts of God, such as fire, flood, hurricanes, earthquakes and tornadoes.
- Improper power supply such as power surge, low voltage, defective household wiring or inadequate fuses.
- Use in commercial or industrial applications
- Damage, accidental or otherwise, to the WHYNTER Electrostatic Sprayer while in the possession of a consumer not caused by a defect in material or workmanship;
- Damage caused by consumer misuse, tampering, or failure to follow the care and special handling provisions in the instructions.
- Damage to the finish of the case, or other appearance parts caused by wear.
- Damage caused by repairs or alterations to the product by anyone other than authorized by the manufacturer.
- Removal, Replacement Packaging, Freight and Insurance cost for the warranty service.
DISCLAIMER OF IMPLIED WARRANTIES; LIMITATION OF REMEDIES CUSTOMER’S SOLE AND EXCLUSIVE REMEDY UNDER THIS LIMITED WARRANTY SHALL BE PRODUCT REPAIR OR REPLACEMENT AS PROVIDED HEREIN. CLAIMS BASED ON IMPLIED WARRANTIES, INCLUDING WARRANTIES OF MERCHANTABILITY OR FITNESS FOR A PARTICULAR PURPOSE, ARE LIMITED TO ONE YEAR OR THE SHORTEST PERIOD ALLOWED BY LAW, BUT NOT LESS THAN ONE YEAR. WHYNTER SHALL NOT BE LIABLE FOR CONSEQUENTIAL OR INCIDENTAL DAMAGES SUCH AS PROPERTY DAMAGE AND INCIDENTAL EXPENSES RESULTING FROM ANY BREACH OF THIS WRITTEN LIMITED WARRANTY OR ANY IMPLIED WARRANTY. SOME STATES AND PROVINCES DO NOT AL-LOW THE EXCLUSION OR LIMITATION OF INCIDENTAL OR CONSEQUENTIAL DAMAGES, OR LIMITATIONS ON THE DURATION OF IMPLIED WARRAN TIES, SO THESE LIMITATIONS OR EXCLUSIONS MAY NOT APPLY TO YOU. THIS WRIT-TEN WARRANTY GIVES YOU SPECIFIC LEGAL RIGHTS. YOU MAY ALSO HAVE OTHER RIGHTS THAT VARY FROM STATE TO STATE.
Please retain the original proof of purchase in order to obtain warranty services. Warranty begins from the original date of purchase.
To obtain service or information, contact Whynter via email at
Asia Pacific : [email protected]
North America: [email protected]
Product contents and specifications may change without notice.
Copyright© 2020 Whynter LLC

Whynter Portable Fridge/Freezer Instruction Manual
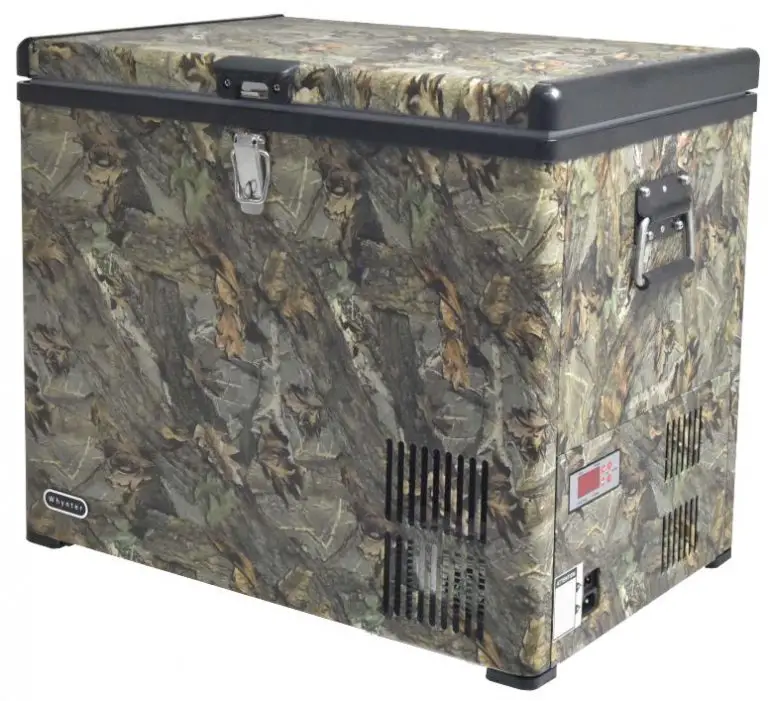
Congratulations on your new Whynter product. To ensure proper operation, please read this Instruction Manual carefully before using this product. Keep this manual in a safe place for future reference.
Safety Precautions
WARNING
TO REDUCE THE RISK OF FIRE, ELECTRICAL SHOCK, OR INJURY WHEN USING YOUR PORTABLE FREEZER, FOLLOW THESE BASIC PRECAUTIONS:
- Read all instructions before using the appliance.
- Never clean appliance parts with flammable fluids. The fumes can create a fire hazard. Do not use an excessively wet cloth, industrial solvents, and oil-based products to clean this appliance.
- To clean the freezer, use only mild detergents. Never use harsh chemicals or solvents.
- Do not store or use gasoline or any other flammable vapors and liquids in the vicinity of this or any other appliance. The fumes can create a fire hazard.
- Do not abuse, sit on, or stand on the appliance.
- This appliance is not intended for use by persons (including children with reduced physical, sensory or mental capabilities, or lack of experience and knowledge, unless they have been given supervision or instruction concerning use of the appliance by a person responsible for their safety
- Children should be supervised to ensure that they do not play with the appliance.
- Ensure the freezer is unplugged before cleaning or if not in use
- If the power cord is damaged, it must be replaced by the manufacturer or its service agent or a similarly qualified person in order to avoid a hazard.
- Use the portable freezer only for its intended function. This appliance is designed for household, noncommercial use only. Any other use will void the warranty.
- Do not plug this portable freezer into the power source before setup is completed.
- An empty portable freezer can be dangerous for children and small animals. If disposing of the portable freeze, remove gaskets, latches, lids, and the entire freezer door from your unused appliance so that children or small animals cannot be trapped inside.
- The portable freezer is an electrical appliance. To avoid serious injury from electrical shock, do not operate the freezer with wet hands, while standing on a wet surface, or while standing in water.
- To avoid the risk of shock, the product should never be used in bathrooms, shower rooms, or in any other steamy or wet areas.
- During installation, the power supply must not be excessively or dangerously bent or flattened.
- Do not tamper with controls.
- For AC power connection, make sure the power cord is placed firmly into a grounded power outlet that can support the maximum power consumption. If the wall receptacle you intend to use is not adequately grounded or protected by a time delay fuse or circuit breaker, have a qualified electrician install an outlet that is appropriate to local electrical codes and requirements.
- Do not use multiple socket or an extension cord as it may overheat and become a risk of fire. Please ensure that the freezer is plugged directly into the electrical outlet.
- The cord should be secured behind the unit and should not be left exposed or dangling
- Make sure the power cord is clean before usage.
- Make sure hands are dry when connecting the power cord. The appliance is equipped with a three-prong grounded plug on the power cord for your protection. Never modify, remove or attempt to repair the power cord yourself.
- Never pull the power cord to disconnect the unit from an outlet. Grasp the plug directly and pull it from the outlet.
- Never lift or carry the freezer by the power cord.
- Keep the power cord away from heated surfaces.
- Do not repair, disassemble and/or modify the appliance by yourself.
- Always turn off the appliance when cleaning or transporting.
- Transport the appliance in an upright position only.
- Always place the appliance on even and hard and level surface.
- When positioning the portable freezer, ensure that there is at least a 6” clearance at the sides of the portable freezer. This will allow for adequate ventilation of heat from the back of the freezer
- Close the freezer lid immediately after putting in any items to maintain the internal temperature of the unit
- Avoid placing the freezer near external heat sources or direct sunlight
- Do not expose this appliance to rain or excessive moisture
- Make sure the freezer is placed on a flat, level, and solid surface.
- Place your appliance on a hard and level floor that is strong enough to support it when it is fully loaded.
- Do not turn the portable freezer upside down, on its side, or 45° or more off level.
- Do not move this portable freezer without securing the lid in a closed and latched position
- Performance may vary based on operational and ambient conditions
ELECTRICAL CONNECTION
The appliance should always be plugged into its own individual electrical outlet which has a voltage rating that matches the rating label on the appliance. The cord should be secured behind the appliance and not left exposed or dangling to prevent accidental injury. This provides the best performance and also prevent overloading house wiring circuits that could cause a fire hazard from overheated. Never unplug the appliance by pulling the power cord. Always grip the plug firmly and pull straight out from the receptacle. Repair or replace immediately all power
cords that have become frayed or otherwise damaged. Do not use a cord that shows cracks or abrasion damage along its length or at either end. When moving the appliance, be careful not to damage the power cord.
EXTENSION CORD
Because of potential safety hazards, it is strongly recommended that you do not use an extension cord with this appliance. However, if you must use an extension cord, it is absolutely necessary that it be a UL/CUL-Listed, 3- wire grounding type appliance extension cord having a grounding type plug and outlet and that the electrical rating of the cord be 15 amperes and 115 volts. Failure to follow these instructions can result in fire, electric shock, or death.
THE MANUFACTURER DISCLAIMS ANY RESPONSIBILITY IF THE ABOVE INSTRUCTIONS ARE NOT FOLLOWED.
Parts and Accessories
Your Whynter portable freezer is supplied with all the accessories you need to enjoy refrigeration almost anywhere.
Below is an image of the freezer features and standard accessories.
Additional protection and insulation can be provided for your Whynter portable freezer with a Whynter insulated flexible transit bag. The transit bag comes custom tailored with openings for your freezer’s handle grips, air vents, and power cords to allow operation with the bag in place.
The transit bag also comes with a fast open top flap for quick and easy access to the freezer compartment. A convenient side pocket also allows you to tote any cords and accessories with
the bag.
If you are interested in purchasing optional accessories, please contact [email protected] for retail sales information.

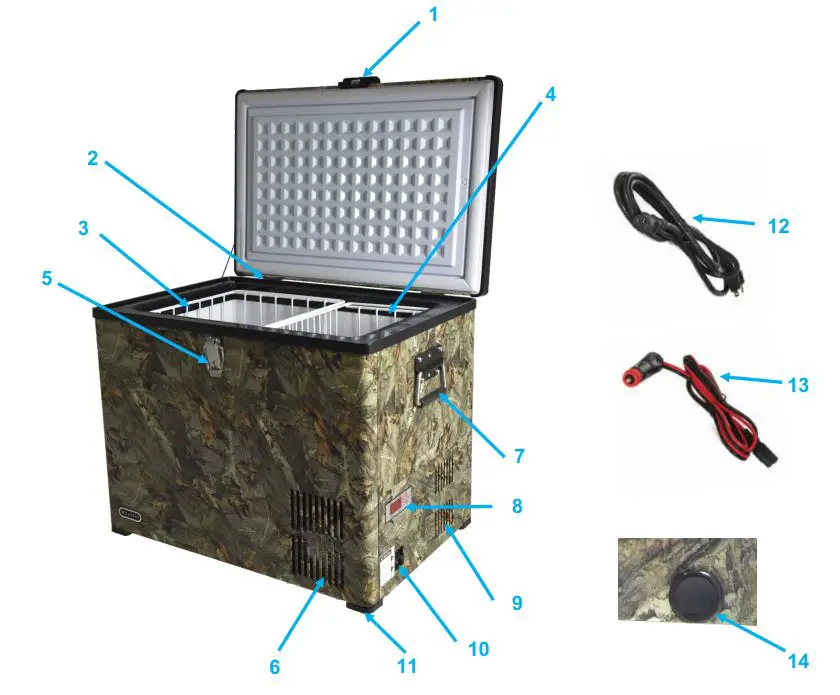
Product Features / Technical Data
Wrapped with the industry’s leading camouflage pattern, Woodland Camo, this Whynter Portable Fridge / Freezer offers premium quality and innovative design to your frozen/ refrigerated needs. Making this perfect for any passionate outdoor enthusiast, this freezer is great for RVs, boats, campsites, fishing trips and truly portable so you can take your fridge/freezer anywhere! All you need is either a standard household 110 Volt outlet or a 12 Volt power source, like an automotive battery.
Whether on a day trip or major expedition, you can easily keep your food and beverages chilled, or frozen with this benchtop freezer. The Whynter portable freezers should not to be confused with less effective 12 volt novelty and beverage type “coolers”, the Whynter portable freezer fridge is a true freezer/refrigerator which cools between –8°F to 50°F. A cost effective and mobile solution for your recreational and critical freezing requirements.
- Operates as a refrigerator or freezer
- Compressor Cooling System
- 8′ AC power cord and 10′ DC power cord are included
- “Fast Freeze” mode rapidly cools to -8°F
- LED temperature display
- Open-door warning system
- Power low indicator
- Insulated lid and walls
- 2 removable wire basket (1 Large, 1 Small)
- Side handles for easy mobility
- Functions even when tilted 30°
- Tough and solid outer casing
- ETL approved
TECHNICAL DATA

Installation
BEFORE USING YOUR APPLIANCE
- Remove the exterior and interior packing.
IMPORTANT: Do not remove any permanent instruction labels or the data label on your freezer - To remove any remaining tape or glue, rub the area briskly with your thumb. Tape or glue residue can also be easily removed by rubbing a small amount of liquid dish soap over the adhesive with your fingers. Wipe with warm water and dry.
- Do not use sharp instruments, rubbing alcohol, flammable fluids, or abrasive cleaners to remove tape or glue. These products can damage the surface of your freezer.
- Before connecting the appliance to the power source, let it stand upright for approximately 4 hours. This will reduce the possibility of a malfunction in the cooling system from handling during transportation.
PROPER LOCATION
- The appliance is designed for free standing installation.
- The normal operation of the freezer depends on heat radiation from the condenser. Allow at least 6 inches of space between the back and sides of the appliance, which allows the proper air circulation to cool the compressor and condenser. The air vent at the front of the appliance must never be covered or blocked in any way.
- Do not install the appliance near an oven or other heating source. Direct sunlight may affect the acrylic coating and heat sources may increase electrical consumption. For best performance, do not install the appliance behind a cabinet, door or block the air vents.
- This portable freezer is suitable for vehicle use and outdoor use such as camping.
- Avoid locating the appliance in area that may be exposed to excessive moisture or rain.
MOVEMENT AND INSTALLATION OF YOUR APPLIANCE
- Position the freezer in a dry and well-ventilated place. Keep the freezer away from direct sunlight, heaters, and corrosive gases or chemicals.
- Clean the interior surface with lukewarm water using a soft cloth.
- Place your appliance on a hard and level floor that is strong enough to support it when it is fully loaded.
- We do not recommend installing the appliance on carpet.
- To level your appliance, install fixed legs at the bottom of the appliance if needed.
- When inserting the AC power-cord into the power socket, make sure the power socket is a grounded 115V~AC / 60Hz socket. Also, make sure that the unit’s grounding prong has not being tampered with.
NOTE: When inserting the DC power-cord, make sure the input is a 12V~DC / 24V power source.
TEST RUN
DC INPUT POWER
- When powering your portable freezer with a standard 12 V socket, the unit will not work if socket has a voltage of less than 10.4 V. The unit will restart when the voltage is 11.8V or greater.
- When powering your portable freezer into a standard 24 V socket, the unit will not work if the socket has a voltage of less than 22.5 V. The unit will restart when the voltage is 24.2 V or greater.
Operation and Controls
CONTROL PANEL GUIDE
To obtain the best possible results for your freezer, it is important that you operate it properly. Your portable freezer uses a digital control system for adjusting the thermostat.
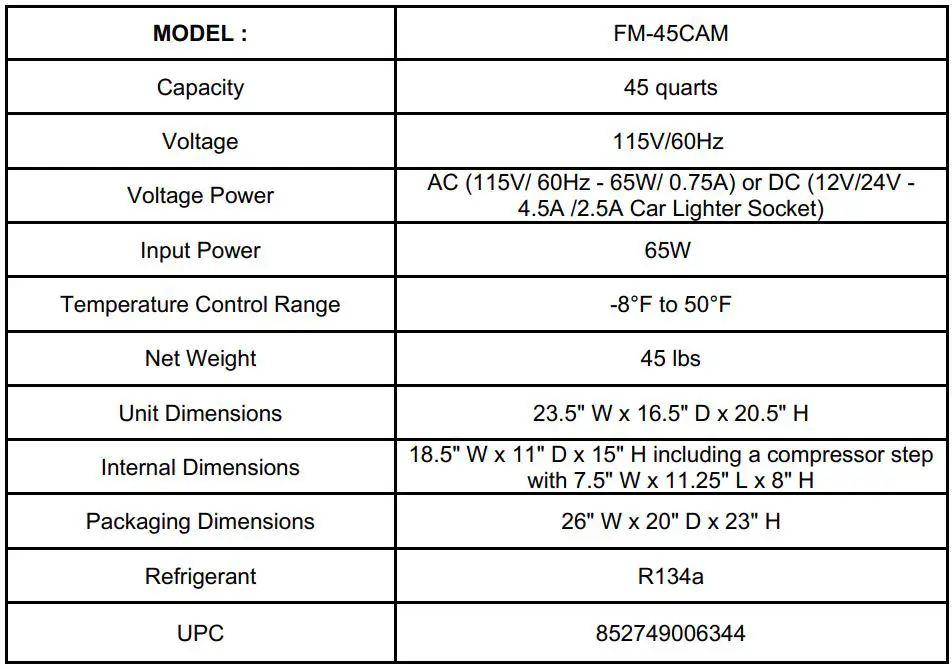
1. Set Button
Press the Set Button to select desired temperature.
Battery cut-out voltage setting:
This function sets the minimum voltage that the unit will run if 12 volt connection is active and DC Cord is plugged in. Press the SET button 3 times to set the Battery cut-out voltage. To select different cut-out voltage (10V/ 10.7V/ 11.8V), press the +/- buttons.
2 – 3. Temperature Control Buttons
The temperature setting can be set within a range of –8°F to 50°F in 1°F increments. Press the Set button and choose your desired temperature setting. For lower temperature setting, press the Down button and set to a lower temperature value. For higher temperature setting, press the Up button and set to a higher temperature value.
Once the desired temperature is set, the temperature display will flash 4 times confirming the chosen temperature and then it will revert back to current temperature setting. The set temperature can be check by pressing the Set Button again.
4. Mode / Power Button
Press the “Mode” button to turn on the portable freezer. To turn off, press the “Mode” button for 5 seconds. When the portable freezer is in operation, press the “Mode” button to select Auto, Low Speed, or Fast Freeze Operation.
5. Auto Mode Indicator Light
The Auto indicator light will illuminate a yellow light when the freezer is running on Auto Mode. In this mode, the unit operates in a fully automatic operation that ensures hassle-free operation while automatically maintaining the set temperature. The temperature can be set between –8°F to 50°F. The portable freezer measures the temperature inside the freezer cabinet and automatically adjusts the appropriate temperature setting for optimal operation.
6. Low Speed Mode Indicator Light
The Low indicator light will illuminate a green light the freezer is running on Low Speed Mode. In this mode, the portable freezer operates at the lowest fan speed while automatically maintaining the set temperature. The temperature can be set between –8°F to 50°F. The unit switches to lower activity level, fan speed and compressor operation are reduced and the energy consumption is minimized.
7. Temperature Display
The LED display shows the actual temperature inside the portable freezer. When setting the desired temperature, the LED display shows the set temperature level from –8°F to 50°F.
Fast Freeze Mode When you set the freezer in Fast Freeze mode, the freezer will rapidly cool the unit to -8°F. The freezer will then maintain this temperature. To operate the unit in Fast Freeze mode when the unit is on, press the MODE button until the FF indicator comes on. Note: Do not run the unit on “FF” (fast freeze) for more than four hours, as this might adversely affect the refrigeration system.
8. Voltage Display
If 120 volt connection is active and the AC Cord is plugged in, the LED Display will display “AC” indicator. If 12 volt connection is active and DC Cord is plugged in, the LED Display will display “DC” indicator.
Note: This portable freezer can be plugged in with both AC power and the DC power at the same time. If both AC and DC are plugged in at the same time, then the unit will primarily operate on AC. If the AC power source fails, DC will become primary source of power supply.
9. Battery Display
The battery icon will be displayed only when connected to a DC power source. The battery icon symbolizes the remaining battery source voltage.
NORMAL SOUNDS
Your new freezer may make sounds that are not familiar to you. Hard surfaces like the floor, walls can make the sounds seem louder than they actually are. The following describes the kinds of sounds that might be new to you and what may be making them.
- Ratting noises may come from the flow of the refrigerant or the water line, items stored on top of the freezer can also make noises.
- The surface temperature of the compressor can reach 158 – 194°F when running.
- The high efficiency compressor may make a pulsating or high-pitched sound.
- The noise emitted by the cooling fan on the condenser is a normal function.
- It is normal for the fan in the power supply to run all the time.
- As each cycle ends, you may hear a gurgling sound due to the refrigerant flowing in your freezer.
OPEN-DOOR WARNING SYSTEM
This portable freezer has an open-door warning system feature which alarms if the freezer door is left unopened for more than 1 minute. Close the freezer door to turn the alarm off.
STORING FROZEN FOOD
When using the freezer for the first time or after defrosting, turn the temperature setting to set “-8°F ” for at least two hours before introducing the food to be stored.
- All frozen food products purchased should be placed in the freezer as soon as possible to avoid the frozen food from defrosting.
- Storage recommendation printed on the packaging of frozen food by the manufacturers should be always be followed.
FREEZING FRESH FOOD
Ensure that your freezing operations are carried out under the most hygienic conditions as freezing alone does not sterilize the food.
- It is advisable to freeze the food by packing it into separate meal portions and not in bulk form. Never put hot or warm food stuffs into the freezer.
- Prior to storing the frozen food, pack it in plastic bags, aluminum sheets or freezing containers and place into the freezer.
- Fresh foods should not be stored together with frozen foods.
- When the temperature is set below 32°F, do not keep glass-bottled drinks such as beer and lemonade or soda cans, as the glass and cans might shatter.
- Do not use this portable freezer as a refrigerator when the ambient temperature is 41°F as food can become frozen.
Note: For best performance, leave enough space inside the freezer compartment for air to circulate around the packages.
Cleaning and Maintenance
DEFROSTING AND DRAINING
WARNING: Before proceeding with cleaning and maintenance operations, make sure the power line of the unit is disconnected. Do not touch the power cord when your hands are wet. Never unplug the unit by pulling on the plug.
To avoid damaging the freezing compartment wall, never use a sharp or metallic instrument to scrape off frost or separate the frozen food.
Moisture contained in food and air may form a layer of frost inside the unit after a period of use. We highly recommend that the unit gets defrosted when frost becomes ¼” thick. The defrosting process for this unit is operated manually.
For complete defrosting:
- Unplug the unit from its power source
- Remove all food and place it in corrugated boxes, insulated bags, picnic cooler, etc. Use towels and newspaper for insulation as needed
- With the door open, use pans of hot water to speed the loosening of the frost. Remove large pieces of before they melt
- Remove the clear drain plug from the inside base cabinet of the freezer. Also, remove the black drain plug from the side of the freezer to drain water.
- Sponge excess water from the bottom of the freezer.
- After defrosting, clean the inside and dry with a soft cloth to wipe away the remaining ice and water.
Once the compartment is wiped and dry, replace the drain plugs and plug in the freezer. Return the temperature value to its previous setting and return food to the freezer.
NOTE: Do not use mechanical devices or other means to accelerate the defrosting process. DO NOT pour hot water directly into compartment or heat with hair dryer while defrosting.
CLEANING
Outside/Exterior
Wipe with a clean cloth lightly dampened with appliance polish wax or mild liquid dishwashing detergent. Dry and polish with a clean, soft cloth. Do not wipe the freezer with a soiled dishwashing cloth or wet towel. Do not use scouring pads, powdered cleaners, bleach, or cleaners containing bleach.
Inside
Use warm water and baking soda solution–about a tablespoon of baking soda to a quart of water. Rinse thoroughly with water and wipe dry. Do not use cleaning powders or other abrasive cleaners. An open box of baking soda in the freezer will absorb stale freezer odors. Change the box every three months.
PROLONGED OFF PERIODS
If the freezer is not to be used for a long period of time, disconnect freezer from main power supply. Clean and dry the inside as instructed. Leave the freezer door open to prevent any mold and mildew growth.
Usage Tips:
- Keep the freezer’s door closed as much as possible. Try not to open the door too frequently, especially when weather is hot and humid
- Ensure that the unit has sufficient clearance for ventilation
- For normal household use, it is recommended to set the thermostat in the middle setting.
- Before loading the freezer with an item, make sure they are cooled to ambient temperature.
- Ice and frost layer increase energy consumption, defrost when frost is 3-5 mm thick.
PREPARING FOR VACATION
To maintain freezer in operation during vacations, be sure your house power is not turned off. For extended vacations or absences, you may prefer to move your frozen foods to a storage locker temporarily. If your freezer is to be left empty, disconnect power cord plug from power source. To prevent formation of odors, place open box of baking soda in freezer and leave freezer door open.
IN CASE OF EXTENDED POWER FAILURE
Keep freezer door/lid closed. Your freezer will keep food frozen for 24 hours provided warm air is not admitted. If freezer is out of operation for 24 hours or more, add dry ice. Leave ice in large pieces. Add more ice as required
NOTE: Handling of dry ice can cause freezing of the hands, gloves or other protection is recommended. If dry ice is not available, move food to a frozen food locker temporarily until power is restored.
ENERGY SAVING TIPS
The freezer should be located in the coolest area of the room, away from heat-producing appliances or heating ducts, and out of direct sunlight. Let hot foods cool to room temperature before placing in the freezer. Overloading the freezer forces the compressor to run longer. Foods that freeze too slowly may lose quality or spoil. Be sure to wrap foods properly, and wipe containers dry before placing them in the freezer. This cuts down on frost buildup inside the freezer
Freezer shelves should not be lined with aluminum foil, wax paper or paper toweling. Liners interfere with cold air circulation, making the freezer less efficient. Organize and label food to reduce door openings and extended searches. Remove as many items as needed at one time, and close the door as soon as possible.
Whynter Portable Freezer Consumption Chart
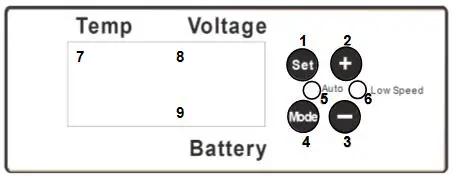
Troubleshooting
Many common portable freezer problems are easily resolved. Try the troubleshooting suggestions below to see if the problems can be resolved before having to contact the service department.
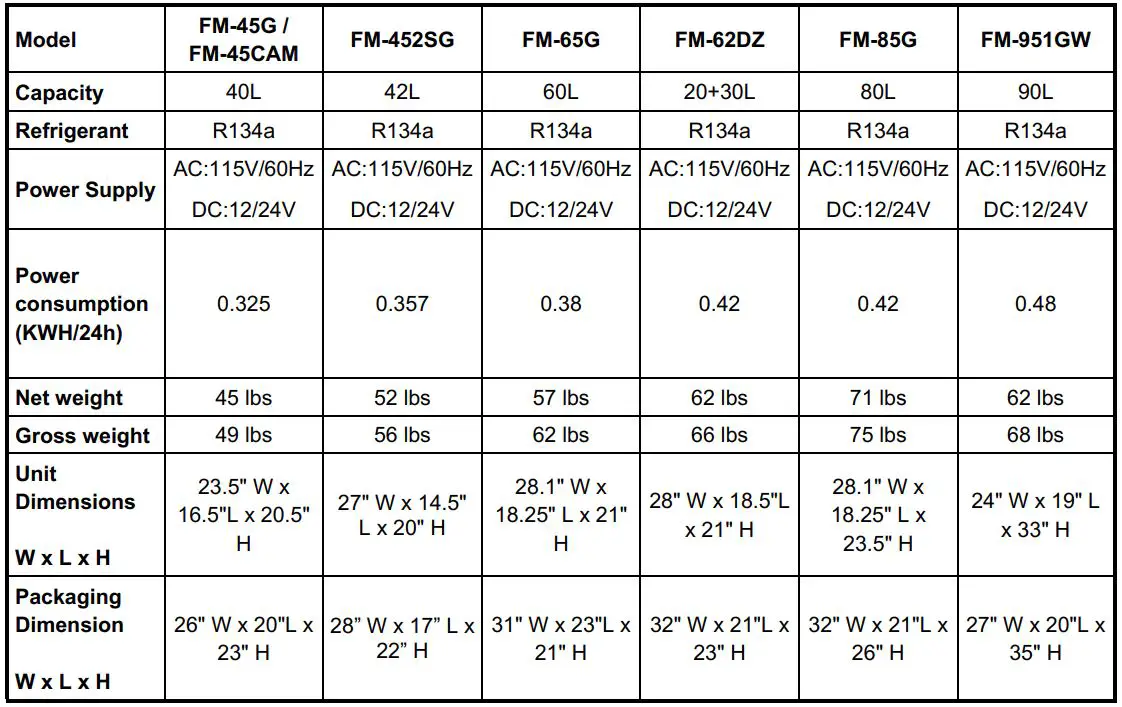
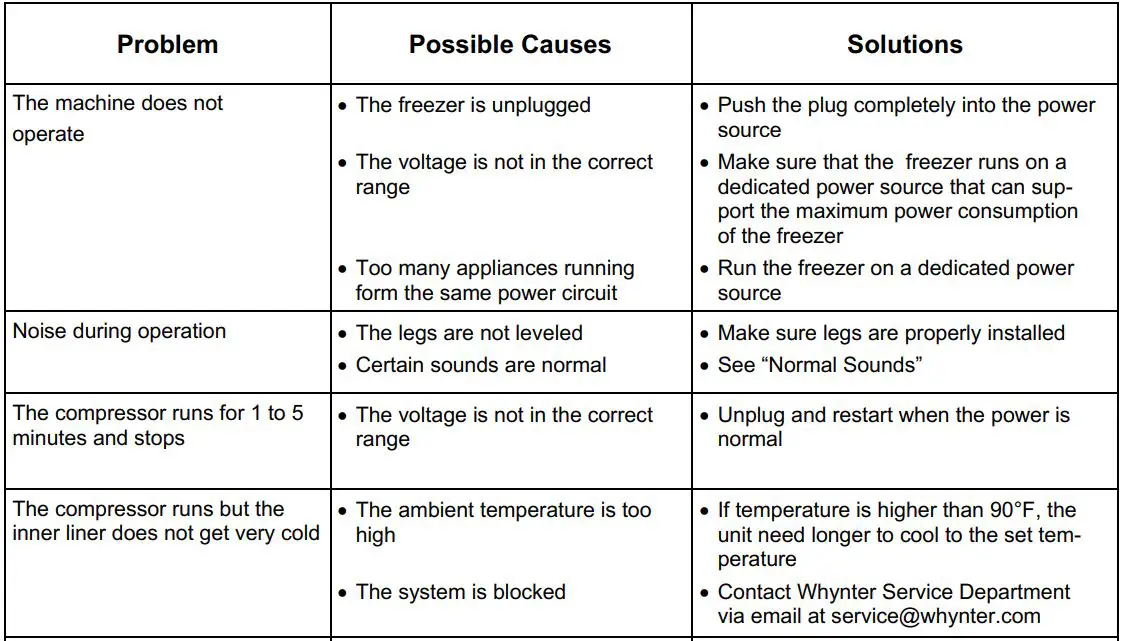
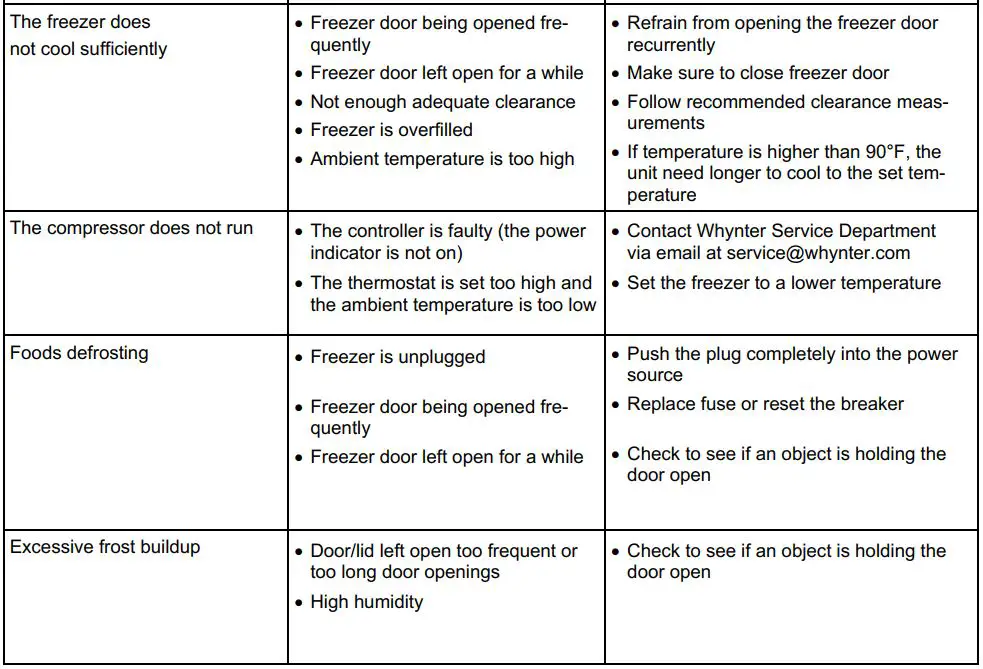
ONE YEAR LIMITED WARRANTY
This Whynter Portable Freezer is warranted, to the original owner within the 48 continental states, for one year from the date of purchase against defects in material and workmanship under normal use and service. When making a warranty claim, please have the original bill or invoice of purchase with purchase date available. Should your Whynter Portable Freezer prove defective within one year from the date of purchase, return the defective part or unit, freight prepaid (within two months of purchase; after two months to one year, customer will be responsible
for freight cost to Whynter’s service department), along with an explanation of the claim to Whynter LLC. A return authorization number issued by Whynter is required for all warranty claims and returns. Please package your Whynter Portable Freezer carefully in its original packaging material to avoid damage in transit. The original box and packaging material should be retained, as Whynter is not responsible for the cost of replacement packaging. Under this warranty, Whynter will repair or replace any parts found defective at our discretion. This
warranty is not transferable. After the expiration of the warranty, the cost of labor and parts will be the responsibility of the original owner of the unit.
THIS WARRANTY DOES NOT COVER:
- Acts of God, such as fire, flood, hurricanes, earthquakes and tornadoes.
- Improper power supply such as power surge, low voltage, defective household wiring or inadequate fuses.
- Use in commercial or industrial applications
- Damage, accidental or otherwise, to the Whynter Portable Freezer while in the possession of a consumer not caused by a defect in material or workmanship;
- Damage caused by consumer misuse, tampering, or failure to follow the care and special handling provisions in the instructions.
- Damage to the finish of the case, or other appearance parts caused by wear.
- Damage caused by repairs or alterations to the product by anyone other than authorized by the manufacturer.
- Removal, Replacement Packaging, Freight and Insurance cost for the warranty service.
DISCLAIMER OF IMPLIED WARRANTIES; LIMITATION OF REMEDIES CUSTOMER’S SOLE AND EXCLUSIVE REMEDY UNDER THIS LIMITED WARRANTY SHALL BE PRODUCT REPAIR OR REPLACEMENT AS PROVIDED HEREIN. CLAIMS BASED ON IMPLIED WARRANTIES, INCLUDING WARRANTIES OF MERCHANTABILITY OR FITNESS FOR A PARTICULAR PURPOSE, ARE LIMITED TO ONE YEAR OR THE SHORTEST PERIOD ALLOWED BY LAW, BUT NOT LESS THAN ONE YEAR. WHYNTER SHALL NOT BE LIABLE FOR CONSEQUENTIAL OR INCIDENTAL DAMAGES SUCH AS PROPERTY DAMAGE AND INCIDENTAL EXPENSES RESULTING FROM ANY BREACH OF THIS WRITTEN LIMITED WARRANTY OR ANY IMPLIED WARRANTY. SOME STATES AND PROVINCES DO NOT AL-LOW THE EXCLUSION OR LIMITATION OF INCIDENTAL OR CONSEQUENTIAL DAMAGES, OR LIMITATIONS ON THE DURATION OF IMPLIED WARRANTIES, SO THESE LIMITATIONS OR EXCLUSIONS MAY NOT APPLY TO YOU. THIS WRIT-TEN WARRANTY GIVES YOU SPECIFIC LEGAL RIGHTS. YOU MAY ALSO HAVE OTHER RIGHTS THAT VARY FROM STATE TO STATE.
Please retain the original proof of purchase in order to obtain warranty services. Warranty begins from the original date of purchase.
To obtain service or information, contact
Whynter LLC via email at [email protected] or call 866-WHYNTER.
Product contents and specifications may change without notice.
Copyright © 2019 Whynter LLC
WWW.WHYNTER.COM

Whynter Portable Tool Box Refrigerator with 2 Drawers and Lock
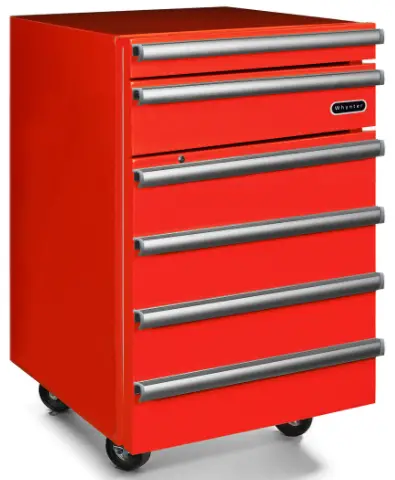
Congratulations on your new Whynter product. To ensure proper operation, please read this Instruction Manual carefully before using this product. Keep this manual in a safe place for future reference.
Safety Precautions
WARNING
TO REDUCE THE RISK OF FIRE, ELECTRICAL SHOCK, OR INJURY WHEN USING YOUR TOOL BOX REFRIGERATOR, FOLLOW THESE BASIC PRECAUTIONS.
- Read all instructions before using the appliance.
- Never clean appliance parts with flammable fluids. The fumes can create a fire hazard. Do not use an exces-sively wet cloth, industrial solvents, and oil-based products to clean this appliance.
- To clean the Tool Box Refrigerator, use only mild detergents. Never use harsh chemicals or solvents.
- Do not store or use gasoline or any other flammable vapors and liquids in the vicinity of this or any other appliance. The fumes can create a fire hazard.
- Do not abuse, sit on, or stand on the appliance.
- This appliance is not intended for use by persons (including children with reduced physical, sensory or mental capabilities, or lack of experience and knowledge, unless they have been given supervision or instruction concerning use of the appliance by a person responsible for their safety
- Children should be supervised to ensure that they do not play with the appliance.
- Ensure the Tool Box Refrigerator is unplugged before cleaning or if not in use.
- If the power cord is damaged, it must be replaced by the manufacturer or its service agent or a similarly qualified person in order to avoid a hazard.
- Use the Tool Box Refrigerator only for its intended function. This appliance is designed for household ,non-commercial use only. Any other use will void the warranty.
- Do not plug this Tool Box Refrigerator into the power source before setup is completed.
- An empty Tool Box Refrigerator can be dangerous for children and small animals. If disposing of the Tool Box Refrigerator, remove gaskets, latches, and the entire refrigerator door from your unused appliance so that children or small animals cannot be trapped inside.
- The Tool Box Refrigerator is an electrical appliance. To avoid serious injury from electrical shock, do not operate the Tool Box Refrigerator with wet hands, while standing on a wet surface, or while standing in water.
- To avoid the risk of shock, the product should never be used in bathrooms, shower rooms, or in any other steamy or wet areas.
- During installation, the power supply must not be excessively or dangerously bent or flattened.
- Do not tamper with controls.
- Make sure the power cord is placed fully and firm into the power source. If the wall receptacle you intend to use is not adequately grounded or protected by a time delay fuse or circuit breaker, have a qualified electrician install an outlet that is appropriate to local electrical codes and requirements.
- Do not use multiple socket or an extension cord as it may overheat and become a risk of fire. Please ensure that the Tool Box Refrigerator is plugged directly into the electrical outlet.
- The cord should be secured behind the unit and should not be left exposed or dangling
- Make sure the power cord is clean before usage.
- Make sure hands are dry when connecting the power cord. The appliance is equipped with a three-prong grounded plug on the power cord for your protection. Never modify, remove or attempt to repair the power cord yourself.
- Never pull the power cord to disconnect the unit from an outlet. Grasp the plug directly and pull it from the outlet.
- Never lift or carry the Tool Box Refrigerator by the power cord.
- Keep the power cord away from heated surfaces.
- Do not repair, disassemble and/or modify the appliance by yourself.
- Always turn off the appliance when cleaning or transporting.
WARNING:
- Transport the appliance in an upright position only.
- Always place the appliance on even and hard and level surface.
- Close the tool box refrigerator door immediately after putting in any items to maintain the internal temperatureof the unit.
- Avoid placing the tool box refrigerator near external heat sources or direct sunlight.
- Make sure the tool box refrigerator is placed on a flat, level, and solid surface.
- Place your appliance on a hard and level floor that is strong enough to support it when it is fully loaded.
- Do not turn the tool box refrigerator upside down, on its side, or 45° or more off level.
- Keep fingers out of the “pinch point” areas; clearances between the door and compartment are necessarily small. Be careful closing drawers and door when children are in the area.
- Do not touch the cold surfaces in the tool box refrigerator compartment when hands are damp or wet, skin may stick to these extremely cold surfaces .
- Do not move this tool box refrigerator without securing the door in a closed and latched position.
- Do not drill holes or install other objects on the casing.
- This tool box refrigerator is not suitable for storage of pharmaceutical products.
- Performance may vary based on operational and ambient conditions.
ELECTRICAL CONNECTION
The power cord of this appliance is equipped with a 3-prong (grounding) plug which mates with a standard 3- prong (grounding) wall outlet to minimize the possibility of electric shock hazard from this appliance. Have the wall outlet and circuit checked by a qualified electrician to make sure the outlet is properly grounded. Where a standard 2-prong wall outlet is encountered, it is your personal responsibility and obligation to have it replaced with a properly grounded 3-prong wall outlet. Do not use an adapter. The refrigerator should always be plugged into its own individual electrical outlet which has a voltage rating that matches the rating plate. A 115 Volt AC, 60 Hz, 15- or 20-amp fused, grounded electrical supply is required. This provides the best performance and also prevents overloading house wiring circuits which could cause a fire hazard from overheated wires. Never unplug your refrigerator by pulling on the power cord. Always grip plug firmly and pull straight out from the outlet. Repair or replace immediately all power cords that have become frayed or otherwise damaged. Do not use a cord that shows cracks or abrasion damage along its length or at either end. When moving the refrigerator away from the wall, be careful not to roll over or damage the power cord.
EXTENSION CORD
Because of potential safety hazards, it is strongly recommended that you do not use an extension cord with this appliance. However, if you must use an extension cord, it is absolutely necessary that it be a UL/CUL-Listed, 3- wire grounding type appliance extension cord having a grounding type plug and outlet and that the electrical rating of the cord be 15 amperes and 115 volts. Failure to follow these instructions can result in fire, electric shock, or death.
THE MANUFACTURER DISCLAIMS ANY RESPONSIBILITY IF THE ABOVE INSTRUCTIONS ARE NOT FOLLOWED.
Caution: Risk of fire / Flammable materials
The main plug of the unit must feature an earthing contact. Do not introduce plug into a socket without effective earthing (if in doubt, please consult a certified technician).
- Do not remove any protective features.
- Never work on the refrigerator with a hose or high pressure cleaner. All maintenance work must be carried out by a certified technician.
- Disassembly must be carried out by certified technician. Keep the ventilation holes in the cabinet free from obstructions.
- Do not use any mechanical or other tool different from the ones recommended by the manufacturer, in order to speed up the defrosting.
- Keep clear of obstruction all ventilation openings in the appliance enclosure.
- Do not use mechanical devices or other means to accelerate the defrosting process, other than those recommended by the manufacturer.
- Do not damage the circuit of the refrigerant fluid.
- Do not use electrical appliances inside the food storage compartments of the appliance, unless they are of the type recommended by the manufacturer.
- Do not use any electrical appliance, apart from the ones recommended by the manufacturer, inside the freezing compartment.
- Keep enough space in order to easily reach the main plug. If the power cable is damaged, it must be replaced by the manufacturer or by its after sales service, or in any case by a person with similar title, to prevent any possible risk.
- Do not damage the refrigerant circuit.
- Do not puncture refrigerant tubing.
Parts and Accessories
- Small Drawer
- Large Drawer
- Door Lock Latch
- Internal Light
- Slide-Out RefrigeratorWire Shelf (1)
- Wheel casters with lock(2)
- Refrigerator Door
- Lock Key Hole
- Refrigerator Handle Bars (4)
- Wheel casters (2)
- Temperature Control Knob / Light Switch(Rear)
- Compressor (Rear)
- Door Keys.
Product Features / Technical Data
Ideal for any small space where cold storage is needed, the Whynter Portable 1.8 cu.ft. Tool Box Refrigerator with 2 Drawers and Lock can also be used in the kitchen, offices, garages or basements. This space-saving Tool Box Refrigerator is designed with a flush back, allowing it to fit cleanly against the wall or into corners. This freezer features a stainless steel trimmed glass door, adjustable temperature control, and a lock for securing the contents.
- Powder coated red with a Full Steel Exterior
- Powerful compressor cooling
- 2 Roller Guided Metal Drawers – for storing a wide variety of home tools and hardware.
- Mechanical temperature control with temperature range from high 30ºF to mid 60ºF
- Wheel Rollers – lets you easily transport or move your tool box refrigerator whenever the need arises
- Soft interior LED lighting with on/off switch
- Inside cabinet drain
- Door lock and two keys
- Freestanding setup (clearance around the unit is needed).
T E C H N I C A L D A T A
| MODEL : | TBR-185SR |
| Storage Volume | 1.8 cu. ft. |
| Temperature Control Range | high 30ºF – mid 60ºF |
| Net Weight | 81.59 lbs |
| Gross Weight | 99.23 lbs |
| Unit Dimensions | 16.93” W x 20.75” D x 31.61” H |
| Packaging Dimensions | 20.47” W x 24.3” D x 33.8” H |
| Refrigerant | R600a |
| Estimated Yearly Electricity Use | 237kWh |
| Noise Level | 39 dB |
| UPC | 852749006733 |
Installation
REMOVE PACKAGING MATERIALS
IMPORTANT: Do not remove any permanent instruction labels or the data label on your tool box refrigerator.
REMOVE TAPE AND GLUE FROM YOUR TOOL BOX REFRIGERATOR BEFORE USING
- To remove any remaining tape or glue, rub the area briskly with your thumb. Tape or glue residue can also be easily removed by rubbing a small amount of liquid dish soap over the adhesive with your fingers. Wipe with warm water and dry.
- Do not use sharp instruments, rubbing alcohol, flammable fluids, or abrasive cleaners to remove tape or glue inside the refrigerator compartment. These products can damage the inside surface.
CLEANING BEFORE USE
After you remove all of the packaging materials, clean the inside of your tool box refrigerator before using it.
INSTALLATION CLEARANCES
Your tool box refrigerator should be conveniently located for day-to-day use in a dry, well-ventilated room. Do not install the tool box refrigerator where the temperature will go below 50°F or above 90°F, because it will not maintain proper temperatures. Be sure to install your tool box refrigerator on a floor strong enough to support it when it is fully loaded.
FREESTANDING INSTALLATION
A freestanding installation will allow you to install the tool box refrigerator in any place you desire provided that the required clearance space around the appliance is respected. In every setting, there must be adequate ventilation and access for service. Never install or operate the unit in an enclosed area, such as a closed cabinet.
- Before connecting the tool box refrigerator to the power source, let it stand upright for approximately 4 hours. This will reduce the possibility of a malfunction in the cooling system from handling during transportation.
- The normal operation of the tool box refrigerator depends on heat radiation from the condenser. Allow at least 6 inches of space between the back and sides of the appliance, which allows the proper air circulation to cool the compressor and condenser. The installation should allow the tool box refrigerator to be pulled forward for servicing if necessary.
- This unit MUST be installed in an area protected from the elements, e.g., wind, rain, water spray or drips. Do NOT use in an outdoor setting.
- The tool box refrigerator should not be located next to ovens, grills or other high heat resources.
- Too much humidity in the air will cause frost to form quickly on the evaporator requiring more frequent de- frosting of the tool box refrigerator.
- Avoid locating the appliance in area that may be exposed to excessive moisture.
- The tool box refrigerator must be installed with all electrical requirements followed.
- The unit should be located on a hard and level surface that can support the unit when it is full. It is important for the tool box refrigerator to be level in order to work properly.
Excessive Weight Hazard
Two or more people should move and install tool box refrigerator. Failure to do so can result in back or other injury. - A standard electrical supply (115 VAC only, 60 Hz, 10A), properly grounded in accordance with National Electrical Code and local codes and ordinances is required.
- IMPORTANT: Do not kink or pinch the power supply cord between the tool box refrigerator and wall or compartment.
MOVEMENT OF YOUR APPLIANCE
- Position the tool box refrigerator in a dry and well-ventilated place. Keep the tool box refrigerator away from direct sunlight, heaters, and corrosive gases or chemicals.
- Clean the interior surface with lukewarm water using a soft cloth.
- Place your appliance on a hard and level floor that is strong enough to support it when it is fully loaded.
- The tool box refrigerator can be simply moved from one room to another by using the pre-installed wheel rollers.
- If the appliance is needed to be lifted, two or more people should move tool box refrigerator. Failure to do so can result in back or other injury.
- We do not recommend installing the appliance on carpet.
Operation and Controls
TEMPERATURE CONTROL BOX
To obtain the best possible results for your tool box refrigerator, it is important that you operate it properly. Your tool box refrigerator uses a mechanical thermostat control knob which can be located at the back side of the refrigerator. This tool box refrigerator operates within a temperature range from high 30ºF – mid 60ºF The temperature control knob is marked with the settings OFF-COLD-COLDEST in order of increasing coldness. When the unit is set to “OFF”, the refrigerator stops running.
NOTE:
- Give your refrigerator time to cool down completely. It is best to wait for 24 hours before adding items.
- This refrigerator is not designed for use as a freezer. The temperature range for this tool box refrigerator is optimized for beverage storage. Perishable items may require a different storage environment.
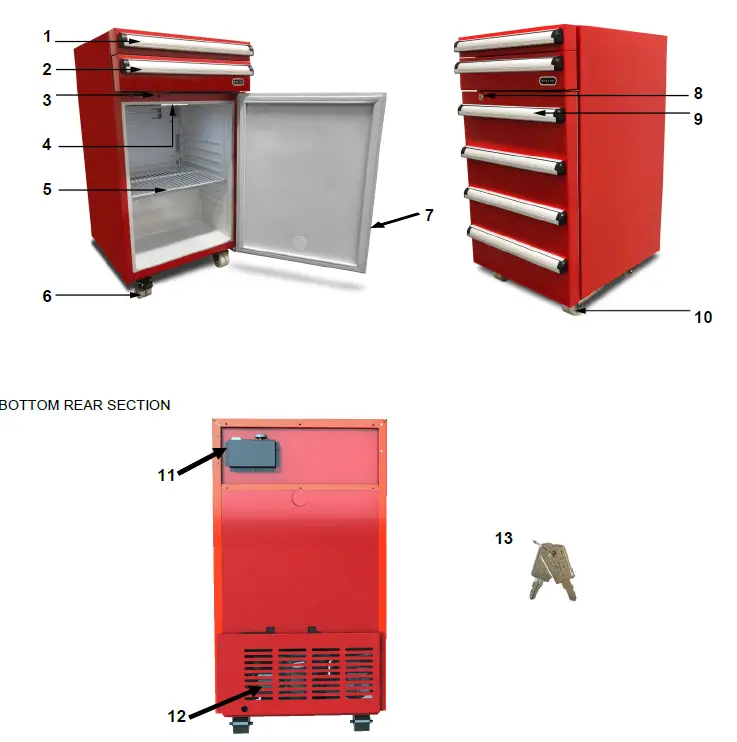
INTERIOR LIGHT
To turn on/off the interior light, flip the switch next to the thermostat control knob. Please note that the interior light can only be controlled by this switch but not the opening and closing of the door.
CYLINDER LOCK
This tool box refrigerator is equipped with a lock to keep your beverages safe and secure. Please note that only the large roller tool drawer and refrigerator cabinet will be secured when the lock is used.
FRESH FOOD STORAGE
- Wrap or store food in the refrigerator in airtight and moisture – proof material. This prevents food odor and taste transfer throughout refrigerator.
- Fruit – wash, dry and store in refrigerator in plastic bags or crisper.
- Leafy vegetables- remove wrapping and trim or tear off bruised and discolored areas then wash in cold water and drain. Place in plastic bag or plastic container and store in crisper.
- Fish – use fresh fish the same day as purchased.
- Meat – store most meat in original wrapping as long as it is airtight and moisture – proof. Re-wrap if necessary.
- Leftovers – cover leftovers with plastic wrap or aluminum foil. Plastic containers with tight-seal lid can also be used.
NOTE: - For best performance, leave enough space in the refrigerator compartment for air to circulate around the packages. Also let enough room at the front so the door can close tightly.
DEFROSTING
Under most ambient conditions, the appliance does not need to be defrosted. In cold ambient temperatures and/or high humidity, some frost may build up. To defrost the appliance, set the thermostat dial to “OFF”, remove frozen or perishable items and defrosting should occur in a few hours. After defrosting, return the thermostat dial to the desired position. For faster defrosting, remove all items from the appliance, unplug the appliance and leave the door open. Never use a knife or other metal instrument to scrape ice/frost from the evaporator.
NORMAL SOUNDS:
The unit is cooled by a compressor. The compressor pumps coolant through the cooling system, producing operating noise. Even when the compressor cuts out, noises caused by changes in temperature and pressure are unavoidable. Operating noise will be most audible immediately after the compressor comes on. It becomes quieter as the operating period continues.
The following noises are normal and occur from time to time:
- Gurgling sound, caused by the refrigerant flowing through the appliance’s coils
- Humming noise made by the compressor. This noise can get louder for brief periods when the motor is switching on.
- Cracking/popping sounds, resulting from the materials contraction and expansion due to temperature variations.
- Fan operating sound, to circulate the air within the refrigerator compartment.
- Unusual noise is normally the result of improper installation.
- Where the unit is installed in open-plan kitchen or in partition walls, the level of operating noise will be heard more acutely. However, this is due to the surrounding architecture and not to the unit.
NOTE: An individual’s perception of noise is directly linked to the environment in which the unit is located, as well the specific type of models. Our appliances are in line with international standards for such appliance and in line with the latest technical developments. Please remember that the noise of the compressor and the coolant circulating in the system is unavoidable.
Cleaning and Maintenance
CLEANING
Outside/Exterior
- Wipe with a clean cloth lightly dampened with appliance polish wax or mild liquid dishwashing detergent. Dry and polish with a clean, soft cloth.
- Do not wipe the tool box refrigerator with a soiled dishwashing cloth or wet towel. Do not use scouring pads, powdered cleaners, bleach, or cleaners containing bleach.
Inside - Turn off the power, unplug the appliance, and remove all items including shelves.
- Use warm water and baking soda solution–about a tablespoon of baking soda to a quart of water. Rinse thoroughly with water and wipe dry.
- Do not use cleaning powders or other abrasive cleaners. An open box of baking soda in the tool box re- frigerator will absorb stale tool box refrigerator odors. Change the box every three months.
- An open box of baking soda in the tool box refrigerator will absorb stale tool box refrigerator odors. Change the box every three months.
CHANGING THE LIGHT BULBS
To change the light bulb, make sure to unplug tool box refrigerator or disconnect unit from power supply be- fore removing the bulb. Replace the bulb with an 8-watt LED bulb. Please note that not all bulbs will fit your tool box refrigerator. Be sure to replace the bulb with one of the same size and shape. Plug in the tool box refrigerator or reconnect tool box refrigerator to power supply after bulb replacement.
PREPARING FOR STORAGE
If the tool box refrigerator will not be used for a long time, or is to be moved to another place, it will be necessary to defrost the unit and dry the interior.
Disconnect the tool box refrigerator from the power supply by removing the power plug from the wall socket.
WARNING: Do not touch the power plug when your hands are wet. Never unplug the unit by pulling the cord. Leave the door open to allow air circulation and mold prevention, mildew and unpleasant smells.
CAUTION: Store the unit out of the reach of children. If you have children, you may want to take additional precautions such as locking the beverage refrigerator door.
VACATION TIME
- Short vacations: Leave the appliance operating during vacations of less than two days.
- Long vacations: If the appliance will not be used for an extended period, remove all items and turn off the appliance. Clean and dry the interior thoroughly.
MOVING YOUR APPLIANCE
- Remove all items inside the appliance.
- Securely tape down (we recommend using painter’s tape) all loose items (shelves) inside your appliance.
- Turn the adjustable leg up to the base to avoid damage.
- Tape (we recommend using painter’s tape) the door shut.
- Be sure the appliance stays secure in the upright position during transportation and protect the exterior of appliance with a blanket, or similar item.
ENERGY SAVING TIPS
- The appliance should be located in the coolest area of the room, away from heat-producing appliances or heating ducts, and out of any direct sunlight.
- Ensure that the appliance is adequately ventilated. Never obstruct the air vents.
- Close the door tightly and do not open the appliance too frequently or for a long period of time.
- Store the content in an organized way.
- Do not over-fill the appliance to allow air to circulate.
Troubleshooting
Many common tool box refrigerator problems are easily resolved. Try the troubleshooting suggestions below to see if the problems can be resolved before having to contact the service department.
| Problem | Possible Causes | Solutions |
| The machine won’t operate | · The tool box refrigerator is un- plugged
· The voltage is not in the correct range · Too many appliances running form the same power circuit |
· Push the plug completely into the power source
· Make sure that the tool box refrigerator runs on a dedicated power source that can support the maximum power consumption of the tool box re- frigerator · Run the tool box refrigerator on a dedicated pow- er source |
| Noise during operation | · Unit is not on a leveled surface
· Certain sounds are normal |
· Make sure unit is placed in a leveled surface
· See “Normal Sounds” |
| The compressor runs for 1 to 5 minutes and stops | · The voltage is not in the correct range | · Unplug and restart when the power is normal |
| The compressor runs but the inner liner does not get very cold | · The ambient temperature is too high
· The system is blocked |
· If temperature is higher than 90°F, the unit need longer to cool to the set temperature
· Contact Whynter Service Department via email at [email protected] |
| The tool box refrigera- tor does not cool suffi- ciently | · Tool box refrigerator door being opened frequently
· Tool box refrigerator door left open for a while · Not enough adequate clearance · Tool box refrigerator is overfilled · Ambient temperature is too high |
· Refrain from opening the tool box refrigerator door recurrently
· Make sure to close tool box refrigerator door · Follow recommended clearance measurements · If temperature is higher than 90°F, the unit need longer to cool to the set temperature |
| The compressor does not run | · The controller is faulty (the power indicator is not on)
· The thermostat is set too high and the ambient temperature is too low |
· Contact Whynter Service Department via email at [email protected]
· Set the tool box refrigerator to a lower tempera- ture |
| Interior light does not work | · No power at outlet
· tool box refrigerator is unplugged · Light bulb burned out |
· Replace fuse or reset the breaker
· Push the plug completely into the outlet · Replace light bulb |
| Door does not fully close | · Unit is not on a leveled surface
· Stored items holding door open |
· Make sure unit is placed in a leveled surface
· Move stored item to a different location |
| Foods defrosting | · The tool box refrigerator is un- plugged
· Fuse blown · Tool box refrigerator door being opened frequently · Tool box refrigerator door left open for a while |
· Push the plug completely into the power source
· Replace fuse or reset the breaker · Check to see if an object is holding the door open |
| Excessive frost buildup | · Door left open too frequent or too long door openings
· High humidity |
· Check to see if an object is holding the door open
· Open the door less often |
Many common tool box refrigerator problems are easily resolved. Try the troubleshooting suggestions below to see if the problems can be resolved before having to contact the service department.
| Problem | Possible Causes | Solutions |
| Tool box refrigerator external surface is
warm |
· The external tool box refrigera- tor walls can be as much as 30° F warmer than room tempera- ture | · This is normal while the compressor works to trans- fer heat from inside the tool box refrigerator com- partment |
| Moisture forms the tool box refrigerator walls | · Weather is hot and humid, which increases internal rate of frost buildup
· Door may not be closing properly · Door is kept open too long, or is opened too frequently |
· This is normal
· Check door installation · Open the door less often |
| Odors in tool box refrigerator | · Interior needs to be cleaned
· Food with strong odors are in the tool box refrigerator |
· Clean interior with sponge, warm water, and baking soda |
ONE YEAR LIMITED WARRANTY
This Whynter Tool Box Refrigerator is warranted, to the original owner within the 48 continental states, for one year from the date of purchase against defects in material and workmanship under normal use and service. When making a warranty claim, please have the original bill or invoice of purchase with purchase date available. Should your Whynter Tool Box Refrigerator prove defective within one year from the date of purchase, return the defective part or unit, freight prepaid (within two months of purchase; after two months to one year, customer will be responsible for freight cost to Whynter’s service department), along with an explanation of the claim to Whynter LLC. A return authorization number issued by Whynter is required for all warranty claims and returns. Please package your Whynter Tool Box Refrigerator carefully in its original packaging material to avoid damage in trans- it. The original box and packaging material should be retained, as Whynter is not responsible for the cost of replacement packaging. Under this warranty, Whynter will repair or replace any parts found defective at our discretion. This warranty is not transferable. After the expiration of the warranty, the cost of labor and parts will be the responsibility of the original owner of the unit.
THIS WARRANTY DOES NOT COVER:
Acts of God, such as fire, flood, hurricanes, earthquakes and tornadoes.
- Improper power supply such as power surge, low voltage, defective household wiring or inadequate fuses.
- Use in commercial or industrial applications
- Damage, accidental or otherwise, to the Whynter Tool Box Refrigerator while in the possession of a consumer not caused by a defect in material or workmanship;
- Damage caused by consumer misuse, tampering, or failure to follow the care and special handling provisions in the instructions.
- Damage to the finish of the case, or other appearance parts caused by wear.
- Damage caused by repairs or alterations to the product by anyone other than authorized by the manufacturer.
- Removal, Replacement Packaging, Freight and Insurance cost for the warranty service.
Please retain the original proof of purchase in order to obtain warranty services. Warranty begins from the original date of purchase.
To obtain service or information, contact Whynter LLC via email at [email protected] or call 866-WHYNTER. Product contents and specifications may change without notice. Copyright © 2018 Whynter LLC WWW.WHYNTER.COM
]]>