INSTALLATION AND CARE GUIDE
FREESTANDING BATHTUB
Compliance with the following codes& standard:
- 2015 Uniform Plumbing Code® ( UPC )
- 2018 International Plumbing Code® ( IPC )
- 2018 International Residential Code® ( IRC )
- CSA B45.5 / IAPM O Z124-2017- Plastic Plumbing Fixtures

![]() READ ALL INSTRUCTIONSBEFORE UNPACKING THE PRODUCT
READ ALL INSTRUCTIONSBEFORE UNPACKING THE PRODUCT
INSTRUCTIONSTHAT, IF IGNORED COULD RESULT IN DEATH OR SERIOUSINJURY CAUSED BY INCORRECT HANDLING OR INSTALLATION OF THE PRODUCT. THESE INSTRUCTIONSM UST BE OBSERVED FOR SAFE INSTALLATION.

2 PEOPLE ARE REQUIRED TO LIFT AND DURING ENTIRE INSTALLATION OF THISPRODUCT
This products must be installed by a fully insured and licensed plumber only. Installation of any our product by anyone other than fully insured and licensed plumber shall void limited warranty. We recommends that such licensed plumber have experience in the installation of products.
Limited warranty is void on any commercial installation We are not responsible for local code compliance for this product. Building and plumbing codes may vary from state-to-state in accordance to your location. We are not resonsible for providing any compliance certifications.
Under no circumstances we are shall not be liable for any and all incidental damages sustained in connection with this product Neither manufacture, nor distributor, nor retailer is responsible for water damage or flood caused due to use of this product. Under no circumstances We shall not be liable for any and all fees, cost of installa on/reinstalla on/removal, subsequent damage or transportation in case of the product defect
Customer Service Phone: 562-229-0088. (Monday – Friday 9 AM – 5 PM Pacific Time) Or Email: [email protected]
TOOLS REQUIRED FOR INSTALLATION (NOT INCLUDED)
OTHER TOOLS MAY BE REQUIRED
 Inspect the bathtub for any damages. If any damage is found please contact your retailer.
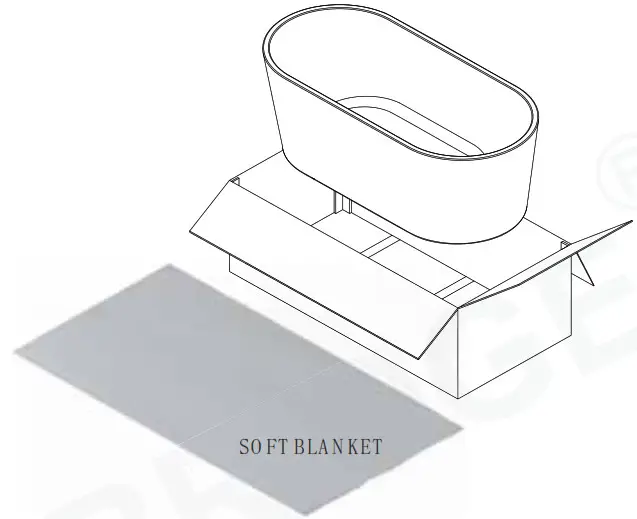
Carefully, remove the tub from it’s crate/box.
Important Note: Bathtub must be carried by a minimum of 2 adult people in upside down posion only. Do not carry the bathtub by its panel.
To avoid scratches or damages to the bathtub be sure to set it on cardboard with so blanket on top of the cardboard.
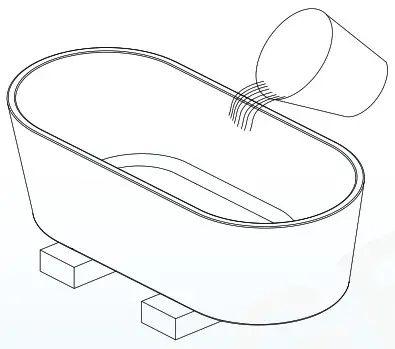
Set your bathtub on two 4×4 pieces of lumber so you can have access from the boom of the bathtub. Put a tray beneath the bathtub.
Very Important! Before proceeding with installation, please check that push pop-up, drain, and integrated overflow are properly sealed and tightened.
Push the pop-up into a close position and fill the bathtub with cold water above the overflow level to test for overflow leakage and drain leakage.
Check for any leaks around the drain and pipe. (NOTE: Due to surface tension, it is normal for a small amount of water to pool around the drain)
If a leakage occurs please disassemble the drain line or overflow assemblies and you can apply a plumbing puy/silicone caulk to fix the leakage.
Once the leakage test was performed you may proceed to the installation.
INSTALLATION WITH UNDERFLOOR ACCESS
- Clean, level, and prepare the floor for installation, Place the tub in the exact installed location on the floor and trace the outline of the bathtub with pencil and mark the drain hole location on the floor. Move the tub away so that the plumbing can be installed.
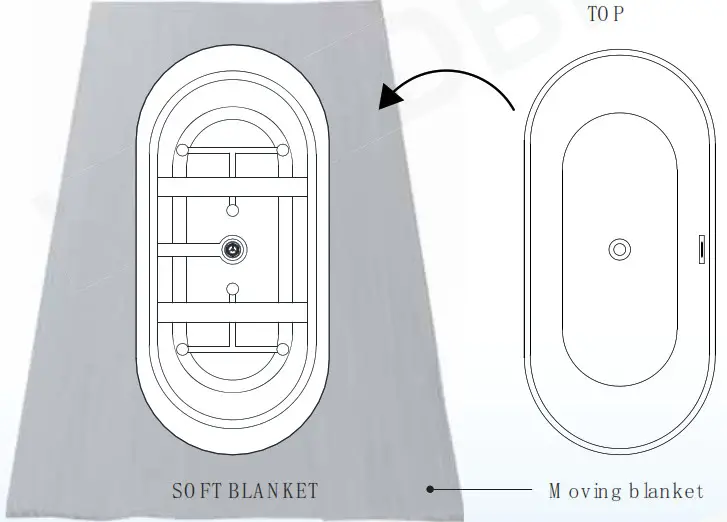
- Turn bathtub upside down and set it on a non-abrasive mat, blanket, or cardboard to prevent any scratches on tub rim.
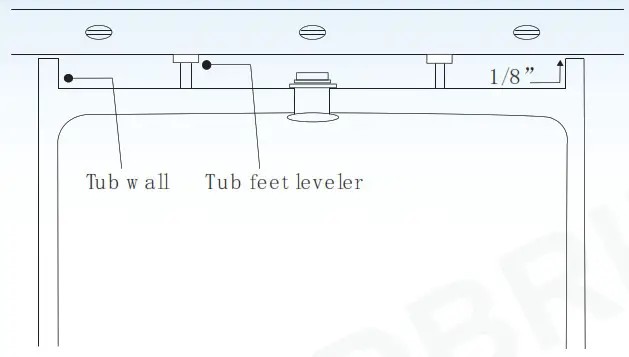
- Place a level across the boom of the tub and adjust the tub feet leveler to touch the level. Then raise the leveler additional 1/8” or 3/16” so that the weight of the tub, water and user are fully supported by the feet adjuster and not the tub walls.
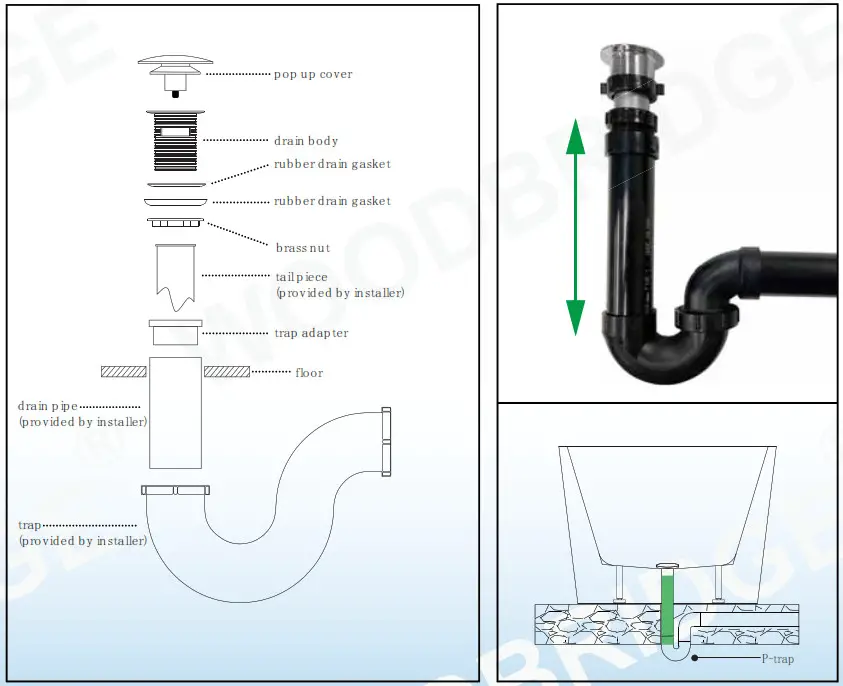
- Install an 1-1/2″ tail piece along with the corresponing flanged washer and 1-1/2″ nut to thedrain body.
- Measure and cut the tail piece to the appropriate length to reach the trap adapter When setting the tub drain, insert tail piece with 1-1/2″ slip joint and rubber washer into the trap adapter and tighten properly.
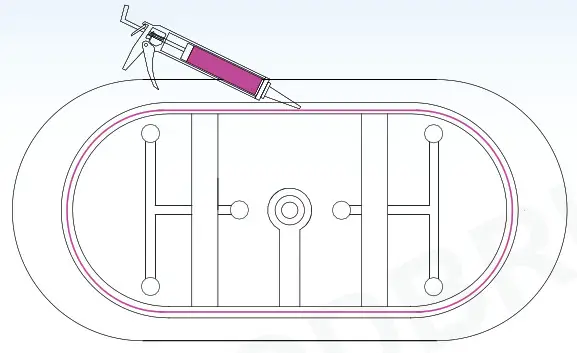
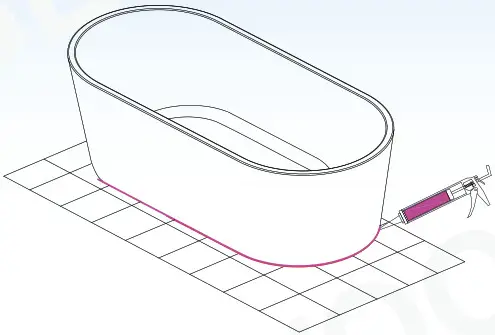
- Apply a generous bead of adhesive or waterproof silicone to the boom of the tub and a bead of tub and tile caulk around the edge of the tub
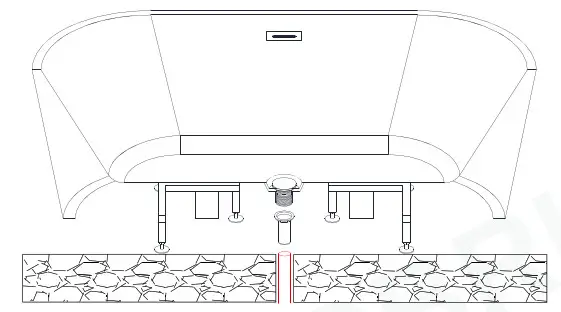
- Flip the tub over and carefully set the tub into posion with tail piece assembly to P-trap and connect to the drain.
- Fill the tub with water to the overflow and then drain the tub while inspecng the waste and overflow connection below the floor for any leaks. Access from below will be necessary for this step.

- With the tub now set in place, wipe off any excess tub or le caulking, adhesive where the tub meets the floor with wet cloth.
- DO NOT SHOWER or MOVE the tub after installation because it will take about 24 hours to get the silicone sealant to dry.
Note:
If installing on a concrete slab where no underfloor access or cannot move drain. You may consider following opon.
- Optional flexible drain hose from plumbing hardware or home improvement store may be used (Woodbridge will not supply this flexible hose). Connect one end attaches to the bathtub drain and the other end needs to be attached to the floor drain by using a transition piece.
- Optional island tub drain may also be used.
- Create a bridge from bathtub drain to floor drain by cerfied plumber only because any mis-joint or loosen on connection will cause leaks.
INSTALLATION ON SLAB FLOOR (NO UNDERFLOOR ACCESS)
- Clean, level and prepare the floor for installation on, Place the tub in the exact installed location on the floor and trace the outline of the bathtub with pencil and mark the drain hole loca on on the floor. Move the tub away so that the plumbing can be installed.
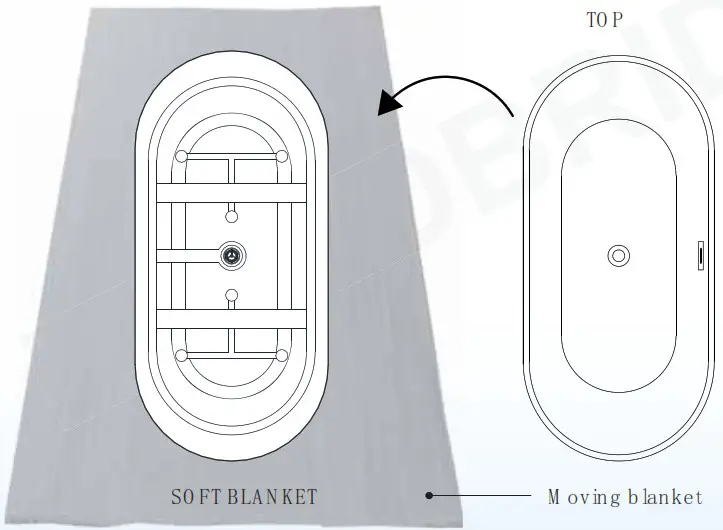
- Turn bathtub upside down and set it on a non-abrasive mat, blanket, or cardboard to prevent any scratches DG IDG on tub rim.
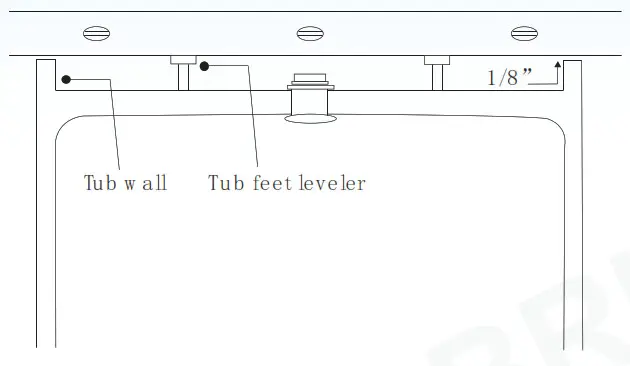
- Place a level across the bottom of the tub and adjust the tub feet leveler to touch the level. Then raise the leveler additional 1/8″ or 3/16″ so that the weight of the tub, water and user are fully supported by the feet adjuster and not the tub walls.
- Measure the actual distance from drain into drain pipe on floor and the drain pipe should extend approximately 1″ above the finish floor. Use a drain adapter (not provided) if necessary.
- Clean the surrounding of the drain pipe with cloth in prepara on of setting the drain, the area should be dry and free of any debris. Apply a bead of clear silicon or plumber putty around the drain body and pass it through the drain hole, also apply plumber putty to the washer and slide it over the bottom of the drain body.
- Install 1 ½” rubber slip gasket over the drain waste vent.
- Apply a generous bead of adhesive or waterproof silicone to the bottom of the tub and caulk around the edge of the tub.
- Flip the tub over and carefully set the tub into position with tail piece assembly to waste vent and connect to the drain.
- With the tub now set in place, wipe off any excess tub or tile caulking, adhesive where the tub meets the floor with wet cloth.
- DO NOT SHOWER or MOVE the tub after installation because it will take about 24 hours to get the silicone to dry.
IMPORTANT SAFETY RULES
ATTENTION! ALWAYS FOLLOW THESE PRECAUTIONS WHEN USING A BATHTUB
![]() Warning The bathtub must be installed and used as described in this manual
Warning The bathtub must be installed and used as described in this manual
![]() Warning Use caution when entering or exiting the bathtub
Warning Use caution when entering or exiting the bathtub
![]() Warning Do not permit children or persons with infirmities to use the bathtub without supervision of an adult
Warning Do not permit children or persons with infirmities to use the bathtub without supervision of an adult
![]() Warning People using any medications or having adverse medical history must consult a physician prior to use of the bathtub to avoid potential hyperthermia and possible drowning
Warning People using any medications or having adverse medical history must consult a physician prior to use of the bathtub to avoid potential hyperthermia and possible drowning
![]() Warning Water temperature over 100ºF may cause hyperthermia and/or other health problems. Check water temperature and adjust it for your personal comfort
Warning Water temperature over 100ºF may cause hyperthermia and/or other health problems. Check water temperature and adjust it for your personal comfort
![]() Warning Never use bathtub while intoxicated, after taking meals or any alcoholic beverages. Consuming alcoholic beverages before or during bathing will cause drowsiness and may result in hyperthermia, loss of consciousness, or even drowning
Warning Never use bathtub while intoxicated, after taking meals or any alcoholic beverages. Consuming alcoholic beverages before or during bathing will cause drowsiness and may result in hyperthermia, loss of consciousness, or even drowning
![]() Warning If you are pregnant or you feel that you are may be pregnant, consult your doctor before using the bathtub
Warning If you are pregnant or you feel that you are may be pregnant, consult your doctor before using the bathtub
![]() Warning Never use any electrical devices such as hair dryer, lamp, telephone, tv, radio, or others within 5 feet of the bathtub
Warning Never use any electrical devices such as hair dryer, lamp, telephone, tv, radio, or others within 5 feet of the bathtub
![]() Warning Do not overfill the bathtub before entering. Entering the bathtub when filled will cause overflow and slippery conditions. Use extreme cau on when entering and exiting
Warning Do not overfill the bathtub before entering. Entering the bathtub when filled will cause overflow and slippery conditions. Use extreme cau on when entering and exiting
Care and Cleaning
- Most dirt will wash off with mild soap and warm water.
- For tough spots, use liquid dish washing soap or non-chlorine bleach.
- Do not use abrasive material such steel wool or scouring pads to clean the acrylic surface.
- Always test the cleaning solution on a small area before using it on the en surface.
- Do not allow cleaning to soak on the acrylic surface.
- Rinse thoroughly with water immediately and wipe dry with so cloth.
Repair and Maintenance
- Use liquid polish compound such as Gel-Gloss Kitchen and Bath Polish(TM) to keep the original shine of acrylic surface.
- Light scratches can be removed with polishing compound for automobiles.
- For deeper scratches use wet sandpaper (1500 grit or higher). Always add water when sanding and lightly sand the area larger than the scratch in a circular motion to remove the scratches. Repeat un l the scratch is removed. Use so cloth and small amount of polishing compound to restore shine. Repeat as needed un l surface shine is restored.
IMPORTANT!
DO NOT USE: Abrasive cleaners such as: acid, ammonia, bleach, and simmilar solutions. Use of such solutions may cause corrosion, finish peeling, and/or dull the surface.
DO NOT USE: Abrasive sponges or cloth. Never use steel, wool, or wired brushes that will permanently scratch the surface.
Retain these installation instructions for future reference!
Please don’t hesitate to contact us if you have any questions or concerns. Customer Service Phone: 562-229-0088. (Monday – Friday 9 AM – 5 PM Pacific Time)
Or Email: [email protected]
www.woodbridgebath.com
WOODBRIDGE B0960S Electronic Bidet Toilet

Compliance with the following codes & standard: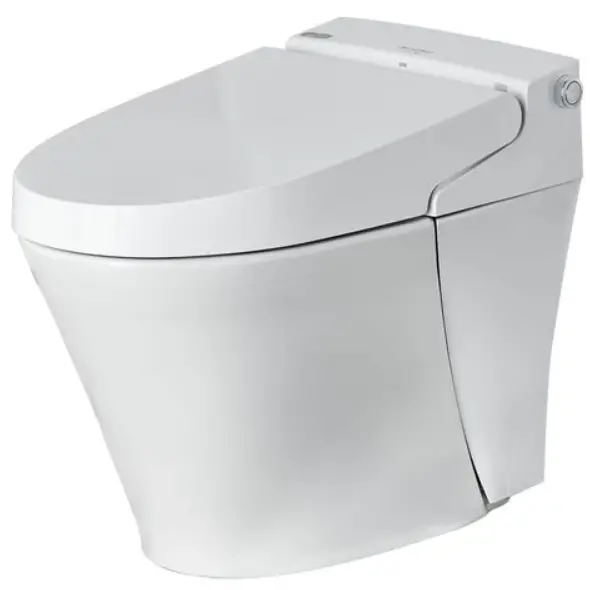
- 2015 Uniform Plumbing Code ( UPC )
- 2018 International Plumbing Code ® ( IPC )
- 2018 International Residential Code ( IPC )
- CSA B45.5 / IAPMO Z124-2017- Plastic Plumbing Fixtures
Customer Service Phone: 562-229-0088. (Monday – Friday 9 AM – 5 PM Pacific Time) Or Email: [email protected]
INSTRUCTIONS THAT, IF IGNORED COULD RESULT IN DEATH OR SERIOUS INJURY CAUSED BY INCORRECT HANDLING OR INSTALLATION OF THE PRODUCT. THESE INSTRUCTIONS MUST BE OBSERVED FOR SAFE INSTALLATION.
2 PEOPLE ARE REQUIRED TO LIFT AND DURING ENTIRE INSTALLATION OF THIS PRODUCT INSTALLATION OF THIS PRODUCTS BY AN INEXPERIENCED INSTALLER MAY RESULT PERSONAL INJURY OR DEATH!
We reserves the right to change, update, modify, alter, redesign this manual/product or its policies without prior notice! We shall not be liable for any injuries or property damages in connection with this product during installation or use of this product!
This products must be installed by a fully insured and licensed plumber only. Installation of any our product by anyone other than fully insured and licensed plumber shall void limited warranty. We recommends that such licensed plumber have experience in the installation of products.
Limited warranty is void on any commercial installation
We are not responsible for local code compliance for this product. Building and plumbing codes may vary from state-to-state in accordance to your location. We are not responsible for providing any compliance certifications.
Under no circumstances we are shall not be liable for any and all incidental damages sustained in connection with this product Neither manufacture, nor distributor, nor retailer is responsible for water damage or flood caused due to use of this product. Under no circumstances We shall not be liable for any and all fees, cost of installation/reinstallation/removal, subsequent damage or transportation in case of the product defect
TOILET COMPONENTS
During unpacking the product and prior to installation inspect your new product for any damages or missing parts. Do not attempt to install or operate the product if the product is damaged. 
TOOLS REQUIRED FOR INSTALLATION
IMPORTANT SAFEGUARDS
When using electrical products, especially when children are present, basic safety precautions shouldalways be followed, including the following:
- The appliance is not to be used by persons (including children) with reduced physical, sensory or
mental capabilities, or lack of experience and knowledge, unless they have been given supervision
or instruction. - Children being supervised not to play with the appliance.
- This appliance can be used by children aged from 8 years and above and persons with reduced physical, sensory or mental capabilities or lack of experience and knowledge if they have been given supervision or instruction concerning use of the appliance in a safe way and understand the hazards involved.
- Children shall not play with the appliance.
- Cleaning and user maintenance shall not be made by children without supervision.
READ ALL INSTRUCTIONS BEFORE USING
DANGER –To reduce the risk of electrocution:
- Do not use while bathing.
- Do not place or store product where it can fall or be pulled into a tub or sink.
- Do not place in or drop into water or other liquid.
- Do not reach for a product that has fallen into water. Unplug immediately.
- Do not wash the main unit or electrical plug with water or detergent.
- Do not handle the electrical plug with wet hands.
- Do not put a hand or other staff over the outlet of air dryer or block the outlet of air dryer.
- Never disassemble,repair or modify this product.
- During installation, disassembly, repaire and maintenance of the product,the power plug must be switched off and water supply be shut off.
WARNING–To reduce the risk of burns, electrocution, fire, or injury to persons.
- Close supervision is necessary when this product is used by, on, or near children or invalids.
- Use this product only for its intended use as described in this manual. Do not use attachments not recommended by the manufacturer.
- Never operate this product if it has a damaged cord or plug, if it is not working properly, if it has been dropped or damaged, or dropped into water. Return the product to a service center for examination and repair.
- Keep the cord away from heated surfaces.
- Never use while sleeping or drowsy.
- Never drop or insert any object into any opening or hose.
- Do not use outdoors or operate where aerosol (spray) products are being used or where oxygen is being administered.
- Connect this product to a properly grounded outlet only. See Grounding Instructions.
- Do not throw cigarettes and other burning stuff into toilet, otherwise it might cause fire.
- This product is electric appliance, so it must be placed far away from water. Please don’t drench urine and other liquid to it.
- Do not lay on side or upside the product during the electrical circuit.
- It is prohibited to use other electric appliances in the same socket.
- It is forbidden to use the power extension or unstable loose outlet.
- The old aging water supply hose can not be used, otherwise it might cause leakage, fire or electrical shock.Installation of the bidet seat should include specified components and new water supply hose.
CAUTION– Indicates that failure to follow the instruction may cause body injury or property damage.
- Do not install or use the product in wet places as steam room etc.This product must be connected to properly grounded power outlet socket.
- It is recommended to use water-proof electrical outlet which should be lnstalled in the place where is not easily got wet.
- This product should be used with AC 110V-120V,50/60Hz electrical current only,load current is at least 15A. P ower plug must be equipped with ground fault circuit interrupter or ground fault electrical leakage protector or similar high sensitive, rapid type leakage switch (Rated sensitive current under 6mA).
- When it thunders,it is strongly recommended to pull out the power plug.
- Do not stand on ceramic toilet.
- Ceramic toilet must install floor fixing bolt.
- Do not stand on product unit,seat and cover.
- Do not lean against the seat cover when using the product,to avoid damage.
- This product is equipped with soft-closing seat cover.Heavy pressing or pushing may damage the soft-closing damper.
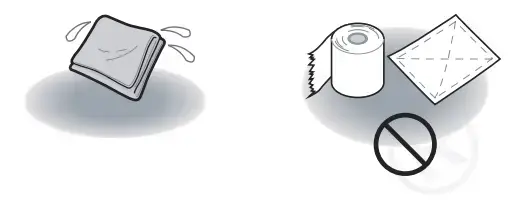
- Do not use lacquer thinner,petrol,liquid medicine,detergent,insecticide,toilet cleanser and scrubbing brush to clean the product.
- Exposure to direct sunlight is prohibited.
- Only use tap water or bottle water;otherwise it may cause chafing.
- Do not connect water supply to heater outlet.Make sure inlet water temperature at 3~35℃.
- When the room temperature is under zero degree,please dry up the water tank,to avoid freezing.
- Raise rest room temperature to prevent the toilet from damage due to freezing.
- When move the product from cold or wet environment into normal room temperature,wait for 2 hours until the condensation water is fully volatilized.Doing so can prevent the product from electric short circuit.
- When not using the product over three(3) days,drain the water out of the container and pull the elelctrical plug from the wall outlet.
- Stop using the product and shut off the power when product malfunctions,please contact the service people for professional service.
GROUNDING INSTRUCTIONS
This product should be grounded. In the event of an electrical short circuit, grounding reduces the risk of electric shock by providing an escape wire for the electric current. This product is equipped with a cord having a grounding wire with a grounding plug. The plug must be plugged into an outlet that is properly installed and grounded.
DANGER– Improper use of the grounding plug can result in a risk of electric shock.
If repair or replacement of the cord or plug is necessary, do not connect the grounding wire to either flat blade terminal. The wire with insulation having an outer surface that is green with or without yellow stripes is the grounding wire.
This product is factory equipped with a specific electric cord and plug to permit connection to a proper electric circuit. Make sure that the product is connected to an outlet having the same configuration as the plug. No adapter should be used with this product. Do not modify the plug provided — if it will not fit the outlet, have the proper outlet installed by a qualified electrician. If the product must be reconnected for use on a different type of electric circuit, the reconnection should be made by qualified service personnel.
SAVE THESE INSTRUCTIONS
www.woodbridgebath.com
| Main Unit | Rating pressure | AC 110V-120V,50/60Hz |
| Rating power | 1200W-1400W | |
| Water pressure range | Minimum water pressure 0.07MPa (20L/min. flow). Maximum water pressure 0.8MPa (Hydrostatic pressure) | |
| Electrical wire | length is about 1.8m | |
| Toilet | Flush volume | 1.6/1.1GPF(6.0/4.1 L) |
| Flushing mode | Siphonic jet | |
| Rough in | 12″ | |
| Outlet outside
diameter |
3.5″ | |
| Drainage method | Down-drain | |
| Cleaning device | Heating power | 1200W |
| Water temperature | 6 different level adjustment | |
| Water volume | 5 different level adjustment | |
| Cleansing mode | Rear cleaning/Rear massage,Front cleansing for ladies | |
| Spray cleansing location | 5 different level adjustment | |
| Water pressure protector | Pressure stabilizer,Automatic pressure discharging | |
| Anti-fouling device | Speedy water discharge device, Automatic cleansing nozzle, Anti
-syphon device, Anti-backflow device, Filter device |
|
| Safety device | Temperature sensor, fail safe device, Bimetallic thermostat, Temperature fuse, Grounding protection, Leakage protector | |
| Drying device | Warm wind speed | Over 4 M/S |
| Warm wind
temperature |
6 different level adjustment | |
| Heating power | 250W | |
| Safety device | Temperature sensor, Bimetallic thermostat, temperature fuse | |
| Deodorization | Deodorization Method | Activated carbon or photocatalyst absorption |
| Heated seat | Surface temperature | 6 different level adjustment |
| Heating power | 50W | |
| Open and close
device |
Quiet soft-closing device,Auto open and close | |
| Heated burning
protection |
The seat temperature will automatically lower to level 1 in 10 minutes after using | |
| Safety device | Seat sensor,Temperature sensor, Bimetallic thermostat,Temperature fuse | |
| Caring device | Night light
assembly |
intelligent,often in the off state |
| User ID setting | To avoid disturbance from remote controls by multi-user | |
| Automatic flushing | Toilet will automatically flush as user walks away from bowl | |
| Auto lid open/ close(optional) | Intelligent lid open/close or by remote controller |
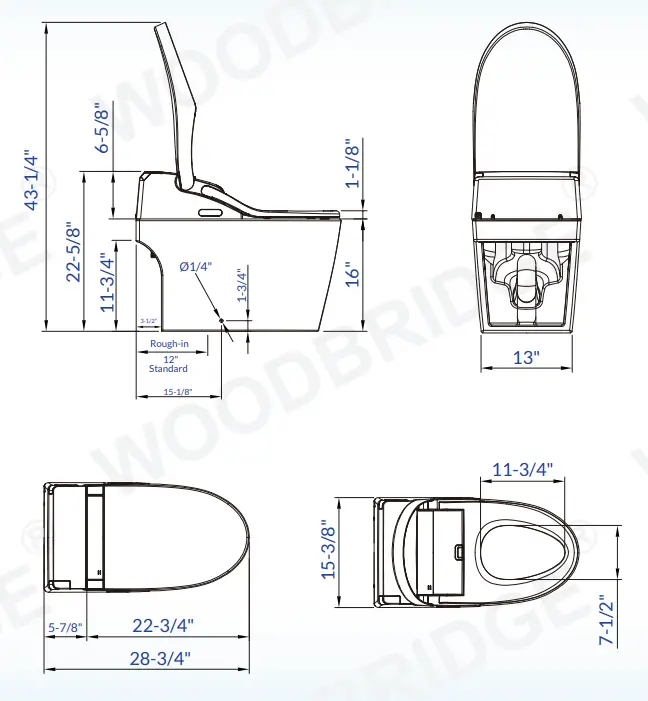
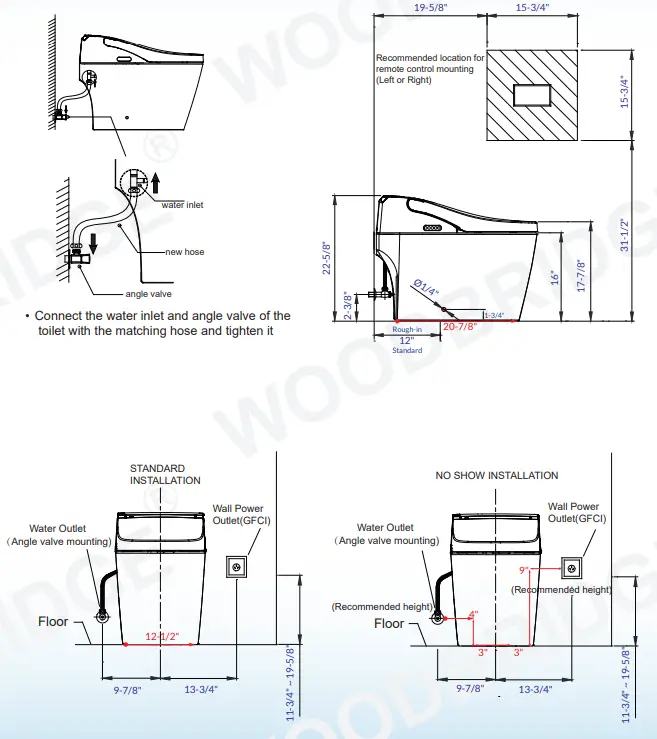
DIMENSIONS/TECHNICAL DATA
IMPORTANT INFORMATION
- Measurements are +3/8″ and subject to change without notice
- Specifications & Configurations are subject to change without notice
- Pls measure toilet on-site before installation
- Please note that installer(s) must be certify or warranty will be voided.
- Measurements herein supersede all others published prior to purblication date shown below
 The product drawing is for reference only, and we reserve the right to modify the appearance of the product.
- If the appearance of the product is changed, the actual product shall prevail.
Installation Option
PARTS IDENTIFICATION
Installation of ceramic toilet
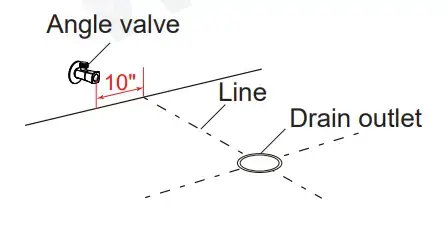
- Water supply angle valve installation
Draw drain outlet centerline on the floor, install angle valve at proper position on wall according to dimension of toilet. 10″ off center is preferred.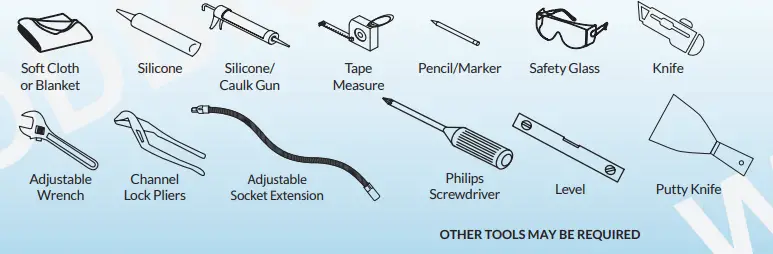
- Cardboard installation
- Align cardboard with the centerline of drain outlet.
- Outline with pencil or tape according to cardboard.
- Please mark the position of flange bolts.
- Mounting bracket installation
Assemble the mounting L-Bracket with bolts and then install them to the pre-install flange plate on the ground and tighten with nuts.
- Ceramic toilet installation
- Install wax ring onto drain outlet of toilet.
- Carefully lower toilet into place directly according to the outline position.
 Attention: This toilet is team-lift recommend, also seat should be in open position to aid in installation.
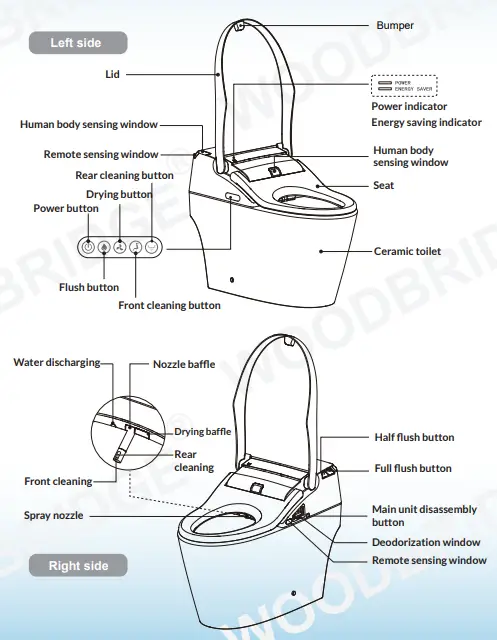
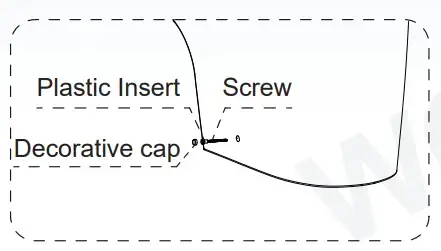
- Install Screw through Plastic Insert and into the opening on the side of the toilet. Tighten Screw into L-Bracket being careful not to over tighten.
- Silicone caulking application
- Apply Silicone caulking to the edge of toilet base, wipe away any excess.
Note:
Please clean the drain outlet;
Please make sure ceramic toilet outlet sits perfectly on drain outlet.
- Apply Silicone caulking to the edge of toilet base, wipe away any excess.
- Installation of hose
Connect water inlet and angle valve with new hose.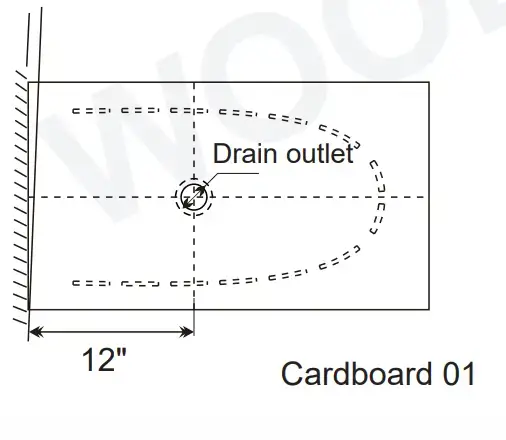
Before Installation
- Turn on the angle valve
Check thread connection,make sure no leakage is found.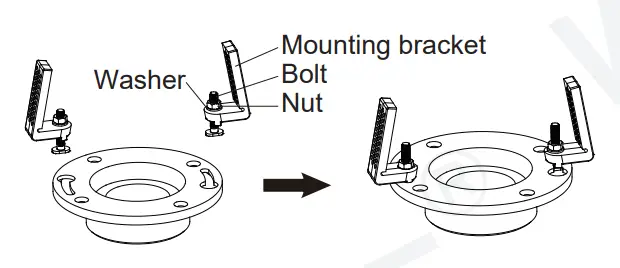
- Power Connection
Insert power line leakage protection plug into the power socket, press the reset switch, plug indicator lights on indicating that the power is on.
Tips:
- Press electric leakage test button prior to usage, the reset switch pops up indicating that the leakage protection function is normal.
- Press the TEST button (then RESET button) every month to assure proper operation.
Suitable for the product with leakage protection plug.
Please refer to the actual product.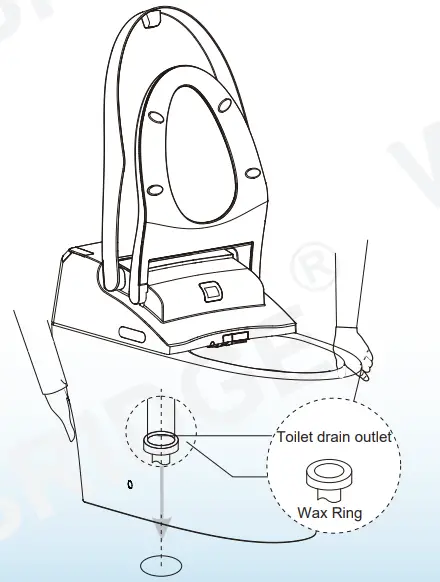
Self-inspection
- The main unit buzzer rings first “click”, power indicator (POWER) and Energy-conservation indicator (ENERGY SAVER) flash. Power indicator lights on and Energy-conservation indicator
- gets off to start self-inspection.
The main unit buzzer rings second “click” to indicate finish of self-inspection, power indictator lights on, and Energy-conservation indicator keeps off. - Start function mode for normal usage.
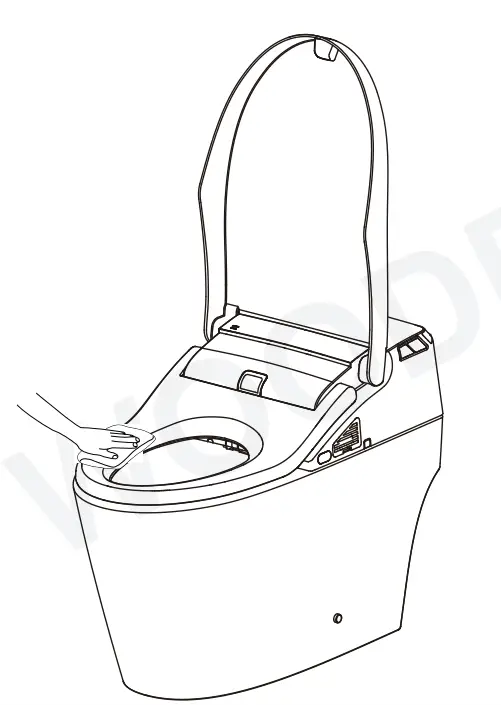
Daily maintenance
Main unit care and maintenace
- Shut off power supply at maintenance.
- 2.Turn the seat upward open, press down the button located on the right side of main unit and pull out the seat.Wipe the stain with a soft damp cloth.
- Safety self- inspection
After cleaning, re-connect the toilet with the power supply.
Spray nozzle maintenance and care
- Nozzle self-cleaning
Press “nozzle cleaning” button and nozzle will move forward and self-clean. - Spray nozzle disassemble
When the wand moves forward,the nozzle can be disassembled to clean.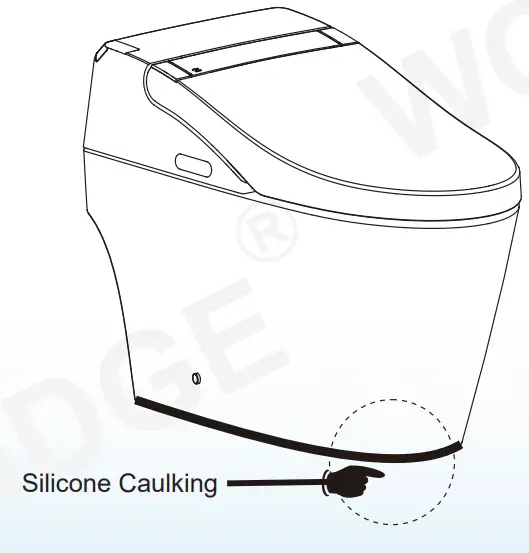
- Use soft cloth or soft brush to clean
Do not pull or push the wand,to avoid damage.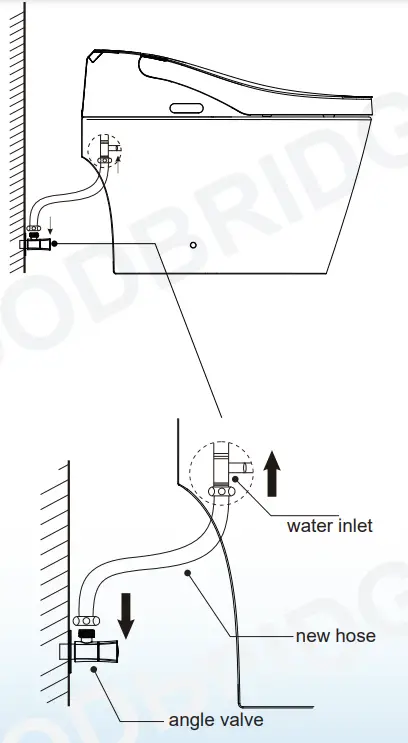
- Nozzle assembly
Re-install the nozzle to the wand and press “nozzle cleaning” button, then the nozzle will move back to the original position.
Emergency Troubleshooting
Electricity and water supply cut-off
- Power failure
Manually press button of full/half flush to perform the toilet flushing.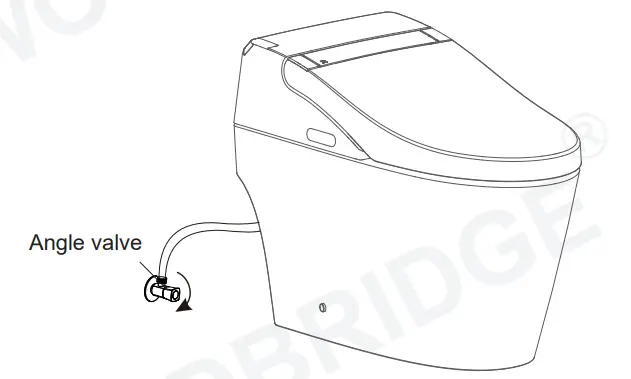
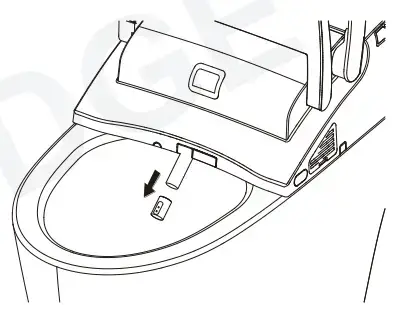
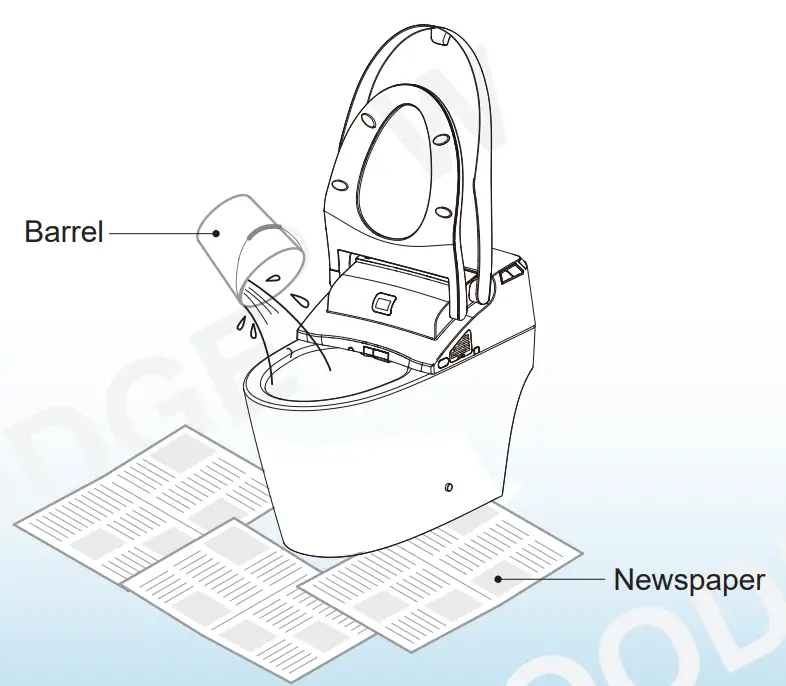
- Water failure
Put around 8L water into a barrel and flush the bowl of ceramic.
Note: Avoid water spilling from bowl.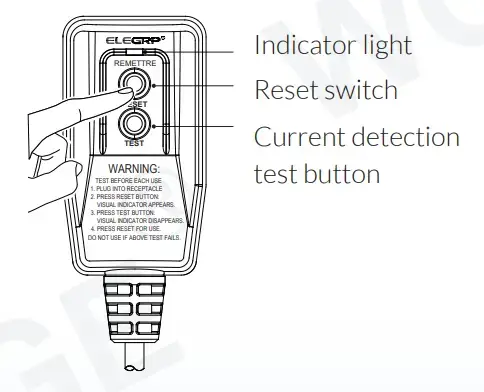
Failure of remote control
- Operate the panels on bidet seat to perform.1.Operate the panels on bidet seat to perform.
- Battery replacement
- Press the “power” button on panel and electricity indicator will turn off.
- Take remote control from hanger.
- Open battery cover to replace battery and put back to hanger.
- Press the “power” button again and electricity indicator will turn on.
Remarks: When replacing the battery, the automatic function and timing function will be cancelled and need to be reset.
When the product is left unused for long time
- Especially in winter season,the water inside the tank should be discharged to avoid freezing.
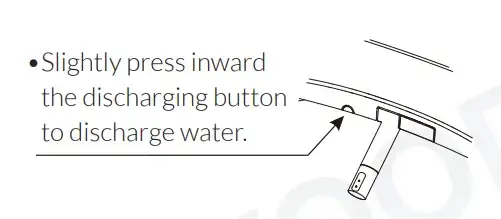
To discharge water
- Turn off the water supply angle valve
- Cut off the electricity
- Discharge water
- Handle the remaining water in bowl
It is suggested to put some antifreeze into water inside the bowl.
Note: Before water discharging, the power must be cut off!
The illustration of main unit keys
 |
||
|
|
Power |
1. Long press “power” button to enter standby mode; and then quick press “power” button to restore functional mode.
2. When people sit, press “power” button to stop the function of rear, front cleaning or drying. When no one sits, press “power” button to switch between function mode and power save mode. |
 |
Flush | Press “flush” button to activate full flushing. |
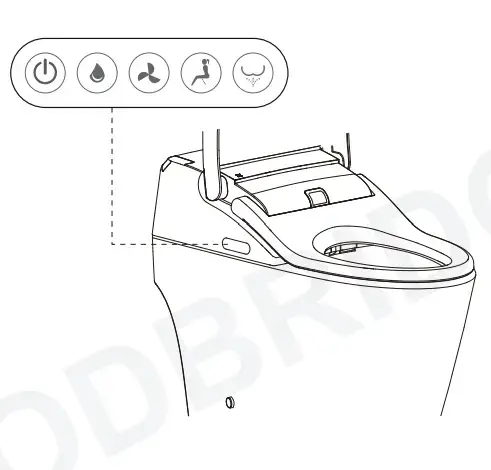 |
Dry | Press “dry” button, warm wind will come out. After a circle or user leaves the seat, it will automatically stop. |
 |
Front | Press “front cleaning” button, the water will come out to clean the front portion of body. It will automatically stop after a circle of cleaning. If press “stop” or “power” button when using, the function will stop immediately. |
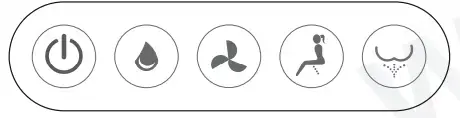 |
Rear | 1. Press ” rear cleaning” button, the water will come out to clean the rear portion of body. It will automatically stop after a circle of cleaning. If press “stop” or “power” button when using, the function will stop immediately.
2. When no one uses, press “rear cleaning” button, then the wand will stretch out to clean the nozzle and spray lance. |

Remark:
- When main unit is in functional mode, the light of Power goes on; When in energy save function, the light of Power goes off, and energy saver lights on; When in standby mode, both lights are off.
- The default setting of all function is on middle level, after using controller, shift to the level setted last time.
Troubleshooting Guide
| Problem | Cause | Solution |
| No flushing | water supply hose buckling causes block | solve the buckling |
| fill valve is off | turn on the fill valve | |
| Water supply is cut off | Connect water supply and
wait for the water |
|
| Poor flushing | Water supply hose buckling
causes partial block |
Solve the buckling |
| Fill valve is not fully
turned on |
Fully turn on the fill valve | |
| Filter is dirty and causes block | Clean the filter | |
| The water is not hot | The water temperature is setted
on normal temperature level |
Reset the water temperature |
| Seat temperature is not hot | The seat temperature is setted
on normal temperature level |
Reset the seat temperature |
| In standby mode | Shift to function mode for
3 minutes |
|
| Wind temperature is not hot | The wind temperature is setted
on normal temperature level |
Reset the wind temperature |
| No wind out | In standby mode or power save mode | Shift to function mode to use dry function |
| spray wand cannot retracted | Power off | Push back the wand lightly and
wait for the power |
| Get stuck by impurities | Clear away the impurities | |
| Spray wand cannot stretch out | Power off | Push back the wand lightly and
wait for the power |
| Do not sit in sensing area | Sit right in the sensing area | |
| Controller cannot
display |
Reverse the polarity of
battery |
Reload the battery |
| Malfunction of deodorization | User doesn’t reach the
sensing area in seat |
Adjust to reach the sensing area |
| Deodorization function keeps working after user leaves | It’s a normal phenomenon if
deodorization function keeps working after user leaves to ensure eliminating smell entirely |
|
| Caution | If the problems cannot be solved as per above methods, please
shut-off the power, and contact service providers for maintenance. |
|
| If the leakage circuit breacker often trips off, it means the
products has electricity leakage, so please shut-off the power, and contact service provider for maintenance. |
||
Produdct Limited Warranty
Thank you for choosing out product. This product is warranted for one(1)years since the purchasing date for free repair of problems arising out of defects in workmanship while using in accordance with installation manual and usage cations for intended purposes.
lf the product does not work properly with warranty period, please contact your nearest service center. This certificate must be presented to obtain free service under this warranty.
Our company reserves the rights to replace the product by other similar models. We can serve to fix or repair the product at a reasonable service charge, after expiration of warranty period.
Service charges shall be paid even during the warranty period, if breakage or damage is caused by any of the following events(including but without limitation)
- The user’s negligence or mistake in operation, unreasonable repair or alteration.
- Product are damaged by negligence or mistake during installation
- The movement of installation location of the product.
- Using the product outside of intended use in residential housing or commerical hotels
- The use of non specified powersupply(voltage, rating pressure)
- The dirt, sand and impurities that causing invalid operation.
- Damages due to force majeure(including but not limitation to natural disaster) or other incidents.
- The user fails to use in compliance with the warning or caution described in the installation manual
Remark.
Please fill in date, seller correctly. lf there are some mistakes, the warranty will get invalid. This one year warranty for free of charge of repair service is only for the items listed in the warranty.
The purchasing dte is subject to the purchasing invoice or receipt.
Please keep this warranty and invoice/receipt available for repair or maintenance. 
Thank you for using WoodBridge products!
Customer Service
- Phone: 562-229-0088. (Monday – Friday 9 AM – 5 PM Pacific Time)
- Email: [email protected]
- www.woodbridgebath.com
]]>
USER MANUAL BID 02
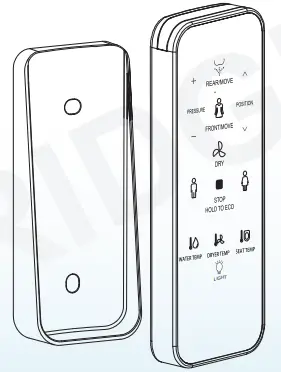
Remote Control Illustration
Thank you for choosing our product. Please read the instructions carefully before installation and keep it available for future maintenance or reference.
Customer Service Phone: 562-229-0088. (Monday – Friday 9 AM – 5 PM Pacific Time) Or Email: [email protected]
Installation Preparation
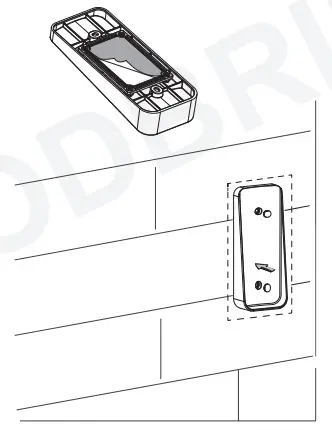
Remote control installation
Remote control hanger installation
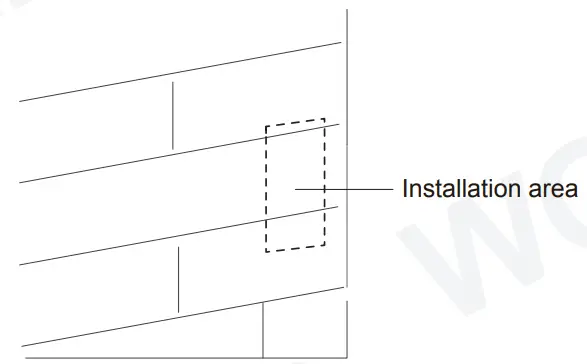
- Place the remote control hanger upright on the pre-installed area of the wall and mark the location of the two mounting holes on the wall with a marker.
Drill a hole in the marked position on the wall with a drill bit of 6 mm in diameter, with a depth of 35 mm.
(When determining the installation location, note that when the person sits on the seat to ensure that the user can catch the remote control.)

- Put the expansion tube into the wall hole and the hanger is tight against the wall.
Align the hole in the hanger with the expansion tube and tighten the screw, and then cover the silicone gasket.
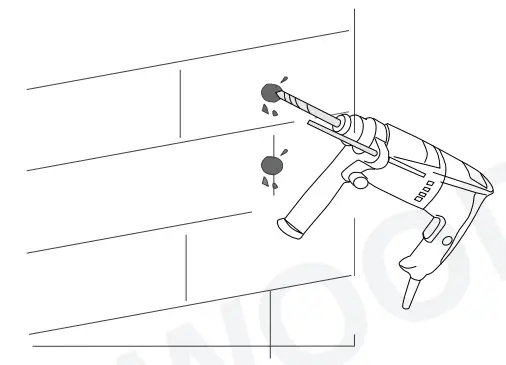
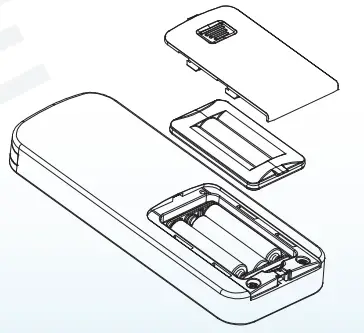
- Put batteries into remote control and cover remote control.

- Put remote control to the hanger.
Notice: Don’t install and use the product in damp places such as the shower room.
Don’t place the product in a place where it is easily exposed to water.
Remote control installation
Remote control hanger installation(Only for the hanger matching with fixing board and foam gasket.)
- Clean and dry the pre-installed area of the remote control rack on the wall. (When determining the installation location, make sure that the user can reach the remote control when he sits on the seat.)
- Remove the adhesive tape on the back of the hanger and place it tightly against the wall, then cover the silicone gasket.
- Put batteries into a remote control and cover the remote control.
- Put remote control to the hanger.
Notice: Don’t install and use the product in damp places such as the shower room.
Don’t place the product in a place where it is easily exposed to water.
Usage Instruction
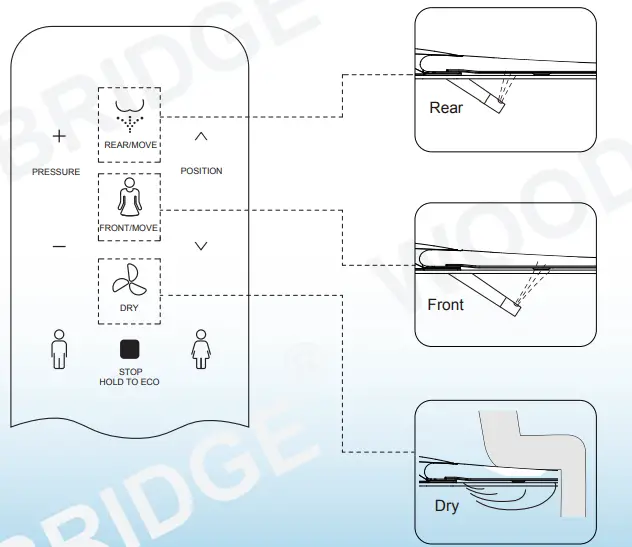
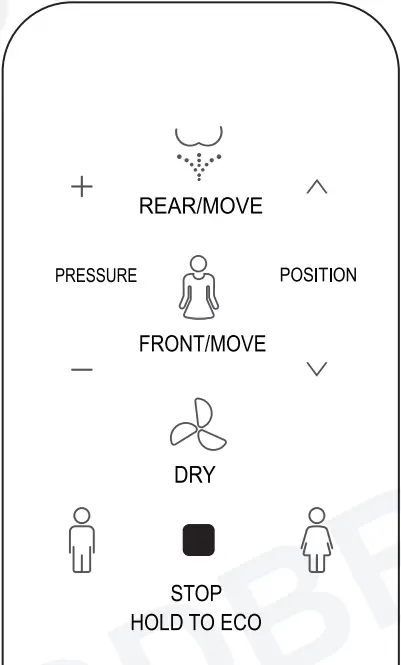
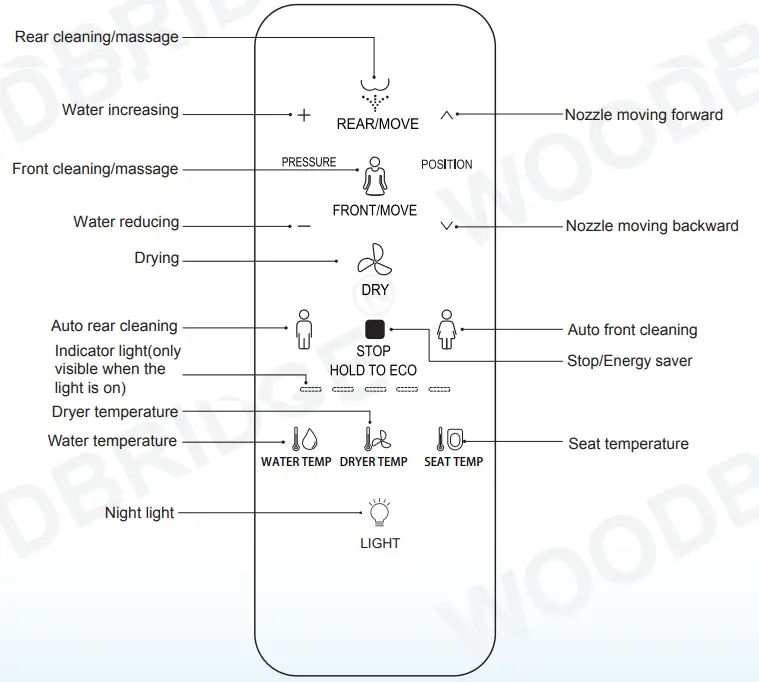
Rear/Front cleaning
- Press the “Rear cleaning/massage” button, the indicator light is on showing current water temperature level, it starts rear cleaning; Press again the “Rear cleaning/massage” button to shift to massage to massage cleaning (nozzle moves forward and backward to expand cleaning area). The cleaning will last for a circle and stop automatically, while it will stop immediately if the user presses the “STOP” button
- Press the “Front cleaning/massage” button, the indicator light is on showing current water temperature level, it starts front cleaning; Press again the “Front cleaning/massage” button to shift to massage cleaning (nozzle moves forward and backward to expand cleaning area). The cleaning will last for a circle and stop automatically, while it will stop immediately if the user presses the “STOP” button.
Drying Operation
- Press the “Dry” button, the indicator light is on showing the current wind temperature level, it starts drying; it will stop drying automatically after a circle or the user leaves the seat.
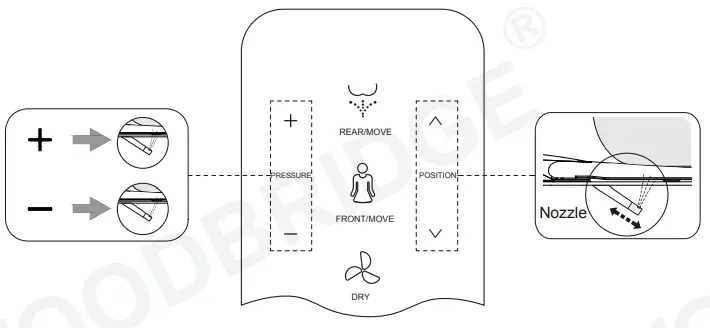
Water volume adjustment
- Press the “+” or “- ” button when it is under the function of rear cleaning or front cleaning, the indicator light will be on showing current water volume level, adjust water volume by levels.
Spray nozzle position adjustment
- Press “∧” or “∨” button when it is under the function of rear cleaning or front cleaning, the indicator light will be on showing the current nozzle position, adjust the nozzle position by 5 levels.

Energy saver
Keep pressing the “STOP” button for more than 3S to enter energy-saving mode, the indicator light will be off and the energy-saving light will be on. Keep pressing the “STOP” button again for more than 3S to exit energy-saving mode, the indicator light will be on and the energy-saving light will be off.
Energy saving
Under energy-saving mode, seat temperature is low(level 1) to achieve energy saving. (Note: If the seat temperature before energy saving is neutral, keep the neutral after energy saving)
Remark
The energy-saving mode will be suspended and goes to function mode if someone uses the seat in the middle of energy saving. The seat starts to heat immediately (without closing the seat temperature), and the energy-saving mode is restored after the human body leaves the seat.
Auto function
- The automatic function of factory default setting is middle level for water volume, nozzle position, water temperature, air temperature, seat temperature.
- A short press on the remote control button “
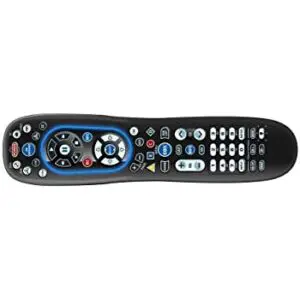 “, “ ” can achieve male hip wash and female bidet wash, fully automatic and convenient use. The user can firstly set the water volume, nozzle position, water temperature gear position, and air temperature gear position. After the setting is completed, press the corresponding automatic key 3s to save the setting. The next time you use it, you can call the saved key by pressing the corresponding automatic key. Set the automatic function to enable automatic cleaning and drying in the whole process.
 - The Auto function mode will be off if the user presses other buttons during the operation of auto functions and shift to operate the functions of the buttons.
|
Auto rear cleaning
Auto front cleaning |
Tips: Certain models don’t have a drying function.
Temperature adjustment
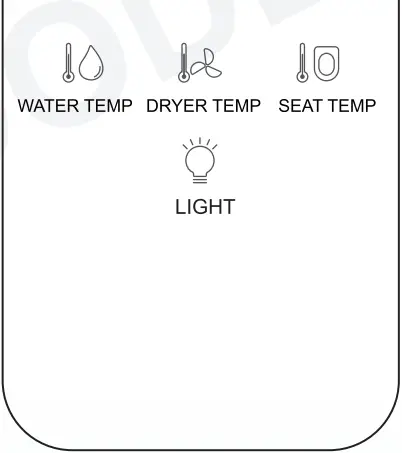
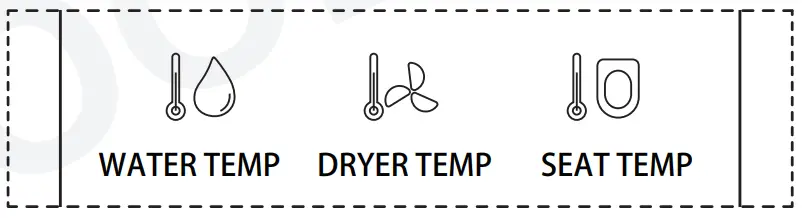
- Water temperature adjustment
Short press the “WATER TEMP” button to adjust the water temperature. The indicator will show the water temperature level if it’s on. When the indicator is off, the water level is 0. Short press this button to adjust the water temperature level from 0 to 5 in the cycle. (Note: the water temperature is set at 10±2.5℃ in level 0, that is, when the inlet water temperature is higher than 10℃, the water won’t be heated, while when the inlet water temperature is lower than 10℃, the water will be heated to about 10℃.) - Dryer temperature adjustment
Short press the “DRYER TEMP” button to adjust the dryer temperature. The indicator will show the dryer temperature level if it’s on. When the indicator is off, the wind level is 0. Short press this button to adjust the dryer temperature level from 0 to 5 in the cycle. - Seat temperature adjustment
Short press the “SEAT TEMP” button to adjust the seat temperature.
The indicator will show the seat temperature level if it’s on. When the indicator is off, the seat level is 0.
Short press this button to adjust seat temperature level from 0 to 5 in the cycle.

Night light (Only for toilets with night light function)
- Short press “Night light” button to turn on/turn off night light, long press “Night light” button to enter into an intelligent mode ( Night light will be on or off by detecting the lightness of surroundings). If the product is on intelligent mode, short press the “Night light” button to exit intelligent mode.

Other Operations
User Code
- The user code needs to be set to avoid disturbance from remote controls when more than one smart toilet is used in the house. Turn on the toilet for setting while turning off others. Press user code combination buttons (Press the “STOP” button first and then press the “REAR” button) to enter user code setting mode, the indicator lights will be on and keep flashing.
- (RF remote control) The Remote control will generate matching user code automatically, press user code combination buttons again to exit setting mode, and the setting is completed. When the main unit is powered off to restart or change remote control batteries, the user code won’t be cleared and no need to reset.
- (IR remote control) Press water volume “+”“-” buttons to select user code. The indicator shows the corresponding user code. Press the user code combination buttons again to save settings and exit. The buzzer beeps and it’s set successfully. When the main unit is powered off to restart or batteries are removed from the remote control, the user code will be cleared and need to be reset. After entering the setting mode, if there’s no operation for 10s, the remote control will exit the setting mode automatically and return to previous states.
Quit mode
Long press the “SEAT TEMP” button to turn on/off quit mode.
Auto deodorization
Press the “Stop” button first and meanwhile press the “FRONT” button to start or close the auto deodorizing function; While the auto deodorization function is on when it’s detected that the user is seated, it’ll start deodorizing and stops when the user leaves above 3s. The auto deodorization function will turn off automatically during drying. (This function only
applies to products with auto deodorization function. This function is set to on by default.)
Remark:
- The buzzer will sound “BEEP” when the user presses one button which means the main unit receives the signal and conduct the operation accordingly. If the buzzer doesn’t sound, it means the main unit doesn’t receive the signal, please adjust the remote control direction and repress the button.
- In case of power cut during the wand’s spray operation, the wand cannot go back to the place, please wait until the power is reset. In case of a power cut for a long period, please push the wand softly back by hand. Do not push hard, to avoid damage to the wand and electrical machine.
- The body should touch the seat and the buzzer rings “CLICK”, which means functions of front cleaning, rear cleaning and drying are in operation. The nozzle will continue to spray for 1-2 seconds after the user stands up during spray operation, so please press the “STOP” button before standing up.
Customer Service Phone: 562-229-0088. (Monday – Friday 9 AM – 5 PM Pacific Time) Or Email: [email protected]
]]>