
X-Rocker 5101801 XR Racing V2 Multi-Platform Steering Wheel User Manual
Introduction
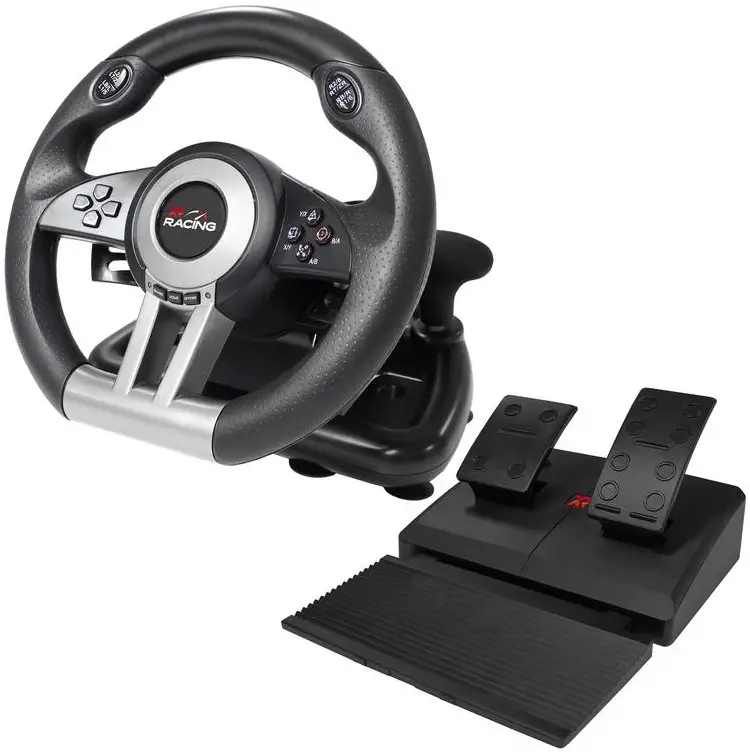
Thank you for purchasing the XR Racing V2 Multi-platform steering wheel. This product is for use with major gaming consoles such as PS4™, Xbox One™ and Switch™. For Xbox One™ and PS4™, you will use your official controller to connect, allowing you to use this steering wheel with any racing game experience. The XR Racing V2 steering wheel also features vibration motors for a tactile and haptic driving experience, programmable buttons for the ideal setup and suction pads/ clamps for a secure fix on your desk, or racing rig setup.

For Support and firmware, please fill in the support form at: xrockeruk.com/pages/support
Product Overview
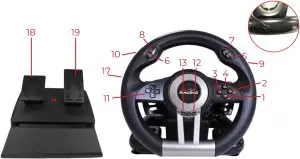
| Function | Number | PS3™ | PS4™ | XBOX ONE™ | PC (X-INPUT) | PC (D-INPUT) | SWITCH |
| Action Key | 1 | X | X | A | A | 2 | B |
| 2 | O | O | B | B | 3 | A | |
| 3 |  |
|
X | X | 1 | Y | |
| 4 |  |
|
Y | Y | 4 | X | |
| 5 | R1 | R1 | RB | RB | 6 | R | |
| 6 | L1 | L1 | LB | LB | 5 | L | |
| 7 | R2 | R2 | RT | RT | 8 | ZR | |
| 8 | L2 | L2 | LT | LT | 7 | ZL | |
| 9 | R3 | R3 | SR | SR | 12 | R3 | |
| 10 | L3 | L3 | SL | SL | 11 | L3 | |
| D-Pad | 11 | UP | UP | UP | UP | UP | UP |
| DOWN | DOWN | DOWN | DOWN | DOWN | DOWN | ||
| LEFT | LEFT | LEFT | LEFT | LEFT | LEFT | ||
| RIGHT | RIGHT | RIGHT | RIGHT | RIGHT | RIGHT | ||
| Function Key | 12 | START | OPTIONS | MENU | START | 10 | + |
| 13 | SELECT | SHARE | VIEW | BACK | 9 | – | |
| Direction | 14 | LX | LX | ↔/↔ | ↔/↔ | ↔/↔ | LX |
| L-Wing | 15 | |
L2 | LT | LT | 1 | B |
| R-Wing | 16 | X | R2 | RT | RT | 2 | Y |
| Gear Stick | 17 | L2 | L1 | LB | LB | 7 | ZL |
| R2 | R1 | RB | RB | 8 | ZR | ||
| L-Pedal | 18 | |
L2 | LT | LT | 1 | B |
| R-Pedal | 19 | X | R2 | RT | RT | 2 | Y |
| Mode | HOME | X-GUIDE | X-GUIDE | 13 | HOME | ||
Function Introduction
Program Functions (Without memory)
Introduction
- Program source button: /1/X/Y, O/3/B/A, /4/Y/X, X/2/A/B, L1/5/LB/L, L2/7/LT/ZL, R1/6/RB/R,R2/8/RT/ZR;
- Programmable button: L-Wing(Square/1/LT), R-Wing(X/2/RT),Accelerator, (X/2/RT), Brake ( /1/LT) ,L3/11/SL,R3/12/SR), Gear Stick (L2/7/LB,R2/8/RB)
Program setup
- Press and hold SHARE + OPTIONS for 3 seconds until the green LED is on.
- Press the programmable button, and the green LED starts blinking
- Press the program source button. The green LED will turn off. Program is now set.
Clear single program
- Press and hold SHARE + OPTIONS/10/Menu for 3 seconds until the green LED turns on
- Press programmed button and the green LED will start blinking.
- Press programmed button again and the green LED will turn off. The single programmed button is now cleared.
Clear all programs
- Press and hold SHARE + OPTIONS for 3 seconds until the green LED is on
- Press OPTIONS and hold for 4 seconds. The green LED will turn off. All of the programmed buttons are cleared with defaults restored
Note: All settings are reset when the steering wheel is turned off.
Program Pedals as Y axis
- Press and hold SHARE +OPTIONS 3 seconds until the green LED turns on.
- Press LEFT of the D-PAD. The green LED will turn off. Pedals are programmed as Y function.
Program L-Wing and R-Wing as Y axis
- Press and hold SHARE for 3 seconds until the green LED turns on.
- Press RIGHT of the D-PAD. The green LED will turn off. Pedals are programmed as Y function.
3 levels wheel sensitivity adjustment
- Press and hold SHARE + OPTIONS for 3 seconds until green LED is on. Release the button.
- Press SHARE again. Current sensitivity is displayed via the LED on the wheel
- Press SHARE a third time to select sensitivity level. It cycles as below:
Middle (Green LED is flashing) →High (Green LED flashes quickly) →Low (Green LED flashes slowly)
- Press UP of the D-PAD to confirm and leave the settings mode
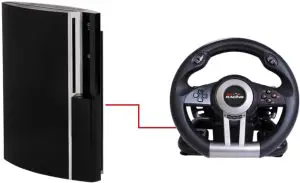
For use with PS3
- Connect the wheel to your console using the included USB cable and connect the pedals to the wheel
- Power on the console.
- The active channel LED indicator will light up when connection is finished automatically. The wheel is now ready to use
- During game play, press the HOME button once to enter the XMB window; Press and hold the HOME button to enter MENU setup window.
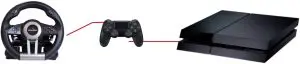
For use with PS4
- Connect the wheel to your console using a spare USB port and connect the pedal to the wheel using the rear USB Port.
- Power on the console.
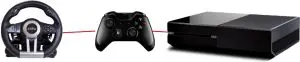
- Connect the racing wheel to controller by a USB cable, consider the controller as a key to establish the connection between the controller and racing wheel (The controller needs to be powered off before connection)
- After the connection been established, the RED LED on the wheel will turn on, and the LED indicator on the controller will turn on. Press the HOME button on the wheel and the wheel will be ready to use/
- During game play, press the HOME button once to enter the Console menu;
For use with XBOX ONE
- Connect the wheel to your console using a spare USB port and connect the pedal to the wheel using the rear USB Port.
- Power on the console.
- Connect the racing wheel to controller by a USB cable, consider the controller as a key to establish the connection between the controller and racing wheel (The controller needs to be powered off before connection)
- After the connection been established, the RED LED on the wheel will turn on, and the LED indicator on the controller will turn on. Press the HOME button on the wheel and the wheel will be ready to use/
- During game play, press the HOME button once to enter the Console menu;
For use with Switch
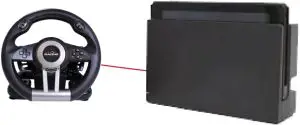
- Connect the wheel to USB port on the console dock then power on your console;
- Alternatively, you can connect the wheel to console using a USB Type-c cable for handheld or tabletop mode.
- After the connection has been established, the RED LED on racing wheel will turn on, and one channel LED will turn on. The wheel is now ready to use.
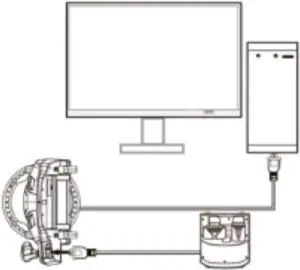
For use with PC
X-INPUT
Connect the wheel directly to the PC using the included USB cable. If you are connected to the internet, then a driver will automatically install and be ready to use.
- The Wheel will default to X-input mode on PC. X Input mode will be displayed by a RED LED on the face of the wheel and with a red LED on the rear channels.
- To switch to Direct Input, Press HOME button for 3 seconds to enter into Direct-input mode, the RED LED will flash 6 times and turn off the 4 channel LEDs.
Troubleshooting
User Safety Information
- Avoid direct contact with liquids. To clean, wipe with a damp cloth. If a spillage occurs, switch off the XR Wheel and wait for the product to dry before reusing.
- Do not use any type of abrasive pad or abrasive cleaning solutions as these may damage the surface material.
- Please consult X Rocker Support before unscrewing and disassembling any of the electrical components or undertaking any changes to the product. If any unauthorised modifications or repairs are made before consultation, then this will void your warranty.
- To reduce potential trip or entanglement hazards, arrange and secure any cables so that people and pets are not likely to trip over or accidently pull on them as they move around or walk through the area.
- If any of the cables or electrical equipment become damaged in any way, stop using immediately and contact X Rocker for more details on how to replace the component.
- When not in use, keep cables and power supplies out of reach of children, please also ensure that these are not subject to harsh impacts such as dropping or throwing the components.
- Never place any type of candle or naked flame on or near the XR Wheel at any time. While X Rocker products are compliant with UK and European safety regulations, prolonged exposure to naked flames will result in damage to the product and other safety hazards.
FAQS
Is this compatible with Gran Turismo?
yes
Does this work with Forza horizon 5
Yes it works on forza 5 quite well but you can only have sound coming through your tv so if like me you use a headset the headset doesn’t work because your controller has to be connected to the steering wheel and apparently that cancels it out!
Do I need to buy a separate stand, or will it work without one ?
it comes with adjustable screws so it can mount to a desk or table just fine – you will love it.
can anyone tell me if this is foldable for storage
Yes it is, the mount the wheel is on has hand screw’s which allow it to fold flat, it can then be stood up for ready storage.
Can you fit the fanatec f1 podium wheel which has direct drive to this stand?
You technically can. But don’t make the mistake. DD1 weighs way too much and causes the rig to shake a lot. If you use a DD1 and like the GT style seating I wools suggest next level racing GT Track you get a seat and it supports DD bases and all major pedals!
How much is the shifter bracket add-on
The X Rocker rig has a shifter bracket in the box.
Is tis steering wheel compatible with the fold away chair.?
It might be a bit close to the ground
Does this plug into the nintendo switch
No it’s not a wheel stand Bushy. Theres obviously two things under the same people. It’s the X Rocker gaming XR racing wheel and floor pedal. And for anyone else asking YES it does plug into the switch we now have it 🙂
Is this compatible with pc?
its a Christmas present so haven’t opened box |(yet) but grandson has already the XR Racing wheel etc and he picked this to go with it all but he uses it with Xbox
Does this come with the pedals as it states in description wheel only?
Mine came with pedals
Are you sure that the weight is 1kg?
Yes
What games is this compatible to play with..
this was bought for our grandson and as far as I now he plays all games on it as well as every child/ adult who comes everyone loves it.
Does this come with a power supply cable to power the chair or is this not needed?
All our audio chairs come with a power cable included and this is no exception. Trust me, you’ll think you’re in the real deal once you feel the feedback on the subwoofer!
Also – did you spot this works fantastoc woth the Race Rig that mounts your wheel controller of choice. Thanks, Team X Rocker.