Read this manual carefully before use, and retain it for future reference.
Product overview

Installation
1. Install the electrostatic sticker
Clean your windshield and put the electrostatic sticker on the recommended area as shown in the right figure. Make sure you remove air bubbles between the sticker and the glass.

2. Stick the camera mount to the windshield
Remove the protective cover from the mount and stick the mount’s base to the center of the electrostatic sticker. Make sure your dash cam body is parallel to the ground. Press the mount to attach it to the electrostatic sticker tightly.
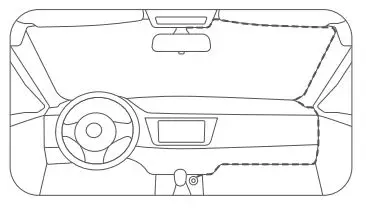
3. Connect USB cable to the cigarette lighter receptacle
Align the cable with the top edge of the windshield and fasten it along the passenger’s side and the glovebox as shown right. Connect the cable to the power adapter and insert the adapter into the cigarette lighter receptacle. Note: The cigarette lighter receptacle might be positioned differently in your car. The picture is provided for reference only.

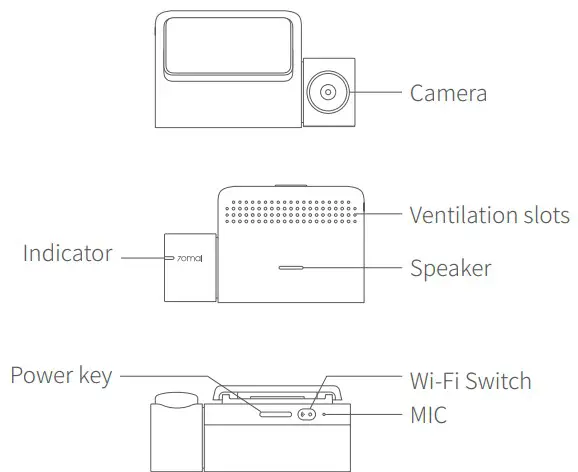
Key functions
Dash Cam only has one key, which is the power key. Different functions may be accessed by pressing the power key a different number of times for each function.

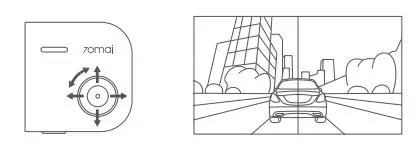
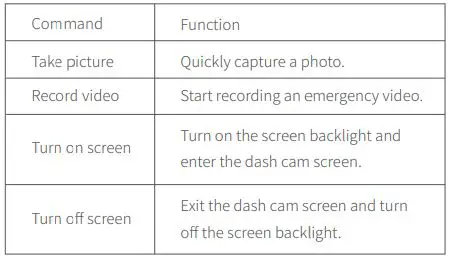
Voice commands
Dash Cam allows quick control through voice commands. When it is running, if you speak a quick command, it will trigger the corresponding function. It supports the following voice commands:

User guide
Please scan the QR code below to get the online user guide. Please use the product according to the instructions in the user guide.

https://help.70mai.asia/639.html
Install APP
Please use the product with the 70mai app. To download and install the app, search for”70mai”in Google Play Store (Android) or App Store (iOS). Or you can download the app by scanning the QR code below:

https://www.70mai.com/en/download/?souce=QrcodeVue
70mai Smart Dash Cam 1S Wi-Fi hotspot:
Hotspot name70mai_d06_XXXXPlease check the label on the device for the hotspot name. Default password12345678
Please refer to the online user guide for how to establish a connection.
Safety precautions
- 70mai Smart Dash Cam 1S records videos outside of moving vehicles. It can’t protect drivers and passengers from any accidents. We shall not take any responsibility if the user gets involved in any traffic accident and/or bear any loss due to product failure, information loss, or product operation.
- Due to differences in vehicle type, driving preferences, the environment, and other differences, parts of the product or the whole product may not work normally in some circumstances. The device may not record normally due to loss of power source, abnormal temperatures and/or humidity, collisions, damage to the TF card, and other reasons. We do not guarantee that all the recorded videos will be saved completely in any given situation. The images recorded by this product are for reference only.
- Install the product correctly. Do not block the driver’s vision. Do not obstruct the air bag. Keep the product at least 20cm away from the driver and passengers. Incorrect installation of the product may cause product failure and injury.
- Keep this product away from strong magnetic fields to avoid damage.
- Do not insert or pull out the TF card when the product is working to avoid damaging the TF card.
- Use a TF card with storage capacity between 16GB and 64GB, and reading and writing speed not lower than Class10. Format the TF card before using it.
- TF card may be damaged after repetitive use. Replace TF cards in time to maintain proper recording. We shall not bear any responsibility caused by failed TF cards.
- The product can record and save footage of traffic accidents, but we do not guarantee all accident footage can be recorded and saved. Small collisions may not be detected by the sensor, therefore, the footage may not be placed among the event videos.
- Do not use this product in temperatures higher than 60 or lower than -10.
- The battery may get discharged if the device is not used for a long time. You might be asked to reset the device time when you power the device on again.
- Do not shake or press the product. Strong impact or shaking may cause irreparable damage to the product.
- Do not clean this product by chemical solvents or cleansers.
- Use this product within the scope of the law.
- Please note that the housing’s temperature rises when the device is running.
Package contents
- 70mai Smart Dash Cam 1S ×1
- USB cable×1
- Power adapter×1
- Electrostatic sticker×1
- Heat resistant adhesive (stocked to the mounting bracket)×1
- User manual×1
Specifications
Model name: Midriver D06
Resolution: 1080P, 30FPS
FOV: 130°
RAM: 512Mb
Extended storage: MicroSD card, 16GB~64GB, Class10 or above
Wi-Fi: IEEE 802.11 b/g/n 2.4GHz
Operation frequency: 2412-2472MHz
Max output power: 15.20dBm
Hereby, 70mai Co. Ltd declares that this 70mai Smart Dash Cam 1S is in compliance with the essential requirements and other relevant provisions of Directive2014/53/EU.
Service: [email protected]
For further information, please go to www.70mai.com
Manufacturer: 70mai Co.,
Ltd Address: Room2220, building2, No.588, Zixing road, Min Hang District, Shanghai, China
FCC
Changes or modifications not expressly approved by the party responsible for compliance could void the user’s authority to operate the equipment.
This equipment has been tested and found to comply with the limits for a Class B digital device, pursuant to Part 15 of the FCC Rules. These limits are designed to provide reasonable protection against harmful interference in a residential installation. This equipment generates, uses and can radiate radio frequency energy and, if not installed and used in accordance with the instructions, may cause harmful interference to radio communications. However, there is no guarantee that interference will not occur in a particular installation.
If this equipment does cause harmful interference to radio or television reception, which can be determined by turning the equipment off and on, the user is encouraged to try to correct the interference by one or more of the following measures:
— Reorient or relocate the receiving antenna.
— Increase the separation between the equipment and receiver.
— Connect the equipment into an outlet on a circuit different from that to which the receiver is connected.
— Consult the dealer or an experienced radio/TV technician for help.
This device complies with Part 15 of the FCC Rules. Operation is subject to the following two conditions: (1) this device may not cause harmful interference, and (2) this device must accept any interference received, including interference that may cause undesired operation.
This equipment complies with FCC radiation exposure limits set forth for an uncontrolled environment. This equipment should be installed and operated with a minimum distance of 20cm between the radiator & your body. This transmitter must not be co-located or operating in conjunction with any other antenna or transmitter.
]]>
Product Introduction
∗ The product, user interface and other illustrations in the user manual serve as references only.
∗ Product images are for illustrative purposes only and may differ from the actual product due to product enhancements.
Packing List
- 70mai rearview mirror dash cam × 1
- Car charger × 1
- Power cord × 1
- Wiring crowbar × 1
- Fixing strap× 2
- User manual× 1
Online Guide
The online guide provides detailed function descriptions of the product. You may read the guide under the Help section on 70mai app or scanning the following QR code:

Download 70mai App
This product is to be used with the 70mai app. Please search for “70mai” in the app store or scan the following QR code to download and install the app:

Product Installation
1. Preparation
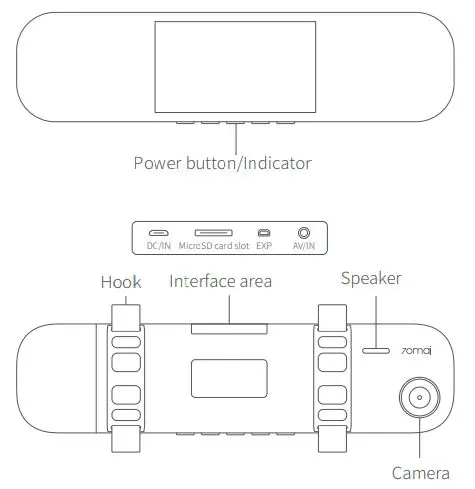
Insert the microSD card into the slot on the dash cam before inserting the power cord into the DC/IN interface on the dash cam.

2. Installation
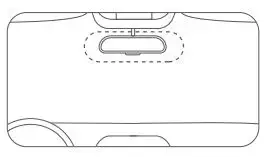
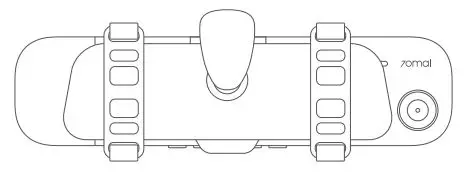
As shown in the figure below, attach the dash cam to the rearview mirror of your vehicle and adjust its position as appropriate to ensure that the camera is not blocked. Use the fixing straps in the packing box to fix the dash cam.

3. Connecting the power supply
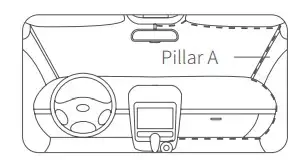
As shown in the figure below, run the power cord along the front windshield, A-pillar, and co-pilot storage compartment to the cigarette lighter. Insert the car charger into the cigarette lighter receptacle.
∗ You can use the cable crowbar in the box to hide the power cord underneath a rubber sealing strip.
∗ As the positions of cigarette lighter receptacles vary with vehicles, the specific routing of power cords depends on the actual conditions. The preceding figure serves as a reference only.
4. Adjust the camera angle
Start the vehicle or rotate the key to the ACC gear position to supply power to the cigarette lighter. The dash cam will be turned on automatically.
The camera supports universal angle adjustment, with a rotational range of ±4°. Please adjust the angle according to the preview screen to ensure that the camera is forward-facing.
Startup/Shutdown
1. Startup
Use any of the following ways to start the dash cam:
- Press the power button.
- Connect the cigarette lighter and start the vehicle. The cigarette lighter will be powered by the vehicle and the dash cam will be turned on automatically.
- Enable the parking surveillance function. The dash cam will be turned on automatically when any collision or movement of the vehicle is detected in parking surveillance mode.
∗ If no external power supply is connected and the built-in battery has a low capacity, the dash cam will not be started.
2. Shutdown
Use any of the following ways to shut down the dash cam:
- Press and hold the power button.
- Connect the cigarette lighter and turn off the vehicle. When the power supply from the vehicle to the cigarette lighter is discontinued, the dash cam will be turned off automatically.
The dash cam will be automatically turned off in any of the following circumstances:
- If no external power supply is connected and the built-in battery has a low capacity;
- If no external power supply is connected and the ambient temperature exceeds the discharge temperature limit of the built-in battery;
- If the dash cam is working under high temperature that exceeds its operating temperature limit;
- If the microSD card is removed while the dash cam is working;
- When the engine is turned off and there is residual power in the cigarette lighter, if the vehicle is kept stationary for 20 minutes and the dash cam is left untouched, the product will switch off automatically. If the parking surveillance function is enabled, the dash cam will enter the parking surveillance mode.
∗ Some vehicles are still powering cigarette lighters after their engines have been turned off. To avoid the loss of battery power due to prolonged operations of the dash cam, please make sure to manually power off the dash cam or remove the car charger if the parking surveillance function has been disabled.
∗ Once the dash cam has been manually powered off, it needs to be manually powered on the next time you start your vehicle. The Company shall not be liable for any loss that results from your failure to switch off the dash cam manually.
Voice Control
The dash cam supports quick control by voice commands. When the dash cam is turned on, you may issue a shortcut command to trigger the corresponding function.
The dash cam supports the following voice commands:
Due to the complex sound environment within the vehicle and the diversity of user accents, we do not guarantee that every voice command will be able to trigger the respective function accurately, nor do we guarantee the complete avoidance of accidental triggering.
If you do not wish to use the voice control function, please disable this function under Settings > Advanced Settings.
Function Description
1. Main interface
Once the dash cam is turned on, it automatically starts to record videos. A flashing red dot in the upper-left corner of the screen indicates that a video is being recorded.
![]() : Sound recording is enabled by default. If you wish to disable sound recording, please press the key below this icon. Once disabled, the icon will change to
: Sound recording is enabled by default. If you wish to disable sound recording, please press the key below this icon. Once disabled, the icon will change to![]() . If dual (front/rear) recording function is enabled, the icon will change to
. If dual (front/rear) recording function is enabled, the icon will change to![]() .
.
![]() : Press the key below this icon to record an emergency video and save it to the emergency video directory.
: Press the key below this icon to record an emergency video and save it to the emergency video directory.
![]() :Press and hold the key below this icon to turn off the dash cam. Press the key below this icon to start the dash cam.
:Press and hold the key below this icon to turn off the dash cam. Press the key below this icon to start the dash cam.
![]() : Press the key below this icon to enter the album.
: Press the key below this icon to enter the album.
![]() : Press the key below this icon to enter Settings.
: Press the key below this icon to enter Settings.
Icons in the status bar:
 : This icon indicates that the rear-recording function has been enabled.
![]() : This icon indicates that the parking surveillance function has been enabled.
: This icon indicates that the parking surveillance function has been enabled.
![]() : This icon indicates that the Wi-Fi hotspot has been enabled.
: This icon indicates that the Wi-Fi hotspot has been enabled.
![]() : This icon indicates that the Wi-Fi hotspot has been disabled.
: This icon indicates that the Wi-Fi hotspot has been disabled.
∗ The rear-recording function must be used with the rearview camera.
∗ You may enable/disable the Wi-Fi hotspot under Settings > Wi-Fi Hotspot.
2. Recording mode
Once the dash cam is turned on, it automatically enters the recording mode to record videos. A flashing red dot in the upper-left corner of the screen indicates that a video is being recorded. The dash cam is not in the recording mode and video recording is suspended in any of the following circumstances:
- When the dash cam is providing operating guidance after you start it for the first time;
- When the microSD card is being formatted;
- When the dash cam is being upgraded;
- When the dash cam is restoring its factory settings;
- When the dash cam is receiving its upgrade package from 70mai app;
- When you perform any operation after accessing the album either from the dash cam itself or from the mobile phone app.
When the dash cam returns to the main interface or exits the preceding procedure, it reverts back to video recording automatically.
3. Emergency video recording
You may choose one of the following ways to record an emergency video:
- Press the key below the”
 “icon on the main interface to record an emergency video;
 - Start the dash cam so that it can automatically record an emergency video when it detects any collision.
The process of recording an emergency video cannot be interrupted. When the emergency video recording is completed, the dash cam automatically enters the normal video recording mode.
You may adjust the sensitivity of the sensor that triggers the emergency video recording mode under Settings > Collision Sensitivity. The higher the sensitivity, the easier it is to trigger the emergency video recording mode. If you do not want the dash cam to automatically enter the emergency video recording mode, you may disable this function under Settings.
You may view the recorded emergency video in the emergency video directory in the album. Due to the complexity of road conditions, the dash cam may not save every emergency video to the emergency video directory. If you are unable to locate an emergency video in the emergency video directory, please search the normal video directory. The system allocates specific storage space for emergency videos during the process of microSD card formatting. When the storage limit is reached, the earliest emergency video will be deleted if a new emergency video is added. Please export important emergency videos to your mobile phone or computer for backup in a timely manner.
4. Parking surveillance
The parking surveillance function is disabled by default. You may enable this function under Settings > Advanced Settings.
Once the parking surveillance function is enabled, the dash cam enters the parking surveillance mode automatically when the vehicle is parked and turned off. In the event of a collision whilst the vehicle is parked, the dash cam automatically records a video and saves it to the parking surveillance video directory. The device will remind you to view the video the next time you start the vehicle. The parking surveillance function is ineffective in any of the following circumstances:
- If no external power supply is connected when the dash cam is turned off and the built-in battery has a low capacity, the parking surveillance mode cannot be enabled.
- When the dash cam enters parking surveillance mode for a long time without an external power supply, it will deplete its built-in battery. When the battery is low or completely
depleted, the dash cam will not be able to record parking surveillance videos in the event of a collision. - When the dash cam enters parking surveillance mode, and there is no external power supply while the temperature inside the vehicle is below 0 or above 50 , the built-in battery cannot work, and the dash cam will not be able to record parking surveillance videos in the event of a collision.
If your vehicle is parked but continues to supply power to the cigarette lighter, the dash cam will enter the parking surveillance mode after 20 minutes and the parking surveillance function shall consume the storage battery of your vehicle. When your vehicle is kept idle for a prolonged period of time, this may result in reduced storage battery power. For such circumstances, it is recommended that you use the parking surveillance cord with the storage battery protection function.
The parking surveillance function relies on an acceleration sensor to detect collision of parked vehicles. Due to the complexity of the environment, we are unable to guarantee that every collision of your parked vehicle can be accurately identified. In addition, there may be missing or false alarms. If frequent false alarms are given due to vibration rather than collision, you may disable the parking surveillance function under Settings.
For more information on product functions, please read the online guide.
Precautions
- This device is an ancillary product designed to record external videos of your vehicle. The use of this product shall not guarantee your driving safety. The Company shall not be liable for any traffic accidents caused by faults, loss of information, or operation of the product, nor shall the Company bear any loss thereof.
- Some functions of this product may not work properly due to the differences in vehicle conditions, driving modes and driving environments. The Company shall not guarantee that the product will be able to work normally under any conditions such as power failure, use beyond the normal temperature/humidity range, collision, microSD card damage, as well as other conditions that may result in functional anomalies. The videos recorded by the dash cam are for reference only.
- To avoid product failure or personal injury, please ensure that the dash cam has been installed properly and does not block the driver’s line of sight nor the airbags.
- Please use the standard car charger, power cord and other accessories of this product to avoid any failure caused by non-conformances. The Company shall not be liable for any loss caused by the use of a non-standard car charger or power cord.
- The microSD card is not included in the packing list of the product. Please purchase the microSD card separately.
- The default file partition format of the microSD card may be inconsistent with the format supported by this product. When inserting the microSD card for the first time, please format it in the dash cam before use.
- Please purchase high-quality microSD cards through proper channels. Low-quality microSD cards may lead to issues such as inconsistencies between the nominal read/write speed and the actual read/write speed, as well as inconsistencies between the nominal capacity and the actual capacity. The Company shall not be liable for any loss or damage of videos as a result of the use of low-quality microSD cards.
- In the event of battery deformation, swelling or leakage during the use or storage of the product, please discontinue use and contact our after-sales service center to avoid safety problems.
- Please keep this product away from strong magnetic fields, which may cause damage to the product.
- Do not use this product at temperatures above 60 or below -10ºC.
- Please use this product to the extent permitted by law. Keep the product at least 20cm away from the driver and passengers.
Product Specifications
Model: Midriver D04
Image sensor: SONY IMX335
Resolution: 2560 × 1600
Camera: FOV 140°F1.86-glass lens
Wireless connection: Wi-Fi IEEE 802.11 b/g/n 2.4 GHz
Sensor: Acceleration sensor
Supported OS: Android 4.4 or iOS 9.0 and above
Expandable memory: Supports 16~64 GB MicroSD cards that
have a rating of Class 10 or above.
Power supply: Car cigarette lighter
Battery capacity: 500 mash
Battery type: Lithium-ion polymer battery
Input: 5V =2A
Dimensions: 304.3 × 76.7 × 15.2 mm
Disposal and Recycling Information
![]() Hereby, 70mai declares that the radio equipment type Midriver D04 is in compliance with Directive 2014/53/EU. The full text of the EU declaration of conformity is available at the following internet address: http://www.mi.com/global/service/support/declaration.html
Hereby, 70mai declares that the radio equipment type Midriver D04 is in compliance with Directive 2014/53/EU. The full text of the EU declaration of conformity is available at the following internet address: http://www.mi.com/global/service/support/declaration.html
![]() All products bearing this symbol are waste electrical and electronic equipment (WEEE as in directive 2012/19/EU) which should not be mixed with unsorted household waste. Instead, you should protect human health and the environment by handing over your waste equipment to a designated collection point for the recycling of waste electrical and electronic equipment, appointed by the government or local authorities. Correct disposal and recycling will help prevent potential negative consequences to the environment and human health. Please contact the installer or local authorities for more information about the location as well as terms and conditions of such collection points.
All products bearing this symbol are waste electrical and electronic equipment (WEEE as in directive 2012/19/EU) which should not be mixed with unsorted household waste. Instead, you should protect human health and the environment by handing over your waste equipment to a designated collection point for the recycling of waste electrical and electronic equipment, appointed by the government or local authorities. Correct disposal and recycling will help prevent potential negative consequences to the environment and human health. Please contact the installer or local authorities for more information about the location as well as terms and conditions of such collection points.
FCC
Changes or modifications not expressly approved by the party responsible for compliance could void the user’s authority to operate the equipment.
This equipment has been tested and found to comply with the limits for a Class B digital device, pursuant to Part 15 of the FCC Rules. These limits are designed to provide reasonable protection against harmful interference in a residential installation. This equipment generates, uses and can radiate radio frequency energy and, if not installed and used in accordance with the instructions, may cause harmful interference to radio communications. However, there is no guarantee that interference will not occur in a particular installation.
If this equipment does cause harmful interference to radio or television reception, which can be determined by turning the equipment off and on, the user is encouraged to try to correct the interference by one or more of the following measures:
— Reorient or relocate the receiving antenna.
— Increase the separation between the equipment and receiver.
— Connect the equipment into an outlet on a circuit different from that to which the receiver is connected.
— Consult the dealer or an experienced radio/TV technician for help.
This device complies with Part 15 of the FCC Rules. Operation is subject to the following two conditions: (1) this device may not cause harmful interference, and (2) this device must accept any interference received, including interference that may cause undesired operation. This equipment complies with FCC radiation exposure limits set forth for an uncontrolled environment. This equipment should be installed and operated with a minimum distance of 20cm between the radiator & your body. This transmitter must not be co-located or operating in conjunction with any other antenna or transmitter.
Service: [email protected]
For further information, please go to www.70mai.com
V.1.0_20190617
]]>User Manual

Please read this manual carefully before using the product and keep it in a safe place.
Thank you for choosing the 70mai Mini Dash Cam
The 70mai Mini Dash Cam is equipped with a professional video recording chip and image sensor for capturing high-quality videos.
User guide
Please scan the QR code below to get the online user guide. Please use the product according to the instructions in the user guide. https://help.70mai.asia/640.html
Activating 70mai Mini Dash Cam
The 70mai Mini Dash Cam must be activated using the 70mai app. To download and install the app, search for “70mai” in GooglePlay Store (Android) or App Store (iOS).
Or you can download the app by scanning the QR code below:

https://www.70mai.com/en/download/?souce=QrcodeVue
Please select “Add Device” in the 70mai app and complete the activation according to the prompts.
Product overview

Illustrations of the product, accessories and user interface in the user manual are for reference purposes only. The actual product
and functions may vary due to product enhancements.
Installation
Please install the product following the method below.
- Install the electrostatic sticker
Clean your windshield and put the electrostatic sticker on the recommended area as shown in the figure below. Make sure you remove air bubbles between the sticker and the glass.
- Install the bracket
Lock the bracket to the Dash Cam, as shown in the figure below.
You will hear a snap when it is in place.

- Stick the camera mount to the windshield
Remove the protective cover from the mount and stick the mount’s base to the center of the electrostatic sticker. Make sure
your dash cam body is parallel to the ground. Press the mount to attach it to the electrostatic sticker tightly.
 4. Connect the USB cable to the cigarette lighter receptacle
Align the cable with the top edge of the windshield and fasten it along the passenger’s side and the glovebox as shown below. Connect the cable to the power adapter and insert the adapter into the cigarette lighter receptacle.
Note: The cigarette lighter receptacle might be positioned differently in your car. The picture is provided for reference only.
Note: You can use the cable crowbar in the box to hide the power cord underneath a rubber sealing strip.
Key functions
The following actions are supported for buttons of the dash cam:
| Keys | Action | Function |
| Power key | Press and hold | Turn the dashcam on/ off |
| Press once | Turn on/off the audio recording | |
| Press three times in a row | Format memory card | |
| Press five times in a row | Reset factory settings | |
| Wi-Fi Switch | Press briefly | Turn Wi-Fi hotspot on / off |
Safety precautions
Please read all precautions and instructions carefully before using this product to ensure proper and safe usage.
- This product records videos outside of moving vehicles. It can’t protect drivers and passengers from any accidents. We shall
not take any responsibility if the user gets involved in any traffic accident and/or bear any loss due to product failure, information loss, or product operation. - Due to differences in vehicle type, driving preferences, the environment, and other differences, parts of the product or the
whole product may not work normally in some circumstances. The device may not record normally due to loss of power source, abnormal temperatures and/or humidity, collisions, damage to the TF card, and other reasons. We do not guarantee that all the recorded videos will be saved completely in any given situation. The images recorded by this product are for reference only. - Install the product correctly. Do not block the driver’s vision. Do not obstruct the airbag. Keep the product at least 20cm away from the driver and passengers. Incorrect installation of the product may cause product failure and injury.
- Please use the car charger and USB cable that comes with this device to avoid compatibility issues. 70mai is not responsible for any loss caused by the use of non-standard car chargers and USB cables.
- The memory card is not included in the package. You will need to buy it by yourself.
- Use a TF card with storage capacity between 16GB and 64GB, and reading and writing speed not lower than Class10. Format the TF card before using it.
- Do not insert or pull out the TF card when the product is working to avoid damaging the TF card.
- TF card may be damaged after repetitive use. Replace TF cards in time to maintain proper recording. We shall not bear any responsibility caused by failed TF cards.
- This device is equipped with a built-in battery that is not removable. Do not disassemble the device yourself. The battery
(battery pack or assembled battery) shall not be exposed to overheating environments such as sunlight, fire, or the like. If the battery is replaced improperly, there is a danger of explosion, so that it can only be replaced with a battery of the same or equivalent type. - The device should not be exposed to water droplets or water splashes. Keep the device dry to avoid battery failure.
- If the battery is deformed, swelling, or leaking, stop using the product immediately and contact customer service.
- Do not shake or press the product. Strong impact or shaking may cause irreparable damage to the product.
- Do not clean this product with chemical solvents or cleansers.
- Keep this product away from strong magnetic fields to avoid damage.
- Do not use this product in temperatures higher than 60℃ or lower than -10℃.
- Please note that the housing’s temperature rises when the device is running.
- Use this product within the scope of the law.
Package contents
- 70mai Mini Dash Cam ×1
- USB cable×1
- Power adapter×1
- Electrostatic sticker×1
- Heat resistant adhesive ×1
- Cable crowbar ×1
- Mounting bracket ×1
- User manual×1
Specifications
Model name: Midrive D05
Image sensor: OV OS05A10
Resolution: 2560×1600
Camera: FOV 140° , F1.8
Wireless connection: Wi-Fi IEEE 802.11 b/g/n/ 2.4GHz
G-sensor: Acceleration sensor
Extended storage: MicroSD card, 16GB~64GB, Class10 or above
Supported OS: Android4.4/iOS9.0 and above
Power supply: car cigarette lighter
Battery type: li-polymer battery
Battery capacity: 500mAh
Input: 5V 1.5A
Dimensions: 86.9 × 47 × 31.9mm
FCC
Changes or modifications not expressly approved by the party responsible for compliance could void the user’s authority to
operate the equipment. This equipment has been tested and found to comply with the limits for a Class B digital device, pursuant to Part 15 of the FCC Rules. These limits are designed to provide reasonable protection against harmful interference in a residential installation. This equipment generates, uses, and can radiate radio frequency energy and, if not installed and used in accordance with the instructions, may cause harmful interference to radio communications. However, there is no guarantee that
interference will not occur in a particular installation. If this equipment does cause harmful interference to radio or television reception, which can be determined by turning the equipment off and on, the user is encouraged to try to correct the interference by one or more of the following measures:
— Reorient or relocate the receiving antenna.
— Increase the separation between the equipment and receiver.
— Connect the equipment into an outlet on a circuit different from that to which the receiver is connected.
— Consult the dealer or an experienced radio/TV technician for help.
This device complies with Part 15 of the FCC Rules. Operation is subject to the following two conditions: (1) this device may not use harmful interference, and (2) this device must accept any interference received, including interference that may cause undesired operation.
This equipment complies with FCC radiation exposure limits set forth for an uncontrolled environment. This equipment should
be installed and operated with a minimum distance of 20 cm between the radiator & your body. This transmitter must not be
co-located or operating in conjunction with any other antenna or transmitter.
Service: [email protected]
For further information, please go to www.70mai.com
Manufacturer: 70mai Co., Ltd
Address: Room2220, building2, No.588, Zixingroad, MinHangDisstrict, Shanghai, China