ALDI 1180130AL Gardenline Solar Water Feature

Components
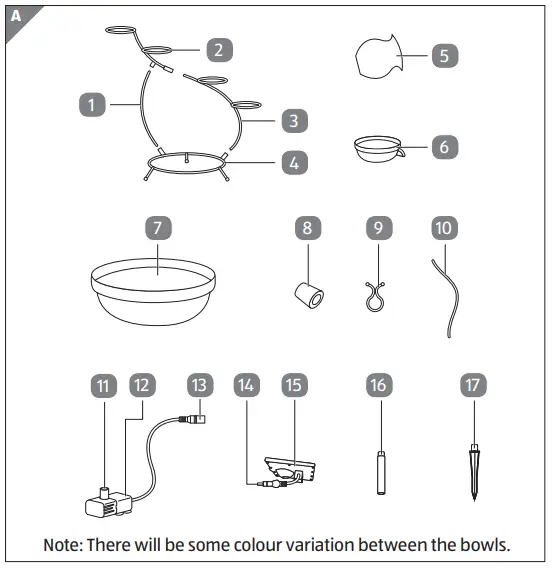
- Stand support
- Upper stand
- Lower stand
- Base stand
- Jug
- Small bowl, 3×
- Large bowl
- Bung
- Clip, 3×
- Hose
- Water outlet
- Pump
- Power connector
- Power plug
- Solar panel
- Pole
- Ground stake
- Filter housing
- Filter
- Impeller
General information
Reading and storing the user manual
This user manual accompanies this solar water feature (hereafter referred to as the “product”), and contains important information on setup and handling. Before using the product, read the user manual carefully. This particularly applies to the safety instructions. Failure to do so may result in personal injury or damage to the product. The user manual is based on the standards and rules in force in the United Kingdom and European Union (Ireland). When abroad, you must also observe country-specific guidelines and laws. Store the user manual for further use. Make sure to include this user manual when passing the product on to third parties. Contact After Sales Support for additional copies of the user manual.
Proper use
The product is exclusively designed for garden decoration. It is only intended for private use and not suitable for commercial purposes. The product is not a children’s toy. Only use the product as described in this user manual. Any other use is considered improper and may result in damage to property or persons. The manufacturer or vendor cannot be held liable for damages or injury incurred through improper or incorrect use.
Explanation of symbols
The following symbols are used in this user manual, on the product or on the packaging.
- This symbol provides you with useful additional information on handling and use.
- Declaration of Conformity (see chapter “Declaration of Conformity”):
- Products labelled with this symbol meet all applicable provisions of the European Economic Area.
- This symbol identifies products protected from dust ingress and are suitable for continuous immersion in water.
- This symbol identifies voltage and the current rating for direct current.
- Maximum water depth for the pump
- Caution! The product is heavy.
Safety
Signal symbol/word definitions
The following symbols and signal words are used in this user manual.
WARNING!
This signal symbol/word designates a hazard with moderate risk, which may result in death or severe injury if not avoided.
NOTICE!
This signal word warns of possible damage to property.
General safety instructions
Risk of injury!
If you do not use the product properly, there is an increased risk of injury.
- This product can be used by children aged from 8 years and above and persons with reduced physical, sensory or mental capabilities or lack of experience and knowledge if they have been given supervision or instruction concerning the use of the product in a safe way and understand the hazards involved. Children shall not play with the product. Cleaning and user maintenance shall not be made by children unless they are older than 8 and supervised.
- Keep children under the age of 8 away from the product and mains cord.
- Make sure that children do not play with the plastic wrapping. They may get caught in it when playing and suffocate.
- Always keep the inside of the power plug and power connector dry. Wipe off any excess water before connecting.
- Keep the product and power cord away from open flames and hot surfaces.
- Lay the power cord so that it does not pose a tripping hazard.
- Do not kink the power cord and do not lay it over sharp edges.
NOTICE!
Risk of damage!
Improper handling of the product may result in damage to the product.
- Place the product on a stable and level surface.
- Place the product in a location away from any other electrical equipment to avoid the risk posed by water splash.
- Only use the product with clear water at temperature below 35 °C.
- Do not pull or push the product for relocation.
- Never place the product on or near hot surfaces (stovetops, etc.) or expose it to high temperatures (heaters etc.).
- Never attempt to clean the solar panel by immersing it in water and do not use a steam cleaner to clean it. Otherwise, you could damage the solar panel.
- Stop using the product if its parts exhibit cracks or breaks or are deformed. Only replace damaged parts with corresponding original spare parts.
First use
Checking the product and scope of delivery
- Risk of damage!
If you are not cautious when opening the packaging with a sharp knife or other pointed object, you may quickly damage the product.- For this reason, be very careful when opening it.
- Take the product out of the packaging.
- Check to make sure that all parts are included (see Fig. A).
Check whether the product or individual parts are damaged. If this is the case, do not use the product. Contact the manufacturer via the service address indicated on the warranty card.
- For this reason, be very careful when opening it.
- Basic cleaning
- Remove the packaging material and all plastic wrappings.
- Clean all parts of the product before first use as described in the chapter “Cleaning”.
Using the product
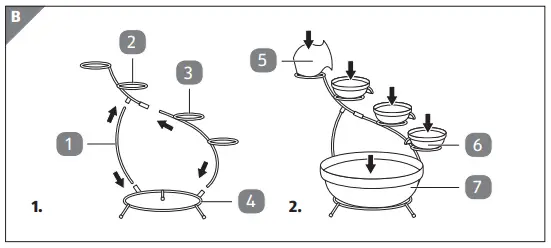
- Insert the base stand 4 , upper stand 2 , lower stand 3 and stand support 1 onto each other (see step 1 in Fig. B).
- Place the jug 5 , small bowls 6 and large bowl 7 on the assembled stand (see step 2 in Fig. B).
- Attach the bung 8 onto the upper end of the hose 10 and then insert the bung and hose into the opening at the bottom of the jug (see step 1 in Fig. C).
- Attach the lower end of the hose to the water outlet 11 of the pump 12 (see step 2 in Fig. C).

- Place the pump at the bottom of the large bowl and secure the pump with its suction feet.
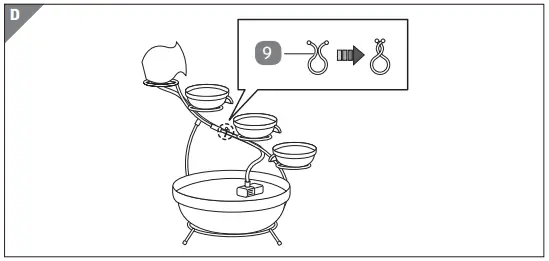
- Attach the hose to the stand with the clips 9 . Close the clips to secure the fixing (see Fig. D).
- Fill the small bowls and large bowl with clean water. The water in the large bowl must cover the pump.
- Insert the ground stake 17 onto the pole 16 and the pole onto the bottom of the solar panel 15 (see step 1 in Fig. E).
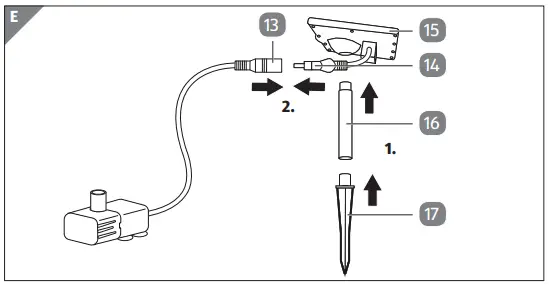
- Insert the solar panel into the ground as far as the ground stake allows. If necessary, use a shovel to loosen hard ground before inserting the solar panel. Do not use any force (e.g. hammer blows) to insert the solar panel as this will cause damage. See chapter “Optimal use of the solar panel” for more details.
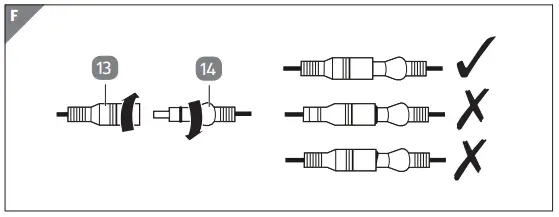
- Insert the power plug 14 into the power connector 13 (see step 2 in Fig. E). Slightly twist the power plug and power connector during insertion to ensure a water-tight connection (see Fig. F).
The pump starts working as soon as it receives sufficient solar power.
Water must be regularly topped up in the bowls during use.
- Optimal use of the solar panel
- Position the product in such a way that the solar panel 15 can absorb maximum sunlight. A shady position will affect its operating capacity (see Fig. G).
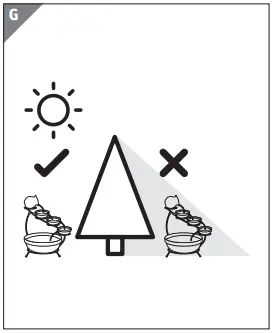
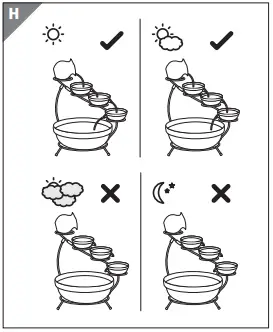
The product is designed primarily to operate in summer months but will also work in spring and autumn provided that there is good sunshine. Performance is directly related to the amount and strength of sunlight received (see Fig. H).
- Position the product in such a way that the solar panel 15 can absorb maximum sunlight. A shady position will affect its operating capacity (see Fig. G).
Troubleshooting
Some problems may be caused by minor faults that you can fix yourself. To do so, follow the instructions in the following table. If it is still not possible to resolve the problem, contact customer service. Do not repair the product yourself.
| Problem | Possible reason and solution |
| The product does not operate, or the performance drops. | − Make sure the solar panel 15 is correctly positioned.
− Make sure there is sufficient water in the bowls 6 / 7 . − Make sure the filter 19 of the pump 12 is clean (see chapter “Cleaning the pump”). − Make sure there is no debris in the bowls blocking the pump. |
Cleaning
- Risk of short circuit!
Water that has penetrated the housing may cause a short circuit.- Make sure that no water penetrates the housing of the solar panel.
- Never immerse the solar panel in water.
- Risk of damage!
Improper handling of the product may result in damage.- Do not use any aggressive cleaners, brushes with metal or nylon bristles, or sharp or metallic cleaning utensils such as knives, hard scrapers and the like. They could damage the surfaces.
- Disconnect the power plug 14 from the power connector 13 before cleaning.
- Regularly change the water in the jug 5 and bowls 6 / 7 .
- Use a damp cloth to wipe off the stand, jug, bowls and solar panel 15 . Then let all parts dry completely.
- Do not use any aggressive cleaners, brushes with metal or nylon bristles, or sharp or metallic cleaning utensils such as knives, hard scrapers and the like. They could damage the surfaces.
- Cleaning the pump
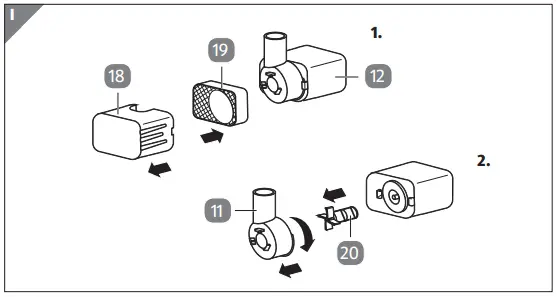
The components of the pump 12 can be disassembled for regular cleaning to ensure optimum performance.- Disconnect the power plug 14 from the power connector 13 before cleaning.
- Gently pull the filter housing 18 to remove it from the pump. Then remove the filter 19 from the filter housing (see step 1 in Fig. I).
- Slightly rotate the water outlet 11 clockwise and then detach it from the pump. Remove also the impeller 20 from the pump (see step 2 in Fig. I).
- Clean the filter housing, filter, water outlet and impeller under running water. Attach them back to the pump after cleaning.
Storage
All parts must be completely dry before being stored.
- Always store the product in a dry area.
- Protect the product from frost. Store it indoors during cold months.
- Protect the product from direct sunlight.
- Store the product so that it is not accessible to children.
Technical data
- Model: 1180130AL / 1180230AL
- Dimensions: Approx. 49 × 41 cm
- Rating (solar panel): 6 V, 1.5 W
- Rating (pump): 4–12 V-3.5 W Max.
- IP code (pump): 68 (protected from dust ingress and suitable for continuous immersion in water)
- Max. liquid temperature (pump): 35 °C
- Product code: 709757 / 709758
Declaration of conformity
The EU declaration of conformity can be requested from the address specified on the enclosed warranty card.
Disposal
Disposing of the packaging
Sort the packaging before you dispose of it. Dispose of paperboard and cardboard with the recycled paper service and wrappings with the appropriate collection service.
Disposing of the product
(Applicable in the European Union and other European countries with separate collection systems of recyclable materials) Old appliances may not be disposed of in the household waste! Should the product no longer be capable of being used at some point in time, dispose of it in accordance with the regulations in force in your city or county. This ensures that old appliances are recycled in a professional manner and also rules out negative consequences for the environment. For this reason, electrical equipment is marked with the symbol shown here.
Great care has gone into the manufacture of this product and it should therefore provide you with years of good service when used properly. In the event of product failure within its intended use over the course of the first 3 years after date of purchase, we will remedy the problem as quickly as possible once it has been brought to our attention. In the unlikely event of such an occurrence, or if you require any information about the product, please contact us via our helpline support services, details of which are to be found both in this manual and on the product itself
CALL: 08448009163
WEB: [email protected]
USER MANUAL
Welcome
Congratulations on choosing to buy a Wellness Plus® product. All products brought to you by Wellness Plus® are manufactured to the highest standards of performance and safety and, as part of our philosophy of customer service and satisfaction, are backed by our comprehensive 1 Year Warranty. We hope you will enjoy using your purchase for many years to come.
Symbol Legend
IMPORTANT: DO NOT USE YOUR WHEELCHAIR UNTIL THIS MANUAL HAS BEEN READ AND UNDERSTOOD.
DANGER! Warning messages regarding possible risks of serious accidents or death.
WARNING! Warning messages regarding possible risks of injury. CAUTION! Warning messages regarding possible technical damage.
NOTE: Information for operating the product.
Use
Light-weight wheelchairs are exclusively for a user who is unable to walk or has limited mobility, for their own personal use in and outdoor on dry, firm and level surface terrain. The maximum weight limit (includes both the user and any weight of accessories fitted to the wheelchair) is marked on a label. Warranty can only be honored if the product
is used under the specified conditions and for the intended purposes. DO NOT use or fit any 3rd party components to the wheelchair.
Area of application
The variety of fitting variants as well as the modular design means that it can be used by those who cannot walk or have limited mobility because of the:
- Paralysis
- Joint contractures/joint injuries
- Illnesses such as heart and circulation deficiencies, disturbance of equilibrium, or cachexia
- Elderly people who still have strength in the upper body.
When considering provision, please also note the body size, weight, physical and psychological constitution, age of the person, living conditions, and environment.
Intended Use
This product is designed for personal use only and is not intended for commercial, healthcare, or trade use.
General safety notes and driving restrictions
The engineering and construction of this wheelchair have been designed to provide maximum safety. International safety standards currently in force have either been fulfilled or exceeded in parts. Nevertheless, users may put themselves at risk by improperly using their wheelchairs. For your own safety, the following rules must be strictly observed.
Unprofessional or erroneous changes or adjustments increase the risk of accidents. As a wheelchair user, you are also part of the daily traffic on streets and pavements, just like anyone else. We would like to remind you that you are therefore also subject to any and all traffic laws. Be careful during your first ride in this wheelchair. Get to know your wheelchair.
Before each use, the following should be checked:
- Fixed axles or on the rear wheels.
- Hook and loop tapes on seats and backrests
- Tyres and wheel locks. Before changing any of the adjustments of this wheelchair, it is important to read the corresponding section of the user’s manual. It is possible that potholes or uneven ground could cause this wheelchair to tip over, especially when riding uphill or downhill. When riding forwards over a step or up an incline, the body should be leaning forward.
- NEVER exceed the maximum load of 120 kg for user plus any items carried on the wheelchair. If you exceed the maximum load, this can lead to damage to the chair, or you may fall or tip over, lose control, and may lead to serious injury to the user and other people.
- Do not exceed the maximum load of 2kg inside the storage pocket
- When it is dark, please wear light clothing or clothing with reflectors, so that you can be seen more easily. Make sure that the reflectors on the side and back of the wheelchair are clearly visible.
- We would also recommend that you fit an active light.
DANGER!
- To avoid falls and dangerous situations, you should first practice using your new wheelchair on level ground with good visibility.
- When getting on or off the wheelchair, do not use the footboards.
- These should be flipped up beforehand and swung to the outside as far as possible. Always position yourself as close as possible to the place where you wish to transfer to.
- Only use your wheelchair with care. For example, avoid traveling against an obstacle without braking (step, curb edge) or dropping down gaps.
- The wheel locks are not intended to stop your wheelchair in motion. They are only there to ensure that your wheelchair does not begin rolling unintentionally. When you stop on uneven ground, you should always use the wheel locks to prevent unintended movement. Always apply both wheel locks; otherwise, your wheelchair could tip over.
- Explore the effects of changing the center of gravity on the behavior of the wheelchair in use, for example on inclines, slopes, all gradients, or when overcoming obstacles. Do this with the secure aid of a helper.
- With extreme settings and less-than-perfect posture, the wheelchair may tip over even on a level surface.
- Lean your upper body further forward when going up slopes and steps.
- Lean your upper body further back when going down slopes and steps. Never try to climb and descend a slope diagonally.
- Avoid using an escalator which may lead to serious injury in the event of a fall.
- Do not use the wheelchair on slopes more than 10°. The Dynamic safe slope is dependent on the chair configuration, the user’s abilities, and the style of riding. As the user’s abilities and style of riding cannot be predetermined then the max safe slope cannot be determined. Therefore this must be determined by the user with the assistance of an attendant to prevent tipping.
- It is possible that potholes or uneven ground could cause this wheelchair to tip over, especially when riding uphill or downhill.
- Do not use your wheelchair on muddy or icy ground.
- Do not use your wheelchair where pedestrians are not allowed.
- To avoid hand injuries do not grab in between the spokes or between the rear wheel and wheel lock when driving the wheelchair.
- Fingers will easily become hot when braking at a high speed or on long inclines.
- Only attempt stairs with the help of an attendant. There is equipment available to help you, e.g. climbing ramps or lifts, please use them. If there is no such equipment available, then the wheelchair must be tipped and pushed, never carried, over the steps (2 helpers). We recommend that users over 80 kg in weight are not transferred in this way.
- Make sure that the attendant only holds the wheelchair using securely mounted parts. Do not use removable parts (e.g. not on the footrests or the armrests).
- Secure your wheelchair on uneven ground or when transferring.
- This wheelchair is not a crash-tested chair, and users should never stay in the chair while in a vehicle.
- Depending on the diameter and setting of the castors, as well as the center of gravity setting of the wheelchair, the castors may begin to wobble at high speeds. This can lead to castor seizure and the wheelchair may tip over.
- In particular, do not travel on an incline without brakes, travel at a reduced speed.
- When reaching for objects (which are in front of, to the side, or behind the wheelchair) make sure that you do not lean too far out of the wheelchair, as if you change the center of gravity there is a risk of tipping or rolling over. The hanging of additional load (backpack or similar items) onto your chair’s back posts can affect the rearward stability of your chair, especially when used in combination with recliner backrests. This can cause the chair to tip backward causing injury.
- If the seat and back sling is damaged, you must replace them immediately.
- Be careful with fire, in particular with burning cigarettes. Seat and back slings can be set alight.
- If the wheelchair is subject to direct sunlight / cold temperature for a long period of time, then parts of the wheelchair (e.g. frame, legrests, brakes, and side guard) may become hot (>41°C) / very cold.
Handling
FOLDING UP
First remove any seat cushion or the back seat shell from the wheelchair and flip up the (platform) footplate or the individual footrests.

Take hold of the seat sling fabric in the middle, at the front, and the back, and pull upwards. The wheelchair will then fold up.

To fold your wheelchair so that it is as small as possible, e.g., to put it into a car, you can remove the footrests. For this purpose, open the latch from the inside and swing the footrest to the side. Then the footrest only has to be drawn out of the receiver tube.
UNFOLDING
Tip the wheelchair on an angle while standing at the side of the wheelchair.

Press down on the seat tube nearest to your body. Your wheelchair is then unfolded. Now ensure the seat tubing is right down and into position. Be careful not to get your fingers caught in the cross-tube assembly.
GETTING INTO YOUR WHEELCHAIR INDEPENDENTLY
- The wheelchair should be pushed up against a wall or solid piece of furniture;
- The brakes should be on;
- The footplates should be hinged up;
- The user can then lower himself into the chair;
- The footplates should then be pushed down and the feet rested on them in front of the heel loops.

GETTING OUT OF YOUR WHEELCHAIR INDEPENDENTLY
- The brakes should be on;
- The hinged footplates should be hinged up;
- With one hand on each armrest, the person should bend slightly forward to bring the body weight to the front of the seat, and with both feet firmly on the ground, one foot well back, push up into the upright position.
WARNING!
- When standing, do not stand on the footplates or the wheelchair will tip up. It is easier and safer to get into your wheelchair if you turn the footplates up and out of the way or take them off the wheelchair.
- Always engage the wheel brakes when transferring in or out of the wheelchair.
STEP TUBES
Step tubes are used by attendants to tip a wheelchair over an obstacle Simply step on the tube to push a wheelchair, for example, over a kerb or step.

WHEEL LOCKS
Your wheelchair is equipped with two-wheel locks. They are applied directly against the tyres.

To engage, press both brake levers forward against the stops. To release the locks, pull the levers back to their original positions. Braking power will decrease with:
- Worn tyre tread
- Wet tyres
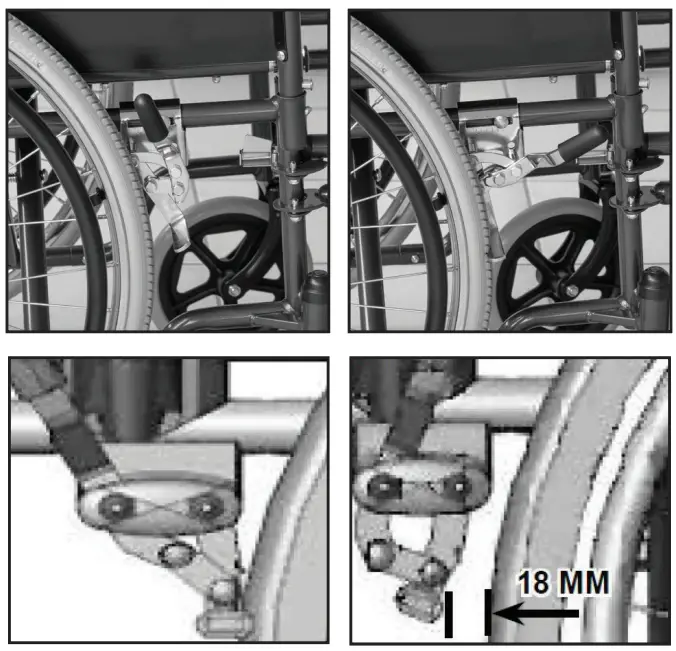
- Improperly adjusted wheel locks. The wheel locks have not been designed to be used as brakes for a moving wheelchair. The wheel locks should therefore never be used to brake a moving wheelchair. Always use the hand rims for braking. Make sure that the gap between the tires and wheel locks complies with the given specifications. To readjust, loosen the screw and set the appropriate gap. Then re-tighten the screw.
CAUTION!
- After each adjustment of the rear wheels, check the wheel lock gap and re-adjust if necessary.
- Mounting the wheel lock too close towards the wheel will result in a higher effort to operate. This might cause the brake lever extension to break!
- Leaning onto the brake lever extension while transferring will cause the lever to break! Splashing water from tyres might cause the wheel lock to malfunction.
FOOTPLATES:
The footplates can be flipped up to make it easier to transfer to/from the chair.
Lower leg length:

For users with longer legs, the leg support can be lowered to the appropriate level by using the bolt located on the base of the footrest. Loosen the bolt, push the tubes to the desired position and then re-tighten the screws. If jammed lightly tap the bolt on a solid surface.
There must always be a minimum gap of 2.5 cm between the footplates and the ground.
ARMRESTS
The armrest will support the user.
- To remove the armrest, push the pin (1), so that the armrest is released.
- Use both hands to lift the armrest out of its location spots.
- To put the armrest in, line up the location spots and push down with a small amount of pressure.

TECHNICAL SPECIFICATION
| Overall Width | 66cm |
| Overall Height | 91cm |
| Overall Length | 109cm |
| Folded Width | 29cm |
| Total Weight | 19.1kg |
| Weight Capacity | 120kg |
| Max Weight for Storage Pocket | 2kg |
| Seat Dimensions | 46 x 40cm |
| Seat-to-Floor Height | 49cm |
| Seat Back Height | 41cm |
| Colour | Titanium |
MAINTENANCE:
- Check all tyres for wear and damage at regular intervals, at least annually. Change the tires as soon as there is any sign of damage or wear.
- Check the seat and back sling for wear and damage at regular intervals, at least annually. Change these items as soon as there is any sign of damage or wear.
- Check all frame and backrest components for wear and damage at regular intervals, at least annually. Change these items as soon as there is any sign of damage or wear.
- Check the brakes for wear and damage at regular intervals, at least annually. Check that they are working properly and are easy to use. Change the brakes as soon as there is any sign of damage or wear.
- Check to make sure all bolts are secure at regular intervals, at least annually. All screws which are critical to using the wheelchair safely have safety nuts. Safety nuts should only be used once and should be replaced after use.
- Please use only mild household cleaners when your wheelchair is dirty. Use only soap and water when cleaning the seat upholstery.
- Depending on the frequency and type of use, we recommend taking your wheelchair to your authorized dealer regularly, but at least within a year, to have it maintained by trained personnel.
CAUTION!
Sand, salt, and seawater can damage the bearings of the front and rear wheels. Clean and dry the wheelchairs carefully, after they have been exposed to these elements.
HYGIENE WHEN BEING REUSED:
When the chair is to be reused, it should be prepared carefully, and be wiped and treated with spray disinfectant on all surfaces which could come into contact with the user. If you need to do this quickly, you must use a liquid, alcohol-based disinfectant suitable for medical products and devices.
TROUBLESHOOTING
Wheelchair pulls to one side
- Check tyre pressure
- Check to make sure wheel turns easily (bearings, axle)
- Check the castor angle
- Check to make sure both castors are making proper contact with the ground or castors may begin to wobble
- Check to make sure all bolts are secure; tighten if necessary (see the section on torque)
- Apply small amount of lubrication to spots where movable parts come in contact with one another
- Check to see if rear wheels are adjusted differently
- All parts are available through Care Quip, who hold spare parts specifically for this model
MANUFACTURER AND AUSTRALIAN SPONSOR
Care Quip
PO BOX 6308
Silverwater NSW 1811
02 9714 1111
[email protected]
![]()
![]()
Warranty Details
REGISTER YOUR PURCHASE AT www.aldi.com.au/en/about-aldi/product-registration/ TO KEEP UP-TO-DATE WITH IMPORTANT PRODUCT INFORMATION
The product is guaranteed to be free from defects in workmanship and parts for a period of 12 months (dependent on the product) from the date of purchase. Defects that occur within this warranty period, under normal use and care, will be repaired, replaced, or refunded at our discretion. The benefits conferred by this warranty are in addition to all rights and remedies in respect of the product that the consumer has under the Competition and Consumer Act 2010 and similar state and territory laws.
Our goods come with guarantees that cannot be excluded under the Australian Consumer Law. You are entitled to a replacement or refund for a major failure and for compensation for any other reasonably foreseeable loss or damage. You are also entitled to have the goods repaired or replaced if the goods fail to be of acceptable quality and the failure does not amount to a major failure.
AFTER SALES SUPPORT
0297141111
AUS Hotline Costs
1 YEAR WARRANTY
[email protected]
MODEL: NC0270 PRODUCT CODE: 18662 03/2022
ALDI 712182471902200 Adventuridge 6 Man Air Tent
Scope of delivery

Components
- Tent
- Guy rope, ×16
- Type I, ×6
- Type II, ×8
- Type III, ×2
- Carry bag
- Air pump
- Valve adapter, ×5
- Fiberglass pole
- Tent loop, ×8
- Air valve, ×3
- Inflatable pole (middle)
- Inflatable pole (rear)
- inflatable pole (front)
- Awning
- Pole socket, ×2
- Outer tent
- Inner tent
- Hook, ×14
- Loop, ×14
Connecting elements supplied
- 7 Peg, ×28
Required tools (not included)
- 19 Hammer
General information
Reading and storing the user manual
This user manual accompanies this 6 man air tent (hereafter referred to as the „product“), and contains important information on setup and handling. Before using the product, read the user manual carefully. This particularly applies to the safety instructions. Failure to do so may result in personal injury or damage to the product. The user manual is based on the standards and rules in force in the United Kingdom and European Union (Ireland). When abroad, you must also observe country-specific guidelines and laws. Store the user manual for further use. Make sure to include this user manual when passing the product on to third parties.
Proper use
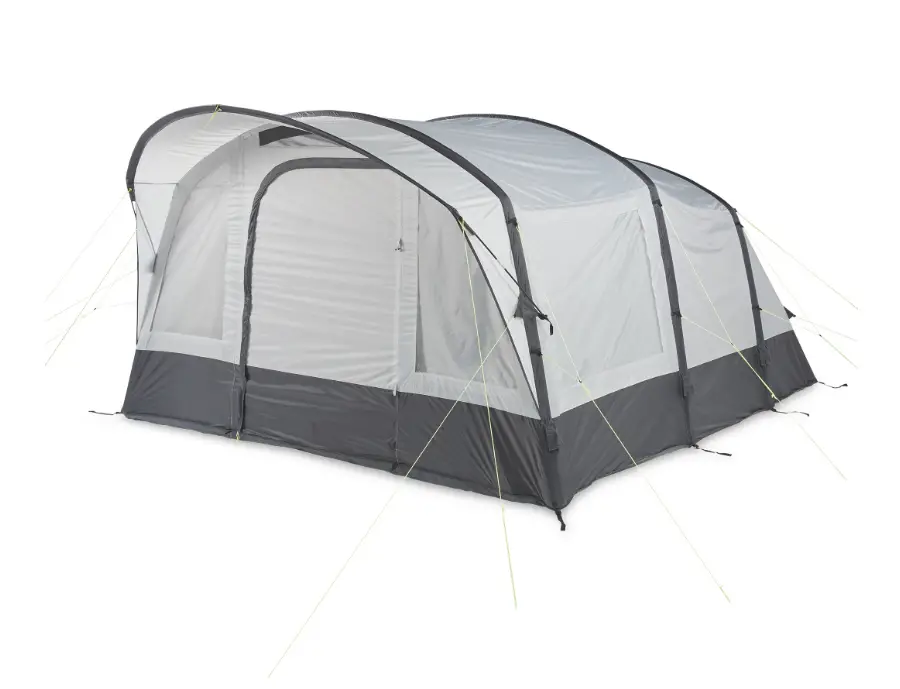
The product is exclusively designed for outdoor camping with up to 6 persons. It is only intended for private use and not suitable for commercial purposes. The product is not a children’s toy. Only use the product as described in this user manual. Any other use is considered improper and may result in damage to property or persons. The manufacturer or vendor cannot be held liable for damages or injury incurred through improper or incorrect use.
Explanation of symbols
- The following symbols are used in this user manual, on the product or on the packaging.
- This symbol provides you with useful additional information on handling and use.
Safety
Signal symbol/word definitions
The following symbols and signal words are used in this user manual.
WARNING: This signal symbol/word designates a hazard with moderate risk, which may result in death or severe injury if not avoided.
CAUTION: This signal symbol/word designates a hazard with low risk, which may result in minor or moderate injury if not avoided.
NOTICE: This signal word warns of possible damage to property.
General safety instructions
The danger of suffocation!
If the inside of the product is not adequately ventilated, there is a risk of suffocation. Children could catch themselves in the tent tarps, in the packaging wrapper or in the carry bag when playing and suffocate.
- Make sure that the ventilation windows are always open in the event of high temperatures.
- Avoid continuous exposure to sunlight to prevent the accumulation of heat inside the product.
- Do not leave children unattended in the product.
- Make sure the vents are open.
- Make sure that there is always an unobstructed path of escape out of the product. Keep the exits unobstructed.
- Do not allow children to play with the tent tarps, the packaging wrapper or carry bag.
- Do not use the product if it exhibits visible damage.
Risk of injury
Once set up, the fiberglass pole is under tension. Careless and improper handling of the pole may result in injury.
- Make sure that the tent poles do not end up in the hands of children.
- When handling the fiberglass poles, pay attention to nearby persons.
Risk of strangulation
If the guy ropes end up in the hands of children, they could strangle themselves.
- Keep the guy ropes out of the reach of children.
- Do not allow children to play with the guy ropes.
Risk of fire and burn hazard
The product consists of flammable material. It could catch fire.
- Do not set up any cooking or heating devices in the product and do not hang any lighting fixtures near the walls or roof of the product.
- Do not place any electric devices (e.g. heaters) that are switched on near or inside the product.
- Do not use any gas or other combustion devices near or inside the product.
- Keep the product away from an open fire. Do not start a fire inside the product.
- Avoid continuous exposure to sunlight to prevent the accumulation of heat inside the product.
- Keep the entrance of the product free of obstructions.
- Make sure you are aware of fire prevention precautions on the premises.
CAUTION
Risk of injury
You could trip over pegs protruding out of the ground or tensioned guy ropes. You could injure yourself in the process.
- Always insert pegs all the way in the ground.
- Take note of the guy ropes when close to the product.
- Do not leave the product unattended during set-up.
NOTICE
Risk of damage
Incorrectly setting up the product, improper handling of the product, and using the product in extreme weather conditions could damage it.
- Only use the product in mild weather conditions.
- Do not use the product in alpine or other extreme conditions, e.g. in the event of hail, flooding, a storm, extreme cold or heat.
- Do not place the product with the entrances against the wind.
- Use the guy ropes and pegs to secure the product and protect it against the wind.
- Promptly take the product down in the event of an incoming storm, thunderstorm or case of strong wind. Even if properly anchored, it may come loose.
- Do not use the product in the event of snow. The tent tarp is not designed to withstand snow loads and may rip.
- Stop using the product if the plastic parts of the product or the tent tarps are deformed, cracked, chipped or exhibit breaks, splinters or other damages.
- Do not place any objects on top of the product.
First use
Checking the product and pack contents
If you are not cautious when opening the packaging with a sharp knife or another pointed object, you may quickly damage the product.
- Be very careful when opening.
- Take the product out of the packaging.
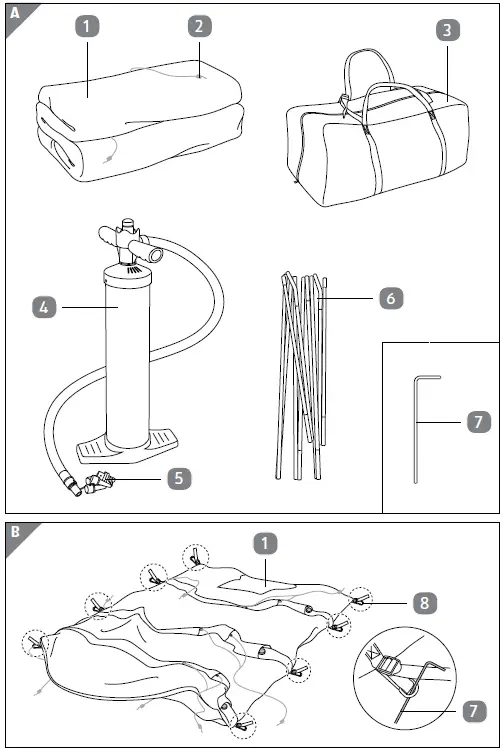
- Check to make sure that the delivery is complete (see Fig. A).
- Check whether the product or the individual parts exhibit damage. If this is the case, do not use the product. Contact the manufacturer at the service address specified on the warranty card.
Setting up the product
If you set up the product in an unsuitable location or do not secure it sufficiently, it may be damaged.
- Set up the product on a dry, level surface on which the guy ropes can be secured.
- Make sure that there are no pointy rocks or other sharp objects on the ground beneath the product.
- Make sure that there is enough space around the product so that you can secure the product with the guy ropes.
- Do not set up the product on sloped ground.
- Do not set up the product on sandy ground. It will not be possible to securely anchor your product in sandy ground.
Risk of damage
Strong wind or a storm may pull the product out of the anchors and damage it.
- Preferably choose a wind-protected area for set-up.
- Set the product up so that the wind can blow over the product from the back of the product.
- Use the guy ropes and pegs to secure the product and protect it against the wind.
- Set up the product before a trip to familiarise yourself with the product’s construction.
- Choose an area that is large enough to accommodate not only the tent, but also ensure there is enough space to each side surrounding the tent to tie down the guy ropes to the ground.
- The net insert in the tent permits adequate ventilation and, at the same time, prevents insects from entering the product.
- The product consists of an outer 15 and an inner tent 16, which are separated by a door. The inner tent typically serves as a bedroom, while the outer tent is used as a living room/lounge.
- Select a suitable, level set-up location where you can properly secure the product by attaching the guy ropes 2 to the ground using the pegs 7 . Ensure the ground is free of stones and other sharp objects.
- Take the tent 1 , the fiberglass pole 6 as well as the pegs out of the carry bag 3 (see Fig. A).
- Spread out the tent with the dark grey underside facing downwards at the setup location (see Fig. B).
- Secure the tent on the ground by using peg 7 to secure the tent loops 8 in the ground (see Fig. B). Use a hammer 19 if necessary to drive the pegs into the ground. Make sure that the underside of the tent is tensioned and that the pegs do not protrude from the ground.
- Locate air valve 9 on the tent (see Fig. C) and make sure the lower parts of the valves are fully screwed onto the tent to prevent air from escaping while inflating. Open the locking caps of the air valves.
- Fit the correct valve adapter 5 to the air hose and insert it into the air valve on the side of the inflatable pole (middle) 10. Use the air pump 4 to inflate the inflatable pole (middle) and keep pumping until the pole feels rigid (see Fig. D). The air pump is fitted with a pressure release valve which automatically releases air from the air tubes once the pressure exceeds 7 psi. Once you have finished inflating, remove the air hose and replace the locking cap.
- Inflate the rear and front inflatable poles 11 / 12 as described above (see Fig. E and F).
- Fold apart the fiberglass poles and push the individual pole parts into each other to connect them.
- Starting from one side, slide the fiberglass pole 6 through the sleeve on the edge of the awning 13. Secure the pole in place by inserting both ends into the pole sockets 14 on each side of the awning (see Fig. G). The fibreglass pole has been set up and is under tension.
- To further secure the product in place, a total of 16 guy ropes 2 of 3 different types are provided (see Fig. H). Unravel the guy ropes and pull them away from the tent, while making sure they are tensioned. The length and rope tension of individual ropes can be adapted by the fasteners attached to some of the ropes. Secure the guy ropes at suitable spots in the ground using the pegs (see Fig. I). Use a hammer if necessary to drive the pegs into the ground.
Attaching the inner tent to the outer tent
The inner and outer tent are buttoned together upon delivery. If the outer tent 15 and the inner tent 16 are not buttoned together (e.g. after cleaning or drying), proceed as follows:
- Spread out the tent with the dark grey underside facing down.
- Take the inner tent and attach it to the outer tent by inserting the hooks 17 attached to the inner tent through the loops 18 attached to the outer tent starting from the rear and moving forward (see Fig. J). Make sure the hooks are pushed all the way through the loops and cannot slip back out.
- Attach the ground sheet to the outer tent via the sewn-in hooks as you work your way forward.
To unbutton the inner tent and the outer tent, perform the above steps in reverse order.
Taking down the product
Proceed as follows if you would like to take the tent down again:
- Remove all objects and any dirt or residues from the tent and clean it as described in the chapter “Cleaning and care”.
- Perform steps 1–10 as described in chapter “Setting up the product” in reverse order. To deflate the inflatable poles, carefully open up the entire valves, not just the locking caps, and carefully press the beams together to release the air. Never force the air out of the beams, as you might risk damaging the beams and poles.
Cleaning and care
NOTICE
Risk of damage
Improper handling of the product may result in damage to the product.
- Do not use any aggressive cleaners, sharp or metallic cleaning mutensils such as knives, hard scrapers, and the like. They could damage the surfaces.
- Never wash the product in the washing machine. It would be destroyed as a result.
- Never have the product dry cleaned.
- Only use clean water or a commercially-available tent cleaner to clean the product.
- Wipe off the product before you take it down to remove dust or build-up dirt on the surface.
- If applicable, wipe the erected tent off with a damp, soft sponge or cloth with clean water or a commercially-available tent cleaner.
- Let the inner tent 16 dry completely.
- Wipe the outer tent 15 off with a damp, soft sponge or cloth with clean water or commercially-available tent cleaner.
- Let the outer tent dry completely.
- If the inside of the outer tent or the inner tent is damp, unbutton the two tents as described in the chapter “Attaching the inner tent to the outer tent”.
- Remove the outer tent and place it with the outside on a smooth, dry, and clean surface.
- Let the inner and outer tent dry completely.
- Place the inner tent with the top side down on a smooth, dry, and clean surface.
- Wipe off the tent floor with a damp, soft sponge or cloth with clean water or commercially- available tent cleaner.
- Let all parts dry completely. You can now fold up the tent 1 for storage as described in the chapter “Storing the product”
Storing the product
NOTICE
Risk of mold
Never fold up the product when it is wet or dirty. Mold or odor may form or the material may be discolored.
- Clean the product before you fold it up as described in the chapter “Cleaning and care”.
- Take the tent 1 down as described in the chapter “Taking down the product”.
- Spread out the product with the dark grey underside facing down.
- If the outer tent 15 and the inner tent 16 are buttoned together, smooth out the outer tent and fold the corners together so that it is flush with the inner tent.
- If the outer tent and inner tent are not buttoned together, button them together as described in the chapter “Attaching the inner tent to the outer tent”.
- Fold the tent up so that it has the width of the carry bag 3 .
- Store the tent, the pegs 7, the fiberglass pole 6, air pump 4, and valve adapters 5 in the carry bag.
Technical data
- Model: AD78
- Dimensions (W × L × H): approx. 360 × 470 × 205 cm
- Packing dimensions (W × L × H): approx. 74 × 42 × 39 cm
- Material
- Tent:
- Windows:
- 185T 68D Polyester PU2000 mm UV PVC
- Weight
- Without packaging:
- approx. 17.5 kg
- With packaging:
- approx. 18.5 kg
- Article number: 712182
Disposal
Disposing of the packaging
Sort the packaging before you dispose of it. Dispose of paperboard and cardboard with the recycled paper service and wrappings with the appropriate collection service.
Disposing of the product
- Dispose of the product in accordance with the applicable laws and regulations for your country.
Great care has gone into the manufacture of this product and it should therefore provide you with years of good service when used properly. In the event of product failure within its intended use over the course of the first 1 year after date of purchase, we will remedy the problem as quickly as possible once it has been brought to our attention. In the unlikely event of such an occurrence, or if you require any information about the product, please contact us via our helpline support services, details of which are to be found both in this manual and on the product itself.
PRODUCED IN CHINA FOR
- ALDI STORES LTD. PO BOX 26, ATHERSTONE WARWICKSHIRE, CV9 2SH.
ALDI STORES (IRELAND) LTD.
- PO BOX 726, NAAS, CO. KILDARE.
- Visit us at www.aldi.com
AFTER SALES SUPPORT
- +44(0)161 447 8597
- www.streetwizeaccessories.com