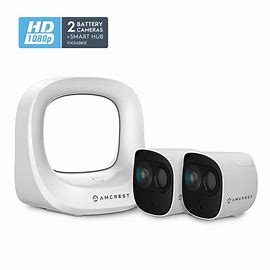

Quick Setup Guide
Wire-Free Battery Camera
![]() For the most recent version of this
For the most recent version of this
Quick Setup Guide visit:
amcrest.com/batterysetup

Thank you for purchasing an Amcrest Battery Camera!
This camera is designed to provide added security as well as peace of mind to your life and connect you with what matters most from anywhere using your smartphone.
This guide is designed as a reference tool for the installation and operation of your camera. Here you can find information about installation, features, and functions, as well as information to aid in
troubleshooting.
Setting Up the Camera
The Amcrest Smart Home app connects your Amcrest camera to your Android or iOS mobile device ensuring you are always connected to what matters most.


To get the app, search for “Amcrest Smart Home” in Google Play or App Store and download.
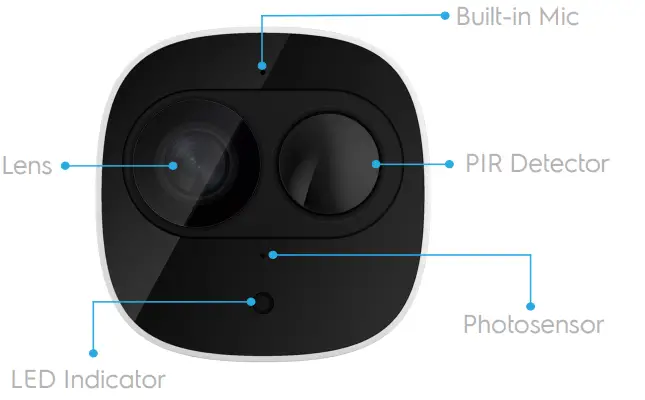
Getting to Know Your Camera
| LED Indicator Status | Device Status |
| Off | Sleep mode Battery is dead |
| Greenlight on | The alarm is triggered Camera is booting |
| Greenlight flashing | Reconnecting to Wi-Fi |
| Greenlight quickly flashing | Pairing with the base station |
| The green light stays on for 10s then turns off | Pairing successful |
| The red light stays on for 10s, then turns off | The pairing has timed out |
| The red light stays on for 1s then turns off | Reset complete |
Getting to Know Your Camera
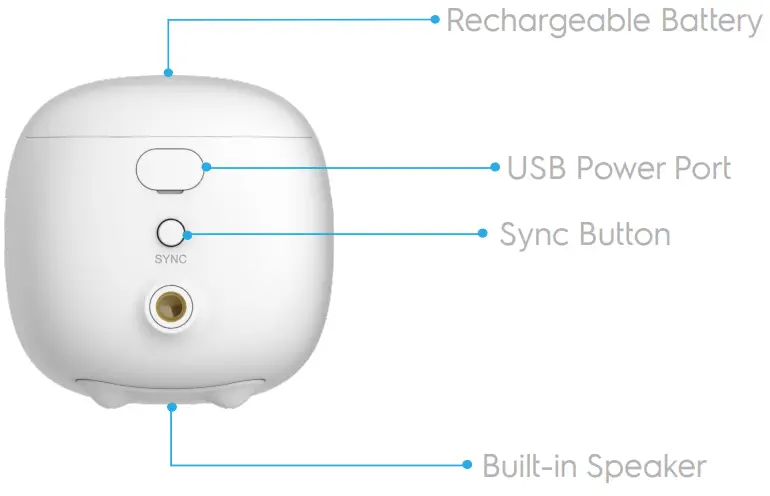
 Note: The Sync button will be used to pair the camera to the base station. You can also press and hold the Sync button for 8 seconds.
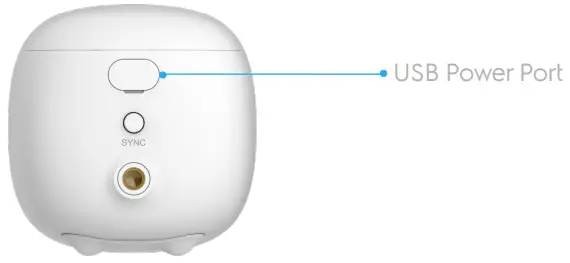
Charging Your Camera
The camera will come preinstalled with a battery already. It is recommended to fully charge the battery before use. A fully charged battery can provide up to 6 months of battery life however, this can vary based on the amount of usage.
To charge the camera, plug the USB charging cable into the USB power port on the back of the camera. When the camera is done charging, the green LED on the front of the camera will remain solid.
Getting to Know Your Smart Hub
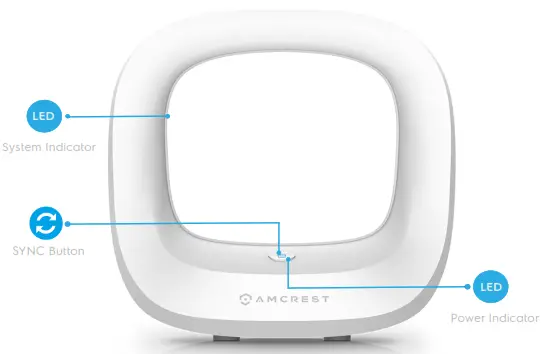
The status of the power indicator is included in the following table
| Power Indicator Status | Device Status |
| Off | Not powered up |
| Blue light stays on | Powered up properly |
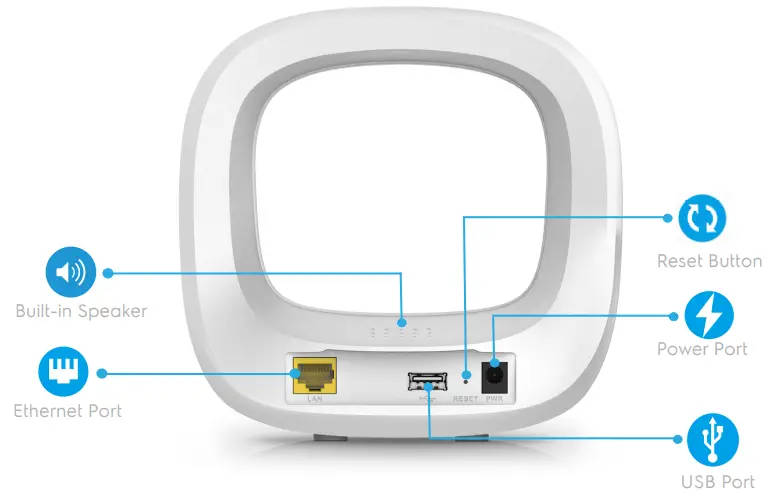
The status of the system indicator is included in the following table.
| System Indicator Status | Device Status |
| Off | Not powered up Operating properly |
| Blue light flashing | Booting up |
| Greenlight flashing | Waiting for network connection |
| Light blue LED is flashing | Waiting to pair with cameras |
| Light blue LED stays on for 10s then turns off | Pairing successful |
| The red light stays on for 1s, then turns off | Pairing has failed |
| Light blue LED stays on for 1s then turns off | Factory Reset is complete |
| Light blue LED is quick flashing | Firmware updating |
Connecting to the Smart Home App
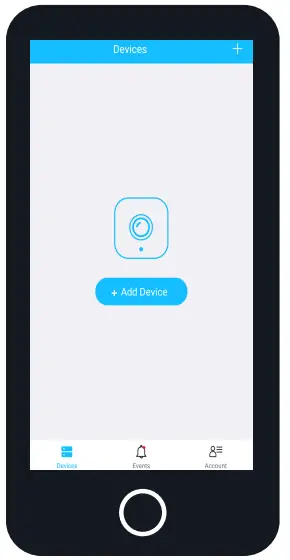
Open the Amcrest Smart Home app and tap on “Register” to register an account. After registering an account, log into the app and tap on “AddDevice”.
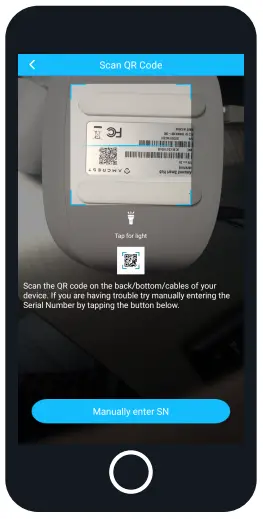
Scan QR Code
Scan the QR code located at the bottom of your smart hub. If you are unable to scan the QR code you can manually enter the serial number by tapping “Manually enter SN”. The serial number can be found on the serial tag on the bottom of the smart hub.
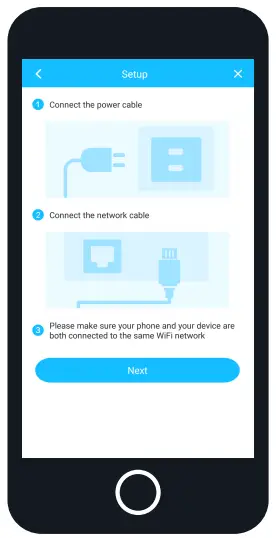
Initial Setup
Connect an Ethernet cable into the Ethernet port on the back of your smart hub and connect the other end of your cable to your router. Apply power to the smart hub and allow the device to boot. Please make sure that your phone and smart hubs are on the same Wi-Fi network. The LED on the smart hub will flash, once a proper connection is made the LED will disappear and you will be ready to tart adding cameras.
Tap “Next” to continue.
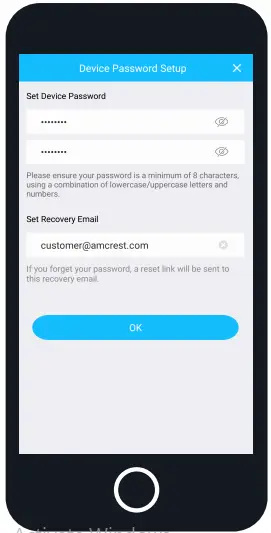
Create a Password
This will be the password for your smart hub. Enter a password with a minimum of 8 characters using a combination of upper/lowercase letters and numbers andconfirm. A recovery email can also be entered in case you forget the password for your device.
Tap “OK” to continue
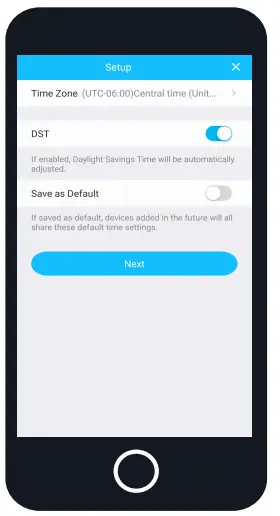
Set the Time and Date
Set the “Time Zone” to your current time zone and set “DST” (Daylight Savings Time) settings if applicable. If you would like to have these settings saved as efault to be added to future devices, you can toggle the “Save as Default” switch to the on position.
Tap “Next” to continue.
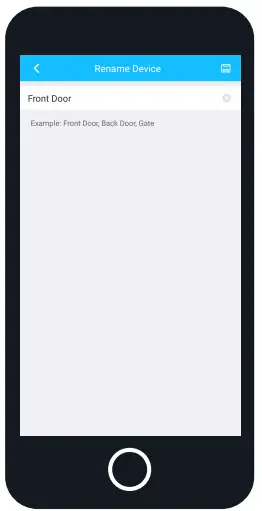
Give Your Smart Hub a Name
A few examples are provided such as; Front Door, Back Door, Office, which can be selected if needed. After you have named your device, tap on the save (![]() ) icon to continue.
) icon to continue.
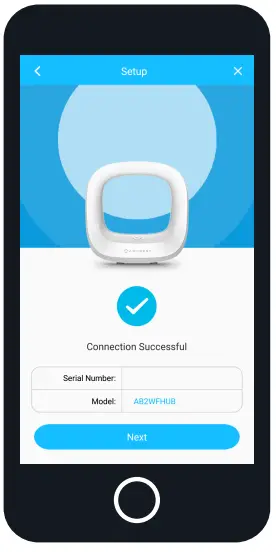
Setup Is Complete!
The smart hub has now been added to your Amcrest Smart Home app! You can now begin pairing cameras to the ub.
Tap “Next” to continue
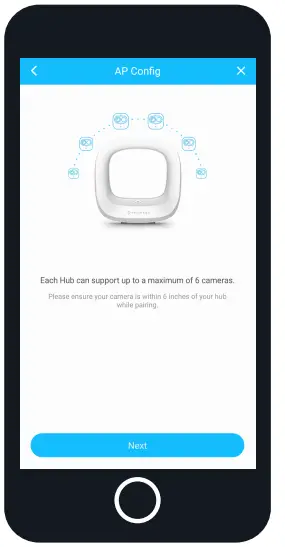
Before You Start
Each smart hub can support up to a maximum of 6 battery cameras. Please ensure your camera is within 6 inches of your hub while pairing a camera.
Tap “Next” to continue.
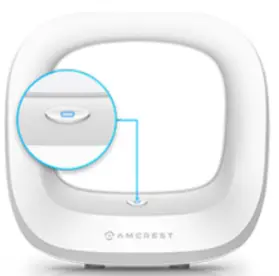
Pairing Cameras
To begin, press the Sync button on the front of the smart hub. Once pressed, an indicator LED on the hub will begin to flash.
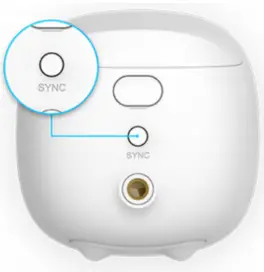
Press the Sync button on the back of the camera. A green indicator light on the front of the camera will begin to flash indicating the camera is pairing the smart hub.
Once the LED lights on the smart hub and camera have both disappeared, the camera has been successfully paired.
Tap “Next” in the app to continue.
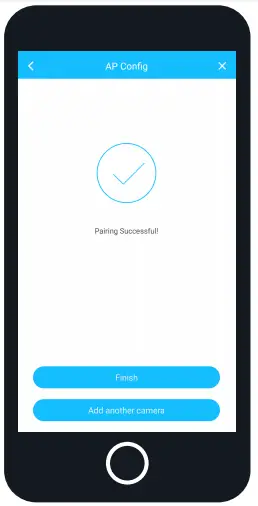
Pairing Is Complete!
The camera has now been successfully paired to the smart hub. If you would like to add additional cameras, tap on “Add another camera” and repeat the pairing process.
If you are done pairing cameras, tap on “Finish”.
Note: If you are pairing additional cameras, tap on “Add another camera” and repeat the pairing cameras process previously described.
Physical Installation
The physical installation of your camera will involve the following items.
SCREWDRIVER – A Phillips head screwdriver will be needed to mount your camera.
DRILL – A drill may be required if installing the camera on concrete, stucco, or a brick mounting surface.
INSTALLATION POSITION MAP – This will be included in the box and will provide a template for the physical installation of your camera.
WALL ANCHORS – Used to secure the mounting screws into the mounting surface.
MOUNTING SCREWS – Used to mount the camera to the mounting surface.
Note: A 15/64’s drill bit may be required to drill the holes for the wall anchors.
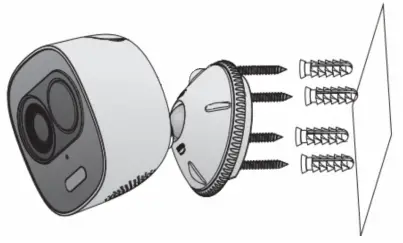
Installing the Camera
Place the installation position map onto the mounting surface and using a drill, drill the marked holes. Place the wall anchors into the holes. Next, turn the mounting bracket in a counterclockwise motion to remove it from the camera. Then, remove the bottom bracket from the top bracket by twisting in a counterclockwise motion.
Place the bottom bracket onto the installation map aligning the holes to the wall anchors. Secure the bracket using a Phillips head screwdriver and mounting screws. Place the camera back onto the security screw of the top mounting bracket and turn in a clockwise motion to secure it to the camera. Place the top bracket back onto the bottom bracket and turn in a clockwise motion to tighten and secure the camera to the mounting surface.
How to Use the Camera
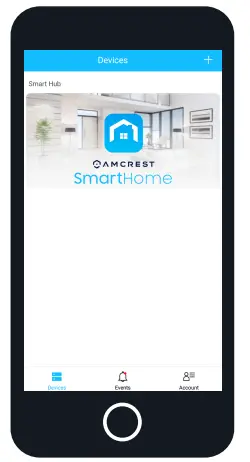
The main screen will be your device’s menu. This is a menu that will display all connected devices as well as provide quick access to the settings for your camera.
 |
DEVICES Displays connected devices in the app. |
 |
EVENTS Provides quick access to motion events and alerts. |
 |
ACCOUNT Access to manage account settings and information. |
Smart Hub Menu
The Smart Hub menu will provide a list of already paired cameras as well as provide setting options for your smart hub.
To access the settings menu, tap on the Settings icon ( ) in the upper right corner of the screen.
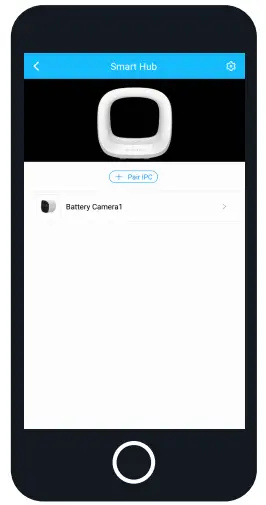
Note: If the paired camera does not show in the Smart Hub menu, swipe down to refresh.
Smart Hub Settings
The settings listed in this menu are related to the smart hub only.
Camera settings can be accessed from the live view screen in the app. To exit the smart hub settings screen, tap on the back arrow in the upper left-hand corner of the screen.
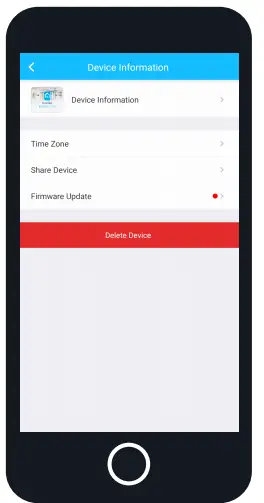
Note: If a red dot is visible next to the Firmware Update menu, a firmware update is available for your smart hub.
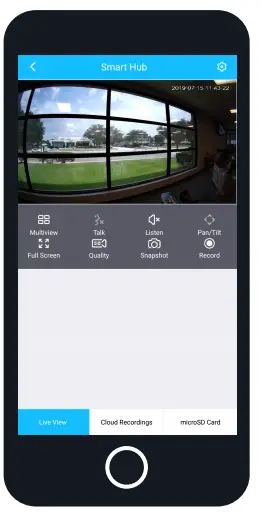
Getting to Know the App
Tap on your paired camera to access the live view screen.
The live view screen allows you to view the live feed for your camera as well as access specific features such as, two-way audio, cloud, and other options related to your camera.
|
SETTINGS Provides access to settings such as device information, motion detection, cloud status, flip image, and deleting a device. |
 |
MULTIVIEW View multiple devices on one screen. |
 |
TALK Enables the microphone for two way communication |
 |
LISTEN Enables the speaker for two-way communication. |
 |
PAN/TILT Not applicable for battery cameras |
 |
FULLSCREEN View your feed in full-screen mode. |
 |
SD/HD Set the device to standard or high definition resolution |
 |
SNAPSHOT Manually take a photo. |
 |
RECORD Manually record a video. |
Amcrest Smart Home Cloud Recording

This is an optional feature that saves recordings of each event the camera captures.
You can access the events from the cloud by registering for an Amcrest Smart Home cloud plan.
Learn more at:
amcrest.com/smarthomecloud
Accessing Flash Drive Recordings
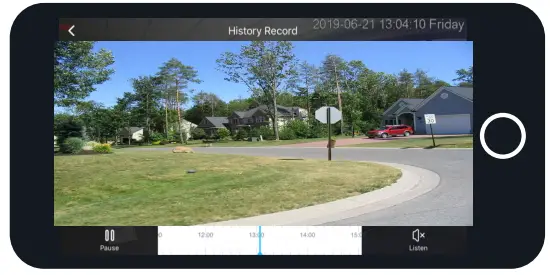
This is a built-in feature that saves recordings of each event the camera captures to an inserted flash drive.
You can access the events from the inserted USB flash drive by tapping on the “USB Storage” option located in the live view interface of the app.
Learn more at:
amcrest.com/batteryplayback
Motion Detection Zones
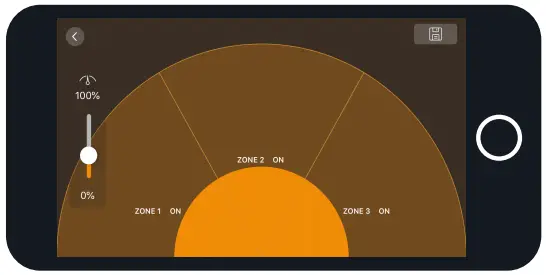
To set up motion alerts you must set up motion zones. These are areas or “zones” that the camera uses to determine when motion detection is detected and can range from 0 to 100%.
To set up motion detection, tap on the settings ( ) icon and tap “Motion Detection”. Select applicable zones, one through three, or use the slider to adjust the motion detect percentage. Tap on the save icon (
![]() ) to save the motion settings.
) to save the motion settings.
You will need at least one active motion zone to receive event notifications.
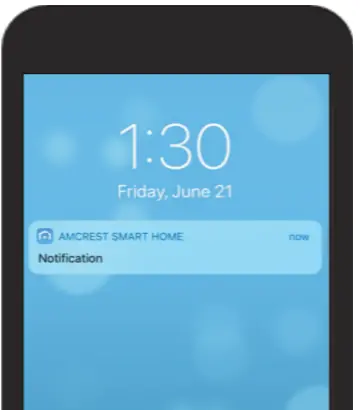
Event Notifications
If your phone is off when the camera captures a motion event you will receive a push notification on your phone.
Troubleshooting
Why Did the Indicator Light On My Hub and Camera Turn Red?
This happens during the paring process if the camera does not properly sync to your hub. If this occurs you may need to resync the camera back to the hub and try pairing again.
To resync the camera, press and hold the sync button on the back of the camera until the indicator light on the front of the camera turns red. Once it turns red release the sync button and pair the camera back to your smart hub.
If none of the above has helped, try one of the following:
- Unplug the power adapter for your smart hub and wait 30 seconds. Apply power back to the smart hub and try the pairing process again.
- Reset the modem on your Wi-Fi network.
Unplug it and wait for about 40 seconds, then plug it back in and continue the setup process. - Perform a factory reset on the smart hub. To perform a factory reset, locate the reset hole on the back of the smart hub. Using a safety pin, or similar device, press in and hold the internal reset button down for 30 – 60 seconds allowing the device to reset. Once the hub comes back online, continue the setup process.
I Mounted My Camera Upside Down. How Do I Flip the Image?
When installing your camera it is important to note the direction in which you want your camera to face. If the image of your camera needs to be flipped, access the live view interface of your camera in the app and tap on the settings ( ) icon in the upper right corner of the screen.
In the settings menu, tap on the “Flip Image” toggle switch to enable and flip the image. The image can only be flipped in a 180° motion.
Why Is the LED On My Smart Hub Blinking Green?
The LED on your Smart Hub will repeatedly flash green if the device does not detect any network activity. To resolve the issue, ensure an Ethernet cable is secured in the Ethernet port on the back of the unit and the other end is properly plugged into your home network.
Once a proper Ethernet connection is made, the LED on the Smart Hub will turn light blue and then disappear once a secure connection is made to your network.
For additional help or assistance please visit: amcrest.com/support
![]() This device complies with Part 15 of the FCC Rules. Operation is subject to the following two conditions:
This device complies with Part 15 of the FCC Rules. Operation is subject to the following two conditions:
(1) this device may not cause harmful interference, and
(2) this device must accept any interference received, including interference that may cause undesired operation.
![]() Or give us a call
Or give us a call
Toll Free : 1-888-212-7538
USA : 713-893-8956
Canada : +1-437-888-0177
Worldwide : +1-713-893-8956
![]() For a list of all our customer support numbers visit:
For a list of all our customer support numbers visit:
amcrest.com/contacts
www.amcrest.com/contacts
Let Us Know
What You Think
We sincerely thank you for your business and are committed to ensuring your full satisfaction. If you are not entirely satisfied for whatever reason, please reach out to us and we will do all within our power to make it right.
As a young and growing company, it would mean the world to us if you could leave an honest online review about our product and services.
![]() facebook.com/amcrest
facebook.com/amcrest
 twitter.com/amcrestsecurity
![]() Instagram.com/amcresttechnologies
Instagram.com/amcresttechnologies
www.amcrest.com/videos
www.amcrest.com/support
© 2019 Amcrest Industries. All rights reserved.