belavi 43472 Grill Gazebo

Getting Started
Ensure all parts packaged in carton match the parts list. Remove all protective materials and place parts on a non-abrasive surface to avoid scratching. If any parts are missing or damaged, DO NOT attempt to assemble. Please contact our customer service center (Monday-Friday
9:00am – 5:00pm EST) at 1-800-599-8898.
Caution
Read all the instructions before assembly. Failure to comply with instructions may result in faulty assembly and potential injury! Assemble product on a soft, non-abrasive surface such as a grass lawn or cardboard to avoid surface scratches or damage to parts. Seek assistance to assemble bulky or heavy items. After final alignment, make sure all bolts and nuts are securely tightened with screw covers pressed in place.
Cleaning & Maintenance
Wash canopy with a mild solution of soap and water; rinse thoroughly. Dry completely.
Warnings and Cautions
- Clean gazebo before storing, do not repack your gazebo until completely dry.
- This gazebo must be assembled by two adults or more.
- The gazebo canopy must be removed during windy or extreme conditions.
- Loading limit of the utensil hook is 10 lbs (4.5 kgs).
- Weight limit for basket and shelves is 35 lbs (15.8 kgs).
- Steel components for garden accessories and furniture are treated with rustinhibiting paint. However, due to the nature of steel, surface oxidation (rusting)
will occur if this protective coating is scratched. This is a natural process. To minimize this condition, it is recommended that care be taken when assembling and handling the product in order to prevent the paint from being scratched. If scratching or damage occurs, it is recommended that the area be touched up immediately with rust inhibiting paint (not included). Surface rust can be removed easily using a very light application of common cooking oil. If surface oxidation (rusting) occurs and no measures are taken to correct it, the oxidation may start dripping on the deck or patio, which may cause damaging stains that may be difficult to remove.
Note: In case of adverse weather conditions or strong wind, please remove the Main Canopy (U) from the gazebo.
The gazebo is designed to provide shade only. Do not use this gazebo in strong wind and rain. Wind and rain can damage the gazebo and could result in injury to you and others. It is not waterproof and not intended for use in the rain. The water will sit easily on the canopy fabric and severely damage the gazebo. Do not use or set up in rain, wind, or stormy conditions.
This product is designed for leisure use only and is not a shelter against adverse weather conditions.
warning
KEEP ALL FLAME AND HEAT SOURCES AWAY FROM THIS PRODUCT/ ITEM FABRIC. This product/item is made with fabric that meets CPAI-84 specifications for flame resistance. It is not fire proof. The fabric will burn if left in continuous contact with any flame source. The application of any foreign substance to the product/item fabric may render the flame-resistant properties ineffective.
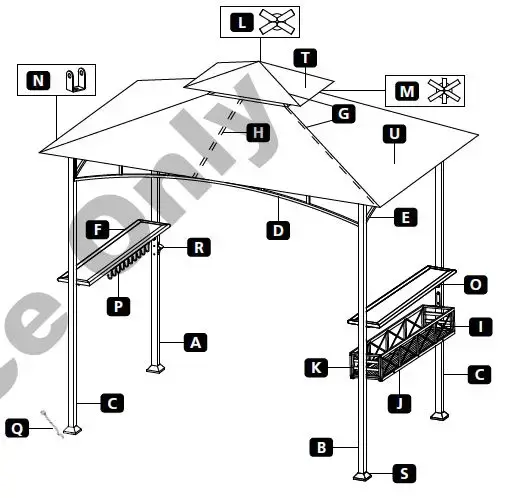
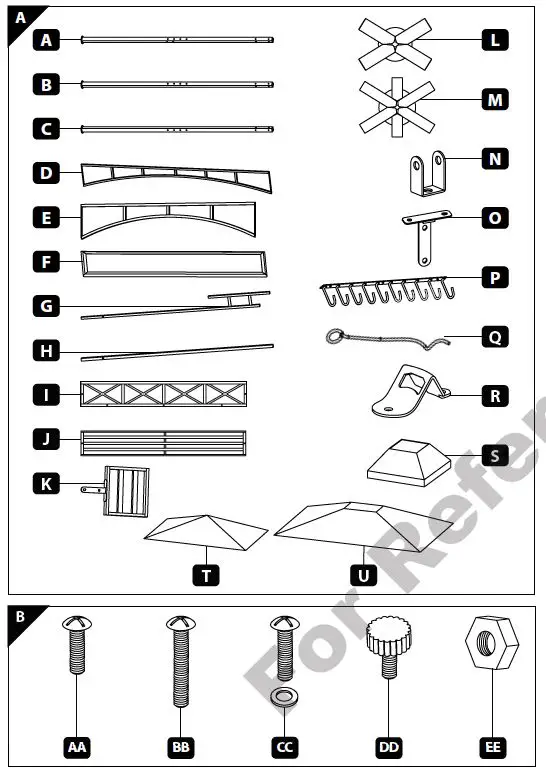
Parts List
| Description | Qty | |
| A | Pole | 1 |
| B | Pole | 1 |
| C | Pole | 2 |
| D | Long Arch | 2 |
| E | Short Arch | 2 |
| F | Shelf | 2 |
| G | Canopy Two-Tier Ribs | 4 |
| H | Canopy Rib | 2 |
| I | Basket Panel | 2 |
| J | Basket Shelf | 1 |
| K | Basket End | 2 |
| L | Top Canopy Connector | 1 |
| M | Main Canopy Connector | 1 |
| Description | Qty | |
| N | Rib Brace | 6 |
| O | Shelf Brace | 4 |
| P | Utensil Rack | 1 |
| Q | Stake | 8 |
| R | Bottle Opener | 1 |
| S | Foot Cover | 4 |
| T | Top Canopy | 1 |
| U | Main Canopy | 1 |
| AA | Bolt (M6x15 mm) | 31 |
| BB | Bolt (M6x32 mm) | 10 |
| CC | Bolt & Washer (M6x18 mm) | 12 |
| DD | Knob Screw | 12 |
| EE | M6 Nut | 6 |
Hardware List
Assembly Instructions
Do not tighten bolts down completely during this portion of assembly.
STEP 1:
Slide Foot Covers (S) down the length of each Pole (A, B, & C) from the top to the bottom of these parts. This part is intended to cover the circular base of each pole.
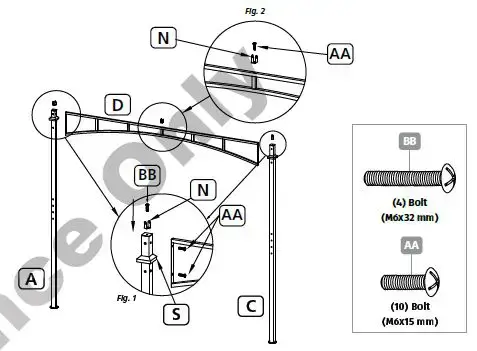
STEP 2:
Insert one M6x32mm Bolt (BB) through each Rib Braces (N), and into the tops of Pole (A), and one of Pole (C), see Fig. 1. Follow this step to connect N to the tops of B, and second C.
STEP 3:
Insert one M6x15mm Bolt (AA) through Rib Brace (N), and into the topcenter of Long Arch (D), see Fig. 2. Follow this step to connect remaining N to remaining D.
Insert two M6x15mm Bolts (AA) through one end of Long Arch (D), and into bolt-threading inserts found near the top of Pole (A). Repeat this step to connect opposite end of D to C. Repeat these steps to connect remaining D with B, and second C.
STEP 4:
Insert two M6x15mm Bolts (AA) through one end of Short Arch (E), and into bolt-threading inserts found near the top of Pole (A), see Fig. 3.
Follow this step to connect opposite end of E to C. Follow these steps to connect remaining E to B, and second C. When complete, both Poles (C) should be diagonal from one another.
It is advised to use the upper most bolt-threading on Poles (A, B, & C) for Shelves (F) so that they are level, use a level if necessary. The lower two inserts will be used later in these instructions for the basket. Do not tighten bolts down completely during this portion of assembly.

STEP 5:
Insert two M6x15mm Bolts (AA) through Shelf Brace (O), and into the bottom of Shelf (F) at one end, see Fig. 4. Repeat this step to connect a second O to opposite end of F. Repeat these steps to connect the remaining part O’s to second part F.
STEP 6:
Insert three M6x15mm Bolts (AA) through eyelets of Utensil Rack (P), and into the bottom of one Shelf (F). See Fig. 5 for the correct orientation on how this part should be installed.
STEP 7:
Insert two Knob Screws (DD) through both Shelf Braces (O) on Shelf (F) with Utensil Rack (P), and into the upper two bolt-threading inserts found on Poles (A & C), see Fig. 6. Repeat this step to connect the second assembled shelf to Poles (B & C).

STEP 8:
Insert the longer ribs of the four Canopy Two Tier Ribs (G) into the longer ends of the Main Canopy Connector (M) until they are locked in place. Insert the short ribs of the four Canopy Two Tier Ribs (G) into the Top Canopy Connector (L) until they are locked in place. Insert the two Canopy Ribs (H) into the shorter ends of the Main Canopy Connector (M) until they are locked in place. See Fig. 7 for an illustration of how these parts connect.
STEP 9:
Place assembled ribs with connectors over the height of assembled frame.
Place ends of Canopy Two Tier Ribs (G) in between Rib Braces (N) at the top of each Pole (A, B, & C). Place ends of Canopy Ribs (H) in between Rib Braces (N) found at the center of both Long Arches (D). Insert six M6x32mm Bolts (BB) through all Rib Braces (N), and through both rib types, see Fig. 8. Use M6 Nuts (EE) with M6x32mm Bolts (BB) to hold these parts together.

STEP 10:
Insert three M6x18 Bolts & Washers (CC) through Basket Panel (I), and into bolt-threading inserts found on the side of Basket Shelf (J), see Fig. 9. Repeat this step to connect remaining I to opposite side of J.
STEP 11:
Place Basket Ends (K) in between Basket Panels (I) on both ends of Basket Shelf (J). See Fig. 10 for the correct orientation of these parts.
Insert one M6x18 Bolt & Washer (CC) through Basket Panels (I), and into the side of Basket Ends (K). Follow this step to connect the second I to the opposite side of K. Follow these steps to connect the second K to the opposite ends of both I
Insert one M6x18 Bolt & Washer (CC) through eyelet at the end of Basket Shelf (J), and into the bottom of Basket Ends (K). Follow this step to connect opposite end of J to second K.
Tighten all bolts left loose throughout assembly process.

STEP 12:
Insert Knob Screws (DD) through the braces on Basket Ends (K), and into the remaining bolt-threading inserts found on Poles (B & C), see Fig. 11 and Fig. 12. Tighten the Knob Screws (DD) completely to hold the basket in place.
STEP 13:
Insert two M6x15mm Bolts (AA) through Bottle Opener (R), and into boltthreading inserts near the center of Pole (A), see Fig. 13.
STEP 14:
Place Top Canopy (T) over upper ribs of Canopy Two Tier Ribs (G) so that pockets underneath canopy fit into those rib ends.
Place Main Canopy (U) over lower rib of Canopy Two Tier Ribs (G), and Canopy Ribs (H). Unfold Main Canopy (U) completely so that pockets underneath canopy fit into these rib ends.
STEP 15:
Lift up Foot Covers (S), and run two Stakes (Q) through designated eyelets at the bottom of each Pole (A, B, & C), and into the ground for extra stability, see Fig. 14. Place Foot Covers (S) over pole feet to complete assembly.
Please contact our AFTER SALES SUPPORT by phone or e-mail when needing assistance with your purchase.
Please retain your sales receipt which validates the 1-year Limited Warranty.
Only submit the Warranty Card when needing assistance with a faulty part.
AFTER-SALES SUPPORT
1800 599 8898 [email protected]
PRODUCT CODE
812576
MODEL NUMBER
32720-22
SERVICE CENTER
TDC USA, Inc.
5 Industrial Road, STE 1 Fairfield, NJ 07004-3017 United States of America
Phone lines available Monday to Friday 9am – 5pm EST.
ALDI INC. FULL WARRANTY CONDITIONS
Dear Customer:
The ALDI warranty is a full warranty offering you the following benefits:
Warranty period:
1 year* from date of purchase
6 months for movable parts and consumables under normal and proper conditions of use.
Costs:
Free repair/exchange or refund.
No shipping or handling costs
Hotline:
1-800-599-8898
Operating hours:
Monday – Friday, 9:00 AM – 5:00 PM EST
Please contact our service hotline by phone, email, or fax when needing assistance with assembly or with faulty parts. This allows us to provide support in the event of possible operator errors.
In order to make a claim under the warranty, please send us:
A copy of your sales receipt, your completed warranty card with contact information provided, and an explanation as to how we can help and what concerns you have with any parts.
The warranty does not cover damage caused by:
- Accident or unanticipated events to frame [metal parts] (e.g. wind, snow, lighting, fire).
- Deterioration, fading, sagging, or unanticipated events to canopies and netting panels (e.g. wind, sun, rain, pets/animals).
- Improper use or transport.
- Failure to follow safety and maintenance instructions.
- Other improper treatment or modification.
After the expiration of the warranty period, you may have your product repaired at your own expense. You will be notified of the repair costs in advance.
This warranty gives you specific legal rights, which may vary from state to state, that are not intended to exceed statutory minimum requirements beyond what is included above.
This warranty does not limit the statutory obligation of the seller arising from any implied warranties. The period of warranty can only be extended in accordance with applicable law.