chicco Presto Stroller
Product Information
The PrestoTM Stroller is a child carrier that comes with a stroller frame, rear wheels, cup holders, and a bumper bar. The stroller has a canopy that can be opened for extra coverage, and the backrest has three positions for reclining. The stroller is designed to provide comfort and safety for children during transportation.
Product Usage Instructions
- Read all instructions before assembling and using the product. Keep instructions for future use.
- Ensure that your child or other children are at a safe distance when opening the stroller.
- Assemble the stroller by standing the stroller frame on end and clicking it into place. Attach the rear wheels to the stroller frame by lining up and inserting the rear wheel post into the opening on the frame. Make sure both wheels are secure by pulling out on wheel assemblies.
- To remove the rear wheels, press the release button on the bottom of the rear wheel mount and pull the rear wheel off of the stroller frame.
- To use the canopy, pull the front edge of the canopy forward to open it. Unzip the zipper for extra coverage and pull forward on the canopy front edge to extend it.
- To recline the backrest, lift up on the recline adjuster lever and pull down. To adjust the backrest into an upright position, push up on the backrest until you reach the desired position.
- To use the bumper bar, locate both center snap buttons, press in on both snap buttons with your thumbs, and pull up at the same time to remove it.
- Do not place more than 1 lb (0.5 kg) in the cup holder and do not place items with a string around your child’s neck, suspend strings from this product, or attach strings to toys.
- Use extra care when going up or down stairs or escalators to prevent losing control of the product and your child falling out.
- Do not use the stroller if it becomes damaged or broken.
- For your child’s safety, read the labels and owner’s manual before using the product.
WARNING
Failure to follow all warnings and instructions may result in serious injury or death. For your child’s safety, read the labels and owner’s manual before using the product.
- PLEASE SAVE OWNER’S MANUAL FOR FUTURE USE.
- ADULT ASSEMBLY REQUIRED.
- NEVER LEAVE CHILD UNATTENDED. Always keep child in view while in the stroller.
- AVOID SERIOUS INJURY from falling or sliding out. Always use seat belt. After fastening buckles, adjust belts to get a snug fit around your child.
- AVOID FINGER ENTRAPMENT: Use care when folding and unfolding the stroller. Be certain the stroller is fully opened and latched before allowing your child near the stroller.
- USE OF THE STROLLER with a child weighing more than 50 lbs (22.7 kg), will cause excessive wear and stress on the stroller. Use the stroller with only one child at a time.
- STROLLER TO BE USED only at walking speed. Product not intended for use while jogging, skating, etc.
- TO PREVENT A HAZARDOUS, UNSTABLE CONDITION, never place purses, shopping bags, parcels or accessory items on the canopy or handle. Do not place more than 10 lbs (4.5 kg) in the storage basket.
- DO NOT use storage basket as a child carrier.
- Avoid burns. Never put hot liquids in cup holder. Do not place more than 1 lb (0.5 kg) in cup holder.
- NEVER ALLOW YOUR STROLLER to be used as a toy.
- DISCONTINUE USING YOUR STROLLER should it become damaged or broken.
- AVOID STRANGULATION. DO NOT place items with a string around your child’s neck, suspend strings from this product, or attach strings to toys.
- NEVER USE STROLLER ON STAIRS or escalators. You may suddenly lose control of the product and your child may fall out. Also, use extra care when going up or down a step or curb.
- Do not attempt to attach any infant car seat to the stroller other than the Chicco infant car seat. Injury or death may result when attempting to use this stroller in conjunction with infant car seats from other manufacturers.
- Before use, remove and dispose of all plastic bags and packaging materials and keep them out of reach of children.
Failure to follow all warnings and instructions may result in serious injury or death. For your child’s safety, read the labels and owner’s manual before using the product.
- Before assembly, check that the product and all of its components have not been damaged during transportation.
- Do not use accessories, spare parts, or any component not supplied or approved by Chicco as they may make the stroller unsafe.
Using Chicco Infant Car Seat with stroller:
- Bumper Bar must be properly attached to use the Chicco infant car seat.
- ONLY USE the Chicco infant car seat with this stroller.
- Only use this product to transport infants that are within the size and weight limitations of the infant car seat.
- FALL HAZARD: Always check that infant car seat is securely attached to stroller frame by pulling up on the infant car seat.
- ALWAYS SECURE your child with the car seat harness. Always make sure child is properly harnessed in the car seat.
- Refer to your Chicco infant car seat owner’s manual for additional warnings and use instructions before using this product.
Components
- A. – Stroller Frame

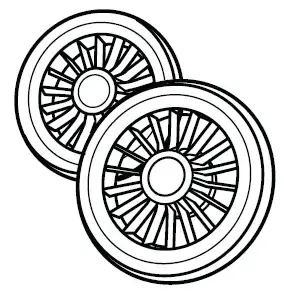
- B. – Rear Wheels
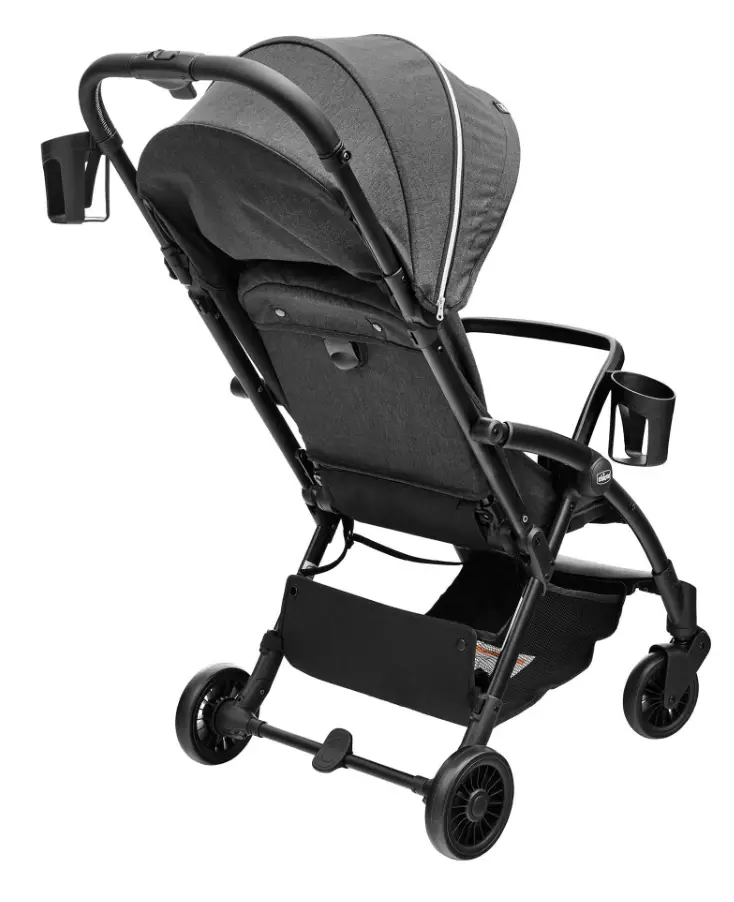
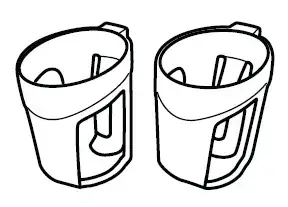
- C. – Cup Holders
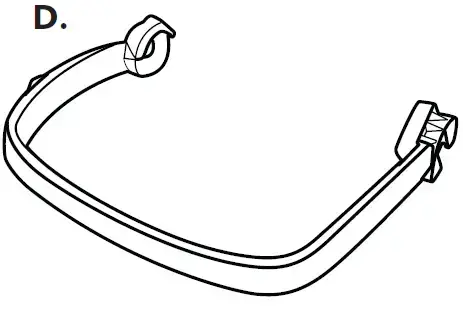
- D. – Bumper Bar
How to Assemble Stroller
WARNING
When opening the Stroller, ensure that your child, or other children, are at a safe distance. Ensure that during these operations, the movable parts of the Stroller do not come into contact with your child.
If you have hardwood floors or linoleum you may want to perform this step on carpeting or lay down some protection for your floors.
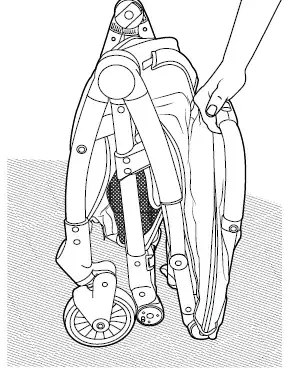
- 1A. Stand the Stroller Frame (A) on end, as shown.
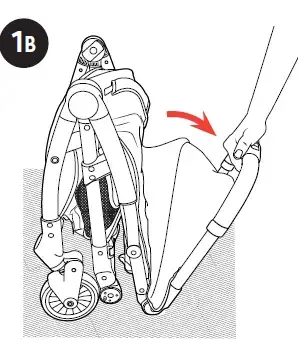
- 1B. Handle unlocks with downward motion.
- 1C. With the Stroller handle pulled away from the seat as shown in 1B, lift in a sweeping back and up motion until the Stroller Frame clicks into place.
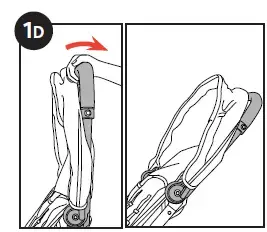
 1D. Place your foot on the rear axle and pull back on the Stroller handle to align the handle with the frame. Check to ensure that the Stroller Frame is locked in the open position.
WARNING
Check that the wheels are fitted correctly.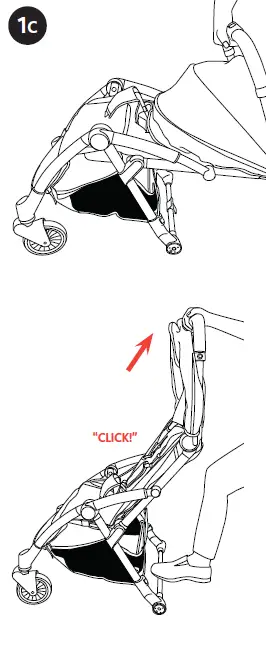
Attach the Rear Wheel (B) to the Stroller Frame by lining up and inserting the Rear Wheel Post into the opening on the frame, as shown. Repeat for the other side.
Make sure both Wheels are secure by pulling out on Wheel assemblies.
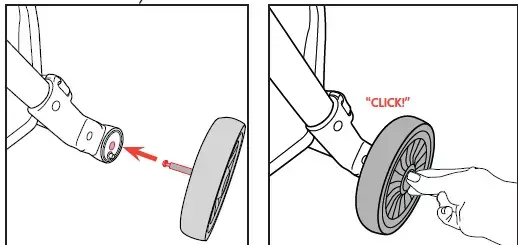
How to Remove Rear Wheels
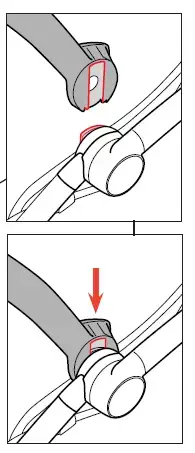
Remove the Rear Wheels (B) by pressing the Release Button on the bottom of the Rear Wheel Mount, as shown. At the same time, pull the Rear Wheel off of the Stroller Frame. Repeat for the other side.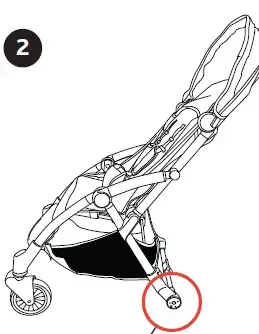
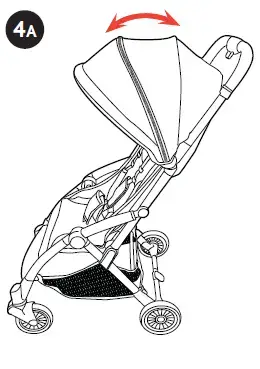
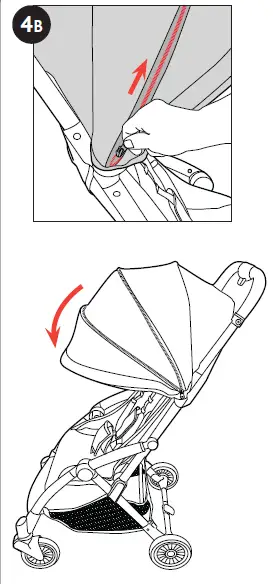
How to Use the Canopy
- 4A. To open the Canopy, pull the front edge of the Canopy forward. Reverse this step to close the Canopy.
- 4B. For extra coverage, locate and unzip the zipper. Pull forward on the Canopy front edge to extend the Canopy, as shown.
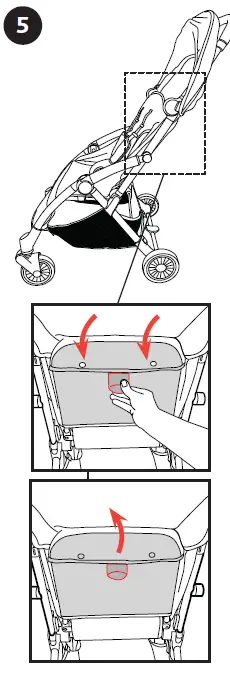
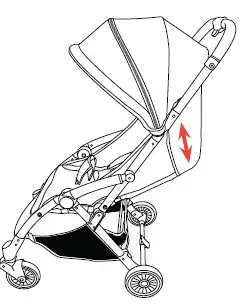
How to Recline the Seat
The Backrest has 3 positions.
- 5. To Recline the Backrest, lift up on the Recline Adjuster Lever and pull down. To adjust the Backrest into an upright position, push up on the Backrest until you reach the desired position.
How to Use the Bumper Bar
- 6A. To use the Bumper Bar (D), line up the Bumper Bar slots with the inside Bumper Bar Mount grooves on the stroller frame, as shown. Slide the Bumper Bar down onto the Bumper Bar Mount and push down until it snaps into position.
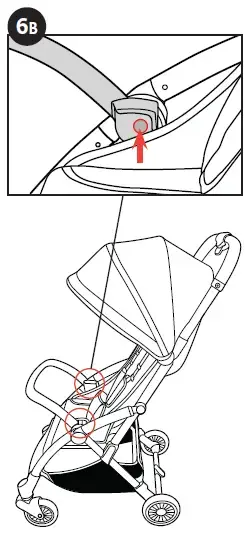
- 6B. To remove the Bumper Bar (D), locate both center snap buttons, as shown. Press in on both snap buttons with your thumbs and pull up at the same time.
Using the Chicco Infant Car Seat
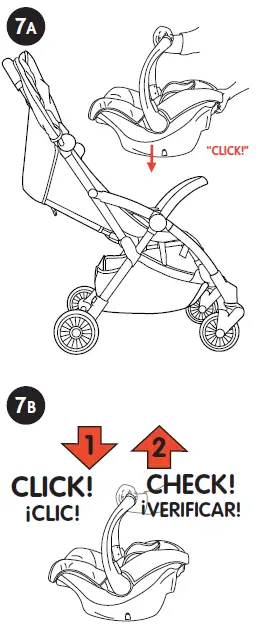
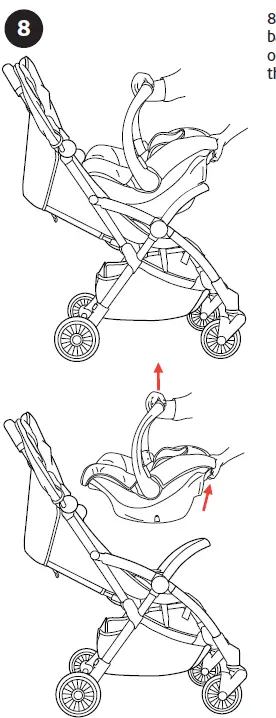
- 7A. With the Bumper Bar attached and the Stroller Backrest FULLY RECLINED, place the Chicco infant car seat into the Stroller Frame. The car seat will only fit into the frame “REAR FACING ONLY”. The baby will be facing you when pushing the stroller. Make sure infant car seat clicks into the stroller frame on both sides.
Note: Pull up on the infant car seat; make sure it is secured to stroller frame (7B). If using the Canopy with the infant car seat rotate the handle down, to allow the Canopy to fully extend open.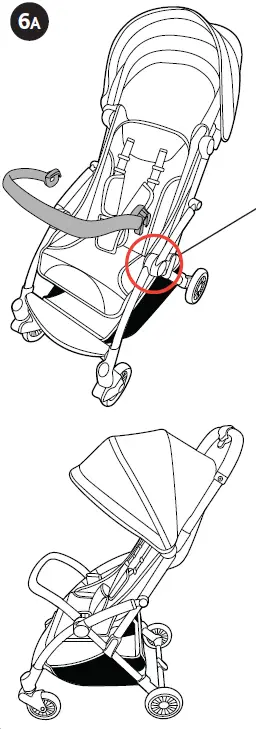
- 8. Squeeze the Release Handle on the back of the infant car seat and lift up on the carrying handle, to remove the infant car seat.
How to Use Cup Holder
Cup Holders can be attached to the right side of the Bumper Bar and either side of the Stroller Frame. The Cup Holders are interchangeable and will fit in any of the 3 available positions.
- 9A. To attached the Cup Holder (C), locate the Cup Holder attachment post on the Stroller. Slide the notched cutout on the Cup Holder onto the Cup Holder attachment post, as shown. Press down on the top edge of the Cup Holder above the notched cutout until it is fully seated.
- 9B. The attachment post on the Bumper Bar is square to prevent your child from rotating the Cup Holder upsidedown.
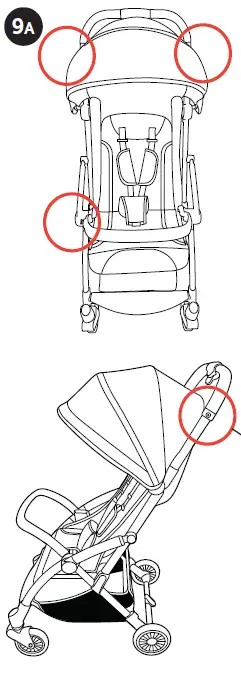
To remove the Cup Holder, reverse step 9A.
How to Use the Brakes
WARNING
Always apply brakes whenever the stroller is stationary. Never leave the stroller on a sloped surface, with a child onboard, even with the brakes applied.
- 10. To engage the Stroller Brakes, step on the Brake Lever and rotate the Lever down to LOCK the Rear Wheels (10A). Pull back and forth on the Stroller to make sure that the brakes are engaged.
To UNLOCK the Stroller, step on the Brake Lever and rotate the Lever forward to unlock the Rear Wheels (10B).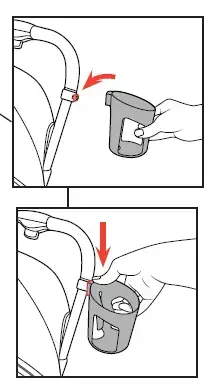
How to Use Safety Harness
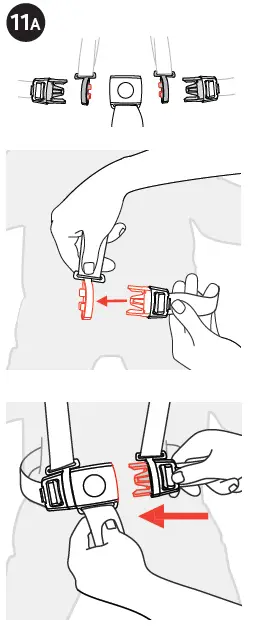
- 11A. This stroller has a 5-point safety harness. The Shoulder Strap Connec-tor is designed to break away from the Waist Clip when not secured in the Crotch Strap Buckle.
Make sure the Shoulder Strap Connector is in the correct position, as shown. Slide the Shoulder Strap Connector onto the Waist Strap Clip and repeat for the other side. Then slide both Waist Clips into the Crotch Strap Buckle, as shown. Pull on both sides to make sure the Clips are secured to the Buckle.
How to Use Safety Harness
WARNING
Never leave child unattended. Avoid serious injury from falling or sliding out. Always use seat belt.
- 11B. The Safety Harness can be released by pressing the button on the center of the Buckle and pulling both Waist Clips out.
Pull up on the Shoulder Strap Connector to remove it from the Waist Strap Clip.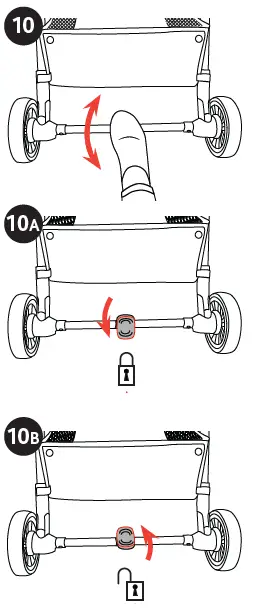
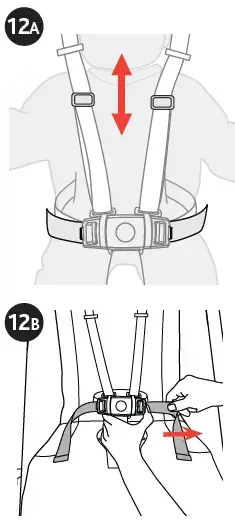
- 12A. The length of the Shoulder Straps can be adjusted by pulling on the adjustment buckles to tighten or loosen.
- 12B. The length of the waist straps can be adjusted. Press the tab at the end of the Waist Strap Clip and pull on the strap to tighten or loosen, to better fit your child.
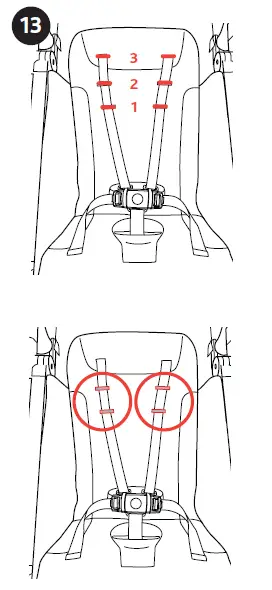
WARNING
This stroller features three harness positions. Always use a harness position located ABOVE the child’s shoulder line. If multiple harness positions are above the child’s shoulder line, use the one closest to it. - 13. It is recommended that a child under 6 months old ride in a Chicco infant car seat as part of the travel system.
The Shoulder Straps can be adjusted to 3 height positions as shown. To adjust the Shoulder Harness, release the Shoulder Strap Connector from the Waist Clip then slide the Shoulder Strap through the loops. Always use the same loop position for both straps.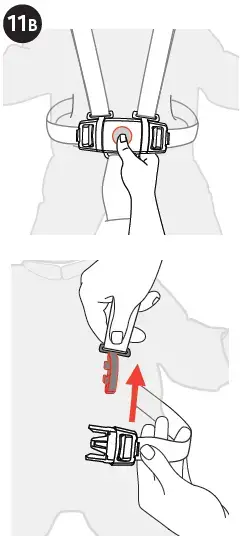
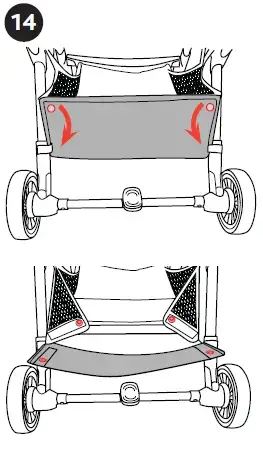
How to Use Basket
The Basket can be best accessed from both the front and back of the stroller.
- 14. For additional basket access from the back of the stroller, undo both snap buttons and hook and loop sections , as shown.
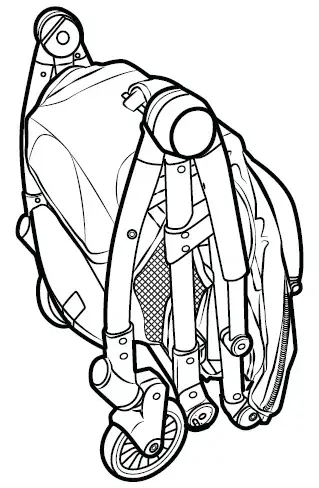
How to Fold Stroller
WARNING
When folding the Stroller, make sure that your child and other children are at a safe distance. Ensure that during the operations, the movable parts of the Stroller do not come in contact with your child.
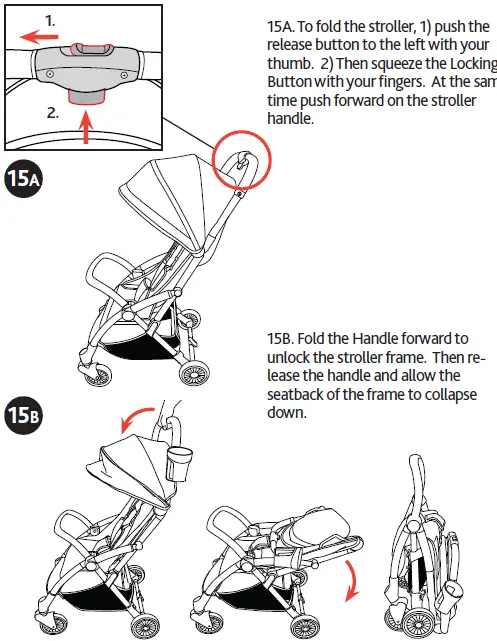
- 15A. To fold the stroller, 1) push the release button to the left with your thumb. 2) Then squeeze the Locking Button with your fingers. At the same time push forward on the stroller handle.
- 15B. Fold the Handle forward to unlock the stroller frame. Then re-lease the handle and allow the seatback of the frame to collapse down.
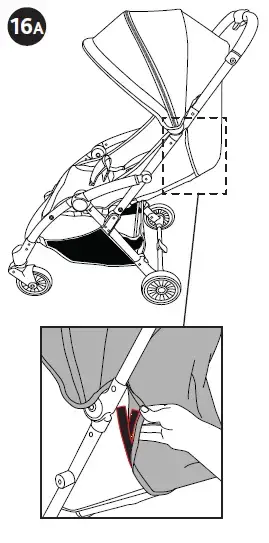
How to Remove Canopy
To remove the Canopy, recline the Seat Back to the lowest position.
- 16A. Undo 2 snap buttons on the Seat Back. Then locate and undo the side sections of hook and loop.
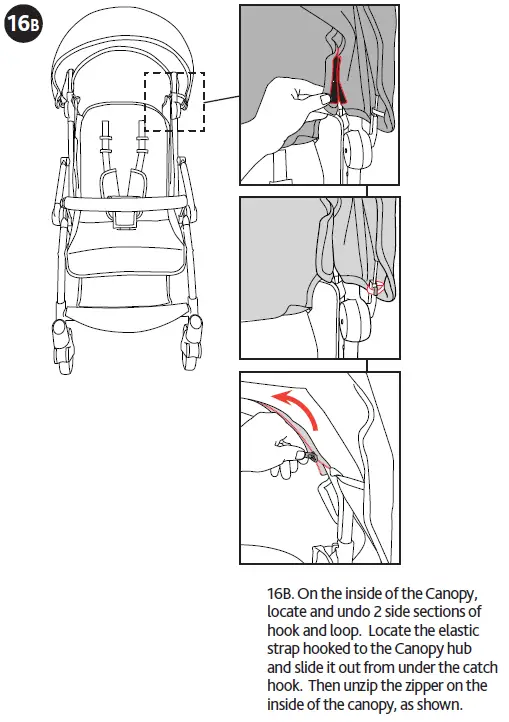
- 16B. On the inside of the Canopy, locate and undo 2 side sections of hook and loop. Locate the elastic strap hooked to the Canopy hub and slide it out from under the catch hook. Then unzip the zipper on the inside of the canopy, as shown.
- 16C. Rotate the Canopy frame forward and pull back the Canopy fabric to reveal the Canopy wire, as shown. On one side use a Phillips head screwdriver to release the snap button, and at the same time pull out on the Canopy Wire. Repeat for the other side.
To re-attach the Canopy repeat step 16 in reverse.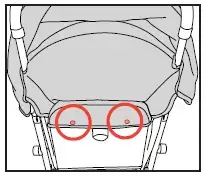
How to Remove Basket
Open the back of the Basket as shown in step 14.
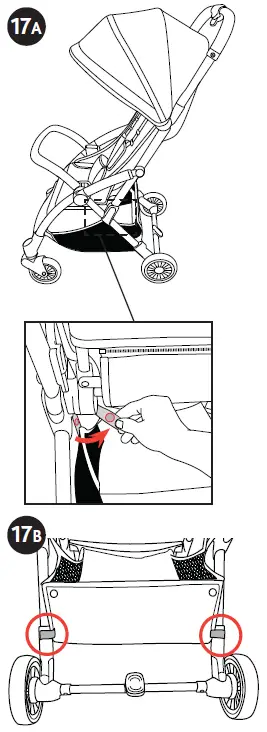
- 17A. To remove the Basket for cleaning, undo both snap buttons above the rear wheels, as shown.
- 17B. Locate 2 webbing loops that at-tach the Basket to the stroller frame above the rear wheels and slide them out from the catch hooks.
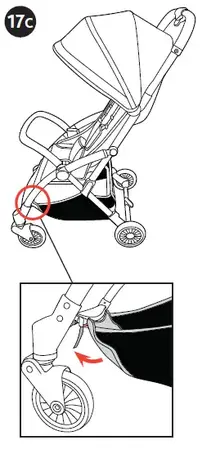
- 17C. Locate and undo 3 hook and loop straps on the back of the footrest. Pull the straps through the openings.
Repeat step 17 in reverse to re-attach the Basket.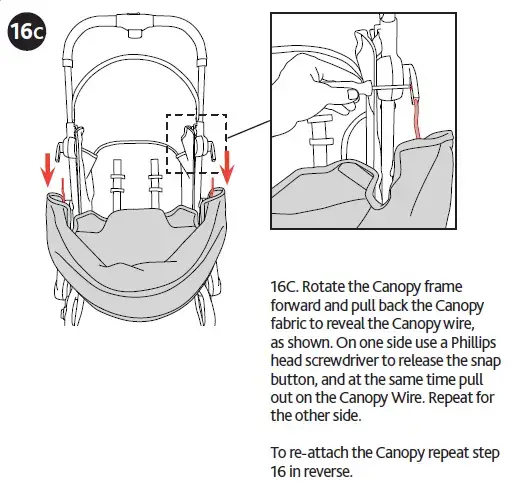
How to Remove Seat Fabric
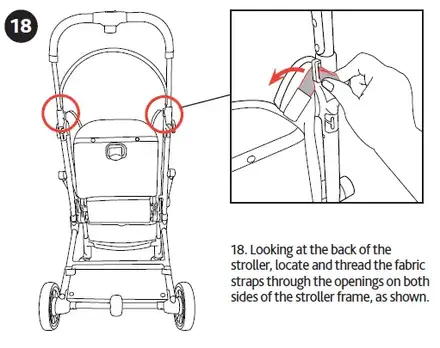
- 18. Looking at the back of the stroller, locate and thread the fabric straps through the openings on both sides of the stroller frame, as shown.
- 19. Undo the zipper on the Seat Back, as shown.
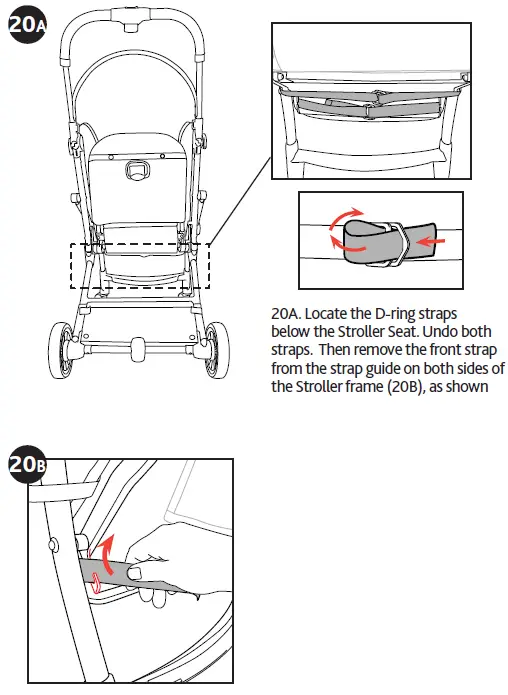
- 20A. Locate the D-ring straps below the Stroller Seat. Undo both straps. Then remove the front strap from the strap guide on both sides of the Stroller frame (20B), as shown
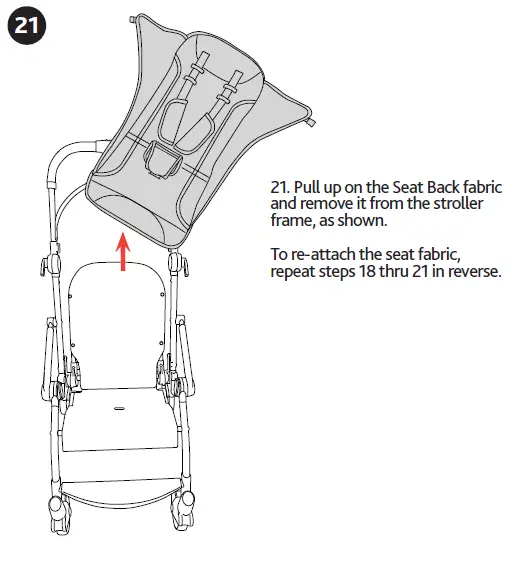
- 21. Pull up on the Seat Back fabric and remove it from the stroller frame, as shown.
To re-attach the seat fabric, repeat steps 18 thru 21 in reverse.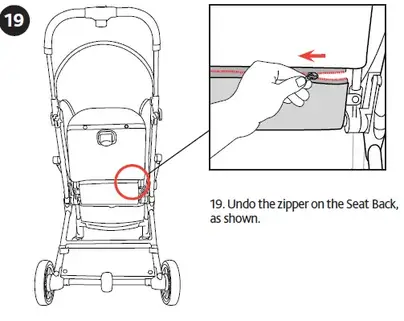
Cleaning and Maintenance
This product requires regular maintenance. The cleaning and maintenance of the stroller must only be carried out by an adult.
CLEANING
Hand wash the seat fabric and canopy using mild soap and water. Hang to dry. Periodically wipe clean plastic parts with a soft damp cloth. Always dry the metal parts to prevent the formation of rust if the stroller has come into contact with water.
MAINTENANCE
Lubricate the moving parts only if necessary, with a light application of a silicone based lubricant. Periodically check the condition of the wheels, and keep them clean of dust and sand. To avoid friction that may prevent the correct operation of the stroller, ensure that all the movable plastic parts placed along the metal frame are clean of dust, dirt or sand. Keep the stroller in a dry place. Prolonged exposure to direct sunlight may cause the fabric to fade.
For More Information
If you have any questions or comments about this product, or are missing any of the parts please do not return this product to the store.
Contact us in one of the following ways:
 (877)-424-4226
 [email protected]
 www.chiccousa.com
 1826 William Penn Way Lancaster, PA 17601
www.chiccousa.com
HOME-TRAVEL BOTTLE WARMER


Instructions for use
Please read these instructions carefully before use and keep them for future reference.
SAFETY WARNINGS
 WARNING
The European standard EN 60335 provides, for protecting the safety of children, that any use of the product by children aged more than 3 years shall only happen under the supervision of an adult.
In compliance with the provisions of the current legislation, Artsana S.p.A. reports below the warnings required by the regulations:
- This device may be used by children aged 3 years and over if they are under supervision or have received instructions on how to use the appliance safely and if they understand the dangers involved. Cleaning and maintenance by the user must not be carried out by children unless they are over 8 years of age and operate under supervision. Keep the appliance and the power cord out of the reach of children below 3 years of age.
- Children should not play with this device.
- These devices can be used by persons with reduced physical, sensory or mental capabilities, or with no prior experience or knowledge, provided that they are supervised or have been instructed on how to safely use the device and have understood the risks involved. However, due to the characteristics of this product category (electric feeding bottle warmer), Artsana S.p.A. recommends that children of any age not use or interact with the product, even under adult supervision. This product is intended for domestic use only and must be used in accordance with the instructions for use provided. Any other use is to be deemed improper and therefore dangerous.
- The appliance is intended for indoor use only; do not leave it exposed to the sun, rain, and any other atmospheric conditions.
- In case the appliance is sold by the original owner or given to third party users, instructions for the safe use of the appliance must be handed over to them, and they must have understood the hazards involved, through reading the user manual and in particular the safety warnings contained in it, which should always accompany the appliance.
- This product can run automatically at a frequency of 50 Hz or 60 Hz.
- Only place the appliance on flat, level surfaces which are out of the reach of children, away from cribs and cots as the device and the water in it become very hot during use: always employ the utmost care and attention when using! The danger of burns.
- Never use the bottle warmer without water in the heating tank.
- To avoid possible burns, during and at the end of the operating cycle, take care as: the water and the upper surface of the appliance may be very hot. Always carefully remove the bottle and/or baby food jar at the end of the operating and/or maintenance cycle as they may be hot.
- Before feeding the heated food to the child, always make sure that the temperature is not too high (not over 37°C).
- Never move the bottle warmer during use or when it still contains hot liquids.
- To disconnect the bottle warmer from the mains, switch off the product by pressing and holding the on/off touch button, then disconnect the power cable plug from the socket. Never pull on the power cable or the device to unplug the appliance from the main socket.
- Check that the power cable plug is always unplugged from the mains socket and that the bottle warmer is cold before moving it, cleaning it, storing it, doing maintenance work, or in between warming cycles.
- The cleaning and maintenance to be performed by the user must not be carried out by children and/or people with reduced mental capabilities or lacking experience or the required knowledge.
- Never immerse or wet the plug, bottle warmer, or power cable in water or other liquids.
- Do not attempt to open or repair the device. The bottle warmer can only be opened with special tools. The power cable must only be replaced with another identical power cable to the one supplied with the appliance; this operation must only be performed by expert technicians or by Artsana S.p.A.
- The device is preset with the maximum bottle warming time. It is important not to repeat the cycle with the same bottle or jar and, in general, it is not advisable to heat food too long.
- At the end of the bottle heating cycle, before feeding the heated milk to the baby, check that the temperature is not too high by pouring a drop of milk on the back of your hand.
- At the end of the jar heating cycle, before feeding the heated food to the baby, check that the temperature is not too high by tasting it with a teaspoon.
- When filling the tank with water and when using and handling the product, be careful not to spill liquids or food on the connector.
- WARNING: at the end of each heating cycle, the surface of the heating element is still hot.
- Use only the cables supplied with the device.
- For use in the car, the device must be powered at a safe low voltage of 12V.
- These instructions are available on www.Chicco.it
WARNING
- Do not leave the appliance, its accessories, and any packaging materials (plastic bags, cardboard boxes, etc.) within the reach of children as they are not toys and can be hazardous.
- Before using the bottle warmer, always make sure that the product and its components are not damaged. If there is damage, do not use the bottle warmer and contact a qualified technician or your dealer.
- Make sure that the voltage and frequency match your main power supply (see the data plate located on the bottom of the device). The electrical system where the appliance is used must conform to all safety regulations in force in the country of use of the device.
- Connect the appliance to a mains socket that is easy to access.
- Never place the bottle warmer directly on or near hot surfaces, hobs, or hotplates, or on delicate surfaces that may be sensitive to humidity and/or heat.
- Use only heat-resistant plastic or glass feeding bottles: do not use disposable bottles.
- During normal operation of the product, pay attention to hot vapor due to water heating to avoid possible burns
- For hygienic and biological reasons, bottle warmers should only be used to heat food that is already prepared and not for cooking food. The recommended temperature for heating food is about 37°C. Do not heat foods again more than once or for longer than an hour.
- The final temperature of the food and the heating time depends on the quantity to be heated, the initial temperature (room temperature or refrigerator temperature), the consistency of the preparation, the heating mode selected, the type and size of the container used (plastic feeding bottle, glass feeding bottle, baby food jar, milk collection bag) and the amount of water inserted in the heating tank.
- After one hour of continuous operation, from the end of the warming cycle, the device will switch off automatically. Allow the device to cool completely (switching it off and removing the plug from the power socket) before using it again.
- After three minutes without being used and with no heating cycle set, the device will switch off automatically.
- Do not touch the bottle warmer with wet or damp hands.
- Do not touch the bottle warmer if it is accidentally dropped into water; unplug it immediately and do not use it again. Contact trained qualified technical personnel or Artsana S.p.A.
- In the event of a fault and/or malfunction of the bottle warmer, switch it off and unplug it from the power socket, do not try to repair and/or service it, but contact only competent and qualified technical personnel or Artsana S.p.A.
- Only contact a qualified technician or Artsana S.p.A. for repairs. Incorrect repairs by unqualified personnel may cause damage or injury to users.
- If you have any doubts about the explanations provided in this instruction manual, please contact your dealer or Artsana S.p.A.
- When disposing of the packaging of the accessories subject to wear or of the device itself, a separate collection must be carried out with reference to the specific legislation in force in each country.
DEVICE CLEANING AND MAINTENANCE
At the end of each use, unplug the bottle warmer power cable (c/d) or (e/f ) from the power socket or from the cigarette lighter. Leave the bottle warmer to cool down completely and after removing any residual water in the tank, dry it thoroughly before storing it in a clean and dry place.
DESCALING
During normal use, limescale deposits may form in the heating tank, which can reduce the performance of the device and damage it in the long term. To remove limescale from the bottom of the tank make sure that the bottle warmer is completely cold, pour into the tank a solution of 200 ml of water and white wine vinegar in equal parts, and leave to act for at least one night.
Never switch the bottle warmer on when the container is soaked in the water-white vinegar solution. After the descaling cycle, rinse the inside of the tank thoroughly, clean and dry all the internal and external parts carefully. Carry out a blank heating cycle filling the heating tank with 140 ml of water. After the automatic switch-off, allow the device to cool completely, then remove any remaining water and dry carefully.
Use a cloth partially moistened with water to clean the external parts of the bottle warmer. It is recommended to carry out descaling at least once a week or, in the case of water particularly rich in limestone, even more frequently.
Do not use tools, abrasive sponges, detergents, alcohol, or solvents to carry out cleaning operations, as they could irreparably damage the bottle warmer and/or its accessories.
WARNING
- Never place the bottle warmer directly underneath the tap of running water or immerse the device, plug, or power cable (c) in water or other liquids.
- Never place the bottle warmer in the dishwasher.
INDEX OF SYMBOLS
 |
Double insulation |
 |
The appliance complies with the essential requirements of applicable EC Directives |
 |
CAUTION! |
 |
Instructions for use |
 |
Read the instructions for use |
 |
For indoor use only |
 |
Device certified and approved by IMQ (Italian Quality Brand Institute) |
The Home-Travel Bottle Warmer is ideal for warming milk or baby food both at home and while traveling. In fact, thanks to a specific cable, the device can also be used in cars. Compatible with most feeding bottles and food jars on the market.
Before using the bottle warmer, read this instruction manual carefully and keep it in a safe place.
DESCRIPTION
a) Main body
b) Baby food jar/feeding bottle holder
c) Power cable for use at home
d) Power cable for use in the car
e) Power supply connector for use at home
f ) Power supply connector for use in the car
g) On/off touch button
h) Heating mode selection touch button
i) Indicator lights (i1,i2, i3)
l) Mechanical switch for the power supply connector
INSTRUCTIONS FOR USE
Caution: It is recommended to carefully sanitize/disinfect the bottles before inserting them into the bottle warmer.
Never use the bottle warmer without water in the heating tank.
To pour the correct amount of water into the heating tank, use the graduated scale on the feeding bottle or another suitable container. Do not fill the tank by placing the device under running tap water.
USE AT HOME
Before carrying out operations 1 to 3, move the mechanical switch (l) over the car power supply connector (f ), check that the power supply cable plug (c) is disconnected from the power socket and that the cable (c) is connected to the power supply connector (e).
- Place the bottle warmer on a flat, stable surface.
- Pour water into the central body (a) according to the following instructions:
| RAPID HEATING /FORMULA | GRADUAL HEATING / BREAST MILK | BABY FOOD HEATING | ||||||||
| ROOM TEMP ABOUT 20°C |
FRIDGE TEMP ABOUT 5°C |
ROOM TEMP ABOUT 20°C |
FRIDGE TEMP ABOUT 5°C |
FREEZER TEMP ABOUT -18°C |
ROOM TEMP ABOUT 20°C | FRIDGE TEMP ABOUT 5°C |
FREEZER TEMP ABOUT -18°C |
|||
| PLASTIC FEEDING BOTTLE | STANDARD FARCE NECK FEEDING BOTTLE (CAPACITY /FILLING) |
ABOUT 60 ML*/2 OZ | 20 ml | 50 ml | 70 ml | 90 ml | 100 ml | / | / | / |
| ABOUT 150 ML/5 OZ | 40 ml | 140 ml | 120 ml | 200 ml | 200 ml | / | / | / | ||
| ABOUT 250 ML/9 OZ | 60 m1 | 140 ml | 220 ml | 220 ml | 220 ml | / | / | / | ||
| ABOUT 330 ML/11 OZ | 100 ml | 160 ml | 220 m1 | 220 ml | 220 ml | / | / | / | ||
| STANDARD SMALL NECK FEEDING BOTTLE (CAPACITY /FILLING) |
ABOUT 60 ML*/2 OZ | 20 ml | 50 ml | 70 ml | 90 ml | 100 ml | / | / | / | |
| ABOUT 150 ML/5 OZ | 100 ml | 150 ml | 120 ml | 300 ml | 300 ml | / | / | / | ||
| ABOUT 250 ML/9 OZ | 180 ml | 210 ml | 300 ml | 300 ml | 300 ml | / | / | / | ||
| ABOUT 330 ML/11 OZ | 200 m1 | 230 ml | 300 ml | 300 ml | 300 ml | / | / | / | ||
| PLASTIC FEEDING BOTTLE | FEEDING BOTTLE WITH REMOVABLE BASE (CAPACITY /FILLING) |
ABOUT 60 ML*/2 OZ | 60 ml | 90 ml | 120 ml | 100 ml | / | / | / | / |
| ABOU 150 ML/5 OZ | 140 ML | 200 ML | 250 ml | 250 ml | / | / | / | / | ||
| ABOUT 250 ML/9 OZ | 200 ml | 250 ml | 250 ml | 250 ml | / | / | / | / | ||
| ABOUT 300 ML/10.5 OZ | 240 ml | 250 m1 | 250 ml | 250 m1 | / | / | / | / | ||
| GLASS FEEDING BOTTLE | STANDARD LARGE NECK FEEDING BOTTLE (CAPACITY /FILLING) |
ABOUT 60 ML*/2 OZ | / | / | 20 ml | 60 ml | / | / | / | / |
| ABOU 150 ML/5 OZ | 40 ml | 60 ml | 100 ml | 200 ml | / | / | / | / | ||
| ABOUT 250 ML/9 OZ | 60 ml | 60 ml | 200 ml | 200 ml | / | / | / | / | ||
| STANDARD SMALL NECK FEEDING BOTTLE (CAPACITY /FILLING) |
ABOUT 60 ML*/2 OZ | / | / | 20 ml | 60 ml | / | / | / | / | |
| ABOUT 150 ML/5 OZ | 40 ml | 60 ml | 100 ml | 220 ml | / | / | / | / | ||
| ABOUT 250 ML/9 OZ | 80 ml | 140 ml | 220 ml | 220 ml | / | / | / | / | ||
| MILK COLLECTION BAG (CAPACITY /FILLING) | ABOUT60 ML/2 OZ | / | / | / | 100 ml | 200 ml | / | / | / | |
| ABOUT 150 ML/5 OZ | / | / | / | 100 ml | 200 ml | / | / | / | ||
| ABOUT 250 ML/9 OZ | / | / | / | 200 m1 | 200 m1 | / | / | / | ||
| BABY FOOD JAR | ABOUT 80G | / | / | / | / | / | 150 ml | 150 ml | 150 ml | |
*60 ml of food in a 150 ml capacity feeding bottle
NOTE: the water quantities to be used for heating, specified above, refer to the Chicco line of feeding bottles and to 80 ml jars. You may use the same quantity of water for feeding bottles of other brands and jars of different capacities, but pay special attention to the temperature of the food at the end of the heating cycle (max 37°).
3. Slowly lower into the central body (a) the baby food jar/feeding bottle support (b) and the:
- FEEDING BOTTLE: with the ring and teat properly mounted on the bottle, without adding the little cup.
- BABY FOOD JAR: without the lid or any labels.
WARNING
Milk collection bags, glass feeding bottles, jars, and feeding bottles with contents amounting to less than 150 ml must be placed on the baby food jar/feeding bottle support (b) before being lowered into the central body (a). This helps provide a better grip and avoids burns. Make sure that the heating water does not spill from the top of the device and that it does not reach the mouth of small feeding bottles or jars. If water spills out of the central body (a) after the feeding bottle has been inserted, immediately dry the external area and base of the bottle warmer and the power cable and plug it with a dry cloth and remove the excess water from the tank.
4. Insert the plugin into the power socket: a long audible signal will be heard.
5. Switch on the interface by touching the on/off touch button (g): an audible signal will be heard and the indicator lights (i) will begin to blink and turn on in progression.
6. Select the heating mode by touching the selector button (h) repeatedly, as follows: a. 1 time: for rapid heating – This program is specifically meant for formula. Indicator light i1 will begin to blink. b. 2 times: for slow heating – This program is specifically meant for breast milk. Indicator light i2 will begin to blink. c. 3 times: for baby food heating – This program is specifically meant for the baby food jar. Indicator light i3 will begin to blink.
7. Initiate the selected heating cycle by touching the on/off touch button (g): an audible signal will be heard and the indicator light for the given heating mode will remain on continuously to indicate that the heating cycle is active. After a cycle is selected (point 6), if three minutes pass without the cycle being activated, the device will switch off automatically.
WARNING
The freezing formula is not advisable.
WARNING
Do not freeze milk in feeding bottles that have a removable base (like the Chicco Perfect5).
WARNING
For milk collection bags, use slow heating mode.
CAUTION
When heating baby food, stir the contents of the jar often to ensure an even temperature.
8. After a few minutes*** of operation the blinking indicator light for the selected function (i) and the emission of a long audible signal mark the end of the heating cycle.
*** Warning: heating time and the final temperature of the food can vary significantly with the size and type of container used (plastic feeding bottle, glass feeding bottle, jar, milk collection bag), the quantity of food to be heated, starting temperature (room temperature, refrigerator temperature…), the heating mode selected and consistency of the preparation.
9. To switch off the bottle warmer, touch the on/off touch button (g) a second time until the indicator lights (i) switch off and disconnect the bottle warmer power cable plug
(c) from the socket.
10. Once the bottle or baby food jar has been removed from the bottle warmer tank, dry it thoroughly before feeding the baby.
CAR USE
WARNING
Do not operate the bottle warmer in a car with the car in motion as the heated water may cause burns.
Before carrying out operations 1 to 3, move the mechanical switch (l) over the household power supply connector (e), check that the power supply cable plug (d) is disconnected from the cigarette lighter and that the cable (d) is connected to the power supply connector (f ).
Follow the instructions given in points 1, 2, and 3 of the USE AT HOME section, using the scheme below:
| RAPID HEATING /FORMULA | GRADUAL HEATING / BREAST MX | BABY FOOD HEATING | ||||||||
| ROOM TEMP ABOUT 20°C |
FRIDGE TEMP ABOUT 5°C |
ROOM TEMP ABOUT 20°C |
FRIDGE TEMP ABOUT 5°C |
FREEZER TEMP ABOUT -18°C |
ROOM TEMP ABOUT 20ºC |
ROOM TEMP ABOUT 5°C |
FREEZER TEMP ABOUT -18°C |
|||
| PLASTIC FEEDING BOTTLE | STANDARD LARGE NECK FEEDING BOTTLE (CAPACITY /FILLING) |
ABOUT 60 ML*/2 OZ |
40 m1 | 50 ml | 100 ml | 100 ml | / | / | / | / |
| ABOUT 150 ML/5 OZ |
40 m1 | 50m1 | 120m1 | 120 mI | / | / | / | / | ||
| ABOUT 250 ML/9 OZ |
40 mI | 50m1 | 150m1 | 150 ml | / | / | / | / | ||
| ABOUT 330 ML/11 OZ |
50 ml | 60m1 | 180m1 | 180 ml | / | / | / | / | ||
| PLASTIC FEEDING BOTTLE | STANDARD SMALL NECK FEEDING BOTTLE (CAPACITY /FILLING) |
ABOUT 60 ML*/2 OZ |
50 ml | 50 ml | 100 ml | 100 ml | / | / | / | / |
| ABOUT 150 ML/5 OZ |
40 ml | 60 ml | 200 m1 | 200 ml | / | / | / | / | ||
| ABOUT 250 ML/9 OZ |
80 ml | 100 ml | 240 ml | 250 ml | / | / | / | / | ||
| ABOUT 330 ML/11 OZ |
80 ml | 100 ml | 250 ml | 250 ml | / | / | / | / | ||
| FEEDING BOTTLE WITH REMOVABLE BASE (CAPACITY /FILLING) |
ABOUT 60 ML*/2 OZ |
80 mI | 90 ml | 100 ml | 100 ml | / | / | / | / | |
| ABOUT 150 ML/5 OZ |
80 ml | 120 ml | 200 ml | 200 ml | / | / | / | / | ||
| ABOUT 250 ML/9 OZ |
120 m1 | 140 m1 | 240 m1 | 250 ml | / | / | / | / | ||
| ABOUT 300 ML/10.5 OZ |
140 mI | 160 m1 | 250 m1 | 250 ml | / | / | / | / | ||
| GLASS FEEDING BOTTLE | STANDARD LARGE NECK FEEDING BOTTLE (CAPACITY /FILLING) |
ABOUT 60 ML*/2 OZ |
30 ml | 40 ml | 40 ml | 50 m | / | / | / | / |
| ABOUT 150 ML/5 OZ |
50 m1 | 50 m1 | 120 ml | 120 ml | / | / | / | / | ||
| ABOUT 150 ML/5 OZ |
50 ml | 50 ml | 200 ml | 200 ml | / | / | / | / | ||
| STANDARD SMALL NECKFEEDING BOTTLE (CAPACITY /FILLING) |
ABOUT 60 ML*/2 OZ |
30 ml | 40 ml | 40 m1 | 50 m1 | / | / | / | / | |
| ABOUT 150 ML/5 OZ |
50 ml | 50 ml | 120 ml | 120 ml | / | / | / | / | ||
| ABOUT 250 ML/9 OZ |
60 ml | 60 ml | 220 ml | 220 ml | / | / | / | / | ||
| MILK COLLECTION BAG (CAPACITY /FILLING) |
ABOUT 60 ML/2 OZ |
/ | / | / | 100 ml | / | / | / | / | |
| ABOUT 150 ML/5 OZ |
/ | / | / | 200 ml | / | / | / | / | ||
| ABOUT 250 ML/9 OZ |
/ | / | / | 250 m1 | / | / | / | / | ||
| BABY FOOD JAR | ABOUT 80G | / | / | / | / | / | 150 ml | 150 ml | / |
*60 ml of food in a 150 ml capacity feeding bottle
NOTE: The water quantities to be used for heating, specified above, refer to the Chicco line of feeding bottles and to 80 ml jars. You may use the same quantity of water for feeding bottles of other brands and jars of different capacities, but pay special attention to the temperature of the food at the end of the heating cycle (max 37 °C).
4. Move the mechanical switch (l) over the household power supply connector (e) and plug it into the cigarette lighter: an audible signal will be heard and the indicator light next to the power cable plug (d) will switch on with a red light.
Follow the instructions given in points 5, 6, 7, and 8 of the “USE AT HOME” section.
When using the bottle warmer with the power cable (d) connected to the car’s cigarette lighter the voltage is different from your mains power supply at home, and the heating time may therefore vary significantly.
9. To switch off the bottle warmer, touch the on/off touch button (g) a second time until the indicator lights (i) switch off and disconnect the bottle warmer power cable plug (d) from the car’s cigarette lighter.
10. Once the bottle or baby food jar has been removed from the bottle warmer tank, dry it thoroughly before feeding the baby.
WARNING
Before using the product in a car, always check that the relevant cigar lighter socket is compatible with the electrical characteristics of the product. Do not use the product with a 24V cigar lighter socket (e.g.. for heavy-duty vehicles): the product could be irreversibly damaged and cause the vehicle’s electrical system to fail.
CAUTION
Before feeding the heated food to the child, always make sure that the temperature of the food is not too high.
If the food is not hot enough, keep the feeding bottle or jar in the bottle warmer using “maintain temperature” mode (see the paragraph titled “Maintain Temperature”). Check the heating status at regular intervals, making sure not to get burned, until the desired temperature is reached.
IN PARTICULAR:
For feeding bottles with the formula:
– shake the feeding bottle for a few seconds in order to even out the temperature of the food and check the temperature by pouring a few drops on the inside of your wrist.
For baby food jars:
– stir the contents of the jar to even out the temperature and taste to be sure it isn’t too hot.
NOTE: do not shake feeding bottles with breast milk to avoid forming air bubbles inside.
NOTE: if heated too much, the valuable nutrients and vitamins contained in breast milk could be lost.
MAINTAINING THE TEMPERATURE
At the end of the heating cycle, if the device is not switched off, it will continue to keep the food hot for a maximum of 60 minutes from the end of the cycle. During this phase, the indicator light (i) for the selected heating mode will continue to blink. Once the 60 minutes have passed the device will switch off automatically.
WARNING
During the maintenance cycle, the temperature of the food may rise above 37°C. In this case, the three indicator lights (i) will start to blink. Always check that the temperature of food is not too high before feeding it to the child.
Powdered milk that has been reconstituted in water at the right temperature of 70 °C, (as specified on the packaging for the powdered milk), can later be heated using the bottle warmer and consumed immediately.
Thawed breast milk should be used immediately.
NOTE:
- It’s best to consume milk and baby food immediately after heating.
- Milk and baby food should not be heated a second time outside of the single feeding/meal. If they have already been heated for a previous feeding/meal, they must be thrown away.
WARNING
If you wish to warm up less than 150 ml of milk do not use “maintain temperature” mode.
TECHNICAL DATA
![]() 00007389100000
00007389100000
Mod. 06867_T
220-240V~, 50-60Hz, 220W
12V 60W
Made in China
For the warranty for product defects see the specific provisions of applicable national laws in the country where purchased, if required. The warranty does not cover components subject to normal wear and tear.
ARTSANA reserves the right to change information described in this manual at any time and without notice.
The reproduction, transmission, copying, as well as the translation into another language, of any part of these instructions, are absolutely forbidden without the previous written authorization by ARTSANA S.p.A.
EC DECLARATION OF CONFORMITY
Artsana S.p.A hereby declares that this appliance, brand Chicco mod. 06867_T complies with all the essential requirements and other provisions set forth by the EU Directives 2014/30/EU (electromagnetic compatibility), 2014/35/EU (low voltage directive), and 2011/65/EU (RoHS). A full copy of the EC declaration can be requested from Artsana S.p.A. Via S. Catelli 1 – 22070 Grandate (CO) Italy.
THIS PRODUCT COMPLIES WITH THE DIRECTIVE 2012/19/EU.
 The crossed bin symbol on the appliance indicates that the product, at the end of its life, must be disposed of separately from domestic waste, either by taking it to a separate waste disposal site for electric and electronic appliances or by returning it to your dealer when you buy another similar appliance. The user is responsible for taking the appliance to a special waste disposal site at the end of its life. If the unwanted appliance is collected correctly as separate waste, it can be recycled, treated, and disposed of ecologically; this avoids a negative impact on both the environment and health and contributes towards the recycling of the product’s materials. . For further information regarding the waste disposal services available, contact your local waste disposal agency or the shop where you bought the appliance.
NOTE
…………………………………………………………………………………………………………………………………………………………
…………………………………………………………………………………………………………………………………………………………
………………………………………………………………………………………………………………………………………………………..
………………………………………………………………………………………………………………………………………………………..
…………………………………………………………………………………………………………………………………………………………
…………………………………………………………………………………………………………………………………………………………
………………………………………………………………………………………………………………………………………………………..
………………………………………………………………………………………………………………………………………………………..
…………………………………………………………………………………………………………………………………………………………
…………………………………………………………………………………………………………………………………………………………
………………………………………………………………………………………………………………………………………………………..
………………………………………………………………………………………………………………………………………………………..
 Made in China
Artsana S.p.A. – Via Saldarini Catelli 1 – 22070 Grandate (CO) Italy
www.chicco.com
Rev. 00-2020
46 007389 100 000_DRAFT_IT_EN
View Fullscreen
®
MAX
Convertible Car Seat User Guide
IS0201E_01
For future use, STORE USER GUIDE in compartment at rear of base.
©2020 Artsana USA, Inc. 08/20 www.chiccousa.com
If you have any problems with your Chicco Child Restraint, or any questions regarding installation or use, please call:
Chicco Customer Service 1-877-424-4226
Please have Model and Serial Number available when you call. These are located on a label on the bottom of the Child Restraint.
For future reference, fill in the information below. The information can be found on the label on the bottom of the Child Restraint.
Model Number:
Serial Number:
Manufactured In:
TABLE OF CONTENTS
Registration and Recall Child Guidelines Safe Use Checklist Important Warnings Best Practices Need Help?
CHILD RESTRAINT OVERVIEW
Child Restraint Components LATCH and Tether Components LATCH and Tether Storage Selecting Rear/Forward-Facing Position Adjusting Crotch Strap Newborn Positioner
VEHICLE INFORMATION
Vehicle Seating Positions Vehicle Seat Belts What is LATCH? What is a Tether?
2 REAR-FACING INSTALLATION
4 Rear-Facing Setup
38
6 Install Using LATCH
42
8 Install Using LAP-SHOULDER BELT
48
14 Install Using LAP BELT ONLY
52
15
FORWARD-FACING INSTALLATION
Forward-Facing Setup
56
16 Install Using LATCH
60
18 Install Using LAP-SHOULDER BELT
66
20 Install Using LAP BELT ONLY
72
22
26 SECURING YOUR CHILD
28 Securing Child with Harness
76
Secure Child Checklist
88
30
ADDITIONAL INFORMATION
32 Installation on an Aircraft
90
34 Cup Holder
92
36 Cleaning and Maintenance
94
REGISTRATION AND RECALL
Please complete the Registration Card that came with your Child Restraint and mail it promptly.
Child Restraints could be recalled for safety reasons. You must register this restraint to be reached in a recall. Send your name, address, e-mail address if available, and the restraint’s model number and manufacturing date to:
Artsana USA, Inc. 1826 William Penn Way
Lancaster, PA 17601 or call 1-877-424-4226 or register online at http://www.chiccousa.com/carseatregistration.aspx
For recall information, call the U.S. Government’s Vehicle Safety Hotline at 1-888-327-4236 (TTY: 1-800-424-9153), or go to http://www.NHTSA.gov.
2
REGISTRATION AND RECALL
PAGE INTENTIONALLY LEFT BLANK
3
CHILD GUIDELINES
This Child Restraint is designed for children ages Birth to 6 years old. ONLY use this Child Restraint if the child meets BOTH of the following Weight and Height requirements:
· Weight is between 4 and 65 pounds (1.8 and 29.5 kg). · Height is 49 inches (125 cm) or less.
The Newborn Positioner is only for infants who weigh between 4 and 11 pounds (1.8 and 5 kg). See Newborn Positioner on page 28.
For premature infants, you must consult the infant’s doctor before using this Child Restraint. A premature infant may have difficulty breathing or have other medical problems when placed in a seated position.
4
CHILD GUIDELINES
REAR – FACING
See Select Rear-Facing on page 22.
NEWBORN INSERT
4 lbs.
11 lbs.
(1.8 kg)
(5 kg)
22 lbs. (10 kg)
NO LATCH
35 lbs.
50 lbs.
(15.9 kg) 40 lbs. (22.7 kg)
(18 kg)
NO LATCH
65 lbs. (29.5 kg)
See Select Forward-Facing on page 24.
FORWARD – FACING
5
SAFE USE CHECKLIST YOUR CHILD’S SAFETY DEPENDS ON YOU! You MUST follow the
detailed instructions in this User Guide to ensure the steps below are performed correctly! Make sure your child meets the age, weight, and height requirements: Refer to the “Child Guidelines” section on page 4. Choose the proper Child Restraint configuration:
REAR-FACING requirements on page 22 FORWARD-FACING requirements on page 24
Select a safe seating location in your car: Refer to the “Vehicle Seating Positions” section on page 30 and 31.
6
SAFE USE CHECKLIST Ensure that the Child Restraint is properly leveled when installed:
REAR-FACING requirements on page 38 FORWARD-FACING requirements on page 56
Check Child Restraint for a snug fit in your car: While holding Child Restraint near belt path used, pull side to side and forward. Belt should remain tight and Child Restraint should not move more than 1″ (25 mm) from vehicle seat back or side-to-side. Secure your child: Refer to the “Securing Your Child” section on page 76.
7
IMPORTANT WARNINGS
WARNING
DEATH or SERIOUS INJURY CAN OCCUR
FAILURE TO FOLLOW THESE INSTRUCTIONS AND THE PRODUCT LABELS CAN RESULT IN SERIOUS INJURY OR DEATH TO YOUR CHILD.
Take Time to Read This User Guide
· Carefully read and understand all instructions and warnings in this User Guide. Your child’s safety depends on you knowing how to setup, install and use this Child Restraint properly.
· Before installing this Child Restraint in a vehicle, be sure to also check the vehicle owner’s manual for information on proper installation.
· NEVER allow others to use this Child Restraint until they have read and understood all instructions in this User Guide.
· This Child Restraint is not intended for use outside of the vehicle.
Make Sure Child Fits This Child Restraint
· Use only with children who weigh between 4 lbs (1.8 kg) and 65 lbs (29.5 kg) and whose height is 49 inches
(125 cm) or less. Determine the right installation setup for your child’s age, weight and height.
8
· ONLY USE the Newborn Positioner REAR-FACING and only if the child weighs between 4 and 11 lbs (1.8 and 5 kg).
IMPORTANT WARNINGS
WARNING
DEATH or SERIOUS INJURY CAN OCCUR
Secure Child Properly
· Snugly adjust the harness around your child. A loose harness could cause the child to be ejected in a sudden stop or crash, resulting in serious injury or death.
A snug strap should not allow any slack. It lies in a relatively straight line without sagging. It does not press on the child’s flesh or push the child’s body into an unnatural position.
· NEVER use clothing or blankets that interfere with fastening or tightening the harness. An unsecured child could be ejected in a sudden stop or crash!
To keep child warm, place a blanket over child and restraint AFTER you have properly secured child in harness.
· ALWAYS check to make sure buckle is securely latched. If buckle separates, child could be killed or seriously injured. · NEVER leave child unattended. Do not allow children to play in or around the Child Restraint. · ALWAYS keep child properly secured in harness whenever child is in Child Restraint.
9
IMPORTANT WARNINGS
WARNING
DEATH or SERIOUS INJURY CAN OCCUR
Install Child Restraint Correctly
· WHEN USING THIS CHILD RESTRAINT REAR-FACING, DO NOT PLACE THIS CHILD RESTRAINT IN VEHICLE SEATING LOCATION WITH A FRONTAL AIR BAG, UNLESS THE AIR BAG CAN BE TURNED OFF. If the airbag inflates, it can cause serious injury or death to your child. For vehicles with side air bags, refer to your vehicle owner’s manual for information on your Child Restraint installation.
· ALWAYS install this Child Restraint in a back seat if possible.
According to accident statistics, children are safer when properly restrained in the rear seating positions rather than in the front seat.
· NEVER install on a rear-facing or side-facing vehicle seat, or on the back of a folded down vehicle seat. · ALWAYS secure this Child Restraint with the vehicle’s Child Restraint anchorage system (LATCH) if available
OR the vehicle seat belt. Refer to Page 5 for proper use/child weight limits when installing with LATCH. · DO NOT use the lower anchors of the Child Restraint anchorage system (LATCH system) to attach this
Child Restraint REAR-FACING when restraining a child weighing more than 35 lbs (15.9 kg) or FORWARD-FACING when restraining a child weighing more than 40 lbs (18 kg).
10
IMPORTANT WARNINGS
WARNING
DEATH or SERIOUS INJURY CAN OCCUR
Install Child Restraint Correctly
· ALWAYS use the top tether strap on this Child Restraint when installed FORWARD-FACING, if a tether anchor is available. NEVER use the top tether strap on this child restraint when installed REAR-FACING.
· NEVER use Child Restraint in a vehicle seating position where it cannot be secured tightly. A loosely installed Child Restraint will not protect your child in a crash.
· Never leave Child Restraint unsecured in your vehicle even when it is unoccupied. It could injure other occupants in a sudden stop or crash.
· DO NOT install this Child Restraint using an inflatable seat belt. The interaction of the inflatable portion of the vehicle’s belt with this Child Restraint can result in serious injury or death. Install using LATCH instead, or move the car seat to a position with a suitable seat belt type.
Ensure Child’s Safety When Using Child Restraint
· NEVER leave your child unattended in the vehicle. · STRANGULATION HAZARD: Your child can strangle in a loose Restraint Harness. Never leave a child in
the Child Restraint with straps loose or undone. · To prevent ejection or breathing difficulties, proper recline is required. When installing the Child
Restraint, check the bubble level on the side of the Child Restraint.
11
IMPORTANT WARNINGS
WARNING
DEATH or SERIOUS INJURY CAN OCCUR
Check Condition of Restraint
· DO NOT use if the Harness or LATCH straps are cut, frayed or damaged. · DO NOT use this Child Restraint if it is more than 8 years old. Check manufacturer’s label on underside
of Child Restraint for the “Do Not Use After” date. · DO NOT use any accessories, pads or products not included with this Child Restraint, unless
approved by Chicco USA. Doing so will void the warranty of this Child Restraint. · You MUST replace this Child Restraint if it has been involved in a crash, even if you cannot see visible
damage. A damaged Child Restraint may not protect your child in a future crash. · Do not modify your Child Restraint. · NEVER remove harness from Child Restraint without the proper removal and installation instructions
available from Chicco USA. Contact us by visiting the Chicco website at www.chiccousa.com or call 1-877-424-4226. · Do not use Child Restraint if any component is damaged, broken, or missing parts. Call 1-877-424-4226 to find out if the damaged part or parts can be replaced.
12
IMPORTANT WARNINGS
PAGE INTENTIONALLY LEFT BLANK
13
BEST PRACTICES
· Ensure all vehicle occupants are properly restrained before traveling. Unrestrained
occupants can be thrown around and may be seriously injured or seriously injure other
occupants in a sharp turn, sudden stop or crash.
· Do not leave loose objects, such as books, bags, etc., in the back of the vehicle. In the
event of a sharp turn, sudden stop, or crash, loose objects can be thrown around and
possibly cause serious injury to vehicle occupants.
· Cover the Child Restraint when the vehicle is parked in sunlight. Parts of a Child Restraint
can become very hot if left in the sun. Contact with these parts can burn a child’s skin.
Always check the surface of any metal or plastic parts before putting your child in the
Child Restraint.
· To avoid strangulation, Do not allow children to play with vehicle seat belts. If possible,
move unused belts out of reach.
· Do not use anything to raise the Child Restraint off the vehicle seat such as a noodle
or towel. In a sharp turn, sudden stop, or crash, the Child Restraint could slide and
potentially cause serious injury.
· Never use a second-hand Child Restraint with an unknown history.
· Never use any accessories that are not included with this Child Restraint, unless
14
specifically approved by Chicco. For more information, go to www.chiccousa.com.
NEED HELP? Need Help Securing Your Child Restraint?
The following sources are available to help ensure your Child Restraint is properly installed: · Contact Chicco, USA by visiting our website at www.chiccousa.com or
calling our Customer Service 1-877-424-4226. Please have Model and Serial Number available when you call. These are located on a label on the bottom of the Child Restraint.
· Refer to your vehicle manual for Child Restraint installation tips.
· Contact a certified Child Passenger Safety Technician in your area by visiting safercar.gov and select “Find Local Child Seat Help” or call 1-866-SEAT CHECK (1-866-732-8243).
15
CHILD RESTRAINT OVERVIEW CHILD RESTRAINT OVERVIEW
CHILD RESTRAINT COMPONENTS
Newborn Positioner
Chest Clip
Harness Strap
Crotch Strap Pad
Harness Release Button
(under fabric)
Harness
Adjustment
16
Strap
Recline Adjustment
Handle
Rear-Facing Lock-Off
(Each Side)
Adjustment Handle
(Head Rest)
Bubble Level Indicator
(Each Side)
Shoulder Pads
Harness Buckle
Recline Position Indicator
CHILD RESTRAINT COMPONENTS
Tether Strap
Forward-Facing Lock-Off
LATCH Connector Storage
SuperCinch® LATCH Tightener
(PULL 2nd)
Tether Storage
Forward-Facing Lock-Off
LATCH Connector Storage
LATCH
Adjuster (PULL 1st)
Instruction Manual
Storage
17
CHILD RESTRAINT OVERVIEW CHILD RESTRAINT OVERVIEW
LATCH AND TETHER COMPONENTS TETHER: A Tether Strap B Tether Strap Adjuster C Tether Hook
LATCH: D LATCH Adjuster (PULL 1st) E SuperCinch® LATCH Tightener (PULL 2nd) F LATCH Strap G LATCH Connectors
18
LATCH AND TETHER COMPONENTS
A
B
C
Tether LATCH
F
PULL
2nd
E
G
F
PULL
1st
D
G
19
CHILD RESTRAINT OVERVIEW CHILD RESTRAINT OVERVIEW
LATCH AND TETHER STORAGE
Always make sure LATCH Components are properly stored in the compartments when not in use.
LATCH STORAGE: 1 Store each LATCH strap in the compartments located on either side of
the Child Restraint base when not in use. Make sure Lower Anchor ConnectorStorage compartments are properly closed.
Fold SuperCinch® LATCH Tightener (Pull 2nd) strap as shown (1a).
2 TETHER STORAGE: Store Tether in the compartment in the back of Child Restraint when not in use. Hook on bar and pull strap tight. Make sure compartment door is properly closed.
20
LATCH AND TETHER STORAGE
1
2
9
8 7 6 1234 5
1a
21
CHILD RESTRAINT OVERVIEW CHILD RESTRAINT OVERVIEW
SELECT REAR-FACING POSITION WARNING! REAR-FACING use of this Child Restraint is ONLY for children who meet ALL of the requirements shown here. If the child is not within these requirements because the child is too large, review the FORWARD-FACING guidelines on page 24.
NEVER turn this Child Restraint FORWARD-FACING with an infant less than one year of age.
22
REAR-FACING: 4 50 lbs (1.8 22.7 kg)
SELECT REAR-FACING POSITION
REAR – FACING
Use REAR-FACING with children: · Who weigh between 4 and 50 lbs
(1.8 22.7 kg).
NEWBORN INSERT
4 lbs.
11 lbs.
(1.8 kg)
(5 kg)
· Who are no taller than 43″ (109 cm).
· When Harness Straps can be positioned
at or below the child’s shoulders*.
NO LATCH
35 lbs.
50 lbs.
(15.9 kg) (22.7 kg)
See Harness Height Adjustment on page 80.
*
23
CHILD RESTRAINT OVERVIEW CHILD RESTRAINT OVERVIEW
SELECT FORWARD-FACING POSITION WARNING! FORWARD-FACING use of this Child Restraint is ONLY for children who meet ALL of the requirements shown here. If the child is not within these requirements because they are too large, select a different child seat. If the child is not within these requirements because the child is too small, review the REAR-FACING guidelines on page 22.
NEVER turn this Child Restraint FORWARD-FACING with an infant less than one year of age.
24
SELECT FORWARD-FACING POSITION
FORWARD-FACING: 22 65 lbs (10 29.5 kg)
FORWARD – FACING
Use FORWARD-FACING with children: 22 lbs.
· Who are at least one year old.
(10 kg)
· Who weigh between 22 and 65 lbs
(10 29.5 kg).
· Who are no taller than 49″ (125 cm) OR when the
top of the ears are below the top of the Head Rest.
· When Harness Straps can be positioned at or
above the child’s shoulders*.
NO LATCH
40 lbs.
65 lbs.
(18 kg)
(29.5 kg)
See Harness Height Adjustment on page 80.
* 25
CHILD RESTRAINT OVERVIEW CHILD RESTRAINT OVERVIEW
ADJUSTING CROTCH STRAP
Adjust Crotch Strap if strap is underneath child.
1 Unbuckle Harness Straps. Remove Crotch Strap Pad (Refer to page 94). Unzip the seat padding halfway (a). Pull seat pad to the side to access the Crotch Strap compartment (b).
2 Slide the orange button on the Crotch Strap lock while pulling up on the Crotch Strap to open the compartment (a, b). Then pull the Crotch Strap forward or backward into desired position.
3 Close the compartment by pushing down on the door until it locks back into place. Check to make sure compartment is locked by pulling up on the Crotch Strap. Re-attach the seat pad.
26
ADJUSTING CROTCH STRAP
1a
1b
2a
2b
3
27
CHILD RESTRAINT OVERVIEW CHILD RESTRAINT OVERVIEW
NEWBORN POSITIONER
WARNING – ONLY use the newborn positioner if the child
1
weighs between 4 and 11 lbs (1.8 and 5 kg).
To ensure a better fit for smaller infants the Newborn Positioner may be needed. Do NOT use any other infant insert or pillows. Only use the one provided by Chicco for this Child Restraint.
Remove Crotch Strap Pad before installing Newborn Positioner. Refer to page 94.
1 Pull Harness Buckle through slot in the bottom of Newborn Positioner.
3a
2 Pull both Harness Straps over the side panels of Newborn Positioner.
3 Push Newborn Positioner firmly into Child Restraint(a) to make sure it is properly positioned (b).
28
NEWBORN POSITIONER
2
3b 29
VEHICLE INFORMATION VEHICLE INFORMATION
VEHICLE SEATING POSITIONS
WARNING! WHEN USING THIS CHILD RESTRAINT REAR-FACING, DO NOT PLACE THIS CHILD RESTRAINT IN A VEHICLE SEATING LOCATION WITH A FRONTAL AIR BAG, UNLESS THE AIR BAG CAN BE TURNED OFF.
The back seat is the safest place for children 12 and under. See your
30
vehicle owner’s manual for Child Restraint installation and instructions.
VEHICLE SEATING POSITIONS
Some vehicles have no seating positions which are compatible with this Child Restraint. If in doubt, contact the vehicle manufacturer for assistance. Only forward-facing vehicle seats can be used with this Child Restraint.
Make sure no more than 3 inches (76 mm) of the Child Restraint base is past the edge of the vehicle seat.
Do not use on a folded down vehicle seat back.
31
VEHICLE INFORMATION VEHICLE INFORMATION
VEHICLE SEAT BELTS
The information in this section applies to installation with vehicle seat belts only.
For simplest installation use LATCH – Refer to page 34 for details.
Vehicle seat belts differ from vehicle to vehicle. Refer to your vehicle owner’s manual for specific information about seat belts and their use with Child Restraints.
Shoulder belt with switchable retractor: Putting the shoulder belt in the locked/switched mode as the last step is optional. The shoulder belt Lock-Off replaces the need for the locked/switched mode. When the Child Restraint is rear-facing using the locked/switched mode may cause Child Restraint to tilt.
VEHICLE SEAT BELTS
The following types of vehicle belts MUST NOT be used to install this Child Restraint. If any of the belt types listed below are in the chosen seating position, choose another vehicle seating position or use LATCH if available.
1
2
3
4
5
1. Motorized (automatic) vehicle belts. 4. Non-Locking (ELR) Lap Belts.
2. Door mounted vehicle belts.
5. Inflatable seat belts.
32
3. Lap-shoulder Belts with 2 retractors (unless Lap Belt has a “Lock Mode”).
33
VEHICLE INFORMATION VEHICLE INFORMATION
WHAT IS LATCH?
WARNING: This Child Restraint is designed to be used with lower anchors at the standard spacing (11 inches (28 cm)) ONLY! Refer to vehicle owner’s manual for information about LATCH and Child Restraint installation positions.
LATCH = Lower Anchors and Tethers for CHildren
United States Motor Vehicle Safety Standards have defined a system for installing Child Restraints in vehicles called LATCH. LATCH may ONLY be used IN PLACE OF vehicle belt if the vehicle is equipped with LATCH anchor points. DO NOT use both the seat belt and LATCH at the same time. Please refer to the vehicle
owner’s manual for designated LATCH locations in vehicles.
LATCH in the vehicle consists of a top tether anchor point and two lower anchor points. Some vehicles owner’s manual use the term “ISOFIX”. LATCH can also be used in vehicle seating positions equipped with ISOFIX.
If the vehicle is equipped with LATCH, the vehicle lower anchor points may be visible at
the seat crease. If not visible, the seating position may be marked with a symbol (fig. a) or
a colored dot. Check the vehicle owner’s manual for vehicle top tether anchor locations.
34
They may be identified using one of the anchor symbols (fig. b or fig. c).
Vehicle Top Tether Anchor
Points
WHAT IS LATCH?
Vehicle Lower Anchor
Points
Vehicle Seat Crease
(Fig. a)
(Fig. b)
(Fig. c)
35
VEHICLE INFORMATION VEHICLE INFORMATION
WHAT IS A TETHER?
The tether is a strap on your child restraint that connects to a tether anchor in your vehicle. Tether anchor locations vary from vehicle to vehicle. Check your vehicle owner’s manual and look for the tether anchor symbol as shown. A tether reduces movement of a forward-facing Child Restraint in a crash and helps to achieve a tight installation.
Vehicle tether anchors can be found in many different locations. Some of the typical locations are shown on the next page. Refer to your vehicle owner’s manual for exact locations, anchor identification, and requirements.
Vehicle Roof Rear Shelf
Back Wall
36
Vehicle Floor
WHAT IS A TETHER?
Back of Seat
37
REAR-FACING INSTALLATION REAR-FACING INSTALLATION
REAR-FACING SETUP
Infants may have difficulty breathing when in a sitting position. Make sure the seat is reclined properly so that your child’s head does not fall forward. Failure to properly recline the Child Restraint could increase the child’s risk of serious injury or death.
1 See page 30 for “Vehicle Seating Positions” before installing. Make sure the vehicle is on a level surface, if possible.
LEVEL SLOPE
2 Squeeze the Recline Adjustment Handle on front of Child Restraint and pull forward to adjust to a reclined position as shown (a).
If a change in recline position is necessary after child restraint is installed,
loosen the current method of installation and adjust the recline. Repeat
installation steps and refer to pages 40-55 to ensure child restraint is
38
installed correctly.
REAR-FACING SETUP Do not use Tether in REAR-FACING mode. Tether must be properly stored – See ” Tether Storage” page 20.
2
2a
1234
9
8 7 56
1234 5
39
REAR-FACING INSTALLATION REAR-FACING INSTALLATION
REAR-FACING SETUP
3 Place Child Restraint rear-facing on selected vehicle seat. Make sure it is not blocking the vehicle belt buckle. Do not exceed the rear-facing maximum overhang of 3 inches over the front edge of the vehicle seat.
4
Installation on a Level Surface: Locate the Bubble Level Indicator
label and re-adjust the seat recline to any position that the Bubble
LEVEL falls between the lines for REAR-FACING installation.
SLOPE
Installation on a Slope: Locate the level line on the blue label near the rear-facing belt path. Adjust the seat recline so that the level line is level with the ground.
REAR-FACING SETUP
3 4 LEVEL
9
8
7 6 1 2 34 5
3
Installation Options:
4
· LATCH installation continued on page 42.
· Lap-Shoulder Belt installation continued on page 48.
· Lap Belt Only installation continued on page 52.
40
SLOPE
9
8
7 6 5
RMEAaDxRiO-mFNAuCm0TINOEGvXeCrEhEaDng
41
REAR-FACING INSTALLATION REAR-FACING INSTALLATION
INSTALL USING LATCH
Do not use the lower anchors of the Child Restraint anchorage system (LATCH system) to attach this Child Restraint when restraining a child weighing more than 35 lbs (15.9 kg) with the internal harness of the Child Restraint.
When installing with LATCH in vehicle equipped with inflatable seat belts, the unused seat belt should NOT be buckled behind the Child Restraint System as this will engage the inflatable portion of the belt.
1 Locate the LATCH Connector Storage compartments. Remove LATCH straps. Make sure LATCH Adjuster strap (Pull 1st) and SuperCinch® LATCH Tightener strap (Pull 2nd) are loosened to their full length.
Make sure LATCH
Adjuster strap (Pull
1st) is loosened to
the full length.
1
1 PULL
42
INSTALL USING LATCH
Make sure
SuperCinch® LATCH
Tightener strap (Pull 2nd) is loosened to the full length.
9
8
7 6 1 2 34 5
PULL
2
43
REAR-FACING INSTALLATION REAR-FACING INSTALLATION
INSTALL USING LATCH
2 Grab both ends of LATCH straps. Slide LATCH strap to blue
REAR-FACING opening on both sides. Note: Both LATCH Connector
Storage compartments must be open and both LATCH straps must
be loosened to their full length in order to slide LATCH straps into
position.
2
3 Close both LATCH Connector Storage compartments.
When not accessing the LATCH or changing the belt path ALWAYS keep LATCH Connector Storage compartments closed.
44
INSTALL USING LATCH
3
45
REAR-FACING INSTALLATION REAR-FACING INSTALLATION
INSTALL USING LATCH
4 Locate the LATCH anchor bars in your vehicle. Attach both LATCH Connectors to the vehicle LATCH bars.
5 Pull up on the end of the LATCH Adjuster strap (Pull 1st) until strap is tight.
6 Pull on the SuperCinch® LATCH Tightener strap (Pull 2nd) to secure the Child Restraint.
CHECK YOUR WORK
Hold Child Restraint at each side near REAR-FACING vehicle belt paths. Pull side to side and forward. Child Restraint should not move more than 1″ (25 mm) from vehicle seat back or side-to-side.
Make sure Child Restraint is level for REAR-FACING use. Make sure infant’s head does not fall forward. If necessary, loosen the Latch Strap, re-adjust recline and repeat installation steps to make sure Child Restraint is installed properly.
46
Check installation before every use!
INSTALL USING LATCH
Do not install by this
4
method for a child weighing
more than 35 lbs (15.9 kg).
1PULL
PULL
5 1st
“CLICK” “CLICK”
PULL
6 2nd
PULL
2
47
REAR-FACING INSTALLATION REAR-FACING INSTALLATION
INSTALL USING LAP-SHOULDER BELT
1 Unzip seat pad.
2 Route vehicle lap-shoulder belt through the blue REAR-FACING seat belt path on the side of Child Restraint (a). Pull seat pad to the side and route the vehicle lap-shoulder belt through the blue REAR-FACING seat belt path on the side of Child Restraint (b).
3 Route the vehicle belt UNDER the seat pad (a). Vehicle belt must be routed behind the Crotch Strap when the Crotch Strap is in the foward postion (closest to the Harness Release Button) or in front of the Crotch Strap when it is in the rear postion.
Pull vehicle belt down through the blue REAR-FACING seat belt path on opposite side of Child Restraint. Buckle the vehicle belt (b). Then re-attach the zippered seat pad.
48
INSTALL USING LAP-SHOULDER BELT
1
2a
2b
3a
9 8 7 6 5 1234
3b
9 8 76 54321
49
REAR-FACING INSTALLATION REAR-FACING INSTALLATION
INSTALL USING LAP-SHOULDER BELT
4 While pushing down on the Child Restraint (a) pull the vehicle shoulder belt (b) to tighten vehicle lap belt.
5 While still pulling the shoulder belt tight, slide the vehicle shoulder belt into the Lock-Off. Always use the Lock-Off on the opposite side of the vehicle belt buckle.
CHECK YOUR WORK
Hold Child Restraint at each side near REAR-FACING vehicle belt paths. Pull side to side and forward. Vehicle belt should remain tight and Child Restraint should not move more than 1″ (25 mm) from vehicle seat back or side-to-side.
Make sure Child Restraint is level for REAR-FACING use. Make sure infant’s head does not fall forward. If necessary, loosen the vehicle belt, re-adjust recline and repeat installation steps to make sure Child Restraint is installed properly.
Check installation before every use!
50
INSTALL USING LAP-SHOULDER BELT
5 4a
4b
9 8 7 6 1234 5
9 8 7 6 1234 5
51
REAR-FACING INSTALLATION REAR-FACING INSTALLATION
INSTALL USING LAP BELT ONLY
1 Unzip seat pad.
2 Route vehicle lap-shoulder belt through the blue REAR-FACING seat belt path on the side of Child Restraint (a). Pull seat pad to the side and route the vehicle lap-shoulder belt through the blue REAR-FACING seat belt path on the side of Child Restraint (b).
3 Route the vehicle belt UNDER the seat pad (a). Vehicle belt must be routed behind the Crotch Strap when the Crotch Strap is in the foward postion (closest to the Harness Release Button) or in front of the Crotch Strap when it is in the rear postion.
Pull vehicle belt down through the blue REAR-FACING seat belt path on opposite side of Child Restraint. Buckle the vehicle belt (b). Then re-attach the zippered seat pad.
52
1 3a
INSTALL USING LAP BELT ONLY
2a
2b
9 8 7 6 5 1234
3b
9 8 76 54321
53
REAR-FACING INSTALLATION REAR-FACING INSTALLATION
INSTALL USING LAP BELT ONLY 4 While pushing down on the Child Restraint (a) pull the loose end of
the vehicle lap belt (b) to tighten belt.
CHECK YOUR WORK
Hold Child Restraint at each side near REAR-FACING vehicle belt paths. Pull side to side and forward. Vehicle belt should remain tight and Child Restraint should not move more than 1″ (25 mm) from vehicle seat back or side-to-side.
Make sure Child Restraint is level for REAR-FACING use. Make sure infant’s head does not fall forward. If necessary, loosen the vehicle belt, re-adjust recline and repeat installation steps to make sure Child Restraint is installed properly.
Check installation before every use!
54
INSTALL USING LAP BELT ONLY
4a
4b 55
FORWARD-FACING INSTALLATION FORWARD-FACING INSTALLATION
FORWARD-FACING SETUP
1 Before placing the Child Restraint in the vehicle, remove Tether from
1
the Tether Compartment. You may need to squeeze the Tether Button
and pull down to loosen the strap before removing. If a Tether Anchor
is not available, the Tether should be stored properly.
2 See page 30 for “Vehicle Seating Positions” before installing. Make sure the vehicle is on a level surface, if possible.
LEVEL SLOPE
3
3 Squeeze the Recline Adjustment Handle on front of Child Restraint and push back to adjust to an upright position as shown (a).
If a change in recline position is necessary, after Child Restraint is installed, loosen the current method of installation and adjust the recline. Repeat installation steps and refer to pages 58-75 to ensure Child Restraint is installed correctly.
56
FORWARD-FACING SETUP
3a
1234
9
8 7 6 5
9 8 7 6
57
FORWARD-FACING INSTALLATION FORWARD-FACING INSTALLATION
FORWARD-FACING SETUP
4 Place Child Restraint facing forward on selected vehicle seat. Make sure it is not blocking the vehicle belt buckle. Lay Tether Strap over the back of the vehicle seat.
5
Installation on a Level Surface: Locate the Bubble Level Indicator
label and re-adjust the seat recline to any position that the Bubble
LEVEL falls between the lines for FORWARD-FACING installation.
Installation on a Slope: If vehicle is on a slope adjust the seat SLOPE recline to position 8 or 9 ONLY.
Installation Options:
· LATCH installation continued on page 60. · Lap-Shoulder Belt installation continued on page 66. · Lap Belt Only installation continued on page 72.
58
FORWARD-FACING SETUP
4
5 LEVEL
5 SLOPE
98
59
FORWARD-FACING INSTALLATION FORWARD-FACING INSTALLATION
INSTALL USING LATCH
Do not use the lower anchors of the Child Restraint anchorage system (LATCH system) to attach this Child Restraint when restraining a child weighing more than 40 lbs (18 kg) with the internal harness of the Child Restraint.
When installing with LATCH in vehicle equipped with inflatable seat belts, the unused seat belt should NOT be buckled behind the Child Restraint System as this will engage the inflatable portion of the belt.
1
Locate LATCH Connector Storage compartments. Remove LATCH straps. Make sure SuperCinch® LATCH Tightener strap (Pull 2nd) and LATCH
Adjuster strap (Pull 1st) are loosened to their full length.
Grab both ends of LATCH straps. Slide LATCH strap to red 2 FORWARD-FACING opening on both sides. Note: Both LATCH Connector
Storage compartments must be open and both LATCH straps must be loosened to their full length in order to slide LATCH straps into position.
3 Close both LATCH Connector Storage compartments.
60
Make sure SuperCinch®
LATCH Tightener strap
1
(Pull 2nd) is loosened to
the full length.
2PULL
2
INSTALL USING LATCH
Make sure LATCH Adjuster strap (Pull 1st) is loosened to the full length.
PULL
1
3
61
FORWARD-FACING INSTALLATION FORWARD-FACING INSTALLATION
INSTALL USING LATCH When not accessing the LATCH or changing the belt path ALWAYS keep LATCH Connector Storage compartments closed. 4 Locate the LATCH bars in your vehicle. Attach both LATCH Connectors to the vehicle LATCH anchor bars. 5 Pull up on the end of the LATCH Adjuster strap (Pull 1st) until strap is tight. 6 Pull on the SuperCinch® LATCH Tightener strap (Pull 2nd) to secure Child Restraint.
62
INSTALL USING LATCH
4 5
PULL
1st
PULL
1st
PULL
2nd
“CLICK”
“CLICK”
6
PULL
2nd
Do not install by this
method for a child weighing
more than 40 lbs (18 kg).
63
FORWARD-FACING INSTALLATION FORWARD-FACING INSTALLATION
INSTALL USING LATCH 7 Locate Tether anchor in your vehicle. Attach Tether Hook.
Pull Tether Adjuster strap to tighten.
CHECK YOUR WORK
Hold Child Restraint at each side near FORWARD-FACING vehicle belt path. Pull side to side and forward. Child Restraint should not move more than 1″ (25 mm) from vehicle seat back or side-to-side.
Make sure Bubble is between lines on label for FORWARD-FACING use. If necessary, loosen the LATCH and Tether Straps, re-adjust recline and repeat installation steps to make sure Child Restraint is installed properly.
Check installation before every use!
64
INSTALL USING LATCH
7
65
FORWARD-FACING INSTALLATION FORWARD-FACING INSTALLATION
INSTALL USING LAP-SHOULDER BELT 1 Route vehicle lap-shoulder belt through the red FORWARD-FACING
seat belt path on the side of Child Restraint. Lift the padding on the back of the seat and pull the vehicle belt through the opening on the side of Child Restraint. 2 Pass the vehicle belt along the back of the Child Restraint as shown. 3 Pull the vehicle belt down through the red FORWARD-FACING seat belt path on the opposite side of Child Restraint. Buckle the vehicle belt. Replace the seat back padding.
66
INSTALL USING LAP-SHOULDER BELT
1
2
3 67
FORWARD-FACING INSTALLATION FORWARD-FACING INSTALLATION
INSTALL USING LAP-SHOULDER BELT 4 While pushing down on the Child Restraint (a) pull the vehicle shoulder
belt (b) to tighten vehicle lap belt. 5 While still pulling the shoulder belt tight, slide the vehicle shoulder
belt into the Lock-Off. Always use the Lock-Off on the opposite side of the vehicle belt buckle.
68
INSTALL USING LAP-SHOULDER BELT
5 4a 4b
69
FORWARD-FACING INSTALLATION FORWARD-FACING INSTALLATION
INSTALL USING LAP-SHOULDER BELT 6 Locate Tether Anchor in your vehicle. Attach Tether Hook.
Pull Tether Adjuster strap to tighten.
CHECK YOUR WORK
Hold Child Restraint at each side near FORWARD-FACING vehicle belt path. Pull side to side and forward. Vehicle belt should remain tight and Child Restraint should not move more than 1″ (25 mm) from vehicle seat back or side-to-side.
Make sure Bubble is between lines on label for FORWARD-FACING use. If necessary, loosen the vehicle belt and Tether, re-adjust recline and repeat installation steps to make sure Child Restraint is installed properly.
Check installation before every use!
70
INSTALL USING LAP-SHOULDER BELT
6
71
FORWARD-FACING INSTALLATION FORWARD-FACING INSTALLATION
INSTALL USING LAP BELT ONLY
1 Route vehicle lap belt through the red FORWARD-FACING seat belt
path on the side of Child Restraint. Lift the padding on the back of the
1
seat and pull the vehicle belt through the opening on the side of the
Child Restraint.
2 Pass the vehicle belt along the back of the Child Restraint as shown.
3 Pull the vehicle belt down through the red FORWARD-FACING seat belt path on the opposite side of Child Restraint. Buckle the vehicle belt. Replace the seat back padding.
72
INSTALL USING LAP BELT ONLY
2
3 73
FORWARD-FACING INSTALLATION FORWARD-FACING INSTALLATION
INSTALL USING LAP BELT ONLY
4 While pushing down on the Child Restraint (a) pull the loose end of the vehicle lap belt (b) to tighten.
5 Locate Tether Anchor in your vehicle. Attach Tether Hook. Pull Tether
4a
Adjuster Strap to tighten.
CHECK YOUR WORK
Hold Child Restraint at each side near FORWARD-FACING vehicle belt path. Pull side to side and forward. Vehicle belt should remain tight and Child Restraint should not move more than 1″ (25 mm) from vehicle seat back or side-to-side.
Make sure Bubble is between lines on label for FORWARD-FACING use. If necessary, loosen the vehicle belt and Tether, re-adjust recline and repeat installation steps to make sure Child Restraint is installed properly.
Check installation before every use!
74
INSTALL USING LAP BELT ONLY
5 4b
75
SECURING CHILD WITH HARNESS
For a better fit in the Child Restraint with smaller infants, the Newborn Positioner provided may be needed. See page 28-29 for more details. Additionally, crotch strap pad and shoulder pads may need to be removed.
SECURING CHILD WITH HARNESS
1
2
SECURING YOUR CHILD SECURING YOUR CHILD
If Crotch Strap is under child, the crotch strap will need to be re-positioned, refer to page 26 “Adjusting Crotch Strap”.
1 Loosen Harness by pressing Harness Release Button (under the fabric) on the front of the Child Restraint and pulling forward on both of the Harness
Straps.
3
2 Unbuckle Harness by pressing the button on Harness Buckle and pulling
out both Buckle Tongues.
3 Open Chest Clip by squeezing both button in the middle of the clip and
pulling apart.
76
77
SECURING YOUR CHILD SECURING YOUR CHILD
SECURING CHILD WITH HARNESS 4 Place child in Child Restraint with child’s back flat against the back of the
seat. Pull Harness Straps over the child’s shoulders and around the child’s waist. Make sure there are no twists in Harness Strap.
Clothing, such as bulky winter coats that interfere with the proper placement or adjustment of the Harness system should never be used. Make sure the Harness
Straps lie flat on the child’s shoulders, are adjusted snugly so that clothing is compressed and the child cannot lean forward, and the Chest Clip is at arm level.
78
SECURING CHILD WITH HARNESS
4
79
SECURING YOUR CHILD SECURING YOUR CHILD
SECURING CHILD WITH HARNESS 5 Adjust Harness Strap height position up or down by squeezing
Adjustment Handle on top of Head Rest. Make sure Head Rest locks into position before tightening Harness.
REAR-FACING POSITION – Position the Harness Straps at or below the child’s shoulders. FORWARD-FACING POSITION – Position the Harness Straps at or above the child’s shoulders.
If using lowest Head Rest/Harness Position, make sure the seat back padding panel is folded under.
80
SECURING CHILD WITH HARNESS
5
*
REAR-FACING AT OR BELOW
*
FORWARD-FACING
AT OR ABOVE
81
SECURING YOUR CHILD SECURING YOUR CHILD
SECURING CHILD WITH HARNESS 6 Insert each Buckle Tongue into Harness Buckle; listen for a click
(a). Pull up firmly on both Buckle Tongues to make sure that they are securely latched (b).
82
SECURING CHILD WITH HARNESS
6a
6b
“CLICK”
83
SECURING YOUR CHILD SECURING YOUR CHILD
SECURING CHILD WITH HARNESS 7 Fasten Chest Clip by snapping both sides together; listen for a click.
Harness straps must fit snugly and lay flat on the center of your child’s shoulders.
8 Push Chest Clip and Shoulder Pads down away from the child’s neck and towards the Harness Buckle. Pull up on both shoulder straps to remove all slack from below.
SECURING CHILD WITH HARNESS
7
8
“CLICK”
84
85
SECURING YOUR CHILD SECURING YOUR CHILD
SECURING CHILD WITH HARNESS
9 Tighten the harness by pulling slowly on Harness Adjustment Strap until the harness is snug on child (a). If you can pinch a fold in the strap at the child’s shoulders, harness is too loose (b). If the harness is too loose pull the Harness Adjustment strap more.
10 Move the Shoulder Pads up to the child’s shoulders. Slide Chest Clip up to center of child’s chest, level with the armpits.
SECURING CHILD WITH HARNESS
9a
9b
10
WARNING – If harness is not snug around your child, child could be ejected in a sudden stop or crash resulting in serious injury or death.
86
87
SECURING YOUR CHILD SECURING YOUR CHILD
SECURING CHILD CHECKLIST
Harness Straps must be snug. If you can pinch a fold in the strap, the harness is too loose. A snug strap should not allow any slack. It lies in a relatively straight line without sagging. It does not press on the child’s flesh or push the child’s body into an unnatural position.
To ensure a better fit for smaller infants, the Newborn Positioner may be needed. Never place extra padding under or behind the child. Only use the Newborn Positioner.
Straps must lay flat, free of twists and centered on top of the child’s shoulders. Check the height of the Harness Straps: Position the Harness Straps at or below the child’s
shoulders for REAR-FACING and at or above the child’s shoulders for FORWARD-FACING.
*
*
88
REAR-FACING FORWARD-FACING
SECURING CHILD CHECKLIST
Check the position of Chest Clip: Chest Clip should be centered on the child’s chest, level with the armpits.
Never secure child in Child Restraint with child dressed in bulky garments or heavy clothing. Heavy clothing can prevent harness from being properly tightened around child.
Never secure child in Child Restraint with child wrapped in a blanket. To keep child warm, place a blanket over child AFTER you have properly secured and tightened harness around child.
NO Bulky Clothing
WARNING – If harness is not snug around your child, child could be ejected in a sudden stop or crash resulting in serious injury or death.
89
ADDITIONAL INFORMATION ADDITIONAL INFORMATION
INSTALLATION ON AN AIRCRAFT When traveling by airplane with your child, Chicco recommends taking the Child Restraint on the airplane with you so that you can use it with your child. Not only will it protect your child during take-off, landing, and turbulence, it will also allow your child to be more comfortable. · This Child Restraint is certified for use on aircraft. Contact the airline prior to travel to discuss their Child Restraint policy. · Install Child Restraint on an aircraft the same way it is installed in a vehicle when using a vehicle lap belt. Reference Rear-Facing on page 52 or Forward-Facing on page 72.
90
PAGE INTENTIONALLY LEFT BLANK
91
ADDITIONAL INFORMATION ADDITIONAL INFORMATION
CUP HOLDER
WARNING – Do NOT use Cup Holder to hold hot liquids. PLASTIC CONTAINERS ONLY – No glass or metal containers. Only use cups with less than 12 oz. (355 ml) capacity. Never place sharp or pointed objects in Cup Holder. In a crash these objects could hit you or your child and cause serious injuries.
1 Slide Cup Holder into either side of Child Restraint where indicated by the Cup Holder icon. To remove, gently pull the Cup Holder away from the seat then lift past the built-in lip.
92
CUP HOLDER
1
93
ADDITIONAL INFORMATION ADDITIONAL INFORMATION
CLEANING AND MAINTENANCE
REMOVING SHOULDER PADS:
1
1 Unhook the hook and loop and remove Shoulder Pads as shown.
INSTALL SHOULDER PADS:
2 Re-attach Shoulder Pads by folding the hook and loop Tab over the Harness Strap (a). Secure both hook and loop Tabs together (b). Make sure they are oriented as shown (c).
REMOVING CROTCH STRAP PAD:
3 Locate the Tab on the Crotch Strap Pad and push it through the Harness
Buckle (a). Pull the Tab out through the front of the Harness Buckle (b)
3a
and remove the Crotch Strap Pad (c).
94
CLEANING AND MAINTENANCE
2a
2b
2c
3b
3c
95
ADDITIONAL INFORMATION ADDITIONAL INFORMATION
CLEANING AND MAINTENANCE
REMOVING SOFTGOODS:
7 Locate the Zipper Tab at the top of the Child Restraint and unzip all the
way around.
7
Unbuckle the Harness. Unsnap Seat Bottom Panel and pull forward.
8 Carefully pull the Seat Pad away from the Child Restraint.
INSTALL SOFTGOODS: 9 Reverse the removing instructions above to reinstall.
NEVER use Child Restraint without the Seat Pad.
96
CLEANING AND MAINTENANCE
8
97
ADDITIONAL INFORMATION ADDITIONAL INFORMATION
CLEANING AND MAINTENANCE
REMOVING CROTCH STRAP:
1 Fully recline the seat (position 1). Open the compartment, slide the button on the Crotch Strap lock while pulling up on the Crotch Strap (a). Turn metal bar slightly on underside of seat and get corner to go through slot (b). Push metal bar through slot while pulling crotch belt out (c).
NEVER use Child Restraint without the Crotch Strap
installed.
1a
INSTALL CROTCH STRAP: 2 Reverse the removing instructions above to reinstall.
DO NOT USE Child Restraint if any part of the harness is damaged. For proper removal and installation of the harness straps visit the Chicco website at www.chiccousa.com or call 1-877-424-4226.
98
CLEANING AND MAINTENANCE When removing Crotch Strap
DO NOT remove the Adjuster Strap Clip. Your child’s safety depends on this clip being installed correctly.
1b
1c
99
ADDITIONAL INFORMATION ADDITIONAL INFORMATION
CLEANING AND MAINTENANCE
DO NOT USE BLEACH, solvents or household cleaners as they may weaken plastics and straps.
DO NOT USE SOAPS OR LUBRICANTS on Harness Adjuster Strap, Buckle and LATCH hardware. It may cause them to malfunction.
· Cleaning Softgoods: Hand wash using mild soap and water, or machine wash in cold water on delicate cycle using mild detergent. Hang to dry. See page 96 for removal instructions.
NEVER use Child Restraint without the seat pad.
· Cleaning Shoulder Pads: Hand wash using mild soap and water. Hang to dry.
· Cleaning Plastics: Sponge clean using warm water and mild soap. Towel dry.
For softgood removal instructions visit the Chicco website at
100
www.chiccousa.com or call 1-877-424-4226.
CLEANING AND MAINTENANCE
· Cleaning Cup Holder: Cup Holder is dishwasher safe on top rack only.
DO NOT USE Child Restraint if any part of the harness is damaged. For proper removal and installation of the harness straps visit the Chicco website at www.chiccousa.com or call 1-877-424-4226.
· Cleaning Harness: Sponge clean using warm water and mild soap. Air dry. Do NOT machine wash.
· Cleaning LATCH and Adjuster Strap: LATCH Straps cannot be replaced. Sponge clean using warm water only. Air dry.
· Cleaning Buckle and LATCH Hardware: Sponge clean, using warm water only. If debris in buckle, remove and rinse in warm cup of water. Air dry. See page 98 for removal instructions.
Do NOT remove LATCH or Adjuster straps. For additional information visit the Chicco
website at www.chiccousa.com or call 1-877-424-4226.
101
]]>Read all instructions BEFORE assembly and USE of product.
KEEP INSTRUCTIONS FOR FUTURE USE.
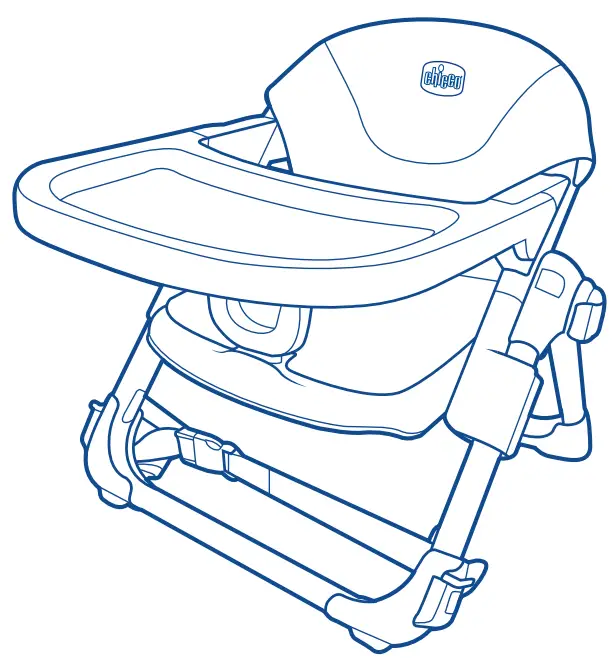
Take-A-Seat™
3-in-1 Travel Seat
Owner’s Manual
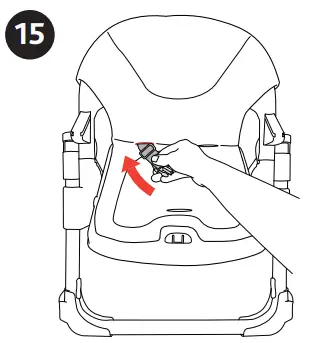 WARNING Failure to follow the warnings and the instructions throughout this booklet could result in serious injury or death. Each mode has specific warnings, make sure to read and understand the warnings in each mode.
This product can be used in the following modes:
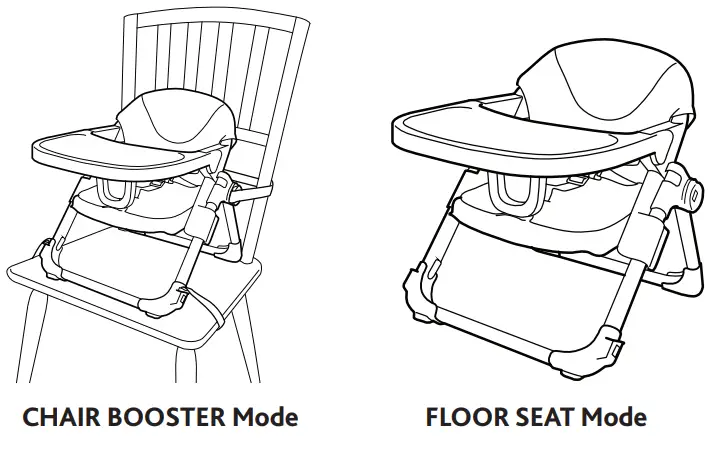
Parts List
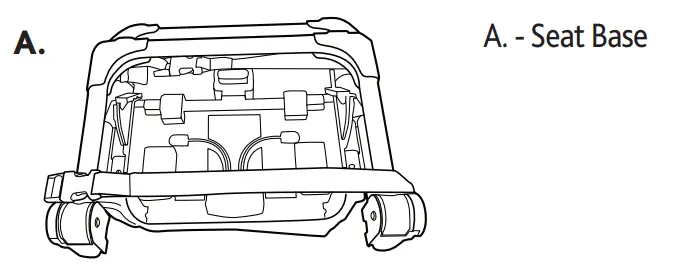
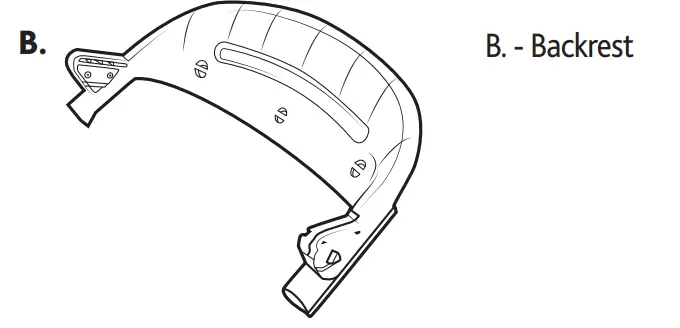
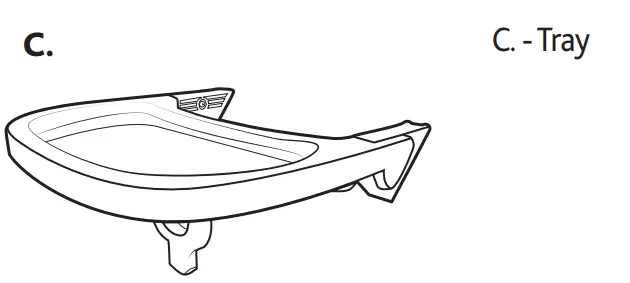
Components
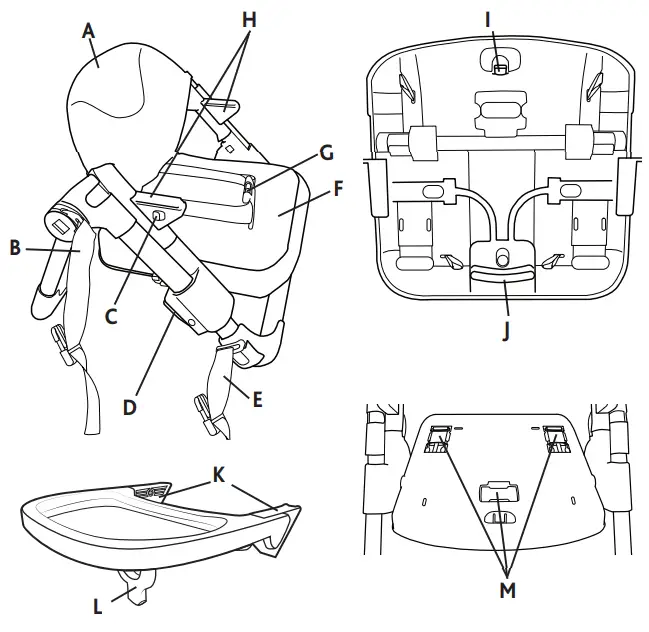
| A – Backrest B – Rear Attachment straps C – Tray Release Buttons D – Seat Height Adjustment Buttons E – Lower Attachment straps F – Seat Pad G – Harness Straps |
H – Tray Supports I – Horn Release Lever J – Seat Release Lever K – Tray Attachments L – Tray Horn M – Harness Strap Storage |
Assembling the Seat
- Unfasten the Rear Attachment Straps.
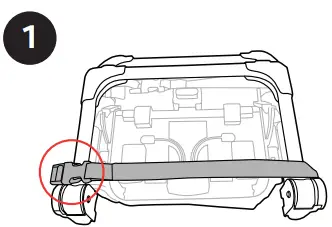
- Rotate the Rear Legs out until they click into place.
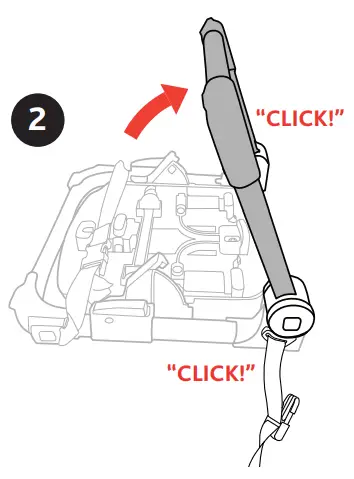
- Flip the chair upright and locate the Locking Lever on the bottom of the seat base as shown. Squeeze the Locking Lever and rotate the seat base up until it clicks into place.
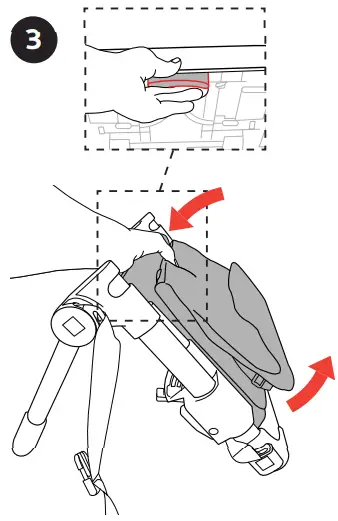
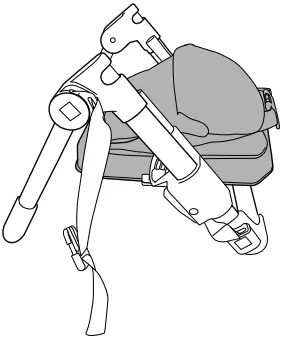
- To attach the Backrest to the seat frame, first, line up the seat frame down tubes with the corresponding openings on the Backrest. Next, guide both Backrest openings onto the top of the down tubes. Then line up the plastic side tabs with the grooves on the Seat Frame, as shown.
Press down on the Seat Backrest until both snap buttons click into place.
Pull up on the Backrest to make sure it is securely attached.
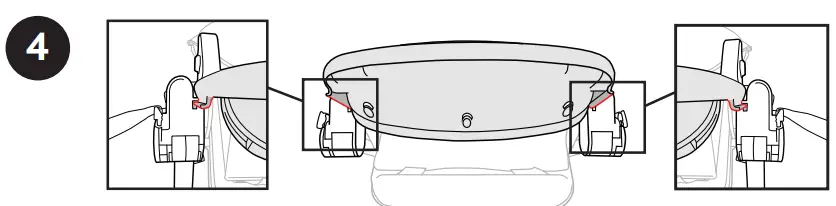
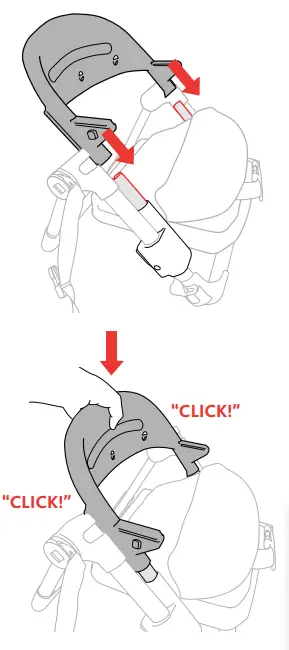
- Pull the Seat Fabric sleeve up and over the Backrest and hook the fabric buttonholes over the 3 Backrest Tabs, as shown.
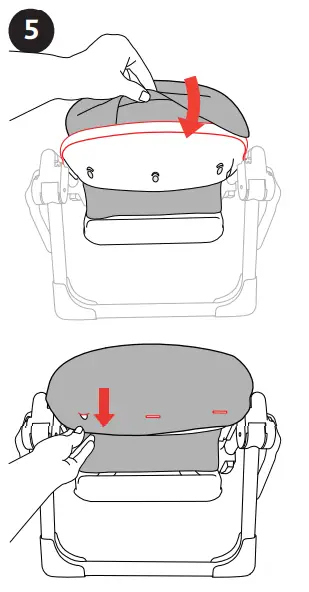
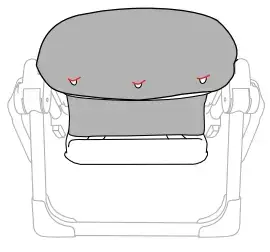
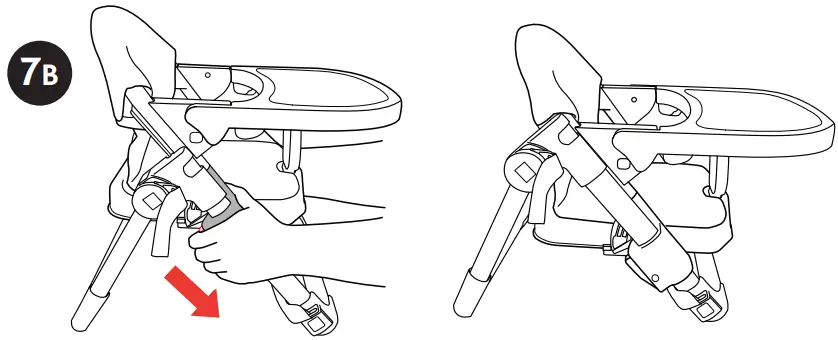 WARNING
The tray is not designed to hold the child in the chair. - A. To attach the Tray to the seat frame, line up the Tray Hubs with theTray Supports. Slide both Tray Hubs onto the Supports until they click into position. Pull out the tray to make sure it is securely attached.
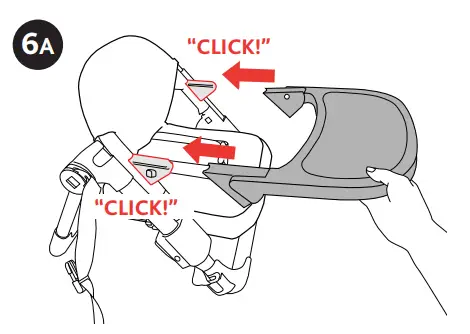
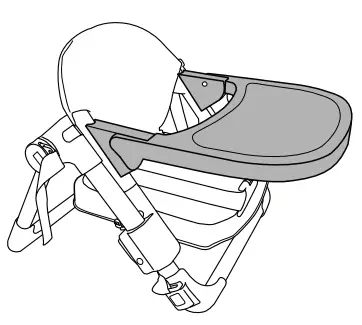 WARNING
IMPORTANT FOR YOUR CHILD’S SAFETY – Always insert the Tray Horn into the Seat Base before using the Tray.
6B. Lift up on the front edge of the Tray and locate the Tray Horn on the bottom of the Tray. Flip the Tray Horn down and insert the Tray Horn into the front of the Seat Base, as shown.
Make sure the Tray Horn clicks into Place. Pull up on the tray to make sure it is securely attached.
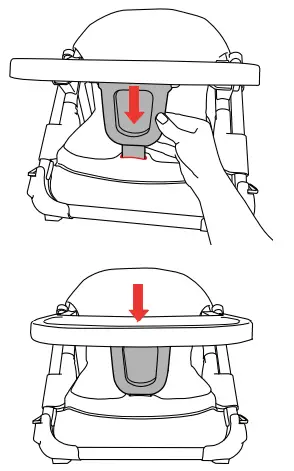
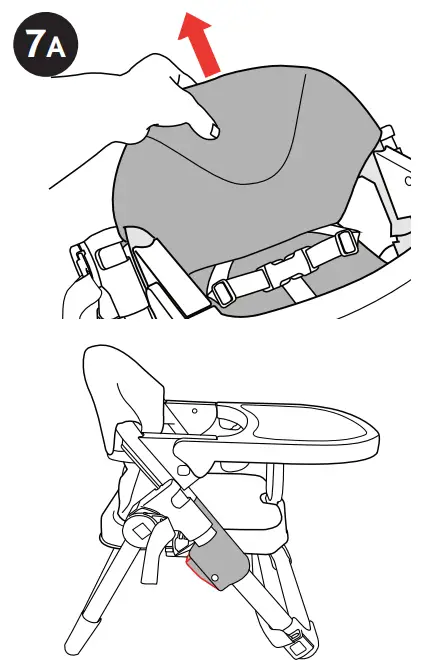
Adjusting the Height of the Seat
WARNING
Do Not adjust the seat height with the child sitting in the seat. Keep your child at a safe distance when adjusting the height of the seat. Make sure that both side locks have locked into place and are at the same height, before placing your child in the seat. - A. To adjust the seat height to a higher position, pull up on the Backrest to the desired height.
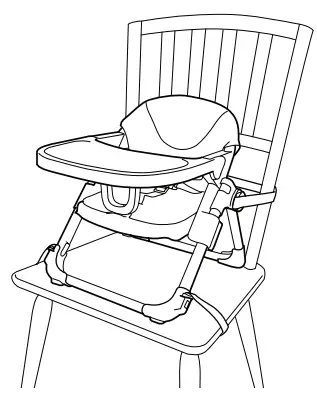 7B. To adjust the seat height to a lower position, squeeze both side adjustment locks and slide the seat down to the desired height.
Make sure the seat locks into one of the 3 positions.
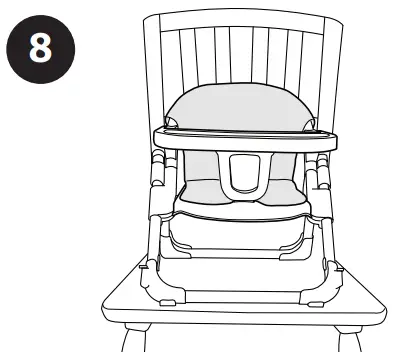 WARNING
BOOSTER SEAT USE
Children have suffered severe head injuries, including skull fractures, after falling with or from boosters.
• Check that the booster seat is securely attached to the adult chair before each use.
• Always use restraints until the child is able to get in and out of the booster seat without help. Adjust to fit snugly.
• Never allow the child to push away from the table.
• Never lift and carry a child in a booster seat.
• Stay near and watch your child during use.
• Until the child is able to get in and out of the booster seat without help (about 2 ½ years old), the child should be secured in the booster seat at all times by the restraint system. The tray is not designed to hold the child in the chair.
• Never allow the child to sit in unsecured chair. Always secure the booster seat to the chair using both attachment straps. Always check that the attachment is secure before each use.
• Prevent serious injury or death. Do not use in motor vehicles.
• Use this booster only for children capable of sitting upright unassisted.
• Do not use for children weighing more than 50 lbs (22.7 kg).
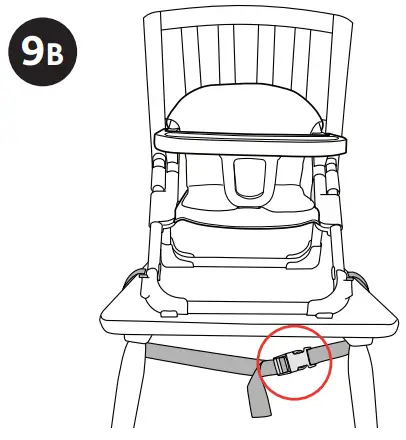
• Do not use on any elevated surface other than a full-sized dining room chair.
• Never fit the booster seat to damaged or unstable chairs, folding chairs, pedestal chairs or bar stools.
• Only use on chairs with a seat at least 14 inches wide, 15 inches deep, and a backrest at least 13 3/4 inches high.
• Always check that the surface of the floor is even and the chair is stable before fitting the booster seat to the chair.
• Do not use the product if any part is broken, torn, or missing.
• Ensure that all components are correctly fitted and adjusted before use.
• To avoid the danger of suffocation, remove all plastic covers before using the product.
• Do not leave the product near walls, curtains, or windows, where the child can become entangled.
• Do not attach any parts to the product that is not supplied or expressly approved by Chicco. - Center the seat on the chair, making sure the back of the seat is against the seatback.
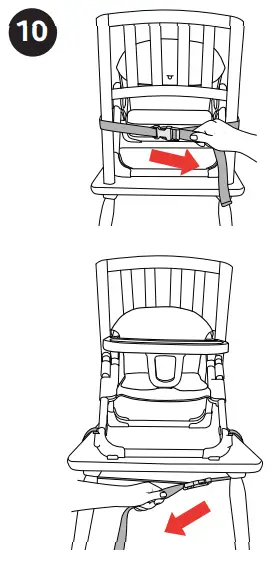
- A. Fasten the Rear Attachment Straps, passing them behind the ackrest of the chair. Pull the Rear Attachment Strap snug – Do not fully tighten.
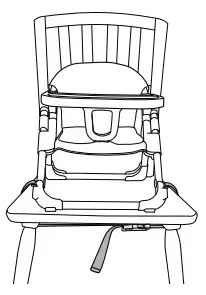
9B. Then fasten the Lower Attachment Straps, passing them underneath the seat of the chair. Pull the Lower Attachment Strap snug – Do not fully tighten.

- To ensure the seat is securely attached to the chair, tighten the Rear and Lower Attachment Straps as shown.
Once tight, pull on the seat and make sure attachment straps do not become loose. If they become loose, reposition the straps and retighten to make sure the straps do not become loose.
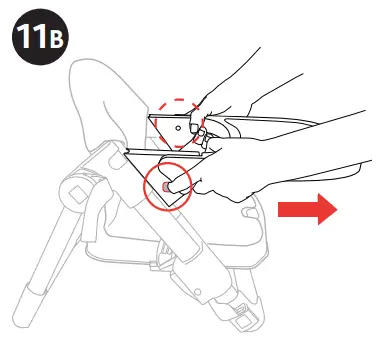
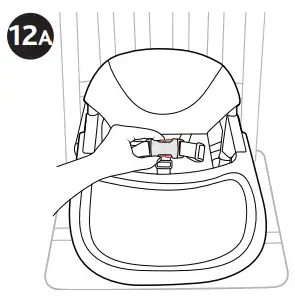
Removing the Tray
- A. Locate the locking tab under the front of the seat base. Push the tab back and pull up on the Tray Horn to remove it from the seat. Flip the Tray Horn up to store and lay flat under the Tray.
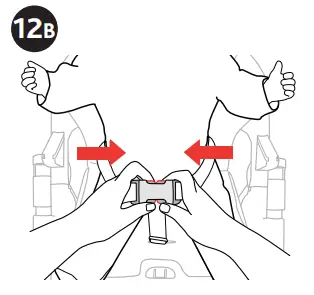 11B. To remove the Tray from the Seat Frame, locate the release buttons on both sides of the Tray Hubs. Press both release buttons at the same time and pull on the tray to remove it from the Tray Supports.
Note: the tray must be level to expose release buttons.
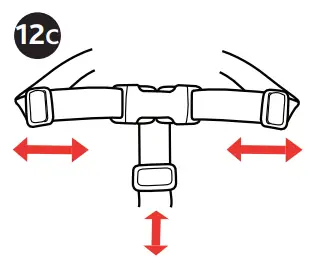
Using the 3-point Harness
- A. Unfasten the 3-point harness by squeezing the prongs on both sides.
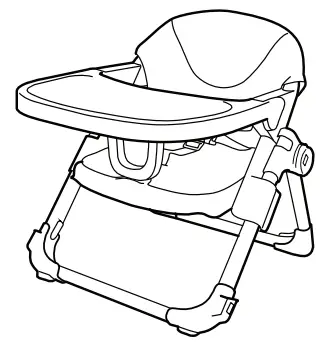 12B. Slide both Waist Clips into the Crotch Strap Buckle. Pull-on both sides to make sure the Clips are secured to the Buckle.
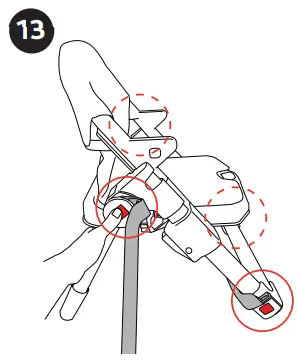 12C. Adjust the 3-point harness to fit your child.
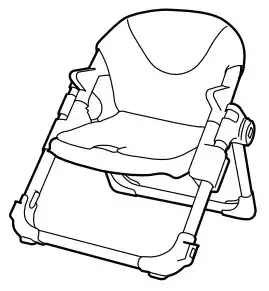 WARNING
FLOOR SEAT USE
FALL HAZARD: Infants have suffered skull fractures falling while in and from floor seats.
• Use ONLY on the floor.
• NEVER use on an elevated surface.
• ALWAYS use restraints. Adjust to fit snugly.
• NEVER lift or carry a child in the product.
• Use ONLY with a child that is able to hold their head up unassisted.
• Do not use for children weighing more than 50 lbs (22.7 kg).
• STOP using a floor seat when the child can climb out or walk.
• ALWAYS keep the child in view while in the product.
• Do not use the product if any part is broken, torn, or missing.
• Ensure that all components are correctly fitted and adjusted before use.
• To avoid the danger of suffocation, remove all plastic covers before using the product.
• Do not leave the product near walls, curtains, or windows, where the child can become entangled.
• Do not attach any parts to the product that are not supplied or expressly approved by Chicco.
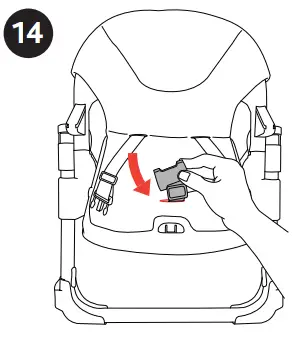
DROWNING HAZARD: Infants have drowned when a floor seat has been placed in a bathtub or pool.
• NEVER use in or near water.Removing the Attachment Straps
- To remove the Rear and Lower Attachment Straps, press in on the release button and at the same time, pull out the Attachment Strap buckle.
Repeat for the other 3 Attachment Strap buckles. Store the straps for later use.
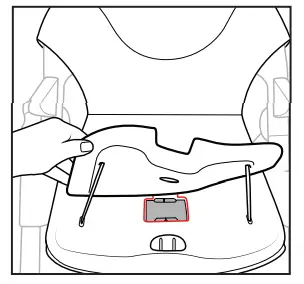 Refer to the previous section for tray removal (steps 11A and 11B).
Refer to the previous section for restraint use (steps 12A, 12B, and 12C).
WARNING
TODDLER CHAIR USE
• Use ONLY on the floor.
• NEVER use on an elevated surface.
• Do not use for children weighing more than 50 lbs (22.7 kg).
• ALWAYS keep the child in view while in the product.
• Do not use the product if any part is broken, torn, or missing.
• Ensure that all components are correctly fitted and adjusted before use.
• To avoid the danger of suffocation, remove all plastic covers before using the product.
• Do not leave the product near walls, curtains, or windows, where the child can become entangled.
• Do not attach any parts to the product that are not supplied or expressly approved by Chicco.
• DROWNING HAZARD: NEVER use in or near water.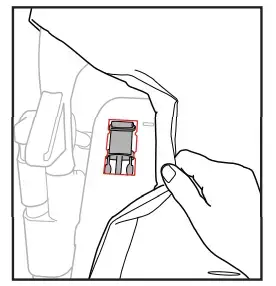
Storing the 3-point Harness
Refer to the previous section for tray removal (steps 11A and 11B).
- Undo the harness buckle. Pull the Crotch Strap through the opening on the seat fabric. Fold the strap and place it into the storage compartment under the fabric, as shown.
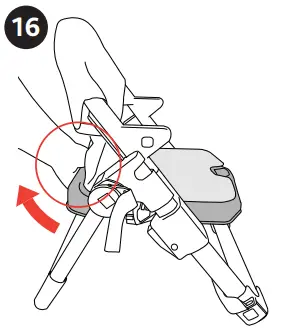
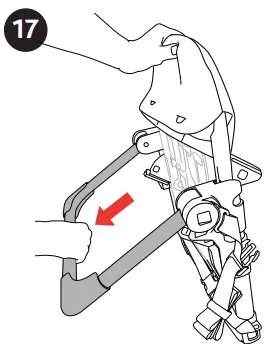
Chair Mode
- Pull a Waist Strap through the opening on the seat fabric. Fold the strap and place it into the storage compartment under the fabric, as
shown. Repeat for other Waist Strap.
Refer to the previous section for attachment strap removal (step 13).


Closing and Transporting the Seat
- Squeeze the Locking Lever on the rear of the Seat Base and rotate the Seat Base up.
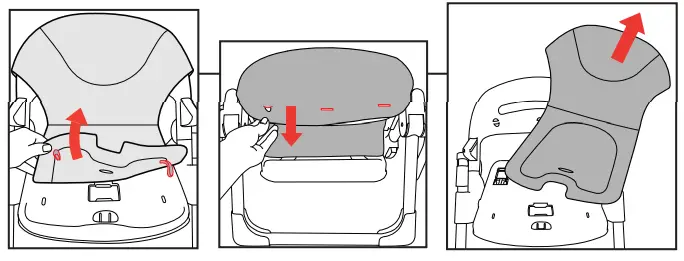
- Stand the Seat up as shown. Pull down on the Rear Legs to release the locking pins and rotate the Rear Legs forward to fold.

- To store the excess Attachment Strap length, fold up the strap and secure it with the hook and loop straps.

Removing the Seat Fabric
- To remove the Seat Fabric, undo the 4 elastic straps on the bottom of the seat base. Unhook the Seat Fabric from the back of the Backrest.
Unbuckle the Harness Buckle and pull the waist belt straps and the crotch strap through the seat fabric. Remove the Seat Fabric from the Booster Frame. Repeat this step in reverse to reattach the seat fabric.


Cleaning and Maintenance
This product requires regular maintenance. The cleaning and maintenance of the product must only be carried out by an adult.
CLEANING
Refer to the Care Label for instructions on cleaning the fabric parts of the product. You can spot clean the seat pad with a damp cloth and mild detergent.
Do not use bleach, spray, or wipes on the Pad or plastics parts on this product.
Periodically wipe clean plastic parts with a soft damp cloth. Always dry the metal parts to prevent the formation of rust if the product has come into contact with water.
- Do NOT fully submerge Tray in water.
- Tray is NOT dishwasher safe.
MAINTENANCE
Periodically check the product for loose screws, worn parts, torn material or stitching. Replace or repair the parts as needed. Use only Chicco replacement parts. To avoid friction that may prevent the correct operation of the product, ensure that all the movable plastic parts placed along the metal frame are clean of dust and dirt. Keep the product in a dry place. Prolonged exposure to direct sunlight may cause the fabric to fade and plastic parts to warp.
For More Information
For USA customers :
If you have any questions or comments about this product or are missing any of the parts, please do not return this product to the store. Contact us in one of the following ways:
 (877)-424-4226
 [email protected]
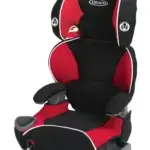 www.chiccousa.com
![]() 1826 William Penn Way
1826 William Penn Way
Lancaster, PA 17601
![]()
Microwave Steam
Sterilizer
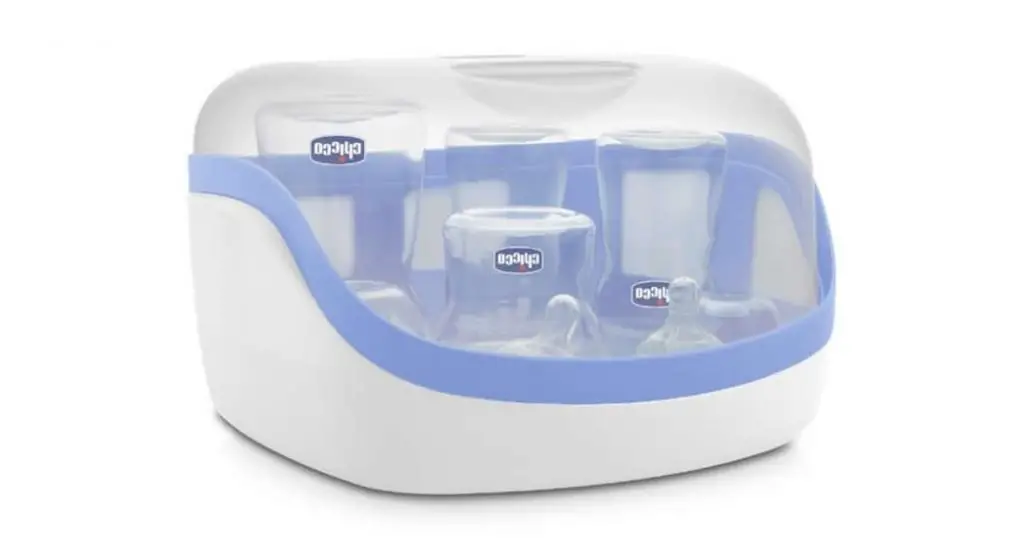
 WARNING
For Your Child’s Safety
Read All Instructions
BURN HAZARD
To avoid risk of burns:
- After sanitizing the components are very hot. Handle with extreme care.
- Wait until all parts of the unit have cooled before touching them.
- Use oven gloves to remove from the microwave and to remove the lid.
- It is recommended to wait before removing the lid. Make sure to open the lid away from you and slowly let out any residual steam.
CAUTION
- This is NOT a toy. Keep out of reach of children.
- NEVER use the Sterilizer without water.
- Only use water in the Sterilizer. Do NOT add cleaning solutions or any other additives.
- ALWAYS use 1 cup = 8oz/240ml of water. Using less than 1 cup = 8oz/240ml could damage the Sterilizer.
- Use ONLY with products that are microwave safe and can be boiled.
- For glass feeding bottles – make sure glass bottles are clearly marked as microwave safe before placing in this Sterilizer.
- Do NOT place metal or nylon objects into the Sterilizer.
- For use with microwave ovens only. Do NOT use any other heat source.
- If the microwave is equipped with a grill function; make sure the grill function is turned off and has cooled down before using the Sterilizer.
- For use with 600W – 1200W power microwaves.
- Do NOT microwave longer than the recommended sanitizing time shown in the chart. This may cause damage to the Sterilizer.
Step 1
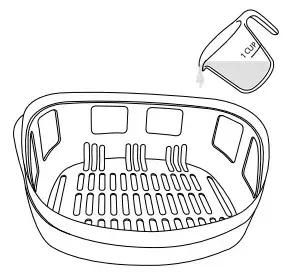 Wash and rinse feeding bottles and accessories before sanitizing.
Remove the lid from the base of the Sterilizer.
Pour 1 cup = 8oz/240ml of water into the base.
Step 2
 To avoid contaminating the nipple after sanitizing it is recommended to attach the nipple onto the ring before placing in the rack. Do not touch the nipple after sanitizing.
Place the feeding bottles and accessories in the rack. Place the lid back on the Sterilizer Base. Place the Sterilizer into the microwave.
Sanitizing Time
DEPENDING ON YOUR MICROWAVE HEATING TIMES MAY VARY. Set the power and time as recommended in the chart below:
| MINUTES | WATT |
| 3 | 1200 W |
| 5 | 900 W |
| 8 | 600 W |
Cleaning
Please do not return this product to the store. If you have any questions or comments about this product, or are missing any of the parts, contact us in one of the following ways:
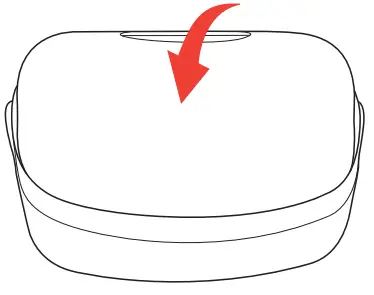 (877)-424-4226
 [email protected]
 www.chiccousa.com
 1826 William Penn Way
Lancaster, PA 17601
©2021 Artsana USA, INC. 03/21
IIS0080ESF_04