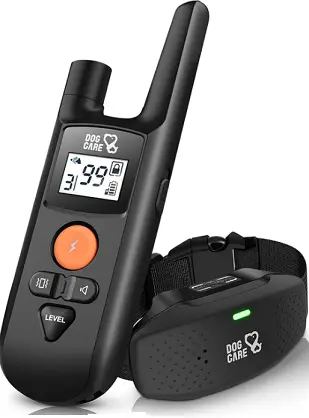
DogCare DOG Training Collar

DogCare DOG Training Collar
Remote Control
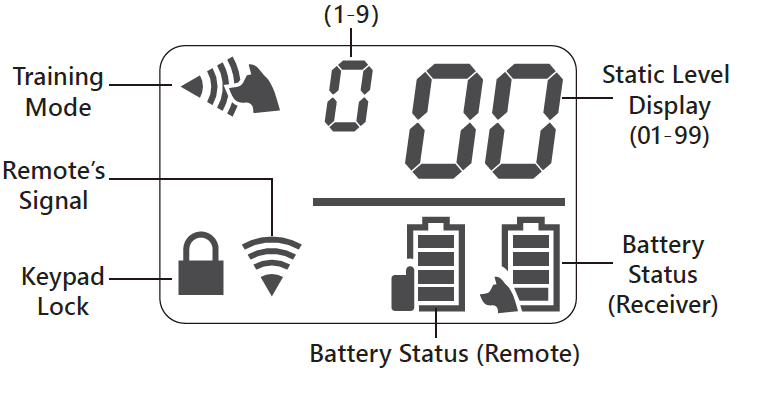
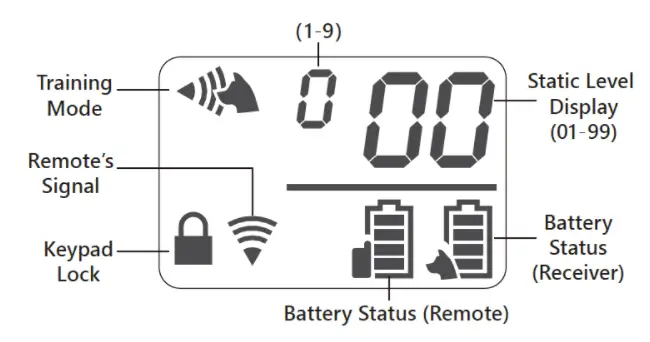
Screen
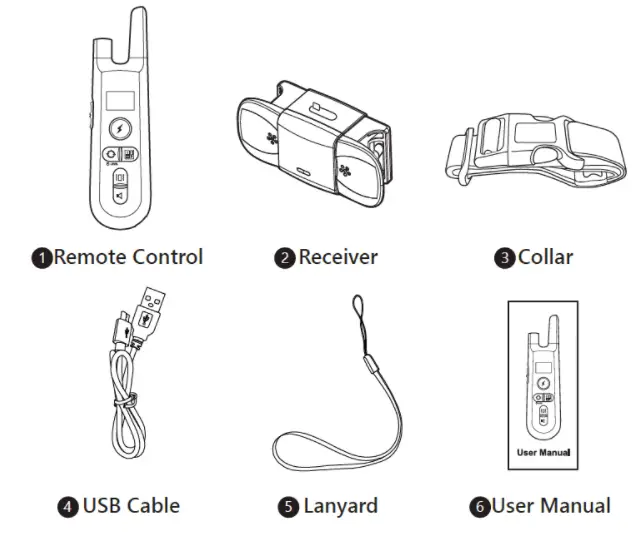
Package Content
- Remote Control
- Receiver
- Collar
- USB Cable
- Lanyard
- User Manual
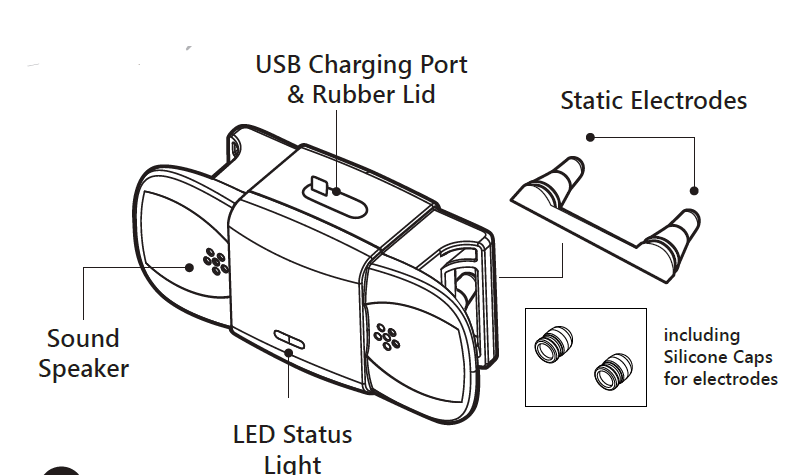
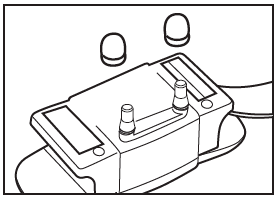
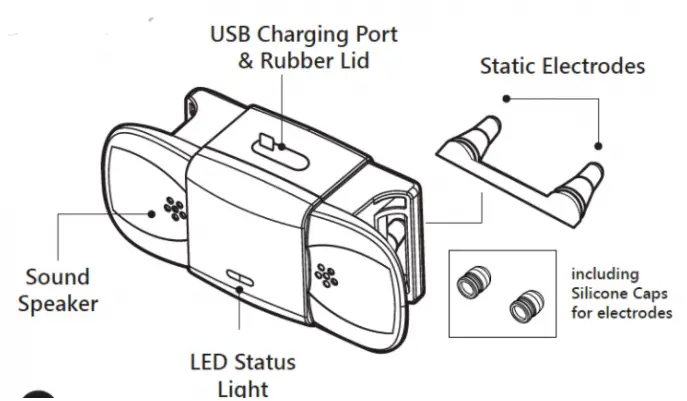
Receiver
Setting Up
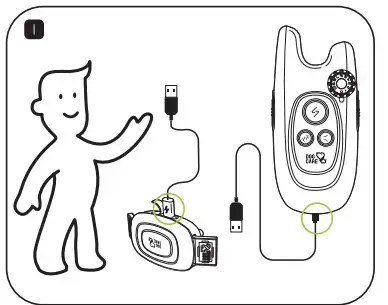
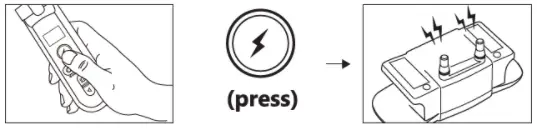
Charge the devices respectively for 2 hours and above.
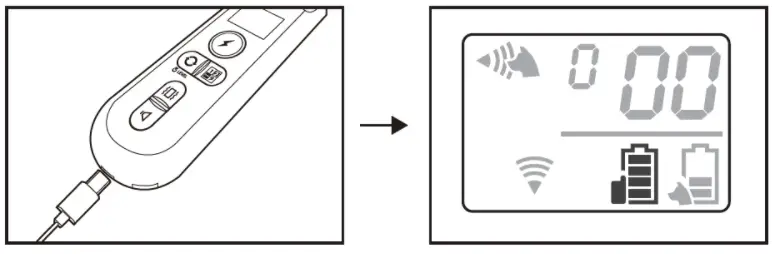
Remote Control: Charge the device until the battery icon on the display indicates full bars.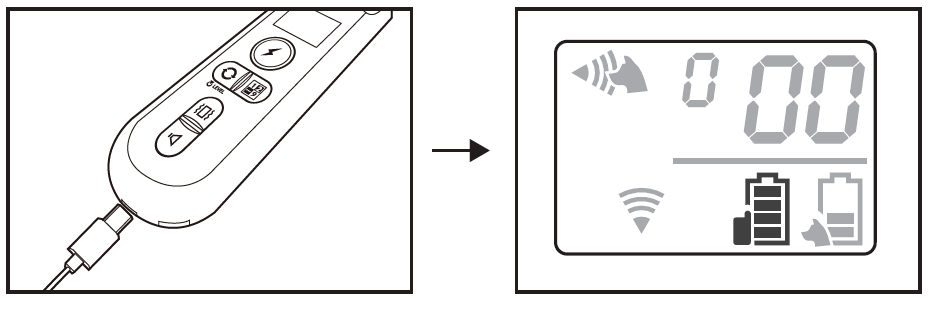
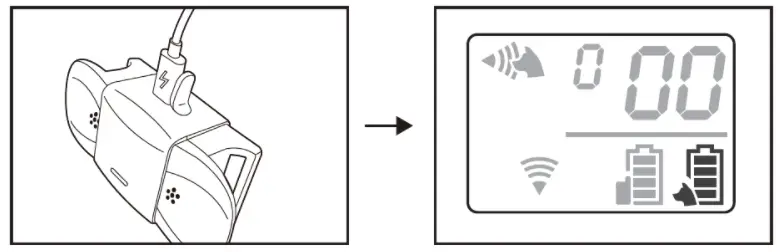
Receiver: Charge the device until the red LED turns green. The display on the Remote will indicate full bars as well.
Match the Remote Control to the Receiver:
*You may skip this step because the set is already paired by factory setting.
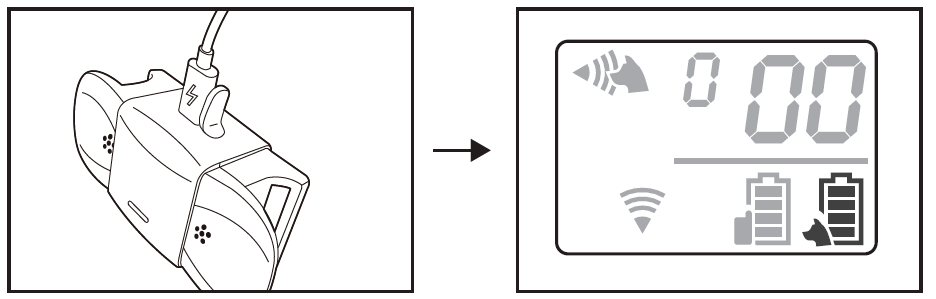
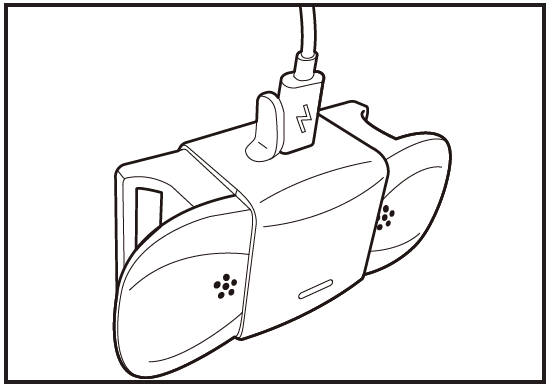
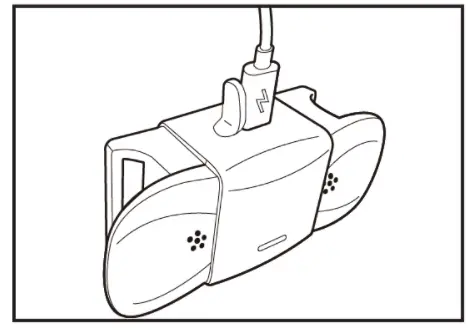
Connect the Receiver to a power source via the USB cable, matching mode can only be activated during charging.
Press and hold Channel Switch / Match Button for 5 secs. The Receiver will vibrate and beep which indicates the matching is complete.
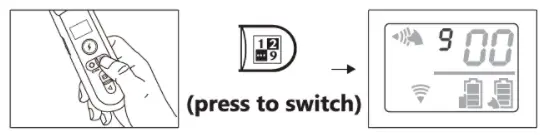
You will see “1” (or subsequent number) in the Channel Display if matching is successful.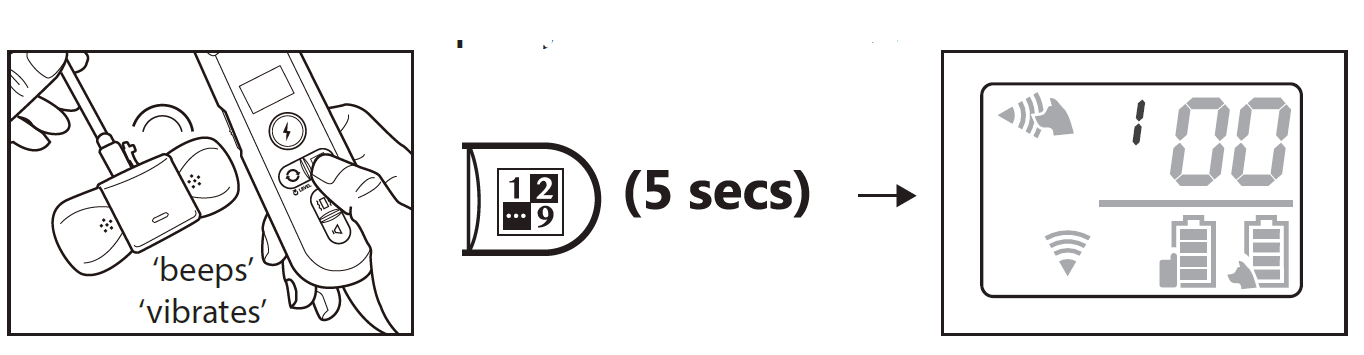
Adding multiple Receivers:
Connect your additional Receiver to a power source. Press and hold Channel Switch /Match Button for 5 secs (repeat steps 2.1 and 2.2). The Channel Display will show the subsequent number of the new Receiver.
Note: Connect only 1 Receiver at a time, do not connect all simultaneously, or the Remote will match all Receivers into a single channel.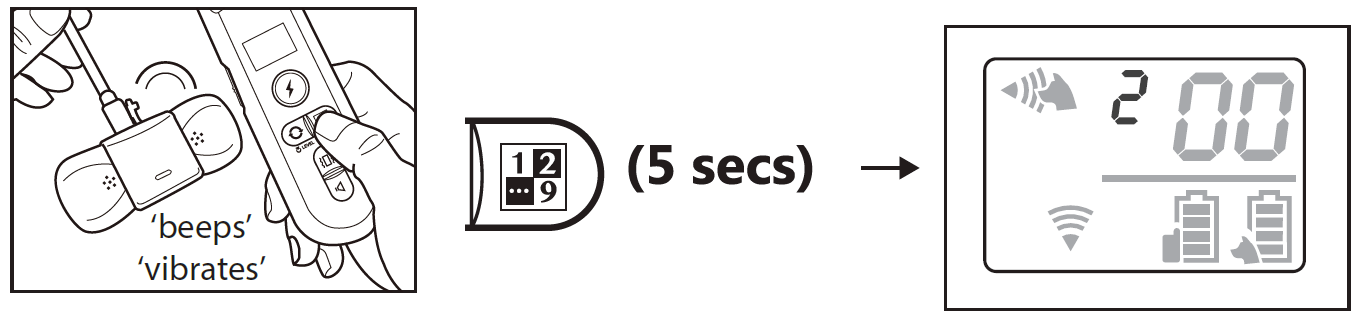
Removing all Matched Receivers:
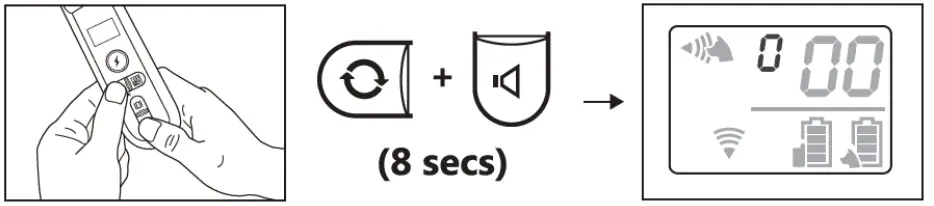
Press and hold Static Level Regulator Activation Button and Beep Button simultaneously for 8 secs. The Channel Display will default to “0”. Note: Make sure all Receivers you want to remove have power and in the effective range, so that Receivers could receive the remove command.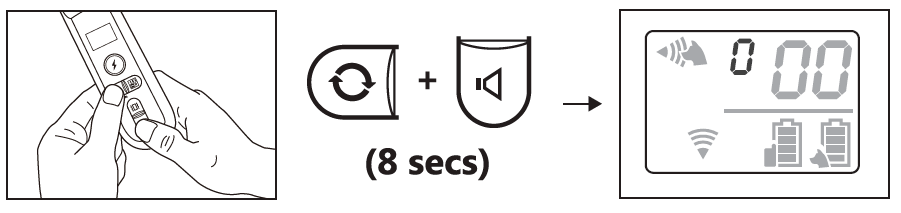
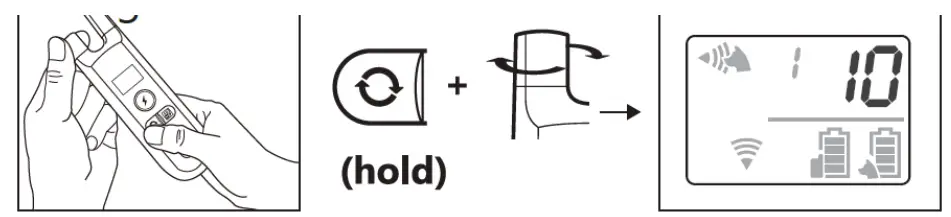
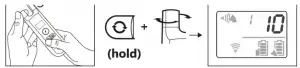
Configurating Static Levels:
Press and hold Static Level Regulator Activation Button and simultaneously slowly rotate Static Level Regulator until the digit on the screen reaches a suitable strength.
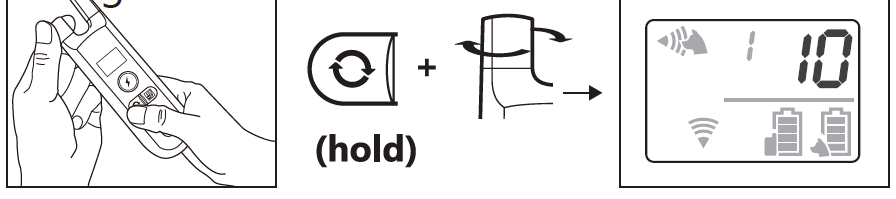
Recommended Static Level strength starts from “10”. This is the minimum sensation your dog can feel. The right static level goes down to individual basis which you should find out from your dog’s responses. The sensitivity to static depends on your dog’s size and weight, amount of fur, and even.
Training Modes
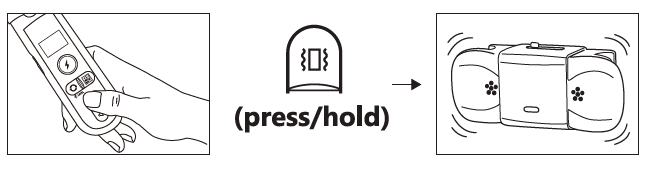
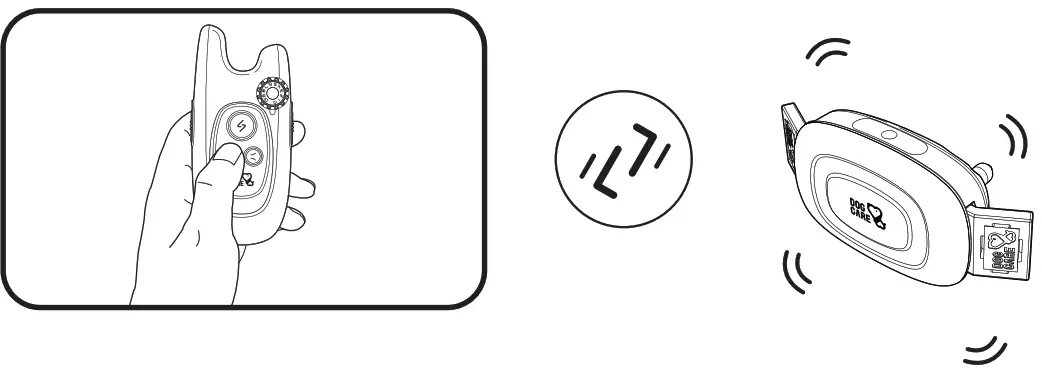
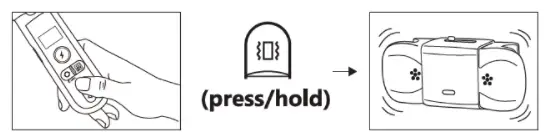
Vibration Mode: Press Vibrate Button, and the Receiver will vibrate once; hold the button and the vibration persists.
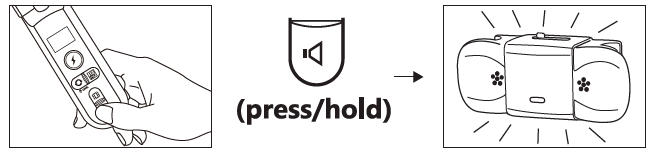
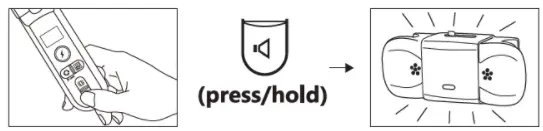
Sound Mode: Press Beep Button, and the Receiver will give a “beep” sound; hold the button and the “beep” sound persists.
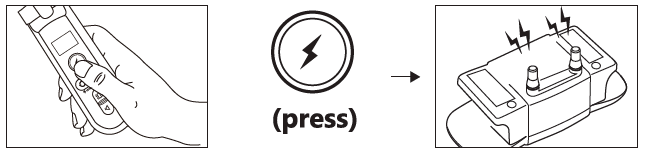
Static Stimulation Mode: Press the Static Button, and the Receiver will give a Static Stimulation to the wearer.
Do not hold the button as it is not recommended to have prolonged shock to your dog. The static, however, will cut off in 4 secs automatically to prevent unintentional harm to your pet.
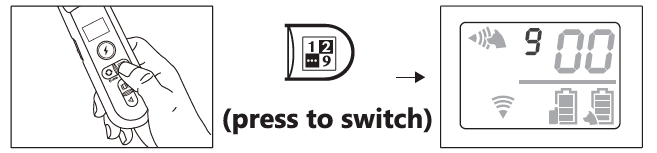
Switching Channel: Press the Channel Switch Button to choose which Receiver you want to control if you matched more than one Receiver.
Wearing the Receiver Collar
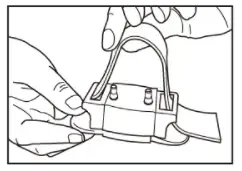
- Thread the collar through the Receiver.
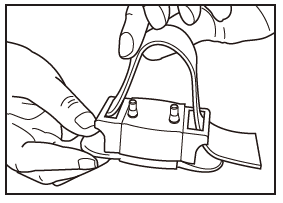
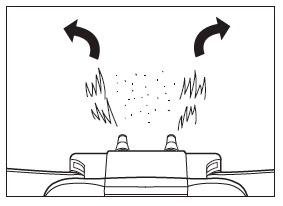
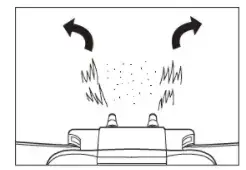
- If your dog has thick fur, please separate the fur at the electrodes with a comb to enable them to reach the skin.
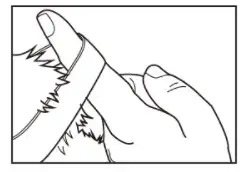
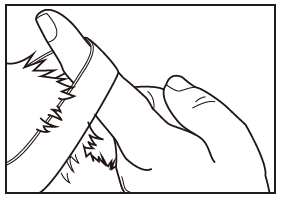
- When wearing the collar, the tightness is at most fitting if one finger can be inserted underneath.
- The Silicone Caps can dull the static sensation, you should decide if you need put them on. The soft caps also protect your dog from direct contact with metal electrodes, which in some cases will cause discomfort to some dogs.
Training Tips
- Reward your dog with food will usually help to achieve the best result.
- Do not use the device on dogs aged below 6-month, old, pregnant, easily frightened, aggressive, in heat, old, and dogs not in best of health.
- Use verbal commands first, and supplement with a corrective stimulus only as needed. Be consistent with your verbal commands, using the same words every time. Work with your pet on one behaviorat a time to avoid confusion and frustration. Use as little stimulus as possible and only to reinforce verbal commands when necessary.
- Do not over correct your dog.
- For example, use the beeps as warning by pressing Beep Button. The dog will become conditioned to the beep preceding the corrective stimulus and will soon learn to recognize the beep as a warning along with your verbal command.
- Do not rely on this product solely to train your dog. Some dogs will not respond to this product. We cannot guarantee the effectiveness of this or any trainer on your dog. If your dog shows signs of growling, snarling, biting or aggression while using the collar, discontinue use immediately and contact a professional trainer for advice.
Important Notice
Regarding you and the product:
- It is strictly prohibited to open the Receiver in any situation. Doing so will likely compromise the waterproof function and thus voiding the product warranty.
- Please use Remote Control and Receivers from the complete set, do not use other product to match with the Receiver.
- If you want to test the product, please use professional testing apparatus. Do not test with hands, so as to avoid accidental injury.
- If find water at the charging port, please wipe it dry before charging.
- Beware the interference from the environment can cause the product not to work properly. For examples are places with high voltage facilities, communication towers, thunderstorm, large buildings, and strong electromagnetic interference.
- Both Remote and Receiver have automatic power-saving mode. They will enter sleep mode if idling for 5 mins.
- The included collar is a basic accessory and is not necessarily suitable for all types of dog breeds. Any collar not wider than 24mm and not thicker than 5mm, made of soft material, can be a replacement for the current collar.
Regarding well-being of your dog:
- The Receiver collar is not a regular collar and not recommended to put on a leash to walk your dog. (Doing so during pulling may hurt the dog due to protruding electrodes on the Receiver.)
- Do not put the collar on for over 12 hours, it may cause rashes or discomfort to your dog’s skin.
- Do not allow children, or anyone who has little to no experience with training dogs, to handle this training kit.
- In order to guarantee normal diving function, please insert the waterproof rubber lid over the charging port.
- Static stimulation is not a pleasant experience for any dogs. Punishment is harsh way to train a dog. Always praise and encourage your dog for good behavior.
Note: With Anti-Misoperation design, Static function always cut-off after 4 secs, this is a precaution designed to prevent unintentional long-pressed of the button, and potential animal abuse.
Troubleshooting
- Remote/Receiver runs out of power quickly; not charging
Make sure the charger and Remote/Receiver is securely connected. Try to use other universal android USB cable to charge. - Static is too weak or even completely no static; Static Mode has no effect on my dog.
Make sure the receiver has enough power(when it is low-battery, shock doesn’t work); Only both electrodes are simultaneously touched by dog’s
skin shock will work; Try to increase the static level to more than 45. If dog has long hair, you need to separate dog hair to make electrodes touched. - Remote/Receiver does not response
Recharge the Remote/Receiver,make sure they have enough power. Check the keypad lock(which is on the left side of Remote), unlock the Remote. If Remote is locked,
there will be a lock icon on the display. If you try methods above but still fail, please remove all the matching and reconnect Remote with Receivers. - Receiver is fully charged, but Remote Display still shows receiver has empty battery.
Turn off Remote and turn on Remote again. - Fail to match Receiver with Remote
Make sure Receiver is connected to a power source( charging mode can only be activated while charging).
Must hold Channel Switch more than 5 secs, if not, matching will fail. If you still fail after trying as above, contact us via to confirm whether receiver and remote is of the different version, we will solve for you. - Training mode fails to sync up even in a very short distance
Make sure there is no strong signal interference in your surroundings. Remote’s range could
Operating Environment & Maintenance
Do not use the product in the circumstances as follow:
- Do not operate the devices under temperature of 104°F and above, doing so in such high temperature will decrease the performance of the batteries.
- Do not use the Remote during snowing, this could lead to water sipping in causing damage to the controller.
- Do not use the set in places with strong electromagnetic interference. This will greatly compromise the performance of the product.
- Avoid dropping the devices on hard surface inflict excessive force on them.
- Avoid using the devices in environment flooded with corrosive chemical, this may lead to color degrading, deforming, or cracking of exterior of the devices.
- When not in use, please wipe clean both the Remote and Receiver with mild detergent. Turn off the Remote, lock the keypad, put on port, the rubber lid on the Receiver’s charging and store the set in a cool dry place.
- During cleaning, wipe with soft cloth and mild detergent. Do not use hard brushes which may scratch the surface of the device.
- If the Receiver has gotten dirty, secure the charging port rubber lid secured
- This product is a professional dog training device and should not be used for other purposes. Please do not violate local laws in using this product.
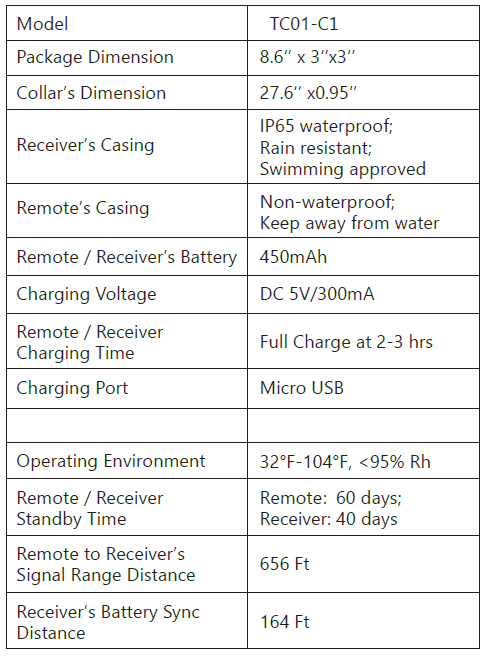
Product Specification
DOG TRAINING COLLAR 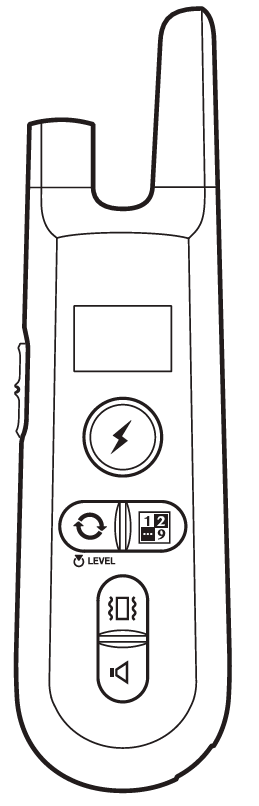 DogCare DOG Training Collar User Manual – Download [optimized]
DogCare DOG Training Collar User Manual – Download
FAQ’S
How to charge the Receiver?
The Receiver is charged by a USB cable, which is included in the package.
How to charge the Remote Control?
The Remote Control is charged by a USB cable, which is included in the package.
How to charge the collar?
The collar is charged by a USB cable, which is included in the package.
How long does it take to charge?
It takes 2 hours to fully charge the collar.
How long does it take to charge the Remote Control?
It takes 2 hours to fully charge the Remote Control.
How long does it take to charge the Receiver?
It takes 2 hours to fully charge the Receiver.
How long does it take for a full battery?
A full battery will last for 30 days. Please note that a new battery will only last for 10 days before recharging again. This is normal and not an indication of a faulty device. If you are using your remote control frequently, we recommend that you buy an extra battery for backup purposes. We also recommend that you use your remote control at least once every 10 days in order to ensure that your device remains charged and ready for use at all times. If you do not use your remote control for extended periods of time, we recommend that you remove its batteries completely from the remote control and store them in a cool dry place away from direct sunlight and heat sources such as radiators or fireplaces. This will help prevent damage due to leakage or corrosion of batteries inside your remote control over time. We also recommend that you replace your batteries every 6 months if they have not been used or stored properly. If your device still fails after following these instructions, please contact us directly via email or call our customer service hotline 24/7 (Toll Free) +1-888-965-7705 (International) +852-965-7705 (Hong Kong).
Do dog trainers recommend shock collars?
You should consider using a shock collar to train your dog only if you’ve reached the limits of positive reinforcement, and even then only after enlisting the help and expertise of a professional trainer or veterinarian.
Are vibration collars for dogs cruel?
Will a vibration collar hurt my dog? Nope! Vibration collars will simply send a buzz to your dog’s neck. They will not shock or cause Fido any pain.
Why isn’t My dog Care shock collar working?
Make sure your battery is charged in both the collar and the transmitter. Low battery charge can make for inconsistent functioning. Make sure both pieces are turned on and that the unit is properly synced so that the collar is receiving a signal from the transmitter.
Can shock collars cause brain damage?
Many ask, can shock collars cause brain damage to dogs? No, although they can make existing issues worse, brain damage is not a shock collar’s side effect
Can a dog sleep with a shock collar on?
While collars are vital for holding ID tags, make sure your dog is also microchipped so when you remove your pup’s collar at night the dog can still be identified in case of an emergency. In conclusion, it’s really bad to let your dog sleep with it’s collar on.
]]>TC08 WELL-D DOG TRAINING SYSTEM
Instruction Manual 
DOG TRAINING SYSTEM
Model: TCOB If any quality issues or confusion. feel free to contact us via
![]() +1-833.220-1900
+1-833.220-1900
 9am – 9pm ,6 am – 6 pm PT
![]() [email protected]
[email protected]

Charge the WELL-D LE collar and remote control with the included USB cable. Charging takes at least 2 hours, respectively.
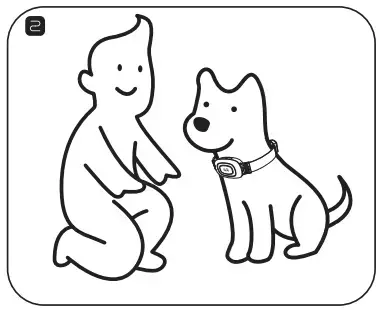
 Place and fit the WELL-D LE collar snugly on your dog’s neck, making sure that the electrodes are touching the dog’s skin on the underside of its neck. Refer to page #9-10 for detailed information.
 Turn on the remote control: rotate the INTENSITY DIAL
 ![]() clockwise.
clockwise.
 Turn off the remote control: rotate the INTENSITY DIAL
![]() counterclockwise. When the POWER ICON
counterclockwise. When the POWER ICON ![]() is aligned with the STATUS LED, the remote control will shut down.
is aligned with the STATUS LED, the remote control will shut down.
 Unlock/Lock the remote control keypad: toggle down the KEYPAD LOCK
 ![]() to unlock, and up to lock.
to unlock, and up to lock.
 Vibrate command: press the VIBRATE BUTTON ID briefly, and the collar
 ![]() vibrate once.
vibrate once.
 Beep command: press the BEEP BUTTON
 ![]() briefly, and the collar will beep once.
briefly, and the collar will beep once.
 Static intensity adjustment: rotate the INTENSITY DIAL
![]() clockwise. The scale ranges from 1 to 10, indicating that the intensity gradually increases. Recommended static level starts from 1.
clockwise. The scale ranges from 1 to 10, indicating that the intensity gradually increases. Recommended static level starts from 1.
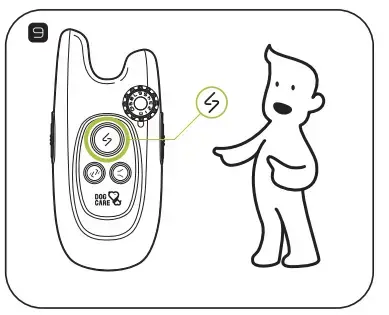 Static command: press the STATIC BUTTON
 ![]() briefly, and the collar will apply a brief static stimulation.
briefly, and the collar will apply a brief static stimulation.
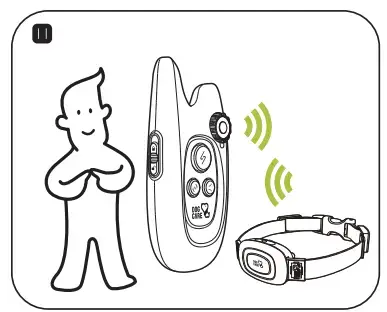 Channel switching: it is possible to train 2 dogs at the same time with your WELL-D LE. Toggle up the CHANNEL SWITCH
 ![]() to select channel I, and down to select channel II.
to select channel I, and down to select channel II.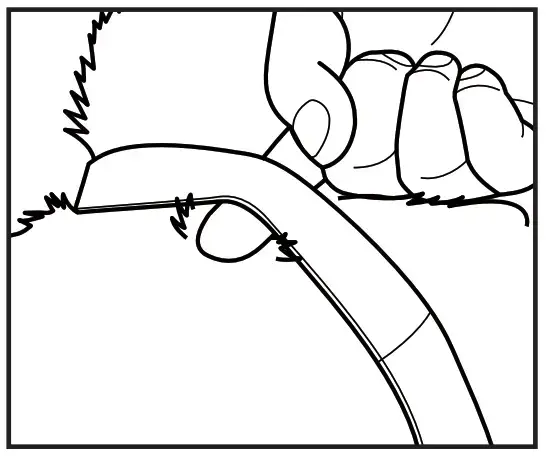 Pairing: the WELL-D LE remote control and collar provided are already paired by the factory setting. To pair them again, or pair a new collar, refer to page #11 for detailed information.
In the Box
COLLAR STATIC STIMULATION QUICK GUIDE
 When wearing the collar, it is most suitable if one finger can be inserted under it. Too tight is not good for your dog, but too loose will dull the static function for the electrodes cannot touch your dog’s skin.
Not Feeling the Static? Try These Solutions
 |
|
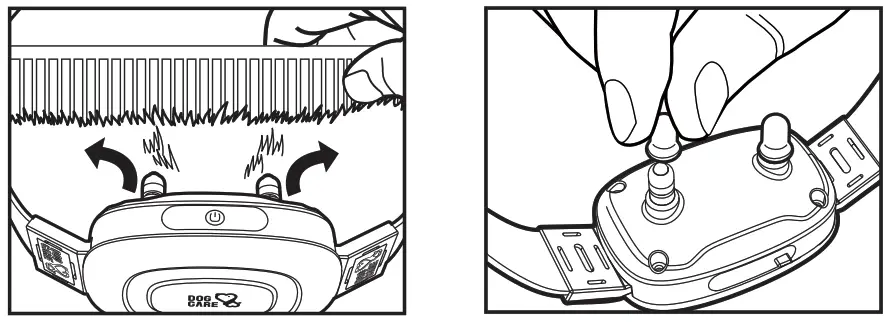
| If your dog has thick fur, please separate the fur apart so that both electrodes can touch the skin. | Make sure the protective silicone caps are off the electrodes. They can dull the static sensation sent to your dog. |
 |
|
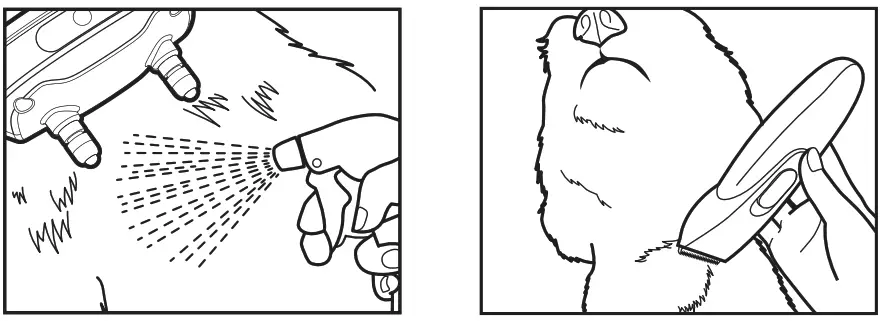
| Neter can help con-‘trot electricity If you spray some water ; round the electrodes. The static function can >e felt more effectively. | One last thing you can try is to shear the fur where both electrodes are touched. |
Note:
- Only when both electrodes are simultaneously touched, the static will work.
- If the collar has a delayed reaction or fails to sync up even in a short distance, make sure there is no strong signal interference In your surroundings. The remote’s range could be affected by obstacles. electromagnetic field. or even stormy weather.
- If you find the collar not working, please check whether you have pushed up the KEYPAD LOCK
 which is on the left side of the remote.
 - The sensitivity to static depends on your dog’s size, weight, amount of fur, and even skin condition.
Product Overview
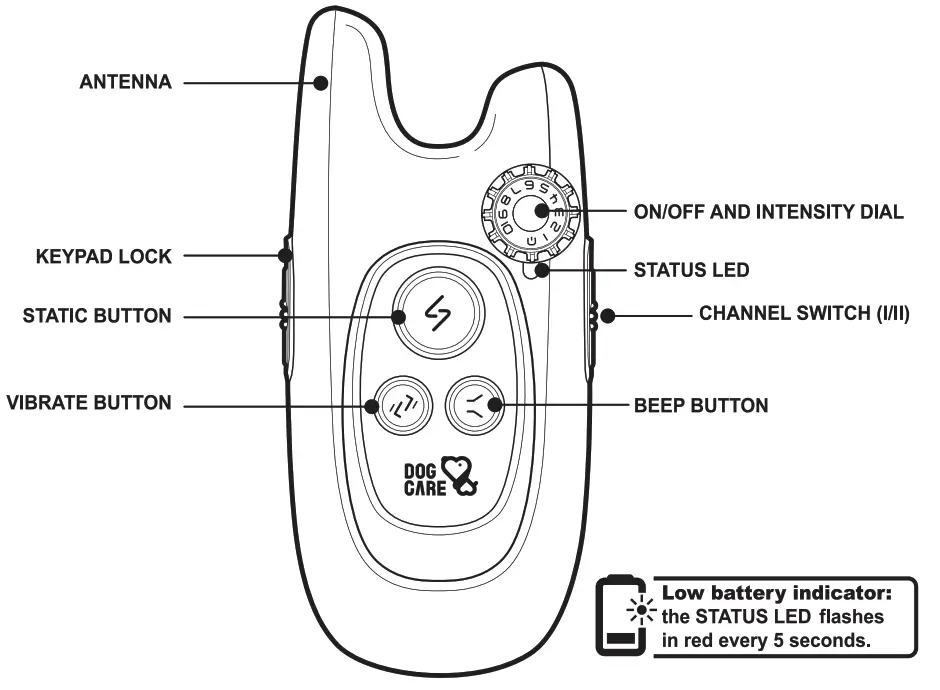
( Remote control)
Collar
![]() Low battery Indicator: the STATUS LED flashes In red every 5 seconds.
Low battery Indicator: the STATUS LED flashes In red every 5 seconds.
Setting Up
- Charge your WELL-D LE remote control and collar respectively for at least 2 hours.
 Remote control: during charging, the STATUS LED lights up in red. When fully charged, the STATUS LED turns steady green.
 Collar during charging. the STATUS LED lights up in red. When fully charged, the STATUS LED turns steady green.
 It is not recommended to leave the devices charging for a prolonged period of time, because it may damage the battery’s lifespan.
 - The scale on the INTENSITY DIAL
 ranges from 1 to 10, indicating that the intensity gradually increases. Rotate the INTENSITY DIAL clockwise to increase the intensity, and counterclockwise to decrease the intensity.
Recommended static level starts from
![]() 1. This is the minimum sensation your dog can feel. The suitable static level goes down to an individual basis that your dog is responsive to the static function. The sensitivity to static depends on your dog’s size and weight, amount of fur, and even skin condition.
1. This is the minimum sensation your dog can feel. The suitable static level goes down to an individual basis that your dog is responsive to the static function. The sensitivity to static depends on your dog’s size and weight, amount of fur, and even skin condition.
Wearing the Collar
![]() CAUTION
CAUTION
To help reduce the chance of Irritation, remove the collar when not In use. Check the tit and comfort of the collar daily. This product is not intended for human use. Do not attempt to use on any person.
 Make sure that the collar is powered oft
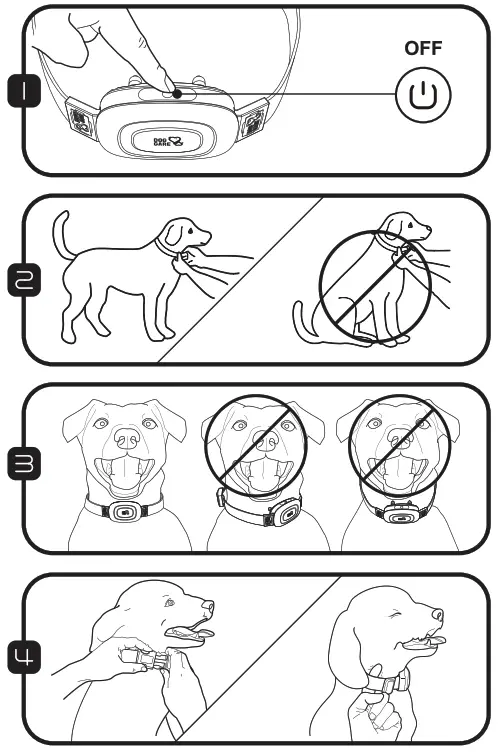
Have your dog stand in a balanced position on a fiat, even surface.
Put the strap over your dog’s neck. centering the collar underneath its neck and making sure that the dog care logo is upright facing you.
Tighten the strap so that it fits snugly on your dog’s neck and should not be able to rotate around the neck. The tightness is at most fit if one finger can be inserted underneath.
NOTE: the collar should fit lightly and should not be able to rotate or slide on your dogs neck. Your dog must be able to swallow food and water normally. You should observe your dog’s behavior to verify that the collar is not too tight.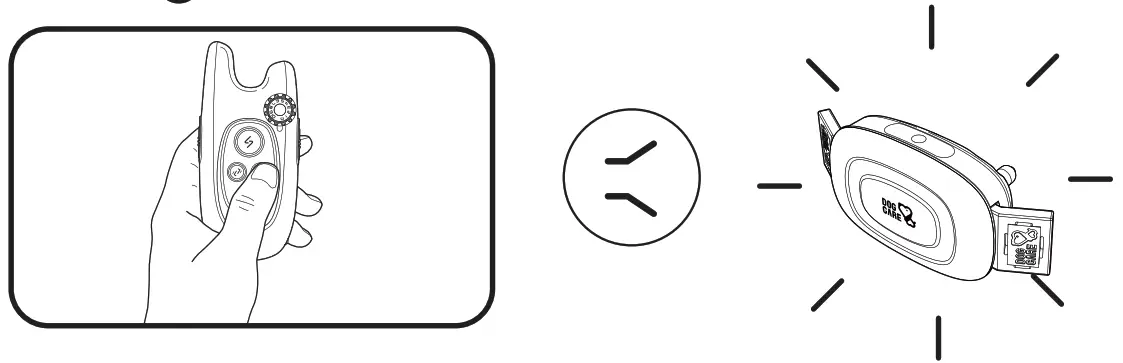
Wiggle the collar to work the electrodes through the dog’s coat.
NOTE: The electrodes must have contact with the dog’s skin to be effective. If your dog has thick fur, please separate the fur at the electrodes with a comb to enable them to reach the skin.
When you are satisfied with the fit of the collar, you may want to adjust the excess strap length. After removing the collar, you can put the strap’s end back through the buckle, or trim away excess strap length and seal the strap’s end with a lighter or candle flame.
NOTE: remove the collar first.
The silicone caps are optional. The soft caps protect your dog from direct contact with metal electrodes which in some cases may cause discomfort. However, the silicone caps may dull the static sensation.
Training Modes
- Vibration mode: Press the VIBRATE BUTTON
 and the collar will vibrate once; hold the VIBRATE BUTTON and the vibration persists.
- Beep mode Press the BEEP BUTTON 8and the collar will give a beep sound; hold the BEEP BUTTON a and the beep sound persists.
- Static mode: Press the STATIC BUTTON
 and the collar will apply a static stimulation.
 NOTE: do not hold the STATIC BUTTON as it is not recommended to have prolonged static stimulation to your dog (the static will be cut off automatically in 3 seconds to prevent unintentional stimulation).
Pairing
Your WELL-1) LE dog training system can pair with up to 2 collars. The remote control and collar provided are already paired. They will communicate with each other once they are powered on. You do not need to pair them again unless the collar loses its link with the remote control.
To pair them again, follow the procedures below:
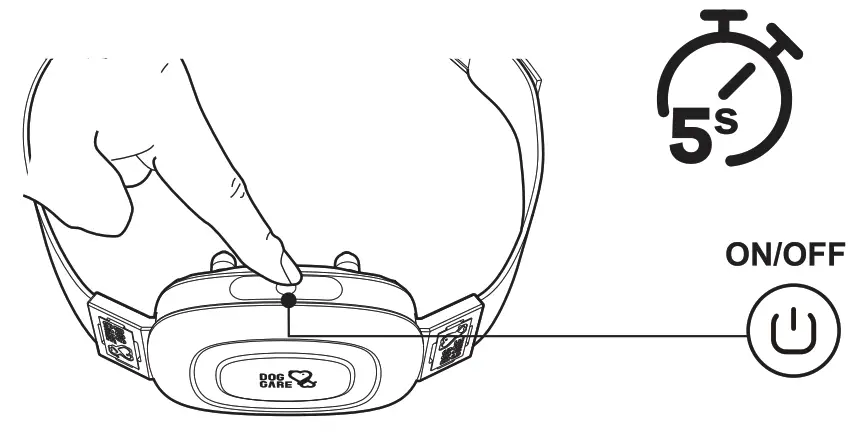
Collar ensure the collar Is powered off. Hold the ON/OFF BUTTON ![]() for S seconds until the STATUS LED on the collar flashes in green.
for S seconds until the STATUS LED on the collar flashes in green.
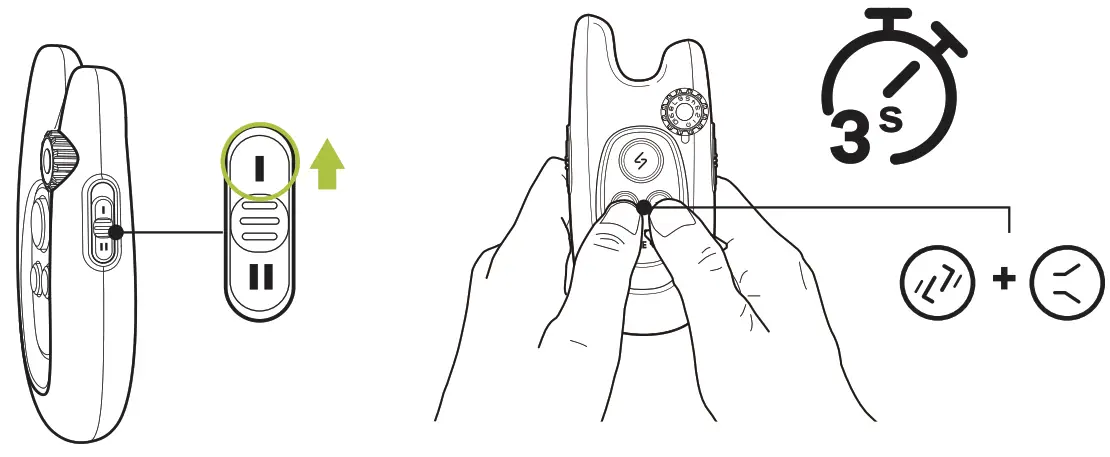
 Remote control: toggle the CHANNEL SWITCH
 ![]() to select channel I. Press the VIBRATE BUTTON
to select channel I. Press the VIBRATE BUTTON ![]() and the BEEP BUTTON
and the BEEP BUTTON ![]() simultaneously for 3 seconds until the STATUS LED on the remote flashes in green.
simultaneously for 3 seconds until the STATUS LED on the remote flashes in green.
 If the pairing is successful, the STATUS LED on the collar will flash in green twice. emit a beep sound. and vibrate once. If no pairing is performed within 20 seconds, the STATUS LED on the collar will turn off and the collar will enter the standby mode.
To pair a new collar, follow the
New collar, after confirming that the new collar is turned off, holds the ON/OFF BUTTON ![]() for 5 seconds until the STATUS LED flashes in green.
for 5 seconds until the STATUS LED flashes in green.
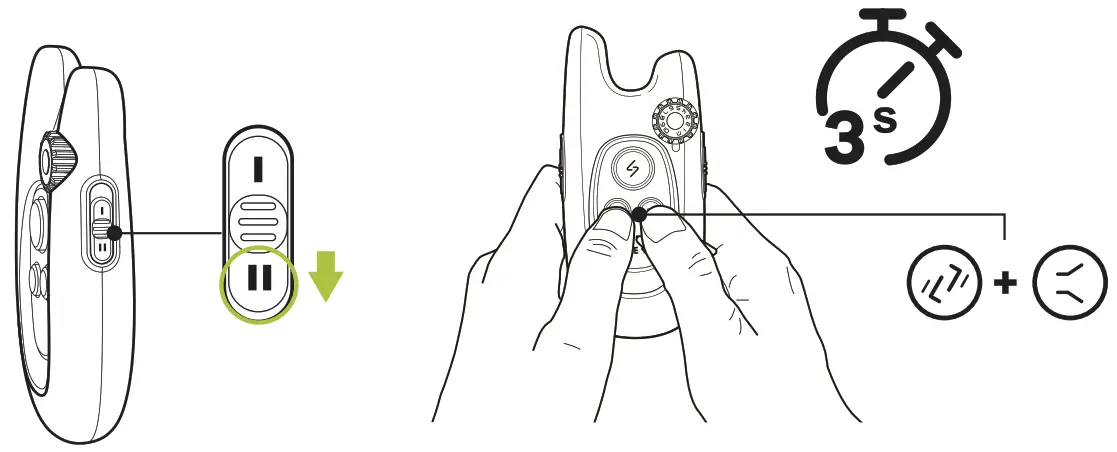
 Remote control: toggle the channel switch to select channel II. Press the VIBRATE BUTTON
 ![]() and the BEEP BUTTON
and the BEEP BUTTON ![]() simultaneously for 3 seconds until the STATUS LED on the remote flash in green. if the pairing is successful, the STATUS LED on the collar will flashes in green twice, emit a beep sound, and vibrate once.
simultaneously for 3 seconds until the STATUS LED on the remote flash in green. if the pairing is successful, the STATUS LED on the collar will flashes in green twice, emit a beep sound, and vibrate once.
 NOTE: it is recommended that you pair one collar at a time. It is not recommended to pair multiple collars in one channel.
Training Tips
- Rewarding your dog with food/treats will usually help to achieve the best training result.
- Do not use the device on dogs aged below 6 months, old, pregnant, easily frightened, aggressive, in heat, and in inferior health conditions.
- Use verbal commands first, and supplement with a corrective stimulus only as needed. Be consistent with your verbal commands, and use the same words every time. Work with your dog on one behavior at a time to avoid confusion and frustration.
- Use as little stimulus as possible and only to reinforce verbal commands when necessary. Do not overcorrect your dog.
- For example, use the beep sound as a warning by pressing the BEEP BUTTONS . The dog will become conditioned to the beep preceding the corrective stimulus and will soon learn to recognize the beep as a warning along with your verbal command.
- Do not rely on this product solely to train your dog. Some dogs will not respond to this product. We cannot guarantee the effectiveness of this or any trainer on your dog.
NOTE: If your dog shows signs of growling, snarling, biting, or aggression while using the color, discontinue use immediately and contact a professional trainer for advice.
Important Notice
Regarding you and the product:
- It is strictly prohibited to open the collar in any situation. Doing so wit likely compromises the waterproof function and thus void the product warranty.
- Please use the WELL-D LE remote control and collar from the complete set. Do not use other products to match the color.
- If you want to test the product, please use professional testing apparatus. Do not test with hands, so as to avoid accidental injury.
- If find water at the charging port, please wipe it dry before charging.
- Beware the interference from the environment can cause the product not to work properly-for example, in places with high voltage facilities, communication towers, thunderstorms, large buildings, and strong electromagnetic interference.
- The included color is a basic accessory and is not necessarily suitable for all types of dog breeds. The color strap Is not replaceable.
Regarding the well-being of your dog:
- The WELL-0 LE colar is not a regular solar. Do not connect a leash directly to the WELL-D LE collar. Doing so during pulling may hurt the dog due to protruding the electrodes.
- Do not put the collar on for over 12 hours, it may cause rashes or discomfort to your dog’s skin.
- Do not allow children or anyone who has little to no experience with training dogs, to handle this training kit.
- In order to guarantee normal diving function, please Insert the waterproof rubber lid over the charging port.
Troubleshooting
- Remote/Collar runs out of power quickly; not charging
• Make sure that the charger and the remote/collar are securely connected.
• Try using other universal Android USB cables to charge. - Static Is too weak; no static; static mode has no effect on my dog
• Make sure the collar has enough power when the battery Is too low. the static cannot function.
• Only both electrodes are simultaneously touching the dog’s skin, the static wit work.
• Try increasing the static level to more than 4.
• If your dog has thick fur, please separate the fur at the electrodes with a comb to enable them to reach the skin. If necessary, trim some of your dog’s hair where the electrodes make contact with the skin to allow for consistent performance. - Remote/Collar does not respond
• Recharge the remote/colar, making sure they have enough power.
• Check the KEYPAD LOCK, which is on the left side of the remote. and unlock the remote. If the remote is locked, the buttons on the remote wit be invalid.
• If the problem persists, please pair the color and remote again. - Fail to pair collar with remote
• After confirming that the collar is turned off, hold the ON/OFF BUTTON for 5 seconds until the STATUS LED flashes in green. If the problem persists, please contact us via support©dogcareglobal.com for further assistance.
 - Training mode fails to sync up even in very short distance
• Make sure there is no strong signal interference in your surroundings.
• The remote control’s range could fluctuate subject to obstacles, electromagnetic fields, or even stormy weather. - The collar beeps/vibrates/releases static by Itself occasionally or constantly
• Make sure no button on the remote has been pressed or gotten stuck.
![]() If any quality issues or confusion, feel free to contact us via [email protected].
If any quality issues or confusion, feel free to contact us via [email protected].
Operating Environment & Maintenance
Do not use the product in the following circumstances:
- Do not operate the WELL-0 LE dog training system under temperatures of 104°F and above, doing so in such high temperatures will decrease the performance of the batteries.
- Do not use the remote during snowing, as this could lead to water sipping in causing damage to the remote.
- Do not use the WELL-D LE dog training system in places with strong electromagnetic interference. This wit greatly compromises the performance of the product.
- Avoid dropping the devices on hard surfaces or inflicting excessive force on them.
- Avoid using the devices in an environment flooded with corrosive chemicals. this may lead to color degrading. deforming, or cracking of the exterior of the devices.
Maintenance:
- When not in use, please wipe dean both the remote control and color with mild detergent. Turn off the remote, lock the keypad, put on the rubber lid on the colors charging port, and store the set in a cool and dry place.
- During cleaning, wipe with a soft cloth and mild detergent. Do not use hard brushes which may scratch the surface of the device.
- If the color has gotten dirty, secure the charging port rubber kb and wash it thoroughly.
NOTE: do not submerge the colar into the water for a long period of time, even though it is P67 waterproof. - If found residues around the charging port’s rubber Id, you should wipe it clean to prevent water from sipping in.
- If the remote control fell Into the water, pick it up quickly and turn off the power. Dry it with a cloth as much as you can and let it out to dry. It should resume function normally once the moisture is dried out.
Terms of Use & Limitation of Liability
- Use of this product means you accept all the terms and conditions.
- This product is a professional dog training device. You are not recommended to use this product if your dog is clever and less than 8 lbs in weight. If you’re not sure whether the product is suitable for your pet dog, please consult a professional handler or contact us.
- This product is a professional dog training device and should not be used for other purposes. Please do not violate local laws in using this product.
- We bear no liability for any direct or indirect losses caused by the use or misuse of this product; all risks in using this product shall be borne by the user.
- Please contact the dealer for parts warranty, goods return, or exchange. We provide only technical support.
- We reserve the right to alter the terms, conditions, and notices of this product offered.
FCC Statement
This device complies with Part 15 of the FCC Rules. Operation is subject to the following two conditions: (1) This device may not cause harmful interference, and (2) This device must accept any interference received, including interference that may cause undesired operation.
Warning: Changes or modifications not expressly approved by the party responsible for compliance could void the user’s authority to operate the equipment.
Note: This equipment has been tested and found to comply with the limits for a Class B digital device, pursuant to Part 15 of the FCC Rules. These limits are designed to provide reasonable protection against harmful interference in a residential installation. This equipment generates uses and can radiate radio frequency energy and, if not installed and used in accordance with the instructions, may cause harmful interference to radio communications. However, there is no guarantee that interference wit does not occur in a particular instalation. If this equipment does cause harmful
interference to radio or television reception, which can be determined by turning the equipment off and on, the user is encouraged to try to correct the interference by one or more of the following measures:
- Reorient or relocate the receiving antenna.
- Increase the separation between the equipment and receiver.
- Connect the equipment into an outlet on a circuit different from that to which the receiver is connected.
- Consult the dealer or an experienced radiofTV technician for help.
Product Specifications
| Model | TC08 |
| Collar adjustable range | 10-27 inches |
| Collar water rating | IP67 |
| Remote water rating | Non-waterproof; Keep away from water |
| Remote/Collar’s battery | 250mAh |
| Charging Voltage | DC 5V/500mA |
| Remote/Collar charging time | 2-3 hours |
| Charging interface | Micro USB |
| Operation environment | 32°F-104°F, <95% RH |
| Remote estimated standby time | 90 days |
| Collar estimated standby time | 10 days |
| Signal range | 600 ft |

![]() +1-833.220-1900
+1-833.220-1900
9am – 9pm ,6 am – 6 pm PT
![]() [email protected]
[email protected]


- Remote Control
- Receiver
- Collar
- USB Cable
- Lanyard
- User Manual
Remote Control: Charge the device until the battery icon on the display indicates full bars.
Receiver: Charge the device until the red LED turns green. The display on the Remote will indicate full bars as well.
*You may skip this step because the set is already paired by factory setting.
Connect the Receiver to a power source via the USB cable, matching mode can only be activated during charging.
Press and hold Channel Switch / Match Button for 5 secs. The Receiver will vibrate and beep which indicates the matching is complete.
You will see “1” (or subsequent number) in the Channel Display if matching is successful.
Connect your additional Receiver to a power source. Press and hold Channel Switch /Match Button for 5 secs (repeat steps 2.1 and 2.2). The Channel Display will show the subsequent number of the new Receiver.
Note: Connect only 1 Receiver at a time, do not connect all simultaneously, or the Remote will match all Receivers into a single channel.
Press and hold Static Level Regulator Activation Button and Beep Button simultaneously for 8 secs. The Channel Display will default to “0”. Note: Make sure all Receivers you want to remove have power and in the effective range, so that Receivers could receive the remove command.
Press and hold Static Level Regulator Activation Button and simultaneously slowly rotate Static Level Regulator until the digit on the screen reaches a suitable strength.
Recommended Static Level strength starts from “10”. This is the minimum sensation your dog can feel. The right static level goes down to individual basis which you should find out from your dog’s responses. The sensitivity to static depends on your dog’s size and weight, amount of fur, and even.
Vibration Mode: Press Vibrate Button, and the Receiver will vibrate once; hold the button and the vibration persists.
Sound Mode: Press Beep Button, and the Receiver will give a “beep” sound; hold the button and the “beep” sound persists.
Static Stimulation Mode: Press the Static Button, and the Receiver will give a Static Stimulation to the wearer.
Do not hold the button as it is not recommended to have prolonged shock to your dog. The static, however, will cut off in 4 secs automatically to prevent unintentional harm to your pet
Switching Channel: Press the Channel Switch Button to choose which Receiver you want to control if you matched more than one Receiver
- Thread the collar through the Receiver.
- If your dog has thick fur, please separate the fur at the electrodes with a comb to enable them to reach the skin.
- When wearing the collar, the tightness is at most fitting if one finger can be inserted underneath
- The Silicone Caps can dull the static sensation, you should decide if you need put them on. The soft caps also protect your dog from direct contact with metal electrodes, which in some cases will cause discomfort to some dogs.
- Reward your dog with food will usually help to achieve the best result.
- Do not use the device on dogs aged below 6-month, old, pregnant, easily frightened, aggressive, in heat, old, and dogs not in best of health.
- Use verbal commands first, and supplement with a corrective stimulus only as needed. Be consistent with your verbal commands, using the same words every time. Work with your pet on one behaviorat a time to avoid confusion and frustration. Use as little stimulus as possible and only to reinforce verbal commands when necessary.
- Do not over correct your dog.
- For example, use the beeps as warning by pressing Beep Button. The dog will become conditioned to the beep preceding the corrective stimulus and will soon learn to recognize the beep as a warning along with your verbal command.
- Do not rely on this product solely to train your dog. Some dogs will not respond to this product. We cannot guarantee the effectiveness of this or any trainer on your dog. If your dog shows signs of growling, snarling, biting or aggression while using the collar, discontinue use immediately and contact a professional trainer for advice.
- It is strictly prohibited to open the Receiver in any situation. Doing so will likely compromise the waterproof function and thus voiding the product warranty.
- Please use Remote Control and Receivers from the complete set, do not use other product to match with the Receiver.
- If you want to test the product, please use professional testing apparatus. Do not test with hands, so as to avoid accidental injury.
- If find water at the charging port, please wipe it dry before charging.
- Beware the interference from the environment can cause the product not to work properly. For examples are places with high voltage facilities, communication towers, thunderstorm, large buildings, and strong electromagnetic interference.
- Both Remote and Receiver have automatic power-saving mode. They will enter sleep mode if idling for 5 mins.
- The included collar is a basic accessory and is not necessarily suitable for all types of dog breeds. Any collar not wider than 24mm and not thicker than 5mm, made of soft material, can be a replacement for the current collar.
- The Receiver collar is not a regular collar and not recommended to put on a leash to walk your dog. (Doing so during pulling may hurt the dog due to protruding electrodes on the Receiver.)
- Do not put the collar on for over 12 hours, it may cause rashes or discomfort to your dog’s skin.
- Do not allow children, or anyone who has little to no experience with training dogs, to handle this training kit.
- In order to guarantee normal diving function, please insert the waterproof rubber lid over the charging port.
- Static stimulation is not a pleasant experience for any dogs. Punishment is harsh way to train a dog. Always praise and encourage your dog for good behavior.
Note: With Anti-Misoperation design, Static function always cut-off after 4 secs, this is a precaution designed to prevent unintentional long-pressed of the button, and potential animal abuse.
- Remote/Receiver runs out of power quickly; not charging
Make sure the charger and Remote/Receiver is securely connected. Try to use other universal android USB cable to charge. - Static is too weak or even completely no static; Static Mode has no effect on my dog.
Make sure the receiver has enough power(when it is low-battery, shock doesn’t work); Only both electrodes are simultaneously touched by dog’s
skin shock will work; Try to increase the static level to more than 45. If dog has long hair, you need to separate dog hair to make electrodes touched. - Remote/Receiver does not response
Recharge the Remote/Receiver,make sure they have enough power. Check the keypad lock(which is on the left side of Remote), unlock the Remote. If Remote is locked,
there will be a lock icon on the display. If you try methods above but still fail, please remove all the matching and reconnect Remote with Receivers. - Receiver is fully charged, but Remote Display still shows receiver has empty battery.
Turn off Remote and turn on Remote again. - Fail to match Receiver with Remote
Make sure Receiver is connected to a power source( charging mode can only be activated while charging).
Must hold Channel Switch more than 5 secs, if not, matching will fail. If you still fail after trying as above, contact us via [email protected] to confirm whether receiver and remote is of the different version, we will solve for you. - Training mode fails to sync up even in a very short distance
Make sure there is no strong signal interference in your surroundings. Remote’s range could
Do not use the product in the circumstances as follow:
- Do not operate the devices under temperature of 104°F and above, doing so in such high temperature will decrease the performance of the batteries.
- Do not use the Remote during snowing, this could lead to water sipping in causing damage to the controller.
- Do not use the set in places with strong electromagnetic interference. This will greatly compromise the performance of the product.
- Avoid dropping the devices on hard surface inflict excessive force on them.
- Avoid using the devices in environment flooded with corrosive chemical, this may lead to color degrading, deforming, or cracking of exterior of the devices.
- When not in use, please wipe clean both the Remote and Receiver with mild detergent. Turn off the Remote, lock the keypad, put on port, the rubber lid on the Receiver’s charging and store the set in a cool dry place.
- During cleaning, wipe with soft cloth and mild detergent. Do not use hard brushes which may scratch the surface of the device.
- If the Receiver has gotten dirty, secure the charging port rubber lid secured
- This product is a professional dog training device and should not be used for other purposes. Please do not violate local laws in using this product.