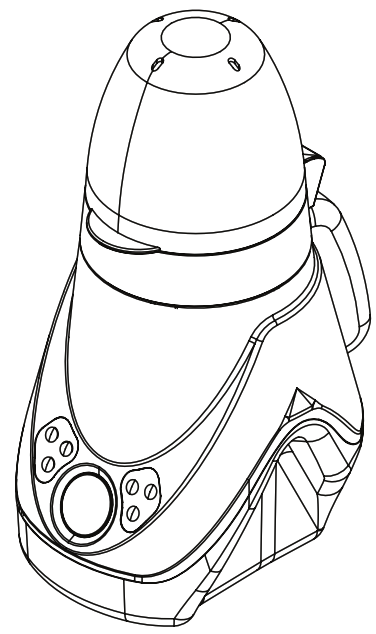
![]() DRBRWN023 Deluxe Bottle Warmer with Sterilizer
DRBRWN023 Deluxe Bottle Warmer with Sterilizer
Deluxe Bottle Warmer
with Sterilizer
User Manual
 Use distilled water only.
READ AND SAVE THESE INSTRUCTIONS
Package Contents:
Deluxe Bottle Warmer with Sterilizer
Quick Reference Guide
2x Storage Caps
Specifications:
Nominal voltage: 120 VAC/60Hz
WARNING: Read the ENTIRE instruction manual to become familiar with the features of the product before operating. Failure to operate the product correctly can result in damage to the product, and personal property and cause serious injury. Failure to operate this Product in a safe and responsible manner could result in injury or damage to the product or other property. This product is not intended for use by children. Do not attempt disassembly or use incompatible components. This manual contains instructions for safety, operation, and maintenance. It is essential to read and follow all the instructions and warnings in the manual, prior to setup or use, in order to operate correctly and avoid damage or serious injury.
IMPORTANT SAFETY INSTRUCTIONS
READ AND SAVE THESE IMPORTANT SAFETY INSTRUCTIONS BEFORE USING THIS APPLIANCE WHEN USING ELECTRICAL APPLIANCES, PRECAUTIONS SHOULD ALWAYS BE FOLLOWED TO REDUCE THE RISK OF FIRE, ELECTRICAL SHOCK, AND INJURY TO PERSONS, INCLUDING THE FOLLOWING:
- Read all instructions.
- Do not touch hot surfaces. Use a lifting handle to remove basket contents.
- To protect against electrical shock, do not immerse the appliance in water or other liquid.
- Close supervision is necessary when any appliance is used near children.
- Unplug from outlet when not in use and before cleaning. Allow cooling before putting on or taking off parts.
- Do not operate any appliance with a damaged cord or plug or after the appliance malfunctions or has been damaged in any manner. Call Handi-Craft’s Customer Service at 1-800-778-9001.
- Misuse of the product may cause potential injury.
- The heating element surface is subject to residual heat after use.
- The use of accessory attachments not recommended by Handi-Craft Company may cause injuries.
- Do not use outdoors. Household and indoor use only.
- Do not let the cord hang over the edge of the table or counter or touch hot surfaces.
- Do not place on or near a hot gas or electric burner or in a heated oven.
- Extreme caution must be used when moving an appliance containing hot liquids.
- To operate, plug the cord into a wall outlet. To disconnect, turn any control to “off”, then remove the plug from the wall outlet.
- Do not use appliances other than for intended use.
- Never immerse the warmer or power cord in water.
- When in use, the warmer contains hot water. Be careful to avoid spilling or splashing any water on yourself when removing contents from the warmer.
- Before serving, be sure the food is at a safe temperature.
- Warming food for long periods is not recommended.
- Before feeding, pour a few drops of the liquid content from the baby bottle onto the back of your hand to test the temperature.
CAUTION: Always check the content temperature of the bottle or the small jar before feeding your baby. - This appliance has a polarized plug (one blade is wider than the other). To reduce the risk of electric shock, this plug is intended to fit into a polarized outlet only one way. If the plug does not fit fully into the outlet, reverse the plug. If it still does not fit, contact a qualified electrician. Do not attempt to modify the plug in any way.
- Before servicing, unplug the cord from the wall outlet. Do not leave the cord within the child’s reach.
- Always UNPLUG the warmer before removing and installing the reservoir. Do not add water directly to the chamber, only add water to the reservoir. Do not remove the reservoir while working.
- The preheating of the appliance is not necessary.
- A short power-supply cord is provided to reduce the risk resulting from becoming entangled in or tripping over a longer cord. CAUTION: Do not use an extension cord.
- Use Distilled Water Only. Using tap water may shorten the life of the unit.
Parts of the Deluxe Bottle Warmer with Sterilizer:
- Deluxe Warmer
- Controls
- Warming Chamber
- Lid
- Basket
- Basket Riser
- Reservoir
- Storage Caps

Always UNPLUG the warmer before filling.
- Remove the water reservoir from the rear of the warmer.
- Add DISTILLED water to the reservoir. Note: The minerals in tap or spring water will shorten the life of this appliance and may result in voiding the warranty.
- Replace the reservoir. Plug in the power cord.
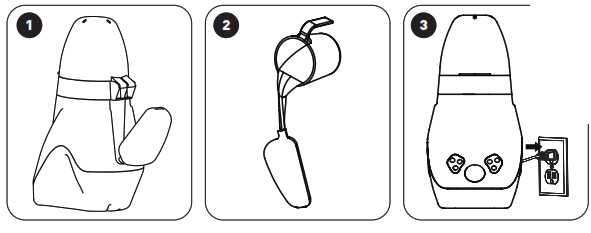 USE DISTILLED WATER ONLY!
Tap water and bottled water contain minerals that shorten the life of this appliance. Damage from the use of non-distilled water will void the warranty.
USING YOUR WARMER
CAUTION: Always check the content temperature before feeding your baby. - Place vessel in the warmer basket. Close Lid. To prevent leakage when warming Dr. Brown’s bottles, do not include an insert and reservoir. Instead, use the appropriate storage cap.
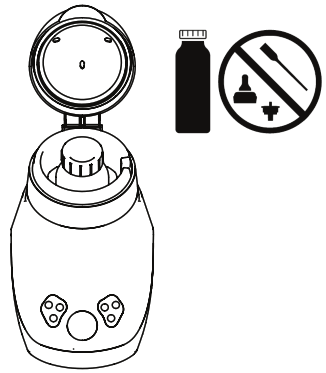 REMOVE VENT PARTS!
Leakage of milk will result when warming bottles with Dr. Brown’s vent components left in the bottle. It’s best to use storage caps when warming bottles.
SETTING WARMING TIME - With the power connected, press any of the 6 function keys to turn the unit on.
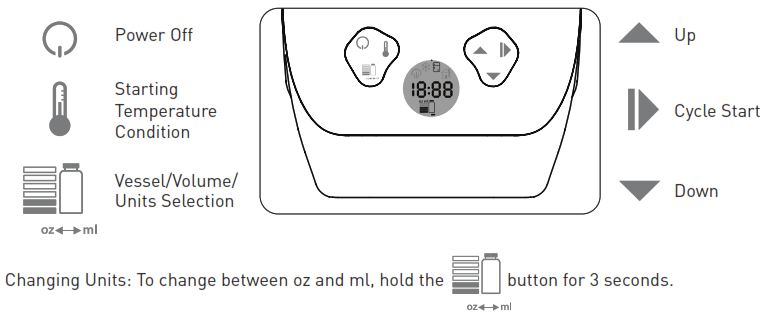 SETTING WARMING TIME (continued)
This chart corresponds to the times pre-programmed into the warmer.Dr. Brown’s bottle Volume  (22°c/27°f)
 (4°c/39°f)
 (-17°c/0°f)
2oz / 60mL 
2:00 3:00 8:45 4oz / 120ml 
2:30 3:45 10:15 4oz / 120mL 
1:45 3:30 X 8oz / 250mL 
2:45 4:30 13:30 8oz / 250mL 
2:30 4:00 X 5oz / 120mL 
2:45 4:00 12:15 9oz / 150mL 
2:15 3:45 X 9oz / 270m 
3:30 5:00 15:00 9oz / 270m 
2.45 4.15 X 11oz / 325mL 3:45 6:00 17:00 WARNING: THIS TIME CHART IS APPROXIMATE FOR DR. BROWN’S VESSEL SIZES. WARMING TIMES WILL VARY DEPENDING ON THE VESSEL MATERIAL, SHAPE, AND VOLUME. TEMPERED GLASS HAS BEEN TESTED FOR USE IN THE DR. BROWN’S BREAST MILK AND BOTTLE WARMER. WE DO RECOMMEND GRADUAL WARMING TO PREVENT BREAKAGE. ALWAYS TEST TEMPERATURE BEFORE FEEDING! DO NOT FREEZE GLASS BOTTLES!
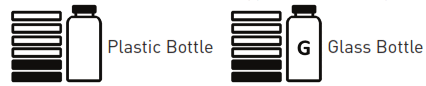
- Select the start temperature condition of the vessel. Each button press toggles the 3 options.
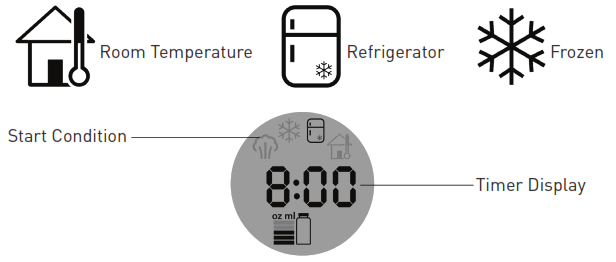 Manual Time Adjustment: While in the temperature condition mode, use the UP and DOWN buttons to change the timer setting. NOTE: The last used warming time is remembered for your next use.
 - Select the vessel material type. Each button press toggles options.
 NOTE: Warming times may vary from the time chart when using a silicone sleeve (not included). Always test the temperature of the contents before feeding!
 - Select the volume amount in the vessel. Use the UP or DOWN Arrow button to adjust between 2oz (60ml) and 11oz (325ml).

- Press the “Cycle Start” button. The timer will count down until warming is complete.
- The warming cycle is complete when the unit beeps. There is a one-minute cooldown period between when the timer hits 0:00 and when the unit beeps. This allows for the bottle to cool slightly before removal. Take care when opening the lid as there may be some residual steam. Allow the steam to clear before reaching into the unit. Use the lifting handle to retrieve smaller bottles. WARNING: Always test temperature before feeding!
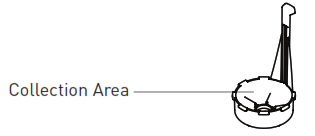
- Carefully empty liquid from the collection area of the basket riser. Use caution: Contents will be hot!
 USING STERILIZER FEATURE
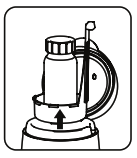
 - Place small parts or bottles to be sterilized in the warmer basket. When sterilizing Dr. Brown’s wide neck bottles, place the reservoir tube inside the upside-down bottle. tack the remaining bottle parts on top of the bottle. Close the lid.
- With the power connected, press any of the 5 function keys to turn the unit on.
- Press the temperature button to toggle to the sterilizer function. The unit will default to 6:00.
- Press the “Cycle Start” button. The timer will count down until sterilizing is finished.

- The sterilization cycle is finished when the unit beeps. There is a one-minute cooldown period between when the timer hits 0:00 and when the unit beeps. This allows or the parts to cool slightly before removal. Take care when opening the lid as there may be some residual steam. Allow the steam to clear before reaching into the unit. Use the lifting handle to retrieve small parts.
- The sterilize feature can be used for any bottle or small part safe for steam sterilization.
TROUBLESHOOTING
If the warmer is not operating, check that:
- The power cable is connected to the power outlet.
- The water is filled to the proper level.
- The unit is correctly assembled.
CLEANING THE WARMER
Daily
- Allow the unit to cool before cleaning.
- Empty the water from the warmer.
- Rinse the reservoir, warming chamber, and components with clean water. If storing unit for longer than a day, dry or allow to air dry before re-assembly. DO NOT SUBMERGE THE BASE IN WATER.
Special Cleaning
If the unit warming chamber and water reservoir bottle become contaminated with milk: Hand wash with clean water and mild detergent.
If buildup occurs on the heating element surface, follow this descale procedure:
- Measure 45 ml (2oz) of pure vinegar and pour it directly into the lower reservoir of the warmer base covering the heating element.
- Let the vinegar sit inside the warming base for 4 hours or overnight.
- Rinse the warmer base with clean water.
For Faster Descaling (Move to a well-ventilated area.)
- Remove the Water Reservoir Bottle and clean with mild detergent and rinse with clean water.
- Mix 90 ml (3 oz) of pure vinegar with 30 ml (1 oz) of distilled water.
- Add water/vinegar mixture to empty and clean Water Reservoir Bottle.
- Run a 6-minute Sterilization Cycle…
- Allow cooling. Rinse warmer, components, and reservoir with clean water.
DO NOT SUBMERGE THE BASE IN WATER.
Using tap water WILL shorten the life of the unit. Use Distilled Water only.
WARRANTY
This warming appliance is warranted against defective material or workmanship for a period of one year from the date of purchase. Any defective part will be repaired or placed at no charge if it has not been tampered with and the appliance has been used according to these printed instructions. This warranty gives you specific legal rights as well as other rights which vary from state to state.
To keep your Deluxe Bottle Warmer in good condition and retain your warranty, USE ONLY DISTILLED WATER.
CUSTOMER SERVICE
If you experience unsatisfactory operation or have any questions/comments, call Handi-Craft’s Customer Service at 1-800-778-9001, send an email to [email protected], or write to Handi-Craft Company, Customer Service, 4433 Fyler Avenue, St. Louis, Missouri 63116 USA. Our Customer Service Representative will advise
you how to correct the problem yourself or will ask you to return the product for repair or replacement.
FCC COMPLIANCE STATEMENT
This device complies with Part 15 of the FCC Rules. Operation is subject to the following two conditions: (1) this device may not cause harmful interference, and (2) this device must accept any interference received, including interference that may cause undesired operation.
Importer: Handi-Craft Company Address: 4433 Fyler Ave., St. Louis, MO 63116 Phone: 800-778-9001
NOTE: This equipment has been tested and found to comply with the limits for a Class B digital device, pursuant to Part 15 of the FCC Rules. These limits are designed to provide reasonable protection against harmful interference in a residential installation. This equipment generates, uses, and can radiate radio frequency energy and, if not installed and used in accordance with the instructions, may cause harmful interference to radio communications. However, there is no guarantee that interference will not occur in a particular installation.
If this equipment does cause harmful interference to radio or television reception, which can be determined by turning the equipment off and on, the user is encouraged to try to correct the interference by one or more of the following measures:
- Reorient or relocate the receiving antenna.
- Increase the separation between the equipment and receiver.
- Connect the equipment into an outlet on a circuit different from that to which the receiver is connected.
- Consult the dealer or an experienced radio/TV technician for help.
Warning: Changes or modifications to this unit not expressly approved by the party responsible for compliance could void the user’s
authority to operate the equipment.
 WSW002_F2
![]() INSTRUCTIONS
INSTRUCTIONS
FOR USE
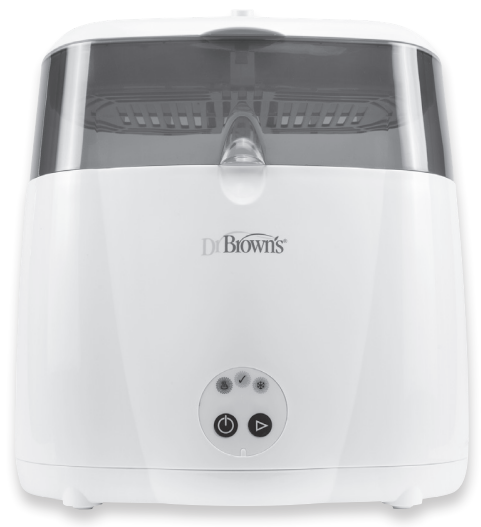 Deluxe Bottle Sterilizer
Model Number AC045
INSTRUCTIONS FOR USE
| Package Contents: Deluxe Bottle Sterilizer Measuring Cup Tongs Instruction Manual |
Specifications: Nominal voltage: 120 VAC/60 Hz 650W |
 WARNING: Read the ENTIRE instruction manual before use to ensure proper safety precautions, operation, and maintenance of this product. Failure to operate in a safe and responsible manner could result in damage to the product or personal property and cause serious injury. This appliance shall not be used by children. Close supervision is necessary when any appliance is used near children. Do not attempt disassembly. The use of accessory attachments is not recommended by Handi-Craft Company and may cause injuries. A copy of these instructions is also available online at drbrownsbaby.com/customer-support
WHEN USING ELECTRICAL APPLIANCES, PRECAUTIONS SHOULD ALWAYS BE FOLLOWED TO REDUCE THE RISK OF FIRE, ELECTRICAL SHOCK, AND INJURY TO PERSONS, INCLUDING THE FOLLOWING:
- Ensure that the wall outlet voltage matches the voltage of the appliance.
- Do not operate an appliance after it malfunctions or has been damaged in any manner. Return appliance to the nearest authorized service facility for examination, repair, or adjustment.
- If the supply cord or plug is damaged, it must be replaced by the manufacturer, its service agent, or a similarly qualified person in order to avoid hazards.
- Place the appliance on a level, heat-resistant surface.
- Do not place on or near a hot gas or electric burner, or in a heated oven.
- Do not let the cord hang over the edge of a table or counter, or touch hot surfaces.
- DO NOT IMMERSE IN WATER.
- HOUSEHOLD USE ONLY.
- Do not use outdoors.
- Unplug from the outlet when not in use and before adding water.
- Do not spill liquid on the cord or plug.
- Do not move the appliance while in use or when it contains hot liquids.
- To operate, plug the cord into a wall outlet. To disconnect, press the power button, then remove the plug from the wall outlet.
- DO NOT open the lid or reach over the appliance while in use, as steam will cause burns and serious injuries.
- DO NOT touch hot surfaces, including top cover, main cover, and trays, during or immediately after use.
- After sterilizing, wait 10 minutes for parts to cool, then open the top cover carefully by the handle and beware of residual steam.
- DO NOT EXCEED the recommended amount of water.
- If it is necessary to drain water from the base, always POUR AWAY FROM YOU.
- Unplug from an outlet and allow to cool for 60 minutes before cleaning and descaling the unit.
- Be careful to avoid spilling or splashing water on yourself when removing contents.
- The heating element surface is subject to residual heat after use.
- Keep the appliance and its cord out of reach of children.
- Do not use appliances for other than intended use.
- Appliances are not intended to be operated by means of an external timer or separate remote-control system.
- NOT FOR SPACE HEATING PURPOSES.
- This appliance has a polarized plug (one blade is wider than the other). To reduce the risk of electric shock, this plug is intended to fit into a polarized outlet only one way. If the plug does not fit fully into the outlet, reverse the plug. If it still does not fit, contact a qualified electrician. Do not attempt to modify the plug in any way.
- A short power-supply cord is provided to reduce the risks resulting from becoming entangled in or tripping over a longer cord.
- Extension cords are available and may be used if care is exercised in their use.
- If an extension cord is used: the marked electrical rating of the extension cord should be at least as great as the electrical rating of the appliance; the longer cord should be arranged so that it will not drape over the countertop or tabletop where it can be tripped over, snagged or pulled on unintentionally (especially by children).
SAVE THESE INSTRUCTIONS
PARTS
A. Top cover
B. Main cover
C. Upper Tray
D. Heating Plate (inside)
E. ON/OFF Button
F. Cycle Start Button
G. Cycle Indicator Lights
H. Removable Tray
I. Tongs
J. Measuring Cup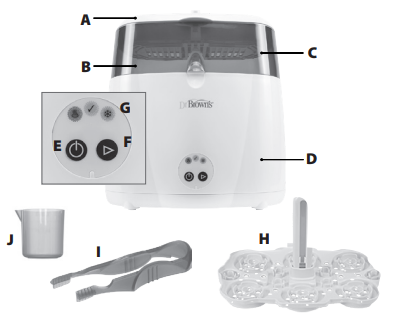
TO USE
- Before running this appliance, it is important that all bottles, bottle parts and/or other accessories are clean. They must be washed, rinsed and empty.
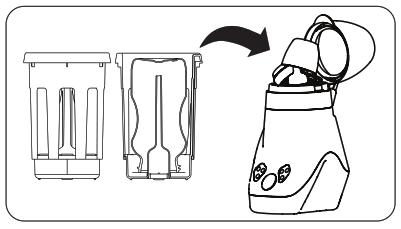
- Position the appliance on a flat surface and out of reach of children where it cannot be knocked or moved during operation. Remove the tray.
- Remove the measuring cup and tongs from the unit.
- Fill the measuring cup to the FILL LINE (3 oz/80 mL) with DISTILLED WATER and pour the water ONTO THE HEATING PLATE.
Note: For best performance, use recommended water and descale monthly. Water with minerals may shorten the life of this appliance.
CAUTION: DO NOT EXCEED the recommended amount of water. If it is necessary to drain water from the base, always POUR AWAY FROM YOU. - Place the removable tray (part H) in the sterilizer heating chamber. Arrange the bottles and other parts in the tray. Note: If using Dr. Brown’s bottles and parts, see Figure A through Figure G on the next page for suggested layout options. Both narrow and wide-neck bottles are shown.
- Close the main cover (part B) and arrange the parts on the upper tray (part C) as shown in Figure C and Figure G.
Note: This appliance can sterilize any item that can withstand boiling water, such as pacifiers/soothers, teethers, toys, and utensils. - Close top cover (part A).
- Plug the power cord into an electrical outlet and press the On Button (E).
Note: When the sterilizer is turned on, you will notice that cycle indicator lights (G) will illuminate with a cycle of RED-BLUE-GREEN colors. After this initial cycle through of colors, the green symbol will remain lit indicating the “READY” mode.
 Ready Cycle: With the green “ready” symbol illuminated, press the cycle start button (F).
 Heat Cycle: The red symbol will indicate that the appliance is “HEATING” to create steam. It will remain lit until all water is consumed and the sterilization cycle is complete. This is approximately 8 minutes but may vary by the amount of water you add, the number of items to be sterilized, and other environmental factors.
 Cool Down Cycle: Upon the completion of the sterilization cycle, the blue symbol will illuminate to indicate the “COOL DOWN” cycle. Note: If you to add water to the unit and start the heating cycle (red light on), the unit must complete the cool-down cycle (blue light on) before a new “heat” cycle can be attempted.
READY (unload) Cycle: When the cool-down cycle is complete, the green“READY” symbol will again light. You may unload your items or allow them to air dry.
WARNING: DO NOT open lid or reach over the appliance while in use, as steam will cause burns and serious injuries. DO NOT touch hot surfaces, including top cover, main cover and trays, during or immediately after use. - Open the main cover and remove all bottles and place on a countertop or other flat surface. Open the top cover and re-assemble the bottles with the various components. CAUTION: After sterilizing, wait 10 minutes for parts to cool, then open top cover carefully and beware of residual steam. Be careful to avoid spilling or splashing water on yourself when removing contents.
- You may now turn the unit off by pressing the on-off button (E) or begin another sterilization cycle after again adding 3 oz/80 mL of water.
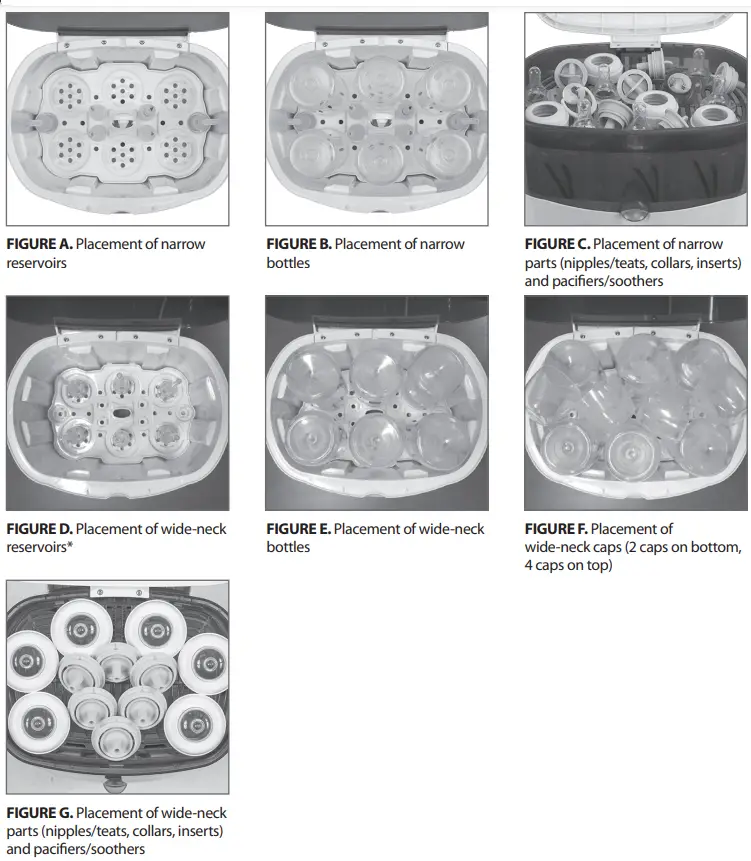
* When sterilizing six (6) 9 oz/270 ml Wide-Neck Options TM bottles, remove the detachable handle from the inner tray to make room for all six bottles, reservoirs, and caps in the main compartment. The green reservoirs should be placed inside the bottles during sterilization. Ensure that all parts are completely cool before removing them from the unit.
TO CLEAN THE APPLIANCE
CAUTION: Unplug from the outlet and allow to cool for 60 minutes before cleaning and descaling the unit. DO NOT IMMERSE IN WATER.
The Dr. Brown’s Natural Flow®
Deluxe Bottle Sterilizer should be cleaned at least once a week when in regular use.
- The removable tray, tongs, and measuring cup can be cleaned in hot soapy water and rinsed completely.
- The base exterior and heating chamber and two covers can be cleaned with a damp sponge or damp cloth.
TO CLEAN THE HEATING PLATE
Mineral deposits may form on the metal heating plate in the bottom of the heating chamber. It is important to descale this appliance every 4 weeks to ensure that it continues to work properly.
- Unplug the device.
- Remove the tray.
- De-scale utilizing a 3.5 oz/100 mL mixture of vinegar/water:
- Fill the measuring cup to FILL LINE (3 oz/80 mL) with white vinegar.
- Then add cold water up to the dashed line (.5 oz/20 mL) for a total of 3.5 oz/100 mL.
- Pour directly over the heating element.
- Turn the unit on and run a sterilization cycle.
- Empty any remaining solution and rinse with clean water.
NOTE: DO NOT USE BLEACH, HARSH ABRASIVES, OR SOLVENTS TO CLEAN THE HEATING CHAMBER OR HEATING ELEMENTS AS THEY MAY CAUSE PERMANENT DAMAGE AND WILL VOID THE WARRANTY.
WARRANTY
This appliance is warranted against defective material or workmanship for a period of one year from the date of purchase. Any defective part will be repaired or replaced at no charge if it has not been tampered with and the appliance has been used according to these printed instructions. This warranty gives you specific legal rights as well as other rights which vary from state to state. This warranty does not cover a defect that has been caused by negligence, accidents or improper use of the appliance. To keep your appliance in good condition and retain your warranty, USE ONLY AS DIRECTED.
CUSTOMER SERVICE
If you experience unsatisfactory operation or have any questions/comments, call Handi-Craft’s Customer Service at 1-800-778-9001 or send an email to [email protected].
For purchases made outside the United States and Canada, please contact your local distributor.
FCC Compliance Statement
This device complies with Part 15 of the FCC Rules. Operation is subject to the following two conditions: (1) this device may not cause harmful interference, and (2) this device must accept any interference received, including interference that may cause undesired operation.
Importer: Handi-Craft Company
Address: 4433 Fyler Ave., St. Louis, MO 63116
Phone: 800-778-9001
NOTE: This equipment has been tested and found to comply with the limits for a Class B digital device, pursuant to Part 15 of the FCC Rules. These limits are designed to provide reasonable protection against harmful interference in a residential installation. This equipment generates, uses and can radiate radio frequency energy and, if not installed and used in accordance with the instructions, may cause harmful interference to radio communications. However, there is no guarantee that interference will not occur in a particular installation. If this equipment does cause harmful interference to radio or television reception, which can be determined by turning the equipment off and on, the user is encouraged to try to correct the interference by one or more of the following measures:
- Reorient or relocate the receiving antenna.
- Increase the separation between the equipment and receiver.
- Connect the equipment into an outlet on a circuit different from that to which the receiver is connected.
- Consult the dealer or an experienced radio/TV technician for help.
WARNING! Changes or modifications to this unit not expressly approved by the party responsible for compliance could void the user’s authority to operate the equipment.
![]() HANDI-CRAFT COMPANY
HANDI-CRAFT COMPANY
ST. LOUIS, MISSOURI 63116 USA/EE.UU.
drbrownsbaby.com (800) 778-9001