
![]()
Eaton’s Wiring Devices
Wi-Fi Smart Switch Configuration Parameters
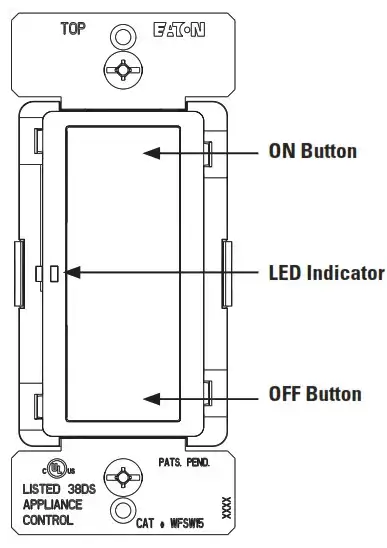
WI-FI SMART SWITCH WFSW15
OPERATION INSTRUCTIONS
- Press the ON button to turn the load ON
- Press the OFF button to turn the load OFF
Quick reference table for Smart Switch Functionality
| Function | Device state | Button | Number of seconds to press |
Default |
| Delayed OFF time | ON | OFF | 2 | 10 seconds |
| Power Up State | ON/OFF | OFF | 5 | OFF |
| LED Indicator brightness | OFF | OFF | 15 | Level 0 |
| LED Indicator brightness | ON | ON | 15 | Level 3 |
| Factory Reset | ON/OFF | ON | 30 | – |
DELAYED OFF
When the load is ON, press and hold the OFF button for 2 seconds until the LED indicator starts flashing for the first time. After 10 seconds, the load will turn OFF.
POWER UPSTATE
This feature allows the user to change the Power Up State of the Smart Switch when the power is restored after an outage.
- Press and hold the OFF button until the LED flashes for the second time (5 secs)
- Release the button
- Single tap the OFF button to cycle between the Power-Up States: OFF state (LED single blink), ON state (LED double blinks) and the
LAST State (LED triple blinks) - Once the level is chosen, press and hold either the OFF or the ON button until the LED indicator starts blinking to save the value
LED INDICATOR BRIGHTNESS
This feature allows the user to change the brightness of the LED indicator.
There are 5 levels (OFF to Full brightness) to change the LED indicator brightness level either while the device is ON or OFF.
Changing the LED indicator brightness for the ON state
- Turn the load ON
- Press and hold the ON button until the LED flashes for the first time (15 secs)
- Release the button
- Single tap the ON or the OFF button to change the LED indicator level (it will cycle between the five levels)
- Once the brightness level is chosen, press and hold either the ON or the OFF button until the LED indicator starts blinking to save the value
Changing the LED indicator brightness for the OFF state
- Turn the load OFF
- Press and hold the OFF button until the LED flashes for the third time (15 secs)
- Release the button
- Single tap the OFF button or the ON button to change the LED indicator level (it will cycle between the five levels)
- Once the brightness level is chosen, press and hold either the OFF or the ON button until the LED indicator starts blinking to save the value
FACTORY RESET
The device can be reset which will exclude the device from its network and restore all factory defaults.
- Press and hold the ON button until the LED flashes for the second time (30 secs)
- Release the button
- The LED will start blinking again indicating the switch is not part of the Wi-Fi network
Eaton’s Wiring Devices
Wi-Fi Smart Duplex Receptacle Configuration Parameters
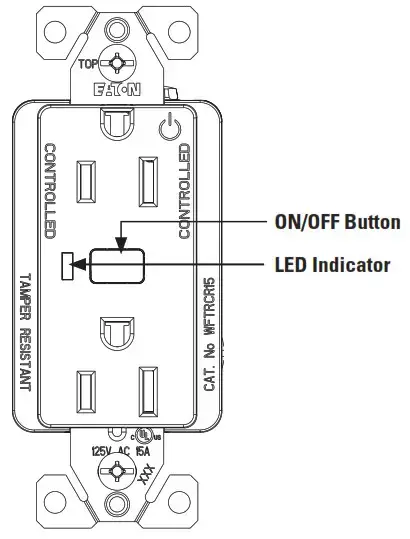
WI-FI SMART DUPLEX RECEPTACLE WFTRCR15
OPERATION INSTRUCTIONS
- Press the ON/OFF button to turn the load ON
- Press the ON/OFF button again to turn the load OFF
Quick reference table for Smart Duplex Receptacle Functionality
| Function | Device state | Button | Number of seconds to press |
Default |
| Delayed OFF time | ON | ON/OFF | 2 | 10 seconds |
| Power Up State | ON/OFF | ON/OFF | 5 | OFF |
| LED Indicator brightness | OFF | ON/OFF | 15 | Level 0 |
| LED Indicator brightness | ON | ON/OFF | 15 | Level 3 |
| Factory Reset | ON/OFF | ON/OFF | 30 |
DELAYED OFF
When the load is ON, press and hold the ON/OFF button for 2 seconds until the LED indicator starts flashing for the first time. After 10 seconds, the load will turn OFF.
POWER UPSTATE
This feature allows the user to change the Power Up State of the Smart Receptacle when the power is restored after an outage.
- Press and hold the ON/OFF button until the LED flashes for the second time (5 secs)
- Release the button
- Single tap the ON/OFF button to cycle between the Power-Up States: OFF state (LED single blink), ON state (LED double blinks), and the LAST state (LED triple blinks)
- Once the level is chosen, press and hold the ON/OFF button until the LED indicator starts blinking and the value will be saved
LED INDICATOR BRIGHTNESS
This feature allows the user to change the brightness of the LED indicator.
There are 5 levels (OFF to Full brightness) to change the LED indicator brightness level either while the device is ON or OFF Changing the LED indicator brightness for the ON state
- Turn the load ON by pressing the ON/OFF button
- Press and hold the ON/OFF button until the LED flashes for the third time (15 secs)
- Release the ON/OFF button
- Single tap the ON/OFF button to change the LED indicator level (it will cycle between the five levels)
- Once the brightness level is chosen, press and hold the ON/OFF button until the LED indicator starts blinking and the value will be saved
Changing the LED indicator brightness for the OFF state
- Turn the load OFF by pressing the ON/OFF button
- Press and hold the ON/OFF button until the LED flashes for the third time (15 secs)
- Release the button
- Single tap the ON/OFF button to change the LED indicator level (it will cycle between the five levels)
- Once the brightness level is chosen, press and hold the ON/OFF button until the LED indicator starts blinking to save the value
FACTORY RESET
The device can be reset which will exclude the device from its network and restore all factory defaults
- Press and hold the ON/OFF button until the LED flashes for the fourth time (30 secs)
- Release the button
- The LED will start blinking again indicating the receptacle is not part of the Wi-Fi network
Eaton’s Wiring Devices
Wi-Fi Smart Universal Dimmer Configuration Parameters
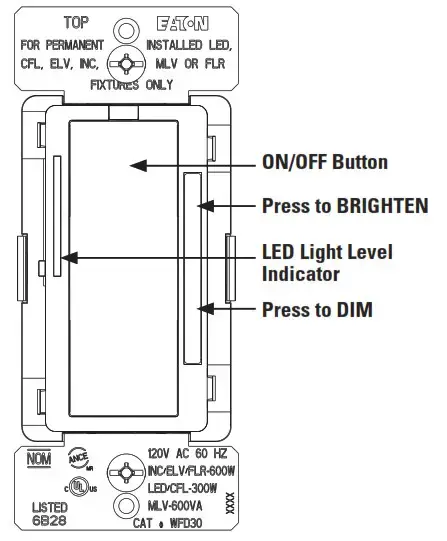
WI-FI SMART UNIVERSAL DIMMER WFD30
OPERATION INSTRUCTIONS
- Press the ON button to turn the lights ON at the previously selected level
- Press the OFF button to turn the lights OFF
- The bottom LED indicates that the dimmer is turned ON (Default)
- Press and hold the ON button for 2 seconds for full brightness
Quick reference table for Smart Universal Dimmer Functionality
| Function | Device state | Button | Number of seconds to press | Default |
| Delayed OFF Time | ON | OFF | 2 | 10 seconds |
| Power Up State | ON | OFF | 5 | OFF |
| Ramp Time Rate | ON | OFF | 10 | 3 seconds |
| LED Indicator Brightness | OFF | OFF | 15 | Level 1 |
| Full Brightness | ON/OFF | ON | 2 | 100% |
| Dimming Level Adjustment | ON | ON | 5 | |
| Rapid Start Feature | ON | ON | 10 | Disabled |
| LED Indicator Brightness | ON | ON | 15 | Level 3 |
| Factory Reset | ON/OFF | ON | 30 |
DELAYED OFF
When lights are ON, press and hold the OFF button for 2 seconds until the LED indicator blinks. After a 10 second delay, the lights will fade OFF.
DIMMING LEVEL ADJUSTMENT
For maximum compatibility with different load types, WFD30 allows the user to set the minimum level. Also, to save on power consumption WFD30 allows the user to set the maximum level.
- After restoring power and adding the device to the Wi-Fi network, press the ON button to turn on the light
- Press and hold the ON button for five seconds until the dimmer LED indicators to begin to cycle rapidly
- Release the ON button. Dimmer will set the light to the previously saved minimum level. During initial setup, the light will be set to the factory minimum default
- Press either the dim or brighten buttons to change the minimum level until the light output is acceptable
- Press and release the ON button once. The dimmer LEDs will start to cycle rapidly again and the dimmer light will go to the previously saved maximum level
- Press either the dim or brighten buttons to change the maximum level until the light output is acceptable
- Press and release the ON button, the LED indicator starts blinking and the value will be saved
NOTE – To restore the default min/max, repeat the steps above and adjust light levels to full min/max settings by pressing dim/brighten buttons until the light output no longer changes.
NOTE – The user can ignore setting max or min by pressing the ON/OFF button without changing the dimming level.
RAPID START FEATURE (DISABLED BY DEFAULT)
This feature ensures that LED/CFL lights turn on when the dimmer preset level is low. With this setting enabled, the lights will momentarily be brighter than the preset level (less than one second) and then dim down to the preset level. Depending on the type of light used, this feature may not be needed.
- After restoring power and adding the device to the Wi-Fi network, press the ON button to turn on the light
- Press and hold the ON button for 10 seconds until the dimmer LED indicators to begin to blink for the second time
- Release the ON button. LED indicators will start flashing fast to indicate the state has changed
NOTE – To disable/enable the RAPID START FEATURE, repeat the steps above again.
LED INDICATOR BRIGHTNESS
This feature allows the user to change the brightness of the LED indicator.
There are 5 levels (OFF to Full brightness) to change the LED indicator brightness level either while the dimmer is ON or OFF state
Changing the LED indicator brightness for the ON state
- Turn the light ON
- Press and hold the ON button for 15 seconds until the LED indicator flashes for the third time
- Release the button
- Use the ON or OFF buttons to change the LED indicator level (it will cycle between the five levels)
- Once the level is chosen, press and hold the ON button until the LED indicator starts blinking to save the value Changing the LED indicator brightness for the OFF state
- Turn the light ON
- Press and hold the OFF button for 15 seconds until the LED indicator flashes for the fourth time
- Release the button
- Use the ON or OFF buttons to change the LED indicator level (it will cycle between the five levels)
- Once the level is chosen, press and hold the OFF button until the LED indicator starts blinking to save the value
POWER UPSTATE (OFF STATE BY DEFAULT)
This feature allows the user to change the Power Up State of the Smart Dimmer when the power is restored after an outage.
- Turn the light OFF
- Press and hold the OFF button for five seconds until the LED indicator flashes for the second time
- Release the button
- LED will blink either at the highest level, indicating the Power Up State is ON, or in the middle level, indicating the Power Up State is the LAST state or the lowest level indicating the Power Up State is OFF
- Use the On or OFF button to cycle between the three states
- Once the level is chosen, press and hold the OFF button until the LED indicator starts blinking to save the value
RAMP TIME RATE (3 SECONDS BY DEFAULT)
This feature is to enable/disable a 3 second ramp time when turning the device ON/OFF. When enabled (default), the dimmer will ramp the load brightness up or down over a 3 second period when turned ON or OFF respectively. When disabled, the dimmer will instantly turn ON/OFF.
- Turn the light ON
- Press and hold the OFF button for 10 seconds until the LED indicator blinks for the third time
- Release the button
- LED indicators will start flashing fast to indicate the state has changed
NOTE – To change the RAMP TIME RATE, repeat the steps above
FACTORY RESET
The device can be reset which will exclude the device from its network and restore all factory defaults.
- Turn ON the dimmer
- Press and hold the ON button for 30 seconds until the LED indicator blinks for the fourth time
- Release the button
- LED indicator will start flashing fast while it is being reset
- The LED indicator will then start blinking at a normal rate indicating the dimmer is not part of a Wi-Fi network
![]()
| Eaton 1000 Eaton Boulevard Cleveland, OH 44122 United States Eaton.com |
Electrical Sector 203 Cooper Circle Peachtree City, GA 30269 United States Eaton.com Eaton.com/connectedhome |
© 2020 Eaton
All Rights Reserved
Printed in USA
Publication No. PA610008EN
May 2020
Eaton is a registered trademark.
All other trademarks are property of their respective owners.
