![]()
Digital Body Weight Scale
Model No.: EB4887S
Questions or Concerns? [email protected]
Thank You.
Thank you for purchasing the EB4887S Digital Body Weight Scale by Etekcity. We are dedicated to providing our customers with quality products for building a better living. Should you have any questions or concerns about using your new product, feel free to reach out to our helpful customer support team at (855) 686-3835 or by email at [email protected]. We hope you enjoy your new product!
Package Contents
1 x Digital Body Weight Scale
3 x 1.5V AAA batteries
1 x User Manual
1 x Measuring Tape
Safety Information
IMPORTANT: Please read and comply with all of the instructions and warnings provided in this manual before using the product. Failure to comply with the instructions and warnings provided herein may result in inaccurate results and/or damage to the product itself.
- The glass platform is slippery when wet. Make sure the platform is dry before stepping on for measurement.
- Consult your primary care doctor or physician before making changes to your diet, exercise plans, and/or physical activities.
- This scale is not intended for commercial use.
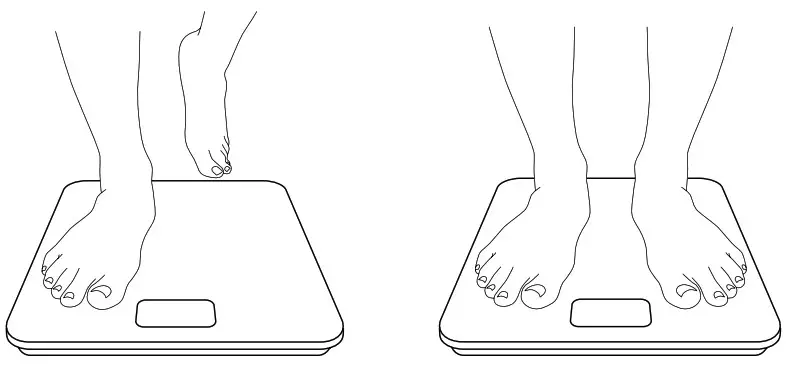
- To weigh safely and accurately, please standstill on the center of the platform until a result is calculated.
- DO NOT strike or drop the scale.
- DO NOT stand on the edge of the scale or jump on it.
- DO NOT stand on the scale platform for a prolonged period of time or when not in weighing operation.
- Always place the scale on a hard, dry, and flat surface before measurement.
- Handle the scale with care, as it is a precision instrument.
- Clean the scale with a damp cloth and avoid getting water or any other liquid inside the scale.
- DO NOT use chemical or abrasive cleaning agents to clean the scale.
- Keep the scale in a cool environment with dry air.
- Always keep the scale in a horizontal position; do not store vertically.
- If the scale fails to turn on, check whether the batteries are installed correctly. Replace the batteries if necessary.
- If an error appears on the display or if the scale does not turn off automatically, remove the batteries for 3 seconds, then reinstall them.
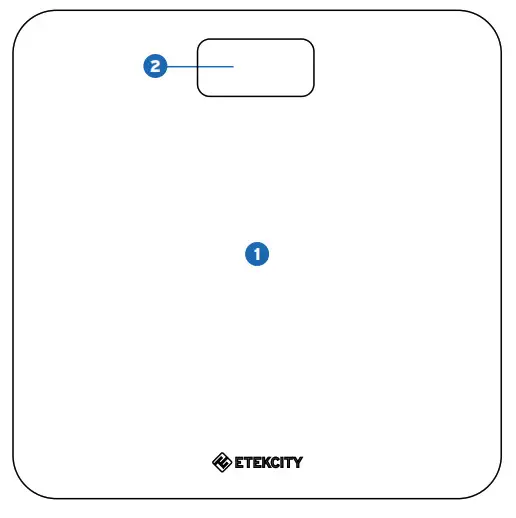
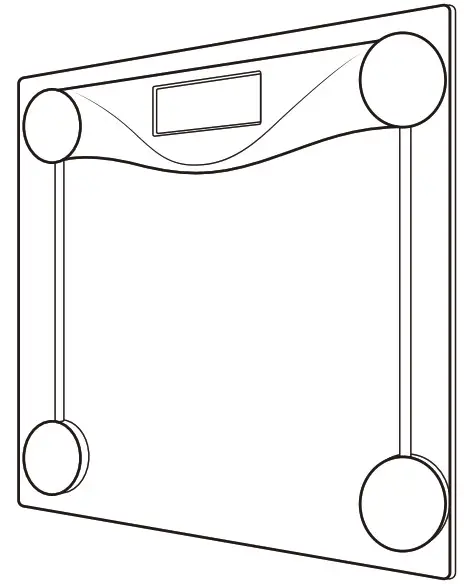
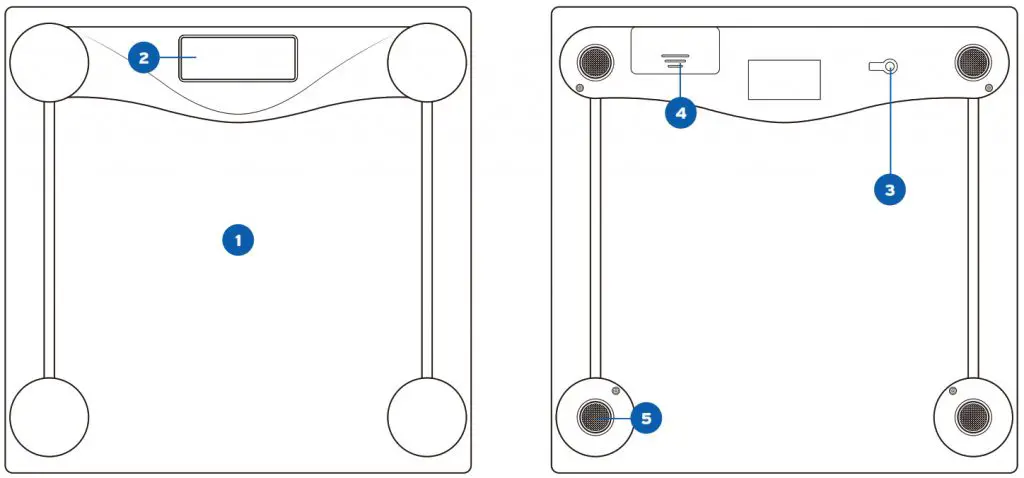
Main Functions
- Weighing Platform
- LCD Display
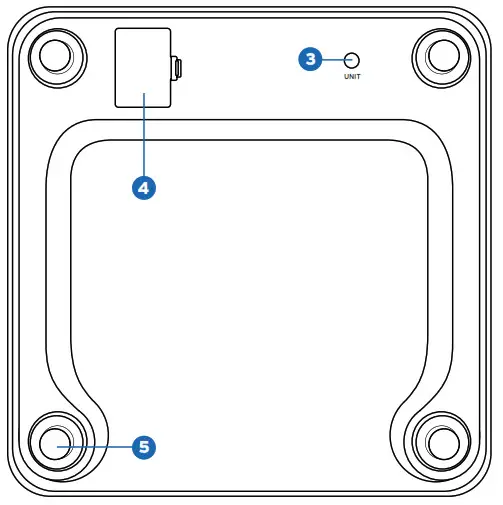
- Unit Selection
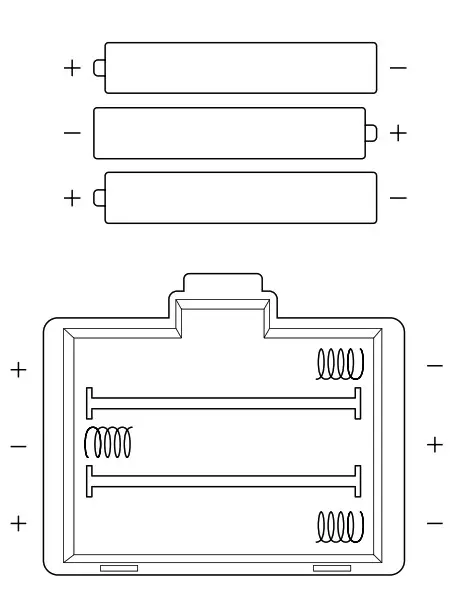
- Battery Compartment
- Anti-skid Padding
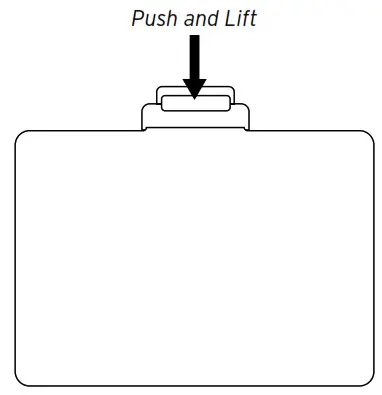
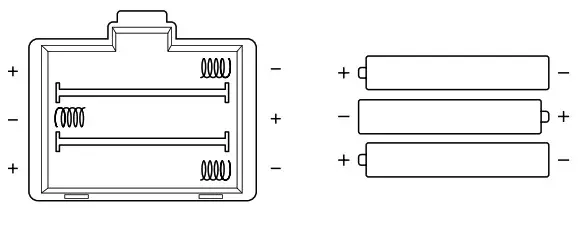
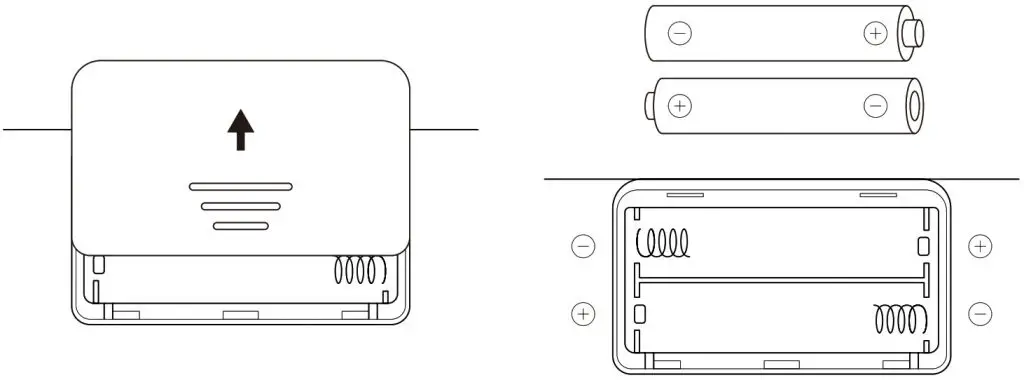
Set-Up
Open the battery compartment cover located on the back of the scale. Remove the three 1.5V AAA batteries from their plastic film and apply the batteries under the correct polarity. Re-seal the battery compartment in order to activate the scale.
Operation
Weight Measurement
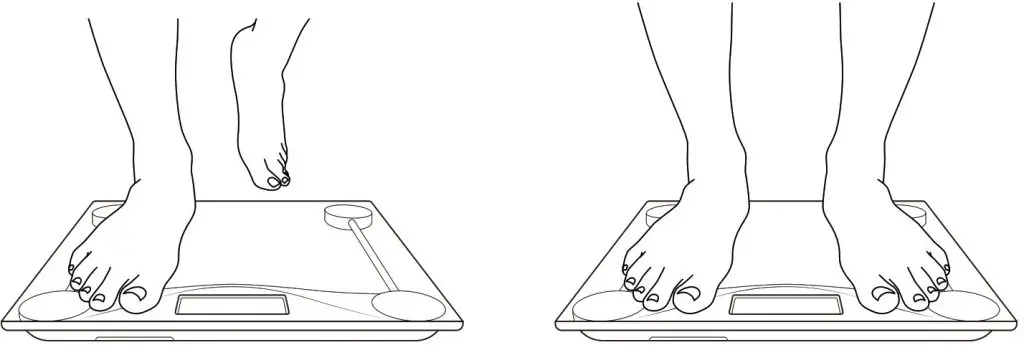
- For best results, place the scale on a hard, flat surface. Avoid carpet or soft surfaces.
- Gently step on the scale. The scale will automatically activate.
- Remain standing evenly on the scale, without moving or shifting your feet or body. The scale will then display and flash your final results.
Converting Weight Units
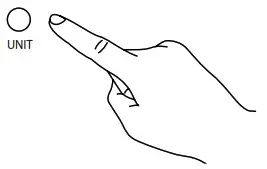
Your new digital body weight scale can convert weight measurements with just the press of a button.
- Apply pressure onto the weighing platform to activate the scale.
- Press the unit conversion button on the back of the scale to convert units from pounds (lb) to kilograms (kg).
- Place the scale back onto a hard, flat surface when you are ready to measure.
NOTE: For accuracy, the digital scale may trigger automatic calibration when physically lifted and moved or when the unit of measurement is changed. Should a ‘C’ appear on the digital display at any time, recalibrate the scale as noted in the Recalibrating the Scale section.
Body Measuring Tape
Your new bodyweight scale comes with a body measuring tape so that you can measure your waist, arms, and legs to help track your fitness progress.
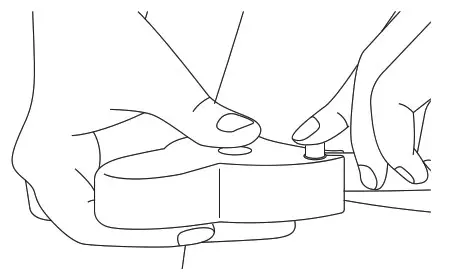
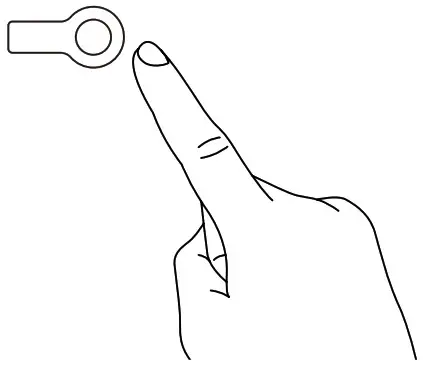
- Pull the peg to extend the measuring tape to the
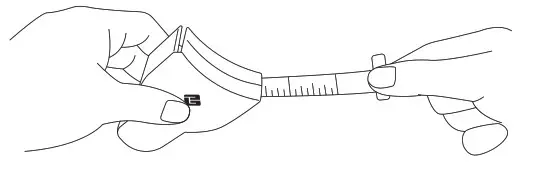
- Wrap the measuring tape around the body part you are measuring.
- Insert the peg into the slot on the other side of the measuring tape.
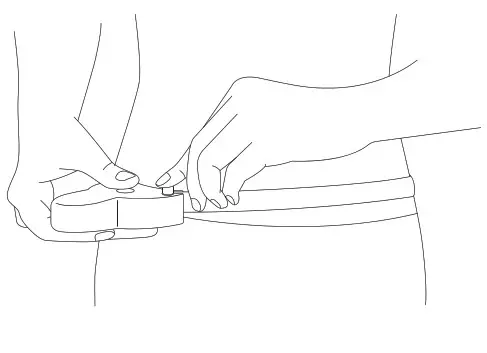
- Press the button on the housing to shorten the measuring tape.
- When you have finished measuring, remove the peg from the slot and press the button to fully retract the measuring tape.
NOTE:
- WARNING: DO NOT let children play with the measuring tape.
- Please note that the measuring tape itself starts at the 2-inch mark to compensate for the length of the side of the housing that gets included in
the measurement loop.
Maintenance
Battery Replacement
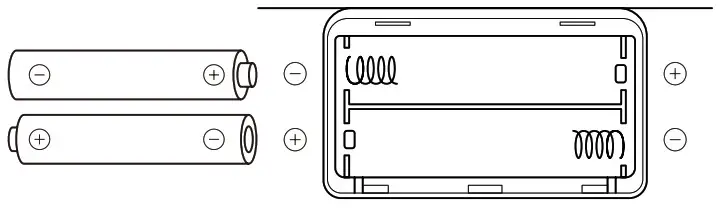
- Open the battery compartment on the back of the scale.
- Remove the old batteries and dispose of them properly.
- Install three new AAA 1.5V batteries, making sure they are placed under the correct polarity.
- Replace the battery compartment cover.
NOTE: The scale may need to be recalibrated after replacing the batteries.
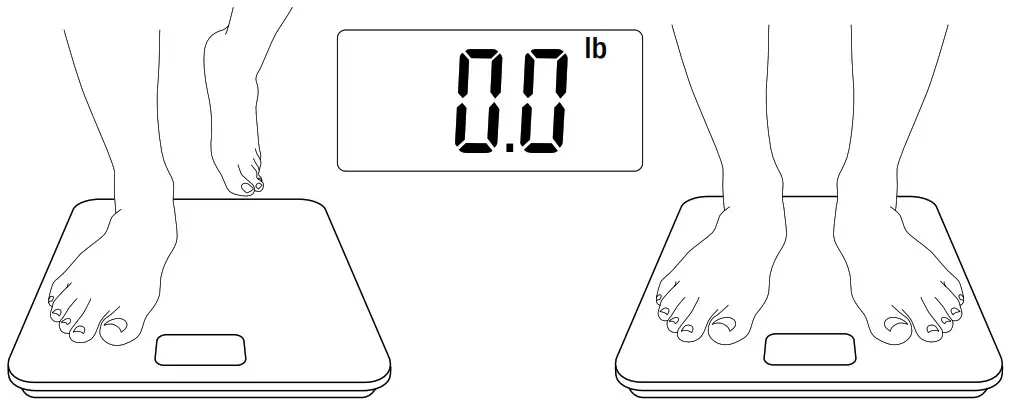
Recalibrating the Scale
If the scale has been moved or flipped upside down, it must be recalibrated to ensure accurate results.
- Place the scale on a hard, flat surface.
- Step on the scale with one foot until the display lights up, then step off.
- The scale will show “0.0,” indicating that the calibration was successful.
Specifications
| Weight Capacity: | 400 lb (180 kg) |
| Graduation: | 0.2 lb (0.1 kg) |
| Weight Units: | lb I kg |
| Platform: | Tempered glass |
| LCD Display: | 2.8″ x 1.4″ (72 x 36.5 mm) |
| Battery: | 3 x 1.5V AAA batteries |
| Auto-off: | 15 seconds |
| Dimensions: | 11.8″ x 11.8″ x 0.9″ (300 x 300 x 24 mm) |
Troubleshooting
| Issue | Cause | Solution |
| “Err” | Maximum weight capacity has been exceeded. |
Step off the scale to avoid damage. |
| The item being weighed is too light. | Remove the item and use a smaller scale to measure object. |
|
| “Lo” | Low battery. | Replace the batteries as noted in the battery Replacement section. |
| “C” | The scale needs to be calibrated. | Recalibrate the scale. |
| Scale is not turning on. |
Batteries may be incorrectly installed. | Take out batteries and reinstall them under the correct polarity. |
| Batteries may need to be replaced. | Replace batteries. | |
| Light does not come on when stepping on scale. |
The scale may be broken. Contact customer support. |
Warranty
| Product | EB4887S Digital Body Weight Scale |
| Default Warranty Period | 1 year(s) |
| For your own reference, we strongly recommend that you record your Order Number and date of purchase. | |
| Order Number: | |
| Date of Purchase: | |
Terms & Policy
Etekcity warrants all products to be of the highest quality in material, craftsmanship, and service. effective starting from the date of
purchase.
Etekcity will replace any product found to be defective due to manufacturer flaws based on eligibility; refunds are available within the first 30 days of of purchase. This warranty extends only to personal use and does not extend to any product that has been used for commercial, rental, or any other use for which the product is not intended. There are no warranties other than the warranties expressly set forth with each product.
This warranty is non-transferrable. Etekcity is not responsible in any way for any damages, losses, or inconveniences caused by equipment failure or by user egligence, abuse, or use noncompliant with the user manual or any additional safety, use, or warnings included in the roduct packaging and manual.
Exceptions and Exclusions
- Damage due to abuse, accident, alteration, misuse, tampering, or vandalism.
- Improper or inadequate maintenance.
- Damage in return transit.
- Unsupervised use by children under 18 years of age.
Etekcity and its subsidiaries assume no liability for damage caused by the use of the product other than for its intended use or as instructed in the user manual. Some states do not allow this exclusion or limitation of incidental or consequential losses so the foregoing disclaimer may not apply to you. This warranty gives you specific legal rights and you may also have other rights which may vary from state to state.
ALL EXPRESSED AND IMPLIED WARRANTIES, INCLUDING THE WARRANTY OF MERCHANTABILITY, ARE LIMITED TO THE PERIOD OF THE LIMITED WARRANTY.
Additional 1-Year Warranty
You can extend your one-year warranty by an additional year. Log onto www.etekcity.com/warranty and enter your order number (i.e. Amazon or Houzz) to register your new product for the extended warranty.
If you are unable to provide the order number for your product, or if your product has been gifted to you, please type a short note in the
order number field along with the date you received your product (i.e. “Gift received on dd/mm/yy”).
Defective Products & Returns
Should your product prove defective within the specified warranty period, please contact Customer Support via [email protected] with your order number? Once our customer service team has approved your request, please return the unit with a copy of the invoice or your order number.
Customer Support
Should you encounter any issues or have any questions regarding your new product, feel free to contact our helpful Customer Support Team. Your satisfaction is our goal!
Customer Support
Etekcity Corporation
1202 N Miller St. Suite A
Anaheim, CA 92806
Local: (657)500-1872
Toll-Free: (855)686-3835
Fax: (657)202-1693
Email: [email protected]
Support Hours
Monday – Friday:
9:00 am – 5:00 pm PST
*Please have your order confirmation number ready before contacting customer support.
Connect with us @Etekcity.


Scan here to join the community!
Visit us at www.etekcity.com
![]() Building on better living.
Building on better living.
ETEKCITY Digital Kitchen Scale User Manual
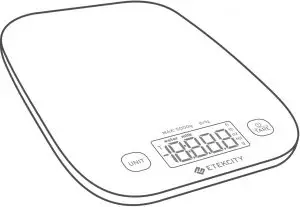
EK7090
Thank you for purchasing the Digital Kitchen Scale by Etekcity.
f you have any questions or concerns, please reach out to our helpful Customer Support Team at [email protected]. We hope you enjoy your new kitchen scale!
Become an Etekcitizen
Exclusive deals, giveaways, and product registration. Better products for better living.
Find us here: etekcity.com
Specifications
| Weight Capacity | 176 oz / 11 lb / 5000 g / 5000 mL |
| Units | oz / lb:oz / fl oz (water/milk) / g / mL (water/milk) |
| Increments | 0.05 oz / 1 g / 1 mL |
| Auto-Off | 3 minutes |
| Battery | 3 x 1.5V AAA batteries |
| Dimensions | 7.9 x 5.6 x 0.5 in / 200 x 141 x 12.5 mm |
Important Safety Information
To avoid damage to this scale, please read and follow all instructions and safety guidelines in this manual.
Scale
- Do not exceed the 11 lb / 5000 g weight capacity as it will damage the scale. An error indicator will appear on the LED display if the limit is exceeded.
- Do not immerse the scale in water or any liquid. If liquid is spilled on the digital display or buttons, immediately wipe the scale clean with a soft cloth to avoid internal damage.
- Handle with care. This scale is not intended for commercial or heavyduty use.
- Keep the scale in a cool, dry place. Avoid exposure to damp environments or extreme temperatures.
- Household use only.
Batteries
- Do not mix new and old batteries.
- If the low battery indicator (“Lo”) appears on the display, replace the batteries.
- If the scale is not in use for an extended period of time, remove the batteries to conserve battery life and extend the lifetime of the scale.
SAVE THESE INSTRUCTIONS
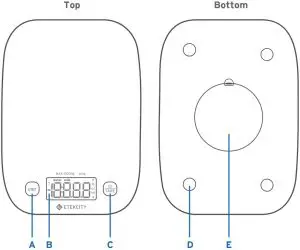
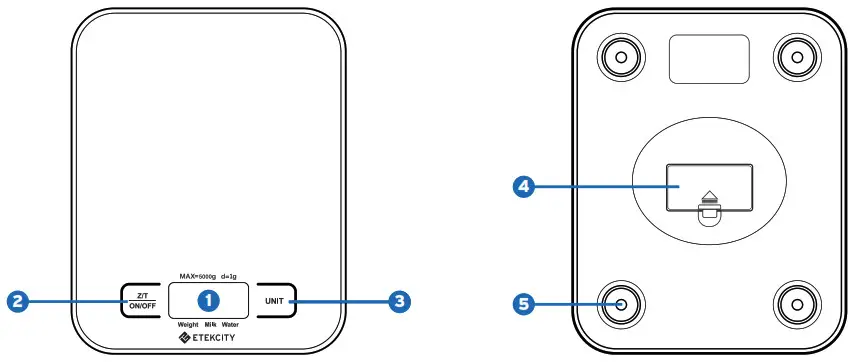
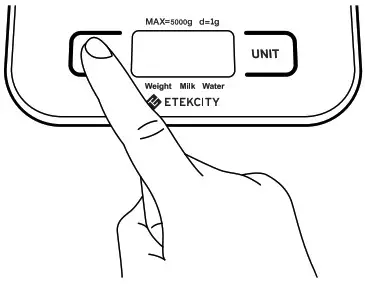
Function Diagram
- A. LED Display
- B. Unit Selection Button
- C. Power/Tare Button
- D. Anti-Skid Pads
- E. Battery Compartment
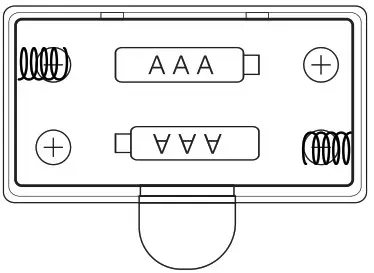
Before First Use
The batteries are pre-installed in the scale.
- Turn the scale over and open the battery compartment.
- Remove the plastic strip from the battery compartment. [Figure: 1]

Figure: 1 - Replace the battery compartment cover.
- Turn the scale over again and place on a hard, dry, flat surface.
- Tap to turn on the scale.
Using Your Scale
Note:
- For accurate results, always place the scale on a hard, dry, flat surface, and keep the scale away from dirt, dust, vibrations, wind, air currents, and electromagnetic interference.
- When you turn on the scale, choose units, or use the tare function, wait for the scale to read “
 ” again before measuring.
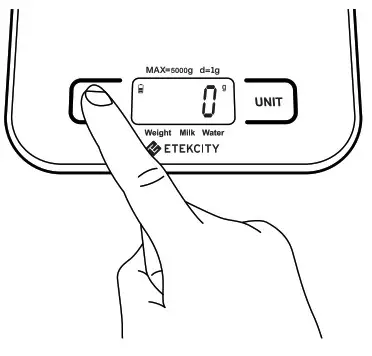
General Operation
- Place the scale on a hard, flat, level surface for measurement.
- Tap
 to turn on the scale. Make sure the scale shows “ ”.
Tap to select your desired measuring unit, which will show on the right of the display.
 - Place your item on the scale.
- Wait for the reading on the display to stabilize.
Unit Conversion
To change the unit of measurement, tap until the display shows the desired unit of measurement.
Automatic Power Off
To save battery power, the scale will automatically power off after 180 seconds of inactivity.
Manual Power Off
Press and hold for 2 seconds to turn off the scale.
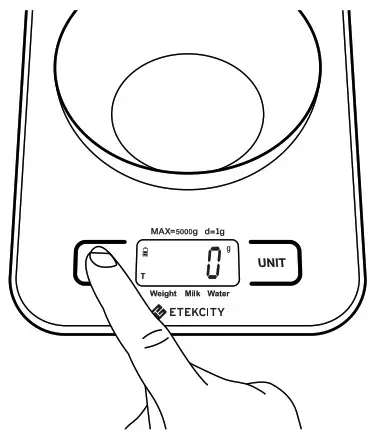
Zero / Tare Function
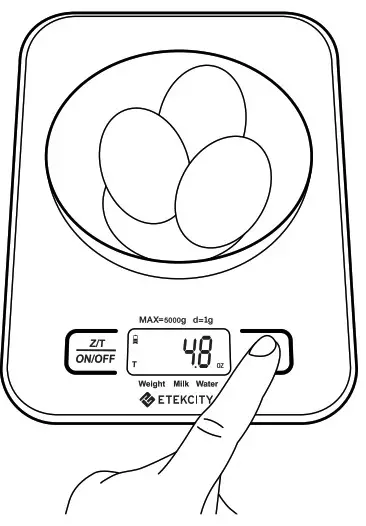
Whenever you measure items inside a container, you can use the tare function to remove the container’s weight from the final measurement.
- Tap to turn on the scale. Make sure the scale shows “ ”.
If the screen does not display “ ” automatically, tap to auto-adjust to zero. - Place the container on the center of the scale.
- Wait for the reading on display to stabilize. The screen will display the container’s weight.
- Tap to tare the weight of the container. The screen should now display “ ”.
- Place the item in the container. The scale will measure the liquid or items, without including the weight of the bowl. [Figure 2]
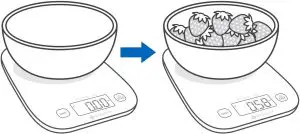
Figure: 2 - When you’re done, reset the scale by removing all weight and tapping again.
Replacing the Batteries
- Turn the scale over and open the battery compartment.
- Take out the used batteries and replace them with 3 new 1.5V AAA batteries.
- Replace the battery compartment cover.
Troubleshooting
| Problem | Possible Cause |
| Scale does not turn on. | Open the battery compartment cover and remove the plastic strip. |
| Replace the batteries. | |
| Make sure batteries are inserted under the correct polarity as marked on battery compartment. | |
| Reading is inaccurate. | Place scale on a level surface. |
| Make sure the screen displays “ ” before measuring (see Zero / Tare Function). |
|
| Remove the batteries for 45 seconds, then replace them to reset the scale. | |
Display shows “  ” ” |
Item is too heavy. Remove item from scale to protect its weight sensors. Use a different scale with a higher weight range. |
Display shows “  ” ” |
Turn the scale off and on again. Avoid moving the scale while measuring. |
Display shows “  ” ” |
Battery power is low. Replace the batteries. |
If your problem is not listed, please contact Customer Support.
Warranty Information
| Product | Digital Kitchen Scale |
| Model | EK7090 |
| Default Warranty Period | 1 year |
| For your own reference, we strongly recommend that you record your order ID and date of purchase. | |
Terms & Policy
Etekcity Corporation warrants all products to be of the highest quality in material, craftsmanship, and service, effective from the date of purchase to the end of the warranty period.
Etekcity Corporation will replace any product found to be defective due to manufacturer flaws based on eligibility. Refunds are available within the first 30 days of purchase. Refunds are only available to the original purchaser of the product. This warranty extends only to personal use and does not extend to any product that has been used for commercial, rental, or any other use in which the product is not intended for. There are no warranties other than the warranties expressly set forth with each product.
This warranty is non-transferrable. Etekcity Corporation is not responsible in any way for any damages, losses, or inconveniences caused by equipment failure or by user negligence, abuse, or use noncompliant with the user manual or any additional safety or use warnings included in the product packaging and manual.
This warranty does not apply to the following:
- Damage due to abuse, accident, alteration, misuse, tampering, or vandalism.
- Improper or inadequate maintenance.
- Damage in return transit.
- Unsupervised use by children under 18 years of age.
Etekcity Corporation and its subsidiaries assume no liability for damage caused by the use of the product other than for its intended use or as instructed in the user manual. Some states do not allow this exclusion or limitation of incidental or consequential losses so the foregoing disclaimer may not apply to you. This warranty gives you specific legal rights and you may also have other rights which may vary from state to state.
ALL EXPRESSED AND IMPLIED WARRANTIES, INCLUDING THE WARRANTY OF MERCHANTABILITY, ARE LIMITED TO THE PERIOD OF THE LIMITED WARRANTY.
Additional 1-Year Warranty
You can extend your 1-year warranty by an additional year. Log onto www.etekcity.com/warranty to register your new product for the extended warranty.
Please fill out all required fields and include your order ID, place of purchase, and purchase date, if applicable.
Defective Products & Returns
If you discover your product is defective within the specified warranty period, please contact Customer Support via [email protected] with a copy of your invoice and order ID. DO NOT dispose of your product before contacting us. Once our Customer Support Team has approved your request, please return the product with a copy of the invoice and order ID.
Customer Support
If you encounter any issues or have any questions about your new product, please contact our helpful Customer Support Team. Your satisfaction is our goal!
CUSTOMER SUPPORT
Etekcity Corporation
1202 N. Miller St., Suite A
Anaheim, CA 92806
Email: [email protected]
Toll-Free: (855) 686-3835
SUPPORT HOURS
Mon–Fri, 9:00 am–5:00 pm PST/PDT
*Please have your order invoice and order ID ready before contacting Customer Support.
Connect with us @Etekcity


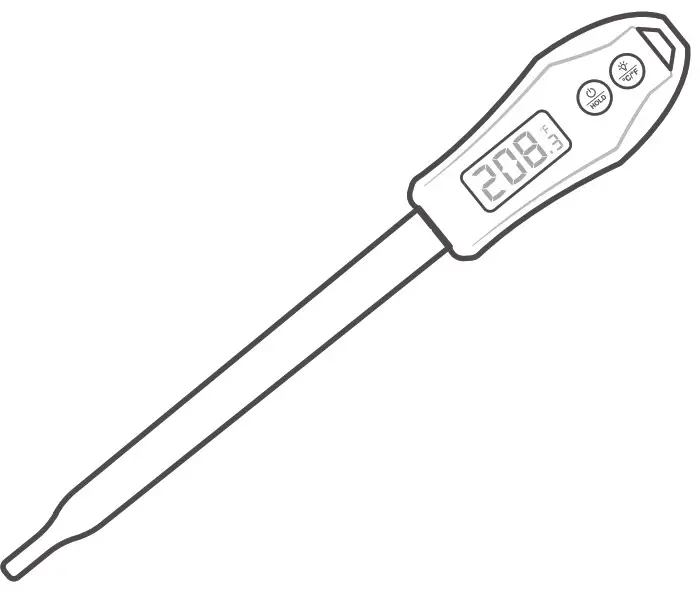
![]() Digital Meat Thermometer
Digital Meat Thermometer
Model: EMT-100
User Manual
Questions or Concerns? [email protected] • (855) 686-3835
Thank you for purchasing the Digital Meat Thermometer by Etekcity.
If you have any questions or concerns, please reach out to our helpful Customer Support Team at [email protected]. We hope you enjoy your new thermometer!
BECOME AN ETEK CITIZEN
Get exclusive deals, giveaways, and product registration. Better products for better living.
Find us at etekcity.com
Package Contents
1 x Digital Meat Thermometer
1 x Quick Start Guide
1 x Temperature Reference Guide
1 x 3V Li-ion Button Cell Battery
Specifications
| Measurement Range | -58°-572°F / -50°-300°C |
| Measurement Accuracy | ±2°F at -4°-302°F / ±1°C at -20°-150°C |
| Resolution | 0.1° |
| Units | °F / °C |
| Waterproof Level | IP66 |
| Backlight Auto-Off | 10 seconds |
| Device Auto-Off | 10 minutes if no buttons are pressed |
| Battery | CR2032 Li-ion Button Cell |
| Rated Power | 3V |
| Case Material | Heat and impact resistant eco-friendly ABS plastic |
| Probe Material | Food-grade 304stainless steel |
| Device Dimensions | 8.9 x 1.3 x 0.9 in / 225.5 x 32.3 x 21.7 mm |
| Response Time | 2-4 seconds |
Features
• Internal magnet allows the thermometer to stick to metal surfaces
• Unit switching
• Backlight can be turned on/off
• Hold Temperature function stops the display from changing the readout
Warnings
• Do not leave the thermometer in the oven while ooking.
• Do not touch the hot probe with bare hands.
• Not intended for use by children aged 12 or under.
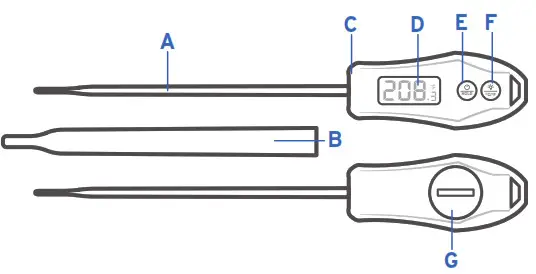
FunctionDiagram
A. Temperature Probe
B. Probe Cover
C. Thermometer Body
D. LCD Display
E. Power/Hold Temperature Button
F. Backlight/Unit Switching Button
G. Battery Compartment
Operation
- Before using the thermometer, peel the protective film off the display.
- To turn on the thermometer, press and hold the button
 for 2 seconds. The LCD screen will turn on, display all options, and then display the current probe temperature.
Note: The default display unit is Fahrenheit.
To change to Celsius, press and hold the button for 2 seconds. Press and hold again to change back to Fahrenheit.
 - Remove the probe cover. Insert the probe into the food being cooked. The thermometer will measure the internal food temperature.
- To hold the temperature on the display, press the button while the probe is still inserted into the food being cooked. The current temperature will remain on the display until the button is pressed again.
- To light up the LCD display, press the button. To turn off the backlight, press the button again. The light will turn off automatically after 10 seconds.
Temperature Reference Guide
| Food | Beef/Steaks
Recommended Internal |
| Rare | 1200-125°F / 48.9°-51.7°C |
| Medium-rare | 1300-135°F / 54.4°-57.2°C |
| Medium | 140°-145°F / 60°-62.8°C |
| Medium-well | 150°-155°F / 65.6°-68.3°C |
| Well done | 160°-165°F / 71.1°-73.9°C |
| Lamb/Steaks | |
| Rare | 120°-125°F / 48.9°-51.7°C |
| Medium-rare | 130°-135°F / 54.4°-57.2°C |
| Medium | 140°-145°F / 60°-62.8°C |
| Medium-well | 150°-155°F / 65.6°-68.3°C |
| Well done | 160°-165°F / 71.1°-73.9°C |
| Food | Recommended Internal Temperature |
| Poultry (Chicken, Turkey, Duck) | |
| Breast | 165°F / 73.9°C |
| Thighs & Legs | 165°-180°F / 73.9°-82.2°C |
| Wings | 165°-180°F / 73.9°-82.2°C |
| Ground | 160°-165°F / 71.1°-73.9°C |
| Pig | |
| Pork | 145°F / 62.8°C |
| Ham, Fully Cooked (to reheat) | 140°F / 60°C |
Tips
- When measuring multiple food temperatures, cool the probe by rinsing the tip with cool water between measurements. Wipe the probe clean before measuring another type of food.
- This thermometer is designed for temporary, hand-held use. Do not leave in an oven. Do not leave inserted in extremely hot food or liquid (anything over 572°F / 300 °C).
- Insert the thermometer in the thickest available portion of meat. Thinner portions of meat are difficult to measure because they tend to cook through fast. Avoid touching a bone. If the tip touches the bone or heavy fat area of the meat, or if the tip is not deep enough, take a second reading to ensure accuracy.
- If the thermometer tip touches the pan, the results will not be accurate. Take a second reading to ensure accuracy.
Cleaning
Note: Do not immerse the thermometer body in water. Do not place in a dishwasher.
- Wash the metal probe in soapy water.
- Sterilize the metal probe by placing it in boiling water for several minutes.
- Clean the thermometer body with a wet washcloth or running water.
Warranty Information
| Product | Digital Meat Thermometer |
| Model | EMT-100 |
| For your own reference, we strongly recommend that you record your order ID and date of purchase. | |
| Order ID | |
| Date of Purchase | |
Terms & Policy
Etekcity Corporation (“Etekcity”) warrants this product to the original purchaser to be free from defects in material and workmanship, under normal use and conditions, for a
period of one year from the date of original purchase.
Etekcity agrees, at our option during the warranty period, to repair any defect in material or workmanship or furnish an equal product in exchange without charge, subject to verification of the defect or malfunction and proof of the date of purchase.
There is no other express warranty. This warranty does not apply:
- If the product has been modified from its original condition;
- If the product has not been used in accordance with directions and instructions in the user manual;
- To damages or defects caused by accident, abuse, misuse or improper or inadequate maintenance;
- To damages or defects caused by service or repair of the product performed by an unauthorized service the provider or by anyone other than Etekcity;
- To damages or defects occurring during commercial use, rental use, or any use for which the product is not intended;
- To damages or defects exceeding the cost of the product.
Etekcity will not be liable for indirect, incidental, or consequential damages in connection with the use of the product covered by this warranty.
This warranty extends only to the original consumer the purchaser of the product and is not transferable to any subsequent owner of the product regardless of whether the product is transferred during the specified term of the warranty.
This warranty does not extend to products purchased from unauthorized sellers. Etekcity’s warranty extends only to products purchased from authorized sellers that are subject to Etekcity’s quality controls and have agreed to follow its quality controls.
All implied warranties are limited to the period of this limited warranty.
This warranty gives you specific legal rights and you may also have other rights which vary from state to state. Some states do not allow the exclusion or limitation of incidental or consequential damages, so the above limitation or exclusion may not apply to you.
If you discover that your product is defective within the specified warranty period, please contact Customer Support via [email protected]. DO NOT dispose of your product before contacting us. Once our Customer Support Team has approved your request, please return the product with a copy of the invoice and order ID. Extend Your Warranty by 1 Year Register your product within 14 days of purchase at www.etekcity.com/warranty to extend your 1-year warranty by an additional year.
This warranty is made by: Etekcity Corporation
1202 N. Miller St. Suite A
Anaheim, CA 93806
Customer Support
If you have any questions or concerns about your new product, please contact our helpful Customer Support Team.
Etekcity Corporation
1202 N. Miller St., Suite A
Anaheim, CA 92806
Support Hours
Monday—Friday
9:00 am —5:00 pm PST/PDT
Email: [email protected]
Toll-Free: (855) 686-3835
*Please have your order invoice and order ID ready before contacting Customer Support.
Connect with us @Etekcity

JJ051920AL-M2_0520EMT-100
]]>![]()
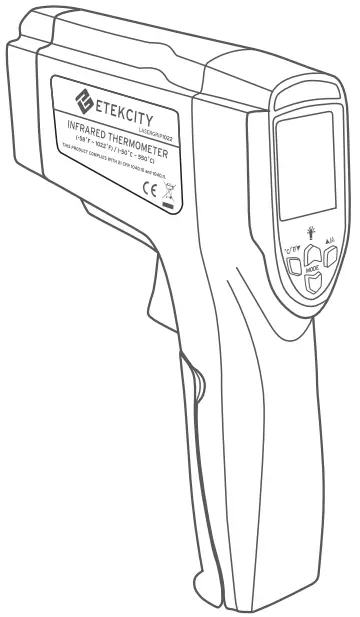
Infrared Thermometer
Model No.: Lasergrip 1022
Questions or Concerns?
(855)-686-3835 • [email protected]
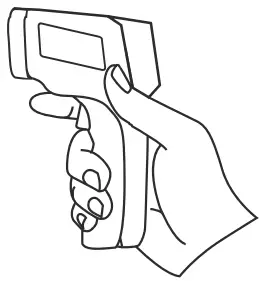
Thank you for purchasing the Lasergrip 1022 Infrared Thermometer by Etekcity. This easy-to-use device lets you conveniently and accurately measure surface temperatures from a distance without the need of any direct contact. Should you have any questions or concerns, feel free to contact our helpful customer support team toll-free at 855.686.3835 or by email at [email protected].
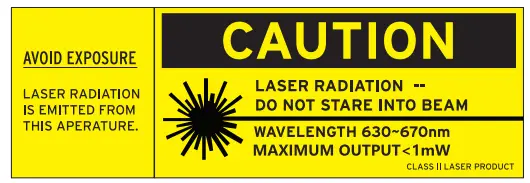
WARNING: THIS DEVICE PRODUCES CLASS 2 LASER RADIATION. THE LASER LIGHT IS INVISIBLE TO THE HUMAN EYE. USE EXTREME CAUTION AT ALL TIMES WHEN LASER IS IN USE. DO NOT LOOK INTO DIRECT OR REFLECTED LASER-LIGHT BEAM OR VIEW BEAM WITH OPTICAL INSTRUMENTS. DO NOT AIM LASER-LIGHT AT ANOTHER PERSON OR ANIMAL. LASER RADIATION MAY DAMAGE YOUR EYE. DO NOT DISASSEMBLE THE DEVICE.
 IMPORTANT: Read all the instructions in this manual. Failure to comply with the instructions in this manual or use of the device, in ways other than the ones mentioned in this manual, may result in hazardous radiation exposure.
Safety Use & Care
- DO NOT point the laser light at another person or animal.
- DO NOT attempt to point laser-light at an aircraft.
- Avoid direct/indirect eye contact with the laser beam. Laser radiation may cause damage to the eyes.
- DO NOT view the beam with optical instruments.
- In the vicinity of use, make any bystanders aware of the dangers of looking directly into the laser pointer.
- DO NOT allow children to operate the device.
- Use a 9V battery when replacing the battery within the device. Make sure to insert the battery in accordance with the correct polarities indicated.
- ALWAYS remove the batteries when cleaning the device.
- DO NOT use leaking batteries or dispose of old batteries in a fire.
- Remove the battery for storage if the device is not being used for a prolonged period of time.
- DO NOT disassemble the device or tamper with internal components.
Doing so will void any warranty. - DO NOT touch the lens or wipe it using anything other than a soft cloth or cotton swab.
- Keep the thermometer away from electromagnetic fields produced by objects such as arc welders and induction heaters.
- DO NOT expose the thermometer to direct sources of heat for extended periods of time.
- The thermometer measures surface temperature, not internal temperature. Do not use the Lasergrip as a reliable source to measure body temperatures.
Features & Specifications
- Laser-guided targeting for aiming precision
- The narrow distance-spot ratio for accurate results at greater distances
- Safely measure hazardous or inaccessible objects
- Standard 9V battery powers up to 12 hours of cumulative use
- Auto-off after 15 seconds of inactivity
- Measurement Range: -58°F ~ 1022°F (-50°C ~ 550°C)
- Accuracy: ±2% / ±2°C
- Resolution: 0.1°F /°C
- Maximum Output: < 1 mW
- Wavelength: 630 – 670 nm
- Distance-Spot Ratio: 12:1
- Response Time: < 500 ms
- Emissivity(Adjustable): 0.1-1.0
- Battery: DC 9V
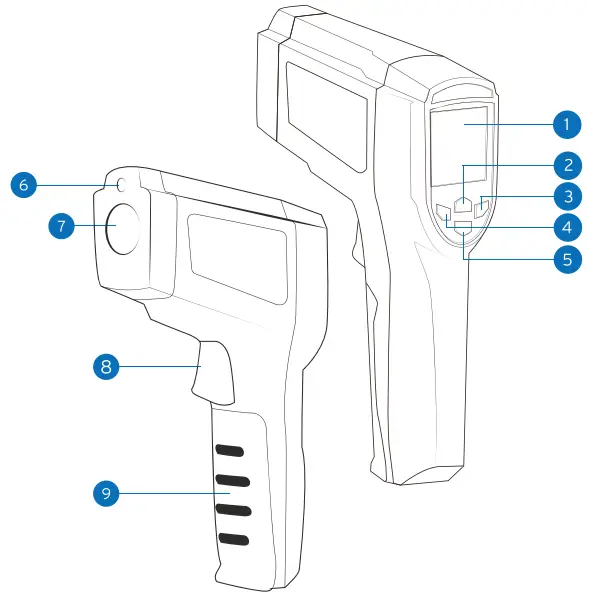
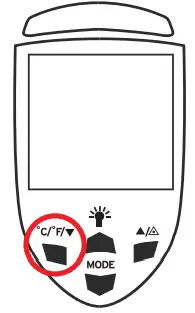
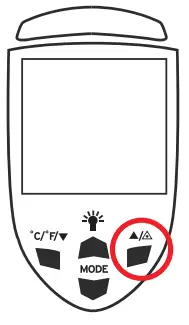
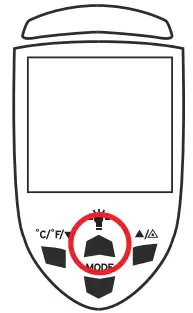
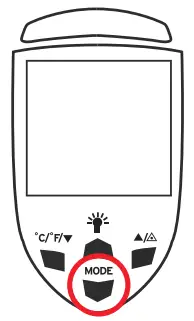
Function Diagram
- LCD Display
- Display Backlight On / Off
- Laser Pointer / UP
- Unit (°C / °F) / DOWN
- Emissivity Adjustment / Max Temperatures
- Laser Hole
- IR Sensor
- Measurement Trigger
- Battery Compartment
Display Icon Key
- Low Battery
- Laser On
- Back-light On
- Continue Scanning
- °C / °F
- Temperature Result
- Max Temperature / Emissivity Result
- Max Temperature Sian
- Adjustable Emissivity Sign
![]()
Operation
Surface Temperature Measurement
NOTE: The Lasergrip cannot measure the temperature of objects behind glass. Inaccuracy may also occur when exposed to steam, dust or any other contaminants in the air.
- Once the battery is properly installed, press the measurement trigger to activate the device.
- Point the Lasergrip towards the surface of measurement.
- Press and hold the measurement trigger and the laser will activate for aiming guidance.
- Keep holding the trigger as you move the Lasergrip if you wish to live scan the surface area for temperature measurement.
- Once the laser is pointed to the desired point of measurement, release the trigger and the LCD display will lock the calculated temperature.
- Press the measurement trigger once again to make another measurement.
 |
 |
| HOLD for continuous temperature reading | RELEASE to lock the temperature result |
NOTE: The Lasergrip LCD will display ‘OH’ when the measured temperature is above the measurable range and will display ‘OL’ when the measured temperature is below the measurable range.
Unit Conversion
To switch between units of temperature measurement, press the °C / °F button at any time while the Lasergrip is on.
Laser Activation
To activate and deactivate the laser, press the laser pointer On /Off button at any time while the Lasergrip is on.
Display Backlight Operation
To activate and deactivate the display backlight, press the display backlight On / Off button at any time while the Lasergrip is on.
Emissivity Adjustment Mode
To adjust the emissivity value before measurement, press the emissivity adjustment mode button, then use the UP ![]() and DOWN
and DOWN ![]() buttons to navigate to the desired value. You may refer to the emissivity reference chart for correct surface emissivity values.
buttons to navigate to the desired value. You may refer to the emissivity reference chart for correct surface emissivity values.
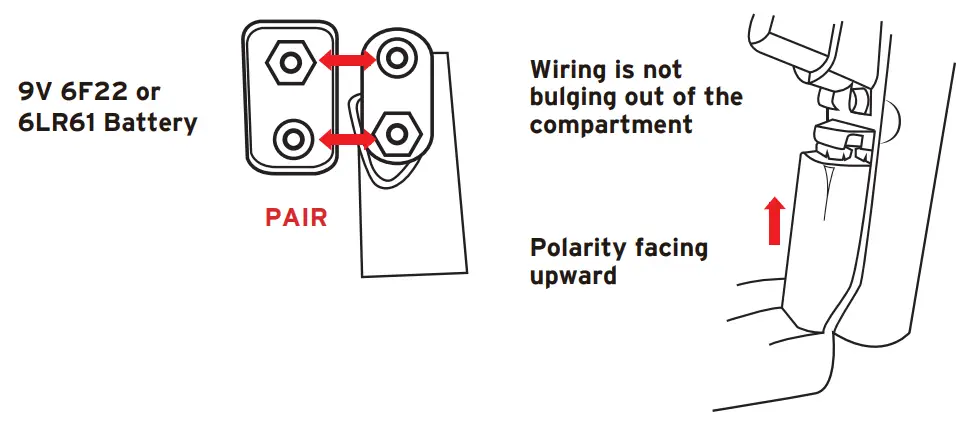
Battery Replacement
A low battery icon will appear on the LCD display when the Lasergrip’s battery power is running low. Immediately replace the battery when the icon appears.
1. Open the battery compartment and remove the used battery. Dispose the used battery properly.
2. Connect a new DC 9V battery, making sure it’s under the correct polarity.
3. Insert the battery into the compartment and close the compartment lid, making sure the wiring is not being pinched by the compartment lid.
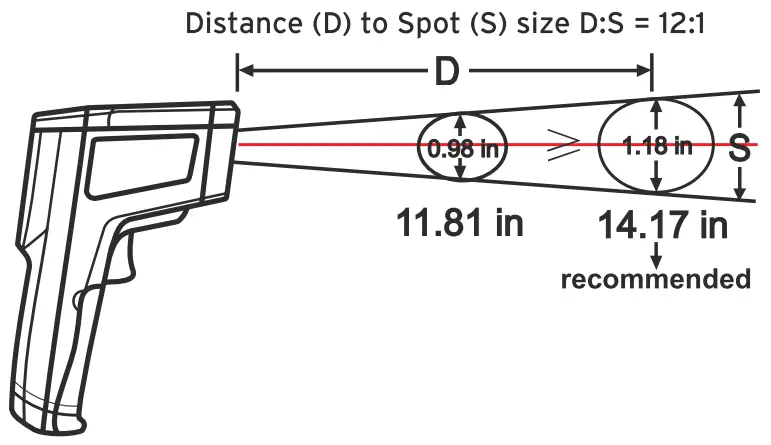
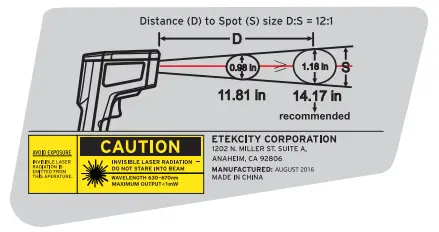
Distance-Spot Ratio
The Lasergrip 1022 measures surface temperature on the basis of distance to spot diameter ratio (D:S). As the distance between the thermometer and the surface increases, the total surface area measured will also increase. With a distance to spot ratio of 12:1 the surface area measured has a diameter of roughly 1/12 the distance.
For the most accurate results, make sure the target has a surface area of twice the corresponding spot diameter. Insufficient surface area will result in inaccurate results. The recommended distance to hold the Lasergrip from the surface of measurement is 14.17 in (36 cm). This creates a spot measurement area of 1.18 inches (3 cm) in diameter.
Emissivity
The emissivity of a material is its efficiency in emitting thermal energy.
Non-reflective surfaces have a higher emissivity (closer to 1) than reflective surfaces (closer to O). Inaccurate results may occur when measuring reflective surfaces such as glass, polished wood, and granite.
To take accurate temperature measurements of reflective surfaces with low emissivity, place a strip of black masking tape over the surface and allow for it to adjust to the temperature of the surface for approximately 30 minutes. Measure the surface, scanning the taped section, eliminating the issue of inaccuracy (See Emissivity Of Materials for details)
FCC Declaration
This device complies with Part 15 of the FCC Rules. Operation is subject to the following two conditions: (1) this device may not cause harmful interference, and (2) this device must accept any interference received.
Including interference that may cause undesired operation.
Emissivity Of Materials
| Material | Feature | Emissivity | Material | Feature | Emissivity |
| Aluminum | Oxidized | 3 | Human Skin | 0.98 | |
| Polished | 0.02-0.04 | Graphite | Oxidized | 020-0.60 | |
| Brass | Oxidized | 0.5 | Plastic | transparent | 0.95 |
| Polished | 0.02-0.05 | Rubber | 0.95 | ||
| Gold | 0.01-0.10 | Plastic Cement | 0.85-0.95 | ||
| Iron | Oxidized | 0.7 | Concrete | 0.95 | |
| Steel | Oxidized | 0.70-0.90 | Cement | 0.96 | |
| Asbestos | 0.95 | Soil | 0.90-0.98 | ||
| Plaster | 0.80-0.90 | Mortar | 0.89-0.91 | ||
| Asphalt | 0.95 | Brick | 0.90-0.96 | ||
| Rock | 0.7 | Marble | 0.94 | ||
| Wood | 0.90-0.95 | Textile | 0.90 | ||
| Charcoal | Powered | 0.96 | Paper | 0.95 | |
| Carbon | 0.85 | Sand | 0.90 | ||
| Lacquenvork | Lackluster | 0.97 | Clay | 0.92-0.96 | |
| Carton Cement | 0.90 | Sand | 0.9 | ||
| Soap Bubble | 0.75-0.80 | Glass | 0.85-0.92 | ||
| Water | 0.93 | Textile | 0.95 | ||
| Snow | 0.83-0.90 | Heated Food | 0.95 | ||
| Ice | 0.96-0.98 | Plastic | 0.95 | ||
| Frozen Foods | 0.95 | 11 | 0.94 | ||
| Ceramics | 0.95 | Steel and iron | 0.80 | ||
| Limestone | 0.98 | Wool | Natural | 0.94 | |
| Paint | 0.93 | Lead | Oxidized | 0.5 |
The device certification information is labeled directly on the device. The sticker is located on the left side of the Lasergrip.
The device warning and aperture safety information are also labeled directly on the device; the sticker is located on the right side of the Lasergrip.
Any updates to the product information (date of manufacturing and manufacturer address) will be added as adhesive overlays.
Package Contents
1 x Lasergrip 1022
1 x 9V DC Battery
1 x User Manual
Warranty Information
Etekcity warrants all products to be of the highest quality in material, craftsmanship, and service, effective from the date of purchase to the end of the warranty period.
Etekcity will replace any product found to be defective due to manufacturer flaws based on eligibility. Refunds are available within the first 30 days of purchase. Refunds are only available to the original purchaser of the product. This warranty extends only to personal use and does not extend to any product that has been used for commercial, rental, or any other use in which the product is not intended for. There are no warranties other than the warranties expressly set forth with each product.
This warranty is non-transferrable. Etekcity is not responsible in any way for any damages, losses, or inconveniences caused by equipment failure by user negligence, abuse, or use noncompliant with the user manual or any additional safety, use, or warnings included in the product packaging and manual.
This warranty does not apply to the following:
- Damage due to abuse, accident, alteration, misuse, tampering, or vandalism.
- Improper or inadequate maintenance.
- Damage in return transit.
- Unsupervised use by children under 18 years of age.
Etekcity and its subsidiaries assume no liability for damage caused by the use of the product other than for its intended use or as instructed in the user manual. Some states do not allow this exclusion or limitation of incidental or consequential losses so the foregoing disclaimer may not apply to you. This warranty gives you specific legal rights and you may also have other rights which may vary from state to state.
ALL EXPRESSED AND IMPLIED WARRANTIES, INCLUDING THE WARRANTY OF MERCHANTABILITY, ARE LIMITED TO THE PERIOD OF THE LIMITED WARRANTY.
Additional 1-Year Warranty
You can extend your 1-year warranty by an additional year. Log onto www.etekcity.com/warranty and enter your order number (for example, from Amazon or Houzz) to register your new product for the extended warranty.
If you are unable to provide the order number for your product, please type a short note in the order number field along with the date you received your product.
Defective Products & Returns
If your product proves defective within the specified warranty period, please contact Customer Support via [email protected] with your order number. DO NOT dispose of your product before contacting us. Once Customer Support has approved your request, please return the unit with a copy of the invoice or your order number.
Customer Support
If you encounter any issues or have any questions regarding your new product, please contact our helpful Customer Support Team. Your satisfaction is our goal!
Etekcity Corporation
1202 N Miller St., Suite A
Anaheim, CA 92806
USA
Support Hours
Mon – Fri 9:00 am – 5:00 pm PST/PDT
Toll Free: (855) 686-3835
Email: [email protected]
*Please have your order confirmation number ready before contacting
Customer Support.
Digital Body Weight Scale
Model No.: EB4074C Series
Questions or Concerns? (855) 686-3835 • [email protected]
Thank You.
Thank you for purchasing the EB4074C Series Digital Body Weight Scale by Etekcity. We are dedicated to providing our customers with quality products for building a better living. Should you have any questions or concerns about using your new product, feel free to reach out to our helpful customer support team at (855) 686-3835 or by email at [email protected]. We hope you enjoy your new product!
Package Contents
1 x Digital Body Weight Scale
1 x Quick Start Guide
2 x 1.5V AAA batteries (pre-installed)
Safety Information
IMPORTANT: Please read and comply with all of the instructions and warnings provided in this manual before using the product. Failure to comply with the instructions and warnings provided herein may result in inaccurate results and/or damage to the product itself.
- The glass platform is slippery when wet. Make sure the platform is dry before stepping on for measurement.
- Consult your primary-care doctor or physician before making changes to your diet, exercise plans, and/or physical activities.
- This scale is not intended for commercial use.
- To weigh safely and accurately, please stand on the center of the platform and stand still until a result is calculated.
- DO NOT strike or drop the scale.
- DO NOT stand on the edge of the scale or jump on it.
- DO NOT stand on the scale platform for a prolonged period of time or when not in weighing operation.
- Always place the scale on a hard, dry, and flat surface before measurement.
- Handle the scale with care, as it is a precision instrument.
- Clean the scale with a damp cloth and avoid getting water or any other liquid inside the scale.
- DO NOT use chemical or abrasive cleaning agents to clean the scale.
- Keep the scale in a cool environment with dry air.
- Always keep the scale in a horizontal position; do not store vertically.
- If the scale fails to turn on, check whether the batteries are installed correctly. Replace the batteries if necessary.
- If an error appears on the display or if the scale does not turn off automatically, remove the batteries for 3 seconds, then reinstall them.
- DO NOT overload the scale (max. weight capacity: 400 lb / 180 kg).
- If the scale is not in use for an extended period of time, remove the batteries to ensure battery conservation and to extend the scale service lifetime.
Main Functions
- Scale platform
- Digital display
- Unit selection
- Battery compartment
- Anti-skid padding
Set-Up
Open the battery compartment cover located on the back of the scale. Remove the two 1.5V AAA batteries from their plastic film and apply the batteries under the correct polarity. Reseal the battery compartment in order to activate the scale.
Operation
Weight Measurement
- For best results, place the scale on a hard, flat surface. Avoid carpet or soft surfaces.
- Gently step on the scale. The scale will automatically activate.
- Remain standing evenly on the scale, without moving or shifting your feet or body. The scale will then display and flash your final results.
Converting Weight Units
- Apply pressure onto the weighing platform to activate the scale.
- Press the unit conversion button on the back of the scale to convert units from pounds (lb) to kilograms (kg).
- Place the scale back onto a hard, flat surface when you are ready to measure.
NOTE: For accuracy, the digital scale may trigger automatic calibration when physically lifted and moved or when the unit of measurement is changed. Should a ‘C’ appear on the digital display at any time, recalibrate the scale as noted in the Recalibrating the Scale section.
Maintenance
Battery Replacement
- Open the battery compartment on the back of the scale.
- Remove the old batteries and dispose of them properly.
- Install 2 new 1.5V AAA batteries, making sure they are placed under the correct polarity.
- Replace the battery compartment cover.
NOTE: The scale may need to be recalibrated after replacing the batteries.
Recalibrating the Scale
If the scale has been moved or flipped upside down, it must be recalibrated to ensure accurate results.
- Place the scale on a hard, flat surface.
- Step on the scale with one foot until the display lights up, then step off.
- The scale will show “0.0,” indicating that the calibration was successful.
Specifications
| Weight Capacity: | 400 lb (180 kg) |
| Graduation: | 0.2 lb (0.1 kg) |
| Weight Units: | lb I kg |
| Battery: | 2 x 1.5V AAA batteries |
| Platform: | Tempered Glass |
| Auto-off: | 15 seconds |
| LCD Display: | 2.9″ x 1.1″ (74 x 28 mm) |
| Dimensions: | 11.9″ x 11.9″ x 1.0″ (303 x 303 x 26 mm) |
Troubleshooting
| Error Message | Reason | Solution |
| “Err” | Maximum weight capacity has been exceeded. | Step off the scale to avoid damage. |
| Item being weighed is too light. | Remove item and use a smaller scale to measure object. | |
| “Lo” | Low battery. | Replace the batteries as noted in the Battery Replacement section. |
| “C” | Scale needs to be calibrated. | Recalibrate the scale. |
| Scale is not turning on. |
Batteries may be incorrectly installed. | Take out batteries and reinstall them under the correct polarity. |
| Batteries may need to be replaced. | Replace batteries. | |
| Light does not come on when stepping on scale. | Scale may be broken. Contact customer support |
Federal Communication Commission
This device complies with Part 15 of the FCC Rules. Operation is subject to the following two conditions:
- This device may not cause harmful interference, and
- This device must accept any interference received, including interference that may cause undesired operation.
NOTE: This equipment has been tested and found to comply with the limits for a Class B digital device, pursuant to Part 15 of the FCC Rules. These limits are designed to provide reasonable protection against harmful interference in a residential installation. This equipment generates, uses, and can radiate radio frequency energy and, if not installed and used in accordance with the instructions, may cause harmful interference to radio communications. However, there is no guarantee that interference will not occur in a particular installation. If this equipment does cause harmful interference to radio or television reception, which can be determined by turning the equipment off and on, the user is encouraged to try to correct the interference by one or more of the following measures: Reorient or relocate the receiving antenna. Increase the separation between the equipment and receiver. Connect the equipment into an outlet on a circuit different from that to which the receiver is connected. Consult the dealer or an experienced radio/TV technician for help.
FCC Caution: Any changes or modifications not expressly approved by the party responsible for compliance could void the user’s authority to operate this equipment.
Warranty
| Product | EB4074C Series Digital Body Weight Scale |
| Default Warranty Period | 1 year |
| For your own reference, we strongly recommend that you record your Order Number and date of purchase. | |
| Order Number: | |
| Date of Purchase: | |
TERMS & POLICY
Etekcity warrants all products to be of the highest quality in material, craftsmanship, and service. effective starting from the date of purchase.
Etekcity will replace any product found to be defective due to manufacturer flaws based on eligibility; refunds are available within the first 30 days of purchase. This warranty extends only to personal use and does not extend to any product that has been used for commercial, rental, or any other use in which the product is not intended for. There are no warranties other than the warranties expressly set forth with each product.
This warranty is non-transferrable. Etekcity is not responsible in any way for any damages, losses or inconveniences caused by equipment failure or by user negligence, abuse, or use noncompliant with the user manual or any additional safety, use, or warnings included in the product packaging and manual.
This warranty does not apply to the following:
- Damage due to abuse, accident, alteration, misuse, tampering or vandalism.
- Improper or inadequate maintenance.
- Damage in return transit.
- Unsupervised use by children under 18 years of age.
Etekcity and its subsidiaries assume no liability for damage caused by the use of the product other than for its intended use or as instructed in the user manual. Some states do not allow this exclusion or limitation of incidental or consequential losses so the foregoing disclaimer may not apply to you. This warranty gives you specific legal rights and you may also have other rights which may vary from state to state.
ALL EXPRESSED AND IMPLIED WARRANTIES, INCLUDING THE WARRANTY OF MERCHANTABILITY, ARE LIMITED TO THE PERIOD OF THE LIMITED WARRANTY.
Additional 1-Year Warranty
You can extend your one-year warranty by an additional year. Log onto www.etekcity.com/warranty and enter your order number (i.e. Amazon or Houzz) to register your new product for the extended warranty.
If you are unable to provide the order number for your product, or if your product has been gifted to you, please type a short note in the order number field along with the date you received your product (i.e. “Gift received on dd/mm/yy”). http://www.etekcity.com/warranty
Defective Products & Returns
Should your product prove defective within the specified warranty period, please contact Customer Support via [email protected] with your order number. Once our customer service team has approved your request, please return the unit with a copy of the invoice or your order number.
Customer Support
Should you encounter any issues or have any questions regarding your new product, feel free to contact our helpful Customer Support Team. Your satisfaction is ours!
Customer Support
Etekcity Corporation
1202 N. Miller St. Suite A
Anaheim, CA 92806
Toll-Free: (855) 686-3835
Email: [email protected]
Support Hours
Monday – Friday:
9:00 am – 5:00 pm PST/PDT
*Please have your order ID number ready before contacting customer support.
Connect with us @Etekcity


Scan here to join the community!
Visit us at www.etekcity.com
 Building on better living.
Digital Kitchen Scale
Model No.: EK6015

Questions or Concerns? [email protected]
Package Contents
1 x Digital Kitchen Scale
1 x User Manual
2 x 1.5 V AAA batteries (Pre-installed)
Safety Information
IMPORTANT: Please read and comply with all of the instructions and warnings provided in this manual before using the product. Failure to comply with the instructions and warnings provided herein may result in inaccurate results and/or damage to the product itself.
Important Safety Information
- Always place the scale on a hard, dry, and flat surface before measurement in order to ensure accuracy.
- DO NOT exceed the 5000g weight capacity. An overload indicator will appear on the LCD display if the limit is exceeded.
- DO NOT immerse the scale in water or corrosive liquids. If a liquid is spilled on the scale platform, immediately wipe the scale clean with a soft cloth in order to avoid potential damage to the scale.
- When replacing batteries, make sure to insert them under the correct polarity as indicated within the battery compartment.
- Replace the batteries if the low-battery indicator is displayed in order to ensure the highest accuracy.
- DO NOT mix new and used batteries to power the device.
- This scale is not intended for commercial or heavy-duty use.
- When not in use, store the scale in a cool, dry environment.
- To clean, wipe the platform surface with a damp soft cloth.
- If the scale fails to turn on, check whether the batteries are installed correctly. Replace the batteries if necessary.
- If the scale is not in use for an extended period of time, take out the batteries to extend the scale service lifetime.
Function Diagram

| 1. LCD Display | 4. Battery Compartment |
| 2. Power / Auto-Tare | 5. Anti-Skid Padding |
| 3. Unit Selection |
Set-Up
The included AAA batteries are preinstalled in the scale.
- Open the battery compartment cover located on the backside of the scale.
- Remove the plastic strip from the battery compartment to allow the batteries to power the device.
- Reapply the battery compartment cover.

General Operation
- Place the scale on a flat and level hard surface for measurement.
- Press the ON/OFF button to turn on the scale. Wait until the screen displays zero before measuring.
- Place the object of measurement on the center of the weighing platform.
- Allow the scale to adjust to the weight of the object for a few seconds before it displays the final measured reading on the LCD screen.
Zero / Tare Function
The tare function allows you to measure objects in a container without having to include the container’s weight in the final measurement.
- Turn on the scale and wait for the screen to display zero. If the screen does not display zero automatically, press the Z/T button to auto-adjust to zero

- Place the desired object which is to be excluded, on the center of the measuring platform.
- Press the Z/T button to tare the current weight of the object. The screen should now display zero
4. Place the desired item(s) to be weighed or the center of the measuring platform or within the tared container to calculate the net weight of the desired item(s).
Unit Conversion
To change the unit of measurement, press the UNIT button until the LCD display indicates the desired unit of measurement.
Automatic Power Off
For battery power conservation, the display backlight will automatically power off after 30 seconds of inactivity. Additionally, the scale itself will automatically power off after 2 minutes of inactivity.
Manual Power Off
Press and hold the ON/OFF button for 2 seconds to manually turn off the digital scale at any time.
Battery Replacement
- Open the battery compartment cover on the backside of the scale.
- Take out the used batteries and dispose of them properly.
- Install new 1.5V AAA batteries, taking note of the correct polarity displayed in the battery compartment.
- Reseal the battery compartment.
| Error Message | Reason | Solution |
| “EEEE” | Scale overload. Maximum weight capacity: 5000g ( 176 oz). |
Remove the object from the scale to avoid damage. |
| “Err” | Calibration error. Unable to measure weight. |
Turn the scale off and turn it back on to retry measurement or auto-tare. Do not move the scale while measuring. |
| “Lo” | Battery power is low. | Install new batteries. |
Specifications
| Weight Capacity | 5000 g / 5000 ml /176 oz /11 lb |
| Units | g / ml / fl’oz / oz / lb:oz |
| Measurement Increments | 1g /1 ml / 0.035 oz |
| Auto-Off | 120 Seconds |
| Backlight Auto-off | 30 Seconds |
| Power | 2 x 1.5V AAA Batteries |
| Dimensions | 186mm x 145mm x 17mm (7.3 x 5.7 x 0.7 in.) |
Warranty
Terms & Policy
Etekcity warrants all products to be of the highest quality in material, craftsmanship, and service for a minimum of 2 years, effective from the date of purchase. Warranty lengths may vary between product categories.
Should you encounter any issues or have any questions regarding your new product, feel free to contact our helpful Customer Support Team. Your satisfaction is ours!
Email: [email protected]
*Please have your order ID number ready before contacting customer support.
Thank You.
Thank you for purchasing the EAP1 Electric Air Pump by Etekcity. We are dedicated to providing our customers with quality products for building a better living. Should you have any questions or concerns about using your new product, feel free to reach out to our helpful customer support team at (855) 686-3835 or by email at [email protected]. We hope you enjoy your new product!
Package Contents
1 x Air pump
1 x Adapter set
1 x User manual
Specifications
Voltage: 120V / 60Hz
Rated Power: 130W
Table of Contents
Safety Information 4
Function Diagram 6
Operation 7
Warranty 8
Customer Support 10
SAFETY INFORMATION
IMPORTANT: Please read and comply with all of the instructions and warnings provided in this manual before using the product. Failure to comply with the instructions and warnings provided herein may result in inaccurate results and/or damage to the product itself.
- To reduce the risk of burns, fire, electric shock, or injury: ONLY use this air pump indoors.
- The rated voltage for this air pump is 120V.
- DO NOT leave the air pump on for more than 10 minutes at a time; doing so may cause the pump to overheat.
- DO NOT attempt to alter the air pump in any way as this will void your warranty.
- DO NOT operate or place the pump on or near hot surfaces such as ovens, heaters, or active fires.
- DO NOT operate the air pump in wet environments or immerse the pump in any liquid.
- DO NOT cover any of the ventilation openings with items such as newspapers, table-cloths, curtains, etc.
- DO NOT place hands, fingers, or foreign objects into the inflation or deflation ports at any time.
- DO NOT look directly into the inflation port with your eyes while the pump is operating.
- Keep this air pump out of reach from children.
- Close supervision is necessary when this product is used by or near children, or
- those with disabilities.
- DO NOT use the air pump with solid state speed controls.
- Always unplug the air pump when putting on or taking off parts.
- Turn off the air pump when it is not being used.
- DO NOT attempt to repair or replace the power cord.
- DO NOT route the cord underneath carpets, rugs, furniture or appliances. Arrange the cord away from high-traffic areas and where it will not be tripped over.
CAUTION: To reduce the risk of electric shock damage to the product:
- DO NOT operate the air pump for more than 10 minutes at a time.
- ONLY store this product indoors.
- To disconnect the air pump, set the power switch to the ‘OFF’ position, then unplug the power cord.
- This air pump and its adapters are not designed to work with needle valves (i.e. basketballs or footballs) nor stem valves (i.e. presta or schrader valves) found on bicycles. DO NOT attempt to use the air pump with these air valves.
Note for the Plug:
This appliance has a polarized plug (one blade is wider than the other). To reduce the risk of electric shock, this plug is intended to fit in a polarized outlet only one way. If the plug does not fully fit inside the outlet, reverse the plug. If it still does not fit, contact a qualified electrician. Do not attempt to alter this safety feature.
SAVE THESE INSTRUCTIONS
Household Use Only
FUNCTION DIAGRAM
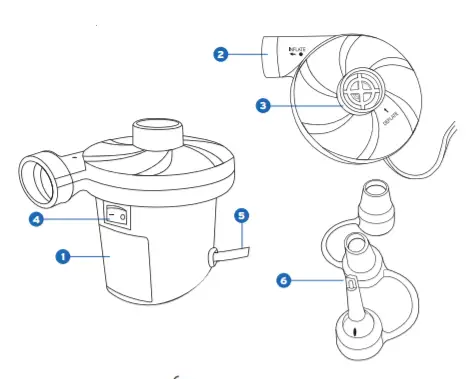
- Pump
- Inflation port
- Deflation port
- Power switch
- Power cord
- Adapters
OPERATION
NOTE: The inflation and deflation ports will fit directly onto larger items such as inflatable rafts or air mattresses. Use the appropriate-sized nozzle on smaller inflation valves.
Inflation
- Attach the inflation port to the item being inflated. If necessary, connect one of the adapters to the inflation port.
- Plug the power cord into a powered electrical outlet.
- Press “I” on the power switch to turn on the air pump. Press “0” to turn off the pump.
Deflation
- Attach the deflation port to the item being deflated. If necessary, connect one of the adapters to the deflation port.
- Plug the power cord into a powered electrical outlet.
- Press “I” on the power switch to turn on the air pump. Press “0” to turn off the pump.
Maintenance
- When finished using the air pump, turn it off, then unplug it from the electrical outlet.
- Allow the air pump to cool for at least 30 minutes before storing.
- If necessary, use a damp cloth soaked in mild detergent to remove any tough stains on the air pump. Dry immediately with a clean cloth. DO NOT immerse the air pump in water or other liquids.
- Store the air pump in a cool, dry place. Make sure it is not placed in an area with direct sunlight or chemical substances.
- This air pump does not contain any user serviceable parts.
WARRANTY
TERMS & POLICY
Etekcity warrants all products to be of the highest quality in material, craftsmanship and service for a minimum of 1 year, effective from the date of purchase. Warranty lengths may vary between product categories. For specific warranty terms, please refer to your product’s listing page or operation manual.
Under the limited warranty, Etekcity will replace or refund any product found to be defective due to manufacturer flaws based on eligibility. This warranty extends only to personal use and does not extend to any product that has been used for commercial use, rental use, or any other use in which the product is not intended for. There are no warranties other than the warranties expressly set forth with each product.
This warranty is non-transferrable. Etekcity is not responsible in any way for any damages, losses or
inconveniences caused by equipment failure or by user negligence, abuse, or use noncompliant with the user manual or any additional safety, use, or warnings included in the product packaging and manual.
Etekcity and its subsidiaries assume no liability for damage caused by the use of the product other than for its intended use or as instructed above and in the user manual. Some states do not allow this exclusion or limitation of incidental or consequential losses so the foregoing disclaimer may not apply to you. This warranty gives you specific legal rights and you may also have other rights which may vary from state to state.
ALL EXPRESS AND IMPLIED WARRANTIES, INCLUDING THE WARRANTY OF MERCHANTABILITY, ARE LIMITED TO THE PERIOD OF THE LIMITED WARRANTY
Should your product prove defective within the specified warranty period, please return the defective unit in its original packaging with (1) an original copy of the invoice, (2) your order confirmation number, (3) and your warranty ID number.
EXCEPTIONS AND EXCLUSIONS
- Damage due to abuse, accident, alteration, misuse, tampering or vandalism.
- Improper or inadequate maintenance.
- Damage in return transit.
- Unsupervised use by children under 18 years of age.
To receive a valid warranty ID number, sign into your Etekcity customer account at www.etekcity.com (If you ordered your product through Amazon, Ebay or Walmart, create an account at www.etekcity.com in order to retrieve your warranty ID). At the top of the warranty page, type in your order number located in your order invoice to retrieve your warranty ID number. Your warranty ID number will then be sent to your email for your records. If deemed defective, your product will be replaced or refunded at no charge to you.
Date of Purchase
Place of Purchase
Order Number
Warranty ID
CUSTOMER SUPPORT
Should you encounter any issues or have any questions regarding your new product, feel free to contact our helpful Customer Support Team. Your satisfaction is ours!
Customer Support
Etekcity Corporation
1202 N. Miller St. Suite A
Anaheim, CA 92806
Toll-Free: (855) 686-3835
Fax: (657) 202-1693
Local: (657) 500-1872
Email: [email protected]
Support Hours
Monday – Friday:
9:00 am – 5:00 pm PST
*Please have your order confirmation number ready before contacting customer support.
Scan here to join the community! www.etekcity.com
]]>