eufy RoboVac 11S
eufy RoboVac 11S
Important Safety Instructions
To reduce the risk of injury or damage, read these safety instructions carefully and keep them at hand when setting up, using, and maintaining this device.
WARNING SYMBOLS USED
This is the safety alert symbol. This symbol alerts you to potential hazards that could result in property damage and/or serious bodily harm or death.
- This device can be used by children aged from 8 years and above and persons with reduced physical, sensory or mental capabilities or lack of experience and knowledge if they have been given supervision or instruction concerning use of this device in a safe way and understand the hazards involved.
- Children should be supervised to ensure they do not play with this device.
- Cleaning and maintenance shall not be performed by children without adult supervision.
- This device is only to be used with the power supply unit provided.
- For the purposes of recharging the battery, only use the detachable power supply unit provided with this device.
- The battery must be removed from this device before this device is disposed of. To remove the battery from this device, first remove the screws on the bottom, then remove the main PCB and unscrew the battery cover using a screwdriver. Remove the battery by disconnecting the quick connector.
- The used battery should be placed in a sealed plastic bag and disposed of safely according to local environmental regulations.
- The external flexible cable or cord of the power supply unit cannot be replaced; if the cord is damaged, the power supply unit shall be disposed of.
- This device is for indoor use only.
- This device is not a toy. Do not sit or stand on this device. Small children and pets should be supervised when this device is operating.
- Store and operate this device in room temperature environments only.
- Clean with a cloth dampened with water only.
- Do not use this device to pick up anything that is burning or smoking.
- Do not use this device to pick up spills of bleach, paint, chemicals, or anything wet.
- Before using this device, pick up objects like clothing and loose paper. Lift up cords for blinds or curtains, and move power cords and fragile objects out of the way. If this device passes over a power cord and drags it, an object could be pulled off a table or shelf.
- If the room to be cleaned has a balcony, a physical barrier should be used to prevent access to the balcony and to ensure safe operation.
- Do not place anything on top of this device.
- Be aware that this device moves around on its own. Take care when walking in the area where this device is operating to avoid stepping on it.
- Do not operate this device in areas with exposed electrical outlets on the floor.
- Do not expose the electronics of this device, its battery, or the integrated Charging Base. There are no user-serviceable parts inside.
- Do not use this device on an unfinished, unsealed, waxed or rough floor. It may result in damage to the floor and this device. Use only on hard floor surfaces or low-pile carpet.
- This device has been designed to be used on floors without scratching them. We still recommend that you test this device on a small area of the room to be cleaned to ensure no scratches are made before cleaning the whole room.
Notice
This symbol on the device or its packaging indicates: Do not dispose of electrical appliances as unsorted municipal waste; use separate collection facilities. Contact your local authority for information regarding the collection systems available. If electrical appliances are disposed of in landfills or dumps, hazardous substances can leak into the groundwater and get into the food chain, damaging your health and well-being. When replacing old appliances with new ones, the retailer is legally obliged to take back your old appliance for disposal at least free of charge.
About Your RoboVac
What’s in the Box
RoboVac Anatomy
Top & Side
Bottom
Dust CollectorSuction InletCharging Base
Remote Control
- Start Auto cleaning
- Start Auto cleaning Stop cleaning
- Start Spot cleaning
- Start Edge cleaning
- Adjust time
- Adjust suction power level in Auto/Single Room Cleaning mode
- Control cleaning direction manually Adjust the hour and minute
- Start Single Room cleaning
- Return RoboVac to Charging Base
- Schedule Auto cleaning start time
Remote Control Display
- Returning to Charging Base
- Auto cleaning mode selected
- Spot cleaning mode selected
- Edge cleaning mode selected
- Single Room cleaning mode selected
- Clock
- Standard suction power enabled
- Boost IQ™ dynamic suction power enabled
- Max suction power enabled
- Scheduled cleaning time
LED Indication
You can see the status of RoboVac from the LED indicator.
| (Status Light) | Status |
| Breathing orange | Charging |
| Solid blue | Standby / Cleaning / Fully charged |
| Solid orange | Low power and returning to Charging Base |
| Off | • RoboVac is off.
• To conserve power, the light automatically turns off when RoboVac is not docked to the Charging Base and has been inactive for 1 minute. |
| Flashing / Solid red + Beeping | RoboVac has an error.
Refer to the “Troubleshooting>Error Tone” section in this manual for solutions. |
Using Your RoboVac
Important Tips Before Use
- Remove power cords and small objects from the floor that may entangle RoboVac.
- Fold tasseled edges of area rugs underneath to prevent tangling RoboVac. Avoid cleaning very dark-colored high-pile rugs or rugs thicker than 1.02 in/26 mm as they may cause RoboVac to malfunction.
- Keep RoboVac away from spaces lower than 2.87 in/73 mm to prevent RoboVac from getting stuck. If necessary, place a physical barrier to block off the problem areas.
- Keep RoboVac away from wet areas.
- RoboVac may climb on top of objects less than 0.63 in/16 mm in height. Remove these objects if possible.
- Anti-drop sensors prevent RoboVac from tumbling down stairs and steep drops. They may work less effectively if dirty or used on reflective/very dark-colored floors. It is recommended to place physical barriers to block off areas where RoboVac may fall.
Preparation
- Install the side brushes before use.
- Turn on the main power switch on the bottom of RoboVac.
- Place the Charging Base on a hard, level surface and against a wall.
- Remove objects within 3 ft/1 m of the left and right side and within 6 ft/2 m of the front of the charging base.
- Connect the round connector of the adapter into the power socket on the Charging Base and the other end into a wall outlet.
• When the Charging Base connects to AC power, the LED indicator on the Charging Base is SOLID WHITE.
Charge Your RoboVac
- RoboVac has a pre-installed rechargeable battery that has to be fully charged before use.
- RoboVac returns to the Charging Base at the end of a cleaning cycle or when its battery is running low.
Method 1: Attach RoboVac to the Charging Base by aligning its charging pins with the charging pins on the base.
Method 2: Press on the remote control to return RoboVac to the Charging Base.
Turn off the main power switch if RoboVac will not be used for a long period of time. To preserve the battery’s lifespan, recharge at least once every 6 months.
Start / Stop Cleaning
Make sure the main power switch on the bottom of RoboVac is turned on before use.
- Press on RoboVac or / on the remote control to start cleaning in Auto Mode.
- Press on RoboVac or on the remote control to stop cleaning.
Select a Cleaning Mode
Auto cleaning
RoboVac optimizes its cleaning path by selecting different cleaning modes automatically until cleaning is complete. This is the most commonly used cleaning mode.
Press on RoboVac or / on the remote control to start cleaning in Auto Mode.
- RoboVac will return to the Charging Base automatically when the battery level becomes low or when RoboVac finishes cleaning.
- By default, RoboVac starts in Auto cleaning mode when it is turned on.
BoostIQ™ Feature
When the BoostIQ™ feature is enabled, RoboVac will automatically increase the suction power if it detects stronger power is needed to ensure the best clean. BoostIQ™ is ideal for cleaning thicker carpets and hard-to-sweep messes, which will reduce the total cleaning time, but increase the noise level. If the vacuuming noise caused by BoostIQ™ disturbs you, you can disable this feature. This feature only works in Auto and Single Room cleaning modes.
In Auto or Single Room cleaning mode, press on the remote control repeatedly to adjust the suction power level.
• The corresponding icon is displayed on the remote control.
| Icon | Suction Power Level |
| Standard | Standard power |
| BoostIQ | Automatically switches between Standard and Enhanced power (default) |
| Max | Maximum power |
Spot cleaning
RoboVac intensively cleans a specific area in a spiral pattern, useful if there is a concentrated area of dust or debris. In Spot mode, RoboVac will stop cleaning after 2 minutes.
Press on the remote control to start cleaning in Spot mode.
Edge cleaning
RoboVac reduces its speed when it detects a wall and then follows the wall to ensure the edge is cleaned thoroughly. In Edge mode, RoboVac will clean for 20 minutes and return to the Charging Base.
Press on the remote control to start cleaning in Edge mode.
Single Room cleaning
RoboVac intensively cleans one single room and stops after 30 minutes. Select this mode only when one specific room needs to be cleaned. Make sure to confine RoboVac to the room by closing the door.
Press on the remote control to start cleaning in Single Room Mode.
Manual cleaning
You can direct RoboVac to clean a particular area by using the directional buttons on the remote control.
Set Time and Scheduled Cleaning
Set Time
Make sure the time is set correctly to your local time before setting a scheduled cleaning.
- Make sure the main power switch on the bottom of RoboVac is turned on.
- Press on the remote control. The time will blink on the display.
- Press to set the “hour” and “minute”.
Note: Make sure AM/PM is set correctly. - Press or to save the setting. RoboVac will BEEP ONCE to indicate the time has been set.
To ensure the time is set successfully, make sure RoboVac is turned on. You will hear a beep when the time has been set.
Set a Scheduled Cleaning
You can schedule RoboVac to start cleaning at a specified time. To cancel a previously scheduled cleaning, press and hold for 3 seconds until RoboVac beeps twice and disappears.
Note: Before setting a scheduled cleaning, make sure the time has been set correctly to your local time; refer to the previous section “Set Time” for how to set the time.
- Make sure the main power switch on the bottom of RoboVac is turned on.
- Press on the remote control. will blink on the display.
- Press to set the “hour” and “minute”.
Note: Make sure AM/PM is set correctly. - Press or to save the setting. RoboVac will BEEP ONCE to indicate the schedule has been set.
To ensure the schedule is set successfully, make sure RoboVac is turned on. You will hear a beep when the schedule has been set.
Cleaning and Maintenance
For optimal performance, follow the instructions below to clean and maintain RoboVac regularly. The cleaning/replacement frequency will depend on your usage habits of RoboVac.
Recommended cleaning/replacement frequency:
| RoboVac Part | Cleaning Frequency | Replacement Frequency |
| Dust Collector | After each use | – |
| Filters | Once every week | Every 2 months |
| Rolling Brush | Once every week | Every 6-12 months |
| Side Brushes | Once every month | Every 3-6 months (or when visibly worn) |
| Brush Guard | Once every month | Every 3-6 months (or when the silicone rubber strip on the brush guard becomes visibly worn) |
| Sensors | Once every month | – |
| Charging Pins | Once every month | – |
| Swivel Wheel | Once every month | – |
Clean the Dust Collector and Filters
- Press the dust collector release button to pull the dust collector out.
- Open and empty the dust collector.
- Remove the pre-filter by pulling the hooks as shown.
- Take out the foam filter and high-performance filter.
- Clean the dust collector and filters with a vacuum cleaner or a cleaning brush.
- Put the filters and pre-filter back together in the dust collector.
- Push the dust collector back into the main unit.
You can wash the dust collector, pre-filter and foam filter with water. Be sure to air-dry them thoroughly before reassembling. Do not wash the high-performance filter with water, as it may damage the filter and reduce the suction power.
Clean the Rolling Brush
- Pull on the release tabs to unlock the brush guard as shown.
- Lift the rolling brush to remove.
- Clean the rolling brush with the provided cleaning tool or a vacuum cleaner.
- Reinstall the rolling brush by inserting the fixed protruding end first and then clicking into place.
- Press down to snap the brush guard into place.
Clean the Side Brushes
Foreign substances, such as hair, can easily get tangled in the side brushes, and dirt may adhere to them. Be sure to clean them regularly.
- Remove the side brushes.
- Carefully unwind and pull off any hair or string that is wrapped between the main unit and the side brushes.
- Use a cloth dampened with warm water to remove dust from the brushes or to gently reshape them.
Only use the side brushes when they are completely dry.
Replace the Side Brushes
The side brushes may become bent or damaged after being used for a period of time.
Follow the instructions below to replace them.
Pull off the old side brushes and snap the new ones into place.
Clean the Sensors and Charging Pins
To maintain the best performance, clean the drop sensors and charging pins regularly.
• Dust off the drop sensors and charging contact pins using a cloth or cleaning brush.
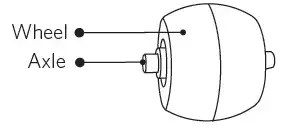
Clean the Swivel Wheel
- Hair or dust particles can easily get entangled in the swivel wheel. Be sure to clean the swivel wheel periodically and as needed.
- Pull out the swivel wheel.
- Reinstall the wheel and push in until it clicks into place.
- You can clean the swivel wheel with water.
- Use the swivel wheel only when it is completely dry.
Troubleshooting
| Problems | Solutions |
| RoboVac cannot be activated. | • Make sure the main power switch is in the ON position.
• Make sure the battery is fully charged. • Replace the batteries (2 AAA) in the remote control. • Make sure the remote control is within range (16 ft/5 m) of RoboVac. • If you still have trouble, turn off the main power switch and then turn it back on. |
| The remote control does not work. | • Replace the batteries in the remote control.
• Make sure RoboVac is turned on and fully charged. |
| RoboVac stops working suddenly. | • Check if RoboVac is trapped or stuck on an obstacle.
• Check if the battery level is too low. • If you still have trouble, turn off the main power switch, wait for 2 seconds, and then turn it back on. |
| You cannot schedule cleanings. | • Make sure the main power switch on the bottom of RoboVac is turned on.
• Make sure the time, time of day (AM/PM), and the scheduled time have been set correctly. • Check if RoboVac’s power is too low to start cleaning. |
| Suction power is weak. | • Check if any obstructions are blocking the suction inlet.
• Empty the dust collector. • Clean the filters with a vacuum cleaner or a cleaning brush. • Check if the filters are wet due to water or other liquid on the floor. Air-dry the filters completely before use. |
| RoboVac cannot be charged. | • Check if the indicator on the Charging Base lights up. If not, contact the eufy service center to repair or replace the Charging Base.
• Dust off the charging contact pins with a dry cloth. • Check if you can hear a beep when RoboVac is docked onto the Charging Base. If not, contact the eufy service center to repair or replace the Charging Base. |
| RoboVac cannot return to the Charging Base. | • Remove objects within 3 ft/1 m to the left and right side and within 6 ft/2 m of the front of the Charging Base.
• When RoboVac is in the vicinity of the Charging Base, it will return more quickly. However, if the Charging Base is located far away, RoboVac will need more time to return. Please be patient as it works its way back. • Clean the charging contact pins. |
| Problems | Solutions |
| The rolling brush does not rotate. | • Clean the rolling brush. • Check if the rolling brush and brush guard have been installed properly. |
| RoboVac’s movements or travel path are abnormal. | • Clean the sensors carefully with a dry cloth.
• Restart RoboVac by turning the power switch off and on. |
Error Tones
When RoboVac is in trouble, it will emit a series of short or long beeps and the red indicator on RoboVac will be solid or flashing.
Flashing red indicator light
| Error Tone | Cause | Solution |
| One beep | • RoboVac is stuck and one of the wheels is not making contact with the floor (hanging in mid-air).
• RoboVac may be in an extremely large room and the bumper is not registering obstacles. |
Restart cleaning in a new location. |
| Two beeps | RoboVac’s bumper is stuck. | Tap RoboVac’s bumper several times to dislodge any debris that may be trapped underneath. |
| Three beeps | • RoboVac’s drop sensors are dirty.
• RoboVac is stuck on the ledge of a staircase and cannot reverse. |
• Clean the drop sensors gently with a dry cloth.
• Place RoboVac in a new location. • Use a physical barrier to block off the problem area. |
| Four beeps | RoboVac’s power level is too low. | Manually charge RoboVac for at least 5 hours. |
Solid red indicator light
| Error Tone | Cause | Solution |
| One beep | RoboVac’s left/right wheel is stuck. | Turn off RoboVac and remove any hair or debris from the left/right wheel. |
| Two beeps | RoboVac’s side brush is stuck. | Turn off RoboVac and remove any hair or debris from the side brush. |
| Three beeps | RoboVac’s suction fan is stuck. | • Turn off RoboVac, then remove and empty the dust collector.
• Make sure the suction inlet is not blocked by any hair or debris. |
| Four beeps | RoboVac’s rolling brush is stuck. | Turn off RoboVac and remove any hair or debris from the rolling brush. |
Specifications
| Product Model | T2108 |
| Input | 19 V 0.6 A |
| Battery Voltage | DC 14.4 V |
| Power Consumption | 25 W |
| Battery Type | DC 14.4 V
Li-ion 2600 mAh |
| Dust Collector Capacity | 0.6 L |
| Cleaning Time | Max. 100 mins |
| Charging Time | 300 – 360 mins |
FAQ’S
Is the battery easy to change?
Yes, you just need to remove the screws on the bottom, then remove the main PCB and unscrew the battery cover using a screwdriver. Remove the battery by disconnecting the quick connector.
How long does it take to charge the battery?
It takes about 3 hours to fully charge a completely drained battery.
How long does it last?
The battery lasts for about 100 minutes of cleaning time.
Can I use other batteries?
No, this device is only compatible with the lithium-ion battery provided with this device.
What is the voltage of this device?
This device operates at 24V DC.
What does the EUFY RoboVac 11S do?
Eufy’s RoboVac 11S is terrific for the technophobes
It effectively collects fine dust and large debris from hard floors and is best-suited to light daily cleans to keep your floors free from dust. Its remote control, pared-back features, and easy operation mean it’s simple to use.
Does Eufy 11S have remote control?
The Eufy RoboVac 11s comes with a physical remote control with a monochrome display.
Can you use Eufy vacuum without WiFi?
If you don’t want to control it with the EufyHome app (don’t want to use WiFi connection), you can control it with remote control.
Should I turn off eufy RoboVac?
In this way, the vacuum can be always ready to go and cleans on schedule every day. If you are leaving for a long time, like one week, it’s recommended to unplug the adapter and the charging base, and turn off the main power switch of your RoboVac for safety.
How long does EUFY 11s battery last?
to 100 minutes
Eufy RoboVac 11 can run for up to 100 minutes and takes 5-6 hours for a full charge.
How do I know if my Eufy battery is bad?
No beeping while charging for about couple of hours. About 2.5 minutes before fully charge(blue light comes on), it starts beeping 5 times with solid red light on. This 5 beeping goes for three times then stops. Then orange light start flashing for another minute or so.
Can you leave robot vacuum charging?
Yes, you can leave the robot on the charging base.
VIDEO
eufy RoboVac 11S
www://us.eufy.com/products/

Eufy HomeBase + Camera + Entry Sensor
Anker Innovations Limited. All rights reserved. Eufy and the Eufy logo are trademarks of Anker Innovations Limited, registered in the United States and other countries. All other trademarks are the property of their respective owners.
What’s include
For HomeBase Installation:

For eufyCam Installation:

For Entry Sensor Installation:

Document:

Note:
- The camera contains strong magnet. We can not guarantee it won’t damage the mechanical hard drives or data on it. Please keep the camera at least 1 ft away from your internal / external hard drives.
- The power adapter varies by region.
- The number of devices and accessories vary by bundle packages.
At a glance
HomeBase

- Alarm off button
- Front LED indicator Anker Power IQ Technology)
- Alarm LED indicator
- Speaker
- MicroSD card slot
- Ethernet port
- Camera charging port (with Anker Power IQ Technology)
- Power port
- Restart button
HomeBase LED indicators


eufyCam

- IR light
- eufyCam LED indicator
- eufyCam lens
- Microphone
- Motion sensor
- Ambient light sensor
- Sync button
- USB charging port
- Screw hole
eufyCam LED indicator

Sensor

- SYNC button
- LED indicator
- Sensor Magnet
Entry Sensor LED indicator


Note: It’s necessary to set up the HomeBase and cameras on the app before you mount the cameras outdoors.
Installing the eufy Security App
- Download the eufy Security App Download the eufy Security app from the App Store (iOS devices) or Google Play (Android devices).

Setting Up the System
Log in or sign up
- If you have a eufyLife or eufyHome account, you can login to the eufy Security app using the same login information.
- However, if you are new to eufy, please sign up for a new account first and then log in.
System Setup
- Follow the onscreen instructions to add your eufy Security devices. Always start with the HomeBase, then eufyCam or sensor; eufyCam cameras and sensors can be purchased separately.
- You will be able to use eufyCam’s live view feature once it has been successfully added to the system; sensors will also appear in the device when successfully added.
- Make sure the devices are working properly before mounting them to your desired spot.

Note: HomeBase and eufyCam are not fully charged when shipping out of the factory (to ensure the safety during transportation). It is recommended to fully charge the HomeBase and eufyCam before start using them.
Charging eufyCam

- eufyCam does not come fully charged. It is recommended that you fully charge eufyCam before mounting it to your desired spot.
- To charge the camera, use the provided micro-USB charging cable to connecteufyCam to the camera charging port on the backside of the HomeBase. The camera LED indicator will blink white while charging. Charging a camera from 0% to 100% takes approximately 4 hours; it will take longer if you charge the
camera via a universal 5V USB charger.
Mounting the Camera Outdoors
- You can mount eufyCam to your selected outdoor location once you have successfully added it to your list of devices in the eufy Security app.
1. Here are some things to consider when looking for a good spot to mount your eufyCam:
- Mount your camera in a spot that has a clear view of what you want to surveil.
- Use the “Mounting Guide” function, found at the end of the setup process or under Camera Settings > Mounting Guide, to test the wireless signal strength of eufyCam at the location you wish to mount the camera. Make sure the location has a strong wireless signal strength so that your camera stays connected to the HomeBase. Move the camera as close to the HomeBase as possible if the wireless signal strength is weak.

- Hang eufyCam between the recommended mounting height of 7-10 ft (2-3 m) above the ground. This height gives eufyCam a wide fieldof- view and maximizes the detection range of the motion sensor of eufyCam.
- Avoid placing eufyCam under direct sunlight.
- Use the secure outdoor mount to secure eufyCam in outdoor environments.

2. Outdoor camera installation
- Drill holes with a 15/64 in (6 mm) drill bit in your desired spot and then insert the anchors into the holes; anchors are necessary for walls that are made out of hard materials such as concrete, brick, or stucco.
- Screw the base of the secure outdoor mount onto the wall. Fasten the ball bracket of the secure outdoor mount to the base of the secure outdoor mount.
- Fasten eufyCam to the secure outdoor mount and adjust the viewing angle by checking the live stream feed in the eufy Security app.

Mounting the Camera Indoors
Indoor camera installation:
1. You can stick the camera directly to a metal surface (Any flat surface made out of iron).

2. You can use the indoor mount to mount the camera:
- Drill a hole in your desired spot. Use the included anchor if it’s drywall and fasten the hook at your desired spot.
- Hang the indoor mount on the hook.
- Attach eufyCam to the indoor mount and adjust the viewing angle by checking the live stream feed in the eufy Security app.

Installing the Sensor
- Place the sensor on a door or window frame inside your home. Use the adhesive strip on the sensor or screws provided to mount the sensor. Close the door or the window and place the sensor magnet on the edge of the door or window.

- Make sure the gap between the sensor and the sensor magnet is less than 1.6 in (4 cm) when the door or window is closed. The bottom of the sensor magnet should align with the bottom of sensor.
F&Q
1. Why did the device setup process fail?
- Make sure your smartphone and HomeBase are connected to the same wireless router.
- Make sure eufyCam or the sensor is in the same room HomeBase is in during the setup process.
- Make sure you follow the onscreen instructions during the setup
process.
2. Why did eufyCam miss recording some events?
- eufyCamutilizes a passive infrared (PIR) sensor to detect motion from moving objects that emit body heat. Only moving objects that enter the PIR sensor’s detection zone will trigger eufyCam to start recording.
- If eufyCam is placed behind a glass or a weatherproof box, the PIR sensor will not be able to detect moving objects. Make sure there are no obstacles or transparent materials placed in front of eufyCam.
3. Why am I receiving so many false alerts?
- Check to see if youenabled eufyCam’s Human Detection feature, which ensures eufyCam will send you an alert only when it detects humans on your property. To enable this feature, go to Camera Settings Motion Detection and tap the Enable / Disable toggle switch.
- You may lower the level of sensitivity to reduce the range of the motion sensor, so that objects at further distances won’t trigger the camera. To set the level of sensitivity, go to Camera Settings Motion Detection.
4. How can I extend eufyCam’s battery life?
- Make sure the wireless signal strength to the HomeBase is good.
- Shorten the video recording time.
- Lower the quality videos are recorded in.
- Lower the sensitivity level of the PIR sensor.
5. Why do I experience significant delays when I watch a live-stream feed ?
- There are several factors that can cause delays when watching a livestream feed, such as how fast the Internet speed on your smartphone is, if the upload speed of HomeBase is less than 1Mbps, and if the signal strength between eufyCam and HomeBase is low.
- Check to see if your smartphone has a strong cellular or Wi-Fi
connection. Make sure your phone has strong cellular signal or is
connected to a stable Wi-Fi network. - If your Internet upload speed is under 1Mbps and you cannot upgrade the speed, try lowering the quality videos are recorded in.
- If the signal strength on the camera is weak, try to mount closer to the HomeBase or move the HomeBase closer to eufyCam.
6. How do I grant eufyCam viewing access to other users?
- Owners 0can grant eufyCam viewing access to other users. They can view at anytime on their phones.
- First, the new user will have to download the EufySecurity app to their smartphone and then create a eufy account or sign into an existing account. Then, the owner must go to Grant Access in their EufySecurity app’s menu and enter the new user’s eufy account information to send an invite.
7. Can I add camera or sensor to the system?
- Yes, the system supports up to 16 cameras and 16 entry sensors.
Please check the region code on the bottom of your HomeBase before purchasing add-on camera or add-on sensor. On the bottom it will show “Region A” or “Region B”. Please purchase the add-on device according to the region code of your HomeBase.
Please visit our official website to download the user manual: www.eufylife.com
Safety
FCC Statement
This device complies with Part 15 of the FCC Rules. Operation is subject to the following two conditions:
- This device may not cause harmful interference, and
- This device must accept any interference received, including
interference that may cause undesired operation.
Warning: Changes or modifications not expressly approved by the party responsible for compliance could void the user’s authority to operate the equipment.
Note: This equipment has been tested and found to comply with the limits for a Class B digital device, pursuant to Part 15 of the FCC Rules. These limits are designed to provide reasonable protection against harmful interference in a residential installation.
This equipment generates uses and can radiate radio frequency energy and, if not installed and used in accordance with the instructions, may cause harmful interference to radio communications. However, there is no guarantee that interference will not occur in a particular installation. If this equipment does cause harmful interference to radio or television reception, which can be determined by turning the equipment off and on, the user is encouraged to try to correct the interference by one or more of the following measures:
- Reorient or relocate the receiving antenna.
- Increase the separation between the equipment and receiver.
- Connect the equipment into an outlet on a circuit different from that to which the receiver is connected.
- Consult the dealer or an experienced radio/TV technician for help.
FCC Radio Frequency Exposure Statement
The device has been evaluated to meet general RF exposure requirements. The device can be used in fixed/mobile exposure condition. The min separation distance is 20cm.
Notice: Shielded cables
All connections to other computing devices must be made using shielded cables to maintain compliance with FCC regulations.
 This product complies with the radio interference requirements of the European Community.
Declaration of Conformity
Hereby, Anker Innovations Limited declares that this device is in compliance with the essential requirements and other relevant provisions of Directive 2014/53/EU.For the declaration of conformity, visit the Web site www. SeeNebula.com/certification.
Due to the used enclosure material, the product shall only be connected to a USB Interface of version 2.0 or higher. The connection to so called power USB is prohibited.
A statement regarding the AC/DC adapter as disconnect device is missing in the user manual.
The statement shall require a socket outlet that is installed near equipment and that shall be easily accessible.
The adapter shall be installed near the equipment and shall be easily
accessible.
Do not use the Device in the environment at too high or too low temperature, never expose the Device under strong sunshine or too wet environment.
The suitable temperature for the product and accessories is -20°C-50°C.
When charging, please place the device in an environment that has a normal room temperature and good ventilation.
It is recommended to charge the device in an environment with a temperature that ranges from 5°C~25°C.
Please ensure to use only the charger offered by the manufacturer. Using unauthorized charger may cause danger and violate the authorization of the projecter and the guarantee article.
This charger is for indoor use only
The charger output voltage/current is 5Vdc/2A. The plug considered as disconnect device of adapter.
RF exposure information: The Maximum Permissible Exposure (MPE) level has been calculated based on a distance of d=20 cm between the device and the human body. To maintain compliance with RF exposure requirement, use product that maintain a 20cm distance between the device and human body.
CAUTION RISK OF EXPLOSION IF BATTERY IS REPLACED BY AN INCORRECT TYPE. DISPOSE OF USED BATTERIES ACCORDING TO THE INSTRUCTIONS.
Wi-Fi Operating Frequency Range:2412~2472MHz for EU, AU;
2412~2462MHz for US/CA;
SUB-1G Operating Frequency Range: 868MHz for EU; 915MHz for US,AU
 This product is designed and manufactured with high quality materials and components, which can be recycled and reused.
 This symbol means the product must not be discarded as household waste, and should be delivered to an appropriate collection facility for recycling. Proper disposal and recycling helps protect natural resources,
human health and the environment. For more information on disposal and recycling of this product, contact your local municipality, disposal service, or the shop where you bought this product.
This device complies with Industry Canada licence-exempt RSS standard(s). Operation is subject to the following two conditions:
- This device may not cause interference, and
- This device must accept any interference, including interference that may cause undesired operation of the device.
Customer Service
- Warranty
12-month limited warranty - Call Us
United States +1 (800) 988 7973 Mon-Fri 9AM-5PM (PT)
United Kingdom +44 (0) 1604 936 200 Mon-Fri 6AM-11AM (GMT)
Germany +49 (0) 69 9579 7960 Mon-Fri 6:00-11:00 - Email Us
Customer Support: [email protected]

Read More About This User Manuals…
Eufy-HomeBase-Camera-Entry-Sensor-User-Manual-Optimized.pdf
Eufy-HomeBase-Camera-Entry-Sensor-Manual-Orginal.pdf
Questions about your Manual? Post in the comments!
References
]]>
Eufy EufyCam 2C Wireless Camera Set

Eufy EufyCam 2C Wireless Camera Set
WIRE-FREE HD SECURITY CAMERA SET
Anker Innovations Limited. All rights reserved. eufy Security and eufy Security Logo are trademarks of Anker Innovations Limited, registered in the United States and other countries. All other trademarks are the property of their respective owners.
GETTING STARTED
For HomeBase 2 installation

For eufyCam 2C installation

- Camera quantity and accessories vary by bundle package.
- HomeBase 2 power adapter varies by region.
PRODUCT OVERVIEW
HomeBase 2

- Status LED
- Speaker
- Power port
- USB port
- Ethernet port
- SYNC/ALARM OFF button
- Reset button
eufyCam 2C

- Lens
- Light sensor
- Microphone
- Motion sensor
- Spotlight
- Status LED
- SYNC button
- Mounting hole
- Charging port
- Speaker
CONNECTING THE HOMEBASE 2
Connecting the HomeBase 2 to the Internet
- Power on the HomeBase 2, then use the ethernet cable provided to connect the HomeBase 2 to your home router.

- The LED indicator turns to blue (this may take up to 1min) when
HomeBase 2 is ready for setup.

SETTING UP THE SYSTEM
Getting the App and Setting up the System
- Download the Eufy Security app from the App Store (iOS devices) or Google Play (Android devices).
- Sign up for a Eufy Security account, then follow the onscreen instructions to complete the setup.

MOUNTING THE CAMERA
Find a Good Mounting Spot
Use the “Mounting Guide” function, found at the end of the setup process or under Camera Settings > Mounting Guide, to test the wireless signal strength of eufyCam 2C at the location you wish to mount the camera. Move the camera as close to the HomeBase 2 as possible if the wireless signal strength is poor.

Height and Location
- Hang eufyCam 2C 7-10 ft (2-3 m) above the ground. This height
maximizes the detection range of the motion sensor of eufyCam 2C. Avoid placing eufyCam 2C under direct sunlight.

The camera can be mounted both indoors and outdoors.
- Turn the knob of the mounting bracket clockwise to loosen and
disassemble it.

- Drill holes with a1/4 inch (6.35mm) drill bit, then insert the anchors into the holes; anchors are necessary for walls that are made out of hard materials such as concrete, brick, or stucco.

- Firmly screw the base of the mounting bracket onto the wall. Fasten the ball knob of the bracket to the base of the bracket.

- Tighten eufyCam 2C to the mounting bracket and adjust the viewing angle by checking the live stream feed in the Eufy Security app.

Tips:
- The Homebase 2 pairs up to 16 cameras, you can repeat the steps mentioned above to add more eufy Cam 2C cameras to meet different needs of use.
- For troubleshooting, check Help on the Eufy Security app. Refer to app page for LED indicator status.
CHARGING EUFYCAM 2C
Charging eufyCam 2C
- Method 1

- Method 2


SATETY STATEMENT
FCC Statement
This device complies with Part 15 of the FCC Rules. Operation is subject to the following two conditions:
- This device may not cause harmful interference, and
- This device must accept any interference received, including
interference that may cause undesired operation.
Warning: Changes or modifications not expressly approved by the party responsible for compliance could void the user’s authority to
operate the equipment.
Note: This equipment has been tested and found to comply with the limits for a Class B digital device, pursuant to Part 15 of the FCC
Rules. These limits are designed to provide reasonable protection against harmful interference in a residential installation.
This equipment generates uses and can radiate radio frequency energy and, if not installed and used in accordance with the instructions, may
cause harmful interference to radio communications. However, there is no guarantee that interference will not occur in a particular installation. If this equipment does cause harmful interference to radio or television reception, which can be determined by turning
the equipment off and on, the user is encouraged to try to correct the interference by one or more of the following measures:
- Reorient or relocate the receiving antenna.
- Increase the separation between the equipment and receiver.
- Connect the equipment into an outlet on a circuit different from that to which the receiver is connected.
- Consult dealer or an experienced radio/TV technician for help.
FCC Radio Frequency Exposure Statement
The device has been evaluated to meet general RF exposure requirements. The device can be used in fixed/mobile exposure condition. The min separation distance is 20cm.
Notice: Shielded cables
All connections to other computing devices must be made using shielded cables to maintain compliance with FCC regulations.
The following importer is the responsible party
Company Name: Fantasia Trading LLC
Address: 9155 Archibald ave, ste202 Rancho Cucamonga ,CA 91730, USA
Telephone: 1-909-484-1530
 This product complies with the radio interference requirements of the European Community.
Declaration of Conformity
Hereby, Anker Innovations Limited declares that this device is in compliance with the essential requirements and other relevant provisions of Directive 2014/53/EU. For the declaration of conformity, visit the Web site www.eufylife.com
Due to the used enclosure material, the product shall only be connected to a USB
Interface of version 2.0 or higher. The adapter shall be installed near the equipment and shall be easily accessible.
Do not use the Device in the environment at too high or too low temperature, never expose the Device under strong sunshine or too wet environment.
The suitable temperature for HomeBase 2 and accessories is -10°C-45°C.
The suitable temperature for eufyCam 2C and accessories is -20°C-50°C.
When charging, please place the device in an environment that has a normal room
temperature and good ventilation.
It is recommended to charge the device in an environment with a temperature that ranges from 5°C~25°C.
Please ensure to use only the charger offered by the manufacturer. Using unauthorized charger may cause danger and violate the authorization of the device and the guarantee article.
This charger is for indoor use only
The charger type is ASSA67W-120200, output voltage/current is 12Vdc/2A. The plug considered as disconnect device of adapter.
RF exposure information: The Maximum Permissible Exposure (MPE) level has been calculated based on a distance of d=20 cm between the device and the human body. To maintain compliance with RF exposure requirement, use product that maintain a 20cm distance between the device and human body.
CAUTION RISK OF EXPLOSION IF BATTERY IS REPLACED BY AN INCORRECT TYPE. DISPOSE OF USED BATTERIES ACCORDING TO THE INSTRUCTIONS.
Wi-Fi Operating Frequency
Range: 2412~2472MHz ; Wi-Fi Max Output
Power: 19dBm
SUB-1G Frequency range: 866~866.8MHz;
SUB-1G Output Power: 12.4dBm
The following importer is the responsible party (contact for EU matters only)
Importer: Anker Technology (UK) Ltd
Importer Address: Suite B, Fairgate House, 205 Kings Road, Tyseley, Birmingham, B11 2AA, United Kingdom
 This product is designed and manufactured with high quality materials and components, which can be recycled and reused.
 This symbol means the product must not be discarded as household waste, and should be delivered to an appropriate collection facility for recycling. Proper disposal and recycling helps protect natural resources, human health and the environment. For more information on disposal and recycling of this product, contact your local municipality, disposal service, or the shop where you bought this product.
This device complies with Industry Canada licence-exempt RSS standard(s). Operation is subject to the following two conditions:
- This device may not cause interference, and
- This device must accept any interference, including interference that may cause undesired operation of the device.
This Class B digital apparatus complies with Canadian ICES-003.
IC RF Statement:
When using the product, maintain a distance of 20cm from the body to ensure compliance with RF exposure requirements.
Customer Service
- Warranty
12-month limited warranty - Call Us
United States +1 (800) 988 7973 Mon-Fri 9AM-5PM (PT)
United Kingdom +44 (0) 1604 936 200 Mon-Fri 6AM-11AM (GMT)
Germany +49 (0) 69 9579 7960 Mon-Fri 6:00-11:00 - Email Us
Customer Support: [email protected]
Anker Innovations Limited.
Room 1318-19, Hollywood Plaza, 610 Nathan Road, Mongkok, Kowloon, Hong Kong

Questions about your Manual? Post in the comments!
FAQ’S
How do I set up my HomeBase 2?
You can set up your HomeBase 2 using the Eufy Security app, or by visiting eufy.com/setup.
What is the difference between EUFY CAM 2 and EUFY Cam 2C?
The EufyCam 2 does have two features that are superior to what the EufyCam 2C offers: longer battery life and anti-theft protection. That extra cost over the EufyCam 2C will net you double the battery life — 12 months on the EufyCam 2 versus six months on the EufyCam 2C although it’ll vary depending on your settings.
What is the max range from HomeBase to the camera?
20-30ft. The actual range will vary depending on a number of factors such as the thickness of walls, obstacles inside the house, and the location of HomeBase.
How Does The Night Vision Work In Eufy Cameras?
The night vision feature on Eufy smart cameras allows users to be able to see their surveillance in pitch darkness so that they don’t miss anything. They use infrared light to illuminate structures, and images in the dark.
Can eufy work without Wi-Fi?
No these don’t work without WiFi. They definitely don’t record if the power goes off, because the base station that stores recordings is plugged into electricity. These items record based on motion detection and do not record 24/7 but only when someone (and some animals) walk or run past it.
Can you watch eufy camera away from home?
Yes. The eufySecurity App helps you keep an eye on things and stay connected to your eufy products anywhere you have an internet connection.
Can someone hack your home security camera?
Any device connected to the internet can be hacked, and that includes home security cameras. Wired cameras are less vulnerable than Wi-Fi cameras, and those with local storage are less vulnerable than cameras that store video on a cloud-based server. However, all cameras can be hacked.
Why is my eufy camera not picking up motion at night?
Please make sure your camera is online and the battery has power. 3. You can test the motion detection in your app and enable the motion detection button. Steps: Device Tab>”…” Icon > Camera Settings > Motion Detection.
Why is my eufy camera black and white?
Infrared Sensors Explained
Cameras are also equipped with a sensor that can see the infrared light reflecting off people and objects in the viewing area. This creates a black and white image to the end-user.
Why is my eufy camera Green?
A solid green light on a eufy camera means there is both a local network and an internet connection.
Can wireless cameras work without Wi-Fi?
yes, wireless cameras can work without the internet, but you won’t be able to access all of their features. Of course, whether or not the camera will work without the internet depends on the type of camera, how it was set up, and how it stores video.
Does eufyCam 2C Pro have an anti-theft alarm?
Sorry that the eufyCam 2C Pro doesn’t have the anti-theft function. However, you can enable the camera or HomeBase alarm when the camera is triggered. Steps in the App: Security > Security Mode Setting > HomeBase Alarm.
Read More About This User Manuals…
Eufy-EufyCam-2C-Wireless-Camera-Set-Manual-Optimized.pdf
Eufy-EufyCam-2C-Wireless-Camera-Set-Manual-Orginal.pdf
Eufy EufyCam 2C Wireless Camera Set
www://us.eufy.com/products/t88311d1
References
]]>
Eufy Security Keypad T8960
Anker Innovations Limited. All rights reserved. eufy Security and eufy Security Logo are trademarks of Anker Innovations Limited, registered in the United States and other countries. All other trademarks are the property of their respective owners.
Model: T8960
WHAT’S INCLUDED
For Keypad Installation

PRODUCT OVERVIEW
Keypad

- Panic Button
• Press and hold for 3 seconds to trigger the alarm - SYNC Button
• Press and hold for 2 seconds to pair with HomeBase - Reset
- LED Indicator
- Buzzer
- Power Indicator
- Micro-USB Charging Port
- Keypad Buttons
- Motion Sensor
Adding the Keypad to the System
Note:
- Make sure you’ve first completed the setup of your eufy Security Home Base.
- Make sure the keypad is fully charged. A fully-charged keypad’s battery can last for 6 months per charge.
- Go to Add Device, and then select Keypad to add it to your system.

- Press and hold the SYNC button for 2 seconds until the LED indicator blinks
blue. This indicates that The Keypad is waiting to pair.
The LED indicator turns solid blue for 5 seconds to indicate the pairing is completed. - Follow the on-screen instructions to complete the setup process.
Note: You can add up to 3 keypads to your Home Base.

MOUNTING YOUR KEYPAD
Mount the Keypad
To mount the keypad:
Option 1: Use the adhesive strips
- Stick the adhesive strips on the keypad, and then tear off the removable film.

- Stick the keypad onto the wall.

Option 2: Use the mounting screws
- Slide the mounting bracket off.

- Place the mounting plate against the wall, matching UP and Down as indicated
on the back of the mounting bracket. Push a pencil tip through the holes on the mounting bracket to mark the location for mounting the keypad.

- Drill holes with a drill bit (15/64” / 6 mm) at each marking.

- Insert anchors into the holes, and fix the mounting bracket onto the wall with the provided screws. No anchors are needed on wooden walls.

- Slide the keypad down until it snaps perfectly onto the mounting bracket.

USING THE KEYPAD
Keypad Mode Introduction
The Keypad features four modes: Away, Home, Customized and Disarmed, which
are associated with four Keypad buttons respectively.

Away mode: All sensors will be activated and your house will be monitored. The
system is armed. Any movement will be detected and an alarm will be triggered.
Recommended using when you are away from home.
Home mode: Interior sensors are disabled, while the exterior sensors are activated.
Recommended using when you are at home and want to be alerted about any breakins outside the house.
Customized mode: Recommended if you feel a customized security mode is needed to match your specific life requirements.
Disarmed mode: No sensors are activated, leaving your house unmonitored.
Arm, Disarm and Turn off an Alarm
- To arm the system, enter the access code and press the or button.
- To disarm the system, enter the access code and press the button.
- To turn off an alarm, enter the access code and press √. The on-going alarm will be turned off with the device’s security mode unchanged. When you turn off the alarm, the alarms of all the devices connected to HomeBase will be turned off.
Set Customized Security Mode
To set a customized security mode using the eufy Security app:
- Open the Keypad homepage.
- Tap the “Security” tab.
- Tap the “Modes” tab and then tap “Customize” to add your personalized
settings. - Follow the on-screen instructions to define the actions of sensors. When the
customized mode is activated, the sensors will act as defined in the app. - Go to the Keypad homepage, tap “Button Allocation” and assign the customized mode to the button.
For example, you could customize a “Sleep Mode” in which only certain sensors
are monitored and alarms are triggered. When you press the button, “Sleep
Mode” will be activated.
Switch between Away / Home / Customized / Disarmed modes
To switch between Away / Home / Customized / Disarmed modes:
- Enter the access code, which is an optional setting on the eufy Security app.
- Press / / / to switch to the corresponding mode.
Note: Access code is recommended to use when you switch from Away to
Disarm, while it is not necessary otherwise.
Device Bypass
Device bypass means that the system will ignore faulty sensors for a specific time
while the system is armed.
When you switch to Home, Away or any customized security mode, the system
will check if there are any issues with all your devices. You may need to bypass a
particular sensor in the following scenarios:
- You want to leave a sensor off while the system is armed.
Example: You arm the system but want to leave a window open. You are sleeping at home and want the room to be unmonitored. - A sensor malfunctions and you don’t have time to deal with it.
- A sensor is not connected to the HomeBase and cannot be detected.
If any issues are detected, the × and √ keypad buttons will flash simultaneously. You may need to:
- Select √ to bypass faulty devices. Then you can switch to the desired mode.
- Select × to cancel the operation. Then you cannot switch the current security
mode.
Note:
- Each time you switch the security mode, the system will re-check whether your devices are working properly.
- Make sure there is at least one active sensor in a mode that can arm the system, or you cannot switch the security mode.
Panic Alarm
The Panic alarm can be used in the case of an emergency. To trigger an emergency
alarm, press and hold the Panic button for 3 seconds. Once the emergency alarm is
triggered, the LED indicator blinks red quickly for 3 seconds, the alarm coming from HomeBase will be heard, and text notifications will be sent to you/the administrator via the eufy Security app and email.
LED Indication

Note: When the Away ( )/ Home ( )/CUS ( ) buttons blink blue simultaneously, it indicates that the current security mode is not associated with these buttons or specified on the app.
Buzzer Indication

OPERATING ON THE EUFY SECURITY APP
All operations, such as mode switch, alarm on / off, device bypass, OTA update can be performed on the eufy Security app.
Keypad Settings
On the eufy Security app, you can create the following settings:
- Set Away, Home, Customized, and Disarm security modes. Make sure the mode associates to the Keypad button accordingly.
- Change access code
- Create access codes for other family members or guests. Up to 6 access codes are supported. The access code should be 4 digits to 8 digits by default.
- Name the device
- Set emergency code. After entering the set code, the alarm will be disabled. A
specified message will be sent to emergency contacts via the app. - Synchronize the Keypad status: Connected, disconnected, charging, factory
default.
Access Code Management
The eufy Security app allows you to assign an access code to your family members,
friends or visitors.
To assign the access code to them, open the eufy Security app, go to the Keypad’s
Device page, enter the user name and assign a new access code.
You can set an expiration date for each access code. Access codes beyond the
expiration date are invalid. This may be suitable for temporary visitors.
Note: Up to 6 access codes can be added on one HomeBase.
CHARGING YOUR KEYPAD
- Before charging your keypad, check whether the Keypad power is low.
- When the Keypad power is low:
- The Keypad’s LED indicator will flash red for 5 seconds when movement is detected nearby. On the eufy Security app, the Keypad power level icon will turn red.
- To charge your Keypad, use the micro USB cable and charger (not provided).

OTA UPDATE
- In some cases, the system may push OTA updates automatically. When the OTA update begins, the LED indicator keeps flashing red until the process is completed.
- To make sure the software is always the latest version, check your software updates and follow the on-screen instructions to update the firmware manually
RESETTING YOUR KEYPAD
When a keypad malfunction occurs, use a sharp-pointed object (such as SIM card
opener) to reset the keypad.
SPECIFICATION
Wi-Fi Frequency: Sub-1G: 866~866.8MHz
Cell Capacity: 2600 mAh
USB-A input: 5V 1A
Working temperaure: -10ºC – 50ºC / 14°F – 104°F
Storage temperature: -20ºC – 60ºC / -4°F – 140°F
TROUBLESHOOTING
The keypad keeps blinking red.
This indicates the keypad is disconnected from the HomeBase.
- Check whether the HomeBase is charged.
- Reset the keypad
- Check whether there is wireless interference nearby.
- Take the keypad closer to the HomeBase
For troubleshooting, check the FAQ section in the eufy Security app.
NOTICE
FCC Statement
This device complies with Part 15 of the FCC Rules. Operation is subject to the
following two conditions:
- This device may not cause harmful interference, and
- This device must accept any interference received, including interference that may cause undesired operation.
Warning: Changes or modifications not expressly approved by the party responsible for compliance could void the user’s authority to operate the equipment.
Note: This equipment has been tested and found to comply with the limits for a Class B digital device, pursuant to Part 15 of the FCC Rules. These limits are designed to provide reasonable protection against harmful interference in a residential installation.
This equipment generates uses and can radiate radio frequency energy and, if not
installed and used in accordance with the instructions, may cause harmful interference to radio communications. However, there is no guarantee that interference will not occur in a particular installation. If this equipment does cause harmful interference to radio or television reception, which can be determined by turning the equipment off and on, the user is encouraged to try to correct the interference by one or more of the following measures: (1) Reorient or relocate the receiving antenna. (2) Increase the separation between the equipment and receiver. (3) Connect the equipment into an outlet on a circuit different from that to which the receiver is connected. (4) Consult the dealer or an experienced radio / TV technician for help.
FCC Radio Frequency Exposure Statement
The device has been evaluated to meet general RF exposure requirements. The device can be used in fixed/mobile exposure condition. The min separation distance is 20cm.
Notice: Shielded cables
All connections to other computing devices must be made using shielded cables to
maintain compliance with FCC regulations.
The following importer is the responsible party:
Company Name: POWER MOBILE LIFE, LLC
Address: 400 108th Ave NE Ste 400, Bellevue, WA 98004-5541
Telephone: 1-800-988-7973
This product complies with the radio interference requirements of the European Community.
 Declaration of Conformity
Hereby, Anker Innovations Limited declares that this device is in compliance with the essential requirements and other relevant provisions of Directive 2014/53/EU. For the declaration of conformity, visit www.eufylife.com.
Do not use the Device in the environment at too high or too low temperature, never expose the Device under strong sunshine or too wet environment.
The suitable temperature for the product and accessories is -10°C-50°C.
RF exposure information: The Maximum Permissible Exposure (MPE) level has been calculated based on a distance of d=20 cm between the device and the human body.
To maintain compliance with RF exposure requirement, use product that maintain a 20cm distance between the device and the human body.
CAUTION RISK OF EXPLOSION IF BATTERY IS REPLACED BY AN INCORRECT TYPE. DISPOSE OF USED BATTERIES ACCORDING TO THE INSTRUCTIONS
SUB-1G Frequency range: 866 ~ 866.8MHz
Max Output Power: 11.746dBm
The following importer is the responsible party (contact for EU matters only)
Importer: Anker Technology (UK) Ltd
Importer Address: Suite B, Fairgate House, 205 Kings Road, Tyseley, Birmingham B11 2AA, United Kingdom
 This product is designed and manufactured with high quality materials and components, which can be recycled and reused.
This symbol means the product must not be discarded as household waste, and should be delivered to an appropriate collection facility  for recycling. Proper disposal and recycling helps protect natural resources, human health and the environment. For more information on disposal and recycling of this product, contact your local municipality, disposal service, or the shop where you bought this product.
IC Statement
This device complies with Industry Canada licence-exempt RSS standard(s).
Operation is subject to the following two conditions:
- This device may not cause interference, and
- This device must accept any interference, including interference that may cause
undesired operation of the device.
This Class B digital apparatus complies with Canadian ICES-003.
IC RF Statement:
When using the product, maintain a distance of 20cm from the body to ensure
compliance with RF exposure requirements.
FCC ID: 2AOKB-T8960 IC: 23451-T8960
Anker Innovations Limited
Room 1318-19, Hollywood Plaza, 610 Nathan Road, Mongkok, Kowloon, Hong Kong
CUSTOMER SERVICE
Warranty
 12-month limited warranty
 +1 (800) 988 7973 Mon-Fri 9AM-5PM (PT)
+44 (0) 1604 936 200 Mon-Fri 6AM-11AM (GMT)
+49 (0) 69 9579 7960 Mon-Fri 6:00-11:00
 Customer Support: [email protected]
@eufyofficial


@eufyofficial

eufyofficial
Eufy-Security-Keypad-T8960-Manual-Optimized.pdf
Eufy-Security-Keypad-T8960-Manual-Orginal.pdf
Questions about your Manual? Post in the comments!
References
]]>

Eufy Indoor Cam 2K Pan & Tilt (Model: T8410)
Anker Innovations Limited. All rights reserved. eufy Security and eufy Security Logo are trademarks of Anker Innovations Limited, registered in the United States and other countries. All other trademarks are the property of their respective owners.
WHAT’S INCLUDED
- eufy Indoor Cam 2K Pan & Tilt × 1
- Model: T8410
- Mounting Plate × 1
- USB Cable × 1
- USB Adapter × 1
- Mounting Screw Pack × 1
- User Manual × 1
PRODUCT OVERVIEW
eufy Indoor Cam 2K Pan & Tilt

- Lens
- Microphone
- SD card slot
- Status LED
- Speaker
- Power input
- SYNC button
SETTING UP THE SYSTEM
- Download the eufy Security app from the App Store
(iOS devices) or Google Play (Android devices).
- Sign up a eufy Security account. Go to the app homepage. Tap Add Device, and add the Indoor Cam Pan 2K to your system.
- Follow the on-screen instructions to complete the setup.
LED Status

MOUNTING THE INDOOR CAM
Select a Location for Mounting
- The camera can be placed on a table, shelf, or can be mounted on a wall or ceiling. Select a location and height where you can get the desired view, and can reach a power outlet easily.

- Disconnect the Indoor Cam from the power outlet before mounting.
- Keep the eufy Indoor Cam at least 0.7 ft / 20 cm away from walls or anything that may obstruct the view. Do this to avoid infrared reflection which can have a negative impact on the night vision performance.

Mount the Indoor Camera
To mount the eufy Indoor Cam on the ceiling, follow the steps below:
- Place the positioning card against the ceiling and then mark the points at which drilling will be required.

- Drill holes with a 5/16” (8 mm) drill bit.

- Align the holes on the mounting plate with those in the ceiling. Insert the anchors into the holes; anchors are necessary for walls that are made out of hard materials such as concrete, brick, or stucco. Fix the screws with a Phillipshead screwdriver to fasten the mounting plate to the ceiling.

- Align the grooves with the mounting plate and rotate the eufy Indoor Cam clockwise until it clicks into place.

- To mount the eufy Indoor Cam on a wall, we recommend using the mounting bracket (not provided) as the illustration below.

POWERING ON THE INDOOR CAM
Connect the eufy Indoor Cam to a power outlet using the provided USB cable and USB adapter. After being powered on, the eufy Indoor Cam will be connected to the system. When it is successfully connected, the status LED will turn solid blue.
Rotate the eufy Indoor Cam to adjust the view and check it using the live stream which you can access in the eufy Security app. You are now all set to use your eufy Indoor Cam.
Tip:
For troubleshooting, check Help on the eufy Security app. Refer to the app page for LED indicator status.
NOTICE
FCC Statement
This device complies with Part 15 of the FCC Rules. Operation is subject to the following two conditions: (1) this device may not cause harmful interference, and (2) this device must accept any interference received, including interference that may cause undesired operation.
Warning: Changes or modifications not expressly approved by the party responsible for compliance could void the user’s authority to operate the equipment.
Note: This equipment has been tested and found to comply with the limits for a Class B digital device, pursuant to Part 15 of the FCC Rules. These limits are designed to provide reasonable protection against harmful interference in a residential installation.
This equipment generates uses and can radiate radio frequency energy and, if not installed and used in accordance with the instructions, may cause harmful interference to radio communications. However, there is no guarantee that interference will not occur in a particular installation. If this equipment does cause harmful interference to radio or television reception, which can be determined by turning the equipment off and on, the user is encouraged to try to correct the interference by one or more of the following measures: (1) Reorient or relocate the receiving antenna. (2) Increase the separation between the equipment and receiver. (3) Connect the equipment into an outlet on a circuit different from that to which the receiver is connected. (4) Consult the dealer or an experienced radio/ TV technician for help.
FCC Radio Frequency Exposure Statement
The device has been evaluated to meet general RF exposure requirements. The device can be used in fixed/mobile exposure condition. The min separation distance is 20cm.
Notice: Shielded cables
All connections to other computing devices must be made using shielded cables to maintain compliance with FCC regulations.
The following importer is the responsible party
Company Name: POWER MOBILE LIFE, LLC
Address: 400 108th Ave NE Ste 400, Bellevue, WA 98004-5541
Telephone: 1-800-988-7973
This product complies with the radio interference
r equirements of the European Community.
Declaration of Conformity
Hereby, Anker Innovations Limited declares that this device is in compliance with the essential requirements and other relevant provisions of Directive 2014/53/EU.For the declaration of conformity, visit the Web site: https://www.eufylife.com/
This product can be used across EU member states.
Due to the used enclosure material, the product shall only be connected to a USB Interface of version 2.0 or higher. The adapter shall be installed near the equipment and shall be easily accessible.
Do not use the Device in the environment at too high or too low temperature, never expose the Device under strong sunshine or too wet environment.
The suitable temperature for T8410 and accessories is 0°C-40°C. When charging, please place the device in an environment that has a normal room temperature and good ventilation.
It is recommended to charge the device in an environment with a temperature that ranges from 5°C~25°C.
Please ensure to use only the charger offered by the manufacturer. Using unauthorized charger may cause danger and violate the authorization of the device and the guarantee article.
This charger is for indoor use only.
The charger type is TEKA012-0502000EU , output voltage/current is 5Vdc/2A. The plug considered as disconnect device of adapter.
RF exposure information: The Maximum Permissible Exposure (MPE) level has been calculated based on a distance of d=20 cm between the device and the human body. To maintain compliance with RF exposure requirement, use product that maintain a 20cm distance between the device and human body.
CAUTION RISK OF EXPLOSION IF BATTERY IS REPLACED BY AN INCORRECT TYPE. DISPOSE OF USED BATTERIES ACCORDING TO THE INSTRUCTIONS.
Wi-Fi Operating Frequency Range:2412~2472MHz ; Wi-Fi Max
Output Power:19dBm
Bluetooth Operating Frequency Range:2402~2480MHz; Bluetooth
Max Output Power:8dBm(EIRP)
The following importer is the responsible party (contact for EU
matters only)
Importer: Anker Technology (UK) Ltd
Importer Address: Suite B, Fairgate House, 205 Kings Road, Tyseley,
Birmingham, B11 2AA, United Kingdom
 This product is designed and manufactured with high quality materials and components, which can be recycled and reused.
This symbol means the product must not be discarded as household waste, and should be delivered to an appropriate collection fac ility for recycling. Proper disposal and recycling helps protect natural resources, human health and the environment. For more information on disposal and recycling of this product, contact your local municipality, disposal service, or the shop where you bought this product.
IC Statement
This device complies with Industry Canada licence-exempt RSS standard(s). Operation is subject to the following two conditions:
(1) this device may not cause interference, and
(2) this device must accept any interference, including interference that may cause undesired operation of the device.
This Class B digital apparatus complies with Canadian ICES-003.
IC RF Statement:
When using the product, maintain a distance of 20cm from the body to ensure compliance with RF exposure requirements.
CUSTOMER SERVICE
- Warranty
12-month Limited Warranty - Call Us
United States +1 (800) 988 7973 Mon-Fri 9AM-5PM (PT)
United Kingdom +44 (0) 1604 936 200 Mon-Fri 6AM-11AM (GMT)
Germany +49 (0) 69 9579 7960 Mon-Fri 6:00-11:00 - Email Us
Customer Support: [email protected]
![]()
Anker Innovations Limited
Room 1318-19,Hollywood Plaza,610 Nathan
Road, Mongkok, Kowloon, Hong Kong
Anker-Eufy-Indoor-PanTilt-Security-Camera-T8410-Manual-Optimized.pdf
Anker-Eufy-Indoor-PanTilt-Security-Camera-T8410-Manual-Orginal.pdf
Questions about your Manual? Post in the comments!
References
]]>

Eufy Indoor Cam 2K
Anker Innovations Limited. All rights reserved. eufy Security and eufy Security Logo are trademarks of Anker Innovations Limited, registered in the United States and other countries. All other trademarks are the property of their respective owners.
WHAT’S INCLUDED
- eufy Indoor Cam 2K × 1
- Model: T8400
- Mounting Plate × 1
- USB Cable × 1
- USB Adapter × 1
- Mounting Screw Pack × 1
- User Manual
Product Overview
eufy Indoor Cam 2K

① Microphone
② Lens
③ Status LED
④ SD card slot
⑤ Speaker
⑥ SYNC button
⑦ Power input
Setting up the system
- Download the eufy Security app from the App Store (iOS devices)
or Google Play (Android devices).
- Sign up a eufy Security account. Go to the app homepage. Tap Add
Device, and add the eufy Indoor Cam to your system. - Follow the on-screen instructions to complete the setup.
LED Status

Mounting the eufy Indoor Cam
- The camera can be placed on a table, shelf, or can be mounted on
a wall or ceiling. Select a location and height where you can get the desired view, and can reach a power outlet easily.

- Disconnect the eufy Indoor Cam from the power outlet before mounting.
- Keep the eufy Indoor Cam at least 0.7 ft / 20 cm away from walls or anything that may obstruct the view. Do this to avoid infrared reflection which can have a negative impact on the night vision performance.
Mount the eufy Indoor Cam
The eufy Indoor Cam can be mounted on the wall or ceiling. To mount the eufy Indoor Cam on the wall:
- Align the positioning card and then mark the points at which drilling will be required.

- Drill holes with a 15/64” (6 mm) drill bit.

- Align the holes on the mounting plate with those on the wall,
matching the direction as UP and Down indicates. Insert the anchors into the holes; anchors are necessary for walls that are made out of hard materials such as concrete, brick, or stucco. Fix the screws with a Phillips-head screwdriver to fasten the mounting plate onto the wall.

- Align the eufy Indoor Cam’s mounting slot with the mounting plate, and then push the camera down until it clicks into place.

- To mount the eufy Indoor Cam on the ceiling, follow the steps 1-4 to secure the camera base onto the mounting plate.
Powering on the eufy Indoor Cam
- Connect the eufy Indoor Cam to the power outlet using the provided USB cable and USB adapter. After powered on, the eufy Indoor Cam will be connected to the system. When it is successfully connected, the status LED will turn solid blue.
- Rotate the eufy Indoor Cam to adjust the view by checking the live streams in the eufy Security app. You are all set to use the eufy Indoor Cam.
Note: For troubleshooting, check Help on the eufy Security app.
Refer to the app page for LED indicator status.
Notice
FCC Statement
This device complies with Part 15 of the FCC Rules. Operation is subject to the following two conditions: (1) this device may not cause harmful interference, and (2) this device must accept any interference received, including interference that may cause undesired operation.
Warning: Changes or modifications not expressly approved by the party responsible for compliance could void the user’s authority to operate the equipment.
Note: This equipment has been tested and found to comply with the limits for a Class B digital device, pursuant to Part 15 of the FCC Rules. These limits are designed to provide reasonable protection against harmful interference in a residential installation.
This equipment generates uses and can radiate radio frequency energy and, if not installed and used in accordance with the instructions, may cause harmful interference to radio communications. However, there is no guarantee that interference will not occur in a particular installation. If this equipment does cause harmful interference to radio or television reception, which can be determined by turning the equipment off and on, the user is encouraged to try to correct the interference by one or more of the following measures:
(1) Reorient or relocate the receiving antenna. (2) Increase the separation between the equipment and receiver. (3) Connect the equipment into an outlet on a circuit different from
that to which the receiver is connected. (4) Consult the dealer or an experienced radio/ TV technician for help.
FCC Radio Frequency Exposure Statement
The device has been evaluated to meet general RF exposure requirements. The device can be used in fixed/mobile exposure condition. The min separation distance is 20cm.
Notice: Shielded cables
All connections to other computing devices must be made using shielded cables to maintain compliance with FCC regulations.
The following importer is the responsible party
Company Name: POWER MOBILE LIFE, LLC
Address: 400 108th Ave NE Ste 400, Bellevue, WA 98004-5541
Telephone: 1-800-988-7973
 This product complies with the radio interference requirements of the European Community.
Declaration of Conformity
Hereby, Anker Innovations Limited declares that this device is in compliance with the essential requirements and other relevant provisions of Directive 2014/53/EU.For the declaration of conformity, visit the Web site:
https://www.eufylife.com/.
This product can be used across EU member states.
The adapter shall be installed near the equipment and shall be easily accessible. Do not use the Device in the environment at too high or too low temperature, never expose the Device under strong sunshine or too wet environment.
The suitable temperature for T8400 and accessories is 0°C-40°C.
When charging, please place the device in an environment that has a normal room temperature and good ventilation.
It is recommended to charge the device in an environment with a temperature that ranges from 5°C~25°C.
Please ensure to use only the charger offered by the manufacturer. Using unauthorized charger may cause danger and violate the authorization of the device and the guarantee article.
This charger is for indoor use only.
The charger type is TEKA006-0501000EU , output voltage/current is 5Vdc/1A. The plug considered as disconnect device of adapter.
RF exposure information: The Maximum Permissible Exposure (MPE) level has been calculated based on a distance of d=20 cm between the device and the human body. To maintain compliance with RF exposure requirement, use product that maintain a 20cm distance between the device and human body.
CAUTION RISK OF EXPLOSION IF BATTERY IS REPLACED BY AN INCORRECT TYPE. DISPOSE OF USED BATTERIES ACCORDING TO THE INSTRUCTIONS.
Wi-Fi Operating Frequency Range: 2412~2472MHz ; Wi-Fi Max Output Power: 19dBm
Bluetooth Operating Frequency Range: 2402~2480MHz; Bluetooth Max Output Power: 8dBm(EIRP)
The following importer is the responsible party (contact for EU matters only)
Importer: Anker Technology (UK) Ltd
Importer Address: Suite B, Fairgate House, 205 Kings Road, Tyseley, Birmingham, B11 2AA, United Kingdom
 This product is designed and manufactured with high quality materials and components, which can be recycled and reused.
 This symbol means the product must not be discarded as household waste, and should be delivered to an appropriate collection facility for recycling. Proper disposal and recycling helps protect natural resources, human health and the
environment. For more information on disposal and recycling of this product, contact your local municipality, disposal service, or the shop where you bought this product.
IC Statement
This device complies with Industry Canada licence-exempt RSS standard(s). Operation is subject to the following two conditions:
(1) this device may not cause interference, and
(2) this device must accept any interference, including interference that may cause undesired operation of the device.
This Class B digital apparatus complies with Canadian ICES-003.
IC RF Statement:
When using the product, maintain a distance of 20cm from the body to ensure compliance with RF exposure requirements.
Customer Service
- Warranty
12-month Limited Warranty - Call Us
United States +1 (800) 988 7973 Mon-Fri 9AM-5PM (PT)
United Kingdom +44 (0) 1604 936 200 Mon-Fri 6AM-11AM (GMT)
Germany +49 (0) 69 9579 7960 Mon-Fri 6:00-11:00 - Email Us
Customer Support: [email protected]
![]() Anker Innovations Limited
Anker Innovations Limited
Room 1318-19,Hollywood Plaza,610 Nathan
Road,Mongkok,Kowloon,Hong Kong
Anker-Eufy-Indoor-Security-Camera-T8400-Manual-Optimized.pdf
Anker-Eufy-Indoor-Security-Camera-T8400-Manual-Orginal.pdf
Questions about your Manual? Post in the comments!
References
]]>

Motion Sensor
Anker Innovations Limited. All rights reserved. eufy Security and eufy Security Logo are trademarks of Anker Innovations Limited, registered in the United States and other countries. All other trademarks are the property of their respective owners.
Model: T8910
51005002023 V01
WHAT’S INCLUDED
For Motion Sensor Installation

PRODUCT OVERVIEW

Installing Batteries
Remove the battery compartment lid on the Motion Sensor and insert the provided CR123A battery.
Adding Motion Sensor to Your System
Note: Make sure you’ve completed the setup of your eufy Security Home Base.
Follow the onscreen instructions on the Eufy Security app to add your motion sensor.
- Choose Add Device, then select Motion Sensor to add it to your system.

- Press and hold the SYNC button for 2 seconds until the LED indicator blinks blue. The Motion Sensor is waiting to pair.

- The LED indicator turns solid blue to indicate the pairing is successful.

Note: The LED indicator, device name and timer can be customized on the eufy Security app.
MOUNTING THE MOTION SENSOR
Find a Location for Mounting
The motion sensor can be installed on a wall. To get optimal detection coverage, consider the following factors before mounting the motion sensor:
- Determine the area of detection and ensure there is an unobstructed field of view
- Determine the height and tilt angle
- Avoid direct sources of heat or sunshine, curtains, plants, or pets.
Ideally, the motion sensor should be installed on a wall facing the door through which people are likely to enter. We recommend placing the motion sensor close to a corner to get the optimal detection coverage.

You can also install the motion sensor in your garage, dining room, or basement.
Height and Tilt Angle
The motion sensor should be mounted 2m / 6⁴/₇ ft to 2.5m / 8⅕ ft above the floor with a tilt angle of preferably 20º downwards. If you have a large pet weighing more than 50 lb, change to a 10º downwards tilt.
With Pets

No Pets

To better detect the area where people may break in, rotate the motion sensor horizontally up to 30º.
Sensitivity
The sensitivity can be adjusted based on the room size. The default setting is medium sensitivity.
Mount the Motion Sensor
There are two methods of mounting the motion sensor at the selected location:
1. Use the 3M adhesive strip:
- Snap the adjustable wall mount onto the motion sensor base.
- Stick the adhesive strip on the back of the sensor, remove the film, and stick the motion sensor on the wall.
- Rotate the motion sensor to adjust the detection coverage.

- Place the mount against the wall and use a pencil to mark the desired location for mounting.

- Drill holes at each marking. No need to drill a pilot hole in the wooden walls.
- Insert anchors into the holes, and fix the mount onto the wall with the provided screws. No anchors are needed on wooden walls.

- Clip the motion sensor back onto the mount.
- Rotate the motion sensor to adjust the detection coverage.

Use the Motion Sensor
After the motion sensor is installed, the alarm will be triggered once movement is detected within the motion sensor’s coverage area.
When the motion sensor is working, its LED indicator shows as below:

Replace the Battery
When the motion sensor’s battery is low, the LED indicator shows as below. You should replace the battery to keep the motion sensor working.
 SPECIFICATIONS
Battery: 1× CR123A battery
Operating Temperature: -10ºC – 40ºC /14°F – 104°F
Storage Temperature: -20ºC – 60ºC /-4°F – 140°F
NOTICE
FCC Statement
This device complies with Part 15 of the FCC Rules. Operation is subject to the following two conditions: (1) this device may not cause harmful interference, and (2) this device must accept any interference received, including interference that may cause undesired operation.
Warning: Changes or modifications not expressly approved by the party responsible for compliance could void the user’s authority to operate the equipment.
Note: This equipment has been tested and found to comply with the limits for a Class B digital device, pursuant to Part 15 of the FCC Rules. These limits are designed to provide reasonable protection against harmful interference in a residential installation.
This equipment generates uses and can radiate radio frequency energy and, if not installed and used in accordance with the instructions, may cause harmful interference to radio communications. However, there is no guarantee that interference will not occur in a particular installation. If this equipment does cause harmful interference to radio or television reception, which can be determined by turning the equipment off and on, the user is encouraged to try to correct the interference by one or more of the following measures: (1) Reorient or relocate the receiving antenna. (2) Increase the separation between the equipment and receiver. (3) Connect the equipment into an outlet on a circuit different from that to which the receiver is connected. (4) Consult the dealer or an experienced radio/ TV technician for help.
FCC Radio Frequency Exposure Statement
The device has been evaluated to meet general RF exposure requirements. The device can be used in fixed / mobile exposure condition. The min separation distance is 20cm.
Notice: Shielded cables
All connections to other computing devices must be made using shielded cables to maintain compliance with FCC regulations.
The following importer is the responsible party.
Company Name: POWER MOBILE LIFE, LLC
Address: 400 108th Ave NE Ste 400, Bellevue, WA 98004-5541
Telephone: 1-800-988-7973
 This product complies with the radio interference requirements of the European Community.
Declaration of Conformity
Hereby, Anker Innovations Limited declares that this device is in compliance with the essential requirements and other relevant provisions of Directive 2014/53/EU. For the declaration of conformity, visit www.eufylife.com.
Do not use the Device in the environment at too high or too low temperature, never expose the Device under strong sunshine or too wet environment.
The suitable temperature for the product and accessories is -10°C-40°C.
RF exposure information:
The Maximum Permissible Exposure (MPE) level has been calculated based on a distance of d=20 cm between the device and the human body. To maintain compliance with RF exposure requirement, use product that maintain a 20cm distance between the device and the human body.
CAUTION RISK OF EXPLOSION IF BATTERY IS REPLACED BY AN INCORRECT TYPE. DISPOSE OF USED BATTERIES ACCORDING TO THE INSTRUCTIONS SUB-1G Frequency range: 866~866.8MHz (for EU) ; 920~920.8MHz (for US).
Max Output Power: 6.496dBm (ERIP)
 This product is designed and manufactured with high quality materials and components, which can be recycled and reused.
This symbol means the product must not be discarded as household waste, and should be delivered to an appropriate collection facility  for recycling. Proper disposal and recycling helps protect natural resources, human health and the environment. For more information on disposal and recycling of this product, contact your local municipality, disposal service, or the shop where you bought this product.
IC Statement
This device complies with Industry Canada licence-exempt RSS standard(s). Operation is subject to the following two conditions:
- This device may not cause interference, and
- This device must accept any interference, including interference that may cause undesired operation of the device.”
- This Class B digital apparatus complies with Canadian ICES-003.
IC RF Statement
When using the product, maintain a distance of 20cm from the body to ensure compliance with RF exposure requirements.
FCC ID: 2AOKB-T8910 IC: 23451-T8910
Anker Innovations Limited
Room 1318-19, Hollywood Plaza, 610 Nathan Road, Mongkok, Kowloon, Hong Kong
CUSTOMER SERVICE
Warranty
 12-month limited warranty
 +1 (800) 988 7973 Mon-Fri 9AM-5PM (PT)
+44 (0) 1604 936 200 Mon-Fri 6AM-11AM (GMT)
+49 (0) 69 9579 7960 Mon-Fri 6:00-11:00
![]() Customer Support: [email protected]
Customer Support: [email protected]
 @EufyOfficial
 @EufyOfficial
 EufyOfficial
Anker-Eufy-Motion-Sensor-Manual-Optimized.pdf
Anker-Eufy-Motion-Sensor-Manual-Original.pdf
Questions about your Manual? Post in the comments!
References
]]>

Anker Innovations Limited. All rights reserved. eufy Security and eufy Security Logo are trademarks of Anker Innovations Limited, registered in the United States and other countries. All other trademarks are the property of their respective owners.
Table of Content
- What’s in the Box
- Power On the Floodlight Camera Indoors
- Get the eufy Security App and Setup the Camera
- Mount Floodlight Camera Outdoors Safety
- Customer Service
What’s in the Box

- Install Floodlight Camera to the junction box outdoors (you need to have a junction box and wires already installed).
- In order to stream video from Floodlight Camera, you need to make sure the Wi-Fi signal strength is strong at the location you want to install Floodlight Camera.
Note: To avoid risk of shock, injury or death, always be cautious when working with electricity. Remember, do hire a professional electrician if you are uncomfortable working with electrical wiring.
Power On the Floodlight Camera Indoors
- Connect Floodlight Camera to a power source, and then wait 1 minute or until the LED indicator blinks red.

Get the eufy Security App and Setup the Camera
- Download the eufy Security app from the App Store (iOS devices) or Google
Play (Android devices).

- Login or sign up for a eufy Security account, then follow the onscreen instructions to complete setup.

Note:
- To avoid risk of shock, injury or death, always be cautious when working with electricity.
- Make sure you can live stream video from Floodlight Camera before mounting.
Mount Floodlight Camera Outdoors
Step 1
- Unplug Floodlight Camera.

Step 2
- Unscrew the power cord; wire nuts will be used later.
- The power cord is not required when mounting the Floodlight Camera outdoors.

Step 3
- Shut down the circuit breaker in your house. Switch on/off the lights to make sure the electricity in your house is properly shut off.

Note: To avoid risk of shock, injury or death, always be cautious when working with electricity.
Step 4
- Remove the old Floodlight from the junction box and install the mounting plate to the junction box.

Note: The concaved side of the mounting plate must face outwards.
Step 5
- Hang Floodlight Camera on the junction box with the hook provided.

- Connect both ground wires(both yellow in color) from the junction box and Floodlight Camera, join the wires by using a wire nut.

Note: To avoid risk of shock, injury or death, always be cautious when working with electricity. Remember, do hire a professional electrician if you’re uncomfortable working with electrical wiring.
- Use wire nuts to connect Floodlight Camera wires to the rest of the wires from junction box. Connect the white wire on the Floodlight Camera to the white wire(neutral) from junction box. Connect the black wire on the Floodlight Camera to the black wire(hot) from junction box.

Note: To avoid risk of shock, injury or death, always be cautious when working with electricity. Remember, do hire a professional electrician if you’re uncomfortable working with electrical wiring.
Step 6
- Insert the central screw through the center of Floodlight Camera and screw it tightly.

- Use the central screw cap to cover the central screw to prevent the central screw from rusting.

Step 7
- After installation is complete, you can turn the camera knobs on Floodlight Camera to adjust the camera to your desired angle.
Step 8
- Switch on the main circuit breaker in the house.
To check whether Floodlight Camera is operating, check if the LED indicator has turned solid white.
Note:
- In case Floodlight Camera is not powered on, switch off the circuit breaker before checking the wiring of Floodlight Camera.
- To avoid risk of shock, injury or death, always be cautious when working with electricity. Remember, do hire a professional electrician if you’re uncomfortable working with electrical wiring.
- In case Floodlight Camera keeps blinking red, it means the floodlight is not connected to the Internet. Please make sure the Wi-Fi signal is strong at the desired location. You may consider moving the wireless router closer to Floodlight Camera or using a Wi-Fi range extender.
- For troubleshooting, check the Help section in the Eeufy Security app.
- Refer to the app page for what the LED indicator status lights mean
Safety
FCC Statement
This device complies with Part 15 of the FCC Rules. Operation is subject to the following two conditions: (1) this device may not cause harmful interference, and (2) this device must accept any interference received, including interference that may cause undesired operation.
Warning: Changes or modifications not expressly approved by the party responsible for compliance could void the user’s authority to operate the equipment.
Note: This equipment has been tested and found to comply with the limits for a Class B digital device, pursuant to Part 15 of the FCC Rules. These limits are designed to provide reasonable protection against harmful interference in a residential installation.
This equipment generates uses and can radiate radio frequency energy and, if not installed and used in accordance with the instructions, may cause harmful interference to radio communications. However, there is no guarantee that interference will not occur in a particular installation. If this equipment does cause harmful interference to radio or television reception, which can be determined by turning the equipment off and on, the user is encouraged to try to correct the interference by one or more of the following measures: (1) Reorient or relocate the receiving antenna. (2) Increase the separation between the equipment and receiver. (3) Connect the equipment into an outlet on a circuit different from that to which the receiver is connected. (4) Consult the dealer or an experienced radio/TV technician for help.
FCC Radio Frequency Exposure Statement The device has been evaluated to meet general RF exposure requirements. The device can be used in fixed/mobile exposure condition. The min separation distance is 20cm.
Notice: Shielded cables
- All connections to other computing devices must be made using shielded cables to maintain compliance with FCC regulations.
- The following importer is the responsible party
- Company Name: POWER MOBILE LIFE, LLC
- Address: 400 108th Ave NE Ste 400, Bellevue, WA 98004-5541
- Telephone:1-206-383-8247
This product complies with the radio interference requirements of the European Community.
Declaration of Conformity
- Hereby, Anker Innovations Limited declares that this device is in compliance with the essential requirements and other relevant provisions of Directive 2014/53/EU.For the declaration of conformity, visit the Web site www.eufylife.com
- Due to the used enclosure material, the product shall only be connected to a USB Interface of version 2.0 or higher. The connection to so called power USB is prohibited.
- The adapter shall be installed near the equipment and shall be easily accessible.
- Do not use the Device in the environment at too high or too low temperature, never expose the Device under strong sunshine or too wet environment.
- The suitable temperature for the product and accessories is -20°C-50°C.
- When charging, please place the device in an environment that has a normal room temperature and good ventilation.
- It is recommended to charge the device in an environment with a temperature that ranges from 5°C~25°C. Please ensure to use only the charger offered by the manufacturer. Using unauthorized charger may cause danger and violate the authorization of the projecter and the guarantee article.
- This charger is for indoor use only
- The charger output voltage/current is 5Vdc/2A. The plug considered as disconnect device of adapter.RF exposure information: The Maximum Permissible Exposure (MPE) level has been calculated based on a distance of d=20 cm between the device and the human body.
- To maintain compliance with RF exposure requirement, use product that maintain a 20cm distance between the device and human body.
CAUTION RISK OF EXPLOSION IF BATTERY IS REPLACED BY AN INCORRECT TYPE. DISPOSE OF USED BATTERIES ACCORDING TO THE INSTRUCTIONS
Wi-Fi Operating Frequency Range:2412~2472MHz for EU;
This product is designed and manufactured with high quality materials and components, which can be recycled and reused.
This symbol means the product must not be discarded as household waste, and should be delivered to an appropriate collection facility for recycling. Proper ![]() disposal and recycling helps protect natural resources, human health and the environment. For more information on disposal and recycling of this product, contact your local municipality, disposal service, or the shop where you bought this product. This device complies with Industry Canada licence-exempt RSS standard(s). Operation is subject to the following two conditions:
disposal and recycling helps protect natural resources, human health and the environment. For more information on disposal and recycling of this product, contact your local municipality, disposal service, or the shop where you bought this product. This device complies with Industry Canada licence-exempt RSS standard(s). Operation is subject to the following two conditions:
(1) This device may not cause interference, and
(2) This device must accept any interference, including interference that may cause undesired operation of the device.”
IC RF Statement:
- When using the product, maintain a distance of 20cm from the body to ensure compliance with RF exposure requirements.
- Lors de l’utilisation du produit, maintenez une distance de 20 cm du corps afin de vous conformer aux exigences en matière d’exposition RF.
- FCC ID:2AOKB-T8420: IC:23451-T8420
Customer Service
- Warranty
12- month limited warranty - Call Us
United States +1 (800) 988 7973 Mon-Fri 9AM-5PM (PT) United Kingdom +44 (0) 1604 936 200 Mon-Fri 6AM-11AM (GMT) Germany +49 (0) 69 9579 7960 Mon-Fri 6:00-11:00 - Email Us
Customer Support: [email protected]
Anker-Eufy-Security-Floodlight-Camera-T8420-Manual-Optimized.pdf
Anker-Eufy-Security-Floodlight-Camera-T8420-Manual-Original.pdf
Questions about your Manual? Post in the comments!
References
]]>
Table of Contents
- Important Safety Instructions
- About Your RoboVac
What’s in the Box
RoboVac Anatomy
LED Indication
Map Navigation and Management - GetStarted Important Tips Before Use
Preparation
Charge Your RoboVac
- Using Your RoboVac
Turn on / off
Start cleaning
Use Your RoboVac with the EufyHome App
Select a Cleaning Mode
Use Mopping System
Use Your RoboVac with Amazon Alexa / the Google Assistant
Set Up Physical / Virtual Barriers
Reset the System - Cleaning and Maintenance
Clean the Dust Collector and Water Tank
Clean the Rolling Brush
Clean the Side Brush
Replace the Side Brush
Clean the Sensors and Charging Pins
Clean the Swivel Wheel
Clean the mopping module
- Troubleshooting Voice Alert
Wi-Fi Connection
- Specifications
- Consignes importantes de sécurité
- Customer Service
Thank you for purchasing RoboVac. Carefully read all instructions before using this product, and keep this manual for future reference.
Important Safety Instructions
To reduce the risk of injury or damage, read these safety instructions carefully and keep them at hand when setting up, using, and maintaining this device.
WARNING SYMBOLS USED
This is the safety alert symbol. This symbol alerts you to potential hazards that could result in property damage and/or serious bodily harm or death.
- This device can be used by children aged from 8 years and above and persons with reduced physical, sensory or mental capabilities or lack of experience and knowledge if they have been given supervision or instruction concerning use of this device in a safe way and understand the hazards involved.
- Children should be supervised to ensure they do not play with this device.
- Cleaning and maintenance shall not be performed by children without adult supervision.
- This device is only to be used with the power supply unit provided.
- Before cleaning or maintaining this device, the plug must be removed from the socket outlet.
- The battery in this device should only be replaced by a skilled professional.
- When removing the battery, disconnect the device from the supply mains.
- For the purposes of recharging the battery, only use the detachable power supply unit provided with this device.
- The battery must be removed before this device is disposed of. To remove the battery, first unscrew the screws on the bottom, then remove the back cover. Remove the battery by disconnecting the quick connector.
- The used battery should be placed in a sealed plastic bag and disposed of safely according to local environmental regulations.
- The external flexible cable or cord of the power supply unit cannot be replaced; if the cord is damaged, the power supply unit shall be disposed of.
- This device is for indoor use only.
- This device is not a toy. Do not sit or stand on this device. Small children and pets should be supervised when this device is operating.
- Store and operate this device in room temperature environments only.
- Clean with a cloth dampened with water only.
- Do not use this device to pick up anything that is burning or smoking.
- Do not use this device to clean up spills of bleach, paint, chemicals, or anything wet.
- Before using this device, pick up objects like clothing and loose paper. Lift up cords for blinds or curtains, and move power cords and fragile objects out of the way. If this device passes over a power cord and drags it, an object could be pulled off a table or shelf.
- If the room to be cleaned has a balcony, a physical barrier should be used to prevent access to the balcony and to ensure safe operation.
- Do not place anything on top of this device.
- Be aware that this device moves around on its own. Take care when walking in the area where this device is operating to avoid stepping on it.
- Do not operate this device in areas with exposed electrical outlets on the floor.
- Do not expose the electronics of this device, its battery, or the integrated Charging Base. There are no user-serviceable parts inside.
- Do not use this device on an unfinished, unsealed, waxed or rough floor. It may result in damage to the floor and this device. Use only on hard floor surfaces or low-pile carpet.
- Do not use the mopping module on carpets.
- This device has been designed to be used on floors without scratching them. We still recommend that you test this device on a small area of the room to be cleaned to ensure no scratches are made before cleaning the whole room.
- Only use attachments recommended or described in this manual.
- Do not handle the appliance or plug with wet hands.
- Ensure that the dust bag and/or filters are correctly in-place before usage.
- Do not use a battery pack or appliance that is damaged or modified. Damaged or modified batteries may exhibit unpredictable behavior resulting in fire, explosion or risk of injury.
- Do not expose the battery pack or appliance to fire or excessive temperature. Exposure to fire or temperature above 130°C may cause explosion.
- Do not modify or attempt to repair the appliance or the battery pack (as applicable), except as indicated in the instructions for use and care.
- Follow all charging instructions and do not charge the battery pack or appliance outside of the temperature range specified in the instructions. Charging improperly or at temperatures outside of the specified range may damage the battery and increase the risk of fire.
- The laser distance sensor of this device meets the standards for Class I Laser Products in IEC 60825-1:2014 and will not generate hazardous laser radiation.
Notice
 This symbol on the device or its packaging indicates: Do not dispose of electrical appliances as unsorted municipal waste; use separate collection facilities. Contact your local authority for information regarding the collection systems available. If electrical appliances are disposed of in landfills or dumps, hazardous substances can leak into the groundwater and get into the food chain, damaging your health and well-being. When replacing old appliances with new ones, the retailer is legally obliged to take back your old appliance for disposal at least free of charge.
FCC Statement
This device complies with Part 15 of the FCC Rules. Operation is subject to the following two conditions: (1) This device may not cause harmful interference, and (2) this device must accept any interference received, including interference that may cause undesired operation.
Warning: Changes or modifications not expressly approved by the party responsible for compliance could void the user’s authority to operate the equipment.
Note: This equipment has been tested and found to comply with the limits for a Class B digital device, pursuant to Part 15 of the FCC Rules. These limits are designed to provide
reasonable protection against harmful interference in a residential installation.
This equipment generates, uses, and can radiate radio frequency energy and, if not installed and used in accordance with the instructions, may cause harmful interference to radio communications. However, there is no guarantee that interference will not occur in a particular installation. If this equipment does cause harmful interference to radio or television reception, which can be determined by turning the equipment off and on, the user is encouraged to try to correct the interference by one or more of the following measures: (1) Reorient or relocate the receiving antenna. (2) Increase the separation between the equipment and receiver. (3) Connect the equipment into an outlet on a circuit different from that to which the receiver is connected. (4) Consult the dealer or an experienced radio / TV technician for help.
The FCC 15.19 statement can be found on the back of the top panel.
RF Exposure Compliance Statement
This equipment complies with FCC/IC radiation exposure limits set forth for an uncontrolled environment. This equipment should be installed and operated with minimum distance 20cm between the radiator and your body.
ISED Compliance Statement
This device contains licence-exempt transmitter(s)/ receiver(s) that comply with Innovation, Science and Economic Development Canada’s licence-exempt RSS(s).
Operation is subject to the following two conditions:
1. This device may not cause interference.
2. This device must accept any interference, including interference that may cause undesired operation of the device.
Declaration of Conformity
This product complies with the radio interference requirements of the European Community. Hereby, Anker Innovations Limited declares that the radio equipment type T2190 is in compliance with Directive 2014/53/EU. The full text of the EU declaration of conformity is available at the following internet address: https://www.eufylife.com/.
Maximum output power: 18 dBm (For EU)
Frequency band: 2.4G band (2.4000GHz – 2.4835GHz)
Trademark Notice
- Amazon, Echo, Alexa and all related logos are trademarks of Amazon.com, Inc. or its affiliates.
- Apple and the Apple logo are trademarks of Apple Inc., registered in the U.S. and other countries. App Store is a service mark of Apple Inc., registered in the U.S. and other countries.
- Google Play and the Google Play logo are trademarks of Google Inc.
- Google Home is a trademark of Google Inc.
About Your RoboVac
What’s in the Box

RoboVac Anatomy
-
Top


-
Dust collector & Water tank


-
Side

-
Bottom

-
Mopping module


-
Charging Base
External view

Internal view

-
Suction Inlet

LED Indication
You can see the status of RoboVac from the LED indicators

Note: When RoboVac is inactive and not on the Charging Base for 10 minutes, it automatically switches to sleep mode and the light becomes dim to conserve power.

Map Navigation and Management
Navigation
Once Auto cleaning starts, RoboVac moves from the Charging Base, automatically scans to generate maps, intelligently determines its cleaning route, and divides the space into zones. The cleaning paths are planned along the walls, following a bow-shaped cleaning method to complete the cleaning of each zone one by one.

Real-time Mapping & Floor plan
Real-time mapping helps you know the cleaning path and environment easily. A floor plan will be built after cleaning. The map will be updated real-time during each cleaning to ensure normal navigation.
To create a complete floor plan:
- Open your doors for RoboVac to map each room;
- Remove any objects that may be in the way or get RoboVac stuck.
Note: Do not remove the Charging Base after a floor plan is created.
Relocalization & Remapping
If the position of RoboVac / Charging Base is adjusted or the surroundings are changed significantly, RoboVac will try to relocalize and may remap to match the surroundings.
- RoboVac will resume cleaning if the relocalization is successful.
- If the relocalization fails, RoboVac will remap to ensure normal navigation with a new cleaning.
- If the original map has the virtual boundary information, RoboVac will not start a new
cleaning to avoid going across the restricted zone.
Note:
- Make sure RoboVac starts each cleaning from the Charging Base.
- During cleaning, do not move the device frequently. If moved, place RoboVac back to the original position.
Get Started
Important Tips Before Use

- (a) Remove power cords and small objects from the floor that may entangle RoboVac.
- (b) Fold tasseled edges of area rugs underneath to prevent tangling RoboVac. Avoid cleaning very dark-colored high-pile rugs or rugs thicker than 1.02 in/26 mm as they may cause RoboVac to malfunction.
- (c) Keep RoboVac away from spaces lower than 4.17 in/106 mm to prevent RoboVac from getting stuck. If necessary, place a physical barrier to block off the problem areas.
- (d) Keep RoboVac away from wet areas during cleaning.
- (e) RoboVac may climb on top of objects less than 0.67 in/17 mm in height (the height will be reduced if the mopping module is installed). Remove these objects if possible.
- (f) Anti-drop sensors will prevent RoboVac from tumbling down stairs and steep drops in most cases. Sensors are less effective if dirty or used on carpeted/reflective/very darkcolored floors. It is recommended to place physical barriers to block off areas where RoboVac may fall.
Note: Place physical barriers in front of fireplaces and areas that may cause damage to RoboVac if entered.
Preparation
- Remove the foam blocks beside the bumper before use.
- Connect the adapter to the Charging Base and put extra cable in the slot as illustrated.

Note: Extra power cord on the ground may be pulled by the main unit to cause an interruption of charging.
- Place the Charging Base on a level surface and against a wall.

- Remove objects within 1.6 ft/0.5 m of the left and right side and within 4.9 ft/1.5 m of the front of the Charging Base. If you cannot remove the objects, check whether RoboVac can return to the Charging Base normally; if not, contact eufy customer service for help.

- Insert the Charging Base into the waterproof pad to keep the floor dry. Make sure it is firmly installed. If mopping is not needed, you can skip this step.

- Connect the adapter to a wall outlet.


Note:
- Install the Charging Base in a location that RoboVac can easily access. It is recommended to place the Charging Base against a wall, and on a hard-level surface rather than on rugs or carpets.
- Always keep the Charging Base plugged in, otherwise RoboVac will not automatically return to it.
- To ensure proper charging, do not frequently move the Charging Base. When its location is changed, RoboVac may remap due to failure in relocalization (see About Your RoboVac > Map Navigation and Management for details).
Charge Your RoboVac
- RoboVac has a pre-installed rechargeable battery that has to be fully charged before use.
- RoboVac will return to the Charging Base at the end of a cleaning cycle or when its battery is running low.
Method 1: Attach RoboVac to the Charging Base by aligning its charging pins with the charging pins on the base.

Method 2: Press on the main unit to send RoboVac to the Charging Base.


Auto Recharge and Resume
RoboVac returns to the Charging Base automatically to recharge when:
- RoboVac has finished cleaning;
- Cleaning is not complete and the battery level becomes low; Once recharged to 80% battery capacity, RoboVac will resume to finish the remaining cleaning.
Note: Do not move the Charging Base during cleaning, otherwise RoboVac may fail to return for recharge. If failed, you have to manually attach it to the Charging Base.
Using Your RoboVac
Turn on / off

Switch to Sleep Mode
- When inactive and not on the Charging Base for 10 minutes, RoboVac automatically stops cleaning and switches to sleep mode. In sleep mode, press any button to wake it up.
Start cleaning
Note: RoboVac cannot start cleaning if the battery level is less than 20%. In this case, recharge RoboVac first before cleaning.
- Press power button to start cleaning in Auto Mode.
RoboVac moves around to scan the environment and build the map automatically.


Note:
- Before cleaning, sort out cables and cords to avoid power interruption or any damaging caused by pulling the cord during cleaning.
- In Auto cleaning mode, RoboVac will clean twice by default if the cleaning time is less than 10 minutes.
Use Your RoboVac with the EufyHome App
To fully enjoy all the available features, it is recommended to control your RoboVac via the EufyHome app.
Before you start, make sure that:
- Your smartphone or tablet is connected to a Wi-Fi network.
- Your smartphone or tablet is running iOS 8.0 (or above) or Android 4.4 (or above).
- The 2.4GHz band wireless signal is enabled on your wireless router.
- The Wi-Fi status light on RoboVac is slowly flashing blue.
- RoboVac is attached to the Charging Base to ensure it has enough power during setup.

- Download the EufyHome app from the App Store (iOS devices) or Google Play (Android devices).
- Open the app and create a user account.
- Tap the “+” icon to add RoboVac to your EufyHome account.
- Follow the instructions in the app to set up the Wi-Fi connection.
After connecting successfully, you can control RoboVac via the app. With the app, you can select cleaning at your desired suction level, schedule cleaning, view the cleaning map, set up “No-Mop” or “No-Go” zones, check the network connection status, and access additional features.
Wi-Fi Status Light

- If you have any problems during the Wi-Fi setup process, refer to the “Troubleshooting > Wi-Fi connection” section in this Manual.
- If RoboVac gets stuck in any space, tap Find My Robot in the app to find the machine. This function is available in the app only.
Reset the Wi-Fi Connection

Schedule Cleaning
With the EufyHome app, you can schedule RoboVac to start cleaning at a particular time.
Note: You can set the time and customize the cleaning schedules from Sunday to Saturday on the EufyHome app. This function is available in the app only.
Select a Cleaning Mode
You can press power button at any time to pause the current cleaning cycle.
1. Auto cleaning
- Press power button to start cleaning in Auto Mode.

- Press power button again to pause cleaning.
Note: By default, RoboVac starts in Auto cleaning mode when it is turned on.
2. Spot cleaning
RoboVac intensively cleans a specific area with a size of 4.9 ft x 4.9 ft / 1.5 m x 1.5 m. Useful if there is a concentrated area of dust or debris. When the cleaning of a certain zone is finished, it automatically returns to the Charging Base.


3. Zone cleaning (available via the app only)
In this mode, set up a cleaning zone in the Eufy Home app. RoboVac will clean this zone only and return to the Charging Base after cleaning.
Note:
- Start Zone cleaning only after RoboVac has created the map.
- It is recommended that RoboVac moves from the Charging Base to start Zonecleaning.
4. Manual-controlled cleaning (available via the app only)
You can direct RoboVac to clean a particular area by using manual controls in the EufyHome app.
5. Select a Suction Power Level
In the EufyHome app, select a suction power level according to your needs:
- Quiet
- Standard (Default)
- Turbo
- Max
Note: You can select the “Mop-Only” suction level in mopping mode. When mopping is finished, RoboVac will change to default suction level automatically.
6. Select BoostIQ™ feature
In the EufyHome app, select the BoostIQ™ feature according to your needs. RoboVac will automatically increase the suction power if it detects that stronger power is needed to ensure the best clean. BoostIQ™ is ideal for cleaning thicker carpets and hard-to-sweep messes, which will reduce the total cleaning time, but increase the noise level. If the vacuuming noise caused by BoostIQ™ disturbs you, you can disable this feature.
Use Mopping System
- The mopping mode is only intended for a clean floor without stubborn stains or liquids. To avoid staining floors, do not use the mopping function when dust is mixed with liquids such as coffee or ink.
- Mopping System cleans best on smooth hard surfaces and may not perform so well on uneven tiles, heavily waxed floors or rough surfaces like slate or brick, which may snag the cleaning pad.
- The mopping mode is not recommended when no one is at home.
- Do not use the mopping mode on a carpeted floor. It is recommended to set a “No-Mop” zone in the EufyHome app to avoid cleaning the carpeted area.
1. Take out the water tank and put it back into the main unit after filling the water

Note:
- Do not use any other cleaning solution other than water. Cleaning solutions, even natural ones, can clog the water release system and break down the materials inside the device.
- To add water into the water tank or install the mopping module, pause the cleaning first. Do not manually move the device.
2. Wet the mopping cloth and wring it until it does not drip. Insert the cloth along the bracket slot and stick it firmly.

3. Install the mopping module into the bottom of RoboVac until a click is heard.

Note: When the mopping module is inserted, RoboVac automatically switches to the mopping mode.
4. Select a cleaning mode to start cleaning.
- RoboVac automatically sweeps and mops in the selected mode.
- If you want RoboVac to mop without vacuuming, select “Mop-Only” mode in the EufyHome app.
- You can also select the mopping water level (3 levels) in the app according to your needs.
Note: To achieve a better mopping effect, it is recommended to clean the floor with
RoboVac three times before installing the mopping module.
5. When RoboVac finishes working and returns to the Charging Base, hold the two buckles by hand, drag backward and remove the mopping module.

- When the mopping module is removed, the system automatically exits mopping mode without water release.
Note:
- Although water release is stopped when cleaning is paused, the mopping cloth will still be wet. Be careful not to keep RoboVac in one location for too long, as the excessive moisture caused by the cloth can damage the floor.
- To avoid damaging wooden floors, make sure the Charging Base is attached to the waterproof pad.
6. Empty any remaining water from the water tank. Clean the mopping cloth to avoid it being mildewed and producing unpleasant smell.

- It is recommended to clean the mopping cloth after mopping each time.
- Remove the mopping module when RoboVac is under charging or not in use.
Use Your RoboVac with Amazon Alexa / the Google Assistant
Amazon Alexa or the Google Assistant is a smart voice control device that enables you to control RoboVac with your voice.
Before you start, make sure that:
- RoboVac is attached to the Charging Base to ensure there is enough power.
- RoboVac is connected with the EufyHome app.
- You have an Alexa-enabled device (i.e. Amazon Echo, Echo Dot and Amazon Tap, Echo Show, Echo Spot) or a device enabled with the Google Assistant (i.e. Google Home, Google Home Mini). These devices are sold separately.
- The Amazon Alexa app or Google Home app is already installed on your smart device, and you have created an account.
To control RoboVac with Amazon Alexa or the Google
- Open the EufyHome app and tap “Smart integrations” in the top left.
- Follow the on-screen instructions to complete the setup.
Note: Currently this feature only supports English, German, French, and Spanish. You can check regularly if more languages are supported at
https://www.eufylife.com/support/
Set Up Physical / Virtual Barriers
Boundary Strips (Sold Separately)
Physical barriers including boundary strips can keep RoboVac away from cleaning certain areas. RoboVac will recognize the barriers and will not cross into the blocked-off area.
- Identify the area or item you do not want RoboVac to get close to.
- Place the boundary strips FLAT on the floor or under an area rug.

Note:
- Make sure the boundary strips are placed on the same surface plane RoboVac is used on.
- If the boundary strips are rolled up, remove and then re-apply on the floor with adhesive tape. Otherwise the boundary strips may not work well.
Virtual Boundary (Available on the App Only)
In the EufyHome app, you can set up a “No-Go Zone” or “No-Mop Zone” as a restricted area. This eliminates the need to use physical barriers, including Boundary Strips. This feature is designed for dividing the cleaning zones, not for isolating hazardous areas.
- No-Go Zone: RoboVac will not enter the zone to vacuum or mop.
- No-Mop Zone: RoboVac will not enter the zone to mop, while vacuuming is still allowed.
Note:
- To set a virtual boundary, RoboVac must initially perform a cleaning run to create a floor plan.
- To clean your home with virtual boundary, ensure that RoboVac is on the Charging Base and that the Base has not been manually moved during cleaning.
- Although a virtual boundary is set, RoboVac may still enter the restricted zone due to such reasons as relocalization, wrong positioning or abnormal sensors.
- Moving the device or changing the environment may cause mapping failed and rebuilt with virtual boundary lost.
Reset the System
You can reset the system if there is no response when pressing any button on RoboVac.
- Make sure RoboVac is not on the Charging Base.
- Use a clip to press the Reset button.

- RoboVac will automatically turn off.
- Dock RoboVac onto the Charging Base or press power button to turn it on.
- The system is reset.
Note: After resetting the system, RoboVac may lose its map and the original settings including the virtual boundary.
Cleaning and Maintenance
Before cleaning and maintaining, turn off the device and unplug the adapter.
For optimal performance, follow the instructions below to clean and maintain RoboVac regularly. The cleaning/replacement frequency will depend on your usage habits of RoboVac.
Recommended cleaning/replacement frequency


Clean the Dust Collector and Water Tank
- Open the top panel of RoboVac and press the release button to remove the dust collector and water tank.
- Take out the filter assembly.

- Take out the pre-filter, foam filter, and high-performance filter.
- Clean the filters with a vacuum cleaner or a cleaning brush. You can also wash the filters for deep cleaning.

- Empty the dust collector. Tap the dust collector to get rid of any excess dirt.

- Press the dust collector release button to separate the dust collector from the water tank.
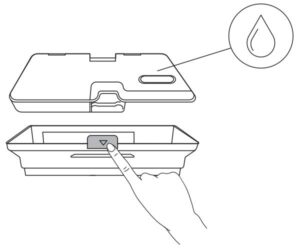
- Rinse the water tank, dust collector and filter assembly thoroughly with water.
Note: Do not use hot water, or any detergent to clean the filter assembly.
- Air-dry the water tank, dust collector and filter assembly completely before next use.

- Replace the pre-filter, foam filter, and high-performance filter.
- Put the filter assembly back into the dust collector.

- Reinstall the dust collector with the water tank.

- Push the assembly back into the main unit.
Clean the Rolling Brush
Pull on the release tabs to unlock the brush guard as shown.
- Lift the rolling brush to remove.
- Clean the rolling brush with a cleaning tool or a vacuum cleaner.
- Reinstall the rolling brush by inserting the fixed protruding end first and then clicking into place.
- Press down to snap the brush guard into place.

Clean the Side Brush
Foreign substances, such as hair, can easily get tangled in the side brush, and dirt may adhere to it. Be sure to clean it regularly.
- Use a Phillips screwdriver to unscrew the screw.

- Carefully unwind and pull off any hair or string that is wrapped between the main unit and the side brush.
- Use a cloth dampened with warm water to remove dust from the brush or to gently reshape it.

Note: Only use the side brush when it is completely dry.
Replace the Side Brush
The side brushes may become bent or damaged after being used for a period of time.
Follow the instructions below to replace it.

- Use a Phillips screwdriver to unscrew the screw on the side brush.
- Pull off the old side brush and snap the new one into place.
- Screw down the screw to fasten the side brush.
Clean the Sensors and Charging Pins
To maintain the best performance, clean the drop sensors and charging pins regularly.
- Dust off the sensors and charging contact pins using a cloth or cleaning brush.

Clean the Swivel Wheel
Hair or dust particles can easily get entangled in the swivel wheel. Be sure to clean the swivel wheel periodically and as needed.

- Pull out the swivel wheel.

- Clean any hair or debris wrapped around the wheel or entangled inside the wheel cavity.
- Reinstall the wheel and push in until it clicks into place.
Note: Do not clean the swivel wheel with water.
Clean the mopping module
It is recommended to clean the mopping cloth after each use.

- Remove the mopping cloth from the module.
- Clean the cloth with water and air-dry it completely to avoid being mildewed or producing unpleasant smell.
Troubleshooting


Voice Alert
When RoboVac encounters a problem, the red indicator on RoboVac will be flashing and you will hear the relevant voice prompts. Follow the voice prompts to solve the problems.


Wi-Fi Connection
Before Wi-Fi setup, make sure RoboVac and your Wi-Fi network meet the following requirements.
Wi-Fi Setup Requirements
- RoboVac:
RoboVac is fully charged and the main power switch on the bottom of RoboVac is turned on.
Wi-Fi status light slowly flashes blue. - Wi-Fi Network:
Use the correct password for your network.
Do not use a VPN (Virtual Private Network) or Proxy Server.
Your Wi-Fi router supports 802.11b/g/n and IPv4 protocol.
You are using a 2.4GHz router or a dual-band router that is configured to support a
2.4GHz frequency band. RoboVac does not support 5GHz frequency band. If RoboVac cannot connect to the Wi-Fi network and you are using a 2.4/5GHz mixed network, switch to a 2.4GHz network for Wi-Fi setup. You can switch back once your setup is complete.
When connecting to a hidden network, make sure you enter the correct network name, SSID (case sensitive), and connecting to a 2.4GHz wireless network. When using a network extender/repeater, make sure the network name (SSID) and password are the same as your primary network.
The firewall and port settings of your Wi-Fi router allow RoboVac to connect with the Eufy servers.
- Network Security Requirement WPA and WPA2 using TKIP, PSK, AES/CCMP encryption.
- Wi-Fi Channels
The FCC requires that all wireless devices in the United States operate on the 1-11 wireless spectrum channels.
Some countries outside North America can use spectrum channels higher than channel 11. Refer to your local regulatory agency to determine which channels are accessible.
A future software release will support access to channels above 11 for users outside North America. Until then, use channels 1-11.
If you cannot control RoboVac with your smartphone, try the solutions below to solve the
problem. If the problem persists, contact the eufy service center for help.

Specifications

Customer Service
For FAQs and more information, please visit www.eufylife.com.
- E-Mail: [email protected]
- Live-Chat: www.eufylife.com
Customer Service hotline

Anker Innovations Limited
Room 1318-19, Hollywood Plaza, 610 Nathan Road, Mongkok, Kowloon, Hong Kong
Anker-Soundcore-Icon-A3123-Manual-Optimized.pdf
Anker-Eufy-RoboVac-L70-Vacuum-Manual-Original.pdf
Questions about your Manual? Post in the comments!
References
]]>Owner’s Manual
RoboVac 11S (T2108)
Important Safety Instructions
To reduce the risk of injury or damage, read these safety instructions carefully and keep them at hand when setting up, using, and maintaining this device.
![]()
WARNING SYMBOLS USED
This is the safety alert symbol. This symbol alerts you to potential hazards that could result in property damage and/or serious bodily harm or death.
- This device can be used by children aged from 8 years and above and persons with reduced physical, sensory or mental capabilities or lack of experience and knowledge if they have been given supervision or instruction concerning use of this device in a safe way and understand the hazards involved.
- Children should be supervised to ensure they do not play with this device.
- Cleaning and maintenance shall not be performed by children without adult supervision.
- This device is only to be used with the power supply unit provided.
- For the purposes of recharging the battery, only use the detachable power supply unit provided with this device.
- The battery must be removed from this device before this device is disposed of. To remove the battery from this device, first remove the screws on the bottom, then remove the main PCB and unscrew the battery cover using a screwdriver. Remove the battery by disconnecting the quick connector.
- The used battery should be placed in a sealed plastic bag and disposed of safely according to local environmental regulations.
- The external flexible cable or cord of the power supply unit cannot be replaced; if the cord is damaged, the power supply unit shall be disposed of.
- This device is for indoor use only.
- This device is not a toy. Do not sit or stand on this device. Small children and pets should be supervised when this device is operating.
- Store and operate this device in room temperature environments only.
- Clean with a cloth dampened with water only.
- Do not use this device to pick up anything that is burning or smoking.
- Do not use this device to pick up spills of bleach, paint, chemicals, or anything wet.
- Before using this device, pick up objects like clothing and loose paper. Lift up cords for blinds or curtains, and move power cords and fragile objects out of the way. If this device passes over a power cord and drags it, an object could be pulled off a table or shelf.
- If the room to be cleaned has a balcony, a physical barrier should be used to prevent access to the balcony and to ensure safe operation.
- Do not place anything on top of this device.
- Be aware that this device moves around on its own. Take care when walking in the area where this device is operating to avoid stepping on it.
- Do not operate this device in areas with exposed electrical outlets on the floor.
- Do not expose the electronics of this device, its battery, or the integrated Charging Base. There are no user-serviceable parts inside.
- Do not use this device on an unfinished, unsealed, waxed or rough floor. It may result in damage to the floor and this device. Use only on hard floor surfaces or low-pile carpet.
- This device has been designed to be used on floors without scratching them. We still recommend that you test this device on a small area of the room to be cleaned to ensure no scratches are made before cleaning the whole room.
Notice
![]()
This symbol on the device or its packaging indicates: Do not dispose of electrical appliances as unsorted municipal waste; use separate collection facilities. Contact your local authority for information regarding the collection systems available. If electrical appliances are disposed of in landfills or dumps, hazardous substances can leak into the groundwater and get into the food chain, damaging your health and well-being. When replacing old appliances with new ones, the retailer is legally obliged to take back your old appliance for disposal at least free of charge.
FCC Statement
This device complies with Part 15 of the FCC Rules. Operation is subject to the following two conditions:
- This device may not cause harmful interference.
- This device must accept any interference received, including interference that may cause undesired operation.
About Your RoboVac
What’s in the Box
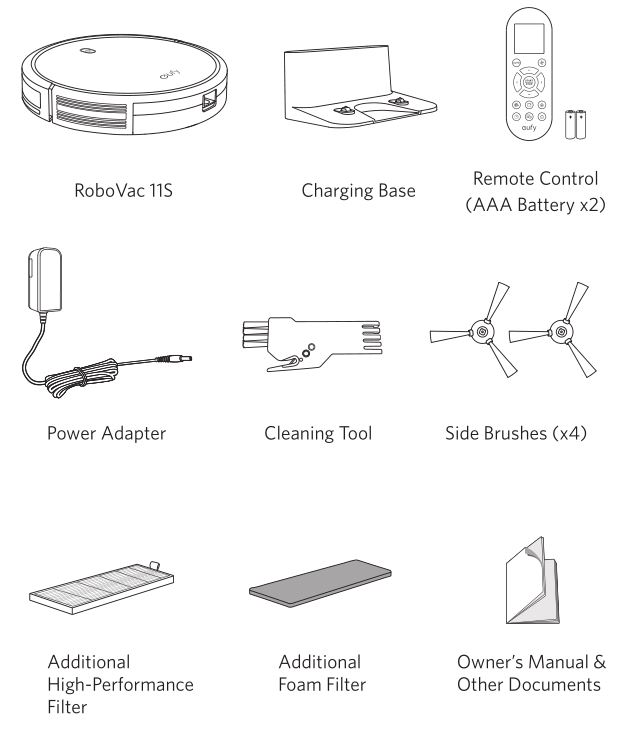
RoboVac Anatomy
Top & Side
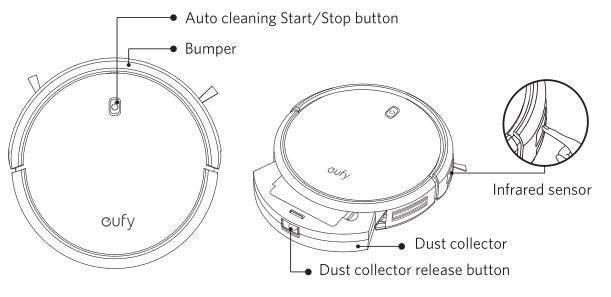
Bottom
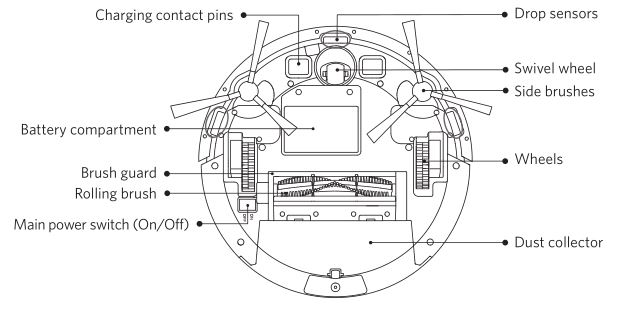
Dust Collector
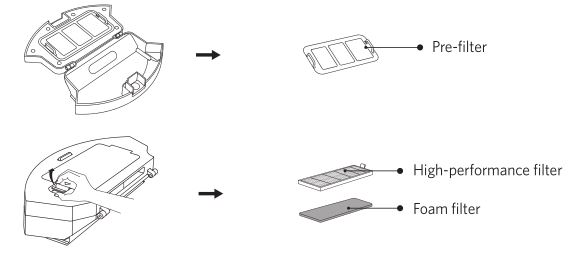
Suction Inlet
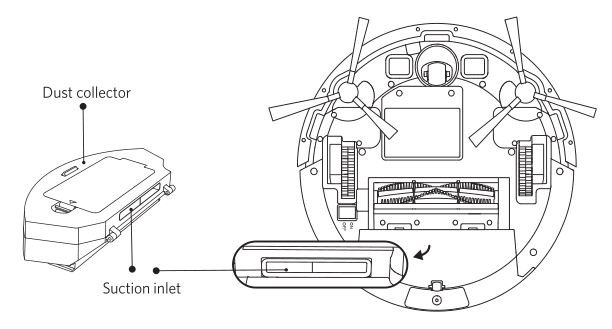
Charging Base
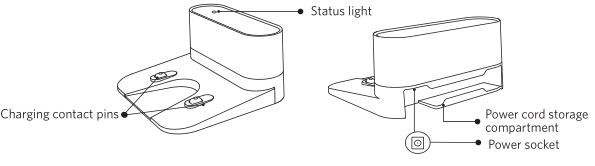
Remote Control
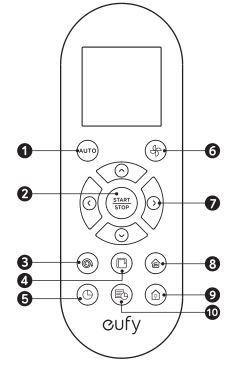
- Start Auto cleaning
- Start Auto cleaning /Stop cleaning
- Start Spot cleaning
- Start Edge cleaning
- Adjust time
- Adjust suction power level in Auto/Single Room / Cleaning mode
- Control cleaning direction manually / Adjust the hour and minute
- Start Single Room cleaning
- Return RoboVac to Charging Base
- Schedule Auto cleaning start time
Remote Control Display
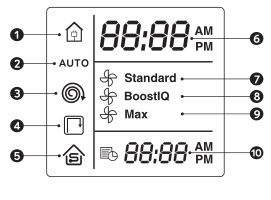
- Returning to Charging Base
- Auto cleaning mode selected
- Spot cleaning mode selected
- Edge cleaning mode selected
- Single Room cleaning mode selected
- Clock
- Standard suction power enabled
- BoostIQ™ dynamic suction power enabled
- Max suction power enabled
- Scheduled cleaning time
Install 2 AAA batteries before using the remote control for the first time. Make sure the positive and negative ends are facing the correct polarity direction as marked in the battery compartment.
LED Indication
You can see the status of RoboVac from the LED indicator.
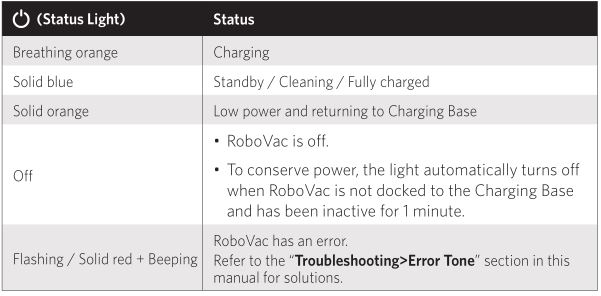
Using Your RoboVac
Important Tips Before Use
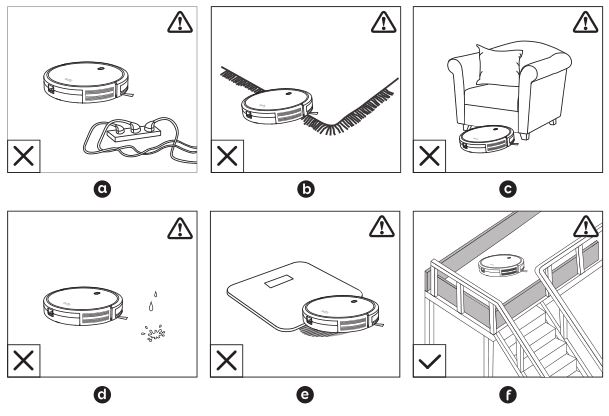
- a. Remove power cords and small objects from the floor that may entangle RoboVac.
- b. Fold tasseled edges of area rugs underneath to prevent tangling RoboVac. Avoid cleaning very dark-colored high-pile rugs or rugs thicker than 1.02 in/26 mm as they may cause RoboVac to malfunction.
- c. Keep RoboVac away from spaces lower than 2.87 in/73 mm to prevent RoboVac from getting stuck. If necessary, place a physical barrier to block off the problem areas.
- d. Keep RoboVac away from wet areas.
- e. RoboVac may climb on top of objects less than 0.63 in/16 mm in height. Remove these objects if possible.
- f. Anti-drop sensors prevent RoboVac from tumbling down stairs and steep drops. They may work less effectively if dirty or used on reflective/very dark-colored floors. It is recommended to place physical barriers to block off areas where RoboVac may fall.
Place physical barriers in front of fireplaces and areas that may cause damage to RoboVac if entered.
Preparation
- Install the side brushes before use.
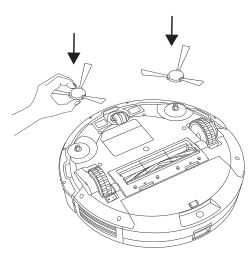
- Turn on the main power switch on the bottom of RoboVac.
 Remove the sticker next to the power switch, and the foam blocks beside the bumper before use.
 - Place the Charging Base on a hard, level surface and against a wall.
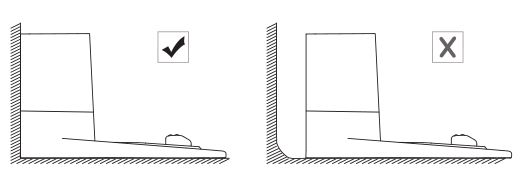
- Remove objects within 3 ft/1 m of the left and right side and within 6 ft/2 m of the front of the charging base.
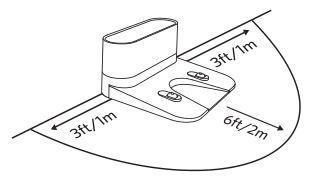
- Connect the round connector of the adapter into the power socket on the Charging Base and the other end into a wall outlet.
- When the Charging Base connects to AC power, the LED indicator on the Charging Base is SOLID WHITE.
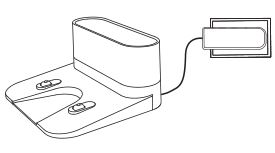
- When the Charging Base connects to AC power, the LED indicator on the Charging Base is SOLID WHITE.
- Install the Charging Base in a location that RoboVac can easily access. It is recommended to place the Charging Base against a wall, and on a hard-level surface rather than on rugs or carpets.
- Always keep the Charging Base plugged in, otherwise RoboVac will not automatically return to it.
Charge Your RoboVac
• RoboVac has a pre-installed rechargeable battery that has to be fully charged before use.
• RoboVac returns to the Charging Base at the end of a cleaning cycle or when its battery is running low.
Method 1: Attach RoboVac to the Charging Base by aligning its charging pins with the charging pins on the base.
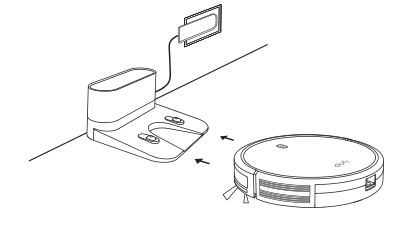
Method 2: Press Home on the remote control to return RoboVac to the Charging Base.
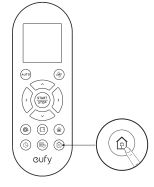
Turn off the main power switch if RoboVac will not be used for a long period of time. To preserve the battery’s lifespan, recharge at least once every 6 months.
Start / Stop Cleaning
Make sure the main power switch on the bottom of RoboVac is turned on before use.
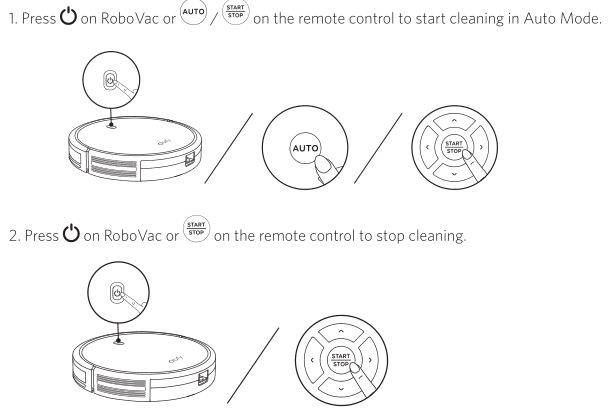
Select a Cleaning Mode
Auto cleaning
RoboVac optimizes its cleaning path by selecting different cleaning modes automatically until cleaning is complete. This is the most commonly used cleaning mode.
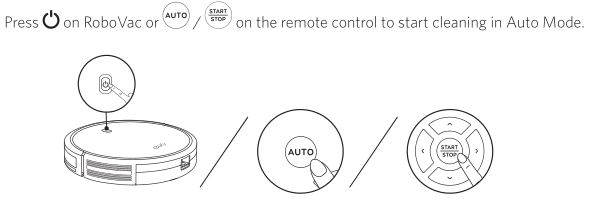
- RoboVac will return to the Charging Base automatically when the battery level becomes low or when RoboVac finishes cleaning.
- By default, RoboVac starts in Auto cleaning mode when it is turned on.
BoostIQ™ Feature
When the BoostIQ™ feature is enabled, RoboVac will automatically increase the suction power if it detects stronger power is needed to ensure the best clean. BoostIQ™ is ideal for cleaning thicker carpets and hard-to-sweep messes, which will reduce the total cleaning time, but increase the noise level. If the vacuuming noise caused by BoostIQ™ disturbs you, you can disable this feature. This feature only works in Auto and Single Room cleaning modes.
In Auto or Single Room cleaning mode, press (Fan Icon) on the remote control repeatedly to adjust the suction power level.
- The corresponding icon is displayed on the remote control.
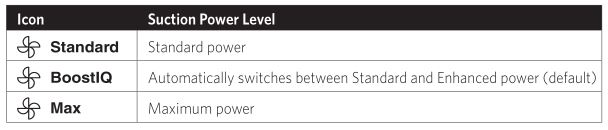
When RoboVac starts cleaning in Auto or Single Room mode the next time, it will clean according to the suction power level you previously selected.
Spot cleaning
RoboVac intensively cleans a specific area in a spiral pattern, useful if there is a concentrated area of dust or debris. In Spot mode, RoboVac will stop cleaning after 2 minutes.

Edge cleaning
RoboVac reduces its speed when it detects a wall and then follows the wall to ensure the edge is cleaned thoroughly. In Edge mode, RoboVac will clean for 20 minutes and return to the Charging Base.
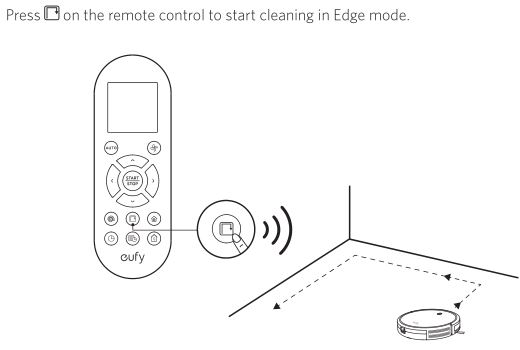
Single Room cleaning
RoboVac intensively cleans one single room and stops after 30 minutes. Select this mode only when one specific room needs to be cleaned. Make sure to confine RoboVac to the room by closing the door.
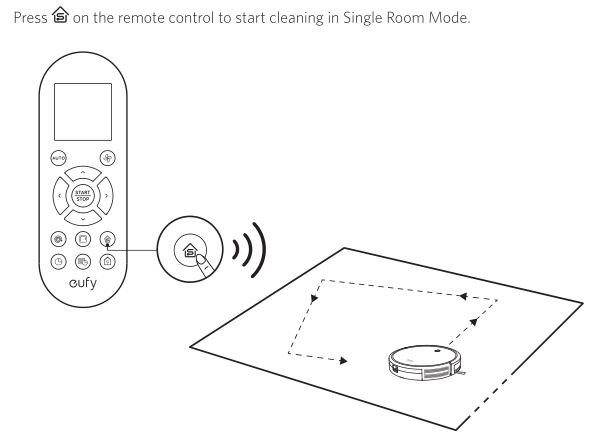
Manual cleaning
You can direct RoboVac to clean a particular area by using the directional buttons on the remote control.
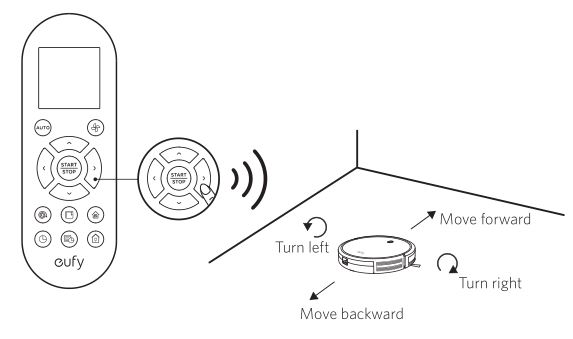
Set Time and Scheduled Cleaning
Set Time
Make sure the time is set correctly to your local time before setting a scheduled cleaning.
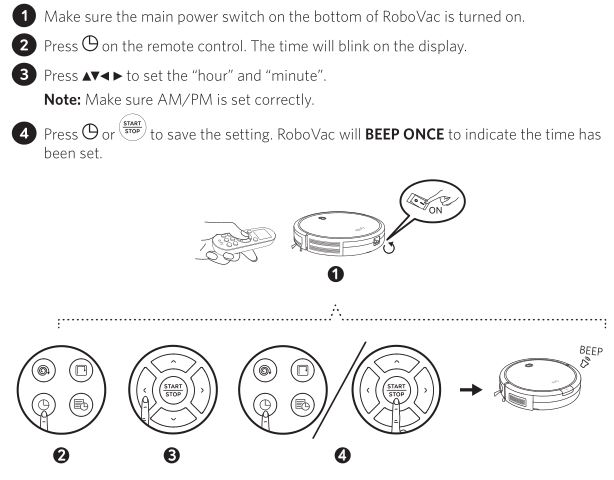
To ensure the time is set successfully, make sure RoboVac is turned on. You will hear a beep when the time has been set.
Set a Scheduled Cleaning
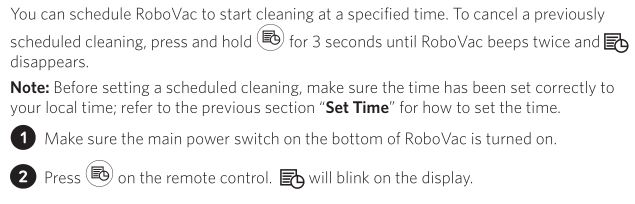
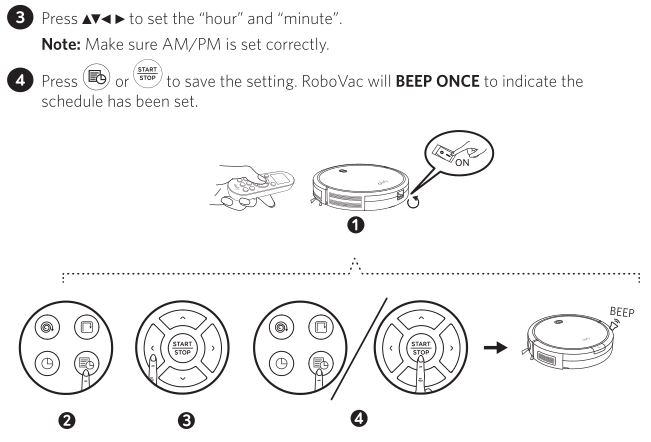
Cleaning and Maintenance
For optimal performance, follow the instructions below to clean and maintain RoboVac regularly. The cleaning/replacement frequency will depend on your usage habits of RoboVac.
Recommended cleaning/replacement frequency:
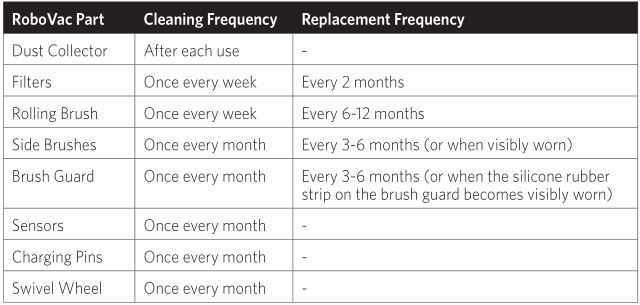
Clean the Dust Collector and Filters
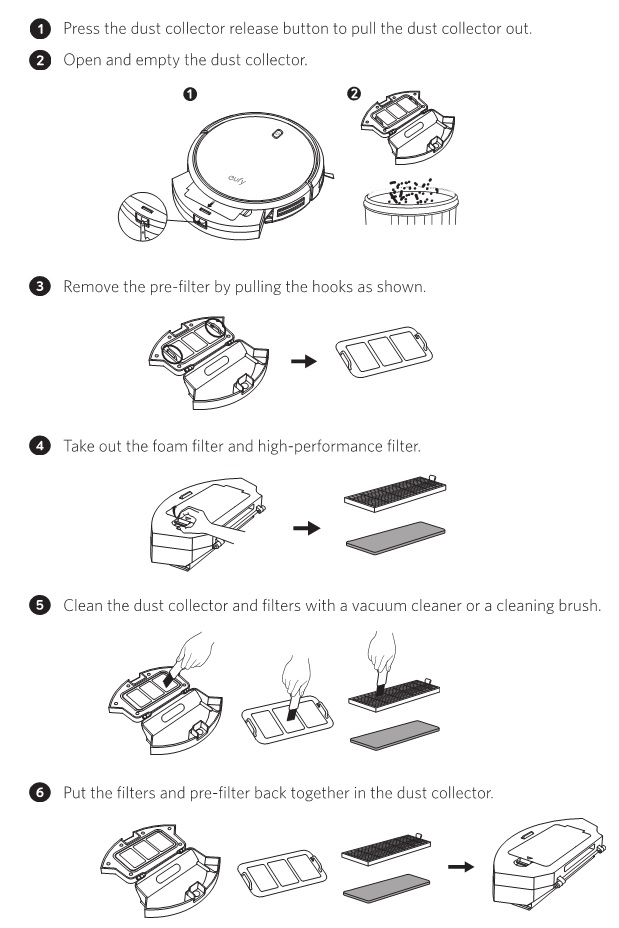
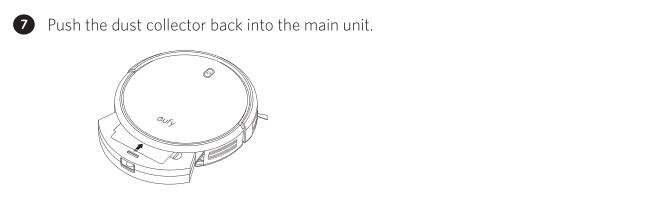
You can wash the dust collector, pre-filter and foam filter with water. Be sure to air-dry them thoroughly before reassembling them. Do not wash the high-performance filter with water, as it may damage the filter and reduce the suction power.
Clean the Rolling Brush
- Pull on the release tabs to unlock the brush guard as shown.
- Lift the rolling brush to remove.
- Clean the rolling brush with the provided cleaning tool or a vacuum cleaner.
- Reinstall the rolling brush by inserting the fixed protruding end first and then clicking into place.
- Press down to snap the brush guard into place.

Clean the Side Brushes
Foreign substances, such as hair, can easily get tangled in the side brushes, and dirt may adhere to them. Be sure to clean them regularly.
- Remove the side brushes.
- Carefully unwind and pull off any hair or string that is wrapped between the main unit and the side brushes.
- Use a cloth dampened with warm water to remove dust from the brushes or to gently reshape them.
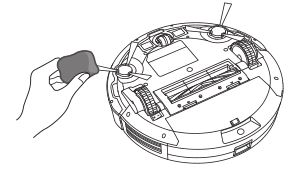
Only use the side brushes when they are completely dry.
Replace the Side Brushes
The side brushes may become bent or damaged after being used for a period of time.
Follow the instructions below to replace them.
Pull off the old side brushes and snap the new ones into place.

Clean the Sensors and Charging Pins
To maintain the best performance, clean the drop sensors and charging pins regularly.
Dust off the drop sensors and charging contact pins using a cloth or cleaning brush.
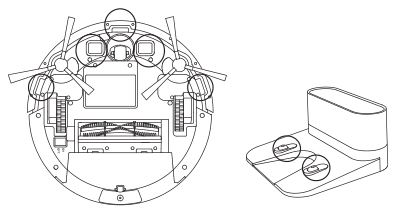
Clean the Swivel Wheel
Hair or dust particles can easily get entangled in the swivel wheel. Be sure to clean the swivel wheel periodically and as needed.
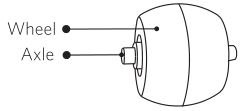
- Pull out the swivel wheel.
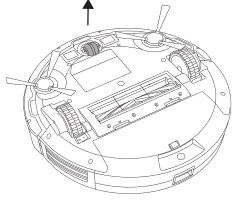
- Clean any hair or debris wrapped around the wheel or entangled inside the wheel cavity.
- Reinstall the wheel and push in until it clicks into place.
- You can clean the swivel wheel with water.
- Use the swivel wheel only when it is completely dry.
Troubleshooting
FAQs
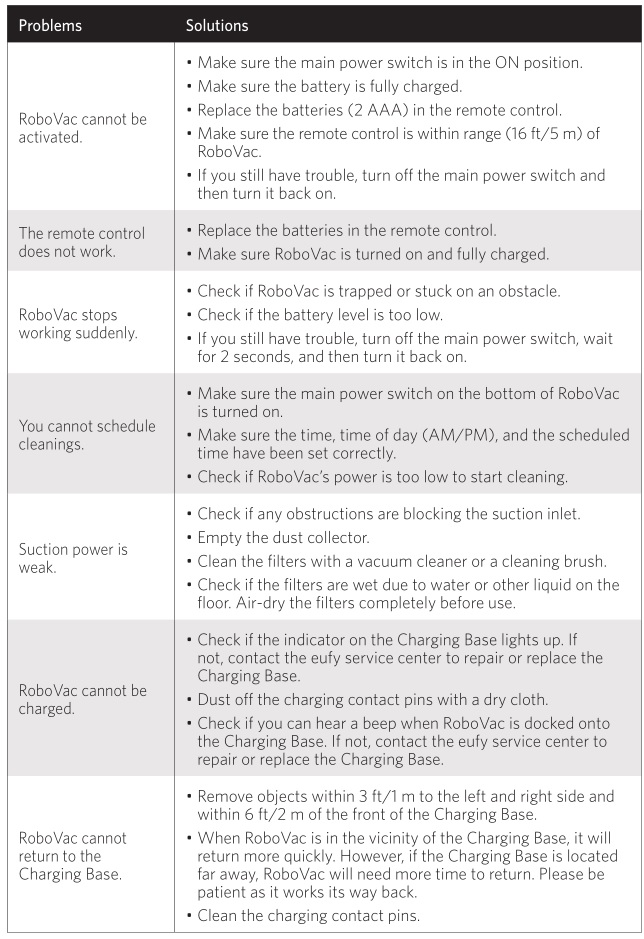
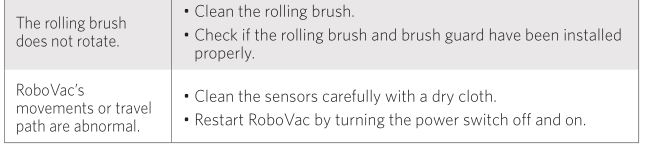
Error Tones
When RoboVac is in trouble, it will emit a series of short or long beeps and the red indicator on RoboVac will be solid or flashing.
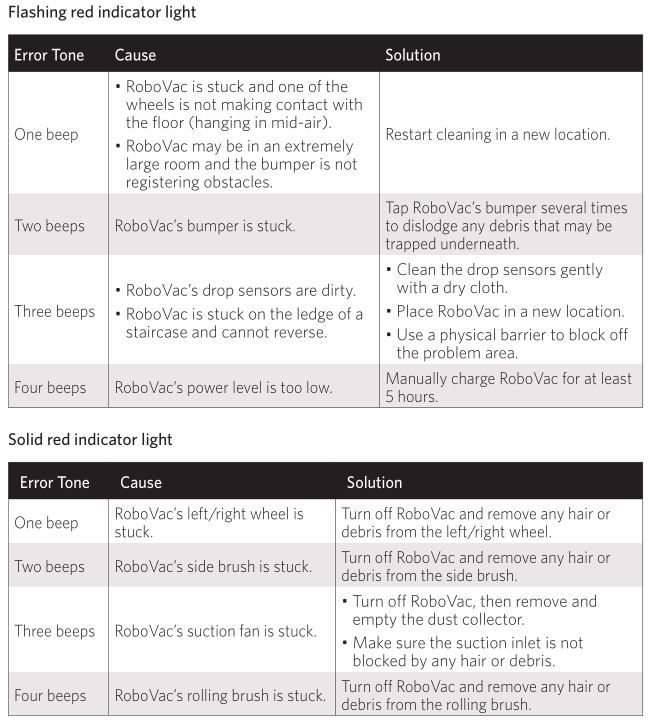
Specifications
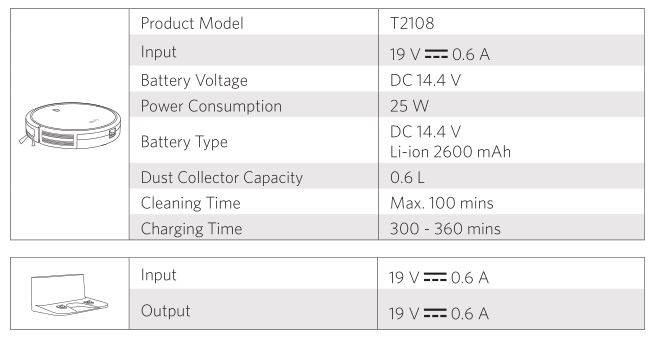
Customer Service