![]()
OPERATING INSTRUCTION
PLEASE READ BEFORE OPERATING THIS EQUIPMENT
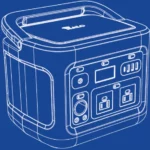
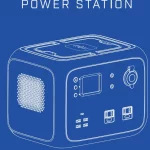
HALO BOLT AIR
Thank you for choosing HALO!
Powerful and loaded with features including a new, easy-to-use digital display, the HALO BOLT AIR can be used to safely jump-start your vehicle or inflate your tires. The HALO BOLT AIR provides portable power so you can charge your phone, tablet, and other electronic devices anywhere! The HALO BOLT AIR also includes a convenient
floodlight and emergency light. Compact, versatile, and simple to use, the HALO BOLT AIR and all accessories fit neatly in its carrying pouch and is perfect to store in your home or vehicle for everyday use or an emergency need. Never be without a charge, a jump start, or a flat tire again!
INCLUDED ITEMS
| – HALO BOLT AIR
– Jumper Cables – USB to Micro USB Cable – Carrying Pouch |
– Car Charging Adapter
– Wall Charging Adapter – 4 Interchangeable Air Nozzles – 12 Inch Air Hose Extension |
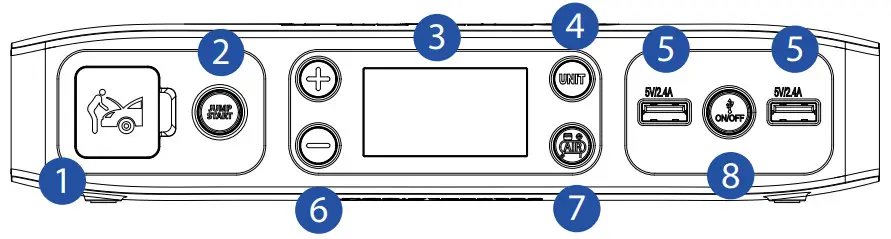
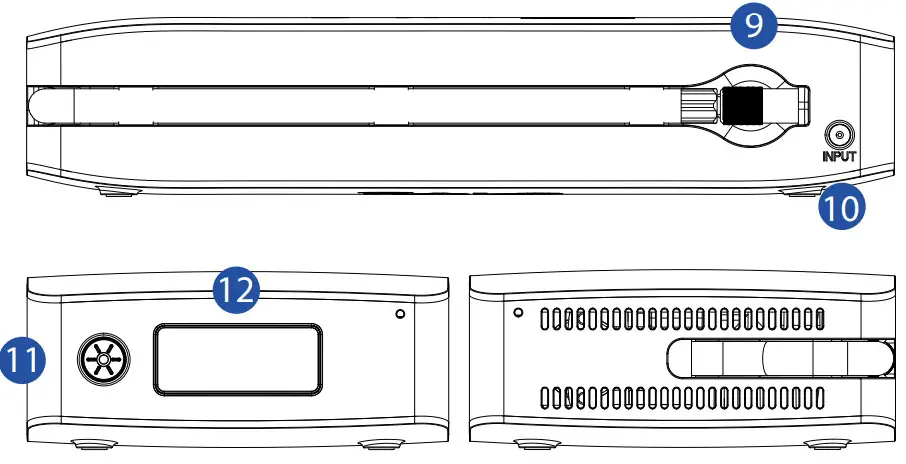
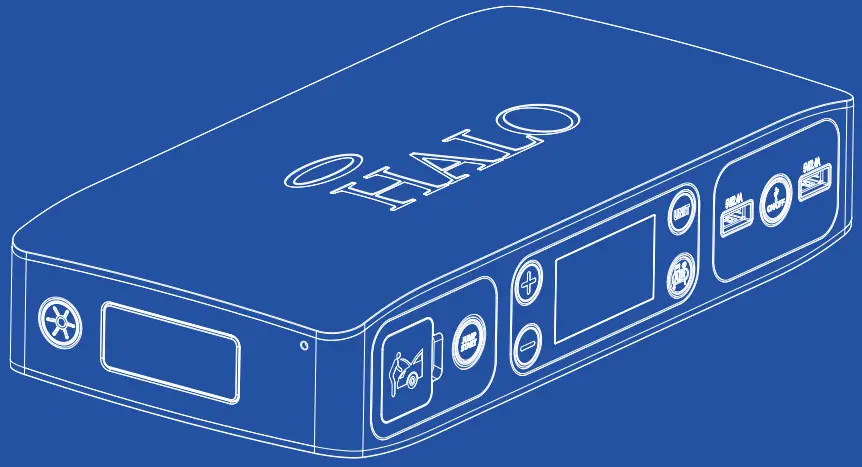
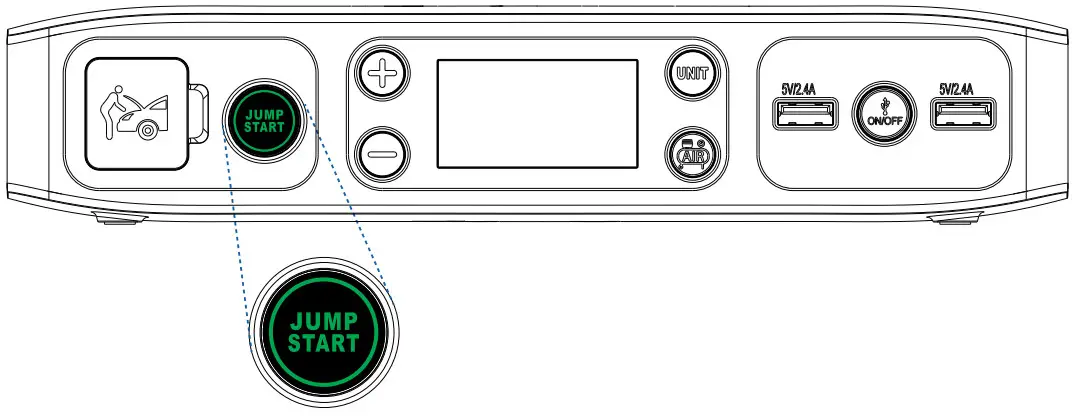
| 1 | Jump Start Output 2 | Jump Start Button 3 | Digital Screen 4 | Pressure Unit Button 5 | USB Outputs 6 | Pressure Settings (+) and (-) 7 | Air Compressor ON/OFF Button 8 | USB ON/OFF Button 9 | Air Hose |
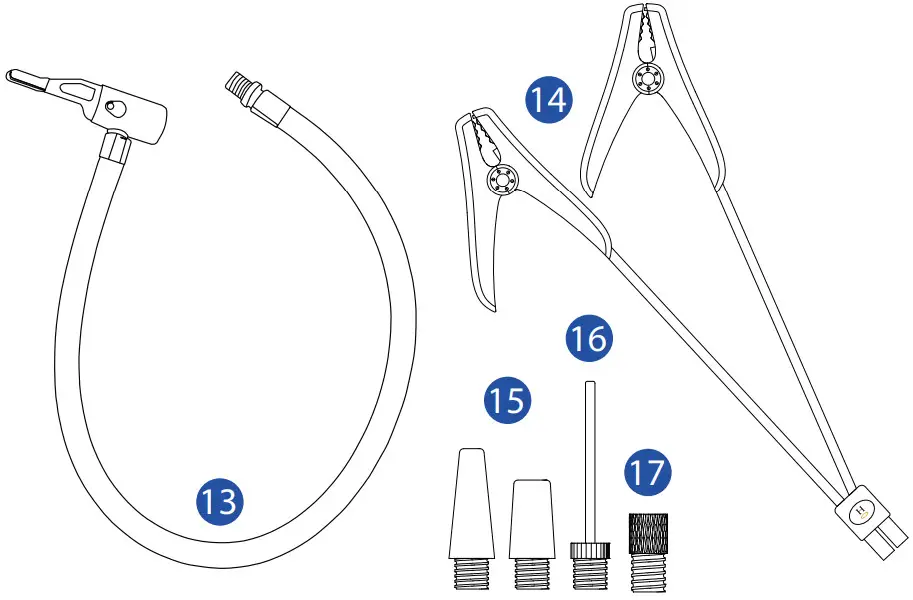
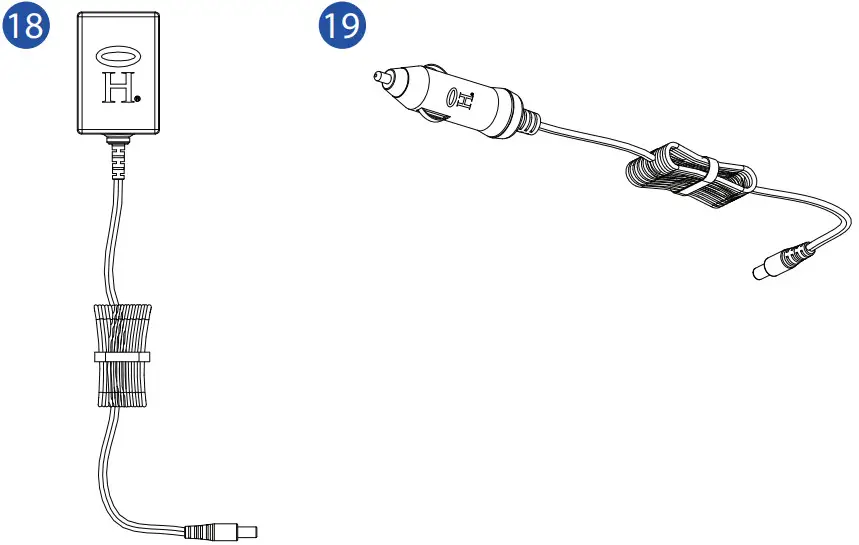
10 | Charging Input 11 | Floodlight ON/OFF Button 12 | Floodlight/Emergency Light 13 | 12 Inch Air Hose Extension 14 | Jumper Cable Clamps 15 | Tapered Adapter (x2) 16 | Sports Ball Needle Adapter 17 | Presta Valve Adapter 18 | Wall Charging Adapter 19| Car Charging Adapter |
OPERATING INSTRUCTIONS
CHARGING YOUR HALO BOLT AIR
IMPORTANT: Before using your HALO BOLT AIR for the first time, fully charge it (so that pressing any button, displays 100% on the digital screen).
To charge your HALO BOLT AIR, use the provided Wall Charging Adapter, and plug the AC adapter plug into the charge input. Next, connect the AC adapter to a wall outlet. The HALO BOLT AIR will automatically begin charging. When the HALO BOLT AIR is fully charged, allfive battery indicator lights will be solid green and the
digital screen will indicate 100% charge. (This could take up to 9 hours). 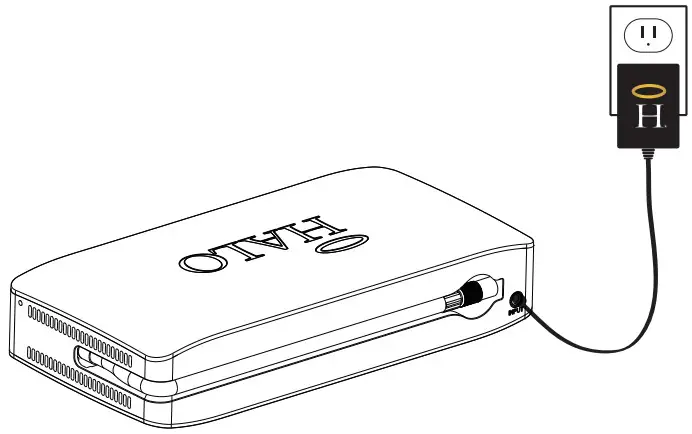 While charging, the digital screen will illustrate the charge percentage of the HALO BOLT AIR. When fully charged, disconnect the cable.
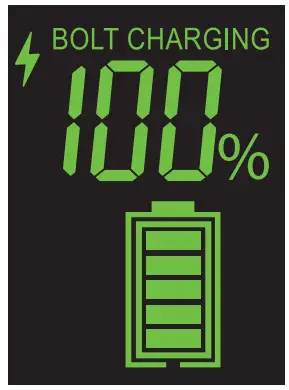 NOTE:
NOTE:
The HALO BOLT AIR is designed to charge between 32°F-113°F (0-45° C). A “TEMP” indicator will be illustrated on the digital display if the HALO BOLT AIR is attempted to be charged outside of this temperature range. When you’re on the road, you can also use the supplied Car Charging Adapter to charge your HALO BOLT AIR.
JUMP STARTING YOUR VEHICLE WITH THE HALO BOLT AIR
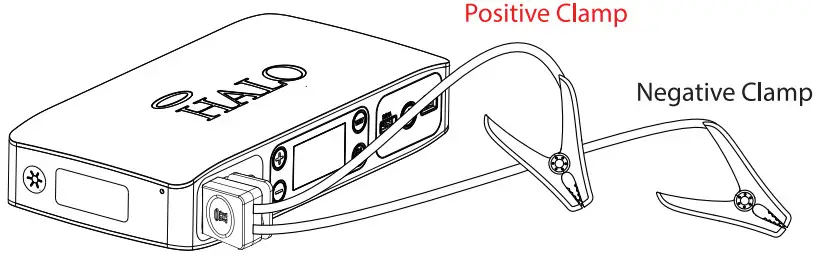
- Plug the jumper cables into the jump start output on the HALO BOLT AIR.
 NOTE:
NOTE:
Make sure the jumper cables are fully plugged into the jump start output before trying to jump your vehicle. - Attach the jumper cable clamps to the vehicle battery.
– Red clamp on positive terminal (+)
– Black clamp on negative terminal (-)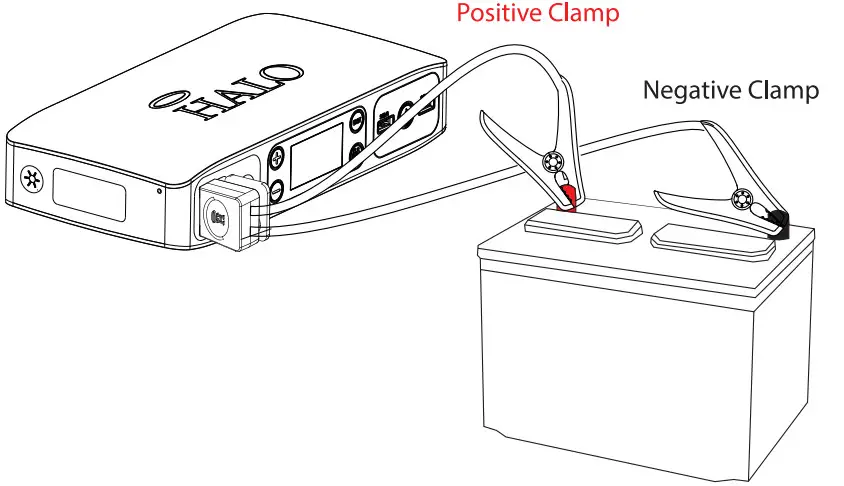 NOTE:
NOTE:
Do not touch red (positive) and black (negative) clamps together at any point. If the jump start button flashes red, the jumper cables have been connected incorrectly. If this flashing red condition occurs, disconnect the jumper cables from the HALO BOLT AIR and vehicle battery and restart the process from Step 1. - Press the “Jump Start” button and wait for the solid green light.
 NOTE:
NOTE:
A flashing green light indicates safety checks are in progress. - Start your vehicle.
NOTE:
The HALO BOLT AIR will allow 3 consecutive jump-start attempts after each time you press the jump start button. You must allow up to 15 seconds between each jump-start attempt. During the 15 seconds, the jump start button will flash green while the HALO BOLT AIR performs its safety checks. Once the jump start button illuminates solid green, the HALO BOLT AIR is ready for the next jump start attempt.
If your vehicle does not start after three attempts, we recommend you consult a certified mechanic.
Disconnect the jumper cable clamps from the car battery.
NOTE:
The jump start function can not be used in conjunction with USB charging or the air compressor. Please ensure that you have not activated the USB or Air Compressor output modes when attempting to jump-start your vehicle.
NOTE:
The HALO BOLT AIR is designed to allow a jump start when used within a safe temperature range. A “TEMP” indicator will be illustrated on the digital display if used outside of the temperature operating range.
JUMPSTART TROUBLESHOOTING TIPS
| Condition | Potential Cause | Solution |
 HALO BOLT AIR Jump HALO BOLT AIR JumpThe start button has been pressed but nothing happens |
The USB OWOFF Button or the Air The compressor ON/OFF Button has been pressed. |
The jump start output can not be used in conjunction with the USB output or air compressor modes. Ensure that both USB and AIR Compressor modes are off. |
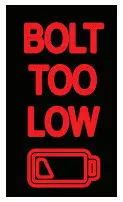
| 1 HALO BOLT AIR displays a red “BOLT TOO LOW” message |
The HALO BOLT AIR is not sufficiently charged to jump-start the vehicle. |
Recharge the HALO BOLT AIR and verify at least 50% charged. Then try the jump-start the process again. |
| HALO BOLT AIR Jump Start button flashes red |
The jumper cables have not been properly connected to the vehicle battery. |
Check the jumper cables and ensure that the red clamp is connected to the positive terminal (+) and the the black clamp is connected to the negative terminal (-). |
 HALO BOLT AIR Jump HALO BOLT AIR JumpStart button flashes green continuously |
 The HALO BOLT AIR is The HALO BOLT AIR iswaiting to te connected to a battery or a SAFETY CHECK FAIL has been triggered. |
Check the jumper cables and ensure they are properly connected to the battery. If the SAFETY CHECK FAIL indicator is triggered during the jump start process, it is recommended that you consult with a certified mechanic. |
 HALO BOLT AIR HALO BOLT AIRdisplays yellow . “TEMP” message |
The HALO BOLT AIR has detected a low or high-temperature condition |
Disconnect the HALO BOLT AIR and allow the unit to acclimate to temperature operating range (0I-12011. |
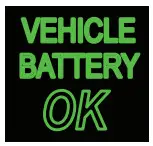
| HALO BOLT AIR displays a green “VEHICLE BATTERY OK” message |
The HALO BOLT AIR detects that it is connected to a vehicle battery with a normal starting voltage |
It is recommended that you consult with a certified mechanic |
| HALO BOLT AIR Shuts off unexpectedly |
The HALO BOLT AIR detects that it is connected to ai reveal direct bast: aneryTht hast could indicate that the vehicle battery or another component is faulty. |
It recommended that you consult with a certified mechanic |
| HALO BOLT AIR Jump Start and On/Off button flashes red and blue |
This could occur when attempting to jumpstart a vehicle while other electrical components (i.e. headlights. heater. radio, etc.) are on |
Turn off your headlights and any other components that may drain your car battery and try the jump start the process again. |
| The vehicle battery may be faulty. | It is recommended that you consult with a certified mechanic |
NOTE:
If none of these troubleshooting tips work, please consult a certified mechanic for assistance.
HALO BOLT AIR COMPRESSOR
The HALO BOLT AIR comes equipped with a 12 Inch Air Hose Extension and 4 Interchangeable Air Nozzles. Simply twist on the corresponding nozzle to inflate balls, pool floaties, bike tires, and more!
1. Connect the air hose to the tire or use the appropriate nozzle to connect to your inflatable device
2. Press the (+) or (-) button to set the desired pressure. The pressure measuring units can be changed by pressing the UNIT button.
3. Once the desired pressure has been set, begin inflating by pressing the Air Compressor ON/OFF button. The air compressor will shut off automatically once the pressure has been reached.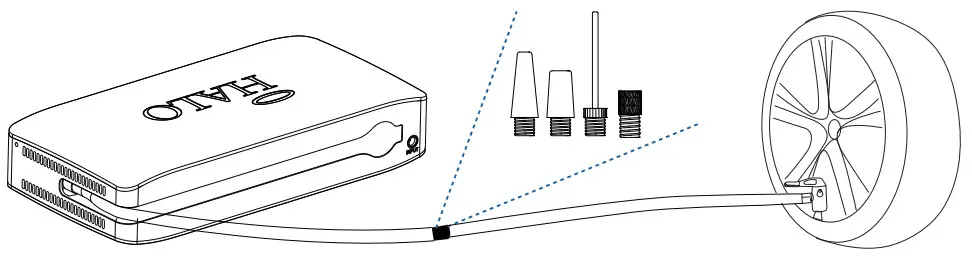
NOTE:The air compressor can be started or stopped at any point by pressing the air compressor ON/OFF button. The (+) and (-) may belong pressed to set the desired pressure quickly. Note: Always check and follow the manufacturer’s recommended pressure. Use caution as the air hose and connectors may get hot after extended use. The HALO BOLT AIR compressor is designed to automatically stop after an extended run-time or if an over-temperature protection setpoint is reached.
CHARGING AN ELECTRONIC DEVICE USING A 5V/2.4A USB OUTPUT PORT
1. Connect the Micro USB tip of the supplied Micro USB cable into the Micro USB input of your electronic device and connect the Standard USB end of the supplied Micro USB cable into either one of the HALO BOLT AIR USB 5V/2.4A Output ports.
NOTE:
If your electronic device does not have a Micro USB Input, your HALO BOLT AIR is also compatible with the charging cable provided with your electronic device. To use, plug the standard USB end of the cable into either one of the two 5V/2.4A USB Output ports located on your HALO BOLT AIR.
2. Turn on the USB charging by pressing the USB Power ON/OFF Button on the HALO BOLT AIR.
NOTE:
The HALO BOLT AIR USB charging feature will automatically power off after 30 minutes of inactivity.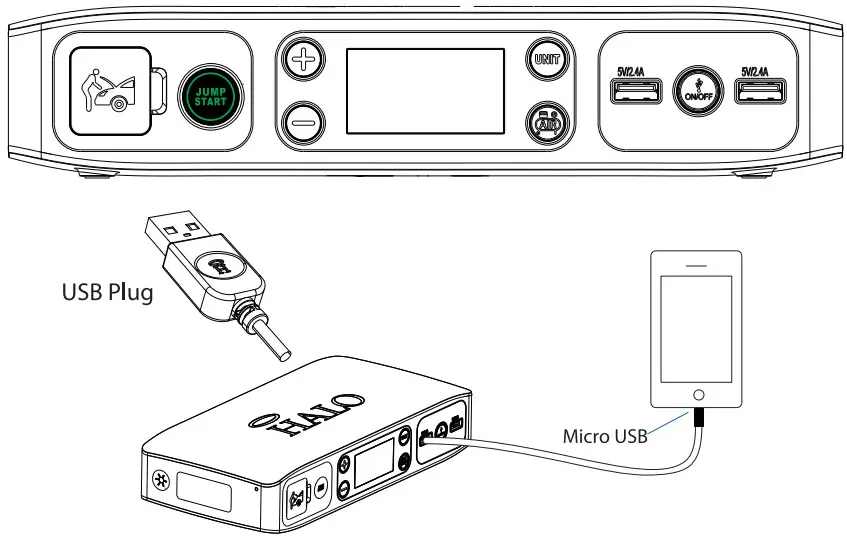 HALO SMART CHARGE TECHNOLOGY
Your HALO BOLT AIR contains the HALO SMART CHARGE TECHNOLOGY to achieve higher compatibility for charging standard 5V USB electronic devices. The HALO SMART CHARGE TECHNOLOGY will allow the HALO BOLT AIR to communicate with your electronic device and provide the fastest and safest charge for that device.
COMPATIBILITY
Standard 5V USB electronic devices including Mobile phones, Tablets, PSP, NDS, MP3, MP4, MP5, Bluetooth, GPS, Cameras, and more. USING YOUR HALO BOLT AIR FLOODLIGHT
The floodlight can be turned on and off by simply pressing and releasing the floodlight ON/OFF button. The first press will turn on the floodlight. A second press will turn on the red emergency light. The third press will turn on SOS flashing red light. The floodlight will automatically turn off after 2 hours of inactivity.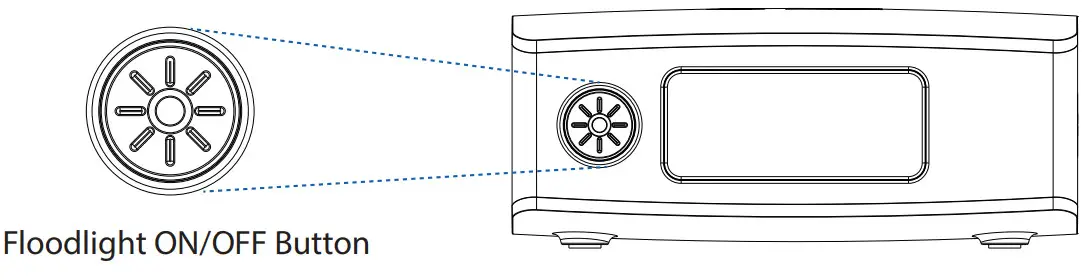 NOTE:
NOTE:
Do not look directly into the LED oodlight.
SPECIFICATIONS
| Battery Cells: Battery Pack Energy: Jump Start: Air Compressor: Input: USB Output: Dimensions: Weight: |
3x Li-Polymer 5300mAh 58830 mWh 12V/500Amps 100PSI max 14V/0.85A 2x USB 5V/2.4A 118 x 242 x 47mm 1150.10 g |
SAFETY PRECAUTIONS
- Read all instructions before using the product.
- Your HALO BOLT AIR should not be used to jump-start unregistered vehicles.
- Make sure the jumper cables are fully plugged into the jump start output before trying to jumpstart your vehicle.
- Caution: The lithium-ion rechargeable battery used in this charging device may present a risk of fire or chemical burn if mistreated. Do not disassemble, expose to heat above 212°F (100°C), or incinerate.
- Misusing or incorrectly connecting your HALO BOLT AIR may cause an electric shock to users and damage equipment.
- Your HALO BOLT AIR may become warm under extended high power operation. During operation, keep your HALO BOLT AIR away from materials that may be affected by these temperatures. Do not cover, wrap, or otherwise restrict the HALO BOLT AIR during operation.
- When used correctly, lithium-ion rechargeable batteries provide a safe and dependable source of portable power. However, if they are misused or abused, this may result in leakage, burns for the explosion, causing personal injury, or damage to other devices.
- Do not disassemble your HALO BOLT AIR. There are no user-serviceable parts inside. Incorrect reassembly may result in shock or flre-hazard.
- Do not drop or be subject to strong impacts. Do not operate your HALO
BOLT AIR if it has received a sharp blow, or has otherwise been damaged in any way. - Do not expose your HALO BOLT AIR to moisture, water, rain, or snow.
- Do not insert any object into the ports or openings of your HALO BOLT AIR.
- Only charge your HALO BOLT AIR by the specified method with the specified charging adapter provided with the unit.
- In the unlikely event of leakage or explosion use sand or a chemical fire extinguisher.
- Ensure there is no metal object between your device and the HALO BOLT AIR when charging your device wirelessly as the object may become hot.
- Batteries should be recycled or disposed of as per state and local guidelines.
- Keep your HALO BOLT AIR dry and away from moisture and corrosive materials. The HALO BOLT AIR should not be used near water or wet areas such as bathtubs, showers, bathrooms, sinks, swimming pools, or basements.
- Do not clean your HALO BOLT AIR with harsh chemicals, soaps, or detergents. Just wipe the case with a soft cloth.
- Keep your HALO BOLT AIR away from heat sources, including open faames, radiators, stoves, ovens, and any other devices that produce heat.
- Do not puncture, crush or be subject to mechanical shock.
- Make sure the HALO BOLT AIR’s charging ports do not become contaminated with lint or other debris. Use a canned-air type of product periodically to ensure that the port openings are clear.
- Recharge your HALO BOLT AIR once every three months when not in use.
COMPLIANCE WITH FCC REGULATION
This device complies with part 15 of the FCC Rules and RSS-Gen of IC Rules. Operation is subject to the following two conditions: (1) This device may not cause harmful interference, and (2) this device must accept any interference received, including interference that may cause undesired operation.
NOTE: This equipment has been tested and found to comply with the limits for a Class B digital device, pursuant to part 15 of the FCC Rules. These limits are designed to provide reasonable protection against harmful interference in a residential installation. This equipment generates, uses, and can radiate radio frequency energy and, if not
installed and used in accordance with the instructions, may cause harmful interference to radio communications. However, there is no guarantee that interference will not occur in a particular installation. If this equipment does cause harmful interference to radio or television reception, which can be determined by turning the equipment off and on, the user is encouraged to try to correct the interference by one or more of the following measures: - Reorient or relocate the receiving antenna.
- increase the separation between the equipment and receiver.
- Connect the equipment into an outlet on a circuit different from that to which the receiver is connected.
- Consult the dealer or an experienced technician for help.
CAUTION: To comply with the limits of the Class B digital device, pursuant to Part 15 of the FCC Rules, this device must be used with certified peripherals and shielded cables. All peripherals must be shielded and grounded. Operation with non-certified peripherals or non-shielded cables may result in interference to radio or reception.
LIMITED WARRANTY
HALO2CLOUD LLC. (HALO) warrants its products to be free from defects in material and workmanship under normal use. Conditions are as follows:
- During the first 90 days from the date of purchase, HALO will repair or replace the defective product.
- HALO will, subject to inspection, repair the defective product or 13 | POWER YOUR LIFE replace it with a new or reconditioned unit. The return must be accompanied by a Return Merchandise Authorization (RMA) number to be issued upon request and must be shipped prepaid.
- Where applicable, all requests for warranty returns must be accompanied by proof of purchase.
- The warranty does not extend to the electronic equipment that is used or incorporates with any of our products and accessories. HALO shall not be held responsible for the improper use of its products.
- In no event shall HALO be liable for any incidental, special, consequential, or punitive damages arising out of the use of HALO’s products. For all questions or exchange requests, please call 888-907-6274, or email us at [email protected]. This Limited Warranty sets forth the full scope of HALO’s obligations and liabilities with respect to the product. All implied warranties, including without limitation the implied warranties of merchantability and fitness for a particular purpose, are limited to the duration of this Limited Warranty. In no event shall HALO be liable for any incidental, special, consequential, or punitive damages or any damages or losses of or to electronic equipment or products that are used with any of HALO’s products.
FOR TECHNICAL SUPPORT PLEASE EMAIL US AT:
[email protected]
OR
CALL US AT: 888-907-6274
HALO
6 CENTRAL ROW
HARTFORD, CT 06103
WWW.BESTHALO.COM
Designed by HALO.
6 Central Row, Hartford, CT 06103
Made in China.