hama 00186310 EWS-200 Weather Station Wetterstation

Product Information: Weather Station Wetterstation
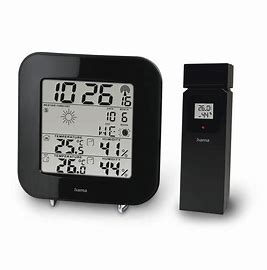
The Weather Station Wetterstation (model number: 00 186310, EWS-200) is a device that displays indoor and outdoor temperature, humidity, time, date, moon phase, and weather forecast. The device comes with two parts – a base station and a measuring station. The base station is used to display the information and set alarms, while the measuring station is placed outside to transmit the outdoor temperature and humidity data to the base station.
Product Usage Instructions
- Inserting Batteries: Before use, insert the batteries (2 pcs. UM-4 or AAA 1.5V batteries) in the measuring station first and then in the base station. Ensure that you insert the batteries with the correct polarity and close the battery compartment.
- Choosing a Location: Choose a suitable location for the measuring station outside, away from direct sunlight, rain, and wind. The measuring station can be mounted on a wall using the opening provided.
- Setting up: After inserting the batteries, place the measuring station outside and the base station inside at your desired location. The base station will search for a connection to the measuring station and perform initial setup. When successful transmission is established between the base station and the measuring station, the clock will automatically search for a DCF signal. During the search, the wireless symbol (9) will flash. the DCF signal is received, the wireless symbol will be displayed continuously. If no signal is received, it will not be displayed. If you want to set the time manually, press the MODE button (22) for 3 seconds to stop the search for the DCF signal. The wireless symbol (9) goesout and you can set the time .
- Display and Settings: The base station displays indoor and outdoor temperature, humidity, time, date, moon phase, and weather forecast. You can hold down the UP button (23) or the DOWN/MEM button (24) to select the values faster. You can also choose from German (GE), English (EN), Danish (DA), Dutch (NE), Italian (IT), Spanish (SP) or French (FR) for the weekday display. To make settings, press the MODE button (22) to enter the settings mode. Use the UP button (23) to select the desired setting and the DOWN/MEM button (24) to change it. Press the MODE button (22) to confirm each selection. Once you have made all the settings, press the MODE button (22) again to exit the settings mode. The settings you made will be saved.
- Additional Features: The base station comes various features such as alarm, battery symbol, comfort range, channel display, and backlight. You can refer to the user manual for more information on how to use these features.
Operating instruction
Controls and Displays

A Base station
- Alarm symbol
- Battery symbol (base station)
- Summer time
- Weather forecast symbol
- Room temperature
- Comfort range
- Channel display
- Outdoor temperature
- Radio symbol
- Time
- Day
- Month
- Weekday
- Moon phase
- Room temperature trend
- Room humidity
- Measuring station radio symbol
- Outdoor humidity
- Outdoor temperature trend
- Outdoor temperature alarm
- Battery symbol (measuring station)
- MODE button
= settings/confirm the setting/alarm setting - UP button
= increase the current setting/activate or deactivate manual radio signal reception - DOWN/MEM button
= reduces the current setting/accessing the saved maximum/minimum values - CH button
= channel selection/manual search for a signal from the measuring station - ALERT button
= setting/activating/deactivating the outdoor temperature alarm - SNZ/LIGHT button
= stops the alarm/activates the backlight (approx. 10 seconds) - Battery compartment
B Measuring station - Display (on front side)
= Displays temperature, humidity and current channel. - LED indicator (on front side)
= Flashes when signals are transmitted. - Opening for wall mounting
- Set the transmission CHANNEL (1-3)
= Input channel for the weather station. Set the channel before inserting the batteries. - Battery compartment
= Unit requires 2 pcs. UM-4 or “AAA” 1.5V batteries.
Explanation of Warning Symbols and Notes
Warning
This symbol is used to indicate safety instructions or to draw your attention to specific hazards and risks.
Note
This symbol is used to indicate additional information or important notes.
Package Contents
- EWS-200 weather station (base station for indoors/measuring station for outdoors)
- 4 AAA batteries
- These operating instructions
Safety Notes
- The product is intended for private, non-commercial use only.
- Do not operate the product outside the power limits given in the specifications.
- Do not use the product in moist environments and avoid splashes.
- Do not use the product in the immediate vicinity of heaters or other heat sources or in direct sunlight.
- Do not use the product in areas where the use of electronic devices is not permitted.
- Only connect the product to a socket that has been approved for the device. The socket must be installed close to the product and easily accessible.
- Do not drop the product and do not expose it to any major shocks.
- Do not open the device or continue to operate it if it becomes damaged.
- Do not attempt to service or repair the product yourself. Leave any and all service work to qualified experts.
- Keep the packaging material out of the reach of children due to the risk of suffocation.
- Dispose of packaging material immediately according to locally applicable regulations.
- Do not modify the product in any way. Doing so voids the warranty.
- Use the product for its intended purpose only.
Warning – Batteries
- When inserting batteries, note the correct polarity (+ and – markings) and insert the batteries accordingly. Failure to do so could result in the batteries leaking or exploding.
- Only use batteries (or rechargeable batteries) that match the specified type.
- Before you insert the batteries, clean the battery contacts and the polar contacts.
- Do not allow children to change batteries without supervision.
- Do not mix old and new batteries or batteries of a different type or make.
- Remove the batteries from products that are not being used for an extended period (unless these are being kept ready for an emergency).
- Do not short-circuit batteries.
- Do not charge batteries.
- Do not throw batteries in a fire.
- Keep batteries out of the reach of children.
- Never open, damage or swallow batteries or allow them to enter the environment. They can contain toxic, environmentally harmful heavy metals.
- Immediately remove and dispose of dead batteries from the product.
- Avoid storing, charging or using the device in extreme temperatures and extremely low atmospheric pressure (for example, at high altitudes).
Getting Started
Measuring station
- Open the battery compartment cover.
- Set the desired channel (32) with the switch. If you are using only one transmitter, please leave the selection at „1“.
- Insert 2 new UM-4 or „AAA“ 1.5V batteries observing correct polarity.
- Close the battery compartment cover and set the unit in the desired location.
Note
Before use, ensure you insert the batteries in the measuring station first and then in the base station.
Base station
- Open the battery compartment (28) and insert two AAA batteries with the correct polarity. Close the battery compartment.
Installation
Note – Installation
- We recommend initially placing the base and measuring stations in the intended locations without installing them and making all the settings described in 6. Operation – to do.
- Only install the stations once the appropriate settings have been made and a stable wireless connection is established.
Note
- The wireless transmission range between the measuring and base stations is up to 30 m in open spaces.
- Before installation, ensure that wireless transmission will not be disrupted by interference or obstacles like buildings, trees, vehicles, high-voltage lines, etc.
- Before the final installation, ensure that there is sufficient reception between the intended installation locations.
- When installing the measuring station, ensure that it is protected from direct sunlight and rain.
- The international standard height for measuring air temperature is 1.25 m (4 ft) above ground.
Warning
- Buy special or suitable installation material from a specialised dealer for wall-mounting.
- Ensure that no faulty or damaged parts are installed.
- Never apply force during installation. This could damage the product.
- Before installation, ensure that the chosen wall is suitable for the weight to be mounted, and make sure that there are no electrical wires, water, gas or other lines at the installation site on the wall.
- Do not mount the product above locations where persons might linger.
Base station
- Use the base to position the base station on a level surface.
Measuring station
- You can also position the measuring station on a level outdoor surface.
- We recommend installing the measuring station securely on an outdoor wall using the opening (31).
- Install an anchor, screw, nail, etc. in the wall of your choice.
- Hang up the base/measuring station using the opening intended for this purpose.
Operation
Note – Input
Hold down the UP button (23) or the DOWN/MEM button (24) to select the values faster.
Connection to the measuring station
- After you insert the batteries, the base station automatically searches for a connection to the measuring station and performs initial setup.
Note
- Initial setup takes approx. 3 minutes.
- During connection, the wireless symbol on the measuring station will flash (17).
- Do not press any buttons during setup. Otherwise, values may not be transmitted correctly and there is a risk of value errors and inaccuracies.
- The setup process is completed when the indoor (5, 16) and outdoor (8, 18) measurement data is displayed.
- the base station still does not receive a signal from the measuring station, press and hold the CH-button (25) for approx. 3 seconds to start the manual search for the signal
Selecting the channel/other measuring stations
Note
You can install two more measuring stations in addition to the included measuring station. Ensure that the base and measuring stations are set to the same channel. Visit www.hama.com for suitable measuring stations.
- Press the CH-button (25) repeatedly to set the channel to that set on the respective measuring station – see 4.1.
Measuring station. 1, 2, 3 (7) is displayed. - Select CH1 if you are only using the measuring station supplied.
- The base station now shows the data measured (8, 18) on the selected measuring station (7).
Basic and manual settings
Automatic setting using the DCF signal
- After the first time the base station is switched on and successful transmission is established between the base station and the measuring station, the clock will automatically search for a DCF signal. During the search, the wirelesssymbol (9) will flash.
| Display | Searching for the DCF signal |
 Display flashing Display flashing |
Active |
| Displayed continuously | Successful – signal is being received |
| Not displayed |
Deactivated |
- If the station still does not receive a signal, press and hold the UP button (23) for approx. 3 seconds to start the manual search for the DCF signal. The wireless symbol (9) will start to flash.
Note – Time settings
- The search process takes about 7 minutes. If it fails, the search ends.The radio symbol (9) disappears.
- In the meantime, however, you can set the time and the date manually.
- The clock automatically continues to search for the DCF signal on a daily basis (1:00, 2:00, 3:00, 4:00 and 5:00 a.m.). If the signal is received successfully, the manually set time and date are overwritten.
Note – Summer time
- The clock automatically switches to summer time. (3) appears on the display as long as summer time is activated.
- Press and hold the UP button (23) for approx. 3 seconds to stop the manual search.
(Manual) settings
- Press and hold the UP button (23) for approx. 3 seconds to stop the search for the DCF signal. The wireless symbol (9) goes out and you can set the time manually.
- Press and hold the MODE button (22) for approx. 3 seconds to make the following settings one after the other:
- Year (10)
- Month (12)
- Day (11)
- Weekday (13)
- Time zone (10)
- 12/24 hour format (10)
- Hours (10) Alarm time
- Minutes (10)
- Temperature unit °C/°F (5.8)
- To select the individual values, press the UP button (23) or the DOWN/MEM button (24) and confirm each selection by pressing the MODE button (22).
- If you do not make an entry for 30 seconds, the device automatically exits the settings mode and the settings you made are saved.
Note – Time zone
- The DCF signal can be received over long distances, but always transmits the current Central European Time in Germany. Make sure you account for the time difference in countries with another time zone.
- If you are in Moscow, the time is 3 hours later than in Germany. This means that you should set +3 for the time zone. The clock then automatically sets the time to 3 hours after the DCF signal received or relative to the manually set time.
Note – Weekday
You can choose from German (GE), English (EN), Danish (DA), Dutch (NE), Italian (IT), Spanish (SP) or French (FR) for the weekday display.
Celsius/Fahrenheit
- Follow the steps described for (Manual) settings to switch between °C and °F on the temperature display.
- If the temperature is outside of the measuring range, LL.L (lower than minimum temperature) or HH.H (higher than maximum temperature) will appear on the temperature display.
Alarm
- Repeatedly press the MODE button (22) to access alarm mode.
- AL is displayed accordingly in the seconds display.
- Press and hold the MODE button (22) for approx. 3 seconds to set the signal time of the alarm displayed. The hours display begins to flash.
- Set the following information in the order listed:
- Hours
- Minutes
- To select individual values, press the UP button (23) or the DOWN/MEM button (24) and confirm each selection by pressing the MODE button (22).
- If you do not make an entry for 30 seconds, the device automatically exits the settings mode and the settings you made are saved.
- In the alarm mode (AL) display, press the UP button (23) or the DOWN/MEM button (24) to activate or deactivate the alarm. The alarm symbol (1) will appear/not appear.
- If the alarm is triggered, the alarm symbol (1) will begin to flash and an alarm will sound.
- Press any button (except the SNZ/LIGHT button (27)) to stop the alarm. Otherwise, it will stop automatically after 2 minutes.
Note – Snooze function
- While the alarm signal is sounding, press the SNZ/LIGHT button (27) to activate the snooze function. Zz begins to flash on the display. The alarm signal will be stopped for 5 minutes, after which it will sound again.
- Press any button (except the SNZ/LIGHT button (27)) to stop the snooze function and the alarm.
Weather forecast/ atmospheric pressure history
- Based on changes in the atmospheric pressure and the data saved, the base station is able to make weather forecasts for the next 12 to 24 hours.
Note – Weather forecast
The weather forecast function is not available during the first few hours of operation because it requires data that is collected during operation.
- The weather forecast and the current weather are indicated by five different symbols (4):

- The weather station indicates a trend as to how the values for the outdoor temperature (8) and room temperature (5) are likely to develop over the next few hours.

Maximum and minimum temperature and humidity values
- The base station automatically stores the maximum and minimum indoor/outdoor temperature and humidity values.
- Repeatedly press the DOWN/MEM button (24) to switch between the current temperature and humidity, minimum temperature and humidity (MIN) and maximum temperature and humidity (MAX).
- Press and hold the DOWN/MEM button (24) for approx. 3 seconds to reset the stored maximum and minimum values.
- The maximum and minimum values are automatically deleted every day at midnight.
Outdoor temperature alarm
- Repeatedly press the CH button (25) to select the measuring station channel (7) for which you would like to set an alarm.
- Press and hold the ALERT button (26) for approx. 3 seconds until the outdoor temperature display (8) begins to flash.
- The symbol for the lower limit value is displayed and the limit value (8) flashes.
- Press the UP button (23) or the DOWN/MEM button (24) to set the displayed limit value and confirm your selection by pressing the ALERT button (26).
- Then repeat this procedure for the upper limit value .
- If you do not make an entry for 30 seconds, the device automatically exits the settings mode and the settings you made are saved.
- Repeatedly press the ALERT button (26) to activate/ deactivate the outdoor temperature alarm. The alarm symbol (20) will appear/not appear.
Moon phases
The base station indicates the current moon phase (14) with the following symbols:

Comfort range
The base station displays the following comfort ranges based on the ration between the current room temperature and room humidity: Backlight
Note – Backlight
If you press the SNZ/LIGHT button (27), the display will light up for approx. 10 seconds.
Low battery capacity
As soon as the (2/21) battery symbol appears on the display of the base station, the capacity of the batteries in the base/ measuring station is very low. Replace the batteries immediately.
Note – Replacing the batteries
- Note that the stations have to be resynchronised each time after you change the batteries in the measuring or base station.
- To do this, remove the batteries from the other station and then reinsert them, or change them as required.
Care and Maintenance
Only clean this product with a slightly damp, lint-free cloth and do not use aggressive cleaning agents. Make sure that water does not get into the product.
Warranty Disclaimer
Hama GmbH & Co KG assumes no liability and provides no warranty for damage resulting from improper installation/ mounting, improper use of the product or from failure to observe the operating instructions and/or safety notes.
Technical Data
| Base station | Measuring station | |
| Power supply | 3.0 V
2 x AAA batteries |
3.0 V
2 x AAA batteries |
| Power consumption | ≥ 3,0 mA | ≥ 6,5 mA |
| Measuring range Temperature Humidity | 0°C – +50°C/ 32°F
– 122°F 20% – 95% |
-40°C – +60°C/
-40°F – 140°F 20% – 95% |
| Measuring increments Temperature | 0.1°C/0.2°F | 0.1°C/0.2°F |
| Temperature and humidity measuring cycle | 30 s | CH1: 57 s
CH2: 67 s CH3: 79 s |
| Radio-controlled DCF clock | Yes | No |
| Hygrometer | Yes | Yes |
| Thermometer | Yes | Yes |
| Max. number of measuring stations | 3 | – |
| Range | ≤ 30 m | |
Declaration of Conformity

Hereby, Hama GmbH & Co KG declares that the radio equipment type [00186310] is in compliance with Directive 2014/53/EU. The full text of the EU declaration of conformity is available at the following internet address:
www.hama.com->00186310->Downloads.
| Frequency band(s) | 433 MHz |
| Maximum radio-frequency
power transmitted |
4,932 mW |
Hama GmbH & Co KG
86652 Monheim/Germany
Service & Support
www.hama.com
+49 9091 502-0 All listed brands are trademarks of the corresponding companies. Errors and omissions excepted, and subject to technical changes. Our general terms of delivery and payment are applied.