ALARM CLOCK USER MANUAL
Thank you for purchasing the HMDX Eclipse Alarm Clock. This, like the entire HMDX Audio product line, is built with high-quality craftsmanship to provide you years of dependable service. We hope you will find it to be the finest product of its kind.
IMPORTANT SAFEGUARDS
When using electrical products, especially when children are present, basic safety precautions should always be followed, including the following:
READ ALL INSTRUCTIONS BEFORE USING
- Close supervision is necessary when this appliance is used by, on or near children, invalids or disabled persons.
- WARNING: DO NOT place speakers too close to ears. May cause damage to ear drums, especially in young children.
- Use this appliance only for its intended use as described in this manual. DO NOT use attachments not recommended by HMDX AUDIO.
- HMDX AUDIO is not liable for any damage caused to iPod/MP3 player or any other device.
- DO NOT place or store appliance where it can fall or be dropped into a tub or sink.
- DO NOT place or drop into water or any other liquid.
- Not for use by children. THIS IS NOT A TOY.
- Turn off appliance when not in use.
- NEVER operate this appliance if it has a damaged cord, plug, cable or housing. If it is not working properly, if it has been dropped or damaged, return it to HMDX AUDIO Service Center for examination and repair.
- Keep away from heated surfaces.
- DO NOT place in or drop into water or other liquid.
- Only set on dry surfaces. Do not place on surface wet from water or cleaning solvents.
SAVE THESE INSTRUCTIONS
DANGER – Please read all instructions carefully before operating
- NEVER leave the appliance unattended, especially if children are present.
- NEVER cover the appliance when it is in operation.
- This unit should NOT be used by children without adult supervision.
- Always keep the appliance away from high temperature and fire.
Getting Started
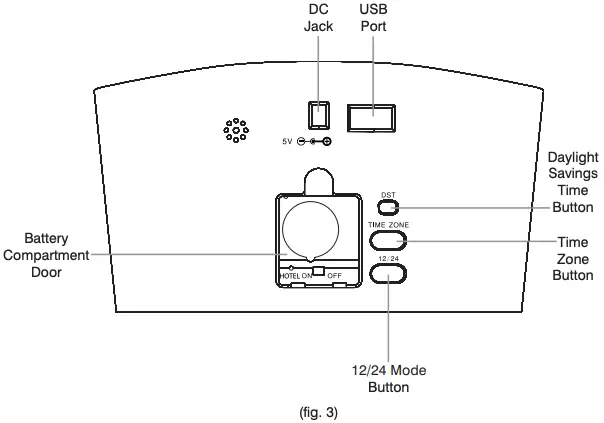
- Attach the AC adapter to the DC jack located in the back of the unit.
- Plug the AC adaptor into a 120V household outlet.
Setting Clock Time
Autoset Feature
For your convenience, the Eclipse is equipped with an autoset clock, meaning the clock will automatically set itself when plugged in (sets to EST). To select your time zone, simply press the TIME ZONE button located on the back of the unit to toggle between time zones until the LED display shows the correct time.
Manually Setting the Clock
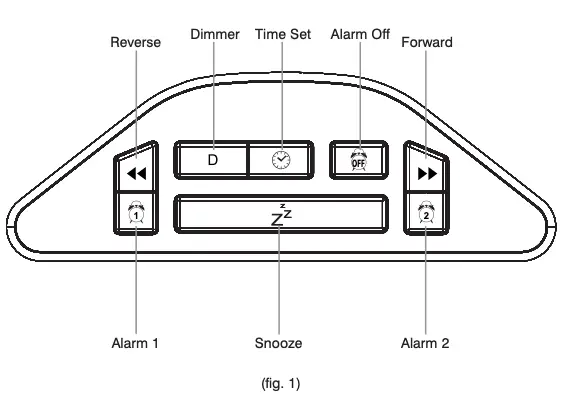
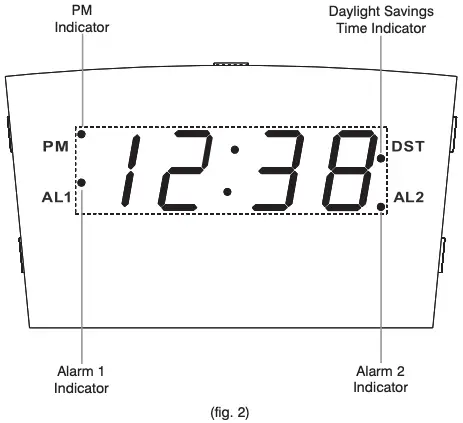
To manually set the clock, press the TIME SET button (Fig. 1) . The hour will begin flashing. Using the FORWARD and REVERSE buttons (Fig. 1), set the hour as desired. Please note: the Eclipse alarm clock is equipped with a 12/24 clock option (for setting this feature, please see the 12/24 Hour Setting section of this instruction sheet). When in 12-hour mode, please be sure to check the PM indicator on the LCD (fig. 3) to ensure that the proper time is set (AM or PM). Press the TIME SET button again to repeat steps above to set the minute. NOTE: You can press and hold the FORWARD and REVERSE buttons to scroll quickly to your desired hour/minute.The Eclipse is also equipped with a 7-5-2 alarm which means that you can set the alarm to wake to the same time seven days a week, five days a week (such as Monday through Friday) or two days a week (such as Saturday and Sunday). To operate this feature, please see the Setting the Alarm section, however, in order for the 7-5-2 alarm feature to work, you must properly set the day when setting the clock time to ensure the alarm will sound on the desired days. To set the day, press the TIME SET button again and, using the FORWARD and REVERSE buttons, set the day of the week, using a 1 for Monday, 2 for Tuesday, 3 for Wednesday, 4 for Thursday, 5 for Friday, 6 for Saturday, and 7 for Sunday. Once you have successfully entered the proper day, the 7-5-2 alarm can be used properly.
12/24 Hour Setting
The Eclipse is equipped with a 12/24 display setting. To switch between 12 and 24 hour modes, simply press the 12/24 button on the back of the unit (fig. 2)
Daylight Savings Time
The Eclipse is equipped with a Daylight Savings Time feature to adjust the clock without having to manually adjust the clock without going through the Time Set menu.
To adjust the clock for Daylight Savings Time, simply press the DST button on the back of the unit (fig. 2) and the time will automatically adjust. The DST indicator (fig. 3) will light up to ensure that the DST feature has been enabled.
Setting the Alarm
Press Alarm 1 or Alarm 2 (fig. 1) button to set the desired alarm.
To adjust the alarm time, press and hold the TIME SET button (fig. 1) and use the FORWARD or REVERSE buttons (fig. 1) to adjust the hour.
Press and hold the TIME SET button again and use the FORWARD and REVERSE buttons to adjust the minute.
The Eclipse alarm clock is equipped with a 7-5-2 alarm feature, which means the alarm can be set to go off at the same time seven days a week (7), Monday through Friday (5), or just on the weekends (2). To adjust the 7-5-2 alarm feature, press and hold the desired alarm button and use the FORWARD and REVERSE buttons to adjust to the desired alarm setting. To disable the 7-5-2 alarm feature, simply slide the “HOTEL” switch (fig. 3) on the back of the unit to the ON position. This will allow the alarm to only be set to sound once. To see the current settings for either alarm, press and hold the desired alarm button and the settings will appear on the LCD. Once the proper alarm has been set, the alarm indicator (fig. 3) will light up to ensure the alarm has been set.
Gradual Wake, Using the Snooze Feature, and Turning the Alarm Off
Gradual Wake Feature
To ensure a non-jarring wakeup, the Eclipse alarm clock is equipped with a Gradual Wake feature, which means that the alarm will begin to sound at the set alarm time, but will start out at a low volume and slowly get louder over a two minute ramp-up.
Operating the Snooze Feature
To operate the snooze feature when alarm is sounding, press the SNOOZE button (fig. 1) on the top of the unit. The alarm will turn off and will sound again after nine minutes. The snooze feature will only work for one hour after the set alarm time. For instance, if the alarm is set for 9:00 a.m., the user can press the snooze button several times, however the alarm will be disabled after 10:00 a.m. and will not sound again until the next programmed alarm time (for instance, the following morning at 9:00 a.m.).
Turning the Alarm Off
Once the alarm sounds, you can either press the Snooze button (see above for Snooze operation) or turn the alarm off. To turn the alarm off, press the ALARM OFF button (fig. 1) on the top of the unit. This will turn the alarm off and the alarm will not sound again until the next programmed alarm time.
USB Charging Port
Operating the USB Charging Port Feature
The Eclipse alarm clock is equipped with a USB charging port on the back of the unit (fig. 3) for charging cell phones, MP3 players, or other mobile devices. To charge your device, simply plug the USB end of your device’s charging cable (not included) into the USB port on the back of the unit. Plug the other end of the cable into your device. Check the device to ensure that it’s charging. If not, unplug the cable from the USB port and plug it back in and check the connection of the cable to your device.
PLEASE NOTE: this USB port is for charging only and will not play audio from any cell phone, MP3 player, or other mobile device.
Adjusting the Dimmer Feature
To adjust the brightness of the clock display, press the DIMMER button (fig. 1) until the desired brightness is reached.
Battery Backup Feature
The Eclipse alarm clock is equipped with a battery backup feature that will keep the clock time during a power outage. For your convenience, the backup battery comes already installed in the Eclipse alarm clock. PLEASE NOTE: the product will not operate on the backup battery. Backup battery is only for keeping the time if the unit is unplugged or during power failure.
Replacing the Backup Battery
- Open the battery compartment cover located on the back of the unit (fig. 2)
- Remove the old battery and replace with a new battery of the same size/type. Be sure to insert the battery the correct way, observing the polarities (+/-) noted in the battery compartment. The battery backup feature will not work if the battery is inserted incorrectly. Inserting the battery incorrectly could also result in damage to the product and may cause the battery to leak or explode.
- Close the battery compartment cover.
Battery Precautions
- Do not mix old and new batteries.
- Do not mix alkaline, standard (carbon-zinc), or rechargeable (ni-cad, ni-mh, etc) batteries.
- Clean the battery contacts and also those of the device prior to battery installation.
- Remove used batteries promptly.
- If the unit is not going to be used for a long period of time, remove batteries to prevent damage due to possible battery leakage.
FCC DISCLAIMER
This device complies with Part 15 of the FCC Rules. Operation is subject to the following two conditions: (1) this device may not cause harmful interference, and (2) this device must accept any interference received, including interference that may cause undesired operation. Freq. 434 MHz. FCC ID: TG3SS-5000TX (Transmitter) Modifications not authorized by the manufacturer may void users authority to operate this device.
Note: This equipment has been tested and found to comply with the limits for a Class B digital device, pursuant to Part 15 of the FCC Rules. These limits are designed to provide reasonable protection against harmful interference in a residential installation. This equipment generates, uses and can radiate radio frequency energy and, if not installed and used in accordance with the instructions, may cause harmful interference to radio communications. However, there is no guarantee that interference will not occur in a particular installation. If this equipment does cause harmful interference to radio or television reception, which can be determined by turning the equipment off and on, the user is encouraged to try to correct the interference by one or more of the following measures:
- Reorient or relocate the receiving antenna.
- Increase the separation between the equipment and receiver.
- Connect the equipment into an outlet on a circuit different from that to which the receiver is connected.
- Consult the dealer or an experienced radio/TV technician for help
Note: The manufacturer is not responsible for any radio or TV interference caused by unauthorized modifications to this equipment. Such modifications could void the users authority to operate the equipment.
Caution: All servicing of this product must be performed by authorized HMDX AUDIO Service Personnel only.