INDESIT Washing Machine
INDESIT Washing Machine
THANK YOU FOR BUYING A INDESIT PRODUCT
In order to receive more complete assistance please register your product on www.indesit.com/register
 Before using the appliance carefully read the Safety Instruction.
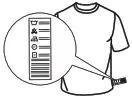
Before using the machine, it is imperative that the transport bolts are for more detailed instructions on how to remove them, see the Installa
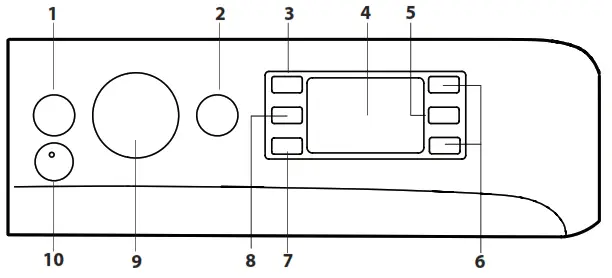
CONTROL PANEL
- ON/OFF button
- START/PAUSE button and indicator light
- TEMPERATURE button
- DISPLAY
- CHILD LOCK button
- OPTION button
- DELAYED START button
- SPIN button
- WASH CYCLE SELECTOR KNOB
- PUSH & GO button
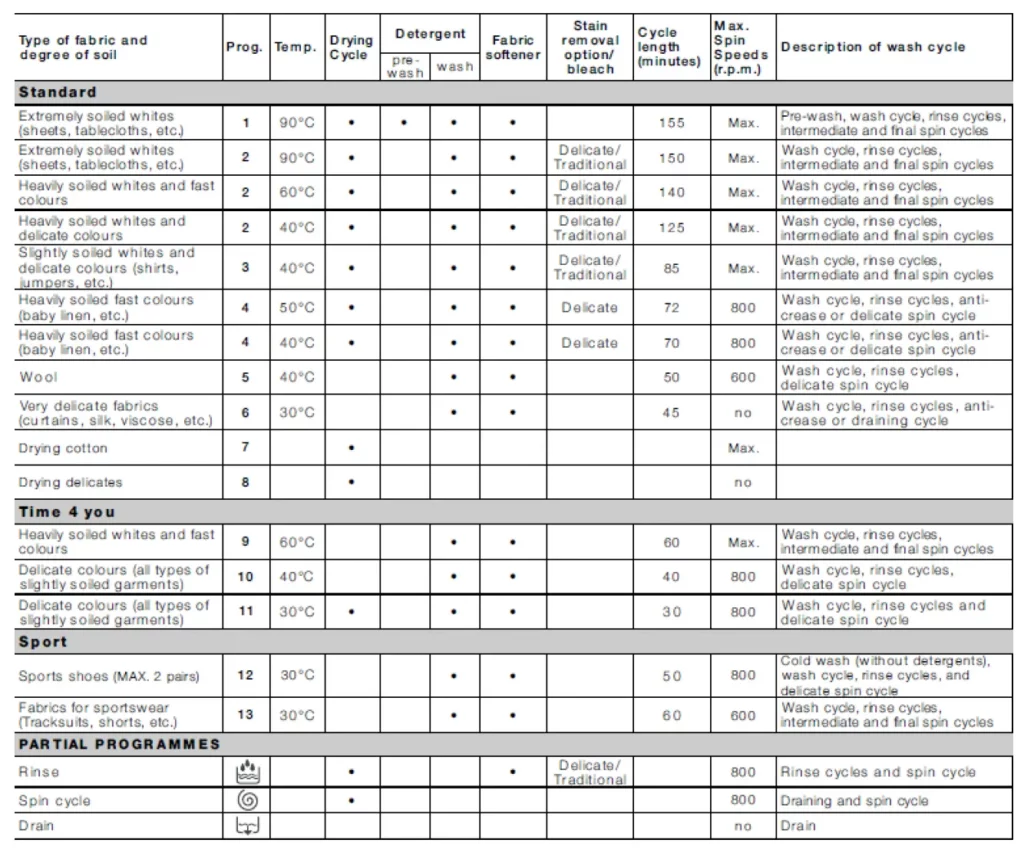
WASH CYCLE TABLE
| Maximum load 7 kg
Power input in off mode 0.5 W / in left-on mode 8 W |
Detergents and Additives | Recommended detergent | Residual
(***) |
Energy
kWh |
Total water l | Laundry | ||||||||
|
Wash cycle |
Temperature | Maxim spin (r.p.m.) | Max. load (kg) | Duration (h : m) | Wash | Fabric softener |
Powder |
Liquid |
||||||
| Setting | Range | 2 | 3 | |||||||||||
| 1 | Cotton | 30°C | 1200 | 3.5 | ** | – | √ | – | – | – | – | |||
| 2 | Synthetics | 30°C | 1000 | 3.5 | ** | – | √ | – | – | – | – | |||
| 3 | Colours | 30°C | 1000 | 3.5 | ** | |
– | √ | – | – | – | – | ||
| 4 | Delicates | 30°C | 0 | 1 | ** | – | √ | – | – | – | – | |||
| 5 | Rapid 30min | 30°C | 800 | 3.5 | 0:30 | – | √ | 73 | 0.19 | 31 | 27 | |||
| 6 | Cotton (2) | 40°C | 1400 | 7 | 3:40 | √ | √ | 50 | 0.98 | 75 | 45 | |||
| 7 | Synthetics (3) | 40°C | 1200 | 4 | 2:55 | √ | √ | 35 | 0.86 | 60 | 43 | |||
| 8 | Mixed | 40°C | 1400 | 7 | ** | – | √ | – | – | – | – | |||
|
9 |
Eco 40-60 (1) |
40°C |
40°C |
1351 | 7 | 3:25 | √ | √ | 53 | 1.04 | 48 | 38 | ||
| 1351 | 3.5 | 2:40 | |
√ | √ | 53 | 0.68 | 45 | 36 | |||||
| 1351 | 1.75 | 2:10 | √ | √ | 53 | 0.52 | 39 | 36 | ||||||
| 10 | White | 60°C | 1400 | 7 | 2:30 | √ | √ | 52 | 1.36 | 75 | 55 | |||
| 11 | Rapid | 20°C | 800 | 1.5 | ** | – | √ | – | – | – | – | |||
| 11 | Rapid | 40°C | 1200 | 3.5 | ** | – | √ | – | – | – | – | |||
| 11 | Rapid | 60°C | 1000 | 7 | ** | √ | √ | – | – | – | – | |||
| 12 | Duvet | 30°C | 1000 | 3 | ** | – | √ | – | – | – | – | |||
| 13 | Wool | 40°C | 800 | 1.5 | ** | |
– | √ | – | – | – | – | ||
| 14 | 20°C | 20°C | 1400 | 7 | 1:50 | – | √ | 52 | 0.16 | 64 | 22 | |||
| 15 | Rinse + Spin | – | – | 1400 | 7 | ** | – | – | – | – | – | – | – | |
| 16 | Spin + Drain * | – | – | 1400 | 7 | ** | – | – | – | – | – | – | – | – |
|
6 |
Eco Cotton (4) |
60 °C | 60 °C | 1400 | 7 | 4:30 | |
√ | √ | 53 | 1.00 | 44 | – | |
| 40 °C | 40 °C | 1400 | 7 | 3:40 | √ | √ | 50 | 0.98 | 75 | – | ||||
| Required dosage Optional dosage | ||||||||||||||
The cycle duration indicated on the display or instruction manual is an estimate based on standard conditions. The actual duration may vary in relation to several factors, such as the temperature and pressure of the incoming water, ambient emperature, amount of detergent, load quantity and type, load balancing and any additional options selected. The values given
for programmes other than the Eco 40-60 programme are indicative only.
1) Eco 40-60 – Test wash cycle in compliance with EU Ecodesign regulation 2019/2014.
The most efficient programme in terms of energy and water consumption for washing normally soiled cotton laundry.
Note: spin speed values shown on the display can slightly differ from the values stated in the table.
For all testing institutes:
2) Long cotton cycle: set cycle 6 at a temperature of 40°C.
3) Long synthetics cycle: set cycle 7 at a temperature of 40°C.
4) Eco Cotton – Test wash cycles in compliance with regulations 1061/2010. Set 6 wash cycles at a temperature of 40°C or 60°C to access these cycles.
* By selecting the 16 cycles and excluding the spin cycle, the washing machine will drain only.
** The duration of the wash cycles can be checked on the display.
*** After programme end and spinning with maximum selectable spin speed, in a default programme setting.
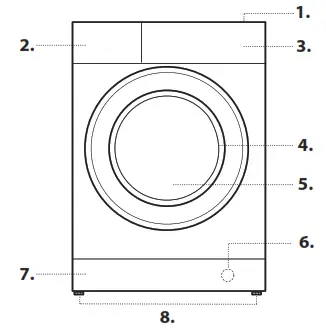
PRODUCT DESCRIPTION
- Top
- Detergent dispenser drawer
- Control panel
- Handle
- Porthole door
- Drain pump (behind the plinth)
- Plinth (removable)
- Adjustable feet (2)
DETERGENT DISPENSER DRAWER
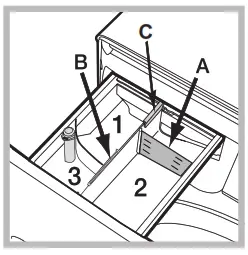
Compartment 1:
Do not insert detergent in this compartment.
Compartment 2: Washing detergent (powder or liquid)
If liquid detergent is used, the removable plastic
partition A (supplied) should be used for proper dosage.
If powder detergent is used, insert the partition into slot B.
Compartment 3: Additives (fabric softener, etc.)
The fabric softener must never exceed the “max” level indicated on the central pin.
! Use powder detergent for white cotton garments, for pre-washing, and for washing at temperatures over 60°C.
! Follow the instructions given on the detergent packaging.
! To remove the drawer, press lever C and pull the drawer outwards.
WASH CYCLES
Follow the instructions on the symbols of the garment’s wash care label. The value indicated in the symbol is the maximum recommended temperature for washing the garment.
Cotton
A 30°C cycle for cotton garments. It allows for reducing electricity consumption for heating the water while guaranteeing good washing performance. Suitable for lightly soiled garments.
Synthetics
A 30°C cycle for synthetic garments. It allows for reducing electricity consumption for heating the water while guaranteeing good washing results. Suitable for lightly soiled garments.
Colours
A 30°C cycle that helps to preserve colours, suitable for cotton or synthetic coloured garments. It allows for reducing electricity
consumption for heating the water while guaranteeing good washing results. Suitable for lightly soiled garments.
Delicates
Suitable for washing very delicate garments. It is advisable to turn the garments inside out before washing them. For best results, use liquid detergent on delicate garments.
Rapid 30min
For washing lightly soiled garments in a short time. Not suitable for wool, silk and garments to be washed by hand.
Cotton
Suitable for washing towels, underwear, table cloths, etc. made of resistant linen and cotton that are moderate to heavily soiled.
Synthetics
Specific for synthetic items. If the dirt is difficult to remove, the temperature can be increased up to 60° and powder detergent can be used too.
Mixed
A 40°C cycle for washing cotton and synthetic garments together. Suitable for lightly soiled underwear.
Eco 40-60
For washing normally soiled cotton garments are declared to be washable at 40 °C or 60 °C, together in the same cycle. This is the standard cotton programme and the most efficient in terms of water and energy consumption.
White
For heavily soiled whites and resistant colours.
Rapid
Allows for varying the garment treatment duration from 20’ to 60’.
– 20’: this cycle refreshes your garments in just 20 minutes.
– 45’: a short cycle designed for washing mixed cotton-synthetic garments.
– 60’: this cycle is designed to wash moderately soiled resistant cotton garments at 60°C in an hour, with good washing performance. For synthetic or mixed garments, the temperature should be lowered to 40°C.
Duvet
For washing clothing padded with goose down, such as double or single duvets (weighing under 3.5 kg), cushions or down jackets. Duvets should be loaded into the drum with their edges folded inwards and no more than ¾ of the total drum volume should be used up. For best results, it is advisable to use liquid detergent to be poured into the detergent drawer.
Wool – Woolmark Apparel Care – Blue:

The “Wool” wash cycle is approved by the Woolmark Company for washing wool garments classified as “hand-washable”, provided that the wash complies with the instructions appearing on the garment’s label and with those provided by the manufacturer of this washing machine. (M1126) 20°C
For washing lightly soiled cotton garments, at a temperature of 20 °C.
Rinse + Spin
Designed for rinsing and spinning.
Spin + Drain
Designed to spin and drain the water.
Eco Cotton
For washing normally soiled cotton garments. At 40°C and 60°C.
DISPLAY
The display is useful when programming the machine and provides a lot of information.
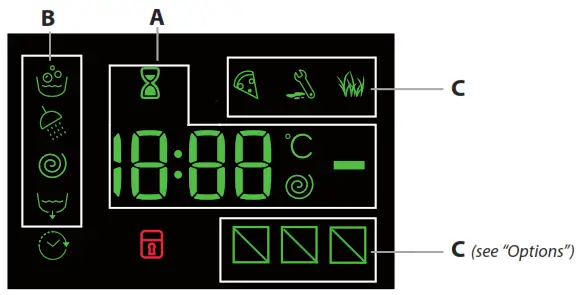
The duration of the available wash cycles and the remaining time of a running cycle appear in section A; if the Delayed Start option has been set, the countdown to the start of the selected cycle will appear. Pressing the corresponding button allows for viewing the maximum spin speed and temperature values attained by the machine during the set wash cycle, or the values selected most recently if these are compatible with the set wash cycle.
The hourglass flashes while the machine processes the data on the basis of the selected cycle. After a maximum of 10 minutes, the icon remains steady lit and the final time remaining is displayed. The “hourglass” icon will then switch off approximately 1 minute after the final time remaining has been displayed. The “washing phases” relative to the selected cycle and the “washing
the phase” of the running cycle appear in section B:
![]() Wash
Wash
![]() Rinse
Rinse
![]() Spin
Spin
![]() Drain
Drain
When lit, the symbol ![]() indicates that the set “Delayed Start” value has appeared on the display.
indicates that the set “Delayed Start” value has appeared on the display.
There are three levels in section C relative to the washing options.
![]() DOOR LOCKED INDICATOR
DOOR LOCKED INDICATOR
When lit, the symbol indicates that the door is locked. To prevent any damage, wait until the symbol turns off before opening the door. To open the door while a cycle is in progress, press the START/PAUSE button ![]() ; if the
; if the ![]() symbol is off, the door can be opened.
symbol is off, the door can be opened.
FIRST-TIME USE
Once the appliance has been installed, and before it is used for the first time, run a wash cycle with detergent and no laundry, by setting the “Auto-Clean” cycle.
DAILY USE
Prepare the laundry by following the suggestions appearing under the
“TIPS AND SUGGESTIONS” section.
Rapid programming
– Press the ON/OFF button ![]() ; the START/PAUSE indicator light
; the START/PAUSE indicator light ![]() will flash slowly green.
will flash slowly green.
– Open the door. Load the laundry while making sure not to exceed the maximum load quantity indicated in the cycle table.
– Pull out the detergent dispenser drawer and pour the detergent into the relevant compartments as described in “DETERGENT DISPENSER DRAWER” section.
– Close the door.
– Press the PUSH & GO button to start the wash cycle.
Traditional programming
– Press the ON/OFF button ; the START/PAUSE indicator light will flash slowly green.
– Open the door. Load the laundry while making sure not to exceed the maximum load quantity indicated in the Wash Cycle Table.
– Pull out the detergent dispenser drawer and pour the detergent into the relevant compartments as described in “DETERGENT DISPENSER DRAWER” section.
– Close the door.
– Use the WASH CYCLE selector knob to select the desired wash cycle: it will be associated with a specific temperature and spin speed that can be modified. The duration of the cycle will appear on the display.
– Modify the temperature and/or spin speed: the machine automatically displays the maximum temperature and spin speed values set for the selected cycle, or the most-recently-used settings if they are compatible with the selected cycle. Pressing the ![]() button gradually reduces the temperature down to the cold wash “OFF” setting. Pressing the button gradually reduces the spin speed until it is completely excluded (“OFF” setting). Pressing these buttons again restores the maximum values.
button gradually reduces the temperature down to the cold wash “OFF” setting. Pressing the button gradually reduces the spin speed until it is completely excluded (“OFF” setting). Pressing these buttons again restores the maximum values.
– Select the desired options.
– Press the START/PAUSE button to start the wash cycle; the relative indicator light will light up steady green and the door will lock (![]() symbol on).
symbol on).
PAUSING A CYCLE
To pause the wash cycle, press the START/PAUSE ![]() button again; the indicator light will flash amber. If the symbol
button again; the indicator light will flash amber. If the symbol ![]() is not lit, the door may be opened. To start the wash cycle from the point at which it was interrupted, press the START/PAUSE
is not lit, the door may be opened. To start the wash cycle from the point at which it was interrupted, press the START/PAUSE ![]() button again.
button again.
OPENING THE DOOR, IF NECESSARY
Once a cycle starts, the ![]() symbol turns on to signal that the door cannot be opened. While a wash cycle is running, the door remains locked. To open the door while a cycle is underway, for example, to add or remove garments, press the START/PAUSE
symbol turns on to signal that the door cannot be opened. While a wash cycle is running, the door remains locked. To open the door while a cycle is underway, for example, to add or remove garments, press the START/PAUSE ![]() button to pause the cycle; the indicator light will flash amber. If the symbol
button to pause the cycle; the indicator light will flash amber. If the symbol ![]() is not lit, the door may be opened. Press the START/PAUSE
is not lit, the door may be opened. Press the START/PAUSE ![]() button again to continue the cycle.
button again to continue the cycle.
CHANGING A RUNNING WASH CYCLE
To change a wash cycle while it is in progress, pause the washing machine using the START/PAUSE ![]() button (the relative indicator light will flash amber), then select the desired cycle and press the START/PAUSE
button (the relative indicator light will flash amber), then select the desired cycle and press the START/PAUSE![]() button again.
button again.
! To cancel a cycle that has already begun, press and hold the ON/OFF ![]() button. The cycle will be stopped and the machine will switch off.
button. The cycle will be stopped and the machine will switch off.
END OF THE CYCLE
This will be indicated by the word “END” on the display; when the ![]() symbol switches off, the door may be opened. Open the door and switch off the machine. If you do not press ON/OFF
symbol switches off, the door may be opened. Open the door and switch off the machine. If you do not press ON/OFF ![]() button, the washing machine will switch off automatically after about 10 minutes. Close the water tap, open the door and unload the washing machine. Leave the door ajar to allow the drum to dry.
button, the washing machine will switch off automatically after about 10 minutes. Close the water tap, open the door and unload the washing machine. Leave the door ajar to allow the drum to dry.
OPTIONS
– If the selected option is not compatible with the set wash cycle, the indicator light will flash and the option will not be activated.
– If the selected option is not compatible with another previously selected option, the indicator light will flash accompanied by a buzzer (3 beeps), and only the latter option will be activated; the indicator light corresponding to the activated option will turn on.
![]() Stain removal
Stain removal
This option allows for selecting the type of dirt so as to optimally adjust the cycle for removing the stains. The following types of dirt can be selected:
– ![]() Food: for stains caused by foodstuffs and beverages, for example.
Food: for stains caused by foodstuffs and beverages, for example.
– ![]() Work: for grease and ink stains, for example.
Work: for grease and ink stains, for example.
–![]() Outdoor: for mud and grass stains, for example. ! The wash cycle duration varies according to the type of selected dirt.
Outdoor: for mud and grass stains, for example. ! The wash cycle duration varies according to the type of selected dirt.
11…![]() Rapid
Rapid
When this button is pressed the first time, the 45’ icon lights up, when pressed the second time the 60’ icon lights up and the third time the 20’ icon lights up.
Delayed Start![]()
To set a delayed start for the selected cycle, press the corresponding button repeatedly until the desired delay period has been reached. When this option has been activated, the ![]() symbol lights up on the display. To remove the delayed start setting, press the button until the word “OFF” appears on the display.
symbol lights up on the display. To remove the delayed start setting, press the button until the word “OFF” appears on the display.
Temperature
Each wash cycle has a pre-defined temperature. To modify the temperature, press the button. The value will appear on the display.
Spin![]()
Each wash cycle has a pre-defined spin speed. To modify the spin speed, press the ![]() button. The value will appear on the display.
button. The value will appear on the display.
PUSH & GO
To start the PUSH & GO cycle press and hold the relative button for
2 seconds. The lit indicator light indicates that the cycle has started.
This wash cycle is ideal for cotton or synthetic fabrics, as it washes at a temperature of 30°C and a maximum spin speed of 1,000 rpm. Max load 3.5 kg (cycle duration 45’).
How does it work?
- Load the laundry (cotton and/or synthetic garments) and close the door.
- Pour the detergent and additives.
- Start the cycle by pressing and holding the PUSH & GO button for 2 seconds. The relevant indicator light will turn green and the door will lock (the
 symbol lights up).
N.B.: starting the wash cycle through the PUSH & GO button activates an automatic non-customisable cycle recommended for cotton and synthetic fabrics. This cycle does not allow for setting any additional options.
To open the door while an automatic cycle is underway, press the START/ PAUSE button; if the locked door symbol is off, the door may be opened. Press the START/PAUSE button again to restart the cycle from the point at which it was interrupted.
 - At the end of the wash cycle, the word END will appear on the display.
CHILD LOCK ![]()
To activate the control panel lock, press and hold the ![]() button for approximately 2 seconds. The lit
button for approximately 2 seconds. The lit ![]() symbol signals that the control panel is locked. This prevents wash cycles from being modified accidentally (except for the ON/OFF
symbol signals that the control panel is locked. This prevents wash cycles from being modified accidentally (except for the ON/OFF ![]() button), especially if there are children in the home. To deactivate the control panel lock, press and hold the
button), especially if there are children in the home. To deactivate the control panel lock, press and hold the![]() button for approximately 2 seconds.
button for approximately 2 seconds.
TIPS AND SUGGESTIONS
Divide the laundry according to:
Type of fabric (cotton, mixed fibres, synthetics, wool, garments to be hand-washed). Colour (separate coloured garments from whites, wash new coloured garments separately). Delicates (small garments – such as nylon stockings – and items with hooks – such as bras: insert them in a fabric bag).
Empty the pockets:
Objects such as coins or lighters can damage the washing machine and the drum. Check all buttons.
Follow the dosage recommendation/additives
It optimizes the cleaning result, it avoids irritating residues of surplus detergent in your laundry and it saves money by avoiding waste of surplus detergent.
Use low temperature and longer duration
The most efficient programmes in terms of energy consumption are generally those that perform at lower temperatures and longer duration.
Observe the load sizes
Load your washing machine up to the capacity indicated in the “Wash Cycle Table” table to save water and energy.
Noise and remaining moisture content
They are influenced by the spinning speed: the higher the spinning speed in the spinning phase, the higher the noise and the lower the remaining moisture content.
CARE AND MAINTENANCE
Before performing cleaning and maintenance, switch the washing machine off and disconnect it from the mains power. Do not use flammable liquids to clean the washing machine. Clean and maintain your washing machine periodically (at least 4 times per year).
Disconnect the water and power supplies
Close the water tap after every wash. This will limit wear on the hydraulic system inside the washing machine and help to prevent leaks. Unplug the washing machine when cleaning it and during all maintenance work.
Clean the washing machine
The outer parts and rubber components of the appliance can be cleaned using a soft cloth soaked in lukewarm soapy water. Do not use solvents or abrasives.
The washing machine has an “Auto-clean” cycle for its internal parts; it must be run without any load in the drum.
To optimise this cycle, it is possible to use either detergent (10% of the quantity specified for lightly soiled garments) or special additives to clean the washing machine. We recommend running a cleaning cycle every 40 wash cycles.
To start the cycle press buttons![]() and 11…
and 11… ![]() simultaneously for 5 seconds.
simultaneously for 5 seconds.
The cycle will start automatically and will run for about 70 minutes. To stop the cycle, press the START/PAUSE button.
Clean the detergent dispenser drawer
Wash it under running water; this operation should be repeated frequently.
Care for the door and drum
Always leave the porthole door ajar in order to prevent unpleasant odours from forming.
Clean the pump
The washing machine is fitted with an auto-cleaning pump that does not require any maintenance. Small items (such as coins or buttons) may sometimes fall into the protective pre-chamber situated at the base of the pump.
! Make sure the wash cycle has ended and unplug the appliance.
To access the pre-chamber:
- remove the cover panel on the front of the machine by first pressing it in the centre then pushing downwards on both sides to extract it;
- loosen the drainage pump cover by turning it anti-clockwise: it is normal for some water to leak out;
- clean the inside thoroughly;
- screw the cover back on;
- put the panel back in place, making sure the hooks slot in place before pushing the panel onto the appliance.
Check the water inlet hose
Check the water inlet hose at least once a year. If it is cracked or broken, it must be replaced: during wash cycles, the high pressure of the water could suddenly split the hose open.
! Never use hoses that have already been used.
LOAD BALANCING SYSTEM
Before every spin cycle, to avoid excessive vibrations before every spin and to distribute the load in a uniform manner, the drum rotates continuously at a speed that is slightly greater than the washing rotation speed. If, after several attempts, the load is not balanced correctly, the machine spins at a reduced spin speed. If the load is excessively unbalanced, the washing machine performs the distribution process instead of spinning. To encourage improved load distribution and balance, we recommend small and large garments be mixed in the load.
ACCESSORIES
Contact our Technical Assistance Service to check whether the following accessories are available for this washing machine model.
Stacking kit
With this accessory, you can secure the tumble dryer to the upper part of your washing machine to save space and facilitate the loading and unloading of the tumble dryer.
TRANSPORT AND HANDLING
Do not lift the washing machine by gripping it from the upper section. Unplug the appliance and close the water tap. Check that the door and detergent dispenser drawer are tightly closed. Detach the filling hose from the water tap then detach the drain hose. Empty all the water remaining in the hoses and secure the latter so that they do not get damaged during transport. Apply the transport bolts back on. Repeat, in reverse order, the transport bolt removal procedure described in the “Health & Safety and Installation Guides”.
DEMO MODE: to deactivate this function, switch the washing machine OFF. Then press and hold the “Start/Pause” ![]() button, within 5 seconds press also “ON/OFF”
button, within 5 seconds press also “ON/OFF”![]() button and hold both buttons for 2 seconds.
button and hold both buttons for 2 seconds.
TROUBLESHOOTING
Your machine could occasionally fail to work. Before contacting the Technical Assistance Service, make sure that the problem cannot be easily solved using the following list.
| Anomalies | Possible causes / Solution |
| The machine does not switch on. | The appliance is not plugged into the socket fully, or not enough to make contact. |
| There is no power to the socket, or the fuse has blown in the mains plug. | |
| The wash cycle does not start. | The door is not closed properly. |
| The ON/OFF |
|
| The START/PAUSE |
|
| The water tap has not been turned on to allow water to flow into the machine. | |
| A delayed start has been set. | |
| The machine does not fill with water (“H2O” appears on the display). | The water inlet hose is kinked. |
| The water inlet hose is not connected to the water supply. | |
| The water pressure is too low. | |
| The water tap has not been turned on to allow water to flow into the machine. | |
| There is no water supply to the house. | |
| The inlet valve filter is blocked. | |
| The START/PAUSE |
|
| The machine continuously fills with water and continually drains away or Water left in the drum or Stuck on the wash. | The top of the drain hose is too low – It must be fitted at a height between 65 and 100 cm from the floor. |
| The drain hose is connected incorrectly to the sink trap allowing water to run into the machine, the drain hose must be positioned higher than the bottom of the sink to prevent water from flowing down the drain hose. | |
| The end of the drain hose has been pushed too far down the standpipe, the ‘U’ bracket should be fitted 100 mm from the end of the drain hose. | |
| The machine does not drain or spin – (error lights flashing). | The Pump filter is blocked. |
| The drain hose is kinked. | |
| New Installation – The blanking cap or spigot has not been removed if connected under a sink. | |
| The drain hose or sink trap is blocked. | |
| The machine does spin. | The ‘Spin’ Speed is set to “OFF”. |
| The machine does not heat or poor wash results. | The ‘Temperature’ is set to “OFF”. |
| The programme takes too long. | Programme times will vary due to water pressure, the incoming water temperature and if the wash load goes out of balance. This will increase the programme times accordingly. |
| The Display sticks at one ‘time to end’ for more than 1 Minute or the Display changes the estimated ‘Time to End’ during the programme. | The display time is for guidance only – it is not a precise time to finish and may vary. |
| The washing machine vibrates a lot during the spin cycle. | The feet have not been adjusted, enabling the machine to rock. |
| New Installation – Either the Transit Bolts including the plastic spacers, or the Polystyrene Packaging have not been removed when installing the machine. | |
| The machine is trapped between cabinets and/or walls. | |
| The load is in a slight out of balance condition and the machine is spinning but at a slower speed. | |
| The machine is noisy. | There will always be some motor, pump and drum noise during spin. |
| The machine leaks from the dispenser. | The dispenser drawer is blocked with detergent and requires cleaning. |
| The water pressure is too high and requires turning downturn down the tap on the water supply pipe slightly and try again. | |
| The machine is tilting forwards – It must be level when in its final position. | |
| The “Options” and START/PAUSE indicator lights flash rapidly and the display visualises an error code (e.g.: F-01, F-…). | Switch off the machine and unplug it, wait for approximately 1 minute and then switch back on again. If the problem persists contact Technical Assistance Centre. |
| The machine smells. | The machine requires a service wash. Run a auto clean wash cycle with detergent and no laundry. |
| The water level is too low when the machine is washing. | The water level is correct if it can be seen at the bottom of the door. |
| There is too much foam. | The detergent is not suitable for machine washing (it should display the text ‘for washing machines’ or ‘hand and machine wash’ or the like). |
| General. | Your washing machine contains sensors that monitor progress during the wash cycle (eg: Water Levels, Temperatures, Out of Balance loads, Wash time/progress). Normally, if your machine successfully completes the cycle, there is unlikely to be anything wrong! |
| The PUSH & GO option does not activate. | After switching on the machine, a control other than PUSH & GO was activated. Switch the machine off and press the PUSH & GO button. |

You can download the Safety Instructions, Product Fiche and Energy data by:
- Visiting our website – http://docs.indesit.eu
- Using QR Code
- Alternatively, contact our After-sales Service (See phone number in the warranty booklet). When contacting our After-sales Service, please state the codes provided on your product’s identification plate.
- For User’s Repair & Maintenance Information visit www.indesit.com
The model information can be retrieved using the QR-Code reported in the energy label. The label also includes the model identifier that can be used to consult the portal of the registry at https://eprel.ec.europa.eu
11453517
FAQ’S
How do I know if my washing machine is in energy saving mode?
The washing machine will automatically switch to energy saving mode if the water temperature is below 60°C and the load is less than 6kg.
What happens if I press the START/PAUSE button when the washing machine is in energy saving mode?
The washing machine will automatically switch to normal operation.
How do I know if my washing machine is in fast spin mode?
The washing machine will automatically switch to fast spin mode if the load is less than 3kg, the water temperature is above 60°C and there are no other options selected.
How do I know if my washing machine has finished a cycle?
The washing machine will beep once when it has finished a cycle. If you have selected the DELAYED START option, you can also check the display for information on how long until your laundry will be ready.
What happens if I press the START/PAUSE button when my washing machine has finished a cycle?
The washing machine will start a new cycle. If you have selected the DELAYED START option, you can also check the display for information on how long until your laundry will be ready.
What are common problems with washing machines?
10 Most Common Washing Machine Problems
It Bounces Around.
It’s Noisy.
Clothes Are Getting Ripped.
Improper Or Slow Draining.
My Washing Machine Won’t Spin.
There’s No Water.
The Door Won’t Open.
It’s Smelly.
Why won’t my washer drain and spin?
If your washer won’t drain or spin, the water level control may be faulty. Open the machine’s control panel and look for a plastic tube attached to the water level valve. If it’s clogged, clear it out with vinegar. If the valve itself is corroded, it may need to be replaced
What to do when washing machine stops working?
Be sure the machine is plugged in and turned on. If necessary, check the receptacle it’s plugged into for power, using a working lamp, appliance, or voltage tester. Be sure the washer lid is closed completely. 2 If the receptacle seems dead, check the circuit breaker or the fuse that serves it.
What causes a washing machine not to start?
First, make sure the power is on and that the machine is plugged in. You should check the outlet to make sure it’s working. Then, check if a fuse is blown or a circuit breaker thrown. If those both work, see if the Delay Start button or Control Lock feature has been activated.
Why is my washing machine making a loud noise when it spins?
The most common reason your washer makes banging sounds during the spin cycle is that an unbalanced load has thrown it out of whack. When you put your dirty clothes in your machine, make sure to distribute them evenly in the drum. Heavy items mixed with lighter ones can cause it to spin unevenly.
How do you use an Indesit washing machine?
Running a wash cycle
LOAD THE LAUNDRY. Open the porthole door. …
ADD THE DETERGENT. Pull out the detergent dispenser drawer and pour the detergent into the relevant compartments as described in “Detergents and laundry”.
CLOSE THE DOOR.
Press the “PUSH & WASH” button to start the wash programme.
Why are all the lights on my indesit washing machine flashing?
All lights flashing on washing machine
Indesit washing machine all lights flashing and not draining can be a sign of a blockage in the filter. If the wash, rinse, and spin function lights are all flashing at the same time this points to a possible obstruction in the waste or drain pipe.
VIDEO
INDESIT Washing Machine
www://www.indesit.co.uk/
Instruction Manual
SAFETY INSTRUCTIONS
Download the complete instruction manual on http://docs.indesit.eu or call the phone number shown on the warranty booklet.
Before using the appliance, read these safety instructions. Keep them nearby for future reference.
These instructions and the appliance itself provide important safety warnings to be observed at all times. The manufacturer declines any liability for failure to observe these safety instructions, for inappropriate use of the appliance or for the incorrect setting of controls.
![]() WARNING: If the hob surface is cracked, do not use the appliance – the risk of electric shock.
WARNING: If the hob surface is cracked, do not use the appliance – the risk of electric shock.
![]() WARNING: Danger of fire: Do not store items on cooking surfaces.
WARNING: Danger of fire: Do not store items on cooking surfaces.
![]() CAUTION: The cooking process has to be supervised. A short cooking process has to be supervised continuously.
CAUTION: The cooking process has to be supervised. A short cooking process has to be supervised continuously.
![]() WARNING: Unattended cooking on a hob with fat or oil can be dangerous – risk of fire. NEVER try to extinguish a fire with water: instead, switch off the appliance and then cover the flame e.g. with a lid or a fire blanket.
WARNING: Unattended cooking on a hob with fat or oil can be dangerous – risk of fire. NEVER try to extinguish a fire with water: instead, switch off the appliance and then cover the flame e.g. with a lid or a fire blanket.
![]() Do not use the hob as a work surface or support.
Do not use the hob as a work surface or support.
Keep clothes or other flammable materials away from the appliance, until all the components have cooled down completely – the risk of fire.
![]() Metallic objects such as knives, forks, spoons, and lids should not be placed on the hob surface since they can get hot.
Metallic objects such as knives, forks, spoons, and lids should not be placed on the hob surface since they can get hot.
Very young children (0-3 years) should be kept away from the appliance. Young children (3-8 years) should be kept away from the appliance unless continuously supervised.
Children from 8 years old and above and persons with reduced physical, sensory or mental capabilities or lack of experience and knowledge can use this appliance only if they are supervised or have been given instructions on safe use and understand the hazards involved.
Children must not play with the appliance. Cleaning and user maintenance must not be carried out by children without supervision.
After use, switch off the hob element by its control and do not rely on the pan detector.
![]() WARNING: The appliance and its accessible parts become hot during use. Care should be taken to avoid touching heating elements. Children less than 8 years of age shall be kept away unless continuously supervised.
WARNING: The appliance and its accessible parts become hot during use. Care should be taken to avoid touching heating elements. Children less than 8 years of age shall be kept away unless continuously supervised.
PERMITTED USE
![]() CAUTION: the appliance is not intended to be operated by means of an external switching device, such as a timer, or a separate remote-controlled system.
CAUTION: the appliance is not intended to be operated by means of an external switching device, such as a timer, or a separate remote-controlled system.
This appliance is intended to be used in household and similar applications such as staff kitchen areas in shops, offices, and other working environments; farm houses; by clients in hotels, motels, bed & breakfasts, and other residential environments.
![]() No other use is permitted (e.g. heating rooms).
No other use is permitted (e.g. heating rooms).
![]() This appliance is not for professional use. Do not use the appliance outdoors.
This appliance is not for professional use. Do not use the appliance outdoors.
INSTALLATION
![]() The appliance must be handled and installed by two or more persons – the risk of injury. Use protective gloves to unpack and install – the risk of cuts.
The appliance must be handled and installed by two or more persons – the risk of injury. Use protective gloves to unpack and install – the risk of cuts.
![]() Installation, including water supply (if any), electrical connections, and repairs must be carried out by a qualified technician. Do not repair or replace any part of the appliance unless specifically stated in the user manual. Keep children away from the installation site. After unpacking the appliance, make sure that it has not been damaged during transport. In the event of problems, contact the dealer or your nearest After-sales Service. Once installed, packaging waste (plastic, styrofoam parts, etc.) must be stored out of reach of children – the risk of suffocation. The appliance must be disconnected from the power supply before any installation operation – the risk of electric shock. During installation, make sure the appliance does not damage the power cable – the risk of fire or electric shock. Only activate the appliance when the installation has been completed.
Installation, including water supply (if any), electrical connections, and repairs must be carried out by a qualified technician. Do not repair or replace any part of the appliance unless specifically stated in the user manual. Keep children away from the installation site. After unpacking the appliance, make sure that it has not been damaged during transport. In the event of problems, contact the dealer or your nearest After-sales Service. Once installed, packaging waste (plastic, styrofoam parts, etc.) must be stored out of reach of children – the risk of suffocation. The appliance must be disconnected from the power supply before any installation operation – the risk of electric shock. During installation, make sure the appliance does not damage the power cable – the risk of fire or electric shock. Only activate the appliance when the installation has been completed.
![]() Carry out all cabinet cutting operations before fitting the appliance and remove all wood chips and sawdust.
Carry out all cabinet cutting operations before fitting the appliance and remove all wood chips and sawdust.
![]() If the appliance is not installed above an oven, a separator panel (not included) must be installed in the compartment under the appliance.
If the appliance is not installed above an oven, a separator panel (not included) must be installed in the compartment under the appliance.
ELECTRICAL WARNINGS
![]() It must be possible to disconnect the appliance from the power supply by unplugging it if a plug is accessible, or by a multi-pole switch installed upstream of the socket in accordance with the wiring rules and the appliance must be earthed in conformity with national electrical safety standards.
It must be possible to disconnect the appliance from the power supply by unplugging it if a plug is accessible, or by a multi-pole switch installed upstream of the socket in accordance with the wiring rules and the appliance must be earthed in conformity with national electrical safety standards.
![]() Do not use extension leads, multiple sockets, or adapters. The electrical components must not be accessible to the user after installation. Do not use the appliance when you are wet or barefoot. Do not operate this appliance if it has a damaged power cable or plug, if it is not working properly, or if it has been damaged or dropped.
Do not use extension leads, multiple sockets, or adapters. The electrical components must not be accessible to the user after installation. Do not use the appliance when you are wet or barefoot. Do not operate this appliance if it has a damaged power cable or plug, if it is not working properly, or if it has been damaged or dropped.
![]() If the supply cord is damaged, it must be replaced with an identical one by the manufacturer, its service agent or similarly qualified persons in order to avoid a hazard – the risk of electric shock.
If the supply cord is damaged, it must be replaced with an identical one by the manufacturer, its service agent or similarly qualified persons in order to avoid a hazard – the risk of electric shock.
CLEANING AND MAINTENANCE
![]() WARNING: Ensure that the appliance is switched off and disconnected from the power supply before performing any maintenance operation; never use steam cleaning equipment – the risk of electric shock.
WARNING: Ensure that the appliance is switched off and disconnected from the power supply before performing any maintenance operation; never use steam cleaning equipment – the risk of electric shock.
![]() Do not use abrasive or corrosive products, chlorine-based cleaners, or pan scourers.
Do not use abrasive or corrosive products, chlorine-based cleaners, or pan scourers.
DISPOSAL OF PACKAGING MATERIALS
The packaging material is 100% recyclable and is marked with the recycling symbol .
.
The various parts of the packaging must therefore be disposed of responsibly and in full compliance with local authority regulations governing waste disposal.
DISPOSAL OF HOUSEHOLD APPLIANCES
This appliance is manufactured with recyclable or reusable materials.
Dispose of it in accordance with local waste disposal regulations. For further information on the treatment, recovery and recycling of household electrical appliances, contact your local authority, the collection service for household waste or the store where you purchased the appliance. This appliance is marked in compliance with European Directive 2012/19/EU, Waste Electrical and Electronic Equipment (WEEE) and with the Waste Electrical and Electronic Equipment regulations 2013 (as amended).
By ensuring this product is disposed of correctly, you will help prevent negative consequences for the environment and human health.
The symbol ![]() on the product or on the accompanying documentation indicates that it should not be treated as domestic waste but must be taken to an appropriate collection center for the recycling of electrical and electronic equipment.
on the product or on the accompanying documentation indicates that it should not be treated as domestic waste but must be taken to an appropriate collection center for the recycling of electrical and electronic equipment.
ENERGY SAVING TIPS
Make the most of your hot plate’s residual heat by switching it off a few minutes before you finish cooking.
The base of your pot or pan should cover the hot plate completely; a container that is smaller than the hot plate will cause energy to be wasted.
Cover your pots and pans with tight-fitting lids while cooking and use as 0little water as possible. Cooking with the lid off will greatly increase energy consumption.
Use only flat-bottomed pots and pans.
DECLARATION OF CONFORMITY
This appliance meets Ecodesign requirements of European Regulation 66/2014 and The Ecodesign for Energy-Related Products and Energy Information (Amendment) (EU Exit) Regulations 2019 in compliance with the European standard EN 60350-2.
NOTE
People with a pacemaker or similar medical device should use care when standing near this induction cooktop while it is on. The electromagnetic field may attect the pacemaker or similar device. Consult your doctor or the manufacturer of the pacemaker or similar medical device for additional information about its effects on the electromagnetic fields of the induction cooktop.
INSTALLATION

ELECTRICAL CONNECTION
An electrical connection must be made before connecting the appliance to the electricity supply.
Installation must be carried out by qualified personnel who know the current safety and installation regulations. Specifically, installation must be carried
out in compliance with the regulations of the local electricity supply company.
Make sure the voltage specified on the data plate located on the bottom of the appliance is the same as that of the home.
Regulations require that the appliance be earthed: use conductors (including the earth conductor) of the appropriate size only.
| R | black |
| S | brown |
| T | blue (gray)-blu (grigio) |
| yellow/green | |
| N | blue |
PRODUCT DESCRIPTION

CONTROL PANEL
| 1. On/O button | 6. Cooking time indicator |
| 2. Cooking level selected | 7. Timer activation button |
| 3. Zone selection indicator | 8. Power and cooking time adjustment buttons |
| 4. Cooking zone selection button | 9. Indicator light – function active |
| 5. Timer indicators active for the selected zone | 10. Child lock button – 3 seconds |
ACCESSORIES
POTS AND PANS
Only use pots and pans made from ferromagnetic material that are suitable for use with induction hobs:
- enameled steel
- cast iron
- special pots and pans in stainless steel, suitable for induction cooking
Check for the![]() symbol (usually stamped on the bottom) to determine whether a pot is suitable. A magnet may be used to check whether pots are magnetic.
symbol (usually stamped on the bottom) to determine whether a pot is suitable. A magnet may be used to check whether pots are magnetic.
The quality and the structure of the pot base can alter cooking performance. Some indications for the base’s diameter do not correspond to the actual diameter of the ferromagnetic surface.
Some pots and pans have only a part of the bottom in a ferromagnetic material, with parts in another material not suitable for induction cooking. These areas may heat up at different levels or lower temperatures. In certain cases, where the bottom is made mainly of non-ferromagnetic materials, the hob might not recognize the pan and therefore not switch on the cooking zone.
To ensure optimum efficiency, always use pots and pans with flat bottoms that distribute the heat evenly. If the bottom is uneven, this will affect power and heat conduction.
Empty pots or pots with a thin base
Do not use empty pots or pans when the hob is on. The hob is equipped with an internal safety system that constantly monitors the temperature, activating the “automatic off“ function where high temperatures are detected. When used with empty pots or pots with thin bases, the temperature may rise very quickly, and the “automatic off“ function may not be triggered immediately, damaging the pan or the hob surface. If this occurs, do not touch anything and wait for all components to cool down.
If any error messages appear, call the service center.
Minimum diameter of pot/pan base for the different cooking areas To ensure that the hob functions properly, use pots of a suitable minimum diameter (refer to the drawing below).
Always use the cooking zone that best corresponds to the minimum diameter of the bottom of the pot.
Place the pot making sure it is well centered on the cooking zone in use.
It is recommended not to use pots that exceed the perimeter of the cooking zone in use.
ADAPTER FOR POTS/PANS UNSUITABLE FOR INDUCTION
Using this accessory makes it possible to use pots and pans that are not suitable for induction hobs. It is important to bear in mind that using it affects efficiency and, consequently, the time needed to heat food. Its use should be limited because the temperatures reached on its surface depend significantly on the pot/pan used, its atness, and the type of food being cooked. Using a pot or pan with a smaller diameter than the adapter disc may cause heat to build up that is not transmitted to the pot or pan, which could blacken both the hob and the disc. Adapt the diameter of your pots/pans and the hob to the diameter of the adapter.
FIRST TIME USE
POWER MANAGEMENT
At the time of purchase, the hob is set to the maximum possible power.
Adjust the setting concerning the limits of your home’s electrical system as described in the following paragraph.
N.B: Depending on the power selected for the hob, some of the cooking zone power levels and functions (e.g. boil or fast heating) could be automatically limited to prevent the selected limit from being exceeded.
To set the power of the hob:
Once you have connected the device to the mains power supply, you can set the power level within 60 seconds.
Press the ”+” button for at least 3 seconds. The display shows ”PL”.
Confirm by pressing![]() .
.
Use the ”+” and ”−” buttons to select the desired power level.
The power levels available are 2.5 kW – 4.0 kW – 6.0 kW – 7.2 kW.
Confirm by pressing![]() .
.
The power level selected will stay in the memory even if the power supply is interrupted.
To change the power level, disconnect the appliance from the mains for at least 60 seconds, plug it back in, and repeat the above steps.
If an error occurs during the setting sequence, the ”EE” symbol will appear, and you will hear a beep. If this happens, repeat the operation.
If the error persists, contact the After-Sales Service.
ACOUSTIC SIGNAL ON/OFF
To switch the acoustic signal on/off:
- Connect the hob to the power supply;
- Wait for the switch-on sequence;
- Within 60 seconds, press the buttons ”+” and
 simultaneously for at least 5 seconds.
DEMO MODE (reheating deactivated, see the section on ”Troubleshooting”)
To switch the demo mode on and off:
- Connect the hob to the power supply;
- Wait for the switch-on sequence;
- Within 60 seconds, press the cooking zone selection buttons in the top left and top right simultaneously for at least 3 seconds (as shown below);
- ”DE” will show on the display.

DAILY USE
SWITCHING THE HOB ON/OFF
To turn the hob on, press the power button for around 1 second.
To turn the hob off, press the same button again, and all cooking zones will be deactivated.
POSITIONING
Locate the desired cooking zone by referring to the position symbols.
Do not cover the control panel symbols with the cooking pot.
Please note: In the cooking zones close to the control panel, it is advisable to keep pots and pans inside the markings (taking both the bottom of the pan and the upper edge into consideration, as this tends to be larger).
This prevents excessive overheating of the keypad. When grilling or frying, please use the rear cooking zones wherever possible. 
 ACTIVATING/DEACTIVATING COOKING ZONES AND ADJUSTING POWER LEVELS
To activate the cooking zones:
Select the pre-selected cooking zone by pressing the corresponding zone selection button. The display will show level ”0”.
Each cooking zone has different power levels that can be adjusted using the ”+”/”−” buttons, from a minimum of 1 to a maximum of 9.
Some cooking zones have a fast heating function (Booster), shown on the display with the letter “P“.
 To deactivate the cooking zones:
Select the cooking zone to be switched off by pressing the corresponding zone selection button (a dot will light up on the display, to the power level indicator’s bottom right). Press the “−“ to set the level to “0“.
INDICATORS
![]() RESIDUAL HEAT
RESIDUAL HEAT
If “H“ appears on the display, this means that the cooking zone is hot. The indicator lights up even if the zone has not been activated but has been heated due to the adjacent zones’ use or because a hot pot has been placed on it.
When the cooking zone has cooled down, the ”H” disappears.
![]() POT INCORRECTLY POSITIONED OR MISSING
POT INCORRECTLY POSITIONED OR MISSING
This symbol appears if the pot is not suitable for induction cooking, is not positioned correctly, or is not of an appropriate size for the cooking zone selected. If no pot is detected within 30 seconds of making the selection, the cooking zone switches off.
COOKING TABLE
| POWER LEVEL | TYPE OF COOKING | LEVEL USE (indicating cooking experience and habits) | |
| Maximum power a |
P | Fast heating/Booster | Ideal for rapidly increasing food temperature to a fast boil (for water) or for rapidly heating cooking liquids. |
| 8 – 9 | Frying – boiling | Ideal for browning, starting to cook, frying deep-frozen products, and fast boiling. | |
| High power | 7 – 8 | Browning – sauteing – boiling – grilling |
Ideal for sautéing, maintaining a lively boil, cooking, and grilling (for a short period of time, 5-10 minutes). |
| 6 – 7 | Browning – cooking – stewing – sautéing – grilling |
Ideal for sautéing, maintaining a light boil, cooking and grilling (for a medium period of time, 10-20 minutes), and preheating accessories. | |
| Medium power | 4 – 5 | Cooking – stewing – sautéing – grilling |
Ideal for stewing, maintaining a gentle boil, and cooking (for a long period of time). Creaming pasta. |
| 3 – 4 | Cooking – simmering – thickening – creaming |
Ideal for long-cooking recipes (rice, sauces, roasts, fish) with liquids (e.g. water, wines, broth, milk), creaming pasta. | |
| 2 – 3 | Ideal for long-cooking recipes (less than a liter in volume: rice, sauces, roasts, fish) with liquids (e.g. water, wines, broth, milk). | ||
| Low power | 1 – 2 | – Melting – defrosting keeping food warm – creaming |
Ideal for softening butter, gently melting chocolate, thawing small products, and keeping just-cooked food warm (e.g. sauces, soups, minestrone). |
| 1 | Ideal for keeping just-cooked food warm, for creaming risottos, and for keeping serving dishes warm (with induction-suitable accessory). | ||
| Zero power | 0 | Support surface | Hob in stand-by or off mode (possible end-of-cooking residual heat, indicated by an “H”). |
MAINTENANCE AND CLEANING
![]() WARNING
WARNING
- Do not use steam cleaning equipment.
- Before cleaning, make sure the cooking zones are switched off and that the residual heat indicator (”H”) is not displayed.
Important:
- Do not use abrasive sponges or scouring pads as they may damage the glass.
- After each use, clean the hob (when it is cool) to remove any deposits and stains from food residue.
- A surface that is not kept suitably clean may reduce the sensitivity of control panel buttons.
- Use a scraper only if residues are stuck to the hob. Follow the scraper manufacturer’s instructions to avoid scratching the glass.
- Sugar or foods with high sugar content can damage the hob and must be immediately removed.
- Salt, sugar, and sand could scratch the glass surface.
- Use a soft cloth, absorbent kitchen paper or a special hob cleaner (follow
the Manufacturer’s instructions). - Spills of liquid in the cooking zones can cause the pots to move or vibrate.
- After cleaning the hob, dry thoroughly.
TROUBLESHOOTING
- Check that the electricity supply has not been shut off.
- If you cannot turn the hob off after using it, disconnect it from the power supply.
- If alphanumeric codes appear on the display when the hob is switched on, consult the following table for instructions.
Please note: The presence of water, liquid spilled from pots, or any objects resting on any of the hob buttons can accidentally activate or deactivate the control panel lock function.
| DISPLAY CODE | DESCRIPTION | POSSIBLE CAUSES | SOLUTION |
| FOE1 | Cookware is detected but it is not compatible with the requested operation. | The cookware is not well positioned in the cooking zone, or it is not compatible with one or more cooking zones. | Press the On/Off button twice to remove the FOE1 code and restore the functionality of the cooking zone. Then, try to use the cookware with a different cooking zone, or use different cookware. |
| FOE7 | Wrong power cord connection. | The power supply connection is not exactly as indicated in the “ELECTRICAL CONNECTION” paragraph. | Adjust the power supply connection according to the “ELECTRICAL CONNECTION” paragraph. |
| FREE | The control panel switches off because of excessively high temperatures. | The internal temperature of electronic parts is too high. | Wait for the hob to cool down before using it again. |
| FOE9 | The cooking zone turns off when the temperatures are too high. | The internal temperature of electronic parts is too high. | Wait until the cooking area has cooled off before using it again. |
| FOE2, FOE4, FOE6, FOES, FOEC, F1 E1, F2E1, F6E1, F6E3, F7E5, F7E6 | Disconnect the hob from the power supply. Wait a few seconds then reconnect the hob to the power supply. If the problem persists, call the service center and specify the error code that appears on the display. |
||
| d E (when the hob is MO | The hob does not switch heat up. The functions do not come on. | DEMO MODE on. | Follow the instructions in the “DEMO MODE” paragraph. |
e.g. P-5(Power level lower than level requested! |
The hob automatically sets a minimum power level to ensure that the cooking zone can be used. | The power regulator limits the power levels in accordance with the maximum value set for the hob. | See paragraph “Power management”. |
SOUNDS PRODUCED DURING OPERATION
Induction hobs may whistle or creak during normal operation.
These noises actually come from the cookware and are linked to the characteristics of the pan bottoms (for example, when the bottoms are made from different layers of material or are irregular).
These noises may vary according to the type of cookware used and the amount of food it contains and are not the symptom of something wrong.
AFTER SALES SERVICE
To receive complete assistance, please register your product on www.indesit.com/register.
BEFORE CALLING THE AFTER-SALES SERVICE:
- See if you can solve the problem by yourself with the help of the TROUBLESHOOTING suggestions.
- Switch the appliance off and back on again to see if the fault persists.
IF AFTER THE ABOVE CHECKS THE FAULT STILL OCCURS, GET IN TOUCH WITH THE NEAREST AFTER-SALES SERVICE.
To receive assistance, call the number shown on the warranty booklet or follow the website’s instructions on www.indesit.com.
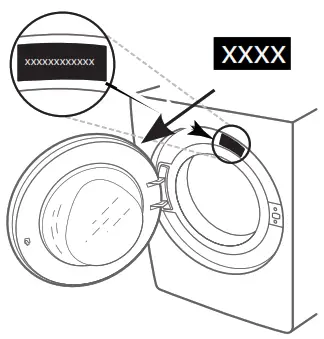
When contacting our Client After sales service, always specify:
- a brief description of the fault;
- the type and exact model of the appliance;

- the serial number (number after the word SN on the rating plate located under the appliance). The serial number is also indicated in the documentation;

- your full address;
- your telephone number.
If any repairs are required, please contact an authorized after-sales service (to guarantee that original spare parts will be used and repairs carried out correctly).
In the case of flush-mounted installation, call the After Sales Service to request assembly of screws kit 4801 211 00112.
In case of installation is not over a built-in oven, you can call the After Sales Service to buy the divider kit C00628720 (cooktop 60 and 65 cm) or C00628721 (cooktop 77 cm).
If you prefer not to buy the divider kit please ensure that a separator is installed according to the installation instructions.
Instruction Manual
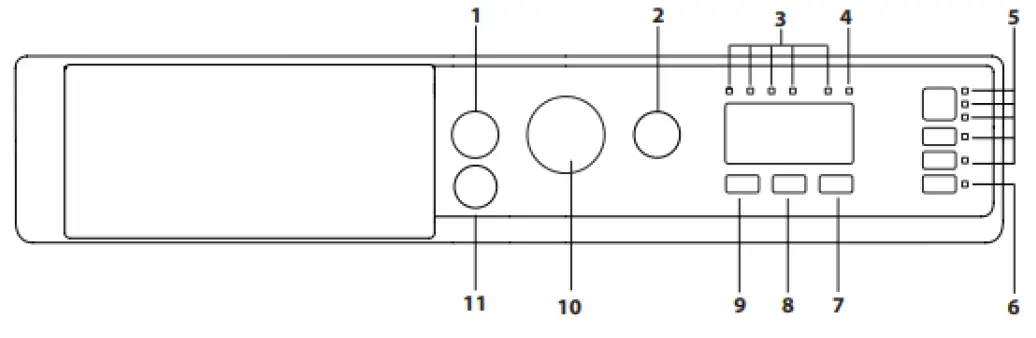
CONTROL PANEL
- ON/OFF button
- START/PAUSE button with indicator light
- WASH CYCLE PROGRESS indicator lights
- DOOR LOCKED indicator light
- FUNCTION buttons with indicator lights
- DRYING ONLY button with indicator light
- DRYING LEVELS button
- TIME DRYING button
- TEMPERATURE button
- WASH CYCLE knob
- PLISH & GO button
Rapid programming
- Open the door. Load the laundry while making sure not to exceed the maximum load quantity indicated in the cycle table.
- Pull out the detergent dispenser drawer and pour the detergent into the relevant compartments as described in “DETERGENT DISPENSER DRAWER section”.
- Close the door.
- Press the PUSH & GO button to start the wash cycle. Traditional programming
- Turn the washing machine on by pressing the ON/OFF button. All the indicator lights will light up for a few seconds, then only the lights corresponding to the settings for the selected wash cycle will remain lit; the START/PAUSE indicator light will also flash.
- Open the door. Load the laundry while making sure not to exceed the maximum load quantity indicated in the Wash Cycle Table.
- Pull out the detergent dispenser drawer and pour the detergent into the relevant compartments as described in “DETERGENT DISPENSER DRAWER” section.
- Close the door.
- Set the WASH CYCLE knob to the desired cycle.
- Modify the temperature: pressing the 40° 60° button allows for gradually reducing the temperature down to the cold wash level ( ).
- Select the desired wash cycle.
- Select the desired options.
- Press the START/PAUSE button to start the wash cycle; the relative indicator light will light up steady green and the door will lock ( indicator light on).
Table of wash cycles

Setting the temperature
Turn the temperature knob to set the wash temperature. The temperature can be lowered, or even set to a cold wash.
Set the drying cycle
Turn the drying knob to set the desired drying type. Two options are available:
A: Based on time from 40 minutes to 150
B: Based on the damp level of the dry clothes
Iron: Slightly damp clothes, easy to iron.
Hanger: Dry clothes to put away,
Upboard: Very dry clothes recommended for to welling and bathrobes.
A cooling stage is foreseen at the end of the drying cycle.
Table of drying times
Dry only
Turn the programme knob to one of the drying settings (7-8) depending on the type of fabric, then select the desired drying type using the drying knob.
Functions
To enable a function:
- Press the button corresponding to the desired function, according to the table below
- The function is enabled when the corresponding button is illuminated.
(The rapid flashing of the button indicates that the corresponding function cannot be selected for the programme set).
DAILY REFERENCE
GUIDE
THANK YOU FOR BUYING A INDESIT PRODUCT
In order to receive more complete assistance, please register your appliance on: www.indesit.com/register
You can download the Safety Instructions and the User Manual, by visiting our website docs. Indesit. eu and follow the instructions on the back of this booklet.
Before using the appliance carefully read the Safety Instructions guide.
PRODUCT DESCRIPTION
APPLIANCE
- Upper rack
- Foldable flaps
- Upper rack height adjuster
- Upper spray arm
- Lower rack
- Cutlery basket
- Lower spray arm
- Filter Assembly
- Salt reservoir
- Detergent and Rinse Aid dispensers
- Rating plate
- Control panel
CONTROL PANEL
- On-Off/Reset button with indicator light
- Program selection knob
- Start/Pause button with indicator light / Drain out
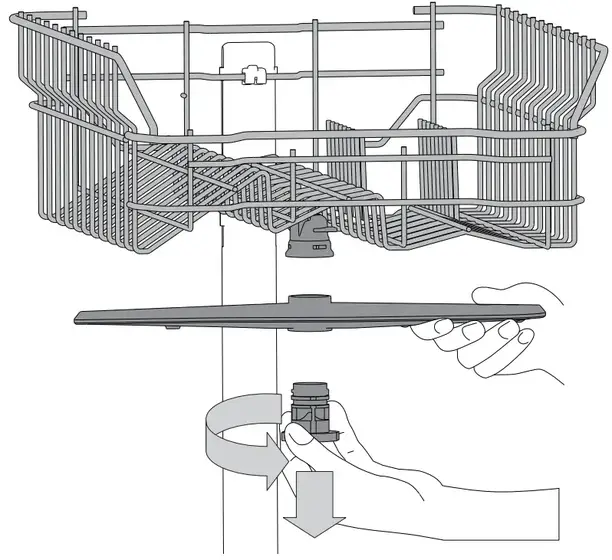
FIRST TIME USE SALT, RINSE AID, AND DETERGENT
ADVICE REGARDING THE FIRST TIME USE
After installation, remove the stoppers from the racks and the retaining elastic elements from the upper rack.
FILLING THE SALT RESERVOIR
The use of salt prevents the formation of LIMESCALE on the dishes and on the machine’s functional components.
- It is mandatory that THE SALT RESERVOIR NEVER BE EMPTY
- It is important to set the water hardness.
The salt reservoir is located in the lower part of the dishwasher (see PRODUCT DESCRIPTION) and must be filled when the green float on the cap of the salt reservoir is no longer visible.
- Remove the lower rack and unscrew the reservoir cap (anticlockwise).
- Only the first time you do this: fill the salt reservoir with water.
- Position the funnel (see figure) and fill the salt reservoir right up to its edge (approximately 1 kg); it is not unusual for a little water to leak out.
- Remove the funnel and wipe any salt residue away from the opening.
Make sure the cap is screwed on tightly so that no detergent can get into the container during the wash program (this could damage the water softener beyond repair). Whenever you need to add salt, it is mandatory to complete the procedure before the beginning of the washing cycle to avoid corrosion.
SETTING THE WATER HARDNESS
To allow the water softener to work in a perfect way, it is essential that the water hardness setting is based on the actual water hardness in your house. This information can be obtained from your local water supplier. The factory sets the default value for the water hardness:
- Switch on the appliance by pressing the ON/OFF button.
- Switch off the appliance by pressing the ON/OFF button.
- Hold the button START/Pause for 5 seconds.
- Switch on the appliance by pressing the ON/OFF button
- The ON/OFF LED light will flash as many times as the level that was set.
- Set the desired water hardness level using the PROGRAM SELECTION knob (see WATER HARDNESS TABLE).
| Water Hardness Table | |||
| Level | °dH German degrees | °fH French degrees | °Clark English degrees |
| 1 ECO Soft | 0- 6 | 0- 10 | 0- 7 |
| 2 Medium |
7 – 11 | 11 – 20 | 8 – 14 |
| 3 Average |
12 – 16 | 21 – 29 | 15 – 20 |
| 4 Hard |
17 – 34 | 30 – 60 | 21 -42 |
| 5 Very hard |
35 – 50 | 61 – 90 | 43 – 62 |
Switch off the appliance by pressing the ON/OFF button.
The setting is complete!
As soon as this procedure is complete, run a program without loading. Only use salt that has been specifically designed for dishwashers. After the salt has been poured into the machine, the SALT REFILL indicator light switches off.
If the salt container is not filled, the water softener and the heating element may be damaged as a result of limescale accumulation. Using Salt is recommended with any type of dishwasher detergent.
FILLING THE RINSE AID DISPENSER
Rinse aid makes dish DRYING easier. The rinse aid dispenser A should be filled when the dark optical indicator on the dispenser door C becomes transparent.
- Open dispenser B by pressing and pulling up the tab on the lid.
- Pour in the rinse aid (max.110 ml), making sure it does not overflow from the dispenser. If this happens, clean the spill immediately with a dry cloth.
- Press the lid down until you hear a click to close it. NEVER pour the rinse aid directly into the appliance tub.
ADJUSTING THE DOSAGE OF RINSE AID
If you are not completely satisfied with the drying results, you can adjust the quantity of rinse aid used.
- Switch the dishwasher on using the ON/OFF button.
- Switch it off using the ON/OFF button.
- Press the button START/Pause three times.
- Switch it on using the ON/OFF button.
- The START LED light will flash as many times as the level that was set.
- Set the level of rinse aid quantity to be supplied using the PROGRAM SELECTION knob (see PROGRAMS TABLE).
- Switch it off using the ON/OFF button
The setting is complete!
If the rinse aid level is set to 1 (ECO), no-rinse aid will be supplied.
A maximum of 5 levels can be set according to the dishwasher model. The factory setting is specific to the model, please follow the instructions above to check this for your machine
- If you see bluish streaks on the dishes, set a low number (2-3).
- If there are drops of water or limescale marks on the dishes, set a mid-range number (4-5).
FILLING THE DETERGENT DISPENSER
To open the detergent dispenser use the opening device D. Introduce the detergent into the dry dispenser E only. Place the amount of detergent for pre-washing directly inside the tub.
- When measuring out the detergent refer to the mentioned earlier information to add the proper quantity. Inside the dispenser E, there are indications to help the detergent dosing.
- Remove detergent residues from the edges of the dispenser and close the cover until it clicks.
- Close the lid of the detergent dispenser by pulling it up until the closing device is secured in place.
The detergent dispenser automatically opens up at the right time according to the program.
Usage of detergent not designed for dishwashers may cause malfunction or damage to the appliance
PROGRAMS TABLE
| Program | Drying phase | Duration of wash program (h: min)*) | Water consumption (litres/cycle) | Energy consumption (kWh/cycle) |
| Eco ECO 50° | |
4:00 | 11.5 | 0.84 |
| Intensive 65° |
|
2:30 | 15.0 | 1.50 |
| Mixed 55° |
|
2:25 | 15.0 | 1.35 |
| Rapid 40’ |
|
0:40 | 8.0 | 0.90 |
| Half Load 50° |
|
1:15 | 11.0 | 0.90 |
Soak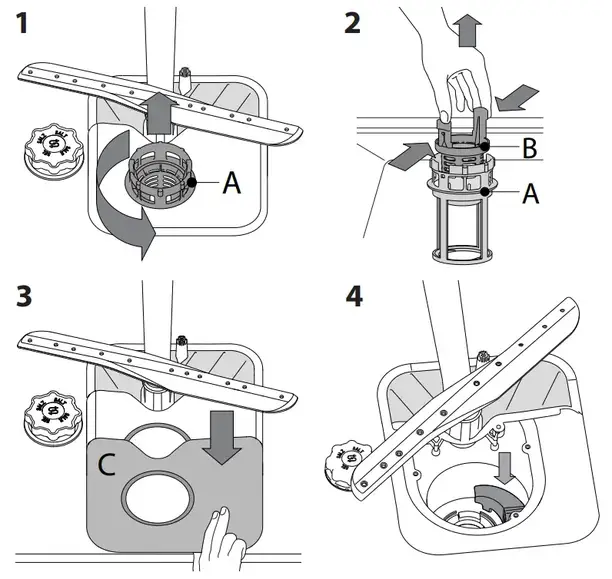 |
|
0:10 | 4.0 | 0.01 |
ECO program data is measured under laboratory conditions according to European Standard EN 60436:2020.
Note for Test Laboratories: For information on comparative EN testing conditions, please send an email to the following address: [email protected].
Pre-treatment of the dishes is not needed before any of the programs. ugly.
*) Values given for programs other than the program Eco are indicative only. The actual time may vary depending on many factors such as temperature and pressure of the incoming water, room temperature, amount of detergent, quantity, and type of load, load balancing, additional selected options, and sensor calibration. The sensor calibration can increase program duration up to 20 min.
PROGRAMS DESCRIPTION
Instructions on wash cycle selection.
- ECO
Eco program is suitable to clean normally soiled tableware, for this use, it is the most efficient program in terms of its combined energy and water consumption, and it is used to assess compliance with the EU Ecodesign legislation. - INTENSIVE
Program recommended for heavily soiled crockery, especially suitable for pans and saucepans (not to be used for delicate items). - MIXED
Mixed soil. For normally soiled dishes with dried food residues. - RAPID 40′
Program to be used for half load of lightly-soiled dishes with no dried food residues. Does not have a drying phase. - HALF LOAD
Ideal for washing a half load of lightly or normally soiled crockery. - SOAK
Use to refresh crockery planned to be washed later. No detergent is to be used with this program.
Notes: Please note that cycle Rapid 40′ is dedicated to lightly soiled dishes.
OPTIONS AND FUNCTIONS
DRAIN OUT
To stop and cancel the active cycle, the Drain Out function can be used. A long press of the START/PAUSE button will activate the DRAIN OUT function. The active program will be stopped and the water in the dishwasher will be drained out.
LOADING THE RACKS
UPPER RACK
Load delicate and light dishes: glasses, cups, saucers, low salad bowls.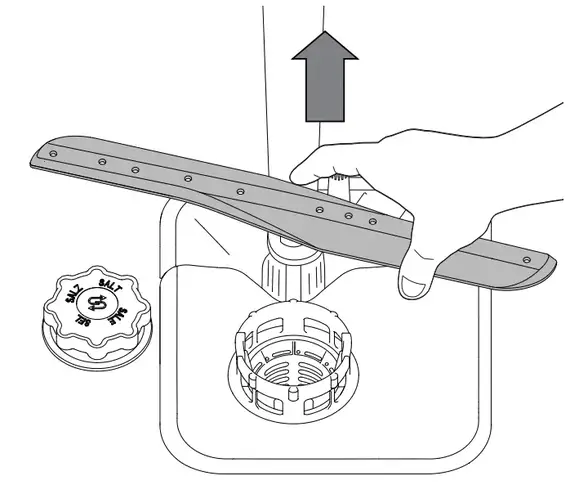
(loading example for the upper rack)
ADJUSTING THE HEIGHT OF THE UPPER RACK
The height of the upper basket can be adjusted: a high position to place bulky crockery in the lower basket and a low position to make the most of the tip-up compartments by creating more space upwards.
The upper rack is equipped with an Upper Rack height adjuster (see figure), without pressing the levers, lift it up by simply holding the rack sides, as soon as the rack is stable in its upper position. To restore to the lower position, press the levers (A) at the sides of the rack and move the basket downwards.
We strongly recommend that you do not adjust the height of the rack when it is loaded. NEVER raise or lower the basket on one side only.
FOLDABLE FLAPS WITH ADJUSTABLE POSITION
The side foldable flaps can be folded or unfolded to optimize the arrangement of crockery inside the rack.
Wine glasses can be placed safely in the foldable flaps by inserting the stem of each glass into the corresponding slots.
Depending on the model:
– to unfold the flaps there is needed to slide it up and rotate or release it from the snaps and pull it down.
– to fold the flaps there is needed to rotate it and slide flaps down or pull it up and attach flaps to the snaps.
LOWER RACK
For pots, lids, plates, salad bowls, cutlery, etc… Large plates and lids should ideally be placed at the sides to avoid interferences with the spray arm.
(loading example for the lower rack)
CUTLERY BASKET
It is fitted with top grids for improved cutlery arrangement. It must only be positioned at the front of the lower rack.
Knives and other utensils with sharp edges must be placed in the cutlery basket with the points facing downwards or they must be positioned horizontally in the tip-up compartments on the upper rack.
DAILY USE
- CHECK WATER CONNECTION
Check that the dishwasher is connected to the water supply and that the tap is open. - SWITCH ON THE DISHWASHER
Press the ON/OFF button. - LOAD THE RACKS
(see LOADING THE RACKS) - FILLING THE DETERGENT DISPENSER
- CHOOSE THE PROGRAM AND CUSTOMISE THE CYCLE
Select the most appropriate program in accordance with the type of crockery and its soiling level (see PROGRAMS DESCRIPTION) by turning the PROGRAM SELECTION knob clockwise. Select the desired options (see OPTIONS AND FUNCTIONS). - START Start the wash cycle by pressing the START/Pause button.
- END OF WASH CYCLE
The end of the wash cycle is indicated by the ON/OFF LED lit. Switch off the appliance by pressing the ON/OFF button and opening the door. Wait for a few minutes before removing the crockery – to avoid burns. Unload the racks, beginning with the lower one.
The machine will switch off automatically during certain extended periods of inactivity, in order to minimize electricity consumption. If the crockery is only lightly soiled or if it has been rinsed with water before being placed in the dishwasher, reduce the amount of detergent used accordingly.
MODIFYING A RUNNING PROGRAM
If a wrong program was selected, it is possible to change it, provided that it has only just begun: press and hold the ON/OFF button, and the machine will switch off. Switch the machine back on using the ON/OFF button and select the new wash cycle and any desired options; start the cycle by pressing the START/Pause button.
ADDING EXTRA CROCKERY
Without switching off the machine, open the door (beware of HOT steam!) and place the crockery inside the dishwasher. Close the door and press the START/Pause button the cycle will begin from the point at which it was interrupted.
ACCIDENTAL INTERRUPTIONS
If the door is opened during the wash cycle, or if there is a power cut, the cycle stops. Once the door has been closed or the electricity supply is restored, to start again the cycle from where it was interrupted, press the START/Pause button.
ADVICE AND TIPS
TIPS
Before loading the baskets, remove all food residues from the crockery and empty the glasses. You do not need to rinse beforehand under running water. Arrange the crockery so that it is held in place firmly and does not tip over; and arrange the containers with the openings facing downwards and the concave/convex parts placed obliquely, thus allowing the water to reach every surface and flow freely. Warning: lids, handles, trays, and frying pans do not prevent the sprayer arms from rotating. Place any small items in the cutlery basket. Very soiled dishes and pans should be placed in the lower basket because in this sector the water sprays are stronger and allow a higher washing performance. After loading the appliance, make sure that the sprayer arms can rotate freely.
UNSUITABLE CROCKERY
· Wooden crockery and cutlery.
- Delicately decorated glasses, artistic handicrafts, and antique crockery. Their decorations are not resistant.
- Parts in synthetic material which do not withstand high temperatures.
- Copper and tin crockery.
- Crockery is soiled with ash, wax, lubricating grease, or ink. The colors of glass decorations and aluminum/silver pieces can change and fade during the washing process. Some types of glass (e.g. crystal objects) can become opaque after a number of wash cycles too.
DAMAGE TO GLASS AND CROCKERY
- Only use glasses and porcelain guaranteed by the manufacturer as dishwasher safe.
- Use a delicate detergent suitable for crockery
- Collect glasses and cutlery from the dishwasher as soon as the wash cycle is over.
TIPS ON ENERGY SAVING
- When the household dishwasher is used according to the manufacturer’s instructions, washing tableware in a dishwasher usually consumes less energy and water than hand dishwashing.
- In order to maximize dishwasher efficiency, it is recommended to initiate the wash cycle once the dishwasher is fully loaded. Loading the household dishwasher up to the capacity indicated by the manufacturer will contribute to energy and water savings. Information on the correct loading of tableware can be found in the Loading chapter. In case of partial loading it is recommended to use dedicated wash options if available (Half load/ Zone Wash, Multi-Zone), filling up only selected racks. Incorrect loading or overloading the dishwasher may increase resources usage (such as water, energy, and time, as well as increasing noise level), reducing cleaning and drying performance.
- Manual pre-rinsing of tableware items leads to increased water and energy consumption and is not recommended.
HYGIENE
To avoid odor and sediment which can be accumulated in the dishwasher please run a high-temperature program at least one a month. Use a teaspoon of detergent and run it without the loading to clean your appliance.
CARE AND MAINTENANCE
CLEANING THE FILTER ASSEMBLY
Regularly clean the filter assembly so that the filters do not clog and that the wastewater flows away correctly. Using a dishwasher with clogged filters or foreign objects inside the filtration system or spray arms may cause unit malfunction resulting in loss of performance, noisy work, or higher resources usage. The filter assembly consists of three filters that remove food residues from the washing water and then recirculate the water.
The dishwasher must not be used without filters or if the filter is loose.
At least once per month or after every 30 cycles, check the filter assembly and if necessary clean it thoroughly under running water, using a non-metallic brush and following the instructions below:
- Turn the cylindrical filter A in an anti-clockwise direction and pull it out (Fig 1).
- Remove cup filter B by exerting a slight pressure on the side flaps (Fig 2).
- Slide-out the stainless-steel plate filter C (Fig 3).
- In case you find foreign objects (such as broken glass, porcelain, bones, fruit seeds, etc.) please remove them carefully.
- Inspect the trap and remove any food residues. NEVER REMOVE the wash-cycle pump protection (black detail) (Fig 4)..

After cleaning the filters, re-place the filter assembly and fix it in position correctly; this is essential for maintaining the efficient operation of the dishwasher.
CLEANING THE SPRAY ARMS
On occasions, food residue may become encrusted onto the spray arms and block the holes used to spray the water. It is therefore recommended that you check the arms from time to time and clean them with a small non-metallic brush.
To remove the upper spray arm, turn the plastic locking ring in an anti-clockwise direction. The upper spray arm should be replaced so that the side with the greater number of holes is facing upwards.
The lower spray arm may be removed by pulling it upwards.
WATER SOFTENING SYSTEM
Water softener automatically reduces water hardness, consequently preventing scale buildup on the heater, contributing also to better cleaning efficiency. This system regenerates itself with salt, therefore it is required to refill salt containers when empty. Frequency of regeneration depends on the water hardness level setting regeneration takes place once per 5 Eco cycles with the water hardness level set to 3. The regeneration process starts in the final rinse and finishes in the drying phase, before the cycle ends.
- Single regeneration consumes ~3.5L of water;
- Takes up to 5 additional minutes for the cycle;
- Consumes below 0.005kWh of energy.
TROUBLESHOOTING
In case your dishwasher doesn’t work properly, check if the problem can be solved by going through the following list. For other errors or issues please contact authorized After-sales Service whose contact details can be found in the warranty booklet. Spare parts will be available for a period of either up to 7 or up to 10 years, according to the specific Regulation requirements.
| PROBLEMS | POSSIBLE CAUSES | SOLUTIONS |
| The dishwasher won’t start or does not respond to commands. | The appliance has not been plugged in properly. | Insert the plug into the socket. |
| Power outage. | For safety reasons, the dishwasher will not restart automatically when power returns. Press the START/Pause button to resume the cycle. | |
| The dishwasher door is not closed. | Vigorously push the door until you hear the “click”. | |
| —– Cycle is interrupted by the door opening for > 4 sec. | Close the door and press the START/Pause button. | |
| It does not respond to commands. | Switch off the appliance by pressing the ON/OFF button, switch it back on after approximately one minute and restart the program. If the problem persists, unplug the appliance for 1 minute, then plug it back in. | |
| The dishwasher won’t drain. | The wash cycle has not finished yet. …. .._ |
Wait until the wash cycle finishes. |
| The drain hose is bent. | Check that the drain hose is not bent (see INSTALATION INSTRUCTION). | |
| The sink drain pipe is blocked. | Clean the sink drain pipe. ……. |
|
| The filter is clogged up with food residues. | Clean the filter (see CLEANING THE FILTER ASSEMBLY). | |
| The dishwasher makes excessive noise. | The dishes are rattling against each other. | Position the crockery correctly (see LOADING THE RACKS). |
| An excessive amount of foam has been produced. | The detergent has not been measured out correctly or it is not suitable for use in dishwashers (see FILLING THE DETERGENT DISPENSER). Restart dishwasher by pressing the DRAIN button (see OPTIONS AND FUNCTIONS) and running new program without detergent. |
|
| The dishes are not clean. | The crockery has not been arranged properly. | Arrange the crockery correctly (see LOADING THE RACKS). |
| The spray arms cannot rotate freely, being hindered by the dishes. | Arrange the crockery correctly (see LOADING THE RACKS). | |
| The wash cycle is too gentle. | Select an appropriate wash cycle (see PROGRAMS TABLE). | |
| An excessive amount of foam has been produced. … |
The detergent has not been measured out correctly or it is not suitable for use in dishwashers (see FILLING THE DETERGENT DISPENSER). | |
| The cap on the rinse aid compartment has not been shut correctly. | Make sure the cap of the rinse aid dispenser is closed. | |
| The filter is soiled or clogged. | Clean the filter assembly (see CARE AND MAINTENANCE). | |
| There is no salt. | Fill the salt reservoir (see FILLING THE SALT RESERVOIR). | |
| The dishwasher does not fill the water. All LEDs are blinking rapidly. |
No water in the water supply or the tap is closed. | Make sure there is water in the water supply or the tap running. |
| The inlet hose is bent. | Make sure the inlet hose is not bent (see INSTALLATION) reprogram the dishwasher and reboot. | |
| —– The sieve in the water inlet hose is clogged; it is necessary to clean it. |
After having carried out the verification and cleaning, turn off and turn on the dishwasher and restart a new program. | |
| The dishwasher finishes the cycle prematurely. | Drain hose positioned too low or siphoning into the home sewage system. | Check if the end of the drain hose is placed at the correct height (see INSTALLATION). Check for siphoning into the home sewage system, and install an air admittance valve if necessary. |
| Air in the water supply. | Check water supply for leaks or other issues letting air inside. |
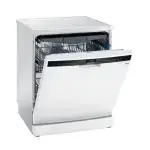
Policies, standard documentation, ordering of spare parts, and additional product information can be found by:
- Visiting our website docs. Indesit. eu and parts-selfservice.whirlpool.com
- Using QR Code
- Alternatively, contact our After-sales Service (See phone number in the warranty booklet).
- When contacting our After-sales Service, please state the codes provided on your product`s
The model information can be retrieved using the QR-Code reported in the energy label. The label also includes the model identifier that can be used to consult the portal of the registry at https://eprel.ec.europa.eu.
400011595485
01/2022 dk – Xerox Fabriano
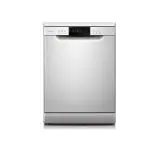
Indesit ID67V9KMB/UK 60cm Double Oven Electric Cooker

SAFETY INSTRUCTIONS
IMPORTANT TO BE READ AND OBSERVED
Before using the appliance, read these safety instructions. Keep them nearby for future reference.
These instructions and the appliance itself provide important safety warnings, to be observed at all times. The manufacturer declines any liability for failure to observe these safety instructions, for inappropriate use of the appliance or incorrect setting of controls.
WARNING: The appliance and its accessible parts become hot during use. Care should be taken to avoid touching heating elements. Children, less than 8 years of age must be kept away unless continuously supervised.
WARNING: If the hob surface is cracked, do not use the appliance – the risk of electric shock.
WARNING: Danger of fire: Do not store items on the cooking surfaces.
CAUTION: The cooking process has to be supervised. A short cooking process has to be supervised continuously.
WARNING: Leaving the hob unattended when cooking with fat or oil can be dangerous – risk of fire. NEVER try to extinguish a fire with water, but switch off the appliance and then cover the flames.g. with a lid or a fire blanket.
Do not use the hob as a work surface or support. Keep clothes or other flammable materials away from the appliance, until all the components have cooled down completely – the risk of fire. Very young children (0-3 years) should be kept away from the appliance. Young children (3-8 years) should be kept away from the appliance unless continuously supervised. Children from 8 years old and above and persons with reduced physical, sensory or mental capabilities or lack of experience and knowledge can use this appliance only if they are supervised or have been given instructions on safe use and understand the hazards involved. Children must not play with the appliance. Cleaning and user maintenance must not be carried out by children without supervision.
WARNING: The appliance and its accessible parts become hot during use. Care should be taken to avoid touching heating elements. Children, less than 8 years of age must be kept away unless continuously supervised
Never leave the appliance unattended during food drying. If the appliance is suitable for probe usage, only use a temperature probe recommended for this oven – the risk of fire. Keep clothes or other flammable materials away from the appliance, until all the components have cooled down completely – risk of fire. Always be vigilant when cooking foods rich in fat, oil or when adding alcoholic beverages – risk of fire. Use oven gloves to remove pans and accessories. At the end of cooking, open the door with caution, allowing hot air or steam to escape gradually before accessing the cavity – risk of burns. Do not obstruct hot air vents at the front of the oven – risk of fire.
Exercise caution when the oven door is in the open or down position, to avoid hitting the door. PERMITTED USE
CAUTION: The appliance is not intended to be operated by means of an external switching device, such as a timer, or a separate remote-controlled system.
This appliance is intended to be used in household and similar applications such as: staff kitchen areas in shops, offices, and other working environments; farm houses; by clients in hotels, motels, bed & breakfast and other residential environments. No other use is permitted (e.g. heating rooms).
This appliance is not for professional use. Do not use the appliance outdoors. Do not store explosive or flammable substances (e.g. gasoline or aerosol cans) inside or near the appliance – risk of fire.
INSTALLATION
The appliance must be handled and installed by two or more persons – the risk of injury. Use protective gloves to unpack and install – the risk of cuts. Installation, including water supply (if any), electrical connections, and repairs must be carried out by a qualified technician. Do not repair or replace any part of the appliance unless specifically stated in the user manual. Keep children away from the installation site. After unpacking the appliance, make sure that it has not been damaged during transport. In the event of problems, contact the dealer or your nearest Aftersales Service. Once installed, packaging waste (plastic, styrofoam parts, etc.) must be stored out of reach of children – risk of suffocation. The appliance must be disconnected from the power supply before any installation operation – the risk of electric shock. During installation, make sure the appliance does not damage the power cable – the risk of fire or electric shock. Only activate the appliance when the installation has been completed.
Do not remove the appliance from its polystyrene foam base until the time of installation.
Do not install the appliance behind a decorative door – the risk of fire.
if the range is placed on a base, it must be leveled and fixed to the wall by the retention chain provided, to prevent the appliance from slipping from the base.
WARNING: In order to prevent the appliance from tipping, the retention chain provided must be installed. Refer to the instructions for installation.
ELECTRICAL WARNINGS
The rating plate is on the front edge of the oven (visible when the door is open).
It must be possible to disconnect the appliance from the power supply by unplugging it if the plug is accessible, or by a multi-pole switch installed upstream of the socket in accordance with the wiring rules and the appliance must be earthed in conformity with national electrical safety standards.
Do not use extension leads, multiple sockets or adapters. The electrical components must not be accessible to the user after installation. Do not use the appliance when you are wet or barefoot. Do not operate this appliance if it has a damaged power cable or plug, if it is not working properly, or if it has been damaged or dropped.
If the supply cord is damaged, it must be replaced with an identical one by the manufacturer, its service agent or similarly qualified persons in order to avoid a hazard -risk of electric shock.
If the power cable needs to be replaced, contact an authorized service center.
WARNING: Ensure that the appliance is switched off before replacing the lamp to avoid the possibility of electric shock.
CLEANING AND MAINTENANCE
WARNING: Ensure that the appliance is switched off and disconnected from the power supply before performing any maintenance operation; never use steam cleaning equipment -risk of electric shock.
Do not use harsh abrasive cleaners or metal scrapers to clean the door glass since they can scratch the surface, which may result in shattering of the glass.
Do not use abrasive or corrosive products, chlorine-based cleaners, or pan scourers.
Make sure the appliance has cooled down before cleaning or performing maintenance. – the risk of burns.
WARNING: Switch off the appliance before replacing the lamp – the risk of electric shock. DISPOSAL OF PACKAGING MATERIALS
The packaging material is 100% recyclable and is marked with the recycle symbol. The various parts of the packaging must therefore be disposed of responsibly and in full compliance with local authority regulations governing waste disposal.
DISPOSAL OF HOUSEHOLD APPLIANCES
This appliance is manufactured with recyclable or reusable materials. Dispose of it in accordance with local waste disposal regulations.
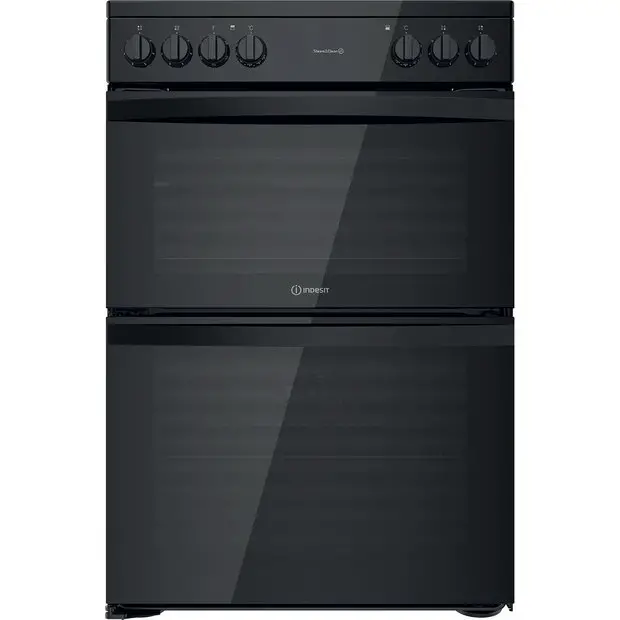
PRODUCT DESCRIPTION

- Glass-ceramic hob
- Control panel
- Runners for accessories (the level is indicated on the wall of the cooking compartment)
- Removable Inner Door Glass
- Main oven door
CONTROL PANEL:
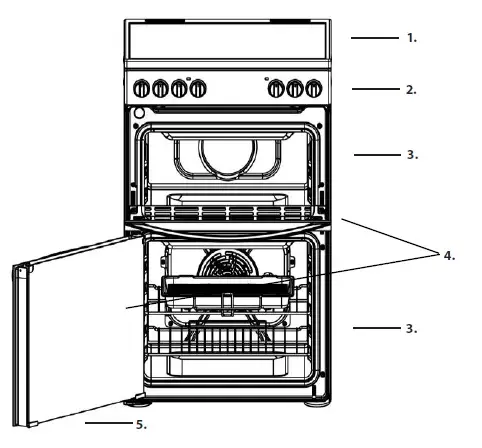
ACCESSORIES
ANTI-STICK TRAY:

GRID:
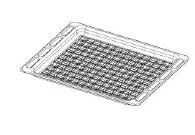
KIT GRILL PAN:
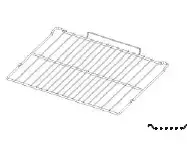
The number and type of accessories may The number and type of accessories may vary depending on which model vary depending on which model
is purchased. Other accessories that are is purchased. Other accessories that are not supplied can be purchased separately from the After-sales Service. separately from After-sales Service.
Grill Pan Handle:
The grill pan handle is detachable from the pan to facilitate cleaning and storage. Fix the panhandle securely before use:
- Fit the handle to the grill pan so that the external ‘hooks’ embrace the edge of the pan (fig. 1)
- Make sure that the middle part of the handle fits exactly the protruding support of the pan (fig .2)
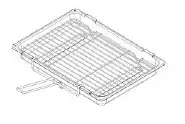
and holds the pan from the bottom. The food must be placed on the rack in the grill pan. Position the grill pan on top of the oven rack. The best results are achieved following the cooking table. Pouring a little water into the grill pan will make the collection of grease particles more efficient and prevent the formation of smoke.
INSTALLATION TIPS
This appliance must be earthed.
Mains Connection:
Your cooker should have been checked to ensure that the voltage corresponds with your supply voltage, this is stated on the rating plate, which is situated on the outer rear panel.
The model number and serial number are located on the front of the cooker, as shown on the Feature’s page.
The cooker must be connected by a competent person such as one who is a, NICEIC registered contractor to a suitable double-pole control unit with a minimum rating of 32A and a minimum contact clearance of 3mm
(applicable to newer properties, older properties where a 30A double pole control unit and a minimum contact clearance of 3mm is acceptable).
The double pole control unit should be fitted
adjacent to the cooker, in accordance with IEE regulations. The control unit must be within 2 meters of but not directly above the appliance and should be easily accessible in the event of an emergency. The power supply cable should conform to B.S.6004 with a conductor size of 6mm2, minimum.
Access to the mains terminals is gained by removing the rear access cover. The main cable must pass through the cable clamp adjacent to the terminal block. A sufficient cable should be used to allow the cooker to be pulled out for servicing. Ensure that the mains cable is routed away from any brackets affixed to the rear panel and is not trapped to the rear wall when pushing the cooker into position between cabinets.
This operation must be performed by a qualified technician.
Before moving your cooker check that it is cool, and switch off at the cooker control unit. Movement of your cooker is most easily achieved by lifting the front as follows:
Take care in moving the cooker as it is heavy. Take care to ensure that any floor covering is not damaged.
Splashplate optional, apply to Parts Department (see Back Cover for a contact number.)
The following instructions should be read by a qualified technician to ensure that the appliance is installed, regulated, and technically serviced correctly in compliance with current regulations.
Positioning
Important: This unit may be installed and used only in permanently ventilated rooms according to the British Standards Codes Of Practice: B.S. 6172/B.S. 5440, Par. 2 and B.S. 6891 Current Editions. The following requirements must be observed:
- The cooker should not be installed in a bed-sitting room with a volume of less than 20m3. If it is installed in a room of volume less than 5m3 an air vent of effective area of 110cm2 is required, if it is installed in a room of volume between 5m3 and 10m3 a supplementary air vent area of 50cm2 is required, if the volume exceeds 11m3 no air vent is required. However, if the room has a door or a window that opens directly to the outside no air vent is required even when the volume is between 5m3 and 11m3.
- During prolonged use of the appliance, you may consider it necessary to open a window to the outside to improve ventilation.
- If there are other fuel-burning appliances in the same room, B.S.5440 Part 2 Current Edition, should be consulted to determine the requisite air vent requirements.
FIRST TIME USE DAILY USE
MAIN OVEN
To heat the oven turn the knob clockwise, selecting the require temperature between 80°C (176°F) and 250°C (482°F) as recommended in the temperature chart. The pilot light will immediately come on and remain on until the oven reaches the required temperature. This light will then automatically go off and on during cooking as the oven thermostat maintains the correct temperature.
It should be noted that at the end of the cooking period there may be a momentary puff of steam when the oven door is opened. This will disperse in a few seconds and is a perfectly normal characteristic of an oven with a good door seal. Since a circulaire fan oven heats up more quickly,and generally cooks food at a lower temperature than a conventional oven, pre-heating is often unnecessary. However, foods such as bread, scones, Yorkshire pudding, do benefit from being placed in a pre-heated oven. The ‘oven temperature charts’ are a guide only, giving approximate cooking temperatures and times. To suit personal taste and requirements, it may be necessary to increase or decrease temperatures by 10°C. Unless otherwise indicated in the charts food should be placed in a cold oven, i.e. without pre-heating. If food is placed in an already hot oven, the suggested cooking time should be reduced, depending on the type and quantity of food being cooked.
Oven positions
Since the distribution of heat in the circulaire fan oven is very even, most foods will cook satisfactorily on any shelf position, but the shelves should be evenly spaced.
The top oven rod shelf can be used in the main oven when cooking large quantities of food.
Food or utensils should Never be placed directly on the floor of the oven for cooking.
Never use more than 4 shelves in the oven as air circulation will be seriously restricted.To ensure oven circulation do not use meat pans larger than 390 x 300mm (15″x12″) and baking trays no larger than 330 x 255mm (13″x 10″), these should be positioned centrally on the oven shelf. Food should not be placed directly on the floor of the oven. To avoid unnecessary cleaning, rod shelves that are not in use should be removed from the oven.
Temperature and time
When all four shelves are used to cook large quantities of food for home freezing or parties, it may be necessary to increase the cooking times given in the temperature charts by a few minutes, to allow for the loss of heat due to extra time taken to load the oven, and the larger mass of food. Baking trays should have an equal gap at either side of the oven.
TOP OVEN
The top oven should be used to cook small quantities of food.The oven is designed so that the grill element operates at a reduced heat output, this is combined with a heating element situated underneath the floor of the oven.
To ensure even cooking of the food it is important that cooking utensils are positioned correctly on the oven shelf so that the element is directly above.
There are two cooking positions, the shelf placed on runner 1 or 2 (from the base), do not use shelves upside down.
Food/utensils must not be placed directly on the oven floor.
There should always be at least 25mm (1in) between the top of the food and the grill element.
Warning: Items stored in top oven will get hot when main oven is in use.
Operation
To heat the oven, turn the control knob clockwise. The top oven pilot light will come on and remain on until the oven reaches the required temperature. The pilot light will automatically go on and off during cooking as the thermostat maintains the correct temperature. Do not use the grill pan as a meat pan in the top oven as air circulation will be seriously restricted. Top oven as a warming compartment for plates Place the plates/dishes on the shelf, positioned on runner 1, turn top oven control to 100°C for 10-15 minutes. Never use grill control.
When the cooker has first used an odor may be emitted, this will cease after a period of use. When first using the cooker ensure that the room is well ventilated (e.g. open a window or use an extractor fan) and that persons who may be sensitive to the odor avoid any fumes. It is suggested that any pets be removed from the room until the smell has ceased. This odor is due to the temporary finish on oven liners and elements and also any moisture absorbed by the insulation.
USING THE GLASS CERAMIC HOB :
The glue applied on the gaskets leaves traces of grease on the glass. Before using the appliance, we recommend you remove these with a special non-abrasive cleaning product. During the first few hours of use there may be a smell of rubber which will disappear very quickly.
Switching the cooking zones on and off:
To switch on a cooking zone, turn the corresponding knob in a clockwise direction. To switch it off again, turn the knob in an anticlockwise direction until it is in the “0” position. If the ELECTRIC HOTPLATE ON indicator light is lit, this shows that at least one hotplate on the hob is switched on.
Cooking azones:
The hob is equipped with electric radiant heating elements. When they are in use the following items on the hob become red.
- The cooking zone.
- The residual heat indicator light: this indicates that the temperature of the corresponding cooking zone is greater than 60°C, even when the heating element has been switched off but is still hot.
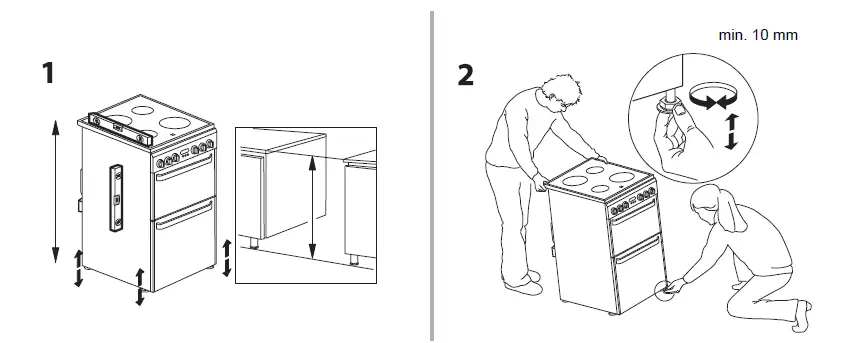
Cooking zones with radiant heating elements:
They have similar properties to gas burners: they are easy to control and reach set temperatures quickly, allowing you to actually see the power they are providing. Turn the corresponding knob in a clockwise direction, to a position between 1 and 6.
| Setting | Normal or Fast Plate |
| 0 | Off |
| 1 | Cooking vegetables, fish |
| 2 | Cooking potatoes (using steam) soups, chickpeas, beans. |
| 3 | Continuing the cooking of large quantities of food, minestrone |
| 4 | For roasting (average) |
| 5 | For roasting (above average) |
| 6 | For browning and reaching a boil in a short time. |
PRACTICAL ADVICE ON USING THE HOB:
- Use pans with a thick, flat base to ensure that they adhere perfectly to the cooking zone.

- Always use pans with a diameter that is large enough to cover the hotplate fully, in order to use all the heat produced.

- Always make sure that the base of the pan is completely clean and dry: this ensures that the pans adhere perfectly to the cooking zones and that both the pans and the hob last for a longer period of time.
- Avoid using the same cookware that is used on gas burners: the heat concentration on gas burners may have warped the base of the pan, causing it not to adhere to the surface correctly.
- Never leave a cooking zone switched on without a pan on top of it, as doing so may cause the zone to become damaged.
| Ratings of Cooking Zones | |||
| Front Left | Front Right | Back Left | Back Right |
| Ceramic 1800 W
180 mm diameter |
Ceramic 1200 W
140mm diameter |
Ceramic 1200 W
140mm diameter |
Ceramic 1800 W
180 mm diameter |
FUNCTIONS & DAILY USE
SELECT A FUNCTION
To select a function, turn the selection knob to the symbol for the function you require.
TOP OVEN
CONVENTIONAL
For cooking any kind of dish on one shelf only.
 BOTTOM:
This function can be used to finish cooking filled pies or to thicken soups. Use this function for the last 10/15 minutes of cooking.
LEFT GRILL
For grilling small food like bacon or toasting bread. The grill pan is placed on top of the top oven cavity shelf. The shelf position can be adjusted to allow for grilling different types of food.

GRILL:
For grilling steaks, kebabs and sausages, cooking vegetables au gratin or toasting bread. When grilling meat, we recommend using a drip tray to collect the cooking juices: Position the pan on any of the levels below the wire shelf and add 200 ml of drinking water.

MAIN OVEN – FAN COOKING:
This control switches on the main oven. To select this control switches on the main oven. To select Fan Cooking – Turn the control clockwise and selection Cooking – Turn the control clockwise and select any temperature between 90°C and Max. As than y temperature between 90°C and Max. As the control is turned the fan will start. The main oven light control is turned the fan will start. The main oven light will immediately come on. will immediately come on.
The thermostat light indicates that the main oven is thermostat light indicates that the main oven is heating. When it turns off, the temperature inside the heating. When it turns off, the temperature inside the oven has reached the setting made with the main oven knob. At this point, the light will turn on and off the oven knob. At this point, the light will turn on and off as the oven maintains the temperature at a constant level. level.
The fan and the oven interior light will remain onThe fan and the oven interior light will remain on throughout cooking. The red main oven thermostat throughout cooking. The red main oven thermostat light will come on until the oven reaches the required light will come on until the oven reaches the required temperature. It will then cycle off and on as the oven temperature. It will then cycle off and on as the oven thermostat maintains the correct temperature.a thermostat maintains the correct temperature.
The heat for fan cooking in the main oven the heat for fan cooking in the main oven is provided by an element situated at the back of the provided by an element situated at the back of the oven, around the fan.oven, around the fan.
Fan cooking is ideal for large poultry or joints fan cooking is ideal for large poultry or joints of meat, reducing cooking times and often eliminating meat, reducing cooking times, and often eliminating the need for pre-heating the oven. It is also ideal for the need for pre-heating the oven. It is also ideal for batch cooking where food is cooked on more than one level, because the forced circulation of hot Airone level because the forced circulation of hot air gives an even temperature from the top to the bottom gives an even temperature from the top to the bottom of the oven.of the oven.
FORCED AIRFORCE AIR:
For cooking different foods on multiple shelves (maximum of four) at the same time. This function can be used to cook different foods without odours being transferred from one food to another.

COOKING TABLE
MAIN OVEN


TOP OVEN:

ACCESSORIES:
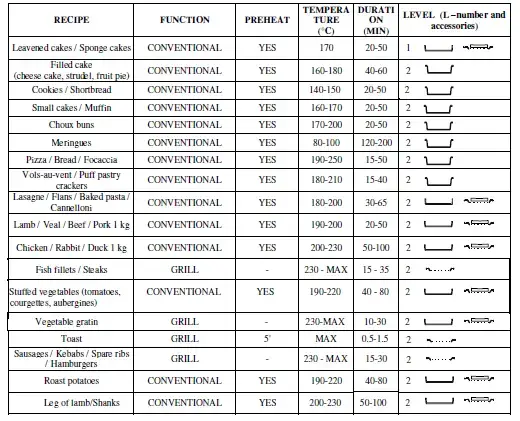
CLEANING AND MAINTENANCE
Cleaning the glass door with 2 panels
TOP OVEN DOORS
- Open the door to .30° RemovingRemoving the retaining training bar depress carefully the clips on both sides of the bar.B NPull the trim up gently until the retainer is released.

- Carefully slide the first inner glass towards you, taking care not to allow the glass to fall.

- Now the external glass panel can be washed.
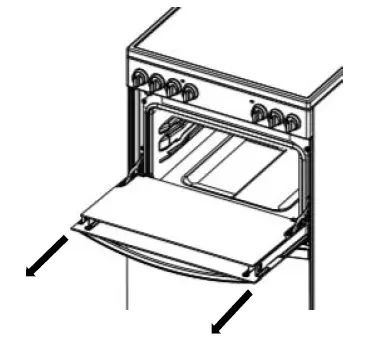
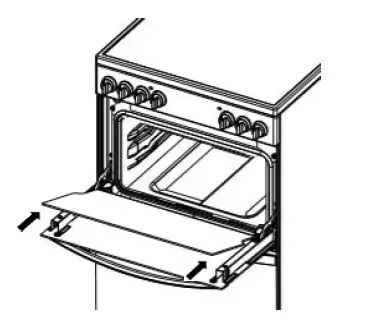
TURN OFF THE MAIN SWITCH AND ENSURE THE COOKER IS COLD BEFORE CLEANING. BEFORE SWITCHING ON AGAIN, ENSURE THAT ALL CONTROLS ARE IN THE OFF POSITION.
- Do not use steam cleaning equipment. Use protective gloves during all operations.
- Carry out the required operations when the oven is cold.
Disconnect the appliance from the power supply. - Do not use wire wool, abrasive scourers or abrasive/corrosive cleaning agents, as these could damage the surfaces of the appliance.
Disconnect the appliance from the power supply.
CLEANING THE CERAMIC HOB
To reduce the amount of cleaning always ensure that the hob and cooking utensils are clean and dry before use. Regular use of cleaner conditioner is recommended for proper care and protection of the hob surface. Apply conditioner before using the hob for the first time. It contains a mild cleaning agent so that subsequent applications may clean off soil and apply a protective film at the same time. For stubborn stains or heavy soiling use any of the special materials, and finish off with conditioner.
CLEANING THE OVEN SURFACE
EXTERIOR SURFACES
- Clean the surfaces with a damp microfibre cloth.If they are very dirty, add a few drops of pH-neutral detergent. Dry them with a dry cloth.
- Do not use corrosive or abrasive detergents. If any of these products inadvertently comes into contact with the surfaces of the appliance, clean immediately with a damp microfibre cloth.
INTERIOR SURFACES:
- After every use, leave the oven to cool and then clean it, preferably while it is still warm, to remove any deposits or stains caused by food residues To dry any condensation that has formed as a result of cooking foods with high water content, let the oven to cool completely and then wipe it with a cloth or sponge.
- Clean the glass in the door with a suitable liquid detergent.
ACCESSORIES
Soak the accessories in a washing-up liquid solution after use, handling them with oven gloves if they are still hot. Food residues can be removed using a washing-up brush or a sponge.
REPLACING THE LIGHT:
- Disconnect the oven from the power supply.
- Unscrew the cover from the light, replace the bulb and screw the cover back on the light.
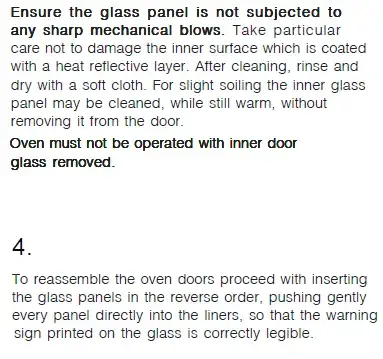
- Reconnect the oven to the power supply. NotNote: Use 40 e: Use 40 W/230 type G9

Steam & Clean:
The action of the steam released during this special low-temperature cleaning cycle allows dirt and food residues to be removed with ease. Pour 200 ml of drinking water on the bottom of the oven and set the temperature at 90°C°C for 20′. Activate the function “CONVENTIONAL” after 20′ switch off the oven and let it cool down for 15′.
TROUBLESHOOTING
What to do if…
Possible reasons
Solutions
| The oven is not working. | Power cut.
Disconnection from the mains. |
Check for the presence of mains electrical power and whether the oven is connected to the electricity supply.
Turn off the oven and restart it to see if the fault persists. |
USEFUL TIPS:
HOW TO READ THE COOKING TABLE
The table lists the best function, accessories and level to use to cook various different types of food. Cooking times start from the moment food is placed in the oven, excluding preheating
where required). Cooking temperatures and times are approximate and depend on the amount of food and the type of accessory used. Use the lowest recommended settings to begin with and, if the food is not cooked enough, then switch to higher settings. Use the accessories supplied and preferably dark-colored metal cake tins and baking trays. You can also use Pyrex or stoneware pans and accessories but bear in mind that cooking times will be slightly longer.
AFTER-SALES SERVICE
To receive assistance, call the number given on the warranty leaflet enclosed with the product or follow the instructions on our website. Be prepared to provide:
- a brief description of the problem;
- the exact model type of your product;
- the assistance code (the number following the word SERVICE on the identification plate attached to the product, which can be seen on the inside edge when the oven door is open);
- your full address;
- a contact telephone number.
Please note: If repairs are required, contact an authorized service center that is guaranteed to use original spare parts and perform repairs correctly.
Please refer to the enclosed warranty leaflet for more information on the warranty.
WWW A complete product specification, including the energy efficiency ratings for this oven, can be read and downloaded from our website www.indesit.com
WARNINGS
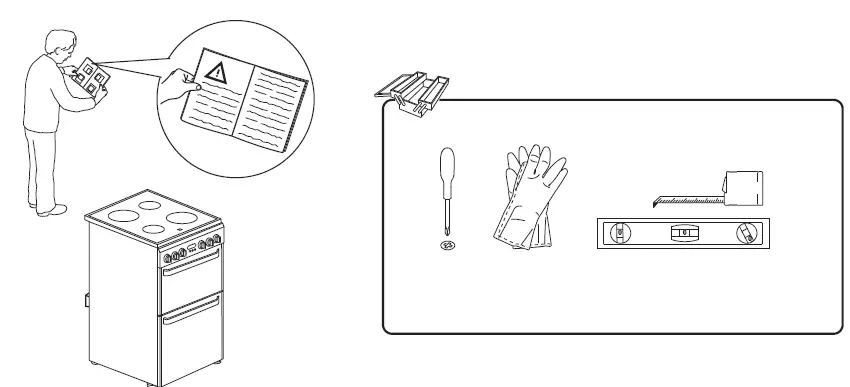
- Whirlpool EMEA S.p.A.
- Via Carlo Pisacane n.1 20016 Pero (MI), Italy
- VAT number: IT00693740425
- www.indesit.com
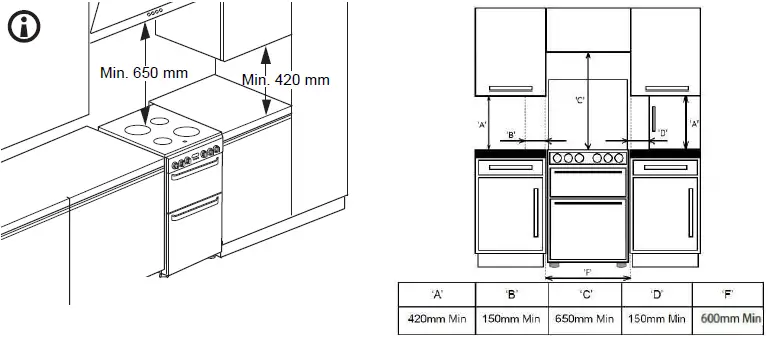
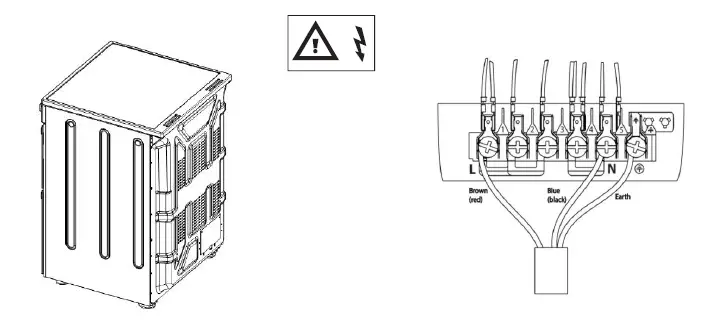

INDESIT Tumble Dryer
INDESIT Tumble Dryer
Installation
WHERE TO PUT YOUR DRYER
The dyer should be placed where air can freely circulate around it preferably near a window that can be opened to reduce the possibility of condensation occurring while the dryer is in use.
If the dryer is enclosed or fitted under a work surface a gap of at least 50 mm (2”) must be allowed above the top for the full width of the dryer and at least 25 mm (1”) either side. This allows air to enter into the rear air inlet. The dryer must never be run in a cupboard with a closed door.
ELECTRICAL CONNECTIONS
The socket must be grounded. The power supply cord should be checked periodically and, if required, replaced by a cord specially prepared for this dryer.
FLUFF FILTER
You must clean the fluff filter after EVERY drying cycle.
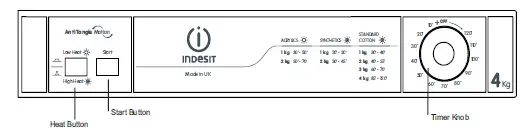
To remove the filter
Step 1 – Open the door of your dryer, remove the filer.
Step 2 – Clean any fluff deposits from the filter mesh, and refit the filter.
Step 3 – Make sure the filter is pushed fully home – NEVER run the dryer without the filter in position.
Failure to clean the filter after EVERY drying cycle will affect the drying performance of your machine.
The dryer must never be installed behind a lockable door, a sliding door or a door with a hinge on the opposite side to that of the dryer door.
This symbol reminds you to read this booklet.
VENTILATION
When the dryer is in use there has to be adequate ventilation to avoid the back flow of gases into the room from appliances burning other fuels, including open fires.
The vent tube should not exceed 2.4 metres in length.
The tube should be kept clear of the air intake vent and kinks or ‘U’ bends must be avoided as these will obstruct the tube and trap condensation.
Laundry
MAX LOAD SIZE
Do not load more than maximum capacity. These numbers refer to dry weight:
Natural fibres: 4kg max Synthetic fibre: 2kg max
WASH CARE LABELS
Look at the labels on your garments, especially when tumble drying for the first time. The following symbols are the most common:
May be tumble dried
Do NOT tumble dry
Tumble dry at high heat setting
Tumble dry at low heat setting
ITEMS NOT SUITABLE FOR TUMBLE DRYING
- Articles that contain rubber or rubber-like materials or plastic film, any flammable articles or objects that contain flammable substances.
- Glass fibres.
- Items which have been dry cleaned.
- Large bulky items (quilts, sleeping bags, etc). These expand when drying and prevent airflow through the dryer
Warnings
! This appliance has been designed and built according to international safety standards.
These warnings are given for safety reasons and must be followed carefully.
GENERAL SAFETY
- This appliance can be used by children aged from 8 years and above and persons with reduced physical, sensory or mental capabilities or lack of experience and knowledge if they have been
given supervision or instruction concerning use of the appliance in a safe way and understand the hazards involved. - This tumble dryer has been designed for home, and not professional, use.
- Do not touch the appliance while barefoot or with wet hands or feet.
- Unplug the machine by pulling on the plug, not the cord.
- After using the dryer, turn it off and unplug it. Keep the door closed to make sure that children do not use it as a toy.
- Children should be supervised to ensure that they do not play with the dryer.
- Cleaning and user maintenance shall not be made by children without supervision.
- Children of less than 3 years should be kept away from the appliance unless continuously supervised.
- The appliance must be installed correctly and have proper ventilation. The air intake at the front of the dryer should never be obstructed (see Installation).
- Never direct the vent tube outlet towards the air intake at the back of the machine
- Never allow the tumble dryer to recycle exhaust air.
- Never use the dryer on carpeting where the pile height would prevent air from entering the dryer from the base.
- Check to see if the dryer is empty before loading it.
- The back of the dryer could become very hot. Never touch it while in use.
- Do not use the dryer unless the filter is securely in place (see Maintenance
- Do not overload the dryer (see Laundry for maximum loads).
- Do not load items that are dripping wet.
- Carefully check all instructions on clothing labels (see Laundry).
- Do not tumble dry large, very bulky items.
- Do not tumble dry acrylic fibres at high temperatures.
- Complete each programme with its cool tumble phase.
- Do not turn off the dryer when there are still warm items inside.
- Clean the filter after each use (see Maintenance).
- Do not allow lint to collect around the dryer.
- Never climb on top of the dryer. It could result in damage.
- Always follow electrical standards and requirements. (see Installation).
- Always buy original spare parts and accessories (see Service).
TO MINIMIZE THE RISK OF FIRE IN YOUR TUMBLE DRYER, THE FOLLOWING SHOULD BE OBSERVED
- Tumble dry items only if they have been washed with detergent and water, rinsed and been through the spin cycle. It is a fire hazard to dry items that HAVE NOT been washed with water.
- Do not dry garments that have been treated with chemical products.
- Do not tumble dry items that have been spotted or soaked with vegetable or cooking oils, this constitutes a fire hazard. Oil-affected items can ignite spontaneously ,especially when exposed
to heat sources such as a tumble dryer. The items become warm, causing an oxidisation reaction with the oil, Oxidisation creates heat. If the heat cannot escape, items can become hot enough to catch fire. Piling, stacking or storing oil-effected items can prevent heat from escaping and so create a fire hazard.If it is unavoidable that fabrics containing vegetable or cooking oil or those that have been contaminated with hair care products be placed in a tumble dryer they should first be washed with extra detergent – this will reduce, but not eliminate the hazard. The cool tumble phase should be used to reduce the temperature of the items. They should not be removed from the dryer and piled or stacked while hot. - Do not tumble dry items that have previously been cleaned in or washed in, soaked in or soiled with petrol/gasoline, dry cleaning solvents or other flammable or explosive substances. Highly flammable substances
commonly used in domestic environments including cooking oil, acetone, denatured alcohol, kerosene, spot removers, turpentine, - waxes and wax removers. Ensure these items have been washed in hot water with an extra amount of detergent before being dried in the tumble dryer.
- Do not tumble dry items containing foam rubber (also known as latex foam), or similarly textured rubber like materials. Foam rubber materials can, when heated, produce fire by spontaneous combustion.
- Fabric softener or similar products should not be used in a tumble dryer to eliminate the effects of static electricity unless the practice is specifically recommended by the manufacturer of the fabric softener product.
- Do not tumble dry undergarments that contain metal reinforcements eg. bras with metal reinforcing wires. Damage to the tumble dryer can result if the metal reinforcements come loose during drying.
- Do not tumble dry rubber, plastic articles such as shower caps or babies waterproof covers, polythene or paper.
- Do not tumble dry rubber backed articles, clothes fitted with foam rubber pads, pillows, galoshes and rubber coated tennis shoes.
- Remove all objects from pockets, especially lighters.
WARNING: Never stop the dryer before the end of the drying cycle .The final part of a tumble dryer cycle without heat (cool down cycle) to ensure that the items are left at a temperature that ensures that the items will not be damaged.
Dryer Description
Control panel
The HEAT button selects drying temperature.
OUT: LOW heat IN: HIGH heat
The Start Button has to be pressed to start a programme or to restart a programme if you open the door during a drying cycle.
The TIMER knob sets the drying time: rotate it clockwise, NEVER COUNTER-CLOCKWISE, until the indictor is pointing to the drying time you want to select.
Set the program knob to OFF to switch off the machine.
CHOOSING A PROGRAMME
- Plug the dryer into the electrical socket.
- Sort your laundry according to fabric type.
- Open the door and make sure the filter is clean and in place.
- Load the machine and make sure items are not in the way of the door seal. Close door.
- Set the temperature with the HEAT button. High heat for Cotton and synthetics. Low heat for delicates and acrylics.
- Select a drying time by rotating the TIMER knob clockwise.
- Press to start button and the drying programme starts.
The tables below show APPROXIMATE drying times in minutes. Weights refer to dry garment weights.
| Cottons – High (full) Heat | |||
| Drying times 800-1000rpm spin in washing machine | |||
| 1kg | 2kg | 3kg | 4kg |
| 30-40mins | 40-55mins | 60-70mins | 85-120mins |
| Synthetics – High (full) Heat | |
| Drying times on reduced spin in washing machine | |
| 1kg | 2kg |
| 20-30mins | 30-45mins |
| Acrylics – Low (gentle) Heat | |
| Drying times on reduced spin in washing machine | |
| 1kg | 2kg |
| 30-50mins | 50-70mins |
| Power Consumption | |||
| Off-mode (Po) – Watts | 0.00 | ||
| Left-on mode (Pl) – Watts | 0.00 | ||
| Programmes | Kg | kWh | Minutes |
| Standard Cotton* | 4 | 2.95 | 101 |
| Standard Cotton | 2 | 1.40 | 51 |
| Synthetics | 2 | 0.84 | 35 |
| *This is the reference programme for the energy label and suitable to dry normal wet cotton laundry. This is the most efficient programme in terms of energy consumption for drying wet cotton laundry. | |||
This data is also available on the website http://www.INDESIT.com/INDESIT
Troubleshooting
Before you call the service centre go through the following troubleshooting suggestions:
PROBLEM:
The dryer won’t start.
POSSIBLE CAUSES/SOLUTION:
- The plug is not in the socket or making contact.
- There has been a power failure.
- The fuse has blown. Try to plug another appliance into the socket.
- You are using an extension cord? Try to plug the dryer directly into the socket.
- The timer knob has not been set properly.
- The start button has not been pressed.
- The start button was pressed with the door open. Make sure the door is closed before pressing the start button.
PROBLEM:
It is taking a long time to dry.
POSSIBLE CAUSES/SOLUTION:
- The filter has not been cleaned.
- The temperature setting is not correct.
- The correct time has not been selected.
- The vent tube or air intake vent is obstructed.
- The items were too wet.
- The dryer was over loaded.
DISPOSAL OF OLD ELECTRICAL APPLIANCES
The European Directive 2002/96/EC on Waste Electrical and Electronic Equipment (WEEE) requires that old household electrical appliances must not be disposed of in the normal unsorted municipal waste stream. Old appliances must be collected separately in order to optimise the recovery and recycling of the materials they contain and reduce the impact on human health and the environment.
The crossed out “wheeled bin” symbol on the product reminds you of your obligation that when you dispose of the appliance
it must be separately collected. Consumers should contact their local authority or retailer for information concerning the
correct disposal of their old appliance
Repairs and After Sales
For product help and advice, repairs, spare parts or accessories, we’re here to help.
For local repair engineers – 03448 111 606
ROI – 0818 313 413
UK standard local rate applies
ROI local Irish rate applies
For Parts and Accessories visit: parts.indesit.co.uk/shop
Please remember to register your appliance at www.indesitservice.co.uk to activate your 10 year parts guarantee
How to find your model and serial number:
DOWNLOAD RESOURCES
- INDESIT Tumble Dryer [pdf] Instruction Manual Tumble Dryer
- Read more: https://manuals.plus/indesit/tumble-dryer-manual#ixzz7ghMDyGM0
SPECIFICATION
| Product Specifications | Description |
|---|---|
| Brand | Indesit |
| Product Name | Tumble Dryer |
| Installation Requirements | Proper ventilation, grounded socket, gap of at least 50mm above the top and 25mm either side if fitted under a work surface |
| Fluff Filter Maintenance | Clean after EVERY drying cycle |
| Laundry Capacity | Natural fibres: 4kg max, Synthetic fibre: 2kg max |
| Wash Care Labels | May be tumble dried, Do NOT tumble dry, Tumble dry at high heat setting, Tumble dry at low heat setting |
| Items Not Suitable for Tumble Drying | Articles that contain rubber or rubber-like materials or plastic film, any flammable articles or objects that contain flammable substances, Glass fibres, Items which have been dry cleaned, Large bulky items (quilts, sleeping bags, etc) |
| Safety Warnings | Follow general safety precautions, keep away from children, proper installation and ventilation, do not overload or use on wet items, clean filter after each use, do not use fabric softener, do not tumble dry certain materials, do not stop dryer before end of cycle |
| Control Panel | HEAT button for temperature selection, TIMER knob for drying time, Start Button to start or restart program |
| Programme Selection | Plug in dryer, sort laundry by fabric type, clean filter, load machine, set temperature and drying time, press start button |
| Approximate Drying Times | Cottons – High (full) Heat: 30-40mins for 1kg, 40-55mins for 2kg, 60-70mins for 3kg, 85-120mins for 4kg |
| Power Consumption | Not provided in manual |
| Troubleshooting | Not provided in manual |
FAQ’S
Why is my Indesit dryer not drying my clothes?
We recommend the following: Ensure that the vent hose is not blocked or crushed. Ensure that your Indesit washer dryer is not being overfilled with clothing as this will impair the performance. Double check the heat switch on your dryer is set to the appropriate position.
Why is my dryer not heating up Indesit?
Failure to empty the water container can result in your Indesit machine not heating (your clothes may still be wet at the end of the drying cycle). To empty your water container, simply pull the container out towards you and remove it fully from the dryer.
How do I reset my Indesit tumble dryer?
Sometimes it may be on the back panel. So you won’t need to remove. It. To reset the heat on your tumble dryer press the red button in if it has tripped you should hear a click a.
Why is my dryer running but not heating?
Common reasons for an electric or gas dryer not heating are a tripped circuit breaker, clogged vent, and no gas flow. Other potential reasons include a faulty thermal fuse and broken heating element.
What is the button for on Indesit tumble dryer?
The HEAT button selects drying temperature. The Start Button has to be pressed to start a programme or to restart a programme if you open the door during a drying cycle.
What do the symbols on a tumble dryer mean?
A square with a circle inside means that the item can be safely tumble dried, while the number of dots inside the tumble dry symbol indicates what temperature setting to use: one dot stands for low heat, two dots for medium, and three for high heat setting. No dot means that you can tumble dry your clothes on any heat.
What do all the laundry symbols mean?
Washing temperature symbols
A single dot inside, this indicates an item should be washed cold at 85ºF (30ºC). Two dots indicate a warm wash temperature of 105ºF (40ºC). Three dots show a warm/hot wash of 120ºF (50ºC). Four dots mean a hot 140ºF (60ºC) wash. Five dots indicate a sanitizing 160ºF (70ºC) wash.
Do not tumble dry symbol meaning?
If your garment’s care label is showing the do not tumble dry laundry symbol, it means that the garment is delicate, cannot be placed in the dryer, and must be air or line dried. Tumble drying a delicate garment can lead to shrinkage, pilling, and other types of damage.
How do I clean my Indesit condenser dryer filter?
Dryer. Okay so first things first let’s clean out the lint filter. Which you find just inside the door and it simply lifts out and all you have to do is throw. All this slop in the bin.
How do I know if my dryer belt is broken?
First off if your drum doesn’t turn. It’s likely that your belt is either broken or off so you’re gonna want to get into that and remove the drum.
Can you use tumble dryer without belt?
Because the belt is what essentially rotates your drum and lets your clothes dry, the appliance will not be able to dry your clothes without it. It has a broken motor. Your dryer motor is what turns the belt that turns the tumbler. If the motor is broken, the dryer drum won’t turn.
Where is a dryer belt located?
The dryer belt goes around the outside of the drum and is looped onto a drive pulley attached to the dryer motor shaft which drives the belt, and around an idler pulley which applies tension to the belt.
What should I do to minimize the risk of fire in my tumble dryer?
To minimize the risk of fire in your tumble dryer, you should tumble dry items only if they have been washed with detergent and water, rinsed and been through the spin cycle. It is a fire hazard to dry items that HAVE NOT been washed with water. Do not dry garments that have been treated with chemical products. Do not tumble dry items that have been spotted or soaked with vegetable or cooking oils, this constitutes a fire hazard.
How do I choose a program for my Indesit Tumble Dryer?
To choose a program for your Indesit Tumble Dryer, plug the dryer into the electrical socket. Sort your laundry according to fabric type. Open the door and make sure the filter is clean and in place. Load the machine and make sure items are not in the way of the door seal. Close door. Set the temperature with the HEAT button. High heat for Cotton and synthetics. Low heat for delicates and acrylics. Select a drying time by rotating the TIMER knob clockwise. Press to start button and the drying programme starts.
What should I do if my dryer is not working properly?
If your dryer is not working properly, consult the troubleshooting section of the manual for suggestions on how to solve common problems before calling the service center.
VIDEO
INDESIT Tumble Dryer
www://indesit.co.uk/
Indesit Washing Machine Instruction Manual
Installation
! This instruction manual should be kept in a safe place for future reference. If the washing machine is sold, transferred or moved, make sure that the instruction manual remains with the machine so that the new owner is able to familiarise himself/herself with its operation and features. ! Read these instructions carefully: they contain vital information relating to the safe installation and operation of the appliance.
Unpacking and levelling
Unpacking
1. Remove the washing machine from its packaging. 2. Make sure that the washing machine has not been damaged during the transportation process. If it has been damaged, contact the retailer and do not proceed any further with the installation process.  3. Remove the 3 protective screws (used during transportation) and the rubber washer with the corresponding spacer, located on the rear part of the appliance (see figure). 4. Close off the holes using the plastic plugs provided. 5. Keep all the parts in a safe place: you will need them again if the washing machine needs to be moved to another location. ! Packaging materials should not be used as toys for children.
Levelling
 1. Install the washing machine on a flat sturdy floor, without resting it up against walls, furniture cabinets or anything else. 2. If the floor is not perfectly level, compensate for any unevenness by tightening or loosening the adjustable front feet (see figure); the angle of inclination, measured in relation to the worktop, must not exceed 2°. Levelling the machine correctly will provide it with stability, help to avoid vibrations and excessive noise and prevent it from shifting while it is operating. If it is placed on carpet or a rug, adjust the feet in such a way as to allow a sufficient ventilation space underneath the washing machine.
Connecting the electricity and water supplies
Connecting the water inlet hose
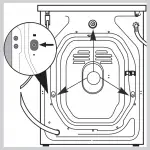 1. Connect the supply pipe by screwing it to a cold water tab using a ¾ gas threaded connection (see figure). Before performing the connection, allow the water to run freely until it is perfectly clear.
 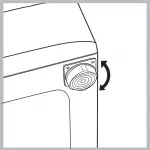 2. Connect the inlet hose to the washing machine by screwing it onto the corresponding water inlet of the appliance, which is situated on the top righthand side of the rear part of the appliance (see figure). 3. Make sure that the hose is not folded over or bent. ! The water pressure at the tap must fall within the values indicated in the Technical details table (see next page). ! If the inlet hose is not long enough, contact a specialised shop or an authorised technician. ! Never use second-hand hoses. ! Use the ones supplied with the machine.
Connecting the drain hose
 Connect the drain hose, without bending it, to a drainage duct or a wall drain located at a height between 65 and 100 cm from the floor;
 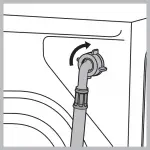 alternatively, rest it on the side of a washbasin or bathtub, fastening the duct supplied to the tap (see figure). The free end of the hose should not be underwater. ! We advise against the use of hose extensions; if it is absolutely necessary, the extension must have the same diameter as the original hose and must not exceed 150 cm in length.
Electrical connections
Before plugging the appliance into the electricity socket, make sure that:
- the socket is earthed and complies with all applicable laws;
- the socket is able to withstand the maximum power load of the appliance as indicated in the Technical data table (see opposite);
- the power supply voltage falls within the values indicated in the Technical data table (see opposite);
- the socket is compatible with the plug of the washing machine. If this is not the case, replace the socket or the plug.
! The washing machine must not be installed outdoors, even in covered areas. It is extremely dangerous to leave the appliance exposed to rain, storms and other weather conditions. ! When the washing machine has been installed, the electricity socket must be within easy reach. ! Do not use extension cords or multiple sockets. ! The cable should not be bent or compressed. ! The power supply cable must only be replaced by authorised technicians. Warning! The company shall not be held responsible in the event that these regulations are not respected.
The first wash cycle
Once the appliance has been installed, and before you use it for the first time, run a wash cycle with detergent and no laundry, using the wash cycle 2.
| Technical data | |
| Model | IWC 5125 |
| Dimensions | width 59.5 cm height 85 cm depth 52.5 cm |
| Capacity | from 1 to 5 kg |
| Electrical connections | please refer to the technical data plate fixed to the machine |
| Water connection | maximum pressure 1 MPa (10 bar) minimum pressure 0.05 MPa (0.5 bar) drum capacity 46 litres |
| Spin speed | up to 1200 rotations per minute |
| Test wash cycles in accordance with directives 1061/2010 and 1015/2010. | Programme 3: Cotton standard 60°C; Programme 4: Cotton standard 40°C. |
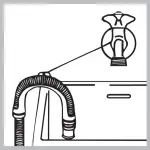 |
This appliance conforms to the following EC Directives: – 2004/108/CE (Electromagnetic Compatibility) – 2002/96/EC – 2006/95/EC (Low Voltage) |
3
Care and maintenance
Cutting off the water and electricity supplies
- Turn off the water tap after every wash cycle. This will limit wear on the hydraulic system inside the washing machine and help to prevent leaks.
- Unplug the washing machine when cleaning it and during all maintenance work.
Cleaning the washing machine
The outer parts and rubber components of the appliance can be cleaned using a soft cloth soaked in lukewarm soapy water. Do not use solvents or abrasives.
Cleaning the detergent dispenser drawer
 Remove the dispenser by raising it and pulling it out (see figure). Wash it under running water; this operation should be repeated frequently.
Caring for the door and drum of your appliance
- Always leave the porthole door ajar in order to prevent unpleasant odours from forming.
Cleaning the pump
The washing machine is fitted with a self-cleaning pump which does not require any maintenance. Sometimes, small items (such as coins or buttons) may fall into the pre-chamber which protects the pump, situated in its bottom part. ! Make sure the wash cycle has finished and unplug the appliance. To access the pre-chamber:  1. using a screwdriver, remove the cover panel on the lower front part of the washing machine (see figure);
 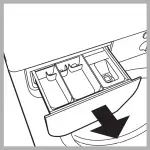 2. unscrew the lid by rotating it anti-clockwise (see figure): a little water may trickle out. This is perfectly normal; 3. clean the inside thoroughly; 4. screw the lid back on; 5. reposition the panel, making sure the hooks are securely in place before you push it onto the appliance.
Checking the water inlet hose
Check the inlet hose at least once a year. If there are any cracks, it should be replaced immediately: during the wash cycles, water pressure is very strong and a cracked hose could easily split open. ! Never use second-hand hoses.
4
Precautions and tips
! This washing machine was designed and constructed in accordance with international safety regulations. The following information is provided for safety reasons and must therefore be read carefully.
General safety
- This appliance was designed for domestic use only.
- This appliance can be used by children aged from 8 years and above and persons with reduced physical, sensory or mental capabilities or lack of experience and knowledge if they have been given supervision or instruction concerning use of the appliance in a safe way and understand the hazards involved. Children shall not play with the appliance. Cleaning and user maintenance shall not be made by children without supervision.
- Do not touch the machine when barefoot or with wet or damp hands or feet.
- Do not pull on the power supply cable when unplugging the appliance from the electricity socket. Hold the plug and pull.
- Do not open the detergent dispenser drawer while the machine is in operation.
- Do not touch the drained water as it may reach extremely high temperatures.
- Never force the porthole door. This could damage the safety lock mechanism designed to prevent accidental opening.
- If the appliance breaks down, do not under any circumstances access the internal mechanisms in an attempt to repair it yourself.
- Always keep children well away from the appliance while it is operating.
- The door can become quite hot during the wash cycle.
- If the appliance has to be moved, work in a group of two or three people and handle it with the utmost care. Never try to do this alone, because the appliance is very heavy.
- Before loading laundry into the washing machine, make sure the drum is empty.
Disposal
- Disposing of the packaging materials: observe local regulations so that the packaging may be re-used.
- The European Directive 2002/96/EC on Waste Electrical and Electronic Equipment, requires that old household electrical appliances must not be disposed of in the normal unsorted municipal waste stream. Old appliances must be collected separately in order to optimise the recovery and recycling of the materials they contain and reduce the impact on human health and the environment. The crossed out “wheeled bin” symbol on the product reminds you of your obligation, that when you dispose of the appliance it must be separately collected.
Consumers should contact their local authority or retailer for information concerning the correct disposal of their old appliance.
Description of the washing machine and starting a wash cycle
Control panel
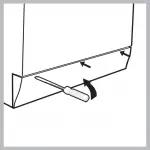 Detergent dispenser drawer: used to dispense detergents and washing additives (see “Detergents and laundry”). ON/OFF button: switches the washing machine on and off. WASH CYCLE knob: programmes the wash cycles. During the wash cycle, the knob does not move. FUNCTION buttons with indicator light: used to select the available functions. The indicator light corresponding to the selected function will remain lit. TEMPERATURE knob: sets the temperature or the cold wash cycle (see “Personalisation”). SPIN SPEED knob: sets the spin speed or exclude the spin cycle completely (see “Personalisation”). WASH CYCLE PROGRESS/DELAY TIMER indicator lights: used to monitor the progress of the wash cycle. The illuminated indicator light shows which phase is in progress. If the Delay Timer function has been set, the time remaining until the wash cycle starts will be indicated (see next page). DOOR LOCKED indicator light: indicates whether the door may be opened or not (see next page). START/PAUSE button with indicator light: starts or temporarily interrupts the wash cycles. N.B. To pause the wash cycle in progress, press this button; the corresponding indicator light will flash orange, while the indicator light for the current wash cycle phase will remain lit in a fixed manner. If the DOOR LOCKED
  indicator light is switched off, the door may be opened. To start the wash cycle from the point at which it was interrupted, press this button again. Standby mode This washing machine, in compliance with new energy saving regulations, is fitted with an automatic standby system which is enabled after a few minutes if no activity is detected. Press the ON-OFF button briefly and wait for the machine to start up again. Consumption in off-mode: 0,5 W Consumption in Left-on: 0,5
Indicator lights
The indicator lights provide important information. This is what they can tell you: Delayed start If the DELAY TIMER function has been activated (see “Personalisation”), after the wash cycle has been started the indicator light corresponding to the selected delay period will begin to flash: 3h 
 6h
6h 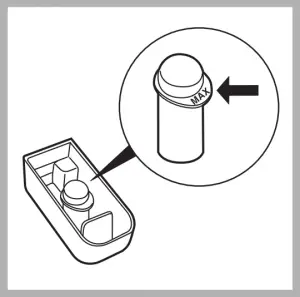 9h
9h  12h
12h 
 As time passes, the remaining delay will be displayed and the corresponding indicator light will flash: 3h 6h 9h 12h The set programme will start once the selected time delay has expired. Wash cycle phase indicator lights Once the desired wash cycle has been selected and has be-gun, the indicator lights switch on one by one to indicate which phase of the cycle is currently in progress. Wash Rinse Spin Drain End of wash cycle END Function buttons and corresponding indicator lights When a function is selected, the corresponding indicator light will illuminate. If the selected function is not compatible with the programmed wash cycle, the corresponding indicator light will flash and the function will not be activated. If the selected function is not compatible with another function which has been selected previously, the indicator light corresponding to the first function selected will flash and only the second function will be activated; the indicator light corresponding to the enabled option will remain lit. Door locked indicator light When the indicator light is on, the porthole door is locked to prevent it from being opened; make sure the indicator light is off before opening the door (wait approximately 3 minutes). To open the door during a running wash cycle, press the START/PAUSE button; the door may be opened once the DOOR LOCKED indicator light turns off.
Starting a wash cycle
1. Switch the washing machine on by pressing the ON/OFF button. All indicator lights will switch on for a few seconds, then they will switch off and the START/PAUSE indicator light will pulse. 2. Load the laundry and close the door. 3. Set the WASH CYCLE knob to the desired programme. 4. Set the washing temperature (see “Personalisation”). 5. Set the spin speed (see “Personalisation”). 6. Measure out the detergent and washing additives (see “Detergents and laundry”). 7. Select the desired functions. 8. Start the wash cycle by pressing the START/PAUSE button and the corresponding indicator light will remain lit in a fixed manner, in green. To cancel the set wash cycle, pause the machine by pressing the START/PAUSE button and select a new cycle. 9. At the end of the wash cycle the END indicator light will switch on. The door can be opened once the DOOR LOCKED indicator light turns off. Take out your laundry and leave the appliance door ajar to make sure the drum dries completely. Switch the washing machine off by pressing the ON/OFF button.
Wash cycles
Table of wash cycles
| Wash cycles | Description of the wash cycle | Max. temp. (°C) | Max. speed (rpm) | Detergents | Max. load (kg) | Residual dampness % | Energy consumption kWh | Total water lt | Cycle duration | |||
| Prewash | Wash | Fabric softener | Bleach | |||||||||
| Daily | ||||||||||||
| 1 | Cotton with prewash: extremely soiled whites. | 90° | 1200 | • | • | • | – | 5 | 53 | 1,76 | 61 | 145’ |
| 2 | Cotton: extremely soiled whites. | 90° | 1200 | – | • | • | • | 5 | 53 | 1,70 | 55 | 130’ |
| 3 | Cotton Standard 60° (1): heavily soiled whites and resistant colours. | 60° | 1200 | – | • | • | • | 5 | 53 | 0,87 | 47 | 165’ |
| 4 | Cotton Standard 40° (2): lightly soiled whites and delicate colours. | 40° | 1200 | – | • | • | • | 5 | 53 | 1,09 | 92 | 155’ |
| 5 | Coloured Cottons: lightly soiled whites and delicate colours. | 40° | 1200 | – | • | • | • | 5 | 53 | 0,75 | 50 | 85’ |
| 6 | Synthetics: heavily soiled resistant colours. | 60° | 800 | – | • | • | • | 3 | 44 | 0,78 | 33 | 105’ |
| 6 | Synthetics (3): lightly soiled resistant colours. | 40° | 800 | – | • | • | • | 3 | 44 | 0,49 | 32 | 95’ |
| 7 | Cotton Standard 20°: lightly soiled whites and delicate colours. | 20° | 1200 | – | • | • | • | 5 | – | – | – | 170’ |
| Special | ||||||||||||
| 8 | Wool: for wool, cashmere, etc. | 40° | 800 | – | • | • | – | 1,5 | – | – | – | 70’ |
| 9 | Silk/Curtains: for garments in silk and viscose, lingerie. | 30° | 0 | – | • | • | – | 1 | – | – | – | 55’ |
| 10 | Jeans | 40° | 800 | – | • | • | – | 3 | – | – | – | 60’ |
| 11 | Express: to refresh lightly soiled garments quickly (not suitable for wool, silk and clothes which require washing by hand). | 30° | 800 | – | • | • | – | 1,5 | 71 | 0,12 | 27 | 15’ |
| Sport | ||||||||||||
| 12 | Sport Intensive | 30° | 600 | – | • | • | – | 3 | – | – | – | 85’ |
| 13 | Sport Light | 30° | 600 | – | • | • | – | 3 | – | – | – | 60’ |
| 14 | Special Shoes | 30° | 600 | – | • | • | – | Max. 2 pairs | – | – | – | 55’ |
| Partial wash cycles | ||||||||||||
 |
Rinse | – | 1200 | – | – | • | • | 5 | – | – | – | 36’ |
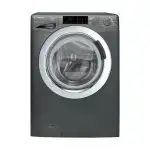 |
Spin + Drain | – | 1200 | – | – | – | – | 5 | – | – | – | 16’ |
The length of cycle shown on the display or in this booklet is an estimation only and is calculated assuming standard working conditions. The actual duration can vary according to factors such as water temperature and pressure, the amount of detergent used, the amount and type of load inserted, load balancing and any wash options selected. 1) Test wash cycle in compliance with directive 1061/2010: set wash cycle 3 with a temperature of 60°C. This cycle is designed for cotton loads with a normal soil level and is the most efficient in terms of both electricity and water consumption; it should be used for garments which can be washed at 60°C. The actual washing temperature may differ from the indicated value. 2) Test wash cycle in compliance with directive 1061/2010: set wash cycle 4 with a temperature of 40°C. This cycle is designed for cotton loads with a normal soil level and is the most efficient in terms of both electricity and water consumption; it should be used for garments which can be washed at 40°C. The actual washing temperature may differ from the indicated value. For all Test Institutes: 2) Long wash cycle for cottons: set wash cycle 4 with a temperature of 40°C. 3) Long wash cycle for synthetics: set wash cycle 6; with a temperature of 40°C. Cotton Standard 20° (wash cycle 7) ideal for heavily soiled cotton loads. The effective performance levels achieved at cold temperatures, which are comparable to washing at 40°, are guaranteed by a mechanical action which operates at varying speed, with repeated and frequent peaks. Express (wash cycle 11) this wash cycle was designed to wash lightly soiled garments quickly: it lasts just 15 minutes and therefore saves both energy and time. By selecting this wash cycle (11 at 30°C), it is possible to wash different fabrics together (except for wool and silk items), with a maximum load of 1,5 kg. Sport Intensive (wash cycle 12) is for washing heavily soiled sports clothing fabrics (tracksuits, shorts, etc.); for best results, we recommend not exceeding the maximum load indicated in the “Table of wash cycles”. Sport Light (wash cycle 13) is for washing lightly soiled sports clothing fabrics (tracksuits, shorts, etc.); for best results, we recommend not exceeding the maximum load indicated in the “Table of wash cycles”. We recommend using a liquid detergent and dosage suitable for a half-load. Special Shoes (wash cycle 14) is for washing sports shoes; for best results, do not wash more than 2 pairs simultaneously.
Personalization
Setting the temperature Turn the TEMPERATURE knob to set the wash temperature (see Table of wash cycles). The temperature may be lowered, or even set to a cold wash  . The washing machine will automatically prevent you from selecting a temperature which is higher than the maximum value set for each wash cycle. Setting the spin speed Turn the SPIN SPEED knob to set the spin speed for the selected wash cycle. The maximum spin speeds available for each wash cycle are as follows: Wash cycles Maximum spin speed Cottons 1200 rpm Synthetics 800 rpm Wool 800 rpm Silk drain only The spin speed may be lowered, or the spin cycle can be excluded altogether by selecting the symbol
 ![]() . The washing machine will automatically prevent you from selecting a spin speed which is higher than the maximum speed set for each wash cycle. Functions The various wash functions available with this washing machine will help to achieve the desired results, every time. To activate the functions: 1. Press the button corresponding to the desired function; 2. the function is enabled when the corresponding indicator light is illuminated. Note: If the indicator light flashes rapidly, this signals that this particular function may not be selected in conjunction with the selected wash cycle. Ec
. The washing machine will automatically prevent you from selecting a spin speed which is higher than the maximum speed set for each wash cycle. Functions The various wash functions available with this washing machine will help to achieve the desired results, every time. To activate the functions: 1. Press the button corresponding to the desired function; 2. the function is enabled when the corresponding indicator light is illuminated. Note: If the indicator light flashes rapidly, this signals that this particular function may not be selected in conjunction with the selected wash cycle. Ec![]() Time Selecting this option enables you to suitably adjust drum rotation, temperature and water to a reduced load of lightly soiled cotton and synthetic fabrics (refer to the “Table of wash cycles”). “Ec
Time Selecting this option enables you to suitably adjust drum rotation, temperature and water to a reduced load of lightly soiled cotton and synthetic fabrics (refer to the “Table of wash cycles”). “Ec![]() Time” enables you to wash in less time thereby saving water and electricity. We suggest using a liquid detergent suitably measured out to the load quantity. ! This function may not be used in conjunction with wash cycles 1, 2, 7, 8, 9, 10, 11, 12, 13, 14,
Time” enables you to wash in less time thereby saving water and electricity. We suggest using a liquid detergent suitably measured out to the load quantity. ! This function may not be used in conjunction with wash cycles 1, 2, 7, 8, 9, 10, 11, 12, 13, 14,![]() ,
, ![]() .
. ![]() Stain removal Bleaching cycle designed to remove the toughest stains. Please remember to pour the bleach into extra compartment 4 (see “Bleach cycle”). ! This function may not be used in conjunction with wash cycles 1, 8, 9, 10, 11, 12, 13, 14,
Stain removal Bleaching cycle designed to remove the toughest stains. Please remember to pour the bleach into extra compartment 4 (see “Bleach cycle”). ! This function may not be used in conjunction with wash cycles 1, 8, 9, 10, 11, 12, 13, 14,![]() .
. ![]() Extra rinse By selecting this option, the efficiency of the rinse is increased and optimal detergent removal is guaranteed. It is particularly useful for sensitive skin. ! This function may not be used in conjunction with wash cycles 11,
Extra rinse By selecting this option, the efficiency of the rinse is increased and optimal detergent removal is guaranteed. It is particularly useful for sensitive skin. ! This function may not be used in conjunction with wash cycles 11, ![]() .
. ![]() Delay timer This timer delays the start time of the wash cycle by up to 12 hours. Press the button repeatedly until the indicator light corresponding to the desired delay time switches on. The fifth time the button is pressed, the function will be disabled. N.B. Once the START/PAUSE button has been pressed, the delay time can only be modified by decreasing it until launching the set programme. ! This option is enabled with all programmes.
Delay timer This timer delays the start time of the wash cycle by up to 12 hours. Press the button repeatedly until the indicator light corresponding to the desired delay time switches on. The fifth time the button is pressed, the function will be disabled. N.B. Once the START/PAUSE button has been pressed, the delay time can only be modified by decreasing it until launching the set programme. ! This option is enabled with all programmes.
Detergents and laundry
Detergent dispenser drawer Good washing results also depend on the correct dose of detergent: adding too much detergent will not necessarily result in a more efficient wash, and may in fact cause build up on the inside of your appliance and contribute to environmental pollution. ! Do not use hand washing detergents because these create too much foam. ! Use powder detergent for white cotton garments, for pre-washing, and for washing at temperatures over 60°C. ! Follow the instructions given on the detergent packaging.  Open the detergent dispenser drawer and pour in the detergent or washing additive, as follows. compartment 1: Pre-wash detergent (powder) Before pouring in the detergent, make sure that extra compartment 4 has been removed. compartment 2: Detergent for the wash cycle (powder or liquid) Liquid detergent should only be poured in immediately prior to the start of the wash cycle. compartment 3: Additives (fabric softeners, etc.) The fabric softener should not overflow the grid. extra compartment 4: Bleach Bleach cycle ! Traditional bleach should be used on sturdy white fabrics, and delicate bleach for coloured fabrics, synthetics and for wool.
  This option is particularly useful for the removal of stubborn stains. Place extra compartment 4 (supplied) into compartment 1. When pouring in the bleach, be careful not to exceed the “max” level marked on the central pivot (see figure). To run the bleach cycle on its own, pour the bleach into extra compartment 4, set the “Rinse”
![]() programme and activate the “Stain removal”
programme and activate the “Stain removal” ![]() option. To bleach during a wash cycle, pour in the detergent and any fabric softener you wish to use, set the desired wash cycle and enable the “Stain removal”
option. To bleach during a wash cycle, pour in the detergent and any fabric softener you wish to use, set the desired wash cycle and enable the “Stain removal” ![]() option. The use of extra compartment 4 excludes the “Pre-wash” option.
option. The use of extra compartment 4 excludes the “Pre-wash” option.
Preparing the laundry
- Divide the laundry according to: – the type of fabric/the symbol on the label – the colours: separate coloured garments from whites.
- Empty all garment pockets and check the buttons.
- Do not exceed the listed values, which refer to the weight of the laundry when dry: see “Table of wash cycles”.
How much does your laundry weigh?
1 sheet 400-500 g 1 pillow case 150-200 g 1 tablecloth 400-500 g 1 bathrobe 900-1200 g 1 towel 150-250 g
Garments requiring special care Wool: all wool garments can be washed using programme 8, even those carrying the “hand-wash only” ![]() label. For best results, use special detergents and do not exceed 1,5 kg of laundry. Silk: use special wash cycle 9 to wash all silk garments. We recommend the use of special detergent which has been designed to wash delicate clothes. Curtains: fold curtains and place them in a pillow case or mesh bag. Use wash cycle 9. Jeans: Turn garments inside-out before washing and use a liquid detergent. Use programme 10. Load balancing system Before every spin cycle, to avoid excessive vibrations and to distribute the load in a uniform manner, the drum rotates continuously at a speed which is slightly greater than the washing rotation speed. If, after several attempts, the load is not balanced correctly, the machine spins at a reduced spin speed. If the load is excessively unbalanced, the washing machine performs the distribution process instead of spinning. To encourage improved load distribution and balance, we recommend small and large garments are mixed in the load.
label. For best results, use special detergents and do not exceed 1,5 kg of laundry. Silk: use special wash cycle 9 to wash all silk garments. We recommend the use of special detergent which has been designed to wash delicate clothes. Curtains: fold curtains and place them in a pillow case or mesh bag. Use wash cycle 9. Jeans: Turn garments inside-out before washing and use a liquid detergent. Use programme 10. Load balancing system Before every spin cycle, to avoid excessive vibrations and to distribute the load in a uniform manner, the drum rotates continuously at a speed which is slightly greater than the washing rotation speed. If, after several attempts, the load is not balanced correctly, the machine spins at a reduced spin speed. If the load is excessively unbalanced, the washing machine performs the distribution process instead of spinning. To encourage improved load distribution and balance, we recommend small and large garments are mixed in the load.
Troubleshooting
Your washing machine could fail to work. Before contacting the Technical Assistance Centre (see “Assistance”), make sure that the problem cannot be not solved easily using the following list.
| Problem: | Possible causes / Solutions: |
| The washing machine does not switch on. | • The appliance is not plugged into the socket fully, or is not making contact. • There is no power in the house. |
| The wash cycle does not start. | • The washing machine door is not closed properly. • The ON/OFF button has not been pressed. • The START/PAUSE button has not been pressed. • The water tap has not been opened. • A delayed start has been set (see “Personalisation”). |
| The washing machine does not take in water (the indicator light for the first wash cycle stage flashes rapidly). | • The water inlet hose is not connected to the tap. • The hose is bent. • The water tap has not been opened. • There is no water supply in the house. • The pressure is too low. • The START/PAUSE button has not been pressed. |
| The washing machine continuously takes in and drains water. | • The drain hose is not fitted at a height between 65 and 100 cm from the floor (see “Installation”). • The free end of the hose is under water (see “Installation”). • The wall drainage system is not fitted with a breather pipe. If the problem persists even after these checks, turn off the water tap, switch the appliance off and contact the Assistance Service. If the dwelling is on one of the upper floors of a building, there may be problems relating to water drainage, causing the washing machine to fill with water and drain continuously. Special anti-draining valves are available in shops and help to avoid this inconvenience. |
| The washing machine does not drain or spin. | • The wash cycle does not include draining: some wash cycles require the drain phase to be started manually. • The drain hose is bent (see “Installation”). • The drainage duct is clogged. |
| The washing machine vibrates a lot during the spin cycle. | • The drum was not unlocked correctly during installation (see “Installation”). • The washing machine is not level (see “Installation”). • The washing machine is trapped between cabinets and walls (see “Installation”). |
| The washing machine leaks. | • The water inlet hose is not screwed on properly (see “Installation”). • The detergent dispenser drawer is blocked (for cleaning instructions, see “Care and maintenance”). • The drain hose is not fixed properly (see “Installation”). |
| The “option” indicator lights and the “start/pause” indicator light flash, while one of the “phase in progress” indicator lights and the “door locked” indicator light will remain lit in a fixed manner. | • Switch off the machine and unplug it, wait for approximately 1 minute and then switch it back on again. If the problem persists, contact the Technical Assistance Service. |
| There is too much foam. | • The detergent is not suitable for machine washing (it should display the text “for washing machines” or “hand and machine wash”, or the like). • Too much detergent was used. |
Service
Before calling for Assistance:
- Check whether you can solve the problem alone (see “Troubleshooting”);
- Restart the programme to check whether the problem has been solved;
- If this is not the case, contact an authorised Technical Assistance Centre using the telephone number provided on the guarantee certificate.
! Always request the assistance of authorised technicians.
Have the following information to hand:
- the type of problem;
- the appliance model (Mod.);
- the serial number (S/N). This information can be found on the data plate applied to the rear of the washing machine, and can also be found on the front of the appliance by opening the door.
SPECIFICATION
| Model | IWC 5125 |
| Dimensions | width 59.5 cm, height 85 cm, depth 52.5 cm |
| Capacity | from 1 to 5 kg |
| Electrical connections | please refer to the technical data plate fixed to the machine |
| Water connection | maximum pressure 1 MPa (10 bar), minimum pressure 0.05 MPa (0.5 bar), drum capacity 46 litres |
| Spin speed | up to 1200 rotations per minute |
| Test wash cycles | Programme 3: Cotton standard 60°C; Programme 4: Cotton standard 40°C |
| EC Directives Conformance | 2004/108/CE (Electromagnetic Compatibility), 2002/96/EC, 2006/95/EC (Low Voltage) |
INDESIT WASHING MACHINE
FAQS
What is the difference between a washing machine and a dishwasher?
A washing machine is used for washing clothes, while a dishwasher is used for washing dishes.
What is the difference between a washing machine and an iron?
A washing machine is used for washing clothes, while an iron is used to remove creases from clothes.
What is the difference between a washing machine and a tumble dryer?
A washing machine is used for washing clothes, while a tumble dryer is used for drying clothes.
How long should a Indesit washing machine last?
Washing manufacturer Indesit say that they expect their products to last 7-8 years. As Indesit also owns the Hotpoint brand, it is fair to say that this standard likely applies to these machines too.
What is the quickest wash on a Indesit washing machine?
As well as the three full-load programs, the new MyTime washing machine offers five further FastCycles: Cotton 30°, Synthetics, Silk & Delicates, Wool, 15-minute Express. So there’s always an ideal solution for quickly cleaning a wide range of garments, even wool and delicates.
How long should a 40 wash take?
A 40°C wash usually takes between 1 hour and 30 minutes and 2 hours and 30 minutes, depending on the size of the load. This wash is considered a warm wash and uses a low spin speed but higher temperatures than a cold wash.
Why does my washing machine take 2 hours?
A washer that continuously takes too long to wash may have a malfunctioning load sense system, or greater problems with its control panel. There may also be issues with your water inlet valve, which pulls water into the appliance for each cycle.
Is quick wash good enough?
A quick wash naturally won’t clean as thoroughly as a full cycle. However, it would still be a good alternative if you just want to refresh your clothes or don’t deal with heavy stains.
Can you wash bedding at 60 if it says 40?
It is recommended that you wash your bedsheets in a hot wash, at least 60 degrees. The hotter that you wash your sheets, the more germs are removed meaning that your bedding will be properly clean and free of germs.
Why do eco washes take so long?
This is because the bulk of energy used by the machine comes from heating the water – the electricity needed to turn the drum or power the sprayers is comparatively much less. If the wash cycle is longer, the water doesn’t need to be heated up as much as shorter programmes.
What is the cheapest time to use a washing machine?
So, an alternative is to avoid peak laundry times: 4pm to 7pm. You could potentially save a few pennies per laundry load if you wash them in the morning, during the day (if you work from home), or later than 7pm in the evening.
Is 30 degrees a cold wash?
Is 30 degrees a cold wash? No, a 30ºC wash is generally considered a warm wash. A cold wash is below 20°C and is usually reserved for clothes that are very delicate.
Does a 30 degree wash clean clothes?
In tests, 30-degree programs cleaned better than 20-degree programs, but they still didn’t wash out some stains such as olive-oil-based stains as well as a 40-degree wash. Greasy stains lifted even better if put on a 60-degree cycle.
How long is eco time on Indesit washing machine?
Calculates exactly the right amount of water to use whatever the size of the load. The Synthetics 40 programme effectively removes stains from your synthetic items, using a low-temperature 40°cycle in just 59 minutes.
Is it cheaper to wash clothes after 7pm?
The most expensive time for you to wash or dry your clothes is between 4pm and 7pm, so try to avoid using your machines between these hours.
What better eco wash or quick wash?
The eco setting on mine heats to 40 then switches the heater off, a standard 40 cycle keeps the heater on to maintain the temperature using more electric. It also does less agitation, as said above. Quick wash tends to be for smaller loads so it’s not the wash I would use for a large load.
What uses the most electricity?
The Top 5 Biggest Users of Electricity in Your Home
Air Conditioning & Heating. Your HVAC system uses the most energy of any single appliance or system at 46 percent of the average U.S. home’s energy consumption.
Water Heating.
Appliances.
Lighting.
Television and Media Equipment.
What temp should you wash bedding?
When washing bedding you want to wash at 60 degrees on a long wash ie 2 hours plus to make sure that any sweat, dander, dust or other nasties are killed and then removed. Wash all bedding on a full cycle 60-degree wash. Colder temperatures may not kill all the bacteria or remove sweat as effectively
Do washing machines use electricity when not in use?
Phantom energy: Do appliances use electricity when plugged in but turned off? The short answer is yes! A variety of different electronic devices and appliances, including televisions, toasters, lamps, and more, when plugged in, can consume electricity even when they’re turned off.
Which wash cycle uses least electricity?
This is the easiest way to reduce electricity use, regardless of kind of washing machine you have. Washing with a cold cycle can save you more than 80% of your energy consumption and cost. This is because most of the energy is used just to heat up the water in warm washes.
What should I do if my Indesit washing machine has been damaged during transportation?
If your washing machine has been damaged during transportation, contact the retailer and do not proceed any further with
How do I level my Indesit washing machine?
To level your washing machine, install it on a flat sturdy floor, without resting it up against walls, furniture cabinets or anything else. If the floor is not perfectly level, compensate for any unevenness by tightening or loosening the adjustable front feet. The angle of inclination, measured in relation to the worktop, must not exceed 2°.
How do I connect the water inlet hose to my Indesit washing machine?
To connect the water inlet hose, screw it onto a cold water tap using a ¾ gas threaded connection. Before performing the connection, allow the water to run freely until it is perfectly clear. Connect the inlet hose to the washing machine by screwing it onto the corresponding water inlet of the appliance, which is situated on the top righthand side of the rear part of the appliance.
Can I use second-hand hoses for my Indesit washing machine?
No, you should never use second-hand hoses for your washing machine. Use only the ones supplied with the machine.
How do I connect the drain hose to my Indesit washing machine?
Connect the drain hose, without bending it, to a drainage duct or a wall drain located at a height between 65 and 100 cm from the floor; alternatively, rest it on the side of a washbasin or bathtub, fastening the duct supplied to the tap. The free end of the hose should not be underwater.
Can I use hose extensions for my Indesit washing machine?
We advise against the use of hose extensions; if it is absolutely necessary, the extension must have the same diameter as the original hose and must not exceed 150 cm in length.
How do I clean my Indesit washing machine?
The outer parts and rubber components of the appliance can be cleaned using a soft cloth soaked in lukewarm soapy water. Do not use solvents or abrasives. Remove the dispenser by raising it and pulling it out. Wash it under running water; this operation should be repeated frequently.
Can children use the Indesit washing machine?
This appliance can be used by children aged from 8 years and above and persons with reduced physical, sensory or mental capabilities or lack of experience and knowledge if they have been given supervision or instruction concerning use of the appliance in a safe way and understand the hazards involved. Children shall not play with the appliance. Cleaning and user maintenance shall not be made by children without supervision.
Can I repair the internal mechanisms of my Indesit washing machine myself?
No, if the appliance breaks down, do not under any circumstances access the internal mechanisms in an attempt to repair it yourself.
How do I care for the door and drum of my Indesit washing machine?
Always leave the porthole door ajar in order to prevent unpleasant odours from forming.
]]>