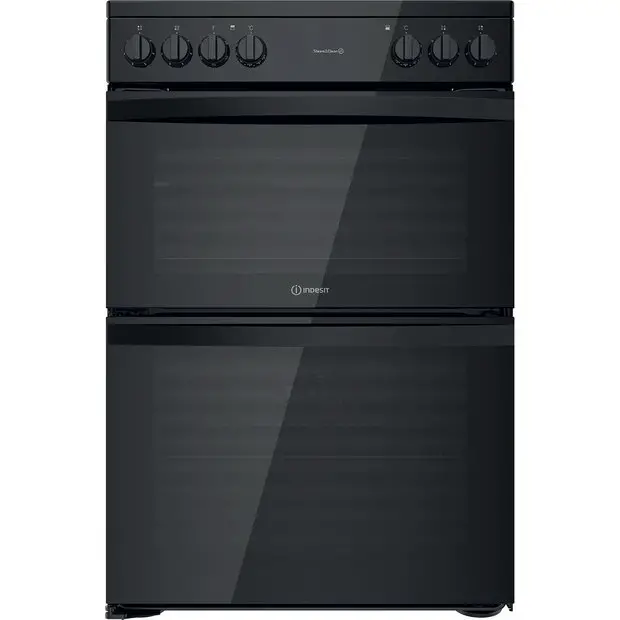
Indesit ID67V9KMB/UK 60cm Double Oven Electric Cooker

SAFETY INSTRUCTIONS
IMPORTANT TO BE READ AND OBSERVED
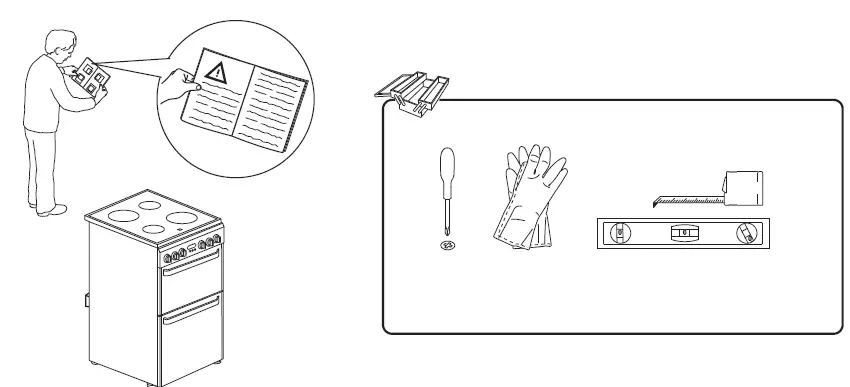
Before using the appliance, read these safety instructions. Keep them nearby for future reference.
These instructions and the appliance itself provide important safety warnings, to be observed at all times. The manufacturer declines any liability for failure to observe these safety instructions, for inappropriate use of the appliance or incorrect setting of controls.
WARNING: The appliance and its accessible parts become hot during use. Care should be taken to avoid touching heating elements. Children, less than 8 years of age must be kept away unless continuously supervised.
WARNING: If the hob surface is cracked, do not use the appliance – the risk of electric shock.
WARNING: Danger of fire: Do not store items on the cooking surfaces.
CAUTION: The cooking process has to be supervised. A short cooking process has to be supervised continuously.
WARNING: Leaving the hob unattended when cooking with fat or oil can be dangerous – risk of fire. NEVER try to extinguish a fire with water, but switch off the appliance and then cover the flames.g. with a lid or a fire blanket.
Do not use the hob as a work surface or support. Keep clothes or other flammable materials away from the appliance, until all the components have cooled down completely – the risk of fire. Very young children (0-3 years) should be kept away from the appliance. Young children (3-8 years) should be kept away from the appliance unless continuously supervised. Children from 8 years old and above and persons with reduced physical, sensory or mental capabilities or lack of experience and knowledge can use this appliance only if they are supervised or have been given instructions on safe use and understand the hazards involved. Children must not play with the appliance. Cleaning and user maintenance must not be carried out by children without supervision.
WARNING: The appliance and its accessible parts become hot during use. Care should be taken to avoid touching heating elements. Children, less than 8 years of age must be kept away unless continuously supervised
Never leave the appliance unattended during food drying. If the appliance is suitable for probe usage, only use a temperature probe recommended for this oven – the risk of fire. Keep clothes or other flammable materials away from the appliance, until all the components have cooled down completely – risk of fire. Always be vigilant when cooking foods rich in fat, oil or when adding alcoholic beverages – risk of fire. Use oven gloves to remove pans and accessories. At the end of cooking, open the door with caution, allowing hot air or steam to escape gradually before accessing the cavity – risk of burns. Do not obstruct hot air vents at the front of the oven – risk of fire.
Exercise caution when the oven door is in the open or down position, to avoid hitting the door. PERMITTED USE
CAUTION: The appliance is not intended to be operated by means of an external switching device, such as a timer, or a separate remote-controlled system.
This appliance is intended to be used in household and similar applications such as: staff kitchen areas in shops, offices, and other working environments; farm houses; by clients in hotels, motels, bed & breakfast and other residential environments. No other use is permitted (e.g. heating rooms).
This appliance is not for professional use. Do not use the appliance outdoors. Do not store explosive or flammable substances (e.g. gasoline or aerosol cans) inside or near the appliance – risk of fire.
INSTALLATION
The appliance must be handled and installed by two or more persons – the risk of injury. Use protective gloves to unpack and install – the risk of cuts. Installation, including water supply (if any), electrical connections, and repairs must be carried out by a qualified technician. Do not repair or replace any part of the appliance unless specifically stated in the user manual. Keep children away from the installation site. After unpacking the appliance, make sure that it has not been damaged during transport. In the event of problems, contact the dealer or your nearest Aftersales Service. Once installed, packaging waste (plastic, styrofoam parts, etc.) must be stored out of reach of children – risk of suffocation. The appliance must be disconnected from the power supply before any installation operation – the risk of electric shock. During installation, make sure the appliance does not damage the power cable – the risk of fire or electric shock. Only activate the appliance when the installation has been completed.
Do not remove the appliance from its polystyrene foam base until the time of installation.
Do not install the appliance behind a decorative door – the risk of fire.
if the range is placed on a base, it must be leveled and fixed to the wall by the retention chain provided, to prevent the appliance from slipping from the base.
WARNING: In order to prevent the appliance from tipping, the retention chain provided must be installed. Refer to the instructions for installation.
ELECTRICAL WARNINGS
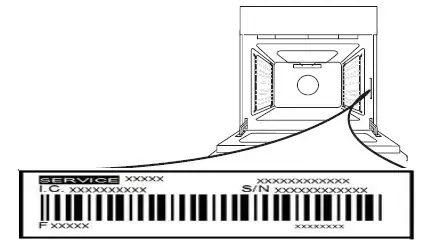
The rating plate is on the front edge of the oven (visible when the door is open).
It must be possible to disconnect the appliance from the power supply by unplugging it if the plug is accessible, or by a multi-pole switch installed upstream of the socket in accordance with the wiring rules and the appliance must be earthed in conformity with national electrical safety standards.
Do not use extension leads, multiple sockets or adapters. The electrical components must not be accessible to the user after installation. Do not use the appliance when you are wet or barefoot. Do not operate this appliance if it has a damaged power cable or plug, if it is not working properly, or if it has been damaged or dropped.
If the supply cord is damaged, it must be replaced with an identical one by the manufacturer, its service agent or similarly qualified persons in order to avoid a hazard -risk of electric shock.
If the power cable needs to be replaced, contact an authorized service center.
WARNING: Ensure that the appliance is switched off before replacing the lamp to avoid the possibility of electric shock.
CLEANING AND MAINTENANCE
WARNING: Ensure that the appliance is switched off and disconnected from the power supply before performing any maintenance operation; never use steam cleaning equipment -risk of electric shock.
Do not use harsh abrasive cleaners or metal scrapers to clean the door glass since they can scratch the surface, which may result in shattering of the glass.
Do not use abrasive or corrosive products, chlorine-based cleaners, or pan scourers.
Make sure the appliance has cooled down before cleaning or performing maintenance. – the risk of burns.
WARNING: Switch off the appliance before replacing the lamp – the risk of electric shock. DISPOSAL OF PACKAGING MATERIALS
The packaging material is 100% recyclable and is marked with the recycle symbol. The various parts of the packaging must therefore be disposed of responsibly and in full compliance with local authority regulations governing waste disposal.
DISPOSAL OF HOUSEHOLD APPLIANCES
This appliance is manufactured with recyclable or reusable materials. Dispose of it in accordance with local waste disposal regulations.
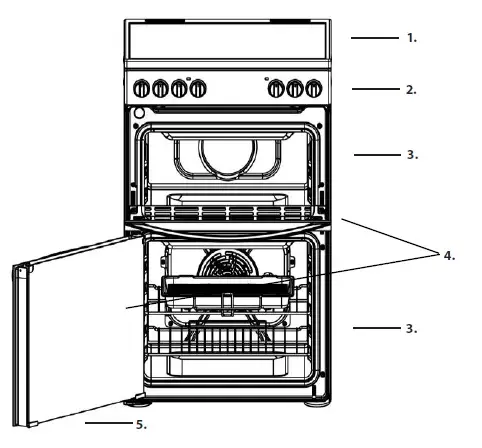
PRODUCT DESCRIPTION

- Glass-ceramic hob
- Control panel
- Runners for accessories (the level is indicated on the wall of the cooking compartment)
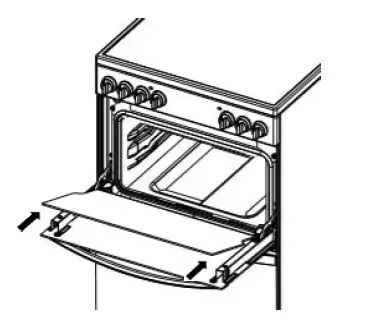
- Removable Inner Door Glass
- Main oven door
CONTROL PANEL:
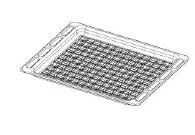
ACCESSORIES
ANTI-STICK TRAY:

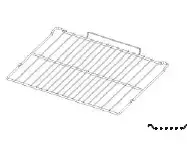
GRID:
KIT GRILL PAN:
The number and type of accessories may The number and type of accessories may vary depending on which model vary depending on which model
is purchased. Other accessories that are is purchased. Other accessories that are not supplied can be purchased separately from the After-sales Service. separately from After-sales Service.
Grill Pan Handle:
The grill pan handle is detachable from the pan to facilitate cleaning and storage. Fix the panhandle securely before use:
- Fit the handle to the grill pan so that the external ‘hooks’ embrace the edge of the pan (fig. 1)
- Make sure that the middle part of the handle fits exactly the protruding support of the pan (fig .2)
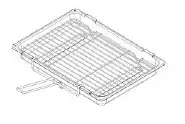
and holds the pan from the bottom. The food must be placed on the rack in the grill pan. Position the grill pan on top of the oven rack. The best results are achieved following the cooking table. Pouring a little water into the grill pan will make the collection of grease particles more efficient and prevent the formation of smoke.
INSTALLATION TIPS
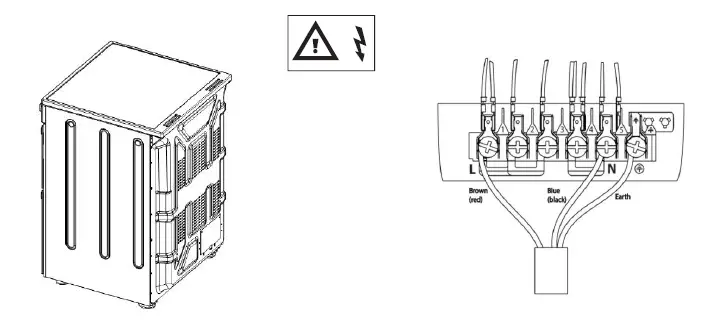
This appliance must be earthed.
Mains Connection:
Your cooker should have been checked to ensure that the voltage corresponds with your supply voltage, this is stated on the rating plate, which is situated on the outer rear panel.
The model number and serial number are located on the front of the cooker, as shown on the Feature’s page.
The cooker must be connected by a competent person such as one who is a, NICEIC registered contractor to a suitable double-pole control unit with a minimum rating of 32A and a minimum contact clearance of 3mm
(applicable to newer properties, older properties where a 30A double pole control unit and a minimum contact clearance of 3mm is acceptable).
The double pole control unit should be fitted
adjacent to the cooker, in accordance with IEE regulations. The control unit must be within 2 meters of but not directly above the appliance and should be easily accessible in the event of an emergency. The power supply cable should conform to B.S.6004 with a conductor size of 6mm2, minimum.
Access to the mains terminals is gained by removing the rear access cover. The main cable must pass through the cable clamp adjacent to the terminal block. A sufficient cable should be used to allow the cooker to be pulled out for servicing. Ensure that the mains cable is routed away from any brackets affixed to the rear panel and is not trapped to the rear wall when pushing the cooker into position between cabinets.
This operation must be performed by a qualified technician.
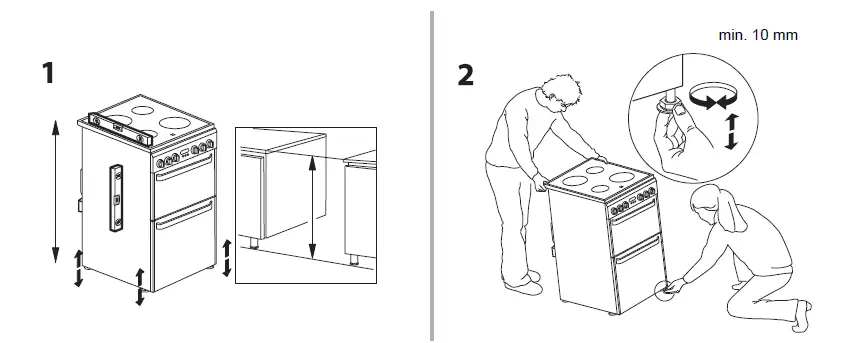
Before moving your cooker check that it is cool, and switch off at the cooker control unit. Movement of your cooker is most easily achieved by lifting the front as follows:
Take care in moving the cooker as it is heavy. Take care to ensure that any floor covering is not damaged.
Splashplate optional, apply to Parts Department (see Back Cover for a contact number.)
The following instructions should be read by a qualified technician to ensure that the appliance is installed, regulated, and technically serviced correctly in compliance with current regulations.
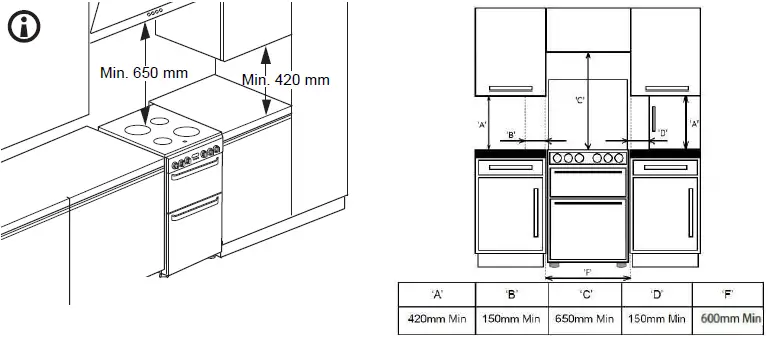
Positioning
Important: This unit may be installed and used only in permanently ventilated rooms according to the British Standards Codes Of Practice: B.S. 6172/B.S. 5440, Par. 2 and B.S. 6891 Current Editions. The following requirements must be observed:
- The cooker should not be installed in a bed-sitting room with a volume of less than 20m3. If it is installed in a room of volume less than 5m3 an air vent of effective area of 110cm2 is required, if it is installed in a room of volume between 5m3 and 10m3 a supplementary air vent area of 50cm2 is required, if the volume exceeds 11m3 no air vent is required. However, if the room has a door or a window that opens directly to the outside no air vent is required even when the volume is between 5m3 and 11m3.
- During prolonged use of the appliance, you may consider it necessary to open a window to the outside to improve ventilation.
- If there are other fuel-burning appliances in the same room, B.S.5440 Part 2 Current Edition, should be consulted to determine the requisite air vent requirements.
FIRST TIME USE DAILY USE
MAIN OVEN
To heat the oven turn the knob clockwise, selecting the require temperature between 80°C (176°F) and 250°C (482°F) as recommended in the temperature chart. The pilot light will immediately come on and remain on until the oven reaches the required temperature. This light will then automatically go off and on during cooking as the oven thermostat maintains the correct temperature.
It should be noted that at the end of the cooking period there may be a momentary puff of steam when the oven door is opened. This will disperse in a few seconds and is a perfectly normal characteristic of an oven with a good door seal. Since a circulaire fan oven heats up more quickly,and generally cooks food at a lower temperature than a conventional oven, pre-heating is often unnecessary. However, foods such as bread, scones, Yorkshire pudding, do benefit from being placed in a pre-heated oven. The ‘oven temperature charts’ are a guide only, giving approximate cooking temperatures and times. To suit personal taste and requirements, it may be necessary to increase or decrease temperatures by 10°C. Unless otherwise indicated in the charts food should be placed in a cold oven, i.e. without pre-heating. If food is placed in an already hot oven, the suggested cooking time should be reduced, depending on the type and quantity of food being cooked.
Oven positions
Since the distribution of heat in the circulaire fan oven is very even, most foods will cook satisfactorily on any shelf position, but the shelves should be evenly spaced.
The top oven rod shelf can be used in the main oven when cooking large quantities of food.
Food or utensils should Never be placed directly on the floor of the oven for cooking.
Never use more than 4 shelves in the oven as air circulation will be seriously restricted.To ensure oven circulation do not use meat pans larger than 390 x 300mm (15″x12″) and baking trays no larger than 330 x 255mm (13″x 10″), these should be positioned centrally on the oven shelf. Food should not be placed directly on the floor of the oven. To avoid unnecessary cleaning, rod shelves that are not in use should be removed from the oven.
Temperature and time
When all four shelves are used to cook large quantities of food for home freezing or parties, it may be necessary to increase the cooking times given in the temperature charts by a few minutes, to allow for the loss of heat due to extra time taken to load the oven, and the larger mass of food. Baking trays should have an equal gap at either side of the oven.
TOP OVEN
The top oven should be used to cook small quantities of food.The oven is designed so that the grill element operates at a reduced heat output, this is combined with a heating element situated underneath the floor of the oven.
To ensure even cooking of the food it is important that cooking utensils are positioned correctly on the oven shelf so that the element is directly above.
There are two cooking positions, the shelf placed on runner 1 or 2 (from the base), do not use shelves upside down.
Food/utensils must not be placed directly on the oven floor.
There should always be at least 25mm (1in) between the top of the food and the grill element.
Warning: Items stored in top oven will get hot when main oven is in use.
Operation
To heat the oven, turn the control knob clockwise. The top oven pilot light will come on and remain on until the oven reaches the required temperature. The pilot light will automatically go on and off during cooking as the thermostat maintains the correct temperature. Do not use the grill pan as a meat pan in the top oven as air circulation will be seriously restricted. Top oven as a warming compartment for plates Place the plates/dishes on the shelf, positioned on runner 1, turn top oven control to 100°C for 10-15 minutes. Never use grill control.
When the cooker has first used an odor may be emitted, this will cease after a period of use. When first using the cooker ensure that the room is well ventilated (e.g. open a window or use an extractor fan) and that persons who may be sensitive to the odor avoid any fumes. It is suggested that any pets be removed from the room until the smell has ceased. This odor is due to the temporary finish on oven liners and elements and also any moisture absorbed by the insulation.
USING THE GLASS CERAMIC HOB :
The glue applied on the gaskets leaves traces of grease on the glass. Before using the appliance, we recommend you remove these with a special non-abrasive cleaning product. During the first few hours of use there may be a smell of rubber which will disappear very quickly.
Switching the cooking zones on and off:
To switch on a cooking zone, turn the corresponding knob in a clockwise direction. To switch it off again, turn the knob in an anticlockwise direction until it is in the “0” position. If the ELECTRIC HOTPLATE ON indicator light is lit, this shows that at least one hotplate on the hob is switched on.
Cooking azones:
The hob is equipped with electric radiant heating elements. When they are in use the following items on the hob become red.
- The cooking zone.
- The residual heat indicator light: this indicates that the temperature of the corresponding cooking zone is greater than 60°C, even when the heating element has been switched off but is still hot.
Cooking zones with radiant heating elements:
They have similar properties to gas burners: they are easy to control and reach set temperatures quickly, allowing you to actually see the power they are providing. Turn the corresponding knob in a clockwise direction, to a position between 1 and 6.
| Setting | Normal or Fast Plate |
| 0 | Off |
| 1 | Cooking vegetables, fish |
| 2 | Cooking potatoes (using steam) soups, chickpeas, beans. |
| 3 | Continuing the cooking of large quantities of food, minestrone |
| 4 | For roasting (average) |
| 5 | For roasting (above average) |
| 6 | For browning and reaching a boil in a short time. |
PRACTICAL ADVICE ON USING THE HOB:
- Use pans with a thick, flat base to ensure that they adhere perfectly to the cooking zone.

- Always use pans with a diameter that is large enough to cover the hotplate fully, in order to use all the heat produced.

- Always make sure that the base of the pan is completely clean and dry: this ensures that the pans adhere perfectly to the cooking zones and that both the pans and the hob last for a longer period of time.
- Avoid using the same cookware that is used on gas burners: the heat concentration on gas burners may have warped the base of the pan, causing it not to adhere to the surface correctly.
- Never leave a cooking zone switched on without a pan on top of it, as doing so may cause the zone to become damaged.
| Ratings of Cooking Zones | |||
| Front Left | Front Right | Back Left | Back Right |
| Ceramic 1800 W
180 mm diameter |
Ceramic 1200 W
140mm diameter |
Ceramic 1200 W
140mm diameter |
Ceramic 1800 W
180 mm diameter |
FUNCTIONS and DAILY USE
SELECT A FUNCTION
To select a function, turn the selection knob to the symbol for the function you require.
TOP OVEN
CONVENTIONAL
For cooking any kind of dish on one shelf only.
 BOTTOM:
This function can be used to finish cooking filled pies or to thicken soups. Use this function for the last 10/15 minutes of cooking.
LEFT GRILL
For grilling small food like bacon or toasting bread. The grill pan is placed on top of the top oven cavity shelf. The shelf position can be adjusted to allow for grilling different types of food.

GRILL:
For grilling steaks, kebabs and sausages, cooking vegetables au gratin or toasting bread. When grilling meat, we recommend using a drip tray to collect the cooking juices: Position the pan on any of the levels below the wire shelf and add 200 ml of drinking water.

MAIN OVEN – FAN COOKING:
This control switches on the main oven. To select this control switches on the main oven. To select Fan Cooking – Turn the control clockwise and selection Cooking – Turn the control clockwise and select any temperature between 90°C and Max. As than y temperature between 90°C and Max. As the control is turned the fan will start. The main oven light control is turned the fan will start. The main oven light will immediately come on. will immediately come on.
The thermostat light indicates that the main oven is thermostat light indicates that the main oven is heating. When it turns off, the temperature inside the heating. When it turns off, the temperature inside the oven has reached the setting made with the main oven knob. At this point, the light will turn on and off the oven knob. At this point, the light will turn on and off as the oven maintains the temperature at a constant level. level.
The fan and the oven interior light will remain onThe fan and the oven interior light will remain on throughout cooking. The red main oven thermostat throughout cooking. The red main oven thermostat light will come on until the oven reaches the required light will come on until the oven reaches the required temperature. It will then cycle off and on as the oven temperature. It will then cycle off and on as the oven thermostat maintains the correct temperature.a thermostat maintains the correct temperature.
The heat for fan cooking in the main oven the heat for fan cooking in the main oven is provided by an element situated at the back of the provided by an element situated at the back of the oven, around the fan.oven, around the fan.
Fan cooking is ideal for large poultry or joints fan cooking is ideal for large poultry or joints of meat, reducing cooking times and often eliminating meat, reducing cooking times, and often eliminating the need for pre-heating the oven. It is also ideal for the need for pre-heating the oven. It is also ideal for batch cooking where food is cooked on more than one level, because the forced circulation of hot Airone level because the forced circulation of hot air gives an even temperature from the top to the bottom gives an even temperature from the top to the bottom of the oven.of the oven.
FORCED AIRFORCE AIR:
For cooking different foods on multiple shelves (maximum of four) at the same time. This function can be used to cook different foods without odours being transferred from one food to another.

COOKING TABLE
MAIN OVEN


TOP OVEN:

ACCESSORIES:
CLEANING AND MAINTENANCE
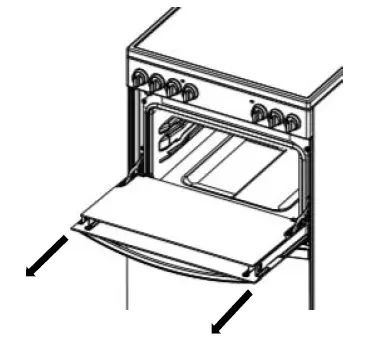
Cleaning the glass door with 2 panels
TOP OVEN DOORS
- Open the door to .30° RemovingRemoving the retaining training bar depress carefully the clips on both sides of the bar.B NPull the trim up gently until the retainer is released.

- Carefully slide the first inner glass towards you, taking care not to allow the glass to fall.

- Now the external glass panel can be washed.
TURN OFF THE MAIN SWITCH AND ENSURE THE COOKER IS COLD BEFORE CLEANING. BEFORE SWITCHING ON AGAIN, ENSURE THAT ALL CONTROLS ARE IN THE OFF POSITION.
- Do not use steam cleaning equipment. Use protective gloves during all operations.
- Carry out the required operations when the oven is cold.
Disconnect the appliance from the power supply. - Do not use wire wool, abrasive scourers or abrasive/corrosive cleaning agents, as these could damage the surfaces of the appliance.
Disconnect the appliance from the power supply.
CLEANING THE CERAMIC HOB
To reduce the amount of cleaning always ensure that the hob and cooking utensils are clean and dry before use. Regular use of cleaner conditioner is recommended for proper care and protection of the hob surface. Apply conditioner before using the hob for the first time. It contains a mild cleaning agent so that subsequent applications may clean off soil and apply a protective film at the same time. For stubborn stains or heavy soiling use any of the special materials, and finish off with conditioner.
CLEANING THE OVEN SURFACE
EXTERIOR SURFACES
- Clean the surfaces with a damp microfibre cloth.If they are very dirty, add a few drops of pH-neutral detergent. Dry them with a dry cloth.
- Do not use corrosive or abrasive detergents. If any of these products inadvertently comes into contact with the surfaces of the appliance, clean immediately with a damp microfibre cloth.
INTERIOR SURFACES:
- After every use, leave the oven to cool and then clean it, preferably while it is still warm, to remove any deposits or stains caused by food residues To dry any condensation that has formed as a result of cooking foods with high water content, let the oven to cool completely and then wipe it with a cloth or sponge.
- Clean the glass in the door with a suitable liquid detergent.
ACCESSORIES
Soak the accessories in a washing-up liquid solution after use, handling them with oven gloves if they are still hot. Food residues can be removed using a washing-up brush or a sponge.
REPLACING THE LIGHT:
- Disconnect the oven from the power supply.
- Unscrew the cover from the light, replace the bulb and screw the cover back on the light.
- Reconnect the oven to the power supply. NotNote: Use 40 e: Use 40 W/230 type G9

Steam & Clean:
The action of the steam released during this special low-temperature cleaning cycle allows dirt and food residues to be removed with ease. Pour 200 ml of drinking water on the bottom of the oven and set the temperature at 90°C°C for 20′. Activate the function “CONVENTIONAL” after 20′ switch off the oven and let it cool down for 15′.
TROUBLESHOOTING
What to do if…
Possible reasons
Solutions
| The oven is not working. | Power cut.
Disconnection from the mains. |
Check for the presence of mains electrical power and whether the oven is connected to the electricity supply.
Turn off the oven and restart it to see if the fault persists. |
USEFUL TIPS:
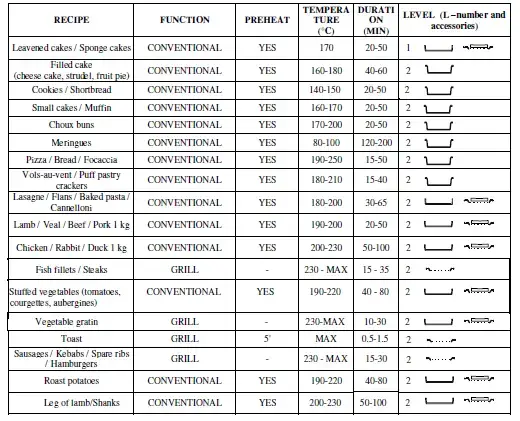
HOW TO READ THE COOKING TABLE
The table lists the best function, accessories and level to use to cook various different types of food. Cooking times start from the moment food is placed in the oven, excluding preheating
where required). Cooking temperatures and times are approximate and depend on the amount of food and the type of accessory used. Use the lowest recommended settings to begin with and, if the food is not cooked enough, then switch to higher settings. Use the accessories supplied and preferably dark-colored metal cake tins and baking trays. You can also use Pyrex or stoneware pans and accessories but bear in mind that cooking times will be slightly longer.
AFTER-SALES SERVICE
To receive assistance, call the number given on the warranty leaflet enclosed with the product or follow the instructions on our website. Be prepared to provide:
- a brief description of the problem;
- the exact model type of your product;
- the assistance code (the number following the word SERVICE on the identification plate attached to the product, which can be seen on the inside edge when the oven door is open);
- your full address;
- a contact telephone number.
Please note: If repairs are required, contact an authorized service center that is guaranteed to use original spare parts and perform repairs correctly.
Please refer to the enclosed warranty leaflet for more information on the warranty.
WWW A complete product specification, including the energy efficiency ratings for this oven, can be read and downloaded from our website www.indesit.com
WARNINGS
- Whirlpool EMEA S.p.A.
- Via Carlo Pisacane n.1 20016 Pero (MI), Italy
- VAT number: IT00693740425
- www.indesit.com