Innovo Infrared Thermometer
Model: INV-EF00
Copyright © Innovo Medical
2014-2016. All rights reserved.
Innovo Medical owns and reserves all of the rights comprised in the copyright of this document. No part of this document may be changed, excerpted, copied, reproduced, or imitated in any form or by any means without prior written consent of Innovo Medical.
All statements, information, and recommendations in this document are provided “AS IS” without warranties, guarantees or representations of any kind, either express or implied. The information in this document is subject to change without notice. Innovo Medical reserves the right of final interpretation of this document.

Version 1.1
Issuing Date: June 2016
To download the latest manual for the thermometer, simply scan the QR code above or visit http://innovo-medical.com/products/innovo-dual-thermometer
Contact Us
Questions or Comments?
Call: 858-888-9781
Email: [email protected]
Visit: www.innovo-medical.com
Introduction
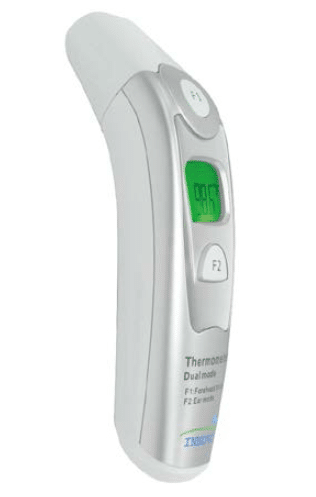
Thank you for purchasing the Innovo INV-EF100 Dual Mode Digital Infrared Thermometer. The INV-EF100 has passed numerous rigorous clinical tests and has proven to be safe, reliable and accurate when used in accordance with the operation manual.
We want to make a thermometer that is capable of accompanying your child from infancy to adulthood. That is why the INV-EF100 Dual Mode Digital Infrared Thermometer is designed to be BOTH an ear thermometer AND a forehead thermometer, offering users the freedom to choose between two modes. We recommend that you use the forehead measurement mode if your child is less than 1 yr old. The eardrum measurement mode can be used when they are older and more comfortable with a foreign object in their ear.
Please read the instructions carefully before using the product. Keep user manual in a safe place for future reference.
- Features of Dual Mode Infrared Thermometer INV-EF100
The INV-EF100 thermometer is able to measure both forehead and ear temperatures by detecting the infrared heat emitted by the respective areas. The forehead mode is activated by pressing the F1 button and the eardrum mode is activated by pressing the F2 button.
Convenient and easy to use
- Easy mode of operation – Take measurement with the press of a button
- Can be used anytime – even when your child is asleep
- Obtain reading faster than an oral thermometer and more comfortable than a rectal thermometer
- Ergonomic design
- Color coded display for fever detection
Accurate and quick
Utilize the latest infrared technology – accurate, precise and instant readings.
Safe and hygienic
- Unlike traditional thermometers, there is no glass or mercury that could pose as a potential health hazard. The thermometer is made up of ABS and TPR plastics, an infrared sensor, an infrared temperature measuring element, a microcomputer controlled circuit and a LCD screen.
- BPA and latex free.
Memory Recall
Has a Memory Mode that can recall 20 previous readings to track changes in temperature.
Convenient Fever warning
When the temperature exceeds 99.5°F/37.5°C, the thermometer will warn the user that he/she may have a fever by 7 rapid short beeps and a flickering reading with a red backlit on the LCD screen for 3 seconds. (For normal body temperature, the signal is a long beep with a green backlit.)
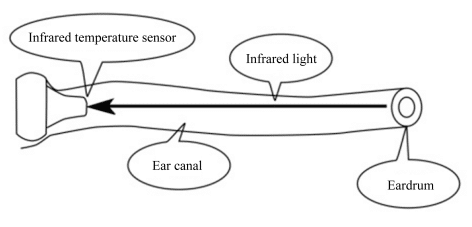
Operating principle
The infrared temperature sensor detects infrared energy emitted by the eardrum. A built-in lens focuses the collected energy, which is then converted into a temperature reading by the thermopiles and measurement circuits.
2. Warnings and Precautions
This product is not intended to substitute advice from a physician, pharmacist, or other licensed health-care professional. You should not use this product for self-diagnosis or for treating a health problem. Contact your health-care provider immediately if you suspect that you have a medical problem.
- Do not use the thermometer for purposes not specified in this User Manual. Follow the instructions stated herein and operate the thermometer carefully when measuring children’s temperature.
- Do not use the thermometer if any part, especially the sensor, shows any sign of damage. Do not attempt to repair the thermometer. Please contact your distributor.
- The thermometer is not designed to be used for newborn babies. Please consult with a doctor before using the thermometer on a newborn.
- The device is not a continuous monitoring device.
- Do not use the thermometer under an ambient temperature higher than 40.0°C (104.0°F) or lower than 10.0°C (50.0°F), which is beyond the operating temperature range of the thermometer.
- The thermometer is not waterproof. Do not immerse in water or other liquids. For cleaning and disinfecting, please follow instructions in the ‘Care and Cleaning’ section.
- Certain parts of the thermometer are lined precisely in order to perform properly. Do not drop the thermometer or twist the thermometer sensor. The thermometer is not designed to withstand intense impact or vibration.
- The thermometer is not a toy. Please keep out of children’s reach.
- Do not touch the tip of the thermometer probe. This may damage the infrared sensor inside.
3. Care and Cleaning
CAUTION! The thermometer sensor is extremely sensitive. The sensor lens has to be perfectly clean to ensure accurate readings.
CAUTION! Any debris and/or facial oil on the sensor lens will prevent an accurate measurement. Always check the sensor before use. The lens should be reflective and gleaming. If it looks dull and lackluster, please clean the lens before use.
- To clean the lens, gently swab the surface with a cotton swab moistened with rubbing alcohol (70% Isopropyl). Do not exert too much pressure as it may damage the delicate sensor.
- Wait for the alcohol to evaporate completely before using the thermometer. This may take about 5-10 minutes. Any residual alcohol will prevent accurate readings.
- To clean the thermometer body and display, wipe with a soft cloth slightly moistened with water or rubbing alcohol. Allow to air dry or gently dry with a piece of tissue paper.
Temperature taking tips for accurate measurement
- Always start with a clean probe and sensor to maintain accuracy and hygiene.
- Make sure that both user and thermometer have stayed in steady-state room condition for at least 30 minutes. Recent exposure to hot or cold temperatures will impact your reading.
- If taking multiple readings, it is advised to wait at least 10 seconds between readings. The thermometer is very sensitive to small changes in temperature. Repeated use with no pause may impact your reading.
- Before taking forehead measurement, remove hair, sweat, debris/oil.
- Before taking eardrum measurement, make sure that the ear canal is free from obstructions or excess earwax build-up.
- As with any thermometer, proper technique is critical to obtaining accurate measurements. Failure to follow instructions will result in inaccurate measurements.
- Normal body temperature is a range and varies by site. Therefore, measurements from forehead and eardrum should not be compared directly.
- In general, an ear temperature is usually 0.5-1°F (0.3-0.6°C) higher than an oral temperature, whereas a forehead temperature is usually 0.5-1°F (0.3-0.6°C) lower than an oral temperature. Therefore, it is NORMAL to get 1-2°F (0.6-1.2°C) difference between an ear measurement versus a forehead measurement. This is NOT due to the inaccuracy of the thermometer.
Battery Installation:
- Slide the battery cover off along the marked direction.
- Put two AAA batteries into the battery compartment according to the stated polarities.
- Slide the battery cover horizontally until it snaps back in place.
Notes:
☆ Prior to using the thermometer for the first time, pull the plastic tab off the battery, if any.
☆ Batteries should be installed according to the stated polarities.
Otherwise, the device bracket might be damaged.
☆ Please remove the batteries if you will not be using the thermometer for an extended period of time.
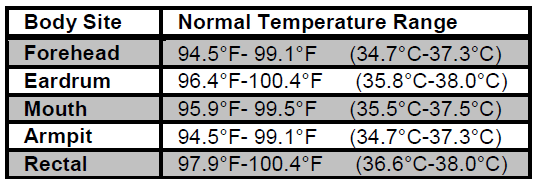
4. Note on Body Temperature
- The normal body temperature is a range.
- The normal range varies from person to person and can fluctuate throughout the day.
- The normal range also varies by body site. Therefore, measurements from different sites should not be compared directly.
To determine if an individual is experiencing an elevated body temperature and/or having a fever, it is critical to know the individual’s normal body temperature when he/she is well. Take multiple readings to obtain the normal body temperature range and note the specific body site measured, for example: forehead or eardrum temperature.
- The normal body temperature range varies slightly with age and gender. Generally, newborns or children have higher body temperatures than adults, and adults have higher body temperatures than the elderly. Women’s body temperatures are approximately 0.3°C (0.5 °F) higher than men’s.
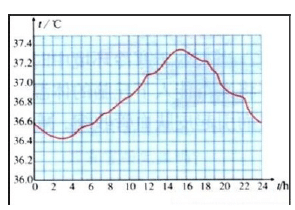
Normal body temperature fluctuates throughout the day and is also affected by external factors. The body temperature of an individual is the lowest between 2:00 a.m. and 4:00 a.m. and the highest between 2:00 p.m. and 8:00 p.m. An individual’s body temperature typically changes by less than 1°C (1.8 °F) each day.
5. Product Designs
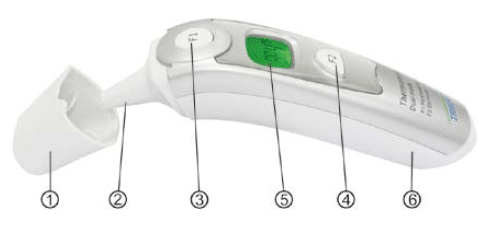
(1) Probe cover (shown unattached to thermometer)
(2) Ear probe
(3) F1: Button for measuring forehead temperature
(4) F2: Button for measuring eardrum temperature and access Menu options
(5) LCD display
(6) Battery cover
6. Measuring Forehead Temperature
- With the probe cover attached, point the thermometer at the center of the forehead.
- Move the thermometer towards the forehead until the probe cover touches the skin. The probe cover acts as a distance guide and ensures that the measuring distance between the thermometer and the forehead is correct.
- Press and release the F1 button. The temperature will be displayed on the screen instantly.
Note:
- You can take another measurement by pressing the F1 button at any time although it is recommended that you wait 10 seconds between readings.
- Make sure that the forehead is free of hair and perspiration.
- The probe cover is attached out of the box.
7. Measuring Temperature via Eardrum
- Gently remove the probe cover to reveal the ear probe.
- Insert the ear probe into the ear canal.
- Press and release the F2 button. The temperature will be displayed on the screen instantly.
Note:
- Do not press the F2 button for more than 3 seconds as you will activate the memory retrieval mode.
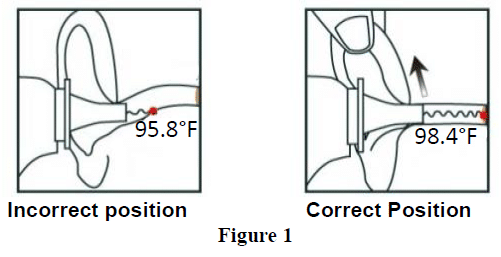
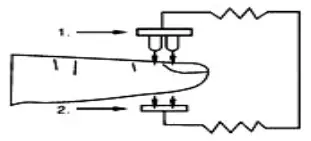
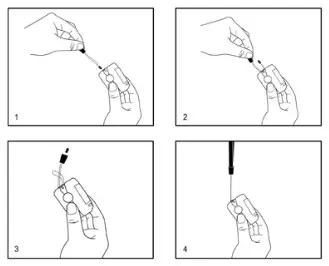
For children older than 1 year old, gently pull the ear up to ensure that the ear canal is straight (See Figure 1). Position the ear probe carefully so that it is aligned with the eardrum to ensure accurate measurement readings. This applies to adults as well.
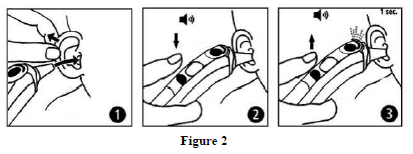
For children younger than 1 year old, gently pull the ear straight back to ensure that the ear canal is straight (see Figure 2).
In order to avoid inaccuracy:
- The sensor is extremely sensitive. Any debris and/or grease on the sensor lens might prevent an accurate measurement. For best result, please check and clean the lens regularly. Please note that the sensor lens can look deceptively “clean” when it is not. The lens of a clean sensor should be reflective and gleaming. If it looks dull and lackluster, then it is dirty. Please clean the lens with a cotton swab moistened with alcohol and wait 5-10 mins for the alcohol to completely evaporate before using the thermometer.
- Please use the thermometer indoor or in an environment where there is no strong air draft.
- Do not move during measurement.
- Make sure there isn’t any sweat, water or condensation on the forehead.
- If the thermometer is transferred from an environment where the ambient temperature might be different, please wait at least 10 minutes and follow rule number 2 before using the thermometer.
- Do not hold the thermometer for a long time as it is highly sensitive to heat.
- Keep the infrared sensor probe clean to ensure accurate readings.
- Before measuring temperature from the ear, remove earwax, if any. Keep the ear canal clean.
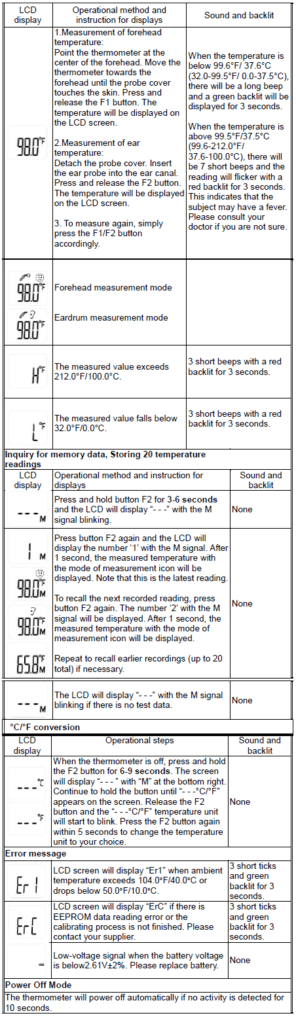
8. Instructions for Display and Operation
Attention:
- Electromagnetic interference: INV-EF100 thermometer contains sensitive electronic components. You should not use the thermometer in an area with electromagnetic interference (e.g. near mobile phones or microwaves)
- Please dispose the used thermometer and batteries in accordance with local regulation requirements.
- Please remove the battery if you will not be using the thermometer for an extended period of time.
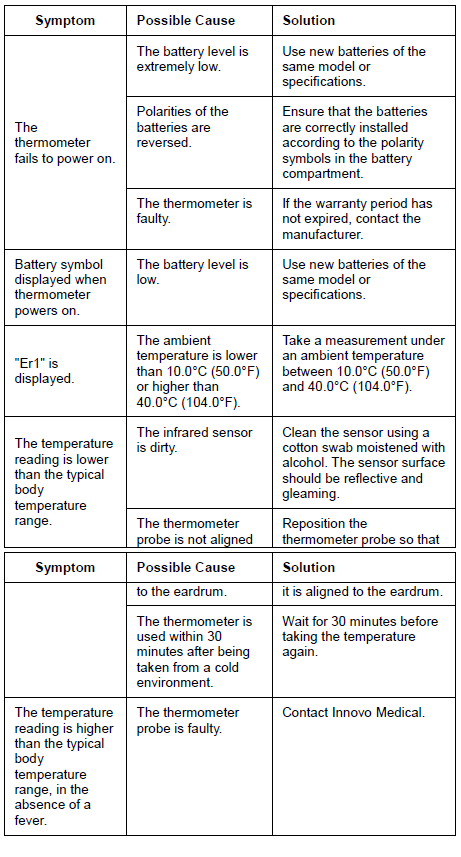
9. Troubleshooting
10. Technical Specifications
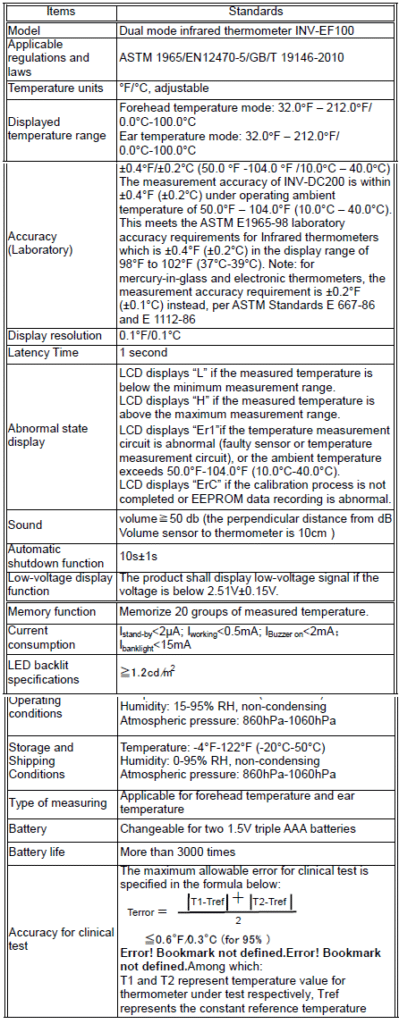
This infrared thermometer meets requirements established in ASTM Standard (E 1965-98). Full responsibility for the conformance of this product to the standard is assumed by Innovo Medical, 406 Sterling Street, Building 2, Camphill, PA 17011, USA.
ASTM laboratory accuracy requirements in the display range of 98°F to102°F (37°C-39°C) for IR thermometers is ±0.4°F (±0.2°C), whereas for mercury-in-glass and electronic thermometers, the requirement per ASTM Standards E 667-86 and E 1112-86 is ±0.2°F (±0.1°C).
11. Warranty and After-Sale Service
For inquiries, please email [email protected]
The device is under warranty for one year after the date of acquisition. To extend your warranty period for an additional 1 year, please go to www.innovo-medical.com and register your purchase.
Batteries, packaging, and any damage caused by improper use are not covered under warranty.
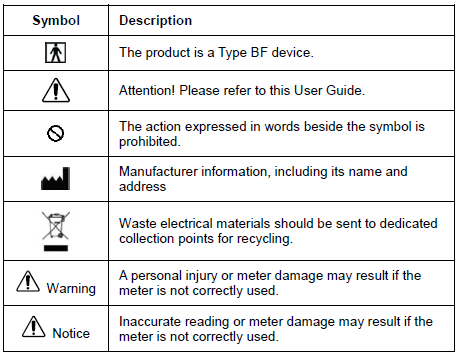
12. Symbols
![]()
Fingertip Pulse Oximeter
USER MANUAL
Ver1.0 – iP900AP
General Description
SpO2 stands for peripheral capillary oxygen saturation. Oxygen saturation is defined as the ratio of oxyhemoglobin (HbO2) to the total concentration of hemoglobin (i.e. Oxyhemoglobin + reduced hemoglobin) present in the blood. It is an important physiological parameter involved in respiration and circulation. The Pulse Oximeter feature herein is small, portable, non-invasive and easy to use. The user only needs to insert a finger into the chamber to measure his/her SpO2 level and pulse rate. It has also been proven to be highly precise and reliable in clinical tests.
Measurement Principle
Oxygenated blood absorbs light preferentially at 905nm (near infrared light), whereas deoxygenated blood absorbs light preferentially at 660nm (red light). A pulse oximeter works by passing a beam of red and infrared light through a pulsating capillary bed and then measure the amount of red and infrared light emerging from the tissues via a sensor. To improve accuracy, the iP900AP uses a proprietary algorithm to collect data from pulsatile arterial blood and excludes noise from the tissues. The relative absorption of light by oxyhemoglobin (HbO) and deoxyhemoglobin is then calculated according to the Beer-Lambert’s law and a quantitative measurement of the users’ oxyhemoglobin status i.e. Oxygen saturation level (SpO2) is derived. Diagram of Operation Principle
- Red and Infrared-ray Emission Tube
- Sensor
Precautions For Use
- Please read the manual carefully before use.
- Do not use the fingertip pulse oximeter in an MRI or CT environment.
- This device is not for continuous monitoring.
- Do not use the fingertip pulse oximeter in an explosive environment.
- In order to ensure proper sensor alignment and skin integrity, the maximum application time at a single site for the device should be less than half an hour.
- Do not sterilize the device using autoclaving, ethylene oxide sterilizing, or immersing the device in liquid. The device is not intended for sterilization.
- Follow local ordinances and recycling instructions regarding disposal or recycling of the device and device components, including batteries.
- This equipment complies with IEC 60601-1-2:2007 for electromagnetic compatibility for medical electrical equipment and/or systems. However, because of the proliferation of radio-frequency transmitting equipment and other sources of electrical noise in healthcare and other environments, it is possible that high levels of such interference due to close proximity or strength of a source might disrupt the performance of this device.
- Portable and mobile RF communications equipment can affect medical electrical equipment.
- Do not disassemble, repair or modify the equipment.
- It may be unsafe to
–use accessories, detachable parts and materials not described in the instructions for use
–interconnect this equipment with other equipment not described in the instructions for use
–disassemble, repair or modify the equipment - The medical silicone and ABS plastic enclosure which contact the user’s skin when the device is used have been assessed by and passed the ISO10993-5 Tests for in vitro cytotoxicity and ISO10993-10 Tests for irritation and delayed-type hypersensitivity.
- The fingertip pulse oximeter is dependent on blood flow to obtain an accurate SpO2 measurement. Verify that nothing is hindering your blood flow before taking your SpO2 readings.
- This device is not intended to diagnose or treat any medical condition or disease. It is intended for non-medical use by healthy people to monitor their pulse rate and blood oxygen levels. It is for sports and/or aviation use. People who need SpO2 and pulse rate measurements because of a medical condition should not use this pulse oximeter and should consult with their physician.
Inaccurate measurements may be caused by
- Significant levels of dysfunctional hemoglobin (such as carbonyl – hemoglobin or methemoglobin).
- Intravascular dyes such as indocyanine green or methylene blue.
- High ambient light. Shield the sensor area if necessary.
- Excessive user movement.
- High-frequency electrosurgical interference and defibrillators.
- Venous pulsations.
- Placement of a sensor on an extremity with a blood pressure cuff, arterial catheter, or intravascular line.
- The user has hypotension, severe vasoconstriction, severe anemia, or hypothermia.
- The user is in cardiac arrest or is in shock.
- Fingernail polish or artificial fingernails.
- Weak pulse quality (low blood perfusion).
- Low hemoglobin.
Product Features
- Easy to operate. Measure your SpO2 non-invasively.
- Small, light and portable.
- OLED screen displays SpO2, Pulse Rate, Pulse bar, Plethysmograph and Perfusion Index (PI). Six different display options.
- Level 1-10 adjustable brightness.
- Preset alarm function.
- 2pcs AAA-size alkaline batteries; low-battery indicator and low power consumption.
- When no or low signal is detected, the screen will display `Finger Out’ and the device will power off automatically in about 8 seconds.
Intended Use
The iP900AP Fingertip pulse oximeter is a portable non-invasive device intended for spot-checking of oxygen saturation of arterial hemoglobin (SpO2) and pulse rate of children (>12 years old) and adult. The device is for sports and/or aviation use.
Operation Instructions
- Install two AAA batteries according to the Battery Installation instructions.
- Place one of your fingers into the finger chamber of the pulse oximeter.
- Press the power button on the front panel to turn the pulse oximeter on.
- Keep your hand and finger still for the reading. It is recommended that you do not move your body while taking a reading.
- Read the data from the display screen.
- Press (<1 sec) the button again to toggle between six display modes (see below).

After turning the oximeter on, each time you press the power button, the oximeter will switch to another display mode. There are 6 display modes shown as follows:

Tips to getting a good reading
- Make sure that your finger is inserted deep into the chamber so that the fingertip is placed directly in between the LED sensor and the LED light source.
- Avoid making any body movement, especially your finger while taking measurement.
- Long fingernails may obstruct the light sensor and prevent accurate measurement. Please keep the fingernails short while using the device.
- Excessive ambient infra-red light, especially in an overly bright lit room, can interfere with the sensor, preventing an accurate measurement.
- Poor blood circulation can affect oximeter readings. Warm your hands and fingers before taking your measurements. Note that the pulse oximeter is measuring your SpO2 and PR based on your blood flow. If the blood flow in your finger drops below a perfusion index of 0.3, the pulse oximeter will not be able to get a reading.
- Some people with medical conditions such as anemia, hypotension and hypothermia may experience an inaccurate reading during use. In such case, we suggest that you consult a physician.
Front Panel
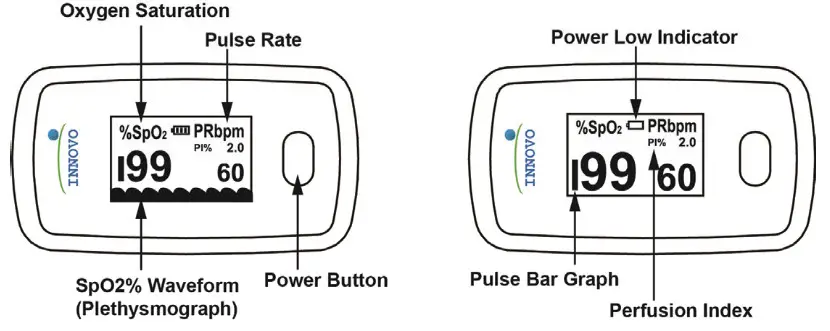 The pulse bar graph, plethysmograph and perfusion index (PI) are useful features that can be used to determine the reliability of a reading. If the height of the pulse bar is less than 30%, this indicates signal inadequacy and the displayed SpO2 or pulse rate value is potentially incorrect. Adjust your finger so that it is directly between the LED lights and sensor.
The plethysmograph indicates the amount of blood flow detected by the pulse oximeter and the perfusion index indicates the strength of your pulse. Each wave in the plethysmograph corresponds to a heartbeat and the wave amplitude corresponds to the amount of blood detected by the pulse oximeter. The pulse oximeter is optimized when the height of the wave amplitude is consistent throughout as shown in the figure above. That is when you should take the reading. The pulse oximeter can function with a PI reading as low as 0.3%. If your PI is below 0.3%, this means that your blood perfusion is too low for a reliable read. Warm your hands to increase blood flow and retake your measurement. In general, a higher PI will give you a more reliable reading.
Settings
In the measuring interface, press and hold the power button to enter the settings interface. To scroll down the menu, short press (<1 sec) the power button. ![]() The icon indicates the line selected. To select an option, long press (>1 sec) the power button.
The icon indicates the line selected. To select an option, long press (>1 sec) the power button.
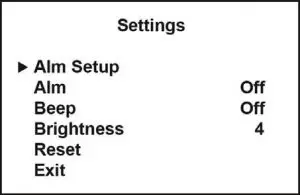 |
Settings menu
Alm Setup To enter the Alarm Setup submenu |
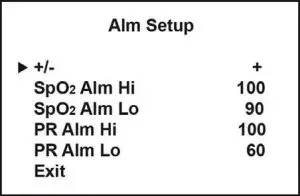 |
Alm Setup submenu
+/- Select + to increase value. Select – to decrease value. |
Setting the alarm parameters
When SpO2 or PR reading exceeds a defined range, an alarm will trigger and the SpO2 or PR reading will start to flash respectively. In addition, an audible alarm can be turned on by setting the `Alm’ under the Settings menu to on. The upper and lower limit for the SpO2 and PR alarm can be user defined. Under the Settings menu, select `Alm Setup’ to enter the Alarm Setup submenu. To increase a value, `+’ should be selected. To decrease a value, `-‘ should be selected. SpO2 limit can be adjusted in increment of 1%; PR limit in increment of 5bpm.
Default limits: SpO2 Alm High 100%, Low 90%; PR Alm High 100bpm, Low 60bpm
Note: Audible alarm can be snoozed/silenced for 30 seconds by pressing the power button. Visual alarm will remain. After 30 seconds, if reading still exceeds the set limit, the audible alarm will turn back on.
Beep – An audible beep to indicate each pulse beat can be turned on by setting the `Beep’ under the Settings menu to on.
Brightness – The screen brightness can be adjusted from 1-10. Level 10 is the brightest. Default level is 4.
Reset – To restore default parameters setting, press and hold the power button until `Yes’ appears.
Exit – Press and hold the power button to return to the measuring interface. Note: In the settings interface, if no operation is detected, device will return to the measuring interface automatically in about 8 seconds.
Product Accessories
- One pulse oximeter
- One lanyard
- Two AAA batteries
- One instruction manual
Battery Installation
- Open the battery door cover.
- Install two AAA batteries into the battery compartment by matching the plus (+) and minus (-) signs in the compartment.
Note: Incorrectly installed batteries may damage the device. - Align the battery door cover and press until it snaps back in place.
Note:
• Please remove the batteries if the pulse oximeter will not be used for a long period of time.
• Please replace the batteries when the low power indicator appears.
Using the Lanyard
- Thread the thin end of the lanyard through the lanyard hole on the device.
- Thread the thick end of the lanyard through the thin loop (threaded in step 1) and pull to tighten.
Warnings!
• Keep the oximeter away from young children. Small items such as the battery door, battery, and lanyard are choking hazards.
• Do not hang the lanyard from the device’s electrical wire.
• Please note that the lanyard tied to the oximeter may cause strangulation due to its length.
Maintenance and Storage
- Replace the batteries when the low power indicator appears.
- Clean the finger chamber and surface of the oximeter before use.
- Remove the batteries if you are not planning to use the oximeter for a long period of time.
- Store the oximeter in a cool and dry place. Extreme moisture may damage the oximeter or affect its lifespan.
- Dispose battery properly. Follow any applicable local battery disposal laws.
Cleaning the fingertip pulse oximeter
It is recommended to clean the oximeter before and after use. To clean, use a soft cloth lightly dampened with water to wipe the finger chamber and the surface of the oximeter. Allow the oximeter to dry thoroughly before use.
CAUTION: Do not pour or spray liquids onto the oximeter, and do not allow any liquid to enter any openings in the device. Disinfecting the fingertip pulse oximeter
The oximeter can be disinfected as needed. To disinfect, use a soft cloth lightly dampened with 70% isopropyl alcohol. Other recommended disinfectants include: 70% ethanol or glutaraldehyde-type 2% liquid disinfectants.
CAUTION: Do not use EtO (Ethylene oxide) or formaldehyde for disinfection. The lifespan of the pulse oximeter is estimated to be five years if 15 measurements are taken per day and each measurement takes 10 minutes. Stop using and contact local service center if one of the following incidents occurs:
- An error in the Possible Problems and Solutions is displayed on the screen.
- The oximeter cannot be powered on even though new batteries are installed.
- There is a crack on the oximeter or damage to the display resulting in unidentifiable readings.
- The spring is defective.
- The button is unresponsive.
- The pulse oximeter is factory calibrated. You do not need to calibrate it again during its lifespan.
Specifications
- Display Type
OLED display - SpO2
Display range: 0%~100%
Measurement range: 70%~100%
Accuracy: 70%~100%±2%; 0%~69% no definition
Resolution: 1%
A functional tester cannot be used to assess the accuracy of a pulse oximeter monitor or sensor. Clinical testing is used to establish the SpO2 accuracy. The measured arterial hemoglobin saturation value (SpO2) of the sensors is compared to arterial hemoglobin oxygen (SaO2) value, determined from blood samples with a laboratory CO-oximeter. The accuracy of the sensors in comparison to the CO-oximeter samples measured over the SpO2 range of 70%~100%. Accuracy data is calculated using the root-mean-squared (Arms value) for all subjects, per ISO 9919:2005, Medical Electrical EquipmentParticular requirements for the basic safety and essential performance of pulse oximeter equipment for medical use.
A functional tester is used to measure how accurately Fingertip Pulse Oximeter is reproducing the specified calibration curve and the PR accuracy.
The model of functional tester is Index2 FLUKE simulator and the version is 2.1.3. - Pulse Rate
Display range: 30bpm~250bpm
Measurement range: 30bpm~250bpm
Accuracy: 30bpm~99bpm, ±2bpm; 100bpm~250bpm, ±2%
Resolution: 1bpm - Perfusion Index
Measurement range: 0.2%~20.0% - Probe LED Specifications
Wavelength Radiant Power RED 660±3nm 3.2mW IR 905±10nm 2.4mW NOTE: The information about wavelength range can be especially useful to clinicians.
- Power Requirements
Two AAA alkaline Batteries
Power consumption: Less than 40mA
Battery Life: Two AAA 1.5V, 1200mAh alkaline batteries could be continuously operated as long as 18 hours. - Environment Requirements
Operation Temperature: 5ºC~40ºC Storage/ Transport Temperature: -25ºC~+70ºC
Ambient Humidity: 15%~93% no condensation in operation; ≤93% no condensation in storage/transport Atmosphere pressure: 70kPa~106kPa - Equipment data update period
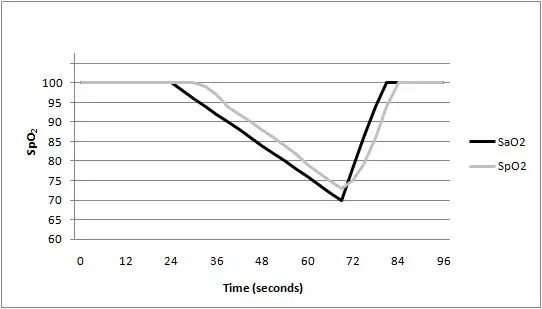
As shown in the following figure. Data update period of slower average is 8s.
- Classification
According to the type of protection against electric shock: INTERNALLY POWERED EQUIPMENT;
According to the degree of protection against electric shock: TYPE BF APPLIED PART, (applied part: the rubber hole of the device);
According to the degree of protection against ingress of water: IP22
According to the mode of operation: CONTINUOUS OPERATION
Clinical Study Summary
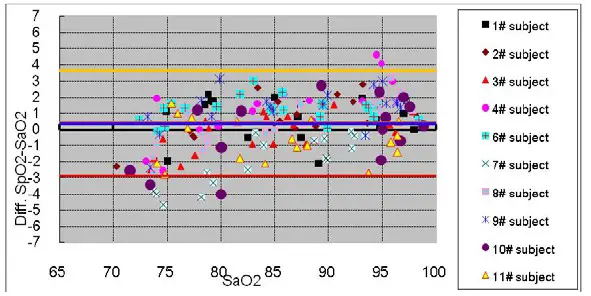
The following details are provided to disclose actual performance observed in the clinical validation study of healthy adult volunteers. The ARMS value analysis statement and Bland-Altman plot of data is shown as following:
ARMS Value Analysis Statement
| Item #pts | 90–100 | 80–<90 | 70–<80 |
| Bias | 78 | 66 | 63 |
| ARMS | 1.02 | 0.40 | -0.48 |
| Item #pts | 1.66 | 1.46 | 1.93 |
Bland-Altman Plot Graphic
Declaration
Guidance and Manufacturer’s declaration – electromagnetic emissions-For all EQUIPMENT and SYSTEMS
| Guidance and Manufacturer’s declaration – electromagnetic emission | ||
| The iP900AP Pulse Oximeter is intended for use in the electromagnetic environment specified below. The customer or the userof iP900AP Pulse Oximeter should assure that it is used in such an environment. | ||
| Emission test | Compliance | Electromagnetic Environment – guidance |
| RF emissions CISPR 11 | Group 1 | The iP900AP Pulse Oximeter uses RF energy only for its internal function. Therefore, its RF emissions are very low and are not likely to cause any interference in nearby electronic equipment. |
| RF emissions CISPR 11 | Class B | The pulse Oximeter (iP900AP) is suitable for use in allestablishments, including domestic establishments and those directly connected to the public low-voltage power supply network that supplies buildings used for domestic purposes. |
| Harmonic emissions IEC 61000-3-2 | Not Applicable | |
| Voltage fluctuations/ flicker emissions IEC 61000-3-3 | Not Applicable | |
Guidance and Manufacturer’s declaration electromagnetic immunity-For all EQUIPMENT and SYSTEMS
| Guidance and Manufacturer’s declaration – electromagnetic immunity | |||
| The iP900AP Pulse Oximeter is intended for use in the electromagnetic environment specified below. The customer or the user of the iP900AP Pulse Oximeter should assure that it is used in such an environment. | |||
| Immunity test | IEC 60601 test level | Compliance Level | Electromagnetic Environment – guidance |
| Electrostatic Discharge (ESD) IEC 61000-4-2 | +/- 6kV contact +/- 8kV air |
+/- 6kV contact +/- 8kV air |
Floors should be wood, concrete or ceramic tile. If floor are covered with synthetic material, the relative humidity should be at least 30%. |
| Power frequency (50/60 Hz) magnetic field IEC 61000-4-8 | 3A/m | 3A/m | Power frequency magnetic fields should be at levels characteristics of a typical location in a typical commercial or hospital environment. |
Guidance and Manufacturer’s declaration electromagnetic immunity
For all EQUIPMENT and SYSTEMS that are not LIFE-SUPPORTING
| Guidance and Manufacturer’s declaration – electromagnetic immunity | |||
| The iP900AP Pulse Oximeter is intended for use in the electromagnetic environment specified below. The customer or the user of the iP900AP Pulse Oximeter should assure that it is used in such an environment. | |||
| Immunity test | IEC 60601 test level |
Compliance Level |
Electromagnetic Environment – guidance |
| Radiated
RF IEC 61000-4-3 |
3 V/m
80 MHz to 2.5 GHz |
3 V/m | Portable and mobile RF communications equipment should be used no closer to any part of the Pulse Oximeter (iP900AP), including cables, than the recommended separation distance calculated from the equation applicable to the frequency of the transmitter. Recommended separation distance |
| OTE 1 At 80 MHz and 800 MHz, the higher frequency range applies. NOTE 2 These guidelines may not apply in all situations, Electromagnetic propagation is affected by absorption and reflection structures, objects and people. | |||
| a Field strengths from fixed transmitters, such as base station for radio (cellular/cordless) telephones and land mobile radios, amateur radio, AM and FM radio broadcast and TV broadcast cannot be predicted theoretically with accuracy. To assess the electromagnetic environment due to fixed RF transmitters, an electromagnetic site survey should be considered. If the measured field strength in the location in which the Pulse Oximeter (iP900AP) should be observed to verify normal operation. If abnormal performance is observed, additional measurements may be necessary, such as reorienting of the relocating the Pulse Oximeter (iP900AP). b Over the frequency range 150 kHz to 80 MHz, fields strengths should be less than 3 V/m |
|||
Recommended separation distances between portable and mobile RF communications equipment and
the EQUIPMENT or SYSTEMS – For all EQUIPMENT and SYSTEMS that are not LIFE-SUPPORTING
| Recommended separation distances between portable and mobile RF communications equipment and Pulse Oximeter (iP900AP) | ||
| The Pulse Oximeter (iP900AP) is intended for use in electromagnetic environment in which radiated RF disturbances are controlled. The customer or the user of the Pulse Oximeter (iP900AP) can help prevent electromagnetic interference by maintaining a minimum distance between portable and mobile RF communications equipment (transmitters) and the Pulse Oximeter (iP900AP) as recommended below, according to the maximum output power of the communications equipment. | ||
| Rated maximum output power of transmitter (W) | Separation distance according to frequency of transmitter (m) | |
| 80 MHz to 800 MHz |
800 MHz to 2.5 GHz |
|
| 0.01 | 0.1167 | 0.2334 |
| 0.1 | 0.3689 | 0.7378 |
| 1 | 1.1667 | 2.3334 |
| 10 | 3.6893 | 7.3786 |
| 100 | 11.6667 | 23.3334 |
| For transmitters rated at a maximum output power not listed above, the recommended separation distanced in meters (m) can be estimated using the equation applicable to the frequency of the transmitter, where P is the maximum output power rating of the transmitter in watts (W) according to the transmitter manufacturer. NOTE 1 At 80 MHz and 800 MHz, the separation distance for the higher frequency range applies. NOTE 2 These guidelines may not apply in all situations. Electromagnetic propagation is affected by absorption and reflection from structures, objects and people. |
||
Possible Problems and Solutions
| Problems | Possible reason | Solution |
| The oximeter fails to display SpO2 and/or PR | 1. Finger is not inserted correctly 2. User’s blood flow is too low to be measured |
1. Make sure that the finger is placed right in between the sensor and LED lights 2. Make sure that nothing is hindering the user’s blood flow |
| SpO2 or PR changes erratically | 1. Finger may not be inserted deep enough 2. Excessive body movement |
1. Insert the finger deep into the chamber 2. Please do not move during measurement |
| The oximeter cannot be powered on | 1. Batteries are drained 2. Batteries might be installed incorrectly 3. The oximeter might be damaged or defective |
1. Please replace the batteries 2. Please refer to ‘Battery Installation’ instruction 3. Please contact local distribution center |
| The display screen turns off suddenly | 1. The oximeter automatically powered off when no signal is detected for more than 8 seconds 2. The batteries are drained |
1. This is normal. Just turn the oximeter on again. 2. Replace the batteries |
| “Error7” is displayedon screen | Err 7 means the emission LED or reception diode is damaged | Please contact local distribution center |
Symbol Definitions
| Symbol | Definition | Symbol | Definition |
| Type BF applied part. | Attention | ||
| IP22 | Protected against dripping water. | ﹪SpO2 | Oxygen saturation |
| PR bpm | Pulse rate (BPM) | Low power indication | |
| PI % | Perfusion Index (%) | SN | Serial No. |
| Storage temperature and relativehumidity | Follow instruction for use | ||
| Manufacturer’s information | Date of Manufacture | ||
| Conformity to WEEE Directive |
Applicable Models
iP900AP
Notes:
- The illustrations used in this manual may differ slightly from the appearance of the actual product.
- The specifications are subject to change without prior notice.
Distributed by:
Innovo Medical
10101 Stafford Centre Dr, Ste B, Stafford, TX, 77477
858-888-9781 [email protected]
www.innovo-medical.com
ALL RIGHTS RESERVED
Issued Date: December 2018