Pictures in manual are for reference only. Please refer to actual product.
IMPORTANT SAFEGUARDS
When using electrical appliances, basic safety precautions should always be followed:
- READ ALL INSTRUCTIONS.
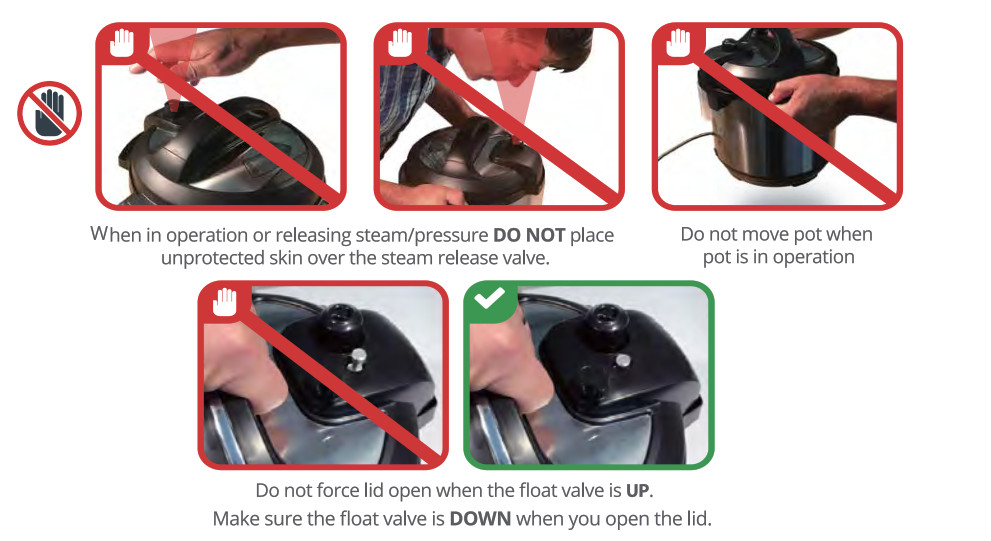
- Do not touch hot surfaces. Only use side handles for carrying or moving.
- Do not place the appliance on or in close proximity to a hot gas or electric burner, or a heated oven; heat from an external source will damage the appliance.
- Do not use near water or flame. Please keep out of direct sunlight.
- Extreme caution must be used when moving the appliance containing hot liquids. Do not move the appliance when it is under pressure.
- Do not use appliance for anything other than intended use.
- Do not use outdoors. Not for commercial use. For household use only.
- This appliance cooks under pressure. Improper use may result in scalding injury. Make certain the appliance is properly closed before operating.
Please see the “Getting Started” section. - Do not fill the appliance over 2/3 full. When cooking foods that expand during cooking such as rice or dried vegetables, do not fill the appliance over 1/2 full. Over filling may cause a risk of clogging the vent pipe and developing excess pressure. Please see the ”Pressure Cooking” section.
- Before each use, check the steam release valve/handle, steam release pipe, anti-block shield and float valve for clogging.
- Do not open the appliance until the appliance has depressurized and all internal pressure has been released. If the float valve is still up and/or the lid is difficult to open, this indicates that the appliance is still pressurized – do not force it open. Any pressure in the appliance can be hazardous. Please see the “Getting Started” section for instructions to safely remove lid.
- Do not use this appliance for deep frying or pressure frying with oil.
- Do not lean over or place your hands or face over the steam release valve/handle or float valve when the appliance is in operation or has residual pressure. Do not touch the metal portion of the lid when the appliance is in operation; this could result in injury.
- Do not cover or obstruct the steam release valve/handle and float valve with cloth or other objects. Obstructing the steam release valve/handle and float valve can create a safety issue and may cause injury.
- Turn the appliance off if steam escapes from the steam release valve/handle or float valve in a steady stream for longer than 3 minutes.
There may be residual pressure in the appliance. Allow the appliance to depressurize naturally or release all excess pressure before opening.
Please see the “Troubleshooting” section. - Turn the appliance off if steam escapes from the sides of the lid and ensure sealing ring is properly installed. Please see the “Getting Started” section.
- To protect against electrical shock, do not immerse the power cord, plugs, or appliance in water or other liquid.
- A short power-supply cord (0.6 m to 0.9 m) is provided to reduce the hazards resulting from it being grabbed by children, becoming entangled in, or tripping over a longer cord.
- Always attach plug to appliance first, then plug cord into the wall outlet. To disconnect, turn appliance “off”, then remove plug from wall outlet.
- Unplug from outlet when not in use and before cleaning. Allow to cool before putting on or taking off parts, and before cleaning or storage.
- Do not operate any appliance with a damaged cord or plug, or after the appliance malfunctions or has been damaged in any manner. Contact Customer Care.
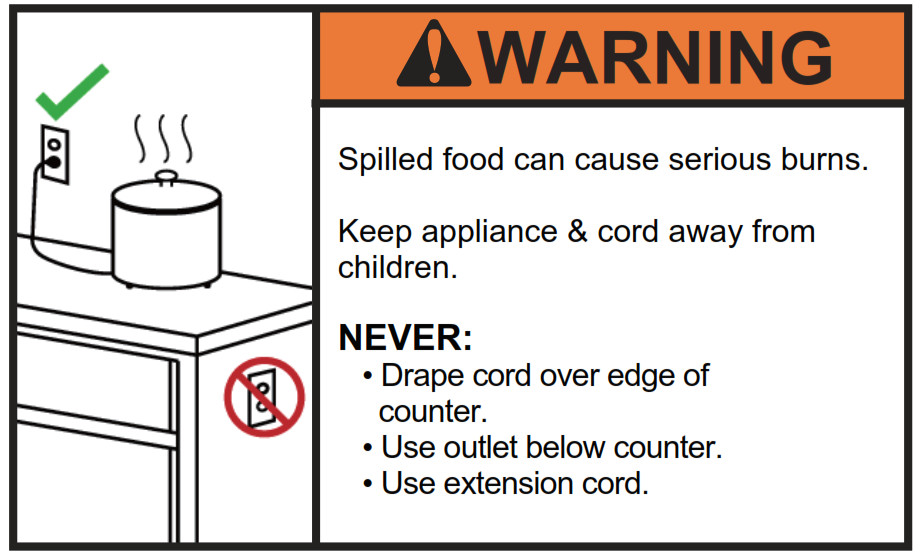
- Do not let power cord hang over edge of table or counter, or touch hot surfaces.
- Intended for countertop use only. Keep the appliance on a stable, heat-resistant platform. Do not place on anything that may block the vents on the bottom of the appliance.
- Spilled food can cause serious burns. Keep appliance and cord away from children. Never drape cord over edge of counter, never use outlet below counter, and never use with an extension cord.
- When cooking meat with skin (e.g. sausage with casing), the skin can swell when heated. Do not pierce the skin as long as it is swollen; this could result in scalding injury.
- When pressure cooking food with a doughy or thick texture, or a high fat/oil content, contents may splatter when opening the lid. Please follow recipe instructions for pressure release method. Once steam is fully released, gently shake the appliance with extreme caution and then release the steam again, if necessary, before removing the lid.
- Before inserting the inner pot into the appliance, wipe the outer surface of the inner pot and cooking element to confirm they are dry and free of food debris.
- Do not attempt to repair, replace, or modify components of the appliance, as this may cause electric shock, fire or injury, and will void the warranty.
- Do not tamper with any of the safety mechanisms.
- Do not use appliance in electrical systems other than 120V/60Hz for North America. Do not use with power converters or adapters.
- Close supervision is necessary when the appliance is used near children.
- This appliance should not be used by children; by individuals whose physical, sensory or mental abilities may prevent safe use of the appliance; or by individuals with limited knowledge of how to use the appliance. Close supervision is needed when using this appliance near these individuals.
- To reduce the risk of electric shock and pressure leakage, cook only in a removable container authorized by the manufacturer.
- The use of accessory attachments not recommended by the appliance manufacturer may cause injuries.
SAVE THESE INSTRUCTIONS

Read and save these safety guidelines.
When using pressure cookers, basic safety precautions should always be followed.

Electrical Shock Hazard Plug into a grounded 3 prong outlet.
Do not remove ground prong.
Do not use an adapter.
Do not use an extension cord.
Failure to follow these instructions can result in death, fire, or electrical shock.
 As per UL safety requirements, a short power supply cord (0.6 m to 0.9 m) is provided to reduce the hazards resulting from entanglement and tripping.
This appliance has a 3-prong grounding plug. To reduce the risk of electric shock, plug the power cord into a grounded (earthed) electrical outlet that is easily accessible.
Only use the power cords included upon purchase with Instant Pot® branded pressure cookers.
Note: ensure the plug is pushed into the socket fully; the loose contact could cause the risk of sparks.
Specifications
| Model | Power supply | Rated Power | Volume | Inner Pot Dimensions | Product Dimensions | Weight |
| Ultra Mini | 700 W | 3 quart | 19-8×12.7cm (7.8×5 in) | 29×25.5×28.5cm (11.4×10.5×11.2 in) |
4.08kg | |
| Ultra60 | 120v∼60Hz | 1000w | 6quart | 15.7×23.9cm (6.2×9.4in.) | 33x31x32cm (13x122x12.6in.) | 5.37kg (11.84lbs) |
| Ultra 80 | 1200 W | 8 quart | 17.5×26.4cm (69x104in) | 37.6×33.8×36.1 cm (14.8×13.5×14.2in.) | 7.12kg (15.7lbs) |
Working Pressure:
Low Pressure: 5.8 – 7.2 PSI (40 – 50 kPa); High Pressure: 10.2-11.6 PSI (70 – 80 kPa)
Keep Warm function: 63 – 78°C(145 ~ 172°F);
Slow Cook function: Low: 82-87.8°C7180-190°F; Med: 87.8-93°C7190-200°F;
High: 93-99°C/200-210°F
Saute function: Low: 135-150°C (275 -302°F); Med: 160-176°C(320 -349°F);
High: 175 – 210°C (347-410°F)
Overview
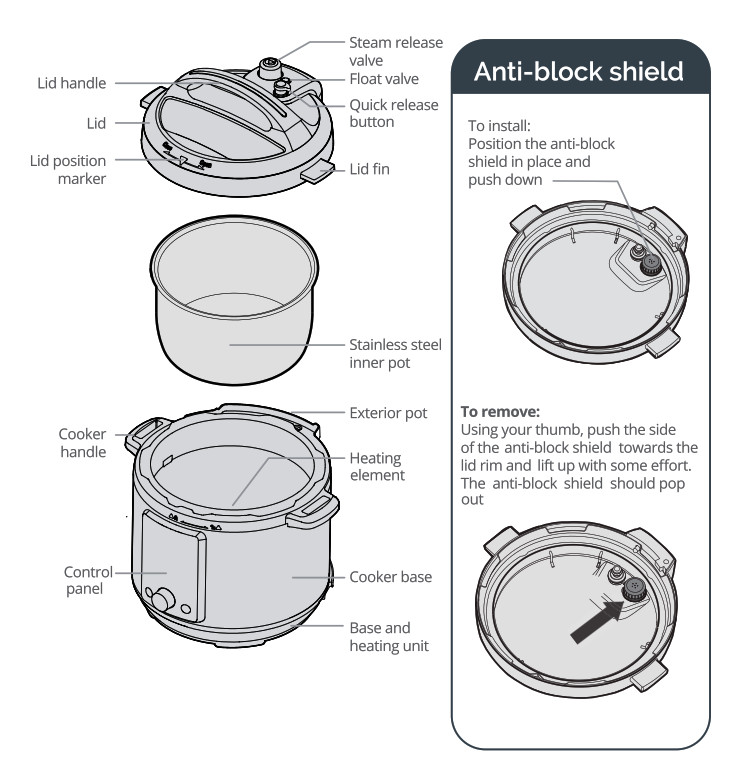
Control and Features
Control Panel
The control panel of your Instant Pot® Ultra Mini/60/80 consists of a large LCD display, a central dial for program selections and adjustments, a Cancel button and a Start button.
 Note that Ultra Mini does not have the Poultry and Multigrain programs.
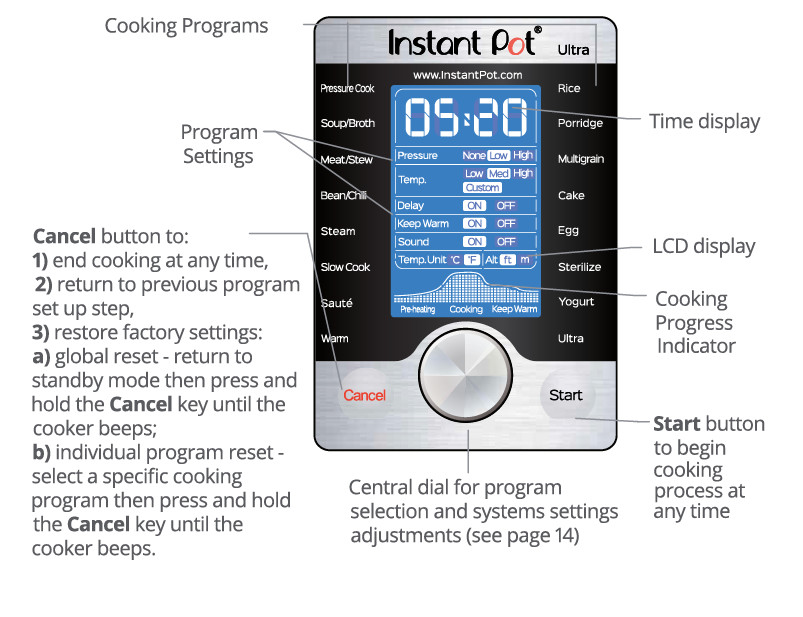
Cooking Program Options
Instant Pot® is a programmed smart cooker that has preset cooking instructions for different food ingredients and cooking methods. It also remembers your most recent program setting per function for a more personalized cooking experience.
Ultra: The ultimate cooking tool to allow full user control of pressure and non-pressure cooking conditions. You can adjust different parameters based on your favourite recipes.
| Programs | Time Range hr:min | High/ Low Pressure | NO Pressure |
Temperature for non-pressure cooking | Delay ON/OFF | Keep Warm ON/OF | Sound ON/OFF |
| Ultra | 0:00 – 99:50 |  |
 |
Low/Med/High/Custom |  |
 |
 |
| Pressure Cook |
0:00 – 6:00 |  |
N/A | N/A |  |
 |
 |
| Soup/ Broth |
0:00 – 6:00 |  |
N/A | N/A |  |
 |
 |
| Meat/ Stew |
0:00 – 4:00 |  |
N/A | N/A |  |
 |
 |
| Bean/ Chili | 0:00 – 4:00 |  |
N/A | N/A |  |
 |
 |
| Steam | 0:00 – 4:00 |  |
 |
N/A |  |
 |
 |
| Slow Cook | 2:00 – 20:00 | N/A |  |
Low/Med/High/ Custom * |  |
 |
 |
Cooking Program Options
| Programs | Time Range hr:min |
High/ Low Pressure |
NO Pressure |
Temperature non-pressure cooking |
Delay ON/OFF |
Keep Warm ON/OFF |
Sound ON/OFF |
| Saute | 0:30 | N/A |  |
Low/Med/High * | N/A | N/A |  |
| Warm | 0:10-99:50 | N/A |  |
Low/Med/High/ Custom * |  |
 |
 |
| Rice | Automatic |  |
N/A | N/A |  |
 |
 |
| Porridge | 0:00 – 4:00 |  |
N/A | N/A |  |
 |
 |
| Multigrain | 0:00 – 4:00 |  |
N/A | N/A |  |
 |
 |
| Cake | 0:00 – 4:00 |  |
 |
N/A |  |
 |
 |
| Egg | 0:00 – 0:30 |  |
N/A | N/A |  |
 |
 |
| Sterilize ** | 0:00 – 4:00 |  |
 |
N/A |  |
N/A |  |
| Yogurt | 0:30 – 99:30 | N/A |  |
Low/Med/High/ Custom * | N/A | N/A |  |
* Med setting is not available on Ultra Mini.
** For dairy pasteurization and water canning only. Please refer to ‘USDA Complete Guide to Home Canning1. The Ultra has not been tested by USDA for food safety in pressure canning.**
Getting Started
- Read warning cards and warning labels. Remove all packaging materials and removable warning cards from the cooker and accessories.
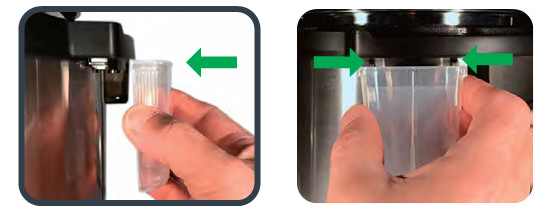
Install the condensation collector at the rear of the cooker by aligning the top of the collector with the guides on the cooker and press in.
- Install the steam release valve onto the lid if it is not already installed.
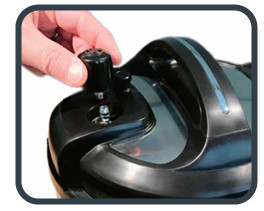
 The steam release valve fits loosely. It does not lock tightly into the lid.
 - Remove the lid by holding the handle, turning the lid counter-clockwise and lifting the lid.

- Remove the inner pot from the pressure cooker. Add food and liquid into the inner pot as the recipe directs. If steaming, place the steam rack on the bottom of the inner pot first. Always add at least 2 cups (~18 fl oz / 500 mL) of liquid for minimum liquid requirement. See “Cooking and Safety Tips” on page 20-21.
- Make sure the outside of the inner pot is dry prior to placing the inner pot back into the pressure cooker. Make sure there is no food debris on the heating element.
- Make sure the sealing ring rack is completely set in the groove on the inside of the sealing ring. Ensure there is no deformation on the sealing ring rack.
Do not attempt to repair a deformed ring rack. - Place the lid on the pressure cooker, align the ▼ mark on the lid with the ‘
 (unlock) mark and turn clockwise to the
  (lock) mark.
 - The Quick Release button will automatically reset and pop up to the Sealing position when the lid is closed (button up = sealed).

Pressure Cooking
The following are all pressure cooking programs: Ultra, Pressure Cook, Meat/Stew, Soup/Broth, Bean/Chili, Steam, Sterilize, Rice, Multigrain, Porridge, Egg and Cake.
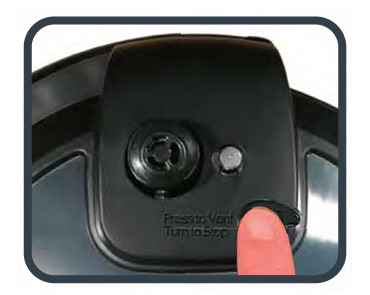
- How the Quick Release button works: when the lid is closed, the Quick Release button will automatically pop up to the Sealing Position (button up = sealed).
For Quick Release – press down the Quick Release button until it clicks and locks into the Venting position.
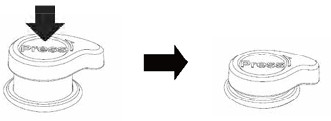 To Stop Quick Release – slightly turn the Quick Release button counter clockwise until it pops up to the Sealing posit

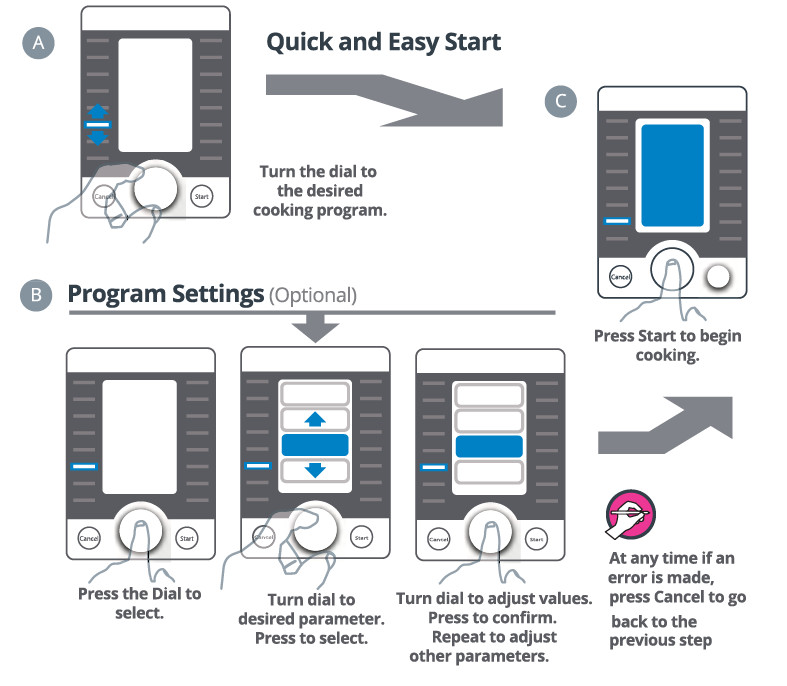
- Connect the power cord. The default cooking program Pressure Cook flashes and the LCD displays the program settings. Press Start to begin cooking right the way, or adjust program settings according to page 13.
When the cooker is idle for 30 seconds, the LCD will display OFF, indicating
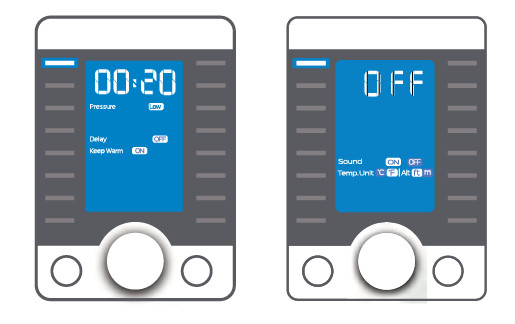
- To begin cooking, follow these steps:
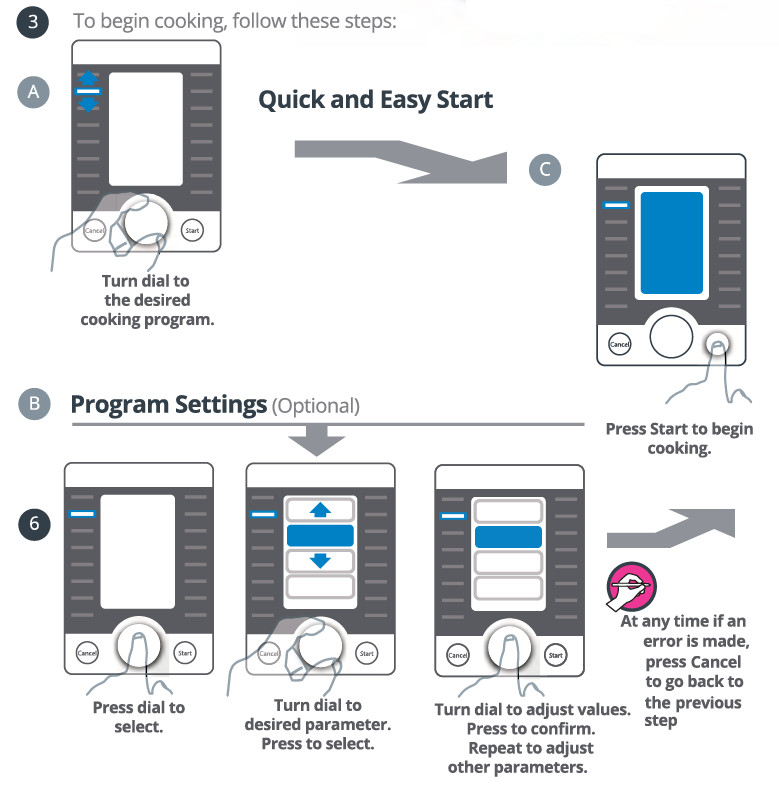
 Systems Settings (Sound ON/OFF, Temperature Unit: °F/°C and Altitude: ft/m) Press the Cancel button to return the cooker to standby mode displaying OFF. Push and hold the central dial for 5 seconds and then release the hold. Rotate to select the parame-teryou wish to change, press the central dial and rotate to make adjustments. Press central dial again to confirm the change. Press Start button to exit.
Initial Test Run (Optional) - Add 3 measuring cups of water to the inner pot (~ 25 fl oz / 750 mL).
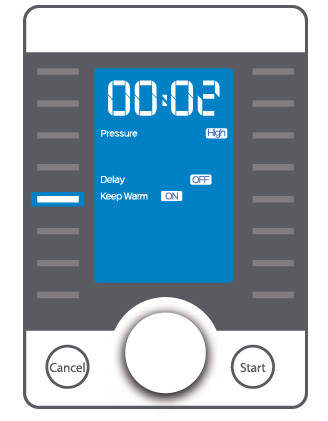
- Plug-in the cooker. Rotate the central dial to Steam, set cooking time to 2 minutes. See diagram below.

• Inner pot should not be more than 2/3 full. For food that expands during cooking such as rice or dried vegetables, inner pot should not be more than 1/2 full. Please note that certain foods such as applesauce, cranberries, pearl barley, oatmeal or other cereals, split peas, noodles, pasta and rhubarb can foam, th or sputter and can clog the steam release valve.
• Make sure the steam release valve, float valve and anti-block shield are clean and free from debris. - Depending on the amount of food and its temperatureTthe preheating cycle can last from 10 to 40 minutes. As the cooker heats up and pressure builds, the float valve will rise. When working pressure is reached, the cooker enters the cooking cycle and the LCD displays the remaining cooking time.
- When cooking is finished, the cooker will either be in Keep Warm mode or in standby mode displaying OFF.
- Release pressure using one of the following methods (refer to recipe):
Natural Release: Allow the cooker to cool down naturally until the float valve drops down. This may take 10 to 40 minutes, or even more, depending on the amount of food in the cooker. Place a wet towel on the metal part of lid to speed up cooling (do not cover the steam release valve).
Quick Release: Press the quick release button until it clicks into the Venting position. Let steam out until the float valve drops down. Never pull out the steam release valve while releasing steam as escaping steam is extremely hot and can cause scalds. For food with large liquid volume or starch content, use Natural Release instead as thick liquid may splatter.
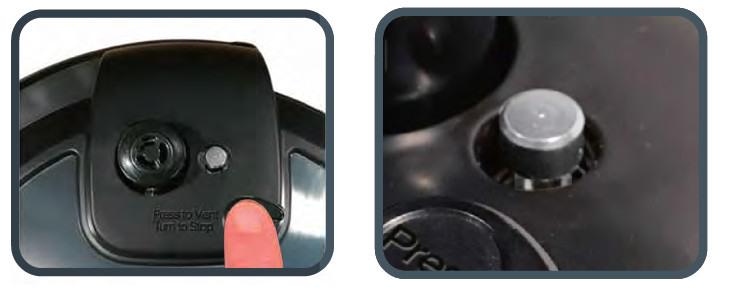 Turn the lid counterclockwise and lift. Make sure the float valve is down before opening the lid.
Non-Pressure Cooking
The following are non-pressure cooking programs: Saute, Yogurt, Ultra, Slow Cook, and Warm.
- Connect the power cord. The default cooking program Pressure Cook flashes.
Slow Cook, Warm and Ultra
An Instant Pot® glass lid may be used. If using the pressure cooking lid, make sure the steam release valve is in Venting position.
Saute
Choose temperatures between Med (for stir-frying), Low (for simmering or thickening sauce) and High (for pan searing or browning meat).
When working temperature has reached, the LCD displays Hot.
Add food to the inner pot and begin sauteing. Do not use any lid for the Saute program or there will be a warning sound.
The saute time is set at 30 minutes as a safety precaution.
Making Yogurt
- 1. Heat Milk
a) Add milk to the inner pot.
b) Connect the power cord. The LCD displays OFF indicating that the cooker is in standby state.
c) Rotate the central dial to locate the Yogurt program, and then press to select it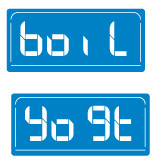
d) Press the central dial again to set the desired heating Time. Set the time and press central dial to confirm.
e) Rotate the central dial to Temp and press the central dial. Select High temperature for boiL. Press Start and let the milk heat.
f) When the cooking cycle has finished, the LCD displays Yogt.
 To make yogurt in containers instead of the inner pot, modify step 1 (Heat Mlilk): fill containers to 90% full with milk, add 1 cup (-8.5 fl oz / 250 mL) of water to the inner pot, place containers on a steam rack in the inner pot, close the lid, the quick release button will automatically reset to Sealing position.Use the central dial to select the Steam function and set the cooking time to 2 minutes. Once complete, use the natural release method then open the lid and continue with steps 2 to 4.
 - Cool Milk
a) Remove the inner pot and place it on a wire rack.
b) Allow the milk to cool to 115°F/46°C Test the milk temperature with a thermometer. - Add Starter Cultur
a) Add starter culture to the warm milk in the inner pot. Stir.
b) Place the inner pot back into the cooker and close the lid.
Non-pressure cooking, the steam release valve can be in Venting or Sealing position.
- Ferment Yogurt
a) Rotate the central dial to locate the Yogurt program, and then press to select.
b) Press the central dial again to set the desired fermentation Time.Press central dial to confirm.
c) Move selection frame to Temp to adjust fermentation temperature. Press central dial to confirm.
d) Press the Start button. The fermentation process starts.
e) When the cooking cycle has finished, the LCD displays Yogt.
f) Remove the lid by turning it counterclockwise and then lifting.
g) Store yogurt in clean jars and refrigerate.
Cooking and Safety Tips
Safety Tips

- Extreme caution should be taken when pressing the Quick Release button. Keep hands and face away from the steam release openings.
Failure to comply may result in scalding or serious injury. - Do not open the lid until pressure inside the pot is completely released.
As a safety feature, until the float valve drops down the lid is locked and cannot be opened. Do not force lid open. - When opening the lid, the inner pot may adhere to the lid. This is caused by vacuum due to cooling. To release the vacuum, press the Quick Release button to the Venting position.
- If the float valve is stuck, press the Quick Release button to the Venting position. Once all the steam is released, push the float valve down with a pen or long stick.
- Follow the recipe instructions for releasing pressure. With the Quick Release method, begin immediately upon completion of pressure cooking; otherwise the food may be overcooked. With the Natural Release method, wait for the amount of time specified in the recipe. Typically, the Quick Release method is used for delicate foods such as custards and fresh vegetables; the Natural Release method is used for meats, soups and grains.
- Always add at least 2 cups (~18 fl oz / 500 mL) of water or other liquids so enough steam can be generated to cook under pressure. Liquids include cooking sauces, wine, beer, stocks, fruit juices and vegetable juices, etc.
- Oils and oil-based sauces do not have enough water content and will not account for the required liquid volume.
- For extra flavor, use the Saute function as you would when cooking with conventional cookware. For example, brown the meat and vegetables for a stew before adding liquids and cooking under pressure.
- Time to pressure and cooking time will vary according to the temperature and quantity of the ingredients. Food that is cold or frozen will take longer to cook than food that is at room temperature.
- When using the Delay program, allow sufficient cooling down time before serving.
- The Delay program is not recommended for porridge, oatmeal or other foamy and thick liquids. Cooking progresses should be monitored when cooking these foods.
Care and Cleaning
 Unplug your Instant Pot® and let it cool to room temperature before cleaning.
- The inner pot and lid are both dishwasher safe
- Remove the inner pot and lid and wash with detergent. Rinse with clear water and wipe dry with a soft cloth.
- Wipe the pressure cooker base rim and slot dry with cloth to prevent rusting of the exterior pot rim.
- Remove the sealing ring and anti-block shield from the underside of the lid. Wash with warm, soapy water, rinse with clear water and wipe dry with a soft cloth.
- The sealing ring must always be properly positioned on the underside of the lid.
- Clean the outer body with a damp soft cloth or sponge
- Never use harsh chemical detergents, scouring pads or powders on any of the parts or components.
- Periodically check that the steam release valve and float valve are in good working order and free of debris.
Troubleshooting
If you experience any problems with the cooker, need technical assistance or product return information, please contact the Instant Pot support team using the methods below:
• Create a support ticket: www.InstantPot.com/support/
• Email:
• Call 1-800-828-7280 ext 2 for the customer care team.
You can also find tips, videos and FAQs on www.InstantPot.com/faq/
The issues in the following tables do not always indicate a faulty cooker.
Please examine the cooker carefully before contacting the support team.
| Problem | Possible reason | Solution | |
| Difficulty with closing the lid | Sealing ring not installed properly | Position the sealing ring | |
| Float valve in the popped-up position | Slightly press the float valve downward | ||
| Difficulty with opening the lid | Pressure inside the cooker | Position the steam release handle to the venting position to release the internal pressure. Open the lid after the pressure is completely released | |
| Float valve stuck at the popped-up position | Ensure steam is completely released by turning steam release handle to Venting position, Press the float valve lightly with a long utensil.
Open the lid cautiously and clean the float valve and lid before the next use. |
||
| Steam leaks from the side of the lid | No sealing ring | Install the sealing ring | |
| Sealing ring damaged | Replace the sealing ring | ||
| Food debris attached to the sealing ring | Clean the sealing ring | ||
| Lid not closed properly | Open then close the lid again | ||
| Float valve unable to rise | Too little food or water in inner pot | Add water according to the recipe | |
| Float valve obstructed by the lid locking pin | Close the lid completely, see “Getting Started” section | ||
| Steam comes out from the steam release valve non-stop | Steam release valve not in sealing position | Turn the steam release handle to the sealing position | |
| Pressure control fails | Contact support | ||
| Steam leaks from float valve for over 2 minutes | Food debris on the float valve silicone seal | Clean the float valve silicone seal | |
| Float valve silicone ring worn- out or missing | Replace the float valve silicone ring | ||
| Display remains blank after connecting the power cord | Bad power connection or no power | Inspect the power cord to ensure a good connection, check if the power outlet is active | |
| Cooker’s electrical fuse has blown | Contact support | ||
| All LCDs flash with a code appearing on screen and the warning beep is ON | C1 | Faulty temperature sensor | Contact support |
| C2 | Faulty temperature sensor | Contact support | |
| C5 | Temperature is too high because inner pot is not placed into the cooker base | Insert the inner pot properly | |
| Temperature is too high because there is no water in inner pot | Put food and water in the inner pot | ||
| C6 | Faulty pressure sensor | Contact support | |
| C6H | Faulty HIGH pressure sensor | ||
| C6L | Faulty LOW pressure sensor | ||
| Rice is half cooked or too hard | Too little water | Adjust dry rice and water ratio according to recipe | |
| Lid opened too early | After cooking cycle completes, leave the lid on for 5 more minutes | ||
| Rice is too soft | Too much water | Adjust dry rice and water ratio according to recipe | |
| Occasional ticking or light cracking sound | The sound of power switching and expanding pressure board when changing temperature | This is normal | |
| Bottom of the inner pot is wet | Wipe bottom of the inner pot dry before cooking | ||
| Self-diagnosed Warning Displays | The word “Food burn” or ‘burn’ is displayed because food is burnt on inner pot | Remove food from cooker and deglaze inner pot, then reintroduce food | |
| The word “no Pr” is displayed because there is not enough pressure | Add a minimum 1.5 cups (375 mL) of a thin liquid to the inner pot | ||
| The word “PrSE” is displayed because of excess pressure. | If pressure has not fully released after 60 minutes contact the Customer Care Team. | ||
| The word “Lid” is displayed because lid is not placed properly | Make sure the lid is closed properly. Do not use the lid during the Sauté Smart Program | ||
Warranty
Limited Warranty
This Limited Warranty is effective for one year from the date of original consumer purchase. Proof of original purchase date and, if requested by an authorized Instant Pot Company (“IPC”) representative, return of your appliance as IPC may direct at IPCs expense, is required to obtain service under this Limited Warranty.
When this appliance is operated and maintained in accordance with written instructions attached to or furnished with the product. Instant Pot Company will pay for either (i) repair labor to correct defects in materials or workmanship that existed when this appliance was purchased or (ii),at its sole and exclusive discretion, replace the appliance for a period of one (1) year from the date of purchase. In the event that your appliance is replaced, the Limited Warranty on the replacement appliance will expire at the original date (i.e.12 months from the original purchase date).
This Limited Warranty extends only to the original purchaser and use of the appliance in the United States of America and Canada. This warranty does not cover units that are used outside of the United States of America and Canada.
Any modification or attempted modification to your appliance may interfere with the safe operation of the appliance and will void this Limited Warranty.This Limited Warranty does not apply in respect of any appliance or any part thereof that has been altered or modified from its factory settings unless such alterations or modifications were expressly authorized by an IPC representative.
IPC is not responsible for shipping costs related to warranty service, save and except for shipping costs associated with the return of your appliance as provided herein.
Limitation and Exclusions
The liability of IPC, if any, for any allegedly defective appliance or part shall in no circumstances exceed the purchase price of a comparable replacement appliance.
This Limited Warranty does not cover:
- Damage resulting from accident, alteration, misuse, abuse, neglect, unreasonable use, use contrary to the operating instructions, normal wear and tear, commercial use, improper assembly, disassembly, failure to provide reasonable and necessary maintenance, fire, flood, acts of God or repair by anyone unless directed by an Instant Pot Representative.
- Repairs where your appliance is used for other than normal, single-family household use or when it is used in a manner that is contrary to published user or operator instructions.
- Use of unauthorized parts and accessories, or repairs to parts and systems resulting from unauthorized repairs or modifications made to this appliance.
The cost of repair or replacement under these excluded circumstances shall be borne by you.
Disclaimer of Implied Warranties
IMPLIED WARRANTIES, INCLUDING ANY WARRANTIES OF MERCHANTABILITY OR IMPLIED WARRANTY OF FITNESS FORA PARTICULAR PURPOSE, ARE HEREBY LIMITED TO ONE YEAR OR THE SHORTEST PERIOD ALLOWED BY LAW. Some states or provinces do not allow limitations to the duration of implied warranties of merchantability or fitness, so this limitation may not apply to you.
Disclaimer of Representations Outside of Warranty
IPC makes no representation about the quality, durability, or need for service or repair of this appliance other than the representations contained in this warranty.
Limitation of Remedies; Exclusion of Incidental and Consequential Damage
YOUR SOLE AND EXCLUSIVE REMEDY UNDER THIS LIMITED WARRANTY SHALL BE PRODUCT REPAIR OR REPLACEMENT AS PROVIDED HEREIN. IPC SHALL NOT BE LIABLE FOR INCIDENTAL OR CONSEQUENTIAL DAMAGES ARISING OUT OF OR IN CONNECTION WITH THE USE OR PERFORMANCE OF THE APPLIANCE OR DAMAGES WITH RESPECT TO ANY ECONOMIC LOSS, PERSONAL INJURY, LOSS OF PROPERTY, LOSS OF REVENUES OR PROFITS, LOSS OF ENJOYMENT OR USE, COSTS OF REMOVAL, INSTALLATION OR OTHER CONSEQUENTIAL DAMAGES OF WHATSOEVER NATURE.
You the buyer may have other rights and remedies under your state’s or province’s applicable laws, which are in addition to any right or remedy which may be available under this limited warranty.
Warranty Registration and Service
Please visit http://instantpot.com/support/register/ to register your new Instant Pot and validate your warranty within thirty (30) days of purchase. You will be asked to provide the store name, date of purchase and model number (found on the base of your cooker) along with your name and address.
The registration will enable us to keep you up to date with product developments, recipes and contact you in the unlikely event of a product safety notification. By registering, you acknowledge to have read and understood the instructions for use, and warnings set forth in the accompanying instructions.
To obtain service under this warranty, please call the Customer Care Team at 1-800-828-7280. If IPC is unable to resolve the problem, you may be asked to send your appliance to the Appliance Service Department for quality inspection. IPC is not responsible for shipping costs related to warranty service, save and except for shipping costs associated with the return of your appliance from Canada or within the 48 contiguous states and the District of Columbia of the United States of America, as provided herein. When returning your appliance, please include your name, address, phone number, proof of the original purchase date as well as a description of the problem you are encountering with the appliance.
Instant Pot® Company
11 – 300 Earl Grey Dr. Suite 383
Ottawa, Ontario
K2T1C1
Canada
Telephone: +1 800 828-7280
Fax: +1 (613) 800-0726
Web: www.lnstantPot.com
Europe Email:
US and Canada E-mail:
To enhance your experience with Instant Pot®, join the official Instant Pot Community
Facebook.com/groups/instantpotcommunity

Instant Pot® Free Recipe App & More
Copyright® Instant Pot® Company


Instant Pot DUO Multi-Use Pressure Cooker User Manual
Getting Started Guide

https://instantpot.com/portfolio-item/duo-6-quart/
Full manual and instruction videos available at instantpot.com
Register your product today at instantpot.com/support/register
Hello! Thank you for welcoming us into your kitchen.
Having families ourselves, we developed the Instant PotTM DuoTM to allow busy families and professionals alike to cook healthy, delicious meals more easily and in less time.
We have partnered with chefs, authors and bloggers to compile a collection of recipes that we hope you enjoy!
Happy Cooking!

Robert J. Wang
Founder & Chief Innovation Officer
Download the Instant Pot App
• 1000+ Recipes
• New User Tips
• Getting Started Videos

- Remove all packaging material from in and around the cooker, and verify that all parts are accounted for.
- Place the cooker on a stable, level surface, away from external heat sources.
- Read all Important Safeguards in the included Safety, Maintenance & Warranty booklet before use. Failure to do so may result in property damage and/or personal injury.
- Follow Care & Cleaning instructions in the included Safety, Maintenance & Warranty booklet to wash the cooker before cooking.
- Do not remove safety warning stickers from lid, serial number from bottom, or rating label from back of cooker base.

Never use the cooker on a stovetop. Do not place appliance on or in close proximity to a hot gas or electric burner, or a heated oven; heat from an external source will damage appliance.
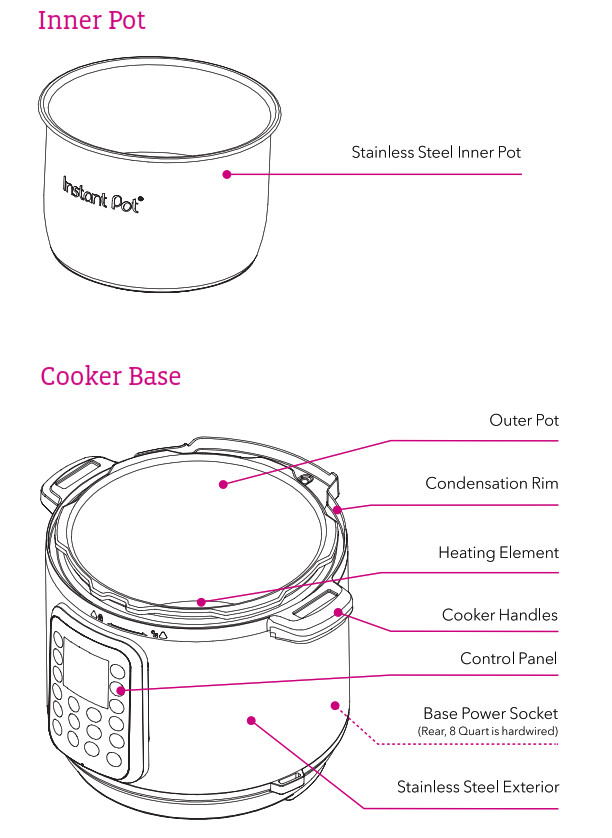
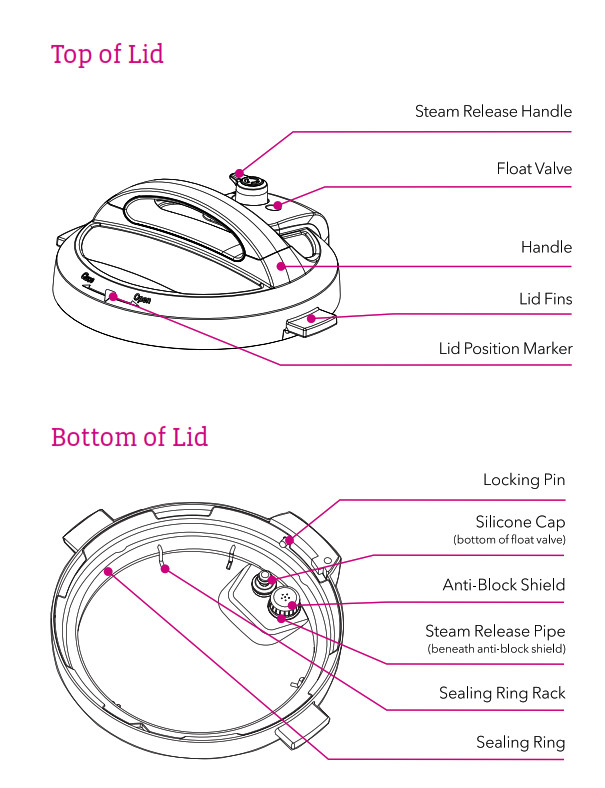
Images are for reference only. Refer to actual product.

When cooker is plugged in, it will play a jingle when the lid is opened and closed.
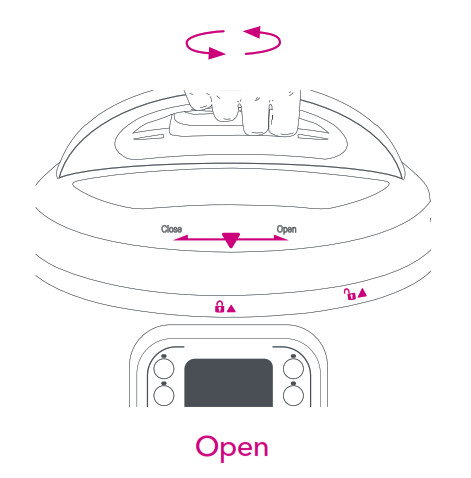
Open: Grip handle and turn lid counter-clock-wise until symbol on lid is aligned with
 symbol on rim of cooker base. Lift lid up and
off of cooker base.
*Note: Always check lid for damage prior to cooking.
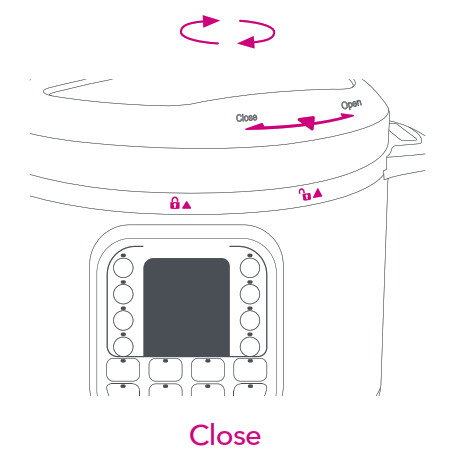
Close: Grip handle and align the  symbol on lid with
 on rim of cooker base. Lower lid into track, then turn lid clockwise until
  symbol on the lid lines up
with
 indicator on base.
Remove: Pull sealing ring out from behind sealing ring rack.
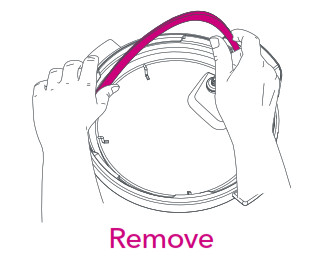
Inspect sealing ring rack. It should be centered in the lid and an even height all the way around.
Sealing ring must be installed before use.
Install: Place sealing ring over sealing ring rack and press into place. Ensure entire sealing ring is snug behind sealing ring rack.
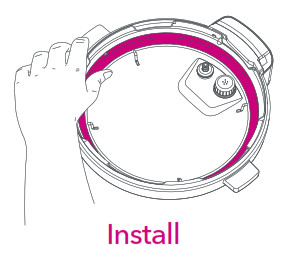
After closing the lid, the sealing ring creates an airtight seal between lid and cooker base.
The sealing ring is an integral part of product safety. Replace your sealing ring every 12-18 months or when deformation or damage is noticed.
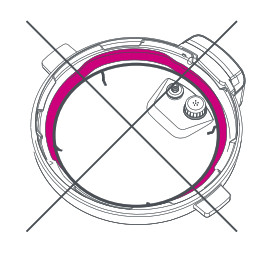

Always check for cuts or deformations in sealing ring prior to cooking. Only use authorized Instant Pot® sealing rings. Failure to follow these instructions may cause food to discharge, which may lead to personal injury or property damage.
Sealing rings may stretch over time. Do not use a stretched or damaged sealing ring. If puckering occurs, replace sealing ring.
The float valve has 2 positions. It pops up to indicate when the cooker is pressurized, and lowers into the lid when the cooker is depressurized.
Refer to “Venting Methods” section in this Guide for information on releasing pressure.
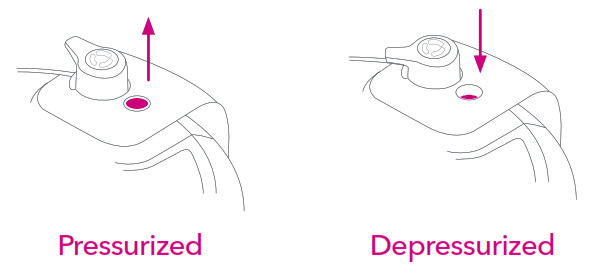
Remove: Place one finger on the flat top of float valve. Turn lid over. Detach silicone cap from bottom side of float valve. Remove float valve from top of lid. Do not discard float valve or silicone cap.
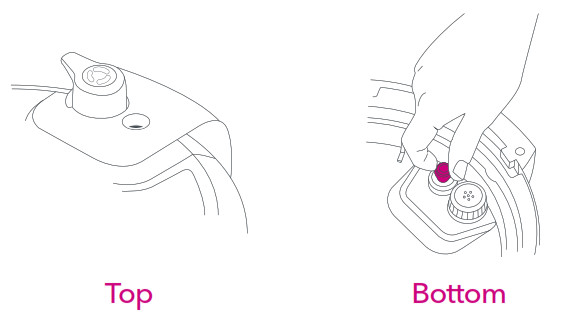
The float valve and silicone cap must be installed before use to seal in pressurized steam.
Install: Drop float valve into float valve hole on top of lid. Place one finger on the flat top of float valve. Turn lid over. Attach silicone cap to bottom of float valve.

While float valve is up, contents of cooker are pressurized. Do not touch the float valve while the cooker is pressurized. Do not attempt to remove the lid while the cooker is pressurized.
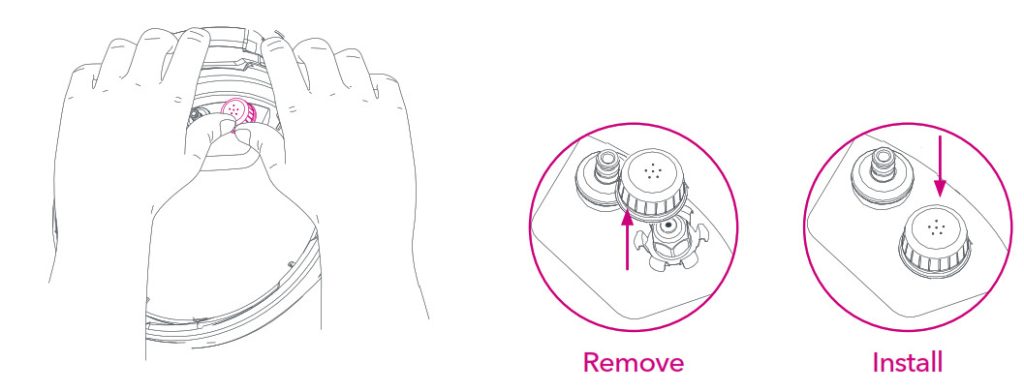
Remove: Grip lid and press firmly against side of anti-block shield (pressing towards side of lid and up) until it pops off the prongs underneath.
Anti-block shield must be installed before use and cleaned frequently.
Install: Place anti-block shield over prongs and press down until it snaps into position.
Anti-block shield prevents food particles from coming up through the steam release pipe, assisting with pressure regulation.
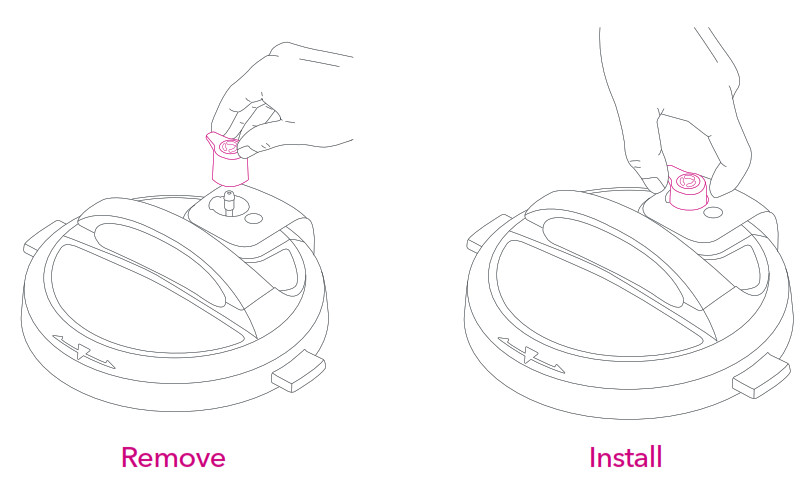
Remove: Pull steam release handle up and off steam release pipe.
Steam release handle must be installed before use, and cleaned frequently.
Install: Place steam release handle on steam release pipe and press down. Fits loosely when installed properly, but will remain in place when the lid is turned over.
Remove inner pot from cooker base and wash with hot water and dish soap before first use.
Wipe outer surfaces of inner pot and heating element to ensure they are dry and free of food debris. Failure to do so may damage the cooker.
Place inner pot into cooker base before cooking. Food must be placed only in the inner pot, not cooker base.
The inner pot is an integral part of product safety. Always use an authorized Instant Pot® inner pot made for this model when cooking. Failure to do so may cause personal injury or property damage.
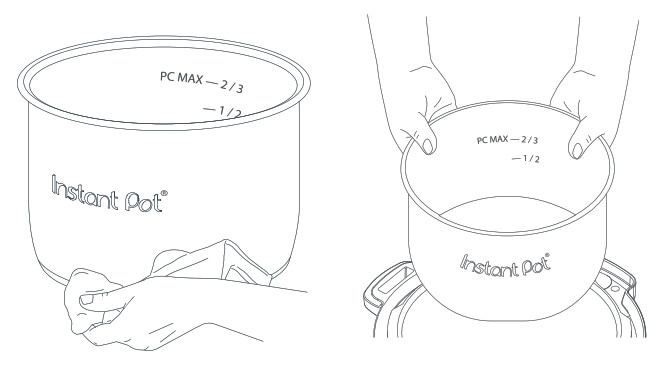
*Note: Always check inner pot for dents or deformations prior to cooking.

To avoid risk of personal injury and/or property damage, do not pour food or liquid into cooker base.
Do not fill the inner pot higher than the PC MAX — 2/3 line (Pressure Cooking Maximum), as indicated on the inner pot.
Exercise extreme caution when cooking and venting food such as applesauce, cranberries, pearl barley, oatmeal, split peas, noodles, etc., as these foods may foam, froth, or spatter, and may clog the steam release pipe and/or steam release valve. Do not fill the inner pot higher than the — 1/2 line when cooking these foods.
Install: On back of cooker base, align grooves on condensation collector over tabs and push condensation collector into place.
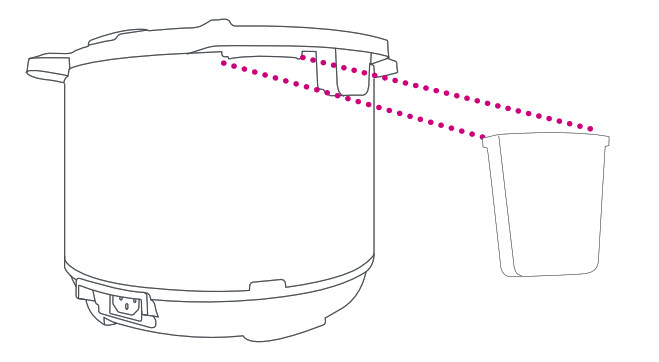
The condensation collector accumulates excess water and should be installed before cooking. Must be emptied and rinsed after use.
Remove: Pull condensation collector away from cooker base. Do not pull down on condensation collector.
Once cooking completes, there are 2 methods to release pressure:
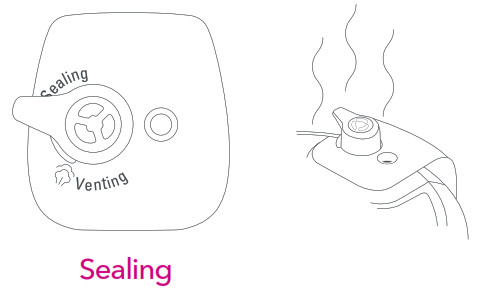
Leave the steam release handle in the “Sealing” position. The cooker dissipates heat so pressure releases naturally over time.
This method must be used when cooking food such as soups, stews or chilis, as well as food that expands, such as beans and grains.
Note: Depressurization time will vary based upon volume of food and liquid.
May take 10-40 minutes, or longer.
Move steam release handle from “Sealing” to “Venting”.
A continuous stream of steam will release through the top of the steam release handle until the float valve drops into the lid.
Note: It will be loud!

If spatter occurs, move the steam release handle back to “Sealing”, and try again after a few minutes.
If spatter continues, use NR to vent remaining pressure.
Float valve will drop when cooker has depressurized. Do not attempt to open the lid while the float valve is still popped up.

- Add 3 cups (24 oz / 750 mL) water to inner pot.
- Insert inner pot into cooker base.
- 3 & 6 Quart: Secure power cord to base connection socket. Ensure connection is tight.
Connect power cord to a 120V power source.
Display indicates “OFF”. - Align on lid with on cooker base.
Lower lid into track, then turn lid clockwise until jingle sounds. - Turn steam release handle to “Sealing” position.
- Select Smart Program: Pressure Cook.
- Use the + / – keys to adjust cook time to “00:05” minutes.
Note: The Instant Pot will save any customization made to cook time.
After 10 seconds, cooker displays “On” to indicate that it has begun Pre-heating. - Float valve rises when the cooker has pressurized
Once pressurized, Cooking begins and display changes
from “On” to cook time countdown. - When the Smart Program completes, the cooker begins
Keep Warm or display indicates “End”. - Turn steam release handle to “Venting” position.
Steam will release through top of the steam release handle.
Float valve will drop when the pressure has been fully released. - To open, turn the lid counter-clockwise until a jingle sounds.
- Discard water and dry inner pot.
- Start cooking!
For details on Smart Programs and operation instructions, view the full manual at instantpot.com
- Cancel
Press to stop a Smart Program at any time. Cooker returns to Standby and display indicates “OFF”. - Delay Start
Postpone cooking up to 24 hours. Select a Smart Program and if desired, adjust the cook time, then press Delay Start to turn the setting on. Use the + / – keys to adjust the number of hours before cooking will begin. - Keep Warm
Setting turns on by default after cooking completes on all Smart Programs except Sauté and Yogurt. Once Smart Program is selected, press Keep Warm to turn the setting off. - Sound On
When in Standby, press and hold “+” key until display indicates “S On”. - Sound Off
When in Standby, press and hold “–” key until display indicates “SOFF”.
Note: Error code alerts cannot be silenced.
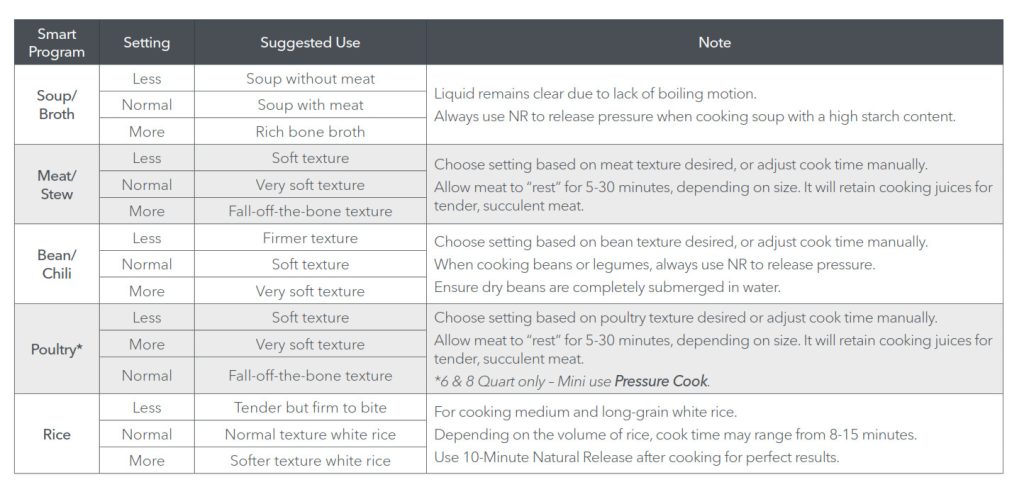
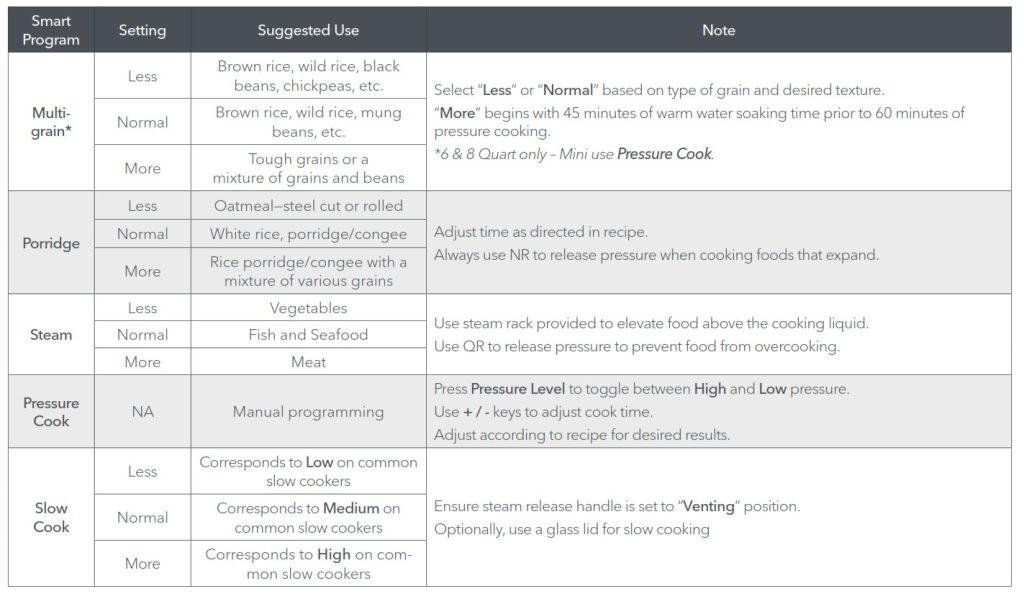

Pressure cooking Smart Programs operate at High (10.2 ~ 11.6psi) or Low (5.8 ~ 7.2psi) pressure. Higher pressure results in higher temperature.

Register your product today at: instantpot.com/support/register
Copyright © 2019 Instant Brands™ IncInstant Brands Inc.
11 – 300 Earl Grey Dr., Suite 383
Ottawa, Ontario
K2T 1C1
Canada1-800-828-7280
For See Instantpot Maker Recipe:
FAQS
Can the Instant Pot be used for canning?
No. This is because you can not verify that the pressure remained consistent the entire time. For example, to can low-acid foods and meat you need to first determine your elevation. In the area on KS I live in over 2,000 ft above seal level. As such, I have to pressure can at 15 psi for the entire time the recipe calls for, and if the pressure drops below 15 psi the I have to start the time over once I get it back to 15 psi. If these guidelines are not followed, there is a significant risk that botulism spores are not destroyed. Home canning is both a science and an art, but do it wrong and you can kill someone.
Is it difficult to clean?
The cooking pot itself is stainless steel, and very easy to clean. There are two normal ways for your reference.
1. After cooking, you could place stainless steel inner pot in sink and fill with soapy water, then clean by hand last after cleaning up the kitchen, a simple swish swish with a clean sponge or brush is all it takes. This way will be more easier.
2. You could cook with at least 1/2 c water in it, preferably 2c. Then clean by hand after the water become cold.
3. Hint, if you do burn something on the bottom or get a sticky mess, you could soak inner pots with a couple tablespoons of baking soda and hot water over night will often lift whatever has been stuck. One can increase the amt of baking soda for a second soak if needed.
Hope our answer will help you.
Other than the capacity, are all the features on the 8Qt the same as the 6 Qt?
The features are the same, however, the actual cooking capacity of the 8 quart pot is 6.34 quarts (6 litres), and the pot actually says “Max” at the 6 litre line. It cannot be filled all the way up with food/liquid when you are cooking, per the manufacturer’s guidelines. So unfortunately, if you purchase the 6 quart pot, the actual cooking capacity would be even lower. I purchased the 8 quart, and was disappointed to find out that the actual cooking capacity is just a hair over 6 quarts. Hope this helps.
what is the psi ?
They state pounds per square inch because an electric pressure cooker can’t reach the same high/low pressures as a stove top model.
This brand gets about as high as you can get out of an affordable electric pressure cooker, many other brands are much, much lower. You need to compare these two values between models and brands.
One factor of pressure is the watts needed to heat it, your wall outlets have limits, just so much you can load the outlet with, other problem price vs what someone is willing to pay.
This pressure cooker has two watt models, go with the higher one if you can.
Understand, this psi problem will increase your cooking times slightly vs a stove top, the manual should tell you what percent to adjust the cook time by if doing it manually.
You most likely are talking about 1-2 minutes on a 15-20 minute recipe. What you are getting is a convenience trading off slightly longer cooking times and smaller capacity aka 6 quarts vs the average 8 quarts for a stove top.
Go to the company’s website, look for their FAQ, they are very straight forward about their pressure cookers, a lot of good information before you buy.
how much can the 3 Quart Hold? I am single and cooking for one..
We (2, plus occasional grown kids and small grandkids = 7) started with a 6 quart, and always had too many leftovers to want to eat the same thing every night for a week. Plus it took up a lot of counter space. We got a 3 quart and it’s great – not too intrusive on the countertop, and we cook plenty for the two of us and the occasional invasion of grown kids/grandkids, even leftovers, but we’re not drowning in leftovers now
Is it made in USA or other country?
The instant pot was designed by the Canadians but manufactured in the orient where another high end pressure cooker is manufactured in the same factory.
Is it worth the extra $40 just for yogurt?
If you asked my wife she would say absolutely. IP pot can take 1 gallon of milk and turn it into yogurt. I do Greek yogurt, which yields 2 qts. from 1 gallon after straining. Nothing you buy in the store comes close. NO additives, no extra sugar….. PLus I get 2 qts whey which we use as a substitute for milk or water in baking recipes. Just mad another batch this week. Cost: 1 gallon whole milk (on sale) $.98 plus 1 6 oz. container of Fage Greek yogurt as starter for $1. Result 2 qts beest ever Greek yogurt and 2 qts. whet. Whey out!! Pun inteneded.
Can it be used as a deep fryer?
Yes, but only if you get the optional glass lid. The pressure cooker lid will eventually gum up from the oil and explode, so you don’t want to do that.
What setting do you use on the mini instant pot when you don’t have a manuel setting?
The Manual setting has been renamed as “Pressure cook” in the newer versions.
When you see a recipe call for Manual selection, choose “Pressure cook” which is same thing.
Is there a way to keep the rice not sticking to the pot?
You would have o use more water than the 1:1 ratio listed in the Instant Pot recipe book. I personally use a 1.5:1 ratio of water to rice to have softer rice and I’ve also never had it stick then.
What is the longest time setting for making yogurt?
99 hours and 30 minutes, seems extreme, but that’s what I can set on my IP for yogurt. I usually let my yogurt incubate for 11 hours.
where is this made from
Instant Pot is designed by Canadians specifically for North American consumers. It is made in China by the No.1 electric pressure cooker manufacturer who has produced and sold over 30 million units for household use worldwide.
What is the highest temperature it will reach for the purpose of sterilizer using water?
In the user manual for the DUO80 8QT 7-1 Multi- Use Programmable Pressure Cooker (pretty much the same for all except the Elite new unit) etc….Working Temperature: 115°C – 118°C (239°F ~ 244°F)
Not sure if this answers your question. However, I suggest that you read the user manual as this information is contained within if not contained within the links supplied by IP for this kind of information. To get higher temperatures or more control over the temperature within the inner pot this will involve more detailed work and hence more costly Instant Pot that may not yet exist. Like any gadget the more you want of it the more you are going to have to pay for a more specific requirements..The Elite at just under 300.00 dollars will let you set inner pot temperatures I am not sure what the maximum temperature would be. It all depends what you want to sterilize, or how you will be using the IP…I use mine fore cooking only. I have an electric Ball pressure canner and even here you are limited. I do have a stove top cooker canner that has higher pressure level specific for low acid canning…the temperature and method of sterilization depends and what you want to sterilize and bacteria you want to destroy.
how do you release steam?
There is a toggle-type valve on the top of the pot to twist when it’s time to release the steam. It’s advisable to use the end of a wooden spoon or utensil to knock it so that you won’t release steam on to your fingers. Very easy and efficient. I have had to trouble doing it when it’s time to release steam.
Is the cooking pot stove top safe and oven safe ?
Yes it is safe to use on the stove top – except for induction. Yes oven safe. Yes dishwasher safe
can this cook fresh artichokes?
Absolutely. It can cook any vegetable… Just be careful not to overcook. Google some recipes that people have tried and they should tell exactly how long to do fresh artichokes!
Canning capability?
It holds 4 wide mouth canning jars with lids and pressure cooks.
]]>
AIR FRYER LID
6 Quart
User Manual
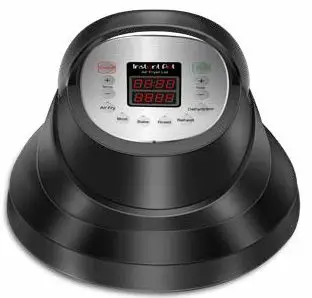
Welcome to the world of Instant cooking.
Thank you for welcoming us into your kitchen.
Having families ourselves, we developed the Instant Pot® Air Fryer Lid to allow busy families and professionals alike to easily cook healthy, delicious meals in less time.
We have partnered with chefs, authors, and bloggers to compile a collection of recipes that we hope you enjoy!
Happy cooking,
![]()
Robert J. Wang
Founder and Chief Innovation Officer

Download the Instant Pot App
- Original Recipes
- New User Tips
- Getting Started Videos

Find helpful how-to videos, download the app, or visit our recipe site.
IMPORTANT SAFEGUARDS
When using your appliance, basic safety precautions should be followed, including the following:
- READ THE GETTING STARTED GUIDE AND ALL INSTRUCTIONS, SAFEGUARDS, AND WARNINGS BEFORE OPERATING THE APPLIANCE.
FAILURE TO FOLLOW THESE SAFEGUARDS AND INSTRUCTIONS MAY RESULT IN INJURY AND/OR PROPERTY DAMAGE. - Only use the appliance with a compatible Instant Pot multi-use pressure cooker base. See page 9 for a list of compatible products.
 WARNING Overloading electrical circuits can lead to fire, burns, and injury. DO NOT plug in the Air Fryer Lid and the Instant Pot multi-use pressure
cooker base at the same time. Always unplug the Instant Pot cooker base BEFORE plugging in the Air Fryer Lid.- Unplug the appliance when not in use and before cleaning. To do so safely, press Cancel to return to Standby mode (OFF), then grasp the plug and remove it from the wall outlet. Never pull from the power cord.
- DO NOT use this appliance with the Instant Pot ceramic coated inner pot. Use only with the Instant Pot stainless steel inner pot.
- DO NOT attempt to use a Smart Program on the Instant Pot pressure cooker base for any function when the Air Fryer Lid is placed on top of the base cooker.
- Always check the cooker base for foreign objects before use.
- Overfilling the inner pot may cause damage, fire, and/or personal injury.
• When using the pressure cooking lid,
– DO NOT fill the inner pot and/or air fryer basket above the PC MAX —2/3line, or over the —1/2 line when cooking foods that expand.
– DO NOT use the broil/dehydrating tray.
• When using the Air Fryer Lid,
– DO NOT allow food to touch the element cover on the Air Fryer Lid. - Oversized foods must not be inserted into the stainless-steel inner pot or the air fryer basket as they may create a fire or risk of electric shock.
- For household countertop use only. Do not use outdoors. Not for commercial use.
- Always operate the appliance on a stable, non-combustible, level surface.
 Spilled food can cause serious burns. Keep the appliance and cord away from children.
• DO NOT let the power cord contact hot surfaces or open flame, including the stovetop.
• DO NOT let the power cord hang over the edge of tables or counters.
• DO NOT use power outlets below counters.
• DO NOT use the appliance with an extension cord. To protect against the risk of electrical shock, do not immerse the Air Fryer Lid, power cord or plug in water or other liquid. Do not rinse the appliance under a tap.
- Regularly inspect the appliance and power cord. Do not operate the appliance if:
• The power cord or plug shows signs of damage.
• The appliance malfunctions.
• The appliance is dropped or damaged in any manner. For assistance, contact Customer Care at [email protected],www.instantpot.com/#Chat, or by phone at 1-800-828-7280. - Do not use the appliance in electric systems other than 120 V~60 Hz. Do not use with power converters or adapters.
- The heat from an external source will damage the appliance.
• DO NOT place the appliance on any kind of stovetop or in a heated oven.
• DO NOT rest the appliance on the power cord.  The appliance’s outer surfaces may become hot during use.
• Do not touch hot surfaces or try to reach through the element cover to touch the heating element or the fan.
• Extreme caution must be used when moving the appliance.
Only use the lid handle to lift and carry the Air Fryer Lid.
• Only place the Air Fryer Lid on the protective pad provided; do not place it on the countertop.- Do not cover the air vents while the appliance is in operation. Doing so will prevent even cooking and may cause damage to the appliance through
overheating.  When cooking, improper use may result in personal injury:
• DO NOT attempt to use the appliance for deep frying with oil.
• Do not use the appliance without the removable stainless-steel inner pot in place, to reduce the risk of damaging the cooker base, causing fire and
personal injury.- DO NOT heat the empty stainless-steel inner pot with the Air Fryer Lid for more than 10 minutes, as doing so may damage the cooking surface.
 Read this manual carefully and completely, and retain for future reference.
Failure to adhere to safety instructions may result in serious injury or damage.
• DO NOT move the Instant Pot cooker base if the stainless-steel inner pot contains hot oil, hot food or hot liquids.
• DO NOT move the Air Fryer Lid if a Smart Program is running.
• DO NOT place the appliance against a wall or against other appliances.
Leave 5″ / 13 cm of space around and above the appliance.
• DO NOT operate the appliance on or near combustible materials such as tablecloths and curtains.
• DO NOT cover or place objects on top of the appliance.  While cooking, the stainless-steel inner pot and accessories become extremely hot. To avoid personal injury,
• DO NOT touch the inner pot or accessories during or immediately after cooking.
• Always use proper hand protection when removing accessories and when handling the hot stainless-steel inner pot.
• Always place hot accessories on a heat-resistant surface or cooking plate.
• Use extreme caution when disposing of hot grease. When the Air Fryer Lid is in operation hot air is released through the air vents, which may result in personal injury. Keep your hands and
face at a safe distance from the air vents. DO NOT place your face or hands over the appliance when removing the Air Fryer Lid.- If the Air Fryer Lid emits black smoke, press Cancel and unplug it immediately.
Wait for smoking to stop before removing the Air Fryer Lid, then allow it to cool to room temperature and clean the lid and inner pot thoroughly. - DO NOT leave the appliance unattended while in use.
- DO NOT connect the appliance to an external timer switch or separate remote-control system.
- This appliance is NOT to be used by children or by persons with reduced physical, sensory or mental capabilities. Close supervision is necessary when
any appliance is used near children and these individuals. Children should not play with this appliance. - Proper maintenance is recommended after each use. Let the appliance cool down to room temperature before cleaning or storing or when adding or
removing parts and accessories. Refer to Care, Cleaning, and Storage. - Avoid contact with moving parts.
- Do not place flammable material in the inner pot, such as paper, cardboard, or IMPORTANT SAFEGUARDS plastic.
 Read this manual carefully and completely, and retain it for future reference.
Failure to adhere to safety instructions may result in serious injury or damage. - The included accessories are not to be used in a microwave, toaster oven, convection or conventional oven, or on a ceramic, electric, induction or gas
cooktop, or an outdoor grill. - Do not clean with metal scouring pads. Pieces can break off the pad and touch electrical parts involving a risk of electric shock.
- Do not use any accessories or attachments not authorized by Instant Brands
Inc. The use of attachments not recommended by the manufacturer may cause a risk of injury, fire, or electric shock. - Do not attempt to repair, replace, alter or modify components of the appliance, as this may cause electric shock, fire or injury, and will void the
warranty. - Do not tamper with any of the safety mechanisms.
- Do not use the appliance for anything other than its intended use.
SAVE THESE INSTRUCTIONS
 Read this manual carefully and completely, and retain it for future reference.
Failure to adhere to safety instructions may result in serious injury or damage.
 To avoid injury, before using this appliance read this User Manual (or the Getting Started Guide and Safety, Maintenance and Warranty booklet) carefully and completely.
 FAILURE TO FOLLOW ANY OF THE IMPORTANT SAFEGUARDS OR THE INSTRUCTIONS FOR SAFE USE IS A MISUSE OF YOUR APPLIANCE THAT CAN VOID YOUR WARRANTY AND CREATE THE RISK OF SERIOUS INJURY.
Overloading electrical circuits can lead to fire, burns, and injury.
DO NOT plug in the Air Fryer Lid and the cooker base at the same time. Always unplug the cooker base BEFORE
plugging in the Air Fryer Lid. Electrical shock hazard. Use grounded outlet only. DO NOT remove ground. DO NOT use an adapter. DO NOT use an extension cord. Failure to follow instructions can cause electrical shock or death.
Special Cord Set Instructions
As per safety requirements, a short power supply cord (0.6 m to 0.9 m / 23 into 35 in) is provided to reduce the hazards resulting from grabbing, entanglement and tripping.
This appliance has a 3-prong grounding plug. To reduce the risk of electric shock, plug the power cord into a grounded (earthed) electrical outlet that is
easily accessible.
Product Specifications

Compatibility
For use with Instant Pot 6 Quart Multi-Use Pressure Cookers.
For use with Instant Pot stainless-steel inner pots. To avoid property damage, never use ceramic-coated inner pots.
Model: Duo 60 (IP-DUO60, IP-DUO60 V2, IP-DUO60 V2.1, IP-DUO60-ENW, IP-DUO60 V3, Duo 60 V3, Duo Frontier Rose 60, Duo Dazzling Dahlia 60, Duo White 60, Duo Teal 60, Duo Red 60, Duo Black SS 60, Duo Red SS 60, Duo Nova Black SS 60). Lux 60 (IP-LUX60, Lux Blue 60, Lux Red 60, IP-LUX60 V2, IP-LUX60ENW, IP-LUX60-ENW-MM, IP-LUX60 V3, Lux Breezy Blossoms 60, Lux Vintage Floral 60, Lux Black SS 60, Lux Red SS 60, Lux 60 V3). Duo Plus 60 (Duo Plus 60, Duo Plus Cinnamon SS 60, Duo Plus Blue SS 60, Duo Plus Copper SS 60, Duo Plus Black SS 60). Ultra 60 (Ultra 60).
Viva 60 (Viva, Viva 60, Viva Cinnamon 60, Viva Cobalt 60, Viva Eggplant 60, Viva Red SS 60, Viva Black SS 60). Nova Plus 60 (Nova Plus 60). Duo Nova
60 (Duo Nova 60).
Air Fryer Lid is NOT compatible with (model) Smart WiFi 60, Duo Evo Plus 6, Duo Evo Plus 60, Duo SV 60, or Max 60.
Find Your Model Number
The model number is listed on the rating label at the back of your pressure cooker.
If you are unsure of your model, contact customer service by [email protected], www.instantpot.com/#Chat, or by phone at 1-800-828-7280
Initial Setup
- Read all the Important Safeguards in this User Manual before using the Air Fryer Lid. Failure to do so may result in property damage and/or personal injury.
- ONLY use Air Fryer Lid with a compatible Instant Pot multi-use pressure cooker. See page 9 for a list of compatible products.
- Always use an Instant Pot stainless-steel inner pot when air frying. Never use a ceramic-coated inner pot.
- Remove all packaging from the appliance and ensure all parts and accessories are accounted for.
- Do not remove identification or safety warning stickers from the appliance.
- Follow Cleaning Before First Use instructions to clean the appliance before first use.
 Overloading electrical circuits can lead to fire, burns, and injury.
DO NOT plug in the Air Fryer Lid and the cooker base at the same time. Always unplug the cooker base BEFORE plugging in the Air Fryer Lid.
 |
||
| To avoid personal injury and/or property damage, place the appliance only on the protective pad provided or on a compatible Instant Pot cooker base. | When in use, leave at least 5” / 13 cm of space around the appliance. Do not cover the Air Fryer Lid, and do not block the air vents. | Do not place the appliance on a stovetop. The heat from an external source may damage the appliance. |
Product, Parts, and Accessories
Air Fryer Lid 6 Quart
Front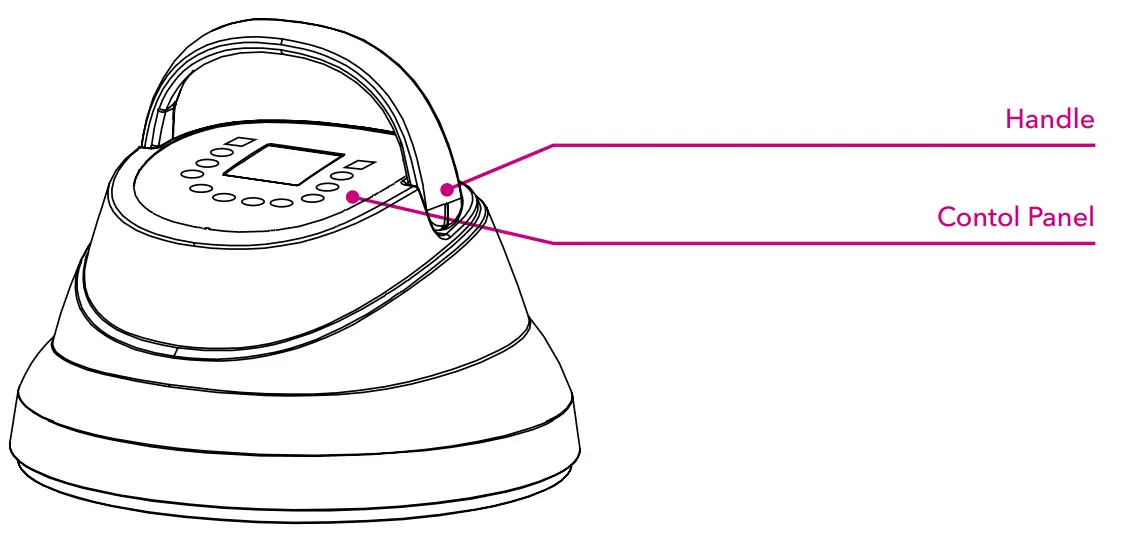
Back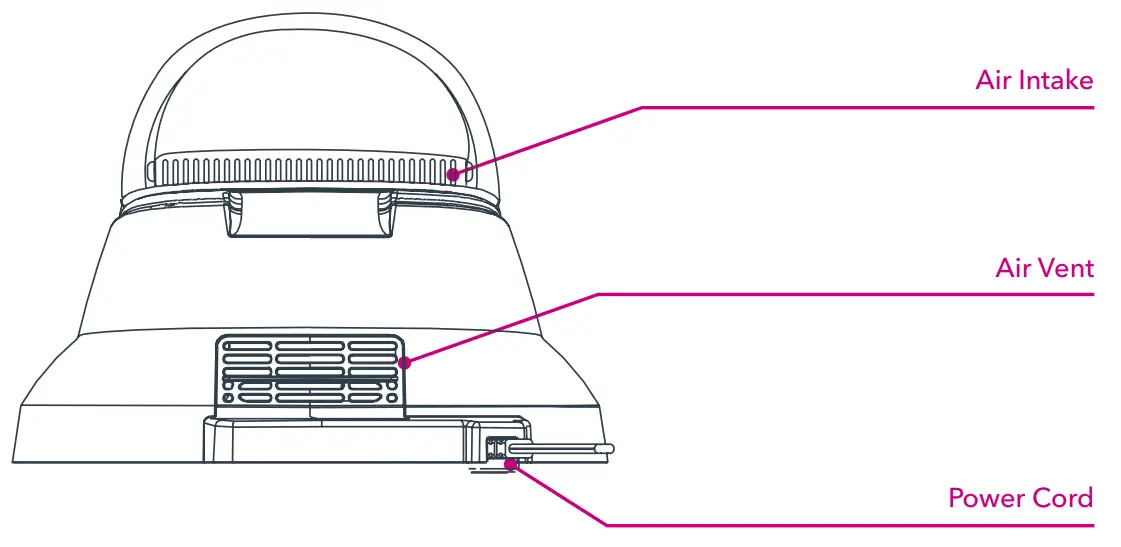
Interior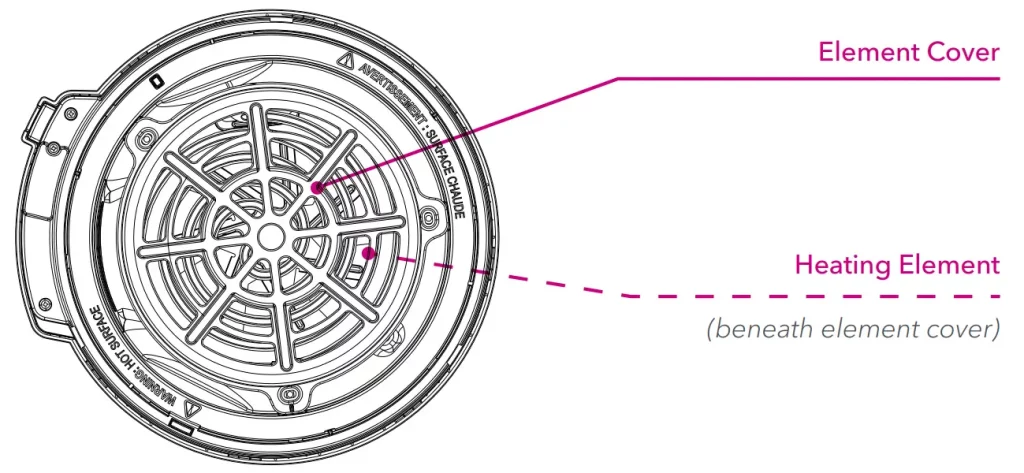
Accessories
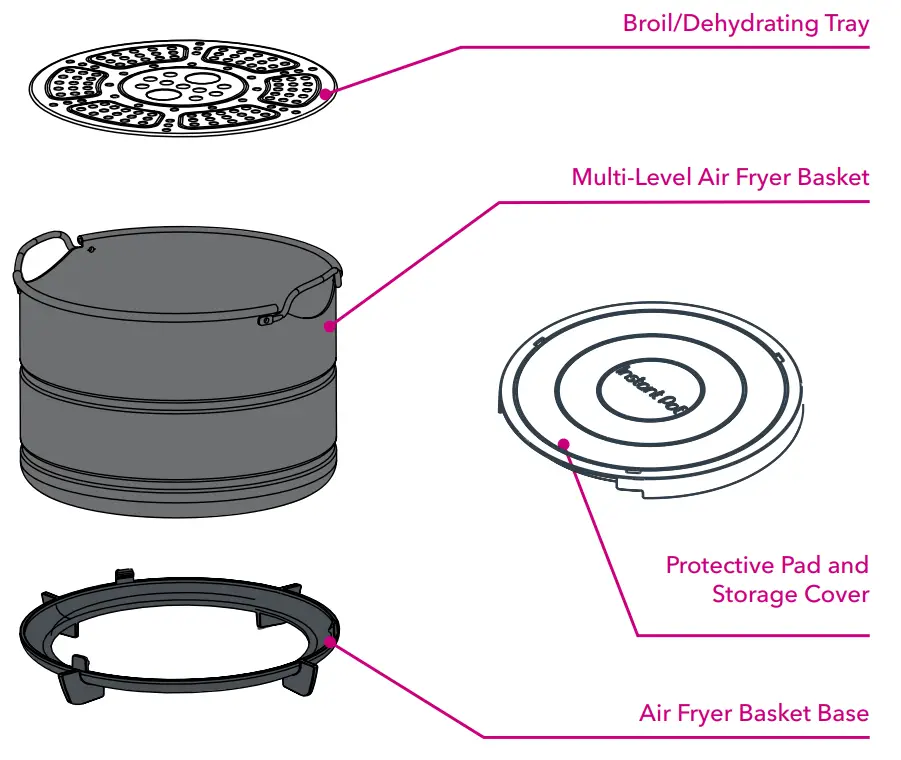
Illustrations are for reference only and may differ from the actual product.
Control Panel
- Display
Indicates the cooking time, temperature, and status messages. - Cancel
Press to stop a Smart Program at any time. The Air Fryer Lid will go to Standby mode. - Start
Press to start a Smart Program. - Time +/—
Increase or decrease the cooking time. - Temp +/—
Increase or decrease the cooking temperature. - Smart Programs
Air Fry, Broil, Bake, Roast, Reheat, and Dehydrate.
Press to select. Refer to Smart Programs for details. - LED Indicators
Illuminate to indicate the active Smart Program.
Status Messages
 |
Indicates that the Air Fryer Lid is in Standby mode. |
 |
Indicates that the Air Fryer Lid has begun preheating. |
 |
Indicates: • The lid is not seated properly. • The inner pot is not present in the cooker base. |
 |
Indicates that food in the cooking chamber should be turned, flipped, or rotated. |
 |
Indicates that the fan is blowing to cool the appliance. |
 |
Indicates that the Smart Program has finished. |
 |
Indicates overheating in the inner pot. Refer to Troubleshooting. |
Smart Program Settings
Change Temperature Scale (°F or °C)
When in Standby mode, press and hold the + button over Temp until Fahrenheit (°F) appears on the display.
When in Standby mode, press and hold the + button over Temp until Celsius (°C) appears on the display.
Turn Sounds On / Off
Sound On: When in Standby mode, press and hold the + button over Time until S On appears on the display.
Sound Off: When in Standby mode, press the — button beneath Time until SOFF appears on the display.
Note: Error alerts cannot be silenced.
Smart Program Memory
Smart Programs are preset with optimal time and temperature settings.
Once a Smart Program has been selected, the time and temperature can be adjusted to suit individual preferences. The new adjusted time and/or temperature is saved when you press Start.
Reset Individual Smart Programs
When the Air Fryer Lid is in Standby mode, press and hold the desired Smart
Program button until the appliance beeps. The Smart Program has been restored to the factory default setting.
Reset All Smart Programs
When the Air Fryer Lid is in Standby mode, press and hold Cancel until the appliance beeps. All Smart Programs have been restored to the factory default
settings.
Cleaning Before First Use
Air Fryer Lid
Wipe the Air Fryer Lid with a soft, damp cloth or sponge to remove any residue from packing materials. Never rinse the lid under the tap.
Accessories
Wash the accessories in your dishwasher or with hot water and dish soap before using them for the first time. Rinse with warm, clear water and use a soft cloth to dry the accessories.
To assemble the multi-level air fryer basket:
- Place the air fryer basket base on a stable surface.
- Position the multi-level air fryer basket over the base and press down firmly. The teeth on the base should pop into the groove on the outside of the basket.
- To easily lift and position the broil/dehydrating tray, hold the large holes in the middle of the tray with 2 fingers.
- Insert the broil/dehydrating tray into the multi-level air fryer basket, ensuring that the raised rim is facing down.
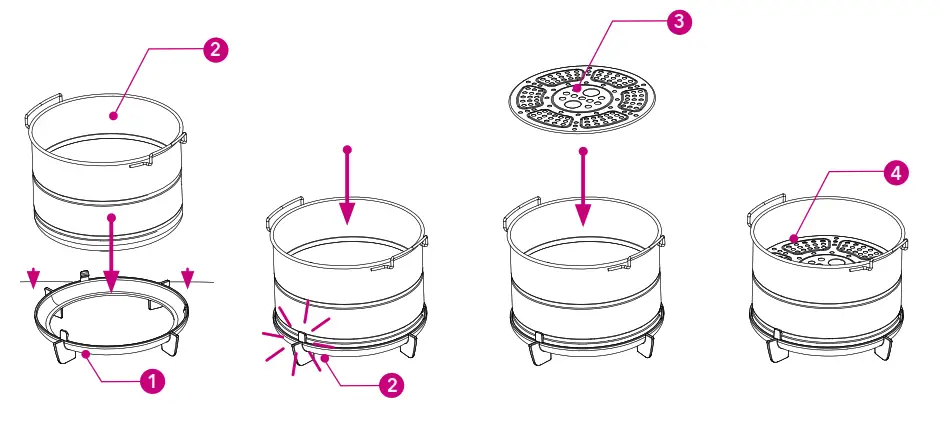
Cooking with the Air Fryer Lid
You can use the Air Fryer Lid to cook your dish from start to finish or to crisp up food that has been cooked another way, such as by pressure cooking, slow cooking or sous vide.
- If plugged in, unplug the Instant Pot cooker base.
- Place your food in the multi-level air fryer basket (with or without the broil/dehydration tray), in an oven-safe baking dish or directly in the inner pot,
according to food type or your recipe.
Note: Use only an Instant Pot stainless-steel inner pot when using the Air Fryer Lid.
Do not use a ceramic-coated inner pot. - Insert the inner pot into a compatible Instant Pot cooker base.
- Place the Air Fryer Lid on the Instant Pot cooker base and plug in.
Ensure you have unplugged your pressure cooker. - Select a Smart Program: Air Fry, Broil, Bake, Roast, Reheat or Dehydrate.
- Use the Temp and Time + / − buttons to adjust the temperature and cooking time as needed.
Note: The Air Fryer Lid saves any customization made to the time or temperature after pressing Start. - Press Start. The display indicates On as the Air Fryer Lid preheats.
- Part way through the cooking cycle the lid beeps and the display indicates turn Food.
- Lift the Air Fryer Lid to pause cooking. If you need to put it down, place it on the protective pad.
- Turn, flip or rotate your food, then place the Air Fryer Lid back on the Instant Pot cooker base to resume cooking.
Note: If the lid is left off for longer than 3 minutes, it will revert to Standby mode and display OFF.
Note: Some food does not require turning. If the lid is not removed after the turn Food indicator appears, cooking will proceed after 10 seconds. - When the Smart Program completes, the lid beeps and the display indicates End.
Note: Except with the Reheat and Dehydrate Smart Programs, the display also indicates
Cool and the fan blows for up to 5 minutes or until you lift the lid. - Lift the Air Fryer Lid off the Instant Pot cooker base and place it on the protective pad, or let the Air Fryer Lid keep your food warm for up to 1 hour.
Note: The Air Fryer Lid beeps after 5 minutes, 20 minutes, and 60 minutes to remind you that cooking has been completed. - Carefully remove your food, serve and enjoy!
To store your Air Fryer Lid:
- Flip the protective pad over so the grooved side is up.
- Lower the Air Fryer Lid onto the protective pad as indicated in the image on the right.
- Turn the Air Fryer Lid clockwise until the protective pad locks into place.
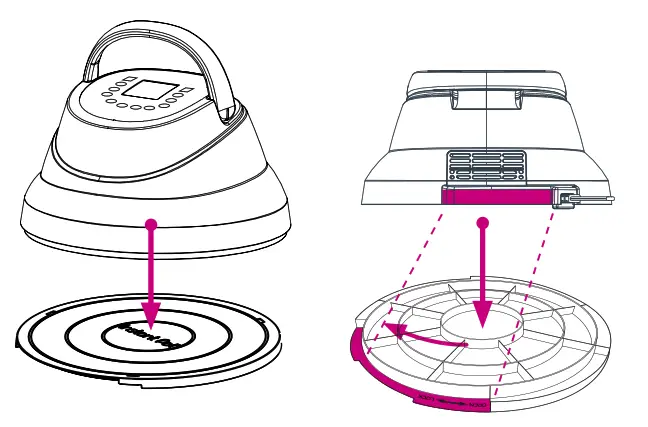
 Do not overfill the inner pot or accessories. To prevent the risk of fire, damage, and/or personal injury, ensure that food contents do not contact the heating element or the element cover. Do not overfill the inner pot or accessories. To prevent the risk of fire, damage, and/or personal injury, ensure that food contents do not contact the heating element or the element cover. |
 |
 Overloading electrical circuits can lead to fire, burns, and injury. DO NOT plug in the Air Fryer Lid and the Instant Pot cooker base at the same time. Always unplug the Instant Pot cooker base BEFORE plugging in the Air Fryer Lid. Overloading electrical circuits can lead to fire, burns, and injury. DO NOT plug in the Air Fryer Lid and the Instant Pot cooker base at the same time. Always unplug the Instant Pot cooker base BEFORE plugging in the Air Fryer Lid. |
Smart Programs
The Air Fryer Lid provides rapid air circulation to cook food and give your meals all the rich, crispy golden flavor of deep frying with little to no oil. Smart Programs use preset times and temperatures for optimal cooking results but are fully adjustable to suit your preferences.
Depending on your recipe, food may be placed in the multi-level air fryer basket, in an oven-safe baking dish, or directly in the inner pot. Always use the stainless steel inner pot, with or without the accessories.
Do not crowd the multi-level air fryer basket or the broil/dehydrating tray. Air must be able to circulate freely around food items.
| Smart Program |
Time Default* |
Time Range |
Temp Default* |
Temp Range |
Recommended Accessory |
| Air Fry | 20 mins | 1 min to 1 hr | 400ºF / 204ºC | 300 to 400ºF 149 to 204ºC |
Air Fryer Basket |
| Air frying is an amazing way to bring out a lot of flavor using only a little oil. Crisp up previously cooked dishes or use the Air Fryer Lid to cook a dish from start to finish. Ideal for fresh or frozen fries, chicken wings, shrimp, and more. |
|||||
| Broil | 10 mins | 1 min to 20 mins |
400ºF / 204ºC | No range | Air fryer basket, on| broil/dehydration tray |
| Broiling involves direct top-down heating, and broiled foods benefit from being placed close to the element. Perfect for melting cheese on French onion soup. |
|||||
| Bake | 30 mins | 1 min to 1 hr | 365ºF / 185ºC | 180 to 380ºF 82 to 193ºC |
Air fryer basket, beneath roil/ dehydration tray /oven-safe baking dish |
| Like a tiny oven, the Bake Smart Program can be used to create decadent brownies, fluffy cakes, pastries, buns, and much more. Bake with the provided multi-level air fryer basket or any oven-safe baking dish, such as a springform pan. Unless specified in your recipe, do not cover your batter when baking. • If baking in the air fryer basket, refer to Cleaning Before First Use for details on assembly. Line the interior of the air fry basket with aluminum foil or parchment paper, then pour in loose batter. • If using a baking dish, ensure to elevate the dish with a steam rack when cooking. |
|||||
| Roast | 40 mins | 1 min to 45 mins |
380ºF / 193ºC | 300 to 400ºF 149 to 204ºC |
Air Fryer Basket |
| The Roast Smart Program is perfect for beef, lamb, pork, poultry, vegetables, and more. Give your roast a beautiful crust, crisp up poultry skins or give your vegetables a golden exterior. |
|||||
| Reheat | 15 mins | 1 min to 1 hr |
280ºF / 138ºC | 120 to 360ºF 49 to 182ºC |
Air fryer basket, beneath broil/dehydration tray /oven-safe baking dish |
| Warm-up meals without overcooking or drying them out. | |||||
| Dehydrate | 6 hours | 1 hour to 72 hours |
125ºF 52ºC |
105 to 165ºF 41 to 74ºC |
Air fryer basket, on and beneath broil/ dehydration tray |
| The Dehydrate Smart Program applies low heat over a long period of time to safely dry out food items. Make fruit leather, dehydrated vegetable chips, and all kinds of jerky. Always follow a trusted recipe when dehydrating meat. |
|||||
*Smart Program times and temperatures are recommendations only. Always follow a trusted recipe, as time and temperature will vary based on food type and quantity.
Cooking Time Chart
| Food | Smart Programs |
Quantity | Cooking Time* | Cooking Temperature* |
| Fries (frozen) | Air Fry | 450 g (1 Ib) | 18 to 20 minutes | 400°F / 204°C |
| 680 g (1.5 Ib) | 22 to 24 minutes | 400°F / 204°C | ||
| Shrimp | Air Fry | 250 to 300 g | 7 to 9 minutes | 400°F / 204°C |
| Beef Steak | Air Fry | 350 to 400 g | 13 to 15 minutes | 400°F / 204°C |
| Pork | Air Fry | 280 to 300 g | 17 to 19 minutes | 375°F / 190°C |
| Quater Chicken | Air Fry | 350 to 450 g | 37 to 39 minutes | 400°F / 204°C |
| Cauliflower | Air Fry | 150 to 200 g | 11 to 13 minutes | 400°F / 204°C |
| Carrots | Air Fry | 0.5 lb (227 g) | 8 to 10 minutes | 400°F / 204°C |
| Green Beans | Air Fry | 0.5 lb (227 g) | 9 to 11 minutes | 400°F / 204°C |
| Asparagus | Air Fry | 16 to 20 pieces | 3 to 5 minutes | 400°F / 204°C |
| Chicken Wings | Air Fry | 6 to 8 pieces | 19 minutes | 385°F / 196°C |
*Cooking times and temperatures are recommendations only.
Always follow a trusted recipe.
For a complete list of cooking times, visit Instant Pot Cooking Time Tables | Instantpot.com
Always use a meat thermometer to ensure the internal temperature reaches a safe minimum temperature. Refer to the USDA’s Safe Minimum Internal Temperature Chart for more information.
Care, Cleaning, and Storage
Unplug the Instant Pot Air Fryer Lid and let it cool to room temperature before cleaning or storage.
Never use harsh chemical detergents, scouring pads, or powders on any of the parts or components.
Clean after each use, and allow the appliance to dry completely before further use or storage.
| Part | Instruction | Cleaning Method |
| Multi-Level Air Fryer Basket • Broil/Dehydration Tray • Base |
• Disassemble before cleaning. • Optionally, spray the cooking tray and/or air fryer basket with non-stick cooking spray before adding food. • To make cleaning easier, line the bottom of the air fryer basket with aluminum foil or parchment paper. |
Dishwasher Safe* and Hand Washable |
| Protective Pad and Storage Cover | • Clean after each use. | |
| Air Fryer Lid | • Once the appliance is cool, clean the heating element cover and the surrounding area with a soft, damp cloth or sponge. Ensure it is free of food debris and/or grease splatter. • Do not remove the element cover. • Wipe the exterior clean with a soft, damp cloth or sponge. • Do not rinse—wipe dry with a soft cloth. |
Damp Cloth Only |
| Power Cord | • Wipe visible particles off the power cord as needed. • Do not fold the power cord when storing. |
*Some discoloration may occur after machine washing, but this will not affect the cooker’s safety or performance.
 |
||
| Do not immerse the appliance in water or any liquid. Do not rinse the appliance under a tap. |
Without proper cleaning, food and grease splatter may build up around the heating element, causing the risk of smoke, fire, and personal injury. | If you smell or see black smoke, press Cancel and unplug the appliance. Once cool, clean food splatter or grease with a soft cloth and mild detergent. |
Troubleshooting
Register your product today.
Contact Customer Care:1-800-828-7280
[email protected]
instantpot.com/#Chat
| Problem | Possible Reason | Solution |
| Air Fryer Lid is plugged in but will not turn on, or turns off during cooking | The appliance is not plugged in. | Plug the power cord firmly into a grounded 120 V outlet. |
| Bad power connection or no power. | Plug the power cord firmly into a grounded 120 V outlet. | |
| Inspect power cord for damage. If damage is noticed, contact Customer Care. | ||
| Check the outlet to ensure it is powered. | ||
| The electrical fuse has blown. | Contact Customer Care. | |
| The microswitch is damaged. | Contact Customer Care. | |
| Black smoke is coming from the Air Fryer Lid |  Stop cooking immediately. Press Cancel, then unplug the appliance. When smoking stops, place the Air Fryer Lid on the protective pad provided. Stop cooking immediately. Press Cancel, then unplug the appliance. When smoking stops, place the Air Fryer Lid on the protective pad provided. |
|
| Food is burning. | Allow it to cool to room temperature before cleaning. Remove food and clean the affected area thoroughly. |
|
| Using an oil with a low smoke point. | Choose a neutral oil with a high smoke point, such as canola, avocado, soybean, safflower, or rice bran. | |
| Faulty circuit or heating element. | Contact Customer Care. | |
| White smoke is coming from the Air Fryer Lid | Cooking foods with excess fat, such as bacon, sausage, and burgers may result in white smoke. | Avoid air frying foods with high-fat content. |
| Check drip pan for excess oil or fat, and carefully remove as needed after cooking. | ||
| Water is vaporizing, producing thick steam. | Pat dry moist food ingredients before air frying. Do not add water or other liquid to the inner pot when air frying. | |
| The seasoning on food has blown into elements. | Be mindful when seasoning food. Spray vegetables and meats before adding seasoning so it better adheres to the ingredients | |
Any other servicing should be performed by an authorized service representative.
Warranty
Limited Warranty
This Limited Warranty is effective for one year from the date of original consumer purchase. Proof of original purchase date and, if requested by an authorized representative of Instant Brands Inc. (“Instant Brands”), return of your appliance, is required to obtain service under this Limited Warranty. Provided that this appliance is operated and maintained in accordance with written instructions attached to or furnished with the appliance, Instant Brands will, in its sole and exclusive discretion, either: (i) repair defects in materials or workmanship; or (ii) replace the appliance. In the event that your appliance is replaced, the Limited Warranty on the replacement appliance will expire 12 months from the date of original consumer purchase.
This Limited Warranty extends only to the original purchaser and use of the appliance in the United States of America and Canada. This warranty does not cover units that are used outside of the United States of America and Canada.
Any modification or attempted modification to your appliance may interfere with the safe operation of the appliance and will void this Limited Warranty. This Limited Warranty does not apply in respect of any appliance or any part thereof that has been altered or modified unless such alterations or modifications were expressly authorized by an Instant Brands representative.
Limitation and Exclusions
The liability of Instant Brands, if any, for any allegedly defective appliance or part shall in no circumstances exceed the purchase price of a comparable replacement appliance.
This Limited Warranty does not cover:
- Damage resulting from accident, alteration, misuse, abuse, neglect, unreasonable use, use contrary to the operating instructions, normal wear, and tear, commercial use, improper assembly, disassembly, failure to provide reasonable and necessary maintenance, fire, flood, acts of God or repair by anyone unless directed by an Instant Brands
Representative; - Repairs where your appliance is used for other than normal, personal use or when it is used in a manner that is contrary to published user or operator instructions; or
- Use of unauthorized parts and accessories, or repairs to parts and systems resulting from unauthorized repairs or modifications made to this appliance.
The cost of repair or replacement under these excluded circumstances shall be paid by you.
Disclaimer of Implied Warranties
EXCEPT AS EXPRESSLY PROVIDED HEREIN AND TO THE EXTENT PERMITTED BY LAW, INSTANT BRANDS MAKES NO WARRANTIES, CONDITIONS OR REPRESENTATIONS, EXPRESS OR IMPLIED, BY STATUTE, USAGE, CUSTOM OF TRADE OR
OTHERWISE WITH RESPECT TO THE APPLIANCES OR PARTS COVERED BY THIS WARRANTY, INCLUDING BUT NOT LIMITED
TO, WARRANTIES, CONDITIONS, OR REPRESENTATIONS OF WORKMANSHIP, MERCHANTABILITY, MERCHANTABLE QUALITY,
FITNESS FOR A PARTICULAR PURPOSE OR DURABILITY.
Some states or provinces do not allow for the exclusion of implied warranties of merchantability or fitness, so this limitation may not apply to you. In these states and provinces, you have only the implied warranties that are expressly required to be provided in accordance with applicable law.
Limitation of Remedies;
Exclusion of Incidental and Consequential Damage
YOUR SOLE AND EXCLUSIVE REMEDY UNDER THIS LIMITED WARRANTY SHALL BE APPLIANCE REPAIR OR REPLACEMENT AS PROVIDED HEREIN. INSTANT BRANDS SHALL NOT BE LIABLE FOR INDIRECT, INCIDENTAL, OR CONSEQUENTIAL DAMAGES
ARISING OUT OF OR IN CONNECTION WITH THE USE OR PERFORMANCE OF THE APPLIANCE OR DAMAGES WITH RESPECT
TO ANY ECONOMIC LOSS, PERSONAL INJURY, LOSS OF PROPERTY, LOSS OF REVENUES OR PROFITS, LOSS OF ENJOYMENT OR USE, COSTS OF REMOVAL, INSTALLATION, OR OTHER INDIRECT, INCIDENTAL, OR CONSEQUENTIAL DAMAGES OF ANY
NATURE OR KIND.
Warranty Registration
Please visit www.instantpot.com/support/register to register your new Instant Brands™ appliance and validate your warranty within thirty (30) days of purchase. You will be asked to provide the store name, date of purchase, model number (found on the back of your appliance), and serial number (found on the bottom of your appliance) along with your name and email address. The registration will enable us to keep you up to date with product developments, recipes and contact you in the unlikely event of a product safety notification. By registering, you acknowledge that you have read and understood the instructions for use, and warnings set forth in the accompanying instructions.
Warranty Service
To obtain service under this warranty, please contact our Customer Service Department by phone at 1-800-828-7280 or by email at [email protected]. You can also create a support ticket online at www.instantpot.com/support. If we are unable to resolve the problem, you may be asked to send your appliance to the Service Department for quality inspection.
Instant Brands is not responsible for shipping costs related to warranty service, save and except for shipping costs associated with the return of your appliance from Canada or within the 48 contiguous states and the District of Columbia of the United States of America, as provided herein. When returning your appliance, please include your name, mailing address, email address, phone number, and proof of the original purchase date as well as a description of the problem you are encountering with the appliance.

Instant Brands Inc.
11–300 Earl Grey Dr., Suite 383
Ottawa, Ontario
K2T 1C1
Canada
Register your product today
instantpot.com/support/register
Contact Information
1-800-828-7280
[email protected]
instantpot.com/#Chat
instantpot.com
store.instantpot.com
Copyright © 2020 Instant Brands™ Inc
]]>
VORTEX PLUS 10 Quart Air Fryer Oven
User Manual
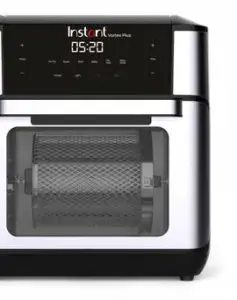
Welcome to the world of Instant cooking.
Thank you for welcoming us into your kitchen.
Having families ourselves, we developed the Instant™ Vortex™ Plus air fryer oven to allow busy families and professionals alike to cook healthy, delicious meals more easily and in less time.
We have partnered with chefs, authors, and bloggers to compile a collection of recipes that we hope you enjoy!
Happy cooking,

Robert J. Wang
Founder and Chief Innovation Officer
Download the Instant Pot App
 www.instantappliances.com/download
- Original Recipes
- New User Tips
- Getting Started Videos

Find helpful how-to videos, download the app or visit our recipe site.
IMPORTANT SAFEGUARDS
When using electrical appliances, basic safety precautions should always be followed:
- READ THE GETTING STARTED GUIDE AND ALL INSTRUCTIONS, SAFEGUARDS, AND WARNINGS BEFORE OPERATING THE APPLIANCE. FAILURE TO FOLLOW THESE SAFEGUARDS AND INSTRUCTIONS MAY RESULT IN INJURY AND/OR PROPERTY DAMAGE.
- Always operate the appliance on a stable, non-combustible, level surface.
- The appliance’s outer surfaces may become hot during use. Do not touch hot surfaces. Wear proper hand protection when opening the oven door and handling hot components. Extreme caution must be used when moving the appliance. Let the appliance cool to room temperature before handling or moving.
 CAUTION To protect against the risk of electrical shock, do not immerse the power cord, plug, or appliance in water or other liquid.
- Do not rinse the appliance under a tap.
- The cooking chamber contains electrical components. To avoid electrical shock, do not put liquid of any kind into the cooking chamber.
- This appliance is NOT to be used by children or by persons with reduced physical, sensory, or mental capabilities. Close supervision is necessary when this appliance is used near children and these individuals. Children should not use or play with this appliance.
- Unplug from the outlet when not in use, as well as before adding or removing parts or accessories, and before cleaning. To unplug, grasp the plug and pull from the outlet. Never pull from the power cord.
- Avoid contact with moving parts.
- Regularly inspect the appliance and power cord. Do not operate any appliance with a damaged cord or plug or after the appliance malfunctions, or is dropped or damaged in any manner. Contact Customer Care at [email protected] or 1-800-828-7280.
- Do not use any accessories or attachments not authorized by Instant Brands Inc. The use of attachments not recommended by the manufacturer, such as fry baskets, may cause a risk of injury, fire or electric shock.
- For household countertop use only. Do not use outdoors.
Not for commercial use. - Do not place the appliance on any kind of stovetop, or in a heated oven. The heat from an external source will damage the appliance.
- Do not let the power cord contact hot surfaces or open flame, including a stovetop.
- Do not use appliances for anything other than intended use.
- Proper maintenance is recommended after each use. Refer to Care and Cleaning. Let the appliance cool to room temperature before cleaning or storage.
 CAUTION Spilled food can cause serious burns. A short power-supply cord is provided to reduce the hazards resulting from grabbing,
entanglement and tripping. Keep appliances and cords away from children.
Never drape the cord over the edge of the table or counter, never use a power outlet below the counter, and never use with an extension cord.- Do not attempt to repair, replace, alter, or modify components of the appliance. This may cause electric shock, fire, and/or injury, and will void the warranty.
- Do not tamper with any of the safety mechanisms.
- Do not use the appliance in electrical systems other than 120V / 60Hz for Canada and the USA. Do not use with power converters or adapters.
- Do not overfill the air fryer basket. Overfilling may cause food to contact the heating element, which may result in fire and/or personal injury.
- Do not cover the air vents while the appliance is in operation. Doing so will prevent even cooking and may cause damage to the appliance.
- Never pour oil into the cooking chamber. Fire and personal injury could result.
- While cooking, the internal temperature of the appliance reaches several hundred degrees. To avoid personal injury, never place unprotected hands inside the appliance until it has cooled to room temperature.
- When cooking, do not place the appliance against a wall or against other appliances. Leave at least 5” / 13 cm of free space on the back, sides, and above the appliance. Do not operate the appliance on or near combustible materials such as tablecloths and curtains. Do not place anything on top of the appliance.
- When in operation, hot air is released through the air vents. Keep your hands and face at a safe distance from the air vents and take extreme caution when removing the accessories from the appliance.
- Should the unit emit black smoke, press Cancel and unplug the appliance immediately. Wait for smoking to stop before opening the door, then clean the appliance thoroughly.
- Do not leave the appliance unattended while in use.
- Never connect this appliance to an external timer switch or separate remote-control system.
- Use extreme caution when removing hot accessories from the cooking chamber or disposing of hot grease.
- Oversized foods and/or metal utensils must not be inserted into the cooking chamber as they may cause a risk of fire and/or personal injury.
- Do not store any materials, other than the included accessories, in the cooking chamber when not in use.
- Do not place any combustible materials in the cooking chamber, such as paper, cardboard, plastic, Styrofoam, or wood.
- The included accessories are not to be used in a microwave, toaster oven, convection, or conventional oven, nor on ceramic, electric, induction, or gas cooktop, or an outdoor grill.
 WARNING: Read this manual carefully and completely, and retain it for future reference.
Failure to adhere to safety instructions may result in serious injury.
SAVE THESE INSTRUCTIONS
 WARNING
To avoid injury, read and understand the instruction manual before using this machine.
 WARNING
Electrical shock hazard. Use grounded outlet only. DO NOT remove ground. DO NOT use an adapter. DO NOT use an extension cord. Failure to follow instructions can cause electrical shock and/or death.
 WARNING
THE FAILURE TO FOLLOW ANY OF THE IMPORTANT SAFEGUARDS AND THE IMPORTANT INSTRUCTIONS FOR SAFE USE IS A MISUSE OF YOUR APPLIANCE THAT CAN VOID YOUR WARRANTY AND CREATE THE RISK OF SERIOUS INJURY.
Special Cord Set Instructions
Per safety requirements, a short power supply cord (0.6 m to 0.9 m / 24” to 35”) is provided to reduce the hazards resulting from grabbing, entanglement and tripping.
This appliance has a 3-prong grounding plug. To reduce the risk of electric shock, plug the power cord into a grounded (earthed) electrical outlet that is easily accessible.
Product Specifications

The models listed may not represent all models in the Vortex, Vortex Plus, or Vortex Pro series. Visit instantappliances.com for details.
Initial Setup
- Read all the Important Safeguards before using the appliance. Failure to read and follow the Important Safeguards may result in damage to the appliance, property damage, or personal injury.
- Remove all packaging material and accessories from within and around the appliance.
- Place the appliance on a stable, level surface, away from combustible material and external heat sources.
- Leave at least 5” / 13 cm of space above and around all sides of the appliance.
- Do not place anything on top of the oven and do not block the air vents.
- Remove the crumb tray and check the cooking chamber for loose packing material before first use.
- Follow the Care and Cleaning instructions in this manual to clean the appliance before first use.
Product, Parts, and Accessories
Before using the air fryer oven, verify that all parts and accessories are accounted for.
Air fryer oven
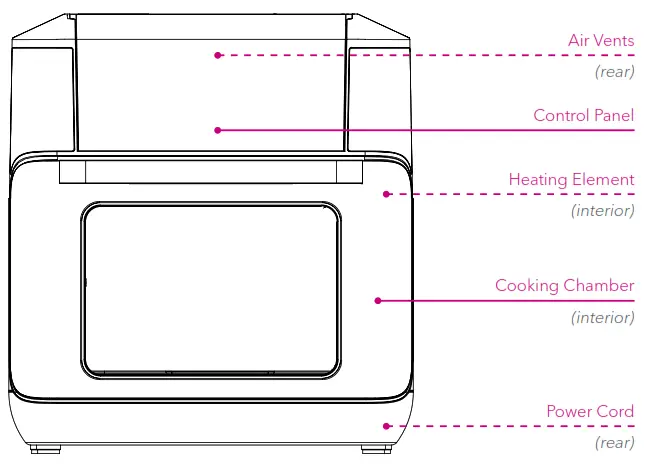
CAUTION: Do not place the appliance on a stovetop. The heat from an external source will damage the appliance. Do not place anything on top of the appliance, and do not block the air vents.
Product, Parts, and Accessories
Accessories
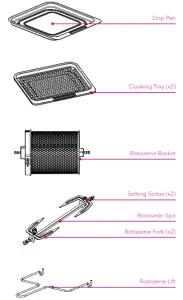
Illustrations are for reference only and may differ from the actual product.
Control Panel
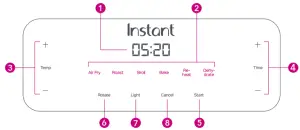
- Display
Indicates cooking time, cooking temperature, reminders and error messages. The display reads OFF when the oven is in Standby mode. - Smart Programs
Smart Programs control cooking times and temperatures automatically. Select a Smart Program by touching the label on the control panel. The key flashes to indicate that it has been selected.
Vortex Plus 10 Smart Programs:
• Air Fry
• Roast
• Broil
• Bake
• Reheat
• Dehydrate
Note: Each Smart Program includes a default cooking time and temperature. - Adjust Temperature
Touch the Temp + or − keys to adjust the cooking temperature. Touch and hold to adjust quickly. - Adjust Time
Touch the Time + or − keys to adjust the cooking time. Touch and hold to adjust quickly.
Note: Smart Programs save your time and temperature adjustments when you touch Start. - Start
Touch Start to begin cooking. - Rotate
Once cooking has begun, touch the Rotate button to turn rotisserie rotation on and off.
Note: Applicable to Air Fry & Roast only. The button turns white when the Rotate function is running and Blue when it’s off. - Light
Touch Light to turn the oven light on or off. The oven light turns off automatically after 2 minutes. - Cancel
Touch Cancel to stop cooking. The oven goes into Standby mode and the display reads OFF.
Smart Program Settings
| Sound On/Off | When in Standby (display indicates OFF), touch and hold both the Temp and Time minus (−) keys for 3 seconds to toggle sound on or off. Note: Error alerts cannot be silenced. |
| Reset Individual Smart Programs | When in Standby, touch and hold the Smart Program you wish to reset for 3 seconds. The Smart Program’s cooking time and cooking temperature are restored to the default setting. |
| Reset All Smart Programs | When in Standby, touch and hold both the Temp and Time plus (+) keys for 3 seconds. All Smart Program cooking times and cooking temperatures are restored to the default settings. |
Display Messages
 |
This indicates that the air fryer oven is in Standby mode. |
 |
This indicates that the air fryer oven has begun pre-heating. |
 |
This indicates that the air fryer oven has reached the desired temperature and food may be added. |
 |
The timer counts down to indicate that a Smart Program is running. |
 |
A reminder to turn, flip or shake food items, as recommended by your recipe. |
 |
This indicates that the Smart Program has ended. |
Initial Test Run
Follow these steps to ensure your air fryer oven is operating properly.
Approximate time: 25 minutes
- Open the oven door.
Place the drip pan on the bottom of the cooking chamber.
Close the oven door. - Connect the power cord to a 120 V power source.
The display reads OFF to indicate that the oven is in Standby mode. - Touch Air Fry on the control panel to select it.
The default cooking time is 18 minutes.
The default cooking temperature for Air Fry is 400ºF. - Use the + or − Time keys to adjust the cooking time to 00:20 minutes.
Note: Smart Programs automatically save your last temperature and time settings. - Touch Start to begin cooking.
The display indicates On while the cooker preheats, as well as the cooking status: Preheat.
Note: Use the + or − keys for Temp or Time to adjust the cook time and temperature at any time. - When the oven reaches the target temperature, the display indicates
Add Food.
For this initial test run, do not add food to the cooking chamber.
Note: The air fryer oven should be preheated before adding food items, except when using the rotisserie setting. The cooking cycle will commence after 10 seconds whether food has been added or not. - Open the oven door.
Use proper hand protection to carefully insert both cooking trays into the preheated cooking chamber.
Close the oven door.
The display indicates the cooking time and temperature, as well as the cooking status: Cook. - Partway through the Smart Program, the oven beeps, and displays turn Food to remind you to flip your food items. When cooking with both cooking trays, swap their positions in the cooking chamber.
Open the glass door to automatically pause the Smart Program, then close the door to resume.
Note: The turn Food notice only appears when using Air Fry and Roast Smart Programs. If Rotate is turned on, the message will not appear. Some food items do not need to be turned. Cooking will resume after 10 seconds whether food has been turned or not. - The display counts down the last minute of cooking time in seconds. When the Smart Program ends, the display indicates End.
Note: If the door is not opened, the oven will remind you that food is ready 5, 30, and 60 minutes after the Smart Program ends.
Follow these basic steps to cook with any Smart Program in the air fryer oven.
 CAUTION
The oven will be hot during and after cooking. Do not touch hot surfaces. Always use proper hand protection to remove cooking trays. Allow the oven to cool to room temperature, then clean the accessories and cooking chamber. Refer to Care and Cleaning in this user manual.
Smart Programs
The Vortex Plus air fryer oven uses rapid air circulation to cook food, giving your meals all the rich, crispy flavor of deep frying with little or no oil.
| Smart Program | Default Timer | Time Range | Default Temperature | Temperature Range* |
| Air Fry | 18 minutes | 1 – 60 minutes | 400°F / 205°C | 180 – 400°F / 82 – 205°C |
| For all your favorite deep-fried meals, including fries, cauliflower wings, chicken nuggets, and more. | ||||
| Roast | 40 minutes | 1 – 60 minutes | 380°F / 193°C | 180 – 400°F / 82 – 205°C |
| Ideal for beef, lamb, pork, poultry, vegetable dishes, and more. | ||||
| Broil | 8 minutes | 1 – 20 minutes | 400°F / 205°C | 400°F / 205°C |
| Direct top-down heating. Perfect for melting cheese on French onion soup, nachos, and more. | ||||
| Bake | 30 minutes | 1 – 60 minutes | I 365°F / 185°C | 180 – 400°F / 82 – 205°C |
| Light and fluffy cakes and pastries, scalloped potatoes, and more. | ||||
| Reheat | 10 minutes | 1 – 60 minutes | 280°F / 138°C | 120 – 360°F / 49 – 182°C |
| Reheat leftovers without overcooking or drying out. | ||||
| Dehydrate | 7 hours | 1 – 15 hours I | 120°F / 49°C | 105 – 160°F/41 – 71°C |
| Perfect for homemade fruit leather, jerky, dried vegetables, and more. | ||||
 CAUTION
Use a meat thermometer to ensure meat reaches a safe minimum internal temperature. Refer to the USDA’s Safe Minimum Internal Temperature Chart for more information.
Using the Rotisserie Accessories
The Instant Vortex Plus is equipped with One-Step Even Crisp Technology™ for simple rotisserie-style cooking with delicious results.
Always insert rotisserie accessories and food items into the cooking chamber before preheating the air fryer oven.
To use the Rotisserie Basket
Read these instructions and/or watch the tutorial video to ensure you are using the rotisserie properly. Failure to follow these steps could result in damage to the rotisserie catch.
- Place food items in the rotisserie basket. Do not overfill the rotisserie.
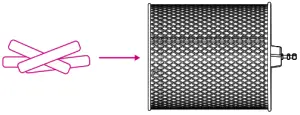
- Align the tab on the rotisserie basket with the notch in the lid, then place the lid on the basket.
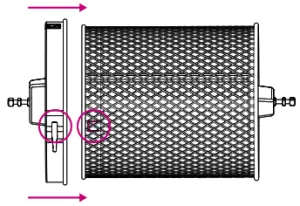
- Turn the lid clockwise to secure it.
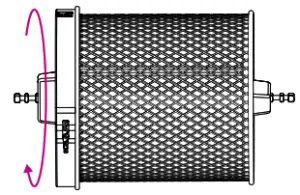
Using the Rotisserie Accessories
Always insert rotisserie accessories and food items into the cooking chamber before preheating the air fryer oven.
To use the Rotisserie Spit and Forks
- Unscrew the 2 set screws.
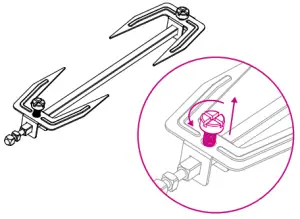
- Remove the forks from the spit.
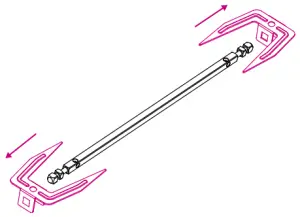
- Push the food item onto the spit.
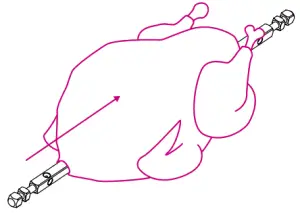
- Slide the forks onto both ends of the spit, ensuring the prongs are inserted into the food item.
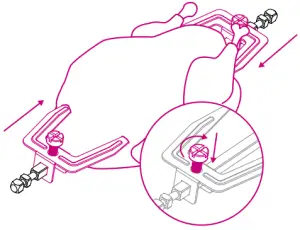
- Tighten the set screws to secure the forks.
 CAUTION
Ensure the food item is able to rotate freely in the cooking chamber.
Do not allow food items to make contact with the heating coil.
Always insert rotisserie accessories and food items into the cooking chamber before preheating the air fryer oven.
To use the Rotisserie Spit or Basket
Read these instructions and/or watch the video to ensure you are using the rotisserie properly. Failure to follow these steps could result in damage to the rotisserie catch.
- Open the oven door and slide the rotisserie basket or rotisserie spit onto the guides in the cooking chamber.
Note: The rotisserie basket and rotisserie spit are installed and removed the same way.
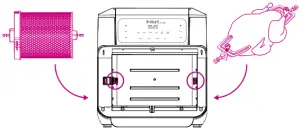
- Move the rotisserie catch lever to the right and hold it in position.
Notice that the rotisserie catch inside the cooking chamber withdraws slightly when you move the lever.
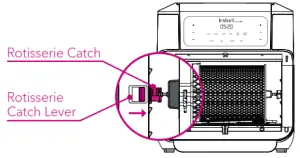
- Align the rotisserie spit with the hole in the rotisserie catch, and set the other end of the rotisserie spit in the notch on the right of the cooking chamber.
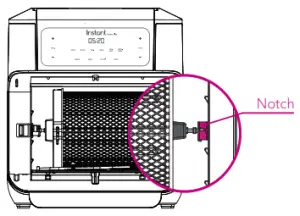
- Release the rotisserie catch lever. Rotate the accessory in place to ensure that it is held securely.
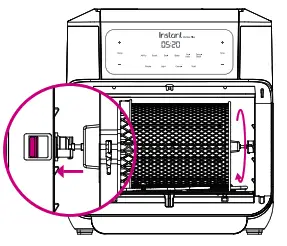
- Close the oven door.
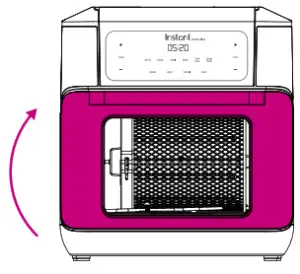
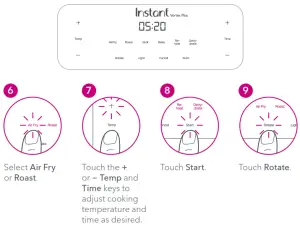
Removing the Accessory
Use caution when opening the oven door. The oven door and accessories will be hot.
- Position the rotisserie lift hooks beneath the left and right arms of the accessory.
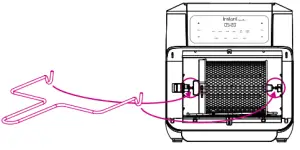
- Move the rotisserie catch lever to the right to release the accessory.
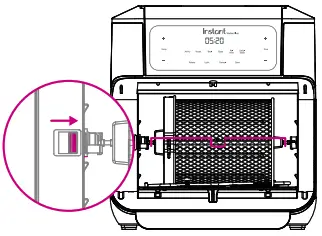
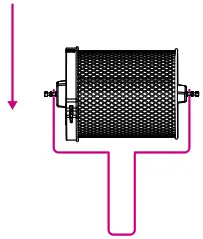
- Pull the accessory towards you, then release the rotisserie catch lever.
- Carefully remove the accessory from the cooking chamber.
 WARNING
Rotisserie spit, forks, and basket will be hot during and after cooking. Always use the rotisserie lift to remove rotisserie accessories, and exercise extreme caution when removing hot accessories from the cooking chamber. Always use proper hand protection when handling or disassembling hot rotisserie accessories.
Cooking Timetable
| Food | Setting | Cook Time | Temperature* | Accessory and Placement |
| Thin-cut fries (Frozen) |
Air Fry / Roast | 14 – 18 minutes | 400°F / 205°C | Rotisserie Basket |
| Thin-cut fries (Fresh) |
Air Fry / Roast | 18-20 minutes | 400°F / 205°C | Rotisserie Basket |
| Thick-cut fries (Frozen) |
Air Fry / Roast | 16-20 minutes | 400°F / 205°C | Rotisserie Basket |
| Thick-cut fries (Fresh) |
Air Fry / Roast | 20 -25 minutes | 400°F / 205°C | Rotisserie Basket |
| Chicken wings | Air Fry / Roast | 20 -30 minutes | 360°F / 182°C | Cooking Tray, Bottom / Rotisserie Basket |
| Whole chicken (up to 4 lbs) |
Roast | 55- 60 minutes | 380°F / 193°C | Rotisserie Spit |
| Chicken nuggets (Frozen) |
Broil | 10 – 15 minutes | 400°F / 205°C | Cooking Tray, Middle |
| Shrimp (Frozen) | Air Fry | 8 minutes | 400°F / 205°C | Cooking Tray. Middle /Rotisserie Basket |
| Shrimp (Fresh) | Air Fry | 8 – 10 minutes | 350°F / 177°C | Cooking Tray. Middle /Rotisserie Basket |
| Fish sticks (Frozen) | Broil | 8-12 minutes | 400°F / 205°C | Cooking Tray. Middle |
| Asparagus | Broil / Bake | 7 – 9 minutes | 370°F / 188°C | Cooking Tray. Middle /Rotisserie Basket |
| Cauliflower | Broil / Bake | 6 – 10 minutes | 370°F / 188°C | Cooking Tray. Middle /Rotisserie Basket |
| Cake | Bake | 25 – 35 minutes | 360°F / 182°C | Drip Pan. Bottom(Springform Pan) |
| Dough | Proof | 25 – 35 minutes | 90°F / 32°C | Drip Pan. Middle (place 1/2 cup water in an oven-safe container in the cooking chamber) |
| Fruit Leather | Dehydrate | 8 – 12 hours | 140°F / 60°C | Drip Pan, Middle / Bottom |
| Beef Jerky | Dehydrate | 3 – 5 hours | 175 °F / 80°C | Cooking Tray. Middle |
*Cook times and temperatures are recommendations only. Always follow a trusted recipe.
For a complete cooking timetable, visit instantappliances.com
 CAUTION
Always use a meat thermometer to ensure the internal temperature reaches a safe minimum temperature. Refer to the USDA’s Safe Minimum Internal Temperature Chart for more information.
Cooking Tips
Instant air fryer ovens cook all your favorite fresh and frozen oven-baked and deep-fried snacks—fast!
- Use the preset Smart Programs as a starting point, and experiment with cooking times and temperatures to get the results you prefer.
- Rotisserie-cooked foods and rotisserie accessories must be placed in the oven before touching Start.
- With the exception of rotisserie-cooked foods, most foods benefit greatly from a preheated oven. Wait for the display to read Add Food before inserting food into the cooking chamber.
- When cooking coated food items, choose breadcrumb batters over liquid-based batters to ensure that the batter sticks to the food.
- For crispy, golden fries, soak fresh potato ticks in ice water for 15 minutes, then pat dry and spray with cooking oil before adding them to the air fryer oven.
- When baking cakes, pies, quiches, or any food with filling or batter, use an oven-safe baking dish and cover food with foil or an oven-safe lid to prevent the top from overcooking.
- The drip pan doubles as a flat cooking tray. Use the drip pan when cooking fragile or filled food.
- When cooking pizza, insert both cooking trays into the oven and place the pizza on the bottom cooking tray.
- Pat moistened food items dry before cooking to prevent smoke, splatter, and excess steam.
- Air frying can cause oil and fat to drip from foods. To prevent excess smoke, carefully remove and empty the drip pan periodically throughout cooking.
- To ensure seasoning adheres properly, spray food items with cooking oil before adding seasoning.
- All oven-safe cookware is safe to use in the air fryer oven.
Download the Instant Pot App or visit our recipe site for fun, easy-to-follow recipes.
 CAUTION Do not spray cooking oil into the cooking chamber.
Care and Cleaning
Clean your Instant Vortex Plus air fryer oven and accessories after each use.
Always unplug the oven and let it cool to room temperature before cleaning.
Let all surfaces dry thoroughly before use, and before storage.
| Part / Accessory | Instruction | Cleaning Method |
| Rotisserie Basket | For best results, use a bristled brush rather than a sponge or cloth. Optionally, spray with non-stick cooking spray before adding food. |
Dishwasher* or Hand Wash |
| Rotisserie Spit and Forks | Disassemble before cleaning after each use. | |
| Cooking Trays | Dishwashers or Do not cover cooking trays when cooking. Air must be able to circulate freely. Cooking trays have a non-stick coating. Avoid using metal utensils when cleaning. |
|
| Rotisserie Lift | Clean as needed. | |
| Drip Pan | Remove for cleaning and ensure all grease and food debris is fully removed. Optionally, line the pan with aluminum foil or parchment paper for easier cleaning. |
|
| Cooking Chamber | Clean the cooking chamber walls as needed. Always check the heating coil for food debris and clean the heating coil as needed. Ensure the heating coil is dry before turning on the air fryer oven. |
Damp Cloth Only |
| Removable Door | Allow to air dry completely before reinstalling. | |
| Outer Body and Stainless Steel | Clean with a soft, damp cloth or sponge, and wipe dry to avoid streaking. |
*Some discoloration of parts may occur after machine washing. This will not affect the safety or the performance of the cooker.
Note: To remove baked-on grease residue from accessories and the cooking chamber, spray the affected area with a mixture of baking soda and vinegar, and wipe clean with a damp cloth. For stubborn stains, allow the mixture to sit on the affected area for several minutes before scrubbing clean.
Remove the Oven Door
- Place one hand on top of the air fryer oven to hold it firmly in place.
- Open the oven door to a 45º angle from the oven.
- Pull the oven door up from the right side until it pops out of its track.
Reinstall the Oven Door
- Hold the oven door at a 45º angle from the oven.
- Align the teeth at the bottom of the oven door with the grooves in the air fryer oven.
- Press down on the right side of the oven door until it pops into place, then press the left side down.
 WARNING WARNING |
||
| Do not immerse the appliance in water. Do not rinse the appliance under a tap. Do not wet the prongs of the power cord. | Without proper cleaning, food and grease splatter may build up around the heating element, causing the risk of smoke, fire, and personal injury. | If you smell smoke, touch Cancel and unplug the appliance. Once cool, remove food splatter or grease with a soft cloth and mild detergent. |
Troubleshooting
Register your product today.
Contact Customer Care: 1-800-828-7280
[email protected]
instantappliances.com/#Chat
| Problem | Possible Reason | Solution | |
| The air fryer oven is plugged in but will not turn on | The appliance is not properly plugged in | Ensure the power cord is plugged into the outlet firmly. | |
| The outlet is not powered | Plugin another appliance to the same plug to test the circuit. | ||
| Move the air fryer oven to another plug. | |||
| Door is open | Ensure the oven door is closed. | ||
| Black smoke is coming from the air fryer oven |  CAUTION Stop cooking immediately. Cancel the Smart Program, then unplug the oven and allow it to cool to room temperature. CAUTION Stop cooking immediately. Cancel the Smart Program, then unplug the oven and allow it to cool to room temperature. |
||
| Using an oil with a low smoke point | Choose a neutral oil with a high smoke point, such as Virgin or Extra Virgin Olive Oil, avocado, Canola, Soybean, Safflower, or Rice Bran. | ||
| Food residue on the bottom of the cooking chamber, or accessories | Remove all accessories from the cooking chamber and clean the area as well as all accessories thoroughly. | ||
| Faulty circuit or heating element | Contact Customer Care. Note: Do not attempt to repair the appliance. |
||
| White smoke is coming from air fryer oven | Cooking foods with high-fat content, such as bacon, sausage, and hamburger | Avoid air frying foods with high-fat content. | |
| Check drip pan/crumb tray for excess oil or fat and carefully remove as needed. | |||
| Water is vaporizing producing thick steam | Pat dry moist food ingredients before air frying. o not add water or other liquid to the cooking chamber when air frying. |
||
| The seasoning on food has blown into element | Be mindful when seasoning food. Spray vegetables and meats before adding seasoning so they adhere to the ingredients. |
||
| All lights flash and a code appears on the display | E1 | Broken circuit of the thermal sensor | Contact Customer Care. |
| E2 | Short circuit of the thermal sensor | Contact Customer Care. | |
Any other servicing should be performed by an authorized service representative.
Warranty
Disclaimer of Implied Warranties
EXCEPT AS EXPRESSLY PROVIDED HEREIN AND TO THE EXTENT PERMITTED BY LAW, INSTANT BRANDS MAKES NO WARRANTIES, CONDITIONS OR REPRESENTATIONS, EXPRESS OR IMPLIED, BY STATUTE, USAGE, CUSTOM OF TRADE OR OTHERWISE WITH RESPECT TO THE APPLIANCES OR PARTS COVERED BY THIS WARRANTY, INCLUDING BUT NOT LIMITED TO, WARRANTIES, CONDITIONS, OR REPRESENTATIONS OF WORKMANSHIP, MERCHANTABILITY, MERCHANTABLE QUALITY, FITNESS FOR A PARTICULAR PURPOSE OR DURABILITY.
Some states or provinces do not allow for the exclusion of implied warranties of merchantability or fitness, so this limitation may not apply to you. In these states and provinces, you have only the implied warranties that are expressly required to be provided in accordance with applicable law.
Limitation of Remedies; Exclusion of Incidental and Consequential Damage
YOUR SOLE AND EXCLUSIVE REMEDY UNDER THIS LIMITED WARRANTY SHALL BE APPLIANCE REPAIR OR REPLACEMENT AS PROVIDED HEREIN. INSTANT BRANDS SHALL NOT BE LIABLE FOR INDIRECT, INCIDENTAL, OR CONSEQUENTIAL DAMAGES ARISING OUT OF OR IN CONNECTION WITH THE USE OR PERFORMANCE OF THE APPLIANCE OR DAMAGES WITH RESPECT TO ANY ECONOMIC LOSS, PERSONAL INJURY, LOSS OF PROPERTY, LOSS OF REVENUES OR PROFITS, LOSS OF ENJOYMENT OR USE, COSTS OF REMOVAL, INSTALLATION OR OTHER INDIRECT, INCIDENTAL OR CONSEQUENTIAL DAMAGES OF ANY NATURE OR KIND.
Warranty Registration
Please visit www.instantappliances.com/support/register to register your new Instant Brands™ appliance and validate your warranty within thirty (30) days of purchase. You will be asked to provide the store name, date of purchase, model number (found on the back of your appliance), and serial number (found on the bottom of your appliance) along with your name and email address. The registration will enable us to keep you up to date with product developments, recipes and contact you in the unlikely event of a product safety notification. By registering, you acknowledge that you have read and understood the instructions for use, and warnings set forth in the accompanying instructions.
Warranty Service
To obtain service under this warranty, please contact our Customer Service Department by phone at 1-800-828-7280 or by email to [email protected]. You can also create a support ticket online at www.instantappliances.com/support. If we are unable to resolve the problem, you may be asked to send your appliance to the Service Department for quality inspection. Instant Brands is not responsible for shipping costs related to warranty service, save and except for shipping costs associated with the return of your appliance from Canada or within the 48 contiguous states and the District of Columbia of the United States of America, as provided herein. When returning your appliance, please include your name, mailing address, email address, phone number, and proof of the original purchase date as well as a description of the problem you are encountering with the appliance.
Limited Warranty
This Limited Warranty is effective for one year from the date of original consumer purchase. Proof of original purchase date and, if requested by an authorized representative of Instant Brands Inc. (“Instant Brands”), return of your appliance, is required to obtain service under this Limited Warranty. Provided that this appliance is operated and aintained in accordance with written instructions attached to or furnished with the appliance, Instant Brands will, in its sole and exclusive discretion, either: (i) repair defects in materials or workmanship; or (ii) replace the appliance. In the event that your appliance is replaced, the Limited Warranty on the replacement appliance will expire 12 months from the ate of original consumer purchase.
This Limited Warranty extends only to the original purchaser and use of the appliance in the United States of America and Canada. This warranty does not cover units that are used outside of the United States of America and Canada.
Any modification or attempted modification to your appliance may interfere with the safe operation of the appliance and will void this Limited Warranty. This Limited Warranty does not apply in respect of any appliance or any part thereof that has been altered or modified unless such alterations or modifications were expressly authorized by an Instant Brands representative.
Limitation and Exclusions
The liability of Instant Brands, if any, for any allegedly defective appliance or part shall in no circumstances exceed the purchase price of a comparable replacement appliance.
This Limited Warranty does not cover:
- Damage resulting from accident, alteration, misuse, abuse, neglect, unreasonable use, use contrary to the operating instructions, normal wear and tear, commercial use, improper assembly, disassembly, failure to provide reasonable and necessary maintenance, fire, flood, acts of God or repair by anyone unless directed by an Instant Brands Representative;
- Repairs where your appliance is used for other than normal, personal use or when it is used in a manner that is contrary to published user or operator instructions; or Use of unauthorized parts and accessories, or repairs to parts and systems resulting from unauthorized repairs or modifications made to this appliance.
The cost of repair or replacement under these excluded circumstances shall be paid by you.
Instant Brands Inc.
11–300 Earl Grey Dr., Suite 383
Ottawa, Ontario
K2T 1C1
Canada
Register your product today instantappliances.com/support/register
Contact Information
1-800-828-7280
[email protected]
instantappliances.com/#Chat
instantappliances.com
store.instantpot.com
Copyright © 2019 Instant Brands™ Inc
686-0101-51

Instant Pot Duo Evo Plus
Quick Start Guide
Get your Instant Pot out of the box
Click here to download the ‘what’s in the box guide’ to see everything that is included with your Instant Pot Duo.
You can also download the full product manual here.
Do the “Water Test” (Initial Test Run)
This will help you become familiar with how your Instant Pot works and ensure the cooker is operating correctly. You can find the details of this in the Getting Started Guide that comes with your Instant Pot.
Learn the basics of pressure cooking
- Pressure cooking relies on steam, and to generate steam your Instant Pot needs liquid. The recommended minimum liquid quantity for a Duo Evo Plus 60 (5.7L) is 375m1 and Duo Evo Plus 80 (7.6L) is 500m1.
- If sautéing before pressure cooking. you should always deglaze the bottom of the pot with a wooden spoon and a bit of liquid (water, stock, wine) to remove any burnt-on or caramelized bits.
- The Sauté function can also be used after cooking to reduce a sauce should it be too liquid-based.
- Avoid using flour or thickeners and add these at the end of the pressure-cooking program if needed.
Cook your first recipe
- Our Recipes to get you started are simple to follow so you can get to know your cooker with a delicious first recipe.
- We also have a wide range of Instant Pot recipes on our website including
meat, vegetarian and vegan, from pasta to curries, breakfast to the cake.
Want to keep updated?
Sign up for our newsletter on our website for the latest news, offers, and recipes, and keep an eye on our youtube channel for new videos. You can also join our Facebook group: instant pot UK Community for tips and tricks from Instant Pot users.
]]>DUO CRISP ™+ AIR FRYER
Multi-Use Pressure Cooker & Air Fryer

Full Manual, How-to Videos and Recipes available online at instantpot.com.au
Register your product today at instantpot.com.au/support/register
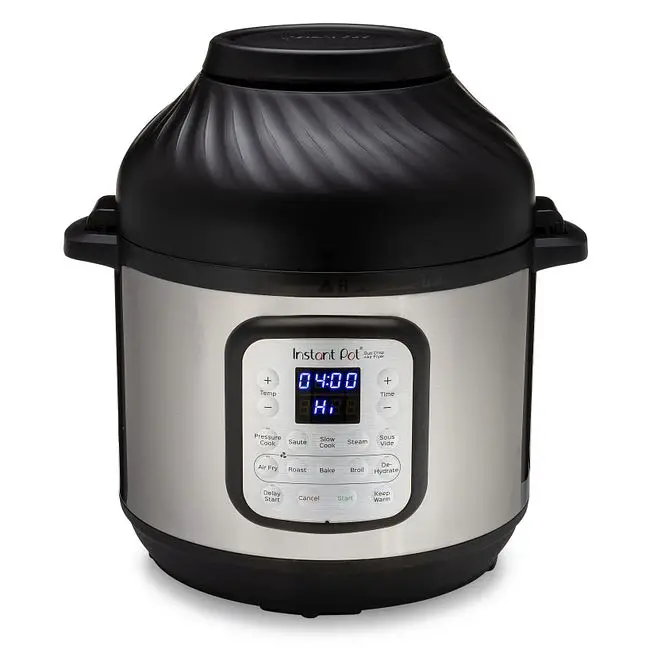
IMPORTANT SAFEGUARDS
When using electrical appliances, basic safety precautions should always be followed:
- READ ALL INSTRUCTIONS, SAFEGUARDS, AND WARNINGS, AS WELL AS INSTRUCTIONS FOR SAFE USE BEFORE OPERATING THE APPLIANCE. FAILURE TO FOLLOW THESE SAFEGUARDS AND INSTRUCTIONS MAY RESULT IN INJURY AND/OR PROPERTY DAMAGE.
- Always use an Instant Pot ® stainless steel inner pot of the appropriate size when using the air fryer lid. The Duo Crisp ™ is only compatible with the stainless-steel inner pot. DO NOT use the cooker with the non-stick, ceramic-coated inner pot.
Failure to follow these instructions may lead to the sudden release of contents and may cause burns or other injuries and/or damage. - Use the Duo Crisp pressure cooker lid or the Duo Crisp air fryer lid with the Duo Crisp cooker base. Using any other lids may cause injury and/or damage.
- Do not let children near the appliance when in use. Children should not play with the appliance.
- Do not put the appliance into a heated oven or on any heated surface.
- Do not place the appliance on or in close proximity to a hot gas or electric burner, or a heated oven. The heat from an external source will damage the appliance. Failure to follow these instructions may result in injury or property damage.
- Do not tamper with any of the safety mechanisms as this may result in injury or property damage.
- Do not move the appliance while it is under pressure.
- Do not use the appliance for a purpose other than that for which it is intended.
- This appliance cooks under pressure. Scalds may result from inappropriate use of the pressure cooker. Make sure that the cooker is properly closed before applying heat. Refer to the Getting Started Guide.
- Never force open the pressure cooker. Do not open before making sure that its internal pressure has completely dropped. Refer to the Getting Started Guide.
- Use the appropriate heat source(s) according to the Getting Started Guide.
- Never use the pressure cooker without adding water, as this would seriously damage it.
- Do not fill the inner pot beyond —2/3 of its capacity as indicated on the inner pot. When cooking foodstuffs that expand during cooking, such as rice or dehydrated vegetables, do not fill the cooker to more than —1/2 of its capacity as indicated on the inner pot.
- After cooking meat with a skin (such as ox tongue), which may swell under the effect of pressure, do not prick the meat while the skin is swollen as you may be scalded.
- The heating element surface inside the Instant Pot® cooker base is subject to residual heat after use; do not touch it.
- Before each use, check that the valves, the steam release pipe, and the anti-block shield are not obstructed. Refer to the Getting Started Guide.
- Never use the pressure cooker in its pressurized mode for deep or shallow frying of food.
- Do not tamper with any of the safety systems beyond the maintenance instructions specified in the instructions for use.
- Do not operate any appliance with a damaged lead or plug, or after the appliance malfunctions or has been damaged in any way. If the power supply lead is damaged, users should contact Customer Care for further assistance.
- For domestic use only. Not intended for commercial or outdoor use.
- This appliance should not be used by children, by individuals whose physical, sensory or mental abilities prevent safe use of the appliance, or by individuals with limited knowledge of how to use a pressure cooker. Close supervision is needed when using this appliance near these individuals.
- When cooking doughy food, use caution when removing the lid to avoid food ejection.
- Do not use this appliance in electrical systems other than 220-240V~ 50-60Hz for Australia and New Zealand. Do not use with power converters or adapters.
- Do not use this appliance for shallow or deep frying or pressure frying with oil.
- Be aware that certain foods such as stewed apples, cranberries, pearl barley, oatmeal or other cereals, split peas, noodles, macaroni, rhubarb or spaghetti can foam, froth and clog the steam release. These foods should not be cooked under pressure cooking settings unless as directed in authorized Instant Pot® recipes.
- Spilled food can cause serious burns. A short power-supply lead is provided to reduce the hazards resulting from grabbing, entanglement and tripping.
• Keep the appliance and lead away from children.
• Never drape the power lead over edges of tables or counters.
• Never use below-counter power sockets, and never use with an extension lead. - Unplug from the outlet when not in use, as well as before adding or removing parts or accessories, and before cleaning. To unplug, grasp the plug and pull from the outlet. To avoid damage to the power lead, never pull from the power lead.
- Always allow the appliance to cool before cleaning. Allow all surfaces to dry thoroughly before use or storage.
- The appliance is not intended to be operated by means of an external timer or a separate remote-control system.
- Always make sure the sealing ring is completely set in the groove on the inside of the sealing ring rack.
- Avoid spillage on the connector.
 CAUTION The cooker base and air fryer lid contain electrical components. To avoid electrical shock, do not immerse the power lead, plug, or cooker base or air fryer lid in water or other liquid. Do not rinse the cooker base or the air fryer lid under a tap.
- Intended for countertop use only. Keep the appliance on a stable, heat-resistant platform. Do not place on or near a hot stovetop.
 CAUTION Do not cover the air vents while the air fryer lid is in operation, and do not place the appliance on anything that may block the vents on the bottom of the appliance. Leave at least 13 cm of space around the air fryer lid while it is in use. Failure to follow these instructions will prevent even cooking and may cause damage to the appliance.
- Avoid contact with moving parts. Failure to do so may result in injury.
- When using the air fryer lid, do not overfill the air fry basket. Overfilling may cause food to contact the heating element, which may result in fire and/or personal injury.
 CAUTION Do not touch accessories during or immediately after cooking. To avoid personal injury:
• Always use proper hand protection when removing accessories, and when handling the inner pot.
• Always place hot accessories on a heat-resistant surface or cooking plate.
• Only place the air fryer lid on the protective pad provided; do not place it on the countertop.
• Use extreme caution when disposing of hot grease.
Failure to follow these instructions may result in serious injury or property damage.- While cooking, the internal temperature of the appliance reaches several hundred degrees. To avoid personal injury, never place unprotected hands inside the appliance until it has cooled to room temperature.
 CAUTION When the air fryer lid is in operation, hot air is released through the air vents. Keep your hands and face at a safe distance from the air vents and take extreme caution when removing hot accessories from the appliance. Failure to follow these instructions may result in injury or property damage.
- Should the unit emit black smoke when using the air fryer lid, press Cancel and unplug the appliance immediately. Wait for smoking to stop before removing the lid, then clean thoroughly. For further information refer to “Troubleshooting”.
- Oversized foods and/or metal utensils must not be inserted into the inner pot or air fry basket as they may cause risk of fire and/or personal injury.
- Do not store any materials in the cooker base or inner pot when not in use.
- Do not place any combustible materials in the cooker base or inner pot, such as paper, cardboard, plastic, Styrofoam or wood.
- Do not use the included accessories in a microwave, toaster oven, convection or conventional oven, or on a ceramic cooktop, electric coil, gas stovetop, or outdoor grill.
SAVE THESE INSTRUCTIONS.
![]() WARNING
WARNING
To avoid injury, read and understand the instruction manual before using this appliance. Failure to do so may result in injury.
![]() WARNING
WARNING
Electric shock hazard. Use an earthed outlet only. DO NOT remove earthing. DO NOT use an adapter. DO NOT use an extension lead. Failure to follow instructions can cause electric shock and/or serious injury.
![]() WARNING
WARNING
FAILURE TO FOLLOW ANY OF THE IMPORTANT SAFEGUARDS AND IMPORTANT INSTRUCTIONS FOR SAFE USE IS A MISUSE OF YOUR APPLIANCE THAT CAN VOID YOUR WARRANTY AND CREATE THE RISK OF SERIOUS INJURY.
Special Lead Set Instructions
As per safety requirements, a short power supply lead is provided to reduce the hazards resulting from grabbing, entanglement and tripping.
To reduce the risk of electric shock, plug the power lead into an earthed and easily accessible electric socket.
![]() WARNING Read this manual carefully and completely and retain for future reference. Failure to adhere to safety instructions may result in serious injury.
WARNING Read this manual carefully and completely and retain for future reference. Failure to adhere to safety instructions may result in serious injury.
Product Specifications
 |
Model: DUO CRISP AF 8 |
 |
1500W |
 |
220–240 V~ 50-60 Hz |
 |
8 Litres |
 |
10.06 kg |
 |
With Air Fryer Lid: 37.5L x 34.5W x 38.8H cm With Pressure Cooker Lid: 37.5L x 34.5W x 36H cm |
With Air Fryer Lid: 37.5L x 34.5W x 38.8H cm
With Pressure Cooker Lid: 37.5L x 34.5W x 36H cm
![]() WARNING
WARNING
Read this manual carefully and completely, and retain for future reference. Failure to adhere to safety instructions may result in serious injury.
Care, Cleaning & Storage
Unplug your Instant Pot® Duo Crisp and allow it to cool before cleaning. Allow all surfaces to dry thoroughly before use. Failure to follow these instructions may cause your appliance to malfunction and could void your warranty.
| Part | Instruction | Cleaning Method |
| Pressure Cooker Lid & Parts • Condensation Collector • Steam Release Valve • Anti-Block Shield • Sealing Ring • Float Valve • Float Valve Silicone Cap |
• Wash after each use with hot water and washing up liquid and allow to air dry, or place on top rack of the dishwasher. • Remove all parts from lid before dishwashing. • With steam release valve and anti-block shield removed, clean interior of steam release pipe to prevent clogging. • To drain water from the lid after dishwashing, take the lid handle and hold the lid vertically over a sink, then turn it 360°— like turning a steering wheel. • After cleaning, store the lid upside down on the cooker base. • Store sealing ring in a well-ventilated area to decrease residual odor from highly flavored meals. To eliminate odors, add 1 cup (250 mL) of water and 1 cup (250 mL) of white vinegar to the inner pot and run Pressure Cook for 5–10 minutes, then QR pressure. • Empty and rinse condensation collector after each use. |
Dishwasher Safe & Hand Washable. |
| Inner Pot | • Heavy hard water staining may require a vinegar dampened sponge and some scrubbing to remove. If there is tough or burned food residue at the bottom, soak in hot water for a few hours for easy cleaning. • Wash after each use. • Ensure all exterior surfaces are dry before placing them in the cooker base. |
Dishwasher Safe & Hand Washable. |
| Air Fryer Lid | • Allow the Air Fryer Lid to cool to room temperature, then clean the heating element and surrounding area with a soft, damp cloth or sponge. Ensure it is free of food debris and/or grease splatter • Do not remove the element cover. • Do not rinse or immerse air fryer lid in water. |
Wipe the exterior clean with a soft, damp cloth or sponge. |
| Power Lead | • Use a barely damp cloth to wipe any particles off power lead. • Do not rinse or immerse power lead in water. |
Damp Cloth Only. |
| Cooker Base | • Wipe the inside of the outer pot as well as the condensation rim with a barely damp cloth and allow to air dry. • Clean cooker base and control panel with a soft, barely damp cloth or sponge. • Do not rinse or immerse the cooker base in water. |
Damp Cloth Only. |
![]() WARNING
WARNING
To protect against the risk of shock, do not immerse the appliance in water or any liquid. Do not rinse the appliance under a tap. To protect against the risk of shock, ensure heating element remains dry at all times.
To protect against the risk of shock, do not submerge power lead at any time. Do not wet pins of power lead.
Without proper cleaning, food and grease splatter may build up around the heating element, leading to the risk of smoke, fire and personal injury.
To prevent fire and personal injury, if you smell smoke, press Cancel and unplug the appliance. Once cool, remove food splatter or grease with a soft cloth and mild washing up liquid.
Troubleshooting
Register your product today at instantpot.com.au/support/register Problem Possible Reason Solution
| Problem | Passible Redson | Solution |
| Air Fryer Lid is in place but the appliance will not turn on | The connection between the Air Fryer Lid and pressure cooker base is loose or broken. | Ensure the Air Fryer Lid is seated correctly on the pressure cooker base. |
| Bad power connection or no power. | Inspect the power lead on the pressure cooker base to ensure a good connection. Ensure the power lead is plugged firmly into the cooker base. | |
| The microswitch is ceased by grease or is damaged. | Contact Customer Care. | |
| Black smoke is coming from the Air Fryer Lid | Using an oil with a low smoke point. | Could be an equipment malfunction. Contact Customer Care. |
| Cancel the Smart Program, unplug the cooker and allow it to cool to room temperature. DO NOT interact with hot appliances. Choose a neutral oil with a high smoke point, such as Rapeseed, Avocado, Soybean, Safflower or Rice Bran. | ||
| Food residue on the bottom of the inner pot or around the element on the Air Fryer Lid. | Cancel the Smart Program, unplug the cooker and allow it to cool to room temperature. Remove all accessories from the inner pot and clean the inner pot, Air Fryer Lid and all accessories thoroughly. | |
| White smoke is coming from the Air Fryer Lid | Cooking foods with high-fat content, such as bacon, sausages and hamburgers. | Could be an equipment malfunction. Contact Customer Care. |
| Avoid air frying foods with high-fat content. | ||
| Check the inner pot for excess oil and/or fat and carefully remove as needed before air frying. | ||
| Food is moist. Water is evaporating, producing thick steam. | White smoke is steam as the water in the food is evaporating and escaping from the Air Fryer. Pat dry moist food ingredients before air frying. | |
| The seasoning on food has blown into elements. | Be careful when seasoning food. Spray vegetables and meats before adding seasoning so it adheres to the ingredients. | |
| Difficulty
closing pressure cooking lid |
The sealing ring is not properly fitted. | Re-position sealing ring, ensuring it is snug behind sealing ring rack. |
| A float valve in the popped-up position. | Gently press the float valve down with a long utensil. | |
| The contents in the cooker are still hot. | Press the quick-release button down until it clicks into the “Vent” position, then lower lid onto the cooker base slowly, allowing heat to dissipate. |
Any other servicing should be performed by an authorized service representative.
| Problem | Passible Redson | Solution |
| Air Fryer Lid is in place but the appliance will not turn on | The connection between the Air Fryer Lid and pressure cooker base is loose or broken. | Ensure the Air Fryer Lid is seated correctly on the pressure cooker base. |
| Bad power connection or no power. | Inspect the power lead on the pressure cooker base to ensure a good connection. Ensure the power lead is plugged firmly into the cooker base. |
|
| The microswitch is ceased by grease or is damaged. | Contact Customer Care. | |
| Black smoke is coming from the Air Fryer Lid | Using an oil with a low smoke point. | Could be an equipment malfunction. Contact Customer Care. |
| Cancel the Smart Program, unplug the cooker and allow it to cool to room temperature. DO NOT interact with hot appliances. Choose a neutral oil with a high smoke point, such as Rapeseed, Avocado, Soybean, Safflower or Rice Bran. | ||
| Food residue on the bottom of the inner pot or around the element on the Air Fryer Lid. | Cancel the Smart Program, unplug the cooker and allow it to cool to room temperature. Remove all accessories from the inner pot and clean the inner pot, Air Fryer Lid and all accessories thoroughly. | |
| White smoke is coming from the Air Fryer Lid | Cooking foods with high-fat content, such as bacon, sausages, and hamburgers. | Could be an equipment malfunction. Contact Customer Care. |
| Avoid air frying foods with high-fat content. | ||
| Check the inner pot for excess oil and/or fat and carefully remove as needed before air frying. | ||
| Food is moist. Water is evaporating, producing thick steam. | White smoke is steam as the water in the food is evaporating and escaping from the Air Fryer. Pat dry moist food ingredients before air frying. | |
| The seasoning on food has blown into elements. | Be careful when seasoning food. Spray vegetables and meats before adding seasoning so it adheres to the ingredients. | |
| Difficulty closing pressure cooking lid | The sealing ring is not properly fitted. | Re-position sealing ring, ensuring it is snug behind sealing ring rack. |
| Float valve in the popped-up position. | Gently press the float valve down with a long utensil. | |
| The contents in the cooker are still hot. | Press the quick-release button down until it clicks into the “Vent” position, then lower lid onto the cooker base slowly, allowing heat to dissipate. |
| Problem | Possible Reason | Solution |
| Steam gushes from steam release valve when the quick-release button is in “Seal” position | Pressure sensor control failure. | Contact Customer Care. |
| Steam release valve not seated properly. | Flick quick-release button to ensure it is in the “Seal” position. | |
| The display remains blank after connecting the power lead | Bad power connection or no power. | Inspect power lead for damage. If damage is noticed, contact Customer Care. Check outlet to ensure it is powered. |
| Cooker electrical fuse has blown. | Contact Customer Care. | |
| No heat in the inner pot. | Perform “Initial Test Run” to check operation, and record findings.
Contact Customer Care. |
|
| Inner pot base may be damaged. | Perform “Initial Test Run” to check operation, and record findings.
Contact Customer Care. |
|
| A small amount of steam leaking/hissing from steam release valve during cook cycle | Quick-release button not in “Seal” position. | Flick the quick-release button to ensure it is in the “Seal” position. |
| The cooker is regulating excess I pressure. | This is normal. No action is required. | |
| Steam gushes from steam release valve when the quick-release button is in “Seal” position | Not enough liquid in the inner pot. | Add 375 ml of a thin cooking liquid to inner pot. |
| Pressure sensor control failure. | Contact Customer Care. | |
| Steam release valve not seated properly. | Flick the quick-release button to ensure it is in the “Seal” position. | |
| Occasional light clicking or cracking sound |
The sound of power switching and expanding pressure board when changing temperatures. | This is normal; no action is needed. |
| The bottom of the inner pot is wet. | Wipe exterior surfaces of inner pot. Ensure the heating element is dry before inserting the inner pot into the cooker base. |
| Error code appears on the display and the cooker beeps continuously | Error Code | Meaning of error code |
| C1 C2 C6L C6H |
Contact Customer Care. | |
| C9 | Pressure function on non-pressure for a long time. | |
| C9 | Using the Air Fry function. The sensor in the Air Fryer lid opens the circuit. | |
| PrSE | Pressure switch disconnected for non-pressure function. | |
| Food burn | Food burning at high temperature on pot bottom for
pressure functions. |
|
| Lid | Using lid mistakenly or lid is not in the correct position. | |
| Pot | Not putting the inner pot into base cooker/sensor short circuit in pressure cooker bottom. |
Any other servicing should be performed by an authorized service representative.
Warranty
Limited Warranty
This Limited Warranty is issued by Corelle Brands (Australia) Pty Ltd (Corelle Brands Australia) and is effective for one year from the date of original consumer purchase. Proof of original purchase date and return of your appliance is required to obtain service under this Limited. Return of your appliance to us will be done in accordance with our instructions only. Provided that this appliance is operated and maintained in accordance with written operating instructions attached to or furnished with the appliance or published operating instructions on www.instantpot.com.au, Corelle Brands Australia will, in its sole and exclusive discretion, either: (i) repair defects in materials or workmanship; or (ii) replace the appliance. In the event that your appliance is replaced, the Limited Warranty on the replacement appliance will expire 12 months from the date of the original consumer purchase. We remind you the appliance you purchased is for personal use only (not commercial use).
Any modification/alteration or attempted modification/alteration to your appliance will void this Limited Warranty unless such modification/alteration or attempted modification/alteration was expressly authorized by a Corelle Brands Australia Representative in writing. This Limited Warranty only covers Corelle Brands Australia’s appliances/products and is not extended to any other appliances, products, equipment, components, or devices that you use or may use in conjunction with Corelle Brands Australia’s appliances.
To claim under this Limited Warranty:
- Contact Corelle Brands Australia at: 9C Commercial Road, Kingsgrove, NSW, 2208 Email: [email protected]
- Provide a description of the appliance you believe has malfunctioned due to defective parts or workmanship.
- If it is necessary for the appliance to be sent to Corelle Brands Australia for repair or replacement, Corelle Brands
Australia will send you a pre-paid shipping label and you must send the appliance and your dated sales receipt to Corelle
Brands Australia along with the appliance. If you do not have your dated sales receipt, please advise Corelle Brands
Australia in advance and Corelle Brands Australia will attempt to verify your purchase. - If Corelle Brands Australia determines that the appliance has malfunctioned due to defective parts or workmanship, and is covered under this Limited Warranty, Corelle Brands Australia will repair and return the appliance, or send you a replacement appliance, at Corelle Brands Australia’s cost.
- Any repaired or replaced appliance will be covered by this Limited Warranty for the remainder of the original warranty period or ninety (90) days following your receipt of the replacement or repaired appliance, whichever is greater.
- If Corelle Brands Australia confirms the appliance has not malfunctioned due to defective parts or workmanship, and/or is in working order, or if proof of purchase is not verified, Corelle Brands Australia reserves the right to return the appliance to you at your pre-paid cost. If this cost is not met, Corelle Brands Australia reserves the right to dispose of the appliance after 45 days’ notice to you.
Limitation and Exclusions
To the maximum extent permitted by law, the maximum liability of Corelle Brands Australia, if any, for any allegedly defective appliance or part shall in no circumstances exceed the purchase price of a comparable replacement appliance or part of the same age.
This Limited Warranty does not cover
- Damage resulting from accident, modification/alteration (unless expressly authorized by a Corelle Brands Australia Representative in writing), misuse, abuse, neglect, unreasonable use, use contrary to the written operating instructions attached to or furnished with the appliance or published operating instructions on www.instantpot.com.au, normal wear and tear, commercial use, improper assembly by you or anyone, disassembly by you or anyone, repair by you or anyone, failure to provide reasonable and necessary maintenance, force majeure event including but not limited to fire, flood, acts of God;
- Repairs where your appliance is used for other than normal, personal use or when it is used in a manner that is contrary to the written operating instructions attached to or furnished with the appliance or published operating instructions on www.instantpot.com.au; or
- Use of unauthorized parts and accessories, or repairs to parts and systems resulting from unauthorized repairs or modifications/alterations made to your appliance.
The cost of repair or replacement under these excluded circumstances shall be borne by you. Our goods come with guarantees that cannot be excluded under the Australian Consumer Law. You are entitled to a replacement or refund for a major failure and compensation for any other reasonably foreseeable loss or damage. You are also entitled to have the goods repaired or replaced if the goods fail to be of acceptable quality and the failure does not amount to a major failure.
Distributed by Corelle Brands (Australia) Pty Ltd.
9c Commercial Road, Kingsgrove, NSW, 2208. 1800 251 643 or (02) 9317 1000.
Email: [email protected]

©2020 Corelle Brands (Australia) Pty Ltd.
Distributed by Corelle Brands (Australia) Pty Ltd.
9c Commercial Road, Kingsgrove, NSW, 2208, Australia
Register your product today at: instantpot.com.au/support/register
Contact Customer Care: Ph 1800 251 643 or 02 9317 1000
[email protected]
instantpot.com.au
© 2020 Corelle Brands (Australia) Pty Ltd.
805-1710-41
