Register Your Product Today
www.lasko.com/product-registration/
You will benefit from:
- Efficient and enhanced support
- Future product updates
Have a Question? Need a Part?
Please Do Not Return Product to Store!
Contact Lasko Customer Service:
(800) 233-0268 Monday-Friday 8AM – 5PM EST.
(Valid in the USA, its Territories, and CANADA Only)
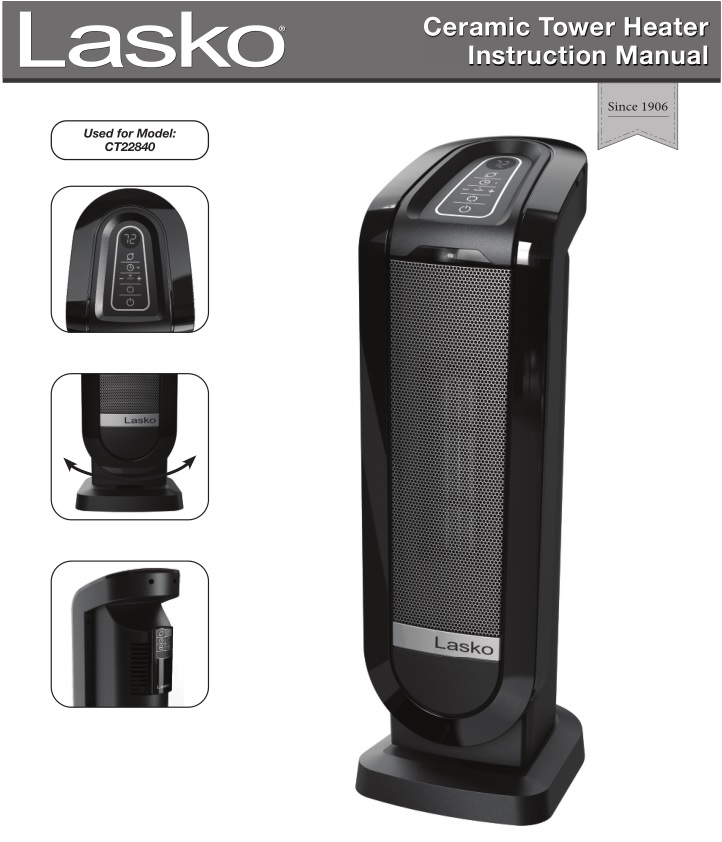
Read and Save These Instructions
Read carefully before attempting to assemble, install, operate or maintain the product described. Protect yourself and others by observing all safety information. failure to comply with instructions could result in personal injury and/or property damage! This Heater is intended for use as supplemental heat. This Heater is for residential use only. It is not intended to be used in commercial, industrial or agricultural settings.
![]()
![]()

![]()
![]()
IMPORTANT SAFETY INSTRUCTIONS
When using electrical appliances, these instructions and warnings should always be followed to reduce the risk of fire, electrical shock and injury to persons:
![]() Read all instructions before using this Heater.
Read all instructions before using this Heater. ![]()
 PLUG HEATERS DIRECTLY INTO A 120V WALL OUTLET/RECEPTACLE ONLY. NEVER USE WITH AN EXTENSION CORD. DO NOT PLUG HEATER INTO ANY OTHER CORD CONNECTED DEVICE, SUCH AS A POWER STRIP, SURGE PROTECTOR, MULTIPLE OUTLET ADAPTER, CORD REEL OR OUTLET-TYPE AIR FRESHENER. THE USE OF SUCH DEVICES MAY CREATE A FIRE HAZARD. DO NOT PLUG MULTIPLE DEVICES IN THE SAME OUTLET OR ON SAME CIRCUIT AS HEATER.
- FAULTY WALL OUTLET CONNECTIONS MAY CAUSE THE WALL OUTLET TO OVERHEAT. BE SURE THAT HEATER PLUG FITS TIGHTLY INTO OUTLET BEFORE EACH USE. DURING USE, CHECK TO MAKE CERTAIN THE HEATER PLUG IS NOT OVERHEATING. IF NECESSARY HAVE A QUALIFIED ELECTRICIAN CHECK AND/OR REPLACE THE WALL OUTLET. DO NOT USE THIS HEATER WITH ANY SOLID STATE SPEED CONTROL DEVICES.
- Make certain that the power source conforms to the electrical requirements of the Heater.
 Extreme caution is necessary when any Heater is used by or near children or invalids. The Heater should not be left operating unattended. Never leave children unattended when the Heater is on or plugged in.
- This appliance has a polarized plug (one blade is wider than the other). To reduce the risk of electric shock, this plug is intended to fit in a polarized outlet only one way. If the plug does not fit fully in the outlet, reverse the plug. If it still does not fit, contact a qualified electrician. Do not attempt to defeat this safety feature.
- DO NOT use the Heater in areas where gasoline, paint, or flammable liquids are used or stored. DO NOT use Heater in locations where flammable or explosive chemicals are stored, or in wet atmospheres.
- Do not operate any Heater with a damaged cord or plug or after the Heater malfunctions, or has been dropped or damaged in any manner. To disconnect Heater, turn the Heater OFF then remove the plug from the outlet.
- Always unplug Heater when not in use. Unplug power cord before servicing or moving the Heater.
 Do not insert or allow fingers or foreign objects to enter any ventilation or exhaust opening as it may cause an electric shock, fire, or damage the Heater. Do not block or tamper with the Heater in any manner while it is in operation.
- Do not block air intakes or exhaust in any manner. Do not place on soft surfaces, like a bed, where openings may become blocked. Do not depend on the on/off switch as the sole means of disconnecting power when servicing or moving the Heater. Always unplug the power cord.

- Always place the Heater on a stable, flat, level surface when operating, to avoid the chance of the Heater overturning. Locate the Power Cord so the Heater or other objects are not resting on it. DO NOT run Power Cord under carpeting. DO NOT cover Power Cord with throw rugs, runners, or similar coverings as this may cause cord to overheat. Arrange Power Cord away from room traffic and where it will not be tripped over.
- This Heater is HOT when in use. To avoid burns, do not let bare skin touch hot surfaces. Always use handle when moving this Heater. Keep combustible materials, such as furniture, pillows, bedding, papers, clothes and curtains at least 3 feet (0.9 m) from the front of the Heater and keep them at least 1 foot (0.3 m) from the sides and rear.
- This Heater is not intended for use in wet or damp locations. This Heater is not intended for use in bathrooms, laundry areas and similar indoor locations. NEVER locate a Heater where it may fall into a bathtub or other water container.
- DO NOT use Heater outdoors.
- This Heater is not suitable for use in agricultural facilities including areas where livestock, poultry or other animals are confined. Please refer to National Electric Code (NEC) Article 547-7 (2008), or applicable state or local codes or standards relating to electrical requirements for Agricultural Buildings. THIS HEATER DOES NOT MEET THE REQUIREMENTS OF NEC ARTICLE 547-7 (2008).
- This Heater is not suitable for use in hazardous locations. Please refer to National Electric Code (NEC) Article 500 or applicable state or local codes or standards relating to electrical requirements for Hazardous locations. THIS HEATER DOES NOT MEET THE REQUIREMENTS OF NEC ARTICLE 500 (2008).
NOTE: This equipment has been tested and found to comply with the limits for a Class B digital device, pursuant to Part 15 of the FCC Rules. These limits are designed to provide reasonable protection against harmful interference in a residential installation. This equipment generates, uses and can radiate radio frequency energy and, if not installed and used in accordance with the instructions, may cause harmful interference to radio communications. However, there is no guarantee that interference will not occur in a particular installation. If this equipment does cause harmful interference to radio or television reception, which can be determined by turning the equipment off and on, the user is encouraged to try to correct the interference by one or more of the following measures: Reorient or relocate the receiving antenna. Increase the separation between the equipment and receiver. Connect the equipment into an outlet on a circuit different from that to which the receiver is connected. Consult the dealer or an experienced radio/TV technician for help. The user is cautioned that changes and modifications made to the equipment without the approval of manufacturer could void the user’s authority to operate this equipment.
SAVE THESE INSTRUCTIONS
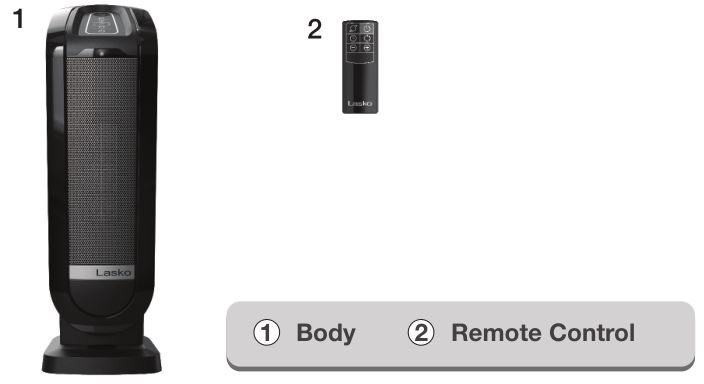
Parts Included
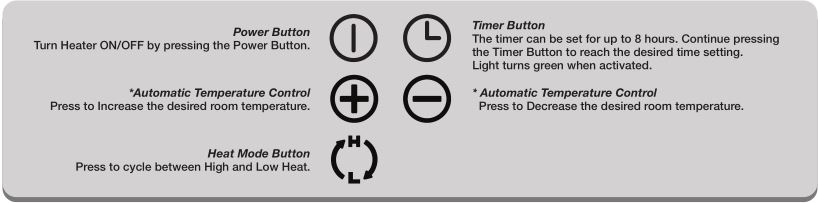
Controls
AUTOMATIC TEMPERATURE CONTROL
The automatic temperature function will only operate on “High” heat. You cannot set the temperature automatically when the unit is in the low heat mode.
- To set the room at a specific temperature press the (+) or (-) buttons to the desired temperature. The display will now reflect the (
 ) and the temperature will be flashing. The Heater is now in Auto Temperature Mode.
 - When you reach the temperature at which you want to set the unit, the set temperature will flash several times and then the display will return to indicate the current room temperature and will gradually change as the room temperature changes. NOTE: the temperature display does not indicate the temperature of the heated air being emitted by the Heater.
- Once the room temperature reaches 2 degrees above the set temperature, the Heater will shut off. Once the room temperature reaches 1 degree below the set temperature, the Heater will turn back on and continue to cycle off and on to maintain the set temperature.
- This function will cancel if the (
 ) button is pressed. The Heater will now be in High heat and run continuously.
NOTE: It is normal for the Heater “fan” to run for approximately 15 seconds when the Heater shuts off after reaching the set temperature. Press the (+) and (-) buttons at the same time to change the display to ° Celsius. Press the same two buttons together again to change the display back to ° Fahrenheit.
REMOTE CONTROL
All the functions performed with the Remote Control work identically to the manual controls except changing °F to °C.
- Install two “AAA” batteries (included).
- Do not mix old and new batteries. Do not mix alkaline, standard (carbon-zinc) or rechargeable (nickel-cadmium) batteries.
- DO NOT DISPOSE OF BATTERIES IN FIRE. BATTERIES MAY EXPLODE OR LEAK.
- Always purchase the correct size and grade of battery most suitable for the intended use.
- Clean the battery contacts and also those of the device prior to battery installation.
- Remove batteries from equipment which is not to be used for an extended period of time.
- Remove batteries if consumed or if product is to be left unused for a long time.
- Remove used batteries promptly.
If you lose your remote control, please call Customer Service to order a replacement at (800) 233-0268, Monday through Friday, between the hours of 8:00 a.m. and 5:00 p.m. EST.
SAFETY FEATURE
- A thermal overload protector is built in to prevent overheating.
- If an overheat temperature is reached, the Heater will automatically shut off. It can only resume operation when the user resets the unit.
To Reset Heater:
- Unplug the Heater and wait 10 minutes for the Heater to cool down.
- After the Heater has cooled down, plug the unit into a 120V~ electrical outlet and follow the operation instructions described in this manual.
TROUBLESHOOTING TIPS
If your Heater shuts off unexpectedly or fails to operate, the previously mentioned safety feature may have been activated to prevent overheating.
- Be sure the power cord is plugged into a working electrical outlet.
- Make certain the batteries in the remote control are new and properly installed.
- Check your Temperature setting. The Heater may be off because it has reached the desired temperature setting.
- If your Heater runs for several minutes and shuts off repeatedly, your Heater may require cleaning. See Maintenance section below.
SERVICING: For servicing, other than general user maintenance, please contact Customer Service at (800) 233-0268, Monday through Friday, from 8am-5pm Eastern.
STORAGE: Store the Heater with these instructions in the original carton in a cool, dry place.
DISPOSITION: Corrugated packaging materials are recyclable. For environmentally responsible disposal of this product, contact your local waste service provider or visit www.1800recycling.com ® .
MAINTENANCE
To reduce the risk of electrical shock and fire please observe the following instructions. Cleaning the Heater regularly will help to maintain its efficiency.
- Always unplug the cord before moving, servicing or cleaning.
- NEVER place the Heater in or near water. DO NOT IMMERSE HEATER IN WATER.
- Clean the Heater only with a vacuum equipped with a brush attachment; the vacuum will remove the lint and dirt from the surface of the Heater.
- Vacuum intake grills every two weeks; this will help to maintain the optimum Heater performance.
- Use a toothbrush or other soft bristle brush to gently loosen any dirt not removed by the vacuum.
- NEVER attempt to take apart the Heater.
- Clean the body of the Heater with a soft cloth only.
- NEVER use ALCOHOL or SOLVENTS such as gasoline, benzene, paint thinner, or other harsh cleaners.
LASKO PRODUCTS, LLC LIMITED WARRANTY (VALID IN THE USA, ITS TERRITORIES, AND CANADA ONLY)
WHAT THIS WARRANTY COVERS: This product is warranted against defects in workmanship and/or materials.
HOW LONG THIS WARRANTY LASTS: This warranty extends only to the original purchaser of the product and lasts for three (3) years from the date of original purchase or until the original purchaser of the product sells or transfers the product, whichever first occurs.
WHAT LASKO WILL DO: Lasko will, at its sole option, repair or replace any part or parts that prove to be defective or replace the whole product with the same or comparable model. For all warranty claims, the product must be returned to Lasko Products, LLC at customer expense with proof of purchase within the warranty period. Contact the Lasko customer service department to obtain a Return Authorization (“RA”). DO NOT return products without an RA or the warranty claim will not be processed.
WHAT THIS WARRANTY DOES NOT COVER: This warranty does not apply if the product was damaged or failed because of accident, improper handling or operation, shipping damage, abuse, misuse, unauthorized repairs made or attempted, or the use of the product for commercial or nonresidential service. This warranty does not cover shipping costs for the return of products to Lasko for repair or replacement. Lasko will pay return shipping charges from Lasko following warranty repairs or replacement.
ANY AND ALL WARRANTIES, EXPRESSED OR IMPLIED (INCLUDING, WITHOUT LIMITATION, ANY IMPLIED WARRANTY OF MERCHANTABILITY), LAST THREE YEARS FROM THE DATE OF ORIGINAL PURCHASE OR UNTIL THE ORIGINAL PURCHASER OF THE PRODUCT SELLS OR TRANSFERS THE PRODUCT, WHICHEVER FIRST OCCURS AND IN NO EVENT SHALL LASKO’S LIABILITY UNDER ANY EXPRESS OR IMPLIED WARRANTY INCLUDE (I) INCIDENTAL OR CONSEQUENTIAL DAMAGES FROM ANY CAUSE WHATSOEVER, OR (II) REPLACEMENT OR REPAIR OF ANY HOUSE FUSES, CIRCUIT BREAKERS OR RECEPTACLES. NOTWITHSTANDING ANYTHING TO THE CONTRARY, IN NO EVENT SHALL LASKO’S LIABILITY UNDER ANY EXPRESS OR IMPLIED WARRANTY EXCEED THE PURCHASE PRICE OF THE PRODUCT AND ANY SUCH LIABILITY SHALL TERMINATE UPON THE EXPIRATION OF THE WARRANTY PERIOD.
Some states and provinces do not allow limitations on how long an implied warranty lasts, or the exclusion or limitation of incidental or consequential damages, so these exclusions or limitations may not apply to you. This warranty gives you specific legal rights. You may also have other rights which vary from state to state and province to province.
Proof of purchase is required before a warranty claim will be accepted.
CUSTOMER SERVICE:
Toll-Free (800) 233-0268. Email:
Our Customer Service team is available to assist you with product and service questions, and replacement parts. They can be reached Monday through Friday, 8am-5pm Eastern. Please have your model number available, as well as the type and style (located on the underside of your product).
Customer Service Dept., 820 Lincoln Ave., West Chester, PA 19380
(Please do not send product to this location) www.lasko.com
PARTS FOR DISCONTINUED, OBSOLETE AND CERTAIN OTHER PRODUCTS MAY NOT BE AVAILABLE. DUE TO SAFETY REASONS, MANY ELECTRONIC COMPONENTS AND MOST HEATER COMPONENTS ARE NOT AVAILABLE TO CONSUMERS FOR INSTALLATION OR REPLACEMENT.
Manual printed in China
TOWER HEATER FAN with REMOTE CONTROL MODEL FH500

This Heater is intended for use as supplemental heat.
This Heater is for residential use only.
It is not intended to be used in commercial, industrial or agricultural settings.
READ AND SAVE THESE INSTRUCTIONS
READ CAREFULLY BEFORE ATTEMPTING TO ASSEMBLE, INSTALL, OPERATE OR MAINTAIN THE PRODUCT DESCRIBED. PROTECT YOURSELF AND OTHERS BY OBSERVING ALL SAFETY INFORMATION. FAILURE TO COMPLY WITH INSTRUCTIONS COULD RESULT IN PERSONAL INJURY AND/OR PROPERTY DAMAGE!
![]() WARNING
WARNING
IMPORTANT SAFETY INSTRUCTIONS
When using electrical appliances, these instructions and warnings should always be followed to reduce the risk of fire, electrical shock and injury to persons:
Read all instructions before using this Heater.
![]() WARNING
WARNING
- PLUG UNIT DIRECTLY INTO A 120V WALL OUTLET/RECEPTACLE ONLY. NEVER USE WITH AN EXTENSION CORD. DO NOT PLUG UNIT INTO ANY OTHER CORD CONNECTED DEVICE, SUCH AS A POWER STRIP, SURGE PROTECTOR, MULTIPLE OUTLET ADAPTER, CORD REEL OR OUTLET-TYPE AIR FRESHENER. THE USE OF SUCH DEVICES MAY CREATE A FIRE HAZARD. DO NOT PLUG MULTIPLE DEVICES IN THE SAME OUTLET OR ON SAME CIRCUIT AS UNIT.
- FAULTY WALL OUTLET CONNECTIONS MAY CAUSE THE WALL OUTLET TO OVERHEAT. BE SURE THAT UNIT PLUG FITS TIGHTLY INTO OUTLET BEFORE EACH USE. DURING USE, CHECK TO MAKE CERTAIN THE UNIT PLUG IS NOT OVERHEATING. IF NECESSARY HAVE A QUALIFIED ELECTRICIAN CHECK AND/OR REPLACE THE WALL OUTLET. DO NOT USE THIS UNIT WITH ANY SOLID STATE SPEED CONTROL DEVICES.
- Make certain that the power source conforms to the electrical requirements of the Unit.
- Extreme caution is necessary when any Unit is used by or near children or invalids. The Unit should not be left operating unattended. Never leave children unattended when the unit is on or plugged in.
- This appliance has a polarized plug (one blade is wider than the other). To reduce the risk of electric shock, this plug is intended to fit in a polarized outlet only one way. If the plug does not fit fully in the outlet, reverse the plug. If it still does not fit, contact a qualified electrician.
Do not attempt to defeat this safety feature. - DO NOT use the Unit in areas where gasoline, paint, or flammable liquids are used or stored. DO NOT use Unit in locations where flammable or explosive chemicals are stored, or in wet atmospheres.
- Do not operate any Unit with a damaged cord or plug or after the Unit malfunctions, or has been dropped or damaged in any manner. To disconnect Unit, turn the Unit OFF then remove the plug from the outlet.
- Always unplug Unit when not in use. Unplug power cord before servicing or moving the Unit.
- Do not insert or allow fingers or foreign objects to enter any ventilation or exhaust opening as it may cause an electric shock, fire, or damage the Unit. Do not block or tamper with the Unit in any manner while it is in operation.
- Do not block air intakes or exhaust in any manner. Do not place on soft surfaces, like a bed, where openings may become blocked. Do not depend on the on/off switch as the sole means of disconnecting power when servicing or moving the unit. Always unplug the power cord.
![]() CAUTION
CAUTION
- Always place the Unit on a stable, flat, level surface when operating, to avoid the chance of the Unit overturning. Locate the Power Cord so the Unit or other objects are not resting on it. DO NOT run Power Cord under carpeting. DO NOT cover Power Cord with throw rugs, runners, or similar coverings
as this may cause cord to overheat. Arrange Power Cord away from room traffic and where it will not be tripped over.
• This Unit is HOT when in use. To avoid burns, do not let bare skin touch hot surfaces. Always use handle when moving this Unit. Keep combustible materials, such as furniture, pillows, bedding, papers, clothes and curtains at least 3 feet (0.9 m) from the front of the Unit and keep them at least 1 foot (0.3 m) from the sides and rear. - This Unit is not intended for use in wet or damp locations. This Unit is not intended for use in bathrooms, laundry areas and similar indoor locations.
NEVER locate a Unit where it may fall into a bathtub or other water container. - DO NOT use Unit outdoors.
- This Unit is not suitable for use in agricultural facilities including areas where livestock, poultry or other animals are confined. Please refer to National Electric Code (NEC) Article 547-7 (2008), or applicable state or local codes or standards relating to electrical requirements for Agricultural Buildings. THIS UNIT DOES NOT MEET THE REQUIREMENTS OF NEC ARTICLE 547-7 (2008).
- This Unit is not suitable for use in hazardous locations. Please refer to National Electric Code (NEC) Article 500 or applicable state or local codes or standards relating to electrical requirements for Hazardous locations. THIS UNIT DOES NOT MEET THE REQUIREMENTS OF NEC ARTICLE 500 (2008).
NOTE: This equipment has been tested and found to comply with the limits for a Class B digital device, pursuant to Part 15 of the FCC Rules. These limits are designed to provide reasonable protection against harmful interference in a residential installation. This equipment generates, uses and can radiate radio frequency energy and, if not installed and used in accordance with the instructions, may cause harmful interference to radio communications. However, there is no guarantee that interference will not occur in a particular installation. If this equipment does cause harmful interference to radio or television reception, which can be determined by turning the equipment off and on, the user is encouraged to try to correct the interference by one or more of the following measures: • Reorient or relocate the receiving antenna. • Increase the separation between the equipment and receiver.
• Connect the equipment into an outlet on a circuit different from that to which the receiver is connected. • Consult the dealer or an experienced radio/ TV technician for help. The user is cautioned that changes and modifications made to the equipment without the approval of manufacturer could void the user’s authority to operate this equipment.
Please contact Customer Service at 800-233-0268 Monday through Friday from 8am to 5pm EST for assistance.
ASSEMBLY
- Carefully remove the unit from the bag and the carton. For ease of assembly, lay the unit down so that the front grill and control panel are facing up.
- Thread the Power Supply Cord through the large hole in the Base Assembly. NOTE: The Cord Channel on the bottom of the Base should be towards the back of the unit. (Figure 1)
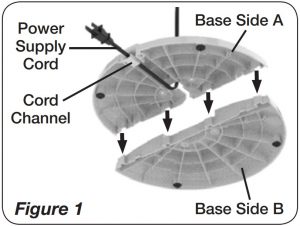
- Assemble the Base by snapping Sides A and B together. (Figure 1)
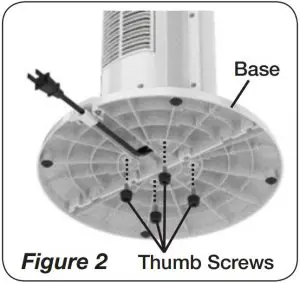
- Attach Base to bottom of the unit. Using (4) Thumb Screws (supplied), fasten the Base to the unit. (Figure 2)
OPERATION
- Place the unit on a firm, level surface. Plastic or rubber tabs, like the feet on this unit, may stick to furniture surfaces and/or hardwood floors. The unit may leave a residue that could darken, stain or leave permanent blemishes on the finish of certain furniture surfaces, including wood surfaces, and/or hardwood floors.
- Plug the cord set into a 120 volt outlet.
Warning:
Be sure that the plug fits tightly into outlet. When plugs fit loosely into receptacles, they may slip partially or completely out of the receptacle with only the slight movement of the attached cord. Receptacles in this condition may overheat and pose a serious fire hazard; if covered by a curtain or drape, the fire hazard is even greater. - When the unit is initially plugged in, there will be a “beep” and the Power Light will come on indicating that there is power to the unit.
The Power Light will remain lit until the unit is unplugged from the electrical outlet. - Turn the Heater ON by pressing the Heater Power Button (
 ).
). - Upon turning the Heater on, the unit will be in High Heat (H3) (1500 Watts). (Figure 3).

- Press the Heat Mode Button ( ) for Medium Heat (H2). Press again for Low Heat (H1). Press a third time for Heater Fan Mode (HF). This activates High Heat (H3) and Super Low Speed (F1) simultaneously.
Press a fourth time to return to High Heat (H3). - To turn the Heater OFF, press the Heater Power Button (
 ).
). - Turn the Fan ON by pressing the Fan Power Button ( ).
- Upon turning the Fan on, the unit will be in High Speed (F4).
- Press the Fan Mode Button (
 ) for Medium Speed (F3). Press again for Low Speed (F2). Press a third time for Super Low Speed (F1).
Press a fourth time to return to High Speed (F4). - To turn the Fan OFF, press the Fan Power Button ( ) and unplug the unit from the electrical outlet.
AUTO ECO ™ THERMOSTAT (Figure 4)

Pressing the (  ) or (
  ) buttons while in any Heater function or speed will turn on the Auto Eco™ function.
- To set the room at a specific temperature press the ( ) or ( ) buttons to the desired temperature. The display will now reflect the Auto Eco™ symbol and the temperature will be flashing. The Heater is now in Auto Eco™ Mode.
- When you reach the temperature at which you want to set the unit, the set temperature will flash several times and then the display will return to indicate the current room temperature and will gradually change as the room temperature changes. NOTE: the temperature display does not indicate the temperature of the heated air being emitted by the Heater.
- Once the room temperature reaches 2 degrees above the set temperature, the Heater will shut off. The Heater will continue to run for 15 seconds after the element has turned off.
- If the ambient temperature is equal to the SET temperature, the Heater will run in LOW heat.
- If the ambient temperature is less then the SET temperature by more than 3 degrees, the Heater will run in HIGH heat.
All of this happens automatically with Lasko Auto Eco™ Technology.
To deactivate the Auto Eco™ function, turn the Heater off or press the ( ) button.
NOTE: In Auto Eco™, the Heater will display the current room temperature in ° Fahrenheit. Press the ( ) and ( ) buttons at the same
time to change the display to ° Celsius. Press the same two buttons together again to change the display back to ° Fahrenheit.
OSCILLATION
With the unit on, press the Oscillation Button (  ) to start and stop the oscillation function. The oscillation function can be used in any speed and/or timer mode.
TIMER FUNCTION (Figure 5)
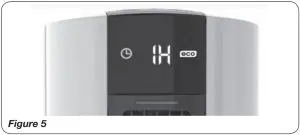
The timer function may be activated when the unit display is in any function or speed. This function allows you to set the length of time the unit will run before turning itself off, from 1 hour to 8 hours. Pressing the Timer Button (  ) will increase the length of time by 1 hour each time this button is pressed. After the display reflects 8 hours, pressing the Timer Button ( ) once more will reset the unit to run continuously.
The unit will turn off when the set time has elapsed. The unit can be turned back on by pressing either Power Button ( ).
EZCLICK ™ FILTER SYSTEM
Press the EZclick™ Filter button to release the cover for the permanent filter. Clean the filter with a vacuum equipped with a brush attachment every two weeks; this will help to maintain the optimum filter performance.
Remember to clean the filter before storing at the end of the season.
REMOTE CONTROL (Figure 6)
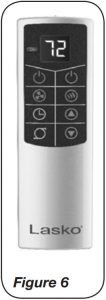
All the functions performed with the Remote Control work identically to the manual controls.
- Install two “AAA” batteries (included).
- Do not mix old and new batteries. Do not mix alkaline, standard (carbon zinc) or rechargeable (nickel-cadmium) batteries.
- DO NOT DISPOSE OF BATTERIES IN FIRE. BATTERIES MAY EXPLODE OR LEAK.
- Always purchase the correct size and grade of battery most suitable for the intended use.
- Clean the battery contacts and also those of the device prior to battery installation.
- Remove batteries from equipment which is not to be used for an extended period of time.
- Remove batteries if consumed or if product is to be left unused for a long time
If you lose your remote control, please call Customer Service to order a replacement at (800) 233-0268, Monday through Friday, between the hours of 8:00 a.m. and 5:00 p.m. EST.
SAFETY FEATURE
- A thermal overload protector is built in to prevent overheating.
- If an overheat temperature is reached, the unit will automatically shut off. It can only resume operation when the user resets the unit.
To Reset Unit:
- Unplug the unit and wait 10 minutes for the unit to cool down.
- After the unit has cooled down, plug the unit into a 120V~ electrical outlet and follow the operation instructions described in this manual.
TROUBLE SHOOTING TIPS
If your unit shuts off unexpectedly or fails to operate, the previously mentioned safety feature may have been activated to prevent overheating.
- Be sure the power cord is plugged into a working electrical outlet.
- Check your Temperature setting. The unit may be off because it has reached the desired temperature setting.
- If your unit runs for several minutes and shuts off repeatedly, your unit may require cleaning.
See Maintenance section below.
If you have a problem that can not be resolved by the steps listed above, contact Technical Assistance at (800) 233-0268, Monday through Friday, between the hours of 8 a.m. and 5 p.m. EST.
MAINTENANCE
![]() WARNING
WARNING ![]()
To reduce the risk of electrical shock and fire please observe the following instructions.
Cleaning the unit regularly will help to maintain its efficiency
- Always unplug the cord before moving, servicing or cleaning.
- NEVER place the unit in or near water. DO NOT IMMERSE UNIT IN WATER.
- Clean the unit only with a vacuum equipped with a brush attachment; the vacuum will remove the lint and dirt from the surface of the unit.
- Vacuum intake grills every two weeks; this will help to maintain optimum performance.
- Use a toothbrush or other soft bristle brush to gently loosen any dirt not removed by the vacuum.
- NEVER attempt to take apart the unit.
- Clean the body of the unit with a soft cloth only.
- NEVER use ALCOHOL or SOLVENTS such as gasoline, benzene, paint thinner, or other harsh cleaners
SERVICING: For servicing, other than general user maintenance, please contact Customer Service at 800-233-0268, Monday through Friday, from 8am-5pm Eastern.
STORAGE: Store the unit with these instructions in the original carton in a cool, dry place.
DISPOSITION: Corrugated packaging materials are recyclable. For environmentally responsible disposal of this product, contact your local waste service provider or visit: www.1800recycling.com®.
About US
Have a Question? Need a Part?
Please Do Not Return Product to Store!
Contact Lasko Customer Service: (800) 233-0268 Monday-Friday 8AM – 5PM EST.
(VALID IN THE USA, ITS TERRITORIES, AND CANADA ONLY)
Air Stik: Ultra Slim Oscillating Fan Operating
This Fan is for residential use only. It is not intended to be used in commercial, industrial or agricultural settings
READ AND SAVE THESE INSTRUCTIONS
READ CAREFULLY BEFORE ATTEMPTING TO ASSEMBLE, INSTALL, OPERATE OR MAINTAIN THE PRODUCT DESCRIBED. PROTECT YOURSELF AND OTHERS BY OBSERVING ALL SAFETY INFORMATION. FAILURE TO COMPLY WITH INSTRUCTIONS COULD RESULT IN PERSONAL INJURY AND/OR PROPERTY DAMAGE!
KEEP INSTRUCTIONS FOR FUTURE REFERENCE.
SAVE THESE INSTRUCTIONS
GENERAL SAFETY INFORMATION
When using electrical appliances, basic precautions should always be followed to reduce the risk of fire, electrical shock and injury to persons, including the following:
- Make certain the power source conforms to the electrical requirements of the Fan.
- Make certain that the room is equipped with a working smoke detector.
- Use this Fan only as described in this manual. Any other use not recommended by the manufacturer may cause fire, electrical shock, or injury to persons.
- To reduce the risk of personal injury and electric shock, the Fan should not be played with or placed where small children can reach it.
- Unplug power cord before installing, servicing, or moving the Fan.
- This Fan must NOT be used in potentially dangerous locations such as flammable, explosive, chemical-laden or wet atmospheres where gasoline, paint or flammable liquids are used or stored.
- DO NOT use Fan in or near a window. Rain may create an electrical hazard.
- Where possible, avoid the use of extension cords because the extension cord may overheat and cause a fire. If you must use an extension cord, minimize the risk of overheating by using the shortest cord possible and ensuring that it is UL listed. NEVER use a single extension cord to operate more than one Fan. DO NOT plug Fan into any other cord connected device, such as a power strip, cord reel, surge protector, mutiple outlet adapters or outlet-type air fresheners. The use of such devices may create a fire hazard.
- NEVER operate any Fan with a damaged cord or plug or after the Fan malfunctions, has been dropped or damaged in any manner. There are no user serviceable parts. Return Fan to an authorized service facility for examination, electrical or mechanical adjustment or repair.
- NEVER insert or allow fingers or foreign objects to enter any ventilation or exhaust opening as it may cause an electric shock or fire, or damage the Fan. To reduce the risk of fire, DO NOT block or tamper with the Fan in any manner while it is in operation.
- Always place the Fan on a stable, flat, level surface when operating, to avoid the chance of the Fan overturning. Locate the Power Cord so the Fan or other objects are not resting on it. DO NOT run Power Cord under carpeting. DO NOT cover Power Cord with throw rugs, runners or the like. Arrange Power Cord away from room traffic and where it will not be tripped over.
- This Fan is not intended for use in wet or damp locations. Never locate a Fan where it may fall into a bathtub or other water container. NEVER use Fan where flammable liquids are used or stored.
- NEVER use Fan outdoors.
- NOTE: This equipment has been tested and found to comply with the limits for a Class B digital device, pursuant to Part 15 of the FCC Rules. These limits are designed to provide reasonable protection against harmful interference in a residential installation. This equipment generates, uses and can radiate radio frequency energy and, if not installed and used in accordance with the instructions, may cause harmful interference to radio communications. However, there is no guarantee that interference will not occur in a particular installation. If this equipment does cause harmful interference to radio or television reception, which can be determined by turning the equipment off and on, the user is encouraged to try to correct the interference by one or more of the following measures:
- Reorient or relocate the receiving antenna.
- Increase the separation between the equipment and receiver.
- Connect the equipment into an outlet on a circuit different from that to which the receiver is connected.
- Consult the dealer or an experienced radio/TV technician for help.The user is cautioned that changes and modifications made to the equipment without the approval of manufacturer could void the user’s authority to operate this equipment.
- This Fan is not suitable for use in agricultural facilities including areas where livestock, poultry or other animals are confined. Please refer to National Electric Code (NEC) Article 547-7 (2008), or applicable state or local codes or standards relating to electrical requirements for Agricultural Buildings. THIS FAN DOES NOT MEET THE REQUIREMENTS OF NEC ARTICLE 547-7 (2008).
- This Fan is not suitable for use in hazardous locations. Please refer to National Electric Code (NEC) Article 500 or applicable state or local codes or standards relating to electrical requirements for Hazardous locations. THIS FAN DOES NOT MEET THE REQUIREMENTS OF NEC ARTICLE 500 (2008).
OPERATION
- Carefully remove the Fan from the plastic bag and the carton.
- Place the Fan on a firm and level surface.
CAUTION: Plastic or rubber tabs, like the feet on this unit, may stick to furniture surfaces and/or hardwood floors. The unit may leave a residue that could darken, stain or leave permanent blemishes on the finish of certain furniture surfaces, including wood surfaces, and/or hardwood floors. - Plug the cord set into a 120 volt outlet.
- To turn the Fan on, press the Power/Speed Button. The Fan will be in High Speed.
- Pressing the Power/Speed Button once more will put the Fan in Low Speed.
- To turn the Fan off, press the Power/Speed Button a third time.
- After turning the Air Stik® Off, unplug the unit from the electrical outlet.
Oscillation Function:
This function will work in any Fan speed. Pressing the Oscillation Button will allow the Fan to circulate air more effectively by moving the Fan from side to side in a
sweeping motion. To stop the oscillation, press the Oscillation Button once more. The Oscillation Button will light when this function is in use.
MAINTENANCE
- Always unplug the cord before moving, servicing or cleaning.
- NEVER place the Fan in or near water.
- Clean the Fan only with a vacuum equipped with a brush attachment; the vacuum will remove the lint and dirt from inside the Fan.
- NEVER attempt to take apart the Fan.
- Clean the body of the Fan with a soft cloth only.
- NEVER use ALCOHOL or SOLVENTS such as gasoline, benzene, paint thinner, or other harsh cleaners
SERVICING
All other servicing, with the exception of general user-maintenance, should be performed by an authorized service representative. Call 1-800-233-0268, Monday through Friday, between the hours of 8:00 a.m. and 5:00 p.m. EST for the location of your nearest service center.
STORAGE
Store the Fan with these instructions, in the original carton in a cool, dry place.
LASKO PRODUCTS, INC. LIMITED WARRANTY (NOT VALID IN MEXICO)
WHAT THIS WARRANTY COVERS: This product is warranted against defects in workmanship and/or materials.
HOW LONG THIS WARRANTY LASTS: This warranty extends only to the original purchaser of the product and lasts for one (1) year from the date of original purchase or until the original purchaser of the product sells or transfers the product, whichever first occurs.
WHAT LASKO WILL DO: During the warranty period, Lasko will, at its sole option, repair or replace any part or parts that prove to be defective or replace the whole product with the same or comparable model.
WHAT THIS WARRANTY DOES NOT COVER: This warranty does not apply if the product was damaged or failed because of accident, improper handling or operation, shipping damage, abuse, misuse, unauthorized repairs made or attempted. This warranty does not cover shipping costs for the return of products to Lasko for repair or replacement. Lasko will pay return shipping charges from Lasko following warranty repairs or replacement
ANY AND ALL WARRANTIES, EXPRESSED OR IMPLIED (INCLUDING, WITHOUT LIMITATION, ANY IMPLIED WARRANTY OF MERCHANTABILITY), LAST ONE YEAR FROM THE DATE OF ORIGINAL PURCHASE OR UNTIL THE ORIGINAL PURCHASER OF THE PRODUCT SELLS OR TRANSFERS THE PRODUCT, WHICHEVER FIRST OCCURS AND IN NO EVENT SHALL LASKO’S LIABILITY UNDER ANY EXPRESS OR IMPLIED WARRANTY INCLUDE (I) INCIDENTAL OR CONSEQUENTIAL DAMAGES FROM ANY CAUSE WHATSOEVER, OR (II) REPLACMENT OR REPAIR OF ANY HOUSE FUSES, CIRCUIT BREAKERS OR RECEPTACLES. NOTWITHSTANDING ANYTHING TO THE CONTRARY, IN NO EVENT SHALL LASKO’S LIABILITY UNDER ANY EXPRESS OR IMPLIED WARRANTY EXCEED THE PURCHASE PRICE OF THE PRODUCT AND ANY SUCH LIABILITY SHALL TERMINATE UPON THE EXPIRATION OF THE WARRANTY PERIOD.
Some states and provinces do not allow limitations on how long an implied warranty lasts, or the exclusion or limitation of incidental or consequential damages, so these exclusions or limitations may not apply to you. This warranty gives you specific legal rights. You may also have other rights which vary from state to state and province to province.
Proof of purchase is required before a warranty claim will be accepted.
CUSTOMER SERVICE:
Toll-Free (800) 233-0268. Email: [email protected]
Our Customer Service team is available to assist you with product questions, service center locations, and replacement parts. They can be reached Monday through Friday, 8am-5pm Eastern. Please have your model number available, as well as the type and style (located on the underside of your product). Please do not return product to place of purchase.
Customer Service Dept., 820 Lincoln Ave., West Chester, PA 19380 (Please do not send product to this location)
www.laskoproducts.com
Manual printed in China
CERAMIC HEATER with ADJUSTABLE THERMOSTAT
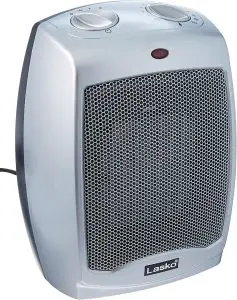
MODEL 754200
This Heater is intended for use as supplemental heat.
This Heater is for residential use only.
It is not intended to be used in commercial, industrial or agricultural settings

READ AND SAVE THESE INSTRUCTIONS
READ CAREFULLY BEFORE ATTEMPTING TO ASSEMBLE, INSTALL, OPERATE OR MAINTAIN THE PRODUCT DESCRIBED. PROTECT YOURSELF AND OTHERS BY OBSERVING ALL SAFETY INFORMATION. FAILURE TO COMPLY WITH INSTRUCTIONS COULD RESULT IN PERSONAL INJURY AND/OR PROPERTY DAMAGE!
MPORTANT SAFETY INSTRUCTIONS
When using electrical appliances, these instructions and warnings should always be followed to reduce the risk of fire, electrical shock and injury to persons:
Read all instructions before using this Heater.
 WARNING
 ● Plug heaters directly into a 120v wall outlet/receptacle only. Never use with an extension cord. Do not plug heater into any other cord connected device, such as a power strip, surge protector, multiple outlet adapter, cord reel or outlet-type air freshener. The use of such devices may create a fire hazard. Do not plug multiple devices in the same outlet or on same circuit as heater.
● Faulty wall outlet connections may cause the wall outlet to overheat. Be sure that heater plug fits tightly into outlet before each use. During use, check to make certain the heater plug is not overheating. If necessary have a qualified electrician check and/or replace the wall outlet. Do not use this heater with any solid state speed control devices.
● Make certain that the power source conforms to the electrical requirements of the Heater.
 ● Extreme caution is necessary when any Heater is used by or near children or invalids. The Heater should not be left operating unattended. Never leave children unattended when the heater is on or plugged in.
● This appliance has a polarized plug (one blade is wider than the other). To reduce the risk of electric shock, this plug is intended to fit in a polarized outlet only one way. If the plug does not fit fully in the outlet, reverse the plug. If it still does not fit, contact a qualified electrician. Do not attempt to defeat this safety feature.
 ● DO NOT use the Heater in areas where gasoline, paint, or flammable liquids are used or stored. DO NOT use Heater in locations where flammable or explosive chemicals are stored, or in wet atmospheres.
● Do not operate any Heater with a damaged cord or plug or after the Heater malfunctions, or has been dropped or damaged in any manner. To disconnect Heater, turn the Heater OFF then remove the plug from the outlet.
● Always unplug Heater when not in use. Unplug power cord before servicing or moving the Heater.
● Do not insert or allow fingers or foreign objects to enter any ventilation or exhaust opening as it may cause an electric shock, fire, or damage the Heater. Do not block or tamper with the Heater in any manner while it is in operation.
● Do not block air intakes or exhaust in any manner. Do not place on soft surfaces, like a bed, where openings may become blocked. Do not depend on the on/off switch as the sole means of disconnecting power when servicing or moving the heater. Always unplug the power cord.
CAUTION
- Always place the Heater on a stable, flat, level surface when operating, to avoid the chance of the Heater overturning. Locate the Power Cord so the Heater or other objects are not resting on it. DO NOT run Power Cord under carpeting. DO NOT cover Power Cord with throw rugs, runners, or similar coverings as this may cause cord to overheat. Arrange Power Cord away from room traffic and where it will not be tripped over.
- This Heater is HOT when in use. To avoid burns, do not let bare skin touch hot surfaces. Always use handle when moving this Heater. Keep combustible materials, such as furniture, pillows, bedding, papers, clothes and curtains at least 3 feet (0.9 m) from the front of the Heater and keep them at least 1 foot (0.3 m) from the sides and rear.
- This Heater is not intended for use in wet or damp locations. This Heater is not intended for use in bathrooms, laundry areas and similar indoor locations. NEVER locate a Heater where it may fall into a bathtub or other water container.
- DO NOT use Heater outdoors.
- This Heater is not suitable for use in agricultural facilities including areas where livestock, poultry or other animals are confined. Please refer to National Electric Code (NEC) Article 547-7 (2008), or applicable state or local codes or standards relating to electrical requirements for Agricultural Buildings. THIS HEATER DOES NOT MEET THE REQUIREMENTS OF NEC ARTICLE 547-7 (2008).
- This Heater is not suitable for use in hazardous locations. Please refer to National Electric Code (NEC) Article 500 or applicable state or local codes or standards relating to electrical requirements for Hazardous locations. THIS HEATER DOES NOT MEET THE REQUIREMENTS OF NEC ARTICLE 500 (2008).
Please contact Customer Service at 800-233-0268 Monday through Friday from 8am to 5pm EST for assistance.
SAVE THESE INSTRUCTIONS
OPERATION (Figure 1)
- Carefully remove the Heater from the bag and the carton.
- Place the Heater on a firm, level surface. Plastic or rubber tabs, like the feet on this unit, may stick to furniture surfaces and/ or hardwood floors. The unit may leave a residue that could darken, stain or leave permanent blemishes on the finish of certain furniture surfaces, including wood surfaces, and/or hardwood floors.
- Make certain the unit is in the OFF (0) position before plugging the Heater into the outlet.
- Plug the cord set into a 120 volt outlet.
WARNING
Be sure that the plug fits tightly into outlet.
When plugs fit loosely into receptacles, they may slip partially or completely out of the receptacle with only the slight movement of the attached cord. Receptacles in this condition may overheat and pose a serious fire hazard; if covered by a curtain or drape, the fire hazard is even greater. - When the Heater is initially plugged in, the Power Light will come on indicating that there is power to the unit. The Power Light will remain lit until the Heater is unplugged from the electrical outlet.
- Turn the Power Knob to the desired setting.
( ) for Fan Only (NO HEAT)
(1) for Low Heat
(2) for High Heat (1500 Watts)
7. For Heater operation, turn the Thermostat Knob to the highest setting ( ).
).
8. To turn the Heater OFF, turn the Power Knob to (0) and unplug the Heater from the electrical outlet.

THERMOSTAT INSTRUCTIONS
- Allow the Heater to warm up the room before setting the thermostat.
- To adjust the thermostat, turn the Thermostat Knob towards the ( ) to the desired temperature and towards the (
 ) to the desired temperature.
 - When the desired temperature is reached, lower the thermostat until the Unit shuts off. This is done by turning the Thermostat Knob towards the ( ).
- The Heater will now automatically maintain the set temperature by cycling the unit on and off. To prevent the Heater from cycling, adjust the thermostat.
SAFETY FEATURE
- A thermal overload protector is built in to prevent overheating.
- If an overheat temperature is reached, the Heater will be automatically shut off. It can only resume operation when the user resets the unit.
To Reset Heater: - Unplug the Heater and wait 10 minutes for the Heater to cool down.
- After the Heater has cooled down, plug the unit into a 120V~ electrical outlet and follow the operation instructions described in this manual.
TROUBLE SHOOTING TIPS
- Be sure the power cord is plugged into a working electrical outlet.
- Check your Thermostat setting. The Heater may be off because it has reached the desired temperature setting.If you have a problem that can not be resolved by the steps listed above, contact Technical Assistance at 800-233-0268, Monday through Friday, between the hours of 8am and 5pm EST.
MAINTENANCE
To reduce the risk of electrical shock and fire please observe the following instructions. Cleaning the Heater regularly will help to maintain its efficiency.
- Always unplug the cord before moving, servicing or cleaning.
- NEVER place the Heater in or near water. DO NOT IMMERSE HEATER IN WATER.
- Clean the Heater only with a vacuum equipped with a brush attachment; the vacuum will remove the lint and dirt from the surface the Heater.
- Vacuum intake grills every two weeks; this will help to maintain the optimum Heater performance.
- Use a toothbrush or other soft bristle brush to gently loosen any dirt not removed by the vacuum.
- NEVER attempt to take apart the Heater.
- Clean the body of the Heater with a soft cloth only.
- NEVER use ALCOHOL or SOLVENTS such as gasoline, benzene, paint thinner, or other harsh cleaners.
SERVICING: For servicing, other than general user maintenance, please contact Customer Service at 800-233-0268, Monday through Friday, from 8am-5pm Eastern.
STORAGE: Store the Heater with these instructions in the original carton in a cool, dry place.
DISPOSITION: Corrugated packaging materials are recyclable. For environmentally responsible disposal of this product, contact your local waste service provider or visit www.1800recycling.com®.
LASKO PRODUCTS, LLC LIMITED WARRANTY (VALID IN THEUSA, ITS TERRITORIES, AND CANADA ONLY)
: This product is warranted against defects in workmanship and/or materials.
This warranty extends only to the original purchaser of the product and lasts for three (3) years from the date of original purchase or until the original purchaser of the product sells or transfers the product, whichever first occurs.
Lasko will, at its sole option, repair or replace any part or parts that prove to be defective or replace the whole product with the same or comparable model. For all warranty claims, the product must be returned to Lasko Products, LLC at customer expense with proof of purchase within the warranty period. Contact the Lasko customer service department to obtain a Return Authorization (“RA”). DO NOT return products without an RA or the warranty claim will not be processed.
This warranty does not apply if the product was damaged or failed because of accident, improper handling or operation, shipping damage, abuse, misuse, unauthorized repairs made or attempted, or the use of the product for commercial or nonresidential service. This warranty does not cover shipping costs for the return of products to Lasko for repair or replacement. Lasko will pay return shipping charges from Lasko following warranty repairs or replacement.
Any and all warranties, expressed or implied (including, without limitation, any implied warranty of merchantability), last three years from the date of original purchase or until the original purchaser of the product sells or transfers the product, whichever first occurs and in no event shall lasko’s liability under any express or implied warranty include (I) incidental or consequential damages from any cause whatsoever, or (ii) replacement or repair of any house fuses, circuit breakers or receptacles. Notwithstanding anything to the contrary, in no event shall lasko’s liability under any express or implied warranty exceed the purchase price of the product and any such liability shall terminate upon the expiration of the warranty period.
Some states and provinces do not allow limitations on how long an implied warranty lasts, or the exclusion or limitation of incidental or consequential damages, so these exclusions or limitations may not apply to you. This warranty gives you specific legal rights. You may also have other rights which vary from state to state and province to province.
Proof of purchase is required before a warranty claim will be accepted
CUSTOMER SERVICE:
Toll-Free (800) 233-0268. Email: [email protected]
Our Customer Service team is available to assist you with product and service questions, and replacement parts. They can be reached Monday through Friday, 8am-5pm Eastern. Please have your model number available, as well as the type and style
(located on the underside of your product).
Customer Service Dept., 820 Lincoln Ave., West Chester, PA 19380
(Please do not send product to this location) www.laskoproducts.com