Packaging Content
 ❶ Creatista Coffee Machine
 ❷ Tasting Box of Nespresso Capsules
 ❸ Milk Jug
 ❹ Nespresso Welcome Brochure
 ❺ User Manual
![]() ❻1 x Water Hardness Test Strip, in the User Manual
❻1 x Water Hardness Test Strip, in the User Manual

Nespresso Vertuo Coffee Machine
Nespresso Vertuo Coffee Machine is an exclusive system creating a perfect coffee, from the Espresso to the large Mug, time after time.
Nespresso Vertuo machines are equipped with the unique CentrifusionTM technology to gently extract Mug, Gran Lungo and Espresso at the touch of a button.
Each extracting parameter has been carefully defined by our coffee experts to ensure that all aromas from each capsule can be extracted to give the coffee body and create an exceptionally rich and generous crema.
Office use: At least one copy of this user manual should be kept in a location available at all times to maintenance and management staff.
ASSISTANCE VIDEOS ARE AVAILABLE ON WWW.NESPRESSO.COM – VISIT THE “MACHINES” SECTION.
Other top Nespresso manual’s:
CAUTION: when you see this sign, please refer to the safety precautions to avoid possible harm and damage.
INFORMATION: when you see this sign, please take note of the advice for the correct and safe usage of your appliance.
CAUTION: the safety precautions are part of the appliance. Read them carefully before using your new appliance for the first time. Keep them in a place
where you can find and refer to them later on.
Avoid risk of fatal electric shock and fire
Avoid possible harm when operating the appliance
Pass them on to any subsequent user.
This Instruction Manual is also available as a PDF file at nespresso.com


The machine can be turned “OFF” at any time by holding the button for 3 seconds. Automatic “OFF” Mode: the machine will turn off automatically after 9 minutes of non-use.
NOTE: once a customer-specific volume is programmed by the user, every time that capsule size is inserted in the machine, the preparation will stop at the user-programmed cup size.
BEFORE A PERIOD OF NON-USE, FOR FROST PROTECTION OR BEFORE A REPAIR
CAUTION: caution should be exercised when plugging in the coffee machine with the button pressed as the machine evacuates remaining liquids using heat. Small quantities of steam may emit from the machine.The machine has a predefined cleaning procedure that can be launched at user discretion. Office use: Daily cleaning.
CAUTION: do not use any strong or abrasive cleaning agent or solvent cleaner. Do not put in a dishwasher. Never immerse the appliance or part of it in water. Clean the coffee outlet regularly with a clean damp cloth. Please use only clean tools for cleaning the machine.
CAUTION: Read the important safeguards on the descaling package. The descaling solution can be harmful. void contact with eyes, skin and surfaces. Never use any product other than the Nespresso descaling kit available through the Nespresso Club to avoid damage to your machine. For any additional questions you may have egarding descaling, please contact your Nespresso Club.
This appliance complies with the EU Directive 2012/19/EC. Packaging materials and appliance contain recyclable materials.
Your appliance contains valuable materials that can be recovered or can be recycled. Separation of the remaining waste materials into different types facilitates the recycling of valuable raw materials.
Leave the appliance at a collection point. You can obtain information on disposal from your local authorities.
To know more about Nespresso sustainability strategy, go to www.nespresso.com/positiveonsultez le site www.nespresso.com/entreprise
Nespresso guarantees this product against defects in materials and workmanship for a period of 1 year. The guarantee period begins on the date of purchase and Nespresso requires presentation of the original proof of purchase to ascertain the date. During the guarantee period, Nespresso will either repair or replace, at its discretion, any defective product at no charge to the owner. Replacement products or repaired parts will be warranted only for the unexpired portion of the original guarantee or six months, whichever is greater. This limited guarantee does not apply to any defect resulting from negligence, accident, misuse, or any other reason beyond Nespresso’s reasonable control, including but not limited to: normal wear and tear, negligence or failure to follow the product instructions, improper or inadequate maintenance, calcium deposits or descaling, connection to improper power supply, unauthorized product modification or repair, use for commercial purposes, fire, lightning, flood or other external causes. This guarantee is valid only in the country of purchase or in such other countries where Nespresso sells or services the same model with identical technical specifications. Guarantee service outside the country of purchase is limited to the terms and conditions of the corresponding guarantee in the country of service. Should the cost of repairs or replacement not be covered by this guarantee, Nespresso will advise the owner and the cost shall be charged to the owner. This limited guarantee shall be the full extent of Nespresso’s liability however caused. Except to the extent allowed by applicable law, the terms of this limited guarantee do not exclude, restrict or modify the mandatory statutory rights applicable to the sale of this product and are in addition to those rights. If you believe your product is defective, contact Nespresso for instructions on how to proceed with a repair. Please visit our website at
ww.nespresso.com for contact details.
USA: NESPRESSO USA, Inc., 24-01 44th Road, Long Island City, NY 11101
CANADA: NESPRESSO CANADA, 300, rue Léo-Pariseau, suite 2400, Montréal, QC H2X 4B3
FRANCE: NESPRESSO FRANCE, 1 Boulevard Pasteur, 75015 Paris, France
| Product Name | Nespresso Vertuo Coffee Machine |
| Technology | CentrifusionTM technology |
| Extraction Options | Mug, Gran Lungo, and Espresso |
| Intended Use | Indoor and non-extreme temperature conditions use only |
| Age Restrictions | Children of at least 8 years of age, as long as they are supervised and have been given instructions about using the appliance safely and are fully aware of the dangers involved |
| Cleaning | Use a damp cloth and mild cleaning agent to clean the surface of the appliance. To clean machine, use only clean cleaning tools. |
| Capsules | Designed for Nespresso Vertuo coffee capsules available exclusively through the Nespresso Club or your Nespresso authorised representative |
| Descaling | Use Nespresso descaling agent according to user manual recommendations or specific alerts |
| Package Contents | Not specified |
My order has damaged, missing, expired, or incorrect items. What should I do?
If you find something is missing, damaged, or incorrect in your order, please contact us as soon as possible. We are committed to providing you with a perfect experience every time and will be happy to make the necessary adjustments.
How much caffeine is in each capsule?
Most all of our espressos contain caffeine within the range of 50-100 mg per cup. This includes Original Espressos and Espresso Lungos, and Vertuo Espressos, Gran Lungos, and Double Espressos.
Based on their Robusta content, the following are exceptions: Vertuo Espresso Diavolitto contains 150 mg of caffeine, and Original Kazaar and Nespresso Professional Ristretto Intenso contain 120 mg per cup.
All Vertuo coffees (7.77 oz.), including XL (14 oz.), have a range of 170-200 mg per cup. Due to its higher volume, the Carafe Pour-Over Style coffee (18 oz.) contains over 200 mg of caffeine per complete capsule serving; because this particular coffee is intended to be enjoyed over multiple “cups”, this still meets our standards for the 200 mg ‘per cup’ limit.
As coffee is a “live” product, caffeine content may vary, and so we are only able to provide a range of caffeine (with exceptions as above) in order to be as accurate as possible. Also, coffees within the same size range can fall lower or higher within the caffeine spectrum: for example, Fortado contains higher levels of Robusta than other Gran Lungos, and so would contain more caffeine than its Gran Lungo counterparts.
My order’s tracking number says it was delivered but I did not receive it. What should I do?
Please contact us as soon as possible. We are committed to providing you with a perfect experience every time and will be happy to assist.
How often should I descale my machine?
Nespresso recommends you descale your machine on a regular basis, every 3 months or every 300 capsules (whichever comes first). Over time, water used during brewing may cause internal mineral build up, which can affect the flow, temperature and overall performance of your machine.
Each Descaling Kit contains two packs of solution and costs $8.95. Descaling Kits are available for purchase by toll-free phone or online via this link.
What pods can it use?
Large pods only
How many capsules come with the s refurbished offer? (complementary gift)
I dont remember exactly how many but I think it was like 15! I have had mine 2 years it was so worth it!
It says it comes with Vertuo capsules, but I just received my machine and there isn’t any ?
I would contact the seller. I had 20 capsules with my machine
Does this have free returns?
you want to return the machine just because they didn’t include the pods? Just ask for them
What is the Nespresso Vertuo Coffee Machine?
The Nespresso Vertuo Coffee Machine is a top-of-the-line coffee maker that produces exceptional coffee every time.
What technology does the Nespresso Vertuo Coffee Machine use?
The Nespresso Vertuo Coffee Machine uses exclusive CentrifusionTM technology to extract Mug, Gran Lungo, and Espresso with just a touch of a button.
How are the extracting parameters defined in the Nespresso Vertuo Coffee Machine?
The extracting parameters have been carefully defined by coffee experts to ensure that all aromas from each capsule are extracted, giving the coffee body and creating an exceptionally rich and generous crema.
Is the Nespresso Vertuo Coffee Machine safe to use?
Yes, the Nespresso Vertuo Coffee Machine is safe to use as long as you follow the safety precautions listed in the user manual.
Can children use the Nespresso Vertuo Coffee Machine?
Yes, children of at least 8 years of age can use the Nespresso Vertuo Coffee Machine as long as they are supervised and have been given instructions about using the appliance safely and are fully aware of the dangers involved.
Can persons with reduced physical, sensory or mental capabilities use the Nespresso Vertuo Coffee Machine?
Yes, persons with reduced physical, sensory or mental capabilities can use the Nespresso Vertuo Coffee Machine as long as they are supervised or have received instruction to use the appliance safely and understand the dangers.
Can I use any coffee capsules with the Nespresso Vertuo Coffee Machine?
No, this appliance is designed for Nespresso Vertuo coffee capsules available exclusively through the Nespresso Club or your Nespresso authorised representative.

Nespresso, an exclusive system creating the perfect Espresso, time after time. All Nespresso machines are equipped with a unique extraction system that guarantees up to 19 bar pressure. Each parameter has been calculated with great precision to ensure that all the aromas from each Grand Cru can be extracted, to give the coffee body and create an exceptionally thick and smooth crema.
Safety precautions 3-5
Overview 6
First use or after long period of non-use 7
Coffee preparation 8-9
Energy saving concept 9
Programming the water volume 10
Reset to factory settings 10
Emptying the system 10
Cleaning 11
Descaling 11-13
Specifications 13
Troubleshooting 14
Contact the Nespresso Club 15
Disposal and environmental protection 15
Ecolaboration 15
Limited warranty 16
![]()
![]() Caution: the safety precautions are part of the appliance. Read them carefully before using your new appliance for the first time. Keep them in a place where you can find and refer to them later on.
Caution: the safety precautions are part of the appliance. Read them carefully before using your new appliance for the first time. Keep them in a place where you can find and refer to them later on.
![]() Caution: when you see this sign, please refer to the safety precautions to avoid possible harm and damage.
Caution: when you see this sign, please refer to the safety precautions to avoid possible harm and damage.
![]() Information: when you see this sign, please take note of the advice for the correct and safe usage of your appliance.
Information: when you see this sign, please take note of the advice for the correct and safe usage of your appliance.
![]() Caution: To prevent EN damage to the appliance do not use alkaline cleaning agents when cleaning, use a soft cloth and a mild detergent.
Caution: To prevent EN damage to the appliance do not use alkaline cleaning agents when cleaning, use a soft cloth and a mild detergent.
SAVE THESE INSTRUCTIONS
Pass them on to any subsequent user. This instruction manual is also available as a PDF at nespresso.com
 Coffee machine
 Nespresso capsules Grand Crus tasting gift
 Nespresso Welcome folder
 User manual
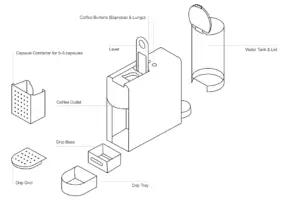
1. Soft touch controls. All controls are activated by touch
R) Ristretto touch
E) Espresso touch
L) Lungo touch
2. Slider for capsule insertion
3. Used capsule container & drip tray
4. Adjustable cup support and drip grid
5. Coffee outlet
6. Adjustable water tank arm
7. Water tank
8. Water tank lid

![]() First read the safety precautions to avoid risks of fatal electrical shock and fire.
First read the safety precautions to avoid risks of fatal electrical shock and fire.
 Remove the water tank and capsule container. Adjust the cable length and store the excess under the machine.
 Insert the remaining cable in the guide under water tank left or right socket, depending on the position chosen for the water tank. Ensure machine is in the upright position.
 Plug the machine into the mains.
 Rinse the water tank before filling it with potable water.
 Place the water tank on its arm, it is fixed with magnets. Insert the drip tray and the capsule container in position. For your safety, operate the machine only with drip tray and capsule container in position.
 Turn the machine ON by opening the slider and pushing it towards the back of the machine. Light will blink on one of the coffee touches: heating up for approximately 25 seconds. Steady light: ready.
 The machine can be turned into Off mode at any time by pushing and holding any touch control for more than 3 sec., confirmed by the other 2 controls flashing.
 Place a container under coffee outlet. Press the Lungo control. Close the slider to rinse the machine. Repeat three times.
 Fill the water tank with potable water.
 Place a cup under the coffee outlet.
 Turn machine ON by either pushing the slider or touching the controls. Light will blink on one of the coffee touches: heating up for approximately 25 seconds. Steady light: ready.

Select the Ristretto control (25 ml), Espresso (40 ml) or Lungo (110 ml) based on the chosen Grand Cru recommended cup size. You can select the desired coffee control even when the machine is still heating up. The coffee will then flow automatically when the machine is ready.

The machine suggests the most frequently chosen cup size (based on last 11 coffees), Espresso as factory setting. You can change this by selecting any other control.
 Completely open the slider and insert a Nespresso capsule.
 Close the slider.
 Preparation will stop automatically. The capsule will be automatically ejected.
 To stop the coffee flow before touch the lit control or move the slider towards the back of the machine until it stops.
 To manually top up your coffee, touch any of the controls within 4 seconds from end of preparation and touch lit control again to stop.
 To change the selected cup size during brewing select the new desired control. The machine will stop immediately if coffee volume extracted is larger than new desired control.
 To accommodate a milk recipe glass, shift the cup support to either the left or right side magnets. The capsule will be automatically ejected.
 Automatic Off mode: the machine will turn into Off mode automatically after 9 minutes of non-use.
 The machine can be turned into Off mode at any time by pushing any control for more than 3 sec., confirmed by the other 2 controls flashing.
 To change automatic OFF mode from 9 to 30 minutes, when slider is closed press and hold both the Lungo and Ristretto controls for more than 3 sec. Espresso control flashes once for confirmation. To revert back to 9 minutes, repeat the same procedure. Espresso control flashes 3 times for confirmation.
 Any control can be programmed. Completely open the slider and insert a Nespresso capsule.
 Touch and hold the control while closing the slider. Release control when desired volume is reached. The other 2 controls flash for confirmation. Water volume level is now stored in the control used during programming.
 Press and hold the Espresso & Lungo controls together for at least 4 sec. The other control flashes for confirmation.
![]() Factory settings are:
Factory settings are:
1. Lungo, Espresso, Ristretto controls 110 ml/40 ml/25 ml.
2. Automatic Off mode after 9 minutes.
3. Most frequently chosen cup size as Espresso control at 40 ml.
 To note, the machine remains blocked for 10 minutes after emptying! Remove the water tank.
Place a container under the coffee outlet.
 Open slider. Press and hold the Ristretto & Lungo controls together for at least 6 sec. The other control flash for confirmation. Then close the slider to start procedure.
 Machines turns to Off mode automatically when empty.
![]() To ensure hygienic conditions, it is highly recommended emptying/cleaning the used capsule container every day.
To ensure hygienic conditions, it is highly recommended emptying/cleaning the used capsule container every day.
 Empty the drip tray and the used capsule container.
 Clean the coffee outlet regularly with a damp cloth.

![]() Never immerse the appliance or part of it in water.
Never immerse the appliance or part of it in water.
 Do not use any strong or abrasive solvent, sponge or cream cleaner. Do not put in the dishwasher.
![]() Duration approximately 15 minutes.
Duration approximately 15 minutes.
![]() Read the safety precautions on the descaling package and refer to the table for the frequency of use (see Descaling section in this manual).
Read the safety precautions on the descaling package and refer to the table for the frequency of use (see Descaling section in this manual).
Empty the drip tray and the used capsule container.
 Fill the water tank with 1 unit of Nespresso descaling liquid and add 0.5 L of water.
 Place a container (minimum volume: 0.6 L) under the coffee outlet.
 Activate the machine by pushing one of the cup selection touches.
 Blinking light: heating up Steady light: ready
 To enter the descaling mode, at slider closed push all the 3 controls simultaneously for at least 3 sec. A short beep will confirm it. Open the slider.
 Push all the 3 controls simultaneously for at least 3 sec. A short beep will confirm it. The control area will start blinking quickly.
 Close the slider to start descaling. Machine stops when water tank is empty.
 Refill the water tank with the used descaling solution collected in the container and touch any control to repeat the procedure.
 Empty and rinse the water tank, capsule container, drip tray and cup support thoroughly. Fill water tank with potable water.
 When ready, touch any control to rinse the machine. Machine will stop when done.
 To exit the descaling mode, push all the 3 controls simultaneously for at least 3 sec. A short beep will confirm this. The machine is now ready for use.
The descaling solution can be harmful. Avoid contact with eyes, skin and surfaces. Never use any product other than the Nespresso descaling kit available at the Nespresso Club to avoid damage to your machine. The following table will indicate the descaling frequency required for the optimum performance of your machine, based on water hardness. For any additional questions you may have regarding descaling, please contact your Nespresso Club.
Water hardness: Descale after: CaCO3 Calcium carbonate
fH dH CaCO3 Cups (40 ml)
36 20 360 mg/l 1000
18 10 180 mg/l 2000 
0 0 0 mg/l 4000
Nespresso descaling kit: Ref. 3035/CBU-2
![]() 220 V, 50-60 Hz, <1260 W
220 V, 50-60 Hz, <1260 W
![]() 19 bar
19 bar
![]() ~ 3 kg
~ 3 kg
![]() 0.8 L
0.8 L
![]()
![]() 115 mm
115 mm ![]() 251 mm
251 mm ![]() 369 mm
369 mm
No light on the controls. ➔ The machine has turned to Off mode automatically; touch one of the controls or push the slider. Check the mains: plug, voltage, fuse.
No coffee, no water. ➔ Check the water tank, if empty, fill with potable water. Descale it if necessary.
Coffee is not hot enough. ➔ Preheat cup. Descale the machine if necessary.
The slider does not close completely or the machine doesn‘t start brewing. ➔ Empty the capsule container. Check that no capsule is blocked inside the machine.
Leakage or unusual coffee flow. ➔ Check that the water tank is correctly positioned.
Lights flash alternatively from back to front. ➔ Empty the used capsule container and check no capsules are blocked. Then touch any control. If problem persists, call the Nespresso Club.
Lights flash alternatively from front to back. ➔ Fill the water tank. If problem persists, call the Nespresso Club.
Lights flash quickly. ➔ Exit descaling procedure, push all the 3 controls simultaneously for at least 3 sec. Disconnect plug from the mains and reconnect after 10 sec. If problem persists, call the Nespresso Club.
No coffee, water just comes out (despite inserted capsule). ➔ Pull the slider to ensure it is closed. If problem persists, call the Nespresso Club.
Water or coffee flow does not stop pushing any control. ➔ Move gently the slider towards the back of the machine to stop the flow.
Machine turns to Off mode. ➔ To save energy the machine will turn to Off mode after 9 minutes of non-use. See paragraph on «Energy saving concept».
As we may not have foreseen all uses of your appliance, should you need any additional information, in case of problems or simply to seek advice, call the Nespresso Club or your Nespresso authorised representative.
Contact details for your nearest Nespresso Club or your Nespresso authorised representative can be found in the «Welcome to Nespresso» folder in your machine box or at www.nespresso.com
This appliance complies with the EU Directive 2002/96/EC. Packaging materials and appliance contain recyclable materials.
Your appliance contains valuable materials that can be recovered or can be recyclable. Separation of the remaining waste materials into different types facilitates the recycling of valuable raw materials. Leave the appliance at a collection point. You can obtain information on disposal from your local authorities.
![]() We have committed to buy coffee of the very highest quality grown in a way that is respectful of the environment and farming communities. Since 2003 we have been working together with the Rainforest Alliance in developing our Nespresso AAA Sustainable Quality Coffee Program.
We have committed to buy coffee of the very highest quality grown in a way that is respectful of the environment and farming communities. Since 2003 we have been working together with the Rainforest Alliance in developing our Nespresso AAA Sustainable Quality Coffee Program.
![]() We chose aluminium as the material for our capsules because it protects the coffee and aromas of the Nespresso Grands Crus. Aluminium is also indefinitely recyclable, without loosing any of its qualities.
We chose aluminium as the material for our capsules because it protects the coffee and aromas of the Nespresso Grands Crus. Aluminium is also indefinitely recyclable, without loosing any of its qualities.
![]() Nespresso is committed to designing and making appliances that are innovative, high performing and user-friendly. Now we are engineering environmental benefits into the design of our new and future machine ranges.
Nespresso is committed to designing and making appliances that are innovative, high performing and user-friendly. Now we are engineering environmental benefits into the design of our new and future machine ranges.
Breville guarantees this product against defects in materials and workmanship for two years domestic use (or 3 months commercial use) from the date of purchase. During this period, Breville will either repair or replace, at its discretion, any defective product at no charge to the consumer. In the event of a product or accessory being repaired or replaced during the guarantee period, the guarantee on the repaired product will expire two years from the purchase date of the original product, not two years from the date of repair. This guarantee excludes liability for consequential loss or any other loss or damage caused to property or person arising from any cause whatsoever. It also excludes defects caused by the product not being used in accordance with instructions, accidental damage, misuse, being tampered with by unauthorised persons, improper maintenance, consumable items or normal wear and tear and does not cover the cost of claiming under the warranty. Except to the extent applicable by law, the terms of this warranty do not exclude, restrict or modify, and are in addition to, the mandatory statutory rights applicable to the sale of the product to you. Any defect or dysfunction resulting from the use of non-genuine Nespresso capsules will be not covered by this warranty.
Nespresso is handling product enquiries and product servicing on Breville’s behalf. If you believe your product is defective, contact the Nespresso customer service team directly for instructions on where to send or bring it for repair by a Breville authorised service agent. Contact Nespresso Australia: 1800 623 033 or New Zealand: 0800 234 579 [email protected].
This product is imported and distributed by Breville and this warranty is provided by Breville. To the extent permitted by law, Nespresso has no liability for the product and all guarantees, warranties and conditions by Nespresso are excluded.
![]()
![]()
![]()
![]()
For Nespresso – Recipe Visit: https://appliance.recipes/category/nespresso

![]()
![]()
![]()

Nespresso, an exclusive system creating the perfect Espresso, time after time.
All machines are equipped with a unique extraction system that guarantees up to 19 Bar pressure. Each parameter has been calculated with great precision to ensure that all the aromas from each Grand Cru can be extracted, to give the coffee body and create an exceptionally thick and smooth crema.
BEC200_05.2013
These instructions are part of the appliance. Read all instructions and all safety instructions before operating the appliance.
SAFETY PRECAUTIONS 03
Overview 05
Specifications 05
Energy Saving Mode 06
First use or after long period of non-use 07
Coffee Preparation 08
Programming the water volume 09
Emptying the system before a period of non-use and for frost protect ion, or before a repair 10
Reset to factory settings 11
Descaling 12
Cleaning 14
Troubleshooting 15
Contact the Nespresso Club 16
Disposal and Environmental Protection 16
Ecolaboration: Ecolaboration.com 16
Limited Warranty 17

Caution: the safety precautions are part of the appliance. Read them carefully before using your new appliance for the first time. Keep them in a place where you can find and refer to them later on.
Caution: when you see this sign, please refer to the safety precautions to avoid possible harm and damage.
Information: when you see this sign, please take note of the advice for the correct and safe usage of your appliance.
CAUTION: to prevent damage to the appliance do not use alkaline cleaning agents when cleaning, use a soft cloth and a mild detergent.
CAUTION: the descaling solution can be harmful. Avoid contact with eyes, skin and surfaces. Never use any product other than the Nespresso descaling kit available at the Nespresso Club to avoid damage to your machine. The table will indicate the descaling frequency required for the optimum performance of your machine, based on water hardness (see Descaling section). For any additional questions you may have regarding descaling, please contact your Nespresso Club.
SAVE THESE INSTRUCTIONS
Pass them on to any subsequent user. This instruction manual is also available as a PDF at nespresso.com

BEC200

![]() 12 cm
12 cm ![]() 23 cm
23 cm ![]() 32.1 cm
32.1 cm
![]() 220-240 V, 50-60 Hz, 1150-1260W
220-240 V, 50-60 Hz, 1150-1260W
![]() Max/max. 19 Bar
Max/max. 19 Bar
![]() 2.4 Kg
2.4 Kg
![]() 0.7 L
0.7 L
 Coffee Machine
 Nespresso Grand Cru capsule tasting gift
«Welcome to Nespresso»Folder
Quick Start Guide
 ENERGY SAVING MODE.
This machine is equipped with an energy saving feature. The machine will automatically enter power off mode after 9 minutes.
 To turn the machine on either press the Espresso or Lungo button.
 To turn the machine off before automatic Power Off mode, press both the Espresso and Lungo buttons simultaneously.
 1. With machine being turned off, press and hold the Espresso button for 3 seconds.
 2. The Espresso button will blink to indicate the current setting.
3. To change this setting press the Espresso button: One time for power off mode after 9 minutes One more time for power off mode after 30 minutes.
4. To exit the energy saving mode press the Lungo button for 3 seconds.
![]() CAUTION: first read the safety precautions to avoid risks of fatal electrical shocks and fire.
CAUTION: first read the safety precautions to avoid risks of fatal electrical shocks and fire.
 1. Rinse the water tank before filling with potable water.
 2. Place a container (min. 1 L) under coffee outlet.
 3. Plug into mains.
4. Press the Espresso or Lungo button to activate the machine.
 Blinking Lights: heating up (25 sec.) Steady Lights: ready
 5. Press the Lungo button to rinse the machine. Repeat 3 times.
1. Rinse then fill the water tank with potable water.
2. Press the Espresso or Lungo button to activate the machine.
Blinking Lights: heating up (25 sec.) Steady Lights: ready
 3. Lift the lever completely and insert a Nespresso capsule.
![]() CAUTION: never lift lever during operation and refer to the safety precautions to avoid possible harm when operating the appliance.
CAUTION: never lift lever during operation and refer to the safety precautions to avoid possible harm when operating the appliance.
![]() Note: during heat up, you can press either coffee button while blinking. The coffee will then flow automatically when the machine is ready.
Note: during heat up, you can press either coffee button while blinking. The coffee will then flow automatically when the machine is ready.
 4. Close the lever and place a cup under the coffee outlet.
5. Press the Espresso (40 ml) or the Lungo (110 ml) button to start. Preparation will stop automatically. To stop the coffee flow or top up your coffee, press again.
 6. Remove the cup. Lift and close the lever to eject the capsule into the used capsule container.
1. Turn the machine on and wait for it to be in ready mode (steady lights).
2. Fill the water tank with potable water and insert a Nespresso capsule.
3. Place a cup under the coffee outlet.
4. Press and hold the Espresso or Lungo button.
5. Release button once the desired volume is served.
 6. Water volume level is now stored.
1. To enter the emptying mode, press both the Espresso and Lungo buttons to turn the machine off.
 2. Remove the water tank and open the lever.
3. Press both the Espresso and Lungo buttons for 3 seconds.
 Both LEDs blink alternatively.
 4. Close the lever.
5. Machine switches off automatically.
6. Empty and clean the used capsule container and drip tray.
1. With machine being turned off, press and hold down the Lungo button for 5 seconds.
2. LEDS will blink fast 3 times to confirm machine has been reset to factory settings.
3. LEDs will then continue to blink normally, as heating up, until ready
Steady lights: machine ready
Factory settings
Espresso Cup: 40 ml
Lungo Cup: 110 ml
Power Off mode: 9 min
![]() Note: duration approximately 15 minutes.
Note: duration approximately 15 minutes.
1. Remove the capsule and close the lever.
 2. Empty the drip tray and used capsule container.
 3. Fill the water tank with 0.5 L of potable water and add 1 Nespresso descaling liquid sachet.
4. Place a container (min. volume 1 L) under the coffee outlet.
5. To enter the descaling mode, while the machine is turned on, press both the Espresso and Lungo buttons for 3 seconds.
 Both LEDs blink.
6. Press the Lungo button and wait until the water tank is empty.
 7. Refill the water tank with the used descaling solution collected in the container and repeat step 4 and 6.
8. Empty and rinse the water tank. Fill with potable water.
9. When ready, repeat step 4 and 6 to now rinse the machine. Repeat twice.
10. To exit the descaling mode, press both the Epresso and Lungo buttons for 3 seconds.
Blinking Lights: heating up (25 sec.)
Steady Lights: ready
11. The machine is now ready for use.
![]() CAUTION: the descaling solution can be harmful. Avoid contact with eyes, skin and surfaces. Never use any product other than the Nespresso descaling kit available at the Nespresso Club to avoid damage to your machine. The following table will indicate the descaling frequency required for the optimum performance of your machine, based on water hardness. For any additional questions you may have regarding descaling, please contact your Nespresso Club.
CAUTION: the descaling solution can be harmful. Avoid contact with eyes, skin and surfaces. Never use any product other than the Nespresso descaling kit available at the Nespresso Club to avoid damage to your machine. The following table will indicate the descaling frequency required for the optimum performance of your machine, based on water hardness. For any additional questions you may have regarding descaling, please contact your Nespresso Club.
Water hardness: Descale after:
fH dH CaCO3 Cups (40 ml)
36 20 360 mg/l 1000
18 10 180 mg/l 2000
0 0 0 mg/l 4000
fH French grade Indice français
dH German grade Indice allemand
CaCO3 Calcium carbonate carbonate de calcium
![]() WARNING Risk of fatal electrical shock and fire.
WARNING Risk of fatal electrical shock and fire.
Never immerse the appliance or part of it in water.
Be sure to unplug the machine before cleaning.
Do not use any strong cleaning agent or solvent cleaner.
Do not use sharp objects, brushes or sharp abrasives.
Do not place in a dishwasher.
 Clean the coffee outlet regularly with a soft damp cloth.
Maintenance unit can be removed in separate pieces for easy cleaning.
No light indicator. ➔Check the mains, plug, voltage, and fuse. In case of problems, call the Nespresso Club.
No coffee, no water. ➔First use: fill water tank with warm water (max. 55° C) and run through machine according to instructions on page 7.
➔Water tank is empty. Fill water tank.
➔Descale if necessary; see Descaling section.
Coffee comes out very slowly. ➔Flow speed depends on the coffee variety.
➔Descale if necessary; see Descaling section.
Coffee is not hot enough. ➔ Preheat cup.
➔Descale if necessary.
Capsule area is leaking (water in capsule container). ➔ Position capsule correctly. If leakages occur, call the Nespresso Club.
Irregular blinking. ➔ Send appliance to repair or call the Nespresso Club.
No coffee, just water runs out (despite inserted capsule). ➔In case of problems, call the Nespresso Club.
As we may not have forseen all uses of your appliance, should you need any additional information, in case of problems or simply to seek advice, call the Nespresso Club or your Nespresso authorized representative. Contact details for your nearest Nespresso Club or your Nespresso authorized representative can be found in the «Welcome to Nespresso» folder in your machine box or at nespresso.com
This appliance complies with the EU Directive 2002/96/EC. Packaging materials and appliance contain recyclable materials.
Your appliance contains valuable materials that can be recovered or can be recyclable. Separation of the remaining waste materials into different types facilitates the recycling of valuable raw materials. Leave the appliance at a collection point. You can obtain information on disposal from your local authorities.
ECOLABORATION: ECOLABORATION.COM
![]() We have committed to buy coffee of the very highest quality grown in a way that is respectful of the environment and farming communities. Since 2003 we have been working together with the Rainforest Alliance developing our Nespresso AAA Sustainable Quality Coffee Program.
We have committed to buy coffee of the very highest quality grown in a way that is respectful of the environment and farming communities. Since 2003 we have been working together with the Rainforest Alliance developing our Nespresso AAA Sustainable Quality Coffee Program.
![]() We chose aluminium as the material for our capsules because it protects the coffee and aromas of the Nespresso Grand Cru. Aluminium is also infinitely recyclable, without losing any of its qualities.
We chose aluminium as the material for our capsules because it protects the coffee and aromas of the Nespresso Grand Cru. Aluminium is also infinitely recyclable, without losing any of its qualities.
![]() Nespresso is committed to designing and making appliances that are innovative, high-performing and user friendly. Now we are engineering environmental benefits into the design of our new and future machine ranges.
Nespresso is committed to designing and making appliances that are innovative, high-performing and user friendly. Now we are engineering environmental benefits into the design of our new and future machine ranges.
Breville guarantees this product against defects in materials and workmanship for two years domestic use (or 3 months commercial use) from the date of purchase. During this period, Breville will either repair or replace, at its discretion, any defective product at no charge to the consumer. In the event of a product or accessory being repaired or replaced during the guarantee period, the guarantee on the repaired product will expire two years from the purchase date of the original product, not two years from the date of repair. This guarantee excludes liability for consequential loss or any other loss or damage caused to property or person arising from any cause whatsoever. It also excludes defects caused by the product not being used in accordance with instructions, accidental damage, misuse, being tampered with by unauthorised persons, improper maintenance, consumable items or normal wear and tear and does not cover the cost of claiming under the warranty. Except to the extent applicable by law, the terms of this warranty do not exclude, restrict or modify, and are in addition to, the mandatory statutory rights applicable to the sale of the product to you. Only the use of Nespresso capsules will guarantee the proper functioning and lifetime of your Nespresso machine. Any defect resulting from the usage of non-genuine Nespresso capsules will not be covered by this warranty.
Nespresso is handling product enquiries and product servicing on Breville’s behalf. If you believe your product is defective, contact the Nespresso customer service team directly for instructions on where to send or bring it for repair by a Breville authorised service agent. Contact Nespresso Australia: 1800 623 033 or New Zealand: 0800 234 579 [email protected].
This product is imported and distributed by Breville and this warranty is provided by Breville. To the extent permitted by law, Nespresso has no liability for the product and all guarantees, warranties and conditions by Nespresso are excluded.
![]()
NES-432001-2002A-2
Nespresso Inssia C Breville Coffee Machine Manual – Optimized PDF
Nespresso Inssia C Breville Coffee Machine Manual – Original PDF
For Nespresso – Recipe Visit: https://appliance.recipes/category/nespresso
CREATISTA
by Nespresso
![]()

CREATISTA MY MACHINE
![]()
![]()
User manual 3
❶ Creatista Coffee Machine
❷ Tasting Box of Nespresso Capsules
❸ Milk Jug
❹ Nespresso Welcome Brochure
❺ User Manual
![]() ❻1 x Water Hardness Test Strip, in the User Manual
❻1 x Water Hardness Test Strip, in the User Manual
Nespresso is an exclusive system creating the perfect Espresso, time after time. Each parameter has been calculated with great precision to ensure that all the aromas from each capsule can be extracted, to give the coffee body and create an exceptionally thick and smooth crema.
CAUTION: When you see this sign, please refer to the important safeguards to avoid possible harm and damage.
INFORMATION: when you see this sign, please take note of the advice for the correct and safe usage of your coffee machine.
 220-240 V, 50-60 Hz, 1300-1600 W
 19 bar / 1.9 MPa
 ~ 5.2 kg / 11.4 lbs
 1.5 L / 50 oz

 17.0 cm, 6.7 in
  30.9 cm, 12.2 in
  40.9 cm, 16.1 in
Nespresso Creatista 2
Packaging Content 3
Creatista 3
Specifications 3
Safety Precautions 5-7
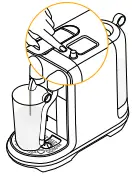
Machine Overview 8
First Use 9-10
Navigation 11
Regular Coffee Preparation 12
Milk Coffee Preparation – Single Cup 13-14
Milk Coffee Preparation – Two Cup 15-17
Latte Macchiato Preparation 18-19
Adjusting Regular Coffee Drinks 20
Adjusting Milk Coffee Drinks 21
Reset to Factory Settings 22
Emptying the System 22
Energy Saving 23
Daily Cleaning 23-24
Steam Wand Cleaning Procedure 24
Descaling 25
Water Hardness 26
Troubleshooting 27
Troubleshooting Milk Froth Preparation 28
Contact Nespresso Club 29
Disposal and Environmental Protection 29
Limited Guarantee 30

CAUTION: the safety precautions are part of the appliance. Read them carefully before using your new appliance for the first time. Keep them in a place where you can find and refer to them later on.
CAUTION: when you see this sign, please refer to the safety precautions to avoid possible harm and damage.
INFORMATION: when you see this sign, please take note of the advice for the correct and safe usage of your appliance.
Pass them on to any subsequent user. This instruction manual is also available as a PDF at nespresso.com
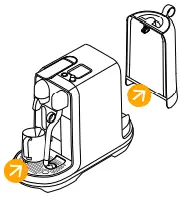
Read the important safeguards first to avoid risks of fatal electrical shock and fire.
❶ Rinse the water tank before filling it with potable water.
 ❷ Place the water tank, insert the drip tray and the capsule container in position. For your safety, operate the machine only with drip tray and capsule container in position.
❸ Plug the machine into the power outlet.
 ❹ Turn the machine ON by pressing the START|CANCEL button. Heating up takes approximately 10 seconds.
 ❺ Rotate the SELECT dial to set your language. Press SELECT to confirm.
 ❻ Setting your water hardness, dip the Water Hardness Test Strip in and out the water tank.
Wait 1 minute. Set the water hardness by rotating the SELECT dial according to the results on the Test Strip. Press SELECT to confirm. For further information refer to page 26.
 ❼ Follow the on-screen prompts to rinse & prepare your machine for use.
First use is to rinse the machine & prime the heating system.
 ❽ Follow the Quick Start Tutorial.
❾ To turn OFF your machine, press and hold the START/CANCEL dial for 2 seconds until machine is off.
❶ Rotate the SELECT dial to select your coffee
 ❷ Display shows current drink settings, Coffee Volume, Milk Temperature, Milk Texture.
 ❸ Press START|CANCEL to make a coffee with the current settings.
❹ Press the SELECT dial to adjust the current settings. Refer page 20 & 21.
❶ Fill the water tank with potable water.
❷ Turn the machine ON by pressing the START|CANCEL button. Heating up takes approximately 10 second.
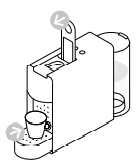
❸ Place a cup under the coffee outlet. Use the cup support if required. PUSH the cup support to unlock.
 ❹ Lift the Lever, insert a capsule and close the lever. Rotate SELECT dial to select your coffee
Ristretto (25ml / 0.85 oz)
Espresso (40 ml / 1.35 oz)
Lungo (110 ml / 3.7 oz)
Press START|CANCEL button to extract
To ensure hygienic conditions, it is highly recommended to not reuse a used capsule.
 ❺ Preparation will stop automatically. Lift the Lever to eject the capsule.
 ❻ To stop the coffee flow press the START|CANCEL button.
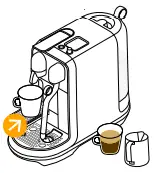
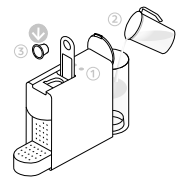
Only use the milk jug provided.
TIP: For optimal milk froth, use pasteurised whole or semi skimmed milk at refrigerated temperature (about 4-6 °C / 39-43 °F ).
❶ Fill the water tank with fresh potable water.
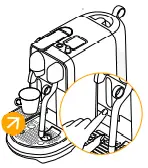
❷ To accommodate smaller cups, use the cup support. PUSH the cup support to unlock.
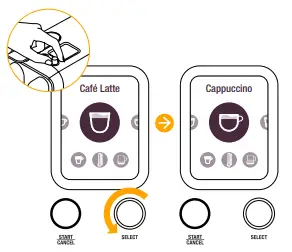
❸ Rotate the SELECT dial to select your drink.
❹ Fill the milk jug with enough fresh cold milk. Minimum and maximum levels are marked on the inside and outside of the milk jug.
CAUTION: Do not fill milk jug above the maximum level marked on the inside & outside of the jug.
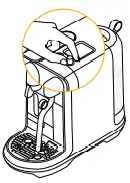
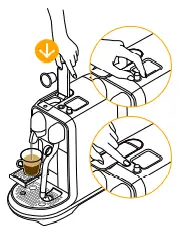
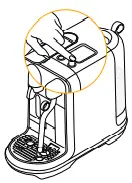
 ❺ Lift the steam wand & position in the centre of the milk jug.
 ❻ Ensure the milk jug is making contact with the temperature sensor located in the drip tray.
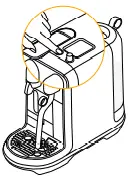
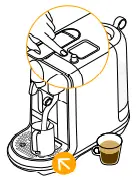
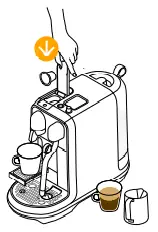 ❼ Lift the Lever & insert your capsule.
 ❽ Press the START|CANCEL button to start the espresso extraction.
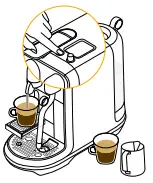
❾ When the espresso extraction is complete, press START|CANCEL to begin milk frothing.
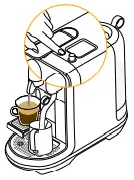
❿ When milk frothing is complete, lift the steam wand, wipe with a clean damp cloth.
Allow steam wand to return to its down position & it will auto purge to rinse itself.
Pour milk into the espresso to finish your drink.
Only use the milk jug provided.
TIP: For optimal milk froth, use pasteurised whole or semi skimmed milk at refrigerated temperature (about 4-6 °C / 39-43 °F ).
❶ Fill the water tank with fresh potable water.
 ❷ To accommodate smaller cups, use the cup support. PUSH the cup support to unlock.
 ❸ Rotate the SELECT dial to select your drink.
 ❹ Lift the Lever & insert your capsule.
 ❺ Press the START|CANCEL button to start the espresso extraction.
❻ Fill the milk jug with enough fresh cold milk for 2 drinks. Maximum level is marked on the inside and outside of the milk jug. Do not overfill.
CAUTION: Do not fill milk jug above the maximum level marked on the inside & outside of the jug.
 ❼ Lift the steam wand & position in the centre of the milk jug and press START|CANCEL to begin milk frothing.
❽ Ensure the milk jug is making contact with the temperature sensor located in the drip tray.
❾ When milk frothing is complete, lift the steam wand, wipe with a clean damp cloth.
❿ Allow steam wand to return to its down position & it will auto purge to rinse itself.
 Place your second cup under the coffee spout.
 Lift the Lever & insert your capsule.
 Press the START|CANCEL button to start the espresso extraction.
Pour milk into the espresso to finish your drinks.
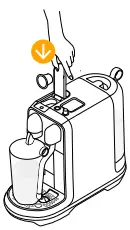
❶ Fill the water tank with fresh potable water.
❷ To accommodate a Latte Macchiato glass, push the cup support in until it locks.
❸ Rotate the SELECT dial to select your drink.
❹ Fill the milk jug to the marked maximum level with fresh cold milk
CAUTION: Do not fill milk jug above the maximum level marked on the inside & outside of the jug.
❺ Lift the steam wand & position in the centre of the milk jug and press START|CANCEL to begin milk frothing.
\❻ Ensure the milk jug is making contact with the temperature sensor located in the drip tray.
❼ When milk frothing is complete, lift the steam wand, wipe with a clean damp cloth.
❽ Allow steam wand to return to its down position & it will auto purge to rinse itself.
❾ Pour milk into the Latte Macchiato glass and place under the coffee spout.
❿ Lift the Lever & insert your capsule.
Press the START|CANCEL button to start the espresso extraction.
\❶ Rotate the SELECT dial to the drink.
❷ Press the SELECT dial to adjust the coffee volume.
❸ Rotate the SELECT dial to adjust the coffee volume. The suggested volume is marked with a dotted line.
❹ Press SELECT dial to save & exit or press START|CANCEL to exit without saving.
1. Ristretto: from 25 to 60 ml / 0.85-2 oz.
2. Espresso: from 25 to 60 ml / 0.85-2 oz.
3. Lungo: from 70 to 150 ml / 2.37 to 5 oz.
Default coffee volumes listed on page 12.
![]() This machine is optimized for pasteurised whole or semi skimmed milk. Milk Temperature and Milk Froth may be adjusted to suit different milk types.
This machine is optimized for pasteurised whole or semi skimmed milk. Milk Temperature and Milk Froth may be adjusted to suit different milk types.
 ❶ Rotate the SELECT dial to the drink & press the SELECT dial to adjust drink.
 ❷ Rotate the SELECT dial to adjust, Espresso Volume, Milk Temperature or Milk Froth level.
 ❸ Press the SELECT dial to enter & rotate to adjust the setting.
Froth levels & Espresso Volumes suggested settings are marked with a dotted line.
 ❹ Press SELECT dial to save & exit or press START|CANCEL to exit without saving.
 ❺ Press START/CANCEL to exit the adjustments menu.
1. Coffee Volume: from 25 to 60 ml / 0.85-2 oz.
2. Milk Temperature: from 55 to 75 °C / 131 to 167 °F.
3. Milk Froth: from 2 to 30 mm / 0.08 to 1.2 in.
❶ Drink Settings are:
-Coffee Volume, Milk Temperature and Milk Froth.
To reset your drink settings: To reset factory settings:
1. Select SETTINGS 1. Select SETTINGS
2. Select RESET 2. Select RESET
3. Select COFFEE RESET 3. Select FACTORY RESET
4. Select ![]() to confirm 4. Select
to confirm 4. Select ![]() to confirm
to confirm
5. Select ![]() to cancel 5. Select
to cancel 5. Select ![]() to cancel
to cancel
6. Machine will power off
7. On next use, you will need to refer to first use instructions
Emptying the System before a period of non-use or for frost protection
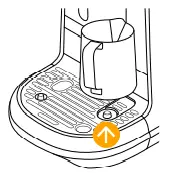
 ❶ Remove the water tank. Place the empty Milk Jug under the coffee outlet.
 ❷ Rotate the SELECT dial to MAINTENANCE, press SELECT dial. Select “Empty Cycle” & press SELECT to start. When the pump stops, empty & wipe dry the capsule bucket & drip tray.
❶ Energy efficient: Machine minimises power use when not making a drink. The display dims after 2 mins of no use, after 10 mins of no use display turns off. Restart by pressing the START|CANCEL button.
![]() To ensure hygienic conditions, it is highly recommended emptying and cleaning the capsule container every day.
To ensure hygienic conditions, it is highly recommended emptying and cleaning the capsule container every day.
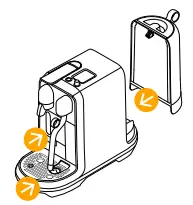
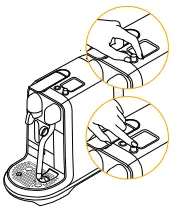
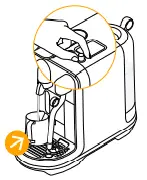
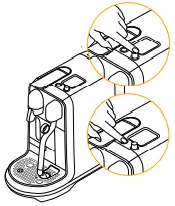
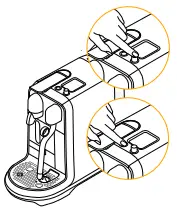
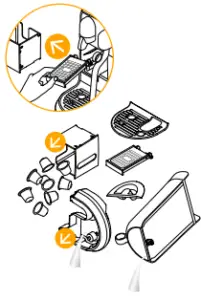
 ❶ Empty the drip tray and the capsule container every day. Remove cup support by first removing the capsule bucket, then unlocking the cup support, pulling the cup support forward & lifting it upwards to disengage from the machine. Clean cup support and wipe inside machine, reassemble with a clean damp cloth. Remove the water tank and lid and clean them both with odorless detergent and rinse with warm water. Refill the water tank with fresh potable water.
❷ Rinse the milk jug & dry after each use. If required, wash the jug with mild detergent.
 ❸ Fill the milk jug with potable water between the min & max marks. Select the MILK function & press START. When complete discard the hot water, then wipe the steam wand with a clean damp cloth.
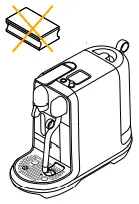
 ❹ Do not use any strong or abrasive solvent, sponge or cream cleaner. Do not put in the dishwasher.
 ❺ Dry all the parts with a soft clean cloth and reassemble all parts. Clean the coffee outlet and inside the machine regularly with a clean damp cloth.
 ❻ Never immerse the appliance or part of it in water or any other liquid.
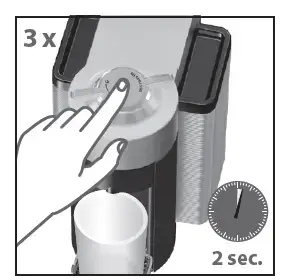
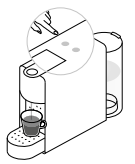
Milk System Cleaning Procedure. Recommended you perform this monthly to prevent steam tip blockages or when the display shows “Clean Steam Wand”.
 ❶ Select Maintenance
 ❷ Select Clean Steam Wand
 ❸ Follow the on-screen prompts
![]() Duration approximately 15 minutes
Duration approximately 15 minutes
![]() Read the important safeguard on the descaling package and refer to the table for the frequency of use. The descaling solution can be harmful. Avoid contact with eyes, skin and surfaces. Never use any product other than the Nespresso descaling kit available at the Nespresso Club to avoid damage to your machine. The following table will indicate the descaling frequency required for the optimum performance of your machine, based on water hardness. For any additional questions you may have regarding descaling, please contact the Nespresso Club.
Read the important safeguard on the descaling package and refer to the table for the frequency of use. The descaling solution can be harmful. Avoid contact with eyes, skin and surfaces. Never use any product other than the Nespresso descaling kit available at the Nespresso Club to avoid damage to your machine. The following table will indicate the descaling frequency required for the optimum performance of your machine, based on water hardness. For any additional questions you may have regarding descaling, please contact the Nespresso Club.
Descaling: Removes scale build-up, maintains coffee taste and prevents machine damage. Frequency will depend on your water hardness & amount of use. Descale when prompted on-screen. The machine will stop you from use if the descale cycle has not been performed after 10 uses. A “lockout” count-down will appear to alert you of the number of uses remaining until usage will stop.
❶ Rotate dial to select MAINTENANCE
 ❷ Select DESCALE
 ❸ Follow the on-screen prompts to complete
To determine water hardness level use the test strip provided.
To change the water hardness setting:
 ❶ Rotate dial to select SETTINGS
 ❷ Select Water Hardness
 ❸ Follow the on-screen prompts to complete
App. fH dH CaCO3 ![]() (40 ml)
(40 ml)
![]() Level 0 <5 <3 < 50 mg/l 2200
Level 0 <5 <3 < 50 mg/l 2200
![]() Level 1 >7 >4 > 70 mg/l 1800
Level 1 >7 >4 > 70 mg/l 1800
![]() Level 2 >13 >7 > 130 mg/l 1400
Level 2 >13 >7 > 130 mg/l 1400
![]() Level 3 >25 >14 > 250 mg/l 1000
Level 3 >25 >14 > 250 mg/l 1000
![]() Level 4 >38 >21 > 380 mg/l 600
Level 4 >38 >21 > 380 mg/l 600
fH French degree
dH German Grade
CaCO3 Calcium Carbonate
Buttons not illuminated. – Machine turns OFF automatically. See paragraph on «Energy Saving
Concept». – Press START/CANCEL or SELECT to turn to «ON-mode».
– Check the outlet: plug, voltage, fuse.
No steam or hot water – Press START/CANCEL or SELECT to turn to «ON-mode». – Check the outlet: plug, voltage, fuse.
No coffee, no water, unusual coffee flow. – Check if the water tank is correctly positioned, if empty, fill with potable water. – Descale the machine, if necessary.
Coffee is not hot enough. – Preheat cup. – Descale the machine, if necessary.
The capsule lever does not close completely – Empty the capsule container. – Check that no capsule is blocked inside the machine. (Note: do not put the finger inside the machine)
Leakage (water under the machine). – Empty drip tray if full. – Check drip tray is securely inserted. – If problem persists, call the Nespresso Club.
No coffee flow, water goes directly into the capsule bucket (despite inserted capsule). – Ensure capsule lever is closed. – Empty capsule bucket and check that no capsule is blocked inside the machine. (NOTE: do not put finger inside the machine) If problem persists, call the Nespresso Club.
Colour display is dim and hard to see/read – Machine display dims automatically after 2 minutes of non use. – See paragraph on «Energy Saving Concept». – Press START/CANCEL or SELECT to turn to «ON-mode». – Adjust the screen brightness setting. Navigate to Settings menu. Select Screen Brightness. Turn the dial and Select High.
Buttons flashing – Follow on screen prompt. – Check the water tank. If empty, fill with potable water and brew a coffee. – Check steam tip for blockages. Use pin cleaning tool stored under the water tank to unblock each of the holes.
– Descale machine, if necessary. – Complete a Clean Steam Wand cycle, if necessary.
Fill Water Tank alert remains on display (water tank is full) – Check if the water tank is correctly positioned. – If problem persists, call the Nespresso Club.
Descale Now alert is displayed – Descale the machine. Navigate to Maintenance menu. – Select Descale and follow the on-screen prompts.
Machine Error message is displayed – A major fault has occurred. – Visit Nespresso.com or call the Nespresso Club to contact your local service centre.
Machine is ON but ceases to operate – Power machine off by holding START/CANCEL. – Wait 60 minutes and press START/CANCEL or SELECT to turn to «ON-mode». – If problem persists, call the Nespresso Club.
Machine turns to OFF mode. – To save energy the machine will turn to OFF mode after 10 minutes of non use. See paragraph on «Energy Saving Concept». – Press START/CANCEL or SELECT to turn to «ON-mode».
Milk steam cycle does not start – Check if the water tank is correctly positioned, if empty, fill with potable water. – Check steam tip for any blockages and ensure wand is lowered.
Quality of froth not up to standard – Be sure to use pasteurised whole or semi-skimmed milk at refrigerated temperature (about 4-6 °C / 39-43 F). For a better result, the milk must be newly opened. – Check the milk froth setting.
– Use the Breville milk jug provided. – Clean both the milk jug and steam wand after each use. – Clean the steam wand. Navigate to Maintenance menu. – Select Clean Steam Wand and follow the on-screen prompts.
Steam is very wet – Use cold, potable water. Do not use highly filtered, demineralised or distilled water.
Milk overflows – Fill jug with appropriate milk volume. – Minimum fill level as marked on the inside & outside of the jug. – Maximum fill level as marked on the inside & outside of the jug. – To stop overflow, either reduce the initial volume of milk and/or reduce the froth level. This varies depending on milk type.
Milk temperature is too hot – Be sure to use the Breville milk jug provided. – Check the milk jug is positioned correctly on the milk jug temperature sensor. – Check the temperture sensor in the drip tray is clean. – Decrease the milk temperature setting.
Milk temperature is not hot enough – Preheat cup. – Use the Breville milk jug provided. – Check the milk jug is positioned on the milk jug temperature sensor. – Increase the milk temperature setting. – Check the steam tip for blockages.
Lower Wand alert is displayed – Ensure the steam wand is lowered.
Clean Steam Wand alert is displayed – Clean the Steam Wand. – Navigate to Maintenance menu. Select Clean Steam Wand and follow the on-screen prompts.
As we may not have foreseen all uses of your appliance, should you need any additional information, in case of problems or simply to seek advice, call the Nespresso Club or your Nespresso authorized representative. Contact details for your Nespresso Club or your Nespresso authorized representative can be found in the «Welcome to Nespresso» folder in your machine box or at nespresso.com
Your appliance contains valuable materials that can be recovered or can be recyclable. Separation of the remaining waste materials into different types facilitates the recycling of valuable raw materials. Leave the appliance at a collection point. You can obtain information on disposal from your local authorities.
Breville guarantees this product against defects in materials and workmanship for two years domestic use (or 3 months commercial use) from the date of purchase. During this period, Breville will either repair or replace, at its discretion, any defective product at no charge to the consumer. In the event of a product or accessory being repaired or replaced during the guarantee period, the guarantee on the repaired product will expire two years from the purchase date of the original product, not two years from the date of repair. This guarantee excludes liability for consequential loss or any other loss or damage caused to property or person arising from any cause whatsoever. It also excludes defects caused by the product not being used in accordance with instructions, accidental damage, misuse, being tampered with by unauthorised persons, improper maintenance, consumable items or normal wear and tear and does not cover the cost of claiming under the warranty.
How to Claim Under the Breville Warranty
Nespresso is handling product enquiries and product servicing on Breville’s behalf. If you believe your product is defective, contact the Nespresso customer service team directly for instructions on where to send or bring it for repair by a Breville authorised service agent. Contact Nespresso Australia: 1800 623 033 or New Zealand: 0800 234 579 [email protected].
This product is imported and distributed by Breville and this warranty is provided by Breville. To the extent permitted by law, Nespresso has no liability for the
For Nespresso – Recipe Visit: https://appliance.recipes/category/nespresso


![]()
Instruction manual 3
Nespresso is an exclusive system creating the ultimate Espresso, time after time. All Nespresso machines are equipped with a unique extraction system that guarantees up to 19 bar pressure. Each parameter has been calculated with great precision to ensure that all the aromas from each capsule can be extracted, to give the coffee body and create an exceptionally thick and smooth crema.
![]() CAUTION: when you see this sign, please refer to the safety precautions to avoid possible harm and damage.
CAUTION: when you see this sign, please refer to the safety precautions to avoid possible harm and damage.
![]() Information: when you see this sign, please take note of the advice for the correct and safe usage of your coffee machine.
Information: when you see this sign, please take note of the advice for the correct and safe usage of your coffee machine.
Content
Safety Precautions 4-6
Machine Overview 7
Specifications 7
First use or after a long period of non-use 8
Coffee Preparation 8-9
Programming the Water Volume 9
Energy saving mode 10
Reset to Factory Settings 10
Cleaning 11
Descaling 11-13
Emptying the system before a period of non-use and for frost protection,
or before a repair 13
Troubleshooting 14
Disposal and environmental protection 14
Limited Guarantee 15
Contact the Nespresso Club 15
 User manual
 «Welcome to Nespresso» Folder
 Nespresso capsule tasting gift
 Coffee Machine

![]() Caution: when you see this sign, please refer to the safety precautions to avoid possible harm and damage.
Caution: when you see this sign, please refer to the safety precautions to avoid possible harm and damage.
![]() Information: when you see this sign, please take note of the advice for the correct and safe usage of your appliance.
Information: when you see this sign, please take note of the advice for the correct and safe usage of your appliance.
![]() Caution: the safety precautions are part of the appliance. Read them carefully before using your new appliance for the first time. Keep them in a place where you can find and refer to them later on.
Caution: the safety precautions are part of the appliance. Read them carefully before using your new appliance for the first time. Keep them in a place where you can find and refer to them later on.
Pass them on to any subsequent user. This instruction manual is also available as a PDF at nespresso.com
 220-240 V~, 50-60 Hz, 1200-1310 W
 19 bar / 1.9 MPa
 ~ 2.3 kg
 0.6 L
0.6 L

 84 mm
84 mm  204 mm
  330 mm
![]() First, read the safety precautions to avoid risks of fatal electrical shocks and fire.
First, read the safety precautions to avoid risks of fatal electrical shocks and fire.
![]() Factory settings: Espresso cup: 40 ml, Lungo cup: 110 ml; Auto Off mode: 9 mins.
Factory settings: Espresso cup: 40 ml, Lungo cup: 110 ml; Auto Off mode: 9 mins.
 ❶ Rinse the water tank before filling with potable water. Place a container (min. 1 L) under coffee outlet. Plug into mains.
 ❷ To turn the machine ON, press either the Espresso or Lungo button.
– Blinking Lights: heating up (25 seconds)
– Steady Lights: ready
❸ Press the Lungo button to rinse the machine. Repeat 3 times.
❹ To turn the machine off before automatic Auto Off mode, press both the Espresso and Lungo buttons simultaneously.
❶ To turn the machine ON, press either the Espresso or Lungo button.
Blinking Lights: heating up (25 seconds)
Steady Lights: ready
 ❷ Lift the lever completely and insert the capsule.
 ❸ Close the lever and place a cup under the coffee outlet.
 Never lift the lever during operation and refer to the safety precautions to avoid possible harm when operating the appliance.
![]() During heat up, you can press either coffee button while blinking. The coffee will then flow automatically when the machine is ready.
During heat up, you can press either coffee button while blinking. The coffee will then flow automatically when the machine is ready.
 ❹ Press the Espresso (40 ml) or the Lungo (110 ml) button to start. Preparation will stop automatically. To stop the coffee flow or top up your coffee, press again.
 ❺ Remove the cup. Lift and close the lever to eject the capsule into the used capsule container.
 ❶ Turn the machine on and wait for it to be in ready mode (steady lights). Fill the water tank with fresh potable water and insert the capsule.
 ❷ Place a cup under the coffee outlet. Press and hold the Espresso or Lungo button. Release button once the desired volume is served. LED will blink fast 3 times to confirm new setting. Water volume level is now stored.
 This machine is equipped with an energy saving feature.
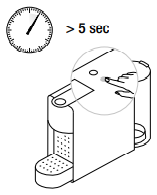 The machine will automatically enter Auto Off mode after 9 minutes.
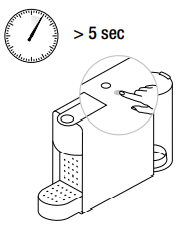 ❶ With machine being turned off, press and hold the Espresso button for 5 seconds. The Espresso button will blink to indicate the current setting.
❷ To change this setting press the Espresso button:
One time for Auto Off mode after 30 minutes.
One more time for Auto Off mode after 9 minutes.
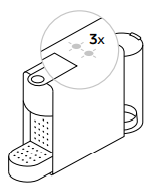 1x Single blinking: 9 mins mode
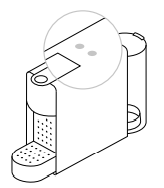 2x Double blinking: 30 mins mode
❸ To exit the energy saving mode press the Lungo button for 5 seconds.
Factory settings: Espresso cup: 40 ml, Lungo cup: 110 ml; Auto Off mode: 9 mins.
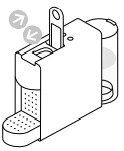 ❶ With machine turned off, press and hold down the Lungo button for 5 seconds.
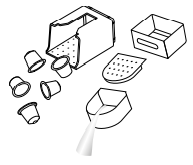 ❷ LEDS will blink fast 3 times to confirm machine has been reset to factory settings.
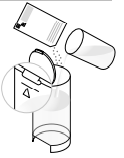 ❸ LEDs will then continue to blink normally, as heating up, until ready.
– Steady Lights: ready
Risk of fatal electrical shock and fire. Never immerse the appliance or part of it in water. / Be sure to unplug the machine before cleaning. / Do not use any strong cleaning agent or solvent cleaner. / Do not use sharp objects, brushes or sharp abrasives. / Do not place in a dishwasher.
❶ Empty the drip tray, the drip base and the capsule container every day. Also remove the water tank with its lid and clean them all with odorless detergent and rinse with warm / hot water.
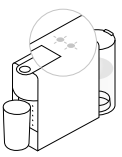 ❷ Dry with a fresh and clean towel, cloth or paper and reassemble all parts. Clean the coffee outlet and inside the machine regularly with a damp cloth.
www.nespresso.com/descaling
 The descaling solution can be harmful. Avoid contact with eyes, skin and surfaces. The following table will indicate the descaling frequency required for the optimum performance of your machine, based on water hardness. For any additional questions you may have regarding descaling, please contact your Nespresso Club.
www.nespresso.com/descaling
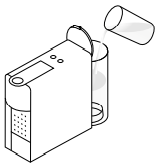 Duration approximately 15 minutes.
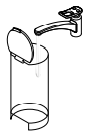 ❶ Lift and close the lever to eject the capsule into theused capsule container
 ❷ Empty the drip tray, drip base and used capsule container.
 ❸ Pour 1 Nespresso descaling liquid sachet into the water tank. Fill the water tank up to the 0.6 L line with potable water.
❹ Place a container (min. volume 1 L) under the coffee outlet.
 ❺ To enter the descaling mode, while the machine is turned on, press both the Espresso and Lungo buttons for 5 seconds.
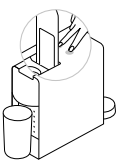 ❻ Both LEDs blink
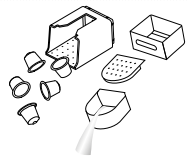 ❼ Press the Lungo button and wait until the water tank is empty.
❽ Refill the water tank with the used descaling solution collected in the container and repeat steps 4 and 7.
❾ Empty and rinse the water tank. Fill with fresh potable water.
❿ When ready, repeat steps 4 and 7 to now rinse the machine. Repeat twice.
11 To exit the descaling mode, press both the Epresso and Lungo buttons for 5 seconds.
12 Empty the drip base.
Water hardness Descaling after:
fH dH CaCO3 Cups (40 ml)
H 36 20 360 mg/l 300
M 18 10 180 mg/l 600
L 0 0 0mg/l 1200
fH French degree
dH German Grade
CaCO3 Calcium Carbonate
Emptying the system before a period of non-use and for frost protection, or before a repair
❶ To enter the emptying mode, press both the Espresso and Lungo buttons to turn the machine off.
❷ Remove the water tank and open the lever. Place a container under the coffee outlet.
❸ Press both the Espresso and Lungo buttons for 5 seconds. Both LEDs blink alternatively.
❹ Emptying process begins. Machine switches off automatically when procedure is finished.
❺ Close the lever. Empty and clean the used capsule container, the drip tray and the drip base.
No light indicator. –Check the mains, plug, voltage, and fuse. In case of problems, call
the Nespresso Club.
No coffee, no water. -First use: fill water tank with warm water (max. 55° C) and run through machine according to instructions on page 8.
-Water tank is empty. Fill water tank.
–Descale if necessary; see Descaling section.
Coffee comes out very slowly. -Flow speed depends on the coffee variety.
–Descale if necessary; see Descaling section.
Coffee is not hot enough. –Preheat cup.
–Descale if necessary.
Capsule area is leaking (water in capsule container). –Position capsule correctly. If leakages occur, call the Nespresso Club.
Irregular blinking. –Send appliance to repair or call the Nespresso Club.
No coffee, just water runs out (despite inserted capsule). -In case of problems, call the Nespresso Club.
This appliance complies with the EU Directive 2012/19/EC. Packaging materials and appliance contain recyclable materials.
Your appliance contains valuable materials that can be recovered or can be recycled. Separation of the remaining waste materials into different types facilitates the recycling of valuable raw materials. Leave the appliance at a collection point. You can obtain information on disposal from your local authorities.
To know more about Nespresso sustainability strategy, go to www.nespresso.com/positive
Breville guarantees this product against defects in materials and workmanship for two years domestic use (or 3 months commercial use) from the date of purchase. During this period, Breville will either repair or replace, at its discretion, any defective product at no charge to the consumer. In the event of a product or accessory being repaired or replaced during the guarantee period, the guarantee on the repaired product will expire two years from the purchase date of the original product, not two years from the date of repair. This guarantee excludes liability for consequential loss or any other loss or damage caused to property or person arising from any cause whatsoever. It also excludes defects caused by the product not being used in accordance with instructions, accidental damage, misuse, being tampered with by unauthorised persons, improper maintenance, consumable items or normal wear and tear and does not cover the cost of claiming under the warranty. Except to the extent applicable by law, the terms of this warranty do not exclude, restrict or modify, and are in addition to, the mandatory statutory rights applicable to the sale of the product to you.
How to Claim Under the Breville Warranty
Nespresso is handling product enquiries and product servicing on Breville’s behalf. If you believe your product is defective, contact the Nespresso customer service team directly for instructions on where to send or bring it for repair by a Breville authorised service agent. Contact Nespresso Australia: 1800 623 033 or New Zealand: 0800 234 579
[email protected]
This product is imported and distributed by Breville and this warranty is provided by Breville. To the extent permitted by law, Nespresso has no liability for the product and all guarantees, warranties and conditions by Nespresso are excluded.
As we may not have forseen all uses of your appliance, should you need any additional information, in case of problems or simply to seek advice, call the Nespresso Club or your Nespresso authorized representative.
Contact details for your nearest Nespresso Club or your Nespresso authorized representative can be found in the “Welcome to Nespresso” folder in your machine box or at nespresso.com
BEC250
by Nespresso
Nespresso Essenza Mini Instruction Manual – Optimized PDF
Nespresso Essenza Mini Instruction Manual – Original PDF
For Nespresso – Recipe Visit: https://appliance.recipes/category/nespresso

![]()

![]()
![]()

INSTRUCTION MANUAL 4
Nespresso, an exclusive system creating the perfect espresso, time after time. All Nespresso machines are equipped with a unique extraction system that guarantees up to 19 bar pressure. Each parameter has been calculated with great precision to ensure that all the aromas from each Grand Cru can be extracted, to give the coffee body and create an exceptionally thick and smooth crema.
Safety precautions 4-6
Overview 7
Specifications 7
First use or after long period of non-use 8
Energy saving concept 8
Coffee preparation 9
Aeroccino – instructions of use 10 -11
Cleaning the Aeroccino 12
Cleaning 13
Descaling 13-14
Programming the volume 15
Reset to factory settings 15
Emptying the system 15
Disposal and environmental protection 15
Troubleshooting 16
Troubleshooting Milk froth preparation 16
Limited warantee 17
Contact Nespresso Club 17
![]()
Caution: the safety precautions are part of the appliance. Read them carefully before using your new appliance for the first time. Keep them in a place where you can find and refer to them later on.
Caution: when you see this sign, please refer to the safety precautions to avoid possible harm and damage.
Information: when you see this sign, please take note of the advice for the correct and safe usage of your appliance.
 Please make sure the bottom of the Aeroccino and area underneath the base is dry, especially the connector area, prior to use. Electricity and water together can cause a fatal electric shock.
Coffee machine
Nespresso capsules Grand Crus tasting gift
Nespresso Welcome folder
User manual

A Soft touch controls. All controls are activated by touch.
Ristretto touch
Espresso touch
Lungo touch
B Slider for capsule insertion
C Adjustable cup support and drip grid
D Used capsule container & drip tray
E Coffee outlet
F Adjustable water tank and milk frother arm
G Aeroccino milk frother
H Water tank
I Water tank lid
J Frothing spring (for milk froth)
K Mixer (for hot milk)
L Lid
M Seal
N Start/stop button
O Storage area for frothing spring
![]() 220–240 V, 50–60 Hz, 1700 W
220–240 V, 50–60 Hz, 1700 W
![]() 0.8 L
0.8 L
![]() 19 bar
19 bar
![]() 213 mm
213 mm ![]() 251 mm
251 mm ![]() 365 mm
365 mm
![]() ~ 4 kg
~ 4 kg
![]() 3593
3593
Read the safety precautions first to avoid risks of fatal electrical shock and fire.
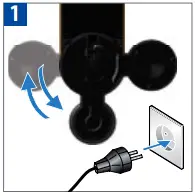 Choose position for water tank. Plug the machine into the mains.
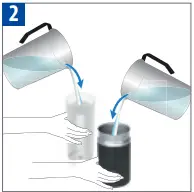 Rinse the water tank before filling it with potable water. Clean jug before first use and after every use according to instructions on page 15.
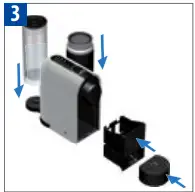
Insert the drip tray, Aeroccino and the capsule container in position. For your safety, operate the machine only with drip tray and capsule container in position.
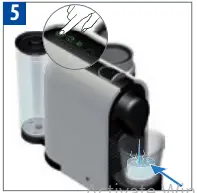 Turn the machine ON by opening the slider and pushing it towards the back of the machine. Light will blink on one of the coffee touch controls: heating up for approximately 25 seconds Steady light: ready. The machine can be turned into OFF mode at any time when slider is closed by pushing and holding any touch control for more than 3 sec., confirmed by the other 2 controls flashing.
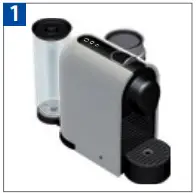 Place a container under coffee outlet. Press the Lungo control. Close the slider to rinse the machine. Repeat three times.
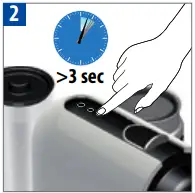 Automatic OFF mode: the machine will turn into OFF mode automatically after 9 minutes of non use.
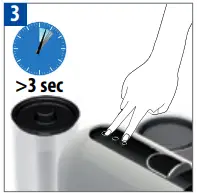 The machine can be turned into OFF mode at any time when slider is closed by pushing any control for more than 3 sec., confirmed by the other 2 controls flashing.
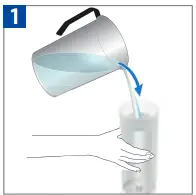 To change automatic OFF mode from 9 to 30 minutes, when slider is closed press and hold both the Lungo and Ristretto controls for more than 3 sec. Espresso control flashes once for confirmation. To revert back to 9 minutes, repeat the same procedure. Espresso control flashes 3 times for confirmation.
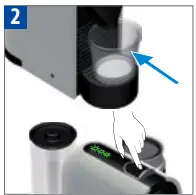 Fill the water tank with potable water.
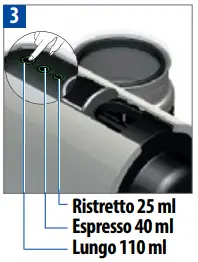 Place a cup under the coffee outlet. Turn machine ON by either pushing the slider or touching the controls. Light will blink on one of the coffee touch controls: heating up for approximately 25 seconds. Steady light: ready.
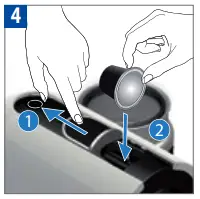 Select the Ristretto control (25ml), Espresso (40 ml) or Lungo (110 ml) based on the chosen Grand Cru recommended cup size. You can select the desired coffee size even when the machine is still heating up. The coffee will then flow automatically when the machine is ready.
![]() The machine selects the most frequently chosen cup size (based on last 11 coffees), Espresso as factory setting. You can change this by selecting any other control.
The machine selects the most frequently chosen cup size (based on last 11 coffees), Espresso as factory setting. You can change this by selecting any other control.
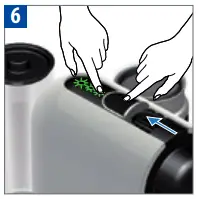 Completely open the slider and insert the capsule.
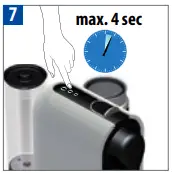 Close the slider. Preparation will stop automatically.
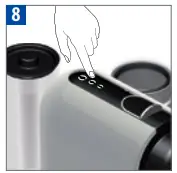 To stop the coffee flow touch the lit control or move the slider towards the back of the machine until it stops.
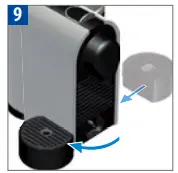 To manually top up your coffee, touch any of the controls immediately from end of preparation and touch lit control again to stop. Max 4 seconds.
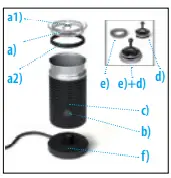 To change the selected cup size during brewing select the new desired control. The machine will immediately stop if the coffee volume extracted is larger than new desired control.
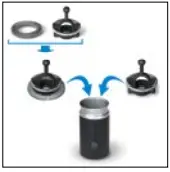 To accommodate a milk recipe glass, shift the cup support to either the left or right side magnets. The capsule will be automatically ejected.
CAUTION: Risk of electrical shock and fire! Make sure the under side of the milk frother is dry.
TIP: For optimal milk froth, use whole or semi skimmed milk at refrigerated temperature (about 4-6 °C). To guarantee hygiene conditions, use heat treated milk (pasteurized), refrigerated & freshly opened only. Milk which has been frozen will not froth.
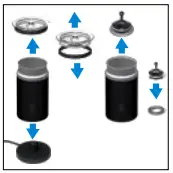 1. Overview: a) Lid a1) Storage area for frothing spring a2) Seal b) Start/stop Button c) Milk frother d) Mixer (for hot milk) e) Frothing spring (for milk froth) f) Base.
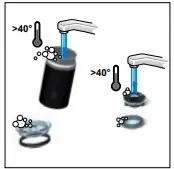 2. Clean before the first use. Attach the relevant whisk.
CAUTION: To ensure hygienic conditions and proper maintenance of the equipment, it is highly recommended to not use special enriched milks, powdered reconstituted milks nor flavoured milks. CAUTION: Syrup, sugar, chocolate powder or any other additives should not be added directly in the jug. This may damage the coating during the preparation.
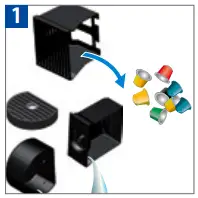 3. Fill milk frother up to one of the two «Max» level indicators.
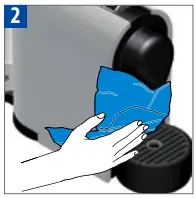 4. Place the lid on the Aeroccino. For a hot preparation, briefly press button to start. Button lights up Red. Take approx. 70-80 sec. For cold milk froth, keep button pressed for approx. 2 seconds. Button lights up Blue. Takes approx. 60 sec.
CAUTION: Use only a non-metal spoon to collect the foam in the jug. CAUTION: Clean before the first use and after each use according to the cleaning instructions. CAUTION: Ensure the jug is cold before removing it from the base. Or, if removing with care, rinse with cold water immediately to cool down the jug and avoid burning risks.
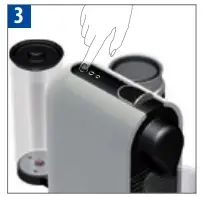 1. Remove the jug from the base, remove seal from lid, remove the whisk, remove the spring from the whisk.
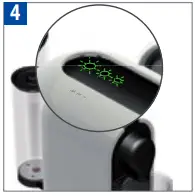 2. Wash inner jug, seal, lid, whisk and spring with detergent and rinse with warm/hot water.
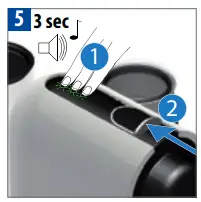 3. Do not put the Jug in the dishwasher and do not immerse into water for cleaning purposes, do not water the bottom part of the Aeroccino which contains the electrical plug, but clean the interior of the Aeroccino with detergent and rinse with warm/ hot water. Use nonabrasive cleaning materials.
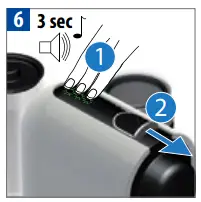 4. Dry all Aeroccino parts with a fresh and clean towel, cloth or paper and reassemble all parts.
CAUTION: In case base needs to be cleaned unplug it first and use only a damp cloth. Make sure the connector is dry before operating. Do not immerse the base in water neither put in the dishwasher. CAUTION: If the bottom part of the jug is wet, dry it before putting it back in contact with the plug. CAUTION: Only use non-abrasive cleaning materials. Do not use abrasives, sharp objects, brushes: risk of scratches and harm to the jug coating.
To ensure hygienic conditions, it is highly recommended emptying/cleaning the used capsule container every day.
 Do not use any strong or abrasive cleaning agent or solvent cleaner. Do not put in a dishwasher. Never immerse the appliance or part of it in water.
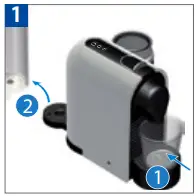 Clean the coffee outlet regularly with a damp cloth.
Duration approximately 15 minutes.
Read the safety precautions on the descaling package and refer to the table for the frequency of use Duration approximately 15 minutes. (see Descaling section in this manual).
CAUTION The descaling solution can be harmful. Avoid contact with eyes, skin and surfaces. Never use any product other than the Nespresso descaling kit available at the Nespresso Club to avoid damage to your machine. The following table will indicate the descaling frequency required for the optimum performance of your machine, based on water hardness. For any additional questions you may have regarding descaling, please contact the Nespresso Club.

°fH French degree
°dH German degree
CaCO3 Calcium Carbonate
Nespresso descaling kit: Ref. DKB2C1
Empty the drip tray and the used capsule container.
Fill the water tank with 1 unit of Nespresso descaling liquid and add 0.5 L of water.
Place a container (minimum volume: 0.6 L) under the coffee outlet. Activate the machine by pushing one of the cup selection touches.
Blinking light: heating up. Steady light: ready
 To enter the descaling mode, at slider closed push all the 3 controls simultaneously for at least 3 sec. A short beep will confirm it. Open the slider.
Push all the 3 controls simultaneously for at least 3 sec. A short beep will confirm it. The control area will start blinking quickly. Close the slider to start descaling. Machine stops when water tank is empty.
Refill the water tank with the used descaling solution collected in the container and touch any control to repeat the procedure.
Empty and rinse the water tank, capsule container, drip tray and cup support thoroughly. Fill water tank with potable water. When ready, touch any control to rinse the machine. Machine will stop when done.
To exit the descaling mode, push all the 3 controls simultaneously for at least 3 sec. A short beep will confirm this. The machine is now ready for use.
Any control can be programmed. Completely open the slider and insert the capsule.
Touch and hold the control while closing the slider. Release control when desired volume is reached. The other 2 controls flash for confirmation.
Press and hold the Espresso & Lungo controls together for at least 4 sec. The other control flashes for confirmation.
Factory settings are:
1. Lungo, Espresso, Ristretto controls 110 ml, 40 ml, 25 ml.
2. Automatic OFF mode after 9 minutes.
3. Most frequently chosen cup size as Espresso control at 40 ml.
To note, the machine remains blocked for 10 minutes after emptying! Remove the water tank. Place a container under the coffee outlet.
Open slider. Press and hold the Ristretto & 13 Lungo controls together for at least 6 sec. The other control flash for confirmation. Then close the slider to start procedure.
Machine turns to OFF mode automatically when empty
This appliance complies with the EU Directive 2002/96/EC. Packaging materials and appliance contain recyclable materials. Your appliance contains valuable materials that can be recovered or can be recyclable. Separation of the remaining waste materials into different types facilitates the recycling of valuable raw materials. Leave the appliance at a collection point. You can obtain information on disposal from your local authorities.
No light on the controls. The machine has turned to OFF mode automatically; touch one of the controls or push the slider. Check the mains: plug, voltage, fuse.
No coffee, no water. Check the water tank, if empty, fill with cold, fresh, potable water. Descale it if necessary.
Coffee is not hot enough. Preheat cup. Descale the machine if necessary.
The slider does not close completely or the machine doesn’t start brewing. Empty the capsule container. Check that no capsule is blocked inside the machine.
Leakage or unusual coffee flow. Check that the water tank is correctly positioned.
Lights flash alternately from back to front.Empty the used capsule container and check no capsules are blocked. Then touch any control. If problem persists, call the Nespresso Club.
Lights flash alternatelyfrom front to back. Fill the water tank. If problem persists, call the Nespresso Club.
Lights flash quickly. Exit descaling procedure, push all the 3 controls simultaneously for at least 3 sec. Disconnect plug from the mains and reconnect after 10 sec. If problem persists, call the Nespresso Club.
Water or coffee flow does not stop pushing any control. Move gently the slider towards the back of the machine to stop the flow.
No coffee, water just comes out (despite inserted capsule). Pull the slider to ensure it is closed. If problem persists, call the Nespresso Club.
Machine turns to OFF mode. To save energy the machine will turn to OFF mode after 9 minutes of non use. See paragraph on «Energy saving concept».
Aeroccino does not start. Be sure to position the jug correctly on a clean base. Be sure to attach the whisk to the jug correctly.
Quality of milk froth not up to standard. Be sure to use whole or semi-skimmed milk at refrigerated temperature (about 4-6° C). Be sure to use the appropriate whisk and the jug is clean.
Red Button blinking. a) The appliance is too hot. Rinse it under cool water. b) Whisk is missing. c) Not enough milk. Fill milk frother up to one of the two «max» level.
Milk Overflows. Be sure to use the appropriate whisk and check the corresponding indicator level.
Breville guarantees this product against defects in materials and workmanship for two years domestic use (or 3 months commercial use) from the date of purchase. During this period, Breville will either repair or replace, at its discretion, any defective product at no charge to the consumer. In the event of a product or accessory being repaired or replaced during the guarantee period, the guarantee on the repaired product will expire two years from the purchase date of the original product, not two years from the date of repair. This guarantee excludes liability for consequential loss or any other loss or damage caused to property or person arising from any cause whatsoever. It also excludes defects caused by the product not being used in accordance with instructions, accidental damage, misuse, being tampered with by unauthorised persons, improper maintenance, consumable items or normal wear and tear and does not cover the cost of claiming under the warranty. Except to the extent applicable by law, the terms of this warranty do not exclude, restrict or modify, and are in addition to, the mandatory statutory rights applicable to the sale of the product to you. Only the use of Nespresso capsules will guarantee the proper functioning and lifetime of your Nespresso machine. Any defect resulting from the usage of non-genuine Nespresso capsules will not be covered by this warranty.
Nespresso is handling product enquiries and product servicing on Breville’s behalf. If you believe your product is defective, contact the Nespresso customer service team directly for instructions on where to send or bring it for repair by a Breville authorised service agent. Contact Nespresso Australia: 1800 623 033 or New Zealand: 0800 234 579 [email protected]
This product is imported and distributed by Breville and this warranty is provided by Breville. To the extent permitted by law, Nespresso has no liability for the product and all guarantees, warranties and conditions by Nespresso are excluded.
As we may not have foreseen all uses of your appliance, should you need any additional information, in case of problems or simply to seek advice, call the Nespresso Club or your Nespresso authorised representative. Contact details for your Nespresso Club or your Nespresso authorised representative can be found in the «Welcome to Nespresso» folder in your machine box or at www.nespresso.com
Nespresso Breville Umilk Manual – Optimized PDF
Nespresso Breville Umilk Manual – Original PDF
For Nespresso – Recipe Visit: https://appliance.recipes/category/nespresso


Safety precautions…………………………………3
Signals, signal words and safety guidelines……………..5
Machine overview………………………………..6
Refrigerator overview ……………………………7
Operating overview……………………………………..8
Nespresso Grand Cru recommendation …………………………………10
First use …………………………………………………11
Energy save mode / Maximum energy save mode……………………13
Coffee preparation …………………………………14
Milk based coffee recipes ……………………………………………16
Milk preparation……………………………………………………..18
Hot water preparation ………………………………………19
Daily cleaning ………………………………………………………20
Milk froth settings………………………………………..23
Menu settings……………………………………………………………..24
Alarms……………………………………………………25
Specifications…………………………………………….28
EC-Declaration ……………………………………………….31
![]() Additional information with advice for preparing beverages or machine operation.
Additional information with advice for preparing beverages or machine operation.
![]() CAUTION: Please read these instructions and safety precautions before operating the appliance.
CAUTION: Please read these instructions and safety precautions before operating the appliance.
Please note!
Please read these instructions before starting up the machine.
Please make sure to read these safety instructions carefully before using your coffee machine for the first time. Store these instructions in a safe place where you can refer to them as needed. Improper use of the machine releases Nespresso from any liability.
This machine is only suitable for producing coffee, milk and hot water products and is suitable for commercial use in the catering trade. Therefore, please take note of the following instructions:
Cleaning the machine on a daily basis is not only an absolute must, but it also guarantees the necessary hygiene and neutral taste as well as a longer life of the machine.
Please refer to chapter “Daily cleaning” (page 20) for a complete guide to successfully clean your machine. Also take note of the following instructions:

![]() The warning triangle appears in the instructions where non-adherence to the safety instructions may result in risks to the user or the machine.
The warning triangle appears in the instructions where non-adherence to the safety instructions may result in risks to the user or the machine.
![]() Warning Electric shock
Warning Electric shock
![]() Warning Risk of scalding
Warning Risk of scalding
![]() Instruction: Read instructions
Instruction: Read instructions
![]() General information
General information
 Prohibition: Do not touch
![]() Prohibition: Do not reach inside
Prohibition: Do not reach inside
 Instruction: Wear safety glasses
![]() Instruction: Wear gloves
Instruction: Wear gloves
Your service partner is a Thermoplan representative. If you have any questions or problems, first contact a Nespresso representative.
Trained service staff are employees trained and certified by Thermoplan, who sell and maintain Thermoplan products.
Briefed staff are employees who were briefed and trained in the use of the coffee machine (reading of the instruction manual) and who are able to operate the machine and execute the maintenance steps described in this manual.
Customers and children are not considered briefed persons and must be kept away from the machine at all times.
Dispensing machines are devices that can dispense coffee, milk and hot water products.
Danger of electric shock
Risk of injury: Do not carry out any modifications on the machine
Danger of illness through wrong /contaminated food
Risk of scalding from the spouts

1 Capsule insertion slots 2 Cup heater 3 Lever 4 Milk froth regulator
5 Energy save button 6 Hot water outlet 7 Coffee outlet 8 Drip grid
9 Drip grid for small cups 10 Used capsule containers 11 Main switch (behind foot)
12 Hot water outlet 13 M2M technology antenna for added value services. Please see also page 28.

1 Cleaning key
2 Milk suction tube
3 Milk container cover
4 Milk container
![]() Always fill with cold milk (below 5° C)
Always fill with cold milk (below 5° C)

 Hot water
 Ristretto
 Espresso
 Lungo
Lungo
![]()
Beverage selection
To view the name of the product on the display please press button for 5 sec. To exit wait 10 sec. without pressing any button.


Hot milk froth
Hot milk
Cold milk froth
Cold milk
Espresso Macchiato
Cappuccino
Latte Macchiato
Lattino
Ristretto
Espresso
Lungo


![]() Open house-installed water supply
Open house-installed water supply
 The main switch is located underneath the machine.
 Close all four levers.
Don’t put the fingers into the capsule insertion slots while closing the levers.
 Press any button.
 Machine performs a cold start rinse.
During rinsing the noise level increases.
 Machine heats up. All buttons blink in white.
 After the heating up time, all buttons shine in white.
 Open all four levers.
 Thoroughly clean the milk container and cover with a merchantable household cleaner.
 Wipe milk suction tube.
 Chang the milk every 24 h. Optional use the tetrapack without milk container.
 Insert milk suction tube through cover into the milk container.
Do not use unpasteurised milk! Only use heat treated (e.g. pasteurised or ultra heat treated) milk.
When pouring milk into the container, pay attention to hygiene to ensure that no contaminated milk enters the system.
![]() The machine switches to the energy save mode after 30 min. of non-use. All buttons appear in a dimmed white.
The machine switches to the energy save mode after 30 min. of non-use. All buttons appear in a dimmed white.
Press any button to return to the operating mode of the machine.


 After two hours of non-use, the machine switches to the maximum energy save mode. Press the energy save button to restart.
“![]() Maximum energy save mode” can be activated by pressing the button for 3 sec.
Maximum energy save mode” can be activated by pressing the button for 3 sec.


![]() Machine may require a cold start rinse. See first use on page 11.
Machine may require a cold start rinse. See first use on page 11.
If required close all levers.
![]() Ristretto
Ristretto
![]() Espresso
Espresso
![]() Lungo
Lungo
 Pull down the drip grid for small cups.

 Choose preferred Nespresso Grand Cru.
 Pull down the lever to the lowest position.
 Choose cup size.
 See Nespresso Grand Cru recommendation on page 10.
 Product name is displayed during preparation.
Product preparation can be stopped by pressing the product button again.
To top up some coffee to your drink press the product button within 1 min. after the end of product preparation. Press button again to stop.


 To top up see Info on page 14.
By pulling up the lever, the used capsule is ejected.


 Machine is ready for next beverage.
Espresso Macchiato
Cappuccino
Latte Macchiato
Lattino

 Choose preferred Nespresso Grand Cru.
 Pull down the lever to the lowest position.
 Choose coffee recipe desired.

 Coffee preparation.
 Frothing milk preparation according to chosen product.
 By pulling up the lever, the used capsule is ejected.


 A 10 sec. automatic rinsing of the the internal milk system will begin 5 min. after the last milk based preparation is finished.
![]() Caution! Risk of scalding!
Caution! Risk of scalding!
Hot milk froth
Hot milk
Cold milk froth
Cold milk

 Choose milk product.


A 10 sec. automatic rinsing of the the internal milk system will begin 5 min. after the last milk based preparation is finished.
![]() Caution! Risk of scalding!
Caution! Risk of scalding!
 Hot water


Caution! Risk of scalding!

 For more water, press the button again. Press again to stop.

Cleaning the machine on a daily basis is not only an absolute must, but it also guarantees the necessary hygiene and neutral taste as well as a longer life of the machine.
Remember to regularly inspect and, if necessary, clean the exterior of the machine.
Use a damp cloth or sponge soaked in a soap solution. Clothes and sponges must be wrung out thoroughly to ensure that they are only moist, not wet, otherwise there is a risk of electric shock.
Only use mild detergents and non-scratch cloths.
Pay particular attention to the product dispensing parts. The display and keyboard must be cleaned with particular care.
Follow these instructions carefully to run the automatic cleaning process.
 Empty both capsule containers daily or on display request. (approx. 130 capsules per container)
 Press cleaning button.
To exit mode press any button.
 Press and hold the cleaning button again.
 Press any key
W ipe milk suction tube. Afterwards press any button.
 Rinse milk container with fresh water. Press any key

After handling the cleaning tablets wash your hands!
Use only the Thermoplan milk cleaning tablets to perform the automatic cleaning process.
Do not use any other cleaning detergent or disinfection agent for this purpose.
![]()
 Container must be empty. Afterwards press any button.
 Remove cleaning key and insert two cleaning tablets.
 When key inserted cleaning starts automatically.
After cleaning process the machine switches to the maximum energy save mode.
 Cleaning process lasts approx. 19 min. during which all buttons shine red.
 After cleaning, empty remaining water and thoroughly clean suction tube and milk container with potable water
Power supply: 220-240 V / 50/60 Hz / 2850-3150 W
380-415 V / 50/60 Hz / 8600-9400 W
208 V / 60 Hz / 8300 W
Dimension: 1003 x 693 x 632 mm (L /D /H)
Weight: 100 kg (empty)
120 kg (in operation)
Outlet height standard: 190 mm
Outlet height drip grid: 90 mm
Water supply: G 3/8” male
Water supply pressure: 2-4 bar / 30-60 psi
Noise emission: <70 dB
Product capacity/h depending on the power supply
Espressos 240
Ristrettos 240
Lungos 200
Milk based beverages 150
Hot water 160
Chlorine: none
TDS: 70 to 200 ppm
Total hardness: 5-8 °dH (8-14 °fH)
pH 6.8 to 7.4
Alkalinity: less than 100 ppm
Iron: less than 0.25 ppm
This coffee machine is equipped with M2M (Machine to Machine) technology which may be activated along with your agreement. Thanks to a SIM card that is already integrated in the machine, such network connections will offer new services (subject to further terms and conditions) to its customers and improve the after sales process by automatically communicating machine troubleshooting / diagnostics to our Customer Relationship Centre (depending on country requirements and specificities).
The capsule container must be removed to see the type plate. The type plate is located beneath the left capsule container on the baseplate.
The type plate contains the following details:
Machine type: Automatic Coffee Machine
Model: AGUILA
Type: AG420PRO
Voltage: according to type plate
Power: according to type plate
Net water: 0.2-0.4 MPa (2-4 bar)
Hydr. boiler: 1.46 MPa (14.6 bar)
Class: 5 (T)
Refrigerant: 134a
Charge: 55 g
Serial number: according to type plate
Production date: according to type plate
Manufacturer
Thermoplan AG
Roehrlistrasse 22
CH – 6353 Weggis
Original user manual
EU DECLARATION OF CONFORMITY
We Thermoplan AG, Roehrlistrasse 22,
CH-6353 Weggis, Switzerland
declare under our sole responsibility that the product
Product Automatic Coffee Machine
Model AGUILA
Type AG420PRO
to which this declaration relates is in conformity with the following standards and corresponding IEC standards:
EN 50366:2006
EN 55014-1:2009
EN 55014-2:2008
EN 60335-1:2010
EN 60335-2-15:2008
EN 60335-2-75:2010
EN 60335-2-89:2010
EN 61000-3-11:2000
EN 61000-3-12:2005
EN 61000-3-2:2009
EN 61000-3-3:2008
EN 61000-6-1:2007
EN 61000-6-3:2011
EN 62233:2008
ETSI EN 301 489-1:2008 (V1.8.1)
ETSI EN 301 489-7:2005 (V1.3.1)
EN 301511 (V9.0.2)
following the provisions of Directives
2011/65/EU (RoHS)
1999/5/EC (RTTED)
2004/108/EC (EMC)
2006/42/EC (MD)
This product also complies with essential safety requirements of the Low Voltage Directive
2006/95/EC
CH-6353 Weggis, 19.09.2011 Adrian Steiner, CEO
Responsible for the technical documentation is:
Andreas Zimmermann
Nespresso Aguila AG420PRO User Manual – Optimized PDF
Nespresso Aguila AG420PRO User Manual – Original PDF
For Nespresso – Recipe Visit: https://appliance.recipes/category/nespresso

![]()
![]()
Congratulations on your purchase of the Nespresso Breville Creatista Pro, the machine that allows you to make cafe quality milk coffees.
N User manual 2
 Creatista Pro Coffee Machine
![]() Tasting Box of Nespresso Capsules
Tasting Box of Nespresso Capsules
![]() Milk Jug
Milk Jug
Nespresso Welcome Brochure
 User Manual
![]() 1 x Water Hardness Test Strip, in the User Manual
1 x Water Hardness Test Strip, in the User Manual
Nespresso is an exclusive system creating the perfect Espresso, time after time. Each parameter has been calculated with great precision to ensure that all the aromas from each capsule can be extracted, to give the coffee body and create an exceptionally thick and smooth crema.
![]() 220–240 V, 50–60 Hz, 2300 W
220–240 V, 50–60 Hz, 2300 W
![]() 19 bar / 1.9 MPa
19 bar / 1.9 MPa
![]() ~6.65 kg / 14.7 lbs
~6.65 kg / 14.7 lbs
![]() 2 L / 68 fl.oz
2 L / 68 fl.oz
![]()
![]() 25.1 cm, 9.8 in
25.1 cm, 9.8 in ![]() 41.8 cm, 16.5 in
41.8 cm, 16.5 in ![]() 49.9 cm, 19.6 in
49.9 cm, 19.6 in
Safety Precautions 4
Machine Overview 7
First Use 8
Drinks Menu 9
Coffee Settings 9
Milk Coffee 11
Regular Coffee 12
Coffee Preparation Tips 13
Daily Cleaning 14
Maintenance 15
Descaling 16
Water Hardness 16
Trouble Shooting 17
Contact Nespresso 19
Disposal and Environmental Protection 19
Limited Guarantee 19
![]()
CAUTION![]() : the safety precautions are part of the appliance. Read them carefully before using your new appliance for the first time. Keep them in a place where you can find and refer to them later on.
: the safety precautions are part of the appliance. Read them carefully before using your new appliance for the first time. Keep them in a place where you can find and refer to them later on.
![]() CAUTION: when you see this sign, please refer to the safety precautions to avoid possible harm and damage.
CAUTION: when you see this sign, please refer to the safety precautions to avoid possible harm and damage.
![]() INFORMATION: when you see this sign, please take note of the advice for the correct and safe usage of your appliance.
INFORMATION: when you see this sign, please take note of the advice for the correct and safe usage of your appliance.
![]() WARNING: When you see this sign, follow the instructions to avoid electrical risks that could result in injury.
WARNING: When you see this sign, follow the instructions to avoid electrical risks that could result in injury.
![]() If the cord is damaged, do not operate the appliance.
If the cord is damaged, do not operate the appliance.
The appliance is intended to prepare beverages according to these instructions.

![]() Read and safely disgard any packaging materials or promotional labels attached to your machine before use.
Read and safely disgard any packaging materials or promotional labels attached to your machine before use.
![]() Read the important safeguards first to avoid risks of fatal electrical shock and fire.
Read the important safeguards first to avoid risks of fatal electrical shock and fire.
![]() CAUTION: Please ensure ground continuity when plugging the machine in the power outlet.
CAUTION: Please ensure ground continuity when plugging the machine in the power outlet.


Hot Water Tap to manually start and stop. Max. 200 mls (6.5 fl. oz)
Swipe up and down on the touch screen to navigate the menu.
Tap the screen to select.

Adjust Coffee Volume Adjust Milk Froth Level Adjust Milk Temperature


Coffee extraction and milk texturing will start simultaneously.
Coffee and milk will stop running automatically. Alternatively, tap the icon to stop.
Hot Water Tap to manually start and stop.
Add Coffee (insert new capsule and extract again)
Icons
![]()
Drink Confirmation Drink Running Drink Complete


 Coffee will stop running automatically. Alternatively, tap the icon to stop
Add Coffee (insert new capsule and extract again)
![]() To ensure hygienic conditions, it is highly recommended not to reuse a used capsule
To ensure hygienic conditions, it is highly recommended not to reuse a used capsule
![]() For optimal milk froth, use pasteurised whole or semi skimmed milk at refrigerated temperature (about 4-6 °C / 39-43 °F ).
For optimal milk froth, use pasteurised whole or semi skimmed milk at refrigerated temperature (about 4-6 °C / 39-43 °F ).
For smaller cups, use the cup support.

Only use the milk jug provided for texturing milk.
![]() CAUTION: Do not fill milk jug above the maximum level marked on the inside & outside of the jug.
CAUTION: Do not fill milk jug above the maximum level marked on the inside & outside of the jug.
Always ensure the milk jug is positioned on the drip tray temperature sensor when texturing milk.

![]() Regular Coffee Coffee Volume
Regular Coffee Coffee Volume
Ristretto From 10 to 30 ml / 0.35 – 1 fl. oz
![]() Espresso From 30 to 70 ml / 1 – 2.3 fl. oz
Espresso From 30 to 70 ml / 1 – 2.3 fl. oz
![]() Lungo From 70 to 130 ml / 2.3 – 4.4 fl. oz
Lungo From 70 to 130 ml / 2.3 – 4.4 fl. oz
Milk Coffee Settings
Coffee Volume 7 levels from 15 to 130 ml / 0.5 – 4.4 fl. oz
Hot Water Volume 7 levels from 50 to 200 ml / 1.7 – 6.8 fl.oz
Milk Temperature 11 levels from 50° to 76°C / 122° to 169°F
Milk Froth 8 levels from 2 to 30mm
Flat White Cafe Latte Cappuccino Latte Macchiato


Min Min Min Max
![]() Do not use any strong or abrasive solvent, sponges or cream cleaners when cleaning. Do not put any parts in the dishwasher.
Do not use any strong or abrasive solvent, sponges or cream cleaners when cleaning. Do not put any parts in the dishwasher.
![]() Never immerse the appliance or any part of it in water or any other liquid
Never immerse the appliance or any part of it in water or any other liquid


Tap to select and follow the on-screen instructions.
![]() Clean Steam Wand
Clean Steam Wand
Recommended monthly to clean steam paths, steam wand and prevent blockages.
![]() Rinse Steam Wand
Rinse Steam Wand
Use daily to clean any blockages.
![]() Descale
Descale
Remove any scale build-up. Refer to Descale instructions on following page.
![]() Water Hardness
Water Hardness
Reset the water hardness level.
![]() Rinse Cycle
Rinse Cycle
When machine hasn’t been used for an extended period of time.
![]() Empty Cycle
Empty Cycle
When storing machine for a period of non-use or for frost protection.
![]() Quick Start Guide
Quick Start Guide
See the Quick Start guide again.
![]() Language
Language
Change the language of the machine.
![]() Factory Reset
Factory Reset
Erases all settings and returns unit to factory settings.
![]() Duration approximately 15 minutes.
Duration approximately 15 minutes.
![]() Read the important safeguard on the descaling package and refer to the table for the frequency of use.The descaling solution can be harmful. Avoid contact with eyes, skin and surfaces. Never use any product other than the Nespresso descaling kit available at Nespresso to avoid damage to your machine. The following table will indicate the descaling frequency required for the optimum performance of your machine, based on water hardness. For any additional questions you may have regarding descaling, please contact Nespresso.
Read the important safeguard on the descaling package and refer to the table for the frequency of use.The descaling solution can be harmful. Avoid contact with eyes, skin and surfaces. Never use any product other than the Nespresso descaling kit available at Nespresso to avoid damage to your machine. The following table will indicate the descaling frequency required for the optimum performance of your machine, based on water hardness. For any additional questions you may have regarding descaling, please contact Nespresso.
Descaling: Removes scale build-up, maintains coffee taste and prevents machine damage. Frequency will depend on your water hardness and amount of use. Descale when prompted onscreen. The machine will stop you from use if the descale cycle has not been performed after 30 uses. A “lockout” count-down will appear to alert you of the number of uses remaining until
usage will stop.
![]() Navigate to the Menu
Navigate to the Menu
and select Descale. Follow the on-screen instructions.
App. fH dH
![]() Level 0 <5 <3
Level 0 <5 <3
![]() Level 1 >7 >4
Level 1 >7 >4
![]() Level 2 >13 >7
Level 2 >13 >7
![]() Level 3 >25 >14
Level 3 >25 >14
![]() Level 4 >38 >21
Level 4 >38 >21
CaCO3 ![]() (40 ml)
(40 ml)
< 50 mg/l 2 200
> 70 mg/l 1 800
> 130 mg/l 1 400
> 250 mg/l 1 000
> 380 mg/l 600
fH French degree
dH German Grade
CaCO3 Calcium Carbonate
Screen / buttons not illuminated. – Machine turns OFF automatically. – Press POWER button to turn machine ON. – Check the outlet: plug, voltage, fuse.
No steam or hot water. – Machine is OFF. Press POWER button to turn machine ON. – Check the outlet: plug, voltage, fuse.
No coffee, no water, unusual coffee flow. – Check if the water tank is correctly positioned, if empty, fill with fresh, potable water. – Descale the machine, if necessary.
Coffee is not hot enough. – Preheat cup using hot water button. – Descale the machine, if necessary.
The capsule lever does not close completely. – Empty the capsule container. – Check that capsules aren’t blocking inside the machine. (Note: do not place fingers inside the machine)
Leakage (water under the machine). – Empty drip tray if full. – Check drip tray is securely inserted. – If problem persists, call Nespresso
No coffee flow, water goes directly into the capsule bucket (despite inserted capsule). – Ensure capsule lever is closed. – Empty capsule bucket and check that no capsule is blocked inside the machine. (NOTE: do not place fingers inside the machine) If problem persists, call the Nespresso.
Display is dim and hard to see/read. – Screen brightness is set on a low setting. – Press POWER button to turn ON. – Adjust the screen brightness setting. Navigate to Menu and select Screen Brightness.
Fill Water Tank prompt remains on screen (water tank is full). – Check if the water tank is correctly positioned. – If problem persists, call Nespresso.
Descale alert is displayed. – Descale the machine. – Navigate to the Menu and select Descale. Follow on-screen prompts.
Machine is ON but ceases to operate. – Press POWER button to turn machine OFF. – Wait 60 minutes and press POWER button to turn machine ON. – If problem persists, call Nespresso.
Touchscreen is not working. – Press POWER button to turn machine OFF. Press POWER button again to turn machine ON. – If problem persists, call Nespresso.
Milk steam cycle does not start. – Check if the water tank is correctly positioned, if empty, fill with fresh potable water. – Check steam tip for any blockages and ensure wand is lowered.
Quality of froth not up to standard. – Be sure to use pasteurised whole or semi-skimmed milk at refrigerated temperature (about 4-6 °C / 39-43° F). For a better result, the milk should be newly opened. – Check the milk froth setting. – Use the provided milk jug. – Clean both the milk jug and steam wand after each use. – Complete Steam Wand Cleaning Cycle. Navigate to the Menu and select Clean Steam Wand, follow the on-screen prompts.
Steam is very wet. – Use fresh, potable water. Do not use highly filtered, demineralised or distilled water.
Milk overflows. – Fill jug with appropriate milk volume. DO NOT fill above the MAX level. – Minimum and maximum levels are marked on the inside and outside of the jug. – To stop overflow, either reduce the initial volume of milk and/or reduce the froth level. This varies depending on milk type.
Milk temperature is too hot. – Use the milk jug provided. – Check the milk jug is positioned correctly on the milk jug temperature sensor in the drip tray. – Check the temperture sensor in the drip tray is dry and clean. – Decrease the milk temperature setting
Milk temperature is not hot enough. – Preheat cup. – Use the provided milk jug. – Check the milk jug is positioned on the temperature sensor in the drip tray. – Increase the milk temperature setting. – Check the steam tip for blockages.
Clean Steam Wand alert is displayed. – Clean the steam wand. – Navigate to the Menu and select Clean Steam Wand. Follow the on-screen prompts.
As we may not have foreseen all uses of your appliance, should you need any additional information, in case of problems or simply to seek advice, call Nespresso or your Nespresso authorized representative. Contact details for Nespresso or your Nespresso authorized representative can be found in the «Welcome to Nespresso» folder in your machine box or at nespresso.com
Your appliance contains valuable materials that can be recovered or can be recyclable. Separation of the remaining waste materials into different types facilitates the recycling of valuable raw materials. Leave the appliance at a collection point. You can obtain information on disposal from your local authorities.
Breville guarantees this product against defects in materials and workmanship for two years domestic use (or 3 months commercial use) from the date of purchase. During this period, Breville will either repair or replace, at its discretion, any defective product at no charge to the consumer. In the event of a product or accessory being repaired or replaced during the guarantee period, the guarantee on the repaired product will expire two years from the purchase date of the original product, not two years from the date of repair. This guarantee excludes liability for consequential loss or any other loss or damage caused to property or person arising from any cause whatsoever. It also excludes defects caused by the product not being used in accordance with instructions, accidental damage, misuse, being tampered with by unauthorised persons, improper maintenance, consumable items or normal wear and tear and does not cover the cost of claiming under the warranty.
In Australia, our goods come with guarantees that cannot be excluded under the Australian Consumer Law. You are entitled to a replacement or refund for a major failure and for compensation for any other reasonably foreseeable loss or damage. You are also entitled to have the goods repaired or replaced if the goods fail to be of acceptable quality and the failure does not amount to a major failure.
How to Claim Under the Breville Warranty
Nespresso is handling product enquiries and product servicing on Breville’s behalf. If you believe your product is defective, contact the Nespresso customer service team directly for instructions on where to send or bring it for repair by a Breville authorised service agent. Contact Nespresso Australia: 1800 623 033 or New Zealand: 0800 234 579 nespresso.com.
This product is imported and distributed by Breville and this warranty is provided by Breville. To the extent permitted by law, Nespresso has no liability for the product and all guarantees, warranties and conditions by Nespresso are excluded.
![]()
CREATISTA PRO
by Nespresso
Nespresso Creatista Pro BNE900 User Manual – Optimized PDF
Nespresso Creatista Pro BNE900 User Manual – Original PDF
For Nespresso – Recipe Visit: https://appliance.recipes/category/nespresso

Nespresso is an exclusive system creating the perfect espresso, time after time. All Nespresso machines are equipped with a unique extraction system that guarantees up to 19 bars of pressure. Each parameter has been
calculated with great precision to ensure that all the aromas from each Grand Cru can be extracted, to give the coffee body and create an exceptionally thick and smooth crema.
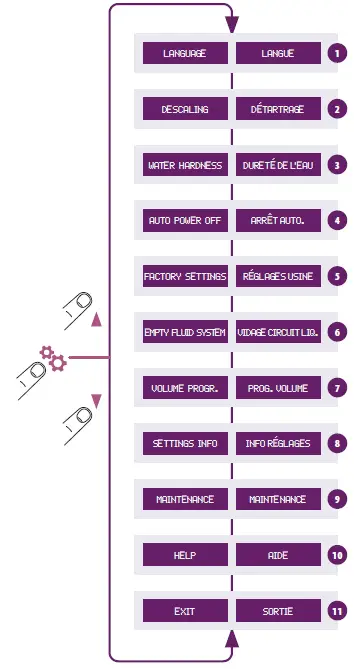 symbol
 symbol
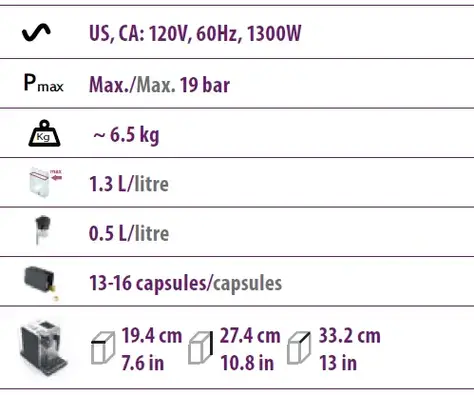 symbol the symbol. the symbol.
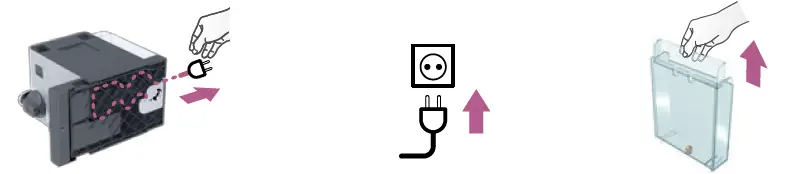
CAUTION: first read the Important Safeguards to avoid risks of fatal electrical shock and fire.
 C to confirm. the symbol is pressed, the machine heats up.
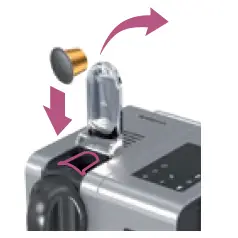
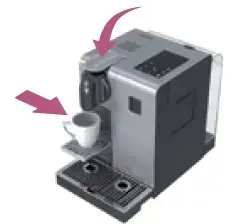

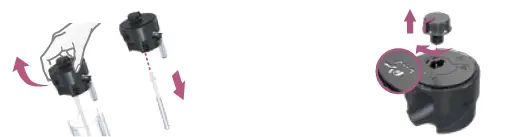
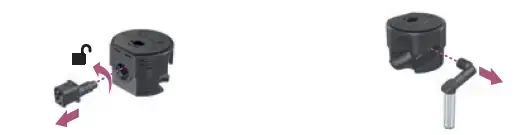 and pulling it up. and pulling it off.
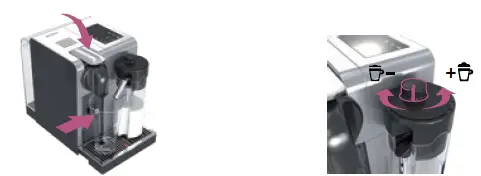
Informat ion: for a perfect milk froth, use skimmed or semi-skimmed milk at refrigerator temperature (about 4° C/39.2° F).
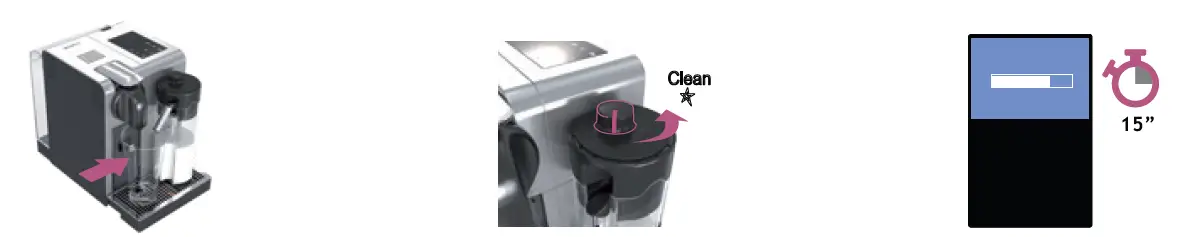
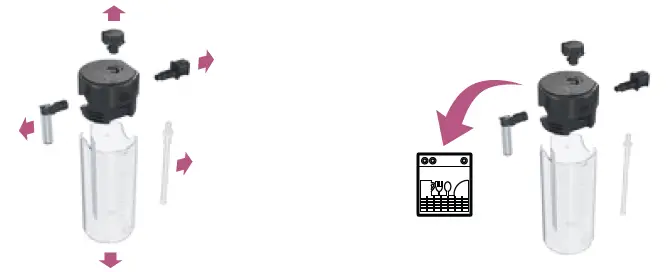
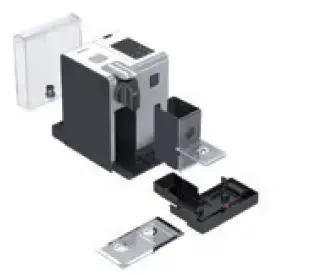
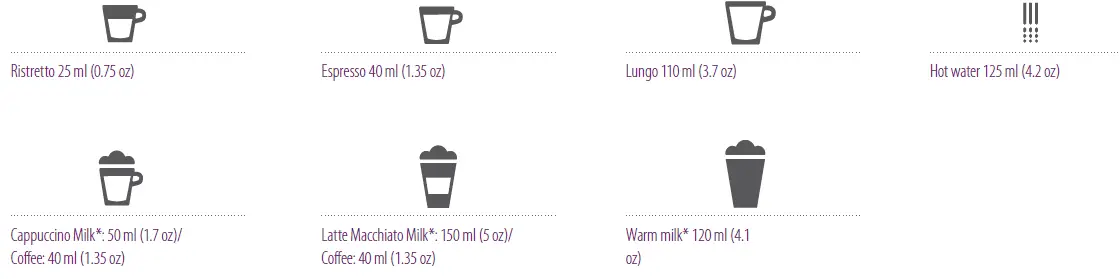
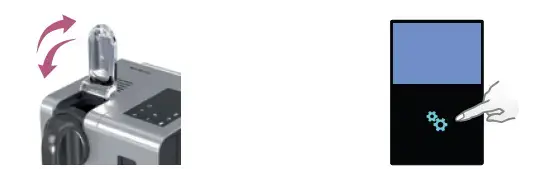
Information: do not use any strong cleaning agent or solvent cleaner. Use a damp cloth and mild cleaning agent to clean the surface of the machine. Do not put any machine components in the dishwasher, except the Rapid Cappuccino System components. 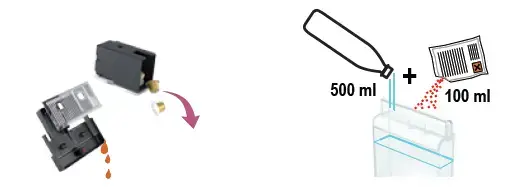
Hand washing of Rapid Cappuccino System (R.C.S.)
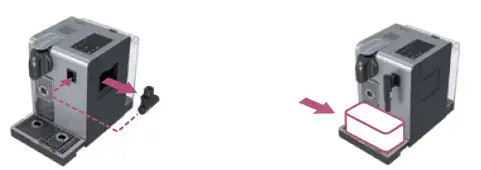
NOTE: *the milk froth volume depends on the kind of milk that is used, its temperature and the position of the milk regulator knob.
NOTE: we recommend you to keep factory settings for Ristretto, Espresso and Lungo to ensure the best in-cup results for each of our coffee varieties.
Water volume can be programmed from 50 to 400 ml (1.7 to 13.5 oz).
Milk volume can be programmed from 30 to 200 ml (1 to 6.8 oz).
Coffee volume can be programmed from 25 to 200 ml (0.85 to 6.8 oz).
CAUTION: if coffee volumes are programmed higher than 150 ml (5 oz): let the machine cool down for 5 minutes before making the next coffee to prevent the risk of overheating!
CAUTION: refer to safety precautions.
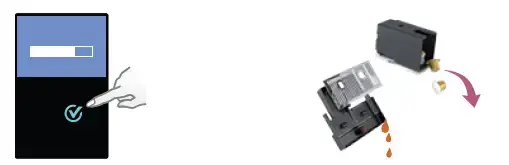
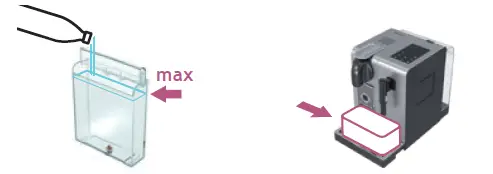
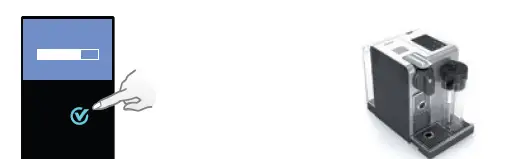
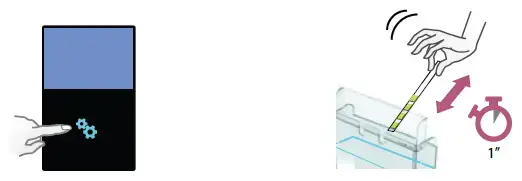 to confirm. The rinsing cycle continues alternately through the coffee outlet, hot water spout and drip tray until the water tank runs empty.
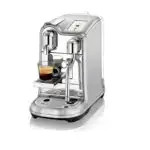
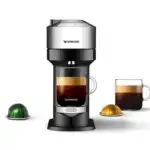
| no light on display. | ➔ check the mains, plug, voltage, and fuse. Press the on the button located behind the machine display. in case of problems, call the Nespresso club. |
| Machine too hot message, indicated in display | ➔ in certain conditions, the machine heater reaches high temperature, (ie. after emptying of the fluid system). simply wait, the machine will cool down automatically. |
| coffee comes out very slowly. | ➔ Flow speed depends on the coffee variety.
➔ Descale if necessary; see Descaling section. |
| coffee is not ho t enough. | ➔ preheat cup.
➔ Descale if necessary; see Descaling section. |
| The capsule area is leaking (water in the capsule container). | ➔ position the capsule correctly. if leakages occur, call the Nespresso club. |
| irregular blinking. | ➔ send the appliance to repair or call the Nespresso club. |
| no coffee, just water runs out (despite inserted capsule). | ➔ in case of problems, call the Nespresso club. |
| Lever cannot be closed completely. | ➔ empty capsule container. Make sure that no capsule is blocked inside the capsule container. |
| The quality of the milk froth is not up to standard. | ➔ For a perfect milk froth, use skimmed or semi-skimmed milk at refrigerator temperature (about 4° c/39.2° F).
➔ rinse after each milk-based preparation. place a recipient under the milk outlet, and rotate the milk regulator knob until the «clean» position. ➔ every two days, disassemble the r.c.s. and clean all components in the upper level of the dishwasher. |
| The machine needs a repair message, indicated in the display. | ➔ contact the Nespresso club or Nespresso authorized representative for examination, repair or adjustment. |
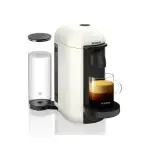
Disposal and Environmental Protection
Your appliance contains valuable materials that can be recovered or recycled. Separation of the remaining waste materials into different types facilitates the recycling of valuable raw materials. Leave the appliance at a collection point. You can obtain information on disposal from your local authorities.
CONTACT THE NESPRESSO CLUB
For any additional information, in case of problems or simply to seek advice, call the Nespresso Club.
Contact details of the Nespresso Club can be found in the «Welcome to Nespresso» folder in your machine box or at nespresso.com
Nespresso warrants this product against defects in materials and workmanship for a period of 1 year. The warranty period begins on the date of purchase and Nespresso requires the presentation of the original proof of purchase to ascertain the date. During the warranty period, Nespresso will either repair or replace, at its discretion, any defective product at no charge to the owner. Replacement products or repaired parts will be warranted only for the unexpired portion of the original warranty or six months, whichever is greater. This limited warranty does not apply to any defect resulting from negligence, accident, misuse, or any other reason beyond Nespresso’s reasonable control, including but not limited to normal wear and tear, negligence or failure to follow the product instructions, improper or inadequate maintenance, calcium deposits or descaling, connection to improper power supply, unauthorized product modification or repair, use for commercial purposes, fire, lightning, flood or other external causes.
This warranty is valid only in the country of purchase or in such other countries where Nespresso sells and services the same model with identical technical specifications. Warranty service outside the country of purchase is limited to the terms and conditions of the corresponding warranty in the country of service. Should the cost of repairs or replacement not be covered by this warranty, Nespresso will advise the owner and the cost shall be charged to the owner. This limited warranty shall be the full extent of Nespresso’s liability however caused. Except to the extent allowed by applicable law, the terms of this limited warranty do not exclude, restrict or modify the mandatory statutory rights applicable to the sale of this product and are in addition to those rights.
The limited warranty applies only to this single-branded Nespresso products. Products marked with both the Nespresso Brand and another producer are governed exclusively by the warranty provided by that other producer. If you believe your product is defective, contact Nespresso for instructions on how to proceed with a repair. Any defect or dysfunction resulting from the use of non-genuine Nespresso capsules will be not covered by this warranty. Please visit our website at www.nespresso.com for contact details.
]]>
LATTISSIMA ONE
MY MACHINE*
LATTISSIMA ONE
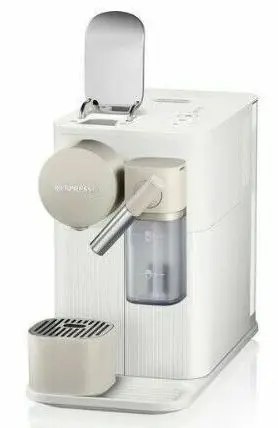

Machine overview
| 1. Rapid Cappuccino system 2. Refill lid 3. Water tank (1 L) 4. Rapid cappucino system connector 5. Rapid Cappuccino Coffee outlet 6. Lever |
7. Base grid 8. Cup support 9. Drip tray 10. Used capsule container 11. Descaling pipe |
 Alerts
| 220-240 V~, 50-60 Hz, 1450 W | |
| 19 bar / 1.9 MPa | |
| 4.17 kg (net weight) (poids net ) | |
| ~1 L | |
![]() CAUTION / WARNING
CAUTION / WARNING
![]() ELECTRICAL DANGER
ELECTRICAL DANGER
![]() DISCONNECT DAMAGED SUPPLY CORD
DISCONNECT DAMAGED SUPPLY CORD
 CAUTION: WHEN YOU SEE THIS SIGN, PLEASE REFER TO THE SAFETY PRECAUTIONS TO AVOID POSSIBLE HARM AND
DAMAGE.
CAUTION: THE SAFETY PRECAUTIONS ARE PART OF THE APPLIANCE. READ ALL INSTRUCTIONS CAREFULLY BEFORE USING YOUR NEW APPLIANCE FOR THE FIRST TIME. KEEP THEM IN A PLACE WHERE YOU CAN FIND AND REFER TO THEM LATER ON.
![]() INFORMATION: WHEN YOU SEE THIS SIGN, PLEASE TAKE NOTE OF THE ADVICE FOR THE CORRECT AND SAFE USAGE OF YOUR APPLIANCE.
INFORMATION: WHEN YOU SEE THIS SIGN, PLEASE TAKE NOTE OF THE ADVICE FOR THE CORRECT AND SAFE USAGE OF YOUR APPLIANCE.
![]() Avoid risk of fatal electric shock and fire.
Avoid risk of fatal electric shock and fire.
The appliance must only be connected after installation.
Avoid possible harm when operating the appliance.
Descaling
1. Coffee Machine |
2. User Manual |
3. Capsules set |
4. “Welcome to Nespresso folder” 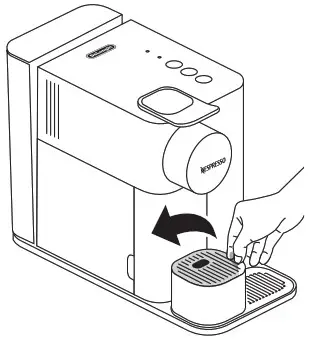 |
5. 1x Water Hardness Test Stick, in the User Manual 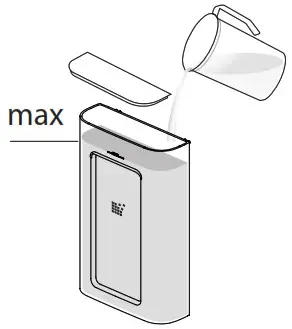 |
|
THE CLASSIC ESPRESSO EXPERIENCE
With the Nespresso Original system, you’re invited to enjoy the essence of an espresso, with or without milk. Inspired by the Italian coffee tradition, it’s a timeless experience at the touch of a button. The Nespresso Original machines and capsules offer an array of aromas to fit all coffee tastes. Espresso or lungo, black or in a recipe, always layered with a soft crema or an indulgent foam. This is only made possible thanks to the 19-bar pressure in every machine. It extracts the optimal flavours from each capsule, to reveal them in your cup. Nespresso Original, classic in its own way.
CAUTION: first read the safety precautions to avoid risks of fatal electrical shock and fire.
Please ensure ground continuity when plugging the machine in the power outlet.
| 1. When unpacking the machine, remove the protective film, water tank, drip tray, and used capsule container. Adjust the cable length and store the excess in the cable guide under the machine. Remove the sticker on the grid. You can register your machine on www.nespresso.com. |
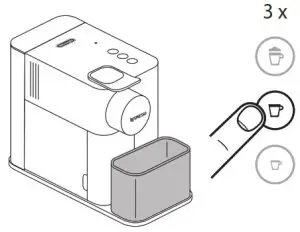 |
| 2. Plug machine into the mains. Rinse the water tank before filling with drinking water up to maximum level. | 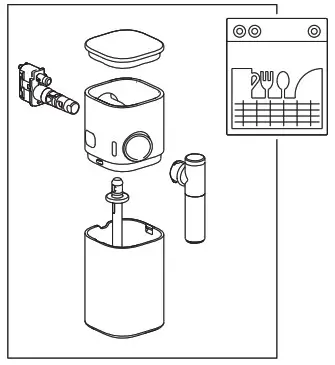 |
| 3. Switch the machine on by pressing any buttons: – Blinking lights: heating-up (18 sec) – Illuminates white: ready to use |
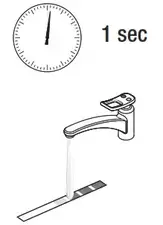 |
| 4. Rinse the machine by placing a 500 ml container under the coffee outlet and pressing the Lungo button. Repeat three times. |
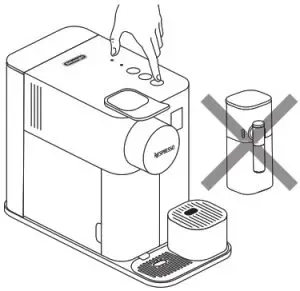 |
| 5. Clean the milk jug, refer to Cleaning Rapid Cappucino System section. | 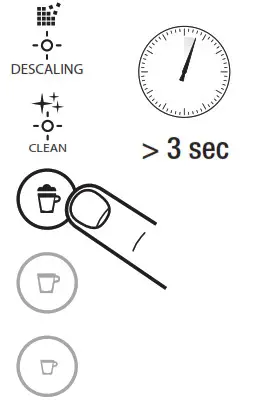 |
| 1. Take water hardness sticker placed on the first pag | 2. The number of red squares indicates the water hardness level. |
| 3. Remove milk jug and switch the machine on. | 4. Press the milk drink button for 3 seconds to enter Menu mode: descaling and clean alerts start blinking. 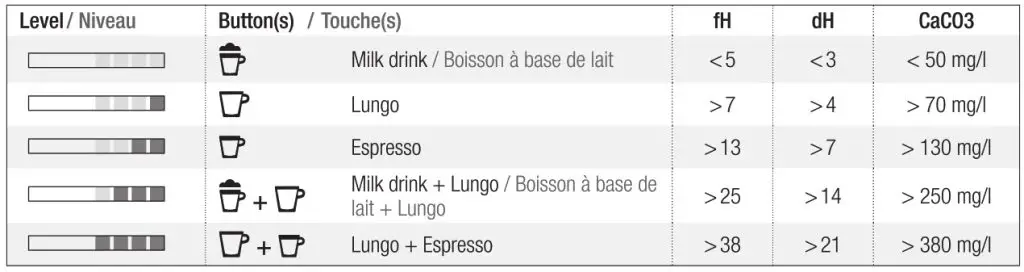 NOTE: the Menu mode exits automatically after 30 sec. if no actions are performed. It can be exit manually by pressing the milk drink button for 3 seconds. NOTE: the Menu mode exits automatically after 30 sec. if no actions are performed. It can be exit manually by pressing the milk drink button for 3 seconds. |
5. Press the Espresso button.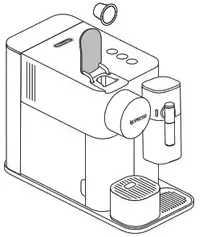 |
6. Now, within 15 sec, you can set the desired value by pressing the corresponding button (see below table). They blink 3 times rapidly to confirm new value. The menu exits automatically and machine returns to ready mode. |
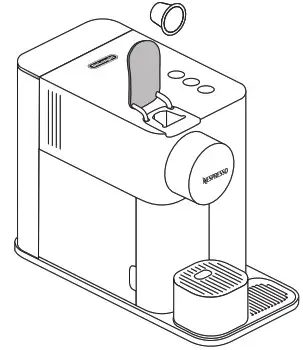
1. Lift the lever completely and insert the capsule.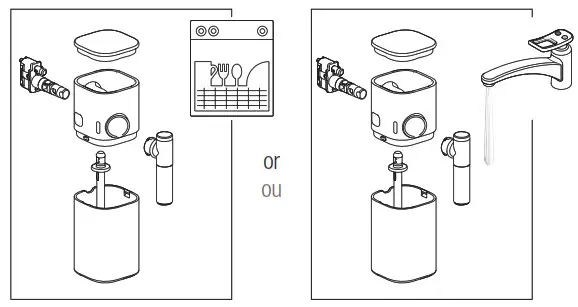 |
2. Close the lever and place a cup adapted to the desired beverage under the coffee outlet.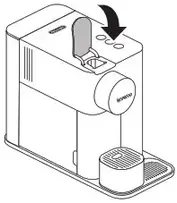 |
3. Close the lever and place a cup adapted to the desired beverage under the coffee outlet.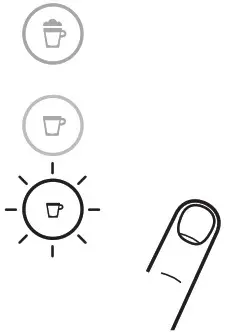 |
4. Few seconds after the end of the preparation, lift and close the lever to eject the capsule into the used capsule container. Do not open the lever too early.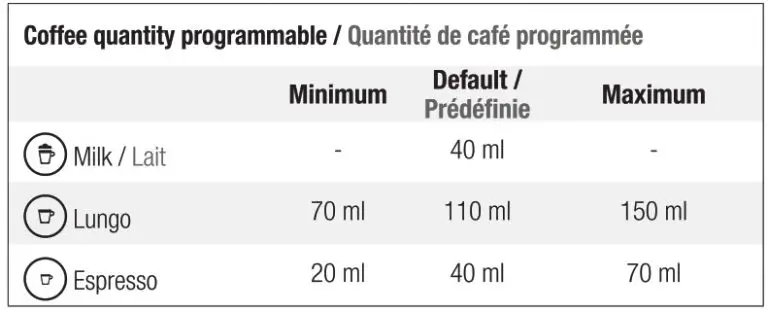 |
![]() NOTE: We recommend you to keep factory settings for Espresso and Lungo to ensure the best in cup results for each of our coffee varieties.
NOTE: We recommend you to keep factory settings for Espresso and Lungo to ensure the best in cup results for each of our coffee varieties.
| 1. Follow the step 1-2 of section “coffee preparation”. 2. Touch and hold Espresso or Lungo button for at least 3 sec to enter the programming mode. Brewing starts and button blinks fast.  |
3. Release button when desired volume is reached. Coffee volume is now stored for the next coffee preparations. Button blinks 3 times to confirm the new coffee volume.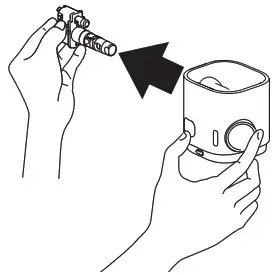 |

![]() NOTE: for milk recipes, coffee quantity cannot be programmed.
NOTE: for milk recipes, coffee quantity cannot be programmed.
| 1. Remove the milk container by pressing the button on the side of the milk jug. Unplug the aspiration tube. 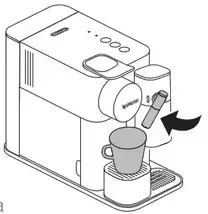 |
2. Position the milk spout vertically to disassemble and to reassemble. |
3. Press the button on the side of milk jug and pull to unlock the connector. |
| 1. Fill the milk container up to one of the 4 levels indicators (see figure). Place the lid and connect the Rapid Cappuccino System to the machine. pasteurized/UHT cow milk. It is not suitable for use for persons suffering from cow milk intolerance or allergies. For a perfect milk froth, use skimmed or semi-skimmed cow milk at refrigerator temperature (about 4° C). The milk froth volume depends on the kind of milk that is used and its temperature. |
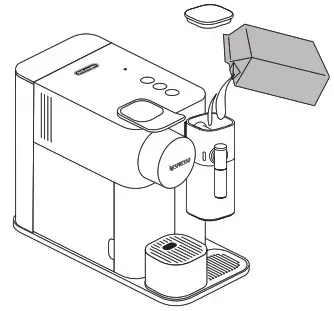 |
| 2. Lift the lever completely and insert the capsule. Close the lever. | |
| 3. Place a cup adapted to the quantity of milk you poured under the coffee outlet and adjust milk spout position by lifting it up to the right level. |  |
| 4. Press the milk button. |
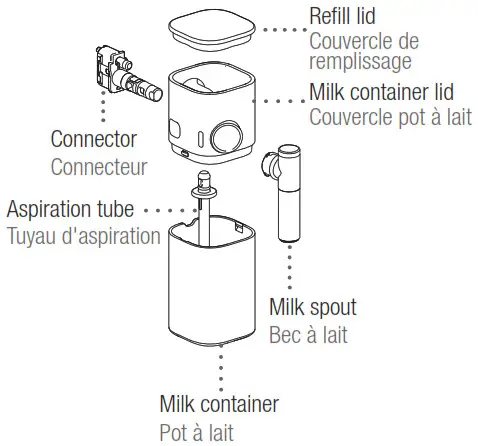 |
| 5. At the end of the preparation, the clean alert Cappuccino System. It is necessary to clean if not more beverage are required. |
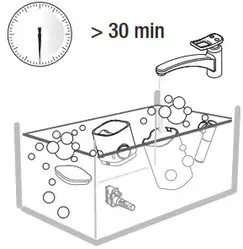 |
| 6. Lift and close the lever to eject the capsule into the used capsule container. | 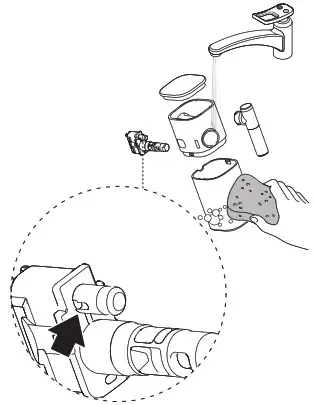 |
| 7. To prepare a second beverage, remove the milk container lid and fill the milk container up. Do not exceed the MAX level. Repeat operations 1 to 6.
|
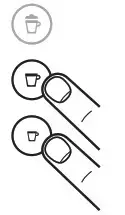 |
| 8. After a period of non use of maximum 30 minutes after your milk recipe preparation, disassemble the milk jug refer to section “Assembling / Disassembling of Rapid Cappuccino System”, and clean all 6 dismantled components in dishwasher or hand wash refer to section “Cleaning Rapid Cappuccino System”. We recommend cleaning the Rapid Cappuccino System between each milk preparation. |
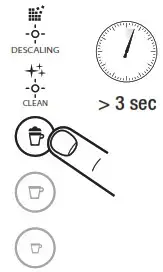 |
| Blinks orange | It is advisable to clean; you can still prepare some other beverages. | |
| Illuminates orange | It is necessary to clean; the machine stops and it is not possible to prepare any beverages. | |
| Disassemble the milk jug. Refer to section “Assembling / Disassembling of Rapid Cappuccino System”. Rinse away carefully any milk residue with hot drinking water. System components can be hand washed. The cleaning procedure must be performed after each use. |
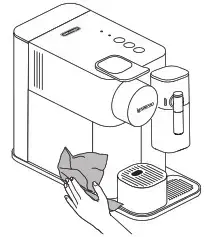 |
| Put the six dismantled components in the upper tray of your dishwasher and run a program at high temperature (50°/60°C). | 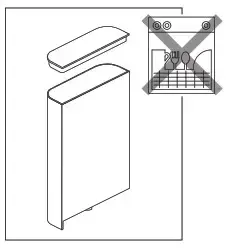 |
HAND WASH:
| 1. Soak all components in with hot drinking water together with mild / soft detergent for at least 30 minutes and rinse thoroughly with hot drinking water. |
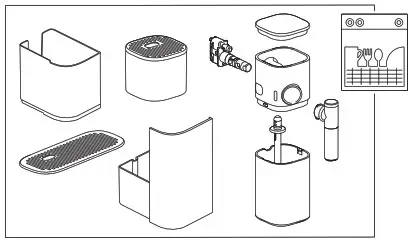 |
| 2. Clean the interior of the milk tank with mild / soft detergent and rinse with hot drinking water. Do not use abrasive material that might damage the surface of the equipment. |  |
| 3. Dry all parts with a clean towel, cloth or paper and reassemble. |  |
MANUAL POWER OFF:
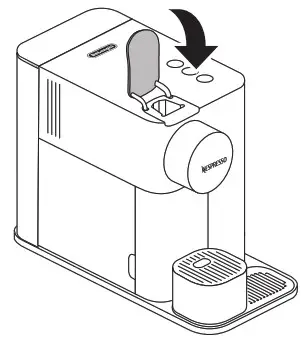
AUTOMATIC POWER OFF:
| 1. It is possible to program the automatic power off time: remove milk jug and switch the machine on. |
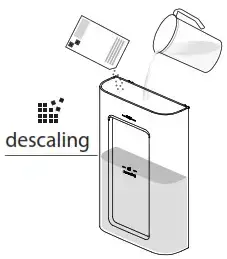 |
| 2. Press the milk button for 3 seconds to enter Menu mode: the descaling and clean alerts start blinking.
|
 |
| 3. Press Lungo button to enter the Power Off Menu. Clean & descaling alerts indicators turn off. One of the recipe button is blinking, indicating what is the current setting (ref to table aside). | 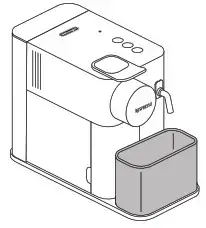 |
| 4. Now, within 15 seconds, you can set the desired value by pressing the corresponding button. They blink 3 times rapidly to confirm new value. The menu exits automatically and machine returns to ready mode. |  |
![]() Do not use any strong cleaning agent or solvent cleaner. Use a clean damp cloth and mild cleaning agent to clean the surface of the machine.
Do not use any strong cleaning agent or solvent cleaner. Use a clean damp cloth and mild cleaning agent to clean the surface of the machine.
| 1. Lift and close the lever to eject the capsule into the used capsule container. Remove drip tray and capsule container. Empty and rinse. Remove water tank.Empty, rinse it before filling with drinking water. Clean cup support and grid. Lift the removable grid and clean |
 |
| 2. Place a container under coffee outlet and press the Lungo button to rinse. | 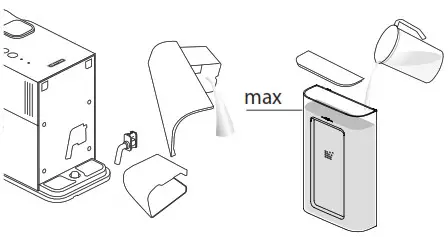 |
| 3. Clean the coffee outlet and machine surface with a clean damp cloth. 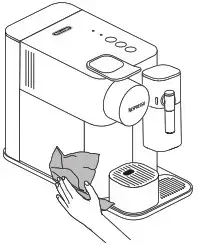 |
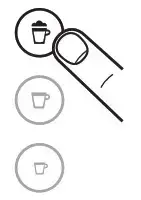 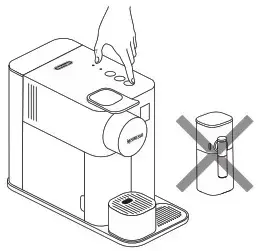 |
CAUTION: refer to safety precautions.
![]() NOTE: to ensure the proper functioning of your machine over its lifetime and that your coffee experience is as perfect as the first day, follow the below process. Descaling time is approximately 20 minutes. To ensure a perfect coffee experience time after time and a good functioning of the machine this is important to descale your machine when needed. When the descaling alert starts to blink, it is time to descale your machine. The machine can still prepare several milk beverages before it is blocked preventively. The blockage prevents any damages to the machine and ensure its proper functioning over its lifetime. In case the machine is blocked, please descale your machine or contact the Nespresso Club. Please make sure to complete the entire descaling procedure. If it is not completed, the machine will remain blocked.
NOTE: to ensure the proper functioning of your machine over its lifetime and that your coffee experience is as perfect as the first day, follow the below process. Descaling time is approximately 20 minutes. To ensure a perfect coffee experience time after time and a good functioning of the machine this is important to descale your machine when needed. When the descaling alert starts to blink, it is time to descale your machine. The machine can still prepare several milk beverages before it is blocked preventively. The blockage prevents any damages to the machine and ensure its proper functioning over its lifetime. In case the machine is blocked, please descale your machine or contact the Nespresso Club. Please make sure to complete the entire descaling procedure. If it is not completed, the machine will remain blocked.
| Blinks orange | It is advisable to descale. | |
| Fast blinking orange | Only few preparations can be made before the machine is blocked. | |
| Illuminates orange | It is necessary to descale; the machine stops and it is not possible to prepare any beverages. | |
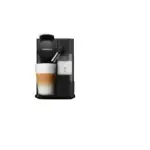 1. Descale the machine when descaling alert blinks orange in ready mode. 1. Descale the machine when descaling alert blinks orange in ready mode. |
2. Lift and close the lever to eject any capsules in the used capsule container. 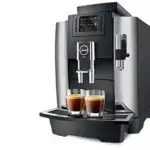 |
3. Empty the drip tray and the used capsule container. Fill the water tank with 100 ml of Nespresso descaling agent (1 pouch). Add water up to the descaling mark on the water tank (~500 ml).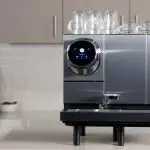 |
4. Take the descaling pipe situated at the back of the machine and plug it into the Rapid Cappucino System Connector of machine. |
| 5. The machine enters the descaling mode. The descaling alert blinks orange during the entire descaling process. The Espresso button illluminates white.  |
6. Place a container with a minimum 1 litre capacity under both the coffee outlet and under the descaling pipe. |
 7. Press the Espresso button. Descaling product flows alternately through the coffee outlet, descaling pipe and drip tray. When the descaling cycle is finished (water tank runs empty), the Lungo button 7. Press the Espresso button. Descaling product flows alternately through the coffee outlet, descaling pipe and drip tray. When the descaling cycle is finished (water tank runs empty), the Lungo buttonilluminates white. |
8. Empty the used capsules container, drip tray recipient and 1 litre container, rinse out and fill the water tank with fresh drinking water up to level MAX. Respect quantity to ensure completion of the cycle.  |
9. Press the Lungo button. The rinsing cycle continues through the coffee outlet, descaling pipe and drip tray until the water tank turns empty. During this phase the Lungo button blinks. |
10. Once the rinsing process is finished, the machine switch off. Remove and store descaling pipe. Empty drip tray and used capsule container. Rince water tank and fill with drinking water. |
11. Clean the machine using a damp cloth. You have now finished descaling the machine. |
|
1. Remove the milk jug and switch the machine on. |
2. Press the milk drink button for 3 seconds to enter Menu mode: descaling and clean alert start blinking. actions are performed or can be exited manually by pressing the milk button 3 seconds. |
3. Press the milk button. The milk button blinks to indicate reset mode. Press it to confirm. All buttons blink 3 times: all volumes are reset to default settings. The menu exits automatically and machine returns to ready mode.
 DEFAULT VALUES:

Milk drink (from 30 to 165 ml corresponding to level Espresso Macchiato and MAX level on the milk container) + Coffee 40 ml
Lungo: 110 ml
Espresso: 40 ml
Automatic power off: 2 minutes
1. Remove the milk jug and switch the machine on. |
2. Remove the water tank. Lift and close the lever to eject any remaining capsule. Place a container under the coffee outlet. |

3. Press the milk drink button for 3 seconds to enter Menu mode: the descaling and clean alerts start blinking. |
4. Press milk drink and Lungo buttons simultaneously. Appuyez simultanément sur less touches boisson à base de lait et Lungo.  |
 The milk drink button blinks to confirm that machine is ready. Once pressed, the emptying starts. The coffee buttons blink alternatively: emptying mode in progress. When the process is finished, the machine switches off automatically. The milk drink button blinks to confirm that machine is ready. Once pressed, the emptying starts. The coffee buttons blink alternatively: emptying mode in progress. When the process is finished, the machine switches off automatically. |
|
| No light indicator. | – Check the mains, plug, voltage, and fuse. In case of problems, call the Nespresso Club. |
| No coffee, no water. | – Water tank is empty. Fill water tank. |
| – Descale if necessary; see Descaling section. | |
| Coffee comes out very slowly. | – Flow speed depends on the coffee variety. |
| – Descale if necessary; see Descaling section. | |
| No coffee, just water runs out (despite inserted capsule). | – Make sure the capsule is not pinched in a wrong position. |
| – Make sure the capsule is not damaged. | |
| – Call Nespresso Club or send appliance to repair. | |
| Coffee is not hot enough. | – Preheat cup. |
| – Descale if necessary; see Descaling section. | |
| Capsule area is leaking (water in capsule container). | – Position capsule correctly. If leakages occur, call the Nespresso Club. |
| Any other blinking behavior not described in the troubleshooting. | – Send appliance to repair or call the Nespresso Club. |
| All buttons blink simultaneously for 10 seconds and then machine switches off automatically. | – Error alarm, machine needs repair. Send appliance to repair or call the Nespresso Club. |
| All 3 buttons blinking fast 3 times and then machine goes back in ready mode. | – Water tank is empty. |
| Descaling and cleaning alert blink. | – Machine is in menu mode, press milk button for 3 seconds to exit menu mode or wait 30 seconds to exit automaticall |
| Descaling alert blinks orange. | – Machine triggers descaling alert according beverages consumption usage. Descale machine. |
| Descaling alert blinks orange and Espresso button illuminates white. | – Machine is in descaling mode. Press Espresso button to start descaling process. |
| Descaling alert illuminates orange, beverage buttons are unavailable. | – Machine blocked due to scale level too high. Descale machine. |
| All coffee buttons and all milk recipe buttons flash alternatively. | – Machine in overheat protection mode, wait until it returns to ready mode. |
| – Appliance will be blocked for approximately 10 minutes after emptying. | |
| Lever cannot be closed completely. | – Empty capsule container. Make sure that no capsule is blocked inside the capsule container. |
| Quality of Milk froth is not up to standard. | – Use skimmed or semi-skimmed cow milk at refrigerator temperature (about 4° C). |
| – Rinse after each milk preparation (see section “Hand Washing of Rapid Cappuccino System”). | |
| – Descale the machine. | |
| – Do not use frozen milk. | |
| – Ensure the air aspiration part is clean. Refer to the section “Hand washing of Rapid Cappuccino System”. | |
| I cannot enter Menu mode. | – Be sure to remove the milk jug. |
| – Be sure to press milk button for 3 seconds. | |
| – Remove descaling pipe. | |
| – Is not possible to enter Menu mode while machine is heating up. | |
| Milk dispensing doesn’t start (clean alert illuminates orange). | – Prepared more than 5 milk dispensing without any cleaning. Action: clean Rapid Cappuccino System. |
| – Overtime milk preparation. Action: clean Rapid Cappuccino System. | |
| – Over 30 min from last milk preparation. Action: clean Rapid Cappuccino System. | |
| Milk jug cannot be dismantled. | – Press the button on the side of the milk jug to remove the parts. |
| – Refer to section “Assembling / Disassembling of Rapid Cappuccino System”. | |
| Sound when machine switches off. | – This sound indicates that the machine is now off. |
| In the event of accidental milk spillage, unplug the machine. | – Immediately clean thoroughly the machine. |
As we may not have forseen all uses of your appliance, should you need any additional information, in case of problems or simply to seek advice, call Nespresso or your Nespresso authorized representative. Contact details for your nearest Nespresso or your Nespresso authorized representative can be found in the «Welcome to Nespresso» folder in your machine box or at nespresso.com.
De’Longhi warrants this product against defects in materials and workmanship for a period of two years from the date of purchase. during this period, De’Longhi will either repair or replace, at its discretion, any defective product at no charge to the owner. Replacement products or repaired parts will be guaranteed for only the unexpired portion of the original warranty or six months, whichever is greater. This limited warranty does not apply to any defect resulting from accident, misuse, improper maintenance, or normal wear and tear. Except to the extent allowed by applicable law, the terms of this limited warranty do not exclude, restrict or modify, and are in addition to, the mandatory statutory rights applicable to the sale of the product to you. If you believe your product is defective, contact Nespresso for instructions on where to send or bring it for repair.
Please visit our website at www.nespresso.com for contact details.
 Your appliance contains valuable materials that can be recovered or recycled. Separation of the remaining waste materials into different types facilitates the recycling of valuable raw materials. Leave the appliance at a collection point. You can obtain information on disposal from your local authorities.
For Nespresso – Recipe Visit: https://appliance.recipes/category/nespresso
]]>