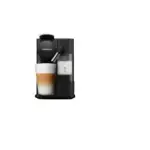
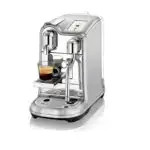
Nespresso Lattissima Pro Espresso Machine User Manual
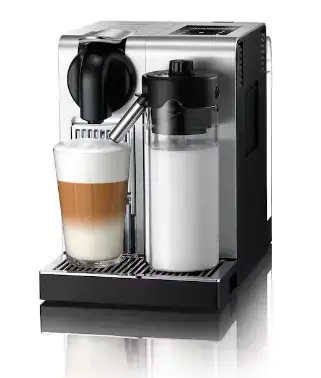
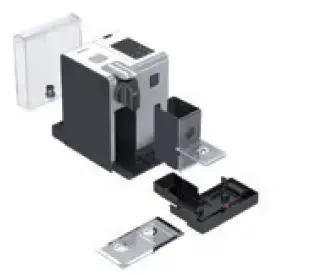
Overview of machine
- A Machine in coffee-only configuration/
- B Machine with Rapid Cappuccino System (for Cappuccino)/
- C Machine with hot water spout
- Lever
- 2 ON /OFF button
- Water tank
- Coffee outlet
- Drip grid
- Drip tray
- Pivoting cup support (not removable)
- Used capsule container
- Steam connector door
- Telescopic hot water spout
- Hot water spout storage area
- Steam connector
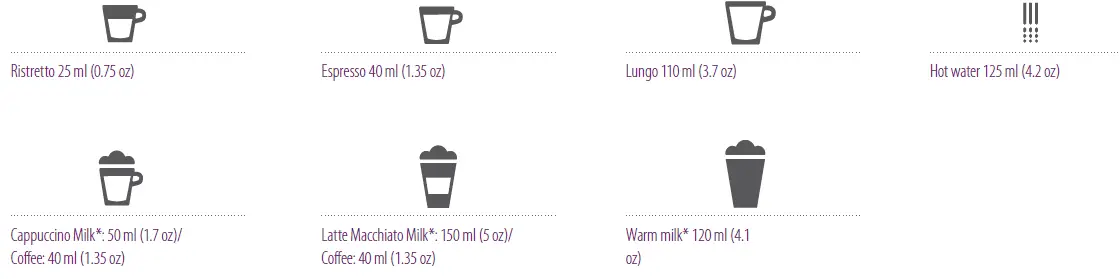
Display - Lungo
- Espresso
- Ristretto
- Hot water
- Warm milk
- Cappuccino
- Latte Macchiato
- Menu
- Scroll up when the Menu is activated
- Option selection when the Menu is activated
- Scroll down when the Menu is activated
- Text display
Rapid - Milk froth regulator knob
- Insert position for milk froth regulator knob
- Minimum froth
- 28 Maximum froth
- CLEAN »: automatic rinsing function
- Milk container lid
- Milk spout
- Milk container
- Milk aspiration tube
- R.C.S. connector
Nespresso is an exclusive system creating the perfect espresso, time after time. All Nespresso machines are equipped with a unique extraction system that guarantees up to 19 bars of pressure. Each parameter has been
calculated with great precision to ensure that all the aromas from each Grand Cru can be extracted, to give the coffee body and create an exceptionally thick and smooth crema.
Packaging content
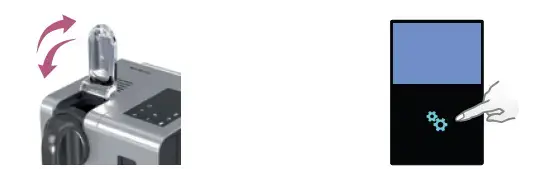
Menu navigation
- Enter the Menu list
Press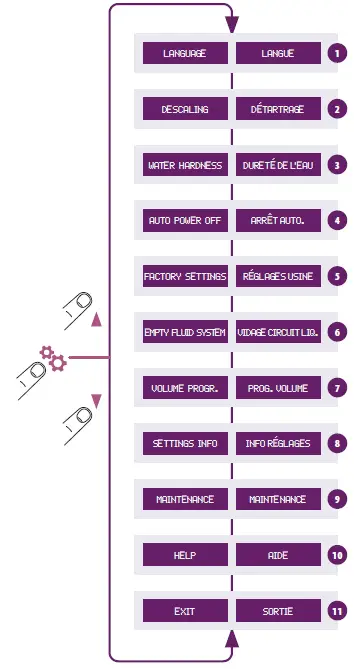 symbol
 - Browse options
Press symbol
 - Select option
Press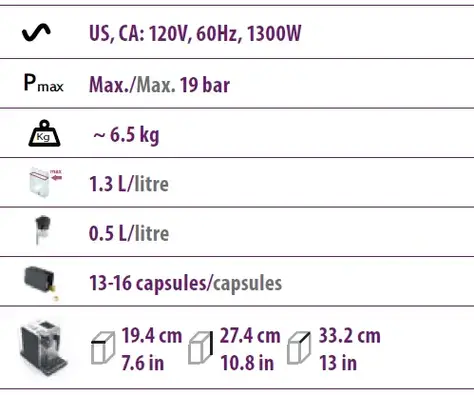 symbol
 - Exit from the Menu list
Scroll to the [exit] option and select. Or quickly press the symbol. - Exit from the option and return to the Menu list
Scroll to the [exit] option and select. Or quickly press the symbol.
Menu list
- Select this option to set your preferred language. Follow the instructions on the text display.
- Select this option once the descaling alert appears on the display. Refer to page 34 for the descaling process.
- Select this option to set the water hardness level according to your location. To determine water hardness, use provided sticker. This will optimize the descaling
frequency. Refer to page 35. - Select this option to set the time after which the machine switches off automatically. (Available options are 9 minutes, 30 minutes, 2 hours and 8 hours). Follow the
instructions on the text display. - Select this option to reset all parameters of the machine to factory settings.
- Select this option to empty the water inside the machine in case you need to send it for repair or before a long period of nonuse. Follow the instructions on the text
display. You will not be able to use the machine for 10 minutes after this process. - Select this option to program the volume of your beverages (coffee cups, hot water and milk-based preparations). Follow the instructions on the text display. In addition,
you can reset all the beverage volumes to factory settings. - Select this option to access all machine settings at a glance.
- Select this option to check the overall status of your machine. The consumption statistics are available either from the first use (absolute) or since the last descaling
(relative). The machine’s serial number is also available. - 10 Select this option to receive the best advice on how to get optimal milk froth quality day after day. The internet link is provided to know more about this feature.
For more information on this feature, click on the provided link. - Exit from the menu list and return to machine-ready mode.
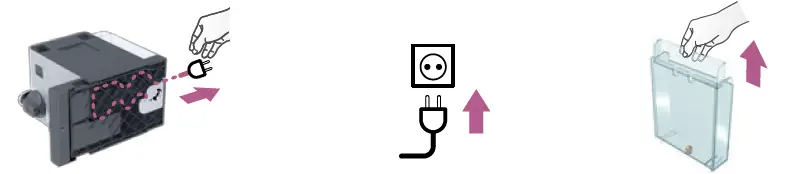
FIRST USE OR AFTER A LONG PERIOD OF NON-USE
CAUTION: first read the Important Safeguards to avoid risks of fatal electrical shock and fire.
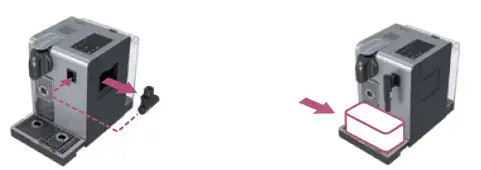
- remove the water tank, drip tray and capsule container. adjust the cable length and store the excess in the cable guide under the machine.
- put the machine in an upright position and plug into a power outlet.
- The water tank can be carried by its cover.
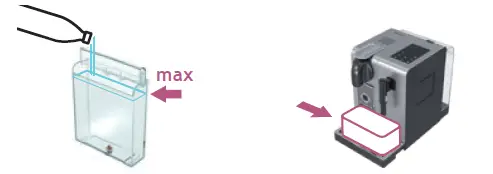
- Rinse the water tank before filling it with fresh potable water up to maximum level.
- Insert the hot water spout. Switch the machine ON .
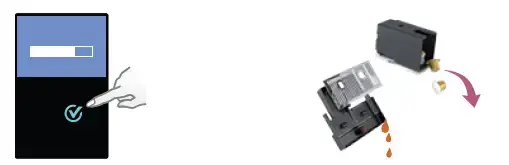
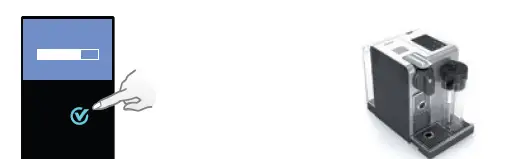
- SE T LANGUAGE: set your preferred language. Press to continue.

- LANGUAGE: select your language by scrolling the options using 1 7 arrows. Press C to confirm.
- Once the symbol is pressed, the machine heats up.
- Rinsing: place a container under the coffee outlet and press the Lungo button. Repeat three times.
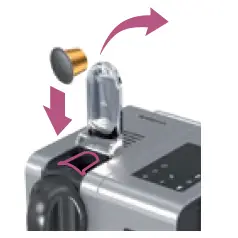
- Rinsing: repeat three times through the hot water spout. Once finished, remove it and store the hot water spout back in the storage area located on the right-hand side of the machine. Close the steam connector door.
- Disassemble the Rapid Cappuccino System (R.C.S.) and clean all components in the upper level of your dishwasher. In case a dishwasher is not available, refer to the section Hand washing of Rapid Cappuccino System ( RCS)
Coffee preparation
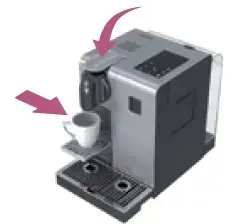
- Lift the lever completely and insert a Nespresso capsule.
- close the lever and place a cup under the coffee outlet.

- press the ristretto (25 ml/0.75 oz), the espresso (40 ml/1.35 oz) or the Lungo (110 ml/3.7 oz) button. preparation will stop automatically. To stop the coffee flow or top up your coffee, press again.
- Take the cup. Lift and close the lever to eject the capsule into the used capsule container.
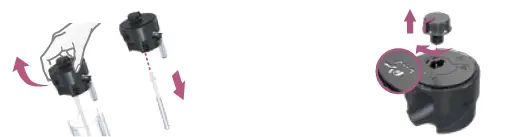
Assembling/Disassembling oF rapid cappuccino system (r.c.s.)/
- Remove the milk container lid and unplug milk aspiration tube.
- Remove the milk froth regulator knob by turning it until
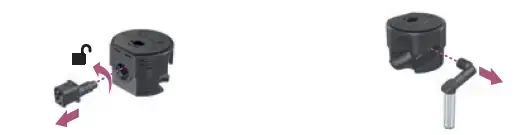 and pulling it up.
 - Remove the Rapid Cappuccino System connector by unlocking it from and pulling it off.
- Remove the milk spout by pulling it off.
Preparing Cappuccino and Late Macchiato
Informat ion: for a perfect milk froth, use skimmed or semi-skimmed milk at refrigerator temperature (about 4° C/39.2° F).
- Fill the milk container with the desired quantity of milk.
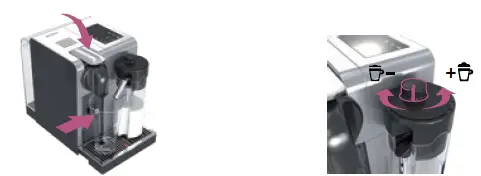
- Close the milk container. Open the steam connector door by sliding it to the right. Connect the Rapid Cappuccino System to the machine.
- The machine heats up for approximately 15 sec.
- Lift the lever completely and insert a Nespresso capsule.
- Close the lever, place a Cappuccino cup or a Latte Macchiato glass under the coffee outlet and adjust milk spout position.
- Adjust the milk froth regulator knob according to the volume of froth you want.
- Press the Cappuccino or Macchiato button. The preparation starts after a few seconds (first milk and then coffee) and will stop automatically.
- At the end of the preparation, lift and close the lever to eject the capsule into the used capsule container.
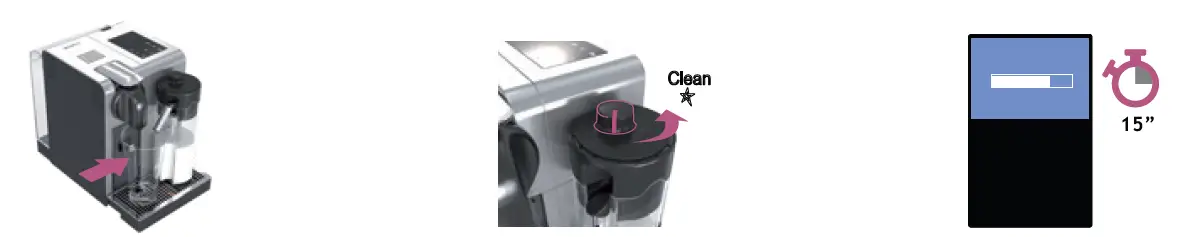
- Place a container under milk spout.
- Rotate the milk regulator knob in the «CLEAN » position. Milk system rinsing process starts and hot water combined with steam flows through the milk spout.
- The rinsing process lasts approximately 15 sec and stops automatically.
- Once rinsing has finished, turn the milk froth regulator knob back in milk position.
- Disconnect the R.C.S. from the machine and place it immediately in the refrigerator. Close the machine steam connector door.
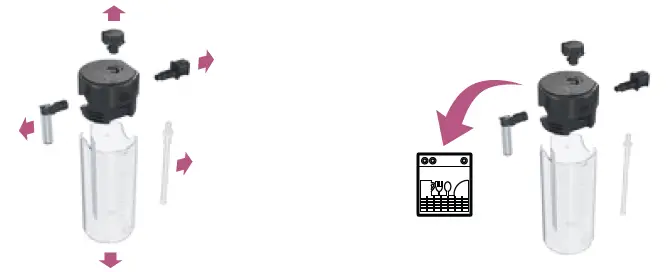
- Every two days, disassemble the Rapid Cappuccino System.
- And clean all components in the upper side of your dishwasher. In case a dishwasher is not available, refer to the section Hand washing of Rapid Cappuccino System (R.C.S.).
Daily care
Information: do not use any strong cleaning agent or solvent cleaner. Use a damp cloth and mild cleaning agent to clean the surface of the machine. Do not put any machine components in the dishwasher, except the Rapid Cappuccino System components. 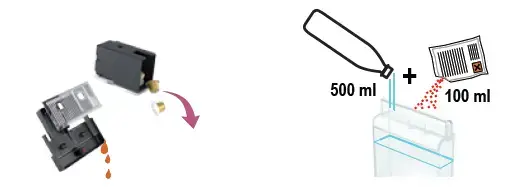
- Remove the drip tray and capsule container. Empty and rinse.
Remove the water tank. Empty and rinse the water tank before filling it with fresh potable water. - Lift and close the lever to eject the capsule into the used capsule container. Place a container under the coffee outlet and press the Lungo button to rinse. Clean the coffee outlet with a clean damp cloth.
- Carefully rinse away any dirt residue on the hot water spout with potable water. Clean it with a clean damp cloth.
Hand washing of Rapid Cappuccino System (R.C.S.)
- Disassemble the Rapid Cappuccino System. Refer to the section «Assembling/Disassembling of Rapid Cappuccino system (R.C.S.)».
- Rinse away carefully any milk residue with potable water.
- Soak all components in warm water (approximately 40° C/104° F) together with soap detergent for at least 30 minutes.
- Rinse with potable water and dry them with a clean damp cloth.
VOLUME FACTORY SETTING
NOTE: *the milk froth volume depends on the kind of milk that is used, its temperature and the position of the milk regulator knob.
NOTE: we recommend you to keep factory settings for Ristretto, Espresso and Lungo to ensure the best in-cup results for each of our coffee varieties.
Water volume can be programmed from 50 to 400 ml (1.7 to 13.5 oz).
Milk volume can be programmed from 30 to 200 ml (1 to 6.8 oz).
Coffee volume can be programmed from 25 to 200 ml (0.85 to 6.8 oz).
CAUTION: if coffee volumes are programmed higher than 150 ml (5 oz): let the machine cool down for 5 minutes before making the next coffee to prevent the risk of overheating!
DescaLing
CAUTION: refer to safety precautions.
- Lift and close the lever to eject any capsule in the used capsule container.
- Enter the Menu, browse the options and select [DescaLing]. you will be guided throughout the whole process. Follow machine display instructions.
- Descaling process: empty the drip tray and the used capsule container.
- Descaling process: fill the water tank with 100 ml (3.4 oz) of Nespresso descaling agent and 500 ml (17 oz) of potable water.
- Descaling process: insert the hot water spout.
- Descaling process: place one container, a minimum of 1 liter, under both the coffee outlet and the hot water spout.
- Press to confirm. The descaling agent flows alternately through the coffee outlet, hot water spout and drip tray.
- Rinsing process: empty the drip tray and the used capsule container. Rinse with potable water.
- Rinsing process: Rinse and fill water tank with potable water up to MAX level.
- Rinsing process: place one container, a minimum of 1 liter, under both the coffee outlet and the hot water spout.
- Press to confirm. The rinsing cycle continues alternately through the coffee outlet, hot water spout and drip tray until the water tank runs empty.
- Once the rinsing process is finished, the machine switches off. Rinse the hot water spout and clean it with a damp cloth. You have now finished descaling the machine.
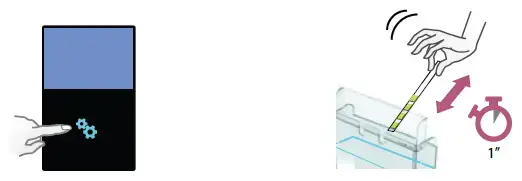
WATER HARDNESS SETTING
- Enter the menu, browse the options and select [WATER HARDNESS ]. You will be guided to set the value. Follow machine display instructions.
- Place the water hardness sticker underwater for 1 second.
- The number of red squares indicates the water hardness level.
- Set the value accordingly.

Troubleshooting
| no light on display. | ➔ check the mains, plug, voltage, and fuse. Press the on the button located behind the machine display. in case of problems, call the Nespresso club. |
| Machine too hot message, indicated in display | ➔ in certain conditions, the machine heater reaches high temperature, (ie. after emptying of the fluid system). simply wait, the machine will cool down automatically. |
| coffee comes out very slowly. | ➔ Flow speed depends on the coffee variety.
➔ Descale if necessary; see Descaling section. |
| coffee is not ho t enough. | ➔ preheat cup.
➔ Descale if necessary; see Descaling section. |
| The capsule area is leaking (water in the capsule container). | ➔ position the capsule correctly. if leakages occur, call the Nespresso club. |
| irregular blinking. | ➔ send the appliance to repair or call the Nespresso club. |
| no coffee, just water runs out (despite inserted capsule). | ➔ in case of problems, call the Nespresso club. |
| Lever cannot be closed completely. | ➔ empty capsule container. Make sure that no capsule is blocked inside the capsule container. |
| The quality of the milk froth is not up to standard. | ➔ For a perfect milk froth, use skimmed or semi-skimmed milk at refrigerator temperature (about 4° c/39.2° F).
➔ rinse after each milk-based preparation. place a recipient under the milk outlet, and rotate the milk regulator knob until the «clean» position. ➔ every two days, disassemble the r.c.s. and clean all components in the upper level of the dishwasher. |
| The machine needs a repair message, indicated in the display. | ➔ contact the Nespresso club or Nespresso authorized representative for examination, repair or adjustment. |
SPECIFICATION
DISPOSAL AND ECO-LOGICAL CONCERNS
Disposal and Environmental Protection
Your appliance contains valuable materials that can be recovered or recycled. Separation of the remaining waste materials into different types facilitates the recycling of valuable raw materials. Leave the appliance at a collection point. You can obtain information on disposal from your local authorities.
CONTACT THE NESPRESSO CLUB
For any additional information, in case of problems or simply to seek advice, call the Nespresso Club.
Contact details of the Nespresso Club can be found in the «Welcome to Nespresso» folder in your machine box or at nespresso.com
WARRANTY
Nespresso warrants this product against defects in materials and workmanship for a period of 1 year. The warranty period begins on the date of purchase and Nespresso requires the presentation of the original proof of purchase to ascertain the date. During the warranty period, Nespresso will either repair or replace, at its discretion, any defective product at no charge to the owner. Replacement products or repaired parts will be warranted only for the unexpired portion of the original warranty or six months, whichever is greater. This limited warranty does not apply to any defect resulting from negligence, accident, misuse, or any other reason beyond Nespresso’s reasonable control, including but not limited to normal wear and tear, negligence or failure to follow the product instructions, improper or inadequate maintenance, calcium deposits or descaling, connection to improper power supply, unauthorized product modification or repair, use for commercial purposes, fire, lightning, flood or other external causes.
This warranty is valid only in the country of purchase or in such other countries where Nespresso sells and services the same model with identical technical specifications. Warranty service outside the country of purchase is limited to the terms and conditions of the corresponding warranty in the country of service. Should the cost of repairs or replacement not be covered by this warranty, Nespresso will advise the owner and the cost shall be charged to the owner. This limited warranty shall be the full extent of Nespresso’s liability however caused. Except to the extent allowed by applicable law, the terms of this limited warranty do not exclude, restrict or modify the mandatory statutory rights applicable to the sale of this product and are in addition to those rights.
The limited warranty applies only to this single-branded Nespresso products. Products marked with both the Nespresso Brand and another producer are governed exclusively by the warranty provided by that other producer. If you believe your product is defective, contact Nespresso for instructions on how to proceed with a repair. Any defect or dysfunction resulting from the use of non-genuine Nespresso capsules will be not covered by this warranty. Please visit our website at www.nespresso.com for contact details.