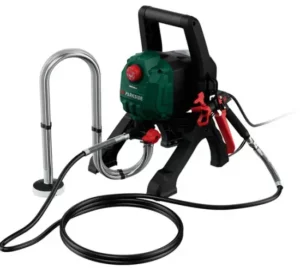
PARKSIDE AFS 550 A1 Airless Paint Sprayer Instructions
Introduction
Congratulations on the purchase of your new appliance. You have selected a high-quality product. The operating instructions are part of this product. They contain important information about safety, usage and disposal. Before using the product, please familiarise yourself with all operating and safety instructions. Use the product only as described and for the range of applications specified. Please also pass these operating instructions on to any future owner
Intended use
This appliance is designed for painting indoor walls as well as outdoor objects. Permissible materials for use include: – water-based paints and varnishes
Do not use for:
- Flammable coatings, materials containing acetone or nitro thinners,
- Materials that contain highly abrasive components,
- Facade paint, lyes and acidic coating materials. Do not use the appliance in areas where there is a risk of explosion. Any other usage or modification of the appliance is deemed to be improper and carries a significant risk of accidents. The manufacturer accepts no responsibility for damage(s) resulting from improper usage. This appliance is intended for domestic use only.
Equipment
- Return hose
- Suction hose
- Pressure regulator dial
- Storage compartment for nozzles and HEA filters
- Nozzle
- Safety catch
- Paint spray gun
- Handle
- Trigger
- Connecting thread for paint spray gun
- HEA filter
- High-pressure hose
- Function switch
- Connecting thread
- Intake filter
- Valve trigger
- Filter plate
- Plastic ring
- Holder
- Nozzle chamber
- Nozzle holder
- Spring
- Washer
- Ball
- O-ring
- Inlet valve
- Fastening screw
- Hex screw
- Hose clips
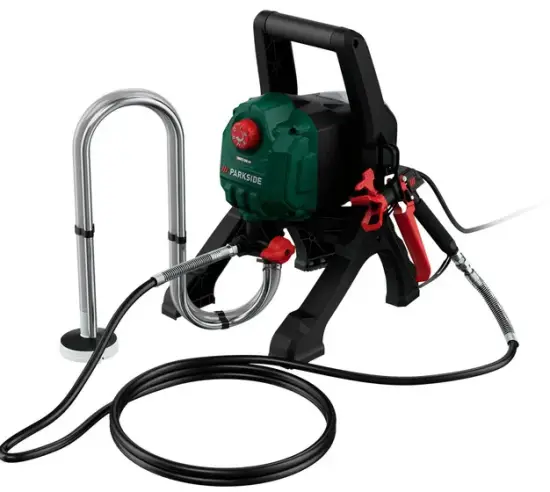
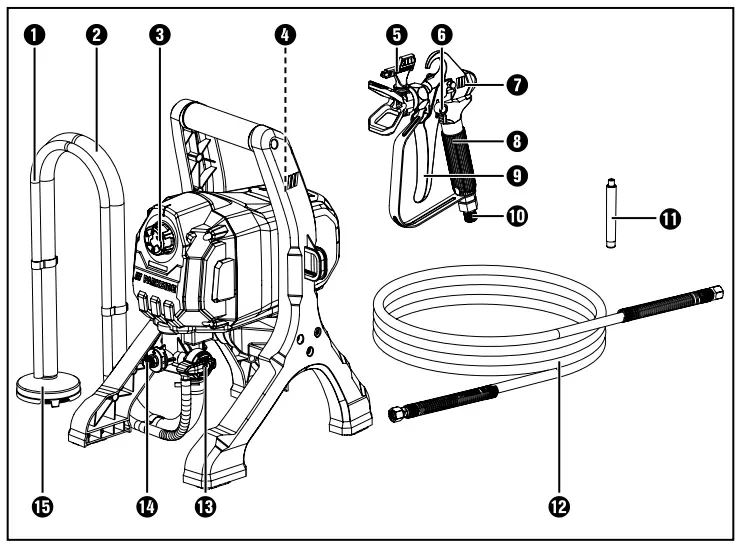
Package contents
- 1 airless paint sprayer
- 1 paint spray gun
- 1 intake hose, 1 m, (pre-fitted) including return hose
- 1 high-pressure hose, 9 m
- 1 white HEA filter (pre-fitted)
- 1 yellow HEA filter
- 2 nozzles 311 and 517* (*pre-fitted)
- 1 set of operating instructions
Technical specifications
Motor unit
- Rated voltage 230 V ∼, 50 Hz (AC)
- Rated power consumption 550 W
- Max. paint flow rate 1250 ml/min
- Max. working pressure 110 bar
- Max. temperature of coating material 40°C
- Protection class : I
- Protection rating IPX3 Protection against water spray, up to 60° compared to normal operating position
Paint spray gun
- Max. surface temperature 43°C
- Max. temperature of coating material 40°C
Noise and vibration data
Noise measurement value determined in accordance with EN 62841. The A-rated noise level of the power tool is typically
- Sound pressure level LpA = 88 dB (A)
- Uncertainty K = 3 dB
- Sound power level LWA = 101 dB (A)
- Uncertainty K = 3 dB
Noise measurement value determined in accordance with EN 14462. The rated noise level of the paint spray gun is typically:
- Sound pressure level LpA = 78.4 dB
- Uncertainty K = 2.5 dB (A)
- Sound power level LWA = 91.2 dB
- Uncertainty K = 2.5 dB (A)
Wear ear muffs!
Total vibration value of the
- handle ah < 5.1 m/s2
- Uncertainty K = 1.5 m/s2
Symbols on the appliance

NOTE
- The vibration emission values and the noise emission values given in these instructions have been measured in accordance with a standardised test procedure and can be used for comparison of the power tool with another tool.
- The specified total vibration values and the noise emission values can also be used to make a provisional load estimate.
WARNING
- Depending on the manner in which the power tool is being used, and in particular the kind of workpiece being worked, the vibration and noise emission values can deviate from the values given in these instructions during actual use of the power tool.
- Try to keep the vibration load as low as possible. Measures to reduce the vibration load are, e.g. wearing gloves and limiting the working time. Wherein all states of operation must be included (e.g. times when the power tool is switched off and times where the power tool is switched on but running without load).
General power tool safety warnings
WARNING
Read all safety warnings, instructions, illustrations and specifications provided with this power tool. Failure to follow all instructions listed below may result in electric shock, fire and/or serious injury.
Save all warnings and instructions for future reference.
The term “power tool” in the warnings refers to your mains-operated (corded) power tool or battery operated (cordless) power too
Work area safety
- Keep work area clean and well lit. Cluttered or dark areas invite accidents.
- Do not operate power tools in explosive atmospheres, such as in the presence of flammable liquids, gases or dust. Power tools create sparks which may ignite the dust or fumes.
- Keep children and bystanders away while operating a power tool. Distractions can cause you to lose control.
Electrical safety
- Power tool plugs must match the outlet. Never modify the plug in any way. Do not use any adapter plugs with earthed (grounded) power tools. Unmodified plugs and matching outlets will reduce risk of electric shock.
- Avoid body contact with earthed or grounded surfaces, such as pipes, radiators, ranges and refrigerators. There is an increased risk of electric shock if your body is earthed or grounded.
- Do not expose power tools to rain or wet conditions. Water entering a power tool will increase the risk of electric shock.
- Do not abuse the cord. Never use the cord for carrying, pulling or unplugging the power tool. Keep cord away from heat, oil, sharp edges or moving parts. Damaged or entangled cords increase the risk of electric shock.
- When working outdoors with an electrical power tool always use extension cords that are also suitable for use outdoors. Use of a cord suitable for outdoor use reduces the risk of electric shock.
- If operating a power tool in a damp location is unavoidable, use a residual current device (RCD) protected supply. Use of an RCD reduces the risk of electric shock.
Personal safety
- Stay alert, watch what you are doing and use common sense when operating a power tool. Do not use a power tool while you are tired or under the influence of drugs, alcohol or medication. A moment of inattention while operating a power tool may result in serious personal injury.
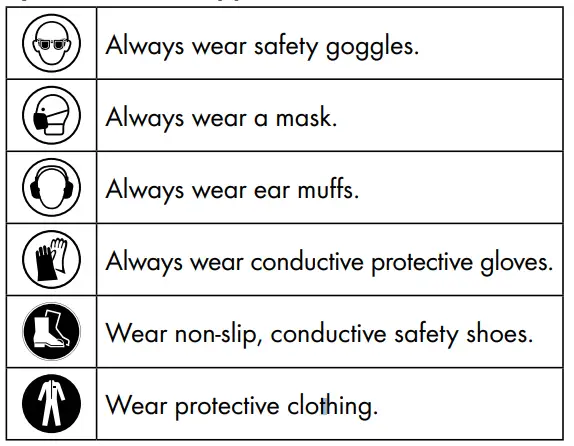
- Use personal protective equipment. Always wear safety goggles. Protective equipment such as a dust mask, non-skid safety shoes, hard hat or hearing protection used for appropriate conditions will reduce personal injuries.
- Prevent unintentional starting. Ensure the switch is in the off-position before connecting to power source and/or battery pack, picking up or carrying the tool. Carrying power tools with your finger on the switch or energising power tools that have the switch on invites accidents.
- Remove any adjusting key or wrench before turning the power tool on. A wrench or a key left attached to a rotating part of the power tool may result in personal injury.
- Do not overreach. Keep proper footing and balance at all times. This enables better control of the power tool in unexpected situations.
- Dress properly. Do not wear loose clothing or jewellery. Keep your hair and clothing away from moving parts. Loose clothes, jewellery or long hair can be caught in moving parts.
- If devices are provided for the connection of dust extraction and collection facilities, ensure these are connected and properly used. Use of dust collection can reduce dust-related hazards.
- Do not allow yourself to get lulled into a false sense of security and do not ignore the safety regulations for power tools, even if you are familiar with the power tool after repeated use. A careless action can cause severe injury within a fraction of a second.
Power tool use and care
- Do not force the power tool. Use the correct power tool for your application. The correct power tool will do the job better and safer at the rate for which it was designed.
- Do not use the power tool if the switch does not turn it on and off. Any power tool that cannot be controlled with the switch is dangerous and must be repaired.
- Disconnect the plug from the power source and/or remove the battery pack, if detachable, from the power tool before making any adjustments, changing accessories, or storing power tools. Such preventive safety measures reduce the risk of starting the power tool accidentally.
- Store idle power tools out of the reach of children and do not allow persons unfamiliar with the power tool or these instructions to operate the power tool. Power tools are dangerous in the hands of untrained users.
- Maintain power tools and accessories. Check for misalignment or binding of moving parts, breakage of parts and any other condition that may affect the power tool’s operation. If damaged, have the power tool repaired before use. Many accidents are caused by poorly maintained power tools.
- Keep cutting tools sharp and clean. Properly maintained cutting tools with sharp cutting edges are less likely to bind and are easier to control.
- Use the power tool, accessories and tool bits, etc. in accordance with these instructions, taking into account the working conditions and the work to be performed. Use of the power tool for operations different from those intended could result in a hazardous situation.
- Keep handles and grasping surfaces dry, clean and free from oil and grease. Slippery handles and grasping surfaces do not allow for safe handling and control of the tool in unexpected situations.
Service
- Have your power tool serviced by a qualified repair person using only identical replacement parts. This will ensure that the safety of the power tool is maintained.
Additional safety instructions
RISK OF EXPLOSION AND FIRE!
Make sure there are no ignition sources in the vicinity. There is a risk of explosion due to the potential formation of an explosive atmosphere in combination with ignition sources (e.g. by electrostatic discharge, electric sparks, hot surfaces)!
- RISK OF INJURY! DUE TO MISUSE! Do not
point the appliance towards people or animals. - RISK OF EXPLOSION/FIRE! SMOKING PROHIBITED! Do not cause any sparks or ignite a naked flame. Make sure there are no ignition sources in the vicinity, such as open fires, smoking cigarettes, cigars and tobacco pipes, sparks, glowing wires, hot surfaces, etc.RISK OF INJURY! DUE TO MISUSE! Do not point the appliance towards people or animals.
- RISK OF EXPLOSION/FIRE! SMOKING PROHIBITED! Do not cause any sparks or ignite a naked flame. Make sure there are no ignition sources in the vicinity, such as open fires, smoking cigarettes, cigars and tobacco pipes, sparks, glowing wires, hot surfaces, etc.
WARNING
Keep your distance from the nozzle tip!
- Do not spray yourself, other people or animals. Keep your hands and other body parts out of the spray jet. If the spray jet pierces your skin, seek medical assistance immediately. The sprayed material can even penetrate through a glove and into the skin and thus into your body.
- Do not treat an injection wound as a simple cut. A high-pressure jet can inject toxins into the body and cause serious injuries (e.g. necrosis, loss of limbs). In the event of a chemical penetration of the skin, seek medical assistance immediately.
- Before each use, the following points must be observed in accordance with the operating instructions:
- Do not use an appliance if it is faulty.
- Secure the hand spray gun against accidental activation using the safety catch on the trigger.
- Ensure earthing – The connection must be made via a properly earthed safety socket (Schuko).
- Check the maximum permissible operating pressure of the high-pressure hose and spray gun.
- Check all connections for leaks
- Strictly follow the instructions on regular cleaning and maintenance of the appliance. Observe the following rules before carrying out any work on the appliance and at every work break:
- Depressurise the spray gun and the high-pressure hose.
- Secure the hand spray gun against accidental activation using the safety catch on the trigger.
- Switch off the appliance.
- Do not use the appliance in areas that fall under the explosion protection ordinance.
- Keep your work area clean, well lit and free of paint and solvent containers, cloths and other inflammable materials. Possible risk of spontaneous combustion. Make sure you have functional fire extinguishers available at all times.
- Do not spray or clean with materials whose ignition point is lower than 21°C. Use waterbased materials, non volatile hydrocarbons or similar materials. The evaporation of volatile solvents will cause an explosive environment.
- Do not spray near ignition sources such as static electric sparks, open flames, ignition flames, hot items, motors, cigarettes or sparks caused by plugging in/unplugging power cables or by operating switches. These kinds of ignition sources could ignite a fire in the environment.
- Do not spray any material if you do not know whether it is potentially dangerous. Unknown materials can cause hazards.
- To avoid potential risks, damaged mains cables should be replaced by the manufacturer, their customer service department or someone similarly qualified.
- Wear additional personal protective equipment such as suitable gloves and a protective mask/respirator when spraying or when handling chemicals. Wearing appropriate protective equipment for the conditions reduces your exposure to dangerous substances.
- Be aware of the potential hazards of the sprayed material. Follow the markings on the container and the manufacturer’s information on the spray material you are using, including the instructions to use personal protective equipment. Follow the manufacturer’s instructions to reduce the risk of fire and injuries caused by poisons, carcinogens, etc.
- The spray gun must not be used for spraying flammable substances. Do not clean spray guns with flammable solvents.
- Secure the appliance and the spray gun.
- Secure all hoses, connections and filter parts before starting up the spray pump. Unsecured parts can come loose with great force or fluid can escape at high pressure, causing serious injury. Always secure the spray gun when assembling or disassembling the nozzle and during any breaks in work.
- Be prepared for recoil from the spray gun during operation. At high operating pressure, pulling the trigger causes a recoil force of up to 15 N. If you are not prepared for this, your hand may be pushed back or you may lose your balance. This can lead to injuries. Continuous exposure to this recoil can lead to permanent damage to health.
- Max. operating pressure: the permissible operating pressure for the spray gun, high-pressure hose and spray gun accessories must not be less than the maximum operating pressure of 110 bar (11 MPa) indicated on the appliance.
- The appliance must be connected via a properly earthed safety socket (Schuko). The connection must be equipped with a residual current device INF ≤ 30 mA.
- Make sure that the mains supply being connected corresponds to the values indicated on the type plate.
- Before carrying out any work on the appliance, relieve the pressure and disconnect the mains plug from the socket.
- You must earth the object that you are intending to spray!
- Observe the user manual when installing, maintaining and repairing the appliance.
- The appliance must be earthed during installation.
- Ensure adequate ventilation in the spray area and sufficient fresh air in the entire room. Wear a mask!
- Always wear suitable safety goggles to keep hazardous vapours and liquids away from your eyes.
- Wear protective clothing to keep paint away
from your skin and hair.
WARNING
- Under certain circumstances, the flow rate of the coating material may cause electrostatic charges to occur on the appliance during spraying. They can cause sparks or flames when discharged. Therefore, make sure that the appliance is always earthed via the electrical installation. The connection must be made via a properly earthed safety socket (Schuko).
- Pay attention to the hazards that may be caused by the sprayed substance and also observe the labels on the containers or the instructions given by the manufacturer of the substance.
- When working indoors: Ensure that no vapours containing solvents form in the area around the appliance. Place the appliance on the side facing away from the spray object. Keep a minimum distance of 5 m between the motor unit and the spray gun.
- When working outdoors: Do not allow vapours containing solvents to drift towards the appliance. Pay attention to the wind direction! Position the appliance so that no vapours containing solvents can reach and build up around the appliance. Keep a minimum distance of 5 m between the appliance and the spray gun.
- There is a risk of a short-circuit if water penetrates the appliance! Never clean the appliance with a high-pressure or steam cleaner.
- Do not use a solvent container with a small opening to clean the appliance. An explosive atmosphere could form. Earth the container beforehand.
Safety instructions for the highpressure hose
DANGER
- Caution: Risk of injury from injection! Leaks can develop in the high-pressure hose due to wear, kinking and improper use. Fluid from the leak can be injected into the skin.
- The electrostatic charge from the spray gun and high-pressure hose is discharged via the high-pressure hose.
- Check the high-pressure hose thoroughly before each use.
- Never pull on the high-pressure hose to move the appliance.
- Never try to repair a defective high-pressure hose yourself!
- Replace a damaged high-pressure hose immediately.
- Avoid sharp bending or kinking; the smallest bending radius is about 20 cm.
- Protect the high-pressure hose from sharp objects and edges.
- Never twist the high-pressure hose.
- Do not immerse the high-pressure hose in solvent. Wipe the outside only with a soaked cloth.
- Route the high-pressure hose so that there is no risk of tripping.
- Do not drive over the high-pressure hose.
NOTE
The risk of damage increases with old highpressure hoses. We recommend replacing the high-pressure hose every 6 years.
Original accessories/attachments
WARNING
Do not use any accessories that are not recommended by PARKSIDE. You can order spare parts and accessories from the telephone numbers given in the section “Service”.
RESIDUAL RISKS!
When using the tool, additional residual risks may occur that are not listed in the enclosed safety instructions. These risks can arise from misuse, prolonged use, etc.
Even if you follow the relevant safety regulations and use safety equipment, certain residual risks cannot be avoided.
These include:
- Lung damage, if no suitable breathing protection is worn;
- Hearing damage, if hearing protection is not worn;
- Eye damage, if suitable eye protection is not worn;
- Damage to health due to swinging of your hands and arms during prolonged operation of the appliance or if the appliance is not properly held or maintained. If you use an appliance for a long period of time, take regular breaks.
WARNING! HAZARDS CAUSED BY MATERIALS AND SUBSTANCES!
- There is a risk of coming into contact with or absorbing coating materials and/or cleaning fluids. There is also a risk of inhaling vapours from liquids. This can cause permanent damage under certain conditions.
- Always wear personal protective equipment when working on the appliance!
- Ensure sufficient technical or natural ventilation.
- Follow the manufacturers’ safety instructions for the respective coating materials and cleaning liquids.
- If you experience any symptoms, seek medical advice!
Working procedures
NOTE
- Ensure that the spray material and thinning agent are compatible. Using an unsuitable thinning agent may cause clots that clog the appliance.
- To find out which thinning agent is suitable for your spray material (water, paint thinner), refer to the manufacturer’s notes provided with the spray material.
- Granular products and products containing solids must not be sprayed. Their abrasive effect will shorten the service life of the appliance.
Preparing the spray surface
WARNING
Risk of electric shock due to penetrating spray material! Be sure to mask any sockets and switches
- Cover any surfaces around the spray area extensively and thoroughly. Any surface that is not masked could become contaminated.
- Make sure that the spray surface is clean, dry and free of grease.
- Polished surfaces should be lightly sanded and the sanding dust removed.
Spraying technique
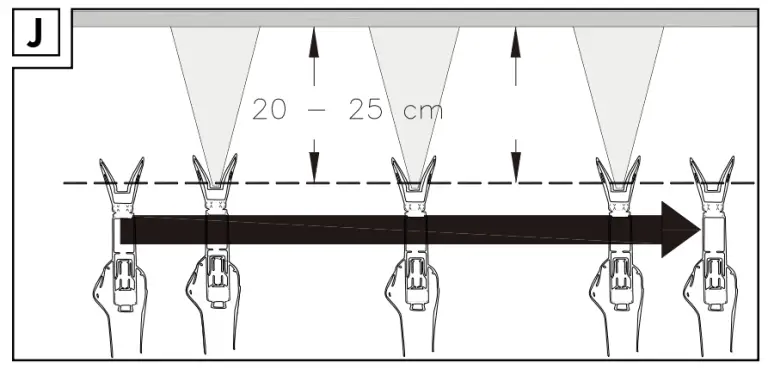
- Always hold the paint spray gun at the same distance and at a right angle to the object. The ideal spraying distance is approx. 20–25 cm. Move the paint spray gun evenly with your whole arm (see fig. J).
- Determine the appropriate settings in each case by experimenting, e.g. on a piece of cardboard.
- Do not switch the appliance on/off above the spray area, but start and stop the spraying process approx. 10 cm outside the spray area.
Before use
Assembly
NOTE
- You can assemble the appliance using two adjustable spanners (not supplied).
- Alternatively, you can also use a 16 mm and 19 mm wrench (not supplied).
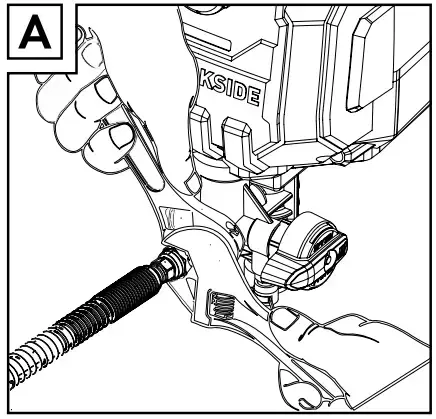
- Fit the high-pressure hose w onto the connecting thread r on the appliance. Tighten the nut using an adjustable spanner. Counter the nut of the connection thread r with a second adjustable spanner (see fig. A).
- Fit the other end of the high-pressure hose w to the connecting thread of the paint spray gun 0. Tighten the nut using an adjustable spanner. Counter the nut of the connection thread of the paint spray gun with a second adjustable spanner.
- Insert the corresponding nozzle 5 with the arrow tip in the spraying direction into the nozzle chamber
Selecting/changing the nozzle
| Nozzle | Use |
| Nozzle 311 | low viscosity spray material |
| Nozzle 517 | viscous spray material |
Replacing the HEA filter
WARNING
The system must be depressurised in order to carry out the following work. To do this, follow the instructions in the section “Depressurising the appliance”.
- Remove the high-pressure hose w from the paint spray gun 7.
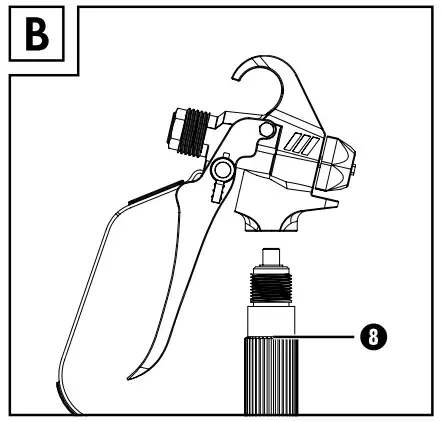
- Turn the handle 8 clockwise until the upper end can be detached from the paint spray gun 7 (see fig. B). You can attach an adjustable spanner to the lower end of the handle to help.
- Insert the appropriate HEA filter q for the installed nozzle 5:
- white HEA filter (pre-fitted): nozzle 517
- yellow HEA filter: nozzle 311
- Turn the handle 8 anticlockwise back into the thread of the paint spray gun 7.
NOTE
Clean the HEA filters q regularly and replace them, if necessary. You can obtain replacement filters from the service hotline given in the section “Service”.
Use
- Place the suction hose 2 and return hose 1 in the paint bucket.
- Press the valve trigger z to ensure that the valve is free of any blockages.
- Insert the plug into a mains power socket.
- Turn the function switch e to the vertical position (PRIME).
- Turn the pressure regulator dial 3 to position 2 to ensure that the paint is pumped through the system.
- Wait until the paint runs through the return hose 1 back into the paint bucket. Turn the pressure regulator dial 3 to position 0 (off).
NOTE
- If no paint comes out, follow the measures described in the section “Eliminating suction problems”.
- Turn the function switch e to the horizontal position (SPRAY).
- Turn the pressure regulator dial 3 to a level corresponding to the viscosity of the sprayed material.
- Hold the paint spray gun 7 over an empty container.
- Unlock the paint spray gun 7 by turning the safety catch 6 so that its tip is facing down.
- Pull the trigger 9 until the paint comes out in a straight stream.
- Lock the paint spray gun 7 by turning the safety catch 6 with the tip as far back and up as possible
Settings
- You can use the pressure regulator dial 3 to switch the appliance on by setting a level greater than 0. The level you choose depends on the spray material used. Determine the best setting by carrying out a spray test.
- The function switch e has two settings:
- PRIME (vertical position): This setting allows you to pre-fill the system with paint or to depressurise the appliance.
- SPRAY (horizontal position): You can use this setting to work with the appliance.
Spraying
- Unlock the paint spray gun 7 by turning the safety catch 6 so that its tip is facing down.
- To spray, press the trigger 9 and hold it down.
- To stop spraying, release the trigger 9 again
WARNING
- Always secure the paint spray gun 7 while you are not actually spraying.
- Lock the paint spray gun 7 by turning the safety catch 6 with the tip as far back and up as possible.
Overheating protection
The appliance has an overheating protection. It switches the appliance off if overheating is imminent. If this happens, carry out the following steps
- Turn the pressure regulator dial 3 to position 0 (off).
- Turn the function switch e to the vertical position (PRIME).
- Let the appliance cool down for at least 30 minutes and, if necessary, remove the cause of the overheating. This could be, for example, an item that is covering the ventilation slots or if the appliance is too close to a wall.
- Put the appliance back into operation
Depressurising the appliance
Always depressurise the appliance when you want to take it out of operation. Depressurise the system as follows:
- Turn the pressure regulator dial 3 to position 0 (off).
- Turn the function switch e to the vertical position (PRIME).
- Unlock the paint spray gun 7 by turning the safety catch 6 so that its tip is facing down.
- Release the pressure by pulling the trigger 9. Hold the paint spray gun 7 over an empty container while doing so.
- Wait until all pressure and paint has been dispelled from the system. To stop spraying, release the trigger 9 again.
- Lock the paint spray gun 7 by turning the safety catch 6 with the tip as far back and up as possible.
Eliminating suction problems
- Press the valve trigger z 3–4 times to remove any blockages or deposits from the valve.
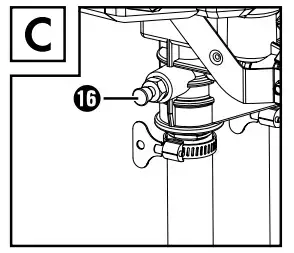
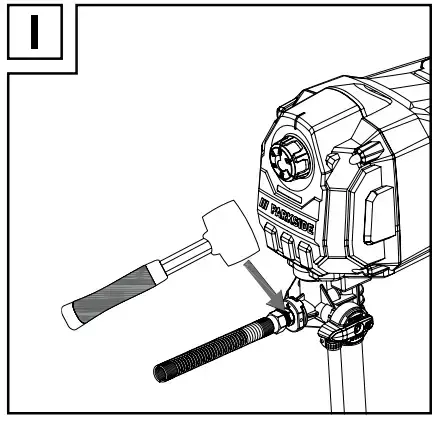
- If the problem persists: tap the connecting thread r several times extremely carefully with a rubber mallet (see fig. I) to loosen harder deposits.
Blow out the nozzle
WARNING
Always secure the paint spray gun 7 while you are not actually spraying.
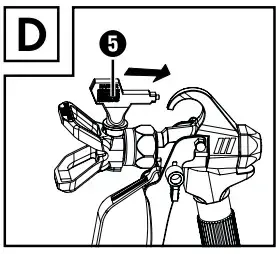
- Turn the inserted nozzle 5 180 degrees towards the rear (see fig. D). If the nozzle cannot be turned, try depressurising the appliance.
- Press the trigger 9 to blow out the nozzle 5. Hold the paint spray gun 7 over an empty container while doing so. As soon as a straight spray jet comes out, the nozzle 5 is blown out.
- Turn the inserted nozzle 5 180 degrees towards the front.
NOTE
Use an appropriate HEA filter q to minimise blockages.
Work breaks
- Depressurise the appliance.
- Turn the pressure regulator dial 3 to position 0 (off).
- Remove the plug from the mains socket.
- Place the paint spray gun 7 in a plastic bag, which you then seal airtight.
- Wet the paint in the paint bucket with water so that no skin forms on the top
Shutting down, maintenance and cleaning
ATTENTION
- Do not use flammable materials such as nitro thinners for cleaning.
- Please refer to the manufacturer’s information of the respective spray material to find out which cleaning agents are suitable
NOTE
- Thorough cleaning directly after every use is very important for safety and operation. Otherwise, the proper functioning of the appliance can no longer be guaranteed.
- Wear suitable protective gloves during cleaning work.
- Remove coating material residues at appropriate intervals. Remove any sprayed material that has got onto unwanted surfaces before it dries
- Depressurise the appliance.
- Lock the paint spray gun 7 by turning the safety catch 6 with the tip as far back and up as possible.
- Unscrew the nozzle holder a from the paint spray gun 7.
- Place the suction hose 2 together with the return hose 1 in a container with water or a suitable cleaning agent.
- Turn the function switch to the horizontal position (SPRAY).
- Turn the pressure regulator dial 3 to position 5.
- Unlock the paint spray gun 7 by turning the safety catch 6 so that its tip is facing down.
- Drain off the remaining paint by pulling the trigger 9. Hold the paint spray gun 7 over a paint bucket while doing so.
ATTENTION
If you are using a metal container, earth the paint spray gun 7 beforehand.
- Release the trigger 9 as soon as the cleaning fluid starts flowing out.
- Lock the paint spray gun 7 by turning the safety catch 6 with the tip as far back and up as possible.
- Turn the function switch e to the vertical position (PRIME).
- Unlock the paint spray gun 7 by turning the safety catch 6 so that its tip is facing down.
Drain off the remaining paint by pulling the trigger 9. Hold the paint spray gun 7 over the detergent container while doing so. - Release the trigger 9 as soon as clear cleaning fluid starts flowing out.
- Lock the paint spray gun 7 by turning the safety catch 6 with the tip as far back and up as possible.
- Turn the pressure regulator dial 3 to position 0 (off). Remove the plug from the mains socket.
- Depressurise the appliance.
- Remove the high-pressure hose w from the paint spray gun 7 with the aid of an adjustable spanner.
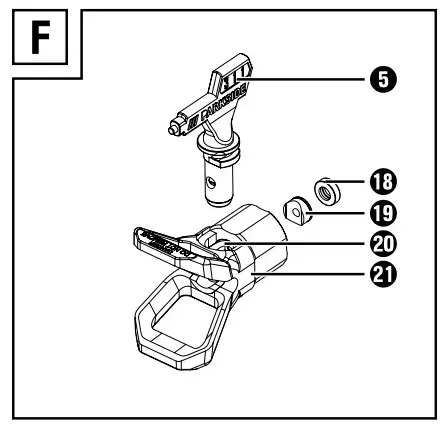
- Disassemble the nozzle holder a along with the nozzle 5, holder o and plastic ring i (see fig. F). Clean all parts thoroughly using suitable cleaning agents.
- Lock the paint spray gun 7 by turning the safety catch 6 with the tip as far back and up as possible.
NOTE
Clean the HEA filters q regularly. Replace them if cleaning is no longer sufficient.
- Disconnect the suction hose 2 and the return hose 1 from the appliance using the hose clips l. Clean the outsides of the hoses.
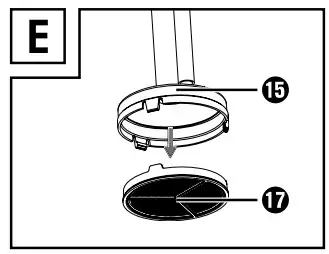
- Remove the filter plate u of the intake filter t (see fig. E).
- Clean the filter plate u thoroughly under running water.
- Remove the high-pressure hose w from the connecting thread r using an adjustable spanner. Counter the connection thread r using a second adjustable spanner.
- Dip the inlet valve h into a container filled with conservation agent (e.g. fine mechanical oil)so that the fluid can be sucked up. Insert the plug into a mains power socket.
- Hold a cloth in front of the connecting thread r. Turn the pressure regulator dial 3 to position 1 for about 5 seconds. This helps to preserve the appliance. Turn the pressure regulator dial 3 to position 0 (off).
- Remove the plug from the mains socket.
Cleaning the inlet valve
WARNING! RISK OF INJURY!
Before carrying out any work on the appliance, switch it off, disconnect the mains plug and depressurise the appliance!
NOTE
If there are irremediable problems with the paint suction, you should clean the inlet valve h or replace it, if necessary
- Disconnect the suction hose 2 from the appliance.
- Remove the inlet valve h using an adjustable spanner.
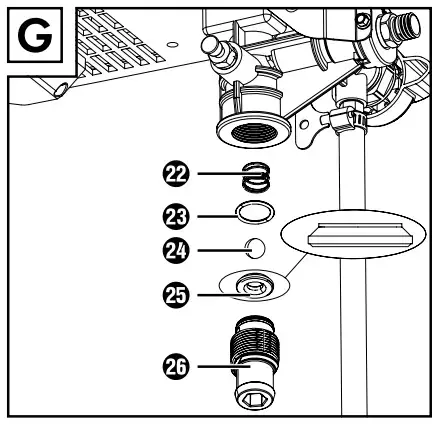
- Remove the O-ring g, ball f, washer d and spring s (see fig. G).
- Clean the parts thoroughly using suitable cleaning agents. Replace them, if necessary.
NOTE
You can obtain replacement parts not listed here from the service hotline given in the section “Service”.
- Grease the O-ring g.
- Replace the parts into the inlet valve h (see fig. G).
- Screw the inlet valve h back into the appliance. Tighten it using an adjustable spanner.
Cleaning the connecting thread
WARNING! RISK OF INJURY!
Before carrying out any work on the appliance, switch it off, disconnect the mains plug and depressurise the appliance!
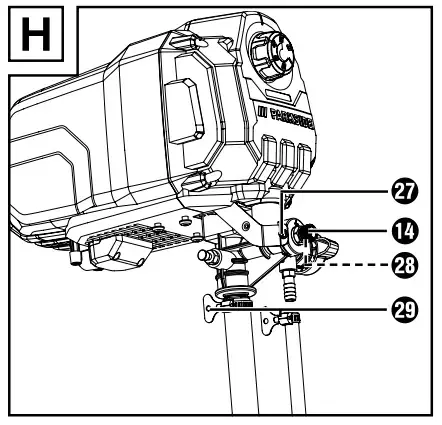
If you are still experiencing a poor spray pattern after cleaning the nozzle, you should clean the connecting thread 14.
- Remove the high-pressure hose w from the connecting thread 14 using an adjustable spanner. Counter the nut of the connection thread 14 with a second adjustable spanner.
- Loosen the fastening screw 27 with a Phillips screwdriver (not supplied).
- Loosen the hex screw 28 with a 2 mm hex key (not supplied).
- Remove the connection thread 14 using an adjustable spanner.
- Clean the connecting thread 14 using a suitable cleaning agent. Replace it, if necessary.
- Screw the connecting thread 14 back into the appliance and tighten it using an adjustable spanner.
- Retighten the fastening screw 27 with a Phillips screwdriver.
- Turn the hex screw k with a 2 mm hex key.
Storage and transportation
- Store the appliance in a dry, dust-free location.
- Transport the appliance only when you have taken it completely out of service. Transport the appliance in such a way that it cannot be damaged or soiled. Preferably, use the original packaging.
Troubleshooting
| Fault | Possible cause | Remedy |
| The paint spray gun does not spray. | The inserted nozzle is clogged. | Clean the nozzle and use a suitable HEA filter. |
| The HEA filter is clogged. | Clean or replace the HEA filter. | |
| The paint spray gun is locked. | Unlock the paint spray gun. | |
| The motor is not running. | The appliance is not plugged in. | Insert the mains plug into an appropriate mains socket. |
| The appliance has overheated. | Follow the instruo lions in the section “Overheating protection”. | |
| There is no volt-age on the
mains socket. |
Check the mains socket. | |
| The appliance has been operated and main. tained according to the operating instructions, but still does not work. | Contact our Customer Service C
department. |
Disposal
 The packaging is made from environmentally friendly material and can be disposed of at your local recycling plant.
 Do not dispose of power tools in the normal domestic waste!
According to the European Directive 2012/19/EU, used power tools must be collected separately and recycled in an environmentally sound manner.
 Dispose of the packaging in an environmentally friendly manner. Note the labelling on the packaging and separate the packaging material components for disposal, if necessary. The packaging materials are labelled with abbreviations (a) and numbers (b) with the following meanings: 1–7: plastics, 20–22: paper and cardboard, 80–98: composites.
 Your local community or municipal authorities can provide information on how to dispose of the worn-out product.
 The product is recyclable, subject to extended producer responsibility and is collected separately
Environmental compatibility and material disposal
- Paints and lacquers … are considered hazardous waste and must be disposed of accordingly.
- Observe the local regulations.
- Observe the manufacturer’s instructions.
- Environmentally harmful chemicals must not be allowed to get into the ground, groundwater or any body of water.
- Spraying work next to bodies of water or adjoining surfaces thereof (catchment area) is therefore not permitted.
- When purchasing paints or lacquers … pay attention to their environmental compatibility.
Kompernass Handels GmbH warranty
Dear Customer,
This appliance has a 3-year warranty valid from the date of purchase. If this product has any faults, you, the buyer, have certain statutory rights. Your statutory rights are not restricted in any way by the warranty described below
Dear Customer,
This appliance has a 3-year warranty valid from the date of purchase. If this product has any faults, you, the buyer, have certain statutory rights. Your statutory rights are not restricted in any way by the warranty described below
Warranty conditions
The warranty period starts on the date of purchase. Please keep your receipt in a safe place. This will be required as proof of purchase.
If any material or manufacturing fault occurs within three years of the date of purchase of the product, we will either repair or replace the product for you or refund the purchase price (at our discretion). This warranty service requires that you present the defective appliance and the proof of purchase (receipt) within the three year warranty period, along with a brief written description of the fault and of when it occurred.
If the defect is covered by the warranty, your product will either be repaired or replaced by us. The repair or replacement of a product does not signify the beginning of a new warranty period.
X 12 V and X 20 V Team Series battery packs come with a 3-year warranty valid from the date of purchase
Warranty period and statutory claims for defects
The warranty period is not prolonged by repairs effected under the warranty. This also applies to replaced and repaired components. Any damage and defects present at the time of purchase must be reported immediately after unpacking. Repairs carried out after expiry of the warranty period shall be subject to a fee.
Scope of the warranty
This appliance has been manufactured in accordance with strict quality guidelines and inspected meticulously prior to delivery.
The warranty covers material faults or production faults. The warranty does not extend to product parts subject to normal wear and tear or to fragile parts which could be considered as consumable parts such as switches or parts made of glass.
The warranty does not apply if the product has been damaged, improperly used or improperly maintained. The directions in the operating instructions for the product regarding proper use of the product are to be strictly followed. Uses and actions that are discouraged in the operating instructions or which are warned against must be avoided.
This product is intended solely for private use and not for commercial purposes. The warranty shall be deemed void in cases of misuse or improper handling, use of force and modifications / repairs which have not been carried out by one of our authorised Service centres.
The warranty period does not apply to
- Normal reduction of the battery capacity over time
- Commercial use of the product
- Damage to or alteration of the product by the customer
- Non-compliance with safety and maintenance instructions, operating errors
- Damage caused by natural hazards
Warranty claim procedure
To ensure quick processing of your case, please observe the following instructions:
- Please have the till receipt and the item number (e.g. IAN 12345) available as proof of purchase.
- You will find the item number on the type plate on the product, an engraving on the product, on the front page of the operating instructions (below left) or on the sticker on the rear or bottom of the product.
- If functional or other defects occur, please contact the service department listed either by telephone or by e-mail.
- You can return a defective product to us free of charge to the service address that will be provided to you. Ensure that you enclose the proof of purchase (till receipt) and information about what the defect is and when it occurred.
You can download these instructions along with many other manuals, product videos and installation software at www.lidl-service.com.
This QR code will take you directly to the Lidl service page (
www.lidl-service.com) where you can open your operating instructions by entering the item number (IAN) 360098_2010.
WARNING!
Have the power tool repaired by the Service Centre or a qualified technician and only using genuine replacement parts. This will ensure that the safety of the appliance is maintained.
NOTE
Replacement parts that are not listed (such as carbon brushes, compressed air hoses, filters, nozzles) can be ordered via our call centre.
Service
Service Great Britain
Tel.: 0800 404 7657
E-Mail: [email protected]
Service Ireland
Tel.: 1890 930 034
(0,08 EUR/Min., (peak))
(0,06 EUR/Min., (off peak))
E-Mail: [email protected]
Importer
Please note that the following address is not the service address. Please use the service address provided in the operating instructions.
KOMPERNASS HANDELS GMBH
BURGSTRASSE 21
44867 BOCHUM
GERMANY
www.kompernass.com
Original declaration of conformity
We, KOMPERNASS HANDELS GMBH, document officer: Mr Semi Uguzlu, BURGSTR. 21, 44867 BOCHUM, GERMANY, hereby declare that this product complies with the following standards, normative documents and EC directives:
Machinery Directive
(2006/42/EC)
EMC (Electromagnetic Compatibility)
(2014/30/EU)
RoHS Directive (2011/65/EU)*
The manufacturer bears the full responsibility for compliance with this conformity declaration. The object of the declaration described above complies with the requirements of the Directive 2011/65/EU of the European Parliament and Council of 8 June 2011 on the limitations of use of certain dangerous substances in electrical and electronic appliances.
Applied harmonised standards
EN ISO 12100:2010
EN 60204-1:2018
EN 1953 :2013
EN 55014-1 :2017/A11:2020
EN 55014-2:2015
EN IEC 63000:2018
EN IEC 61000-3-2:2019
EN 61000-3-3:2013+A1 :2019
Type designation of the machine: Airless Paint Sprayer PAFS 550 A1
Year of manufacture: 03–2021
Serial number: IAN 360098_2010
Bochum, 06/01/2021
Semi Uguzlu
– Quality Manager

We reserve the right to make technical changes in the context of further product development.

