PreSonus Studio One 5

Welcome to PreSonus Studio One 5!
Introduction
Welcome to PreSonus Studio One 5! Thank you for purchasing Studio One. We want to make sure you have a great first experience with this product, so please read the following information carefully to ensure you have a successful installation.
System Requirements
We make every effort to ensure that Studio One will run well on the widest variety of computers possible. Please review these specifications to determine compatibility with your system.
macOS®
- macOS® 10.13 or higher (64-bit only).
- Intel® Core™ i3 processor or better.
- 4 GB RAM minimum (8 GB or more recommended).
Windows®
- Windows® 10 (64-bit only).
- Intel® Core™ i3 / AMD A10 processor or better.
- 4 GB RAM minimum (8 GB or more recommended).
Additional Requirements (all Systems)
- Internet connection on an available computer (for authorization and updates only).
- A monitor resolution of 1366 x 768 or higher (high-dpi monitor recommended).
- Multi-touch-enabled monitor (with TUIO support, if on macOS) required for optional touch operation.
- 40 GB available hard drive space for installation, content, and recording projects.
Versions
There are three versions of Studio One 5: Prime, Artist and Professional. Studio One uses a single installer for all versions, and the product key with which you activate Studio One determines the version that you run. The following describes the differences between these versions.
Studio One Prime
- Unlimited audio and MIDI Tracks.
- Stereo inputs and outputs.
- Basic set of plug-ins, Presence XT sampler.
- Basic set of editing features, including Arranger Track.
- Content browser with musical search and direct access to the PreSonus Shop.
Studio One Artist
- Unlimited audio and MIDI Tracks, unlimited simultaneous record inputs.
- Advanced editing features, including comping, transient detection and editing, pitch correction (Melodyne trial version), and much more.
- Full SoundCloud™ integration.
- 30 Native effects and 5 virtual instruments (adds Impact XT, Sample One XT, Mai Tai and Mojito).
- Adds Event-based effects.
- Adds support for user-definable Macros.
- Adds support for 3rd party VST/AU plug-ins and Rewire.
- Adds support for Studio One Remote app.
Studio One Professional
- Includes all Artist features and content.
- Adds the Project page, an integrated mastering solution.
- Adds the Show page, an integrated live performance environment.
- Adds Arranger Track with Scratch Pads.
- Adds Chord Track and harmonic editing.
- Adds Score editor based on Notion.
- Adds AAF and Song Track Import.
- Adds fully licensed Melodyne Essential 5 pitch correction.
- Adds Extended FX Chains and Multi Instruments.
- Adds support for 3rd party sampler formats (EXS, Giga, Kontakt, Bitwig).
- Adds video playback and sync.
- Adds Note FX, Groove Delay, Multiband Dynamics, OpenAIR, Pipeline, and IR Maker Native Effects plug-ins.
Installation
The method you use to install Studio One depends on how you purchased it.
Retail Purchase: If you bought Studio One in a retail box and received a Product Key in the box, you’ll register the key and then download Studio One, and then activate it online upon first launching the product.
Direct Purchase from Shop.PreSonus.com: If you bought the software directly from http://shop.presonus.com, the Studio One installation download is added to your user account and can be found under recent purchases on your My.PreSonus.com home page.
Activation happens online after first launching the product.
Direct Purchase of USB Flash Drive: If you’re installing Studio One from the USB flash drive that is available as an additional accessory purchase from http://shop.presonus.com, your activation will happen online using the Product Key after launching the product for the first time.
If you bought Studio One from our website, you already have a My.PreSonus account. If you do not yet have a My.PreSonus account, you’ll need to create one.
Beyond being a requirement to download and activate the latest version of Studio One 5, there are many benefits to creating a My. PreSonus account including easy access to additional documentation and other content files, access to the user forums, latest tips and product videos, and the ability to easily create a technical support ticket.
To create a user account, go to: http://my.presonus.com. On that web page, click Create My PreSonus Account, then fill out the provided form or connect My. PreSonus to your Facebook, Google, or LinkedIn account, and then click Create My PreSonus Account again to create your new account.
Once you create your account, a verification email from PreSonus is automatically sent to the email address you provided. Click on the link in the email to activate your account. You are now ready to download and install Studio One.
You should receive this email within minutes of creating your account—if you do not receive our email, please contact [email protected] to have your account manually activated.
If your computer is not connected to the internet, you can still download and activate Studio One by using a different computer that does have internet access, as described in the Offline Activation section below.
To download the Studio One installer, log into your MyPresonus account at http://my.presonus.com. Click the Register a Product button, select Software or Extensions and enter your Product Key. If you bought an upgrade to Studio One from our website, the Product Key is sent to you by email. If you bought a boxed version of Studio One, the Product Key is included in the box.
Once your copy of Studio One is registered, you have the option to click a button “View My Product”. This takes you straight to that product’s detail, on that page you’ll see a Download Studio One button. Click this to download the primary Studio One installer. The correct installer for the operating system you are currently running will be automatically downloaded. If you are downloading from a different computer (i.e. Mac vs PC) than that which you plan to Install Studio One, and need an installer for a different operating system, please click on “View Other Systems” to access the correct download. Once the installer has downloaded, run it and follow all onscreen instructions.
Activation
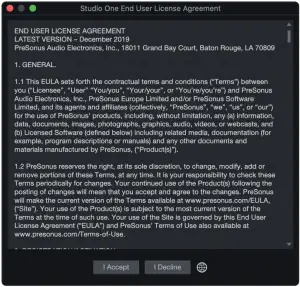
Studio One must be activated for use on your computer. Once installation is complete, launch Studio One. The License Agreement appears.
I Accept to accept the agreement, and the PreSonus Login window is then displayed.
If you already have a user account, enter your My.PreSonus username and password, and press Login to log into your account.
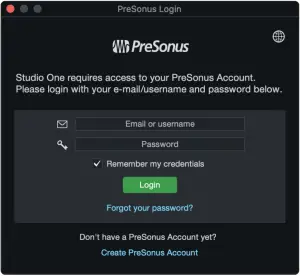
If you need to create an account and your computer is connected to the Internet, click on Create My.PreSonus Account. Fill in your desired user-account details, and click Create PreSonus Account.

In most cases, Studio One will self-activate the first time you log in with your MyPresonus account. In the rare instance where you have multiple licenses of the same Studio One version registered to the same My.PreSonus account, you will need to select which license to activate. If you have not already done so, launch Studio One and open the Studio One/ Studio One Activation menu.
If the computer on which Studio One has been installed is connected to the Internet, select the Activate my purchased version of Studio One option. If the Product Key is not already entered, type or paste in the Product Key you received via email (or with your package, if using a retail boxed or education version of Studio One). Click the Activate button to finish the activation process.

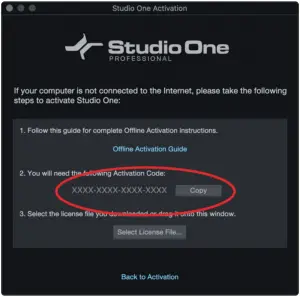
If the computer on which Studio One has been installed is not connected to the Internet, click Activate Offline in the Studio One Activation window, and make note of the Activation Code shown in the instructions. You will need a USB flashdrive, a copy of your product key, and a copy of the activation code.
Then, go to a computer with an Internet connection, visit http://my.presonus.com, and log in to your account. Click the Register a Product button, select Software or Extensions, and enter your product key, as printed on the Studio One package or provided via email. Click on Register, and you are taken to your Software list.
Select the product you just registered from your Software list, and then click Offline Activation on the next page. Click Activate Software, and enter the Activation Code provided by Studio One. You may also enter a computer name to help you keep track of your five allowed activations.
Click Offline Activation again, and then click Download License to download your User License file. Save this file to some sort of external media (such as a flash drive or CD-R), and then copy the file to the computer on which Studio One is installed.
In Studio One, navigate to the Studio One/Studio One Activation dialog again, click Activate Online, then click Select License File to load your user license file, activating Studio One.
Content Installation
Studio One comes with many audio loops and instruments that are organized into Sound Sets, as well as demo songs and tutorial videos. The number of Sound Sets available for installation depends on the version of Studio One you have installed (Artist or Professional). To install the Sound Sets and demo/tutorial material, launch Studio One and open the Studio One/Studio One Installation menu.
In the Install From menu, you can choose to download all selected content from your PreSonus Account, or navigate to downloaded content in your file system (or a provided USB stick). If you wish to install any further content at a later time, you can always return to Studio One/Studio One Installation window to do so.
By default, all essential packages included with your version of Studio One are selected for installation (Recommended Installation). You can set the Install To location to any desired location on your computer, then click on Install.
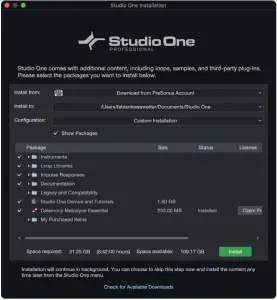
After installation, you can find all of the installed content in the Browser, which is on the Song page. Demos and tutorials can be accessed from the Start page. Instrument presets are listed under the related instrument in the Instruments tab of the Browser, as well as the preset browser in the plug-in window.
Melodyne
We have partnered with Celemony to bring you access to their Grammy winning Melodyne, a useful timing and pitch-correction and manipulation tool that integrates closely with Studio One. Studio One Artist comes with Celemony Melodyne Trial. Studio One Professional comes with a full Celemony Melodyne Essential license.
In Studio One, navigate to Studio One/Studio One Installation. Depending on the version of Studio One you have activated, you will see one of the following listed:
- Celemony Melodyne Trial (Artist)
- Celemony Melodyne Essential (Professional)
Check the box next to the version of Melodyne that is listed to select it. Then, click Install to install and authorize Melodyne.
Device Set up
Set Up Your Audio Device
Studio One automatically selects an audio device to use for audio input and output, pulling from a list of devices currently installed on your computer. If you have a PreSonus audio interface, it is selected automatically.
To select a different device, navigate to Studio One/Options/Audio Setup (macOS: Preferences/Options/Audio Setup) or click Configure Audio Device under Setup on the Studio One Start Page
Follow these steps to configure your audio device for use in Studio One:
- Select your chosen device from the Audio Device drop-down menu under the Studio One/Options/Audio Setup (macOS: Preferences/Options/Audio Setup) menu.
- Some devices offer a selection of configuration options. If your connected device has those controls, you can click on the Control Panel button next to the device selection drop-down menu and make your changes within the device’s control panel. If your device does not offer these options, the Control Panel button is greyed out.
- Set Device Block Size (and on Windows, Internal Device Block Size as well) to fit your needs. Lower settings minimize latency, which is useful when tracking. Higher settings bring more latency, but give you additional processing power, for effects and instrument plug-ins.
• macOS: Device Block Size is the audio device’s buffer size, which has a direct impact on your audio device’s performance. You can increase or decrease the Device Block Size by sliding the horizontal fader left or right. The appropriate setting depends upon your specific use of Studio One.
• Windows: Internal Block Size can be locked to the Device Block Size by checking the Lock box (checked by default). The Internal Block Size is the software buffer size, which has a direct impact on your computer system and on Studio One’s performance.
If unlocked, the Internal Block Size can be selected from a drop-down menu.
If you are unsure of the best setting, leave Internal Block Size locked to Device Block Size.
For DSP-powered effects and virtual instruments, such as Universal Audio UAD hardware, locking the Internal Block Size of your Audio Device is critical to ensure proper operation. - By default, Studio One’s processing precision is set at Single (32-bit floating point). If using Studio One Professional, you may choose double precision (64-bit floating point) from the Process Precision drop-down menu.
- If your computer has multiple processors or processing cores, Enable Multi-Processing is checked by default. Unless you experience performance issues, it is recommended you leave this at the default setting for best performance.
- When the aforementioned settings are selected, your system’s current total input and output latency, sample rate, and bit depth is reported below the Audio Setup menus.
For more detailed information on Audio Device and I/O setup, refer to the Reference Manual in the Help menu of Studio One.
Set Up Your MIDI Keyboard
A MIDI keyboard controller is a hardware MIDI device that is used for playing and controlling other MIDI devices, virtual instruments, and software parameters. In Studio One, MIDI keyboard controllers are referred to as Keyboards. Before recording a performance with a Keyboard, the MIDI keyboard controller must first be set up in Studio One. Once set up, it will be available at all times for use in Studio One.
To set up your Keyboard, navigate to Studio One/Options/External Devices (macOS: Preferences/ Options/External Devices) or click Configure External Devices under Setup on the Studio One Start Page and follow these steps:
- In the External Devices section, click on the Add… button.
- Choose your device from the predefined device list or set this to New Keyboard if you do not see your device in the list.
If set to New Keyboard, you may wish to type in a Manufacturer Name and a Device Name in the appropriate fields. This makes identifying your Keyboard easier. - Specify which MIDI channels to use to communicate with this Keyboard. All MIDI channels are selected by default.
If you are unsure of the appropriate MIDI channels to use, just leave this at the default setting. - Engage Split Channels if you would like to create a separate Instrument Track input for each MIDI channel from the Keyboard.
- Specify the device to which the Keyboard is sending and the device from which it is receiving via Studio One. Select your device driver name from the drop-down menu for both Receive From and Send To.
- You can choose to use this Keyboard as your Default Virtual Instrument Input by checking the appropriate box. If you are using only one Keyboard with Studio One, you should check this box.
Your Keyboard is now ready for use in Studio One.
For more detailed MIDI Device setup information, refer to the Studio One Reference Manual in the Help menu of Studio One.
Helpful Tips
Info View
The Info View panel, accessed via the Question Mark icon in the top toolbar on the Song and Project pages, displays all possible actions for the selected mouse tool, as well as showing the possible modifiers and their related actions. Various controls in the Studio One interface and included plug-ins also display information in the Info View when you hover the mouse pointer over them. From Info View, you can press F1 on your keyboard to jump directly to related sections of the Studio One reference manual.
Reference Manual
The Studio One reference manual is fully integrated into Studio One and can be accessed from the Help menu (Studio One Reference Manual) or by pressing F1 on your keyboard. A table of contents is shown in the left column of the help window. In addition you will find a complete index, cross-reference links inside the text and a useful search option. The English Reference Manual is installed by default, other languages are available for Download from your My.PreSonus account.
Key Commands for Migrating Users
If you are migrating from another DAW to Studio One, you might find it helpful to switch the key-command set to one specifically created to make the transition from another DAW easier.
In the Studio One/Options/General/Keyboard Shortcuts (Mac OS: Preferences/Options/ Keyboard Shortcuts) menu, you will find a heading called Keyboard Mapping Scheme. Here, you can select from keyboard maps for several DAWs, including Pro Tools® , Cubase, and Logic® ; select a map, and Studio One will recognize and apply common key commands from that DAW. You can then customize the key-commands to fit your workflow.
The key commands used for each DAW can be viewed in the Key Command menu and can be exported in several file types for external viewing.
Getting Additional Help And Connecting with Fellow Studio One Users
In Studio One 5, Help and the Reference manual are both context sensitive and will answer your questions in most cases. If you need additional assistance:
1. Please consult the online Knowledgebase, located here: http://support.presonus.com/forums
2. Ask your peers for help in the PreSonus forums: https://forums.presonus.com. The Forums are also a great place to connect with your fellow Studio One users.
3. You can also file a support ticket from the link found on the Knowledgebase or from within your My.PreSonus account.
We hope you enjoy Studio One!
Added bonus: PreSonus’ previously Top Secret recipe for…
Chicken and Andouille Gumbo
Ingredients:
- 1 C All-Purpose flour
- ¾ C Vegetable Oil
- 1 large onion (diced)
- 1 small onion (quartered)
- 6 celery stalks (diced)
- 1 large green bell pepper (diced)
- 3 cloves garlic (2 minced, 1 whole)
- 1 lb link Andouille sausage
- 4 Chicken leg quarters
- 4 qt water
- 4 bay leaves
- 1 tsp thyme
- 1 tsp Old Bay seasoning
- 1-2 C frozen okra, sliced
- ¼ C fresh parsley, minced
- 6-8 eggs (optional)
Cooking Instructions:
- In a large pot, combine whole chicken leg quarters, water, quartered onion, Old Bay, 2 bay leaves and 1 whole clove garlic.
Cover and bring to a low boil. Simmer stock until chicken is falling off the bone. Remove the chicken and set aside. Discard the onion, bay leaves, and garlic, reserving the liquid. - In a heavy saucepan, heat 1 Tbsp of the oil on medium high heat and brown the andouille until it is cooked through. Set aside sausage for later.
- In the same saucepan, add and heat remaining oil. Slowly add flour 1-2 Tbsp at a time, stirring continuously. Continue cooking and stirring the roux until it is a dark brown (it should look like melted dark chocolate). Be careful to not to get the oil too hot or the flour will burn and you’ll have to start over.
- Once roux has reached the correct color, add diced onion, celery, green pepper, and minced garlic. Cook until vegetables are very tender. Do not cover.
- Slowly add 1 quart of chicken broth and bring to a low boil, stirring constantly.
- Transfer roux mixture to a soup pot and bring to low boil. Do not cover, the roux will settle on the bottom of the pot and burn.
- Add remaining chicken broth, bay leaves, and thyme. Simmer for 30 minutes.
- While gumbo is simmering, debone and shred chicken and slice the andouille.
- Add chicken and andouille to gumbo and return to a simmer. Simmer for 30 45 minutes.
- Stir in frozen okra and parsley and bring to a rolling boil.
- Optional: Crack one egg into a teacup and quickly pour into the boiling gumbo. Repeat with the other eggs being careful not to cluster them too closely. After all the eggs have risen back to the surface, reduce heat and simmer.
- 12. Correct seasoning with salt and pepper (red, white and/or black) if necessary.
- Serve over rice with potato salad.
Serves 12
Be sure to check out www.presonus.com for the latest feature lists, compatibility, and computer requirements.
© 2020 PreSonus Audio Electronics, Inc. All Rights Reserved. Studio One is a registered trademark of PreSonus Software Ltd. Mac, and Mac OS are registered trademarks of Apple, Inc., in the U.S. and other countries. Windows is a registered trademark of Microsoft, Inc., in the U.S. and other countries. Other product names mentioned herein may be trademarks of their respective companies. All specifications subject to change without notice. Bon temps y’all; let’s make some music! Part# 70-62000152

AudioBox USB® 96
USB Audio Interface
Quick Start Guide
Overview
What’s in the box
Along with this Quick Start Guide, your package contains the following:
- AudioBox USB96
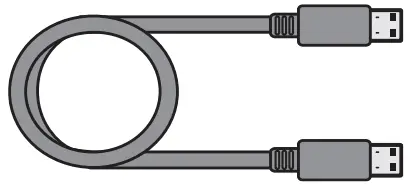
- 6’ (1.8m) USB cable
- Studio One Key Commands Guide

- PreSonus Health Safety and Compliance Guide

Downloads
- Universal Control with software drivers for Windows®
- Studio One Artist DAW and resources (approximately 2 GB)
- AudioBox USB96 Owner’s Manual PDF
Getting Started
Congratulations on choosing a PreSonus AudioBox USB®96. You now own a state-of-the-art, USB 2.0 interface featuring two Class A microphone preamplifiers, analog
monitoring, high-resolution 96 kHz recording — and Studio One Artist creative music environment.
Step 1: Register Your AudioBox USB96
- Go online to my.presonus.com and create — or log in to — you’re My PreSonus user account.

- Click to register.

- Enter your AudioBox USB96 serial number and purchase date, then click Register.

Step 2: Download Your Software and Manual
Download the following from your My PreSonus user account:
Universal Control for Windows (not necessary for Mac)

AudioBox USB96 Owner’s Manual
Studio One Artist software (optional)

Step 3: Install Universal Control
Windows users: Install Universal Control and the AudioBox USB96 Windows driver. This installer was designed to be easy to use. Simply follow the onscreen instructions.
You will be alerted that the installer has successfully finished and it will prompt you to reboot your computer.
Click “Finish” to automatically restart your computer.
macOS users: The AudioBox USB96 is a class-compliant Core Audio device, so no installation is necessary. Simply connect your AudioBox USB96 to your computer to begin using it.
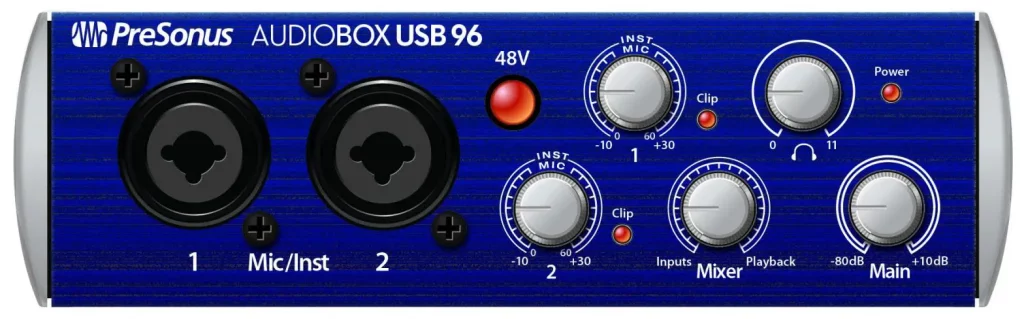
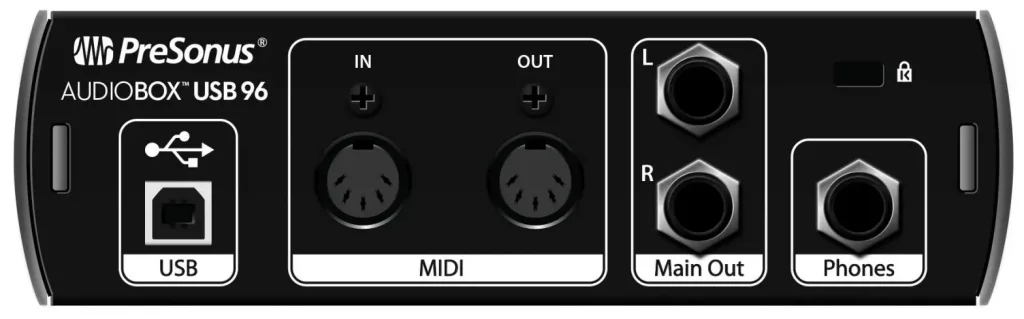
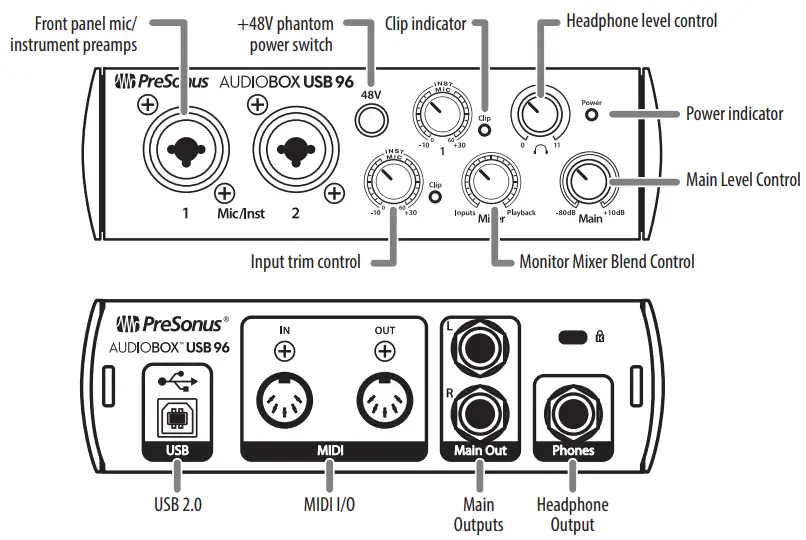
Step 4: Meet the AudioBox USB96
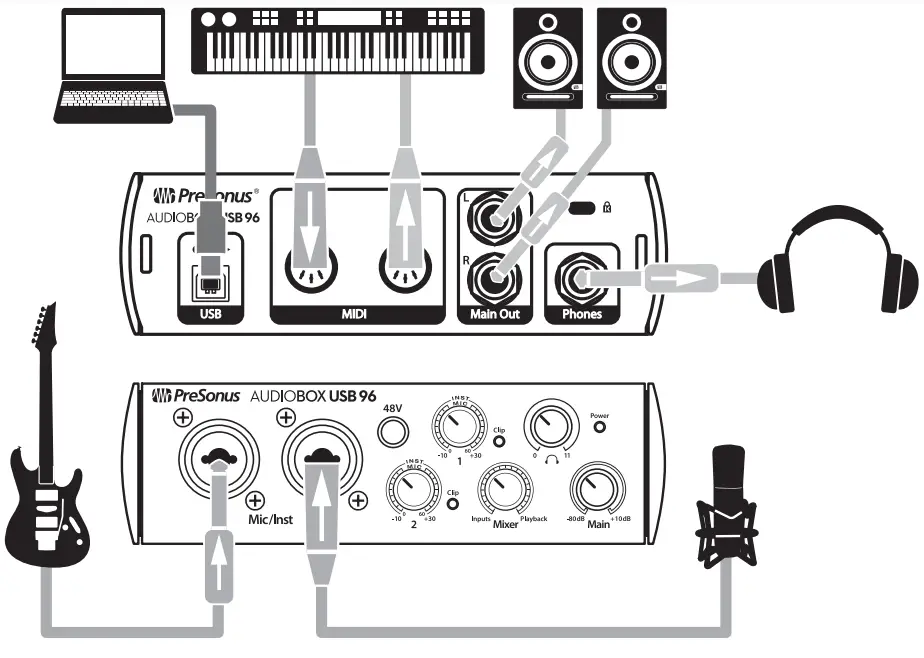
Step 5: Make the Connections
Step 6: Install Studio One
To install Studio One Artist, download the Studio One Artist installer from your My PreSonus account to the computer on which you will use it.

Windows users: Launch the Studio One Artist installer and follow the onscreen instructions.
Mac users: Drag the Studio One Artist application into the Applications folder on your Mac hard drive.
Step 7: Authorize Studio One
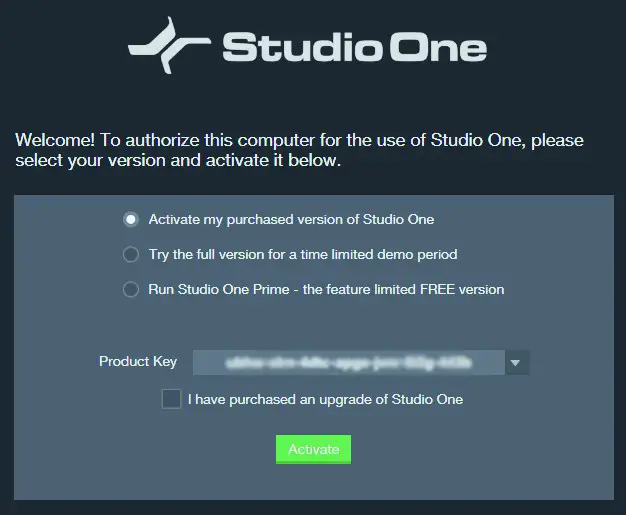
When Studio One is launched for the first time on your computer, you’ll need to enter your My PreSonus account information. Once entered, Studio One will scan your account for available Studio One Product Keys. Select your Product Key and click Activate. Your computer will need to be connected to the Internet for authorization and activation.
Step 8: Install Studio One Bundled Content

Studio One Artist comes bundled with demos, instruments, loops, and samples to provide you with everything you need to begin producing music.
The first time you launch Studio One Artist, you will be prompted to install its companion content.
Select the content you wish to add and click “Install” to automatically download and install it from your My PreSonus user account.
Step 9: Start Recording!
|
Launch Studio One Artist. |
 |
From the Start page, select “Create a new Song.” |
 |
Select “AudioBox USB” from the Templates list. |
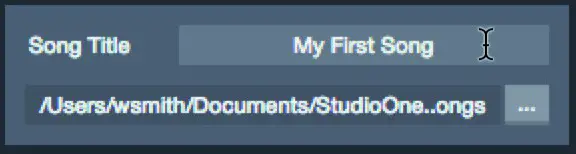 |
Give your Song a name. |
 |
Click the OK button when you are finished. |
 |
Click on the MIX button to open the Console in Studio One. |
 |
Turn the Mixer knob on the front panel of your AudioBox USB96 to the 12 o’clock position. This will allow you to hear both your inputs and the playback from the computer. |
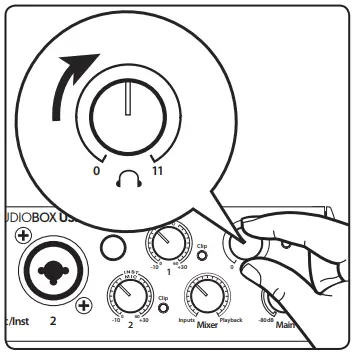 |
Connect a pair of headphones to the AudioBox USB96 headphone output and turn the Phones volume control to the 12 o‘clock position. |
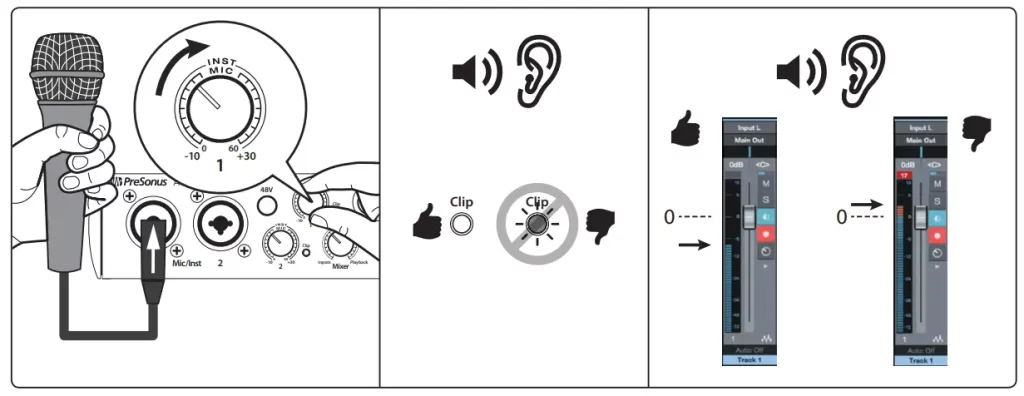
Connect a microphone then speak into it while watching the meter on Channel 1 in Studio One and slowly turning the AudioBox USB96 Input 1 Trim knob clockwise.
You are now ready to record.
Click the “Record“ button in Studio One Artist and begin recording your first masterpiece!

To playback your recording, click on the “Return to Zero” button in the transport in Studio One Artist and then click on the “Play” button.
Step 10: Learn More
A variety of helpful tips, tricks, and educational material is available at www.PreSonus.com including:
- Your AudioBox USB96 Owner’s Manual
- The PreSonus User Community
- PreSonus Learn Articles
- Studio One Video Tutorials
- And more….
© 2017 PreSonus Audio Electronics, Inc. All Rights Reserved. PreSonus and AudioBox USB have registered trademarks of PreSonus Audio Electronics, Inc. Studio One is a registered trademark of PreSonus Software, Ltd. macOS is a trademark of Apple, Inc., in the U.S. and other countries. Windows is a registered trademark of Microsoft, Inc., in the U.S. and other countries. Other product names mentioned herein may be trademarks of their respective companies All specifications are subject to change without notice.
18011 Grand Bay Ct. • Baton Rouge,
Louisiana 70809 USA• 1-225-216-7887
www.presonus.com
Part# 70-12000048-B
]]>
Key Features
- Dynamic broadcast microphone
- Cardioid polar pattern
- Great choice for recording vocals for podcasts, radio, and more
- Works with any audio interface with a microphone preamp
- End address
- Exceptional clarity throughout its frequency response range
- Rugged construction
- Top-quality performance specifications
- Integrated hard mount and windscreen
When your voice needs to be heard
Whether you’re starting your first podcast, telling your YouTube subscribers about the latest trends, or running a program for your local volunteer radio station from your living room, you need a microphone that will bring your voice to your listener with clarity and warmth. The PD-70 is built to capture the spoken word cleanly and clearly while eliminating mechanical noise and breathiness that can get between you and your audience. Thanks to superior off-axis rejection, you can set up your broadcast studio in just about any space—and unwanted reverberance, electrical hum, and the random car driving by will be left behind, leaving only the pristine, natural sound of your voice.
Frequency response

Polar pattern

Technical specifications
- Capsule Type: Dynamic
- Sensitivity: 1.6mV/Pa
- Frequency Response: 20 Hz to 20 kHz
- Polar Pattern: Cardioid
- Output Impedance: 350Ω
