
Please read all of the installation instructions carefully before installing the product. Improper installation will void the manufacturer’s warranty. The installation instructions do not apply to all types of vehicles and are written as guidelines to assist in installing the system. Please consult an experienced technician if you are not comfortable installing the product. Prior to using and installing the Backup Camera System, please read the safety information provided in this user manual. Be sure to use the product as outlined in this user manual. Alteration or modifications carried out without appropriate authorization may invalidate the user’s right to operate the equipment.
WARNING: Failure to read and follow these warnings and instructions may result in serious injury, including damaged property, so please pay close attention and exhibit the utmost care.
- The Digital Backup Camera is designed as an aid to the driver in detecting potentially hazardous driving conditions, obstructions, and large stationary objects. You, the driver, must also remember to drive safely and properly. Use of the Digital Backup Camera is not a substitute for safe, proper and legal driving practices.
- Never back up while looking only at your connected monitor display screen. You should always check behind and around the vehicle when backing up just as you would if the vehicle did not have the Digital Backup Camera. Always make sure your driving area is clear. Always back up slowly and with caution.
- Never depend on the Backup Camera entirely when backing up. The image on the monitor display screen may be slightly different from actual and real-time conditions. Objects viewed in the rear view monitor differ from actual distances because a wide-angle lens is used. So use the camera as an aid and always follow intended driving practices to properly judge distances from objects.
- The Backup Camera’s assisted low lux lighting performance feature is also an aid to a driver. Always use your own eyes to confirm the vehicle’s surroundings, as the displayed image may be not well lit or not entirely visible. Always proceed with caution and perform double-checks before proceeding.
- The area displayed by the Backup Camera is limited. It does not display objects that are close to or just below the bumper, underneath the vehicle, or objects out of the camera’s view. The camera’s view can change according to your vehicle’s orientation on the road or changing road conditions.
- Be sure to check the camera is properly functioning, is properly positioned and securely mounted, every time you operate your vehicle.
- Make sure your trunk or hatch operates correctly, as intended, before and after installation.
- Proceed with caution when cleaning your vehicle around the camera. Avoid excess water exposure around the camera especially with spraying or a power washer.
- Please make sure to keep the camera clean and unobstructed from any debris
- Follow all traffic laws and motor vehicle regulations.
- Consult local laws and regulations for any restrictions on installation or use.
- Using a Backup Camera System is not adequate enough to completely eliminate a vehicle’s blind spot. Always remember to drive with caution, following all traffic laws.
System Installation and Wiring
Note: Camera System installation on diesel vehicles may require a slightly different wiring install.
Caution: Connecting to other types of electrical systems will cause damage to your vehicle. Please contact the manufacturer if you are unaware of the system type in yOur vehicle. Refer to the model’s power requirements prior to connection and installation.
Quick Installation:
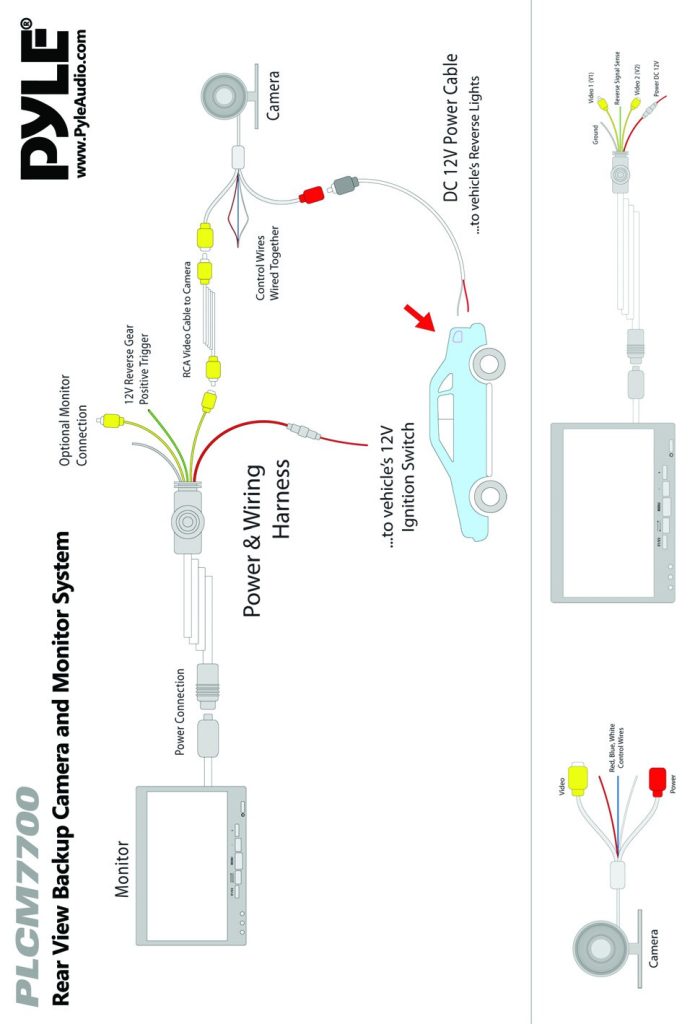
This rearview backup camera system comes in two parts, one is the camera, the other is the monitor. When installing, the camera can be mounted either in the rear of your vehicle (preferably just above the license plate) or in front of your vehicle (also, preferably just above the license plate).
This kit includes necessary wiring and cable connector accessories sufficient for typical connections. However, additional accessory cables and installation materials may be necessary for a completely secure and operational backup camera performance.
Camera Connection:
Connect the camera, using the red cable, of the included DC 12V power cable, to the positive 12V reverse tail light in the rear of your car. Then, connect the black wire, of the DC 12V power cable, and ground properly. This connected power and ground cable then connects to the camera, and will supply power to the camera directly.
Next, use the included yellow RCA video connector cable, and run that cable from the yellow RCA video connector jack of the camera, to the yellow video connector of the rearview mirror assembly’s power and wiring harness.
Power & Wiring Harness Connection:
Then, connect the included power and wiring harness. Use the DC 12V power connection cable, use it’s a red wire and connect to your vehicle’s positive 12V ignition switch voltage (Which will only be powered when your vehicle is on or activated by key). This followed by connecting the black wire of the DC 12V input and grounding properly. The green line, from the power and wiring harness, activates the 12V reverse positive trigger (Reverse Signal Sense) and supplies power once the vehicle in placed into the reverse gear. Also located on the Power & Wiring Harness are (2) video RCA connection jacks (Labeled V1 and V2). You may use these to connect to the included monitor, along with an additional compatible monitor in your vehicle.
Display Monitor Connection:
Finally, connect the power connection cable of the display monitor into the Power and Wiring Harness Connection.
The additional video input on the monitor and mirror assembly’s harness (V1/V2) is available for connecting an additional monitor or display screen. The included display monitor assembly, when connected, automatically retrieves the video signal when activated. The included display monitor will also give you the option to choose between your video sources (V1/V2).
Installation Transcript:
1. Locate the reverse taillight wiring behind your vehicle’s reverse light. You may need to remove an interior panel, or other cover, in
order to locate the wiring. Connect the included power 12V DC power cable to the reverse light.
2. Connect the camera to this ‘reverse light’ connection installation, then mount the camera in the desired location. The camera also features (3) colored Control Wires (Red, Blue and White).
Control Wires (Red, Blue and White)
Use these optional wiring cables to take advantage of the backup camera’s additional features. Wiring the colored cables together allow further camera control and ability:
Control Wires, Wiring Combinations Output Effect:
Red, Blue, and White:
Wired together, this combination flips the video display horizontally and activates the distance scale lines on the display monitor.
Blue and Red:
Wired together, this combination ONLY activates the distance scale line display on your video monitor
White and Red:
Wired together, this combination ONLY flips the video display horizontally (For mounting the camera in the front of your vehicle.)
3. Attach the Display Monitor.
4. Use the included Power and Wiring Harness’ 12V DC power cable to connect to, preferably, your vehicle’s fuse panel. – 12V ignition control line, this line receives power 12V with key on, loses power with key off.
5. Connect the Power and Wiring Harness to the Display Monitor.
6. Connect the RCA video cable from the camera, to the Power and Wiring Harness.
Camera Installation Transcript:
a. Connect the camera’s Red wire to your vehicle’s reverse light positive wire.
b. Connect the camera’s Black wire to your vehicle’s reverse light negative wire.
c. Connect your desired ‘Control Wires’ combination.
d. Reverse Signal Sense ‘Green Line’ 12V reverse positive trigger – This receives 12V positive power when the reverse lights are activated on the vehicle. It forces the monitor to the ‘ON’ position and into rear view camera mode.
‘Please remember to run cables in the least obtrusive route possible. Vehicle vibrations and bumpy driving conditions can result, so extra care should be taken to securely mount the camera and fasten all cables and wiring to secure locations.
‘Ensure the wires are safely and securely connected, with proper isolation applied to all connections.
Additional Notes:
– Determine the best location for the camera (The camera is preferably mounted just above the license plate).
– Be sure when running the connection cables to leave a small amount of slack so you can still move the camera around the license plate, if you decide to slightly adjust the camera’s positioning at a later time.
– After installation, Test the camera before use. Placing your vehicle in reverse should provide o picture in the monitor within the rearview mirror assembly.
PHSPAMT22
Bubble Bath Spa Mat User’s Manual

BUBBLE BATH SPA MAT
Model #: PHSPAMT22
When using electrical products, especially when children are present, basic safety precautions should always be followed:
DANGER: To reduce the risk of electric shock:
- Always unplug the product from the electric outlet immediately after using (and before cleaning).
- If the appliance falls into water, unplug it immediately. Do not reach into the water.
- Do not place or store appliance where it can fall or be pulled into a tub or sink. Do not place or drop into water or other liquid. Store in dry place.
- This appliance has to be positioned so that the plug is accessible. Parts incorporating electrical components must be located or fixed so that they cannot fall into the bath.
 Do not use or put up over bathtubs, showers or any basin etc. filled with water!
Do not submerge the appliance in water or liquid!
WARNING: To reduce the risk of burns, electrocution, fire, or injury to persons:
- The appliance should never be left unattended when plugged in. Always unplug the appliance when it is not in use.
- Close supervision is necessary when this appliance is used by, or near children, or disabled people.
- Use this appliance only for its intended use as described in this manual. Do not use any attachments that have not been recommended by the manufacturer.
- Never operate the appliance if it has a damaged cord or plug, if it is not working properly, if it has been dropped or damaged, or dropped into water. Return this appliance to the service center for examination and repair.
- Do not put and use the appliance next to/near electric heaters, hot surfaces or any heat sources. Fire, electric shock or injury might occur.
- Do not carry this unit by holding the power cord.
- Using the appliance for more than 30 minutes is not recommended. Continuous use could lead to the product being overheated. When the product is overheating, stop using it and allow it to cool down before operation.
- Keep the power cord away from heated surfaces.
- Disconnect the power cord by holding the plug attached to the cord instead of pulling the cord itself.
- Do not stand on this appliance.
- Never operate this appliance near an electrical oven or any heat source.
- Never operate the appliance if any openings are blocked. Keep the openings free of lint, hair and other particles.
- Do not use the appliance outdoors or operate it where aerosol (spray) products are being used or where oxygen is being administered.
- Do not use this product if you have sensitive skin or poor circulation. The use by unattended children or incapacitated persons can be dangerous.
- Never use while sleeping or drowsy.
- Do not plug in the appliance before the tub is filled with water. Do not overfill the tub and make the water run over the edge after you enter it.
- Never drop or insert any objects into any opening or the tube.
- Always ensure that the air inlet on the underside of the main unit is not covered.
- This appliance is equipped with a protective device which may make the appliance not operable under certain conditions (such as immersion of the appliance). If the appliance becomes inoperable, return it to the service center for examination and repair.
- Do not use this product with an extension cord. This will damage the circuit protector.
CAUTIONS
- Never use this appliance as a substitute for medical attention. Persistent ailments and symptoms could be more serious and should be investigated.
- This appliance should not be used in the following cases: Tuberculosis, benign and malignant tumors, hemorrhages, inflammations on the skin, phlebitis and thrombosis, open and fresh wounds, bruises, broken skin or varicose veins, or undetermined calf pain.
- Consult your physician, if you have any therapeutic questions regarding its use.
- Do not use on any unexplained pain before consulting your physician.
- Stop using the product if the pain increases or the swelling occurs after application.
- Do not use on any part of the body that is anesthetized.
- Do not use on any part of the body where surgery has been performed recently.
- It should not be used by children younger than 12 years old.
- It should not be used by people during pregnancy or anyone with high blood pressure or a heart condition.
- Do not use the appliance if you have sensitive skin.
- This appliance should not be left with children without supervision in order to avoid from being played with.
- As additional protection, the installation of residual current device (RCD) with a rated breaking current of not more than 30mA is recommended in the electric circuit of the bathroom. Please consult a qualified electrical engineer.
1. MAIN UNIT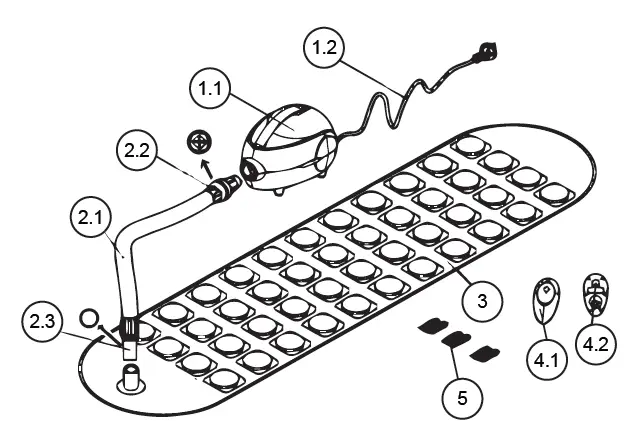
1.1 Main unit
1.2 AC power cord 3M (approx.)
2. AIR HOSE: 2.5M (approx.)
2.1 Air hose
2.2 Hose end with valve and aroma clip
2.3 Hose end without valve
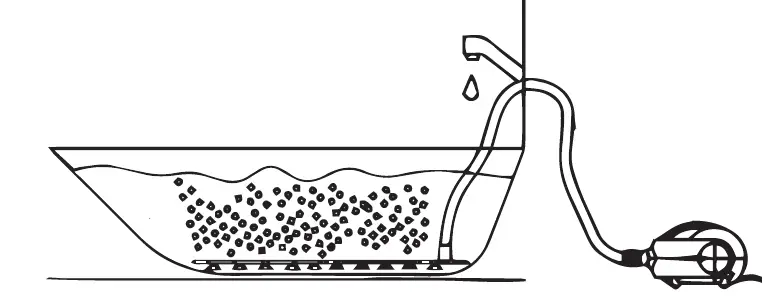
The hose end (fig 2.2) should be plugged into airflow hole of the main unit, and another hose end (fig 2.3) should be connected to the bath mat (fig 3).
3. BATH MAT WITH SUCTION CUPS ON UNDERSIDE
4. REMOTE CONTROL
4.1 Remote control with function button
4.2 Suction cup of the remote control and the battery (CR2032) compartment
5. 3x AROMA CLIP WITH PADS
6. SPARE COTTON PADS FOR AROMA CLIP (NOT SHOWN)
- Remove the main unit and all accessories from the box and check if there’s anything damaged.https://manuals.plus/wp-content/uploads/2020/12/bubble-bath-spa-mat-assembly.png
- Be sure the Control Unit is unplugged.
Place control unit on the floor or a level, sturdy surface near your bathtub.
Do not place unit where it can fall into the bathtub. - Make sure the ON/OFF switch is at the position “O”
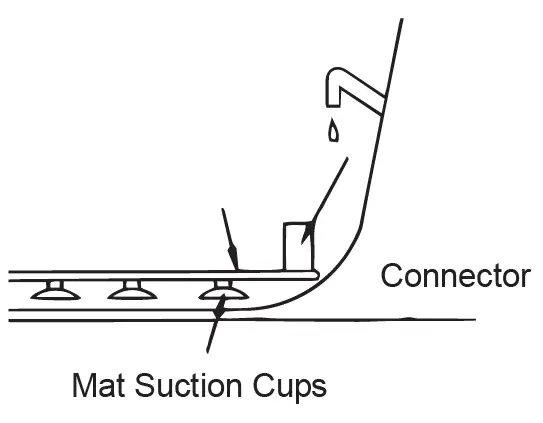
- Place the bath mat into bathtub and press it down. Use suction cups to stick the bath mat firmly to the tub (it must not slide around). The suction cups will stick better if they are slightly wet. The connector on the bath mat is on the end where your feet should be.
- Make sure there is a pleasant room temperature in the bathroom.
- Before using the product for the first time, we suggest to give your bath tub a deep cleaning for the soft mat to adhere to the tub floor better.
- Connect the hose end with the valve and aroma clip to the main unit and ensure it is locked by turning it counterclockwise. Connect the other hose end to the connector on the bath mat.
CAUTIONS:
For safety, the main unit must be kept at least 60CM away from the bathtub and always keep the floor dry when the appliance is put on the floor.
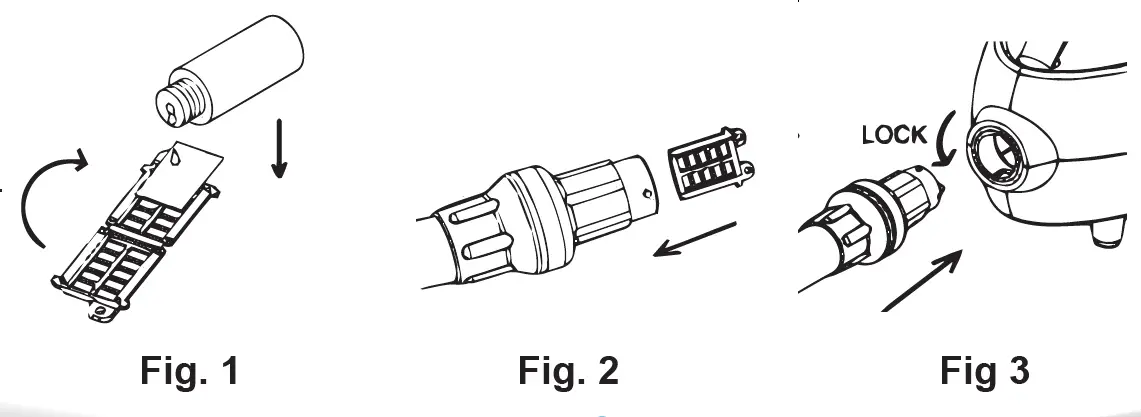
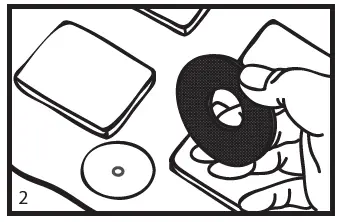
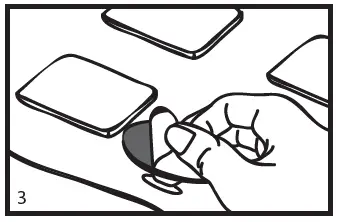
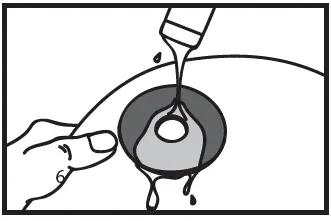
- Put a drop of essential oil on the cotton pad, place the cotton pad on aroma clip and close the aroma clip (Fig. 1)
- Insert the aroma clip into the tube end (Fig. 2)
- Plug the air hose into main machine (Fig. 3)
Note: After using please dispose properly the cotton pad
Note: Too much essential oil may cause aroma clip erosion.
The sprinkler bath can be controlled directly from the set by means of on/off switch or with the remote control.
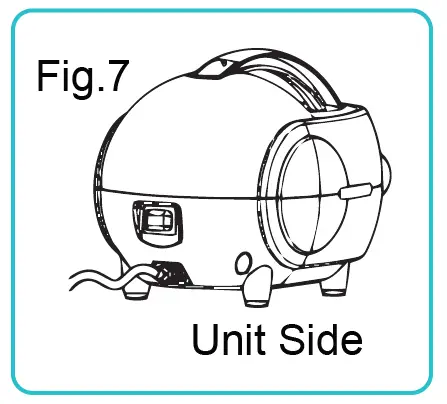
The ON/OFF switch is on the back side of the (Fig.7). You can find the ON/OFF on the back of the unit.
“0” : The device is switched off. Remote control won’t work.
“I” : The device will be turned on without using remote control and will run at low intensity level. In this mode, you can still use the remote control to adjust the intensity level and turn off the product.
“II” : The device is in stand-by mode and can only be operated by the remote control.
The appliance switches off automatically after 20 minutes.
This unit can be operated with the remote control by pointing the remote control at the infrared sensor on the handle of the main unit, and pressing the function button. Also, the remote control comes with a suction cup on the back. Slightly wet the suction cup and press it firmly to the bathroom wall or to the side of the bathtub. Do not immerse the remote control in water.
When using the remote control, the selected setting is indicated by the colored LED lights (Fig.7) on the handle.
- The lower intensity level- the green LED display lights up
- Press once more and the machine will reach the higher intensity level
- Red LED display lights up
- Press once more and the machine switches into programme mode
- Orange LED display lights up
“Power On /Low High Program Power Off”
BUTTON: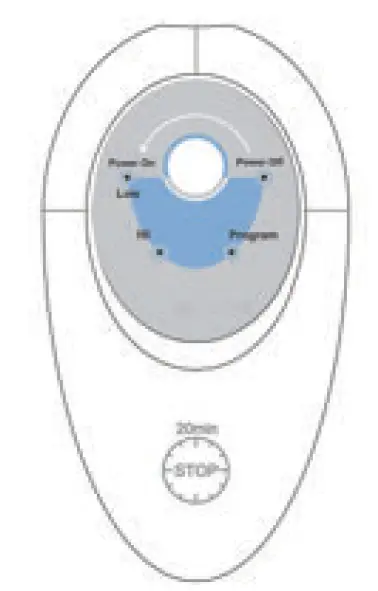
- Press the button once, the machine will turn on with Low intensity.
- Press the button the second time to change the intensity to Hi.
- Press button for the third time to enter program mode. Program mode means the intensity will change automatically with the rotation of Low, Medium and High.
- Press the button the fourth time to turn the machine off.
- The appliance will turn off automatically after using 20 minutes.
BATTERY:
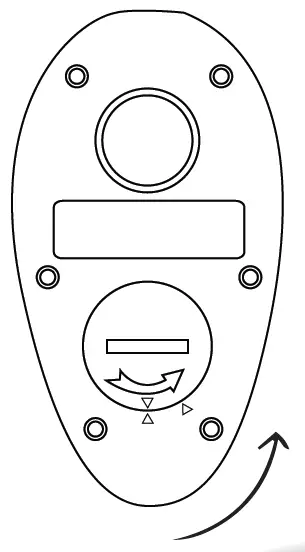
To change the battery, simply use a coin to open the cover of the battery compartment on the back of the remote control, once the battery is inserted, use the coin again to close the battery compartment.
Battery Operated 3V CR 2032
Batteries do not belong in household waste. As a consumer, you have the obligation by law to take all used batteries to public collection points in your area or where batteries are sold.
AIR BUBBLES:
Hundreds of pinholes on the bath mat produce millions of air bubbles every second.
DOUBLE-SIDED ADHESIVE PLATE:
Check if the plates are clean and without deformation before using. If the round plate is deformed, please submerge it into warm water (similar temperature as the bath water) for 5~10min. Always wait until the round plates are completely dry before attaching to the suction cups.
- Tear off the protection paper, the side with non-woven fabric is to be attached on the suction cup.

- We suggest to attach 4 round plates on suction cups located in 4 corners and 1 in center.
- Remove the plastic cover on the other side of the round plate. The soft mat is ready to be used.
- Press down every suction cup.

- Remove the soft mat from the bath tub. Slide your fingernail under the suction cups ( or round plates ) to release the vacuum. Do not remove the soft mat by pulling it.

- Cleaning the round plates is easy; just use your fingers and some water to clean it.
- Clean the main unit with a soft damp cloth. Clean the bath mat with a mild detergent or soap; it is recommended to clean the bath mat each time after being used.
- Disinfect the bath spa periodically to keep it bacteria free. If the appliance is used frequently, it is advisable to disinfect it on weekly basis. Use a household disinfectant by following the manufacturer’s instructions.
- The best way to take the bath mat out of the tub is by carefully sliding a fingernail under suction cups to release the vacuum and pulling the mat sideways gently instead of tearing or pulling it.
- It is recommended to turn the bath mat over, lay it flat, and press it lightly to squeeze any remaining water.
- Store the appliance in a dry and clean place. If it will not be used for a long period of time, store it in the original package.
CAUTION: READ SAFETY RULES AND OPERATING INSTRUCTION CAREFULLY. THIS PRODUCT IS INTENDED FOR INDOOR USE ONLY.
This appliance has a polarized plug (one blade is wider than the other). As a safety feature, this plug will fit in a polarized outlet only one way. If the plug does not fit fully in the outlet, reverse the plug. If it still does not fit, contact a qualified electrician. Do not attempt to bypass this safety feature.
This appliance is provided with an appliance leakage circuit interrupter (ALCI) safety device. This device is designed to make the unit inoperable under some abnormal conditions. The ALCI safety device is equipped with a test button in order to check its operation. This unit should be tested before using to make sure the safety device is operational.
It is recommended to test the ALCI before using the appliance each time.
- Press the reset button on the ALCI device.
- Press the test button. The reset button should pop out and the appliance will stop the operation. This verifies that the safety device is operating properly.
- Press the reset button to reactivate your ALCI safety device.
- The bubble bath mat now is ready for use.
Note: If the reset button pops out during use, press the reset button. If the reset button cannot be pressed down, stop using the appliance and return it to the distributor or the designated service center.
Technical Data:
Voltage: 120V ~ 60Hz
Watts: 350W
Remote Control: 3V CR2032 Lithium Battery

PHSPAMT22
Portable Spa Bubble Bath Massager
Thermal Spa Waterproof Non-slip Mat with Suction Cup Bottom, Motorized Air Pump and Adjustable Bubble Settings
USER MANUAL
When using electrical products, especially when children are present, basic safety precautions should always be followed:
DANGER: To reduce the risk of electric shock:
- Always unplug the product from the electric outlet immediately after using (and before cleaning).
- If the appliance falls into water, unplug it immediately.
Do not reach into the water. - Do not place or store appliance where it can fall or be pulled into a tub or sink.
Do not place or drop into water or other liquid. Store in dry place. - This appliance has to be positioned so that the plug is accessible.
- Parts incorporating electrical components must be located or fixed so that they
cannot fall into the bath.
Do not use or put up over bathtubs, showers or any basin etc. filled with water! Do not submerge the appliance in water or liquid!
WARNING: To reduce the risk of burns, electrocution, fire, or injury to persons:
- The appliance should never be left unattended when plugged in. Always unplug the appliance when it is not in use.
- Close supervision is necessary when this appliance is used by, or near children, or disabled people.
- Use this appliance only for its intended use as described in this manual. Do not use any attachments that have not been recommended by the manufacturer.
- Never operate the appliance if it has a damaged cord or plug, if it is not working properly, if it has been dropped or damaged, or dropped into water. Return this appliance to the service center for examination and repair.
- Do not put and use the appliance next to/near electric heaters, hot surfaces or any heat sources. Fire, electric shock or injury might occur.
- Do not carry this unit by holding the power cord.
- Using the appliance for more than 30 minutes is not recommended.
Continuous use could lead to the product being overheated. When the product is overheating, stop using it and allow it to cool down before operation. - Keep the power cord away from heated surfaces.
- Disconnect the power cord by holding the plug attached to the cord instead of
pulling the cord itself. - Do not stand on this appliance.
- Never operate this appliance near an electrical oven or any heat source.
- Never operate the appliance if any openings are blocked. Keep the openings free of lint, hair and other particles.
- Do not use the appliance outdoors or operate it where aerosol (spray) products are being used or where oxygen is being administered.
- Do not use this product if you have sensitive skin or poor circulation.
The use by unattended children or incapacitated persons can be dangerous. - Never use while sleeping or drowsy.
- Do not plug in the appliance before the tub is filled with water. Do not overfill the tub and make the water run over the edge after you enter it.
- Never drop or insert any objects into any opening or the tube.
- Always ensure that the air inlet on the underside of the main unit is not covered.
- This appliance is equipped with a protective device which may make the appliance not operable under certain conditions (such as immersion of the appliance). If the appliance becomes inoperable, return it to the service center for examination and repair.
- Do not use this product with an extension cord. This will damage the circuit protector.
- The appliance is designed to work with ordinary household current only at 120volts A.C., 60 Hz.
CAUTIONS
- Never use this appliance as a substitute for medical attention. Persistent ailments and symptoms could be more serious and should be investigated.
- This appliance should not be used in the following cases:
Tuberculosis, benign and malignant tumors, hemorrhages, inflammations on the skin, phlebitis and thrombosis, open and fresh wounds, bruises, broken skin or varicose veins, or undetermined calf pain. - Consult your physician, if you have any therapeutic questions regarding its use.
- Do not use on any unexplained pain before consulting your physician.
- Stop using the product if the pain increases or the swelling occurs after application.
- Do not use on any part of the body that is anesthetized.
- Do not use on any part of the body where surgery has been performed recently.
- It should not be used by children younger than 12 years old.
- It should not be used by people during pregnancy or anyone with high blood pressure or a heart condition.
- Do not use the appliance if you have sensitive skin.
- This appliance should not be left with children without supervision in order to avoid from being played with.
- As additional protection, the installation of residual current device (RCD) with a rated breaking current of not more than 30mA is recommended in the electric circuit of the bathroom. Please consult a qualified electrical engineer.
1. MAIN UNIT
1.1 Main unit
1.2 AC power cord 3M (approx.)
2. AIR HOSE: 2.5M (approx.)
2.1 Air hose
2.2 Hose end with valve and aroma clip
2.3 Hose end without valve
The hose end (fig 2.2) should be plugged into airflow hole of the main unit, and another hose end (fig 2.3) should be connected to the bath mat (fig 3).
3. BATH MAT WITH SUCTION CUPS ON UNDERSIDE
4. REMOTE CONTROL
4.1 Remote control with function button
4.2 Suction cup of the remote control and the battery (CR2032) compartment
5. 3x AROMA CLIP WITH PADS
6. SPARE COTTON PADS FOR AROMA CLIP (NOT SHOWN) ASSEMBLY:
- Remove the main unit and all accessories from the box and check if there’s anything damaged.
- Be sure the Control Unit is unplugged. Place control unit on the floor or a level, sturdy surface near your bathtub.
Do not place unit where it can fall into the bathtub. - Make sure the ON/OFF switch is at the position “0”.
- Place the bath mat into bathtub and press it down. Use suction cups to stick the bath mat firmly to the tub (it must not slide around). The suction cups will stick better if they are slightly wet. The connector on the bath mat is on the end where your feet should be.
- Make sure there is a pleasant room temperature in the bathroom.
- Before using the product for the first time, we suggest to give your bath tub a deep cleaning for the soft mat to adhere to the tub floor better.
- Connect the hose end with the valve and aroma clip to the main unit and ensure it is locked by turning it counterclockwise. Connect the other hose end to the connector on the bath mat.
CAUTIONS
For safety, the main unit must be kept at least 60CM away from the bathtub and always keep the floor dry when the appliance is put on the floor.
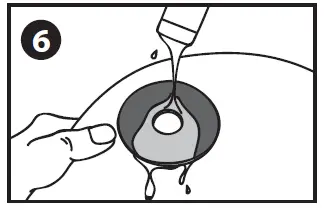
• Put a drop of essential oil on the cotton pad, place the cotton pad on aroma clip and close the aroma clip (Fig. 1)
• Insert the aroma clip into the tube end (Fig. 2)
• Plug the air hose into main machine (Fig. 3)
Note: After using please dispose properly the cotton pad.
Too much essential oil may cause aroma clip erosion.
The sprinkler bath can be controlled directly from the set by means of ON/OFF switch or with the remote control.
Set Control
The ON/OFF switch is on the back side of the (Fig.7).
You can find the ON/OFF on the back of the unit.
“0” : The device is switched off. Remote control won’t work
“I” : The device will be turned on without using remote control and will run at low intensity level. In this mode, you can still use the remote control to adjust the intensity level and turn off the product.
“II” : The device is in stand-by mode and can only be operated by the remote control.
The appliance switches off automatically after 20 minutes.
This unit can be operated with the remote control by pointing the remote control at the infrared sensor on the handle of the main unit, and pressing the function button. Also, the remote control comes with a suction cup on the back. Slightly wet the suction cup and press it firmly to the bathroom wall or to the side of the bathtub. Do not immerse the remote control in water. When using the remote control, the selected setting is indicated by the colored LED lights (Fig.7) on the handle.
- The lower intensity level- the green LED display lights up
- Press once more and the machine will reach the higher intensity level – Red LED display lights up
- Press once more and the machine switches into programme mode – Orange LED display lights up

BUTTON: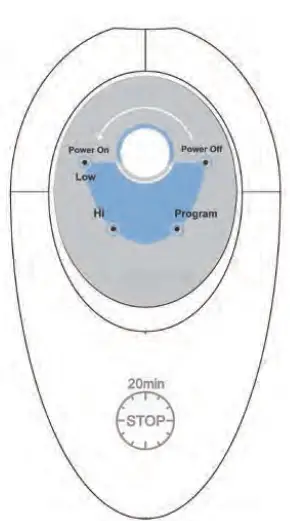
1. Press the button once, the machine will turn on with Low intensity
2. Press the button the second time to change the intensity to Hi
3. Press button for the third time to enter program mode.
Program mode means the intensity will change automatically with the rotation of Low, Medium and High.
4. Press the button the fourth time to turn the machine off.
5. The appliance will turn off automatically after using 20 minutes
BATTERY:
To change the battery, simply use a coin to open the cover of the battery compartment on the back of the remote control, once the battery is inserted, use the coin again to close the battery compartment.
Battery Operated 3V CR 2032
Batteries do not belong in household waste. As a consumer, you have the obligation by law to take all used batteries to public collection points in your area or where batteries are sold.
AIR BUBBLES:
Hundreds of pinholes on the bath mat produce millions of air bubbles every second.
DOUBLE-SIDED ADHESIVE PLATE
Check if the plates are clean and without deformation before using. If the round plate is deformed, please submerge it into warm water (similar temperature as the bath water) for 5~10min. Always wait until the round plates are completely dry before attaching to the suction cups.
- Tear off the protection paper, the side with nonwoven fabric is to be attached on the suction cup.
- We suggest to attach 4 round plates on suction cups located in 4 corners and 1 in center.
- Remove the plastic cover on the other side of the round plate. The soft mat is ready to be used.

- Press down every suction cup.
- Remove the soft mat from the bath tub. Slide your fingernail under the suction cups (or round plates) to release the vacuum. Do not remove the soft mat by pulling it.
- Cleaning the round plates is easy; just use your fingers and some water to clean it.
- Clean the main unit with a soft damp cloth. Clean the bath mat with a mild detergent or soap; it is recommended to clean the bath mat each time after being used.
- Disinfect the bath spa periodically to keep it bacteria free. If the appliance is used frequently, it is advisable to disinfect it on weekly basis. Use a household disinfectant by following the manufacturer’s instructions.
- The best way to take the bath mat out of the tub is by carefully sliding a fingernail under suction cups to release the vacuum and pulling the mat sideways gently instead of tearing or pulling it.
- It is recommended to turn the bath mat over, lay it mat, and press it lightly to squeeze any remaining water.
- Store the appliance in a dry and clean place. If it will not be used for a long period of time, store it in the original package.
CAUTION: READ SAFETY RULES AND OPERATING INSTRUCTION CAREFULLY. THIS PRODUCT IS INTENDED FOR INDOOR USE ONLY.
This appliance has a polarized plug (one blade is wider than the other). As a safety feature, this plug will fit in a polarized outlet only one way. If the plug does not fit fully in the outlet, reverse the plug. If it still does not fit, contact a qualified electrician. Do not attempt to bypass this safety feature.
This appliance is provided with an appliance leakage circuit interrupter (ALCI) safety device. This device is designed to make the unit inoperable under some abnormal conditions. The ALCI safety device is equipped with a test button in order to check its operation. This unit should be tested before using to make sure the safety device is operational.
ALCI Testing
It is recommended to test the ALCI before using the appliance each time.
- Press the reset button on the ALCI device.
- Press the test button. The reset button should pop out and the appliance will stop the operation. This verifies that the safety device is operating properly.
- Press the reset button to reactivate your ALCI safety device.
- The bubble bath mat now is ready for use.
Note:
- If the reset button pops out during use, press the reset button.
- If the reset button cannot be pressed down, stop using the appliance and return it to the distributor or the designated service center.
- Drop the Mat in the Tub & Relax!
- Instantly Create a Soothing Bubbling Bath Spa
- Designed to Lay on Your Bathtub Floor
- Fully Submergible 100% Waterproof Safe Mat
- Connected Air Hose Delivers Massaging Bubbles
- Cushioned & Pleasantly Padded Surface Texture
- Full Body Support & Comfort
- Soothing Non-Abrasive Water-Safe Material
- Simple Button Control Operation
- Suction Cup Bottom for Non-Slip Comfort
- Adjustable Bubble Intensity Settings
- Motorized Air Pump is to be Placed Outside of Your Tub
- Includes Wireless Remote Control
- Motorized Air Pump
- Air Hose & Soft Mat
- Aroma Clip
- Remote Control
- Power Cable
- Air Hose Length: 8.2′ Feet
- Automatic Safety Power-Off Function
- Remote Control Battery: Button Cell (CR2032)
- Engineered Soft & Mold Resistant Mat
- Mat Dimensions (L x W): 47.0” x 14.2”
- Power: 120V (350 Watt System)
- Total Weight: 7.05 lbs.
Questions? Issues?
We are here to help!
Phone: (1) 718-535-1800
Email: [email protected]

PYLE 300 Watt Stero Receiver

PT270AIU 300 Watt Stero Receiver
with Built-In iPod Docking Station -AM-FM Tuner, USB/SD Card Readers and Subwoofer Control
Please read these operating instructions carefully before use. They will acquaint you fully with its features.
This product adopts highly advanced digital techniques, high powered, four -channel outputs to be the media center of your living room. It includes an AM/FM tuner, MP3/iPod input jack, headphone jack. This Pyle Pro hybrid amplifier also has sub-out and pre-outs for a variety of applications.
WARNING: TO REDUCE THE RISK OF FIRE OR ELECTRIC SHOCK. DON’T EXPOSE THIS EQUIPMENT TO RAIN OR MOISTURE
TO REDUCE THE RISK OF FIRE OR ELECTRIC SHOCK AND ANNOYING INTERFERENCE, USE THE RECOMMENDED ACCESSORIES ONLY. THIS DEVISE IS INTENDED FOR CONTINUOUS OPERATION!
FEATURES
- PRE-Amp with AM/FM Tuner
- CPU management of all functions, remote sensor
- Digital fluorescent output displays all the functions
- Separate gain control of pre-amp and subwoofer
- All the blue lights and blue rings gain control through LED Dimmer
- AM/FM Quartz synthesized Tuner, auto station seek and store, 50 stations storage, with both manual and automatic tuning
- Ipod/Mp3 Input with cable
- Digital karaoke system
- Over heat, over current protection
PRECAUTIONS
- Power Source: The unit should be connected to a power supply AC-110/60Hz, AC-220V/50Hz.
- Ventilation: The unit should be situated so that its location or position does not interfere with its proper ventilation. Place the unit at least 10cm away from the walls.
- Water and moisture: The unit should not be used near water-for example, near a swimming pool, in a wet basement, etc.
- Electric Shock: If a metal objects, such as a hair pin or a needle, comes into contact with the inside of this appliance, a dangerous electric shock may result. For families with children, never permit children to put anything, especially metal, inside this unit.
- Enclosure Removal: Do not open the unit as this might result in damage to the circuitry or electrical shock. If a foreign object should get into the unit, contact your dealer or service company.
- Abnormal Smell: If an abnormal smell or smoke is detected, immediately turn the power OFF and pullout the power cord. Contact your dealer or nearest service station.
How to replace the preset radio stations?
Use the remote control to set the radio stations.
NOTE: The preset radio stations can’t be deleted, BUT CAN BE REPLACED.
Operations Steps:
- Press TUNER MODE on the remote control
- Pres AM/FM, and select FM
- Press PRE/NEXT to select the stations you don’t want to keep;
- Press TUNING again choose the radio stations you want to save
- Press MEMORY to save the new stations
In this way, you can replace the preset radio stations.
OPERATION
- POWER: Use this button to turn ON or OFF the speakers.
Caution: Make sure that all connections are properly connected and the main volume is set to minimum level before turning ON the unit. - INPUT SELECT: Select the input source: CD/DVD, USB, Radio.
- MICROPHONE VOLUME: MIC VOL Adujst “MIC VOL” knob to increase or decrease the karaoke volume
- ECHO: Adjust “ECHO” to get a satiable echo effect.
- TREBLE/BASS: Turn TREBLE/BASS knob to adjust treble/bass tone master channel.
- MASTER VOLUME: You can adjust MASTER VOLUME from turn right volume up , turn left volume down.
CONTROLS & FUNCTIONS
FRONT PANEL
- POWER SWITCH
Press to power unit ON/OFF - SD/MMC CARD READER
- USB READER
- PLAY/PAUSE
- PREV
Used to select the Previous station which have been kept in system - NEXT
Used to select the next station which have been kept in system - TUNING <
- TUNING >
- AUTOSCAN
Auto search for radio station
- IPOD DOCK
- AM/FM SELECTOR
- MUTE
- A/B SPEAKERS OUTPUT SELECTOR
- INPUT SELECTOR
- VOLUME CONTROL
- SUB.VOL CONTROL
- TREBLE
- BASS
- ECHO
- MIC. TREBLE
- MIC. BASS
- MIC. VOL
- MIC 2 INPUT
- MIC 1 INPUT
BACK PANEL
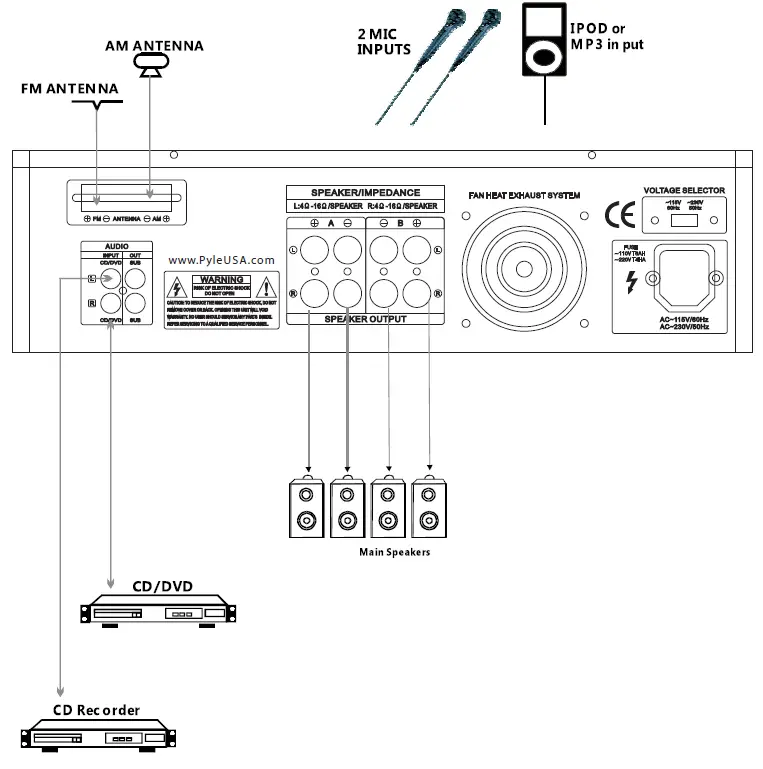
- TUNER ANT: Connect for AM and FM antennas.
- AUDIO INPUT JACKS:
Connect the audio ouput jacks of DVD/CD AUX to these jacks. - A SPEAKER OUTPUT TERMINALS:
Connect your speaker system to these terminals. - B SPEAKER OUTPUT TERMINALS:
Connect other speaker system(s) to these terminals. - COOLING FAN
- VOLTAGE SELECTOR SWITCH: Slide to select correct voltage 110V or 220V.
- POWER CORD: Connect to AC 110V/60Hz and 220V/50Hz outlet.
REMOTE CONTROL
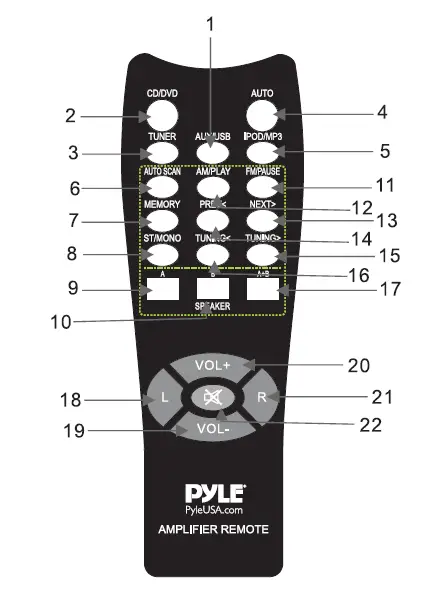
- AUX/USB Selector
- CD/DVD Selector
- TUNER Selector
- AUTO: Automatically search the single source when power ON
- IPOD/MP3 Selector
- AUTOSCAN: AM/FM auto scan selector scan and store stations automatically. Can store 50 stations
- MEMORY: After a station has been found you can store the station by pressing the MEMORY botton and the screen will display SAVE.
- ST/MONO: Stereo and mono selector.
- SPEAKER A selector
- SPEAKER B selector
- FM/PAUSE selector
- AM/PLAY selector
- NEXT> Next station
- PREV< Previous selector
- TUNING>
- TUNING<
- A+B SPEAKER selector
- 21. L/R Left/Right balance control
- VOL-
- VOL+
- MUTE selector
Remote Controller 0peration
- Remote controller should be operated within 6 meter and the scope of 30° in front of receiver.
- Make sure that there is no big obstacle between remote controller and machine.
- Remote sensor should be far away from the light, high amounts of light can affect its performance.
SAFETY INSTRUCTIONS
- Make sure that all connections are properly connected and the main volume is set to minimum level before turning ON the unit.
- When more than one pair of speakers are used, (specially the main speaker output) make sure that the speakers used are of the same wattage and impedance, otherwise the unit maybe damaged under high power or long term operation.
- To avoid humming sounds and unwanted noise, make sure that all the wires are properly inserted.
- For speaker cords, strip off the vinyl coating and twist the wire tip. Push down the pink jack or loosen the screw terminal, before inserting the wire tip, then fasten it and tighten the screw. Be careful not to let the wires stick out of the terminal otherwise this may cause short circuit when wires of different terminal contact each other.
- After the unit is turned ON, adjust the main volume to the desired level same with bass and treble volume, etc.

Features:
- Auto Station Seek
- A/B Speaker Output
- 110-220V Switchable
- USB/SD Card MP3 Player
- 50 Radio Station Memory
- Inputs: RCA (1 Audio Source)
- Total Power Output: 600 Watt
- AM/FM Quartz Synthesized Tuner
- Separate Subwoofer Gain Controls
- Digital Fluorescent Output Display Meter
- Microphone Volume, Tone & Echo Controls
- 2 Mono RCA Dedicated for Subwoofer Output
- Outputs: Banana Bbinding Post (to Speakers)
- iPod / MP3 Input with Included Connection Cable
- iPod Docking Station, Suitable for All iPod & iPhone Models (USB, SD Memory & iPod Not Included)
- 150 Watt x 2 @ 8 Ohms
- 175 Watt x 2 @ 4 Ohms

 HURTSGR – HURTSPK – HURTSCA
HURTSWH – HURTSBU – HURTSRD
Lightweight and Foldable Kick Scooter
Adjustable Scooter for Teens and Adult,
Alloy Deck with High Impact Wheels
USER MANUAL


AN IMPORTANT MESSAGE TO PARENTS:
This manual contains important information. For your child’s safety, it is your responsibility to review this information with your child and make sure that your child understands all warnings, cautions, instructions and safety topics. We recommend that you periodically review and reinforce the information in this manual with younger riders and that you inspect and maintain your child’s scooter to insure their safety.
2
Scooter riding can be a hazardous activity. Scooters can and are intended to move and it is therefore possible to get into dangerous situations and/or lose control and/or fall. If such things occur you can be seriously injured or die. Like any other moving product, using a scooter can be a dangerous activity and may result in injury or death even when used with proper safety precautions. Use at your own risk and use common sense.
- Always wear safety equipment such as a helmet, knee pads and elbow pads. Always wear a helmet when riding your scooter and keep the chinstrap securely buckled.
- Always wear shoes.
- Ride on smooth, paved surfaces away from motor vehicles.
- Avoid sharp bumps, drainage grates and sudden surface changes. Scooter may suddenly stop.
- Avoid street and surfaces with water, sand, gravel, dirt, leaves and other debris. Wet weather impairs traction and visibility.
- Do not ride at night.
- Avoid excessive speed associated with downhill rides.
- Adults must assist children in the initial adjustment procedures to unfold scooter, adjust handlebar and steering to height, and finally to fold scooter.
- Obey all local traffic and scootering laws and regulations.
- Watch out for pedestrians.
- Do not exceed 220 pounds (100 kg).
3
- Do not allow children under 8 to use the scooter. Children under 9 should ride with adult supervision at all times. All children and preteens should ride with adult guidance at all times.
- Rider weight doesn’t necessarily mean a child’s size is appropriate to fit or maintain control of scooter.
- Aparent’s decision to allow his or her child to ride this product should be based on the child’s maturity, skill and ability.
- Refer to the section on safety for additional warnings.
Direct parental supervision is required. Scooters are meant to be used only in a controlled environment free of potential traffic hazards and not on public streets. Do not allow your child to ride a scooter in any areas where vehicle traffic is present. Child must maintain a hold on the handlebars at all times. Never allow more than one child at a time to ride a scooter. Never use near steps, sloped driveways, hills, roadways, alleyways or swimming pool areas, keep fingers and other body parts away from the product when folding or unfolding. Adults must not allow children to assist in folding or unfolding the scooter.
Do not ride a scooter in wet weather. Scooters are intended for use on solid, flat, clean and dry surfaces such as pavement or level grounds without loose debris such as rocks or gravel. Wet, slick or uneven and rough surfaces may impair traction and contribute to possible accidents. Do not ride a scooter in mud, ice, puddles or water. Avoid excessive speeds that can be associated with downhill rides. Never risk damaging surfaces such as carpet or flooring by use of scooter indoors. Do not ride at night or when visibility is impaired.
4
Always ensure child is wearing proper protective equipment such as an approved safety helmet. A helmet may be legally required by local law or regulation in your area. A child should always wear shoes, never ride barefooted or in sandals, and keep shoelaces ties and out of the way of the wheels.
FAILURE TO USE COMMON SENSE AND HEED ABOVE WARNINGS FURTHER INCREASES RISK OF SERIOUS INJURY. USE AT YOUR OWN RISK AND WITH APPROPRIATE AND SERIOUS ATTENTION TO SAFE OPERATION. USE CAUTION.
 WARNINGS
ALWAYS INSPECT SCOOTER PRIOR TO RIDING. Properly inspecting and maintaining your scooter can reduce the risk of injury. Always inspect your scooter before riding and regularly maintain it.
CHECK LOCAL LAWS REGRADING SCOOTER USE. Check local laws and regulations to see where and how Ayou may use your street surfing scooter legally. in many states and local areas, scooter riders are required BY LAW to wear a helmet. Check local laws and regulations regarding laws governing helmet use and scooter operation in your area. Brake may get hot from continuous use. Do not touch after braking.

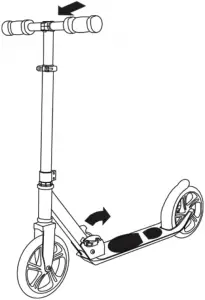
Remove contents from box. Remove the separators that protect the components during shipping. You will need to install the handlebars. locate and unpack the handlebars. Check to ensure that the upper clamp and screws are included.
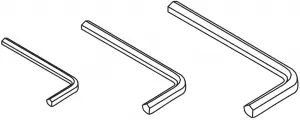
Required Tools (included):
3mm, 5mm & 6mm Allen Wrench (if using your own tools, we recommend the use of mechanic grade tools)
5

6
 1
1
To adjust the height of the handlebars, unlock the steering tube by pulling outward on the quick-release lever. Slide the T-tube to the desired position and secure bypushing inward on the quickrelease lever.
2
The tension of the quick release clamping mechanism can be adjusted by tightening or loosening the Allen bolt. Be careful not to over tighten. You should always be able to open and close the quick-release lever by hand and the T-tube should telescope freely with the quickrelease open.
7
 3
3
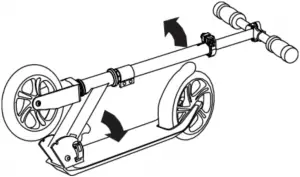
To unfold the scooter, pull the release lever downwards toward the deck while pulling upwards on the steering column.
4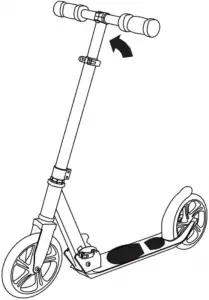
Release the lever and continue to unfold the steering column upward. grip the handlebars and place one foot on the deck. Pull the handlebars up until the latch engages. Make sure the locking mechanism is secure in the open position before riding.
5
To fold the scooter push the handlebars forward lightly while pulling back on the release lever. if may help if you place one foot on the deck. When the release lever unlatches, pull back on the handlebars and continue folding your scooter until it latches.
8
DO NOT USE NON-HURTLE RENEGADE PRODUCTS WITH YOUR SCOOTER.
HURTLE RENEGADE scooters have been built to certain design specifications. The original equipment supplied at the time of sale was selected on the basis of its compatibility with the frame, fork and all other parts. Certain after market products may or may not be compatible.
Failure to properly engage the quick-release clamps may cause the T-Bar to telescope up or down while riding, which may cause you to lose control and fall. With the quick-release properly adjusted and engaged the T-Bar will not move up or down in normal use.
Keep your fingers clear of the folding mechanism when folding or unfolding the scooter make sure others are standing clear.
Failure to properly install and tighten the handlebar t-tube steering tube clamp may cause the rider to lose control and fall. Assembly must be performed by an adult with mechanical experience.
If you do not understand these instructions or the concept of “tightening securely”, seek the assistance of a qualified mechanic.
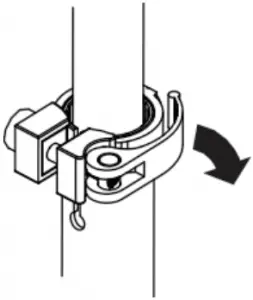
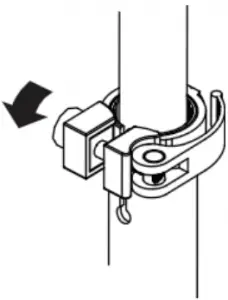
COLLAR CLAMP
Check that the collar clamp bolt is tightened securely. This item is tightened and quality inspected at the factory, after use, periodically check the tightness before riding.
9
WHEELS AND BEARINGS
Under normal circumstances and conditions, street surfing wheels and wheel bearings are maintenance free. nonetheless, it is the responsibility of the owner or guardian to periodically inspect the wheel for wear and tear, the axle for proper tightness, and bearing for side-to-side play and loose parts. When a wheel or wheel bearing develops play, this is an indication of excess wear and replacement is necessary. Replace immediately with only genuine street surfing wheels. Worn tires/wheels/bearings are considered normal wear and tear and are not covered by the street surfing Warranty. Wheels other than genuine street surfing wheels may not be compatible with your street surfing scooter. The use of anything other than genuine street surfing replacement parts may affect your safety.
LOOSE PARTS
Check and secure all fasteners before every ride. Make sure that the steering tube clamps and handlebars spring buttons are locked properly in place before riding.
SAFETY GEAR
Always wear proper protective equipment such as an approved safety helmet, elbow pads and kneepads. Always wear shoes (lace-up shoes with rubber soles), never ride barefooted or in sandals, and keep shoelaces tied and out of the way of the wheels.
CLEANING YOUR SCOOTER
Wipe with a damp cloth to remove dirt and dust. Do not use industrial cleaners or solvents as they may damage the surfaces. Do not use alcohol, alcohol-based or ammonia based cleaners as they may damage or dissolve the plastic components or soften the decals or decal adhesive.
10
HOW TO RIDE
Place one foot on the deck, push forward with the other foot. steer. For enhanced cornering, lean slightly into the direction of the turn. For controlled stops, apply the brake by stepping on the rear fender/brake. Practice applying the brake at various speeds and in an open area free from obstructions before riding around others.
BE CAREFUL!
You will see people on TV and maybe even people you know doing tricks and stunts. These are people who have been practicing on scooters for a very long time. Don’t try something until you are ready. Avoid steep inclines and don’t ride too fast–you can lose control and fall. skateboard parks are not designed for scooters. never ride in traffic or on the street and watch your surroundings for pedestrians, bikers, boarders and skaters.
WARNING:
Wheelies and other stunt-type riding reduces your ability to maneuver and control your scooter. Take the necessary precautions, such as wearing appropriate protective gear and practice in an area safe for stunt riding and free from obstructions.
Maintain a hold on the handlebars at all times.
Failure to follow these instructions may damage your vehicle and void your warranty.
If you ride your scooter in a manner that places large forces and stresses on the product, the scooter will not be covered under warranty. The scooter is designed to meet and exceed applicable safety standards, however the forces exerted through extreme riding will cause premature wear to all parts.
11
The manufacturer warranties this product to be free of manufacturing defects for a period of 6 months from date of purchase. This limited Warranty does not cover normal wear and tear, tires, tubes or cables, or any damage, failure or loss caused by improper assembly, maintenance, or storage.
This limited Warranty will be void if product is ever:
- Used in a manner other than for recreation.
- Modified in any way.
- Rented.
The manufacturer is not liable for incidental or consequential loss or damage due directly or indirectly to the use of this product. HURTLE does not offer an extended warranty. If you have purchased an extended warranty, it must be honored by the store at which it was purchased. For your records, save your original sales receipt with this manual.
Features:
- Compact Kick Scooter
- Lightweight Alloy Deck
- Smooth Riding Wheels
- Comfortable T-Bar Handlebar
- Durable ABEC-7 Bearings
- T-bar Anodized Clamp Collar
- Includes Extended Standing Area for Pro-style Scooter Performance
- Stand Kick Scooter Design
- Adjustable T-Bar Handlebar Height
- Long-Lasting, Super Smooth Gliding Wheels
- Easy Maneuvering Lean-to-Steer Technology
- Lab Tested & Safety Certified
- Indoor/Outdoor Use
- Suitable for Teenagers and Adult, Beginner and Intermediate Riders
- Long Guard Rail to Stop Easily
- Mud Guard Front Wheel
- Extended up to 3 Heights
- Easy Folding Technology
- Foldable Handles
- Non-Slip Deck + Foot Stand
- Front Suspension
Technical Specs:
- Construction Material: 20% Steel + 80% Alloy
- Wheel Type / Wheel Material: PU Wheel
- Recommended Age: 8+
- Weight Capacity: Up to 220 lbs.
- Handlebar Height Setting: 33.1” x 35.8” x 38.6” -inches
- Wheel Size: 8” -inches
- Deck Size: 21.46” x 4.41” -inches
- Total Scooter Size (L x W x H): 33.1” x 12.3” x 38.6” -inches
- Product Weight: 4.4kgs
What’s in the Box:
- (1) Teens Scooter
- (1) Simple Tools for Assembly
- (1) Carry Strap
We are here to help!
Email: [email protected]
13
![]()


HURTSBU HURTSPK HURTSWH HURTSRD HURTSGR HURTSCA
]]>![]()
![]()
PSWP6BK
Waterproof MP3 Player with Headphones
User Manual

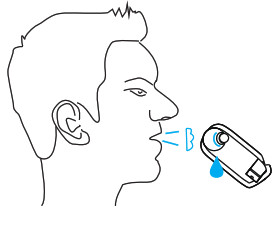
- For safety, please use the smaller size earplug than your normal size earplug when doing outdoor sport and make
sure you can hear the outside sounds:

- For safety, please do not use the headset when you are driving a car, a motorcycle, ship, a bike, or walking on the street. Please follow the local laws and regulations.
About PSPWP6BK
Wearing
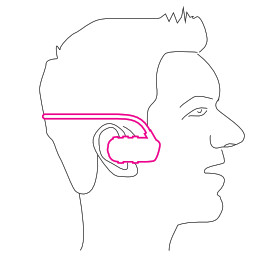
Please put swimming goggles against the connecting rod at the point near the ear.
Note: When swimming, please do use swimming waterproof earbuds. Please choose earbuds according to your wearing comfort.
Charging
- Please connect the player to the computer via the USB clip.

- Be sure to dry the water on the main body before connecting a computer or charging. Clean the metallic contacts regularly to prevent poor contact when for battery charging and data transferring.
Blow Off The Water Film
 |
The volume may come down when swimming, it’s because it forms a thin water film on the waterproof net or speaker film. |
 |
Take off the waterproof earbuds, blow off the water film. |
 |
Squeeze the earbuds to let the water come out. |
Precautions
- Do not use the player in an extreme environment. the player may not work on temperature over 104°F or below -41°F or in a very dry environment.
- Do not impact the player with a hard object. otherwise, it would cause surface scratched, battery falling or other firmware damage
- Do not disconnect the player when it is formatting, uploading, downloading otherwise it would cause “program error” or “computer dis-recognization”
- Do not repair, dismantle or rebuild the player without permission from the manufacturer.
- Reduce the volume to avoid hearing damage.
- We are not responsible for any personal data losses or other indirect losses caused by improper operation, software, hardware, product maintenance or other accident.
Listen to Music
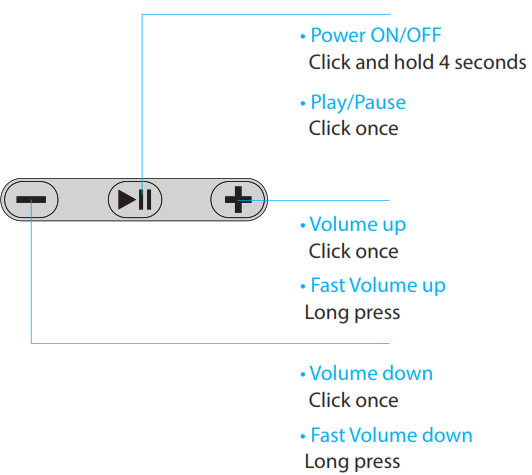
Shuffle Play Mode ON:
When the player is on, press , then press
 .
.
Shuffle Play Mode OFF:
When in Shuffle Play Mode. press then press  the player will be in normal play mode.
Note: MP3 player keys are multi-functional. The pressing modes contain Long Press and Press. Different operating modes stand for different functions.
Troubleshooting
No response after pressing;
Stop automatically while playing;
System power off automatically when starting.
- Please charge.
No sound from the player. - Make sure the volume is not in the “0′ level.
- Damaged Mp3 files may cause some noise and failure in playing music.
- Please make sure the music file is complete.
Unable to download music. - Check if the USB line is broken or not connected well.
- Check if the driver is installed appropriately.
- Check if there is blank memories inside.
Can not be read by the computer. - Check if the USB wire is broken or not connected well.
- Check if the operation is incorrect.
- Check if the driver software is installed well.
Failure to play the compressed MP3 - Damaged Mp3 files may cause some noise and failure in playing music. Please make sure the file is completed.
Product Specification
- IP Rating: IPX8
- Dimensions: 140mm x 43mm x 110mm
- Weight:27g
- USB Interface: USB 2.0 (High speed)
- Battery: Lithium battery
- Memory: 4GB/8GB
- Music format: MP3, WMA
- File Format: FAT16, FAT32
- Mp3 bite rate: 8Kbps~320Kbps
- Earphone output power: 5mW+5mW
- Frequency response: 20Hz-20KHz
- S/N: >70dB
- Distortion: <0.3%
- Operating environment: 41°F—104°F
- Operating time: 10 hours
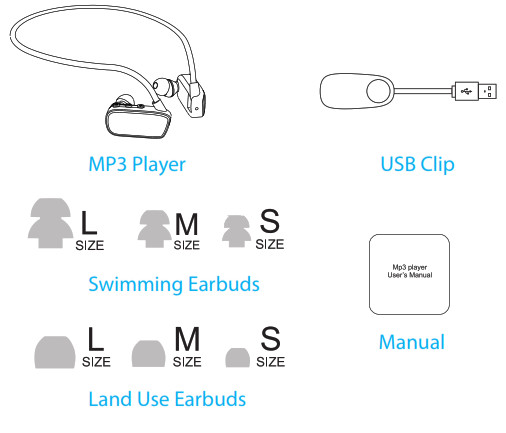
Packing List
PYLE Phono Turntable Preamp

IMPORTANT SAFETY INSTRUCTIONS
- Read Instructions: All the safety and operating instructions should be read before the appliance is operated.
- Retain Instructions: The safety and operating instructions should be retained for future reference.
- Heed Warnings: All warnings on the appliance and in the operating instructions should be adhered to.
- Follow Instructions: All operating and use instructions should be followed.
- Water and Moisture: The appliance should not be used near water-for example, near a bathtub, washbowl, kitchen sink, laundry tub, swimming pool, or a wet basement.
- Ventilation: The appliance should be situated so that its location or position does not interfere with its proper ventilation. For example, the appliance should not be situated on a bed, sofa, rug, or similar surface that may block the ventilation openings: or placed in a built-in installation, such as a bookcase or cabinet that may impede the flow of air through the ventilation openings.
- Heat: The appliance should be situated away from heat sources such as radiators, heat registers, stoves, or other appliances (including amplifiers) that produce heat.
- Power Sources: The appliance should be connected to a power supply only of the type described in the operating instructions or as marked on the appliance.
- Grounding or Polarization: Precaution should be taken to insure that the grounding or polarization means of an appliance is not defeated.
- Power-Cord Protection: Power supply cords should be routed so that they are not likely to be walked on or pinched by items placed upon or against them, paying particular attention to cords at plugs, convenience receptacles, and the point at which they exit from the appliance.
- Cleaning: The appliance should be cleaned only as recommended by the manufacturer.
- Power Lines: An outside antenna system should not be located in the vicinity of overhead power lines or other electric light or power circuits, or where it can fall into such power lines or circuits. When installing an outside antenna system, extreme care should be taken to keep from touching such power lines or circuits as contact with them might be fatal.
- Non-use Periods: The power cord of the appliance should be unplugged from the outlet when the appliance is to be left unused for a long period of time.

- Object and Liquid Entry: Care should be taken so that objects do not fall and liquids are not spilled into the enclosure through openings.
- Carts and Stands: If the appliance is used with a cart or stand, the cart or stand should be a type recommended by the manufacturer. An appliance and cart combination should be moved with care. Quick stops, excessive force, and uneven surfaces cause the appliance and cart combination to overturn.
- Mounting: The appliance should be mounted only as recommended by the manufacturer.
- Damage Requiring Service: The appliance should be serviced by qualified service personnel when:
A. The power-supply cord or plug has been damaged.
B. Objects have fallen into, or liquid has been spilled into the appliance enclosure.
C. The appliance has been exposed to rain.
D. The appliance has been dropped, or the enclosure damaged.
E. The appliance does not appear to operate normally or exhibits a marked change in performance. - Servicing: The user should not attempt to service the appliance beyond that described in the user’s operating instructions. All other servicing should be referred to qualified personnel
- Overloading: Do not overload wall outlets and extension cords as this can result in a risk of fire or electric shock.
- Replacement Parts: When replacement parts are required, be sure the service technician has used replacement parts specified by the manufacturer or have the same characteristics as the original part. Unauthorized substitutions may result in fire, electric shock or other hazards.
- Safety Check: Upon completion of any service or repairs to this appliance, ask the service technician to perform safety checks to determine that the appliance is in proper operating condition.
FEATURES AND CONTROLS

Pyle Phono Turntable Preamp MiniElectronic Audio Stereo Phonograph Preamplifier with RCA Input, RCA Output & Low Noise Operation Powered by 12 Volt DC Adapter.
This electronic preamplifier stands up to the test and will provide you with serious sound performance. The PP444 is perfect for bringing your studio equipment’s phono-level output to a more suitable line-level output. It’ll take your audio signal, amplify its strength and prepare it for further processing by your receiver or amplifier. Preamps technically provide voltage gain to your desired equipment and are key to assisting the signal source, whether it’s a turntable, musical instrument or microphone. The ultra-low noise audio conditioning circuitry allows the preamp to boost audio to levels that are more manageable for various types of audio equipment. You’ll find it easier to adjust the recording level volumes of different sources from microphones and instruments alike. You should position your preamp close to the source to reduce unwanted noise and interference. Preamps can sometimes come built into the stereo equipment, but if that’s not the case, the PP444 is an easy install, wise choice and great addition to any musician or producer. Take your sounds and audio production skills to the next level with the PP444 Preamplifier.
Features and Technical Specs:
- Converts Phono Signals to Line Level Signals
- State-of-the-Art Circuitry Accommodates Magnetic Pickups
- Ultra-Low Noise Operation Improves Sound Performance
- Connects to Turntables and Other Studio Equipment
- Input Sensitivity: 3mV at SOK Ohms (Phono)
- Dedicated RCA and 1/4″ Output Connectors
- Power On LED Indicator
- Power Supply Included, DC 12V/150mA
- Dimensions (W x D x H):4.09″ x 2.28″ x 1.38″

Pyle Portable Speaker, Boombox, Bluetooth Speakers, Rechargeable Battery, Surround Sound
Specifications
- BRAND: Pyle
- COLOR: Black
- SPEAKER TYPE: Surround
- MODEL NAME: Sound Around
- SPEAKER SIZE: 4 Inches
- PRODUCT DIMENSIONS: 6 x 6.5 x 11.5 inches
- ITEM WEIGHT: 2.65 pounds
Introduction
The portable Bluetooth speaker allows you to stream music from your iPhone, Android, Smartphone, iPad, Tablet, PC, and other devices. It has a wireless range of more than 30 feet. Don’t be fooled by its diminutive size; this compact speaker features a high-powered 40″ full-range stereo sound system. It also has a ported enclosure that produces a powerful bass response. A USB flash drive, SD memory card readers for digital MP3 audio files, and an Aux (35mm) input connector with accompanying audio cable round out the capabilities of this compact boombox. Premium features include a side panel button control Centre, FM radio, digital sound amplifier, and a built-in rechargeable battery in the portable boombox speaker.
FEATURES
- 0ch Outdoor Bluetooth Speaker:
- Outdoor HIFI Bluetooth speaker output very clear sound and dynamic sound effect;
- With A2DP Bluetooth, wireless stream music from any Bluetooth-enabled device such as your mobile phone, notebook, iPhone, or iPad;
- Secure simple pairing for user-friendly operating; 10 meters operating range;
- With Line-in function suitable for PC, MID, TV, and other radio device; With USB & TF card support;
- Built-in lithium rechargeable battery 1500mAh; With handle, easy to take out;
- Digital Sound Amplifier Aux (3.5mm) Input Jack
- Side Panel Button Control Center Convenient Carry Strap for Portability Full Range Stereo Sound Reproduction
- Ported Enclosure Design for Impressive Bass Response
WHAT’S IN THE BOX
- Wireless Tube Speaker
- USB Charging Cable
- Audio Connection Cable
INSTRUCTION FOR APPEARANCE AND KEY
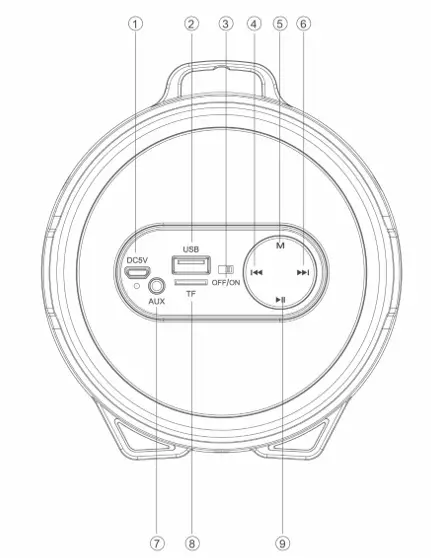
- Charging jack
- USB port
- ON/OFF button
- Backward/Volume down
- Mode (Switch Bluetooth, USB disk, TF, FM and AUX-IN state)
- Forward /Volume up
- Aux-in jack
- TF slot
- Play/Pause
BLUETOOTH CONNECTION
- Turn the power button to “ON”, The LED light turn blue and twinkle quickly and beep twice
- Activate Bluetooth of mobile phone and search for device name “BT speaker” then connect it. The blue LED light twinkle slowly and beep third time once connected successfully.
- Play the music from your mobile phone and enjoy.
- Press the Forward or Backward button on the devices or on Mobile phones to select songs you like.
- Press the Play/Pause button on the devices or on Mobile phones to play/stop the music
- Use the Bluetooth device to adjust the volume up and down. Or long-press to forwarding or Backward button to adjust volume up and down.
PLAYING MUSIC FROM USB DISK & TF CARD:
- Turn the Power button to “ON”.
- Insert TF card or USB flash disk into the slot, and the music stored will be played automatically and the blue LED light always keep lighting.
- Under playing mode, short press Forward or Backward to select songs you like, Or long-press to forwarding or Backward button to adjust the volume up and down.
- PLAY/PAUSE to play or pause.
- Please turn the Power button to “OFF” while without use.
REMARK: Under Bluetooth playing mode, insert a TF card or USB that will disconnect the Bluetooth and switch the playing from USB or TF card. You can press the MODE button to switch to Bluetooth mode again.
HOW TO USE FM RADIO:
- Under FM radio state, the audio cable provided is treated as antennal. Please Insert the audio cable to get the best FM signal before using it.
- Turn the power button to “ON”, and press the “MODE” button to switch to the FM radio state.
- Under playing mode, short press the “Play/pause” button to auto search the FM Channel and store it automatically.
- Press the Forward or Backward button to change the stored FM channel.
AUX-IN
For other compatible music devices or your MP3/MP4 players, use the supplied audio line cable to connect from the device’s “Line Out” to the “Aux-In” of this device. Then press the “MODE” button to switch to the AUX-IN state.
Enjoy When using an external device, all functions will be controlled by the external device except the “Play/pause” button.
BATTERY CHARGING
- Power off the unit, put the provided charge cable into the charging slot of the unit, connect the other end to PC or another charger with DC5V output, the red charging indicator keeps lighting.
- Charge time should be 3-5 hours. When charging full, the indicator light will switch off.
- In order to prolong the life of the battery, please do not charge for more than 8 hours.
NOTE
- The unit will operate without the wire connection using the lithium battery. The amount of battery life depends on how hard the unit is working. Heavy, loud, bass music will use more energy to produce than the spoken word.
- The built-in rechargeable battery is not replaceable. Do not remove or replace it, do not throw in the trash or in the fire.
- When cleaning the product, use a soft dry cloth. For more severe stains, please dampen the cloth with water only. Anything else has the chance of dissolving the paint or damaging the plastic.
Frequently Asked Questions
- How do you pair a Pyle Speaker with your phone?
Go to your iPhone or Android’s Bluetooth settings and look for Pyle Audio. Tap it and type in your pairing code, which is 0000 by default. - What is the procedure for increasing the volume on my Pyle Speaker?
The forward or back button becomes a volume increase or reduction button when held down for 2 seconds. - Are Pyle speakers Bluetooth-enabled?
With the Pyle Tube BoomBox Speaker, you can enjoy portable and powerful music playback! All of today’s latest gadgets, including Smartphones, Tablets, and Laptops, may effortlessly connect and play music via Bluetooth wireless audio streaming. - Why isn’t my Pyle speaker working?
Make sure the Bluetooth feature on YOUR device is turned on. 5. See “Pairing the Speaker with a Bluetooth Enabled Device” for more information on how to repeat the pairing process. My Bluetooth device will not connect to the Bluetooth Speaker. - What is the best way to charge a Pyle Bluetooth speaker?
Connect the power cable to the amplifier system by plugging it into the socket. Turn the amplifier on. When the Power Indicator turns red, it means it’s time to take action. When the RECHARGE LED goes red during charging, it implies the battery is almost full, and it turns off when fully charged. - What’s the best way to connect a wireless speaker to your television?
Place the wireless transmitter in close proximity to the television.
Connect the other end of the RCA audio cables to your television’s “Audio Out” ports.
Place the wireless speakers in the room where you want them. - What is the procedure for turning on my Pyle amplifier?
Make sure the front of the amplifier’s LEFT and RIGHT knobs are set to MIN. To switch on the amplifier, press the POWER button. The power switch and the LEFT/RIGHT volume control have a blue light around them. - Are Pyle speakers Alexa-compatible?
This is the way to go if you want to bring power and Alexa to your back yard or garage at a reasonable price. 5.0 stars out of 5 Alexa Dot is now in the backyard, thanks to the Pyle Bluetooth Amplifier! A fantastic system! - Why does Bluetooth pairing fail?
It’s also a good idea to restart both your Bluetooth device and your Bluetooth connection. Check to see if Bluetooth data and cache have been erased. If the Bluetooth app is not connecting successfully to Android, you may need to erase the saved app data and cache. - What is the Pyle Bluetooth speaker’s code?
Go to your iPhone or Android’s Bluetooth settings and look for Pyle Audio. Tap it and type in your pairing code, which is 0000 by default.

Pyle PDICBT266 Bluetooth Flush Mount
Introduction
Thank you for purchasing this PYLE Bluetooth Ceiling / Wall Speaker system. It is a state of the art product carefully designed and manufactured for your installation needs, and has been thoroughly tested to ensure consistent and reliable performance.
If you have any question about the installation or operation of your PYLE Bluetooth Ceiling / Wall Speaker System which are not answered by this manual, contact your dealer immediately.
Specifications
- Amount of Speakers: 2
- Speaker size: 5”
- MAX Output Power: 200 watt
- Impendence: 8 Ohm
- Sensitivity: 88 dB
- Frequency Response: 70-20 kHz
- Cut-Out Diameter: 6”
- Mounting Depth: 8”
Bluetooth Connection Diagram
- Bluetooth Version:0
- Bluetooth Network Name: Pyle
- Bluetooth Network Password: ‘0000’
- Bluetooth Wireless Range: 30’+Feet
- As shown in pictures, A is speaker, B is speaker, C is Bluetooth controller, and D is power adapter.
- As shown is Picture C, port (1)(2) connect to the negative pole of speaker in Picture A, port (3)(4) connect to the positive pole of speaker in Picture Port (5) connects to power adapter in Picture D’s D1port.
EXISTING CONSTRUCTION
IN-CEILING SPEAKERS
Cut the drywall
Note: Always allow at least one-half inch between a wall stud and the speaker cutout or the locking tabs will not be able to swivel into place.
Connect the speaker wires to the speaker.
Screw down each of the four Phillips head screws. The locking tabs will swivel into place and secure the unit to the rear surface of the drywall. Put in the strips of adhesive to secure the grille.
Replace the metal grille.
Complete.
Bluetooth Connection Diagram 4 CHANNEL
- Bluetooth Version:0
- Bluetooth Network Name: Pyle
- Bluetooth Network Password: ‘0000’
- Bluetooth Wireless Range: 30’+Feet
- As shown in pictures, A is speaker, B is speaker, C is Bluetooth controller, D is power adapter, E is speaker, and F is speaker.
- As shown is Picture C, port (1) (2) connect to the negative pole of speaker in Picture A, port (3)(4) connect to the positive pole of speaker in Picture B, port (6)(7) connect to the positive pole of the speaker in Picture E, port (8)(9) connect to the positive pole of speaker in Picture F, port (5) connects to power adapter in Picture D’s D1port.
- As shown in pictures, A is speaker, B is speaker, C is Bluetooth controller, D is power adapter is speaker, and F is speaker
- As shown is Picture C, port (1) (2) connect to the negative pole of speaker in Picture A, port (3) (4) connect to the positive pole of speaker in Picture B, port (6) (7) connect to the positive pole of speaker in Picture E, port (8) (9) connect to the positive pole of speaker in Picture F, port (5) connects to power adapter in Picture D’s D1port.
Frequently Asked Questions
How do I get two sets to play simultaneously, one in one place and the other in another?
Each device has one or two Bluetooth chips, but only when connected to an iOS-running laptop, not when using a smartphone. Strong computers are readily available. In order to pair two speakers with a MacBook, both speakers must be close enough to hear one another.
How do they work?
Thank you for letting us know about this. It uses Bluetooth to function. Given that the suggested wire has received both favourable and unfavourable reviews
I swap to red/black 14-16 awg cable or copper wire?
I’m not sure what kind of wire the installers used for mine, but it wasn’t the wire that was included with the speakers.
Which kind of speaker mounting brackets are acceptable?
Hello, you don’t need a bracket to install this item. To finish the project, just drill a hole for the speaker and secure it with a bolt. To view the whole list of the device’s specifications, go to our website, pyleaudio.com. After the model number in the search field, type PDICBT266 to get more information. I appreciate it.
Can I watch TV and utilise these speakers at the same time?
I believe you’ll be fine if your television has a Bluetooth connection option. It creates a distinctive Bluetooth connection. We utilise four of them to connect our iPhones to. I’d absolutely buy them again because of their superb quality.
What particular fashion do you mean?
I’m not certain. I bought this one. I’ve got two. One for each daughter’s bedroom and bathroom
Have you have any images of the real rig?
We sorry that this product doesn’t have any installation videos. Please contact our customer care department at 718 535 1800 if you have any more queries or worries. From Monday through Friday, 9 AM to 5 PM EST, press 2 first, then 1. I’m grateful.
What specific style are you referring to?
I’m not sure. I purchased this one. I have two. One each for the bathroom and bedroom of each daughter
Have you got any images of the real rig?
We very regret that this product does not have installation videos available. Please contact our customer service department at 718 535 1800 if you have any more questions or issues. From Monday through Friday, 9 AM to 5 PM EST, press 2 first, followed by 1. I’m grateful.
These speakers can withstand water.
My suspicion is that the mines I have in the kitchen are not waterproof even though they are classified as maritime type mines.
Can I use one of these speakers in the bathroom as I only have one?
I think these speakers have poor sound quality. They sound tinny, so you couldn’t pay me to use them.
Those who I can relate?
The subpar Bluetooth receiver can only support two speakers at once. Most current phones can simultaneously cast to two Bluetooth receivers, offering four speakers.
Is it possible to hard wire it with 12v dc for an RV application?
Despite being possible, it is not recommended due to the possibility of the Bluetooth controller on the device being harmed.
How do you change the television’s volume up and down?
The TV to which the speakers are connected should control the volume.
Can these be operated by 12 volts and mounted in a boa?
If you mean on a boat, then yes, you may and it does require 12v DC power, which is supplied by its converter.
Can these be used in a workplace setting? Is there anything else I need install them with?
They don’t truly rock hard, but they ought to be adequate for meeting-style activities. Everything you require to get going is included, including the Bluetooth receiver.
If a Bluetooth receiver is positioned between ceiling joists and covered with 3/4″ wood planks, will it still be able to receive signal? The range of the reception?
Yes, it should. I built mine in the porch ceiling using six to ten inches of spray insulation, and it works well.
Do I need a receiver to connect to a projector, or will speakers suffice?
Hello, this device does not require an amplifier or receiver. Because it’s wireless, you can use Bluetooth to connect your projector. Visit our website, pyleaudio.com, to view the unit’s further specifications. For further information, enter the model number PDICBT266 in the search box. I’m grateful.
Can I install more than one set of these in several rooms? And each one has a unique Bluetooth name for private connections?
Instead of the four speakers, you’ll need to buy two sets of the two speakers.
]]>
Please take a few moments to read through this booklet. In it you will find answers to many of your questions and other invaluable information about how to attach a guitar strap and how to tune a guitar.
Instructions:
A. How to attach a guitar strap?
1. Adjust your guitar strap to the correct size.

2. Take the looped end of your string and thread it through the key hole on the front of your strap, tying a knot close to the hole.

3. Adjust your guitar strap to the correct size.

4. Run one side of the string through the headstock and tie a knot on the other side.

5. Ready to Play now!

B. How to tune a guitar (for first time user)
1. Hold the strings down with your left hand while stretch the strings away from the body with your right. (image 1)
2. Use some pressure to wiggle strings back and forth. You don’t need to be gentle but make sure you don’t pull too hard once you feel the string resisting or it can break. (image 2)

BASIC RUNDOWN OF TUNING A GUITAR
1. Memorize what the strings are on the guitar. (E Low version, A, D, G, B, E High version) (image A, B)
2. Look at the tuners of the guitar. (image C)

3. Pluck the string with a pick or if not with the pick then with your finger and when you move the tuner around, you can hear the pitch get lower. You can turn it the other way and tighten it and you hear the pitch get higher.

4. You can also use clip-on tuners then put on the headstock because it reads the vibration off the guitar and tells what note it is or it’s close to.

5. Move the needle of the tuner to get the right tune of the string. If the needle goes too far, bring it back down and even lower than the notes needs to be and then bring it back up until the needle hits the right tune of the strings.

6. Once you’ve tuned all the strings, you can gently tug each string at the the middle back and forth to help stretch it. When stretched the string will drop pitch and go out of tune. After stretching re-tune each string and repeat this process 6-8 times. This stretching process is only necessary for new strings and the instrument will hold better in tune after they are broken in.

How to Adjust an Acoustic Guitar Truss Rod
Your truss rod needs adjustment when the neck of your guitar has too much or too little upbow or too much backbox. Tightening or loosening the adjustment nut adds or lessens pressure on the rod and neck. As a general rule, tightening the nut moves the neck away from the string pull and removes upbow; loosening the nut allows the neck to relax into an upbow again (especially when helped by the strings’ pull). Controlled upbow is known as relief.
However, with a one-way truss rod, if the neck warps away from the string pull, no amount of loosening the truss rod will pull the neck straight, because the truss rod only works against the pull of the strings.

Two primary signs tell you that your truss rod needs adjusting:
- There’s a noticeable change in the action; the height of the strings over the frets has become either too high or too low. The most common scenario is that the strings get higher as the neck upbows from the string pull.
- Some strings buzz on the frets between the nut and the fifth fret. This indicates that the neck is either too straight or it is backboned from the truss rod’s slow, constant pressure over time.
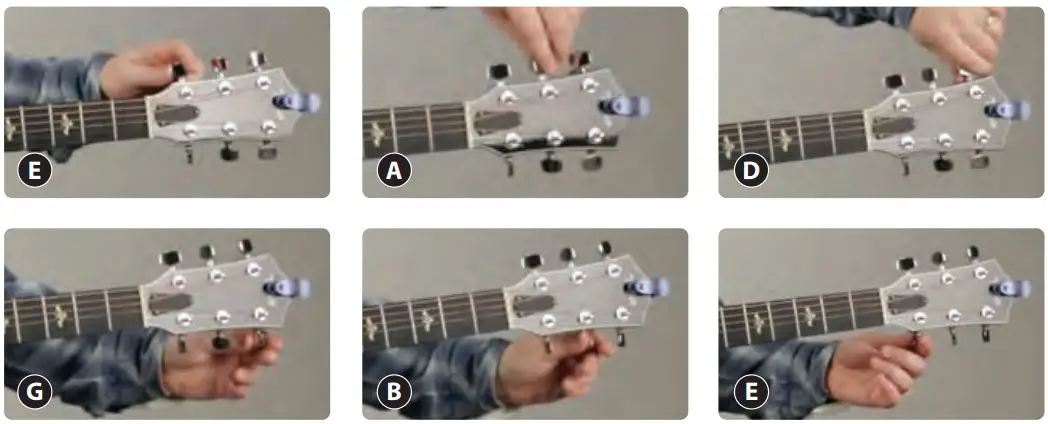
As you press the string down at the 1st and 14th frets, the string should be approximately .010″ away from the 6th fret about the thickness of a business card.
![]()
Questions? Issues?
We are here to help!
Phone: (1) 718-535-1800
Email: [email protected]
PPSPKR131
Wireless BT Streaming Mini Speaker
In order to have a better experience of the product, please read this manual carefully before using our product.

Function Description
FUNCTION KEY DESCRIPTION
| MODE | Mode switch |
| Volume+/next song | |
 |
Volume-/previous song |
 |
Play pause/double-click to switch between Chinese and English prompts |
| DC/5V AUX | Micro-USB charging port/external audio input port |
| USB | USB music player |
| MicroSD/TF | Micro SD music player |
Instructions for use
- Wireless BT Streaming Connection
Turn on the speaker (ON/OFF); search for the Wireless BT name on the device: BT SPEAKER, after the pair is successful, you can use it. If you need to connect a new device, frst disconnect the paired device and reconnect the new device. - Wireless BT Playback
1. Turn the machine ON/OFF
2. Play pause Setting
When playing, press to select play/pause.
3. Volume +/
When playing, press and hold to increase or decrease the volume level.
4. Up and down song
When playing, press to select the previous/next song. - AUX Input
Use the Android interface to connect the Wireless BT speaker, the USB, and the 3.5 audio interfaces to connect to the Questions? Issues? We are here to help! Phone: (1) 718-535-1800 Email: [email protected] computer to enter the external AUX mode, press pause/play, press to select previous/next songs, and press and hold to adjust the volume. - Micro SD/USB
Insert Micro SD/USB, enter Micro SD/USB mode automatically, press pause/play, press to select previous/ next songs, press and hold to adjust the volume. - MODE
Press the MODE button, followed by Wireless BT, USB, Micro SD, AUX.
Troubleshooting
| COMMON PROBLEM | SOLUTION |
| Multiple connections and
unsuccessful pairing |
|
| Volume is weak/No sound |
|
| Music Intermittent |
|
| The pilot lamp does not shine | The Wireless BT speaker has insufficient power. Please recharge and try again. |