PYLE 300 Watt Stero Receiver
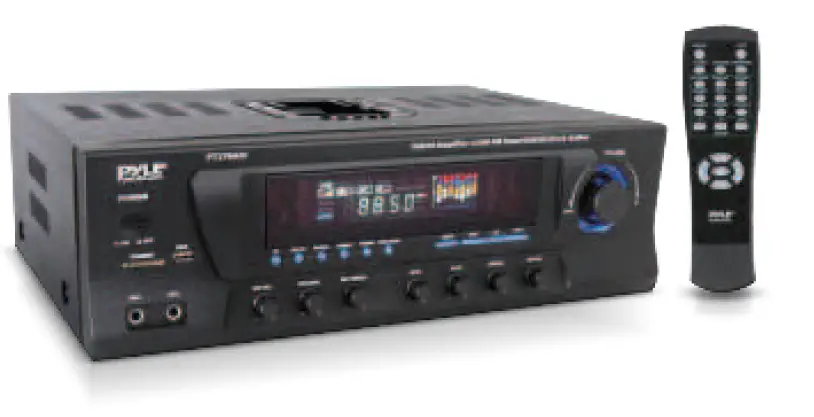
PT270AIU 300 Watt Stero Receiver
with Built-In iPod Docking Station -AM-FM Tuner, USB/SD Card Readers and Subwoofer Control
Please read these operating instructions carefully before use. They will acquaint you fully with its features.
This product adopts highly advanced digital techniques, high powered, four -channel outputs to be the media center of your living room. It includes an AM/FM tuner, MP3/iPod input jack, headphone jack. This Pyle Pro hybrid amplifier also has sub-out and pre-outs for a variety of applications.
WARNING: TO REDUCE THE RISK OF FIRE OR ELECTRIC SHOCK. DON’T EXPOSE THIS EQUIPMENT TO RAIN OR MOISTURE
TO REDUCE THE RISK OF FIRE OR ELECTRIC SHOCK AND ANNOYING INTERFERENCE, USE THE RECOMMENDED ACCESSORIES ONLY. THIS DEVISE IS INTENDED FOR CONTINUOUS OPERATION!
FEATURES
- PRE-Amp with AM/FM Tuner
- CPU management of all functions, remote sensor
- Digital fluorescent output displays all the functions
- Separate gain control of pre-amp and subwoofer
- All the blue lights and blue rings gain control through LED Dimmer
- AM/FM Quartz synthesized Tuner, auto station seek and store, 50 stations storage, with both manual and automatic tuning
- Ipod/Mp3 Input with cable
- Digital karaoke system
- Over heat, over current protection
PRECAUTIONS
- Power Source: The unit should be connected to a power supply AC-110/60Hz, AC-220V/50Hz.
- Ventilation: The unit should be situated so that its location or position does not interfere with its proper ventilation. Place the unit at least 10cm away from the walls.
- Water and moisture: The unit should not be used near water-for example, near a swimming pool, in a wet basement, etc.
- Electric Shock: If a metal objects, such as a hair pin or a needle, comes into contact with the inside of this appliance, a dangerous electric shock may result. For families with children, never permit children to put anything, especially metal, inside this unit.
- Enclosure Removal: Do not open the unit as this might result in damage to the circuitry or electrical shock. If a foreign object should get into the unit, contact your dealer or service company.
- Abnormal Smell: If an abnormal smell or smoke is detected, immediately turn the power OFF and pullout the power cord. Contact your dealer or nearest service station.
How to replace the preset radio stations?
Use the remote control to set the radio stations.
NOTE: The preset radio stations can’t be deleted, BUT CAN BE REPLACED.
Operations Steps:
- Press TUNER MODE on the remote control
- Pres AM/FM, and select FM
- Press PRE/NEXT to select the stations you don’t want to keep;
- Press TUNING again choose the radio stations you want to save
- Press MEMORY to save the new stations
In this way, you can replace the preset radio stations.
OPERATION
- POWER: Use this button to turn ON or OFF the speakers.
Caution: Make sure that all connections are properly connected and the main volume is set to minimum level before turning ON the unit. - INPUT SELECT: Select the input source: CD/DVD, USB, Radio.
- MICROPHONE VOLUME: MIC VOL Adujst “MIC VOL” knob to increase or decrease the karaoke volume
- ECHO: Adjust “ECHO” to get a satiable echo effect.
- TREBLE/BASS: Turn TREBLE/BASS knob to adjust treble/bass tone master channel.
- MASTER VOLUME: You can adjust MASTER VOLUME from turn right volume up , turn left volume down.
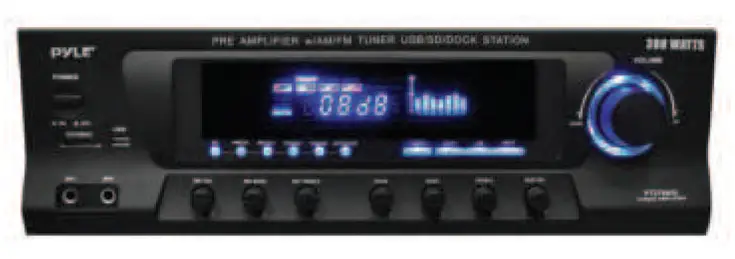
CONTROLS and FUNCTIONS
FRONT PANEL
- POWER SWITCH
Press to power unit ON/OFF - SD/MMC CARD READER
- USB READER
- PLAY/PAUSE
- PREV
Used to select the Previous station which have been kept in system - NEXT
Used to select the next station which have been kept in system - TUNING <
- TUNING >
- AUTOSCAN
Auto search for radio station
- IPOD DOCK
- AM/FM SELECTOR
- MUTE
- A/B SPEAKERS OUTPUT SELECTOR
- INPUT SELECTOR
- VOLUME CONTROL
- SUB.VOL CONTROL
- TREBLE
- BASS
- ECHO
- MIC. TREBLE
- MIC. BASS
- MIC. VOL
- MIC 2 INPUT
- MIC 1 INPUT
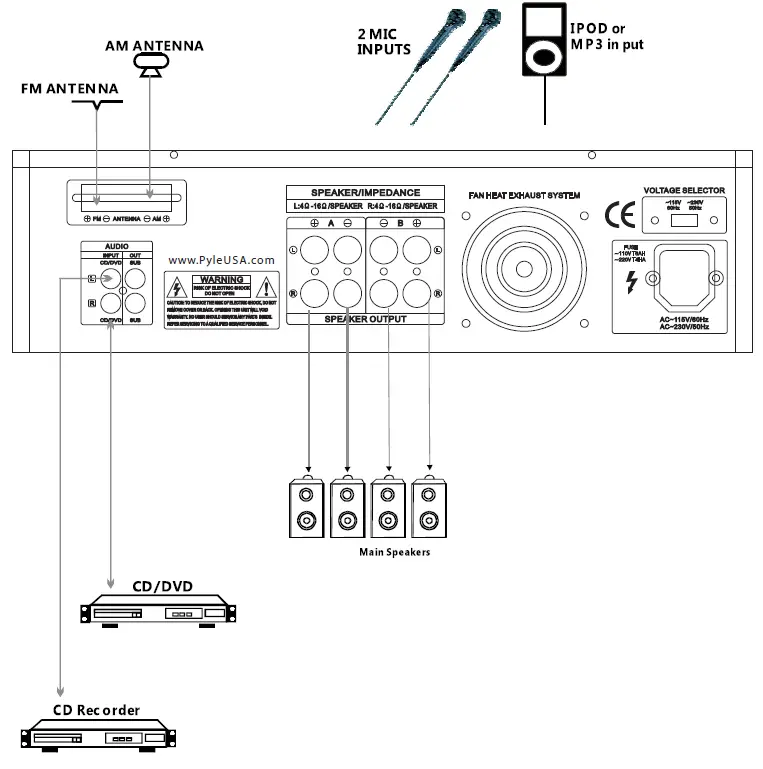
BACK PANEL
- TUNER ANT: Connect for AM and FM antennas.
- AUDIO INPUT JACKS:
Connect the audio ouput jacks of DVD/CD AUX to these jacks. - A SPEAKER OUTPUT TERMINALS:
Connect your speaker system to these terminals. - B SPEAKER OUTPUT TERMINALS:
Connect other speaker system(s) to these terminals. - COOLING FAN
- VOLTAGE SELECTOR SWITCH: Slide to select correct voltage 110V or 220V.
- POWER CORD: Connect to AC 110V/60Hz and 220V/50Hz outlet.
REMOTE CONTROL
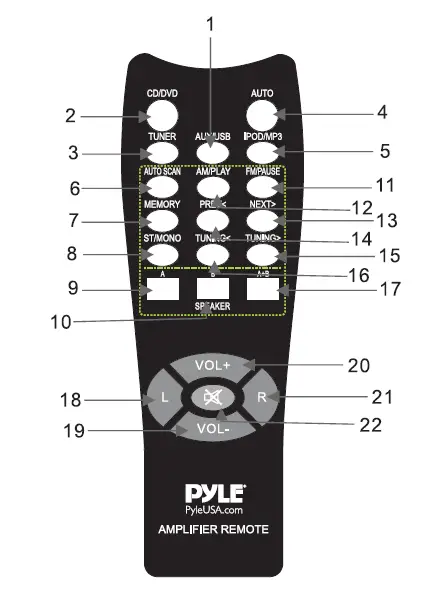
- AUX/USB Selector
- CD/DVD Selector
- TUNER Selector
- AUTO: Automatically search the single source when power ON
- IPOD/MP3 Selector
- AUTOSCAN: AM/FM auto scan selector scan and store stations automatically. Can store 50 stations
- MEMORY: After a station has been found you can store the station by pressing the MEMORY botton and the screen will display SAVE.
- ST/MONO: Stereo and mono selector.
- SPEAKER A selector
- SPEAKER B selector
- FM/PAUSE selector
- AM/PLAY selector
- NEXT> Next station
- PREV< Previous selector
- TUNING>
- TUNING<
- A+B SPEAKER selector
- 21. L/R Left/Right balance control
- VOL-
- VOL+
- MUTE selector
Remote Controller 0peration
- Remote controller should be operated within 6 meter and the scope of 30° in front of receiver.
- Make sure that there is no big obstacle between remote controller and machine.
- Remote sensor should be far away from the light, high amounts of light can affect its performance.
SAFETY INSTRUCTIONS
- Make sure that all connections are properly connected and the main volume is set to minimum level before turning ON the unit.
- When more than one pair of speakers are used, (specially the main speaker output) make sure that the speakers used are of the same wattage and impedance, otherwise the unit maybe damaged under high power or long term operation.
- To avoid humming sounds and unwanted noise, make sure that all the wires are properly inserted.
- For speaker cords, strip off the vinyl coating and twist the wire tip. Push down the pink jack or loosen the screw terminal, before inserting the wire tip, then fasten it and tighten the screw. Be careful not to let the wires stick out of the terminal otherwise this may cause short circuit when wires of different terminal contact each other.
- After the unit is turned ON, adjust the main volume to the desired level same with bass and treble volume, etc.
Features:
- Auto Station Seek
- A/B Speaker Output
- 110-220V Switchable
- USB/SD Card MP3 Player
- 50 Radio Station Memory
- Inputs: RCA (1 Audio Source)
- Total Power Output: 600 Watt
- AM/FM Quartz Synthesized Tuner
- Separate Subwoofer Gain Controls
- Digital Fluorescent Output Display Meter
- Microphone Volume, Tone & Echo Controls
- 2 Mono RCA Dedicated for Subwoofer Output
- Outputs: Banana Bbinding Post (to Speakers)
- iPod / MP3 Input with Included Connection Cable
- iPod Docking Station, Suitable for All iPod & iPhone Models (USB, SD Memory & iPod Not Included)
- 150 Watt x 2 @ 8 Ohms
- 175 Watt x 2 @ 4 Ohms