Razer Phone 2 Support

Audios and Notifications
Razer Phone does not ring
his issue could be caused by your phone’s sound settings. Follow the steps provided below when your Razer Phone is not ringing.
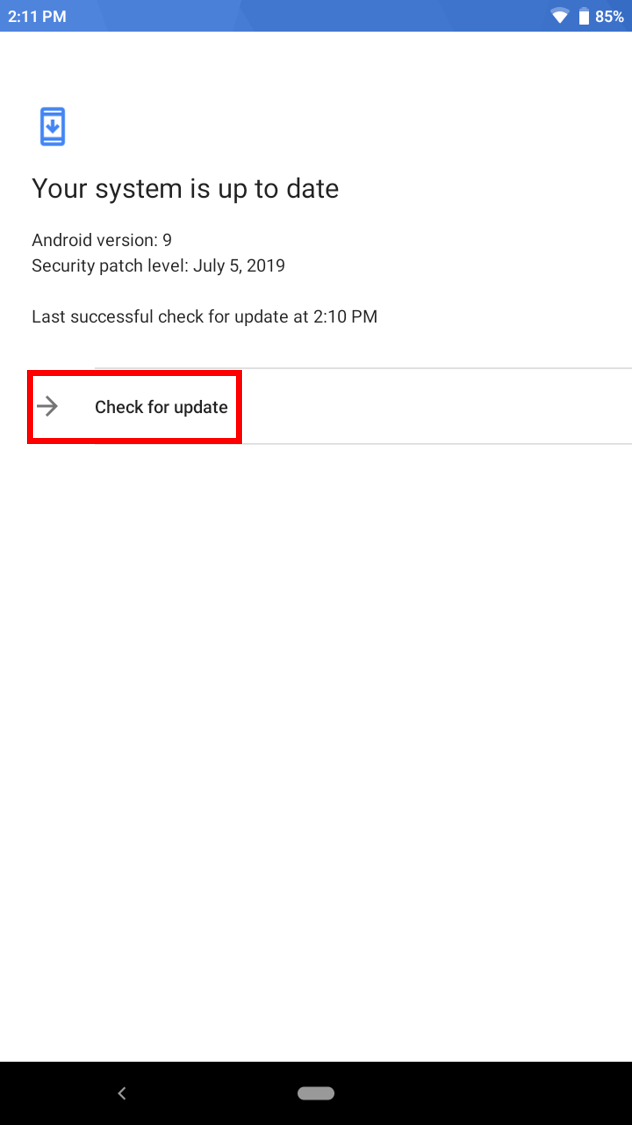
Note: Before proceeding to the troubleshooting steps, be sure that the Razer Phone is up to date. Navigate to Settings > System > Advanced > System update > Check for update.
- Go to Settings > Sound.
- Ensure that the phone is set to “Ring” and the volume is set to its maximum for testing. You can adjust the volume to your liking after testing.

- Ensure that a phone ringtone is set.

- After all the settings have been configured, call your Razer Phone from a different phone line.
- If the issue persists, reboot the device and test the phone again.
- If rebooting your device does not help, back up your phone data and perform a factory reset.
My Razer Phone has poor or no sound during a call
When calling, there may be instances where the audio quality is poor or there is no sound at all. Poor audio quality during a call could be affected by poor network coverage or structural obstructions. This problem could also be due to a software issue.
To solve this issue, follow the steps below:
Note: Before proceeding to the troubleshooting steps, be sure that the Razer Phone is up to date. Navigate to Settings > System > Advanced > System update > Check for update.
- Check the network coverage in your area. Poor network coverage will normally affect the quality of your calls and can even result in dropping calls.
- Remove any cellphone covers, case protectors and screen protectors from the phone as they may be obstructing the sound from the phone speakers.
- If the phone has a good network coverage and all obstructions from the phone have been removed and you are still experiencing issues, restart the phone by pressing and holding the power or fingerprint button.
- Test the phone again.
- If the issue persists, make sure that the audio settings are correct and the device is not muted.
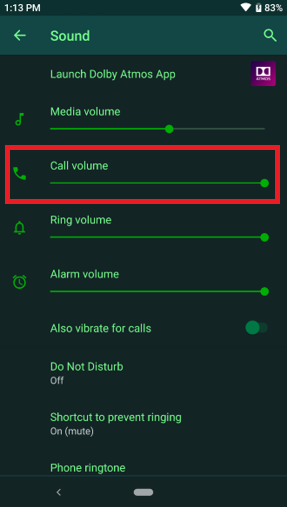
- From your “Top menu”, click the “Settings” icon indicated by a cog.
- Select the “Sound” settings. Ensure the “Call volume” is set to its maximum for testing. You can adjust the volume to your liking after testing.
- Test your phone again.
- After all the settings have been configured, call your Razer Phone from a different phone line.
- Reboot the device and test the phone again.
- If the issue persists, back up your phone data and perform a factory reset.


My Razer Phone is not producing sound on my headphones
There may be instances when there is no sound coming out of your headphones. This may be due to either a Bluetooth connection failure if you’re using wireless headphones or a defective headset. It could also be a software issue.
The troubleshooting steps below will depend on what type of headphones are connected to your phone.
Note: Before proceeding to the troubleshooting steps, be sure that the Razer Phone is up to date. Navigate to Settings > System > Advanced > System update > Check for update.
Connection via Bluetooth
- Ensure that both the Bluetooth device and the Razer Phone have enough power.
- Ensure that Bluetooth is enabled and properly paired to your Bluetooth headphones.
- If the device fails to pair, test the Bluetooth device on a separate Bluetooth-enabled device to test if the Bluetooth device is defective.
- If the issue persists and you have verified that the Bluetooth device is working fine, forget the paired connection from the Razer Phone and perform a hard reset.
- After rebooting the phone, pair the Bluetooth device to the Razer Phone and test it again.
- If the issue persists, back up your files and perform a factory reset.
Connection via USB-C or 3.5 mm Analog Port Adapter
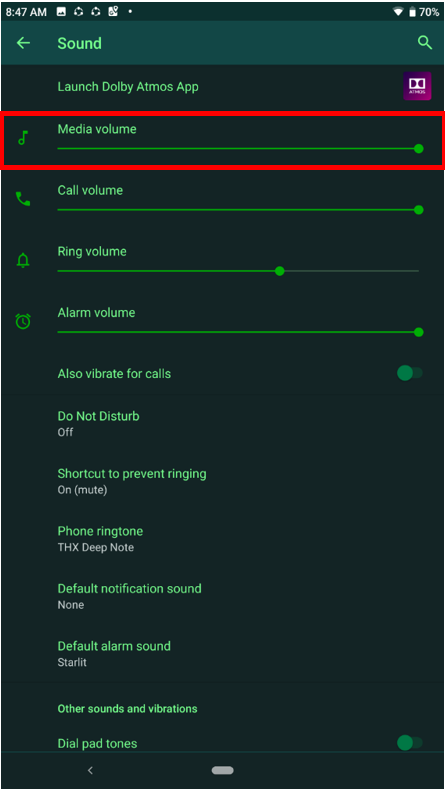
- Make sure that the audio settings are correct, and the device is not muted. Check if the “Media” slider is at its maximum for testing.
- Ensure that you are not connected to any Bluetooth-enabled audio device. Android disables the analog jack when a Bluetooth device is enabled.
- Perform a hard reset.
- After rebooting, test the device by playing any music or video.
- If the issue persists, test the headset you are using on the Razer Phone on a different smartphone or computer to isolate if the headset is defective.
- If you have confirmed that the headset is functional, it is possible that the adapter might be defective. Try connecting the Razer Phone to a Bluetooth-enabled audio device to see if the Razer Phone is defective.
- Test the device by playing any music or video.
- If the issue persists, back up your files and perform a factory reset on your Razer Phone.

My Razer Phone is not producing sound on its speakers
If the Razer Phone is not producing sound on its speakers, this may be due to your phone being on low volume or on mute. This issue could be easily solved by ensuring that your media sound settings are not muted or on the lowest setting.
Follow the steps below to fix this issue:
Note: Before proceeding to the troubleshooting steps, be sure that the Razer Phone is up to date. Navigate to “Settings” > “System” > “Advanced” > “System update” > “Check for update”.
Follow the steps below to troubleshoot this problem.
- Increase the volume by pressing the top button on the left side of the phone to make sure that the volume is loud enough to hear the sound from the speaker. Alternatively, you can adjust the sound in the phone’s settings.
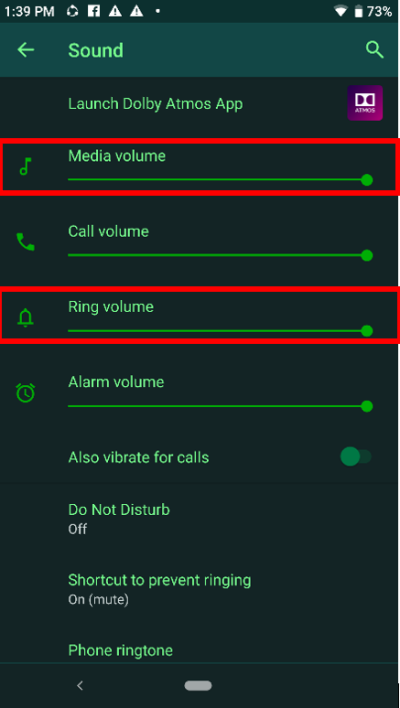
- Make sure that the audio settings are correct, and the device is not muted. Check if the “Media” and “Ring” volume slider is at its maximum for testing by going to Settings > Sound. Test your device by playing music or by calling your phone.
- If the issue persists, perform a hard reset.
- After rebooting, test the device by playing any music or video.
- If the above steps are unable to solve the issue, backup your files and perform a factory reset on your Razer Phone.

How to fix microphone issues on the Razer Phone
efore proceeding to the troubleshooting steps, be sure that the Razer Phone is up to date. Navigate to Settings > System > Advanced > System update > Check for update.
Note: There is more than one microphone on Razer Phones. The top microphone on the Razer Phone and Phone 2 is only used for noise canceling during voice calls.
Follow the steps outlined below to help fix the issue:
- Ensure that you are not connected to any external audio device (either via 3.5mm adapter DAC, USB-C connector or Bluetooth).
- Perform a hard reset to clear the phone of any glitches and errors.
- If the issue persists, boot to safe mode to isolate the possibility of 3rd-party apps causing the issue.
- Test the phone by making a call or recording an audio clip.
- If the mic is still not working properly, backup your phone data and perform a factory data reset.
When using the speakerphone on my Razer Phone, the caller hears their own voice or an echo
| Answer ID: 1743
This issue could be due to a third-party app currently unsupported by the Razer Phone 2.
Note: Before proceeding to the troubleshooting steps, be sure that the Razer Phone is up to date. Navigate to Settings > System > Advanced > System update > Check for update.
If the issue is not occuring using the native phone app, follow the steps below:
- Disable Wi-Fi calling.
- Select a different “Preferred Network” by going to Settings > Network & Internet > Advanced.
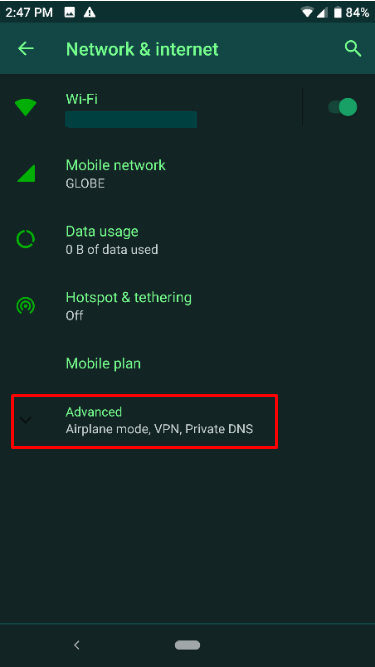
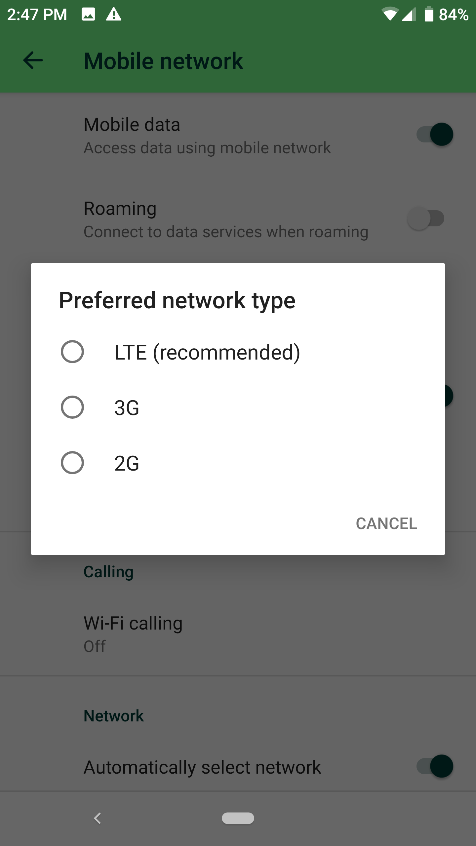
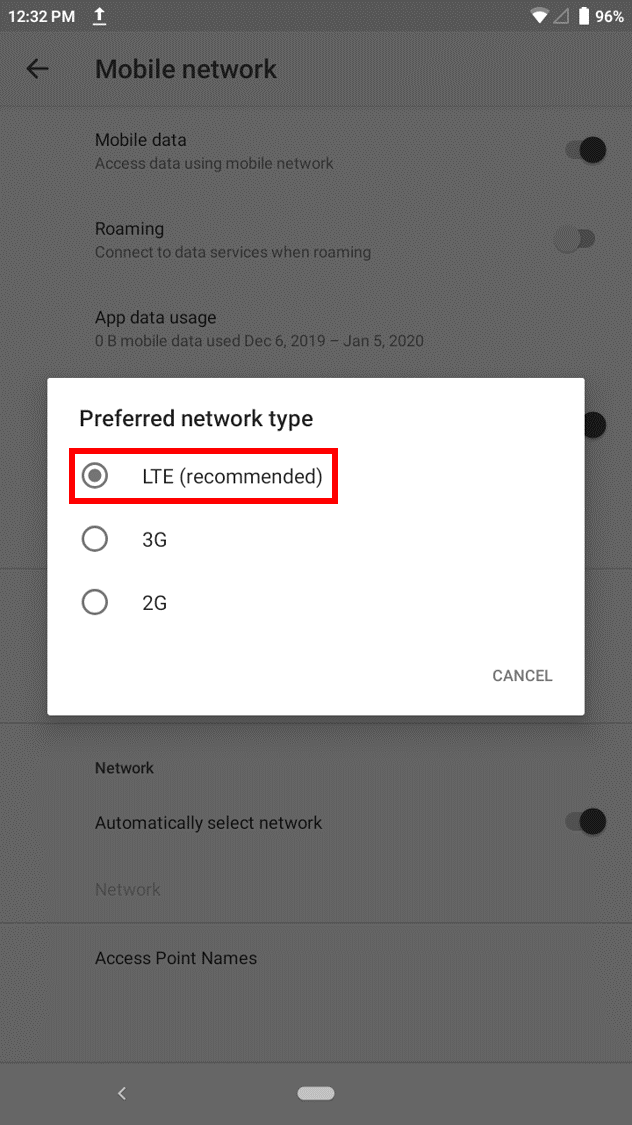
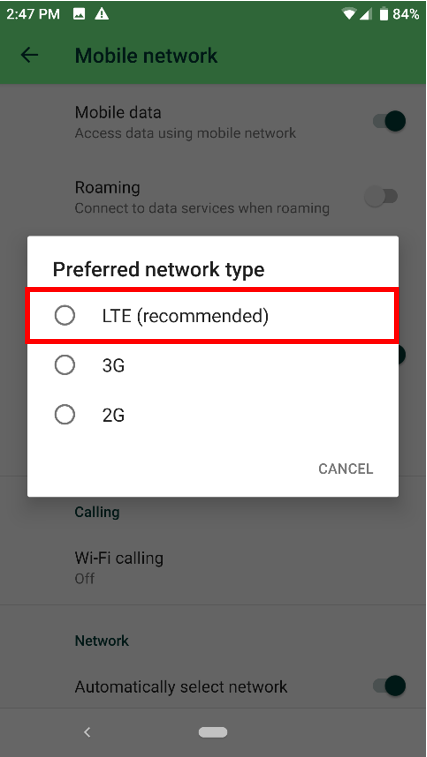
- Tap “Preferred Network Type”.
- Switch between “LTE (recommended)”, “3G Only”, and “2G Only” and verify if the issue persists each time you switch the network type.
- Move to a different location, preferably to a location with a stronger signal.
- Try inserting the SIM card to a different phone to verify that the SIM is not defective. If the issue persists, this could be caused by a defective SIM card. In that case, contact your network or service provider.
- If the SIM card works on a different mobile phone, test a SIM from a different mobile carrier and verify if the issue has been resolved.
- If the above steps did not fix the issue, contact Customer Support to assist you further in troubleshooting this issue.


The Dolby Atmos has stopped working on my Razer Phone
The Dolby Atmos Technology on the Razer Phone enhances the dual front-firing stereo speakers for an immersive audio experience. If the Dolby Atmos has stopped working, follow the steps below to fix the problem.
Note: Before proceeding to the troubleshooting steps, ensure that the Razer Phone is up to date. Navigate to Settings > System > Advanced > System update > Check for update.
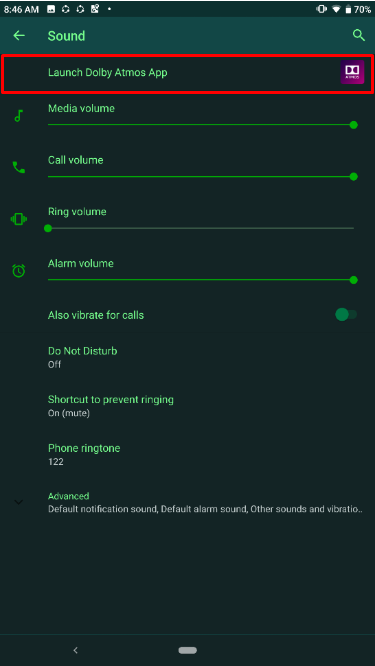
- Go to Settings and tap “Sound”.
- Tap “Launch Dolby Atmos App”.
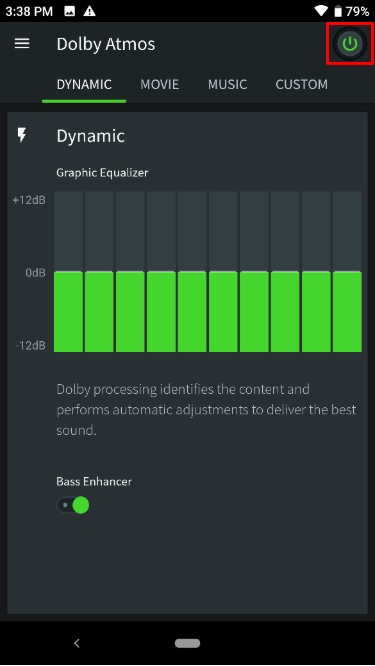
- Turn off Dolby Atmos by tapping the power icon on the top-right corner of the screen.
- If you are using your headset or earphones, go to My Razer Phone is not producing sound on my headphones.Note: Be sure to use the audio dongle that comes with the Razer Phone 2. It is not recommended to use the audio dongle from Razer Phone 1 with the Razer Phone 2 or vice versa.
- If there are no audio devices connected to your Razer Phone 2, follow the steps in My Razer Phone is not producing sound on its speakers.


Power and Battery
Razer Phone Battery Saving Tips
With its 4000 mAh battery pack, the Razer Phones will allow you to play your favorite games longer than most other handsets in the premium class. However, actual battery performance will still vary with every user.
If you are experiencing uncharacteristically poor battery performance, you may want to check with the following:
- Brightness Settings – Consider lowering your brightness settings to prolong battery life.
- Wireless Connectivity – Turning on Wi-Fi, Data Connection, or Bluetooth consumes extra battery. Using these in places with the weak signal will also take a hit on the battery life as the phone spends more power in keeping the signal stable. Turn these off when not needed to conserve battery.
- Apps with auto-sync – Apps that auto-sync information such as GPS trackers, social media apps, weather widgets, and newsreaders will also consume more battery as they also use wireless connectivity.
- Extreme Temperatures – Exposing the phone to extreme hot or cold temperatures are generally not good for Lithium-Ion batteries and may degrade the battery life.
- Using the Max Refresh Setting – The Max refresh rate can be adjusted globally by going to Settings > Display > Refresh Rate, or individually for each game via Cortex.
- Display Resolution – The Razer Phones’ display resolution is set to 1440p out of the box but can be adjusted down to 1080p or even 720p in Settings > Display > Advanced > Display Resolution.
- Dolby Atmos – While using considerably less power than the display, using Dolby Atmos may also consume more battery. Consider disabling this option to prolong your battery life.
You may also opt to turn on the Battery Saver within Settings to conserve battery life even more.
For Android 9 (Pie)
- Go to Settings > Battery.
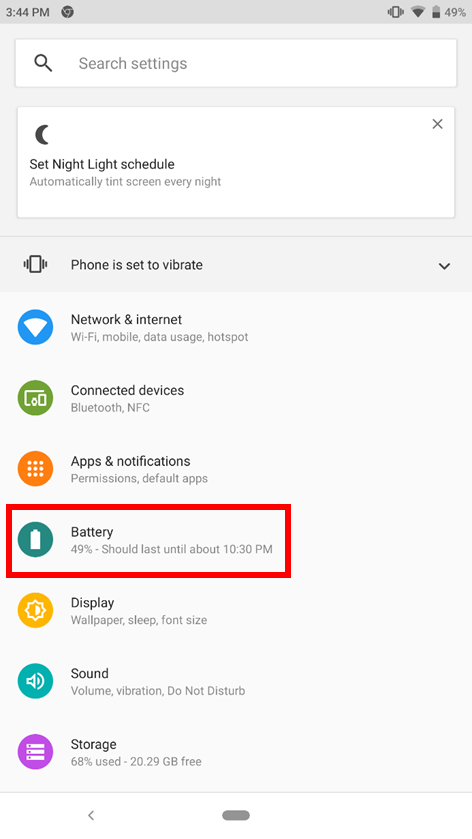
- Tap “Battery Saver”.
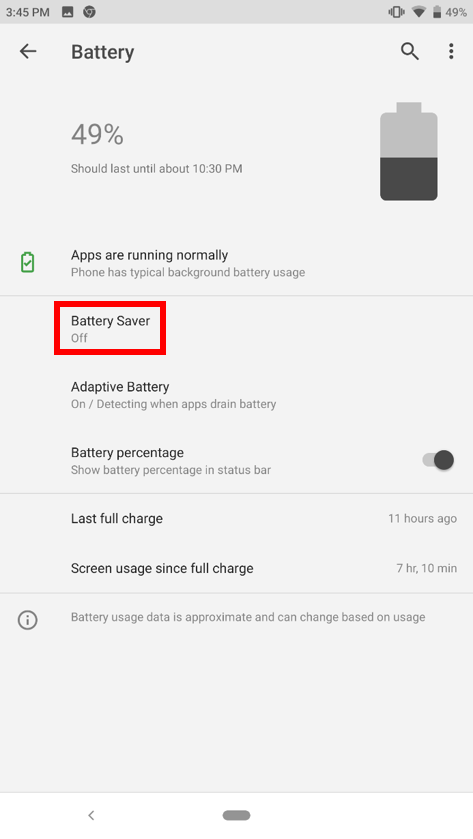
- Tap the “TURN ON NOW” button to immediately activate the battery saving feature.
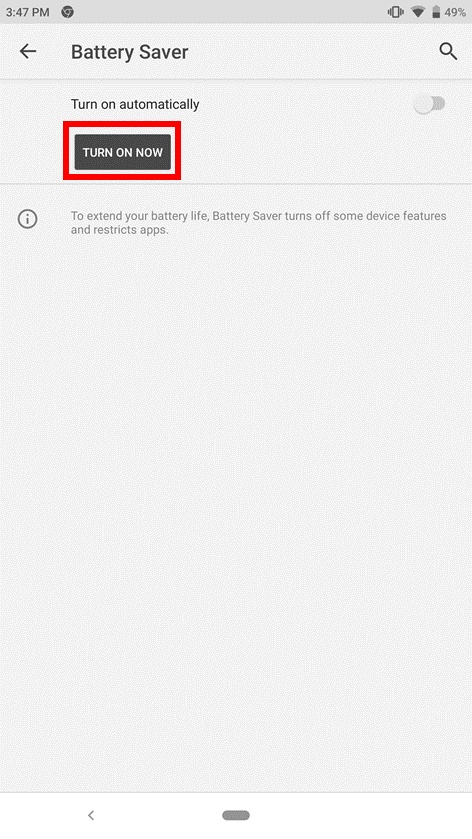
- Alternatively, you can set it to automatic by toggling on the “Turn on automatically” switch. Then, adjust the slider to which percentage you want the Battery Saver mode to activate.


My Razer Phone is not charging
If your Razer Phone will not charge, this may be due to a number of reasons. Charging issues may be caused by anything from a faulty cable to intermittent power connections. For wireless chargers, the issue may be because of misalignment or physical obstructions.
To isolate the issue, refer to the steps below:
- Ensure that you are using the adapter and cable that came with the Razer Phone as much as possible. Some third-party peripherals may not reach the specifications for the Razer Phone and such may not be able to charge the device correctly. Worse, using unrated peripherals may result in injury.
- Check if there is any debris blocking the charging ports and the outlet to ensure a steady power connection.
- Test the phone by plugging it into another power outlet or source such as a power bank.
- If your device’s battery was completely depleted, it may take a while for the charging indicator to display on the phone. Consider leaving the phone charging for at least an hour.
- If the issue persists remove the power adapter and attempt to charge the Razer Phone on a computer that has a USB-C port.
- If the phone charges successfully, the power adapter may be defective. Contact Customer Support for assistance.
- If the issue persists, consider using a third-party USB-C charger. If that solves the issue, the USB-C cable may be defective. Contact Customer Support for assistance.
If the above steps do not solve the issue, consider doing a factory data reset.
My Razer Phone is overheating
A rise in temperature is normal on smartphones. They are designed to handle a certain level of high temperatures. Usually, a smartphone reaching temperatures of up to 32-40°C is completely normal.
Remember that the longer you use the phone the more you will notice a rise in temperature, especially when you are running demanding apps or games.
If your phone is often heating up to the point where it is unpleasant to hold, it might have some serious issues.
Follow the steps below to help stabilize the Razer Phone’s temperature to the optimal level:
- Remove a Razer Phone case if there is any.
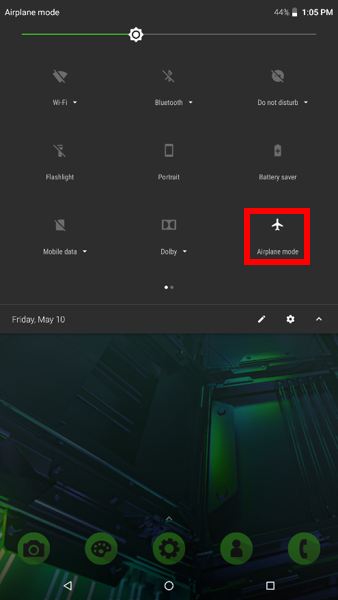
- Turn on “Airplane mode” to quickly disable Bluetooth, WiFi, and cellular signal search. To do this, follow these steps:
- Make the notification tray appear by swiping down on the home screen.
- Tap “Airplane mode” to enable.
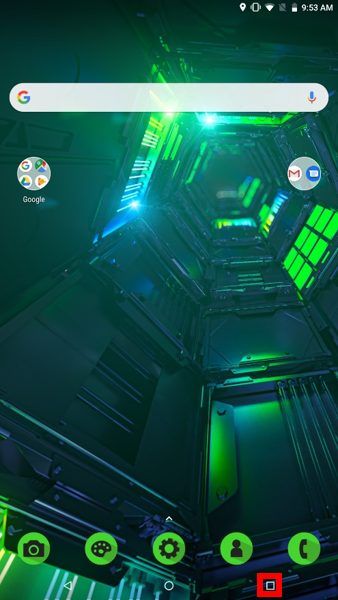
- Tap the recent apps icon on the lower right of the screen.
- Tap “CLEAR ALL” to clear apps that are running in the background.

- If the temperature does not drop to the optimal level, restart the Razer Phone. If restarting the phone did not help, proceed to the next step.
- Install antivirus software from the Play Store to detect and remove malware or virus infection. A phone getting too hot can be a sign of a malware or virus infection.Note: Malware can cause the phone to overheat by consuming lots of its RAM and CPU power.


- If the issue persists, check and perform a system update.
If the above steps did not help, backup your phone data and perform a factory reset.
Razer Phone does not turn on or power up
If your Razer Phone will not turn on, this may be due to a number of reasons. The most likely cause of your Razer Phone not powering on is an insufficient battery charge or a random software error that could easily be remedied by a hard reset. To determine which issue you are experiencing, follow the steps below:
- Plug-in the charger to the phone and check to see if the dynamic battery charging icon is showing up.
- If the phone does not indicate charging, ensure that you are using the adapter and cable that came with the Razer Phone as much as possible. Some third-party peripherals may not reach the specifications for the Razer Phone and such may not be able to charge the device correctly. Worse, using unrated peripherals may result in injury.
- Check if there is any debris blocking the charging ports and the outlet to ensure a steady power connection.
- Test the phone by plugging it into another power outlet or source such as a power bank.
- If your device’s battery was completely depleted, it may take a while for the charging indicator to display on the phone. Consider leaving the phone charging for at least an hour.
- If the issue persists remove the power adapter and attempt to charge the Razer Phone on a computer that has a USB-C port.
- If the phone charges successfully, the power adapter may be defective.
- If the issue persists, consider using a third-party USB-C charger. If that solves the issue, the USB-C cable may be defective.
- Perform a hard reset by simultaneously pressing and holding the power button and volume up button for 7 to 10 seconds.
Razer Phone restarts or reboots by itself
There may be instances where the Razer Phone restarts itself without any prompt. This issue is most likely caused by incompatible apps or bugs in previous versions of the software that have since been fixed through updates. To fix this, do the following:
Note: Make sure the phone is sufficiently charged. You may also keep the device plugged in throughout the whole troubleshooting process.
- Boot the Razer Phone to safe mode. Observe the device for up to 24 hours to see if the issue persists. If the phone works normally under safe mode, the issue is due to a third-party application. Consider uninstalling the app that you last downloaded before the issue appeared.To boot to safe mode, do the following:
For Android Version 9 (Pie)
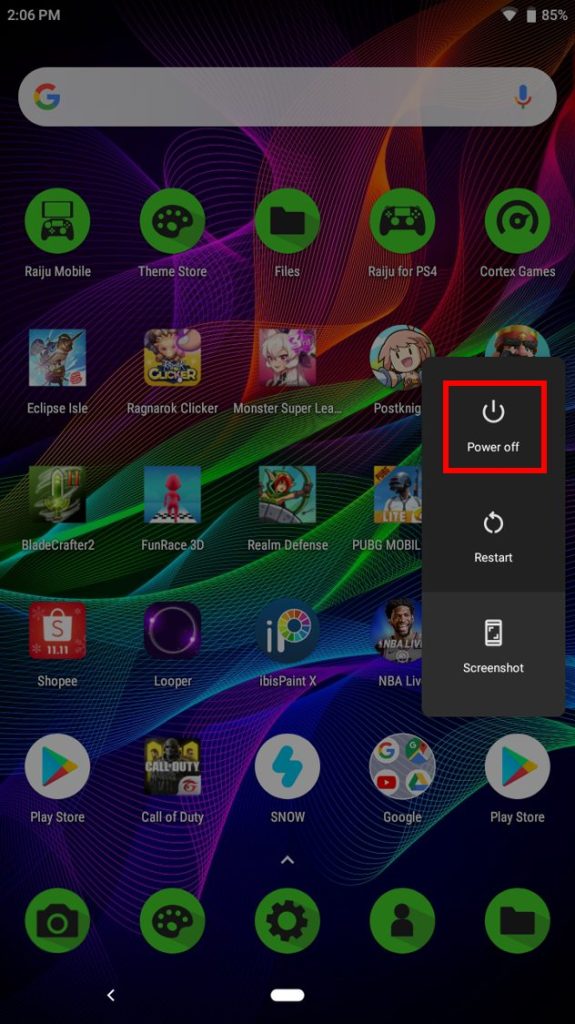
- Press and hold the power button.
- On your screen, touch and hold “Power off”.
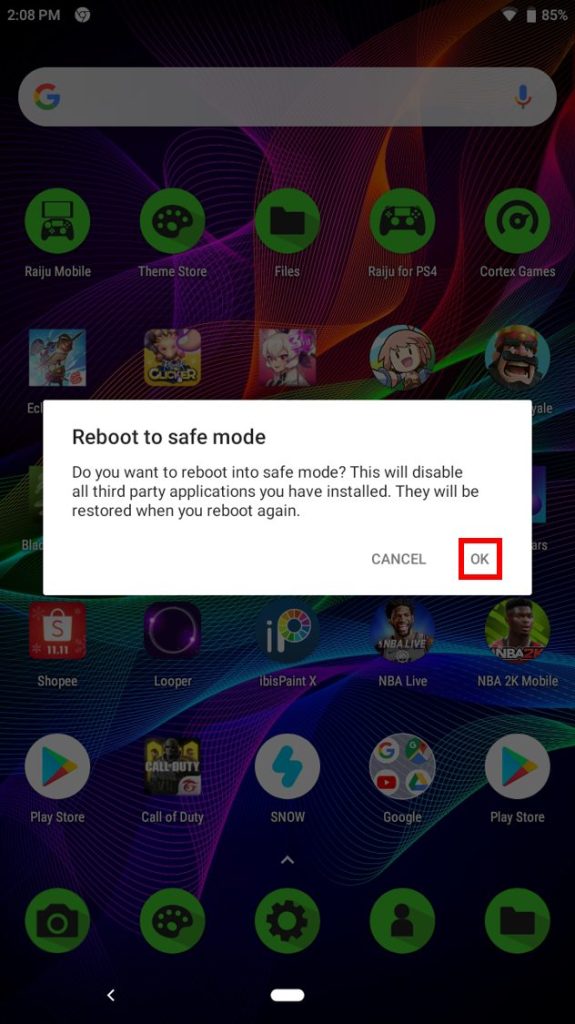
- Tap “OK” when asked if you want to reboot to safe mode.
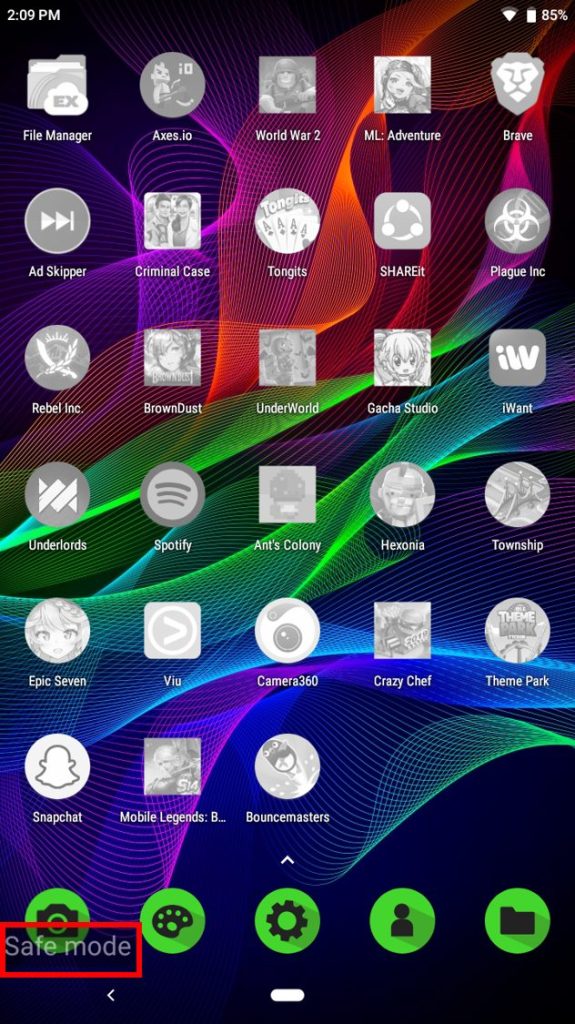
- After the reboot, the words “Safe mode” will be labeled on the bottom of the screen.
- If you are still experiencing the issue, check if you are running the latest software for the device. Ensure that your device is always up-to-date by performing a software update.Note: Steps may vary depending on your device’s operating system.
For Android Version 9 (Pie)
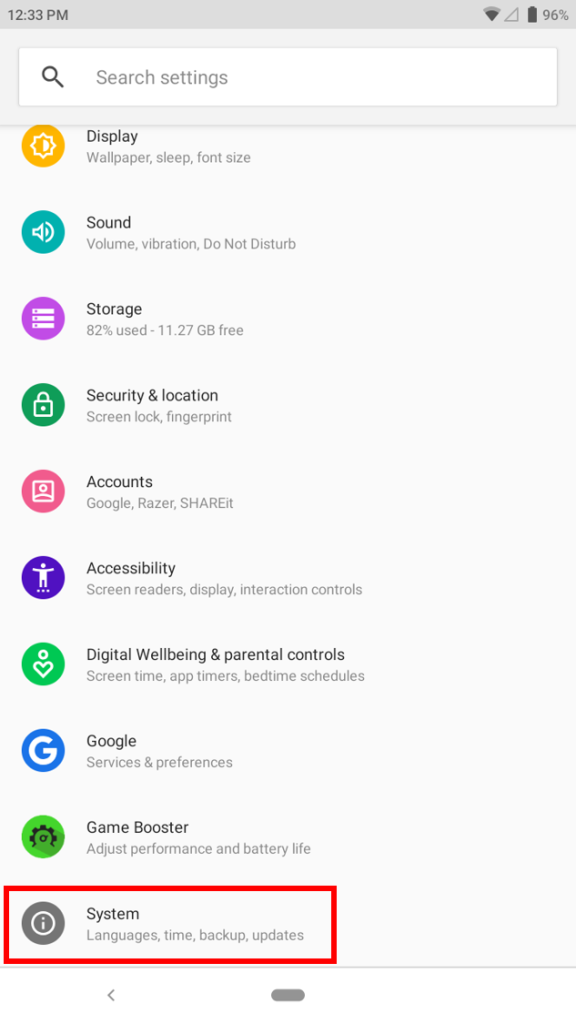
- Go to Settings > System.
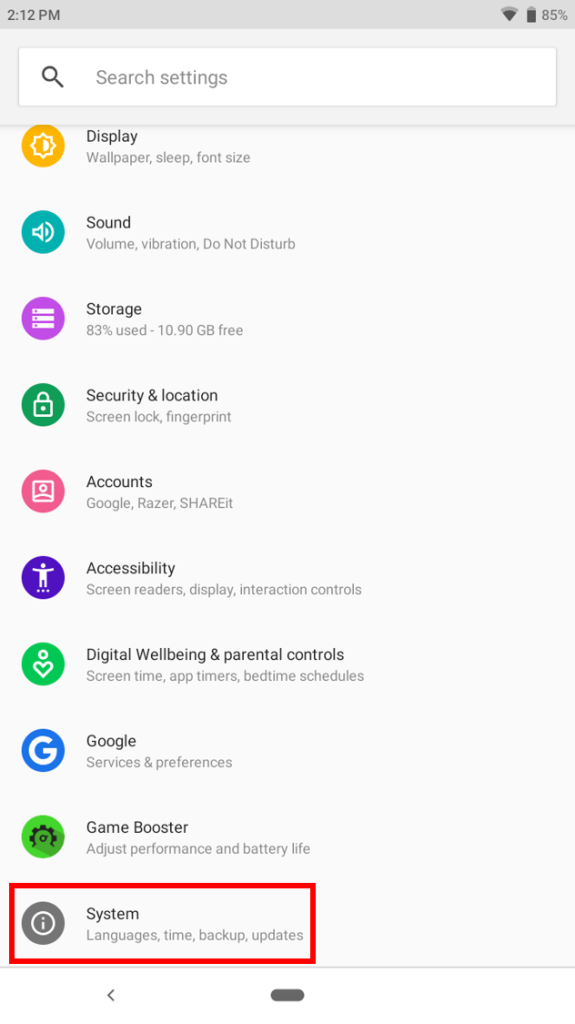
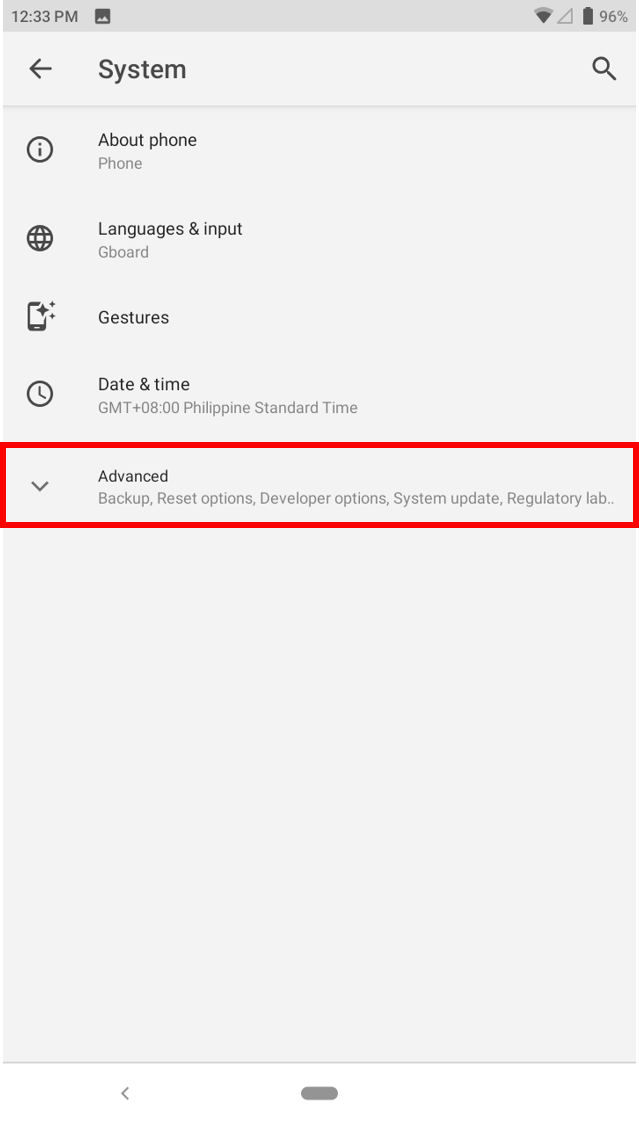
- Go to Advanced > System update.
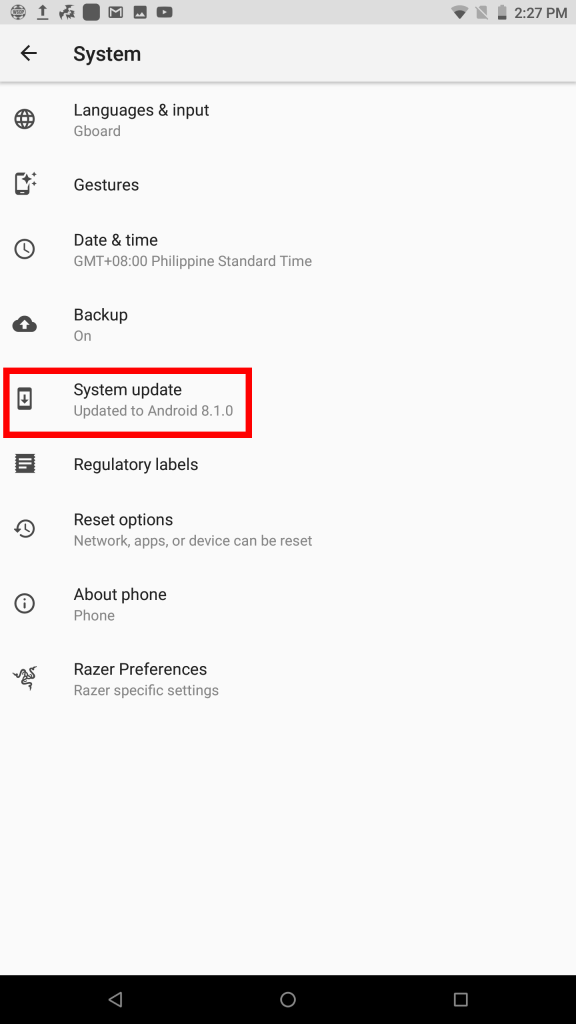
- Tap “Check for update”.
- Tap “Update Now” if an update is available.
- Go to Settings > System.
- If the issue persists, consider doing a factory data reset. To do that, follow the steps below:
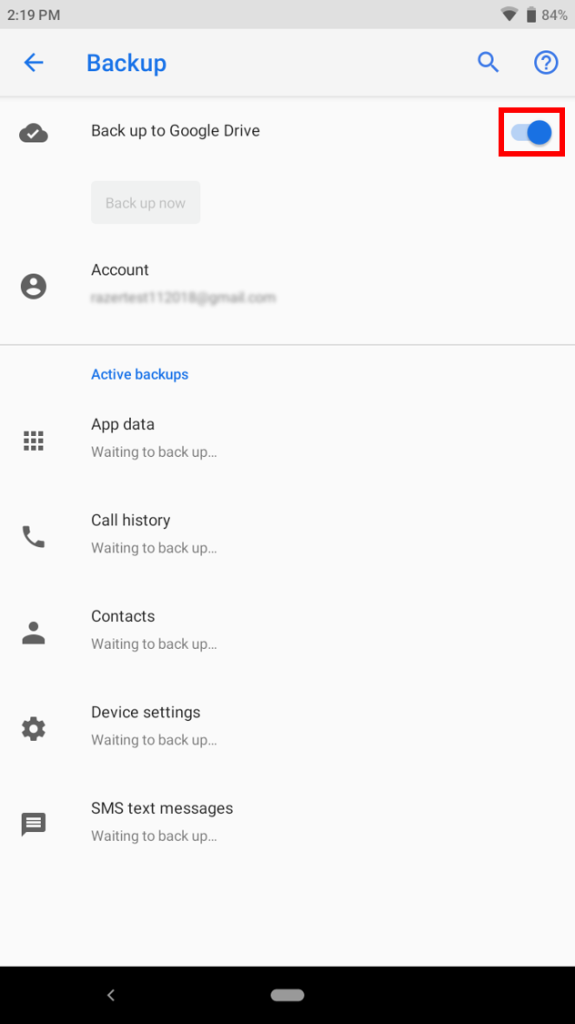
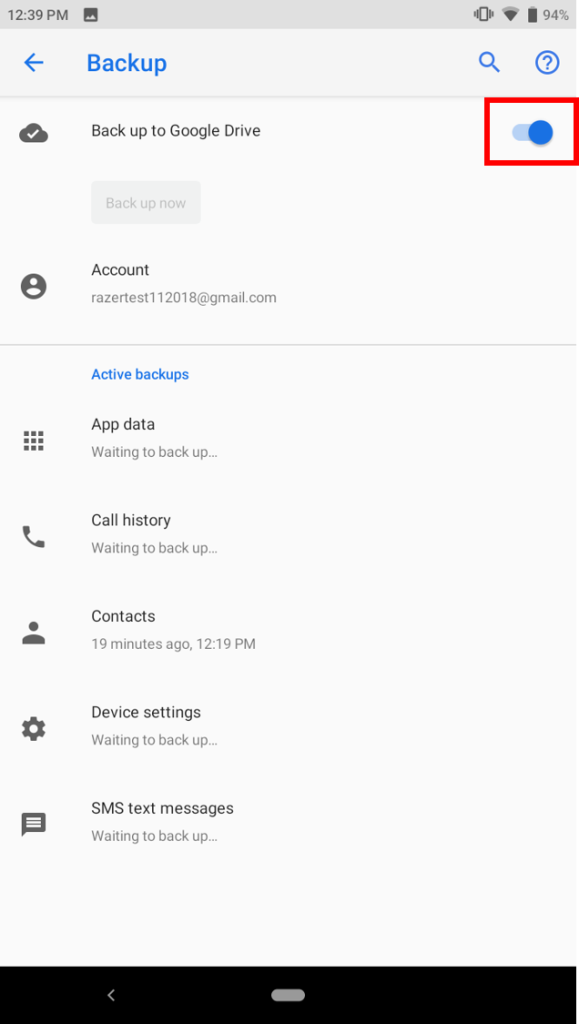
- Before resetting your phone, first backup your data to Google Drive. Go to Settings > System.

- Go to Advanced > Backup.
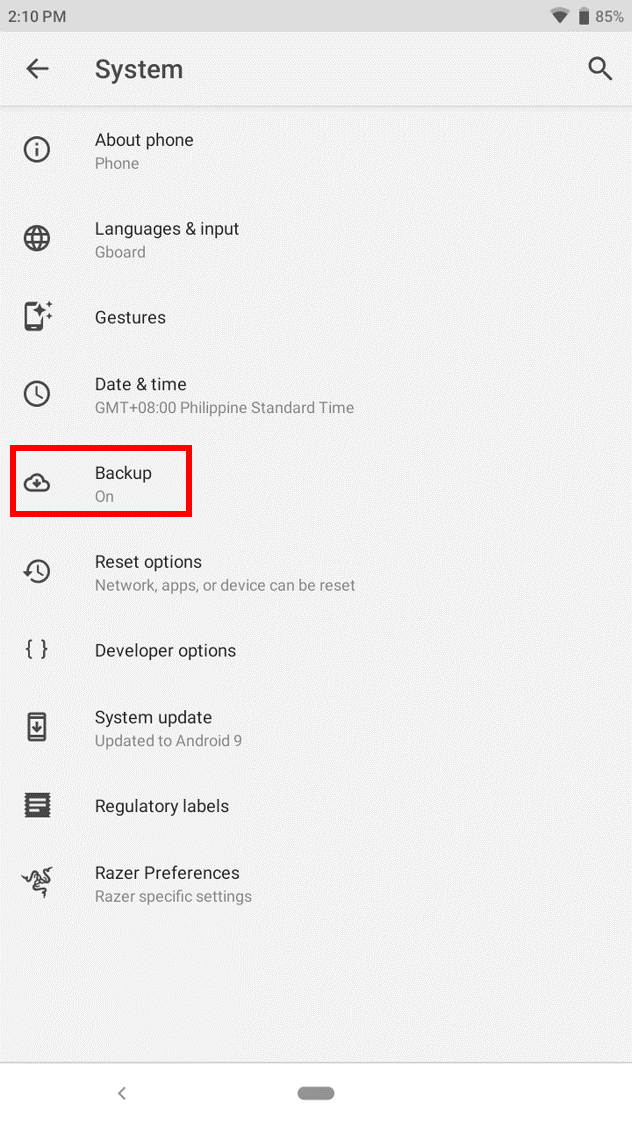
- Toggle “Backup up to Google Drive” option on.
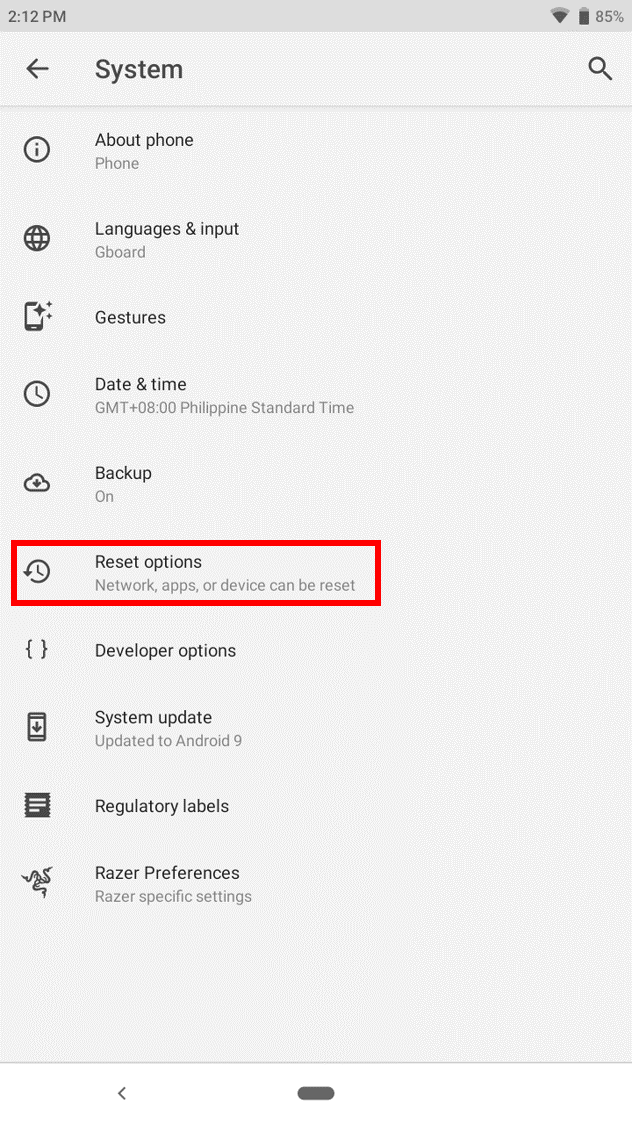
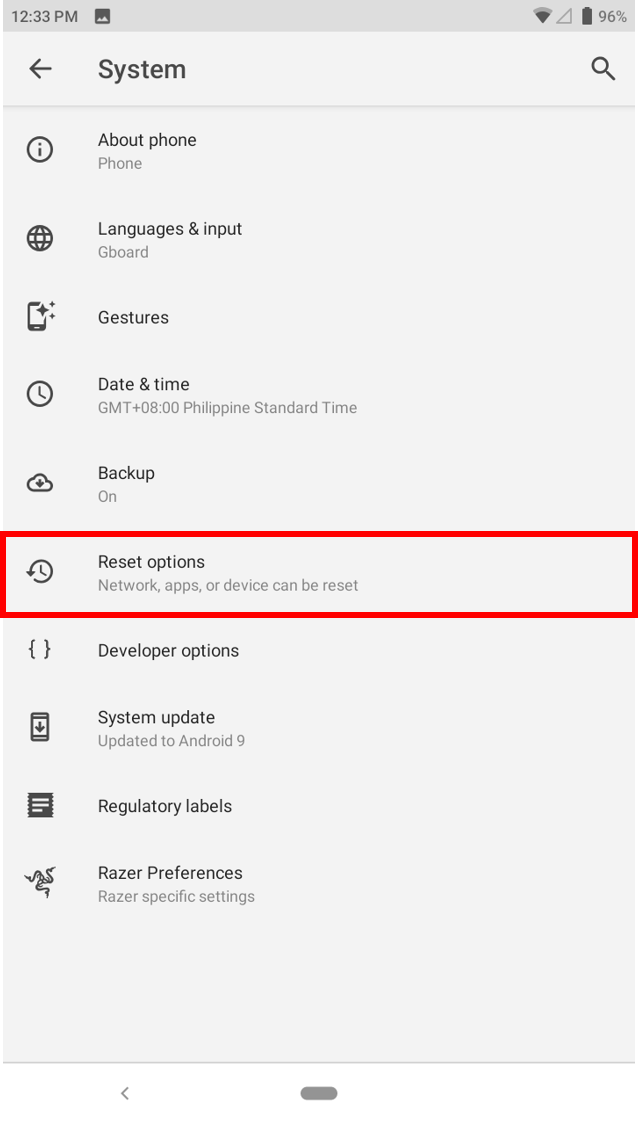
- To reset your phone, go back to Settings > System, then tap “Reset options”.
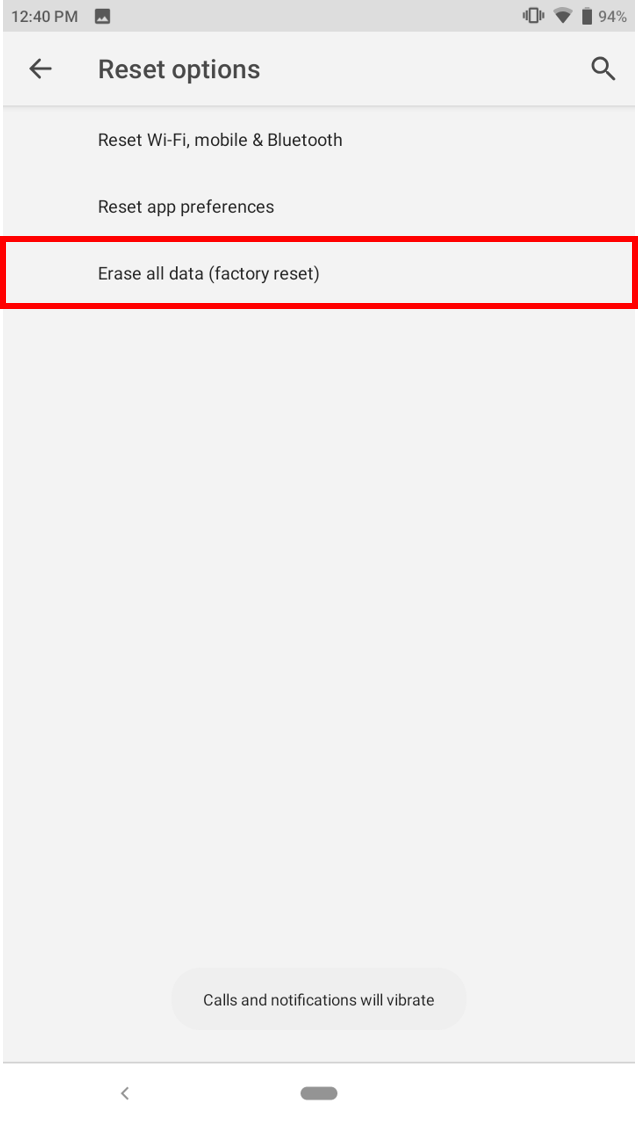
- Tap on “Erase all data (factory reset)”.
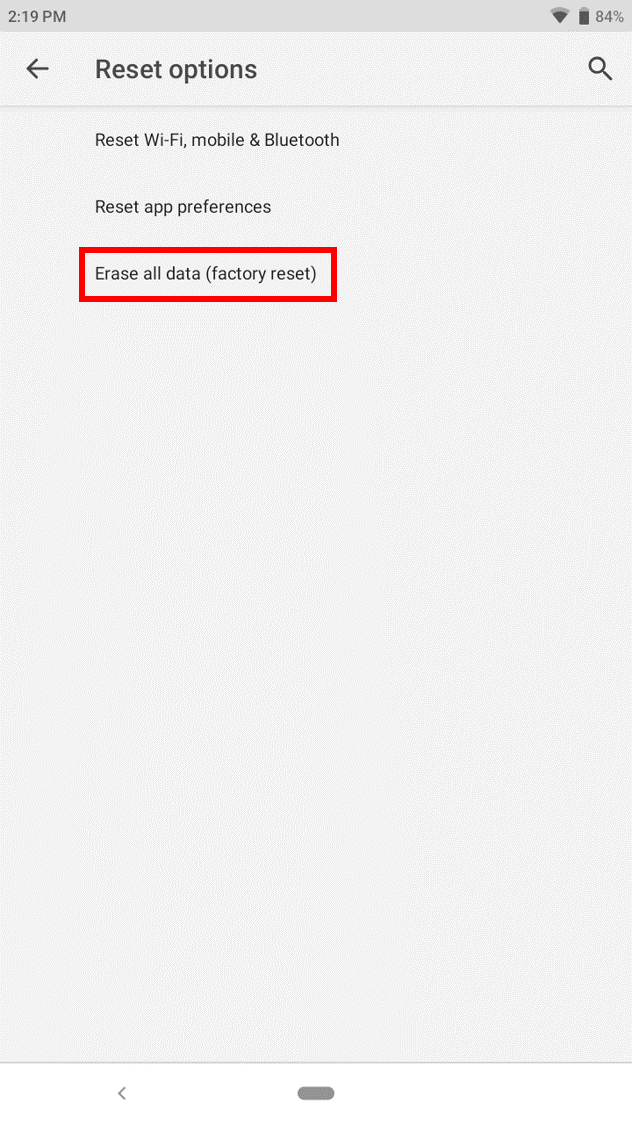
- On the next window, tap “RESET PHONE”.

- Before resetting your phone, first backup your data to Google Drive. Go to Settings > System.


The Dolby Atmos has stopped working on my Razer Phone
The Dolby Atmos Technology on the Razer Phone enhances the dual front-firing stereo speakers for an immersive audio experience. If the Dolby Atmos has stopped working, follow the steps below to fix the problem.
Note: Before proceeding to the troubleshooting steps, ensure that the Razer Phone is up to date. Navigate to Settings > System > Advanced > System update > Check for update.
- Go to Settings and tap “Sound”.
- Tap “Launch Dolby Atmos App”.
- Turn off Dolby Atmos by tapping the power icon on the top-right corner of the screen.
- If you are using your headset or earphones, go to My Razer Phone is not producing sound on my headphones.Note: Be sure to use the audio dongle that comes with the Razer Phone 2. It is not recommended to use the audio dongle from Razer Phone 1 with the Razer Phone 2 or vice versa.
- If there are no audio devices connected to your Razer Phone 2, follow the steps in My Razer Phone is not producing sound on its speakers.
Razer Phone Battery Saving Tips
With its 4000 mAh battery pack, the Razer Phones will allow you to play your favorite games longer than most other handsets in the premium class. However, actual battery performance will still vary with every user.
If you are experiencing uncharacteristically poor battery performance, you may want to check with the following:
- Brightness Settings – Consider lowering your brightness settings to prolong battery life.
- Wireless Connectivity – Turning on Wi-Fi, Data Connection, or Bluetooth consumes extra battery. Using these in places with the weak signal will also take a hit on the battery life as the phone spends more power in keeping the signal stable. Turn these off when not needed to conserve battery.
- Apps with auto-sync – Apps that auto-sync information such as GPS trackers, social media apps, weather widgets, and newsreaders will also consume more battery as they also use wireless connectivity.
- Extreme Temperatures – Exposing the phone to extreme hot or cold temperatures are generally not good for Lithium-Ion batteries and may degrade the battery life.
- Using the Max Refresh Setting – The Max refresh rate can be adjusted globally by going to Settings > Display > Refresh Rate, or individually for each game via Cortex.
- Display Resolution – The Razer Phones’ display resolution is set to 1440p out of the box but can be adjusted down to 1080p or even 720p in Settings > Display > Advanced > Display Resolution.
- Dolby Atmos – While using considerably less power than the display, using Dolby Atmos may also consume more battery. Consider disabling this option to prolong your battery life.
You may also opt to turn on the Battery Saver within Settings to conserve battery life even more.
For Android 9 (Pie)
- Go to Settings > Battery.
- Tap “Battery Saver”.
- Tap the “TURN ON NOW” button to immediately activate the battery saving feature.
- Alternatively, you can set it to automatic by toggling on the “Turn on automatically” switch. Then, adjust the slider to which percentage you want the Battery Saver mode to activate.
My Razer Phone is not charging
If your Razer Phone will not charge, this may be due to a number of reasons. Charging issues may be caused by anything from a faulty cable to intermittent power connections. For wireless chargers, the issue may be because of misalignment or physical obstructions.
To isolate the issue, refer to the steps below:
- Ensure that you are using the adapter and cable that came with the Razer Phone as much as possible. Some third-party peripherals may not reach the specifications for the Razer Phone and such may not be able to charge the device correctly. Worse, using unrated peripherals may result in injury.
- Check if there is any debris blocking the charging ports and the outlet to ensure a steady power connection.
- Test the phone by plugging it into another power outlet or source such as a power bank.
- If your device’s battery was completely depleted, it may take a while for the charging indicator to display on the phone. Consider leaving the phone charging for at least an hour.
- If the issue persists remove the power adapter and attempt to charge the Razer Phone on a computer that has a USB-C port.
- If the phone charges successfully, the power adapter may be defective. Contact Customer Support for assistance.
- If the issue persists, consider using a third-party USB-C charger. If that solves the issue, the USB-C cable may be defective. Contact Customer Support for assistance.
If the above steps do not solve the issue, consider doing a factory data reset.
My Razer Phone is overheating
A rise in temperature is normal on smartphones. They are designed to handle a certain level of high temperatures. Usually, a smartphone reaching temperatures of up to 32-40°C is completely normal.
Remember that the longer you use the phone the more you will notice a rise in temperature, especially when you are running demanding apps or games.
If your phone is often heating up to the point where it is unpleasant to hold, it might have some serious issues.
Follow the steps below to help stabilize the Razer Phone’s temperature to the optimal level:
- Remove a Razer Phone case if there is any.
- Turn on “Airplane mode” to quickly disable Bluetooth, WiFi, and cellular signal search. To do this, follow these steps:
- Make the notification tray appear by swiping down on the home screen.
- Tap “Airplane mode” to enable.
- Tap the recent apps icon on the lower right of the screen.
- Tap “CLEAR ALL” to clear apps that are running in the background.
- If the temperature does not drop to the optimal level, restart the Razer Phone. If restarting the phone did not help, proceed to the next step.
- Install antivirus software from the Play Store to detect and remove malware or virus infection. A phone getting too hot can be a sign of a malware or virus infection.Note: Malware can cause the phone to overheat by consuming lots of its RAM and CPU power.
- If the issue persists, check and perform a system update.
If the above steps did not help, backup your phone data and perform a factory reset.
Razer Phone does not turn on or power up
If your Razer Phone will not turn on, this may be due to a number of reasons. The most likely cause of your Razer Phone not powering on is an insufficient battery charge or a random software error that could easily be remedied by a hard reset. To determine which issue you are experiencing, follow the steps below:
- Plug-in the charger to the phone and check to see if the dynamic battery charging icon is showing up.
- If the phone does not indicate charging, ensure that you are using the adapter and cable that came with the Razer Phone as much as possible. Some third-party peripherals may not reach the specifications for the Razer Phone and such may not be able to charge the device correctly. Worse, using unrated peripherals may result in injury.
- Check if there is any debris blocking the charging ports and the outlet to ensure a steady power connection.
- Test the phone by plugging it into another power outlet or source such as a power bank.
- If your device’s battery was completely depleted, it may take a while for the charging indicator to display on the phone. Consider leaving the phone charging for at least an hour.
- If the issue persists remove the power adapter and attempt to charge the Razer Phone on a computer that has a USB-C port.
- If the phone charges successfully, the power adapter may be defective.
- If the issue persists, consider using a third-party USB-C charger. If that solves the issue, the USB-C cable may be defective.
- Perform a hard reset by simultaneously pressing and holding the power button and volume up button for 7 to 10 seconds
Razer Phone restarts or reboots by itself
There may be instances where the Razer Phone restarts itself without any prompt. This issue is most likely caused by incompatible apps or bugs in previous versions of the software that have since been fixed through updates. To fix this, do the following:
Note: Make sure the phone is sufficiently charged. You may also keep the device plugged in throughout the whole troubleshooting process.
- Boot the Razer Phone to safe mode. Observe the device for up to 24 hours to see if the issue persists. If the phone works normally under safe mode, the issue is due to a third-party application. Consider uninstalling the app that you last downloaded before the issue appeared.To boot to safe mode, do the following:
For Android Version 9 (Pie)
- Press and hold the power button.
- On your screen, touch and hold “Power off”.
- Tap “OK” when asked if you want to reboot to safe mode.
- After the reboot, the words “Safe mode” will be labeled on the bottom of the screen.
- If you are still experiencing the issue, check if you are running the latest software for the device. Ensure that your device is always up-to-date by performing a software update.Note: Steps may vary depending on your device’s operating system.
For Android Version 9 (Pie)
- Go to Settings > System.
- Go to Advanced > System update.
- Tap “Check for update”.
- Tap “Update Now” if an update is available.
- Go to Settings > System.
- If the issue persists, consider doing a factory data reset. To do that, follow the steps below:
- Before resetting your phone, first backup your data to Google Drive. Go to Settings > System.
- Go to Advanced > Backup.
- Toggle “Backup up to Google Drive” option on.
- To reset your phone, go back to Settings > System, then tap “Reset options”.
- Tap on “Erase all data (factory reset)”.
- On the next window, tap “RESET PHONE”.
- Before resetting your phone, first backup your data to Google Drive. Go to Settings > System.
My Razer Phone charger emits noise
There are two common types of noise that a phone charger emits: hum or whine, and buzz or scratch. A hum or whine, also known as “coil whine”, is emitted by an electronic part vibrating as power runs through which generally cannot be get rid of. Meanwhile, a buzzing sound is caused by a defective or failing capacitor which is a potential fire hazard.
While possibly irritating, a coil whine is harmless. However, you may opt to replace it if you are really bothered by it.
To replace the Razer Phone charger, follow the steps below:
- Ensure that the noise is really coming from the charger by plugging it into other power outlets.
- If the noise does not occur when plugged into another power outlet, then it is the faulty power outlet emitting the sound, have it repaired by an electrical professional.
- Once confirmed that the noise is coming from the charger, contact Razer Support to process the replacement.
Calling and Messaging
Unable to receive/send messages – My Razer Phone 2 is having problems sending or receiving messages
This could be caused by a poor network coverage due to structural obstructions …read more
People cannot hear me when I call using my Razer Phone
| Answer ID: 1592
When then the caller is unable to hear you during calls, it could be caused by poor network coverage. Follow the troubleshooting steps below to fix this problem.
Before doing anything else, ensure that your device is up-to-date by performing a system update.
- Check network coverage on the Razer Phone.Note: Network signal is affected by walls, buildings, trees, and weather
- In most cases call issues are due to the network coverage in the location you are in.
- Drop your call and attempt to call again 2 to 3 times.
- If people still cannot hear you during a call, perform a hard reset to clear any possible glitches on the phone.
- If the issue persists, attempt to use another SIM card.
- If the Razer Phone gets rid of the issue with another SIM card, the issue is with the SIM card, contact your network provider.
- If you are still having call quality issues despite using another SIM card, proceed to the next step.
- Back up your phone data and perform a factory reset
The network coverage on my Razer Phone is poor
In most cases, several issues arise due to poor network coverage, such as:
- Poor call quality
- Break up or drop calls
- Network busy
- No service
Below are the troubleshooting steps that may help fix the issue(s):
Before doing anything else, ensure that your device is up-to-date by performing a system update.
Signal Troubleshooting
- Check network coverage on the Razer Phone. Try moving to a different location, preferably with fewer obstacles and more open, and see if it helps.Note: Network signal is affected by walls, buildings, trees, and weather.
Device Settings Troubleshooting
Note: The instructions below apply to the Razer Phone with the Android Pie installed.
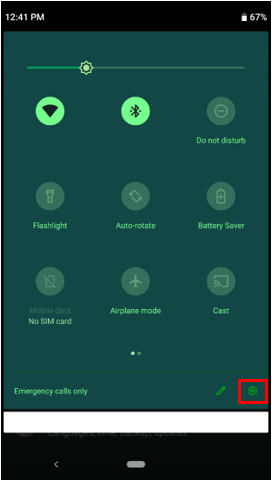
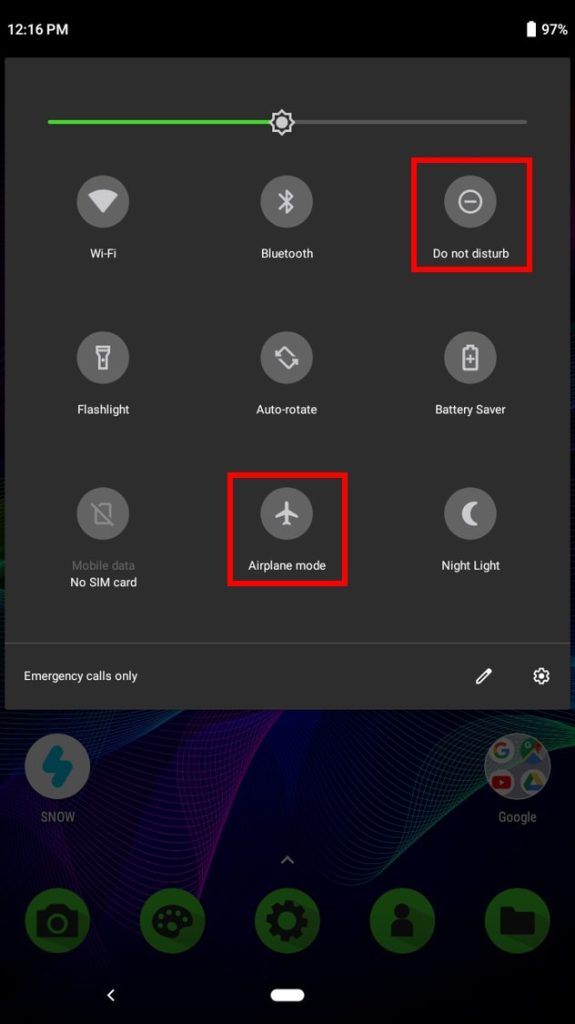
- From your home screen, swipe down twice to display quick settings.
- Ensure that the “Airplane mode” and “Do not disturb” are not enabled.
- If they are enabled, tap the icon(s) to disable.
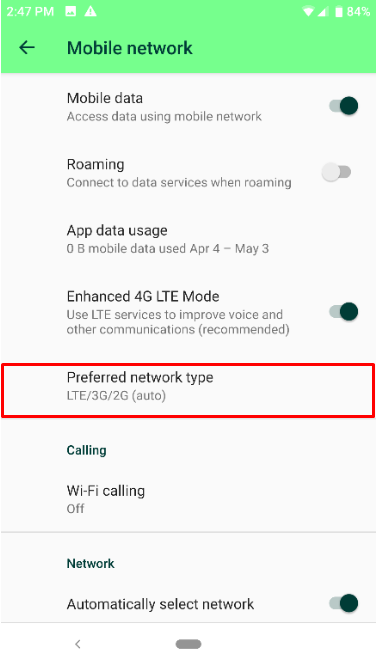
- Go to Settings > Network & internet > Mobile network.

- Tap “Advanced” to display more options, then tap “Preferred network type”.
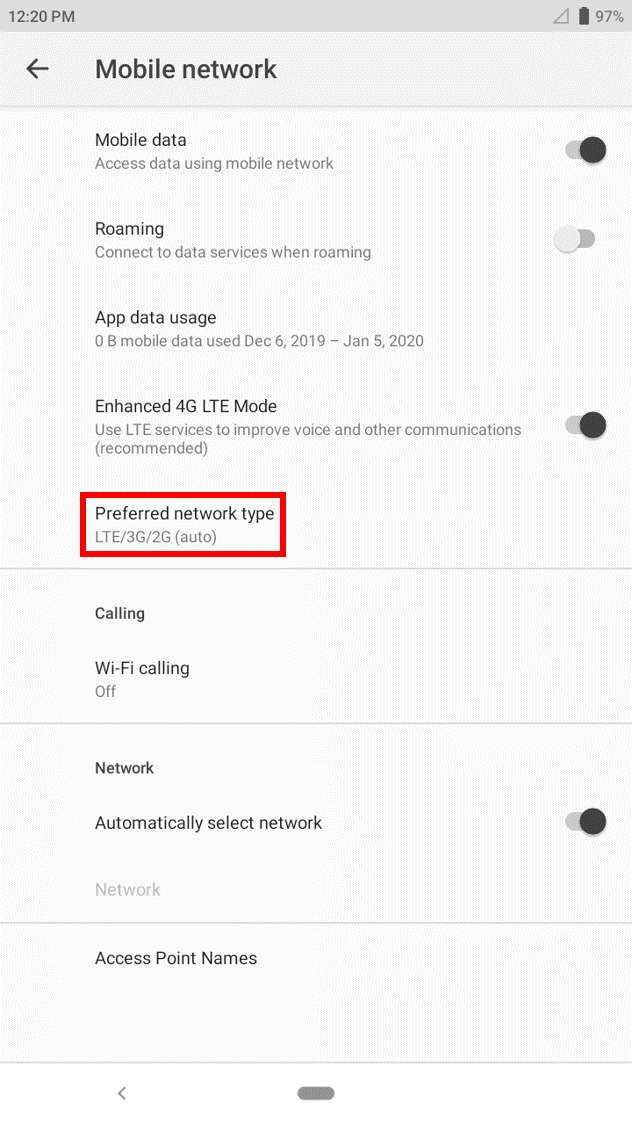
- Ensure that the preferred network type is “LTE/3G/2G (auto)” by selecting the “LTE (recommended)” option.


SIM Troubleshooting
- Use another SIM card. If the Razer Phone starts to have better network coverage, then the issue is with the SIM. You may opt to replace your existing SIM card or contact your network provider.
Ruling Out
- If you are still experiencing the issue(s) despite following the instructions above, you may consider performing a hard reset.
- If the issue persists, back up your phone data and perform a factory reset.
I cannot receive or make calls on my Razer Phone
This issue could be caused by an outdated Android OS or a poor network coverage. Follow the troubleshooting steps below to fix this issue.
Before doing anything else, ensure that your device is up-to-date by performing a software update.
The instructions below apply to the Razer Phone with the Android Pie installed.
- From your home screen, swipe down twice to display quick settings.
- Ensure that the “Airplane mode” and “Do not disturb” are not enabled.
- If they are enabled, tap the icon(s) to disable.

- Go to Settings > Network & internet > Mobile network.

- Tap “Advanced” to display more options, then tap “Preferred network type”.

- Ensure that the preferred network type is “LTE/3G/2G (auto)” by selecting the “LTE (recommended)” option.
- If all the settings are correct and you are still experiencing the issue, perform a hard reset.
- If performing hard reset does not help, contact your network provider to verify that everything is okay on their end and attempt to use another SIM card.
- If the issue persists, back up your phone data and perform a factory reset.


Razer Phone does not ring
This issue could be caused by your phone’s sound settings. Follow the steps provided below when your Razer Phone is not ringing.
Note: Before proceeding to the troubleshooting steps, be sure that the Razer Phone is up to date. Navigate to Settings > System > Advanced > System update > Check for update.
- Go to Settings > Sound.
- Ensure that the phone is set to “Ring” and the volume is set to its maximum for testing. You can adjust the volume to your liking after testing.
- Ensure that a phone ringtone is set.
- After all the settings have been configured, call your Razer Phone from a different phone line.
- If the issue persists, reboot the device and test the phone again.
- If rebooting your device does not help, back up your phone data and perform a factory reset.
Display and Camera
My Razer Phone’s touchscreen is not responding
There may be instances where your Razer Phone’s touchscreen is not working or is not responding. This may be due to a glitch or software issue. If you experience this problem, do the following:
- Power off the device.
- Press and hold the volume up and power button simultaneously to enter Recovery Mode. Release the buttons only when you see the “Three-Headed Snake” logo.
- Once you see the menu, use the volume down button to select “Wipe data/factory reset” and press the power button.
- Select “Reboot System Now” when prompted. The touchscreen should now be functional again.
My Razer Phone’s display is blank
One way to go about this issue is to make sure that the Razer Phone has enough battery charge left. If the device screen turns on then goes to blank immediately, it means the battery must be charged longer.
Make sure that the device is indeed charging properly by looking out for the charging indicator on the screen. Note that if the battery was completely drained, it may take more than a few minutes for the indicator to appear. We recommend leaving the device to charge for at least an hour before attempting to turn it on again.
If the screen is still not turning on, the device may not be charging properly. Follow these steps:
- Ensure that you are using the adapter and cable that came with the Razer Phone as much as possible. Some third-party peripherals may not reach the specifications for the Razer Phone and such may not be able to charge the device correctly. Worse, using unrated peripherals may result in injury.
- Check for any debris blocking the charging ports and the outlet to ensure a steady power connection.
- Test the phone by plugging it into another power outlet or source such as a power bank.
- If the issue persists, remove the power adapter and attempt to charge the Razer Phone on a computer that has a USB-C port.
- If the phone charges successfully, the power adapter may be defective.
- If the issue persists, consider using a third-party USB-C charger. If that solves the issue, the USB-C cable may be defective.
Some users have also reported that the device is already powered on but cannot boot up into the Android home screen. You may try performing a hard reset on the device to restart the device. Do this by pressing and holding the Power button and the Volume up button for 7 to 10 seconds.
If the above steps do not solve your issue, consider doing a factory reset on your device. Note that, at this point, you will lose all data that you have not yet backed up. Be sure to back up your data before doing a factory reset.
To factory reset your Razer Phone, do the following:
- Power off the device.
- Enter Recovery Mode by holding the volume up and power button.
- Release the buttons when you see the Triple-Headed Snake logo on the buttons.
- Select “Wipe data/factory reset” and confirm to wipe user data.
The display on my Razer Phone is faded, blurry, or shows lines
There may be instances where the Razer Phone is faded, blurry or showing lines on the display. This may be due to physical damage or it could be a software issue.
If you are experiencing this problem, follow the steps below:
- Check if the Razer Phone shows any cracks or physical damage on the screen.
- Perform a hard reset to reboot the phone and clear any errors or glitches.
- If the issue persists, backup your phone data and perform a factory data reset.
The display on my Razer Phone does not go dark while on a call
The Razer Phone’s screen should turn off immediately when you put the phone behind your ears as you engage in a call. This is to prevent you from accidentally activating other apps as your face comes in contact with the touch screen.
If your display does not go dark while you are engaged in a call, this may be due to a software issue. Do the following steps:
Note: Steps may vary depending on your device’s operating system. The steps below are for Android 9 (Pie).
- Check if you are running the latest software for the device. Ensure that your device is always up-to-date by performing a software update.
- Check if there are any obstructions to the Razer Phone’s proximity sensors. Screen protectors and screen covers may block the sensor from working normally.
- You may also try to reboot the device by pressing and holding the power button.
- If the issue persists, consider doing a factory data reset.
How to troubleshoot a Razer Phone when the camera does not work
There may be instances where the Razer Phone camera fails to work properly. You may receive an error message such as “Cannot connect to camera”, or the screen remains blank.
This issue may indicate that the Razer Phone camera has a problem with either its software or hardware parts. The following are also potential reasons why the camera is not working:
- Low device storage
- Low RAM
- Slow device performance due to numerous applications
- Software or technical glitch
To resolve this issue:
- Ensure that there are no obstructions such as phone covers and screen protectors on the camera. Do this for both the front and back cameras.
- Check if you are running the latest software for the device and perform a software update. Make sure that the “Razer Camera 2” application is updated.
- If an error message shows up telling you that the memory is full, you will have to clear up some storage space by deleting unused files, apps, images, or videos.
- If the camera does not completely work, shows a blank screen, or does not work at all, force close the app to reboot the camera.
- Go to Settings > Apps & notifications.
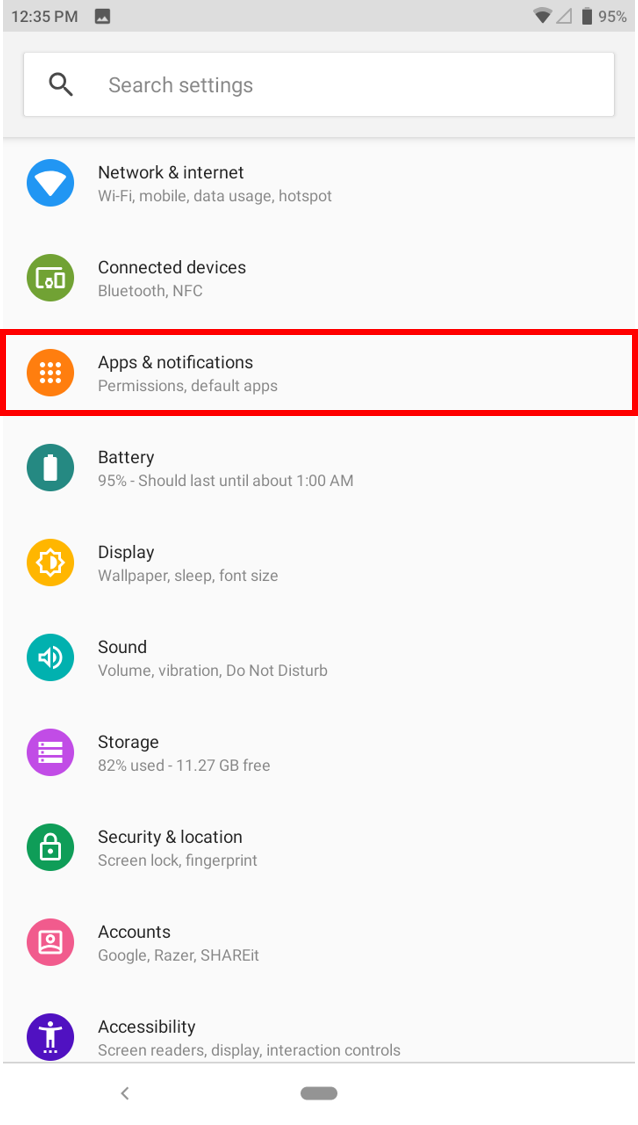
- Tap on “Camera”.
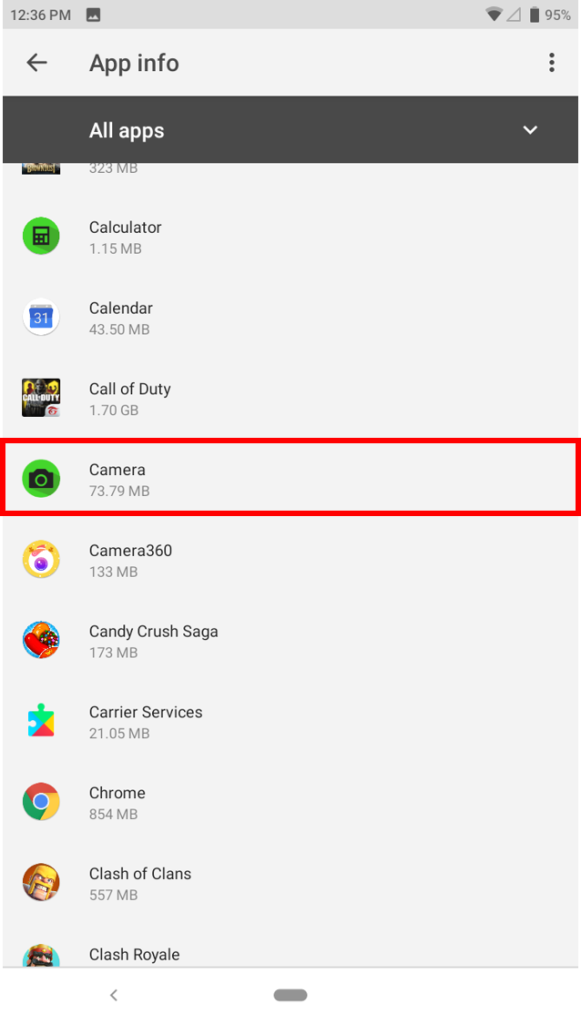
- Reset the Camera app by tapping on “FORCE STOP”.
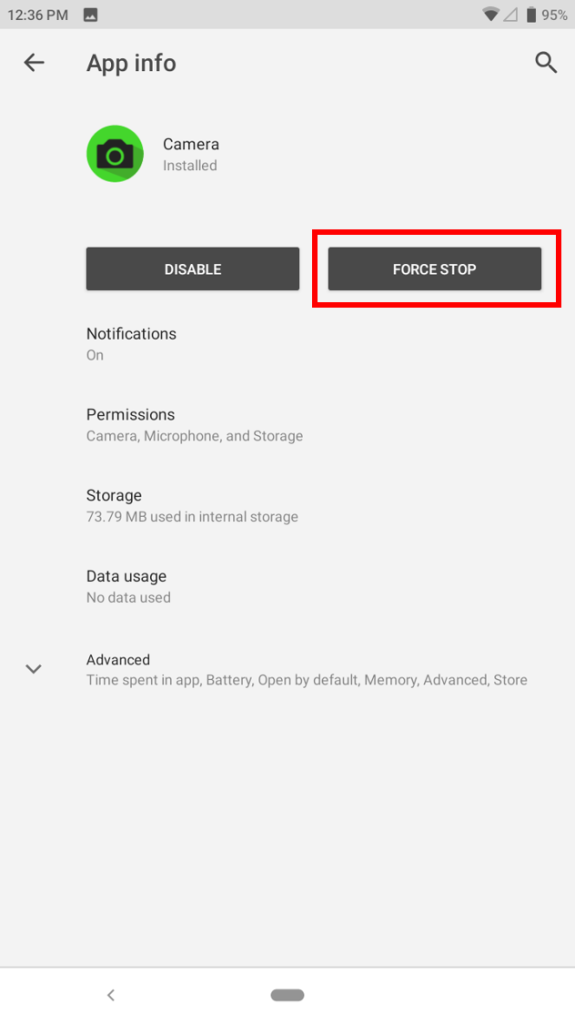
- Launch the Camera app again to see if the issue persists.
- Go to Settings > Apps & notifications.
- If the issue persists, consider doing a factory reset.
- Before resetting your phone, backup your data to Google Drive. Go to Settings > System.
- Tap on “Advanced”.
- Tap on “Backup”.
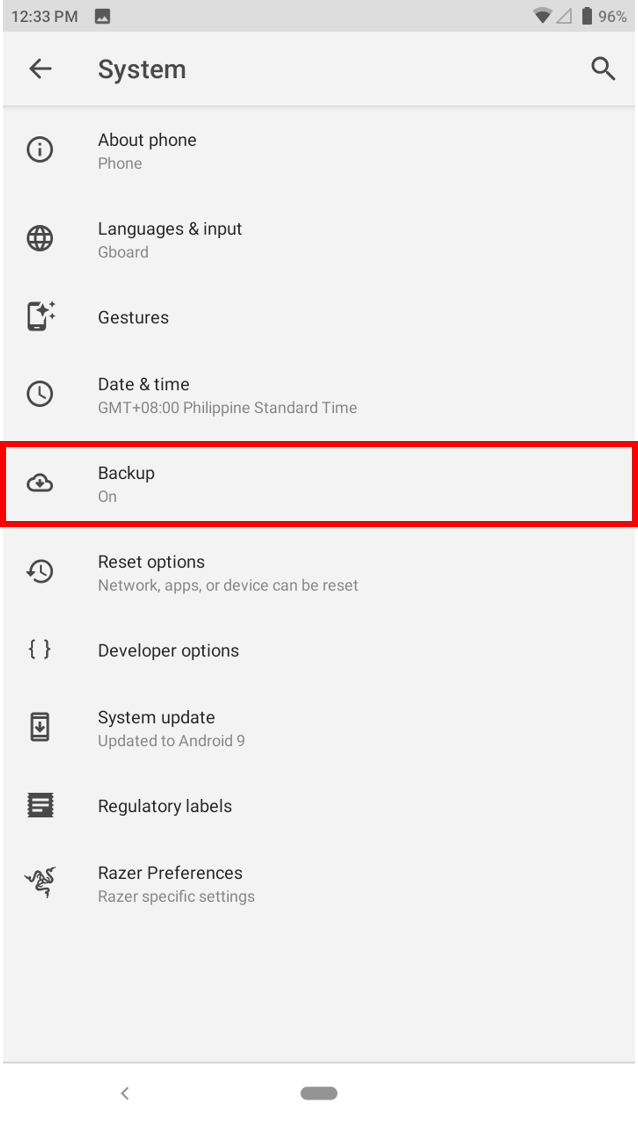
- Toggle “Backup up to Google Drive” option on.
- To reset your phone, go back to Settings > System > Advanced. Tap on “Reset options”.
- Tap on “Erase all data (factory reset)”.
- On the next window, tap “RESET PHONE”.
- Before resetting your phone, backup your data to Google Drive. Go to Settings > System.


Connectivity
Internet, PC, and Bluetooth connection issues on the Razer Phone
Connectivity issues can occur for many different reasons. The following steps can help you identify and fix what’s causing connection issues on your Razer Phone.
Note: Before proceeding to the troubleshooting steps, be sure that the Razer Phone is up to date. Navigate to Settings > System > Advanced > System update > Check for update.
Connecting to the Internet
- Ensure that your choice of internet access has already been enabled, either by a WiFi or mobile data connection.
- Try connecting to the same internet connection using a different mobile device and a different SIM card if available.
- If the second device or SIM card cannot connect to the internet connection, the issue is with the internet connection.
- Mobile Data – Contact your network provider.
- Wi-Fi Connection – Contact your internet service provider.
- If the second device connects successfully to the internet connection, proceed to the next step.
- If the phone is still having trouble connecting to the internet, perform a hard reset.
- If the issue persists, back up your phone data and perform a factory reset.
Connecting to Bluetooth
Follow the instructions below to resolve Bluetooth connection issues with the Razer Phone:
- Remove all Bluetooth devices paired with the Razer Phone.
- Turn off and on the Bluetooth on the Razer Phone.
- Restart the Bluetooth device you are trying to connect.
- Clear cache and data on Bluetooth Share and Bluetooth MIDI Service.
- Try to reconnect the Bluetooth device and verify if the issue has been resolved.
- If the issue persists, try to connect to a different Bluetooth device.
- If the phone connects to a different device, the Bluetooth device you are trying to pair may be defective or incompatible.
- If the phone does not connect to a different device, proceed to the next step.
- Boot into “Safe Mode”.Note: Safe Mode disables third-party apps that run on your phone and hence can help you identify buggy apps. If Bluetooth works properly in Safe Mode, then it means that a third-party app is causing the problems. Uninstall recently installed apps or the ones that are possibly causing the issue.
- Perform a hard reset on the Razer Phone and verify if the issue has been resolved.
- Change “AVRCP Version” by navigating through Settings > System > About phone.
- Repeatedly tap “Build Number” until it shows “You are now a Developer”.
- Then navigate back to System > Developer Options > Bluetooth AVRCP Version.
- Select each version and test out if the issue has been resolved.
- If the issue persists, backup the data and perform a factory reset.
Connecting to Computer
- Connect your Razer Phone to your computer via the included USB-C Thunderbolt 3 cable.
- Tap the notification on the phone to check if you have successfully connected to the computer.
- Once detected, select the interaction you want to perform with the device and the computer.
- If the computer is still unable to detect the Razer Phone, boot the Razer Phone to Safe Mode to isolate if a third-party application is causing the issue.
- Reconnect the phone to the computer while in Safe Mode.
- If the issue persists, back up your phone data and perform a factory reset.
Razer Phone unable to get a 4G signal
In most cases, call issues are due to the network coverage in the location you are in.
Note: Before proceeding to the troubleshooting steps, be sure that the Razer Phone is up to date. Navigate to Settings > System > Advanced > System update > Check for update.
To fix this issue, follow the steps below:
- Check the network coverage on the Razer Phone.Note: Network signal is affected by walls, buildings, trees, and weather conditions.
- Make sure that “LTE (recommended)” is selected. Navigate to Settings > Network & internet > Mobile network, expand “Advanced” and select “Preferred network type”.
Note: If you are in a poor 4G coverage area, you can force your phone to use lower frequencies like 2G and 3G. This may or may not improve performance depending on the network coverage.
- If you are still experiencing the issue, there might be a problem with your SIM card and may have to contact your network provider to request a replacement.
- If the issue persists, back up the data and perform a factory reset.

My Razer Phone cannot get a mobile data connection
There are multiple ways to solve when the Razer Phone is unable to get a cellular data connection but can receive text messages and phone calls. Try the steps below to see which works best for your problem.
Note: Before proceeding to the troubleshooting steps, be sure that the Razer Phone is up to date. Navigate to Settings > System > Advanced > System update > Check for update.
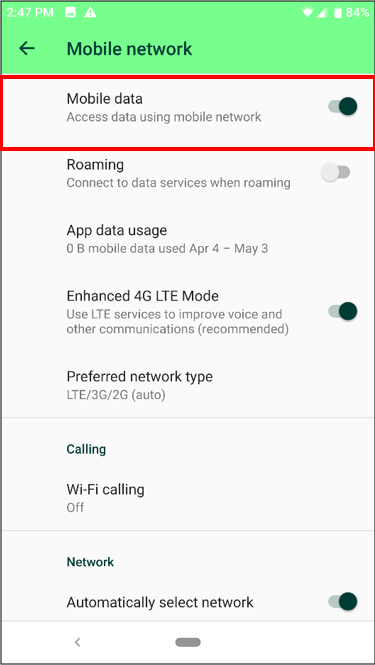
Enable Mobile Data
- Be sure to enable “Mobile data” on your phone by going to Settings > Network & internet > Mobile Network.
- On “Mobile Data”, tap the toggle switch to enable it.

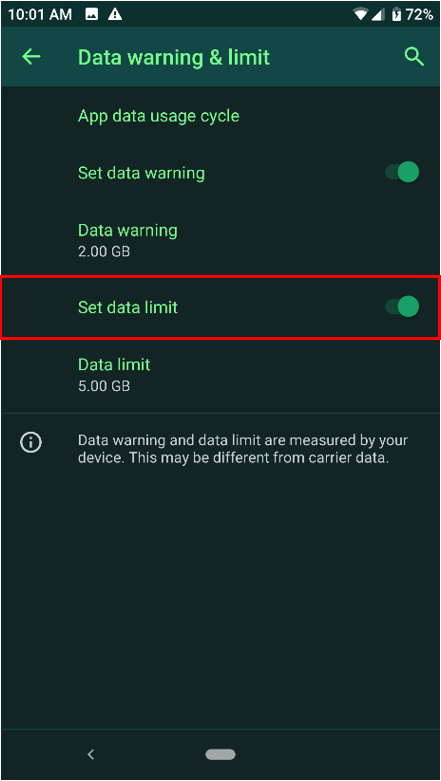
Disable Mobile Data Limit
- Make sure that the “Set data limit” is disabled. Navigate through Settings > Network & internet > Data Usage > App data usage.
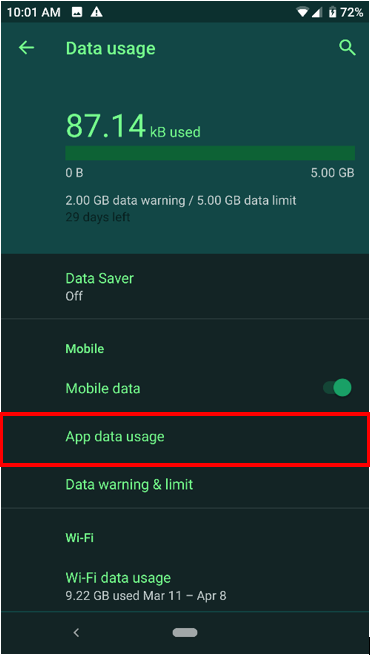
- Click the “Settings” icon on the upper right screen.
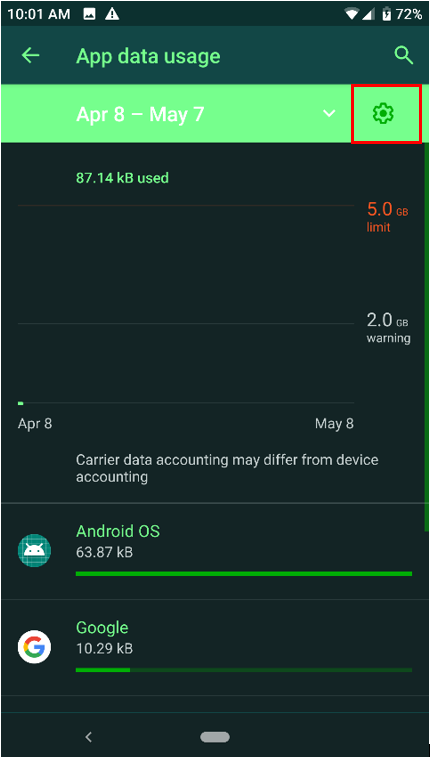
- Tap on the slide bar for “Set data limit” to turn it off.


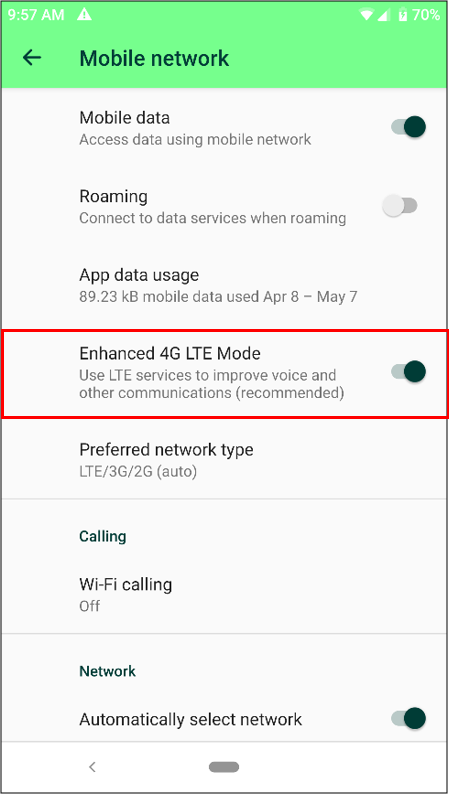
Enable 4G LTE Mode
- Navigate to Settings > Network & internet > Mobile network.
- Tap on the toggle switch next to “Enable 4G LTE Mode” to turn it on.

Set or Automatically Select Network Type
Choose either to let the phone automatically select network type or set the network type manually by:
- Navigate through Settings > Network & internet > Mobile Network.
- Expand “Advanced” and select “Preferred network type”.
- Choose “LTE (recommended)” as your preferred network type.
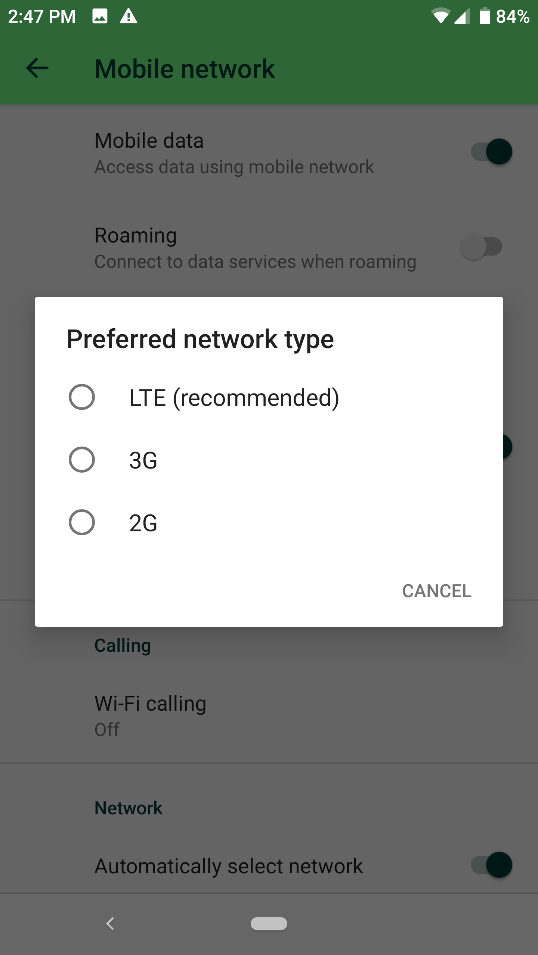

Note: By choosing “LTE (recommended)”, the phone will automatically select the network type depending on the data coverage of your location.
Reset Mobile Network settings
Note: Resetting the mobile network will not erase the user data, only the WiFi and Bluetooth saved settings and profiles.
- Navigate to Settings > System > Advanced > Reset options.
- Tap on “Reset WiFi, mobile, & Bluetooth”.
- On the bottom part of the screen, tap on “Reset Settings”.
If the above steps did not resolve the issue, test the Razer Phone 2 with another SIM card to see if the issue is within the Razer Phone.
The following steps are advanced troubleshooting steps.
Check your Carrier if the APN settings are correct
- Navigate to Settings > Network & internet > Mobile Network > Advanced > Access Point Names.

- Tap on the currently selected APN.
- Enter Your APN Settings ManuallyYou can contact our Technical Support team for assistance when doing the following steps.Note: Be sure that the “Mobile data” is disabled and the “Mobile data limit” is enabled.
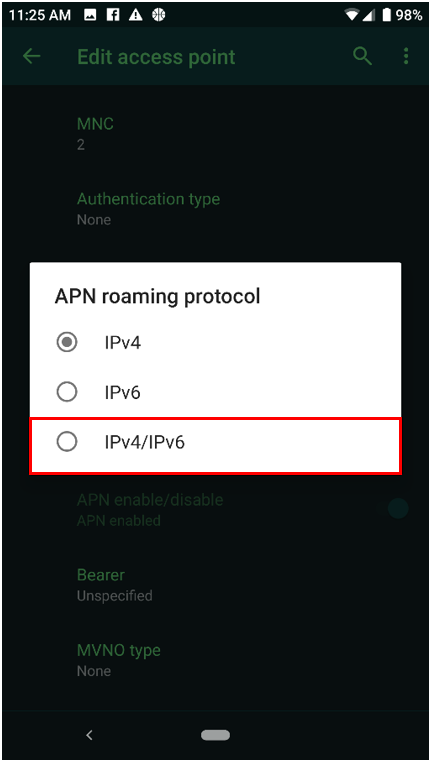
- Navigate to Settings > Network & internet > Mobile Network > Advanced > Access Point Names.
- Tap the “+” icon on the top right corner.
- Set “APN protocol to “IPv4/IPv6”.
- Enter all the APN details for your network and save.
- If the issue persists, back up your phone data and perform a factory reset.
- Scroll down until you see “APN protocol”, tap it.
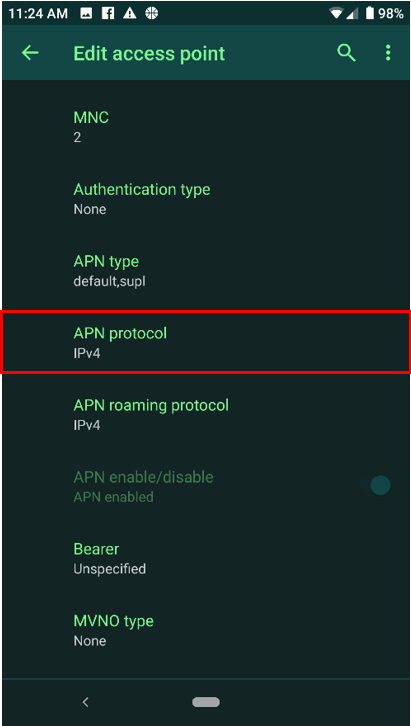
- Select “IPv4/IPv6”.


Razer Phone Verizon NO SIM CARD error
Verizon customers encounter NO SIM CARD error message on their Razer Phone 2 devices. This occurs when the customer’s preferred network type is LTE/CDMA. To resolve this, the user needs to change the preferred network to LTE/3G/2G.
Please follow the steps below for instructions on how to do this:
- Select “Settings” > “Network & Internet”.


- Select “Mobile Network” > “Preferred Network Type”.


- Select the option “LTE/3G/2G”.

- Restart the phone to apply the changes.
Software
My Razer Phone is having performance issues
You may encounter some issues with the performance of the Razer Phone and several troubleshooting steps can be performed to resolve them. Before troubleshooting, ensure that the Razer Phone is up to date. Make sure that the phone is charged correctly. Charge the phone for at least an hour before troubleshooting.To troubleshoot:
- Clear up your recent apps by pressing the home button and swiftly swiping upwards to display your recently opened apps, swipe right, and press “CLEAR ALL”.
- If the Phone is loading slowly, perform a hard reset.
- If the issue persists, boot the Razer Phone to safe mode to see if a third-party application is causing the issue.
- Observe the phone for 24-hours to observe if the issue persists while in safe mode.
- If the phone works normally while under safe mode, the issue is due to a third-party application. Uninstall the app that is causing the issue.
- Perform a hard reset to exit safe mode.
- If you are still experiencing a slowdown or if you are unsure if an app is causing the issue, check if you are running the latest software for the device and perform a system update if needed.
- If the issue persists, back up your phone data and perform a factory data reset.
My Razer Phone crashes or freezes
If you experience crashing and freezing on your Razer Phone. this can be attributed to a number of factors such as the following:
- Phone has not been reset for a long time
- Third-Party apps malfunctioning
- Internal memory may be full
To resolve this, try the following troubleshooting steps:
- Perform a hard reset.
- Test the phone.
- If you are still experiencing crashing and freezing or if you are unsure if an app is causing the issue, check if you are running the latest software for the device and perform a system update.
- Check if there are any application updates available on Google Play under “My apps & games”. Perform an app update if there are any.
- If the issue is still present, boot the phone to safe mode to isolate if a third-party application is causing the issue.
- Observe the phone for 24-hours to see if the issue persists while in safe mode.
- If the phone works normally while under safe mode, the issue is due to a third-party application. Please uninstall the app that is causing the issue.
- If the issue persists, backup your phone data and perform a factory data reset.
The Razer Phone is unable to proceed with the Setup Wizard on first boot up
If your Razer Phone is unable to proceed with the Setup Wizard on its first bootup, this may be caused by the phone attempting to do an Over-the-air (OTA) update which contains System and application optimizations. It is a mandatory update and cannot be skipped. See the tips below:
- The size of the OTA update is approximately 500MB. It may take quite a while to download.
- The Razer Phone needs to be connected to a Wi-Fi or cellular network to receive an OTA update.
- It is recommended to update via Wi-Fi.
- If not using a Wi-Fi connection, the user may use up cellular data on their plan.
Others
How do I access my Razer Phone if I forgot the security lock code?
If you cannot access the Razer Phone because of a security lock on your Password, numeric password, lock pattern, and so on, select one of the two methods below to recover your phone.
Important Note: All methods will erase data from your phone.
- If your phone is linked to your Google account click here. (preferred and easiest method)
- If you enabled Secure Startup, click here.
Erase data via Android Find
If you have linked the phone to a google account, you can recover the phone by doing an erase from your computer. Do note that doing so will cause all data to be permanently erased from your phone.
- Please visit https://www.google.com/android/find and log in using the Google account linked to the Razer Phone.
- Select the Razer Phone and then choose “ERASE DEVICE”.

- Confirm the action by clicking the “ERASE DEVICE” button.

- You will be asked to sign-in again to proceed.
- When prompted, click “Erase” to proceed. Once confirmed, the Razer Phone will reset to factory settings.

Reset via Secure Startup
- Do 20 attempts to recover the password. There is a lock-out period of 30 seconds after 5 initial failed attempts.
- After the 21st attempt, you will be warned with a message that the device will be reset after 9 more failed attempts and will revert to out of box factory settings. (Must enter all 4 digits to be qualified as an attempt)
The Razer Phone is not detecting a SIM card
Most of the time, a Razer Phone cannot detect a SIM card when it is not properly inserted.
Follow the steps below to help diagnose and resolve the issue:
- Make sure that the Razer Phone system is up to date.
- Restart the Razer Phone and see if it fixed the issue, if not proceed to the next step.
- Reseat the SIM card.
- If the Razer Phone detects the SIM after reseating, then it is a placement issue.
- If reseating the SIM card did not work, proceed to the next step.
- Insert the SIM card to another Phone.
- If the SIM card is not detected using another phone, then the SIM card is broken. Contact your network provider to process SIM card replacement.
- If the SIM card is detected using another phone, proceed to the next step.
- Perform a hard reset. Simultaneously press and hold the power and the volume up buttons for 10 seconds and wait for the device to reboot.
If the above steps did not help, backup your phone data and perform a factory reset.
How to unlock a locked SIM on the Razer Phone?
You may encounter a locked SIM issue on your Razer Phone due to multiple incorrect attemps. If this happens, an “Enter PUK” error will be displayed. To unlock your SIM, follow the steps below:
- Enter the “PUK” code that came along with your SIM card.
- If you do not know the “PUK” code please contact your network provider to assist you in unlocking your SIM card.
The fingerprint sensor on the Razer Phone is not working
f you experience issues with the fingerprint sensor on your Razer Phone, you can perform the troubleshooting steps below to resolve the problem.Note: Before you proceed, please ensure that your Razer Phone is updated.
- If the Razer Phone is not detecting your fingerprint, please ensure that:
- The fingerprint that you set is clean and clear of any dirt and oils.
- The sensor is clean, you may use a microfiber cloth to make sure there are no smudges that may be causing the error.
- If the sensor is still not working, please use the backup unlock method you have previously set to unlock your phone. If you can no longer remember your backup unlock method, refer to Forgot security lock code on my Razer Phone.
- Once you have the phone unlocked, assign a new fingerprint lock.
- If the Razer Phone fingerprint sensor does not work while assigning a new fingerprint lock, please perform a hard reboot.
- After the reboot, access the phone again and attempt to assign a new fingerprint lock.
- If the issue persists, back up your phone data and perform a factory data reset.
How to tell if my Razer Phone has liquid damage
The Razer Phone 2 is equipped with LCIs (Liquid Damage Indicators) that can show if the phone has been in contact with water or other liquids. Once the LCI has been exposed to water or other liquids it will quickly change color from white to Red. The LCI will only change color if exposed to a liquid and will not be affected by high humidity or other environmental factors.
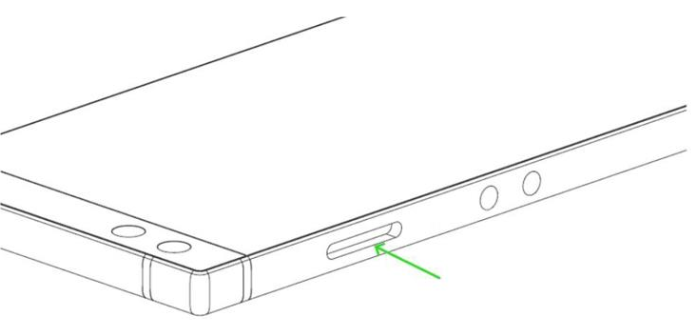
The Razer Phone’s LCI can be checked by opening the SIM tray, while the internal LCIs can only be checked by a qualified repair center technician.
Below are the steps on how to check the LCI that is located inside the SIM tray of the Razer Phone 2.
- Insert your SIM eject pin to remove the SIM tray.
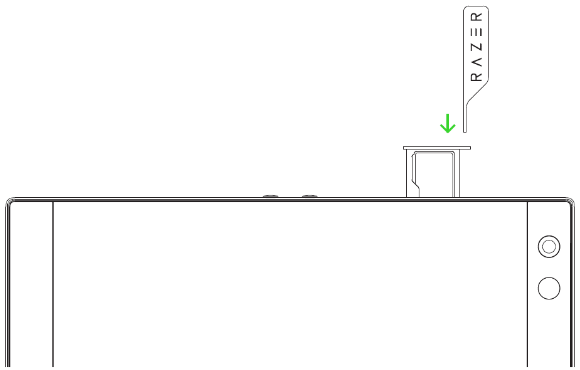
- Use a magnifying glass with the help of a portable light when looking inside the SIM tray.
- You will notice a round dot that will either be white or red.
- White – the phone has not been exposed to liquids.
- Red – the phone has been exposed to a liquid.


Note: Internal LCIs may indicate water damage that is not reflected by the one shown above. Liquid damage is not covered by Razer’s Limited Warranty.