reolink Wireless NVR System
What’s in the Box
Note: The Micro SD card can only record when motion detected. If you want to set the 24/7 video recordings, please purchase and install the HDD to record. The way to install the HDD, please refer to https://bit.ly/2HkDChC
Connection Diagram
To make sure nothing was damaged during shipping, we recommend that you connect everything and try it before you do a permanent installation.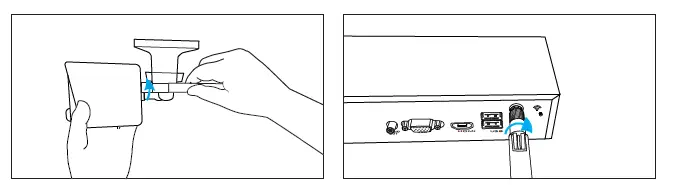 Step 1: Turn the antenna base in a clockwise motion to connect. Leave the antenna in a vertical position for best reception. Screw the WiFi antenna to connect to the antenna socket on the WiFi NVR
Note: Before installing the antenna, you need to fold the bracket of the camera as the picture shown so that you can install the antenna easily.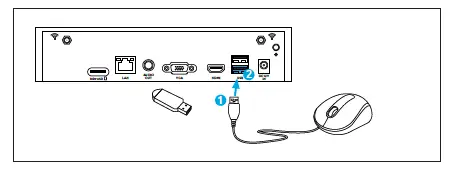
Step 2: Connect the supplied mouse (1) to the bottom USB port (2). To copy video recordings and to perform a firmware upgrade, connect a USB flash drive (not included) to the top port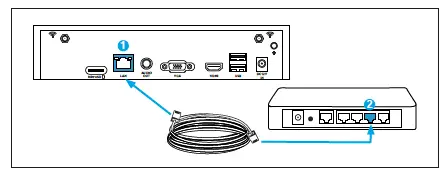
Step 3: Connect the supplied Ethernet cable to the Ethernet port (1) on your NVR then connect the other end to a spare port (2) on your router. Don’t proceed to the next step until this is done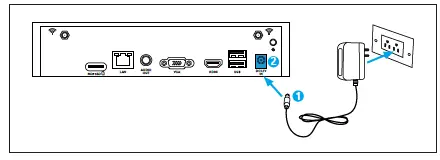 Step 4: Connect the supplied power adapter’s power connection (1) to the power input (2) on your NVR first (to minimize sparking). Connect the power adapter to a power outlet to supply power
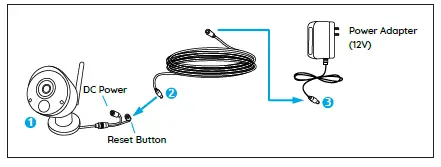
Step 5: Connect the output on the power cable to the power input on the camera. Then connect the input on the power cable to the power adapter. The reset button is used to restore factory default settings.
Setup WiFi System on Monitor
If you want to initial setup the WiFi system on monitor, you need to connect the HDMI/VGA cable to the HDMI/VGA port (1) then connect the other end to a spare HDMI/VGA input (2) on your TV.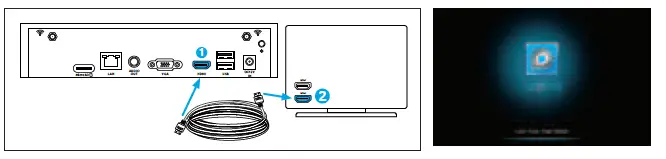
After you connect the system according to the connection diagram, during the startup, you will see the
below splash screen after a few seconds.
You need to follow the Setup Wizard to set up your NVR by clicking “Right arrow”to continue and click “Finish” to save your settings at the last step.
Note: Please enter at least 6 characters as the password. Then You can skip the remaining steps to finish the wizard and configure them later
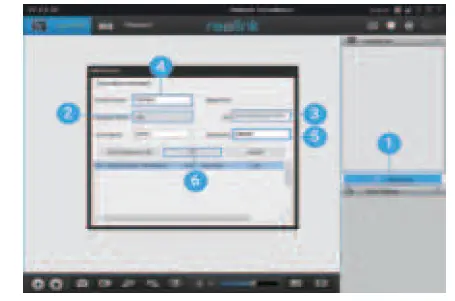
Wizard Setup
- Choose a language, video standard, resolution and check the UID.
- Name the system and create a password.
Live View Screen and Menu Bar
Live View is the NVR’s default display mode, and all of your connected cameras are displayed on screen. You may check the status or operation of your NVR and cameras by using the icons and menu bars on the Live View screen Right click the mouse on the LiveView screen to open the Menu bar.
- Open the Main Menu
- Open Camera List
- Search Video Files
- Audio On/Off (audios can be set up only after you enable Record Audio in Recordings)
- Lock/Shut Down/Reboot
Setup WiFi system on Reolink App (For Smartphone)
Download and install the Reolink App in App Store (for iOS) and Google Play (for Android).
-
Phone is in the Same Network with NVR
- After downloading finished, install and launch the app.
- During start-up, you will see the Devices page. The NVR will automatically show in the device list.
- Click the device you want to add, it will pop up a menu asking you to create a password. For security consideration, you’d better create a password and name the device for the first-time use.
- Done! You can start to live view now.
-
Phone is Not in the Same Network with NVR or Using Cellular Data
- Click the button to Enter the UID of the NVR, then click Next to add the device.
- You need to create a login password and name the device to finish the initialization for the NVR.
Note: The default password is blank (no password). - Initialization Done! You can start to live view now.
Setup WiFi System on Reolink Client (For PC)
Please download the client software from our official website: https://reolink.com/software-and-manual and install it.
Launch the Reolink Client software and manually add the NVR to the Client. Please follow the steps below.
-
PC is in the Same Network with NVR
- Click “Add Device” on the right-side menu.
- Click “Scan Device in LAN”.
- Double click on the device you want to add. The information will be filled in automatically.
- Input the password created on Reolink App or on NVR to log in.
Note: The default password is blank. If you’ve already create a password on the mobile app or on NVR, you need to use the password you’ve created to log in. - Click “OK” to log in
-
PC is Not in the Same Network with NVR
- Click “Add Device” on the right-side menu.
- Choose “UID” as the Register Mode and type in the UID of the NVR.
- Create a name for the camera displayed on Reolink Client.
- Input the password created on Reolink App or on NVR to log in.
Note: The default password is blank. If you’ve already create a password on the mobile app or on NVR, you need to use the password you’ve created to log in. - Click “OK” to log in.
-
Client UI Introduction
Attention for Camera Installation
PIR Sensor Installation Angle
When installing the camera, please install the camera angularly (the angle between the sensor and the detected object is larger than 10°) for effective motion detection. If the moving object approaches the PIR sensor vertically, the sensor may not detect the motion events.
FYI:
- The PIR sensor’s detecting distance: 23ft (in default)
- The PIR sensor’s detecting angle: 100° (H)
Camera Ideal Viewing Distance
The ideal viewing distance is 2-10 meters (7-33ft), which enables you to recognize a human
Note: The PIR trigger can’t work alone, it needs to be used with motion detection. There are two detection types can be chosen. One is Motion and PIR, the other is Motion.
How to Install the Camera
Mounting Tips
Lighting
- For best results, do not point the camera towards a light source.
- Pointing the camera towards a glass window intending to see outside may result in a poor image because of glare and lighting conditions inside and outside.
- Don’t place the camera in a shaded area that is pointing into a well-lit area as this will result in a poor display. The light to the sensor located at the front of the camera needs to be the same as the light at the focal target for best results.
- As the camera uses infrared LEDs to see at night, it’s recommended to clean the lens from time to time if the picture degrades.
Environment
- Make sure the power connections are not directly exposed to water or moisture and not shielded from other outdoor elements.
- Weatherproof only means that the camera can be exposed to weather such as rain and snow. Weatherproof cameras cannot be submerged under water.
- Do not expose the camera where rain and snow will hit the lens directly.
- Cameras geared for cold weather may work in extreme conditions as low as -25° as the camera produces heat when plugged in.
- Suggested Working Distance: Less than 3 WOOD WALLS within 90ft.