ROYAL Manual Typewriter Instruction Manual
Additional Features:
Impression Regulator – The force of the keystroke can be adjusted to either “light” or “heavy”. For light impression move Impression Regulator (8) down to “L”
position. For heavy impression Regulator up to “H” position.
Carriage Release –
The tension on the carriage can be released by pressing the Carriage Release 23 and sliding the carriage to either the right or left.
Automatic Space Key –
The carriage will move rapidly toward the left when the Automatic Space 12 Key ~ is pressed
Paper Support –
The Paper Support 1 holds paper in an upright position. To use, press the raised portion of the Paper Support, to partially lift the arm. Raise the arm by rotating it into the vertical position. To return the Paper Support, rotate the arm back to horizontal position.
Shift Keys –
There is a Left Shift Key 11 and a Right Shift Keye 14 which are used to type capital letters and the top symbols shown on keys.
Shift Lock –
The Shift Lock Key 10 permanently engages the shift key function to allow for ALL CAP typing. To engage the shift lock feature , push the Shift Lock Key
down. To release Shift lock, press either of the Shift keys.
Typewriter Diagram
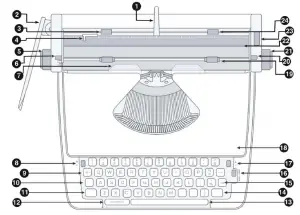
- PAPER SUPPORT
- CARRIAGE RETURN LEVER
- LEFT MARGIN STOP
- PAPER GUIDE
- LEFT ROLLER KNOB
- LINE SPACING SELECTOR
- ALIGNMENT GUIDE
- IMPRESSION REGULATOR
- MARGIN OVERRIDE KEY
- SHIFT LOCK KEY
- LEFT SH I FT KEY
- AUTOMATIC
- SPACE KEY
- SPACE BAR
- RIGHT SHIFT KEY
- TAB KEY
- RIBBON COLOR SELECTOR
- TAB SET/TAB CLEAR LEVER
- TOP HOUSING
- PAPER RETENTION BAR
- PAPER RELEASE LEVER
- RIGHT ROLLER KNOB
- PAPER INSERT SLOT e CARRIAGE RELEASE
- RIGHT MARGIN STOP
- LEFT RIBBON CONTROL ARM
- LEFT RIBBON GUIDE POSTS
- GRIGHT RIBBON SPOOL
- LEFT RIBBON SPOOL SHAFT
- RIBBON CARRIER
- GRIGHT RIBBON SPOOLSHAFT
- LEFT RIBBON SPOOL
- RIGHT RIBBON GUIDE POSTS
- GRIGHT RIBBON CONTROL ARM
Getting Started:
- Unpack machine and remove the transit safety devices.
- Keyboard steel protection rod
- & 3: Carriage track plastic stopper (two pcs)
- Carriage return lever plastic stopper
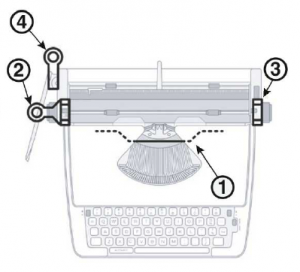
- Raise Carriage Return Lever f). Your typewriter will come with the Carriage Return Lever in the down position. Always lift Carriage Return Lever into raised position when operating typewriter.
- Typecast should be kept clean and free of dust Occasional oil is recommended to keep moving parts in smooth working condition.
Adjust Paper Margins:
- Margin Stops 3) f24) are located near the back of the typewriter carriage.
- Slide stops to the right and left to set paper margins. Margins determine at what point the typewriter starts and stops.
- Margins can be overridden by pressing the Margin Override Key
Set Line Spacing:
- There are four setting which determine the line spacing of your typewriter.
R: No spacing. Carriage will move but paper will not advance upward.
1: Single spacing
-: One and a half spacing
2: Double spacing - To set line spacing, move Line Spacing Selector 6 to correspond with the desired spacing.
Load Paper:
- Align left edge of paper with Paper Guide 4
- Insert paper into Paper Insert Slot 22 until paper stops.
- Turn either the Left Roller Knob 5 or Right Roller Knob 21 to advance paper.
- Advance paper to top of transparent Alignment Guide 7.
- To align or straighten paper, release tension on Roller by pushing the Paper Release Lever 20 toward back of machine. Manually adjust paper using the transparent Alignment Guide 7. Restore tension on roller by pulling Paper Release Lever toward front of machine.
- Lift Paper Retention Bar 19 to raised position.
- Advance paper using either Carriage Return Lever 2 or the Roller Knobs 5 ) 21 to desired starting position.
- Return Paper Retention Bar 21 to down position.
- You can set or remove tabs using the Space Bar and Tab Set Lever17
- To set tab, press Space Bar 13 desired number of spaces and push Tab Set Lever 17 up to”+”. Repeat as needed.
- To clear tab , press Tab Key~. When typewriter carriage stops at tab , move Tab Set Lever down to”-“
Paper Return:
- The Carriage Return Lever 2 is designed to return the carriage to its left margin starting position. Prior to reaching the right margin position, there will be an audible
bell. This bell indicates when the carriage should be returned to the left margin . To return the carriage, push the Carriage Return Lever to the right Move the carriage
until it stops. This will also advance the paper based upon line spacing setting.
Change Type Color:
- To type using the black portion of the ribbon , move Ribbon Color Selector 16down to “BLK” position.
- To type using the color portion of the ribbon, move Ribbon Color Selector up to “CLR” position.
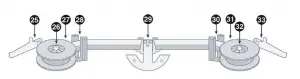
Changing Typewriter Ribbon:
- Remove Top Housing 18 by sliding Top Housing forward then lift it from the typewriter

- Swing Ribbon Control Arms 25) 23) away from spool.
- Remove Ribbon Spools 27 31 from Ribbon Spool Shafts 26 /32
- Place new spool of ribbon onto Ribbon Spool Shafts 26/32
- Ribbon Control Arms 25/33 should be on the outside of spool.
- Place ribbon in between left and right Ribbon Guide Posts 28/30
- Lift Ribbon Carrier 29 ) and thread ribbon through Ribbon Carrier .
- Replace Top Housing 18 by inserting the pins underneath Top Housing into key
- holes on body of typewriter, push Top Housing down, and slide toward back of typewriter.

WARRANTY, REGISTRATION & TECHNICAL SUPPORT
PLEASE FILL OUT AND RETURN THE PRODUCT REGISTRATION CARD INCLUDED WITH YOUR NEW ROYAL PRODUCT OR FILL OUT THE PRODUCT REGISTRATION FORM ON THE ROYAL WEB PAGE AT: http:// www.royal.com.
BE SURE TO KEEP A COPY OF YOUR SALES RECEIPT!
STANDARD WARRANTY
ROYAL CONSUMER INFORMATION PRODUCTS, INC. (“Royal”), at 11 60 U.S. Highway 22 East, Suite 301 Bridgewater, NJ 08807 USA WARRANTS that your NEW Product is free of defects of workmanship and materials. If there is a defect or malfunction of this product, Royal wi ll repair
it free of charge as follows:
PARTS: New or comparable rebuilt parts in exchange for defective parts for ONE ( 1) YEAR from date of customer purchase.
LABOR: Royal provides labor warranty for ONE (1) YEAR from date of end-user purchase. Product must be sent postage prepaid and insured to Royal in accordance with the warranty procedures outl ined below. At completion of the repair, the consumer will be responsible for the cost for any parts or services no longer covered under the
warranty.
This warranty does not apply to persons who purchased th is product second-hand or used. This warranty does not include adjustments, parts and/or repairs required by circumstances beyond the control of Royal, including but not limited to fi re or other casualty, accident, neglect, abuse, misuse, abnormal use or battery leakage damages.
THERE ARE NO OTHER EXPRESSED WARRANTIES EXCEPT AS STATED HEREIN. AFTER THE PERIOD OF EXPRESSED WARRANTY SET FORTH HEREIN, THERE ARE NO EXPRESSED OR IMPLIED WARRANTIES AND THOSE EXCLUDED INCLUDE THOSE OF MERCHANTABILITY AND FITNESS FOR PARTICULAR PURPOSE. Royal shall NOT be held liable for CONSEQUENTIAL DAMAGES resulting from any failure, defect or malfunction of this product. Some States do not allow limitations on how long an implied warranty lasts and some States do not allow the exclusion or limitation of incidental or consequential damages, so the
above limitations may not apply to you.
WARRANTY PROCEDURES
TO OBTAIN SERVICE UNDER THE TERMS OFTHISWARRANTY:
Please do the following:
- Send a copy of your ori ginal sales receipt showing original purchase date, along with your mailing and shipping addresses, the model name of the product and a note
describing the nature of the problem and a note describing the nature of the problem to: Royal Consumer Information Products, Inc. Warranty Processing 50 Hilton Street
Easton, PA 18042-7391 USA Do Not Return the Product to This Address! - You will receive a return authorization number via U.S Mail within 7-1 2 business days from the date your return request is received if it is determined that there is a basis for a replacement product. The return authorization form you receive will list the return procedures, applicable charges, if any, and the correct shipping address for the
returned product.
PRODUCT SUPPORT HOTLINE:
For questions on use of this product or this warranty cal l 1-800-272-6229 (in the U.S. and Canada) or in Mexico call 01-800-849-4826, Monday through Friday during normal business hours. You can also e-mail Royal at: [email protected]
]]>USER MANUAL
PRODUCT DIAGRAM
CONTROL BUTTONS
- Pressure unit change/Flashlight control
- Dial down adjustment
- Power control/inflator start
- Dial-up adjustment
- Mode change
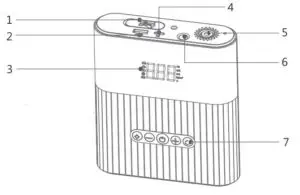
- EC5 jump start connector
- USB output
- Multi information LED
- TYPE C input
- Inflator connection
- LED flashlight
- Control buttons
Product Specifications
- Storage Temp: -20 – 60° C
- Charging port: Type-C
- USB output: DC5V/2A
- LED Light: 1 LED
- Operating Temp: -10 – 45° C
- Inflator Speed: Car tires up to 18 inch ~ 15 minutes (from empty to full)
- Peak Current: 1000A
- Inflator tube: 240mm extension (Including air tap)
- Product dimensions: 150 x 129 x 37mm
- Charging spec: DC5V/2A
- Charging time: ≤ 6 hours
- Battery capacity: 8800mAh
Product Content
- Main unit x 1
- AC Charger x 1
- USB Cable x 1
- User Manual x 1
- Nozzle Kit x 1
- Carrying bag x 1
- Car Charger x 1
- Inflator Tube x 1
- Instruction Card x 1
- Jump Starter Cable x 1
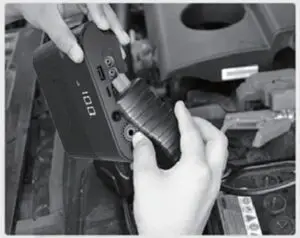
Air Pump Operating Instructions
Using the Inflator Pump
Suitable Applications:
Most vehicles with inflatable wheels (exclude trucks that are> 5 tons), sports equipment, inflatable swimming apparatus, and small air mattresses. This product can be operated with manual or preset limits for automatic inflation. Four different units of measure in pressure can be selected for ease of operation. As a side benefit, this product can also be used as a pressure gauge.
It comes with 4 preselect modes indicated as CAR, MOTOCYCLE, BICYCLE and
BASKETBALL features for a no-guess operation. Once you have selected the mode, you can fine-tune the pressure to fit the applications. Once this is all set,
the automatic function will take over with no guesswork. With an added LED, it is perfect for those hard-to-see areas when it is dark.
Car/Motorcycle/Electric Scooter/Bicycle
Press and lock the inflator quick-connect to the tire valve stem. Turn on the main unit, and the LED will display the current tire pressure. Select either manual or preset mode, then inflate to the desired pressure setting.
Inflatable ball/Air floatation equipment/Air mattress
Choose the right plastic inflator adaptor; clip and press into the quick connect. Turn on the main unit, select manual or preset mode, then inflate. Product offers 4 different units of pressure measurement:
(PSI) / (BAR) / (KPA) / (Kg/cm2 )
Four modes of preset values

Power ON/OFF
Press power button for 3 seconds, it will turn on, LED will display onboard
battery capacity.
To shut off unit, simply press power button for 3 seconds. If unit is ON and there is no activity for more than 3 minutes, it will shut off automatically. To turn back on, simply follow the power on procedures.
Mode Change
This unit has 4 preset modes to choose from. The 4 modes are “CAR” “MOTORCYCLE” “BICYCLE” &“BASKETBALL”.
You can press once to toggle to right mode. A preset pressure value will be selected but you can adjust it as you see fit.
Unit Change
This unit has 4 pressure units of measure for your convenience. They are: “PSI” “BAR” “KPA”& “Kg/cm² ”. You can press once to toggle to right unit of measure. Your choice of unit will reappear on the next power on.
Value Adjustment
All preset modes include a predetermined pressure value for your convenience. However, if you need to fine-tune it, you can press the or for finer adjustment. Pressing once will adjust 0.01 value once, holding it will quickly adjust addtional 0.01 value. Waiting for 3 seconds will set value, or press to set. Turning the pump on will automatically stop it at the preset point.
LED Flashlight
This unit has a built in LED flashlight to illuminate it. First you power on the unit, then press for 3 seconds, and the LED will turn on. Pressing again will turn it into S.O.S. flash mode. A sustained press will turn off the LED.
Power Bank Function
This unit has a USB outlet 5V/2A to charge up your portable electronics. It has an 8800mAh battery, and it will provide ample charging power to your electronics. To use this feature, all you need to do is power on the unit.
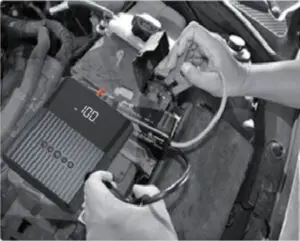
JUMP STARTER OPERATION
- The jump-start unit is suitable to diesel 5.0L gasoline or 3.0L diesel engines. (A colder climate or degraded engine system will impact the effectiveness for diesel period.)
- When your car is disabled on the road, this jump starter will help you to get back on the road without calling for heip.
- Using high output Lithium battery technology, the battery will quickly generate up to 1000A peak current to crank over your disabled engine. In order to maximize safety, this unit comes with 8 protection parameters.
1. Short circuit 2. Reverse polarity 3. Over-charging 4. Excess current output
5. Excess temperature 6. Overload 7. Low voltage limits 8. Excess voltage limits
Note: Please make sure the unit has more than 30% of battery capacity remaining
Step 1
At this point, make sure the RED (+ POSITIVE) and BLACK (-NEGATIVE)are
attached correctly. Connect the other cable connector to the jump-start
connection location. Turn the power on for the unit.
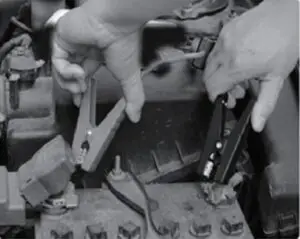
Step 2
Clip the jump-start cable to the battery terminal. RED TO RED and BLACK TO
BLACK. Make sure the alligator clip is reasonably secure and target battery
post is free of any rust and oxidation.
Step 3
Start your car at once. If it fails to start, retry in about 20 seconds and repeat
process. If your car fails to start after 4 attempts, please stop and call for help. If
the outside temperature is below freezing point, you may try it up to 6 times.
Step 4
Once you successfully start your car, please remove the alligator clips ASAP to prevent damage to the unit.
Charging unit
Use the TYPE C input to charge the unit. Make sure the power source is at least 5V/2A, if less, it will take longer to charge. With the correct power source, it will take around 6 hours to completely charge the unit. The charging icon on the LED will blink and continue to show capacity until it reaches 100% and shuts off automatically. TO MAKE SURE YOUR CHARGER IS FULLY CHARGED, CHARGE IT FOR 12 HOURS BEFORE INITIAL USE.
Product Features
There are six patents for this product
- Mini/lightweight/portable/easy storage, it is a necessity for a selfdriving
tour & outdoor activities. - Multi-function in one product: pressure gauge + air pump + lighting +
power bank + jump starter - Safety and efficiency with a high-rate lithium polymer battery.
- Eight features to guarantee safety
- Can inflate up to 150PSI with super-powerful inflatable ability
- High-precision tire pressure detection, accurate to 0.01BAR
- Low battery alert function, to make sure your product always has
sufficient power
Caution
READ AND UNDERSTAND ALL SAFETY INFORMATION BEFORE USING THIS PRODUCT. Failure to follow these safety instructions may result in an ELECTRICAL SHOCK, EXPLOSION, or FIRE, which may lead to a SERIOUS INJURY, DEATH, or PROPERTY DAMAGE.
ELETCTRICAL SHOCK. Product is an electrical device that can shock and cause
serious injury. Do not cut power cords. Do not submerge in water or get wet.
EXPLOSION. Unmonitored, incompatible, or damaged batteries can explode if
used with product. Do not leave product unattended while in use. Do not attempt to jump start a damaged or frozen battery. Use product only with batteries of recommended voltage. Operate product in well ventilated areas. FIRE. Product is an electrical device that emits heat and is capable of causing burns. Do not cover product. Do not smoke or use any source of electrical spark or fire when operating jump start . Keep product away from combustible materials.
EXPLOSIVE GASES. Working in the vicinity of a lead-acid is dangerous. Batteries generate explosive gases during normal battery operation. To reduce risk of battery explosion, follow all safety information instructions and those published by the battery manufacturer and manufacturer of any equipment intended to be used in the vicinity of battery. Review cautionary markings on these products and on engine.
Accessories may present a choking hazard to children. Do not leave children unattended with product or any accessory. The product is not a toy. Never plug the air tube into any person or animal’s mouth/ear/noise/eye. Using near any combustible or explosive liquid or gas place (such as gas station) is forbidden.
The air tube will be really hot after inflation, watch your hand while removing it.
Suggest waiting for 5-10 minutes between inflating each tire.
Do not plug in the charging cable for a long time, in case it over charges or damages the product.
WARRANTY, REGISTRATION & TECHNICAL SUPPORT
PLEASE FILL OUT AND RETURN THE PRODUCT REGISTRATION CARD INCLUDED WITH YOUR NEW ROYAL PRODUCT OR FILL OUT THE PRODUCT REGISTRATION FORM ON THE ROYAL WEB PAGE AT: http:// www.royal.com.
BE SURE TO KEEP A COPY OF YOUR SALES RECEIPT! STANDARD WARRANTY
ROYAL CONSUMER INFORMATION PRODUCTS, INC. (“Royal”), at 1011 U.S. Highway 22 west, Suite 202 Bridgewater, NJ 08807 USA WARRANTS that your NEW Product is free of defects of workmanship and materials. If there is a
defect or malfunction of this product, Royal will repair it free of charge as
follows:
- PARTS: New or comparable rebuilt parts in exchange for defective parts for ONE (1) YEAR from date of customer purchase.
- LABOR: Royal provides labor warranty for (90) DAYS from date of end-user purchase. Product must be sent postage prepaid and insured to Royal in accordance with the warranty procedures outlined below. At completion of the repair, the consumer will be responsible for the cost for any parts or services no longer covered under the warranty.
This warranty does not apply to persons who purchased this product
second-hand or used.
This warranty does not include adjustments, parts and/or repairs required by circumstances beyond the control of Royal, including but not limited to fire or other casualty, accident, neglect, abuse, misuse, abnormal use, or battery leakage damages.
THERE ARE NO OTHER EXPRESSED WARRANTIES EXCEPT AS STATED HEREIN.
AFTER THE PERIOD OF EXPRESSED WARRANTY SET FORTH HEREIN, THERE ARE NO EXPRESSED OR IMPLIED WARRANTIES AND THOSE EXCLUDED INCLUDE THOSE OF MERCHANTABILITY AND FITNESS FOR PARTICULAR PURPOSE.
Royal shall NOT be held liable for CONSEQUENTIAL DAMAGES resulting from any failure, defect or malfunction of this product. Some States do not allow limitations on how long an implied warranty lasts and some States do not allow the exclusion or limitation of incidental or consequential damages, so the above limitations may not apply to you.
WARRANTY PROCEDURES
TO OBTAIN SERVICE UNDER THE TERMS OF THIS WARRANTY:
- Send a copy of your original sales receipt showing original purchase date,
along with your mailing and shipping addresses, the model name of the
product, and a note describing the nature of the problem to:
Royal Consumer Information Products, Inc.
Warranty Processing
50 Hilton Street
Easton, PA 18042-7391 USA
Do Not Return the Product to This Address! - You will receive a return authorization number via U.S Mail within 7-12 business days from the date your return request is received if it is determined that there is a basis for a replacement product. The return authorization form you receive will list the return procedures, applicable charges, if any, and the correct shipping address for the returned product.
PRODUCT SUPPORT HOTLINE:
For questions on use of this product or this warranty call 1-800-272-6229 (in the U.S. and Canada) or in Mexico call 01-800-849-4826, Monday through Friday during normal business hours. You can also e-mail Royal at: [email protected]
WARNING:
This product can expose you to chemicals including phthalates and total lead, which is known to the state of california to cause reproductive harm. For more information go to P65Warnings,ca,gov.
Royal Consumer Information Products, Inc.
1011 U.S. Highway 22 West Suite 202
Bridgewater, NJ 08807
Made in China
 IT Back Up Camera
Royal Drive BC3000
Wireless SolarPower RearVision
100% DIY, installs in minutes
INTRODUCTION
Welcome
Thanks for your choosing BC3000 product, which provides value and quality. Please read this User Manual carefully before using the product.
Wireless SolarPower RearVision can display image behind the vehicle and can be used when backing up or any time you want to view behind the vehicle (even while your vehicle is in park).
Notice:
* Due to product upgrades or technical updates, the instruction manual may sometimes be changed in need. The manufacturer reserves the right to modify and update product specifications without prior notice.
01. CONPONENTS

02. GETTING STARTED
Remove the whole Wireless SolarPower RearVision BC3000 packing or assembly and make sure all components are included.
Charge the All-in-one camera’s built-in battery
- Connect the supplied DC cord to the charging port of the Camera.
- Plug the cable USB port into any standard USB charging adapter with an output rating more than 1 000mA.
- Charge 4 to 5 hours.

Under normal use, the All-in-one camera maintains a charge with exposure to sunlight. A battery status indicator is provided on the monitor when the camera is in use. If you’re storing your vehicle in a garage ( or not exposing the camera to sunlight on a regular basis) for more than one month, you may need to recharge it via the DC charging port.
Check the wireless function
- Shake the camera in the air.
- Touch the Monitor button quickly and check the image after the monitor is powered.
Note
- Camera has to be waken up from sleeping status by little vibration.
- * In the process of use, there is wireless interference from outside.
If no connection normally, the device will shut off automatically 10 seconds later. Then please touch the “Touch for Rearview” button to tum it on.
03. INSTALLATION
Camera Installation

Camera Angle
To adjust the camera angle for ideal angle if the default angle (such as position A) is not ideal, just use your fingers to hold the camera house and move the Lens to position B, position C, or other position.

Note
- Please note when rotating the camera: hold the license plate holder with one hand, and the outer frame of the camera with the other hand and rotate up or down to make the best Angle.
04. MONITOR MOUNT

1. Two ways to mount the monitor
1) Socket on the window shield: Fix holder bracket B (see figur 1) to the monitor via screw tool, choose and clean a right place on the window shield. With the suction lever in the released position, press the suction cup against the windshield. Press the suction lever toward the suction cup to lock the mount. To adjust the angle of monitor, loosen the collar on the ball joint, retighten in the desired position.
2) Stick on the dash board: Fix holder bracket A (see figur 2) to the install position of monitor via screw tool, choose and clean a right place on the dash board, tear the paper of the monitor holder’s sticky tape, put and press the holder on the dash board.
2. Connect the monitor and car ignition lighter hole with power cord.
05. OPERATION
Using the device BC3000
1. Switch your 12-volt DC power port on with your ignition, the monitor will start work accordingly, the video signal will be sent from camera and will be displayed on the monitor.
The image is set to time out in 30 seconds(default). However if you wish to shut the Image off manually, just touch the “Touch for Rearview” Button on the monitor again anytime to stop at once.
2. If you want to see the backup image when driving your car , just touch the “Touch for Rearview” Button on the Touch top of monitor. tor…..,.,.
3. When the vehicle Is shut off, power is removed from the monitor and the monitor will shut off automatically, and the camera will stop work.

Note:
* If you want the RearVision BC3000 to keep working after 30 seconds (for example, you cannot finish reversing your vehicle during the first 30 seconds), you have to touch the “Touch for Rearview” button on the monitor once again.
* After you have been staying inside vehicle quietly (eg. sleeping) with vehicle engine stopping, you want to see the backup image but only put your vehicle key on the ACC -ON position (no starting the engine), there will have no image on the monitor after touching the touch button. So you have to give the vehicle a light vibration (such as re-open and shut vehicle door, or tap somewhere lightly), then touch “Touch for Rearview” button to start work.
06. BUTTON & SETTING

Function of the monitor backup buttons
1. The middle button–[MENU/OK]:
Short Press to enter monitor menu setting. Long Press (press and hold for 3 seconds) to confirm the chosen item in the menu setting interface.
2. The Up button—–[ADD]:
Short Press to change/add parameter value at the menu setting interface.
3. The Down button–[DEC]:
Short Press to change/decrease parameter value at the menu setting interface.
Only Short Press DOWN button [DEC] to switch the Parking guide Lines display modes (Display or No display)!

Menu Operations:
1. Main Menu
While the monitor is showing the backup camera image, short press the middle button [MENU/OK] to enter the main menu interface, and 4 options are avail_able (Including Pairing, Image Parameters, Image Mirror, Software Information).

2. Image Parameter
While the monitor is showing the backup camera image, short press the middle button [MENU/OK] to enter the main menu interface. From the 4 options(Pairing/lmageParameter/ImageMirror/Softwareinformation), select Image Parameter, long press the (MENU/OK] button again, 3 Images(Brightness/Contrast/Color) setting interface are shown bellow: (Brightness/Contrast/Color settings are similar)


3. Image Mirror
Select the “Image Mirror” icon and long press the middle button (MENU/OK]enter the mirror setting interface, short press [ADD] or [DEC] button, to set rightwards or leftwards image. After setting, short press [MENU/OK] twice continuously to exit the setting, the image setting will be saved for future use.
While the monitor is showing the backup camera image again, short press !MENU/OK] to enter the main menu interface, select the “Image Mirror” icon and long press [MENU/OK], to set upwards or downwards image. After setting, short press 1! twice again continuously to exit the setting.
(It is best to have a video image displayed when making this selection). (Short Press means press and hold 1 second, and Long Press means 3 seconds).
![3. Image Mirror Select the "Image Mirror" icon and long press the middle button (MENU/OK] t~ enter the mirror setti~g interface, short press [ADD] or [DEC] button, to set nghtwards or leftwards image. After setting, short press [MENU/OK] twice continuously to exit the setting, the image setting will be saved for future use. While the monitor is showing the backup camera image again, short press !MENU/OK] to enter the main menu interface, select the "Image Mirror'' icon and l~ng press [MEN_U/O_K], to s!'lt upw~rds or downY!ards image. After setting, short press 1! twice again continuously to exit the setting. (It is best to have a video image displayed when making this selection). (Short Prass means press and hold 1 second, and Long Press means 3 seconds).](https://manuals.plus/wp-content/uploads/2020/11/Image-Mirror.png)
07. INTERFACE ICON & MEANING
![]()
08. INFORMATION
Battery Icon is on the top right corner of the screen, indicates the relative capacity of the built-in lithium battery of the camera when a video image is present.
Signal strength of the received image is on the top left corner of the screen when a video image is present.
Red Indicator Light
When the monitor is powered on and still stay standby mode, the Red indicator Light doesn’t work. When touching the “Touch for Review” button, the Light will blink quickly. When the monitor works, the light will extinguish.
Wireless Camera
The Camera & Video transmitter are built-inside the WSU43 device, and is equipped with the built-in rechargeable lithium battery, which is connected with the solar panel.
When the monitor is turned on, work command is sent to the camera, upon receive this signal, the camera will work from standby mode at once, and send image video to the monitor for 30 seconds.
A DC to USB charging cable is provided to charge the battery initially prior to mounting on your vehicle, as well as to recharge if needed.
09. SPECIFICATION
CAMERA
Operational Current(when transmitting): <280mA
Sleeping Current: <0.06mA
Pixels: 96Qx576
View Angle: 110·
Image Sensor: 1/3″ CMOS
Image Quality: Max 30 fps
Camera Assembly: IP 68
TRANSMITTER
Frequency: 2400 ~ 2485.5 MHz
Transmission distance: 328ft (100m) Dax.
Working Temperature: 14°~ 140°F (-10·~ so·c)
MONITOR
LCD Display Screen Size: 4.3 inches
Power Cord Fuse: 1A
Operation Current: <150mA
Effective Pixels: 480><272
10. TROUBLESHOOTING
If the monitor doesn’t turn on when power is applied:
- Check to make sure the power source is active (if your cigarette lighter is switched with vehicle ignition, your monitor will only work when the vehicle is running or the key in the ON position).
- Check to make sure the fuse and power cord are in working order.
If the monitor doesn’t display images within a few seconds of touching the starting button:
- The battery in the camera may be depleted and require recharging.
- In the process of use, there is wireless interference from outside. so if youcan’t tum on the product over 15 seconds after touching the baton , please touch the Touch for Rearview button again to tum it on.
If the video image is poor:
Check that the camera lens is clean from road grime, snow, or ice.
If the video image does not last 30 seconds:
Recharge the battery in the camera.
If no image after touching “Touch for Rearview”Botton in quiet (no vibration at all) environment, such as testing the WSU43 in office or laboratory.
Vibrate the camera, touch the powered Monitor “Touch for Rearview” button quickly (not over 3 minutes from vibration) to wake up the sleeping camera, make it enter standby status and receive the command from the monitor.
Notice:
* Under the actual situation of installation, test, and use of vehicle, the environment is different total. Little vibration must happen when open vehicle door, people touching the vehicle, even the engine work. So the camera will stay at standby status.
11. CARE & MAINTENANCE
Cleaning
Don’t clean or wipe the All-in-one Camera with solvents or chemical materials. If necessary, remove dirt or stains using a soft cloth dampened with a mild detergent solution.
Fuse Replacement
- Turn the cap on the tip of the power plug counterclockwise (no tools needed).
- Remove the cap, center pin and fuse.
- Replace the fuse with a new 1-am fuse.
- Replace the center pin and cap. Turn the cap clockwise.
Disposal
The Wireless SolarPower RearVision is designed to provide years of service. The RearVision WSU43 should be recycled or safely disposed of at a local recycling center.
12. DISCLAIMER
BC3000 Wireless SolarPower RearVision is intended to assist responsible driver, but it doesn’t relieve a driver from full responsibility for operation of the vehicle. It is the driver’s sole responsibility to avoid contact with any objects, animals, especially persons. By installing and/or using BC3000 Wireless SolarPower RearVision, you agree that you are solely responsible for the operation of your vehicle, the Rear Vision supplier is not responsible for any property damage, personal injury, or loss of life that may result from the operation of your vehicle.
Notice:
Some USA states or local government may have regulations or laws that restrict the use of anything that might impair the clear view of a license plate. Check local laws for explanation.
Warranty:
FILL OUT THE PRODUCT REGISTRATION FORM ON THE ROYAL WEB PAGE AT: http://www.royal.com. BE SURE TO KEEP A COPY OF YOUR SALES RECEIPT!
STANDARD WARRANTY
ROYAL CONSUMER INFORMATION PRODUCTS, INC. (“Royal”), at 1011 U.S. Highway 22 West, Suite 202 Bridgewater, NJ 08807 USA WARRANTS that your NEW Product is free of defects of workmanship and materials. If there is a defect or malfunction of this product, Royal will repair it free of charge as follows:
PARTS: New or comparable rebuilt parts in exchange for defective parts for ONE (1) YEAR from date of customer purchase.
13. WARRANTY INFO
This warranty does not apply to persons who purchased this product second-hand or used.
This warranty does not include adjustments, parts and/or repairs required by circumstances beyond the control of Royal, including but not limited to fire or other casualty, accident, neglect, abuse, misuse, abnormal use or battery leakage damages.
THERE ARE NO OTHER EXPRESSED WARRANTIES EXCEPT AS STATED HEREIN. AFTER THE PERIOD OF EXPRESSED WARRANTY SET FORTH HEREIN, THERE ARE NO EXPRESSED OR IMPLIED WARRANTIES AND THOSE EXCLUDED INCLUDE THOSE OF MERCHANTABILITY AND FITNESS FOR PARTICULAR PURPOSE. Royal shall NOT be held liable for CONSEQUENTIAL DAMAGES resulting from any failure, defect or malfunction of this product. Some States do not allow limitations on how long an implied warranty lasts and some States do not allow the exclusion or limitation of incidental or consequential damages, so the above limitations may not apply to you.
WARRANTY PROCEDURES
TO OBTAIN SERVICE UNDER THE TERMS OF THIS WARRANTY:
Please do the following:
1. Send a copy of your original sales receipt showing original purchase date, along with your mailing and shipping addresses, the model name of the product and a note describing the nature of the problem and a note describing
the nature of the problem to:
Royal Consumer Information Products, Inc.
Warranty Processing
50 Hilton Street
Easton, PA 18042-7391 USA
Do Not Return the Product to This Address I
2. You will receive a return authorization number via U.S Mail within 7-12 business days from the date your return request is received if it is determined that there is a basis for a replacement product. The return authorization form you receive will list the return procedures, applicable charges, if any, and the correct shipping address for the returned product
14. SUPPORT
PRODUCT SUPPORT HOTLINE:
For questions on use of this product or this warranty call
1-800-272-6229 (in the U.S. and Canada) or in Mexico call
01-800-849-4826, Monday through Friday during normal
business hours. You can also e-mail Royal at:
[email protected]
Royal-Drive-IT-Back-Up-Camera-BC3000-Manual-Optimize
Royal-Drive-IT-Back-Up-Camera-BC3000-Manual-Original
Questions about your Manual? Post in the comments!
References
]]>